1
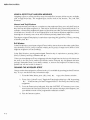
FOR
LS
QUICKTOO ®
THE IBM PC®
USER'S MANUAL
QUICKTOOLS®
FOR THE IBM PC®
UserS Manual
P/N 852462
June 1988
l!ll19BB John
Fluke Mfg. Co.,lnc. All rights reserved. Lil.ho
in U.S.A.
FLUKE
LIMITED WARRANTY
Fluke warrants to the original purchaser that the media on which QuickTools is furnished will be free from
material defects and workmanship for 90 days from the date of shipment. This warranty does not apply to
media which, in Fluke's opinion, have been subject to mis use, alteration, accident or abnormal conditions of
operation or handling. Your software program is provided "AS IS" and Fluke does not warrant that it will be
error free, operate without interruption or that all errors will be corrected.
For warranty service on your media, contact your nearest Fluke Service Center or send the media wilh a
description of the difficulty, postage prepaid, to the nearest Fluke Service Center. Fluke assumes no risk for
damage in transit.
Fluke will replace, free of charge, media which fail to meet this warranty. However, if Fluke determines that
the failure was caused by misuse, alteration, accident or abnormal conditions of operation or handling, you
will be billed for the replacement. The new media will be sent to you, transportation prepaid. lf Fluke is
unable, within a reasonable time, to replace your media, your purchase price will be reimbursed to you when
you return them to Fluke.
THIS WARRANTY IS EXCLUSIVE ANO IS IN LIEU OF ALL OTHER WARRANTIES, EXPRESS OR IMPLIEO,
INCLUOING BUT NOT LIMITE O T O ANY IMPLIEO WARRANTY OF MERCHANTIBILITY OR FITNESS FOR A
PARTICULAR PURPOSE OR USE. FLUKE WILL NOT BE LIABLE FOR ANY
SPECIAL, INOIRECT,
INCIDENTAL, OR CONSEQUENTIAL OAMAGES OR LOSS, INCLUDING LOSS OF DATA, WHETHER IN
CONTRACT, TORT, OR OTHERWISE. IF FLUKE IS HELO TO BE LIABLE, FOR ANY REASON, ITS
MAXIMUM LIABILITY SHALL NOT EXCEED FIVE TIMES THE PRICE OF THE SOFTWARE.
Table of Contents
SECTION
1
TITLE
GETTING STARTED
o
o o
o
o o
o o o o
o o o o o
INTRODUCING QUICKTOOLS
ABOUT T H I S MANUAL
You Already Know
o
o o
o
o o
o o
o
o
o o o
o o
o
o
How This Manual is Organized
SYSTEM REQUIREMENTS
o
Setting Things U p
o o o o
o
o o
o o
o o
o
o o
o
o
o o
o o o
Hardware Compatibility
PAGE
o o
o
o o o
o
o
o
o
o o o o
o
o o o o o o
o
o o o
o
o o
o
o o
o
o
o
o
o
o
o o
o
o o
o o
o o o
o
o o
o
o
o o o o
o
o o
o o
o
o
o
o o o o o
o
o o
o o
o
o o o o
o
o o o
o o
o
o o o o o
o o o o o
o
o
o o o o
o o o
o o
o
o o o
o o
o
o o
o
o o o o o
o o o
o
o
o o o o
o
o o o
o o
o o
o
o
o o o
o
o o
o
o o
o o o
o o o
o
o o o
o o
o
o o o
o
Set the Communication Parameters
What You Have Accornplished
o
o
o o
o o o
o
o o o
o o
o
o o
o
Run a Mernory Test
o o o o
o
o o o o o
o
o
o o o o
o
o o
o o
o o
What Yo u .H ave Accornplished
o
o o
o
o o
o
o o
o
o o
o o
o o
o
o o
o
o
o
o o
o o
o o
o o
o
o o
o
o o
o o
o
• • •
• • •
• •
•
o
o o o
o o
o
Possible Problerns
o
•
• o
• •
o
• •
o
•
o
o
• • o • • • • o
•
o o
o
o o
o
WHAT YOU HAVE ACCOMPLISHED
3
EDITING STORED COMMANDS
STARTING THE EDITOR
o
o
HOW THE EDITOR WORKS
Programmer Comn1ents
Operator Messages
o
o
o
• •
• o
• •
o o
o o o o
o
• • o • • • •
o •
•
o
o o o
Adding a L abel t o a Test Routine
. . .
Saving a Test Routine
o
• • • • o o
o •
o
o o o
o
o o
o o
o o o
o
o
o
o o
o
o
o
o
o o
o
o o o
o
o
o o o o
o
o o
o o
o
o o o o
o
o o
o o
o o
o o o
o o
o o
o o o
o o o o o
o o o o o o o
o
o o
o o o
o o
o
o o o o o
o o
o
o o o o o
o
o o
o
o o
o o o o
o
o
o
o
o o
o
o o
o
o
o
o
o o
o
o
o
o o
o
o
o o o
o o
o o o
o o
o
o
o
o o o
o o
o
o o
o o o
o o o
o o o o
o o o
o o
o
o o
o
o o
o
o o
o o o
o o
o
o o
o
o o
o
o o
o
o
o
o o
o o o
o
o
o o o o
o
o
o
o . o
o
o o
o o
o o o o
o o
o
o
•
• •
•
• • •
•
o o o
. o
o . o
• o
• • •
o o o
o o o o o
•
•
• •
• •
• •
o
o o •
• o •
o
• • •
o
o
o
o o
• • • • • o •
o
•
• o
o
• • • o •
•
•
• o o
o .
.
.
o
. o •
•
•
. . . . .
o o • • • • • •
o o
o
. o
o o o
• • • • • • • • •
o •
• • •
o
• o •
o
• • • • • o
o o o
o •
o
o • •
o
•
o o • o • o
o o
o o
• • • o
o
o o • • • • • • o • • • • •
•
. o
o o o •
o o o • • • o o
• • • o o
WHAT YOU HAVE ACCOMPLJSHED
o
o
. o • • • • • • o .
o
o
o o
• • •
o o o
o
o o o
o
• • • • • • • •
. . . . . . o
. . . . . . . . . . . o o
• • o
• • • o
o
o
o o
o o
. . . . . . . . . . . . . . . . . . . . . . . .
• • • • • • • • • • o o
o
o o •
o o
o o
o
o o
o o o o
Run the Sarne Two Tests, Saving the I nteraction
Run the Recorded Test Routine
o
o o
o o o
o
o o
o
o o
o o o o
o
o
o o
o
o
o o
o o
o
o o
o
o o o
o o o o o
o
o
o o o
o o
o o o
o o o
START UP THE lNTERACT WINDOW
Run a Bus Test
o o o
o o
o o
o
STARTING QUICKTOOLS FOR THE FIRST TIME
· Your Screen Doesn't Look Like This?
o
o
o
o
INSTALLING QUICKTOOLS ON A HARD DISK
A QUICKTOOLS SESSION
o o
o o o o o o o
GETTING ARO UND IN QUICKTOOLS
2
o o
o o o
o
o
o
• o
o • • • • o
• o o
• • o
. . . 0 0
0 0
. o
• • o
o
•
o o
o
• •
o o o o o o o
o
o o •
o
•
o
o
• • • •
•
o o •
o o o
o • • • • • • o
o o
. . . . . . . . . . o o
o
• • • • • o
0
0 0
o
•
o
o
o o
0 0 0 . .
1-1
1-1
1-2
1-2
1-2
1-3
1-3
1-4
1-5
J-5
2-1
2-1
2-3
2-4
2-5
2-5
2-7
2-7
2-8
2-8
2-9
2-9
2-10
3-1
3-2
3-3
3-4
3-4
3-6
3-6
3-6
(continued on page ii)
TABLE OF CONTENTS, continued
4
PAGE
TITLE
SECTION
EXECUTING A QTEST . .
.
. . .
.
. . .
.
. . . . . . .
.
.
.
.
. . .
ASSIGNING A QTEST TO A FUNCTION KEY
Interact and Test Windows
.
. . . . . . . .
..
. . . . . . . . . . . . . . . . . . .
5
.
.
ENHANCING THE TEST ROUTINE
. . . . .
. . . .
.
.
.
. . .
. . . . . . . . . . . . . . . . . . . . . .
RUNNING T H E ASSIGNED QTEST
.
. . . . . . . . . . . . .
. . .
4·1
4-1
4-2
. 4-2
4-2
4-2
. . . . . . . . . . . . . . . . . . . .
USING A QTEST THAT HAS BEEN ASSIGNED
Edit Window
.
.
.
.
.
.
.
. . . . .
.
.
.
. . .
. . . . . . . .
.
.
.
. . . .
.
.
. . . . . . . . . . . . . . . . .
. .
.
.
. . . . . . . . . . . .
. . . . . . . . . . .
.
. . . . . . . .
. . . . . . . . . . . .
.
.
. . .
. . . . .
. .
.
. . . .
5·1
.
5-l
.
.
5-2
User-Defined Strings . . . . . . . . . . . . . . . . . . . . . . . . . . . . . . . . . . . . . . . . . . . 5-3
SPEEDING UP TEST EXECUTION
.
.
.
5-4
QUICKTRACE'"
.
.
.
5-5
THE ON F AIL COMM AND
.
.
. . . . . . . .
How to Use the ON FAIL Command
.
. . . .
.
.
. .
. . . . .
. . . . . . . . . . . . . . . . . . . . . .
.
.
. .
6
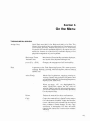
ON THE MENU
.
.
.
. . . . . . .
. . . . . . . . . . . . . .
THE M AIN M EN U W lNDOW
APPENDIX
GLOSSARY
. .
. . . . . . .
THE INTERACT WINDOW
.
.
.
.
.
. . . . . . . . .
.
.
.
. . . . . . . . . . . . .
.
.
. . . . .
. . . . . . . . . . . . . . . . . . . . . . . . . .
.
. . . .
. . . . . . . . . .
. . . . . . . .
. . . . . . . . . . . .
.
.
. . . . . .
. ..
.
.
.
.
.
.
.
. . . . . . . . . . . . . . . . . .
. . . . . . . . . . . .
. . . . . . . . . . . . . . . .
. . . . . . . . . . . . . . . . . . . . . . . . . . . . .
¡¡
. . . . . . .
.
.
.
6-1
6-1
6-3
.
6-4
. . . . . . . . . . . . . . . . . . . . . . . . . . . . . . . . . . . . . . . . . . 6-5
THE EDITOR WINDOW
T H E TEST WINDOW
. . . . . .
. . . . . . . . . .
.
.
. . . . . . . .
. . . . . . . . . . . . . . . . . . . . . .
A-1
Section 1
Getting Started
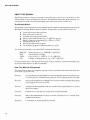
INTROOUCING QUICKTOOLS
QuickToolsn• software makes remote operation of the Fluke 90 J.LP Board Tes ter (the Tester) as
easy as using the Tester's front panel. Here are the major features of QuickTools:
l.
2.
QuickTools is a communication too! for controlling the Fluke 90 remoteJy.
•
Records or prints either an entire interaction (commands and responses)
between an IBM PC* or a true compatible and the Fluke 90, or just the
commands.
•
Assures correct remote command syntax through pop-up prompting.
QuickTools creates and executes sequences of Fluke 90 commands.
•
Performs user-definable actions on failure.
•
Executes short sequences with function keys.
•
Permits following the execution of command sequences either in full detail, or
by observing only the Jabels of statements as t hey execute.
•
Includes a built-in program editor featuring pop-up command syntax
prompting.
•IBM PC is a trademark of lnternational Business Machines Co.
1- 1
GETTING STARTED
ABOUT THIS MANUAL
QuickTools software is easy to use because it provides 11elp to new users, but the built-in aids
can be turned off later as familiarity increases. The manual has been designed similarly. It is
structured as a series of exercises presented in an order most useful to a new user.
You Already Know...
This manual is most effective if yo u are already familiar with the setup and general operation of
the Fluke 90 and the I B M Personal Computer. In particular, you shouJd know how to:
•
•
•
•
•
•
•
•
Locate and connect the serial port
Plug in and turn on the PC
Load the operating system (DOS)
Specify a path and filename (e.g., C:\QKTLS\qt.exe)
Specify a pattern for matching (e.g., DIR A:\*.TST)
Change the active drive
Starf up an application program
Use an editor program to add information to a file
You should also be able to use these DOS commands effectively:
MKDIR
DIR
COPY
CD
(make directory, e.g., MKDIR C:\QKTLS)
(show directory listing)
(copy a file, e.g., COPY A:\*.* C:\QKTLS)
(change working directory, e.g., CD C:\QKTLS)
You may need to refer to the appropriate sections ofyour computer's operation manual ifyou
are unsure about how to use these commands.
How This Manual is Organized
The QuickTools manual is arranged as a group of tasks, presented in the order that most new
users need to perform them.
1-2
Section 1
is an introduction to the QuickTools software and this manual, and shows how
w connect the PC, Fluke 90 Tester, and your UUT in preparation for testing.
Section 2
takes you .through a practice QuickTools session in which yo u begin developing
a test program for your own UUT.
Section 3
continues the development o( the test routine while explaining how to use the
QuickTools editor.
Section 4
explains how to run the test routine that is being developed.
Section 5
adds sorne enhancements to the test routine and shows how to include sorne
sophisticated features.
Section 6
is a reference to all the QuickTools menus.
GETTING STAATEO
SYSTEM REQUIREMENTS
QuickTools software is designed to run on the I B M PC, PC-XT, and PC-AT or compatibles.
The software runs on systems under DOS version 2 . 1 orlater. If you have an earlier version of
DOS, you must update it befare attempting to run QuickTools.
Hardware Compatibility
l f yo u intend to use a system other than an IBM personal computer for running QuickTools,
the computer must meet certain criteria to be truly hardware compatible.
1.
QuickTools communication drivers communicate directly with t w o components at
the serial port:
lntel* 8259A Programmable lnterrupt Controller
National Semiconductor• 8250 or 16450 UART
All l B M systems and most compatibles use these parts, but ifyour compatible does
not, QuickTools may not communicate properly.
2.
QuickTools screen drivers directly address the following standard IBM (or
compatible) display boards:
Standard monochrome display
Enhanced Graphics Adapter (EGA)
Color Graphics Adapter (CGA)
Video Graphics Array (VGA)
If your systern is compatible as described here, skip to the next section, titled
"Setting Things U p."
3.
However, QuickTools provides an alternative screen output that does not directly
access the display board. Instead, the alternative output uses M S-DOS ANSI.SYS
drivers. To make use of the alternative screen output requires yo u to install device
drivers on the bootup disk. lnclude the following line in the file CONFIG.SYS:
DEVICE=ANSl.SYS
If ANSI.SYS was not specified in CONFIG.SYS at bootup, reboot so the PC will
load the ANSJ console driver.
•Jntcl is a registered tradcmark oflntel Corporation.
•National Semiconductor is a registered trademark of National Semiconductor Corporatioo.
1-3
GETTING STARTED
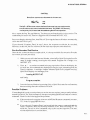
Setting Things Up
l.
Make a backup copy of the QuickTools disk and put the original away for
safekeeping. Use the copy for day-to-day operations.
CAUTION
Memory Resident programs may cause a loss of serial data when running
QuickTools. Your autoexec.bat file may be executing a program that stays
active after returning automatically to DOS. lt may be necessary to edit or
remove the autoexec.bat file and reboot.
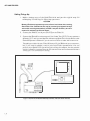
2.
Connect the I B M PC serial port (RS-232) to the Fluke 90.
3.
Connect the Fluke 90 to a known good U nit Under Test (U UT). Do nol connect a
defective U U T until you are familiar with the way QuickTools works. Refer to the
Fluke 90 Operator's Manual if yo u do not know how Lo make this connection.
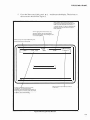
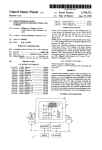
The cable provided with your Fluke 90 fits most 25-pin IBM serial port connectors,
but if you need a n adapter, consult your local Fluke representative. You can
perform most QuickTools operations even without the adapter, but the practice
session in Section 2 assumes that the PC and the Tester are connected and that a
working UUT is connected for testing.
o¡
11
c:::::::J�
==
==
111111111111111
.
o
o
o
1o1
IBM PC
11
c;;JCEJODEl
f;DEJDEJD8
IIDDEJCJDEl
- ---���0§
FLUKE 90
Figure 1. Connectlons Between IBM PC, Fluke 90 .uP Board Tester and UUT
1-4
GETTING S"[ARTED
INSTALLING QUICKTOOLS ON A HARD DISK
If you have a hard disk, you can install QuickTools there to take advantage of its speed and
convenience.
1.
Change the default drive to the hard disk.
2.
Malee a directory using the DOS command MKDIR QKTLS.
3. I n sert the QuickTools floppy disk and copy al! files to the new hard disk directory.
Assuming the floppy drive is drive A: and the hard drive is C:, the copy command
would be:
COPY A:*.* C:\QKTLS
GETTING AROUND IN QUICKTOOLS
QuickTools is easy to learn and to use. All operations are selected from menus.
To select a menu item from the Main Menu:
Simultaneously press (Alt) and the key that corresponds to the upper case letter in the
selection. For exampJe, to select Setup, press (Alt) s.
To select a menu ítem within Su bmenus:
M ove the current selection using the arrow keys (l
Enter key is shown in this manual as � . )
!), then press the Enter key. (The
OR
Press the key that corresponds to the upper case letter in the selection. For example, to
select Warning beeper from the Setup menu, press w.
Entry Fields:
Filenames and other editable selections are displayed in reverse video to indicate that
they can be modified. Use the following keys wben working with entry fields:
(INSERT)
toggles between Insert and Typeover modes.
(DELETE)
deletes the character at the cursor position.
(BACKSPACE) deletes the character to the left of the cursor position.
(CT RL) ( END) de.letes all of the field to the right of the cursor.
-and-
move the c ursor a character at a time within the field.
<HOME)
moves the cursor all the way to the Ieft <:nd of the field.
(END)
moves the cursor all the way to the right end of the field.
1-5/1-6
Section 2
A QuickTools Session
The session described here gets QuickTools operating right away and introduces you to most of
its fea tures.
STARTING QUJCKTOOLS FOR THE FIRST TIME
Boot DOS. l nsert the QuickTools floppy disk, and change the default drive to the one where
QuickTools is loaded. To start QuickTools, type:
QT
f-l
lf you are using the ANSI drivers, start QuickTools by typing:
QT -A +-J
When you start QuickTools, the Main Menu appears on the display. Each time you start
QuickTools, the message "<Ait) H for Help" is flashing in the lower right corner. Try it. After
reading the help screen, return to the main menu by pressing <Alt) x.
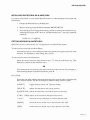
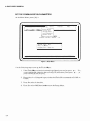
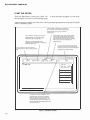
A QUICKTOOLS SESSION
The Test Window ofters the quickest way to
execute stored test programs. Rather than
displaying the full command and response
activity of the program, Test displays only
operator messages. program labels. and the
pass/fail results of the tests.
OuickTools uses (Ait) h for Help and (Ail) x
for Exit The Assign 1-key selection lets you
place these on function keys of your choice
and also assigns function keys to otten-used
sequences of Fluke 90 commands (Otests).
An option lets you match the formal of a
function key reminder display lo the physical
arrangement of your keyboard.
The lnteract Window is like a super terminal
emulator. 1t lets you enter Fluke 90
commands directfy or by way of OuickTools
unique command prompting. The entire
interaction can be logged to disk for later
editing or t o a printer for analysis. One optíon
limits the storage to commands only, as a
way to quickly create test programs. The last
1 00 transactions of an lnteract session are
available for screen reviewing.
A gateway to the Disk Operating System. This
menu permits copying, deleting, printing, and
viewing files without leaving OuickTools.
Accesses OuickTools text editor lor creating
and modifying test roulines.
Changes the parameters that control
communication between OuickTools and the
Fluke 90, enables and disables the warning
beeper, determines the colors used by
OutckTools screens, and establishes the
default files that QuickTools uses for testing
and recording.
Disk
pP Board
FLUKE 90
Softvare
Interface
F'LUKE 9 1iJ Port 1
cor•l:
l
Null:
Printer
Path
1
Port
option
by
Teeter
Version
9600
:
1.0
baud
8 db
C:\QKTLS\
Program rile
Select
lnleract
Edlloc·
Setup
Alt Capital
l du�my.uut
letter
AH X
to
eXit
Figure 2. QuickTools Main Menu
2-2
l
Alt H for Help
A QUICKTOOLS SESSION
Your Screen Doesn't Look Like This?
If yo u do not see the display shown in Figure 2, make sure that you bave done the following:
•
Correctly loaded DOS Version 2.1 or later
•
Used the correct command to start up QuickTools: QT
OR
•
For the alternate display mode, started QuickTools using QT -A
•
Jf necessary, placed the ANSJ.SYS device driver on the same disk as DOS. This
must be the ANSI.SYS that was supplied with your system disk.
•
Booted the system with the CONFIG.SYS file specifying DEVICE
=
ANSI.SYS
U ntiJ QuickTools is running, any error messages come from the operating system. If DOS
reports no errors, but you don't see the screen shown here, check out these possibilities:
•
Odd characters seem to be filling the screen
There is a problem with the ANSI.SYS driver. Be sure you have correctly
configured the disk.
•
The screen has little contrast or appears blurry.
So me monochrome PC's may display color poorly. Go to the Setup Menu (Alt s),
press the C key (color), then press the A key (all areas of the screen to
monochrome). Press (Alt) x to go back to the Main Menu.
If all these things are correct, you may have a defective disk. In this case, make another
QuickTools backup disk and try again.
To exit from QuickTools, press (Alt)
x
from the Main Menu.
2-3
A QUICKTOOLS SESSION
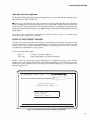
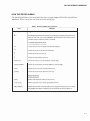
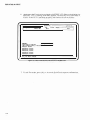
SET THE COMMUNICATION PARAMETERS
At the Main Menu, press (Alt) s.
Aseign_f·key
Qu¡ckTools
-------i09;48;02h
r1 5etup h
Editor
I nteract
Test
1
1
1
, >F'luke 90 port
1 Printer port
j Warn1ng beeper
Disk
..___
_
_ _
______
_
F'
1
Color selection
Deíault
Software
files
Interface
�lH
Yeraion :
F'LUKE 90 Port 1 co�l: 9600
Printer Port 1 Null:
Path 1 C;\QKTLS\
Program File 1 du�my.uut
Select
menu fuoction by up/down arrovs
•
n
E ter
baud
1.�
S db
j
1
!
1
Alt X to exit
1
Alt
K
for help
Figure 3. Setup Menu
Use the following steps to set
2-4
up the Fluke 90 port.
l.
If the Fluke 90 port selection is airead y highlighted, yo u canjust prcss f-J . If it
is not highlighted, either use the arrow keys to move there, then press f-J , or
press the f key (Fluke 90 port).
2.
Press either 1 o r 2, depending on whether the Fluke 90 ís connected to C O M l or
COM2.
3.
Press 8 to select 8 data bits.
4.
Press 9 to select 9600 baud and
return to the Setup Menu.
A QUICKTOOLS SESSION
What You Have Accomplished
By making the Fluke 90 selection from the Setup Menu, you have defined the communication
link between the Tester and the PC.
On power up, the Fluke 90 sets itself to communicate using eight data bits and 1200 baud.
Serial communication requires both devices to be set the same, so QuickTools automatically
sets both the PC and the Fluke 90 to the selected parameters. For example, you may prefer to
operate at a higher speed . Doing so only requires that you change the baud rate selection in the
Setup Menu.
QuickTools first establishes communication with the Tester, resets its communication
parameters, then resets the PC to match.
START UP THE INTERACT WINDOW
The lnteract Window provides one ofthe most powerful features of QuickTools: a way to send
remote commands to the Tester and immediately see the results. An interact session is usually
the first step in test routine development because it interactively tests the U UT. Later the
commands are combined into a test routine.
To exit the Setup Menu, press:
(Alt) X
(Alt) i �
to return to the Main Menu, or,
to go immediately to the lnteract Window
Befare it starts an interactive session, QuickTools first displays the name of the default
Program File, tbe one that QuickTools will load and prepare to run in the Interact session.
Brand new copies of QuickTools uses an empty file called D U M M Y . U U T as the name ofthe
default Program File.
r
¡
IJuickTopls
Ass�go_i-key
D1sk
Editor
Sctup
-'------
1
1
Presa
FLUKE 90 Port
Printer
Path
1
Port
�
dummy.uut
�
0<:¡:50:16
T st
1
h
1
l
�p Board Tester
FLUKE 90
Soítvare Interface
j
rl Interact h
1
coml:
1
Ve rsion
:
9600 baud
1.0
8 db
Hull:
C:\QKTLS\
Program File
1
dummy.uut
"Enter• to select vith displayed program file or any key to chaoge file.
Figure 4. lnteract Window Showing the Default Program Name
2-5
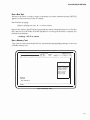
A QUICKTOOLS SESSION
Pressíng t-J
activates the lnteract window and establishes a communicatíon link between
the PC and the Fluke 90. The screen should look like the next illustration.
e
(Alt) k displays a representation of the Fluke
90 front panel as a remind
r of the available
tests. This command prompting key display
.
(Ait) n sends Operator Messages
QuickTools/ Fluke 90 commands and
responses to the
in to the scr e en.
printer as
persis ts until you t urn it off with a second
they are scrolled
(Ait) k
(Ait) f displays a reminder of the Function
Key assignments. The reminder display
(Ait) s togs the lnteract session to disk. The
disappears al the next keystroke.
Pressing an
e
-
F ke y assigned to a
session or buffer is saved to the currently
named Recording File. which can b e
changed h ere or in the Setup Menu.
test
program causes that program to execute
immediat ly.
rr
Ouic�¿bols
\
ll
\\
p�Hit
1
!.
lnteract
ahov_t keys
prompt_ Keya
Save
�
L
llindow
/.109/s2:
"'""¡"'
1
/
beGin
'""""
11r,
eXit
d
�··"
n.
""'
l
X
?)
Prompt Key
.
F LUKE
90
¡--
Alt H ior Help
1
"'
\..
Enter any
EHTER>
1
Co�municetiona eatabliahed
Reset
Mem
Loop
1/o
Clear
Probe
Enter
Trece
Other
�
�
L
1
1
Fluke 90 command here.
(Ait) g s tarts, pauses,
or c ontinues execution
of the current Pro
9 ram File . which can be
changed either here or in
the Setup Menu.
Figure 5. The lnteract Wíndow
2-6
B11a
A QUICKTOOLS SESSION
Aun a Bus 'fest
Whenever the Tester is ready to accept a command, the remote command prompt ENTER)
appears on the bottom line of the PC display.
Run Test Bus by typing:
(Alt)b to display bus tests, f--.1 to select test bus.
Observe the display. QuickTools has generated the remote command syntax for a Test Bus
(BT) and sent it to the Fluke 90. While QuickTools is waiting for the Tester's response, the
command line displays
...working... ALT_C to cancel.
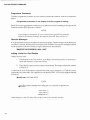
Aun a Memory Test
Type (Alt) m. Notice that the QuickTools command prompting display changes to show the
available memory tests.
r
OuickTools
lnleract
priNt
shov_f-keys
prompt_Keys
llindo�t
Save
1 09:53:171�
--11
'
---------
beGin
eKit
l!El!ORV
1
TESTS
>Test Memory
memory Checkaull
memory Exa�tine
,.emory Verify
memory llrite
memory Soak
m<'mory fill
ENTER>BT
TEST BUS
TEST COIIPLETED
\..
ENTER>
Figure 6. Memory Tests
2-7
A QUICKTOOLS SESSION
Use the following steps to run a memory test.
l.
I fthe Test memory selection i s not highlighted, use the arrow keys to select ít, then
press � .
2.
QuickTools prompts for a beginning address. To begin the test at the displayed
address,just press � . To change the address, press (HOME) to go to the left,
then delete the old address by pressing (CTRL) (END). Type in the lowest RAM
address of your UUT. When the address is correct, press f--1
3. QuickTools now prompts for an ending address and supplies OOFF, the default.
This time to change the address,just type the hew address. The editor always starts
in typeover mode.
4.
To send the command, press f-1
Observe the display. The return of the
ENTER) prompt indicates that the Tester is ready for the next command. To send
the command agaín, press t then �
To change the command, press t , then
l
edi the líne befare pressíng �
.
.
5.
Run the same test a few times, trying out different address ranges. If the ending
address is lower than the beginning address, the tester responds with r!??,
indicating it is unable to complete the command.
Each command is redisplayed above the ENTER line. The buffer you are seeing
can be printed out, saved on the disk, or edited.
What You Have Accomplished
The lnteract Window opens communication with the Fluke 90 and sends remate commands to
it. In these few minutes, you have already used QuíckTools' powerful command syntax
generator. You never need to remember the name or syntax of Fluke 90 commands, because
QuickTools takes care of that for you.
When you changed the beginning address, you used the QuickTools editor for the first time.
The editor's capabilíties are fully explained in Sectíon 3.
By sending the BT and MT commands, yo u have checked the UUT bus and the RAM address
range you entered.
Run the Same Two Tests, Saving the lnteraction
To prepare to save the interaction:
l.
Select Save from the lnteract menu.
2.
Select disk On.
3. Select cornmands Only. You will be asked to name the Recording file.
4.
2-8
For now, name the new file something easy to remember, like MYTEST.IST. I f
the file yo u name already exists, a message appears stating that the commands you
enter will be appended to tbe existing file.
A QUICKTOOLS SESSION
CAUTION
QuickTools reserves two filenames for its own use:
INIT_QT
TEMP_QT
VAL
DIR
The INIT_QT file stores values that QuickTools uses from one session to the
next, like the screen colors and default filenames. The TEMP_QT directory
is a temporary file created and deleted during QuickTools operation.
Now, repeat the Bus Tes t and Memory Test that you performed earlíer in thís section. The
commands you send to the Tester are logged to the file named MYTEST.l ST.
Stop recording by selecting Save, then Disk off. (Leaving the Interact Window automatically
closes the disk file for you.)
[f you selected "Complete Data" in step 3 above, the responses would also be recorded.
However, in this case, the file could not be Run until the responses were edited out.
Run the Recorded Test Routine
Once the test routine has been recorded to disk, it is always available for execution. Run the
test routine you have just saved.
1.
While you are still in the Interact Window, select beGin. QuickTools asks for a file
name to begin running, showing the last named Program file. Change it to
MYTEST. 1ST.
2.
Press f--1
to run the test named in the pop-up window. Observe the display. As
the tests run, the commands are displayed as they are sent, alternating with the
Tester's responses. A message window indicates QuickTools program activity.
QuickTools displays two messages, first:
Loading MYTEST.1ST
and finally:
Program. complete
3. Leave the Interact Window by pressing ( Alt) x. QuickTools asks for coofirmation
because exiting clears the transaction records.
Possible Problems
If something didn't work correctly when you ran the new test routine, it may actually ind icate
normal operation! The Tester attempts to interpret everything QuickTo0ls sends as a remote
command. Check for the following possible problems:
•
If the tester doesn 't recognize a line as a valid Fluke 90 remo te command, it returns
????. Look for typographical errors.
•
If you selected "Complete Data" and saved both the remote commands and the
Tester's responses, there wiU be many instances of the Tester returning ????. To
avoid this, be sure to save commands only or edit out the responses. Tbe next
section explaíns how to use the editor.
2-9
A QUICKTOOLS SESSION
•
Memory Resident programs may cause a loss of serial data when running
QuickTools. Your autoexec.bat file may be executing a program that stays active
after returning automatically to DOS. It may be necessary to edit or remove the
autoexec. bat file and reboot.
WHAT YOU HAVE ACCOMPLISHED
In this section, you have performed most of the tasks needed to create a new test routine for
your own UUT. In this first QuickTools session you have done the following:
•
Established communication between the PC and the Tester.
•
Used QuickTools remote command syntax prompting as an aid to sending
commands to the Tester.
•
Saved the commands to a new file.
•
Run the newly recorded test routine.
In the next section, you will edit the saved interaction to begin creating a fully developed test
program.
2-10
Section 3
Editing Stored Commands
Any series of stored remate commands can be called a test routine, because withoul further
enhancement they perform a series oftests on the U UT. Editing a test routine can make it even
more useful. This section explains how to use QuickTools built-in editor to add capabilities to
the test routine. Further enhancements are covered in the last section.
NOTE
A ny text editingprogram can be used to create oredit test routinesas long
as the editor can save the results as an ASCII textfile.
3-1
EDITING STORED COMMANDS
START THE EDITOR
From the Main Menu, press (Ait) e then +-'
should appear as shown in the following figure.
to start the editor program. Your display
Like the lnteract window, the editor also uses key-prompting to generate the proper Fluke 90
remote command syntax.
(Ait) k displays a representation of the Fluke
90 front panel. This command prompt1ng key
display persists until you turn it off with a
second (Ait) k.
Allows recording !he curren! session lo disk,
removing the curren! session and loading a
new file from disk, and inserting a file from
(Ait) f displays a reminder of the Function
Key assignments. The reminder display
disappears at the next keystroke.
disk into the current session (the file is added
betow the current cursor position in the
Editor Window).
Pressing an F-key assigned t o a test
program causes that program lo be inserted
below the current line.
(ALT)
(ALT) x leaves the editor, alter asking for
confirmation. lf you have changed the file
n selects printing. This seJeclion
permits you to
and have not saved it. a second confirmation
prinl out the curren! Program
is requir ed to exit without saving.
File.
�
Prompt Key
UKE 90
¡--
t H for Help
command:
TEST DUS
During editor operation, single fines can be
sent to the Tester to verify the command.
Select the line to verify by using the arrow
keys, to highlight it, then press (Al!) v '
f-.1
to send the command line lo the Tester. The
results are displayed on the bottom line until
you move the cursor.
Figure 7.
3-2
The Editor Window
Bua
Reset
Mem
Loop
Ilo
Clear
Pro be
En ter
Trace
Other
EDITING STOREO COMMANDS
HOW THE EDITOR WORKS
The QuickTools Editor is line-oriented. Each line is a single complete Fluke 90 or QuickTools
command. Table l shows the functions of al! the editing keys.
Table 1. QuickTools Editor Key Functions
KEY
ACTION
(INSERT)
toggles between insert and typeover modes
f-!
the ENTER key breaks the line at the cursor. Everything to the right of the cursor
forms a new line. lf you press ENTER at the end of the line. a blank line is
created, ready for entering a new command.
CURSOR MOVEMENT KEYS
-
moves the cursor to the right one character position
-
moves the cursor to the left one character
t
moves the cursor up one line
�
moves the cursor down one line
(PAGE UP)
moves the cursor up in the buffer by one full page
(PAGE DOWN)
moves the cursor down in the the buffer by one full page
( End )
moves the cursor t o the right end o f the line
(Home)
moves the cursor to the lefl end of the line
DELETION KEYS
(DEL)
deletes the character at the cursor pos ilion
(Ctrl) (End)
deletes 1rom the cursor to the right end of the line
(Back Space)
deletes the character to the teft of the cursor.lf pressed
when the cursor is at the
lett margin, Back Space combines the line with the line directly above
it.
3-3
EDITING STORED COMMANDS
Programmer Comments
To add a programmer comment to a test routine, precede the comment with two exclamation
points:
!!Programmer comments do not display while the program is running
QuickTools treats programmer comments in a traditional way. Everything to the rigbt of the
comment marker (!!) is ignored at runtime.
NOTE
lfyouforget to include the "!!"in a comment line, QuickTools sends the
line as a command. Generally the response from the Tester will be ????.
Operator Messages
A single exclamation point introduces an operator message. These messages can be displayed,
recorded, or printed, but they are never output to the Fluke 90. Use operator messages to check
on the progress of the test routine orto give directions to the operator.
!RAMTEST IN PROGRESS 0000
-
OOFF
Adding a Label to a Test Routine
Labels have two uses:
l.
They display in the Test window, providing a convenient way for an operator to
follow the execution of the test routine.
2.
They identify a part of a test routine for branching. This usage is discussed in detail
in Section 5.
A label can be up to 78 characters long and ends with a colon character ( : ). Fluke 90 remo te
commands follow the label. For example, part of the MYTES.T. J ST routine might be labeled
as follows:
MemCheck1: M T 0 2 0 1 0 3FF
NOTE
QuickTools dele tes leading and trai/ing spaces, so thefollowing labels are
equivalent:
mem check 1:
mem check 1:
MEM check 1:
Labels display on the PC in the Test window, but not the Interact window.
3-4
EDITING STORED COMMANDS
NOTE
A label can be made invisible by ending it with two colon characters. Use
invisible labels Lo suppress Lhe display of less important labels that a test
may branch Lo.
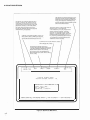
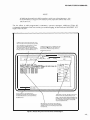
Use the editor to add programmer's comments, operator messages, additional Fluke 90
commands, and labels to the test routine you aredeveloping. A final version ofMYTE ST. lST
might look like this:
A label (up lo 78 characters) identifies lines
the test routine will use for branching.
do not display during test execution
lnteract Window.
Labels and
Labeis
in the
operator
messages are the only actívíty displayed ¡n
the Test Window. A label ls made invisible by
ending it with two colons instead of one.
Traditional programmer comments can be
included in a QuíckTools test routine. As
shown here, comments begin with two
exclamation points
(!!).
Windov
prompt_Keys
fileS
Verify
l/o
Probe
Trace
fXIHT
coaaand:
¿
/
As you move lo a
QuíckTools
new program line,
interprets \he line and displays
The column on the lar righl hand side of \he
the expanded syntax lar that command on
screen shows the relative location in ttle
buffer of the line being ed ited. The buffer can
the bottom fine.
hold
400 llnes . To move within the buffer, use
the up and down arrow keys, and (PAGE
UP) and (PAGE DOWN).
Messages lar the operat or are set off by a
single exclamation point(!). These messages
display on the
PC screen during lnteract and
Test sessions.
Figure 8. Sample Program with Comments and Messages
3-5
EDITING STORED COMMANDS
Saving a Test Routine
Before exiting the editor, save the test routine. Select "fileS" from the menu bar, then select
"Save file". You wiJI be asked to name the file to save. Tf you use the name MYTEST. l ST,
QuickTools overwrites the old file.
WHAT YOU HAVE ACCOMPLISHED
The main purpose of this section has been to introduce QuickTools built-in editor, and show
you how to use it to move around in and edit a QuickTools test routine. In Section 3 you you
have accomplished the following:
3-6
•
Added comments, messages, and labels to the test routine.
•
Saved the test routine to a disk file.
Section 4
Executing a Qtest
In Sectío n 2 you created a test program a n d executed it in the lnteract Window. Sectíon 3
expanded the test program to include Jabels, operator messages a n d programmer comments.
The purpose of this section is to explore QuickTools execution of these Qtest features.
ASSIGNING A QTEST TO A FUNCTION KEY
When MYTEST. IST is fully developed a n d proven to locate faults reliably, you may want to
speed things up by assig n i ng it t o a fuoction key so the tests can be run by pressi ngjust o n e key.
To assign a Qtest to a function key, perform the following steps.
l.
Return to the Main Menu.
2.
Select Assig n , and press the Function Key you wish to use for the Qtest.
3.
A Status Window appears that displays the current i n formation for the Function
Key you pressed. The selection "to Qtest" is highlighted. Press � .
4.
A n entry box appears, asking you for the name of the Qtest. Type MYTEST.I ST
5.
� . When assigni ng tests t o a Function Key, be su re to i n d icate the e n tire path.
The full specificati o n of a file can be up to 42 c haracters.
Next, another entry box requests a label for the file. The label can be a maximum of
six characters. l:"his label appears o n the "Show F-Key" popup. Enter MY1ST
f-1 .
6.
QuickTools next asks for a description of the file. The description can be a
maximum of of 22 characters and it appears in the Status W i n d o w area o n the
Main Menu when you select Assign, then F-Key. The description supplies the
operator with additional information about the Qtest. After entering a description,
press �
7. To check that everything has been keyed i n properly, repeat step 2. Press (ESC) to
leave the e ntry unchanged.
4-1
EXECUTJNG A QTEST
USING A QTEST THAT HAS BEEN ASSIGNED
Assigning a Qtest to a Function Key saves time and effort because all the tests are available
with a single keystroke. The assigned Qtest can be used in the Interact, Test, and Edit
Windows.
lnteract and Test Windows
In the 1 nteract and Test Windows, to run the tests that make up a Qtest, press only the Function
Key that has the Qtest assigned to it. This can be an efficient way to prescreen boards. Por
example, a function key might be assigned to a Qtest that runs a Bus Test and so me preliminary
checksum tests. Another use of an assigned Qtest in the l n teract Window might be to run a
thorough set of memory tests on an area of memory already identified as faulty.
Pressing an assigned Function key is equivalent to pressing (Ait) g (beGin), S (Start), entering
a filename, and +-J
Edit Window
In the Edit Window, pressing an assigned Function Key inserts the tests that make up the Qtest
into the buffer. This is a way to include su btests into a group of longer tests (which in turn
might be assigned to a Function Key).
In the Edit Window, pressing and assigned Function key is equivalent to pressing (Alt) s
(fileS), 1 (Insert), entering a filename and f--J
U nless you later change an F-key assignrnent with the Assign function, the key will always run
the tests in the file you've named. QuickTools retains Function key assignments between
sessions. Remember that if you delete, rename, or move a file assigned to a function key,
QuickTools wiiJ not be able to locate it.
RUNNING THE ASSIGNED QTEST
Once a test has been assigned to a Function key, it is available by pressingjust that Function
key. To try it out the first time, follow these steps:
1.
�
to go to the Interact window.
2.
Press (Alt) f (showF-keys). Toggle the Function key display to ON by pressing
f--J . Confirm that you have assigned MY 1ST and verify the function key
assignment.
3.
Press the Function key indicated. Note that MYTEST. 1 S T executes just as it has
done in previous excercises (Section 2). All operator messages should appear, but
you should see none of the programmer comments or labels.
4.
4-2
From the Main Menu, press (Alt) i and
Exit the Interact window.
EXECUTING A QTEST
5.
Go to the Test screen (<Alt) t and � )
the screen are described i n Figure 9.
and observe the display. The choices o n
Starts. pauses. and continues the current
Program File. As the program eKecutes. only
labels. pass/fail responses. and operator
comments display. To see all commands and
thelr responses, use the lnteract windows·
beGin seleclion.
Allows logging the curren! session. The
session is saved to the currently named
Recording File. which can be changed here
or in the Setup Menu.
Setects printing. This setection permits you to
send the Test session to the printer.
,r
\
¡,
\
\
\
priNt
Quick
Test �
shov_F-key
1
\..
\..
oo ls
Windov
Save
Communicetions established
1
j_
1
beGin
1 09:57:35_b
eXlt
1
1
All_Gjt.o Start program
1
1
,
.J
Displays a reminder of the Function Key
assignments. The reminder display
disappears at the next keystroke. Pressing an
F-key assigned toa test program causes that
program to execute immediately.
Leaves the Test wmdow, but f�rst asks for
confirmation.
Figure 9. Running the Test Routine
4-3
EXECUTING A QTEST
6.
Again press the Function key assigned to MYTEST. lST. Observe the display. As
MYTEST. l ST is running, each label appears, followed by the word PASS or
FALL. lf the UUT is operating properly, the screen will look as fo llows:
QuickToob
ptUit
IUSTESTI
progr•••
ah.cking ..aory loaatiana
11� Teat in
IMow
be<>in
prograa
COftPLETE
8USTEST1 P4SSED
IEACYECXl 1 PASSED
aEICYECX21 PASSEO
ftEaCHECXJ1 PASSEO
BEICHECX41 PASSEO
BEBCHECX�1 PASSED
Alt_G to Start prograa
Figure 10. Labels and Pass/Fail lndications for MYTEST.1ST
7. To exit Test mode, press (Alt)
4-4
x.
As usual, QuickTools requests confirmation.
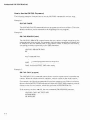
Section 5
Enhancing the Test Routine
This section adds some sophisticated features to the test routine you have been developing. It
explains how to set up branching within the routine and how to cal! another test routine based
on UUT failure conditions.
THE ON FAIL COMMAND
When QuickTools is executing a test program, it sends each Fluke 90 command in sequence
until a failure occurs. A failure is recognized as one of three conditions:
l.
The Tester returns the string FAIL.
If QuickTools receives the word FAIL from the Tester, it means that the UUT has
failed a test caJled for by a remate command.
2.
The Tester returns the string ????.
l f the Tester sends ????, it means that it was unable to recognize the command,
indicating the command had a syntax error.
3.
The Tester returns a string different from one specified in an ON FAJL statement.
User-defined strings are explained later in this section.
When a failureis detected, QuickTools takes the action specified by the most recent ON FAIL
command. ON FAIL can specify one of these actions:
PAUSE
BRANCH ..
CALL ..
NO ACTION
(the default action)
to a label within the same test routine
another test routine and returns upon completion
disables all failure action
The specified action remains in effect until changed by a d ifferent ON FAIL command or until
a failure action is taken. When QuickTools takes action on a failure (PAUSE, BRANCH to a
label, or CALL a different program), it automatically resets the failure activity to PAUS E ,
cancelling the currently defined action and any user-defined string.
5- 1
ENHANCING THE TEST ROUTINE
How to Use the ON FAIL Command
The following examples illustrate how to use the ON FAIL command in various ways:
Example 1 :
O N FAIL PAUSE
The ON F AIL PAUSE command halts test program execution on a failure. This is the
default condition, and is asssumed at the beginning of a test program.
Example 2:
ON FAIL BRANCH
flabel}
The ON FAIL BRANCH comand causes the test routine to begin execution at the
indicated label if the test fails. For example, the following commands tell QuickTools
to branch to the line labeled DAG: if any failures occur. lf there are no faiJures,
everything proceeds sequentially to the END statement.
ON F AIL BRANCH DAG
BT
more command lines
END
! ! normal program execution stops here
DAG: !beGin MYTEST.2ND when ready
Example
3:
ON FAIL CALL
{program}
The ON F AIL CALL command causes the test routine to pass control to another test
routine. When the called routine is complete, control returns to the initial routine.
For example, the following commands fírst perform a memory test. Ifthere is a failure,
the test routine MYTEST.2ND will execute. When MYTEST.2ND completes, control
returns to the first test routine, which then performs a CHECKSUM test.
If the memory test does
not
fail, the next command (CK 0000 0 1 00) executes.
ON FAIL CALL MYTEST.2ND
MT 8000 8080
CK 0000 0100
5-2
ENHANCING THE TEST ROUTINE
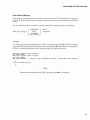
User-Defined Strings
In all ofthe preceding examples, a "failure" may be an actual UUT failure (FAIL) or a syntax
error (????). Failures also occur if the response from the tester does not contain the user-defined
string.
Use the following syntax to construct valid commands containing strings for matching:
[
ON FAIL f<stríng)} [
BRANCH
]
]
CALL
]
(
PAUSE
[ NO ACTION ]
{label}
{program}
Example:
The following list of commands tells the Tester to call the program 'F90RT' if the checksum
returned from the Fluke 90 is not the same as the checksum listed in the ON FAIL command. If
"E720" is contained anywhere in the returned string, the program continues.
ON
GK
ON
CK
ON
FAIL
0000
FAIL
0101
FAIL
more
< E720 > CALL F90-RT
OOFF
< 4F36 ) CALL F90-RT
0200
PAUSE ! ! canc e l s u s e r- d e f i n e d
c ommand
string,
specifies
new
a c t i on
l ines
NOTE
The maximum length ajan ON FA IL <string) commandis 78 characters.
5-3
ENHANCING THE TEST ROUTINE
SPEEDJNG UP TEST EXECUTJON
The next few paragraphs describe a method for speeding up test routine execution.
In operation, the Fluke 90 Board Tester "cycle steals"· from the UUT microprocessor. This
means that normally the Fluke 90 does al! of íts testing while the U UT processor is running. By
having the test routíne halt the UUT processor, considerable time can be gained since the
Tester does not have to wait for a free processor cycle before performing its activity in the U UT.
In the following example program listing, a speed increase of 4 to 1 ís accomplished by using a
breakpoint to halt the microprocessor during testing.
CAUTION
The method described here should only be used for UUTs with static RAM
because the refresh cycle may be stopped during breakpoint operation.
Stopping a UUT with dynamic RAM may cause the contents of the RAM to
be losf.
Example Program:
1 1
! ! TEST. UUT
1 1
E x amp l e of s p e e d i n c r e a s e s a va i l a b l e f o r STAT I C RAM b o a r d s
bt
db
c c l e s h a r i n g t im i n g test:
! . For t h i s p or t i en o f t h e t e s t s ,
t h e UUT i s r u n n i n g .
! ! e x e c u t i o n t i m e f o r t h i s memory t e s t i s a b o u t 2 1 s e c o n d s
! ! f o r c h e c k s um , a b o u t 1 2 s e c o n d s .
! T i m e t h e e x e c u t i o n o f t h e f o l l o w i n g two t e s t s .
M T 8000 9000
c k 0000 1000
! r e c or d e x e c u t i o n t i me
!
v
1 1
! !
! !
! !
n o w we ' l l h a l t t h e UUT a n d r e t e s t
t i me f o r t h e m e m o r y t e s t i s n o w a b ou t
f o r t h e ROM c h e c k s u m t e s t ,
3 seconds
VUT Ha l t e d t i m i n g t e s t :
��
!
mt
ck
Time
the
! r e c or d
db
end
5-4
two
8000 9000
0000 1 000
tests
e x e é u t i on
again
t i me
7
seconds,
ENHANCING THE TEST ROUTINE
QUICKTRACE11"
The QuickTracen• function follows and isolates suspected faulty address, data, or control lines
on the UUT. The signal line can be fo'llowed to isolate the fault. When QuickTrace is used in a
test program, The program halts and allows you to probe various points on the UUT. Each
time you probe a 1trace on the UUT, the trace name is displayed on the QuickTools screen
(followed by a carriage return). Jf two traces are shorted together, both trace names are
displayed on the same line of the QuickTools screen. To exit from QuickTrace, either press
(Alt) e on the I B M PC keyboard or press the button on the probe.
•
QuickTrace is a trademark of John Fluke Mfg. Co., fnc.
S-5/5-6
Section 6
On the Menu
THE MAIN MENU WINDOW
QuickTools uses (Alt) h for Help and (Alt) x for Exit. The
Assign f-key selection lets you place these on function keys of
your choice and also assigns function keys to often-used
sequences of Fluke 90 commands (Qtests). An option lets you
match the formal of a function key reminder display to the
physical arrangement of your keyboard.
Assign f-key
Horizontal Form
Vertical Form
Matches the Fuoction Key reminder display to
the layout of the keyboard being used.
press ( F l ) - (FIO)
Changes the assignment of a Function Key.
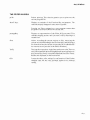
A gateway to the Disk Operating System. This menu permits
copying, deleting, printing, and viewing files without leaving
QuickTools.
Disk
select File(s)
Marks files for deletion, copying, printing or
viewing. QuickTools prompts for a pattern and
will accept w¡ldcards. Files matching the pattern
display in the menu area.
When you press
f-.1 at a highlighted file
name, QuickTools marks the file with an
asterisk. (Alt) x ends file selection and returns
you to the Disk menu to choose tbe operation
for the selected files.
Delete
Deletes all marked files after confirmation.
Copy
Copies the marked file(s). QuickTools prompts
for a destination filename. When the destina
tion is a directory, all selected files are copied
there without a name change. In any copy
operation, a destination file with the same
name as the source file is overwritten without
warning.
6-1
ON THE MENU
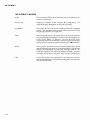
Setup
6-2
Print
Sends the selected file(s) to the printer port.
View
Di splays the selected file(s).
Changes the parameters that control communication between
QuickTools and the Fluke 90, enables and disables the warning
beeper, determines the colors used by Quick Tools screens, and
establishes the default files that QuickTools uses for testing and
recording.
Fluke 90 port
Sets the port (COM 1 or COM2), baud rate,
and number ofdata bits to be used for commun
ication between the PC and the Fluke 90.
Printer port
Selects the printer port QuickTools uses.
Warning Beeper
Enables and disables operation of the PC
beeper.
Color SeJection
Sets the background colors for the menu bar,
main screen body and status/ entry line. Quick
Tools automatically changes the foreground
colors. For best results with monochrome
monitors, choose "All" to select monochrorne
for all three areas.
Default files
Tells QuickTools software the names of the files
to use for running (the default Program File),
for reco rdi ng (the default Recording File), and
for the Upload and Download filenarnes.
Editor
Accesses QuickTools text editor for
test routines.
creating
and modifying
Interact
The Interact Window is like a super terminal emulator. Fluke
90 commands can be entered directly or by way of QuickTools
unique command prompting. The entire interaction can be
logg�d to disk for later editing or to a prjnter for analysis. One
option limits the storage to commands only, as a way to
q uick \y e reate test programs. The last 1 0 0 transactions of an
Interact session are available for screen reviewing.
Test
The Test Window offers the quickest way to execute stored test
programs. Rather than displaying the full command and
response activity of the program, Test displays only operator
messages, program labels, and the passjfail results of the
tests.
ON THE MENU
THE EDITOR WINDOW
priNt
Selects printing. This selection permits you to print out the
current program file.
showF-keys
Displays a reminder of the Function Key assignments. The
reminder display disappears at the next keystroke.
Pressing an F-key assigned to a test program causes that
program to be inserted below the current line.
promptKey
Displays a representation of the Fluke 90 front panel. This
reminder display persists until you turn it off by selecting it a
second time.
Save
Allows recording the current session to disk, removing the
current session and loading a new file from disk, and inserting a
file from disk into the current session (the file is added below
the current cursor position in the Editor Window).
Yerify
During editor operation, single lines can be sent to the Tester to
verify the command. M ove the highlighted line using the arrow
keys, then select Verify to send the command line to the Tester.
Results are displayed on the bottom line.
eXit
Leaves the editor, after asking for confirmation. 1f the file has
changed since the last save, prompts again to exit without
saving.
6-3
ON THE MENU
THE INTERACT WINDOW
6-4
priNt
Se.lects printing. This selection permits yo u to send the Interact
session to the printer.
showF-keys
Displays a reminder of the Function Key assignments. The
rerninder display disappears at the next keystroke.
promptKey
Shows the ALT keys to use for ínvokíng Fluke 90 command
syntax. This reminder display persists until you turn it off by
selecting prompt-Key a second time.
S ave
Allows logg�ng the current session. The session is saved to the
currently named Recordíng file, which can be changed here or
in the Setup Menu. In lnteract, you can save the entire
transaction or just the commands. You can log the interactions
as they occur, or log the contents of the current 1 00-line buffer.
beGin
Starts, pauses, and contínues the current Program File, which
can be changed either here or in the Setup Menu. QuickTools
displays all commands and operator messages and the the
Fluke 90 responses. To limit the display to labels, operator
messages, and passjfail responses only, use the Test Window.
eXit
Leaves the session, but first asks for confirmation to ensure
that any changed or new files have been logged. Leaving clears
the transaction buffer.
ON THE MENU
THE TEST WINDOW
priNt
Selects printing. This selection permits you to send the Test
session to the printer.
showF-keys
Displays a reminder of the Function Key assignments. The
reminder display disappears at the next keystroke. Pressing an
F-key assigned to a test program causes that program to
execute immediately.
Save
Allows logging the current session. The session is saved to the
currently named Recording file, which can be changed here or
in the Setup Menu.
beGin
Starts, pauses, and continues the current Program File. As the
program executes, only labels, pass/ fail responses, and opera
tor comments display. To see al! commands and their responses,
use the Interact window's beGin selection.
eXit
Leaves the Test window, but first asks for confirmation.
6-5/6-6
Appendix A
G l ossary
interaction
A communication between tbe PC and the Tester. Interactions have two parts: first,
QuickTools sends a remote command from the IBM PC to the Tester. I n the second part, the
Tester responds. The response might be test results, a checksum ca1culated for an area of
memory, an add ress or data line being probed using QuickTrace, and so on.
message area
An area in the QuickTools display that gives information about different operations. For
example, in the Test and Interact Windows, Qtest progress is shown in this area.
program file
A disk file containing a series of Fluke 90 commands. QuickTools permits program files to be
edited, assigned to function keys, run, or printed out.
Qtest
A sequence of Fluke 90 commands. Also called a test routine or a program, a Qtest is a
program file that is assigned to a function key. Qtests are assigned from the Main Menu and
executed in the Interact and Test Windows. In the Editor, pressing a Function key which has a
Qtest assigned inserts the Qtest into a program.
recording file
The file QuickTools uses to save interactions.
select
To make a choice from a menu. The selected ítem is highlighted and preceded by a prompt
symbol ).
Sclect Menu options by pressing (Alt) and the capitalized letter. Submenus requrre only the
capitalized letter. For example, in the Setup Menu, press W to select Warning beeper, then N to
select oN.
status/ entry line
QuickTools uses the bottom line of each window to display information pertinent to that
window's operation. For example, in the Editor Window, the bottom line of the display
expands the syntax of the currently selected command line.
A-i/A-2