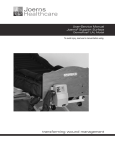
1
serenity
Mattress Replacement System
Owners and Operators Manual
Serenity Support Surface Manual
Table of Contents
DANGER ...................................................................................................... 3
WARNINGS.................................................................................................... 3
CAUTIONS..................................................................................................... 3
IMPORTANT.................................................................................................. 3
INTRODUCTION............................................................................................ 4
SYSTEM/CONTROL UNIT FEATURES............................................................... 5
MATTRESS FEATURES..................................................................................... 6
SYSTEM SPECIFICATIONS.............................................................................. 7
Environmental Conditions.................................................................... 7
AGENCY APPROVALS..................................................................................... 7
SAFETY INSTRUCTIONS................................................................................. 8
QUICK START INSTRUCTIONS....................................................................... 9
DETAILED EXPLANATION OF FUNCTIONS............................................... 10-14
KEYPAD FUNCTIONS...................................................................... 10-12
Power Button............................................................................... 10
Patient Weight.............................................................................. 10
Alternating Pressure Adjustment.................................................. 10
Alternating Pressure Cycle Time................................................... 11
Low Air Loss Adjustment.............................................................. 11
Deflate......................................................................................... 11
Max Inflate................................................................................... 11
Patient Safety Rails........................................................................ 11
Alarm Mute.................................................................................. 11
Comfort Adjustment Up & Down Buttons.................................... 12
Lock Out...................................................................................... 12
WIRELESS REMOTE CONTROL..........................................................12-13
Using the Wireless Remote Control............................................... 12
Remote Control Buttons............................................................... 13
Remote Standby........................................................................... 13
Batteries....................................................................................... 13
OTHER FEATURES.............................................................................13-14
CPR.............................................................................................. 13
Power Failure System................................................................13-14
Transport..................................................................................... 14
Emergency Evacuation................................................................. 14
Ground Pin.................................................................................. 14
ALARMS ................................................................................................15-16
CHECK HOSE CONNECTOR................................................................. 15
POWER FAILURE................................................................................... 15
NON THERAPEUTIC RANGE................................................................. 16
CLEANING AND MAINTENANCE............................................................. 17-20
GENERAL CLEANING GUIDELINES........................................................ 17
CONTROL UNIT CLEANING................................................................. 17
FILTER CLEANING & MAINTENANCE.................................................... 17
MATTRESS CLEANING.......................................................................... 18
TOP-SHEET CLEANING......................................................................... 19
Light Cleaning of Top-sheet.......................................................... 19
Deep Cleaning of Top-sheet......................................................... 19
BETWEEN PATIENTS CLEANING PROCEDURE....................................... 20
STORAGE AND CARE................................................................................... 21
WARRANTY.................................................................................................. 23
2
DANGER
Explosion hazard – Do not use in the presence of flammable gases.
WARNINGS
The cover of this product is not air permeable and may present a
suffocation risk. It is the responsibility of the caregiver to ensure that the
patient can use this product safely.
Do not use the Serenity control unit in the presence of flammable gases
(e.g. anesthetic agents). Possible explosion hazard if used in the presence of
flammable anesthetics.
Ensure that the Serenity mattress is securely attached to the bed frame prior to
use. Care should be taken to ensure that the straps do not interfere with the
normal operation of the bed.
To reduce the risk of entrapment of the patient between the mattress and the
bed frame, make sure that the mattress is securely attached to the bed frame and
any space between the headboard, footboard and the mattress is less than two
inches at any point.
If side rails are used with the Serenity mattress, care must be taken to reduce
the risk of entrapment of the patient. Make sure that any space between the
side rails and the mattress is less than two inches.
Never drop or insert any object into the opening on the Serenity control unit.
CAUTIONS
Do not use in the presence of smoking material or open flame. Air
flowing through the mattress will support combustion.
Care should be taken to not allow patients whose mental state is such that
making decisions about the delivery of the therapy provided by the Serenity
could result in an adverse outcome to have access to the wireless remote control.
Risk of electric shock, do not remove the back cover of the control unit. Refer
all service to qualified service personnel.
It is important to keep in mind that certain combinations of therapy modes
will allow the system to operate at pressures that are not providing pressure
relief therapy. This is indicated on both the front of the unit and on the
remote with the “non-therapeutic range” light being illuminated. When this
lamp is illuminated the system is not providing continuous pressure relief
and care should be taken to ensure patient is frequently turned to avoid the
development of pressure ulcers.
IMPORTANT
The AC power cord acts as the main disconnect for this device.
Emergency Deflate is accomplished by disconnecting the hose connector from
the control unit.
www.accuromedical.com
3
Serenity Support Surface Manual
Introduction
Thank you for purchasing the Therapeutic Mattress Systems, Serenity Mattress Replacement
System manufactured by Accuro Medical Products, LLC.
The Serenity mattress replacement system is quiet, comfortable and easy to use. Serenity is the
first alternating pressure low air loss mattress replacement system specifically designed to address the needs of the hospice patient.
Offering many more comfort settings than other air mattress systems is one way that the Serenity is able to address the complex comfort needs of the hospice patient. Serenity will allow the
user to adjust the comfort setting well below the softest setting of most systems. The system will
also allow the user to make the surface much firmer than most air systems.
With four choices of alternating pressure and four choices of alternating pressure cycle times the
user is able to find a combination that will provide just the right amount of therapy resulting in
superior comfort.
Having four options for direct and indirect low air loss therapy helps control moisture on the
patient’s skin surface. You can adjust the air flow to the level that will control the moisture
while not cooling the patient.
When used in the Therapeutic Ranges, the Serenity is suitable for the care and prevention of all
stages of pressure ulcers as well as patients that have been assessed to be at high risk from the
complications of immobility. This high quality medical product, if properly used and cared for,
will provide many years of trouble free service and outstanding clinical performance for all of
your patients weighing between 70 and 350lbs.
Serenity replaces the standard mattress on most long-term care and home-care bed frames. Its
low friction low shear top cover, interface pressures below capillary closure, and many therapy
options ensure that Serenity will meet your clinical needs.
The wireless remote control allows those patients that are in a clear mental state to make adjustments to the system while lying on the mattress. This makes transfers and comfort adjustments
much easier. It also allows the patient to adjust his/her therapy when appropriate. Care should
be taken to not allow patients whose mental state is such that making these types of adjustments could result in an adverse outcome to have access to the remote control.
Please take the time to read the contents of this manual before using the system, and retain it
for future reference.
4
System Features
CONTROL UNIT FEATURES
• Compact lightweight power unit is quiet with robust features
• Patient weight capacity: 70-350 lbs.
• Individual Patient Weight Settings
• Thirteen Comfort settings
• Four alternating pressure modes
• Four Air Loss therapy modes
• Rapid system inflation
• Max Inflate (auto-firm) function with automatic return to therapy mode
• Auto-deflate
• Patient position sensor optimizes support when the head of the bed is elevated
• Wireless remote control
• Reusable air filter
• Integrated carrying handle for portability
• Crisp, easy to read graphics for intuitive setup and therapy control
• Automatic panel lockout to prevent tampering (Note: This is an optional feature
and must be requested at time of ordering)
• Audible and visual power fail alarm
• Audible alarm mute
• Integrated hanging brackets that automatically adjust to footboards up to 2” thick
• “Quick disconnect” mattress connection allows for rapid setup and CPR deflate at
the control unit
www.accuromedical.com
5
Serenity Support Surface Manual
Mattress Features
• Serenity provides pressure relief therapy to patients from 70 to 350 pounds.
• The easy to clean and ultra low maintenance design makes the system ideal for ownership.
• The eight inch deep air cells allow the system to operate at very low pressures, which
enhances the ability of the system to provide very low interface pressures.
• The durable non-slip vinyl bottom-cover of the mattress protects internal components while
being very easy to clean. Nylon attachment straps ensure the stability of the mattress on the
bed frame.
• The low friction, low shear waterproof top-cover of the mattress prevents contamination of
internal components while providing a shear and friction reducing laying surface.
• Serenity’s Air Loss Top-sheet delivers four levels of both direct and indirect low air loss
providing outstanding moisture management.
• Four Alternating Pressure settings allow you to select the therapy that works best for each
patient.
• CPR deflation in less than 60 seconds.
• Integrated side bolsters that provide a firm side to the mattress that helps to reduce the risk of
patient falls.
• Integrated patient safety rails reduce your patient’s risk of a fall by adding an additional
3 inches of side bolster above the mattress surface. Patient Safety Rails can be inflated or
deflated with the push of a button.
• Automatic pressure equalization system supports the patient in the event of a power failure
for approximately 24 hours.
• Emergency Evacuation handles allow patients to be evacuated on the support surface.
6
System Specifications
Weight:
Control Unit ........................................... 14.5 lbs. (6.6 Kg)
Mattress..................................................... 23.5 lbs. (10.6 Kg)
Max patient weight ................................... 350 lbs. (160 Kg)
Dimensions:
Control Unit............ 16(W) x 12(H) x 7(D) in. Mattress ................... 36(W) x 80(H) x 10(D) in. (40 x 30 x 18 cm)
(91 x 203 x 25 cm)
Electrical Specifications:
USA ........................................ Europe/Australia
115V AC, 60 Hz, .................... 220V/240V AC, 60/50 Hz,
2A .......................................... 2A
Equipment Symbols:
Refer to user manual
SN:
Serial Number
CE Mark:
Environmental Conditions
Operating Conditions: Ambient Temperature:...................................+10°C to +40°C
Relative Humidity: ................ 30% to 75% Non-Condensing
Storage and Shipping Conditions:
Ambient Temperature:................................... -10°C to +40°C
Relative Humidity: ........................................... 10% to 100%
Agency Approvals
UL Classified Medical Equipment UL 60601-1 Can/CSA C22.2 No. 601.1
Risk Class 2G
Note: UL Classification refers to Power Unit only, not complete mattress replacement system.
www.accuromedical.com
7
Serenity Support Surface Manual
Safety Instructions
1.To avoid damaging the Serenity control unit, be sure the power available at your location
matches the power call-out on the rear of the Control Unit (i.e. 110VAC, USA; 220VAC
Europe/Australia)
2.To avoid electric shock, always plug the Serenity Control Unit into a properly grounded
receptacle. If you are uncertain if the outlet you wish to use is grounded have the outlet
inspected by a licensed electrician.
3.Do not spill food or liquids onto the Serenity Control Unit. If a spillage does occur, disconnect it from its power supply and allow at least 24 hours for drying. During the drying
time other arrangements must be made to meet the patient’s clinical needs.
4.Do not insert items into any openings of the Serenity Control Unit. Doing so may cause
fire or electrical shock by shorting internal components.
5.Keep unit away from radiators or other heat sources.
6.Be sure nothing is placed on the power cable and ensure it is not located where it can be
stepped on or tripped over.
7.Do not attempt to service the Control Unit except as explained in this guide. Always follow installation and servicing instructions closely.
WARNING!
Service and repair must only be performed by an
authorized Accuro Medical Products, LLC Technician.
8
Quick Start Instructions
1. Remove the existing mattress from the bed and store it.
2. Unroll the Mattress with the hose connection at the foot of the bed with the nylon side up.
3. Secure the ten (10) straps securely to the bed frame. Being careful not to impede the moving
parts of the bed frame.
4. Hang the Serenity Control Unit on the foot of the bed facing away from the bed. Attach the
hose connector to the Control Unit.
5. Plug in the Control Unit power cord. The yellow “Standby” light will illuminate.
6. If you are going to use the Adjustable Air Loss Therapy Sheet, apply it at this time.
7. If the patient is being transferred from a wheelchair or standing position he/she should be
placed on the bed at this time. If the patient is being transferred onto the surface in a laying
position he/she can be placed on the bed at this time or after the system is fully inflated.
8. Press the Power Key. The Unit starts and the Green “On” light illuminates (mattress can be
inflated with patient on the mattress).
9. Select the appropriate weight range.
10. The rapid inflate cycle will start automatically. The mattress will quickly inflate to the
appropriate pressure. This is based on the weight range selection and the comfort setting.
11. If you want to reposition the patient or to transfer the patient onto the surface in a laying
position press the “Max Inflate” key. The surface will quickly become very firm. The max
inflate cycle will last for 12 minutes or until the “Max Inflate” key is pressed again.
12. If the patient is being transferred onto the bed in a laying position, he/she should be
transferred at this time.
13. Inflate the Patient Safety Rails.
14. Select an Air Loss Therapy Mode.
15. Select an Alternating Pressure Therapy Mode.
16. Allow the unit to operate for several minutes prior to changing the Comfort Adjustment.
INFORMATION
It is recommended that you only change the Comfort Adjustment
one level every few minutes. This allows the system to equalize.
www.accuromedical.com
9
Serenity Support Surface Manual
Detailed Explanation of Functions
10
1
2
3
4
5
11
6
1.
2.
3.
4.
5.
6.
Power
Patient Weight
Alternating Pressure Adjustment
Alternating Pressure Time
Low Air Loss Adjustment
Deflate
7
8
9
7. Max Inflate
8. Patient Safety Rails
9. Alarm Mute
10.Comfort Adjustment Up
11.Comfort Adjustment Down
Keypad Functions
1. Power Button
Turns the Serenity on and off. The ‘Standby’ indicator light glows yellow when the
unit is plugged into the main electrical supply but is not turned on.
• To activate the unit press the power button. The yellow ‘Standby’ light will turn off,
and the green ‘On’ light will illuminate.
• To turn the unit off press the power button. The green “On” light will go off and
the yellow ‘Standby” light will turn on.
2. Patient Weight Button
Used to select patient’s weight.
• Press the ‘Patient Weight’ key. The Weight setting is displayed next to the button.
• Keep pressing the “Patient Weight” key to adjust the weight setting to match the
patient’s weight range.
3. Alternating Pressure Adjustment
This changes the pressure profile of the alternating pressure cycle. When “Off” is
selected the mattress is in static pressure relief mode. In this mode the mattress provides
continuous pressure relief. “Low” indicates a low level alternating pressure. This mode
provides gentle pressure changes on an eight (8) minute cycle. “Medium” indicates a
moderate level of alternating pressure. This mode provides moderate pressure changes
on an eight (8) minute cycle. “High” indicates aggressive alternating pressure therapy,
loading and unloading the tissue on an eight (8) minute cycle.
• Press the ‘Alternating Pressure’ button. The current setting is displayed next to the
button.
• Keep pressing the “Alternating Pressure” key to select the desired alternating pressure profile.
10
4. Alternating Pressure Cycle Time
This function is used to select the length of time between Alternating Pressure Cycles. You
can select between 8, 12, 15 or 20 minutes. The 8 minute cycle is the default Alternating
Pressure Cycle for all settings, and the only cycle time available for the High setting. To
change the setting:
• Press the “Cycle Time” button. The current setting is displayed next to the button.
• Keep pressing the ‘Cycle Time” button to select the desired Alternating Pressure
Cycle Time.
•
CAUTION It is important to keep in mind that certain combinations of
therapy modes will allow the system to operate at pressures that are not providing
pressure relief therapy. This is indicated on both the front of the unit and on
the remote with the “non-therapeutic range” light being illuminated. When
this lamp is illuminated the system is not providing continuous pressure relief
and care should be taken to ensure the patient is frequently turned to avoid the
development of pressure ulcers.
:
5. Low Air Loss Adjustment
This function is used to adjust the Air Loss Therapy. It requires the use of the optional
Air Loss Top-sheet. When the unit powers up the Air Loss feature is set to “Off”. There
are four levels of Air Loss Therapy. Off, Low, Medium, and High. Each level adjusts the
amount of air that is released into the Top-sheet.
• Press the ‘Low Air Loss’ button. The current setting is displayed next to the button.
• Keep pressing the “Low Air Loss” key to select the desired level of Low Air Loss
therapy.
6. Deflate
This function is used to deflate the entire mattress without unplugging the unit or
using the CPR deflate.
• Press the ‘Deflate’ button. The unit will immediately start deflating.
• To re-inflate to the previous settings press the ‘Deflate’ button again.
7. Max Inflate
This function is used to rapidly inflate the mattress or to make the mattress very firm
for in-bed procedures. The system will return to the previous mode settings after 12
minutes.
• Press the ‘Max’ button to activate this feature.
• To turn Max Inflate off press the ‘Max’ button again.
8. Patient Safety Rails
Patient Safety Rails are used as an additional safety feature that will help prevent patients from falling out of bed. They add a full 3 inches to the height of the side bolsters
above the mattress surface. The Patient Safety Rails will help to reduce the need for
side-rails.
• Press the Patient Safety Rail button to inflate the Patient Safety Rails.
• To deflate the Patient Safety Rails press the Patient Safety Rail button.
9. Alarm Mute
Alarm Mute is used to either temporarily or permanently mute the Serenity Alarms.
This is normally done to allow the provider to correct alarm conditions.
• Press the ‘Alarm’ button to mute for 30 minutes. Press and hold for 3 seconds to permanently mute all alarms until the unit is put in “Stand By” mode or the “Alarm Mute”
button is depressed and held for 3 seconds.
www.accuromedical.com
11
Serenity Support Surface Manual
CAUTION: In most circumstances it is not recommended to permanently
mute the Alarms and should only be done when absolutely necessary.
10. & 11. Comfort Adjustment Up & Down Buttons
This is a micro adjustment that fine tunes the softness and firmness of the mattress.
There are thirteen choices, six that are firmer, six that are softer, and one that is no
adjustment. The unit powers up at no adjustment.
• Press either ‘Comfort Adjustment’ button. The current setting is displayed next to
the buttons.
• To increase the firmness press the up button. To decrease the pressure press the
down button.
Lock Out:
The lock out function is turned on or off at the time of manufacturing. If not requested the unit
is built with this function disabled. This function is used to lock the keyboard so that settings
are not accidentally changed. The lock out function automatically activates after 10 minutes of
inactivity. When the Lock Out function is engaged the Power ‘On’ light begins to flash indicating ‘Lockout’ is enabled.
To “Unlock” and make adjustments to the settings press and hold the Power Key
seconds.
for 3
Wireless Remote Control
The Wireless Remote control allows the patient to change:
• Comfort Adjustment
• Low Air Loss Therapy
• Alternating Pressure Therapy
• Alternating Pressure Therapy Cycle Time
• Patient Safety Rails
• Max Firm
• Deflate
Using the Wireless Remote Control
To use the Wireless Remote Control face the back of the remote (the black side) towards the
back of the control unit. Press the buttons on the remote and the change is indicated on the
remote (the adjustment will take a few seconds to go into effect). The patient should wait
for several minutes between comfort adjustments allowing the system to accomplish each
adjustment completely.
The remote will not work when off to the side or in front of the control unit, the remote sensor
is in the back of the control unit.
CAUTION: Care should be taken to not allow patients whose mental state
is such that making decisions about the delivery of the therapy provided by
the Serenity could result in an adverse outcome to have access to the wireless
remote control.
12
Remote Control Buttons
Each of the buttons on the remote function the same way the corresponding buttons do on the
control unit. To make an adjustment press the corresponding button one time. You will see the
LED for that function change. To continue to make additional changes keep pressing the button. Wait after each button press to see the LED change on the remote.
Remote Standby
The Wireless remote will go into standby mode if no buttons are depressed for 10 minutes. All
LEDs will go blank. This is done to conserve battery life. To wake the unit up press any button
one time.
Batteries
The wireless remote uses four AA batteries. It is recommended that you use lithium batteries
for extended battery life. Use of rechargeable batteries is not recommended as they could cause
damage to the wireless remote.
To replace the batteries remove the battery cover on the back of the remote by loosening the
Philips style screw and opening the cover. Remove all four of the old batteries and replace with
new ones.
Other Features
CPR
The hose connection at the Control Unit is marked “CPR”, Disconnect the hose from the Control Unit. Initiate organization’s CPR procedures. To re-inflate the mattress, re-attach the hose
to the Control Unit.
Power Failure System
The Power Failure System that is incorporated into the Serenity Mattress Replacement System
helps to ensure that pressure relief therapy is maintained if power is lost to the unit. In the
event of a power failure the pressure is equalized in the mattress.
During a power failure it is recommended that the patient’s head of the bed be lowered to
the flat position to help keep interface pressures as low as possible. If the patient has medical
conditions that make this unsafe or impractical hand checks should be done every two hours to
ensure the patient is not bottoming out.
To perform a hand check, unzip the top cover from the mattress, slide one hand between the
cushions directly under the patient’s buttocks. You should have at least two fingers width of space
between the buttock and the bottom of the mattress. If your hand check revels that you do not
have adequate space, a turning schedule should be implemented immediately and the patient
should be transferred to another surface as soon as possible.
www.accuromedical.com
13
Serenity Support Surface Manual
CAUTION: If the hose connector is disconnected from the control unit
during a power failure the system will deflate and cannot be re-inflated until
the power is restored.
To ensure the patient is protected you should perform a hand check every four to six hours to
ensure that the system is providing adequate pressure relief. If at any time you determine there
is less than two fingers worth of air under the patients buttock, he/she should be transferred to
another surface as soon as possible and a turning schedule initiated immediately.
Transport
To transport the patient on the mattress with the mattress attached to the bed frame: Press the
power button placing the Unit in Standby. Unplug the Unit (the mattress will hold air during
the transport). Secure the power cord. When the transport is complete, plug the Unit in and
press the power button to enter the Run mode.
To transfer the patient on the mattress to another bed frame: Max inflate the mattress. Inflate
the patient safety rails. Remove the mattress straps from the bed frame. Place the new bed frame
next to the old bed frame (making sure the top of the two bed frames are even. Place the mattress blower in standby. Unplug the mattress blower and place gently between the patients legs.
Make sure all power cables are not tangled up. Pull the mattress across to the new bed frame.
Secure all straps. Hang the blower on the foot of the bed, plug in and turn on.
Emergency Evacuation
To use the Serenity as an evacuation device: Inflate the Patient Safety Rails, Max Inflate the mattress, remove the straps from the bed frame, power unit off, unplug the unit from wall power,
place the control unit on the mattress, use the handles on the sides of the mattress to remove
the mattress from the bed and evacuate the patient.
If necessary you can use gate belts to secure patient to mattress. Care must be taken when positioning the gate belts to prevent injury to the patient. Power should be restored to the Serenity
as soon as possible so that therapy can be resumed.
CAUTION: During evacuation Serenity is not providing pressure relief
therapy. The unit should be plugged in and power restored as soon as
possible.
Ground Pin
The Serenity control unit has a conveniently located ground pin. This pin is used to conduct
ground testing. To use the ground pin plug the control unit into the test device, place the
ground test lead in contact with the ground pin and read the results on the test device.
14
Alarms
The Serenity mattress replacement system monitors several functions and will alarm if the
system detects a condition that is effecting the normal operation of the system. There are both
visual and audible alarms. Please refer to the following explanation of alarm conditions and
follow the instructions provided to correct the condition. If the problem persists contact Accuro
Medical’s customer service department at 1-800-669-4757.
Check Hose Connector
The Check Hose Connector alarm will sound if the system detects a leak. This is determined by
the microprocessor if the system is unable to maintain the expected pressures during operation.
The most common reasons for this alarm condition are:
• The hose connector is not properly attached to the control unit
To correct this alarm condition, disconnect the hose connector for the control unit,
re-align the slot in the connector with the key on the control unit, turn ¼ turn.
• One of the tubing connector “O” rings is damaged or missing in the hose connector.
Disconnect the hose connector from the control unit.
Make sure that there is an “O” ring on each of the four white tubing connectors. Do
this by looking inside the hose connector
If any of the “O” rings are damaged or missing then replace.
CAUTION: Only use “O” rings supplied by Accuro Medical Products, LLC
• If the alarm condition cannot be corrected as outlined above contact Accuro Medical
Products LLC for further advice.
Power Failure
The Power Failure alarm will sound whenever the unit is running and loses power. The alarm
will sound and the power failure light will illuminate. Once power is restored the system will
return to the settings that were selected prior to the power failure.
www.accuromedical.com
15
Serenity Support Surface Manual
Non Therapeutic Range
The Non Therapeutic Range light indicates that the Serenity is operating outside of the commonly accepted pressure relief setting. The Serenity Mattress Replacement System is designed
specifically to provide comfort to the end of life patient and therefore will allow the user to
select settings that are not providing pressure relief. The following are the combinations that
will cause the system to operate outside of the accepted pressure relief ranges:
• Selecting one of the top three Comfort Settings with the Alternating Pressure Setting in the
“Static” mode.
• Selecting one of the top three Comfort Settings along with either the 12, 15 or 20 minutes
Alternating Pressure Cycle Times.
• Selecting one of the bottom three Comfort Setting with the Alternating Pressure Setting
on the Static or Low settings could result in the mattress being so soft the patient could
potentially bottom out. Bottoming out is when there is less than one inch of air under the
patients bottom and the bed frame.
• Selecting the High Alternating Pressure Setting with either the 12, 15 or 20 minute
Alternating Pressure Cycle Times.
CAUTION:
It is important to keep in mind that certain combinations of
therapy modes will allow the system to operate at pressures that are not
providing pressure relief therapy. This is indicated on both the front of
the unit and on the remote with the “non-therapeutic range” light being
illuminated. When this lamp is illuminated the system is not providing
continuous pressure relief and care should be taken to ensure the patient is
frequently turned to avoid the development of pressure ulcers.
16
Cleaning and Maintenance
The Serenity is designed to keep bodily fluids out of the inside of the mattress. Follow facility protocol with respect to: cleaning between patients, cleaning if the surface becomes soiled,
cleaning while in use. Use the same cleaning schedule protocol for the Serenity mattress system
that you use for your standard hospital mattresses.
If at any time you are concerned that bodily fluids have penetrated the exterior of the mattress
contact Accuro Medical Products LLC for further instructions.
WARNING: Disconnect the power cord from the wall outlet before
attempting to replace the filter or clean the control unit.
General Cleaning Guidelines
1.Patient care equipment that does not come in contact with mucous membranes or non-contact skin requires low-level disinfection. Wiping surfaces with a properly prepared detergent/
disinfectant carries out low level disinfecting.
2.Processing of dirty patient care equipment should take place in an area away from clean or
sterile supplies and food preparation areas.
3.Detergent/disinfectants should not be mixed with other germicides or detergents. Using the proper
dilution ensures the most effective killing power of the disinfectant. Always follow the disinfectant
manufacturer’s instructions.
4.Wash hands often and well, including after removal of gloves, paying particular attention to
around and under fingernails and between fingers.
Control Unit Cleaning
Wipe off dust. If necessary, clean the housing exterior with a disinfectant solution or a mild
detergent and a damp cloth. Then wipe dry.
DO NOT HEAT OR STEAM AUTOCLAVE THE CONTROL UNIT.
Filter Cleaning & Maintenance
Check the air filter on the rear of the unit on a monthly basis for the buildup of dust/dirt. If
buildup is visible turn off the blower then remove the filter by grasping the filter and pulling.
Replace with a clean filter. Ensure the replaced filter covers the whole filter region.
Hand-wash the removed filter in warm soapy water and allow to air dry. When dry, store the
filter in a safe place for the next filter maintenance.
WARNING: Do not put a moist filter back in the unit. Do not
operate the unit without a filter. Doing so could result in permanent
damage to the system.
www.accuromedical.com
17
Serenity Support Surface Manual
Mattress Cleaning
The Serenity mattress top cover and bottom covers are both designed to prevent any moisture
from entering the inside of the mattress. Both the top cover and the bottom cover of the mattress can be wiped down with a disinfectant solution or a mild detergent using a damp cloth.
Mattress should be dry before the patient is placed back on the mattress.
If support surface becomes soiled (such as with food, medication, or other non-human waste materials)
and can be easily cleaned:
• Don protective gloves,
• Wipe soiled area using detergent/disinfectant,
• Dry with a clean cloth or towel.
If support surface becomes grossly soiled, or becomes soiled with body substances:
• Don protective gloves, protective apparel, and eye protection device ,
• Remove patient from surface,
• Remove any visible bodily substance from surface and dispose of per facility protocol,
• Using an approved disinfectant cleaner, wipe down the entire mattress. Follow manufactures
guidelines on proper use of disinfectant cleaner,
• Remove and dispose of gloves and protective apparel per facility protocol,
• Return patient to surface.
18
Top-Sheet Cleaning
The Adjustable Air Loss Top-sheet is designed to allow a variety of air loss therapies to the patient and therefore will allow liquids to penetrate the surface. The materials that the Top-sheet
is made out of are antibacterial in nature. The Top-sheet should be replaced or cleaned if it
becomes soiled. If used on an extended period of time the Top-sheet should be replaced or deep
cleaned on a monthly basis.
Light Cleaning of Top-sheet
Light cleaning should be done at least once a week or if the top-sheet becomes soiled (such as with food,
medication, or other non-human waste materials) and can be easily cleaned:
• Don protective gloves,
• Wipe soiled area using detergent/disinfectant,
• Turn Air Loss therapy on high and allow Top-sheet to dry completely before returning the
patient to the mattress.
Deep Cleaning of Top-sheet
If support surface becomes grossly soiled, or becomes soiled with body substances:
•
•
•
•
•
•
•
•
Don protective gloves, protective apparel, and eye protection device,
Remove patient from surface,
Remove any visible bodily substance from surface and dispose of per facility protocol,
Remove the top-sheet from the mattress,
Remove the hose from the top-sheet,
Place the top-sheet in a standard household clothes washer,
Wash with warm water, standard laundry soap, and one cup of bleach,
Either air dry or dry in standard household clothes dryer on NO HEAT.
www.accuromedical.com
19
Serenity Support Surface Manual
Between Patients Cleaning Procedure
Don protective gloves, protective apparel, and eye protection device
Prepare detergent/disinfectant (reg. by EPA as hospital disinfectant) solution according to
manufacturer’s instructions for correct use-dilution.
Mattress
• remove any visible bodily substance from surface and dispose of per facility protocol,
• remove Top-sheet from mattress,
• with the system inflated, thoroughly wipe down the entire mattress surface following
detergent/disinfectant manufacturer’s instructions. Normally there is no need to clean
internal components as the outer cover is water proof,
• allow all components to air dry,
• wrap mattress in plastic and return to storage area.
Control Unit
• Thoroughly wipe down outside of control unit and allow to air dry,
• remove the filter by grasping the filter and pulling,
• replace with a clean filter. Ensure the replaced filter covers the whole filter region
• cover control unit with plastic and return to storage area
Top-sheet
• remove the hose from the Top-sheet,
• place the Top-sheet in a standard household clothes washer,
• wash with warm water, standard laundry soap, and 1 cup of bleach,
• either air dry or dry in standard household clothes dryer on NO HEAT
20
Storage and Care
Control Unit
After disinfecting the unit as outlined above, Accuro Medical recommends that it be placed in a
plastic bag for dust resistance and then stored in the Mattress Cart (or other clean area used to
store electromechanical medical devices).
Support Surface
After disinfecting the mattress gently roll it up, use the attached straps to secure it. Accuro
Medical recommends that it be placed in a plastic bag for dust resistance and then stored in the
Mattress Cart (or other clean area used to store electromechanical medical devices).
www.accuromedical.com
21
Serenity Support Surface Manual
Notes
____________________________________________
____________________________________________
____________________________________________
____________________________________________
____________________________________________
____________________________________________
____________________________________________
____________________________________________
____________________________________________
____________________________________________
____________________________________________
____________________________________________
____________________________________________
____________________________________________
____________________________________________
____________________________________________
____________________________________________
22
Warranty
This warranty is extended only to the original purchaser and does not affect statutory rights.
Accuro Medical Products LLC, (the warrantor) warrants the Mattress Components (see below)
to be free from defects in materials and workmanship for a period of three (3) years covering
all materials and labor costs. If within such warranty period the product shall be proven to the
warrantor’s reasonable satisfaction to be defective, it shall be repaired or replaced, at warrantor’s option; warrantor’s sole obligation, and your exclusive remedy under this warranty being
limited to such repair or replacement.
Mattress Components – Mattress base, air sacks, hosing and mattress covers are warranted for
three years from the original date of purchase. In the event of a defect in materials or workmanship the items will be replaced with new soft goods in exchange for the defective product.
Top -sheet – Top-sheets are warranted for a period of ninety (90) days from the original date of
purchase. In the event of a defect in materials or workmanship the items will be replaced with
new Top-sheet in exchange for the defective product.
If the product is deemed by the warrantor not to be covered under warranty a quote will be
sent to you for your approval before work will begin. If you do not want the work performed
a minimum charge of $45 will be charged and your product will be sent back C.O.D. using the
shipper of your choice.
Warranty service in the United States can be obtained during the warranty period from Accuro
Medical Products LLC. Please call 800-669-4757 to obtain a return authorization number (RA
number).
No product will be accepted for return without an RA number.
Shipping – The purchaser is responsible for shipping costs incurred returning defective product
to Accuro Medical Products LLC. Accuro Medical Products LLC will pay all shipping costs incurred in returning repaired or replacement parts to the purchaser.
Limits and Exclusions
There are no express warranties except as listed above.
The warrantor does not warranty the merchantability or fitness of this product for a particular
purpose.
THIS WARRANTY DOES NOT COVER NORMAL WEAR AND TEAR OR DAMAGE WHICH
OCCURS IN SHIPMENT OR FAILURES WHICH ARE CAUSED BY PRODUCTS NOT SUPPLIED
BY THE WARRANTOR OR FAILURES WHICH RESULT FROM ACCIDENT, MISUSE, ABUSE,
NEGLECT, MISHANDLING, MISAPPLICATION, ALTERATION, FAULTY INSTALLATION, MODIFICATION, OR SERVICE BY ANYONE OTHER THAN THE WARRANTOR OR DAMAGE THAT IS
ATTRIBUTABLE TO ACTS OF GOD.THE WARRANTOR SHALL NOT BE LIABLE FOR INCIDENTAL
OR CONSEQUENTIAL DAMAGES RESULTING FROM THE USE OF THIS PRODUCT, OR ARISING
OUT OF ANY BREACH OF THIS WARRANTY. ALL EXPRESS AND IMPLIED WARRANTIES ARE
LIMITED TO THE APPLICABLE WARRANTY PERIOD SET FORTH ABOVE.
www.accuromedical.com
23
Accuro Medical Products, LLC
2854 Hitchcock Avenue
Downers Grove, IL 60515
Phone: 800.669.4757
www.accuromedical.com
6/12 Rev C UPC 84635400539