1
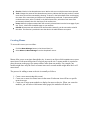
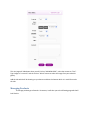
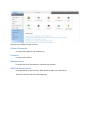
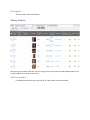
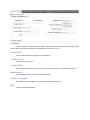
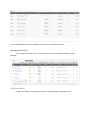
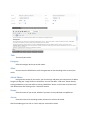
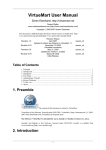
Contents
Admin Panel: ........................................................................................................................................... 3
Dashboard: .............................................................................................................................................. 3
Main Menu:............................................................................................................................................. 4
Column Headers .................................................................................................................................. 5
Toolbar ................................................................................................................................................ 6
Creating Menus ....................................................................................................................................... 7
Column Headers .................................................................................................................................. 8
List Filters ............................................................................................................................................ 8
Toolbar ................................................................................................................................................ 9
Managing Slideshow................................................................................................................................ 9
Add new slide: ................................................................................................................................... 10
Managing Products:............................................................................................................................... 11
Product Categories: ........................................................................................................................... 12
Products: ........................................................................................................................................... 12
Manufacturers: .................................................................................................................................. 12
Add New Manufacturer: .................................................................................................................... 12
Manufacturer Name: ......................................................................................................................... 13
Published:.......................................................................................................................................... 13
Manufacturer Category Name: .......................................................................................................... 13
Manufacturer Email: .......................................................................................................................... 13
Description: ....................................................................................................................................... 14
Adding Product:..................................................................................................................................... 14
Add New Product: ............................................................................................................................. 14
Published:.......................................................................................................................................... 15
Product SKU: ..................................................................................................................................... 15
Product Name: .................................................................................................................................. 15
Product Alias: .................................................................................................................................... 15
Manufacturer: ................................................................................................................................... 15
Product Categories: ........................................................................................................................... 15
URL:................................................................................................................................................... 15
Cost Price: ......................................................................................................................................... 16
Base Price: ......................................................................................................................................... 16
Product Description: .......................................................................................................................... 16
Short Description: .............................................................................................................................. 16
Product Description: .......................................................................................................................... 16
Product Images:................................................................................................................................. 16
Custom Fields: ................................................................................................................................... 16
Managing Articles:................................................................................................................................. 17
Add New Article:................................................................................................................................ 17
Title: .................................................................................................................................................. 18
Category: ........................................................................................................................................... 18
Alias: ................................................................................................................................................. 18
Article Editor: .................................................................................................................................... 18
Status: ............................................................................................................................................... 18
Access: .............................................................................................................................................. 18
Admin Panel:
To access admin panel you need to type “administrator” after your site link.
www.sabrinazcollections.co.uk/administrator/
Fill the “Username” and “Password” field with the required information given to you.
Dashboard:
After you are logged in, it will take you to the following page.
This is your Dashboard; you can manage different aspects of your site here.
Main Menu:
To access the main menu go to Menus -> Main Menu.
This is the part where all the menus are contained.
Column Headers
Checkbox. Check this box to select one or more items. To select all items, check the box
in the column heading. After one or more boxes are checked, click a toolbar button to
take an action on the selected item or items. Many toolbar actions, such as Publish and
Unpublish, can work with multiple items. Others, such as Edit, only work on one item at
a time. If multiple items are checked and you press Edit, the first item will be opened for
editing.
Title. The name of the item. For a Menu Item, the Title will display in the Menu. For an
Article or Category, the Title may optionally be displayed on the web page. This entry is
required. You can open the item for editing by clicking on the Title.
Published. Whether the item has been published or not. You can change the Published
state by clicking on the icon in this column.
Ordering. The order in which to display items. You can sort the list by order number by
clicking on the Ordering label in the column heading. If the list is sorted by this column,
you can change the order by clicking the arrows or by entering the sequential order and
clicking the 'Save Order' icon. This is shown in the screen below.
Note that the ordering is only defined within a single category. For this reason, it is
easier to re-order the list if you use the Category filter to select one category. Note that
the display order on a page can often be overridden the 'Advanced Options' section of
each Menu Item.
Access. The viewing level access for this item.
Menu Item Type. The Menu Item Type selected when this menu item was created. This can be
one of the core menu item types or a menu item type provided by an installed extension.
Home. The yellow star icon designates which menu item is the current Home Page. Clicking on
an empty Star icon will designate that menu item as the new Home Page.
Language. Item language.
ID. This is a unique identification number for this item assigned automatically by Joomla!. It is
used to identify the item internally, and you cannot change this number. When creating a new
item, this field displays 0 until you save the new entry, at which point a new ID is assigned to it.
Toolbar
At the top right you will see the toolbar:
The functions are:
New. Opens the editing screen to create a new menu item.
Edit. Opens the editing screen for the selected menu item. If more than one menu item is
selected (where applicable), only the first menu item will be opened. The editing screen can also
be opened by clicking on the Title or Name of the menu item.
Publish. Makes the selected menu items available to visitors to your website.
Unpublish. Makes the selected menu items unavailable to visitors to your website.
Check In. Checks-in the selected menu items. Works with one or multiple menu items selected.
Trash. Changes the status of the selected menu items to indicate that they are trashed. Trashed
menu items can still be recovered by selecting "Trashed" in the Select Status filter and changing
the status of the menu items to Published or Unpublished as preferred. To permanently delete
trashed menu items, select "Trashed" in the Select Status filter, select the menu items to be
permanently deleted, then click the Empty Trash toolbar icon.
Home. Makes the page associated with the currently selected menu item the home page of your
site. That is, it becomes the default page on your website.
Rebuild. Reconstructs and refreshes the relevant table. Normally, you do not need to rebuild
this table. This function is provided in case the data in the table becomes corrupted.
Creating Menus
To access this screen you can either:
Click the Menu Manager button in the Control Panel, or
Select Menus → Menu Manager from the drop-down menus.
Menus allow a user to navigate through the site. A menu is an object which contains one or more
menu items. Each menu item points to a logical page on the site. A menu module is required to
place the menu on the page. One menu can have more than one module. For example, one
module might show only the first level menu items and a second module might show the level 2
menu items.
The process for adding a menu to the site is normally as follows:
1. Create a new menu (using this screen).
2. Create one or more new menu items on the menu. Each menu item will have a specific
menu item type.
3. Create one or more menu modules to display the menu on the site. When you create the
modules, you will select which menu items (pages) the modules will show on.
Column Headers
Checkbox. Check this box to select one or more items. To select all items, check the box in the
column heading. After one or more boxes are checked, click a toolbar button to take an action
on the selected item or items. Many toolbar actions, such as Publish and Unpublish, can work
with multiple items. Others, such as Edit, only work on one item at a time. If multiple items are
checked and you press Edit, the first item will be opened for editing.
Title. The name of the menu.
# Published. Number of published menu items in this menu.
# Unpublished. Number of unpublished menu items in this menu.
# Trashed. Number of trashed menu items in this menu.
Modules Linked to the Menu. Lists any menu modules associated with the menu. The column
shows the module's name, access level, and position on template.
ID. This is a unique identification number for this item assigned automatically by Joomla!. It is
used to identify the item internally, and you cannot change this number. When creating a new
item, this field displays 0 until you save the new entry, at which point a new ID is assigned to it.
List Filters
Page Controls. When the number of items is more than one page, you will see a page control
bar as shown below.
o
o
o
o
o
Display #: Select the number of items to show on one page.
Start: Click to go to the first page.
Prev: Click to go to the previous page.
Page numbers: Click to go to the desired page.
Next: Click to go to the next page.
o
End: Click to go to the last page.
Toolbar
At the top right you will see the toolbar:
The functions are:
New. Opens the editing screen to create a new menu.
Edit. Opens the editing screen for the selected menu. If more than one menu is selected (where
applicable), only the first menu will be opened. The editing screen can also be opened by
clicking on the Title or Name of the menu.
Delete. Deletes the selected menus. Works with one or multiple menus selected. Deleting a
menu also deletes all the menu items it contains and any associated menu modules. On clicking
Delete you will be asked to confirm that you want to delete the selected menus. Clicking OK
button will delete the menus. Click Cancel to abort the deletion.
Rebuild. Reconstructs and refreshes the menu table. Normally, you do not need to rebuild this
table. This function is provided in case the data in the table becomes corrupted.
Options. Opens the Options window where settings such as default parameters or permissions
can be edited. See Menus Configuration.
Managing Slideshow
To access the slideshow manager go to Extend -> Module Manager->Main Banner.
In the Main Banner on the left panel you will see multiple tabs, in “Your Slides”, you will be able to see
the banners that are being used on the main page of your website.
Add new slide:
To add a new slide for you site, click on “ADD NEW SLIDE”.
This mini page will slide down when you will click on “ADD NEW SLIDE”, select the content to “Text”.
Type image to “no stretch” and the click on “Select” button to select the image from your website’s
gallery.
Add the title which will be showing on your banner and then the Content which is in small font under
the title.
Managing Products:
To manage products go to Extend-> Virtuemart, It will take you to the following page which will
look like this.
Here you can see different type of menus.
Product Categories:
It contains the categories your products use.
Products:
It contains the products.
Manufacturers:
It contains the list of manufacturers related to your products.
Add New Manufacturer:
In the Manufacturer option click on “New” button to add a new manufacturer.
After that it will take you to the following page.
Manufacturer Name:
Name of manufacturer.
Published:
Select the status of manufacturer.
Manufacturer Category Name:
Select the category in which your manufacturer lies.
Manufacturer Email:
The Email of Manufacturer.
Description:
The Description of the manufacturer.
Adding Product:
After clicking on Products it will take you to this page, here you will see the already added products. You
can edit products by clicking on their name.
Add New Product:
For adding a new product you need to click on “New” button on the top toolbar.
Published:
Check or uncheck according what you want, if you want this product to be published then check
mark it and if you want this product to be unpublished then leave it as it is.
Product SKU:
This is a unique code that you give to your products.
Product Name:
The name of your product.
Product Alias:
This is unique code that is shown in the link when someone opens your product on your site.
Manufacturer:
Select the Manufacturer from the drop-down menu.
Product Categories:
The category of your product, you can select multiple categories here.
URL:
You can leave this field blank.
Cost Price:
Your purchase amount. (It will not be visible on your site).
Base Price:
The amount in which you want to sell this product.
Product Description:
In the second tab on the top you will see “Product Description”. Here you will be able to add the
description related to your product.
Short Description:
Write a short description of your product, it will be short and simple.
Product Description:
It will be as long as you want or as short as you want, just the way you want it to be.
Product Images:
In this tab you will be able to add images for your product. You can add as many images as you
want. To add an image you need to scroll down until you will see a “Browse” button. Click on that
button and then browse for images, click on the “upload” radio button and the click “Save”.
Custom Fields:
In this tab you can add other custom fields for your product. As you can see in this image there
are the sizes added as custom fields.
You can add different price for the different sizes. Or you can also add colors here.
Managing Articles:
You can add or edit articles here. To access the Articles you need to go to Articles-> Article
Manager.
Add New Article:
To add a new article you need to go to Articles-> Article Manager-> Add New Article.
Title:
The title of your Article.
Category:
Select the category where you article relates.
Alias:
You can leave this field blank as it will auto generate an alias according to the name of your
article.
Article Editor:
Here goes the content of your article, you can also copy and paste your content here or add an
image by clicking the “Image” button in the bottom. You can also add a “read more” button here by
staying somewhere in your text and then clicking “Read More” button. It will create a link where the
user will be taken after clicking on the “read more” button.
Status:
Select the status of your article, whether if you want it to be published or unpublished.
Access:
Select the access level according to who you want this article to be visible.
After finish editing you can click on “Save” and your article will be saved.