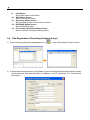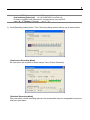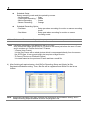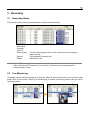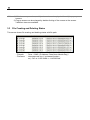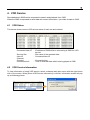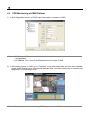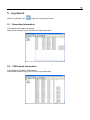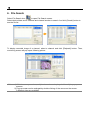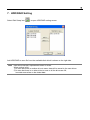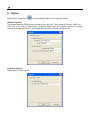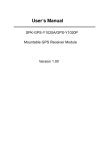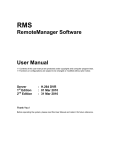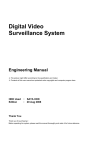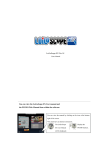
1
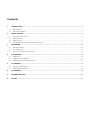
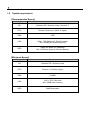
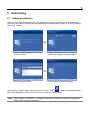
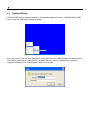
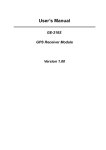
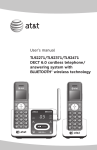
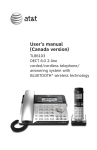
SMS NVR Software User Manual User Manual ※ Contents of this user manual are protected under copyrights and computer program laws. ※ Functions or configurations are subject to be changed or modified without prior notice. 1st Edition : 10 Jun 2009 2nd Edition : 01 May 2011 Thank You Before operating the system, please read this User Manual thoroughly and retain it for future reference. Contents 1. INTRODUCTION ...................................................................................................................................................................... 2 1.1 1.2 2. KEY FEATURES ........................................................................................................................................................................ 2 SYSTEM REQUIREMENT ........................................................................................................................................................... 3 INITIAL SETTING .................................................................................................................................................................... 4 2.1 2.2 2.3 2.4 3. SOFTWARE INSTALLATION ....................................................................................................................................................... 4 SYSTEM STARTUP .................................................................................................................................................................... 5 SCREEN LAYOUT ..................................................................................................................................................................... 6 SITE REGISTRATION (RECORDING SCHEDULE SETUP) ............................................................................................................. 7 RECORDING .......................................................................................................................................................................... 10 3.1 3.2 3.3 4. RECORDING STATUS .............................................................................................................................................................. 10 LIVE MONITORING ................................................................................................................................................................ 10 FILE CREATING AND DELETING STATUS..................................................................................................................................11 VOD SERVICE ....................................................................................................................................................................... 12 4.1 4.2 4.3 5. VOD STATUS ......................................................................................................................................................................... 12 VOD SERVICE INFORMATION ................................................................................................................................................ 12 VOD MONITORING AT CMS PLATFORM ................................................................................................................................ 13 LOG SEARCH ........................................................................................................................................................................ 14 5.1 5.2 RECORDING INFORMATION .................................................................................................................................................... 14 VOD SEARCH INFORMATION ................................................................................................................................................. 14 6. FILE SEARCH ........................................................................................................................................................................ 15 7. HDD/RAID SETTING ............................................................................................................................................................. 16 8. OPTION ................................................................................................................................................................................... 17 2 1. Introduction SMS is a “Windows-Based NVR Software” and can be provided to customer as free (SMS-Lite only). User just installs this software at normal P/C workstation and can record video & audio data from multiple IP products such as video server & IP camera over network. Besides, SMS is perfectly compatible to CMS software and hence user can not only get live monitoring but also search & playback the recorded data at SMS by approaching from CMS server through network. To say again, SMS server acts as "Master Storage Center" while CMS server does as "Control Center" for live monitoring & VOD playback & alarm control & checking system status, etc... 1.1 Key Features Simultaneous Recording up to 16 IP Devices SMS can simultaneously record up to 16 IP devices over network. Moreover, it provides pre & post event recording by sensor-activation. Perfect Compatibility with CMS SMS is perfectly compatible to CMS since both are operated under unique network platform. SMS provides its data when requested by CMS, and thus user can remotely search and playback the data on the SMS master storage server just on CMS platform. Live Monitoring of Recording Status If user wants to make it sure to view recording status to avoid any data loss, pop-up screen (image player) can be shown by just one mouse click. Quick Search Function SMS supports quick search function to enable user to instantly search and playback the desired data. Storage Media Management Multi-HDDs management is one of the strong features of SMS. By using this capability, SMS can effectively handle massive volume of video & audio data and achieve long-term data storage. Note There are two kinds of version in SMS, SMS-Lite & SMS-Pro. This manual describes the operational details for SMS-Lite only. 3 1.2 System requirement [Recommended Specs] Category Content OS Windows XP / Windows Vista / Windows 7 CPU Pentium Dual core 1.8GHz or Higher RAM 1GB VGA 1024 × 768, 24bit color, DirectX support Min. 256MB (No shared memory) HDD 20MB free space for installation Min. 10GB free space for Remote Backup [Minimum Specs] Category Content OS Windows XP / Windows Vista CPU Pentium Ⅳ 2GHzor Higher RAM 512MB VGA 1024 × 768, 24bit color Min. 64MB video memory HDD 20MB free space 4 2. Initial Setting 2.1 Software Installation User can find “SMSSetpup.exe” file in CD and click it to start the installation of SMS software. User can easily set up this program by InstallShield Wizard as below, which is for user to simply click “next” buttons. * Press the [Next] button to move to the next screen. * Press [Change] button if you want to Install the program in another folder. * Select program folder. * Click [Install] to begin installation. Upon clicking “Finish” button, user can find the icon of “SMS” created on desktop window. After initial installation, user can click this icon to execute SMS software. Note SMS program is located in “C:\Program Files\SMS” as default unless user changes its folder during program installation. 5 2.2 System Startup Click the SMS icon on desktop window or “Storage Management Server” of MS Windows’ “Start” menu to get the SMS login window as below. Input the correct “User ID” and “Password” in the login box, then, SMS software will be executed. The default password for “Administrator” is none, leaving it empty in password. If you want, create new password for “Administrator” when the first login. 6 2.3 Screen Layout 1 2 3 4 5 6 7 8 9 10 11 12 13 1) 2) 3) 4) 5) 6) 7) 8) Recording Schedule Management Site registration & Recording schedule setting Disk Setup HDD/RAID setting Option Setup Network setting and Log save path setting Disconnection of File Service Disconnection of all VOD services to CMS Disconnection of each VOD service can be done by clicking the right button of the mouse, Stop Recording Stop recording of all recording channels Stop recording of each channel can be done by clicking the right button of the mouse. View Server Condition Return to main screen from log viewer screen Log Search Go to log viewer screen File Search Open file search screen 7 9) Information Show SMS version information 10) VOD Status Screen Show VOD service status 11) Recording Status Screen Show recording status of each site & channel 12) HDD/RAID Status Screen Show HDD/RAID status 13) File Creating & Deleting Status Screen Show current file creating & deleting status 2.4 Site Registration (Recording Schedule Setup) 1) Select Recording Schedule Management icon to open Recording Schedule screen. 2) In Recording Schedule screen, click [Add] to open Site Registration/Schedule Setting screen as below picture. And input Site Name, IP Address, User ID, Password, Port, Channel and Description. 8 Note In case of DDNS connection, input URL as per following format. [mac address].[ddns link] : ex.) 001c84010021.cctv-link.net In order to register multi-channels for a single device such as DVR, input “X – Y” format in Channel : ex.) 1 - 16 3) Click [Recording Setup] button. Then, Recording Setup screen will pop up as shown below. [Continuous Recording Mode] No other items are required to select except “Only I-Frame Recording” [Schedule Recording Mode] User can select various recording options such as schedule setup for designated time period and pre & post alarm. 9 Schedule Setup Select recording mode and time period by mouse. - No Recording : Gray - Continuous Recording : Yellow - Motion Recording : Green - Sensor Recording : Orange Schedule Recording Option - Pre Alarm : Setup pre-alarm recording for motion or sensor recording mode. - Post Alarm : Setup post-alarm recording for motion or sensor recording mode. Note Motion and Sensor recording requires proper setup at the correspondent device. Note Pre Alarm Recording is set based on the no. of GOP. GOP means the frame group from an I-Frame to the frame just before the next I-Frame and it contains an I-Frame and a few P-Frames. * I-Frame (Intra Frame) It is the Key Frame with a whole picture which is compressed directly from the source like JPEG type. It has a good quality but requires a large file size. * P-Frame (Previous or Predicted Frame) It is made based on the previous I-Frame and has a small file. 4) After finishing all required setup, click [OK] at Recording Setup and [Apply] at Site Registration/Schedule setting. Then, the site will be registered and shown on the list as follows. Note SMS starts recording right after finishing site registration and schedule setting. And it keeps recording as per schedule as far as the program runs. 10 3. Recording 3.1 Recording Status This screen shows current recording status of each site and channel. - Site Name Channel User ID Record Start : The first recording start time of the channel since the program starts running. - Record : The progress of creating file. - Status : Network bit rate. Note Record (Percentage) Each recording file is created on 1 hour base. Therefore, the percentage will be renewed every 1 hour. 3.2 Live Monitoring To display current recording image of a channel, select a channel and open menu with the right button click of the mouse. When [Live Monitoring] is clicked, monitoring screen will pop up as following picture. 11 Note 1) With the same procedure, multiple channels can be played with multiple pop-up screens. 2) Pop-up screen can be enlarged by double clicking of the mouse on the screen. 3 different sizes are available. 3.3 File Creating and Deleting Status This screen shows file creating and deleting status with file path. - File path - File name : Drive :\ SMS \ IP Address \ Date(Year+Month+Day) \ : hhmmssxx.ssf (xx+1 is channel number) ex.) Ch 3 at 11:45:32AM => 11453202.ssf 12 4. VOD Service Recorded data in SMS can be requested to search and playback from CMS. When the SMS is requested to send data with correct information, it provides its data to CMS. 4.1 VOD Status This screen shows current VOD service status of each site and channel. - Connected User IP - Service Site User ID Channel Connect Connection Info. : IP address of CMS which is connecting to SMS for VOD service : Site name of the recorded data : Connected User ID : Connected time. : Time of recorded data which is being played at CMS. 4.2 VOD Service Information To view Information of each VOD service, select a channel and open menu with the right button click of the mouse. When [Show VOD Service Information] is clicked, information screen will pop up as following picture. 13 4.3 VOD Monitoring at CMS Platform 1) In Site Registration screen of CMS, input information to connect to SMS. Note 1) Site Name & Channel are for the site (device) of the recorded data to search and playback. 2) IP Address, Port, User ID and Password are for those of SMS. 2) In Monitoring screen of CMS, go to “Playback” mode and select date and time with calendar and/or Intelli-Search bar to find desired recorded data. And then, select site or channel and drag/drop it to monitoring screen. Note For the detail information of using CMS, please refer to CMS User Manual. 14 5. Log Search Select Log Search icon to get into Log Viewer screen 5.1 Recording Information This shows log list about recording. Select date to search log in the list of the right side panel. 5.2 VOD Search Information This shows log list about VOD service. Select date to search log in the list of the right side panel 15 6. File Search Select File Search icon to open File Search screen. Select desired date and IP address and channel number to search. And click [Search] button to see the file list. To display recorded image of a channel, select a channel and click [Playback] button. Then, monitoring screen will pop up as following picture. Note 1) With the same procedure, multiple channels can be played with multiple pop-up screens. 2) Pop-up screen can be enlarged by double clicking of the mouse on the screen. 3 different sizes are available. 16 7. HDD/RAID Setting Select Disk Setup icon to open HDD/RAID setting screen Add HDD/RAID to save file from the available disk which is shown on the right side. Note Data will be saved in alphabetical order of drives. When a drive is full, 1) In case that there is another drive to save, data will be saved to the next drives. 2) In case that there is no other drive to save or all the drives are full, new data overwrites on the oldest data. 17 8. Option Select Option Setup icon to setup Network Option and Log Save Option. [Network Option] The domain name of DDNS server is fixed as “cctv-link.net”. Port number is fixed as 10000, too. VOD Port is for helping classification of system when there are multiple systems in a same network circumstances and it is connected from the outer network circumstances. [Log Save Option] Select folder to save log file.