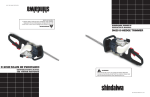
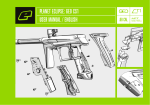
1
1
Contents
s This Operator’s and User’s Manual is in English.
s It contains important safety guidelines
and Instructions.
s Should you be unsure at any stage, or unable
to understand the contents within this manual
you must seek expert advice.
General Warnings
2
Parameters
Switching on your ANGEL
3
Valve dwell
Turning off your ANGEL
3
De-Bounce
making your ANGEL safe
3
Paint type
Navigation button
4
MROF eyes on/off
12
Battery replacement
4
Breakout
12
Switching ANGEL eyes on/off
5
Ramp
OPTO board
5
Shot % filtering
13
Macro line hose
5
Anti bolt stick
13
Propellant air/nitrogen supply
6
Software version
13
Adjusting/removing the ASA
6
Factory reset
13
Installing an air/nitrogen system
6
Game timer alarm
14
Bolt removal and rotor breech
7
Tournament lock
14
Velocity adjustment
7
General care & cleaning
15
Mini reg removal & assembly
16
OLED menu
s Le mode d’emploi est en Anglais.
s Il contient des instructions et mesures
de sécurité importantes.
s En cas de doute, ou s’il vous est impossible
de comprendre le contenu du monde d’emploi,
demandez conseil à un expert.
s Este manual de (operarios y) usarios està
en Inglés.
s Contiene importantes normas de seguridad
e instrucciones.
s Si no esta seguro de algún punto o no entiende
los contenidos de este manual debe conultar
con un experto.
s Diese Bedienungs und Benutzeranleitung
ist in Englisch.
s Sie enthält wichtige herheitsrichtlinien
und -bestimmungen.
s Sollten Sie sich in irgendeiner Weise unsicher
sein, oder den Inhalt dieses Heftes nicht
verstehen, lassen Sie siche bitte von einem
Experten beraten.
8-9
11
11-12
12
12-13
Rubber finger detent replacement
17
10
Angel eyes sensor cleaning
17
NPPL
10
Eye ribbon removal
18
PSP
10
LPR pressure test
19
MILLENNIUM
10
LPR adjustment
20
XBall/NXL
10
LPR assembly
20
CFOA
10
LPR spool removal
20
Full Auto
10
LPR removal
21
Modes
Semi Auto
Demo
Exhaust valve Stem/guide removal
22
11
Ram removal
23
Breakout
11
trigger adjustment & removal
24
Soft breakout
11
Useful conversions
Hard breakout
11
Fault finding
Ramp
11
Warranty - EEC/ROW
Custom Semi
10-11
25
25-26
27
Warranty - USA/Canada
Warranty card
28
inside Back cover
2
ADHERE STRICTLY TO THESE AND ALL OTHER
SAFETY INSTRUCTIONS AND GUIDELINES
s4HE!.'%,ISNOTATOY
s#ARELESSORIMPROPERUSEINCLUDINGFAILURETOFOLLOWINSTRUCTIONS
and warnings within this Operator Manual and attached to the
!.'%,COULDCAUSEDEATHORSERIOUSINJURY
s$ONOTREMOVEORDEFACEANYWARNINGSATTACHEDTOTHE!.'%,
s0AINTBALLINDUSTRYSTANDARDEYEFACEEARANDHEADPROTECTION
designed specifically to stop paintballs and meeting ASTM
standard F1776 (USA) or CE standard (Europe) must be worn
by user and any person within range.
s9OUMUSTBEATLEASTYEARSOFAGETOPURCHASETHE!.'%,
s0ERSONSUNDERYEARSOFAGEMUSTHAVEADULTSUPERVISION
WHENUSINGORHANDLINGTHE!.'%,
s!LWAYSFOLLOWINSTRUCTIONSWARNINGSANDGUIDELINESGIVENWITH
ANYlRSTSTAGEREGULATORYOUUSEWITHTHE!.'%,
s$ONOTlRETHE!.'%,WITHTHEBREECHRELEASEKNOBINTHE
unlocked position.
s.EVERLOOKINTOTHEBARRELORBREECHAREAOFTHE!.'%,WHILST
THE!.'%,ISSWITCHEDONANDABLETOlRE
s.EVERPUTYOURlNGERORANYFOREIGNOBJECTSINTOTHEBREECHOR
PAINTBALLFEEDTUBEOFTHE!.'%,
s.EVERALLOWPRESSURISEDGASTOCOMEINTOCONTACTWITHANYPART
of your body.
s!LWAYSSWITCHOFFTHE!.'%,WHENNOTINUSE
s/BSERVEALLLOCALANDNATIONALLAWSREGULATIONSANDGUIDELINES
s!LWAYSlTABARRELBLOCKINGDEVICETOYOUR!.'%,WHENNOT
in use on the field of play.
s5SEONLYONPROFESSIONALPAINTBALLlELDSWHERECODESOFSAFETY
are strictly enforced.
s!LWAYSREMOVEALLPAINTBALLSFROMTHE!.'%,WHENNOTINUSE
on the field of play.
s5SECALIBREPAINTBALLSONLY
s!LWAYSREMOVETHElRSTSTAGEREGULATORANDRELIEVEALLRESIDUAL
GASPRESSUREFROMTHE!.'%,BEFOREDISASSEMBLY
s+EEPTHE!.'%,SWITCHEDOFFUNTILREADYTOSHOOT
s4REATEVERY!.'%,ASIFITISLOADED
s.EVERPOINTTHE!.'%,ATANYTHINGYOUDONOTINTENDTOSHOOT
s$ONOTSHOOTATPERSONSATCLOSERANGE
s$ONOTSHOOTATFRAGILEOBJECTSSUCHASWINDOWS
s!LWAYSMEASUREYOUR!.'%,SVELOCITYBEFOREPLAYINGPAINTBALL
using a suitable chronograph.
s.EVERSHOOTATVELOCITIESINEXCESSOFFEETMETERS
per second, or at velocities greater than local or national laws
allow.
s$ONOTlRETHE!.'%,WITHTHEBREECHOPENORWITHOUTTHEBOLT
in the breech, as high pressure gas will be emitted.
s5SECOMPRESSEDAIRNITROGENGASONLY$ONOTUSE#/
s4HE!.'%,CANHOLDASMALLRESIDUALCHARGEOFGASTYPICALLY
SHOTSWITHTHElRSTSTAGEREGULATORREMOVED!LWAYS
DISCHARGETHE!.'%,INASAFEDIRECTIONTORELIEVETHISRESIDUAL
gas pressure.
s!LWAYSREMOVElRSTSTAGEREGULATORANDALLRESIDUALGAS
PRESSUREFROMTHE!.'%,FORTRANSPORTANDSTORAGE
s!LWAYSFOLLOWWARNINGSANDGUIDELINESGIVENWITHYOURlRST
stage regulator for safe transport and storage.
s!LWAYSSTORETHE!.'%,INASECUREPLACE
s4()3/0%2!4/23-!.5!,-534!,7!93!##/-0!.94(%
02/$5#4).4(%%6%.4/&2%3!,%/2.%7/7.%23()0
s3(/5,$9/5"%5.352%!4!.934!'%9/5-534
3%%+%80%24!$6)#%
READ ALL WARNINGS BEFORE ATTEMPTING ANY WORK ON YOUR ANGEL. SHOULD YOU BE UNSURE AT ANY STAGE YOU MUST SEEK EXPERT ADVICE.
3
1
0USHHOLD
navigation
button for
UPTOSECS
ADHERE STRICTLY TO THESE
AND ALL OTHER SAFETY
INSTRUCTIONS AND GUIDELINES
.'%,IS,)6%ANDCAPABLEOFlRING
·!Ensure
a barrel blocking device is fitted
· TOTHE!.'%,
the hopper is removed from
· Ensure
THE!.'%,
that there are no paintballs
· Ensure
INTHE!.'%,
0AINTBALLINDUSTRYSTANDARDEYEFACEEAR
·and
head protection designed specifically
to stop paintballs and meeting ASTM
standard F1776 (USA) or CE standard
(Europe) must be worn by user and any
person within range.
3(/5,$9/5"%5.352%!4!.934!'%
9/5-5343%%+%80%24!$6)#%
·
Switching on
your ANGEL
2
1 4OSWITCHTHE!.'%,/.PRESSANDHOLD
the navigation button inwards for up to
SECONDS4HE!.'%,WILLTURN/.AND
WILLAUTOMATICALLYGOINTO,)6%MODE
with the eyes on. The display screen will
illuminate and will show the firing status
OFTHE!.'%,
2 The LED on the rear of the grip frame will
show blue.
'UNSTATUS
Battery
status
Eyes
status
Ball
status
Screen shows Eyes
are faulty.
'AMETIMERSTATUS
Screen shows Eyes are off.
Screen shows Eyes on and
ball detected
3
0USHHOLD
FORSECS
Turning off
your ANGEL
3 3WITCHTHE!.'%,/&&BYPRESSING
and holding the navigation button
FORSECONDS!GOODBYEMESSAGE
will be displayed on the screen and
THE!.'%,WILLPOWERDOWN
4
)-0/24!.4./4%
s7HENACCESSINGTHESTATUSMENUFROM
THE,)6%SCREENTHE!.'%,WILLREMAIN
,)6%ANDANYTRIGGERPULLWILLRETURNYOU
TOTHE,)6%SCREEN
s)FACCESSINGANYOFTHEOTHERMENUS
FROMTHESTATUSMENUTHE!.'%,WILL
revert to SAFE and any trigger pull will
return you to the SAFE screen.
Making your ANGEL
safe
7HENYOUTURNTHE!.'%,/.THE!.'%,
IS,)6%4OMAKETHE!.'%,3!&%EITHER
s Access the menu options by pushing
the navigation button up or down and
HOLDINGFORSECS4HE!.'%,ISSTILL
,)6%ANDCAPABLEOFlRING
Mode
Tournament
lock status
s Choose SAFE from the menu options.
7HENTHE!.'%,IS3!&%ASCREENSIMILAR
to that on the left will show. The screen will
INDICATETHE!.'%,IS3!&%4HESCREEN
will also indicate the mode you are in and
whether the tournament lock is on or off.
4 The LED on the rear of the grip frame will
show green.
READ ALL WARNINGS BEFORE ATTEMPTING ANY WORK ON YOUR ANGEL. SHOULD YOU BE UNSURE AT ANY STAGE YOU MUST SEEK EXPERT ADVICE.
4
Navigation Button
1
2
1 The functions, features and settings
ADHERE STRICTLY TO THESE
AND ALL OTHER SAFETY
INSTRUCTIONS AND GUIDELINES
OFTHE!.'%,ARECONTROLLEDBYA
DIRECTIONALNAVIGATIONBUTTON
located on the rear of the grip frame.
2 The button can move up and down
to scroll through features and
settings indicated on the display
and can be pressed in to select
the highlighted function or setting
required.
The navigation button is located on the
rear of the grip frame and allows access
TOTHE!.'%,INTERNALMENUOPTION
0USHTHEBUTTONUPORDOWNANDHOLD
FORSECONDS
To navigate through the options simply
push the button up to scroll up and
push the button down to scroll down.
0RESSTHEBUTTONINWARDSTOMAKE
a selection.
Battery Replacement
3
4
3 2EMOVETHERIGHTHANDGRIPCHEEK
BYREMOVINGTHESCREWSUSINGA
SUITABLEMM!LLENWRENCH
4 5SINGABLUNTPICKORTHEMM!LLEN
wrench, carefully prise the battery
clear of its terminals.
5 2EMOVETHEBATTERY
Observe the battery polarity as marked
on the battery housing terminal and on
the battery.
5
Always use a good quality fresh battery.
READ ALL WARNINGS BEFORE ATTEMPTING ANY WORK ON YOUR ANGEL. SHOULD YOU BE UNSURE AT ANY STAGE YOU MUST SEEK EXPERT ADVICE.
a barrel blocking device is fitted
· Ensure
TOTHE!.'%,
the hopper is removed from
· Ensure
THE!.'%,
that there are no paintballs
· Ensure
INTHE!.'%,
0AINTBALLINDUSTRYSTANDARDEYEFACEEAR
·and
head protection designed specifically
to stop paintballs and meeting ASTM
standard F1776 (USA) or CE standard
(Europe) must be worn by user and any
person within range.
3(/5,$9/5"%5.352%!4!.934!'%
9/5-5343%%+%80%24!$6)#%
·
5
1
Switching ANGEL eyes
on/off
2
ADHERE STRICTLY TO THESE
AND ALL OTHER SAFETY
INSTRUCTIONS AND GUIDELINES
.'%,IS,)6%ANDCAPABLEOFlRING
·!Ensure
a barrel blocking device is fitted
· TOTHE!.'%,
the hopper is removed from
· Ensure
THE!.'%,
that there are no paintballs
· Ensure
INTHE!.'%,
0AINTBALLINDUSTRYSTANDARDEYEFACEEAR
·and
head protection designed specifically
0USHHOLD
FORSECS
to stop paintballs and meeting ASTM
standard F1776 (USA) or CE standard
(Europe) must be worn by user and any
person within range.
3(/5,$9/5"%5.352%!4!.934!'%
9/5-5343%%+%80%24!$6)#%
·
Screen
Scr
Sc
Screen
eenn sh
show
shows
oows
w Ey
Eyes
yes off
ooff.
of
fff.
s%NSURETHATTHE!.'%,ISONSEEPAGE
s!SDEFAULTTHE!.'%,EYESWILLALWAYSBE
/.WHENEVERTHE!.'%,ISSWITCHED/.
1 4HE!.'%,EYESCANBESWITCHEDOFF
by pulling and holding the trigger for
SECONDS4HE!.'%,S-2/&WILLDROP
TOITSDEFAULT-2/&EYESOFFSETTING)TWILL
fire 1 shot to confirm that the eyes have
been switched off and the buzzer will
sound once.
2 The eyes off symbol will be displayed on
the display screen. The LED on the rear
of the grip frame will show red.
s4OTURNTHE!.'%,EYESBACKONPULLAND
HOLDTHETRIGGERAGAINFORSECONDS
4HE-2/&WILLRETURNTO-2/&EYESON
SETTINGSEEPAGEFORFACTORYDEFAULT
setting), the buzzer will sound twice and
the eyes on symbol will be displayed on
the display screen. The LED on the rear
of the grip frame will show blue.
s Should the eyes detect a malfunction
due to a component failure or the eyes
becoming dirty they will automatically turn
THEMSELVESOFFANDTHE-2/&WILLREVERT
TOITS-2/&EYESOFFSETTINGSEEPAGE
for factory default setting), the display will
indicate that the eyes are off and that a ball
is not detected.
OPTO board
4HE!.'%,INCORPORATESTHE/04/BOARD
This board is the latest development in trigger
sensing function. It achieves unsurpassed
advancements in trigger repeatability and
sensitivity, its friction-free non-mechanical
operating button results in faster, shorter
and lighter trigger strokes that give the user
higher prolonged achievable rates of fire.
3
0ULLBACKCOLLET
4
3 0ULLBACKTHECOLLETONTHECONNECTOR
and keep the collet depressed and pull
the Macro line hose out of the connector
firmly.
4 Cut back the Macro line hose cleanly
and squarely.
5 0USHTHEHOSElRMLYINTOTHE-ACROLINE
connector to re-attach.
To remove
5
To attach
Macro line hose
IMPORTANT NOTE:
Please make sure that the Macro line
is trimmed back before re-insertion
after it has been removed.
READ ALL WARNINGS BEFORE ATTEMPTING ANY WORK ON YOUR ANGEL. SHOULD YOU BE UNSURE AT ANY STAGE YOU MUST SEEK EXPERT ADVICE.
6
Propellant
air/nitrogen supply
1
ADHERE STRICTLY TO THESE
AND ALL OTHER SAFETY
INSTRUCTIONS AND GUIDELINES
2
4HE!.'%,ISDESIGNEDTOOPERATEON!IR
.ITROGENGAS4HISNEEDSTOBESUPPLIEDTO
THE!.'%,USINGASUITABLElRSTSTAGE
REGULATOR4HEIDEALINPUTPRESSUREISPSI
BUTTHE!.'%,WILLOPERATEWITHAN
INPUTPRESSUREUPTOPSI
Note: Some preset systems will deliver
a higher pressure than their rating. So, if
you are using a High Pressure system rated
at 850 psi this could lead you to inputting
more pressure into the ANGEL than is
recommended.
Adjusting or
removing the ASA
on its mounting rail
3
5
The ASA connects to the grip frame of the
!.'%,VIAANINTEGRATEDDOVETAILMOUNTING
rail that allows the user to slide the ASA
body along the rail to fine tune the mounting
position or remove the ASA completely.
The ASA body is locked down onto the
rail via two set screws located within
a central recess at the front and back
of the integrated rail.
Installing an
air/nitrogen system
4
Depression
0IN
.OTE0INORIENTATION
1 5 SINGAMM!LLENWRENCHREMOVETHE
screw at the front of the ASA.
2 5SINGAMM!LLENWRENCHREMOVETHE
screw at the rear of the ASA.
3 Slide the ASA forward or backward to
the desired position.
/2
4 Slide the ASA clear of the mounting
bracket to remove completely.
5 When disassembling the ASA note the
orientation of the ‘depression pin’
6
%ACH!.'%,COMESCOMPLETEWITHACENTRALLY
PORTEDONOFF!.'%,!3!ALLOWINGFORTHE
EASYCONNECTIONOFAPRESETAIRNITROGEN
system for immediate use.
6 Before installing your preset system into
THE!3!ALWAYSENSURETHATTHEONOFF
ADJUSTERKNOBISWOUNDOUTAPPROXIMATELY
halfway. Be careful not to unscrew the
!3!ONOFFADJUSTERKNOBTOOFARASIT
is possible to completely disassemble
the ASA.
7 To install your air or nitrogen system
screw your tank and regulator onto the
ASA and tighten.
7
READ ALL WARNINGS BEFORE ATTEMPTING ANY WORK ON YOUR ANGEL. SHOULD YOU BE UNSURE AT ANY STAGE YOU MUST SEEK EXPERT ADVICE.
follow instructions, warnings
· Always
and guidelines given with any first stage
REGULATORYOUUSEWITHTHE!.'%,
5SECOMPRESSEDAIRNITROGENGASONLY
·$/./453%#/
use a paintball regulator that has
· Only
been designed for air or nitrogen gas.
ONOTEXCEEDPSIBARINPUT
·$PRESSURETOTHE!.'%,
suitable precautions when using
· Take
sharp cutting instruments.
Macro Line hose must be cut back
· The
cleanly and square prior to attachment
or re-attachment to ensure secure fitment.
(/5,$9/5"%5.352%!4!.934!'%
·39/5-5343%%+%80%24!$6)#%
7
ADHERE STRICTLY TO THESE
AND ALL OTHER SAFETY
INSTRUCTIONS AND GUIDELINES
1
Bolt removal
2
4HE!.'%,SBOLTINCLUDESGASPORTSTHAT
direct a small proportion of air onto the
LENSESOFTHE!.'%,EYESENSORSWHICH
negates the need to clean them as regularly
as other high end markers. If you experience
a serious breakage in the breech during a
GAMEYOUR!.'%,EYESWILLSWITCHOFFAND
under most circumstances you will be able to
continue firing paint and the gas from the bolt
PORTSWILLCLEANYOUR!.'%,EYES9OUCAN
then switch them back on by holding down
THETRIGGERFORSECONDS
Note: It is important that the bolt is
kept clean and free from dirt or grit and
that it is run dry with no lubricant. We
recommend that you clean your bolt after
each day of use.
a barrel blocking device is fitted to
· Ensure
THE!.'%,
the hopper is removed from the
· Ensure
!.'%,
that there are no paintballs in the
· Ensure
!.'%,
·the%NSURETHE!.'%,ISSWITCHEDOFFVIA
navigation button on the rear of the
grip frame prior to fitting your first stage
regulator.
0AINTBALLINDUSTRYSTANDARDEYEFACEEAR
and head protection designed specifically
to stop paintballs and meeting ASTM
standard F1776 (USA) or CE standard
(Europe) must be worn by user and any
person within range.
Always follow instructions, warnings
and guidelines given with any first stage
REGULATORYOUUSEWITHTHE!.'%,
5SECOMPRESSEDAIRNITROGENGASONLY
$/./453%#/
Only use a paintball regulator that has
been designed for air or nitrogen gas.
$ONOTEXCEEDPSIBARINPUT
PRESSURETOTHE!.'%,
Take suitable precautions when using
sharp cutting instruments.
The Macro Line hose must be cut back
cleanly and square prior to attachment
or re-attachment to ensure secure fit.
3(/5,$9/5"%5.352%!4!.934!'%
9/5-5343%%+%80%24!$6)#%
·
3
1 Turn the breech release knob clockwise
about a quarter of a turn.
2 Lift and rotate the breech block as
illustrated. Using the bolt pin slide
the bolt from the breech.
Note: If the breech will not open it may
be the case that the bolt is in the forward
position. To check this look down the feed
tube. If you can see the bolt, the breech
will not open. Push the bolt back into the
marker as far as it will go - the breech
should now open.
Note: To replace the bolt reverse these
instructions.
·
·
·
·
·
·
·
OTETHATTHEBOLTPINMUSTLOCATEIN
3 .
the correct place to enable the breech
to close.
CAUTION:4HE!.'%,MUSTNOTBElRED
without a bolt present. This can result in
DAMAGETOYOUR!.'%,!NYDAMAGECAUSED
from failure to follow these instructions is not
COVEREDBYYOUR!.'%,WARRANTY
4
5
6
Velocity Adjustment
4 5 SINGAMM!LLENWRENCHTURNTHE
VELOCITYADJUSTERSCREWEITHER
5 clockwise to decrease velocity
6 counter-clockwise to increase velocity.
READ ALL WARNINGS BEFORE ATTEMPTING ANY WORK ON YOUR ANGEL. SHOULD YOU BE UNSURE AT ANY STAGE YOU MUST SEEK EXPERT ADVICE.
8
ADHERE STRICTLY TO THESE
AND ALL OTHER SAFETY
INSTRUCTIONS AND GUIDELINES
OLED menu
Status
The Status menu allows you to select
BETWEEN,IVE3AFETHE)NFORMATIONDISPLAY
SCREENANDTHE0ARAMETERSSETTING
s To access the Status menu press and
hold the navigation button up or down
FORSECONDS
Note: If a trigger pull has been made
immediately prior to pressing the
navigation button then a further 5
second delay will be initiated to prevent
accidentally putting the ANGEL in SAFE
during a game situation.
s Once in the Status menu use the
navigation button to scroll up or down
TOCHOOSEBETWEEN,IVE3AFE)NFORMATION
AND0ARAMETERS
s0RESSINGTHENAVIGATIONBUTTONINWARDS
will select the highlighted function.
Information
The Information screen will display all
the relevant information relating to the
ELECTRONICSETTINGSOFYOUR!.'%,
s7ITHTHE!.'%,ONAND,IVEPUSHTHE
NAVIGATIONBUTTONUPORDOWNFOR
seconds.
s4HE!.'%,WILLBEINTHE3TATUSMENU
s Use the navigation button to scroll through
the Status menu settings until
Information is highlighted.
s0USHTHENAVIGATIONBUTTONINWARDSTO
select the Information menu.
s The following information will be displayed
on the OLED. Scroll up or down using the
navigation button to view this information.
Status
Software version
Mode
Soft breakout setting
Hard breakout setting
Soft ramp setting
Hard ramp setting
Dwell time
MROF eyes on limit
MROF eyes off limit
De-bounce level
Paint Type
Shot % filtering
Anti Bolt Stick
ANGEL eyes on/off
Game timer set
Alarm time set
Total shots fired since reset
a barrel blocking device is fitted
· Ensure
TOTHE!.'%,
the hopper is removed from
· Ensure
THE!.'%,
that there are no paintballs
· Ensure
INTHE!.'%,
0AINTBALLINDUSTRYSTANDARDEYEFACEEAR
·and
head protection designed specifically
Parameters
4HE!.'%,SSETTINGSCANBEEASILYADJUSTED
from the Parameters menu.
s7ITHTHE!.'%,ONAND,IVEPUSHAND
hold the navigation button up or down for
SECONDS
s4HE!.'%,WILLBEINTHE3TATUSMENU
s5SETHENAVIGATIONBUTTONTOSCROLL
through the Status menu settings until
Parameters is highlighted.
s0USHTHENAVIGATIONBUTTONINWARDSTO
select the Parameters menu.
The following functions are all accessible
via the navigation button and can all
BEACCESSEDANDADJUSTEDFROMTHE
Parameters display.
Modes
Valve Dwell
De-bounce
Paint Type
MROF eyes ON
MROF eyes OFF
Breakout
Ramp feature
Shot Filter
ABS
Game Timer Set
Alarm Time Set
to stop paintballs and meeting ASTM
standard F1776 (USA) or CE standard
(Europe) must be worn by user and any
person within range.
3(/5,$9/5"%5.352%!4!.934!'%
9/5-5343%%+%80%24!$6)#%
·
The navigation button is located on the
rear of the grip frame and allows access
to the internal menu option.
0USHTHEBUTTONUPORDOWNANDHOLDFOR
SECONDS
To navigate through the options simply
push the button up to scroll up and push
THEBUTTONDOWNTOSCROLLDOWN0RESSTHE
button inwards to make a selection.
IMPORTANT NOTE
When accessing the status menu from
the LIVE screen the ANGEL will remain
LIVE and any trigger pull will return you
to the LIVE screen.
If accessing any of the other menus from
the status menu, the ANGEL will revert to
SAFE and any trigger pull will return you
to the SAFE screen.
READ ALL WARNINGS BEFORE ATTEMPTING ANY WORK ON YOUR ANGEL. SHOULD YOU BE UNSURE AT ANY STAGE YOU MUST SEEK EXPERT ADVICE.
9
ADHERE STRICTLY TO THESE
AND ALL OTHER SAFETY
INSTRUCTIONS AND GUIDELINES
a barrel blocking device is fitted
· Ensure
TOTHE!.'%,
the hopper is removed from
· Ensure
THE!.'%,
that there are no paintballs
· Ensure
INTHE!.'%,
0AINTBALLINDUSTRYSTANDARDEYEFACEEAR
·and
head protection designed specifically
to stop paintballs and meeting ASTM
standard F1776 (USA) or CE standard
(Europe) must be worn by user and any
person within range.
3(/5,$9/5"%5.352%!4!.934!'%
9/5-5343%%+%80%24!$6)#%
·
STATUS
Live/Safe
Parameters
Information
Semi Auto
Modes
Current Settings
NPPL
Valve Dwell
Status
De-bounce
Software version
PSP
IMPORTANT NOTE:
Tournament lock
To comply with some Tournament
rules some of the ANGEL’s features are
required to be locked down so that they
cannot be adjusted on the field of play.
For more details see page 14.
Millennium
XBall/NXL
Paint Type
Mode
MROF eyes ON
Soft breakout setting
MROF eyes OFF
Hard breakout setting
Breakout
Soft ramp setting
Ramp Feature
CFOA
Full Auto
Shot Filter
Anti Bolt Stick
Hard ramp setting
Dwell time
MROF eyes on limit
Game Timer Set
MROF eyes off limit
Demo
Alarm Time Set
De-Bounce level
Custom Semi
Paint Type
Shot % filtering
Soft Breakout
Anti Bolt Stick
Breakout
ANGEL eyes on/off
Soft Ramp
Game timer set
Hard Ramp
Alarm time set
Total shots fired
since reset
Battery voltage
READ ALL WARNINGS BEFORE ATTEMPTING ANY WORK ON YOUR ANGEL. SHOULD YOU BE UNSURE AT ANY STAGE YOU MUST SEEK EXPERT ADVICE.
10
MODES
s%NSURETHATTHE!.'%,ISSWITCHEDON
s Ensure that you are not activating the
trigger.
s0USHANDHOLDTHENAVIGATIONBUTTON
50OR$/7.FORSECONDS
s The Status menu will be displayed.
s0USHTHENAVIGATIONBUTTONUPTOHIGHLIGHT
the Parameters menu.
s0USHTHENAVIGATIONBUTTONINTOSELECT
the Parameters menu.
s From the Parameters menu, select the
Mode feature by pushing the navigation
button inward.
s Scroll up or down through the Mode
options by pushing the navigation button
up or down.
s Once the desired Mode setting has been
reached, press the navigation button
inwards to save the new setting.
s A Saved Mode message will be
displayed.
The Parameters menu will be displayed.
Semi Auto
4HE!.'%,EYESWILLDEFAULTTOON
WHENEVERTHE!.'%,ISMADELIVEVIATHE
navigation button.
7ITHTHEEYESACTIVATEDTHE!.'%,WILL
only fire when a paintball is present and
HASBEENDETECTEDBYTHE!.'%,EYES
7ITHTHEEYESACTIVATEDTHE-2/&THATTHE
!.'%,WILLlREATISLIMITEDBYTHE-2/&
eyes on level.
7ITHTHEEYESTURNEDOFFTHE-2/&THATTHE
!.'%,WILLlREATISLIMITEDBYTHE-2/&
eyes off level.
4HE!.'%,WILLlRESHOTFOREACHPULL
of the trigger.
"REAKOUTAND2AMPSETTINGSDONOT
function in this Mode.
NPPL
4HE!.'%,EYESWILLDEFAULTTOON
WHENEVERTHE!.'%,ISMADELIVEVIA
the navigation button.
7ITHTHEEYESACTIVATEDTHE!.'%,WILL
only fire when a paintball is present and
HASBEENDETECTEDBYTHE!.'%,EYES
7ITHTHEEYESACTIVATEDTHE-2/&THAT
THE!.'%,WILLlREATISLIMITEDBYTHE
-2/&EYESONLEVEL
7ITHTHEEYESTURNEDOFFTHE-2/&THAT
THE!.'%,WILLlREATISLIMITEDBYTHE
-2/&EYESOFFLEVEL
4HE!.'%,WILLlRESHOTFOREACHPULL
of the trigger.
"REAKOUTAND2AMPSETTINGSDONOT
function in this Mode.
PSP
4HE!.'%,EYESWILLDEFAULTTOON
WHENEVERTHE!.'%,ISMADELIVEVIATHE
navigation button.
7ITHTHEEYESACTIVATEDTHE!.'%,WILL
only fire when a paintball is present and
HASBEENDETECTEDBYTHE!.'%,EYES
4HElRSTSHOTSWILLBElREDINSEMI
automatic.
/NTHETHSHOTTHE!.'%,WILLRAMPTOA
PRESET-2/&SETATBALLSPERSECOND
provided that the user maintains trigger
pulls at a rate of 5 balls per second or
above.
If the user stops firing for more than
SECONDTHEINITIALSHOTSINSEMI
automatic must be re-initiated.
"REAKOUTAND2AMPSETTINGSDONOT
function in this Mode.
Millennium
4HE!.'%,EYESWILLDEFAULTTOON
WHENEVERTHE!.'%,ISMADELIVEVIATHE
navigation button.
7ITHTHEEYESACTIVATEDTHE!.'%,WILL
only fire when a paintball is present and
HASBEENDETECTEDBYTHE!.'%,EYES
The rate of fire will be capped at 15 shots
per second.
2AMPINGOFSHOTSISALLOWEDONCEBALLS
PERSECOND"03ISACHIEVEDTHE!.'%,
MAYRAMPUPTO"03ONLYIF"03OR
greater is maintained. Once the trigger is
released, only 1 additional shot may be
discharged.
"REAKOUTAND2AMPSETTINGSDONOT
function in this Mode.
XBall/NXL
4HE!.'%,EYESWILLDEFAULTTOON
WHENEVERTHE!.'%,ISMADELIVEVIA
the navigation button.
7ITHTHEEYESACTIVATEDTHE!.'%,WILLONLY
fire when a paintball is present and has
BEENDETECTEDBYTHE!.'%,EYES
4HElRSTSHOTSWILLBElREDINSEMI
automatic.
On the 4th shot if the trigger is pulled and
HELDTHE!.'%,WILLlREFULLYAUTOMATICUPTO
APRESETMAXIMUM-2/&SETAT"03
4HE!.'%,WILLSTOPlRINGASSOON
as the trigger is released.
If the user stops firing for more than
SECONDTHEINITIALSHOTSINSEMI
automatic must be re-initiated.
"REAKOUTAND2AMPSETTINGSDONOT
function in this Mode.
CFOA
4HE!.'%,EYESWILLDEFAULTTOON
WHENEVERTHE!.'%,ISMADELIVEVIA
the navigation button.
7ITHTHEEYESACTIVATEDTHE!.'%,WILL
only fire when a paintball is present and
HASBEENDETECTEDBYTHE!.'%,EYES
4HElRSTSHOTSWILLBElREDINSEMI
automatic.
/NTHETHSHOTTHE!.'%,WILLRAMP
TOAPRESET-2/&SETATBALLSPER
second, provided that the user maintains
trigger pulls at a rate at 5 balls per second
or above.
If the user stops firing for more than
SECONDTHEINITIALSHOTSINSEMI
automatic must be re-initiated.
"REAKOUTAND2AMPSETTINGSDONOT
function in this Mode.
Full Auto
4HE!.'%,EYESWILLDEFAULTTOON
WHENEVERTHE!.'%,ISMADELIVEVIATHE
navigation button.
7ITHTHEEYESACTIVATEDTHE!.'%,WILL
only fire when a paintball is present and
HASBEENDETECTEDBYTHE!.'%,EYES
4HE!.'%,WILLlREATACAPPEDMAXIMUM
RATEOFBALLSPERSECONDWITHTHE!.'%,
eyes activated.
7ITHTHEANGELEYESDEACTIVATEDTHE!.'%,
will fire at a capped maximum rate of 15
balls per second.
)TISPOSSIBLETOLOWERTHE-2/&WITHBOTH
eyes on and eyes off in this mode, but you
will not be permitted to raise them above
THE"03CAP
"REAKOUTAND2AMPSETTINGSDONOT
function in this Mode.
Demo
This is a dry firing mode for firing the
!.'%,WHENONDISPLAYANDISDESIGNED
to demonstrate the rate of fire achievable.
It should only be used for demonstration
READ ALL WARNINGS BEFORE ATTEMPTING ANY WORK ON YOUR ANGEL. SHOULD YOU BE UNSURE AT ANY STAGE YOU MUST SEEK EXPERT ADVICE.
ADHERE STRICTLY TO THESE
AND ALL OTHER SAFETY
INSTRUCTIONS AND GUIDELINES
a barrel blocking device is fitted
· Ensure
TOTHE!.'%,
the hopper is removed from
· Ensure
THE!.'%,
that there are no paintballs
· Ensure
INTHE!.'%,
0AINTBALLINDUSTRYSTANDARDEYEFACEEAR
·and
head protection designed specifically
to stop paintballs and meeting ASTM
standard F1776 (USA) or CE standard
(Europe) must be worn by user and any
person within range.
3(/5,$9/5"%5.352%!4!.934!'%
9/5-5343%%+%80%24!$6)#%
·
The ANGEL’s default values are :
Mode
semi
Soft breakout settings : seconds
10
Hard breakout settings: seconds
10
Soft ramp settings: start delay (shots) 4
Kick in (BPS)
5
Drop out (BPS)
4
Hard ramp settings: start delay (shots) 4
Kick in (BPS)
5
Drop out (BPS)
4
Dwell time (m/secs)
9
MROF eyes ON limit
unlimited
MROF eyes OFF limit
De-Bounce (level)
Paint Type
Shot % Filter
ABS (Anti bolt stick) [m/secs]
ANGEL eyes
15bps
10
8
5%
0.25
ON
Game time set (mins/ Secs)
7:10
Alarm time set (mins/secs)
1:00
11
ADHERE STRICTLY TO THESE
AND ALL OTHER SAFETY
INSTRUCTIONS AND GUIDELINES
a barrel blocking device is fitted
· Ensure
TOTHE!.'%,
the hopper is removed from
· Ensure
THE!.'%,
that there are no paintballs
· Ensure
INTHE!.'%,
0AINTBALLINDUSTRYSTANDARDEYEFACEEAR
·and
head protection designed specifically
to stop paintballs and meeting ASTM
standard F1776 (USA) or CE standard
(Europe) must be worn by user and any
person within range.
3(/5,$9/5"%5.352%!4!.934!'%
9/5-5343%%+%80%24!$6)#%
·
PURPOSESASTHE!.'%,EYESFEATUREIS
reverse functioned so that it cannot fire
should a paintball be detected.
"REAKOUTAND2AMPSETTINGSDONOT
function in this Mode.
Custom Semi
4HE!.'%,EYESWILLDEFAULTTOON
WHENEVERTHE!.'%,ISMADELIVEVIATHE
navigation button.
7ITHTHEEYESACTIVATEDTHE!.'%,WILL
only fire when a paintball is present and
HASBEENDETECTEDBYTHE!.'%,EYES
7ITHTHEEYESACTIVATEDTHE-2/&THATTHE
!.'%,WILLlREATISLIMITEDBYTHE-2/&
eyes on level.
7ITHTHEEYESTURNEDOFFTHE-2/&THATTHE
!.'%,WILLlREATISLIMITEDBYTHE-2/&
eyes off level.
4HE!.'%,WILLlRESHOTFOREACHPULLOF
the trigger.
"REAKOUTAND2AMPSETTINGSCANBEUSED
individually or in combination in this Mode.
Breakout
4HEREAREBREAKOUTMODESTHATCANONLY
BEUSEDWHENTHE!.'%,ISINCUSTOM
semi mode.
Soft breakout
Once the soft breakout feature has been
selected from the custom modes screen
ANDTHE!.'%,ISONANDLIVE)TWILLlREAS
if it were in normal semi auto mode until
the breakout mode is activated.
To activate the breakout feature press the
navigation button inwards. The alarm will
momentarily sound to indicate that the
breakout mode has been initiated. In order
FORTHE!.'%,TOSTARTlRINGINTHEBREAKOUT
mode once it has been initiated, a rate of
trigger pulls higher than 4 per second must
be reached and maintained within the time
period that the breakout mode is active.
The duration of the time period that the
BREAKOUTMODEISACTIVECANBEADJUSTED
4HERANGEFORTHISADJUSTMENTISn
seconds. If the rate of trigger pulls at any
point once the breakout mode has been
initiated falls below 4 per second, or should
THETRIGGERBEPULLEDANDHELDINFORSECS
or the time period of the breakout elapses,
the breakout mode will revert to the
previously selected mode.
Hard breakout
Once the hard breakout feature has been
selected from the custom modes screen
ANDTHE!.'%,ISONANDLIVEITWILLlREAS
if it were in normal semi auto mode until
the breakout mode is activated.
To activate the breakout feature press the
navigation button inwards. The alarm will
momentarily sound to indicate that the
breakout mode has been initiated. In order
FORTHE!.'%,TOSTARTlRINGINTHEBREAKOUT
mode once it has been initiated, the trigger
must be pulled and held in within the time
period that the breakout mode is active.
The duration of the time period that the
BREAKOUTMODEISACTIVECANBEADJUSTED
4HERANGEFORTHISADJUSTMENTISTO
seconds. If the trigger is released at any
point once the breakout mode has been
initiated, or the time period of the breakout
elapses, the breakout mode will revert
to the previously selected mode.
Ramp
4HEREARE2AMPMODESTHATCANONLYBE
USEDWHENTHE!.'%,ISINCUSTOMSEMI
MODE3OFTRAMPAND(ARDRAMP
4HEREARE0ARAMETERSTHATCANBE
ADJUSTEDTOCUSTOMTUNETHERAMPMODES
3TARTDELAY4HISISTHENUMBEROFSHOTS
fired before the ramp mode starts.
The range for the start delay is between
ANDSHOTS
+ICKINPOINT4HISSETSTHEMINIMUM
number of trigger pulls per second that
must be reached in order for the software
to add shots. The range for the kick in
point is between 4 and 16 trigger pulls
per second.
$ROPOUTPOINT4HISSETSTHEMINIMUM
number of trigger pulls per second that
must be maintained in order for the
software to add shots. The range for the
drop out point is between 4 and 16 trigger
pulls per second. Should the number of
trigger pulls drop below this rate for more
than 1 second the software will no longer
add shots until the kick in point has been
re-achieved.
To enable any of the ramping features it
must be selected from the custom modes
menu.
Parameters
Valve dwell
Dwell controls the valve opening time.
Longer dwell uses more gas and generates
variable pressures. Shorter dwell uses less
gas and reduces noise, but is less tolerant
of poor quality paint and can result in
WEAKSHOTS4HERANGEOFADJUSTMENTTHAT
is available is from 6 milliseconds to 15
MILLISECONDSINMILLISECONDINCREMENTS
)MPORTANT.OTE
The internal lock button must be used
to turn Dwell options on or off.
s%NSURETHATTHE!.'%,ISSWITCHEDON
s Ensure that you are not activating the
trigger
s0USHANDHOLDTHENAVIGATIONBUTTON50
OR$/7.FORSECONDS
s The Status menu will be displayed
s0USHTHENAVIGATIONBUTTONUPTOHIGHLIGHT
the Parameters menu
s0USHTHENAVIGATIONBUTTONINTOSELECT
the Parameters menu
s From the Parameters menu select the
Dwell feature by pushing the navigation
button inwards.
s Scroll up or down through the Dwell
settings by pushing the navigation button
up or down.
s Once the desired setting has been
reached, press the navigation button
inwards to save the new setting.
s A Saved Dwell message will be
displayed.
The Parameters menu will be displayed.
De-Bounce
This is the length of time that the trigger
has to be pulled for it to be accepted by
the electronics as a valid trigger activation.
4HEREARELEVELSOFADJUSTMENTBEING
THELEASTSENSITIVEANDTHEMOST
SENSITIVEADJUSTMENT
s%NSURETHATTHE!.'%,ISSWITCHEDON
s Ensure that you are not activating the
trigger.
s0USHANDHOLDTHENAVIGATIONBUTTON50
OR$/7.FORSECONDS
s The Status menu will be displayed.
READ ALL WARNINGS BEFORE ATTEMPTING ANY WORK ON YOUR ANGEL. SHOULD YOU BE UNSURE AT ANY STAGE YOU MUST SEEK EXPERT ADVICE.
12
Parameters
cont...
De-Bounce cont...
s0USHTHENAVIGATIONBUTTONUPTOHIGHLIGHT
the Parameters menu.
s From the Parameters menu select the
De-Bounce feature by pushing the
navigation button inwards.
s Scroll up or down through the
De-Bounce settings by pushing the
navigation button up or down.
s Once the desired setting is reached press
the navigation button inwards to save the
new setting.
A Saved De-Bounce message will be
displayed.
The Parameters menu will be displayed.
Paint Type
4HISALLOWSYOUTOSELECTTHECORRECT!.'%,
eye settings for the type of paint that you
are using.
Once you have selected the correct setting
THE!.'%,EYESPROGRAMWILLINTELLIGENTLY
ADJUSTITSELFTOTHEFRAGILITYOFYOURPAINT
1 - 6 = Fragile
7 - 10 = Medium
11 - 12 = Hard
s Ensure that your loader is at its maximum
performance and reliability otherwise you
may encounter problems related
to the loader.
s Selection of a paint type setting that
is too high may result in ball breakages.
s%NSURETHATTHE!.'%,ISSWITCHEDON
s Ensure that you are not activating the
trigger.
s0USHANDHOLDTHENAVIGATIONBUTTON
50OR$/7.FORSECONDS
s The Status menu will be displayed.
s0USHTHENAVIGATIONBUTTONUPTOHIGHLIGHT
the Parameters menu.
s0USHTHENAVIGATIONBUTTONINTOSELECT
the Parameters menu.
s From the Parameters menu select the
Paint Type feature by pushing the
navigation button inwards.
s Scroll up or down through the Paint
Type settings by pushing the navigation
button up or down.
Once the desired setting has been reached
press the navigation button inwards to save
the new setting.
A Saved Paint Type message will be
displayed.
The Parameters menu will be displayed.
MROF eyes on
This allows the user to set the Maximum
2ATEOF&IREWHILSTTHE!.'%,EYESAREON
4HEREARELEVELSOFADJUSTMENTRANGING
FROMTOUNLIMITEDBALLSPERSECOND
s%NSURETHATTHE!.'%,ISSWITCHEDON
s Ensure that you are not activating the
trigger.
s0USHANDHOLDTHENAVIGATIONBUTTON50
OR$/7.FORSECONDS
s The Status menu will be displayed.
s0USHTHENAVIGATIONBUTTONUPTOHIGHLIGHT
the Parameters menu.
s0USHTHENAVIGATIONBUTTONINTOSELECT
the Parameters menu.
s From the Parameters menu select the
MROF eyes on feature by pushing the
navigation button inwards.
s Scroll up or down through the MROF
eyes on settings by pushing the
navigation button up or down.
s Once the desired setting has been
reached press the navigation button
inwards to save new setting.
A Saved MROF eyes on message will be
displayed.
The Parameters menu will be displayed.
MROF eyes off
This allows the user to set the Maximum
2ATE/F&IREWHILSTTHE!.'%,EYESAREOFF
4HEREARELEVELSOFADJUSTMENTRANGING
FROMTOUNLIMITEDBALLSPERSECOND
s%NSURETHATTHE!.'%,ISSWITCHEDON
s Ensure that you are not activating the
trigger.
s0USHANDHOLDTHENAVIGATIONBUTTON50
OR$/7.FORSECONDS
s The Status menu will be displayed.
s0USHTHENAVIGATIONBUTTONUPTOHIGHLIGHT
the Parameters menu.
s0USHTHENAVIGATIONBUTTONINTOSELECT
the Parameters menu.
s From the Parameters menu select the
MROF eyes off feature by pushing the
navigation button inwards.
s Scroll up or down through the MROF
eyes off settings by pushing the
navigation button up or down.
s Once the desired setting has been
reached press the navigation button
inwards to save the new setting.
A Saved MROF eyes off message will
be displayed.
The Parameters menu will be displayed.
Breakout
This allows the user to select between
a soft and hard breakout mode. Once the
hard or soft option has been selected, the
duration that the breakout will be active
for can then be selected. The length of the
breakout mode duration can be set from
TOSECONDS
s%NSURETHATTHE!.'%,ISSWITCHEDON
s Ensure that you are not activating the
trigger.
s0USHANDHOLDTHENAVIGATIONBUTTON50
OR$/7.FORSECONDS
s The Status menu will be displayed.
s0USHTHENAVIGATIONBUTTONUPTOHIGHLIGHT
the Parameters menu.
s0USHTHENAVIGATIONBUTTONINTOSELECT
the Parameters menu.
s From the Parameters menu select the
Breakout feature by pushing the
navigation button inwards.
s Select Soft or Hard Breakout option using
the navigation button by pressing
it inwards to confirm the desired option.
s Select the duration that you wish the
breakout to be active for by using the
navigation button to scroll between the
VALUESOFANDSECONDSTHENPRESS
the navigation button inwards to confirm
your desired settings.
A Saved Soft/Hard Breakout message
is displayed.
The Breakout menu will be displayed.
Ramp
4HISALLOWSTHEUSERTOSELECTLEVELSOF
RAMPMODE3OFT2AMPAND(ARD2AMP
/NCETHELEVELOF2AMPHASBEENSELECTED
the user can then customize the ramp
mode by selecting the start delay (number
of shots to be fired before the ramp mode
ACTIVATESADJUSTABLEBETWEENAND
SHOTSKICKIN"03NUMBEROFTRIGGERPULLS
per second that has to be reached to get
THERAMPMODETOSTARTADJUSTABLEBETWEEN
ANDSHOTSANDTHEDROPOUT"03
(minimum number of trigger pulls that must
BEMAINTAINEDINORDERTOKEEPTHE!.'%,
INRAMPMODEADJUSTABLEBETWEENAND
16 shots).
READ ALL WARNINGS BEFORE ATTEMPTING ANY WORK ON YOUR ANGEL. SHOULD YOU BE UNSURE AT ANY STAGE YOU MUST SEEK EXPERT ADVICE.
ADHERE STRICTLY TO THESE
AND ALL OTHER SAFETY
INSTRUCTIONS AND GUIDELINES
a barrel blocking device is fitted
· Ensure
TOTHE!.'%,
the hopper is removed from
· Ensure
THE!.'%,
that there are no paintballs
· Ensure
INTHE!.'%,
0AINTBALLINDUSTRYSTANDARDEYEFACEEAR
·and
head protection designed specifically
to stop paintballs and meeting ASTM
standard F1776 (USA) or CE standard
(Europe) must be worn by user and any
person within range.
3(/5,$9/5"%5.352%!4!.934!'%
9/5-5343%%+%80%24!$6)#%
·
13
ADHERE STRICTLY TO THESE
AND ALL OTHER SAFETY
INSTRUCTIONS AND GUIDELINES
a barrel blocking device is fitted
· Ensure
TOTHE!.'%,
the hopper is removed from
· Ensure
THE!.'%,
that there are no paintballs
· Ensure
INTHE!.'%,
0AINTBALLINDUSTRYSTANDARDEYEFACEEAR
·and
head protection designed specifically
to stop paintballs and meeting ASTM
standard F1776 (USA) or CE standard
(Europe) must be worn by user and any
person within range.
3(/5,$9/5"%5.352%!4!.934!'%
9/5-5343%%+%80%24!$6)#%
·
Parameters
cont...
Ramp cont...
s%NSURETHATTHE!.'%,ISSWITCHEDON
s Ensure that you are not activating the
trigger.
s0USHANDHOLDTHENAVIGATIONBUTTON50
OR$/7.FORSECONDS
s The Status menu will be displayed.
s0USHTHENAVIGATIONBUTTONUPTOHIGHLIGHT
the Parameters menu.
s0USHTHENAVIGATIONBUTTONINTOSELECT
the Parameters menu.
s From the Parameters menu select the
Ramp feature by pushing the
navigation button inwards.
s Select Soft or Hard Ramp option using
the navigation button by pressing it
inwards to confirm the desired option.
s9OUCANTHENSELECTTOADJUSTStart
Delay, Kick in BPS and Drop out
BPS by pressing the navigation button
inwards.
A Saved Start Delay, Kick in BPS and
Drop out BPS message will be displayed.
The Soft or Hard Ramp menu will be
displayed.
Shot % filtering
4HISALLOWSTHEADJUSTMENTOFTHEPOINT
within the current firing cycle that a new
buffered shot will be accepted.
4HE3HOTlLTERISADJUSTABLEFROM
TOLEVELS
Level 1 turns the shot filtering off which
allows the additional shot to be registered
at the earliest point after the eyes have
detected a ball and the trigger has provided
AVIABLElRECOMMAND,EVELSTHROUGH
TOSETSTHEOFTHElRINGCYCLETHAT
must have been completed before the
ADDITIONALSHOTMAYBEALLOWEDFROM
of the cycle increasing in 5% increments
UPTOAMAXIMUMOFOFTHECYCLE
s%NSURETHATTHE!.'%,ISSWITCHEDON
s Ensure that you are not activating the
trigger.
s0USHANDHOLDTHENAVIGATIONBUTTON
50OR$/7.FORSECONDS
s The Status menu will be displayed.
s0USHTHENAVIGATIONBUTTONUPTOHIGHLIGHT
the Parameters menu.
s0USHTHENAVIGATIONBUTTONINTOSELECT
the Parameters menu.
s From the Parameters menu select the
Shot % Filtering feature by pushing the
navigation button inwards.
s Scroll up or down through the Shot
% Filtering settings by pushing the
navigation button up or down.
s Once the desired setting has been
reached press the navigation button
inwards to save the new setting.
A Saved Shot % Filtering message will
be displayed.
The Parameters menu will be displayed.
Anti Bolt Stick
First shot drop off can occur when the
VALVEOR2AMINCURSSTATICFRICTIONAFTERA
period of inactivity. This results in the first
shots fired after this inactivity being lower
in velocity because the seals need to break
free from the forces of the static friction.
Anti Bolt Stick programming allows the
DWELLTIMETOBEINCREASEDFORTHElRST
SHOTSIFTHE!.'%,HASBEENINACTIVEFOR
seconds to overcome static friction. There
ARELEVELSOF!"3ADJUSTMENTRANGING
FROMMILLISECONDSTOMILLISECONDS
s%NSURETHATTHE!.'%,ISSWITCHEDON
s Ensure that you are not activating the
trigger.
s0USHANDHOLDTHENAVIGATIONBUTTON50
OR$/7.FORSECONDS
s The Status menu will be displayed.
s0USHTHENAVIGATIONBUTTONUPTOHIGHLIGHT
the Parameters menu.
s0USHTHENAVIGATIONBUTTONINTOSELECT
the Parameters menu.
s From the Parameters menu select the
Anti Bolt Stick feature by pushing the
navigation button inwards.
s Scroll up or down through the Anti Bolt
Stick settings by pushing the navigation
button up or down.
s Once the desired setting has been
reached, press the navigation button
inwards to save the new setting.
A Saved Anti Bolt Stick message will be
displayed.
s4HE!.'%,WILLBEINTHEStatus menu.
s Use the navigation button to scroll
through the Status menu settings until
Information is highlighted.
0USHTHENAVIGATIONBUTTONINWARDSTO
select the Information menu.
Factory reset
The default factory settings can be restored
if required at any time.
s0RESSTHEINTERNALBUTTONLOCATEDON
the circuit board inside the grip frame.
s The screen will display the internal
options menu.
s Using the navigation button scroll
up or down to select the reset function.
s0RESSTHENAVIGATIONBUTTONINWARDS
to initiate the reset function.
s9OUWILLBEASKEDTOCONlRMTHAT
you wish to continue with this action.
0RESSTHENAVIGATIONBUTTONINWARDS
to confirm this is correct.
s A reset message will be displayed on
the screen confirming that the default
settings have successfully been restored.
The Parameters menu will be displayed.
Software version
The software version is displayed on the
information page.
s7ITHTHE!.'%,ONANDLive push the
navigation button up or down for
SECONDS
READ ALL WARNINGS BEFORE ATTEMPTING ANY WORK ON YOUR ANGEL. SHOULD YOU BE UNSURE AT ANY STAGE YOU MUST SEEK EXPERT ADVICE.
14
Game timer/alarm
Tournament lock
This is a fully interactive game timer with
countdown alarm that will allow you and
your team to play in unison. The timer and
alarm can be set in either 1 second or
MINUTEINCREMENTSFROMTOMINUTES
Once the alarm and timer are set they will
be activated by the first trigger pull after
MAKINGTHE!.'%,LIVEANDSELECTINGTHE
timer function.
s%NSURETHATTHE!.'%,ISSWITCHEDON
s Ensure that you are not activating the
trigger.
s0USHANDHOLDTHENAVIGATIONBUTTON50
OR$/7.FORSECONDS
s The Status menu will be displayed.
s0USHTHENAVIGATIONBUTTONUPTOHIGHLIGHT
the Parameters menu.
s0USHTHENAVIGATIONBUTTONINTOSELECT
the Parameters menu.
s From the Parameters menu select
the Game or alarm timer feature by
pushing the navigation button inwards.
s Using the navigation button, scroll up
or down to highlight Change timer.
s0USHTHENAVIGATIONBUTTONTOSELECT
Change timer.
s Using the navigation button scroll up
or down to select the first digit required.
s0USHTHENAVIGATIONBUTTONINWARDS
to store the first digit.
s2EPEATTHEPREVIOUSTWOPOINTS
TOSTORETHENDRDANDTHDIGITS
Saved game timer/game alarm
message displayed on screen.
To comply with some Tournament rules
SOMEOFTHE!.'%,SFEATURESAREREQUIRED
to be locked down so that they cannot be
ADJUSTEDONTHElELDOFPLAY
ADHERE STRICTLY TO THESE
AND ALL OTHER SAFETY
INSTRUCTIONS AND GUIDELINES
1
1 0RESSTHEINTERNALBUTTONLOCATEDONTHE
circuit board inside the grip frame.
s The screen will display the internal
options menu.
s Using the navigation button scroll up or
down to highlight the Tournament lock
function.
s0RESSTHENAVIGATIONBUTTONINWARDTO
initiate the Tournament lock features.
s Using the navigation button scroll up or
down to highlight the Lock or Unlock
feature as required.
s0RESSTHENAVIGATIONBUTTONINWARDTO
enable or disable the Tournament lock
function as required.
s9OUWILLBEASKEDTOCONlRMTHATYOU
WISHTOCONTINUEWITHTHISACTION0RESS
the navigation button inwards to confirm
this is correct.
s A padlock icon will be displayed on
the screen indicating the Status of
the tournament lock.
s The following features are affected
by the tournament lock.
Modes
-2/&EYES/.
-2/&EYES/&&
Dwell
De-Bounce
Shot % filtering
Anti Bolt Stick
)NORDERTOADJUSTANYOFTHESEFEATURESTHE
tournament lock must be disabled.
READ ALL WARNINGS BEFORE ATTEMPTING ANY WORK ON YOUR ANGEL. SHOULD YOU BE UNSURE AT ANY STAGE YOU MUST SEEK EXPERT ADVICE.
a barrel blocking device is fitted
· Ensure
TOTHE!.'%,
the hopper is removed from
· Ensure
THE!.'%,
that there are no paintballs
· Ensure
INTHE!.'%,
0AINTBALLINDUSTRYSTANDARDEYEFACEEAR
·and
head protection designed specifically
to stop paintballs and meeting ASTM
standard F1776 (USA) or CE standard
(Europe) must be worn by user and any
person within range.
3(/5,$9/5"%5.352%!4!.934!'%
9/5-5343%%+%80%24!$6)#%
·
15
ADHERE STRICTLY TO THESE
AND ALL OTHER SAFETY
INSTRUCTIONS AND GUIDELINES
General care
& cleaning
a barrel blocking device is fitted
· Ensure
TOTHE!.'%,
the hopper is removed from
· Ensure
THE!.'%,
that there are no paintballs
· Ensure
INTHE!.'%,
0AINTBALLINDUSTRYSTANDARDEYEFACEEAR
·and
head protection designed specifically
4HE!.'%,ISDESIGNEDFORMINIMUM
maintenance and requires far less lubrication
and greasing of internal parts than other high
performance markers.
&OREXTERNALCLEANINGOFTHE!.'%,WE
recommend the use of a water moistened
cloth. The only oil that is suitable for use in
external cleaning is ANGEL Love Juice or
other synthetic oil, which again should only
BEAPPLIEDSPARINGLYUSINGACLOTH.EVER
USEHYDROCARBONBASEDOILSSUCHAS7$
6ASELINE$UCK/IL0LUS'ASETCTOCLEANOR
LUBRICATETHE!.'%,ASTHISWILLDAMAGETHE
internal seals.
)NTERNALLUBRICATIONOFTHE!.'%,CANBE
achieved without disassembly by removing
your regulator and simply adding a couple of
drops of ANGEL Love Juice oil to your ASA
adapter. Once this has been done re-attach
your regulator as per the instructions on page
ANDSHOOTTHE!.'%,TIMES4HISWILL
then disperse the lubricant to all the moving
PARTSOFTHE!.'%,4HISSHOULDBEDONE
EVERYSHOTSFOR!.'%,STHATAREUSED
regularly, or in cases of prolonged spells of
infrequent use, prior to each occasion you
USEYOUR!.'%,
)NTERNALGREASINGOFYOUR!.'%,ISREQUIRED
after disassembly to avoid damage to internal
parts during re-assembly. The only grease
suitable for this purpose is ANGEL Love
Juice Extreme Grease.
For full details on oiling or greasing the
!.'%,SINTERNALPARTSPLEASEGOTO
to stop paintballs and meeting ASTM
standard F1776 (USA) or CE standard
(Europe) must be worn by user and any
person within range.
3(/5,$9/5"%5.352%!4!.934!'%
9/5-5343%%+%80%24!$6)#%
·
HTTPWDPTVE?BLASTNEWS
MAYNEWSHTMLLUBE
IMPORTANT NOTES:
s.OSOLVENTSORABRASIVECLEANINGPRODUCTSSHOULDBE
used. All external and internally accessible moving parts
should be lubricated using light synthetic oil only.
s!LLTHREADSONTHE!.'%,EXCEPTTHOSEFORTHE!.'%,
accessory mountings at the base of the grip frame are metric.
s!.'%,ACCESSORYMOUNTINGSUSEINDUSTRYSTANDARD
10/32 UNF at centres 0.75” (20mm).
s7HENINSERTINGSCREWSINTOTHEBOTTOMOFTHEGRIPFRAME
the screw thread length must not exceed 0.375” (10mm)
otherwise damage will occur to the electronics.
s7ERECOMMENDTHATYOUREMOVETHERIGHTHANDCHEEKCOVER
and battery when inserting these screws and ensure that the
screws do not project into the circuit board cavity when fitting.
s4HE!.'%,SHOULDNEVERBEIMMERSEDINTOWATER
otherwise damage may occur to the electronics.
READ ALL WARNINGS BEFORE ATTEMPTING ANY WORK ON YOUR ANGEL. SHOULD YOU BE UNSURE AT ANY STAGE YOU MUST SEEK EXPERT ADVICE.
16
Mini reg removal
& assembly
1
ADHERE STRICTLY TO THESE
AND ALL OTHER SAFETY
INSTRUCTIONS AND GUIDELINES
2
a barrel blocking device is fitted
· Ensure
TOTHE!.'%,
the hopper is removed from
· Ensure
THE!.'%,
that there are no paintballs
· Ensure
INTHE!.'%,
remove the first stage regulator
· Always
and release all residual gas pressure from
THE!.'%,BEFOREDISASSEMBLY
·4gasHE!.'%,CANHOLDASMALLRESIDUAL
charge, typically two shots, with the
The mini-regulator is a second stage
regulator that is used to control the velocity
and regulate the gas pressure. It can be
deleted, but only if a suitable first stage
regulator is used that incorporates a high
flow and good regulation properties across
the tank pressure range.
1 2EMOVETHEVELOCITYADJUSTERSCREW
LOCATEDONTHEFOREGRIPUSINGAMM
Allen wrench.
2 Unscrew the bottom section of the fore
grip and remove.
3
first stage regulator removed. Always
DISCHARGETHE!.'%,INASAFEDIRECTION
to relieve this residual gas pressure.
3(/5,$9/5"%5.352%!4!.934!'%
9/5-5343%%+%80%24!$6)#%
4
3 2EMOVETHEFOREGRIPCAPUSINGASUITABLE
wrench.
·
4 Using the extraction tool provided,
remove the minireg cartridge.
It may be necessary to remove the fore grip
completely in order to facilitate access to the
UNDERSIDEOFYOUR!.'%,4ODOTHIS
5 Using a 4mm Allen wrench remove the
fore grip retention screw.
6 2EMOVETHETOPSECTIONOFTHEFOREGRIP
Note: If replacement of the macro line
hose connector is required - remove the
regulator end cap from the fore grip before
attempting to replace the fitting. Failure to
do so can result in damage to the regulator
end cap or the fore grip.
5
6
7 Minireg cartridge assembly.
.OTETHESPRINGSTACKORDER
7
302).'
34!#+
/2$%2
READ ALL WARNINGS BEFORE ATTEMPTING ANY WORK ON YOUR ANGEL. SHOULD YOU BE UNSURE AT ANY STAGE YOU MUST SEEK EXPERT ADVICE.
17
ADHERE STRICTLY TO THESE
AND ALL OTHER SAFETY
INSTRUCTIONS AND GUIDELINES
1
2
a barrel blocking device is fitted
· Ensure
TOTHE!.'%,
the hopper is removed from
· Ensure
THE!.'%,
that there are no paintballs
· Ensure
INTHE!.'%,
0AINTBALLINDUSTRYSTANDARDEYEFACEEAR
·and
head protection designed specifically
to stop paintballs and meeting ASTM
standard F1776 (USA) or CE standard
(Europe) must be worn by user and any
person within range.
3(/5,$9/5"%5.352%!4!.934!'%
9/5-5343%%+%80%24!$6)#%
·
Rubber finger detent
replacement
4HE!.'%,&,9INCORPORATESTHENEW
piece eye cover strap. This eye cover strap
incorporates the improved ADB fingers and
is designed for ease of replacement of the
!$"SANDTROUBLEFREECLEANINGOFTHE!.'%,
eyes, if required.
1 2EMOVETHEVOLUMECHAMBER
maintenance plug with a 4mm Allen
wrench.
3
4
2 Slide the front section of the eye cover
forward and remove.
3 Carefully remove the eye cover arms
FROMEITHERSIDEOFTHE!.'%,
4 5SINGAMM!LLENWRENCHORSIMILAR
push out the ADB finger to be replaced.
5 Take a new ADB finger and insert the
grommet into the retaining hole of the
eye cover arm.
2EPEATTHISPROCESSFORTHEOTHERSIDE
To reassemble, reverse the above
procedure.
5
5
Note: It is important that the front section
of the eye cover is located correctly on the
eye cover arms as shown in 6 + 7 .
Also note that it is important not to splay
the eye cover arms too far apart. This may
result in damage to the eye cover.
Angel Eyes sensor
cleaning
Carefully remove the eye cover arms as
shown in point 3 above.
Carefully extract the eye sensor from its
housing and gently remove any grease or
debris build-up using a clean cotton bud 8 .
6
7
8
READ ALL WARNINGS BEFORE ATTEMPTING ANY WORK ON YOUR ANGEL. SHOULD YOU BE UNSURE AT ANY STAGE YOU MUST SEEK EXPERT ADVICE.
18
Eye ribbon removal
1
2
1 2EMOVETHEEYECOVERASSHOWNON
page 17.
a barrel blocking device is fitted
· Ensure
TOTHE!.'%,
the hopper is removed from
· Ensure
THE!.'%,
that there are no paintballs
· Ensure
INTHE!.'%,
remove the first stage regulator
· Always
and release all residual gas pressure from
THE!.'%,BEFOREDISASSEMBLY
·4gasHE!.'%,CANHOLDASMALLRESIDUAL
charge, typically two shots, with the
2 2EMOVETHEFOREGRIPASSHOWNON
page 16.
3 2EMOVETHERIGHTHANDGRIPCHEEKBY
removing the screws using a suitable
MM!LLENWRENCH
4 Carefully unplug the solenoid from the
board.
5 Carefully unplug the eye ribbons from
the board.
6 2EMOVETHETWOSCREWSRETAININGTHEGRIP
FRAMEUSINGAMM!LLENWRENCHAND
remove the grip frame.
ADHERE STRICTLY TO THESE
AND ALL OTHER SAFETY
INSTRUCTIONS AND GUIDELINES
3
4
5
first stage regulator removed. Always
DISCHARGETHE!.'%,INASAFEDIRECTION
to relieve this residual gas pressure.
3(/5,$9/5"%5.352%!4!.934!'%
9/5-5343%%+%80%24!$6)#%
·
7 Carefully remove the eye ribbon from the
ribbon recess.
To rebuild, reverse this procedure.
6
7
7
7
READ ALL WARNINGS BEFORE ATTEMPTING ANY WORK ON YOUR ANGEL. SHOULD YOU BE UNSURE AT ANY STAGE YOU MUST SEEK EXPERT ADVICE.
19
ADHERE STRICTLY TO THESE
AND ALL OTHER SAFETY
INSTRUCTIONS AND GUIDELINES
1
LPR pressure test
2
The low pressure regulator controls the
PNEUMATICCYCLEOFTHE!.'%,ANDISLOCATED
in the left hand chamber at the rear of the
!.'%,BODY
a barrel blocking device is fitted
· Ensure
TOTHE!.'%,
the hopper is removed from
· Ensure
THE!.'%,
that there are no paintballs
· Ensure
INTHE!.'%,
remove the first stage regulator
· Always
and release all residual gas pressure from
THE!.'%,BEFOREDISASSEMBLY
·4gasHE!.'%,CANHOLDASMALLRESIDUAL
charge, typically two shots, with the
first stage regulator removed. Always
DISCHARGETHE!.'%,INASAFEDIRECTION
to relieve this residual gas pressure.
3(/5,$9/5"%5.352%!4!.934!'%
9/5-5343%%+%80%24!$6)#%
4HEPRESSURENEEDSTOBEAPPROXIMATELYPSI
(4.14 bar) output from an input pressure of
PSIFROMTHESECONDSTAGEREGULATOR
9OUR!.'%,HASBEENTESTEDANDTUNED
to its optimum operating pressure at the
FACTORYUSINGAPSIINPUT4HE!.'%,,02
utilizes shims, as this is the best method of
maintaining its optimum operating pressure.
3
3
If you are using a high pressure system you
MAYNEEDTORESETTHE,029OUMAYALSO
NEEDTOADJUSTTHE,02ONCEYOUR!.'%,HAS
bedded in, but only if you are experiencing
low velocity on your factory settings. Once
THISISDONEYOUSHOULDONLYNEEDTOADJUST
THE,02IFYOUCHANGEYOUR!IR.ITROGEN
system.
·
,02ADJUSTMENTISACHIEVEDBYTHEADDITION
or removal of shims. Each shim equals
APPROXIMATELYPSIBAR7ERECOMMEND
the use of the optional service tools and
lubrication of parts with LOVE JUICE
Extreme Grease only.
1 2 EMOVETHEBACKPLATERETAININGSCREW
USINGAMM!LLENWRENCH
2 2EMOVETHE,02CHAMBERPLUGUSING
a 4mm Allen wrench.
3 3CREWINTHE,02PRESSUREGAUGEUNTIL
it stops turning.
Make a note of the pressure reading.
Should the reading be too high or low
proceed to the next stage ,02!DJUSTMENTPAGE
ADHERE STRICTLY TO THESE
AND ALL OTHER SAFETY
INSTRUCTIONS AND GUIDELINES
· %NSURETHATTHE!.'%,ISDEGASSEDAND
switched off.
Note: Remove the pressure gauge, replace
the LPR chamber plug and back plate and
re-gas your ANGEL.
ADHERE STRICTLY TO THESE
AND ALL OTHER SAFETY
INSTRUCTIONS AND GUIDELINES
· 4(%!.'%,)3,)6%!.$#!0!",%
/&$)3#(!2').'
s &IRESHOTSWITH./PAINTBALLSPRESENTTO
STABILIZETHE,02PRESSURE
READ ALL WARNINGS BEFORE ATTEMPTING ANY WORK ON YOUR ANGEL. SHOULD YOU BE UNSURE AT ANY STAGE YOU MUST SEEK EXPERT ADVICE.
20
LPR Adjustment
1
ADHERE STRICTLY TO THESE
AND ALL OTHER SAFETY
INSTRUCTIONS AND GUIDELINES
2
a barrel blocking device is fitted
· Ensure
TOTHE!.'%,
the hopper is removed from
· Ensure
THE!.'%,
that there are no paintballs
· Ensure
INTHE!.'%,
remove the first stage regulator
· Always
and release all residual gas pressure from
THE!.'%,BEFOREDISASSEMBLY
·4gasHE!.'%,CANHOLDASMALLRESIDUAL
charge, typically two shots, with the
ADHERE STRICTLY TO THESE
AND ALL OTHER SAFETY
INSTRUCTIONS AND GUIDELINES
· %NSURETHATTHE!.'%,ISDEGASSEDAND
switched off.
1 2 EMOVETHEBACKPLATERETAININGSCREW
USINGAMM!LLENWRENCH
2 2EMOVETHE,02CHAMBERPLUGUSING
a 4mm Allen wrench.
3
first stage regulator removed. Always
DISCHARGETHE!.'%,INASAFEDIRECTION
to relieve this residual gas pressure.
3(/5,$9/5"%5.352%!4!.934!'%
9/5-5343%%+%80%24!$6)#%
4
3 Using the extraction tool provided,
WITHDRAWTHE,02PISTONCAREFULLY
·
4 Add or remove shims to increase
or decrease pressure respectively.
One shim equates to approximately
PSICHANGEINPRESSURE
2EPLACETHE,02PISTON,02CHAMBERPLUG
BACKPLATEANDREGASYOUR!.'%,
4OCHECKTHE,02PRESSURESEEPAGE
LPR assembly
4HE,02MAYBESERVICED
once it has been removed by
FOLLOWINGTHE,02ASSEMBLY
PROCEDUREONPAGE4HE
serviceable parts are the
external ‘O’ rings and the
,02SPOOL
A ,02SPOOL
B ,02BODY
C 0ISTONSPACER
D ,02SHIMS
E ,02SPRINGSTACK
F ,02PISTON
G ,02CIRCLIP
.OTE
The order
of the three
tri-active springs
should not be
altered.
C
A
B
E
G
D
302).'
34!#+
/2$%2
F
5
5
6
LPR spool removal
5 5 SINGASUITABLEPICKREMOVETHE,02CIRCLIP
FROMTHE,02BODY
6 7ITHTHE,02CIRCLIPREMOVEDSEPARATETHE
,02SPOOLFROMTHE,02BODY
READ ALL WARNINGS BEFORE ATTEMPTING ANY WORK ON YOUR ANGEL. SHOULD YOU BE UNSURE AT ANY STAGE YOU MUST SEEK EXPERT ADVICE.
21
ADHERE STRICTLY TO THESE
AND ALL OTHER SAFETY
INSTRUCTIONS AND GUIDELINES
1
2
LPR removal
3
If you are experiencing operating pressure
inconsistency, this may be due to a damaged
SPOOLSEALONYOUR,024HISSEALISSHOWNIN
REDONTHE,023POOL A SHOWNONPAGE
a barrel blocking device is fitted
· Ensure
TOTHE!.'%,
the hopper is removed from
· Ensure
THE!.'%,
that there are no paintballs
· Ensure
INTHE!.'%,
remove the first stage regulator
· Always
and release all residual gas pressure from
THE!.'%,BEFOREDISASSEMBLY
·4gasHE!.'%,CANHOLDASMALLRESIDUAL
charge, typically two shots, with the
first stage regulator removed. Always
DISCHARGETHE!.'%,INASAFEDIRECTION
to relieve this residual gas pressure.
3(/5,$9/5"%5.352%!4!.934!'%
9/5-5343%%+%80%24!$6)#%
1 2EMOVETHERIGHTHANDGRIPCHEEKBY
REMOVINGTHESCREWSUSINGASUITABLE
MM!LLENWRENCH
2 Carefully unplug the solenoid from the
board.
3 Carefully unplug the eye ribbons from
the board.
4
5
6
4 2EMOVETHETWOSCREWSRETAININGTHEGRIP
FRAMEUSINGAMM!LLENWRENCH
5 2EMOVETHEBOLTASDESCRIBEDONPAGE
·
6 2EMOVETHEBACKPLATERETAININGSCREW
MM!LLENWRENCHANDREMOVETHE
back plate.
7
7 2EMOVETHE,02CHAMBERPLUGUSING
a 4mm Allen wrench.
8 Loosen the top plate retaining screw using
AMM!LLENWRENCH
9 ...and slide the top plate from the body.
8
9
10
11
10 Carefully lift and remove the solenoid
- carefully extracting the solenoid plugs
from the grip frame housing noting the
orientation of the gasket.
11 %XTRACTTHE,02RETAININGPIN
12
13
14
15
12 2EMOVETHE,02PISTONUSINGTHE
extraction tool supplied.
13 Using a blunt pick remove the solenoid
piston spacer.
14 Using a blunt pick, extract the
,02BODY
To remove the
LPR spool from
the LPR body see
page 20 LPR spool removal
15 Check the spool seal for signs of
damage and replace spool assembly if
necessary. The spool assembly is part of
THECOMPREHENSIVE!.'%,SPARESKIT
To rebuild, reverse this procedure.
READ ALL WARNINGS BEFORE ATTEMPTING ANY WORK ON YOUR ANGEL. SHOULD YOU BE UNSURE AT ANY STAGE YOU MUST SEEK EXPERT ADVICE.
22
Exhaust valve stem
removal
4HEMAGNETICEXHAUSTVALVEINYOUR!.'%,
&,9REDUCESITSWORKINGPRESSUREBYOVER
PSIONTHE!.'%,!4HE!.'%,
&,9SPSIWORKINGPRESSUREREDUCESITS
KICKMAKINGYOUR!.'%,&,9EVENSOFTER
ONPAINTTHANTHE!.'%,!)FYOUARE
experiencing gas leaking from the breech
area, first ensure your tank is delivering at
LEASTPSITOYOUR!.'%,)FYOUARESTILL
experiencing operating pressure related
PROBLEMSWITHYOUR!.'%,SUCHASGAS
leaking from the breech area, inability to
achieve the required velocity or increased
NOISEWHENSHOOTINGYOUR!.'%,MAYHAVE
a damaged exhaust stem face seal. This seal
is shown in 11 and can be easily accessed
by removing the exhaust valve stem assembly
following the instructions in points 1 and 2
below. Once removed, inspect the face seal.
If the face of this seal is scored, or
impregnated with grit or dirt or is excessively
deformed, it is necessary to replace the
exhaust valve stem assembly by reversing
the procedure in points 1 and 2 below.
1 2EMOVETHEVOLUMECHAMBER
maintenance plug using
a 4mm Allen wrench.
2 Insert a suitable Allen wrench into the
cavity. The exhaust valve stem (which is
magnetic) will be attracted to the Allen
wrench and can be easily removed.
1
ADHERE STRICTLY TO THESE
AND ALL OTHER SAFETY
INSTRUCTIONS AND GUIDELINES
2
a barrel blocking device is fitted
· Ensure
TOTHE!.'%,
the hopper is removed from
· Ensure
THE!.'%,
that there are no paintballs
· Ensure
INTHE!.'%,
0AINTBALLINDUSTRYSTANDARDEYEFACEEAR
·and
head protection designed specifically
3
4
to stop paintballs and meeting ASTM
standard F1776 (USA) or CE standard
(Europe) must be worn by user and any
person within range.
3(/5,$9/5"%5.352%!4!.934!'%
9/5-5343%%+%80%24!$6)#%
·
5
6
7
8
8
9
Exhaust valve guide
removal
Once the valve stem assembly has been
replaced if you are still experiencing the
same problem you will need to inspect the
O-ring on the exhaust valve guide nearest
the face seal for nicks or tears and replace
if necessary. If there are no signs of damage
to this O-ring, inspect the face seal seat for
dents or scratches and replace if necessary,
following the instructions in points 1 and 2
above and points 3 to 10 below.
3 Slide off the eye cover.
4 2EMOVETHEFOREGRIPASSHOWN
on page 16.
5 2EMOVETHEENDPLUGRETENTIONPINUSING
the extraction tool provided.
6 Carefully move eyes out of the way
to avoid damage.
7 2EMOVETHEENDPLUG
8 2EMOVETHETWOSCREWSRETAININGTHEGRIP
FRAMEUSINGAMM!LLENWRENCH
10
9 2EMOVETHE,02RETAININGPIN
10 Using a blunt pick, carefully extract
the exhaust valve guide as shown.
Important notes for the re-assembly
of components:
s%NSUREEXHAUSTVALVESTEMASSEMBLY
is located in the exhaust body within
the ANGEL.
s%NSURETHATTHEENDCAPISLOCATED
correctly.
11
Exhaust valve
guide seal
READ ALL WARNINGS BEFORE ATTEMPTING ANY WORK ON YOUR ANGEL. SHOULD YOU BE UNSURE AT ANY STAGE YOU MUST SEEK EXPERT ADVICE.
23
ADHERE STRICTLY TO THESE
AND ALL OTHER SAFETY
INSTRUCTIONS AND GUIDELINES
1
2
3
RAM removal
5
9OUMAYNEEDTOREMOVEYOUR2AMIFTHE
!.'%,SHAMMERHASCOMELOOSEORTHE
2AMISLEAKING4OESTABLISHIFAGASLEAKIS
COMINGFROMTHE2AMlRSTCHECKYOUR,02
PRESSUREISABOVEPSIANDIFSOOPENTHE
breech block and listen for gas emitting from
the breech pin slot. If gas is emitting from the
BREECHPORTITISNOT2AMRELATEDANDWILLBE
due to your exhaust valve. If gas is emitting
FROMTHESLOTREMOVEYOUR2AMFOLLOWING
the instructions below and inspect the three
O-rings for damage and replace if necessary.
If the O-rings are not damaged, inspect the
2AMSHAFTFORSCRATCHESORDENTSANDREPLACE
THECOMPLETE2AMIFNECESSARYFOLLOWINGTHE
instructions below.
a barrel blocking device is fitted
· Ensure
TOTHE!.'%,
the hopper is removed from
· Ensure
THE!.'%,
that there are no paintballs
· Ensure
INTHE!.'%,
0AINTBALLINDUSTRYSTANDARDEYEFACEEAR
·and
head protection designed specifically
to stop paintballs and meeting ASTM
standard F1776 (USA) or CE standard
(Europe) must be worn by user and any
person within range.
3(/5,$9/5"%5.352%!4!.934!'%
9/5-5343%%+%80%24!$6)#%
·
4
6
1 2EMOVETHERIGHTHANDGRIPCHEEKBY
REMOVINGTHESCREWSUSINGASUITABLE
MM!LLENWRENCH
2 Carefully unplug the solenoid from the
board.
3 Carefully unplug the eye ribbons from
the board.
4 2EMOVETHETWOSCREWSRETAININGTHEGRIP
FRAMEUSINGAMM!LLENWRENCHAND
remove the grip frame.
5 Turn the breech release knob clockwise
and remove the bolt from the breech.
7
8
9
NOTEthe breech will not open unless
the bolt is in the backward position.
6 2EMOVETHEBACKPLATERETAININGSCREW
MM!LLENWRENCHANDREMOVETHE
back plate.
7 2EMOVETHE,02CHAMBERPLUGUSING
a 4mm Allen wrench.
8 7ITHDRAWTHE2AMRETAININGPIN
9 4HE2AMCANNOWBEWITHDRAWN
To rebuild, reverse this procedure.
A
B
IMPORTANT NOTES:
For re-assembly of components
s%NSURETHE2AMASSEMBLYISLUBRICATED
with Love Juice Extreme Grease prior
to refitting.
s%NSURETHE2AMASSEMBLYEXTERNAL
O-rings are not damaged.
s%NSURETHE2AMASSEMBLYISINSERTED
slowly to prevent damage to the
O-rings.
s.OTETHATTOREPLACETHE2AMRETAINING
pin, the holes in the gun body A and in
the Ram itself B must be aligned.
READ ALL WARNINGS BEFORE ATTEMPTING ANY WORK ON YOUR ANGEL. SHOULD YOU BE UNSURE AT ANY STAGE YOU MUST SEEK EXPERT ADVICE.
24
Trigger adjustment
Back stop
ADHERE STRICTLY TO THESE
AND ALL OTHER SAFETY
INSTRUCTIONS AND GUIDELINES
Front stop
a barrel blocking device is fitted
· Ensure
TOTHE!.'%,
the hopper is removed from
· Ensure
THE!.'%,
that there are no paintballs
· Ensure
INTHE!.'%,
0AINTBALLINDUSTRYSTANDARDEYEFACEEAR
·and
head protection designed specifically
4HETRIGGERSYSTEMHASFOURADJUSTABLE
POINTSback stop, front stop, magnetic
return strength control and activation point.
7HENADJUSTINGTHETRIGGERITISADVISABLE
to set both the front and back stop positions
before you proceed to set the return
strength or activation point.
Back stop
Counter-clockwise = moves the point
at which the trigger stops - backwards,
towards the grip cheek
Clockwise = moves the point at which
the trigger stops - forwards, away from
the grip cheek
Magnetic return strength
to stop paintballs and meeting ASTM
standard F1776 (USA) or CE standard
(Europe) must be worn by user and any
person within range.
3(/5,$9/5"%5.352%!4!.934!'%
9/5-5343%%+%80%24!$6)#%
Activation point
·
.OTE)TISIMPORTANTNOTTOOVERADJUSTTHE
back stop position set screw in this direction
as it will result in not enough travel for
a trigger pull to activate the button.
Front stop
Counter-clockwise = moves the point
from which the trigger-pull starts forwards,
away from the grip cheek
Clockwise = moves the point from which
the trigger-pull starts backwards, towards
the grip cheek
Note: It is important not to over adjust
the front stop position set screw in this
direction as it will result in not enough
return travel for the trigger to reset the
Magnet return strength
Counter-clockwise = makes magnet
return strength weaker.
Clockwise = makes magnet return
strength stronger
1
Firstly remove the grip frame.
3EEPAGElGS
4HEN
1 With the grip frame removed
you now have access to the
trigger clamp plate and the
trigger itself
2
It is important not to over adjust this portion
of the trigger as it will negate the position
of the front stop set screw. For this reason
it is advisable that during the setup of the
trigger you should wind the magnetic return
strength adjuster screw counter-clockwise
several turns so that it does not interfere with
the adjustment of the front stop set screw.
Activation point
Counter-clockwise = moves the point
at which the trigger will activate closer
to the end of the trigger pull
Clockwise = moves the point at which
the trigger will activate closer to the start
of the trigger pull.
Trigger removal
2 2EMOVETHETRIGGERCLAMPPLATE
3 2EMOVETHETRIGGER
3
)MPORTANT.OTE
When reassembling the trigger
note the orientation of the trigger
clamp plate and ensure that the
clamp plate is located correctly
on the trigger bearings.
Trigger clamp plate
Locate onto
trigger bearings
READ ALL WARNINGS BEFORE ATTEMPTING ANY WORK ON YOUR ANGEL. SHOULD YOU BE UNSURE AT ANY STAGE YOU MUST SEEK EXPERT ADVICE.
25
USEFUL CONVERSIONS
Listed are some useful conversions
relating to pressure, velocity, mass
and distance.
PROBLEM
SOLUTION
PAGE
!.'%,7),,./4&)2%
.OAIRORNITROGENPRESENT
0ROPELLANT!IR.ITROGEN3UPPLY
)STHEBATTERYOPERATIONAL
#HANGETHEBATTERY
)STHE!.'%,IN@3!&%
-AKINGTHE!.'%,@,)6%
ATMPSI
)STHETRIGGERNOTCLOSINGTHEBUTTON
4RIGGER!DJUSTMENT
BARPSI
)STHETRIGGERNOTRELEASINGTHEBUTTON
4RIGGER!DJUSTMENT
PSIBAR
)STHEBOLTJAMMEDFORWARD
#LEARTHEBLOCKAGEFROMBREECH
)STHE,02SETCORRECTLY
,02!DJUSTMENT
PRESSURE
ATMBAR
VELOCITY
)STHE/04/4RIGGERFUNCTIONING
4RIGGER!DJUSTMENT
&TSMS
!RETHE!.'%,%YESSWITCHEDON
%NSUREPAINTISPRESENT
n
&TS-PH
!RETHE!.'%,%YESOPTICSBLOCKED
#LEANTHE!.'%,%YES/PTICS
n
6%,/#)496!2)!4)/.3
!REGOODQUALITYPAINTBALLSBEINGUSED
5SEGOODPAINTBALLS
n
)STHEBARRELBORECORRECTFORTHEPAINT
5SESUITABLEBARREL
n
MASS
)STHEPAINTSWOLLENCOLDORHOT
2EVIEWYOURSTORAGEOFPAINT
n
GOZ
)STHEBARRELBORECLEAN
#LEANTHEBARREL
n
+G)B
)STHETANKREGCHOKINGONGASSUPPLY
#HECKTANKREGULATORASSEMBLY
n
OZ+G
)STHETANKREGOPERATINGCORRECTLY
#HECKTANKREGULATORASSEMBLY
)STHEMINIREGOPERATINGCORRECTLY
-INIREG3ERVICE
DISTANCE
)STHEMINIREGCHOKINGONGASSUPPLY
-INIREG3ERVICE
MM)NCH
!REUNSUITABLEAFTERMARKETPARTSlTTED
5SEGENUINE!.'%,PARTS
)NCHMM
)STHEBOLTWORN
2EPLACE"OLT
)STHE,02SETCORRECTLY
,02!DJUSTMENT
)STHEVALVEDWELLSETCORRECTLY
$WELL!DJUSTMENT
)STHElRSTSHOTLOW
)NCREASE$WELL4IME
6%,/#)494//,/7()'(
)STHEHIGHPRESSUREREGSETCORRECTLY
#HECKATGASSOURCE
FOOT)BSFORCE*OULES
)STHEVELOCITYADJUSTERSCREWSETCORRECTLY
6ELOCITYADJUSTMENT
*OULEFOOT)BSFORCE
)STHEBOLTSTICKING
#HECKRUBBERlNGERDETENTS
'RAM'RAINS
)STHE,02SETCORRECTLY
,02!DJUSTMENT
'RAINLB
)STHEVALVEDWELLSETCORRECTLY
$WELL!DJUSTMENT
MS&TS
MS-PH
MS+PH
THOUMICRON
MICRONTHOU
FORMULA TO CONVERT
FEET PER SECOND (Ft/s)
TO FOOT Lbs (Force)
n
n
LB'RAINS
6ELOCITYSQUAREDX0ROJECTILEWEIGHT
6%,/#)49&TSFEETPERSECOND
02/*%#4),%7%)'(4'2!).3
4HEREFOREAPAINTBALL GRAMS
&TSFOOTLBSFTLBS
'!3,%!+).'
&ROMTHEBACKCOVER
#HECKSOLENOIDVALVE
&ROMTHE2AMASSEMBLY
#HECK2AMBODY/RINGS
&ROMTHEGASJOINTS
#HECKALLlTTINGS
&ROMTHEEXHAUSTVALVE
%XHAUSTVALVESTEMGUIDE
READ ALL WARNINGS BEFORE ATTEMPTING ANY WORK ON YOUR ANGEL. SHOULD YOU BE UNSURE AT ANY STAGE YOU MUST SEEK EXPERT ADVICE.
lGS
26
PROBLEM
SOLUTION
PAGE
"2%!+).'0!).4"!,,3
)STHEPAINTTOOFRAGILE
5SELESSFRAGILEPAINT
n
)STHEBARRELBORECORRECTFORTHEPAINT
5SEASUITABLEBARREL
n
)STHEPAINTSWOLLENCOLDORHOT
2EVIEWYOURSTORAGEOFPAINT
n
!RETHE!.'%,%YESSWITCHEDON
3WITCH!.'%,%YESON
!RETHE!.'%,%YESFUNCTIONING
!.'%,%YES4EST
)STHELOADERBATTERYWEAKDEAD
2EPLACEBATTERIES
n
)SASUITABLEWORKINGLOADERlTTED
#HECKLOADERSPECIlCATIONS
n
)STHECORRECTPAINTTYPESELECTED
#HANGE0AINT4YPESETTINGS
)STHERATEOFlRESETTOOHIGH
-2/&!DJUSTMENT
!RETHERUBBERlNGERDETENTSFUNCTIONING
#LEANORREPLACE
)STHEPAINTTOOFRAGILEFORTHELOADER
#HANGEPAINTTOTOUGHERGRADE
n
#(/00).'0!).4"!,,3
)STHELOADERBATTERYWEAKDEAD
2EPLACEBATTERIES
n
)SASUITABLEWORKINGLOADERlTTED
2EPLACELOADER
n
)STHELOADERDIRTY
#LEANLOADER
n
!RETHEPAINTBALLSSWOLLEN
2EPLACETHEPAINTBALLS
n
!RETHE!.'%,%YESSWITCHEDON
3WITCH!.'%,%YESON
!RETHE!.'%,%YESFUNCTIONING
!.'%,%YES4EST
)STHECORRECTPAINTTYPESETTINGSELECTED
#HANGE0AINT4YPESETTINGS
)STHE2ATE/F&IRESETTOOHIGH
-2/&!DJUSTMENT
!RETHERUBBERlNGERDETENTSFUNCTIONING
#LEANORREPLACE
)STHERATEOFlRESETCORRECTLY
-2/&!DJUSTMENT
)STHELOADERBATTERYWEAKDEAD
2EPLACEBATTERIES
n
)SASUITABLEWORKINGLOADERlTTED
2EPLACELOADE
n
)STHELOADERDIRTY
#LEANLOADER
n
!RETHE!.'%,%YESSWITCHEDON
3WITCH!.'%,%YESON
)STHECORRECTPAINTTYPESELECTED
#HANGE,OADER4YPESETTINGS
)STHE2ATE/F&IRESETTOOLOW
-2/&!DJUSTMENT
&)2).'4//3,/7,9
%8#%33)6%./)3%'!3#/.35-04)/.
)STHEVALVE$WELLSETCORRECTLY
$WELL!DJUSTMENT
)STHE,02PRESSURESETCORRECTLY
,02!DJUSTMENT
)STHEEXHAUSTVALVEWORN
%XHAUST6ALVEREPLACEMENT
)STHEBARRELBORECORRECTFORTHEPAINT
5SEASUITABLEBARREL
n
READ ALL WARNINGS BEFORE ATTEMPTING ANY WORK ON YOUR ANGEL. SHOULD YOU BE UNSURE AT ANY STAGE YOU MUST SEEK EXPERT ADVICE.
27
Terms of warranty - EEC/R.O.W. (excluding usa/canada).
3UBJECTTOTHECONDITIONSSETOUTBELOW
7$0WARRANTSTHATTHE!.'%,WILL
correspond to its specification at the time
of delivery and will be free from defects in
materials and workmanship for a period of
six months from the date of purchase.
7$0GIVESTHISWARRANTYSUBJECTTOTHE
FOLLOWINGCONDITIONS
s0ROOFOFPURCHASEISREQUIREDINALL
warranty claims.
s7ARRANTYISNOTTRANSFERABLE
s4HECOMPANYSHALLBEUNDERNOLIABILITY
in respect of any defect arising from fair
wear and tear.
s3EALSBATTERIESWIRINGCIRCUITBOARDS
displays and exhaust valves are not
covered by this warranty. Wilful damage,
negligence, abnormal working conditions,
weather, accident, tampering, failure
to follow manufacturers instructions
(whether oral or in writing), misuse or
ALTERATIONORREPAIROFTHE!.'%,WITHOUT
the company’s written approval will
invalidate this warranty and the company
shall be under no obligation whatsoever
to the purchaser in respect of any of the
above breaches of this warranty.
s4HEABOVEWARRANTYDOESNOTEXTEND
to parts, materials or equipment not
manufactured by the company, in
respect of which the purchaser shall only
be entitled to the benefit of any such
warranty or guarantee as given by the
manufacturer to the company.
4HISWARRANTYDOESNOTCOVERTHEFOLLOWING
s2EPAIRSALTERATIONSORREPLACEMENTSNOT
authorised by the manufacturer.
s4HEGRADUALREDUCTIONINPERFORMANCE
LINKEDTOTHEAGEOFTHE!.'%,ORUSAGE
s!NYTHINGCAUSEDDIRECTLYORINDIRECTLYBY
vandalism or theft.
s!NYDAMAGETOPARTSWHICHARERECALLED
by the Manufacturer.
s!NYLOSSDAMAGEORFAILUREWHICH
a qualified engineer appointed by the
manufacturer believes could have been
avoided, or was totally or partly caused
by a lack of maintenance.
3UBJECTASEXPRESSLYPROVIDEDINTHESE
conditions and except where the goods are
sold to a person dealing as a consumer
(within the meaning of the Unfair Contract
4ERMS!CTALLWARRANTIESCONDITIONS
or other terms implied by statute or
common law are excluded to the fullest
extent permitted by law.
Where the goods are sold under a
consumer transaction (as defined by
the Unfair Terms in Consumer Contracts
2EGULATIONS3)THESTATUTORY
rights of the purchaser are not affected
by these conditions. Carriage charges in
relation to warranty claims shall be borne
by the customer.
Where any valid claim in respect of
THE!.'%,ISBASEDINTHEQUALITYOR
CONDITIONOFTHE!.'%,ORITSFAILURETO
meet specification, and such valid claim is
notified to the company in writing and is in
accordance with the company’s standard
terms and conditions of sale, the company
shall be entitled to repair or replace the
goods or the part in question free of charge
or, at the company’s sole discretion, refund
to the purchaser the price of the goods (or
a proportionate part of the price) but the
company shall have no further liability to
the purchaser.
Except in respect of death or personal
INJURYCAUSEDBYTHECOMPANYSNEGLIGENCE
the company shall not be liable to the
purchaser by reason of any representation,
or any implied warranty, condition or other
term, or any duty at common law, or under
the express terms of this guarantee, for any
direct or indirect, special or consequential
loss or damage, whether to persons or
property, costs, expenses or other claims
for compensation or damages whatsoever
(whether caused by the negligence of
the company, its employees or agents
or otherwise) which arise out of or in
CONNECTIONWITHTHESUPPLYOFTHE!.'%,
its use, or misuse, or resale by the
purchaser, or any individual, and the
entire liability of the company under or in
connection with the purchase or use or
MISUSEOFTHE!.'%,SHALLNOTEXCEEDTHE
PURCHASEPRICEOFTHE!.'%,0URCHASER
agrees to adhere strictly to all warnings and
safety procedures and the contents of the
Operator’s Manual.
The laws of England shall govern this
warranty and the purchaser agrees to
SUBMITTOTHENONEXCLUSIVEJURISDICTION
of the English courts.
4HESUPPLYANDPURCHASEOFTHE!.'%,
ISSUBJECTTOTHECOMPANYSSTANDARD
terms and conditions of sale, a copy of
WHICHISAVAILABLEONREQUEST!.'%,
patents applied for, design rights and all
RIGHTSRESERVED4HE!.'%,ISMARKETED
ANDDISTRIBUTEDBY7$0,TD#OMPANY
REGISTEREDIN%NGLAND.OAND
7$00AINTBALL)NCREGISTEREDIN53!.O
.OWARRANTYISGIVENTOPARTSNOT
manufactured by the manufacture,r and
ALLLIABILITYFORLOSSDAMAGEORINJURYIS
excluded.
This warranty must be construed and read
INCONJUNCTIONWITHTHEPRODUCTSTERMSAND
conditions of sale.
To make a warranty claim, the purchaser
must first contact the nearest authorised
!.'%,3ERVICE#ENTREFORINSTRUCTIONS
!LISTOFAUTHORISED!.'%,3ERVICE#ENTRES
MAYBEOBTAINEDTHROUGHTHE7$0WEBSITE
WWWWDPTVORBYCONTACTING7$0BYMAIL
AT7$0-ETRO4RIANGLE-OUNT3TREET
.ECHELLS"IRMINGHAM%NGLAND"14
ORBYFAXAT
ORBYCALLING
28
Terms of warranty - USA / Canada
'ENERAL%XPRESS7ARRANTIES
7$0WARRANTSTOTHEBUYERWHOIS
purchasing to place into use (Buyer) only,
THATTHE!.'%,0RODUCTSHALLBEFREE
from material manufacturing defects in
materials and workmanship for six months
FROMTHEDATEOFPURCHASESUBJECTTOTHE
requirements, disclaimers and limitations
of this Warranty. This is not a Warranty of
performance, but a limited Warranty as to
THECONDITIONOFTHE0RODUCTATTHEBEGINNING
of the Warranty period, this Warranty is only
against such defects and not against any
other failures such as, but not limited to,
those due to wear and tear, exposure to the
elements, unusual operating environments,
misuse, negligence, accident, alteration
or repair in any respect which, in the
JUDGEMENTOF7$0ADVERSELYAFFECTSTHE
CONDITIONOROPERATIONOFTHE0RODUCT.ORMAL
maintenance and perishable items such as
seals, batteries, wiring, indicator lamps and
exhaust valves are excluded from this limited
Warranty against defects. This Warranty is
not transferable and it may not be waived or
EXPANDEDEXCEPTINWRITINGSIGNEDBY7$0
The terms and limitations of this Warranty
shall also apply to any additional goods or
information, which may be distributed by
7$0RELATINGTOTHE!.'%,
$ISCLAIMERAND,IMITATIONOF%XPRESSAND
Implied Warranties.
There are no express Warranties other than
those contained in this Warranty. Whether
ORNOTTHE0RODUCTISTOBEUSEDEXCLUSIVELY
by the Buyer, there shall be no third party
BENElCIARIESTOTHIS7ARRANTYHEREIN./
7!22!.49)302/6)$%$4/$)342)"54/23
/2$%!,%23%8#%04!3-!9"%
%802%33,902/6)$%$).!3%0!2!4%
!'2%%-%.4/&3!,%
!LLDESCRIPTIONSILLUSTRATIONSOFTHE0RODUCT
and other information in catalogues,
brochures and price lists or otherwise
PROVIDEDBY7$0OROTHERSAREINTENDED
FORGENERALINFORMATIONONLY7$0ISNOT
responsible for any errors or omissions
therein or for any loss or damage resulting
FROMRELIANCEONTHEM7$0DOESNOT
WARRANTTHATTHE0RODUCTISINCOMPLIANCE
with any law or industry standards,
GUIDELINESORPROCEDURES7$0STANDARD
terms and conditions of sale also apply if
"UYERISADIRECTPURCHASERFROM7$07$0
$)3#,!)-3!,,)-0,)%$7!22!.4)%3
).#,5$).'"54./4,)-)4%$4/4(/3%
/&&)4.%33&/2!0!24)#5,!20520/3%
!.$-%2#(!.4!"),)49
2EMEDYAND,IMITATIONOF7$0LIABILITY
$EFECTIVEORNONCONFORMING0RODUCTOR
parts thereof discovered and returned to
7$0FREIGHTPREPAIDWITHPROOFOFPURCHASE
during the Warranty period shall be repaired
ORREPLACEDBY7$0WITHOUTANYADDITIONAL
CHARGEANDSHIPPEDTO"UYER&/"7$0
)NLIEUOFREPAIRORREPLACEMENTIF7$0
ELECTS7$0MAYUPONRETURNOFSUCH
product and making a determination of
non- conformity or defect, keep the product
and refund the purchase price paid by
Buyer. Buyer’s remedies shall be limited
EVENINTHEEVENTOF7$0DEFAULTOFITS
Warranty obligations) exclusively to those
PROVIDEDINTHIS7ARRANTY5.$%2./
#)2#5-34!.#%33(!,,7$0/2!.9
3500,)%2$)342)"54/2$%!,%2/2
/4(%20%23/."%,)!",%&/2%8%-0,!29
05.)4)6%#/.3%15%.4)!,/2).#)$%.4!,
$!-!'%3./2&/2!.9!-/5.4).
%8#%33/&4(%"59%23052#(!3%02)#%
Buyer waives any causes of action or theories
of liability including, but not limited to, those
arising under contract, tort, strict liability,
0RODUCTLIABILITYSTATUTESOROTHERWISE
except as to those specifically provided by
the Uniform Commercial Code (as adopted in
Michigan) as excluded, modified and limited
in this warranty.
!DDITIONAL#ONSUMER0ROTECTION
The products are offered for sale for end use
in supervised commercial establishments
where professional safety codes are
enforced, and not for personal, family
ORHOUSEHOLDUSE.EVERTHELESSIFTHE
0RODUCTISDETERMINEDINATRANSACTIONTOBE
ACUSTOMER0RODUCTUNDERAPPLICABLELAWTHE
FOLLOWINGPROVISIONSSHALLBECOMEAPPLICABLE
A4(%)-0,)%$7!22!.4)%3/&
-%2#(!.4!"),)49/2&)4.%33/&4(%
02/$5#4&/2!0!24)#5,!20520/3%
4(!4#!../4"%$)3#,!)-%$!2%
,)-)4%$).$52!4)/.4/4(%).)4)!,
%802%337!22!.490%2)/$
(b) Some states do not allow limitations on
how long an implied Warranty lasts, so the
above limitation in (a) may not apply.
(c) Some states do not allow the exclusion or
limitation of incidental or consequential
damages, so such limitations may not
apply.
(d) And this Warranty gives buyer specific
legal rights, and buyer may also have
other rights provided for by law.
0ARTS3ERVICEAND4RAININGPERFORMED
BY7$0
All Warranty and non-Warranty parts, labour
ANDSERVICEIFANYPROVIDEDBY7$0RELATED
TOTHEPRODUCTARESUBJECTTOALLLIMITATIONS
and disclaimers of warranties and remedies
provided in this Warranty. The replacement
ORREPAIROFAPRODUCTBY7$0DOESNOTGIVE
rise to any new Warranty except the Warranty
period provided for herein shall be extended
by the length of any period in which defective
or non-conforming product is in possession
OF7$07$0MAYHAVEACCESSTOTHE
0RODUCTAFTERPURCHASEOFTHE0RODUCT7$0
is not under any duty to inspect the product
for any defects or any improper use or
MODIlCATIONOFTHE0RODUCTNORTOCORRECT
or advise anyone of any such condition,
use or modification, which is observed.
Any notification, which may be given,
ISVOLUNTARYANDSUBJECTTOALLLIMITATIONS
and disclaimers in this Warranty.
5SERS2ESPONSIBILITYFOR3AFETYAND
Indemnification.
It is Buyer’s or other user’s responsibility to
obtain all training and means that may be
necessary to effectively protect all individuals
ANDPROPERTYFROMDAMAGEANDBODILYINJURY
which otherwise may result from the use
ORMAINTENANCEOFTHE0RODUCTANDTOUSE
THE0RODUCTINACCORDANCEWITHOPERATING
instructions and due care.
If operating instructions are not provided
WITHTHE0RODUCTORHAVEBEENLOSTACOPY
WILLBEPROVIDEDBY7$0WITHOUTCOSTON
request. The buyer shall use and shall
require all others to use all safety devices
and guards furnished with or intended to be
USEDWITHTHE0RODUCTANDTOFOLLOWPROPER
safe operating procedures in accordance
with general industry standards and as set
forth in manuals and instruction information
FURNISHEDBY7$0)FTHE"UYERFAILSTO
comply with the obligations set forth in this
section, the Buyer shall defend and indemnify
7$0HARMLESSFROMANYCLAIMLIABILITYOR
OBLIGATIONINCURREDBY7$0ORITSSUPPLIERS
DISTRIBUTORSORDEALERSTOPERSONSINJURED
directly or indirectly in connection with the
use of the product contrary to this Warranty
ORANYWARNINGORINSTRUCTIONFROM7$0
,AWAND*URISDICTION
This Warranty shall be governed by the laws
of Michigan, and Buyer irrevocably submits
TOTHENONEXCLUSIVEJURISDICTIONOFCOURTS
sitting in Michigan to resolve all disputes
arising from or related to this warranty or use
OFTHE0RODUCT
#LAIMSANDINFORMATIONPROCEDURE
To make a warranty claim, the Buyer must
lRSTCONTACTTHENEARESTAUTHORISED!.'%,
Service Centre for instructions. A list of
AUTHORISED!.'%,3ERVICE#ENTRESMAYBE
OBTAINEDTHROUGHTHE7$0WEBSITEWWW
WDPTVORBYCONTACTING7$0BYMAILAT
7$0-ETRO4RIANGLE-OUNT3TREET
.ECHELLS"IRMINGHAM%NGLAND"14
ORBYFAXAT
ORBYCALLING