1
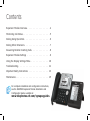
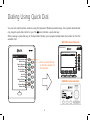
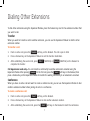
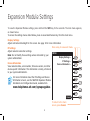
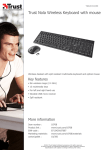
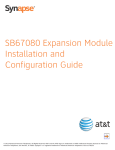
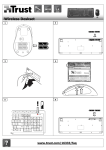
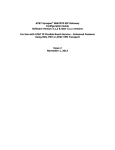
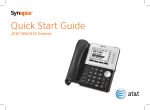
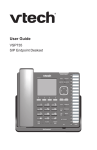
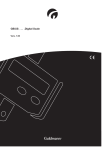
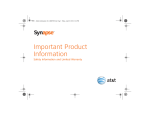
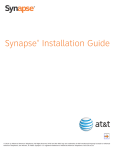
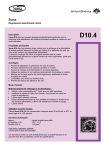
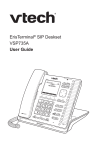
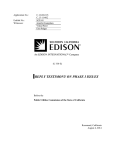
User Guide
AT&T SB67080 Expansion Module
Contents
Expansion Module Overview . . . . . . . . . . . . . . . 4
Monitoring Call Status . . . . . . . . . . . . . . . . . . 5
Dialing Using Quick Dial . . . . . . . . . . . . . . . . . 6
Dialing Other Extensions . . . . . . . . . . . . . . . . . 7
Answering Remote Incoming Calls . . . . . . . . . . . . 8
Expansion Module Settings . . . . . . . . . . . . . . . . 9
Using the Display Settings Menu . . . . . . . . . . . . .10
Troubleshooting . . . . . . . . . . . . . . . . . . . . . 11
Important Safety Instructions . . . . . . . . . . . . . . .13
Maintenance . . . . . . . . . . . . . . . . . . . . . . .15
For complete installation and configuration instructions,
see the SB67080 Expansion Module Installation and
Configuration Guide, available at
www.telephones.att.com/synapseguides.
Expansion Module Overview
The Synapse SB67080 Expansion Module adds to the functionality of your Synapse Deskset, enabling you
to monitor activity at other extensions and providing additional quick-dial keys. Depending on how your
Expansion Module is configured, you can monitor up to 24 extensions or access up to 24 additional
quick-dial entries.
The front panel and screen of the Expansion Module are shown and described below.
Module number (paired
Deskset extension number)
The Expansion Module dials
and answers calls through the
paired Deskset.
Screen
Displays extension names,
call status, quick-dial entries,
and Expansion Module settings.
Shift Key
(0
&KDUOLH-RKQVRQ
0DU\:LOOLDPV
5REHUW%URZQ
/LQGD0LOOHU
5LFKDUG6HUOLQJ
'DYLG&DUWHU
$QJHOD0DUWLQ
*UDKDP%HOO
$%&$FFRXQWDQWV
0LOIRUG7D[L
'U$SSOHWRQ
'DYLV&DWHUHU
• Press to display the next page.
Each page shows 12 extensions
and/or quick-dial entries.
Page Indicator
The screen shows 12
extensions and/or quick-dial
entries per page.
Feature Keys and LEDs
• Dial extensions and
external numbers.
• Answer incoming calls
to other extensions.
• Select Expansion Module
settings.
• LEDs indicate call status.
• Press and hold to access the
Settings menu.
4
4
Monitoring Call Status
The Expansion Module enables you to monitor call activity at other extensions. Screen icons and Feature Key
LEDs indicate the current call status, as described below.
Icon
LED
Status
LED
Status
Solid Green Dialing, on a phone
Solid
Orange
Deskset user has turned Do Not Disturb (DND)
on. You can still call the extension, but ringing
at the far end will be silenced.
Slow Green
Flash
On Hold
Fast Orange Incoming call while DND is on. You can answer
the call remotely (see page 8). You cannot
Flash
Fast Green
Flash
Incoming Call.* You
can answer the call
remotely (see page 8).
call, or paging
Icon
monitor any other call activity while the
extension has DND on.
None
Idle—no activity on the phone, and DND is off.
None
Indicates a quick-dial entry.
* If your Synapse system has been configured for Line Appearance mode, the Expansion Module does not
indicate a new incoming call on an external line. In Line Appearance mode, a Feature Key LED flashes green
for an incoming call when:
• the call is on the Intercom line
• the external call is forwarded to an extension through a Call Forward-No Answer setting
• the external call is transferred to an extension.
For more information about Line Appearance mode, see your Deskset User Guide, available at
www.telephones.att.com/synapseguides.
5
5
Dialing Using Quick Dial
You can call external phone numbers using the Expansion Module quick-dial keys. Your system administrator
can program quick-dial entries for you. The
icon indicates a quick-dial key.
After pressing a quick-dial key on the Expansion Module, your Synapse Deskset dials the number on the first
available line.
SB6703x Series Deskset
307XH)HE
(0
0LOIRUG7D[L
$%&$FFRXQWDQWV
0LOIRUG7D[L
&KDUOLH-RKQVRQ
0DU\:LOOLDPV
5REHUW%URZQ
/LQGD0LOOHU
([W
$P\/HH
5LFKDUG6HUOLQJ
'DYLG&DUWHU
$QJHOD0DUWLQ
*UDKDP%HOO
Press a quick-dial key
to dial the number on
the Deskset.
4XLFN
'LDO
7UDQVIHU
&RQI
3DUN
0RUH
SB6702x Series Deskset
6
Dialing Other Extensions
To dial other extensions using the Expansion Module, press the Feature Key next to the extension number that
you want to call.
Transfer
When you want to transfer a call to another extension, you can use the Expansion Module to dial the other
extension number.
To transfer a call:
1. From an active call, press the Transfer soft key on the Deskset. The call is put on hold.
2. Press a Feature Key on the Expansion Module to call the transfer destination.
3. After establishing the second call, press
complete the transfer.
Xfer?
[SB6703x] or Transfer [SB6702x] on the Deskset to
Call Appearance mode only—You can transfer a call directly to another extension’s voicemail using the
Expansion Module. After pressing Transfer for the first call, press the Vmail soft key on the Deskset, then
press a Feature Key on the Expansion Module to transfer the waiting call directly to an extension’s voicemail.
Conference
When you have an active call and want to create a conference call, you can use the Expansion Module to dial
another extension number before joining all calls in a conference.
To create a conference call:
1. From an active call, press the
Conf
soft key on the Deskset.
2. Press a Feature Key on the Expansion Module to dial another extension number.
3. After establishing the second call, press the
Join?
7
soft key on the Deskset to start the conference.
7
Answering Remote Incoming Calls
The Expansion Module enables you to answer a call that is ringing at any monitored extension.
To answer a remote call with the Expansion Module, press the flashing Feature Key for the ringing extension.
The Deskset paired with the Expansion Module will answer the call. The illustration below shows the Expansion
Module being used to answer a call from Milford Taxi to Charlie Johnson’s extension.
Note: The Deskset answers the call in its Preferred Audio Mode (Speaker or Headset). After the Deskset
answers the remote call, pick up the handset to speak to the caller through the handset.
SB6703x Series Deskset
307XH)HE
(0
0LOIRUG7D[L
$%&$FFRXQWDQWV
'U$SSOHWRQ
&KDUOLH-RKQVRQ
0DU\:LOOLDPV
5REHUW%URZQ
/LQGD0LOOHU
([W
$P\/HH
5LFKDUG6HUOLQJ
'DYLG&DUWHU
$QJHOD0DUWLQ
*UDKDP%HOO
Press the key for
the ringing extension.
The call is answered
on the Deskset.
4XLFN
'LDO
7UDQVIHU
&RQI
3DUN
0RUH
SB6702x Series Deskset
8
Expansion Module Settings
To view the Expansion Module settings, press and hold the Shift key for five seconds. The main menu appears,
as shown below.
To access the settings menus listed below, press an associated Feature Key from the main menu.
Display Settings
Adjust contrast and backlight for the screen. See page 10 for more information.
IP Settings
Adjust network connection settings.
Note: Do not modify these settings unless instructed by your
system administrator.
Device Information
View network status, serial number, firmware version, and other
device-specific information. This information is mainly of interest
to your system administrator.
Press a key to view each menu.
0(18
'LVSOD\6HWWLQJV±
,36HWWLQJV±
'HYLFH,QIRUPDWLRQ±
For more information about the IP Settings and Device
Information screens, see the SB67080 Expansion Module
Installation and Configuration Guide, available from
www.telephones.att.com/synapseguides.
&DQFHO
To return to the main
screen, press Cancel.
9
Using the Display Settings Menu
You can adjust the Expansion Module display on the Display Settings menu.
To adjust the Display Settings:
Press to change the value.
•
Press the t or u keys to change the highlighted value.
',63/$<6(77,1*6
•
To move to the next setting on the screen, press Next.
•
To save the settings and return to the main menu, press
Save.
&RQWUDVW
%DFNOLJKW>+LJK@
•
To return to the previous menu without saving any changes,
press Cancel.
1H[W
6DYH
&DQFHO
10
10
Troubleshooting
Network Status Messages
When the Expansion Module is joining the network or network activity is disrupted, status messages appear
in the header area of the screen. Some of these messages appear as part of normal operation, but if one of
them appears and does not go away, there may be a problem with the network or the device.
Status
Action
Network Down
•
•
Ensure the LAN cable is connected correctly to the back of the unit.
If the problem persists, consult your system administrator.
Acquiring Address
Joining Site
Synchronizing
Synch Failed
•
•
Reset the Expansion Module.
Disconnect the LAN cable, reset the Expansion Module to factory defaults, then reconnect
the Expansion Module.
Consult your system administrator.
•
Resetting the Expansion Module
You may need to manually reset the Expansion Module or return the device
to factory defaults if it does not respond or fails to synchronize with the
system. To reset the Expansion Module, press the RESET button by inserting
a pen or paper clip into the hole and applying pressure to the button.
To reset the device without losing any custom settings, press the RESET
button for less than five seconds. You can get the same result by
disconnecting and reconnecting power to the device.
To completely reset the device to factory defaults, unplug the LAN
cable and press the RESET button for more than five seconds.
11
LAN Port
RESET
Button
11
Troubleshooting, continued
Expansion Module and Deskset Error Messages
If the message Cannot communicate with Deskset appears when you try to call an extension from the
Expansion Module, there may be a connection problem between the Expansion Module and the Deskset with
which it is paired.
First try making a call from the Deskset. If you can call out successfully, then
the Expansion Module is not paired with your Deskset or it has a network error.
Consult your system administrator.
If you cannot make a call from the Deskset, then the Deskset has a network
error (which may be indicated by a message on the Deskset screen or Deskset
Device Information page), the Deskset may be disconnected from the network,
or have lost power. Ensure that the Deskset has power and is connected to the
network.
For more information about troubleshooting the Deskset, consult your
system administrator or download the Deskset User Guide from
www.telephones.att.com/synapseguides.
(0
&KDUOLH-RKQVRQ
0DU\:LOOLDPV
5REHUW%URZQ
/LQGD0LOOHU
$%&$FFRXQWDQWV
&DQQRWFRPPXQLFDWH
0LOIRUG7D[L
ZLWK'HVNVHW
([W
'DYLV&DWHUHU
5LFKDUG6HUOLQJ
'DYLG&DUWHU
$QJHOD0DUWLQ
*UDKDP%HOO
12
12
Important Safety Instructions
This symbol alerts you to important operating or servicing instructions in this document. Always follow
basic safety precautions when using this product to reduce the risk of injury, fire, or electric shock.
When using your telephone equipment, basic safety precautions should always be followed to reduce the risk
of fire, electric shock, and injury, including the following:
• Read and understand all instructions.
• Follow all warnings and instructions marked on the product.
• Unplug this product from the wall outlet before cleaning. Do not use aerosol or liquid cleaners. Use a
damp cloth for cleaning.
• Do not use this product near water (for example, near a bathtub, kitchen sink, or swimming pool).
• Do not place this product on an unstable surface.
• This product should be operated only from the type of power source indicated on the marking label. If you
are not sure of the type of power supply in your home or office, consult your dealer or local power company.
• Do not allow anything to rest on the power cord. Do not install this product where the cord may be
walked on.
• Never push objects of any kind into this product through the slots in the unit because they may touch
dangerous voltage points or create a short circuit. Never spill liquid of any kind on the product.
• To reduce the risk of electric shock, do not disassemble this product; take it to an authorized service
facility. Opening or removing parts of the unit other than specified access doors may expose you to
dangerous voltages or other risks. Incorrect reassembling can cause electric shock when the product is
subsequently used.
13
Important Safety Instructions, continued
•
•
Do not overload wall outlets and extension cords.
The power adapter is intended to be correctly oriented in a vertical or floor mount position. The prongs are
not designed to hold the plug in place if it is plugged into a ceiling or an under-the-table or cabinet outlet.
Unplug this product from the wall outlet and refer servicing to an authorized service facility under the
following conditions:
• When the power supply cord or plug is damaged or frayed.
• If liquid has been spilled on the product.
• If the product has been exposed to rain or water.
• If the product does not operate normally when following the operating instructions. Adjust only those
controls that are covered by the operating instructions. Improper adjustment of other controls may
result in damage and often requires extensive work by an authorized technician to restore the product to
normal operation.
• If the product has been dropped and the unit has been damaged.
• If the product exhibits a distinct change in performance.
14
14
Maintenance
Your system contains sophisticated electronic parts, so it must be treated with care.
Avoid Rough Treatment
Handle the unit gently. Save the original packing materials to protect your equipment if you ever need to ship it.
Avoid Water
Your unit can be damaged if it gets wet. Do not use the equipment outdoors in the rain or handle it with wet
hands. Do not install the equipment near a sink, bathtub, or shower.
Electrical Storms
Electrical storms can sometimes cause power surges harmful to electronic equipment. For your own safety,
exercise caution when using electrical appliances during storms.
Cleaning Your Unit
Your unit has a durable plastic casing that should retain its luster for many years. Clean it only with a soft
cloth slightly dampened with water or a mild soap solution. Do not use excess water or cleaning solvents of
any kind.
15
15
NOTE: For customer service or product information, visit our website at
www.telephones.att.com/smb or call 1 (888) 916-2007.
In Canada, call 1 (888) 883-2474.
© 2012–2013 Advanced American Telephones. All Rights Reserved.
AT&T and the AT&T logo are trademarks of AT&T Intellectual Property
licensed to Advanced American Telephones, San Antonio, TX 78219.
Synapse® is a registered trademark of Advanced American Telephones.
Printed in China Issue 3.0 06/13