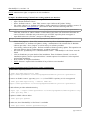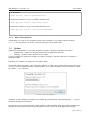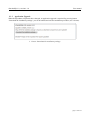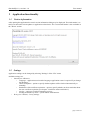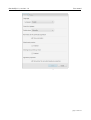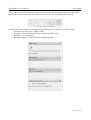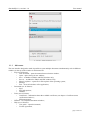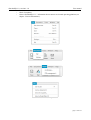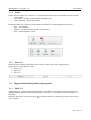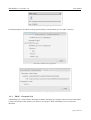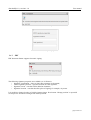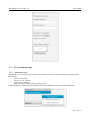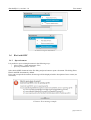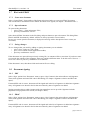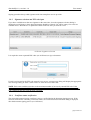
1
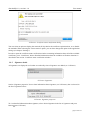
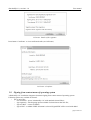
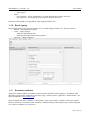
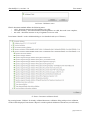
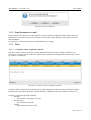
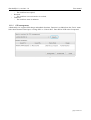
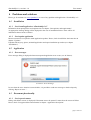
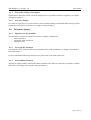
eParakstītājs 3.0, version.1.3.0.
User manual
eParakstītājs 3.0
Version 1.3.0.
User manual
LVRTC
eParakstītājs 3.0, version.1.3.0.
User manual
Content
1 Introduction..................................................................................................................................................4
1.1 Document usability...............................................................................................................................4
1.2 Document purpose................................................................................................................................4
1.3 Application description.........................................................................................................................4
1.4 Terms and Abbreviations......................................................................................................................4
2 Installation and Updates................................................................................................................................6
2.1 Prerequisites and requirements.............................................................................................................6
2.2 Installation............................................................................................................................................6
2.2.1 Microsoft Windows platform........................................................................................................7
2.2.2 Mac OS X platform......................................................................................................................8
2.2.3 Ubuntu Linux platform.................................................................................................................8
2.2.4 Other Linux platforms................................................................................................................10
2.3 Updates...............................................................................................................................................10
2.3.1 Application Upgrade...................................................................................................................11
3 Application functionality............................................................................................................................12
3.1 Version information............................................................................................................................12
3.2 Settings...............................................................................................................................................12
3.3 User interface......................................................................................................................................14
3.3.1 Main menu..................................................................................................................................16
3.3.2 Toolbar........................................................................................................................................18
3.3.3 Status line...................................................................................................................................18
3.4 Supported document formats and properties.......................................................................................18
3.4.1 EDOC 1.0...................................................................................................................................18
3.4.2 EDOC – European (2.0)..............................................................................................................19
3.4.3 PDF.............................................................................................................................................20
3.5 New document setup...........................................................................................................................21
3.5.1 Attachment zone.........................................................................................................................21
3.6 Work with PDF...................................................................................................................................22
3.6.1 Open document...........................................................................................................................22
3.7 Work with EDOC................................................................................................................................23
3.7.1 Create new document.................................................................................................................23
3.7.2 Open document...........................................................................................................................23
3.7.3 Saving changes...........................................................................................................................23
3.8 Document signing...............................................................................................................................23
3.8.1 PDF.............................................................................................................................................23
3.8.2 EDOC.........................................................................................................................................23
3.8.3 Signature selection and PIN code input......................................................................................24
3.8.4 Certificate status notification......................................................................................................24
3.8.5 Signature details.........................................................................................................................25
3.9 Signing from context menu of operating system.................................................................................26
3.10 Batch signing....................................................................................................................................27
3.11 Document validation.........................................................................................................................27
3.12 Send document to e-mail..................................................................................................................29
3.13 Tools.................................................................................................................................................29
3.13.1 Certificate status verification window.......................................................................................29
3.13.2 PIN management......................................................................................................................30
4 Problems and solutions...............................................................................................................................31
4.1 Installation..........................................................................................................................................31
4.1.1 Can't install application “eParakstītājs 3.0”................................................................................31
4.1.2 Can't update application..............................................................................................................31
4.2 Application.........................................................................................................................................31
4.2.1 Error messages............................................................................................................................31
page 2 from 32
eParakstītājs 3.0, version.1.3.0.
User manual
4.3 Document functionality......................................................................................................................31
4.3.1 Can't open document...................................................................................................................31
4.3.2 Can't make changes in document................................................................................................32
4.3.3 Can' save changes.......................................................................................................................32
4.4 Document signing ..............................................................................................................................32
4.4.1 Signatures are not available........................................................................................................32
4.4.2 Can't sign the document..............................................................................................................32
4.4.3 Can't validate document..............................................................................................................32
page 3 from 32
eParakstītājs 3.0, version.1.3.0.
User manual
1 Introduction
1.1
Document usability
Document is for application "eParakstītājs 3.0" version 1.3.0.
1.2
Document purpose
This is user manual for "eParakstītājs 3.0". It includes description about installation process, first steps how
to start and all functions that application provides.
1.3
Application description
"eParakstītājs 3.0" is an application that allows you to create and sign electronic documents, as well as make
signed document validation.
This version supports following document formats:
•
EDOC – with file extension .edoc;
•
PDF – with file extension .pdf.
Documents can be signed electronically by persons who have LVRTC issued eParaksts smart card or OCMA
issued eID identity card with valid electronic signature and authentication certificates.
This document describes the following application features:
•
creation of electronic documents;
•
signing of electronic documents;
•
signed document validation.
More information about eParaksts smart cards and electronic document format is available on the eParaksts
website www.eparaksts.lv
1.4
Terms and Abbreviations
Abbreviation
Description
LVRTC
State Joint-Stock Company “Latvia State Radio and Television Center”
OCMA
The Office of Citizenship and Migration Affairs
eParaksts
Brand of LVRTC certification service provider
eID
OCMA issued identity card
Signature
Electronic data that are attached to a document or logically associated with the
document. These data provide the authenticity of an electronic document and
approves the identity of the signer.
EDOC
A standardized format for electronic document containing the signatures and
data to be signed
PDF
“Adobe Systems” Portable Document Format, which is independent of
software, hardware and operating systems.
page 4 from 32
eParakstītājs 3.0, version.1.3.0.
User manual
Certificate
Electronic evidence which binds digital signature data with signer identity
information. The certificate can be used to verify that digital signature belongs
to an individual.
Smart card
Plastic card with a built-in microprocessor and memory used by the user
identification or electronic document signing. Authentication and signing
certificates are stored on a smart card.
Time stamp
Exact time is added during signing procedure. Time stamp is electronically
signed confirmation that the document is marked on the certification service
provider at specified date and time.
page 5 from 32
eParakstītājs 3.0, version.1.3.0.
User manual
2 Installation and Updates
2.1
Prerequisites and requirements
Application "eParakstītājs 3.0" designed to install on the following operating system platforms:
•
Microsoft:
•
Windows 8 and 8.1;
•
Windows 7;
•
Windows Vista;
•
Windows XP;
•
Mac OS X version from 10.6 to 10.11;
•
Ubuntu Linux (from version 12.04);
To sign a document or to validate the structure and attached signatures, you need an Internet connection and
the Time stamp availability. Time stamp is a paid service and its availability depends on the smart card
provider and issuing regulations.
A smart card reader and appropriate smart card driver is required to add signatures (see chapter
"Installation").
The application supports the following smart cards for signing operations:
•
LVRTC eParaksts signature card;
•
OCMA eID identity card.
2.2
Installation
To install the application "eParakstītājs 3.0", download installation package for the appropriate operating
system from www.eparaksts.lv website and start installation.
The installation includes "eParakstītājs 3.0" application and the following drivers for smart cards:
•
Gemalto Classic Client, version 6.3 – required for LVRTC eParaksts card;
•
Latvia eID Middleware, version 1.2.12 – required for OCMA eID card.
Drivers can be installed separately.
Software installation procedure is different for different operating systems. Each supported operating system
have different installation packages, as well as the procedure for installing applications.
Installation package name is constructed as follows:
eparakstitajs3-[version].[extension]
For example, "eParakstītājs 3.0" version 1.0.0 will have the following package name:
Operating system
File name
Windows
eparakstitajs3-1.0.0.msi
Ubuntu Linux
Installation provided using "Ubuntu Software Center" (see chapter
"Ubuntu Linux platform")
Mac OS X
eparakstitajs3-1.0.0.dmg – application only
eparakstitajs3-distribution-1.0.0.pkg – full
page 6 from 32
eParakstītājs 3.0, version.1.3.0.
User manual
installation
Other Linux distributions
2.2.1
eparakstitajs3-1.0.0.tar.gz
Microsoft Windows platform
Standard Windows MSI package is used for installation on a Microsoft Windows platform. It supports
installation using user interface wizard and quiet installation using command line.
Installation wizard contains following steps:
•
start – shows short information about application and its purpose;
•
license agreement;
•
installation scope:
•
for current user only – application will be available for current user on computer;
•
for all users – application will be available for all users on computer. Administrator rights is
required for this scope;
•
installation folder – location for installation. This is available if installation for all users was applied;
•
installation options – here you can select additional options for installation such as shortcuts, file
type associations or drivers for smart card. This is available if installation for all users was applied;
•
ready for installation – this is last step before installation
•
installation finished – Finished installation. If installation failed, error message with reason
description will appear.
Command line for quiet installation is following:
eparakstitajs3-1.0.0.msi /quiet [optional parameters]
Following installation parameters are available for quiet installation:
Parameter name
Values
Default value
Description
CREATE_EDOC_ASSOCIATION
0 – don't create
1
association
1 – create association
.edoc file type extension
association
CREATE_SHORTCUT_DESKTOP
0 – don't create
shortcut
1 – create shortcut
1
Create shortcut on
Desktop
CREATE_SHORTCUT_STARTMENU
0 – don't create
shortcut
1 – create shortcut
1
Create shortcut in “Start”
menu
INSTALL_MIDDLEWARE_EID
0 – don't install
1 – install
2 – install if has
administrator rights
2
Install driver Latvia eID
Middleware
INSTALL_MIDDLEWARE_GEMALTO 0 – don't install
1 – install
2 – install if has
administrator rights
2
Install driver Gemalto
Classic Client
INSTALL_BROWSER_PLUGIN
2
Install signing plug-in
for internet browsers
0 – don't install
1 – install
2 – install if has
administrator rights
page 7 from 32
eParakstītājs 3.0, version.1.3.0.
User manual
SET_UPDATE_TYPE_MANUAL
0 – automatically
1 – manual
0
Application setting
“Check for updates”
SET_PROXY_AUTO_URL
“” (empty) – none
“URL” – value
“” (empty)
Application setting
“Automatic proxy
configuration”. Use “\”
to get “/”.
ALLUSERS
“” (empty) – for
2
current user only
1 – for all users
2 – depends on
parameter
MSIINSTALLPERU
SER
Installation scope
parameter
MSIINSTALLPERUSER
“” (empty) – for all
users
1 – for current user
only
Installation scope
parameter depends on
Windows and Windows
Installer version
1
For more information about using parameters, see MS documentation:
http://msdn.microsoft.com/enus/library/windows/desktop/aa370905%28v=vs.85%29.aspx
NOTE: If you need to install “Gemalto Classic Client” (see chapter "Installation"), then it is necessary to
reboot the workstation at the end of installation.
Operating system supported tools have to be used to uninstall the application (using “Control Panel ->
Programs and Features”). Drivers can be uninstalled separately.
2.2.2
Mac OS X platform
Use Mac OS X PKG installation package for full application and card driver installation. Administrator
rights is required to for this installation.
Use Mac OS X DMG installation package for application only installation. This can be done by any user.
2.2.3
Ubuntu Linux platform
Application installation for Ubuntu Linux is provided by LVRTC software repository. To add LVRTC
repository you need:
•
to add repository source APT line:
deb https://www.eparaksts.lv/files/ep3updates/debian precise eparaksts
•
add software provider authentication key to “Reliable software providers”. Key file can be
downloaded from
https://www.eparaksts.lv/files/ep3updates/debian/public.key
•
update software repository;
page 8 from 32
eParakstītājs 3.0, version.1.3.0.
User manual
NOTE: Administrator rights is required to for this installation.
Example: Installation using Ubuntu Linux 12-04 graphical user interface
This example shows step by step installation using “Ubuntu Software Center”:
•
Open “Ubuntu Software Center”;
•
Select “Software sources...” from “Edit” menu to open “Software & Updates” dialog;
•
Tab “Other software” of “Software & Updates” dialog contains list of software repository sources. If
it does not contain www.eparaksts.lv , press button “Add” and enter following APT line:
deb https://www.eparaksts.lv/files/ep3updates/debian precise eparaksts
•
After that, in the list of “Other software” will be added 2 new lines (one for binaries and other for
source). Remove or disable entry with source type as LVRTC repository does not support it.
Open built-in browser (“Firefox”) and go to following address
https://www.eparaksts.lv/files/ep3updates/debian/public.key
•
•
•
•
•
Select “Save page as...” from “File” menu to save the key file to local folder. Open tab
“Authentication” of “Software & Updates” dialog. “Authentication” tab contains list of “Reliable
software providers”. Press “Import” to add saved key to software providers.
Close dialog “Software & Update”. Perform available software repository update. This operation can
take some minutes. Open “Update manager” to update it manually.
Do search for “eparakstitajs3” in “Ubuntu Software Center”. “eParakstītājs 3.0 for Linux” must be
found.
Click on found entry to open details of the installation. Then click button “Details” to view all
installation options. Section “Optional add-ons” contains options for card drivers. Select required
and perform installation.
Press “Install” to complete installation.
NOTE: Restart is required after installation if any of drivers were installed.
Example. Installation using Ubuntu Linux 12-04 command line
1) add LVRTC repository source
# sudo apt-add-repository "deb
https://www.eparaksts.lv/files/ep3updates/debian precise eparaksts"
2) remove or disable "source" type entry (deb-src) from LVRTC repository as it is not supported.
# sudo apt-add-repository --remove "deb-src
https://www.eparaksts.lv/files/ep3updates/debian precise eparaksts"
2) add software provider authentication key
# wget -qO - https://www.eparaksts.lv/files/ep3updates/debian/public.key
| sudo apt-key add 3) update available software index
# sudo apt-get update
4) make sure, that "eParakstītājs 3.0 for Linux" is available
# sudo apt-cache search eparakstitajs3
page 9 from 32
eParakstītājs 3.0, version.1.3.0.
User manual
5) do installation
# sudo apt-get install eparakstitajs3
6) install smart card driver, if you use LVRTC eParaksts card
# sudo apt-get install libclassicclient
7) install smart card driver, if you use OCMA eID smart card
# sudo apt-get install latvia-eid-middleware
2.2.4
Other Linux platforms
"eParakstītājs 3.0" setup is also available on other Linux platforms. Use package with the extension
"tar.gz" for this purpose. To do this, extract the package in the desired folder.
2.3
Updates
Application "eParakstītājs 3.0" provides an update procedure. Checking for updates can be done:
•
automatically – updates are checked automatically at application start time
•
manually – updates will be checked on user request;
It can be configured in application settings (see chapter "Settings"). Internet connection is required for
update procedure.
If updates are available, it is displayed in the update dialog.
To manually check for updates, select "Check for updates" in "Help" menu. Update dialog shows the current
version, as well as information about available updates. To re-check for updates, click on the button "Check
for updates ..." (see 1.Picture).
1. Picture. Check for updates
Available version is displayed if updates are available. By pressing button "Download updates …" you can
download and apply these updates.
Start update process by pressing button "Apply updates". After the update application will be automatically
restarted. If any document where left open and unsaved, then you have to close application manually.
page 10 from 32
eParakstītājs 3.0, version.1.3.0.
2.3.1
User manual
Application Upgrade
When the dependant components have changed, an application upgrade is required. By pressing button
“Download the installation package” you can download and start the installation procedure (see 2.Picture).
2. Picture. Download the installation package
page 11 from 32
eParakstītājs 3.0, version.1.3.0.
User manual
3 Application functionality
3.1
Version information
After opening the application the actual version information dialog may be displayed. This information is to
notify user about the critical updates or application related news. The version information is also available in
the “About” section.
3. Picture. Version information
3.2
Settings
Application settings can be changed by selecting "Settings" of the “File” menu.
Available settings are:
•
General (see 4.Picture):
•
Language – application user interface language. Application restart is required if you change
the language;
•
Check for updates – option to specify whether updates will be checked automatically or
manually;
•
Reminders of the certificate expiration – option to specify whether to show reminders about
the user certificate expiration (see chapter “Certificate status notification”).
•
preview – option to switch off automatic preview;
•
sending documents by email – option enables send function.
•
Proxy (see 5.Picture) – Proxy settings.
page 12 from 32
eParakstītājs 3.0, version.1.3.0.
User manual
4. Picture. General settings
page 13 from 32
eParakstītājs 3.0, version.1.3.0.
User manual
5. Picture. Proxy settings
3.3
User interface
Signing process is divided into 3 steps:
1. document and signing format selection;
2. EDOC, PDF and Batch signing – document format dependent view;
3. save and send.
Starting window is always for document format selection (see . Picture).
6. Picture. Format selection window
Use Document and attachment zone to manage documents to sign (see chapter “Attachment zone”).
Buttons “Create EDOC”, “Create PDF” and “Create separately” will advance you to next step of the signing
process.
Central part always contains simplified document preview area (see 7.Picture). For EDOC format document
preview shows selected document from the list of attachments, but PDF format document will be displayed
page 14 from 32
eParakstītājs 3.0, version.1.3.0.
User manual
in the preview area itself. Preview area contains zoom and page switching options, that can be found at the
bottom part of preview area. Move with the mouse cursor to this area and options will be showed.
7. Picture. Preview controls
On the left side of the window is located document content panel. It contains (see 8. and 9. Picture):
•
Document type and version – EDOC or PDF;
•
Documents – list of attached documents. Available for EDOC only;
•
Signatures – list of signatures;
•
Signature properties – if document have attached signatures.
8. Picture. EDOC document view
page 15 from 32
eParakstītājs 3.0, version.1.3.0.
User manual
9. Picture. PDF document view
3.3.1
Main menu
The user interface designed to make it possible to open multiple documents simultaneously each in different
window. On the top of the window is main menu bar:
•
File (see 10.Picture):
•
New document – opens document format selection window;
•
Open – opens always in new window;
•
Save – available for EDOC and PDF windows only;
•
Save as – available for EDOC and PDF windows only;
•
Show in explorer – opens file in file explorer of the operating system;
•
Settings;
•
Exit – closes all windows of the application;
•
Document (see 11.Picture):
•
Sign;
•
Sign with options;
•
Validate;
•
Tools (see 12.Picture):
•
Certificates – information about the available certificates (see chapter “Certificate status
verification window”);
•
PIN management;
•
Window – list of opened document windows;
•
Help (see 13.Picture):
•
User guide – opens this manual;
•
License agreement;
page 16 from 32
eParakstītājs 3.0, version.1.3.0.
•
•
User manual
Check for updates;
About “eParakstītājs 3.0” – information about current version and operating platform (see
chapter “Version information”).
10.Picture. Menu “File”
11. Picture. Menu “Document”
12.Picture. Menu “Tools”
13.Picture. Menu “Help”
page 17 from 32
eParakstītājs 3.0, version.1.3.0.
3.3.2
User manual
Toolbar
Format selection toolbar (see 14.Picture) is located under the main menu of the format selection window:
•
Create EDOC;
•
Create PDF – available if attached PDF documents only;
•
Create separately – Batch sign window.
Document toolbar (see 15.Picture) with common used functions is located under the main menu :
•
Save – save changes;
•
Sign – sign document;
•
Validate – validate document structure and signatures;
•
Send – send document to e-mail.
14.Picture. Format selection toolbar
15.Picture. Document toolbar
3.3.3
Status line
Status line can be found on the bottom of the window. It shows steps of the signing process.
Signing process is divided into 3 steps:
1. Select (1/3)
2. Sign (2/3)
3. Save (3/3)
16.Picture. Status line
3.4
3.4.1
Supported document formats and properties
EDOC 1.0
"eParakstītājs 3.0" supports almost all functionality for old EDOC 1.0 document format that is based on
standard template with core and template properties. However it is not possible to create new EDOC 1.0
document.
Properties data can be viewed by pressing (info) button which is in document type and version section
(see 17.Picture).
page 18 from 32
eParakstītājs 3.0, version.1.3.0.
User manual
17.Picture. EDOC properties
Document properties are shown in the properties dialog of the document (see 18. and 19. Picture).
18.Picture. EDOC core properties
19.Picture. EDOC template properties
3.4.2
EDOC – European (2.0)
"eParakstītājs 3.0" creates all new documents in EDOC European (2.0) format. Current version of the format
is shown in left side of the window (see .Picture). See chapter “Work with EDOC” how to create new
document.
page 19 from 32
eParakstītājs 3.0, version.1.3.0.
User manual
20.Picture. EDOC European
21.Picture. EODC European properties
3.4.3
PDF
PDF document format supports electronic signing.
22.Picture. PDF
The following signature properties are available (see 23.Picture):
•
Signature visualization – show or don't show signature on document;
•
Visible signature position – specifies location of visual signature;
•
Signature reason – text that will be added to document;
•
Signature location – text that describes place of signing, for example, city name.
It is possible to change location of visible signature image. Press button “Change position” to open full
screen preview and locate rectangle into desired position.
page 20 from 32
eParakstītājs 3.0, version.1.3.0.
User manual
23.Picture. PDF properties
3.5
3.5.1
New document setup
Attachment zone
Attachment zone is located on the left side of the window. It allows to select documents for signing. Main
functions are:
•
add (see 24. Picture);
•
remove (see 25. Picture);
•
export (see 26. Picture);
•
open with default editor of the operating system.
Functional buttons, context menu, keyboard shortcuts and drag&drop helps to manage attachments.
24.Picture. Add attachment
page 21 from 32
eParakstītājs 3.0, version.1.3.0.
User manual
25.Picture. Remove attachment
26.Picture. Export attachment
3.6
Work with PDF
3.6.1
Open document
It is possible to open existing document in the following ways:
•
select “Open...” from main menu “File”;
•
press key combination “Ctrl+O”.
Select desired PDF document in the file dialog and press button to open a document. File dialog filters
EDOC and PDF documents by default.
If you can not open the document, the message will be displayed with a description of error reason (see
27.Picture).
27.Picture. Error message example
page 22 from 32
eParakstītājs 3.0, version.1.3.0.
3.7
3.7.1
User manual
Work with EDOC
Create new document
Select “Create EDOC” from toolbar of the format selection window to create new EDOC document.
You can add files in attachment zone to EDOC document to be signed (see chapter “Attachment zone”)
3.7.2
Open document
To open existing document:
•
select “Open...” from main menu “File”;
•
press key combination “Ctrl+O”.
Select desired EDOC document in the file dialog and press button to open a document. File dialog filters
EDOC and PDF documents by default. All files are always opened in a new window.
In case you can not open the document, it displays the message with a description of error reason (see
27.Picture).
3.7.3
Saving changes
To save changes that you made by adding or signing documents you can whether:
•
select “Save” option on “File” menu;
•
press “Save” button in main application toolbar;
•
press key combination “Ctrl+S”.
If the document was opened from previously existing file, its contents will be overwritten. If you do not want
to overwrite the contents of the document, then save it under a different name. To do this select "Save As ..."
from “File” menu or press key combination "Ctrl+Shift+S".
If the document is new, then show folder and name in file save dialog.
3.8
3.8.1
Document signing
PDF
Select “Sign” option from “Document” menu or press “Sign” button in the main toolbar to add signature.
Then select signature and enter PIN code in PIN dialog (see chapter “Signature selection and PIN code
input”).
If entered PIN code is correct, document will be signed and in the list of signatures is added new signature
entry. All signatures are shown in the list that are ordered by time of signature was added.
Signing procedure always adds signature with time stamp from service provider. Signature includes
properties from properties area as well (see chapter “PDF”).
3.8.2
EDOC
Select “Sign” option from “Document” menu or press “Sign” button in the main toolbar to add signature.
Then select signature and enter PIN code in PIN dialog (see chapter “Signature selection and PIN code
input”).
If entered PIN code is correct, document will be signed and in the list of signatures is added new signature
entry. All signatures are shown in the list that are ordered by time of signature was added.
page 23 from 32
eParakstītājs 3.0, version.1.3.0.
User manual
Signing procedure always adds signature with time stamp from service provider.
3.8.3
Signature selection and PIN code input
If you have available more than one signature at the same time , then the signature selection dialog is
displayed (see 28.Picture), where desired signature should be selected. List will be empty if no cards are
available. Press “Refresh list” to update the content of the list after you entered a card.
28.Picture. Signature selection
It is required to enter requested PIN codes (see 29.Picture) to sign a document.
29.Picture. PIN input dialog
If card is not inserted or the PIN code entered is not correct, error message dialog will display the appropriate
error message asking to insert a smart card or re-enter the correct PIN code.
NOTE: Each smart card has restriction to the maximum number of incorrectly entered PIN code. If the
application reported that the PIN code is not correct, please, carefully make sure that you enter correct PIN
code. Otherwise this may result in smart card lock!
3.8.4
Certificate status notification
The selected document signing certificate is always verified during the document signing process. If the
selected certificate has a warning verification status, the certificate status notification dialog is displayed
after the document signing process (see 30.Picture).
page 24 from 32
eParakstītājs 3.0, version.1.3.0.
User manual
30.Picture. Certificate status notification dialog
You can select an option to display the reminder N days before the certificate expiration date, or to disable
the reminder. When selecting the “Don't remind” option, you can later change this option in the application
settings (see chapter “Settings”).
In order to open the certificate status verification window containing information about all of the available
certificates, press “Certificates” button. Detailed information about the available verification situations is
described in the section “Certificate status verification window”.
3.8.5
Signature details
All signatures are displayed as a list that are ordered by time of signature was added (see 31.Picture).
31.Picture. Signatures
Section “Signature properties” shows short information about signature (see 32.Picture), that is selected in
the list of signatures above.
32.Picture. Signature properties
To view detailed information about signature, select desired signature in the list of signatures and press
button (see 33.Picture).
page 25 from 32
eParakstītājs 3.0, version.1.3.0.
User manual
33.Picture. Details of the signature
Press button “Certificate” to view certificate details (see 34.Picture).
34.Picture. Certificate
3.9
Signing from context menu of operating system
"eParakstītājs 3.0" installation integrates document signing from context menu of operating system.
Following options are available if selected:
•
one or more files:
◦ new document – opens "eParakstītājs 3.0" with attached selected file(s);
◦ sign separately – batch signing option available if selected more than one file;
◦ sign as EDOC – creates an EDOC;
◦ sign as PDF – available if PDF document is selected. Signed PDF will be saved with added
page 26 from 32
eParakstītājs 3.0, version.1.3.0.
•
User manual
suffix signed;
folder:
◦ new document – opens "eParakstītājs 3.0" with attached files from the first level;
◦ sign separately – batch signing option with files from the first level.
Signature will be added in existing EDOC when signing an EDOC file.
3.10
Batch signing
Batch signing helps to sign many documents in a row. Batch signing window (see . Picture) contains:
•
left side – documents to be signed;
•
center – signing settings:
◦ folder for signed documents;
◦ destination document format with properties;
•
right side – signed documents.
35.Picture. Batch signing
3.11
Document validation
Application validates EDOC and PDF document structure and all document signatures. In addition, PDF
document signed content validation must be done using “Adobe Systems” application “Adobe Reader” (for
more information see www.adobe.com).
Open document and select “Validate” of “Document” menu or press button “Validate” in the main toolbar.
Internet connection is required to make validation. Validation dialog with document status will be displayed
as a result for validation (see 36.Picture).
page 27 from 32
eParakstītājs 3.0, version.1.3.0.
User manual
36.Picture. Validation status
EDOC document standard defines the following states:
•
valid – document structure and all signatures are valid;
•
valid with warning – document structure and all signatures are valid, but result is not complete;
•
not valid – document structure or any of signatures were not valid.
Press button “Details” on the validation dialog to view detailed result (see 37.Picture).
37.Picture. Document validation details
By pressing button “Validate” for already validated document, validation dialog with previous validation
results will be displayed. Press button “Repeat” to make repeated validation of document (see 38.Picture).
page 28 from 32
eParakstītājs 3.0, version.1.3.0.
User manual
38.Picture. Repeat validation
3.12
Send document to e-mail
Press toolbar button “Send” to call this function. It opens default mail application with current file as an
attachment. If current document is not saved then it stays unsaved, but temporary file will be saved for email attachment.
It is possible to switch off this feature in "eParakstītājs 3.0" settings.
3.13
3.13.1
Tools
Certificate status verification window
Certificate status verification window contains information about all of the available certificates (see
39.Picture). Certificate status verification window can be opened from the application's main menu “Tools”
by selection “Certificates”.
39.Picture. Certificate status verification window
Certificate status verification is performed always when opening the certificate status verification window.
Detailed status information about the selected certificate is displayed under the available certificate list.
Certificate verification possible situations:
•
Warning:
◦ The certificate will expire in N days;
•
No certificates:
◦ The certificate not found;
•
Invalid:
◦ The certificate is not yet valid;
page 29 from 32
eParakstītājs 3.0, version.1.3.0.
User manual
The certificate has expired;
Revoked:
◦ The certificate is not activated or is revoked;
Unknown:
◦ The certificate status is unknown.
◦
•
•
3.13.2
PIN management
"eParakstītājs 3.0" supports PIN change and unblock functions. Function is available form the “Tools” menu.
Select desired smartcard and press “Change PIN” or “Unlock PIN”. Enter PIN or PUK codes if requested.
40.Picture. PIN management
page 30 from 32
eParakstītājs 3.0, version.1.3.0.
User manual
4 Problems and solutions
Please, go for assistance to www.eparaksts.lv, in case of any problem with application "eParakstītājs 3.0".
4.1
4.1.1
Installation
Can't install application “eParakstītājs 3.0”
Information about prerequisites and requirements see chapter “Prerequisites and requirements”.
An appropriate message dialog will be displayed in the case of installation failure. There will be all
information about reasons of failure.
4.1.2
Can't update application
Internet connection is required to make application updates. Please, check it and follow the instruction in
chapter “Updates”.
If update fails anyway, please, uninstall application and repeat installation procedure (see chapter
“Installation”).
4.2
4.2.1
Application
Error messages
Error message dialog is displayed when an unexpected application error occurs (see 41.Picture).
41.Picture. Error message
In case when the error situation is unresolvable, it is possible to send error message to the developer by
clicking “Report an error...”.
4.3
4.3.1
Document functionality
Can't open document
Dialog with failure reasons is displayed if document can not be opened. It must show the reason of failure.
Please, check for supported document formats in chapter “Application description”.
page 31 from 32
eParakstītājs 3.0, version.1.3.0.
4.3.2
User manual
Can't make changes in document
Signed EDOC document content can not be changed, but it is possible to add more signatures (see chapter
“Document signing”).
4.3.3
Can' save changes
User must have privileges to save document in selected folder. Dialog with detailed failure message will be
displayed in case of any save failures (see chapter “Saving changes”).
4.4
4.4.1
Document signing
Signatures are not available
The following is required to sign the document (see chapter “Installation“):
•
smart card reader;
•
appropriate smart card driver;
•
valid smart card.
4.4.2
Can't sign the document
It is required to have internet connection and signature time stamp availability (see chapter “Prerequisites
and requirements“).
For more information about time stamp service, please refer to the smart card issuer.
4.4.3
Can't validate document
Application supports EDOC and PDF document validation only. Internet connection is required to validate
documents (see chapter “Prerequisites and requirements“).
page 32 from 32