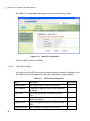
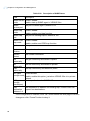
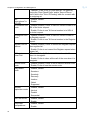
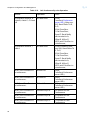
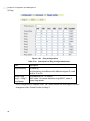
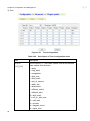
1
USER'S MANUAL VoIP Gateway Venus 29XX Series SIP Headquarters: No. 25, Alley 15, Lane 120, Sec. 1. Nei-Hu Rd, Version: 1.8 Taipei 114, Taiwan Date: 2011/04/11 P/N: 07008-00122 TEL: 886-2-26583000 FAX: 886-2-26583232 Beijing Branch: Room 303, No.7 Gengfang International Building, A13 Huayuan Road, Haidian, Beijing, China Zip Code: 100088 TEL: 86-10-62522081~87 FAX: 86-10-62522077 Venus 29xx Series SIP User‟s Manual Copyright © 2009 TAINET COMMUNICATION SYSTEM CORP. All rights reserved Notice This document is protected by the international copyright law. No part of this publication may be reproduced by any means without the expressed permission of Tainet Communication System Corporation. TAINET is a registered trademark, and Venus 29xx Series SIP is a trademark of Tainet Communication System Corporation. Other product names mentioned in this manual are used for identification purposes only and may be trademarks or trademarks of their respective companies. The information provided from Tainet Communication System Corporation is believed to be accurate. Any changes and enhancements to the product and to the information thereof will be documented and issued as a new release to this manual. Trademark All products and services mentioned herein are the trademarks, service marks, registered trademarks or registered service marks of their respective owners. i Venus 29xx Series SIP User‟s Manual About This Manual This section guides users on how to use the manual effectively. The manual contains information needed to install, configure, and operate TAINET‟s VENUS 29xx Series VoIP SIP Gateway. The summary of this manual is as follows: Chapter 1: Overview Chapter 2: Hardware Installation Chapter 3: Configuration and Management Chapter 4: Edit Configuration File Chapter 5: Troubleshooting Appendix A: Supplemental Telephone Features Appendix B: Abbreviation Appendix C: Code Determination Flow Chart ii Venus 29xx Series SIP User‟s Manual Symbols Used in This Manual 3 types of symbols may be used throughout this manual. These symbols are used to advise the users when a special condition arises, such as a safety or operational hazard, or to present extra information to the users. These symbols are explained below: Warning: This symbol and associated text are used when death or injury to the user may result if operating instructions are not followed properly. Caution: This symbol and associated text are used when damages to the equipment or impact to the operation may result if operating instructions are not followed properly. Note: This symbol and associated text are used to provide the users with extra information that may be helpful when following the main instructions in this manual. iii Venus 29xx Series SIP User‟s Manual LIMITED WARRANTY TAINET‟s DISTRIBUTOR shall be responsible to its customers for any and all warranties, which it makes relating to Products, and for ensuring that replacements and other adjustments required in connection with the said warranties are satisfactory. TAINET warrants to DISTRIBUTOR that the Products to be delivered hereunder will be free of defects in material and workmanship under normal use and service for a period of twenty-four (24) months [twelve (12) months in Taiwan] following the date of shipment to DISTRIBUTOR. If during the warranty period, any component part of the equipment becomes defective by reason of material or workmanship, and DISTRIBUTOR notifies TAINET of such defect within seven days after knowing of such defect, TAINET shall, for any Product that TAINET agrees is defective, at its option, supply a replacement part, request return of equipment to its plant for repair, or perform necessary repair at the equipment‟s location. At TAINET's option, DISTRIBUTOR shall destroy any Product that TAINET agrees is defective and shall provide satisfactory proof of such destruction to TAINET. TAINET is not responsible for Products damaged by misuse, neglect, accident or improper installation, or if repairs or modifications were made by persons other than TAINET‟s own authorized service personnel, unless such repairs by others were made with the written consent of TAINET. THE ABOVE WARRANTY IS IN LIEU OF ALL OTHER WARRANTIES, EXPRESSED OR IMPLIED. THERE ARE NO WARRANTIES THAT EXTEND BEYOND THE FACE HEREOF, INCLUDING, BUT NOT LIMITED TO, WARRANTIES OF MERCHANTABILITY AND FITNESS FOR A PARTICULAR PURPOSE, AND IN NO EVENT SHALL TAINET BE LIABLE FOR CONSEQUENTIAL DAMAGES. If DISTRIBUTOR extends to its customers any additional warranty with respect to Products that is broader in scope than the warranty provided by TAINET, DISTRIBUTOR shall be solely responsible for any and all liabilities, obligations and damages resulting from the extension of such warranty. TAINET shall not be liable to any person for any special or indirect damages, including, but not limited to, lost profits, from any cause whatsoever arising from or in any way connected with the manufacture, sale, handling, repair, maintenance or use of the Products, and in no event shall TAINET‟s liability exceed the purchase price of the Products. iv Venus 29xx Series SIP User‟s Manual Software Products are provided “as is” and without warranty of any kind. TAINET disclaims all warranties including the implied warranties of merchantability and fitness for a particular purpose. TAINET shall not be liable for any loss of use, interruption of business or indirect, special, incidental or consequential damages of any kind. TAINET shall do its best to provide end users with Software updates during the warranty period under this Agreement. TAINET has not been notified of any intellectual property rights or others which may be infringed by the Products or the promotion, marketing, sale (or resale), or servicing thereof in the Territory, but TAINET makes NO WARRANTY, EXPRESS OR IMPLIED, WITH RESPECT THERETO. v Venus 29xx Series SIP User‟s Manual CONTENTS CHAPTER 1. OVERVIEW ......................................................................................... 1 1.1 1.2 1.3 PRODUCT OVERVIEW ................................................................................................................. 1 APPLICATIONS ........................................................................................................................... 4 PRODUCT DESCRIPTION ............................................................................................................. 6 1.3.1 Hardware Architecture ....................................................................................................................... 6 1.3.2 Software Architecture ......................................................................................................................... 8 1.4 1.5 TECHNICAL SPECIFICATIONS ................................................................................................... 11 STANDARD COMPLIANCE ........................................................................................................ 15 CHAPTER 2. HARDWARE INSTALLATION ...................................................... 17 2.1 UNPACKING ............................................................................................................................. 17 2.2 SITE REQUIREMENTS ............................................................................................................... 18 2.2.1 Site Selection .................................................................................................................................... 18 2.2.2 AC Electrical Outlet Connection...................................................................................................... 18 2.2.3 Grounding ........................................................................................................................................ 18 2.3 2.4 LED INDICATORS .................................................................................................................... 20 CABLE CONNECTION ............................................................................................................... 21 2.4.1 Connecting the Power Source .......................................................................................................... 21 2.4.2 Connecting the IP Network via Ethernet .......................................................................................... 21 2.4.3 Connecting the Terminal .................................................................................................................. 22 2.4.4 Connecting the Telephony Devices .................................................................................................. 22 2.5 HARDWARE DIAGNOSIS ........................................................................................................... 26 CHAPTER 3. CONFIGURATION AND MANAGEMENT .................................. 27 3.1 QUICK START .......................................................................................................................... 27 3.1.1 Connecting to Venus 29xx................................................................................................................ 27 3.1.2 Complete the “Quick Start” configuration ....................................................................................... 33 3.2 QUICK SETUP .......................................................................................................................... 41 3.2.1 Login ................................................................................................................................................ 41 3.2.2 Main Page......................................................................................................................................... 41 3.2.3 Network Setting................................................................................................................................ 42 3.2.4 SIP Setting ........................................................................................................................................ 43 3.2.5 Analog (FXS/FXO) Setting .............................................................................................................. 43 3.2.6 Status Check ..................................................................................................................................... 44 3.3 vi LOGIN AND LOGOUT ................................................................................................................ 45 Venus 29xx Series SIP User‟s Manual 3.4 NAVIGATING THE WEB INTERFACE .......................................................................................... 46 3.5 CONFIGURATION ...................................................................................................................... 48 3.5.1 Save & Run ...................................................................................................................................... 49 3.5.2 Interface Configuration .................................................................................................................... 50 3.5.3 System Configuration....................................................................................................................... 59 3.5.4 SIP Configuration ............................................................................................................................. 70 3.5.5 Advanced Configuration .................................................................................................................. 82 3.5.6 Data Configuration ......................................................................................................................... 104 3.6 MAINTENANCE ...................................................................................................................... 113 3.6.1 Fault Management .......................................................................................................................... 113 3.6.2 Performance Management.............................................................................................................. 115 3.6.3 Diagnostics ..................................................................................................................................... 118 3.6.4 Device Control ............................................................................................................................... 120 3.7 STATUS .................................................................................................................................. 133 3.7.1 System information ........................................................................................................................ 133 3.7.2 Ethernet .......................................................................................................................................... 133 3.7.3 3Gmodem Info ............................................................................................................................... 134 3.7.4 Analog (FXS/FXO) ........................................................................................................................ 135 3.7.5 Routing Table ................................................................................................................................. 135 3.7.6 ARP Table ...................................................................................................................................... 135 3.8 3.9 FXS TO FXO LINE EXTENSION EXAMPLE............................................................................... 136 NAVIGATION THE COMMAND LINE INTERFACE ...................................................................... 144 3.9.1 Syntax ............................................................................................................................................. 146 3.9.2 Status Commands ........................................................................................................................... 146 3.9.3 Configuration Commands .............................................................................................................. 147 3.9.4 Maintenance Commands ................................................................................................................ 151 3.9.5 Other Commands............................................................................................................................ 153 CHAPTER 4. EDIT CONFIGURATION FILE.................................................... 157 4.1 4.2 FILE FORMAT......................................................................................................................... 157 EXAMPLE FILE ...................................................................................................................... 157 CHAPTER 5. TROUBLESHOOTING .................................................................. 201 5.1 5.2 INSTRUMENTS ....................................................................................................................... 201 TROUBLESHOOTING............................................................................................................... 201 APPENDIX A SUPPLEMENTAL TELEPHONE FEATURES ........................... 205 APPENDIX B ABBREVIATION ............................................................................ 207 vii Venus 29xx Series SIP User‟s Manual APPENDIX C CODE DETERMINATION FLOW CHART ............................... 209 viii Venus 29xx Series SIP User‟s Manual FIGURES Figure 1-1 Typical SIP VoIP Application...................................................................................................4 Figure 1-2 Enterprise VoIP Intranet Application .......................................................................................5 Figure 1-3 MTU/MDU Application ..........................................................................................................5 Figure 1-4 Front View of VENUS 2932 ...................................................................................................6 Figure 1-5 Rear View of VENUS 2932.....................................................................................................6 Figure 1-6 Front View of VENUS 2924 ...................................................................................................6 Figure 1-7 Rear View of VENUS 2924.....................................................................................................6 Figure 1-8 Front View of VENUS 2916 ...................................................................................................7 Figure 1-9 Rear View of VENUS 2916.....................................................................................................7 Figure 1-10 Front View of VENUS 2908-8S ..............................................................................................7 Figure 1-11 Rear View of VENUS 2908-8S ...............................................................................................7 Figure 1-12 Front View of VENUS 2908-4S4O .........................................................................................7 Figure 1-13 Rear View of VENUS 2908-4S4O...........................................................................................8 Figure 1-14 Web Browser..........................................................................................................................10 Figure 2-1 VENUS 2908-8S Series Telephony Interface ........................................................................22 Figure 2-2 VENUS 2908-4S4O Series Telephony Interface ...................................................................22 Figure 2-3 Twisted Pair Cable .................................................................................................................25 Figure 3-1 Connecting to the PC .............................................................................................................28 Figure 3-2 The Login Page ......................................................................................................................29 Figure 3-3 The Login CLI Screen ...........................................................................................................30 Figure 3-4 The root menu of the web site ...............................................................................................30 Figure 3-5 The Root Screen.....................................................................................................................31 Figure 3-6 The Command List Screen ....................................................................................................31 Figure 3-7 Set Ethernet Interface.............................................................................................................32 Figure 3-8 The Quick Start web page ......................................................................................................34 Figure 3-9 Network Connection Mode configuration .............................................................................35 Figure 3-10 Static IP Configuration...........................................................................................................36 Figure 3-11 SIP Server Configuration .......................................................................................................37 Figure 3-12 FXS/FXO Configuration........................................................................................................39 Figure 3-13 Saving the configure information ..........................................................................................39 Figure 3-14 Quick Start completed............................................................................................................40 Figure 3-15 Check FXS/FXO state ...........................................................................................................40 Figure 3-16 Login Page ............................................................................................................................41 Figure 3-17 Main Page..............................................................................................................................42 Figure 3-18 Network Configuration .........................................................................................................42 Figure 3-19 SIP Realm ..............................................................................................................................43 ix Venus 29xx Series SIP User‟s Manual Figure 3-20 Analog (FXS/FXO) settings ..................................................................................................44 Figure 3-21 Status Check ..........................................................................................................................44 Figure 3-22 Web-based Login interface ....................................................................................................45 Figure 3-23 Terminal Emulation-based Login interface ...........................................................................46 Figure 3-24 Web UI Main Page .................................................................................................................47 Figure 3-25 Prompt of “Save & Run” .......................................................................................................49 Figure 3-26 Prompt after click “OK” button on “Save & Run” page........................................................49 Figure 3-27 Ethernet Configuration ..........................................................................................................51 Figure 3-28 Prompt after click “OK” button .............................................................................................53 Figure 3-29 Analog (FXS/FXO) Configuration ........................................................................................54 Figure 3-30 3G Modem ............................................................................................................................57 Figure 3-31 Analog (FXS/FXO) Configuration ........................................................................................58 Figure 3-32 System General Configuration...............................................................................................59 Figure 3-33 NTP Configuration.................................................................................................................60 Figure 3-34 User Management Configuration...........................................................................................61 Figure 3-35 UI Management Configuration ..............................................................................................62 Figure 3-36 Provisioning Configuration....................................................................................................63 Figure 3-37 SNMP Configuration .............................................................................................................65 Figure 3-38 TR069 Configuration .............................................................................................................67 Figure 3-39 FM Configuration ..................................................................................................................68 Figure 3-40 Syslog Configuration ..............................................................................................................69 Figure 3-41 SIP General Configuration .....................................................................................................71 Figure 3-42 SIP Realm Configuration .......................................................................................................74 Figure 3-43 SIP Group Configuration for 8S and 4S4O Model ................................................................77 Figure 3-44 SIP Phone Routing Table Configuration ................................................................................79 Figure 3-45 SIP Digit Manipulation Configuration ...................................................................................81 Figure 3-46 RTP Management Configuration ...........................................................................................83 Figure 3-47 Calling Feature Configuration ...............................................................................................86 Figure 3-48 Region Configuration ............................................................................................................96 Figure 3-49 Ring Configuration ................................................................................................................98 Figure 3-50 Tone Configuration ................................................................................................................99 Figure 3-51 DDNS Configuration ...........................................................................................................101 Figure 3-52 NAT Traversal Configuration ..............................................................................................102 Figure 3-53 SLIC Configuration ...............................................................................................................103 Figure 3-54 Meter Configuration ..............................................................................................................103 Figure 3-55 Static Routing Configuration ...............................................................................................105 Figure 3-56 NAT mapping Configuration ...............................................................................................106 Figure 3-57 DHCP Server Configuration ................................................................................................108 Figure 3-58 DHCP Server Configuration ................................................................................................ 110 x Venus 29xx Series SIP User‟s Manual Figure 3-59 QoS Configuration ............................................................................................................... 111 Figure 3-60 Port Based Vlan Configuration ............................................................................................ 112 Figure 3-61 Vlan Tag Configuration ....................................................................................................... 112 Figure 3-62 FM Monitoring .................................................................................................................... 114 Figure 3-63 FM Clear .............................................................................................................................. 115 Figure 3-64 Ethernet Performance .......................................................................................................... 116 Figure 3-65 Call Control Status ............................................................................................................... 116 Figure 3-66 RTP Status ............................................................................................................................ 117 Figure 3-67 SIP Agent Status................................................................................................................... 117 Figure 3-68 SIP Call Initiation Status ...................................................................................................... 118 Figure 3-69 Clear Performance Message ................................................................................................ 118 Figure 3-70 Ping ...................................................................................................................................... 119 Figure 3-71 result of ping a connected IP device .................................................................................... 119 Figure 3-72 result of ping a disconnected IP device ................................................................................ 119 Figure 3-73 Stun ......................................................................................................................................120 Figure 3-74 result of stun a disconnected Stun server .............................................................................120 Figure 3-75 Traceroute ............................................................................................................................120 Figure 3-76 Firmware Upgrade ...............................................................................................................121 Figure 3-77 Step 1 of F/W Upgrading .....................................................................................................122 Figure 3-78 Step 2 of F/W Upgrading .....................................................................................................123 Figure 3-79 F/W Upgrading failure .........................................................................................................124 Figure 3-80 Step 3 of F/W Upgrading .....................................................................................................124 Figure 3-81 Step 4 of F/W Upgrading .....................................................................................................125 Figure 3-82 Config Up/Down..................................................................................................................125 Figure 3-83 Set Config uploading parameters .........................................................................................127 Figure 3-84 Config uploading .................................................................................................................127 Figure 3-85 Config uploading failure ......................................................................................................128 Figure 3-86 Set config downloading parameters .....................................................................................128 Figure 3-87 Config downloading ............................................................................................................129 Figure 3-88 Config downloading failure .................................................................................................129 Figure 3-89 Syslog Upload ......................................................................................................................130 Figure 3-90 Reset to Default ...................................................................................................................131 Figure 3-91 Reset finished.......................................................................................................................131 Figure 3-92 Reset to Default ...................................................................................................................132 Figure 3-93 Reboot finished ....................................................................................................................132 Figure 3-94 System information Status ...................................................................................................133 Figure 3-95 Ethernet Status .....................................................................................................................134 Figure 3-96 Analog Status .......................................................................................................................135 Figure 3-97 Routing Table Status ............................................................................................................135 xi Venus 29xx Series SIP User‟s Manual Figure 3-98 ARP Table Status .................................................................................................................136 Figure 3-99 CLI Main UI ........................................................................................................................145 Figure 3-100 Main CLI Tree .....................................................................................................................145 Figure 3-101 Status Commands ................................................................................................................146 Figure 3-102 Prompt of Save command ....................................................................................................147 Figure 3-103 Set command .......................................................................................................................147 Figure 3-104 Show command....................................................................................................................149 Figure 3-105 Maintenance commands ......................................................................................................152 Figure 3-106 Spy command ......................................................................................................................154 xii Venus 29xx Series SIP User‟s Manual TABLES Table 1-1 VENUS 29XX Series Technical Specification ...................................................................... 11 Table 2-1 LED Description ....................................................................................................................20 Table 2-2 10/100Base-T Connection .....................................................................................................21 Table 2-3 Venus2916 RJ-21Pin Assignment ..........................................................................................23 Table 2-4 Venus2924/2932 First RJ-21Pin Assignment.........................................................................23 Table 2-5 Venus2932 Second RJ-21Pin Assignment .............................................................................24 Table 2-6 Twisted Pair Pin Assignment .................................................................................................25 Table 3-1 Terminal Emulation Software ................................................................................................28 Table 3-2 Network Connection Mode Configuration ............................................................................34 Table 3-3 Static IP Configuration...........................................................................................................35 Table 3-4 SIP Server Configuration .......................................................................................................36 Table 3-5 FXS/FXO Configuration........................................................................................................38 Table 3-6 VENUS 2908 User.................................................................................................................45 Table 3-7 Main Menu Tree.....................................................................................................................47 Table 3-8 The Configuration Menu Items ..............................................................................................48 Table 3-9 The Interface Configuration Menu Items ..............................................................................50 Table 3-10 Description of Ethernet Configuration Items .........................................................................52 Table 3-11 Description of Analog (FXS/FXO) Configuration Items .......................................................54 Table 3-13 Description of PSTN Lifeline Items ......................................................................................58 Table 3-14 The System Configuration Menu Items .................................................................................59 Table 3-15 Description of System General Items ....................................................................................59 Table 3-16 Description of NTP Items ......................................................................................................60 Table 3-17 Description of User Management Items ................................................................................61 Table 3-18 Description of UI Management Items....................................................................................62 Table 3-19 Description of Provisioning Items .........................................................................................63 Table 3-20 Description of SNMP Items ...................................................................................................66 Table 3-21 Description of TR069 Items...................................................................................................67 Table 3-24 Description of SIP General Configuration Items ...................................................................71 Table 3-25 Description of SIP Realm Configuration Items .....................................................................75 Table 3-26 Description of SIP Group Configuration Items .....................................................................78 Table 3-27 Description of SIP Phone Routing Table Configuration Items ..............................................79 Table 3-29 Description of RTP Management Configuration Items .........................................................83 Table 3-30 Description of Calling Feature Configuration Items .............................................................86 Table 3-31 Call Waiting Operation ..........................................................................................................91 Table 3-32 Call Conference normal Operation ........................................................................................91 Table 3-33 Call Conference By refer Operation ......................................................................................93 Table 3-34 Call Conference By star number Operation ...........................................................................94 xiii Venus 29xx Series SIP User‟s Manual Table 3-35 Call Conference By flash number Operation .........................................................................95 Table 3-36 Attended Call Transfer Operation ..........................................................................................96 Table 3-37 Unattended Call Transfer Operation ......................................................................................96 Table 3-38 Description of Region Configuration Items ...........................................................................97 Table 3-39 Description of Ring Configuration Items ..............................................................................98 Table 3-40 Description of Tone Configuration Items ..............................................................................99 Table 3-41 Description of DDNS Configuration Items .........................................................................101 Table 3-42 Description of NAT Traversal Configuration Items .............................................................102 Table 3-45 The Data Configuration Menu Items ...................................................................................104 Table 3-46 Description of Static Routing Items .....................................................................................106 Table 3-47 Description of NAT mapping Items .....................................................................................107 Table 3-48 Description of DHCP Server DHCP Items ..........................................................................109 Table 3-49 Description of DHCP Server Assign Items .......................................................................... 110 Table 3-50 Description of QoS Items .................................................................................................... 111 Table 3-51 Description of Vlan Items .................................................................................................... 112 Table 3-52 The Maintenance Menu Items ............................................................................................. 113 Table 3-53 The Fault Management Menu Items .................................................................................... 113 Table 3-54 Description of FM Monitoring ............................................................................................ 114 Table 3-55 The Performance Management Menu Items ........................................................................ 115 Table 3-56 The Fault Management Menu Items .................................................................................... 118 Table 3-57 The Device Control Menu Items..........................................................................................120 Table 3-58 Description of Firmware Upgrade Items .............................................................................121 Table 3-59 Description of Config Up/Down Items ................................................................................126 Table 3-61 Description of Routing Table Monitoring Items ..................................................................136 Table 3-62 The Main CLI Tree ..............................................................................................................145 Table 3-64 Save Command ....................................................................................................................147 Table 3-65 Set Command Items .............................................................................................................148 Table 3-66 Show Command Items .........................................................................................................150 Table 3-67 mt Command Items ..............................................................................................................152 Table 3-68 Spy level ..............................................................................................................................155 Table 5-1 Voice Codec Bandwidth.......................................................................................................204 Table A-1 Supplemental Telephony Features .......................................................................................205 xiv Chapter 1 Overview Chapter 1. Overview 1.1 Product Overview TAINET VENUS 29xx Series, a critical part of the Next Generation Network (NGN), functions as an interface gateway unit between the traditional Public Switched Telephone Network (PSTN) and the IP packet network by performing the conversion of the analog voice traffic to/from the IP-based media stream. VENUS 29xx Series is a Voice-over-IP (VoIP) Gateway that provides cost-effective and quality voice service over global IP packet network (Internet or Intranet) for end-users, and, in the meanwhile, lower the installation and maintenance effort. With analog voice interface connecting to user‟s existing telephone handset or PABX, and the Ethernet interface connecting to the service providers' IP network, VENUS 29xx Series bridges the PSTN and IP network. Depending on the installed firmware, VENUS 29xx Series supports Session Initiation Protocol (SIP), Media Gateway Control Protocol (MGCP) and MEGACO which comply with IETF RFC 3261, RFC 3435 and RFC 3525 respectively. This document is only for VENUS 29xx Series installed with SIP firmware. VENUS 29xx Series allow traditional PSTN users to make phone calls over the Internet without changing their telephone operating procedure. Using a Proxy Server or SoftSwitch together with the VENUS 29xx Series, service providers or telecom companies are able to provide integrated voice and data service over the IP network to their customers. Features like billing, accounting and network management supported by the SoftSwitch are available as well. VENUS 29xx Series installed with SIP firmware provides the following services and functions: 1 Support SIP protocol, which complies with IETF RFC 3261 standard. Chapter 1 Overview Venus 2908/2916/2924/2932 Series support up to 8/16/24/32 analog voice interfaces respectively for traditional POTS (Plain Old Telephone System) equipments (telephone handset, FAX machines, etc). Venus 2908 Series provides 4 FXS/4 FXO ports or 8 FXS, Venus 2916/2924/2932 Series provides 16/24/32 FXS telephone interfaces and Venus 2932 FXO provides 32 FXO interfaces respectively for various customers. Each telephone interface can drive at least three telephone handsets through up to 4 km (13k feet) of 24 AWG copper lines. Support ITU-T standard voice codecs. Apply quality VoIP technologies including: Real-time voice packet encapsulation and voice play-out based on the Real-Time Protocol (RTP), Adaptive Jitter Buffer, Echo Cancellation(ITU-T G.168/165), Compensation for Loss of Packet, Voice Activity Detection (VAD) and Silence Suppression. Support T.30 Transparent FAX service or T.38 FAX Relay. Supplemental Class 5 features like Call Forwarding, Caller ID Display/Blocking, Call Returning, Speed Dial, Call Waiting, Call Transfer, Voice Message Indication, Hotline, Call Park and 3-way Conferencing… etc can be easily supported. Use static IP address assignment or obtain the dynamic IP address from a DHCP (Dynamic Host Configuration Protocol) Server or BootP (Bootstrap Protocol) Server. Provide DHCP server function on LAN port. Provide PSTN lifeline feature as backup. (2908 only) Support PPPoE function (Point-to-Point Protocol over Ethernet), NAT/NAPT function (Network Address Translation/Network Address Port Translation), port-based VLAN, VLAN ID and priority tagging, and QoS function that including IEEE 802.1p and IEEE 802.1Q Support RFC-2833 RTP payload for DTMF Digits, Telephony Tones and Telephony Signals Provide Terminal User Interface via the console port、TELNET or web browser for easy and quick local or remote configuration and monitoring. 2 Provide SNMP MIB for integrating into service providers‟ SNMP management system. Chapter 1 Overview Support TFTP protocol for remote software upgrade and configuration file download. 3 User Interface is protected with User ID and Password from unauthorized users. Provide three user accounts with three levels of access privilege. Provides a flexible dialing principles, as well as speed dial using hot key, and hotline direct dial functions. Support SRTP, Secure Real-time Transport Protocol, for enhanced security. Support TR-069 Management Protocol. RoHS compliant products. Chapter 1 Overview 1.2 Applications VENUS 29xx Series, designed as a desktop or rack-mount unit, can be easily installed in a telecommunication equipment room of a building. It uses the standard 10/100 Base-T Ethernet to connect to the service providers' IP backbone through the router or data communication equipment. Up to 32 traditional telephone handsets or FAX machines located in the rooms at each floor of the building can be connected to the VENUS 29xx Series telephone ports using copper wires (Figure 1-1). With various management features supported on VENUS 29xx Series, service providers or telecomm companies can provide toll-quality voice service to the customers. The deployment of an intelligent IP packet network for integrated data and voice service with billing, accounting, and management features can be soon built up. Figure 1-1 Typical SIP VoIP Application Large or median sized enterprises are able to build-up the high quality, cheap or free, private voice service based on the Intranet or Extranet network by deploying VENUS 29xx Series units at corporate HQ and local branch offices. The VENUS 29xx Series communicates with the SoftSwitch/SIP Proxy Server installed at corporate HQ through managed IP leased line, such as DDN (Digital Data Network) leased line or VPN (Virtual Private Network) network. With the scalable voice capacity feature provided by VENUS 29xx Series, enterprises can install proper amount of telephone interfaces for each branch (Figure 1-2). 4 Chapter 1 Overview Figure 1-2 Enterprise VoIP Intranet Application For the Multi-Tenants Units (MTU) or Multi-Dwelling Units (MDU) markets, such as a hotel or campus, VENUS 29xx Series performs as a voice access platform to accommodate the voice-over-IP traffics from all the users. Thanks to the convenience of adding new Ethernet nodes, new VENUS 29xx Series units can be installed easily to extend the amount of users. To support more VENUS 29xx Series media gateway allows service providers to provide cost effective and quality voice services with minimum capital investment and maintenance cost. Figure 1-3 MTU/MDU Application The advantages of using VENUS 29xx Series, the high port density CPE (Customer Premise Equipment) Gateway, are 5 Lower installation effort Easier maintenance Chapter 1 Overview Competitive per port price High voice quality Available feature extension Consuming less public IP addresses which are valuable resources 1.3 Product Description 1.3.1 Hardware Architecture VENUS 2932 is a compact standalone VoIP Gateway with AC power, built-in 32 channels Voice Processing capacity including 32 FXS ports or 32 FXO ports. Figure 1-4 Front View of VENUS 2932 Figure 1-5 Rear View of VENUS 2932 VENUS 2924 is a compact standalone VoIP Gateway with AC power, built-in 24 channels Voice Processing capacity. Figure 1-6 Front View of VENUS 2924 Figure 1-7 Rear View of VENUS 2924 VENUS 2916 is a compact standalone VoIP Gateway with AC power, built-in 16 6 Chapter 1 Overview channels Voice Processing capacity. Figure 1-8 Front View of VENUS 2916 Figure 1-9 Rear View of VENUS 2916 VENUS 2908-8S is a compact standalone VoIP Gateway with AC power; built-in 8 channels Voice Processing capacity and 1 PSTN port for dial-line backup. Figure 1-10 Front View of VENUS 2908-8S Figure 1-11 Rear View of VENUS 2908-8S VENUS 2908-4S4O is a compact standalone VoIP Gateway with AC power; built-in 8 channels Voice Processing capacity including 4 FXS ports and 4 FXO ports. Figure 1-12 7 Front View of VENUS 2908-4S4O Chapter 1 Overview Figure 1-13 1.3.1.1 Rear View of VENUS 2908-4S4O Venus 29xx Series Base Unit 1.3.1.2 VENUS 2908:Base Unit with AC power supply VENUS 2916/2924/2932:Base Unit with optional AC or DC power supply Accessories 50-pin cable(Telco-Cable:RJ-21 male connector to 16 pairs of twisted pair converter for Venus2916/2932) 50-pin cable(Telco-Cable:RJ-21 male connector to 24 pairs of twisted pair converter for Venus2924) 1.3.2 Software Architecture Applying advanced VoIP technology; VENUS 29xx Series uses powerful DSP (Digital Signal Processor) and CPU (Central Processing Unit) to build up a high performance Media Gateway platform. Running over an embedded Multi-tasking Real-Time Operating System, network protocols can be handled efficiently. Architecture of multiple DSPs for performing voice processing concurrently guarantees highest voice quality. Both the DSP and CPU software can be remotely upgraded for feature enhancement. VENUS 29xx Series provides several different ways for equipment management: 8 Terminal User Interface via the Craft port for local management Terminal User Interface via Telnet for remote management Terminal User Interface via Web browser fro remote management SNMP Management Chapter 1 Overview 1.3.2.1 TR-069(CWMP) Management Craft Port By using the VT-100/ANSI compatible terminal emulation software, such as Microsoft HyperTerminal, user is able to configure VENUS 29xx Series via the Craft port at the rear panel. 1.3.2.2 Telnet VENUS 29xx Series can be managed through a Telnet connection. The User Interface format and the management functions provided by TELNET are exactly the same as the craft port. To maintain the consistency of configuration, only one single user is allowed to login the terminal user interface via the craft port or Telnet at the same time. 1.3.2.3 Web Browser The gateway allows users to make settings using a web browser, must enable Web function of the Venus configuration item first. After opening a browser, enter gateway‟s IP address as the website address in order to enter the Web configuration screen as shown in the following diagram. (IE Browser used for example) 9 Chapter 1 Overview Figure 1-14 1.3.2.4 Web Browser SNMP Management The embedded SNMP agent in VENUS 29xx Series allows the device to be managed by the SNMP management system. 1.3.2.5 TR-069 Management VENUS 29xx Series can be managed by the Auto Configuration Servers (ACS) via TR-069 protocol. 10 Chapter 1 Overview 1.4 Technical Specifications Table 1-1 VENUS 29XX Series Technical Specification Items Base Unit Specification Number of slots for Ethernet switch module per unit: VENUS 2916/2924/2932(FXS/FXO): Built-in 5 Ethernet ports. VENUS 2908: Built-in 2 Ethernet ports. Maximum Number of VoIP Channels supported: VENUS 2932(FXS/FXO): 32 FXS voice channels or 32 FXO voice channels. VENUS 2924: 24 voice channels. VENUS 2916: 16 voice channels. VENUS 2908-8S: 8 voice channels, 1 PSTN backup line VENUS 2908-4S4O: 4 FXS voice channels and 4 FXO voice channels. Console Port: - Type: Ethernet Port, RS-232, DCE mode - Connector: DB-9 Female - Format: 115,200bps, no parity, 8 data bits, 1 stop bit WAN Interfaces: IEEE 802.3u 10/100BaseT Fast Ethernet port with auto-negotiation Indicators: - PWR LED: Power Status - SYS ALM LED: System Status and Diagnosis Indication - ETH(1~4) LED: LAN Network Card interface status - ETH0 LED: WAN Network Card interface status - Ser LED: Service status and PSTN status - VOICE CHANNEL 1~32 LED: Hook and Ring status of the voice channels RST Push Button: RESET Power Supply - AC power model: 100V ~ 230VAC, 50~60 Hz - DC power model: -36V ~ -72VDC Signaling Type: FXS loop start driving 2-wire analog FXS Telephone telephone handsets or G3 FAX machines Interface channel Input Impedance: 600-ohm termination mode (FXS-8, FXS-4 Return Loss: > 20dB from 200Hz to 3.4kHz and FXS-32) Attenuation/Frequency Distortion: ITU-T G.712 Compliant 11 Chapter 1 Overview Items Specification Group Delay: ITU-T G.712 Compliant Total Distortion: ITU-T G.712 Compliant Longitudinal balance: <45 dB from 200Hz to 3.4kHz Gain: - A/D: -3 +- 0.2dB at 1KHz - D/A: -3 +- 0.2dB at 1KHz DC Feed Current: 25mA current limited Line Current Detection: <10mA Ringer Frequency: 20Hz (17~40Hz selectable) Ringer Output Voltage: >40Vrms, 3 REN Ringing Current Limit: 100mA current limited Signaling Format: DTMF or pulse dial Idle State Voltage: Vtip-ring < 48V, and Vring<Vtip < 0V 50-pin female RJ-21 Telco connector Optional fan-out cable (50-pin connector to 16 or 24 RJ-11 plugs) for wiring or testing Long haul (up to 3,000m of 24 AWG lines) design FXO Telephone Electronic Spec Interface channel Signaling Type: FXO Loop Start (FXO-4 and Line Impedance: 600-ohm termination mode FXO-32) Return Loss: > 20dB from 200Hz to 3.4KHz Attenuation/Frequency Distortion: ITU-T G.712 Compliant Group Delay: ITU-T G.712 Compliant Total Distortion: ITU-T G.712 Compliant Longitudinal balance: <45 dB from 200Hz to 3.4kHz Gain: - A/D: -3 +- 0.2dB at 1kHz - D/A: -3 +- 0.2dB at 1kHz Leakage Current < 10uA On-hook Resistance > 10Mohm DC Current Limit: 133mA Caller ID Detection Signaling Format: DTMF 50-pin female RJ-21 Telco connector Ring Detection Ring Detection Frequency: 17~40Hz (configurable) 12 Chapter 1 Overview Items Specification Ring De-bounce: < 200ms (configurable) Ring Cadence: - Inter-Pulse < 550ms (Configurable) - Inter-Cycle < 5000ms (Configurable) Auto Answer after Ring: 1 ring (Configurable) Line Disconnection Detection of the Disconnection Tones: (User Configurable) - Busy Tone - Reorder Tone - Congestion Tone Long Dial Tone without Dialing: 10 seconds Line Reversal Detection ITU-T G.711 µ-Law (64kbps) ITU-T G.711 A-Law (64kbps) ITU-T G.723.1 (6.3K/5.3kbps) ITU-T G.729A (8kbps) ITU-T G.726 (16k/24k/32k/40kbps) DTMF, Call Progress tones (Dial tone, Busy tone, Ring back tone, Congestion tone, Off-hook notice tone, etc) V.21/V.25/V.8 tone detection for automatic data/fax/voice switch over to G.711 voice coder Voice Activity Detection (VAD) Silence Suppression Comfort Noise Generation (CNG) Adaptive Jitter Buffer Echo Cancellation (ITU-T G.165/G.168 compliant) Compensation for Loss of Packet In-band or Out-band DTMF Relay Selectable TX/RX Gain Controls Call Signaling (Call Control) Protocols IETF RFC-3261 Session Initiation Protocol (SIP) Voice Packet Encapsulation IETF RFC-1889 Real Time Protocol (RTP) Media Description Protocol IETF RFC-2833 RTP payload for DTMF Digits, Telephony Tones and Telephony Signals IETF RFC-2327 Session Description Protocol (SDP) Voice Codec Tone Generation and Detection Quality Enhancement Technologies 13 Chapter 1 Overview Items Specification Internet Protocols QoS TCP/IP, UDP, ARP/RARP, ICMP, Telnet, DNS Client, BootP Client, DHCP Client/Server, SNMP Client,CWMP Client, TFTP Client, PPPoE, RIP I/II and NAT IEEE 802.1p VLAN VLAN (ID, priority) tagging, port-based VLAN IP Address Assignment Static or Dynamic using DHCP or BootP client FAX over IP Fax Auto-detection T.30 Transparent FAX FAX Relay Mode: ITU-T T.38 Real Time G3 FAX over IP protocol supporting ITU-T V.21, V.27ter, V.29 and V.17 up to 14,400bps Console, Telnet, Web Browser, proprietary authentication, SNMP management,TR069 management Software download and Configuration file download/upload via TFTP Management Remote Upgrade & Remote Provisioning Circumstance Physical Dimension EMC Compliant Safety Compliant 14 Operating Temperature: 0°C ~ 50°C Storage Temperature: -10°C ~ 70°C Relative Humidity: 10% ~ 90% (non-condensing) 437 W x 44 H x 286 D mm (2916/2924/2932) 250 W x 55 H x 200 D mm H (2908) EN 50081-1, EN 50081-2 FCC Part 15 Class A CE mark EN-60950 FCC Part 68 UL/CSA Chapter 1 Overview 1.5 Standard Compliance VENUS 29xx Series complies with the following standards and protocols: 15 ITU-T Codec Standard ITU-T V.21/V.25/V8 – FAX / Modem Answer Tone ITU-T G.168/G.165 Digital network echo cancellers IETF RFC 3261 – SIP (Session Initiation Protocol) IETF RFC 3262 – Reliability of Provisional Responses in Session Initiation Protocol (SIP) IETF RFC-3263 – Locating SIP Servers IETF RFC 3264 – An Offer/Answer Model with Session Description Protocol (SDP) IETF RFC 3265 – SIP - Specific Event Notification IETF RFC 1889 – RTP (Real Time Protocol) IETF RFC-2327 – Session Description Protocol IETF RFC-2543 – Session Initiation Protocol IETF RFC 2833 – payload for DTMF Digits, Telephony Tones and Telephony Signals IETF RFC 2976 – SIP INFO Method IETF RFC 3311 – SIP UPDATE Method IETF RFC-3323 – A Privacy Mechanism for the SIP IETF RFC-3325 – Private Extension to the SIP for Asserted identify within Trusted Networks IETF RFC 3515 – The SIP Refer Method IETF RFC-3550 – RTP-A Transport Protocol for Real-Time Applications. July 2003 IETF RFC-3665 – SIP Basic Call Flow Example Chapter 1 Overview IETF RFC-3842 – A Message Summary and Message Waiting Indication Event Package for the SIP 16 IETF RFC-3891 – The SIP "Replaces" Header IETF RFC-3892 – The SIP Referred-By Mechanism IETF RFC-3960 – Early Media and Ringing Tone Generation in the SIP IETF RFC-3986 – Uniform Resource Identifier: Generic Syntax IETF RFC-4028 – Session Time in the SIP IETF RFC-4566 – Session Description Protocol IP Protocols: TCP/IP, UDP, ARP/RARP, ICMP, Telnet, DNS Client, BootP Client, DHCP Client, DHCP Server, TFTP Client, SNMP agent (V1 or V2c),CWMP agent,,PPPoE, NAT/NAPT and RIP I/II Chapter 2 Hardware Installation Chapter 2. Hardware Installation 2.1 Unpacking This chapter provides the information for installation of the VENUS 29xx Series. Before unpacking, make a preliminary inspection of the container. Evidence of damage should be noted and reported immediately. Unpack the equipment as follows: Place the container on a flat surface and open the container. Carefully take the VENUS 29xx Series out of the container and place it securely on a flat, clean surface. 17 Inspect the unit for signs of damage. Immediately report any damage found. Check the packing list against your order to ensure that the supplied modules match your order. If modules have been pre-installed in accordance with your order, check that all the modules are in their proper slots and are secure. Immediately report any deviations. Check that all the necessary items have been included, following items are shipped with your VENUS 29xx Series: One VENUS 29xx Series Manual (this one) One AC power cable Chapter 2 Hardware Installation 2.2 Site Requirements 2.2.1 Site Selection Install the device in a clean area that is free from environmental extremes. Allow at least 6 inch (15.24 cm) in front of the device for access to the front panel, and at least 4-inch (10.2 cm) in back for cable clearance. Position the device so you can easily see the front panel. 2.2.2 AC Electrical Outlet Connection VENUS 29xx Series with AC power input should be installed within 1.83m (6 feet) of an easily accessible grounded AC outlet capable of furnishing the required supply voltage, in the range of 100 to 230V AC. 2.2.3 Grounding The FCC requires telecommunications equipment to withstand electrical surges that may result from lightning strikes; the VENUS 29xx Series device meet the requirements set forth by the FCC. The following procedure outlines some common practices that can minimize the risk of damage to computer equipment from electrical surges. Make sure the electric service in your building is properly grounded as described in article 250 of the National Electrical Code (NEC) handbook. Verify that a good copper wire of the appropriate gauge, as described in Tables 250-94/95 of the NEC Handbook, is permanently connected between the electric service panel in the building and a proper grounding device such as: 18 A ground rod buried outside the building at least 8 feet (2.44 meters) deep in the earth. Chapter 2 Hardware Installation Several ground rods, connected together, buried outside the building at least 8 feet (2.44 meters) deep in the earth. A wire (see tables 250-94/95 of the NEC handbook for gauge) that surrounds the outside of the building and is buried at least 2.5 feet (.76 meters) deep in the earth. Note: The three grounding devices described above should be firmly placed in the earth. Soil conditions should not be dry where the device is buried. If you are unsure whether the electric service in your building is properly grounded, have it examined by your municipal electrical inspector. Install a surge protector between the device and Ground point. Any additional computer equipment you have connected to the device (directly or through another device), such as a terminal or printer should also be plugged into the same surge protector. Make sure that the surge protector is properly rated for the devices you have connected to it. 19 Call your telephone company and ask them if your telephone line is equipped with a circuit surge protector. If you are operating the device in an area where the risk of electrical surges form lightning is high, disconnect the device from the telephone line at the rear panel when it is not in use. Chapter 2 Hardware Installation 2.3 LED Indicators Table 2-1 Label PWR LED Description Function Description Power Status Colors Off (Power is Off) Green (Power is ON) Green (Normal Operation) SYS ALM System Status Yellow (Performing Diagnosis) Red (System Failure) VOICE CHANNEL LEDs Eth0 Off (On-Hook State of the Telephone Handset) Voice Channel Status Green (Off-Hook State of the Telephone Handset) Ethernet 0 Status Green (Network Card is plug in and 10/100 Base-T Link is Up) Off (Network Card is unplug) Green (Network Card is plug in and 10/100 Eth1(2908) Ethernet (1~4) Base-T Link is Up) Eth1~4(2916/ Status 2924/2932) Off (Network Card is unplug) SER(2908) 20 Server Status Green (Registered to the SIP server) Off (Not registered to the SIP server) Chapter 2 Hardware Installation 2.4 Cable Connection 2.4.1 Connecting the Power Source VENUS 29xx accepts 100V~230VAC/50~60Hz (Auto-range) power source. Connect the device to a power outlet of the correct voltage and rating as your power system. Note: It is strongly recommended to use an AC power cord with Grounding pin or connect the Grounding Screw on the rear panel to the grounded supply of correct power system. 2.4.2 Connecting the IP Network via Ethernet On the base unit of VENUS 29xx Series, the embedded 10/100Base-T Ethernet port is provided as the standard interface to the IP network. The pin layout of the RJ-45 connector for IEEE 802.3 standard 10/100Base-T Ethernet ports are defined as following: Table 2-2 10/100Base-T Connection Pin #. Pin Function Pin #. Pin Function 1 TD+ 5 N/C 2 TD- 6 RD- 3 RD+ 7 N/C 4 N/C 8 N/C For connecting the 10/100Base-T Fast Ethernet, a Category 5 unshielded twisted-pair (UTP) cable or shielded twisted-pair cable is used. Two pairs of the twisted wires are used for separated Rx (reception) and Tx (transmission). The Fast Ethernet port is backward compatible with traditional 10Base-T Ethernet. VENUS 29xx Series can automatically detect whether it is connected to a 10Base-T or 100Base-T Network. 21 Chapter 2 Hardware Installation 2.4.3 Connecting the Terminal The Console port connector labeled “CRAFT” on the front panel of VENUS 29xx is provided for connection to an external ANSI or VT-100 compatible terminal for quick and easy, local configuration of the VENUS 29xx Series. Speed and Data format: 115,200bps, none parity, 8 data bits, 1 stop bit, and no flow control. 2.4.4 Connecting the Telephony Devices VENUS 2908 supplies 8(2908-8S) or 4(2908-4S4O) telephony ports. Figure 2-1 Figure 2-2 VENUS 2908-8S Series Telephony Interface VENUS 2908-4S4O Series Telephony Interface Venus 2916 used the first RJ-21 interface, with the pin configuration as shown in the table below. Figure 2-1 RJ-21 connector 22 Chapter 2 Hardware Installation Table 2-3 Venus2916 RJ-21Pin Assignment Pin # Port 1, 26 2, 27 3, 28 4, 29 5, 30 6, 31 7, 32 8, 33 9, 34 10, 35 11, 36 12, 37 13, 38 14, 39 15, 40 16, 41 17 ~ 25 42 ~ 50 Port 1 Port 2 Port 3 Port 4 Port 5 Port 6 Port 7 Port 8 Port 9 Port 10 Port 11 Port 12 Port 13 Port 14 Port 15 Port 16 Reserve Reserve Venus 2924/2932 used the first RJ-21 interface, with the pin configuration as shown in the table below. Table 2-4 23 Venus2924/2932 First RJ-21Pin Assignment Pin # Port 1, 26 Port 1 2, 27 Port 2 3, 28 Port 3 4, 29 Port 4 5, 30 Port 5 6, 31 Port 6 7, 32 Port 7 8, 33 Port 8 9, 34 Port 9 10, 35 Port 10 11, 36 Port 11 12, 37 Port 12 13, 38 Port 13 14, 39 Port 14 15, 40 Port 15 16, 41 Port 16 Chapter 2 Hardware Installation 17, 42 Port 17 18, 43 Port 18 19, 44 Port 19 20, 45 Port 20 21, 46 Port 21 22, 47 Port 22 23 48 Port 23 24, 49 Port 24 25, 50 Reserved Venus 2932 used the second RJ-21 interface, with the pin configuration as shown in the table below. Table 2-5 Venus2932 Second RJ-21Pin Assignment Pin # Port 1, 26 2, 27 3, 28 4, 29 5, 30 6, 31 7, 32 8, 33 9, 34 10, 35 11, 36 12, 37 13, 38 14, 39 15, 40 16, 41 17 ~ 25 42 ~ 50 Port 17 Port 18 Port 19 Port 20 Port 21 Port 22 Port 23 Port 24 Port 25 Port 26 Port 27 Port 28 Port 29 Port 30 Port 31 Port 32 Reserve Reserve There are two cables available: Twisted-pair cable: Male RJ-21 connector to 16 / 24 pair twisted pair cable. Fan-out cable: RJ-21 connector to 16 / 24 RJ-11 copper cable. Twisted-pair cable: Male RJ-21 to 16 /24 pair twisted pair cable can easily be connected to the line patch panel. 24 Chapter 2 Hardware Installation Figure 2-3 Table 2-6 25 Twisted Pair Cable Twisted Pair Pin Assignment RJ-21 Pin # Copper Color Voice Channel (per pair) 1 & 26 Black / Black and White Port 1 2 & 27 Brown / Brown and White Port 2 3 & 28 Red / Red and White Port 3 4 & 29 Orange / Orange and White Port 4 5 & 30 Yellow / Yellow and Black Port 5 6 & 31 Green / Green and White Port 6 7 & 32 Blue / Blue and White Port 7 8 & 33 Purple / Purple and White Port 8 9 & 34 Gray / Gray and Black Port 9 10 & 35 White / Orange and Black Port 10 11 & 36 Pink / Red and Black Port 11 12 & 37 Light Green / Green Black Port 12 13 & 38 Pink and Black / Pink and Red Port 13 14 & 39 Pink and Blue / Pink and Green Port 14 15 & 40 Light Blue / Light Yellow Port 15 16 & 41 Light Blue and Black / Light Blue and Red Port 16 17 & 42 Light Blue and Blue / Light Blue and Green Port 17 18 & 43 Gray and Red / Gray and Green Port 18 Chapter 2 Hardware Installation 2.5 RJ-21 Pin # Copper Color Voice Channel (per pair) 19 & 44 Blue and Black / Purple and Black Port 19 20 & 45 Light Green and Black / Light Green and Red Port 20 21 & 46 Light Green and Blue / Light Green and Green Port 21 22 & 47 Light Yellow and Black / Light Yellow and Red Port 22 23 & 48 Light Yellow and Blue / Light Yellow and Green Port 23 24 & 49 White and Black / White and Red Port 24 25 & 50 White and Blue / White and Green Reserved Hardware Diagnosis When the connections are all done, turn on the power of the device to boot up the software. VENUS 29xx Series will perform hardware detection, initialization and diagnosis. The LED indicators at the front panel show the progress of the hardware diagnosis. If it passed all the hardware diagnosis, the “SYS ALM” LED will display GREEN color; whereas, the RED color indicates hardware failure. The diagnosis result can be observed via the User Interface (UI) provided by VENUS 29xx Series. 26 Chapter 3 Configuration and Management Chapter 3. Configuration and Management This Chapter describes the Terminal User Interface provided by VENUS 29xx Series. There are three methods to access to the Terminal User Interface: the Craft port, Telnet and Web browser, those present the exactly same format of terminal management. The Craft port is used primarily when the device is installed for the first time and the IP configuration is not yet provisioned. Once when the IP connection is provisioned, user may login to the Terminal User Interface using the Telnet software or Web browser to remotely control or maintain the device from anywhere in the global IP network. 3.1 Quick Start Once when the VENUS 29xx Series is successfully started up, please make sure that the connection to the IP network is properly installed before continuing with the configuration. Very few parameters are required for configuring the VENUS 29xx to bring up basic VoIP service. Here is a guide for start VoIP service quickly. 3.1.1 Connecting to Venus 29xx 3.1.1.1 Setup PC There are five ways to connect the VENUS 29xx, the Web-based management, Telnet_based management, SNMP_based management, TR069_based management and the Terminal Emulation-based management. The Web-based one is recommended. The connection between PC and VENUS 29xx SERIES as shown in the following Figure: 27 Chapter 3 Configuration and Management Figure 3-1 Connecting to the PC 1) Web-based The web-based management allows users to manage VENUS 29xx from a remote Web browser. The embedded web server in the VENUS 29xx Series provides a user-friendly interface. You can complete the configuration by web. First, you need to connect VENUS 29xx Series Eth0 interface to the network interface of your PC with Ethernet cable. Then, you need web browser software, such as Internet Explorer (IE), Mozilla Firefox, Netscape Navigator, etc to enter the web page. 2) Terminal Emulation-based By using the VT-100/ANSI compatible terminal emulation software, such as Microsoft HyperTerminal, user can configure VENUS 29xx SERIES via the Craft port with console cable. Table 3-1 lists some commonly used software, based on the type of PC platform you are using. Table 3-1 Terminal Emulation Software Operation System Software Windows 98/XP/NT/2000/2003/Vista HyperTerminal (included with Windows software) Linux Minicom Or Kermit Select the COM port used and setup the following settings: - Speed: 115200 bps (bit per second) - Data Length: 8 bits - Parity Bit: None - Stop Bit: 1 bit - Flow Control: None 28 Chapter 3 Configuration and Management 3.1.1.2 Power ON VENUS 29xx Series Power on your VENUS 29xx SERIES after the gateway is connected to your PC. It takes several seconds to perform the initialization and diagnosis. After the gateway has been finished initializing, the LED of service change to green. And now, you can connect to the gateway 3.1.1.3 Connect to VENUS 29xx Series 1)Web-based The default parameters of VENUS 29xx Series Ethernet port are as follow: Default IP address: 192.168.0.1 Default gateway: 192.168.0.254 Default net mask: 255.255.255.0 Before enter the web site of the VENUS 29xx Series you need to change the configuration of your PC network to the same network segment as the VENUS 29xx Series. Open the web site by the web browser and you will see the login web page as shown in the following Figure. Figure 3-2 29 The Login Page Chapter 3 Configuration and Management 2) Terminal Emulation-based You also can change the device network configuration by the Terminal Emulation instead of change your PC‟s. After the Terminal Emulation startup press any key on the gateway. It will prompt the following messages: Figure 3-3 3.1.1.4 The Login CLI Screen Login Username and Password are required to login the VENUS 29xx for protection from unauthorized access to the device. Default User Name: admin Default User Password: admin 1) Web-based Type the User Name and the User Password, and then click the “Login” button go to the root menu as shown in the following Figure. Figure 3-4 30 The root menu of the web site Chapter 3 Configuration and Management There are three items, “Status”, “Configuration” and “Maintenance” in the top menu. 2) Terminal Emulation When the security check is passed, the terminal UI displays the Root Menu as shown in the following Figure: Figure 3-5 3.1.1.5 The Root Screen Command List Type the “help” in the Terminal Emulation when login successfully to show the Command List as shown in the following Figure: Figure 3-6 3.1.1.6 The Command List Screen Configure the Ethernet Interface 1) Set IP Address Command format: set interface ethernet <id(0..1)> ip_address <ip string for static> 31 Chapter 3 Configuration and Management Sample: admin> set interface ethernet 0 ip_address 192.168.1.222 2) Set Default Gateway Command format: set interface ethernet <id(0..1)> default_gateway <ip string for static> Sample: admin> set interface ethernet 0 default_gateway 192.168.1.20 3) Save and run the setting Type “save” to save and run the setting. The two commands have been executed as shown in the following Figure. Figure 3-7 3.1.1.7 Set Ethernet Interface Check the setting of Ethernet interface Type “show interface Ethernet 0” in the Terminal Emulation to check the setting of Ethernet 0. The result of the status is shown as following. admin>show interface ethernet 0 Ethernet0 config Parameters: Interface mode:enable IP mode:static IP address:192.168.1.222 Net mask:255.255.255.0 Default gateway:192.168.1.20 DNS1:0.0.0.0 DNS2:0.0.0.0 32 Chapter 3 Configuration and Management DHCP use host name as Venus 2908 name:disable DHCP use static dns:disable DHCP trust server1:0.0.0.0 DHCP trust server1 net mask:0.0.0.0 DHCP trust server2:0.0.0.0 DHCP trust server2 net mask:0.0.0.0 PPPOE user name: PPPOE password: PPPOE use static dns:disable PPPOE use remote gateway:enable PPPOE reconnect when link down:enable MTU size:1500 MAC address: admin> The Ethernet interface has modified and then you can complete the “Quick Start” configuration in the 6 steps, please refer to section 3.1.2. 3.1.2 Complete the “Quick Start” configuration 3.1.2.1 Start “Quick Start” Click the “Configuration” of the top menu and come to “Quick Start” page. This page will guide you through completing the basic configuration of the VENUS 29xx Series as shown in the following Figure. 33 Chapter 3 Configuration and Management Figure 3-8 3.1.2.2 The Quick Start web page Select Network Connection Mode There are three modes for selecting the network, “Static IP”, “DHCP” and “PPPoE”. Table 3-2 Network Connection Mode Configuration Items Description Necessary Network Connection Mode Default:”Static IP” Y If you select “Static IP”, you need to set the VENUS 29xx Series network connection manually. This is the recommended way for the configuration. The “DHCP” mode and “PPPoE” mode are provided to advanced user. The web page of Network Connection Mode configuration is shown in the following Figure. 34 Chapter 3 Configuration and Management Figure 3-9 Network Connection Mode configuration Caution: If “DHCP” is selected, the detailed “DHCP Configuration” can only be done after this whole “Quick Start” setting is completed. Click the “Next” button to continue. 3.1.2.3 Static IP setting If you set the SIP proxy and the registrar server with its domain name but not its IP address, you need to set the DNS server IP address. You may set the second DNS server if you have two. The second DNS server is the backup of the first one. Table 3-3 35 Static IP Configuration Items Description Necessary IP address The local IP address of the VENUS 29xx. Y Net mask The net mask of the local IP Y Default gateway The default gateway to route packages for other network. Y DNS1 address The DNS server IP address from which N VENUS 29xx can get ip information when domain name is used. DNS2 address The backup DNS server IP address. N Chapter 3 Configuration and Management The Static IP configuration web page is shown in the following Figure. Figure 3-10 Static IP Configuration Click the “Next” button to continue. 3.1.2.4 Sip Server setting You need to set the SIP proxy and the register server manually. Sometime, they will share the same configuration if they are combined in a same system. Table 3-4 SIP Server Configuration Items Description Necessary Domain Name The domain name of the Proxy Server. N Proxy address IP address or domain name of the softswitch. No default. Y Proxy Port Port of the soft switch, the default value is 5060 . N Registrar address IP address or domain name of the registrar server. No default. 36 Y Registrar Port Port of the registrar server, the default value is N 5060. Outbound Proxy The IP address or domain name of the N Chapter 3 Configuration and Management Items Description Necessary address outbound proxy Transport way The transport of SIP signaling, the default value is UDP. Y The SIP Server configuration web page is shown in the following Figure. Figure 3-11 SIP Server Configuration Caution: You may set the “Proxy address”, the “Registrar address” and the “Outbound Proxy address” with its domain name if the DNS server is configured. Click the “Next” button to continue. 37 Chapter 3 Configuration and Management 3.1.2.5 FXS/FXO setting We supply you default configuration of the FXS/FXO. You can change the User Number and User authentication ID parameters of Ports as needed. Table 3-5 FXS/FXO Configuration Items Description Necessary User Number(Port1) Default: 1001. Y User Number(Port2~8) or (port2~32) Default: increment; Y User authentication No default ID(Port1) N User authentication Default: Same; ID(Port2~8) or (port2~32) N User authentication No default password(Port1) N User authentication Default: Same; password(Port2~8) or (port2~32) N Local server port number Default: 5060; N Register Mode Default: Enable; Y “Shut Down”- The port can do nothing. “Disable”-The port only allowed to receive call. “Enable”-The port work normal. The FXS/FXO configuration web page is shown in the following Figure. 38 Chapter 3 Configuration and Management Figure 3-12 FXS/FXO Configuration You need to set the “User authentication ID” and the “User authentication password” when the Sip proxy and the register require authentication. Click the “OK” button and you come to the last page of the “Quick start” which shows you “Save and Run the web server configuration Succeed!”. All the ports of the Venus 29xx Series will register to the server automatically after this operation. Figure 3-13 39 Saving the configure information Chapter 3 Configuration and Management Figure 3-14 3.1.2.6 Quick Start completed Check the FXS/FXO state Now, you have completed the Quick Start configuration of the VENUS 29xx Series. You can click the “status” of the top menu and select the “Analog (FXS/FXO)” of the left panel to check the result of this process. If you see “Register” state of the ports are all “OK”, the configuration is successful. The FXS/FXO state is shown in the following Figure. Figure 3-15 40 Check FXS/FXO state Chapter 3 Configuration and Management Now, the Venus 29xx Series is ready for VoIP service. 3.2 Quick Setup 3.2.1 Login Setup PC‟s IP address to be using the same network segment as Venus 29xx Series and directly connect PC to the WAN port of Venus 29xx Series. Enter the default IP address http://192.168.0.1 to access the Web user interface. Default user name is “admin” and password is “admin”. Figure 3-16 3.2.2 Login Page Main Page After Login, user will see the main page of Venus 29xx Series. 41 Chapter 3 Configuration and Management Figure 3-17 3.2.3 Main Page Network Setting Users now will need to change the network configurations to comply with field application. Select Configuration >> Interface Configuration >> Ethernet to setup desired IP address, Net mask and Default Gateway or select “DHCP” or “PPPOE” for Venus to automatically derive IP setting from the server. Select “OK” to confirm settings and select “Save & Run” to apply settings. Figure 3-18 42 Network Configuration Chapter 3 Configuration and Management 3.2.4 SIP Setting In order for Venus to be successfully registered to the SIP server, users need to enter the SIP proxy and registration addresses. Click Configuration >> SIP Configuration >> Realm to configure Venus SIP realm. Select realm index to 0 and change realm valid to “Enable”. Click “OK” to confirm and select “Save & Run” to apply. Figure 3-19 3.2.5 SIP Realm Analog (FXS/FXO) Setting Setup user number and authentication ID and password for each analog FXS or FXO ports to have them successfully registered to SIP server. Select register mode to “Enable” and enter correct user number and authentication ID and password. Select “OK” to confirm and select “Save & Run” to apply. 43 Chapter 3 Configuration and Management Figure 3-20 3.2.6 Analog (FXS/FXO) settings Status Check After all configurations are done, user can check the current registration status at Status >> Analog (FXS/FXO). Figure 3-21 44 Status Check Chapter 3 Configuration and Management 3.3 Login and Logout There are three types of user accounts built in the Venus 29xx Series: Administrator, Operator and Monitor. Each type of user can change its own name and password. Table 3-6 User Class User Name Default Password Administrator admin admin VENUS 2908 User Operating System manager. Full control. Operator user Only allow Ethernet configuration and monitor. Monitor guest Only allow monitor. 1) Web-based After input the right user name and password, click “Login” button to log in the web. Click “Logout” icon of the main page to log out the web. Figure 3-22 Web-based Login interface 2) Terminal Emulation-based Input the right user name and password and then press “enter” key to login the CLI 45 Chapter 3 Configuration and Management interface. Input “logout” and then press “enter” key to logout the CLI interface. Figure 3-23 3.4 Terminal Emulation-based Login interface Navigating the Web Interface The following Figure shows the style of the Web UI. Indications point out the layout of the UI and help user to navigating through the User Interface. There are three categories in the main menu, “Status”, “Configuration” and “Maintenance”. Each category has several sub-menu also for special functions. Status To get system info and status working state; Configuration To set and update system configuration; Maintenance To manage the system fault, control the device and diagnostic. 46 Chapter 3 Configuration and Management Figure 3-24 Web UI Main Page Table 3-7 Main Menu Tree Menu Sub-Menu Description Status System Info Show the version of the Software, Hardware, Boot Code and etc. Ethernet Show the configuration of the eth0 and eth1. (eth2~4 for 2916/2924/2932). 3Gmodem Info Show current status of 3G modem connection. Analog (FXS/FXO) Show the state of each FXS/FXO. Routing table Show the routing table. ARP table Show the ARP table. Configuration Quick Start 47 A guide for user to start the system quickly. Interface Configuration Configure Ethernet, Analog, 3GModem and PSTN. System Configuration Configure (System) General, System Time, User Management, UI Management, Provision ,SNMP, TR069, FM Threshold and Syslog SIP Configuration Configure (SIP) General, Realm, Group, Phone Routing Table and Digit manipulation. Chapter 3 Configuration and Management Menu Sub-Menu Description Advanced Configuration Configure RTP Management, Calling Feature, Region Profile, DDNS, NAT Traversal, SLIC Configuration and Meter Configuration. Data Configuration Configure Static Routing, NAT Mapping, DHCP Sever, QoS and VLAN Management. Note: Static Routing and NAT Mapping are displayed if interface eth1 is in router mode. Save & Run Save all the changes and run them. Maintenance Fault Management FM Monitoring and Clear FM. Performance Management Ethernet, Call Control, RTP, NAT, DHCP Server, SIP Agent, SIP Call Initiation and Clear. Notes: NAT && DHCP server are displayed if interface eth1 is in router mode. 3.5 Diagnostics Tools including Ping, STUN, Traceroute. Device Control F/M Upgrade, Config Up/Down, Syslog Upload, Reset to Default and Reboot. Configuration Beside “Quick Start” and “Save & Run”, the Configuration menu is divided into seven groups, “Quick Start”, “Interface Configuration”, “System Configuration”, “SIP Configuration”, “Advanced Configuration”, “Data Configuration” and “Save & Run”. “Quick Start” is used to help user starting VENUS 29xx quickly, please refer to Section 3.1 for more information. Table 3-8 48 The Configuration Menu Items Menu Description Quick Start A guide for user to start the system quickly. Interface Configuration Configure Ethernet, Analog, 3GModem and PSTN. Chapter 3 Configuration and Management Menu Description System Configuration Configure (System) General, NTP, User Management, UI Management, Provision ,SNMP, TR069, FM Threshold and Syslog SIP Configuration Configure (SIP) General, Realm, Group, Phone Routing Table and Digit Manipulation. Advanced Configuration Configure RTP Management, Calling Feature, Region Profile, DSP Allocation, DDNS, NAT Traversal, SLIC Configuration and Meter Configuration. Data Configuration Configure Static Routing, NAT Mapping, DHCP Sever, QoS and VLAN Management. Save & Run 3.5.1 Save all the changes and run them. Save & Run “Save & Run” is not a single group of Configuration. Save the confirmed changes of configuration and run them. If no change has been confirmed, do nothing. Figure 3-25 Prompt of “Save & Run” Click “OK” button to save and run or click “Cancel” button to give up. Figure 3-26 49 Prompt after click “OK” button on “Save & Run” page. Chapter 3 Configuration and Management 3.5.2 Interface Configuration Table 3-9 The Interface Configuration Menu Items Menu Description Ethernet Configuration of the eth0, eth1 or eth2~4(2916/2924/2932) such as “Static IP”, “DHCP”, “PPPoE”, “DNS” and so on. Analog(FXS/FXO) Configuration of the port1~8(2908), port1~16(2916), port1~24(2924) or port1~32(2932). 3.5.2.1 3GModem 3G Modem configuration. PSTN Lifeline (2908 8S Model only) PSTN configuration. Ethernet Configuration There are two Ethernet interfaces in VENUS 2908 and five Ethernet interfaces in VENUS 2916/2924/2932. Ethernet interface 0 is usually called WAN. Ethernet interface 1~4 can be considered as LAN port. Ethernet interface 0 supports three methods of obtaining the IP address: static, DHCP or PPPoE. Ethernet interface 1 operates on four modes: disable, router, switch and Eth0 backup. Ethernet 2 to 4 operates on two modes: switch and disable. 50 Chapter 3 Configuration and Management Figure 3-27 51 Ethernet Configuration Chapter 3 Configuration and Management Table 3-10 Description of Ethernet Configuration Items Field Description Interface mode Interface working mode, for interface 0, it should be always Enabled. For interface 1, it can be configured to “Disable”, “router” or “switch” or “Eth0 backup”. For interface 2~4, it can be configured to “Disable” or “switch”. Eth0Backup Backup interface for Eth0: 1.Disable 2.Eth1 3.3G IP mode Quick Start parameter. There are three IP mode: 1.Static IP address (default) - IP is assigned to a specified one; 2.DHCP client mode - Auto assigned by DHCP server; 3.PPPoE mode - Auto assigned by PPPoE server; IP address Quick Start parameter The static IP address of specified interface. Net mask Quick Start parameter The net mask of specified interface. Default gateway Quick Start parameter The default gateway address of specified interface. DNS1 address Quick Start parameter The DNS server 1 IP address DNS2 address Quick Start parameter The DNS server 2 IP address DHCP use host name as IAD name 1.Disable(default); DHCP use static DNS 1.disable(default); 2.Enable;use host name in DHCP protocol 2.enable; ignore the DNS information in DHCP offer. DHCP use trust server 1.disable(default); 2.enable DHCP trust server address 1 The first trust DHCP server network address. DHCP trust net mask 1 The first trust DHCP server net mask. DHCP trust server 52 The second trust DHCP server network address. Chapter 3 Configuration and Management address 2 DHCP trust net mask 2 The second trust DHCP server net mask. PPPoE user name The user name of PPPoE authentication. PPPoE password The password of PPPoE authentication. PPPoE use static DNS 1.disable(default); 2.enable; ignore the DNS information in PPPoE offer. PPPoE use remote gateway 1.disable; PPPoE reconnect when link down 1.disable; MTU size The MTU size of specified interface MAC address The MAC address of specified interface, configurable by admin user only. Speed&Duplex 0 = auto (default) 2.enable(default);use this gateway as VENUS 2908 default gateway 2.enable(default); 1 = 10M full 2 = 10M half 3 = 100M full 4 = 100M half Ingress limit Set up ingress limitation for incoming packets Egress limit Set up egress limitation for outgoing packets If the configuration is finished, click “OK” button below the web page to confirm changes or click “Cancel” button to deny it. Figure 3-28 53 Prompt after click “OK” button Chapter 3 Configuration and Management 3.5.2.2 Analog (FXS/FXO) Configuration The analog line means either FXS interface or FXO interface. Generally the total number is different for each model. The configuration parameter is specified by each interface (Port Numbers 1 to 8 or 1 to 32). Figure 3-29 Table 3-11 54 Analog (FXS/FXO) Configuration Description of Analog (FXS/FXO) Configuration Items Chapter 3 Configuration and Management Field Description Port Number Port number from 1 to 8(2908) or 1 to 16(2916) or 1 to 24(2924) or 1 to 32(2932). User Number Quick Start parameter (Same or increment) The register numbers which allow using the same number for different port. The ports used the same number is taken as group binding number. User name In SIP, it presents the display name for specified user. Tel Number User number for Tel format Register mode Quick Start parameter. Enable/Disable register to server. 1.Shut down 2.Disable(default) 3.Enable Realm Index Quick Start parameter. The assigned realm index (0..7). Assume the realm 0 always exists. Local service port number Quick Start parameter. User authentication ID Quick Start parameter (Same or increment) User authentication password Quick Start parameter (Same or increment) Digitmap The default digitmap for collect digits RX gain The RX gain. (-20..20) TX gain The TX gain. (-20..20) Min flash time The minimum flash time Max flash time The maximum flash time Local service port number. Default is 5060 for SIP The authentication user ID. The authentication user password. Rep flash time The report flash time (2908 4S4O and 2932 FXO) Line reversal 1.Disable 2.Enable(Default)(Send line reversal signal for FXS port and 55 Chapter 3 Configuration and Management detect line reversal signal for FXO) Caller ID 1.Disable(Default); generation/dete 2.Enable; ction mode Dialing mode 1.Both 2.DTMF 3.Pulse Hotline number The hotline number or URL Hotline timeout The time to wait for digits input. If time out do hotline. Always forward The forward number or URL for always forward. number Busy forward number The forward number or URL for busy forward. No answer The forward number or URL for no answer forward. forward number Wait times for no answer forward The ring times to wait before No answer forward to configure number. Call ID block 1.Disable(Default) 2.Enable The Asserted ID mode defines the header that is used in the generated INVITE request. The header also depends on the calling Privacy: allowed or restricted. The P-asserted (or P-preferred) headers are used to present the originating party‟s Caller ID. The Caller ID is composed of a Caller Number and (optionally) a Caller Name. P-asserted (or P-preferred) headers are used together with the Privacy header. If Caller ID is restricted, the „Privacy: id‟ is included. Otherwise for allowed Caller ID the „Privacy: none‟ is used. If Caller ID is restricted (received from Tel or configured in the gateway), the From header is set to <[email protected]>. Call ID PAI show 1.Disable(Default); Third Call ID PAI show 1.Disable(Default); Preferred identity of call ID block Preferred identity in call ID block mode 2.Enable; 2.Enable; If the configuration is finished, click “OK” button bellow the web page to confirm changes or click “Cancel” button to deny it. 56 Chapter 3 Configuration and Management 3.5.2.3 3GModem This page is used to set up configurations for 3G modem connection Figure 3-30 3G Modem Table 3-12 Description of 3G Modem Configuration Items 57 Field Description Country Country of 3G modem network Telecom Telecom of 3G modem network 3G Network Network type to be used in 3G modem connection APN Access Point Name of 3G modem network Dialed Number Number dialed to establish 3G modem connection Account Account of 3G modem Password Password of 3G modem Chapter 3 Configuration and Management Field Description Authenticatio Authentication type : n 1.Auto (Default) 2.PAP 3.CHAP Primary DNS Primary DNS used in 3G modem network Second DNS Secondary DNS used in 3G modem network 3.5.2.4 PSTN Lifeline Configuration This configuration is available in Venus 2908-8S model only. Figure 3-31 Analog (FXS/FXO) Configuration Table 3-13 Description of PSTN Lifeline Items Field Description Prefix for PSTN line seizure Default: “#*1”.The function code to use PSTN Lifeline. PSTN max. ring off-time 30..70. 100ms base. Default is 40. Lifeline with channel Default port for PSTN service when as callee. Default is port 1. Ring counter 0: disable. Only ring on default port when PSTN call coming. 5..20 valid value. Ring for specify times on current spare port before turn to the next. The first one is the default port by setting. If the configuration is finished, click “OK” button bellow the web page to confirm 58 Chapter 3 Configuration and Management changes or click “Cancel” button to deny it. 3.5.3 System Configuration Table 3-14 The System Configuration Menu Items Menu Description General Configuration of the “Device name” and so on. System Time Simple Network Time Protocol (SNTP) client configuration. User Configuration of the three build-in users in VENUS 29xx: Management Administrator, operator and monitor. UI Configuration of build-in WEB and Telnet server Management Provision Configuration of the Provision SNMP Configuration of the Simple Network Management Protocol(SNMP) agent TR069 Configuration of TR069) agent CPE WAN Management Protocol (CWMP or FM Threshold Fault alarm threshold configuration of CPU, DSP and RAM usage. Syslog 3.5.3.1 Configuration of the capture and upload of the spy log messages. General Configuration Figure 3-32 Table 3-15 Field System General Configuration Description of System General Items Description Device name The device name (may be domain name) used by NMS. Default is the MAC of the device. If the configuration is finished, click “OK” button bellow the web page to confirm 59 Chapter 3 Configuration and Management changes or click “Cancel” button to deny it. 3.5.3.2 System Time Configuration Simple Network Time Protocol (SNTP) client functionality generates requests and reacts to the responses using the NTP version 3 protocol definitions (according to RFC 1305). Through these requests and responses, the NTP client is able to synchronize the system time to a time source within the network. By synchronizing time to a network time source, traffic handling, maintenance, and debugging actions become simplified for the network administrator. Figure 3-33 Table 3-16 Field Description NTP Mode 1. Disable(default) NTP Configuration Description of NTP Items 2. Enable 60 NTP server address IP address (in dotted format notation) or domain name of the NTP server. Not assigned will disable the NTP function. NTP server port NTP service port number of NTP server. Default is 123. NTP polling interval Defines the time interval (in seconds) the NTP client requests for a time update. 64~8192. Default is 1024. Chapter 3 Configuration and Management Field Description Time zone Defines the GMT time zone (+13 to -12). DST mode Enable or Disable the Daylight saving time DST time(m) Minutes to be added to the current system time. NTP reboot schedule 1. Disable(default) Reboot dayofweek Selection of reboot day of week when reboot schedule is enabled 2. Enable Reboot hour Configuration of NTP reboot hour in 24 hours format. If the configuration is finished, click “OK” button below the web page to confirm changes or click “Cancel” button to deny it. 3.5.3.3 User Management Configuration There are three build-in users in VENUS 29xx: Administrator, Operator and Monitor. User could change the name and password. Figure 3-34 Table 3-17 61 User Management Configuration Description of User Management Items Field Description Administrator name The administrator name and default is “admin”. Administrator password The administrator password and default is “admin”. Chapter 3 Configuration and Management Field Description Operator name The Operator name and default is “user”. Operator password The Operator password and default is NULL. Monitor name The Monitor name and default is “guest”. Monitor password The Monitor password and default is NULL. If the configuration is finished, click “OK” button below the web page to confirm changes or click “Cancel” button to deny it. 3.5.3.4 UI Management Configuration Venus 29xx Series has one build-in Telnet server and one build-in WEB server for remote management. Figure 3-35 UI Management Configuration Table 3-18 Field Description of UI Management Items Description Telnet server Enables or disables the build-in Telnet server. Telnet server is mode disabled by default in Ethernet interface 1. 1.Disable(Default) 2.Enable Telnet server Telnet service port number of TCP. port Default is 23 62 Chapter 3 Configuration and Management Field Description Telnet server Sets the timeout for disconnection of an idle web session (in idle timeout minutes). When set to zero, idle sessions are not disconnected. Default is 64. Web server mode Enables or disables the build-in Web server. Web server is enabled by default in Ethernet interface 1. 1.Disable 2.Enable (Unsecured)(Default) Web server port Web service port number of TCP. Default is 80. Web Server Sets the timeout for disconnection of an idle web session (in Idle Timeout minutes). When set to zero, idle sessions are not disconnected. Default is 20. If the configuration is finished, click “OK” button below the web page to confirm changes or click “Cancel” button to deny it. 3.5.3.5 Provision Figure 3-36 Table 3-19 Field 63 Description Provisioning Configuration Description of Provisioning Items Chapter 3 Configuration and Management Field Description Provisioning protocol The protocol which is used for downloading provisioning file. Default: TFTP, FTP, HTTP Provisioning server address The provisioning server IP address Provisioning server port The provisioning server port Provision user name The user name is used for authentication Provisioning user password The password is used for authentication Provisioning file name The name of provisioning file Provisioning Default :disable file encryption Enable, use encryption file. The encryption algorithm is PC1. Provisioning timeout The timeout of twice provisioning file acquire. When set to zero, just acquire provisioning file once in VENUS 29xx restart. If the configuration is finished, click “OK” button below the web page to confirm changes or click “Cancel” button to deny it. 64 Chapter 3 Configuration and Management 3.5.3.6 SNMP Figure 3-37 65 SNMP Configuration Chapter 3 Configuration and Management Table 3-20 Field Description of SNMP Items Description SNMP server Default: disable mode Enable: start up SNMP agent in VENUS 29xx SNMP service port The port of SNMP agent ,default is 161 SNMP trap mode Default: disable SNMP trap port The port for sending trap to, default is 162 SNMP CDR trap mode Default: disable Enable: enable send trap function. Enable: enable send CDR trap function. System name The system name System location The system location System contact The contact information Get community The get community and default is public Set community The set community and default is private Trap community The trap community and default is public NAT pass Default:disable through mode Enable: enable this option ,just when VENUS 29xx is in private network NAT pass through interval(sec) The keep alive time for SNMP NAT Trap destination address 1-4 The destination IP address for sending trap. VENUS 29xx can support four destinations. If the configuration is finished, click “OK” button bellow the web page to confirm changes or click “Cancel” button to deny it. 66 Chapter 3 Configuration and Management 3.5.3.7 TR069 Figure 3-38 Table 3-21 TR069 Configuration Description of TR069 Items Field Description TR069 mode Default: disable ACS URL Auto-Configuration Server. This is a component in the broadband network responsible for auto-configuration of the CPE for advanced services. CPE port The port of CPE Inform interval(sec) The inform time interval in seconds Auth mode 1.Disable(Default) Enable: start up SNMP agent in VENUS 29xx 2.Basic 3.Digest CPE user CPE user name CPE pwd CPE password ACS user ACS user name ACS pwd ACS password If the configuration is finished, click “OK” button bellow the web page to confirm changes or click “Cancel” button to deny it. 67 Chapter 3 Configuration and Management 3.5.3.8 FM Threshold Figure 3-39 Table 3-22 Field FM Configuration Description of FM Threshold Items Description CPU usage If current CPU usage exceeds the threshold create an Threshold (0..100) alarm message. Default: 100(%) DSP usage If current DSP usage exceeds the threshold create an Threshold (0..100) alarm message. Default: 100(%) RAM usage If current RAM usage exceeds the threshold create an Threshold (0..100) alarm message. Default: 100(%) 68 Chapter 3 Configuration and Management 3.5.3.9 Syslog Figure 3-40 Table 3-23 Syslog Configuration Description of Syslog Items Field Description Log Mode 1. Disable(Default) 2. Remote Server 3. Local File System 69 Log Server IP IP address of the Log Server Log Server Port Port number of the Log Server. Default is 514. Chapter 3 Configuration and Management 3.5.4 SIP Configuration 3.5.4.1 SIP General Configuration 70 Chapter 3 Configuration and Management Figure 3-41 Table 3-24 SIP General Configuration Description of SIP General Configuration Items Field Description FQDN mode Enable/Disable FQDN function. Default is Disable FQDN name When FQDN mode is Enable, input FQDN name. Used for specify the contact URL to a special address. Trust proxy 1. Disable (Default) 2. Enable, Check the remote IP and port of the message has received whether it matches the configured Proxy address, Registrar address or Outbound Proxy address . If it isn‟t match any one of them ,this message will be discard.This function can be use to avoid packets from unknown address. T1 time An estimate of the round-trip time (RTT) for SIP protocol, default value is set to 500 ms. Password with md5 1. Disable (Default) 2. Enable Reg auth always 1. Disable (Default) 2. Enable Use port in URI 1. Disable (Default), Use the default port 5060 for the request URL (Effect the request line and the destination). 2. Enable, Use the port of the realm configuration for the request URL (Effect the request line and the destination). Compact mode 1. Disable (Default) use long format header type 2. Enable use short format header type Invite without SDP 1. Disable (Invite with SDP), Default 2. Enable In band ring back 1. Disable (Default) tone 2. 183 with SDP 3. 180 with SDP Invite timeout 71 Default is 60(0~65536). The default Invite timeout in seconds. Chapter 3 Configuration and Management Session Expires Mode 1. Disable (Default) 2. Use UPDATE 3. Use Re-INVITE Session Expires Time 3600 (Default). Determines the timeout (in seconds) for keeping a re-INVITE message alive within a SIP session. The SIP session is refreshed each time this timer expires. The SIP method used for session-timer updates is determined according to the Session Expires Mode. Minimum Session 120(Default). Defines the time (in seconds) that is used in Expires the Min-SE header. This header defines the minimum time (10~100000) that the user agent supports for session refresh. The valid range is 10 to 100000. PRACK mode 1. Disable (Default), Not support PRACK. 2. Supported, Support PRACK but not required. 3. Required, Require PRACK. INFO Mode 1. Disable (Default). 2. Enable, UE can send DTMF signal through INFO message. Subscription mode 1. Disable, Default Pound Symbol mode 1. Disable (Default), use %23 if need to report # in URI Ring mode Ring mode in hunting group 2. Enable; Register subscription. 2. Enable, use # in Invite URI 1. Ascending any one (Default). Select the lowest available channel. 2. Ascending cyclic. Select the lowest available channel number in the hunt group. Select the next higher available channel number when no answer. 3. All in hunting group. Select all channels in hunting group and the first hanging down channel will be connected. Current disconnect 1. Disable, Default 2. Enable; Note:This option just for future use Routing table mode Determines if the local Tel to IP routing table takes precedence over a Proxy for routing calls. 1. Disable (Default), Prefer to use Proxy to route calls. 2. Prefer, The gateway checks the 'Dest Phone Prefix' and/or 'Source Phone Prefix' field in the 'Tel to IP Routing' table for a match with the outgoing call. Only if a match is not found, a Proxy is used 72 Chapter 3 Configuration and Management 3. Fallback, If use Proxy to route calls fail the gateway checks the 'Dest Phone Prefix' and/or 'Source Phone Prefix' field in the 'Tel to IP Routing' table for a match with the outgoing cal Use "user=phone" in SIP URL 1. Disable, Default 2. Enable Tel Invitation URL 1. Disable (Default), Prefer to use SIP format number in to mode URL of the Invite request. 2. Enable, Prefer to use Tel format number in to URL of the Invite request. Tel Register URL 1. Disable (Default), Prefer to use SIP format number in mode the Register request. 2. Enable, Prefer to use Tel format number in the Register request. Register Fail No Resend 1. Disable (Default), Prefer to resend the Register request when register fail. 2. Enable, Prefer to not resend the Register request when register fail. UNRegister Clean Call 1. Disable (Default), Prefer to not clean the call of the user when it is unregister. 2. Enable, Prefer to clean all the call of the user when it is unregister. Service Route mode 1. Disable (Default), Prefer to not to use the service route. Early Media mode 1. Disable, Default 2. Enable, Prefer to use the service route. 2. Sendrecv 3. Sendonly 4. Recvonly 5. Inactive 6. Gated 7. Supported Request 1. Disable, Default Disposition mode 2. No-fork 3. Parallel 4. Sequential Call Filter mode 1. Disable, Default 2. Enable Tel2Ip dest manipulatione 73 1. Disable, Default 2. Enable Chapter 3 Configuration and Management Tel2Ip src manipulatione 1. Disable, Default Ip2Tel dest manipulatione 1. Disable, Default Ip2Tel src manipulatione 1. Disable, Default 2. Enable 2. Enable 2. Enable If the configuration is finished, click “OK” button bellow the web page to confirm changes or click “Cancel” button to deny it. 3.5.4.2 SIP Realm Configuration User can use different realm to get different Registrar and Proxy parameters for each analog line. Venus 29xx Series allow user to input 8 (REALM_NUMBER) groups of parameter for selection and the index is 0 to 7. The realm configuration parameter is as below: Figure 3-42 74 SIP Realm Configuration Chapter 3 Configuration and Management Table 3-25 Description of SIP Realm Configuration Items Field Description Realm Index Quick Start parameter The assigned realm index (0~7) Where, 0 to 7 means the used realm. Realm valid 1. Disable (Default) 2. Enable Domain Name Quick Start parameter Defines the Domain Name of specified realm. If specified, the Domain Name is used as Request-URI in REGISTER, INVITE and other SIP messages. If not specified, the Registrar/Proxy address is used instead. Proxy address Quick Start parameter IP address or domain name of the primary Proxy server you are using. If you enable Proxy Redundancy, the gateway can work with tow Proxy servers. If there is no response from the primary Proxy, the gateway tries to communicate with the redundant Proxy. Proxy port 5060(Default) Quick Start parameter Primary proxy service port number. Redundant Proxy NULL (Default) address IP addresses or domain name of the redundant Proxy you are using. Redundant Proxy 0(Default) Port Service port number of the redundant Proxy you are using. Registrar address Quick Start parameter IP address or domain name of the primary Registrar server you are using. If this parameter is not specified and analog line need do REGISTER, the proxy server is used. Registrar Port 5060(Default) Quick Start parameter Primary registrar service port number. Backup Registrar NULL(Default) address IP address or domain name of the backup Registrar server you are using. Unlike redundant proxy server, VENUS 29xx will send REGISTER message even if the primary Registrar works well. Backup Registrar 0(Default) 75 Chapter 3 Configuration and Management Port Backup registrar service port number. Registration Time 3600(Default) Defines the time (in seconds) for which registration to a Proxy server is valid. The value is used in the header „Expires„. If Registrar server return new expires parameter in response, the gateway resumes registration according to the new parameter. Re-registration Timing (%) 100(Default) Defines the re-registration timing (in percentage). The timing is a percentage of the re-register timing set by the Registration server. The valid range is 50 to 100. The default value is 100. For example: If 70 (%) is used and Registration Expires time is 3600, the gateway resends its registration request after 3600 x 70% = 2520 sec. Outbound Proxy address Quick Start parameter Outbound Proxy Port Quick Start parameter Transport way Quick Start parameter IP address or domain name of the outbound proxy server. Outbound proxy service port number. Transport protocol and valid options include: AOR name If AOR name is specified, REGISTER message will use this parameter in From/To URI. Otherwise, it will use the same value of Request URI. Keep Alive mode 1. Disable (default). 2. Enable Keep alive with Proxy using OPTIONS. 3. Enable Keep alive with Proxy using REGISTER. Any response from the Proxy, either success (200 OK) or failure (4xx response) is considered as if the Proxy is correctly communicating. Note 1: This parameter must be set to 2(OPTIONS) when Proxy redundancy is used. Note 2: When the active proxy does not respond to INVITE messages sent by the gateway, the proxy is marked as inactive. The behavior is similar to a Keep-Alive (OPTIONS or REGISTER) Keep Alive interval 60(Default) Defines the Proxy keep-alive time interval (in seconds) between Keep-Alive messages. If the configuration is finished, click “OK” button bellow the web page to confirm changes or click “Cancel” button to deny it. 76 Chapter 3 Configuration and Management 3.5.4.3 SIP Group Configuration The analog line could be managed in hunting group and we assume the maximum group number is 8 and valid index is 0 to 7. The hunting group is a logical UA and may contain multiple physical analog ports. Figure 3-43 77 SIP Group Configuration for 8S and 4S4O Model Chapter 3 Configuration and Management Table 3-26 Description of SIP Group Configuration Items Field Description Group Index Quick Start parameter The assigned realm index (0~7) Where, 0 to 7 means the used realm. Group Number Quick Start parameter The register number and allow use the same number for different port. The ports used the same number is taken as group binding number. Group name The display name for specified group. Register mode Quick Start parameter 1. Invalid 2. Disable 3. Enable Realm Index Quick Start parameter The assigned realm index (0~7) Where, 0 to 7 means the used realm. Local service port 5060(Default) number Group Quick Start parameter authentication ID The authentication user ID. Group authentication password Quick Start parameter Involved TCID Mode (4S4O Model Only) FXS Involved TCIDs Set the ports of the group. The authentication user password. FXO If the configuration is finished, click “OK” button bellow the web page to confirm changes or click “Cancel” button to deny it. 3.5.4.4 SIP Phone Routing Table Configuration The Phone Routing Table (build-in phone book) is used to route incoming telephone calls to IP addresses. This routing table associates a called / calling telephone number‟s prefixes with a destination IP address or with an FQDN (Fully Qualified Domain Name). When Proxy server is not used in VENUS 29xx, a call is routed through the Phone 78 Chapter 3 Configuration and Management routing table. The called and calling numbers are compared to the list of prefixes on the Phone Routing Table (up to 50 prefixes can be configured). Calls that match these prefixes are sent to the corresponding IP address. If the number dialed does not match these prefixes, the call is not made. When using a Proxy server, you do not need to configure the Phone Routing Table. However, if you want to use fallback routing when communication with Proxy servers is lost, or to obtain different SIP URI host names (per called number), you need to configure the Phone Routing Table. Figure 3-44 Table 3-27 Field SIP Phone Routing Table Configuration Description of SIP Phone Routing Table Configuration Items Description Destination prefix Each entry in the Destination phone number prefix fields represents a called telephone number prefix. The prefix can be 1 to 32 digits long. An asterisk (*) represents all numbers. 79 Source prefix Each entry in the Source phone number prefix fields represents a calling telephone number prefix. The prefix can be 1 to 32 digits long. An asterisk (*) represents all numbers. SIP UA address In each of the SIP Address fields, enter the IP address that is assigned to these prefixes. Domain names can be Chapter 3 Configuration and Management used instead of IP addresses. To discard outgoing IP calls, enter 0.0.0.0 or nothing in this field. SIP UA port 5060(Default) Remote SIP UA service port number. If the configuration is finished, click “OK” button bellow the web page to confirm changes or click “Cancel” button to deny it. 3.5.4.5 SIP Digit Manipulation Configuration The digit manipulation is a more specific digit map used to control the number to be dialed out. The manipulation table is able to specify the number of digits to be removed or added. The digit manipulation rules are executed in the following order: - Number of stripped digits. - Number of digits to leave(keep). - Prefix / suffix to add. First two parts (Dst prefix and Scr prefix) are monitoring fields to see if the dialed number(To which number) or the dialing number(From which number) matching the rule. - Dst prefix: Checking the number which the user just dialed and see if it matches the prefix number configured in this field. For example, if current Dst prefix has an entry of 888, then numbers such as 88811, 888535, 88823582 would match this rule. - Src prefix: Checking if the calling user port/extension number matches the prefix number configured in this field. For example, if current port extension numbers of 2908 are 5501, 5502, 5503, 5504, 6601, 6602, 6603, 6604 and Src prefix is configured as 66. Then only the last four ports, 6601 to 6604, would be affected by this particular rule. User could also input " * " to apply this rule to any port in 2908. Next three parts (Strip Digit, Digit Leave, and Prefix(Suffix)) are modification to the dialed number, remove or add digits as required. - Strip Digit: The number of digits to be removed from the number which the user just dialed. Usage: Enter the number of digits to remove the digits from beginning of the number. Enter the number of digits in brackets "( )" to remove the digits from end of the number. For example, if user dials 12345678, and configure Strip Digit to be "2(3)", then Venus will 80 Chapter 3 Configuration and Management remove 2 digits in the front and 3 digits at the end. Resulting final output would be 345 only, because digits were removed. - Digit Leave: The number of digits to keep from the original number or after digit stripped. For example, if the final number dialed by the user is 345 or the final number after digit stripped is 345, and Digit Leave is configured as 2. The final output would be only 45 because only the last 2 digits will be kept. - Prefix (Suffix): Prefix: The number to be added in front of the dialed or final output number. Suffix: The number to be added at the end of the dialed or final output number. For example, if the final dialed number or original number is 45 and Prefix(Suffix) is configured as 888(9999). The final result would be 88845999. Here is an example of all the rules combined together and resulting a final number to dial out. - Settings: Dst prefix: 2; Src prefix: 70; Strip Digit:2(1); Digit Leave: 2; Prefix(Suffix): 55(1234). - User "7001" dial "29080123"; "29080123" --> AfterStrip Digit: 08012; -->After Digit Leave: 12; -->Pre(Suff)Fix:55121234; -->The final result is "55121234". Figure 3-45 81 SIP Digit Manipulation Configuration Chapter 3 Configuration and Management Table 3-28 Description of Digit Manipulation Items Field Description Dst prefix Each entry in the Destination phone number prefix fields represents a called telephone number prefix. The prefix can be 1 to 32 digits long. An asterisk (*) represents all numbers. Src prefix Each entry in the Source phone number prefix fields represents a calling telephone number prefix. The prefix can be 1 to 32 digits long. An asterisk (*) represents all numbers. Strip Digit Number of digits to be removed from the left of the telephone number prefix, or enter the number of digits (in brackets) to remove from the right of the telephone number prefix. Digit Leave Number of digits to be left from the right Prefix(Suffix) Enter the number/string to be added to the front of the phone number, or enter the number in brackets to add the number to the end of the phone number. 3.5.5 Advanced Configuration 3.5.5.1 RTP Management Configuration RTP parameters are used to assign the RTP base port number, RTCP mode, RTP filter working mode and CODEC associated parameters. 82 Chapter 3 Configuration and Management Figure 3-46 Table 3-29 RTP Management Configuration Description of RTP Management Configuration Items Field Description RTP base port 30000(Default) The base port number and total 32 numbers are reserved for specific group. RTCP mode 83 Enable/Disable (Default) RTCP. Chapter 3 Configuration and Management RTP filter mode 1. Disable(Default) 2. Enable, can filter RTP packages when RTP source not match. SRTP mode 1. Disable (Default) 2. Enable SRTP crypto suites 1.AES_CM_128_HMAC_SHA1_80 (Default) Preferred audio codec 1.PCMU 2. F8_128_HMAC_SHA1_80 2.PCMA 3.G.729A 4.G.729AB 5.G.723 (5.3K) 6.G.723 (6.3K) 7.G.726-16 8.G.726-24 9.G.726-32 10.G.726-40 G711 default ptime 20(Default) G723 default ptime 30(Default) G726 default ptime 20(Default) G729 default ptime 20(Default) Use RFC2833 RFC2833 enable or disable (Default). Valid value is 10, 20 and 30 in ms. Valid value is 30 and 60 in ms. Valid value is 10, 20 and 30 in ms. Valid value is 10, 20, 30, 40, 50 and 60 in ms. Default RFC2833 101(Default) payload type The default payload type of RFC2833. The real time payload type may be negotiated with SDP. Use G726 codec 1.Disable (Default) 2.Enable (Use G726 codec) Default G726-16 2 (Default) codec payload The default payload type of G726-16. type Default G726-24 2 (Default) codec payload The default payload type of G726-24. type Default G726-32 2 (Default) codec payload The default payload type of G726-32. 84 Chapter 3 Configuration and Management type Default G726-40 2 (Default) codec payload The default payload type of G726-40. type VAD mode Enable/Disable (Default) VAD function Echo Cancel mode Enable/Disable (Default) EC function Playout min delay Playout minimum delay (ms) Playout nominal delay Playout nominal delay (ms) Playout max delay Playout maximum delay (ms) Pob starve timeout Pob starve timeout (ms) Adaptive playout Adaptive playout If the configuration is finished, click “OK” button bellow the web page to confirm changes or click “Cancel” button to deny it. 3.5.5.2 Calling Feature Configuration These parameters are used to define the call feature for all protocol including SIP. 85 Chapter 3 Configuration and Management Figure 3-47 Table 3-30 86 Calling Feature Configuration Description of Calling Feature Configuration Items Chapter 3 Configuration and Management Field Description CLIP mode Select from Bell Core, ETSI and DTMF for Calling Line Identification Presentation. CLIP type Select from NA, Japan, ETSI, YDN, BT and Canada for the type of Calling Line Identification Presentation. DTMF prefix D(Default)This is just for DTMF caller ID display. number for CLIP Deny second stage dialing 1. Disable (Default) Partial digit timeout The time between partial digits Critical digit timeout The time between Critical digits 2. Enable, Deny second stage dialing if needed. Inter digit timeout The time between two digits input. Max concurrent call The max concurrent call is allowed in the device. E164 mode Disable (Default)/ Enable (E164 function) Dialing prefix To append the prefix to the dial string. Used for all the users of the device to share a dialing prefix. Emergency call number1 The emergency call number Emergency call number2 The emergency call number Emergency call number3 The emergency call number Emergency call number4 The emergency call number Emergency call indication mode 1.Disable (Doesn‟t ring when caller hung up and release the call) 0, not limit; 2. Enable (Ring when caller hung up and remain t the call) Call hold 1. Disable (Default) 2. Enable (support music on hold, no checking) Call hold mode 1. IP 0.0.0.0(Default) 2. SendOnly 3. Inactive Call waiting 1. Disable (Default) 2. Enable Call waiting tone 3 (Default value) interval The call waiting tone interval time in seconds. Call waiting tone Set times playing Call waiting tone. (Invalid for Current 87 Chapter 3 Configuration and Management times Version) Three Way 1. Disable (Default) conference mode 2. Normal, Conference by flash. 3. By refer, Conference by REFER method. 4. By star Number, Conference by star number (*1, *2, *3). 5. By flash number, Conference by flash number (0, 1, 2, 3, 4). Conference server URL Be used when the three way conference mode is “By refer”. In this mode the conference is hold by the specified conference server. Dial in Conference function code Default”*88”. To enable dial in conference function Remove participant from Conference function code To enable remove participant from Conference function code Attended Call transfer 1. Disable (Default) 2. Enable Call waiting temp Default “*70”. To disable call waiting function for current de-active code call if Call Waiting is enable. After the user On Hook the function reconverts. Call ID block Default “*67”. To block call ID for current call ever the user temp active code “Call ID block” enable or disable. After the user On Hook the function reconverts. Always forward active prefix number Default “*72”. To inform the Proxy to do Always forward for current call and append the function code(“*72”) to front of the dial string. After the user On Hook the function reconverts. Always forward de-active prefix number Default “*73”. To inform the Proxy to cancel Always forward. Call return function code *69(Default) Call redial function code *68(Default) Unattended call transfer function code Default “*66”. (See Table 3-30 - Unattended Call Transfer Operation) Defines the call return function code and NULL means disable. Defines the call redial function code and NULL means disable. Call Park function Default “*61”. code User A Call User B, User A hold User B, User A dial “*61” 88 Chapter 3 Configuration and Management to Park User B to Park server, After that User A hear busy tone to On Hook. Now the call User B with A has been Park. Call Park server URL To specify a Park server. Example “[email protected]”. If without the configuration auto generate a local park server in the device. Call Park server share with tcid 1~8(2908) or 1~16(2916) or 1~24(2924) or 1~32(2932), The local park server share the TCP/IP port with a specified TCID. Call pick up function code Default “*62”. Call intercept function code Default “*63”. Fax Signaling Method Determines the SIP signaling method used to establish and convey a fax session after a fax is detected. When there are Call be Park in the device a user (User C) can dial “*62” to pickup the call. When User A call to User B, User B is ringing. If User C in a same device with User B, User C dial “*63” to intercept the call. After that User B stop ring and conversion A and C. 1. No fax negotiation using SIP signaling, changing code as configuration (G711 transparent mode). 2. Initiates T.38 fax relay.(Default) 3. Initiates fax using the coder G.711 A-law/µ-law. 4. Fax Fallback, Initiates T.38 fax relay. If the T.38 negotiation fails, the gateway re-initiates a fax session using the coder G.711 A-law/µ-law. Note 1: Fax adaptations: Echo Canceller = On Silence Compression = Off Echo Canceller Non-Linear Processor Mode = Off Note 2: If the gateway initiates a fax session using G.711, a „gpmd‟ attribute is added to the SDP in the following format: For A-law: „a=gpmd:0 vbd=yes;ecan=on‟. For µ-law: „a=gpmd:8 vbd=yes;ecan=on‟. T30 fax codec 1. G711 µ-law 2. G711 A-law Fax tone detection Fax tone detection and send reInvite to build fax communication. 1. Disable (Default) 2. Callee 3. Caller 89 Chapter 3 Configuration and Management 4. Both callee && caller Modem Signaling Determines the SIP signaling method used to establish Method and convey a data session after a modem tone is detected. 1. No negotiation using SIP signaling, changing code as configuration (G711 transparent mode). 2. Initiates data using the coder G.711 A-law/µ-law. Note 1: Fax adaptations: Echo Canceller = Off Silence Compression = Off Echo Canceller Non-Linear Processor Mode = Off Note 2: If the gateway initiates a fax session using G.711, a „gpmd‟ attribute is added to the SDP in the following format: For A-law: „a=gpmd:0 vbd=yes;ecan=off‟. For µ-law: „a=gpmd:8 vbd=yes;ecan=off‟. Modem codec 1. G711 µ-law 2. G711 A-law Modem tone detection Modem tone detection and send reInvite to build modem communication. 1. Disable (Default) 2. Callee 3. Caller 4. Both callee && caller Report Flash 1. Disable (Default) 2. Enable, Report the flash hook event by re-invite request. SDP Offans Only 1. Disable (Default) 2. Enable, Not to offer the only one codec with SDP again when receive more codec in the answer SDP. Register Expire mode 1. Disable (Default), Tainet mode(Registration Expire = Expire * Re-registration Timing) 2. Enable, Huawei Mode(Registration Expire = Expire -600s(Expire >=1200s); Registration Expire = Expire/2(Expire <1200s)). Request Re-Auth mode 1. Disable (Default), If receive 401/407 for a request with the Auth act it as a error code and not resend the request. 2. Enable, If receive 401/407 for a request with the Auth update the Auth parameters and send the request again. Next Nonce mode 90 1. Disable (Default), not support the Next Nonce. 2. Enable, support the Next Nonce. Chapter 3 Configuration and Management FXO auto route (2908 4S 4O only) (Only for 4FXS 4FXO Type) Internal Dialing mode 1. Disable (Default) 1. Disable (Default) 2. Enable, If a FXS Port dial to a not found number fail, auto route the call out from the first spare FXO. 2. Fix Number, enable internal dialing with the preset number (01, 02, 03….etc) 3. Tel Number, enable internal dialing with user specified Tel Number Play Rapid Tone 1. Disable (Default) 2. Enable If the configuration is finished, click “OK” button bellow the web page to confirm changes or click “Cancel” button to deny it. Table 3-31 Call Waiting Call Hold Three way conference mode Call Waiting Operation Disable * * (Not support) Enable Disable * (Not support) Enable Enable Disable Flash Hook Normal Flash Hook By refer Flash Hook By star number Flash Hook, *2 By flash number Flash Hook, 2 Table 3-32 91 Call Waiting Operation Call Conference normal Operation Scene Operation Effect Conversion A and B, A Hold B, A dial C, C Hook off A Flash Hook Three way conference Conversion A and B, C dial A A Flash Hook A hold B; Conversion A and C; Conversion A and B, C dial A, A Flash Hook, A Flash Hook Again Three way conference Conversion A and B, A Hold B, A dial C, C Hook off, A Flash Hook, Do three way conference A Flash Hook A Bye C, Conversion A and B Chapter 3 Configuration and Management Conversion A and B, C dial A, A Flash Hook, Do three way conference 92 A Flash Hook A Bye C, Conversion A and B Chapter 3 Configuration and Management Table 3-33 Call Conference By refer Operation Scene Operation Effect Conversion A and B, A Hold B, A dial C, C Hook off A Flash Hook A Call ConvServ(Conference server URL), After recv 200, Send Refer To B, To C; B Call ConvServ; C Call ConvServ; B and C Send Notify with terminal to A; A Bye B, A Bye C; A,B,C and ConvServ in a conference; Conversion A and B, C dial A A Flash Hook A Call ConvServ, After recv 200, Send Refer To B, To C; B Call ConvServ; C Call ConvServ; B and C Send Notify with terminal to A; A Bye B, A Bye C; A,B,C and ConvServ in a conference; 93 A,B,C and ConvServ in a conference; A Hook On A Bye ConvServ(Conference server URL) A,B,C and ConvServ in a conference; B Hook On B Bye ConvServ(Conference server URL) A,B,C and ConvServ in a conference; C Hook On C Bye ConvServ(Conference server URL) A,B,C and ConvServ in a conference; ConvServ Bye A A is kicked out the Confernence A,B,C and ConvServ in a conference; ConvServ Bye B B is kicked out the Confernence A,B,C and ConvServ in a conference; ConvServ Bye C C is kicked out the Confernence Chapter 3 Configuration and Management Table 3-34 Scene Call Conference By star number Operation Operation Conversion A and B, A Hold B, A dial C, C Hook off Effect A hold B; Conversion A and C; A hold B; Conversion A and C; A Flash Hook, dial “*1” A hold C; Conversion A and B; A hold C; Conversion A and B; A Flash Hook, dial “*2” A hold B; Conversion A and C; Conversion A and B, A Hold B, A dial C, C Hook off A Flash Hook, dial “*3” Do three way conference. Conversion A and B, C dial A A Flash Hook, dial “*2” A hold B; Conversion A and C; A hold B; Conversion A and C; A Flash Hook, dial “*1” A hold C; Conversion A and B; A hold C; Conversion A and B; A Flash Hook, dial “*2” A hold B; Conversion A and C; Conversion A and B, C dial A A Flash Hook, dial “*3” Do three way conference. A(organizer), B, C in a conference. A Hook On A Bye B; A Bye C; A(organizer), B, C in a conference. B Hook On B Bye A; Conversion A and C; A(organizer), B, C in a conference. C Hook On C Bye A; Conversion A and B; Call Conference By flash number There are five function codes to be used in Venus 29xx. “0” – Disconnect the last call. “1” – Disconnect the previous call. “2” – Switch call or be used to accept the waiting call. “3” – Do three way conferences. “4” – Call transfer by flashhook + function code “4” when “Attended Call transfer” is set to enable. 94 Chapter 3 Configuration and Management Table 3-35 Call Switch A hold B A and C converse Call Conference By flash number Operation Call Hold Call Waiting Conferences by Call Hold Conferences by Call Waiting A and B converse A and B converse A and B converse A and B converse A FLASHES C dials A A hold B,A call C C call A A dials C A and C converse A,B,C converse A and C converse A,B,C converse “ 0” Bye C - Terminate C Bye C Bye C “ 1” Bye B - Bye B Bye B Bye B “ 2” A and B converse - A and C converse A and C converse A and B converse B gets MOH B gets MOH C gets MOH C gets MOH A and C converse B gets MOH 95 “ 3” A,B,C converse - A,B,C converse - - “ 4” B and C converse C send 487 to A - - - C send BYE to A A receives busy tone A receives busy tone C ring Chapter 3 Configuration and Management Table 3-36 Attended Call Transfer Operation Attended Three Way Call transfer conference mode Operation Disable * (Not support) Enable By flash number mode Organizer Flash Hook, Dial “4” Enable Other mode Organizer Hook On Table 3-37 Unattended Call Transfer Operation Scene Operation Effect Conversion A and B, A Hold B A dial Unattended Call Transfer function code(*66); A play Stutter Tone; A dial C number A play Busy Tone( and A Hook On), C Ring, C Hook Off, Conversion C and B; 3.5.5.3 Region Profile Configuration The Regional configuration is used to assign specified regional profile, which contains Ring and Tone definition. Also the country code, area code, internal access code and domestic access code are also defined here. These parameters are used when E.164 function is enabled. 1) Region Figure 3-48 96 Region Configuration Chapter 3 Configuration and Management Table 3-38 Description of Region Configuration Items Field Description Region ID The region ID of profile. 0 = GENERIC 1 = USA 2 = CHINA 3 = TAIWAN 4 = HONGKONG 5 = INDIA 6 = SWEDEN 7 = MALAYSIA 8 = FRENCH 9 = CZECH 10 = SLOVAKIA 11 = AUSTRALIA 12 = POLAND 13 = BULGARIA 14 = NEWZEALAND Region code The Country/Region code Area code The area code International long distance access code The international access code Domestic long distance access code The domestic access code If the configuration is finished, click “OK” button bellow the web page to confirm changes or click “Cancel” button to deny it. 97 Chapter 3 Configuration and Management 2) Ring Figure 3-49 Table 3-39 Ring Configuration Description of Ring Configuration Items Field Description Ring frequency 25 (Default) Ring frequency and different with different region ID, valid value is 17 to 50. Default Ring Ring cadence On 1 in 100ms. Ring 0 ~ Ring 7 Note: index 1-8 means distinctive ring R0-R7, index 9 means ring splash. Ring Splash If the configuration is finished, click “OK” button bellow the web page to confirm changes or click “Cancel” button to deny it. 98 Chapter 3 Configuration and Management 3) Tone Figure 3-50 Table 3-40 Tone Configuration Description of Tone Configuration Items Field Description Tone ID Tone frequency 1. First index means tone id and second index means tone element. [0-17] [1-6] 0 = busy 1 = ring_back 2 = congestion 3 = dial_tone 4 = dial_tone2 5 = out_of_service 6 = addr_ack 7 = disconnect 8 = offhook_notice 9 = offhook_alert 10 = dial_tone3 11 = off_on_dial_tone 12 = call_wait 13 = reorder 14 = keypad_echo1 15 = rapid_tone 99 Chapter 3 Configuration and Management 16 = rmt_disconnect 17 = call_hold Timeout [0-17] Default tone timeout in ms. Freq1 Tone frequency 1. [0-17][1-6] Amp 1 Tone amplitude 1, in 1/10db. [0-17][1-6] Freq 2 Tone frequency 2. [0-17][1-6] Amp 2 Tone amplitude 2, in 1/10db. [0-17][1-6] Freq 3 Tone frequency 2. [0-17][1-6] Amp 3 Tone amplitude 3, in 1/10db. [0-17][1-6] Freq 4 Tone frequency 2. [0-17][1-6] Amp 4 Tone amplitude 4, in 1/10db. [0-17][1-6] Duration [0-17][1-6] Tone element duration. If the configuration is finished, click “OK” button bellow the web page to confirm changes or click “Cancel” button to deny it. 3.5.5.4 DDNS Dynamic DNS(DDNS) is a method, protocol or network service that provides the capability for a network device using the internet Protocol Suite, such as an IP router or computer system, to notify a domain name server to change, in real time(ad-hoc), the active DNS configuration of its configured hostnames, addresses or other information stored in DNS. Through this technique, Our VENUS 29xx can communicate with each other just by setting the peer domain name. 100 Chapter 3 Configuration and Management Figure 3-51 Table 3-41 DDNS Configuration Description of DDNS Configuration Items Field Description DDNS mode Default: Disable Enable, start up DDNS function. HTTP access address The HTTP server IP address , this is used for private network pass through when VENUS 29xx is in private network. This may be provided by DDNS service provider. DDNS server address Dynamic DNS server address , This is used for update locate active information such as Local IP address Host name The domain name in DDNS User ID The user ID use for authentication User password The password use for authentication If the configuration is finished, click “OK” button below the web page to confirm changes or click “Cancel” button to deny it. 3.5.5.5 NAT Traversal Configuration User may assign one NAT address if the NAT server is DMZ. Otherwise, STUN should be used. Simple Traversal of UDP through NATs (STUN) (according to RFC 3489) is a client/server protocol that solves most of the NAT traversal problems. The STUN server operates in the public Internet and the STUN clients are embedded in end-devices (located behind NAT). STUN is used both for the signaling and the media streams. STUN works with many existing NAT types, and does not require any special behavior from them. STUN enables the gateway to discover the presence (and types) of NATs and firewalls located between it and the public Internet. It provides the gateway with the 101 Chapter 3 Configuration and Management capability to determine the public IP address and port allocated to it by the NAT. This information is later embedded in outgoing SIP/SDP messages and enables remote SIP user agents to reach the gateway. Figure 3-52 Table 3-42 NAT Traversal Configuration Description of NAT Traversal Configuration Items Field Description NAT IP address The external IP address of DMZ NAT server. Disable this function to assign IP address of 0.0.0.0. STUN server address Stun server IP address or domain name. STUN server port 0(Default) Stun server service port number. STUN polling interval 64 (Default) Defines the time interval (in seconds) the STUN client requests for a NAT keep alive update. If the configuration is finished, click “OK” button below the web page to confirm changes or click “Cancel” button to deny it. 3.5.5.6 SLIC Configuration SLIC Configuration is used to adjust the Current and Voltage Value of SLIC. By changing the current value, user may increase the distance between FXS port and telephone. 102 Chapter 3 Configuration and Management Figure 3-53 Table 3-43 SLIC Configuration Description of SLIC Configuration Items Field Description Current Value Adjust the Current Value Voltage Value Select the appropriate Voltage Value If the configuration is finished, click “OK” button below the web page to confirm changes or click “Cancel” button to deny it. 3.5.5.7 Meter Configuration Meter Configuration is used to adjust the settings of metering tone generation. Figure 3-54 Table 3-44 103 Meter Configuration Description of Meter Configuration Items Field Description Voltage Value Select the appropriate Voltage Value Slope Value Select the appropriate Slope Value Chapter 3 Configuration and Management Duration Value Duration time of metering tone Pause Value Pause time of metering tone Ramping Value 1.Smooth 2.Abrupt Frequency Value 1.16KHZ 2.12KHZ 3.5.6 Data Configuration Table 3-45 Menu The Data Configuration Menu Items Description Static Routing (Eth1 Configuration static routing information which use for under Router mode) LAN NAT mapping (Eth1 Configuration NAT information which use for LAN under Router mode) DHCP Server (Eth1 Configuration DHCP server information which use for under Router mode) LAN 3.5.6.1 QOS Configuration of IP QoS. VLAN (Eth1 under Switch mode) Configuration of VLAN. Static Routing Static Routing information is used for routing data between LAN and internet when LAN is in router mode. 104 Chapter 3 Configuration and Management Figure 3-55 105 Static Routing Configuration Chapter 3 Configuration and Management Table 3-46 3.5.6.2 Description of Static Routing Items Field Description IP address The network address of this route record Net mask The net mask of the network address Gateway address The gateway IP address of this route record Metric The metric use for routing data to next hop NAT mapping In computer networking, network address translation(NAT) is the process of modifying network address information in datagram packet headers while in transit across a traffic routing device for the purpose of remapping a given address space into another. The NAT has two class, SNAT(Source NAT) and DNAT(Destination NAT). Our VENUS 29xx just supports DNAT to transit packages between LAN and internet when LAN is in router mode. Figure 3-56 106 NAT mapping Configuration Chapter 3 Configuration and Management Table 3-47 Field Description NAT mode Default:disable Description of NAT mapping Items Enable, start up NAT mode index The current NAT mapping records (1-50). Internal IP address The IP address of device in LAN Internal port The IP port of device in LAN External port The IP port of wan which is used for access through internet Protocol The NAT mapping protocol, Default disable TCP :mapping TCP protocol only UDP:mapping UDP protocol only If the configuration is finished, click “OK” button bellow the web page to confirm changes or click “Cancel” button to deny it. 3.5.6.3 DHCP Server DHCP service runs on a central server that dynamically assigns an IP address to individual PCs or workstations. This protocol delivers IP information on a LAN. The service can be used just when LAN is in router mode. 107 Chapter 3 Configuration and Management Figure 3-57 108 DHCP Server Configuration Chapter 3 Configuration and Management Table 3-48 Field Description of DHCP Server DHCP Items Description DHCP server mode Default: disable Enable, start up DHCP service DHCP server subnet The subnet on which the DHCP service run DHCP server subnet mask The subnet mask of the subnet DHCP server domain name The DHCP server domain name DNS server IP address 1-4 The DNS server IP address use for LAN, you can configure four DNS server Default gateway IP The default gateway IP address for LAN, you can address 1-4 configure four gateway Default lease time The lease time for IP assign for device in LAN Free IP address in The low and high consist of a range for IP assign. You can low 1-5 configure four IP range. Free IP address in The low and high consist of a range for IP assign. You can high 1-5 configure four IP range. 109 Chapter 3 Configuration and Management Figure 3-58 Table 3-49 DHCP Server Configuration Description of DHCP Server Assign Items Field Description IP address This IP is assigned to a static IP Host name The host name of the static IP MAC address The MAC address of the static IP 3.5.6.4 QoS Configuration DiffServ is architecture providing different types or levels of service for IP traffic. DiffServ (according to RFC 2474) offers the capability to prioritize certain traffic types, depending on their priority, thereby accomplishing a higher-level QoS at the 110 Chapter 3 Configuration and Management expense of other traffic types. By prioritizing packets, DiffServ routers can minimize transmission delays for time-sensitive packets such as VoIP packets. Figure 3-59 Table 3-50 Field Description QoS mode 1.Disable QoS Configuration Description of QoS Items 2.DSCP 3.TOS (IP precedence) Signaling DSCP The signaling DSCP. Default is 37. Voice DSCP The voice DSCP. Default is 37. Signaling TOS The signaling TOS. Default is 6. Voice TOS The voice TOS. Default is 6. If the configuration is finished, click “OK” button bellow the web page to confirm changes or click “Cancel” button to deny it. 3.5.6.5 VLAN Configuration Venus 29xx only support port base VLAN. It support tag for port also. There are three groups for VLAN setting. You can set any group for your need. Zero to six ports can be in one VLAN. If the setting is repeated it will be ignored. 111 Chapter 3 Configuration and Management The “Port Based” page is used to partition VLAN and the “Tag Based” page to set VLAN tag. Figure 3-60 Port Based Vlan Configuration Figure 3-61 Vlan Tag Configuration Table 3-51 Description of Vlan Items Field Description VLAN Group[6] Eth0, Eth1, Eth2~4, local. Default no select. VLAN Tag[5] Eth0, Eth1or Eth2~4 1. no 2.yes VLAN Priority[6] Default 0. (Notes: Current no using) VLAN VID[6] Eth0, eth1, Eth2~4, local 0~4094 If the configuration is finished, click “OK” button bellow the web page to confirm changes or click “Cancel” button to deny it. 112 Chapter 3 Configuration and Management 3.6 Maintenance The Maintenance menu is used to manage the system state and the firmware. It is divided into four groups, “Fault management”, “Performance Management”, “Diagnostics”, and “Device Control”. Table 3-52 Menu The Maintenance Menu Items Description Fault FM Monitoring and Clear FM Records. Management Performance Ethernet, Call Control, RTP, SIP Agent, SIP Call Initiation, NAT, Management DHCP Server and Clear PM Records. 3.6.1 Diagnostics Do Ping, STUN test and Traceroute. Device Control F/M Upgrade, Config Up/Down, Syslog Upload, Reset to Default and Reboot. Fault Management Table 3-53 3.6.1.1 The Fault Management Menu Items Menu Description Monitoring Fault alarm messages monitoring. Clear Records Fault alarm messages cleaning. Monitoring There are six levels for alarm message, “Clear”, “Event”, “Warning”, “Minor”, “Major” and “Critical”. 113 Chapter 3 Configuration and Management Figure 3-62 Table 3-54 Field Description Refresh Interval 1. disable FM Monitoring Description of FM Monitoring 2. 10 s(Default) 3. 20 s 4. 30 s 5. 40 s 6. 50 s 7. 60 s Refresh the alarm messages. 114 Chapter 3 Configuration and Management 3.6.1.2 Clear Records Figure 3-63 3.6.2 Performance Management Table 3-55 115 FM Clear The Performance Management Menu Items Menu Description Ethernet Ethernet status Call Control Call Control status RTP RTP status SIP Agent SIP Agent status SIP Call Initiation SIP Call Initiation status Clear Performance messages cleaning. Chapter 3 Configuration and Management 3.6.2.1 Ethernet Figure 3-64 3.6.2.2 Call Control Figure 3-65 116 Ethernet Performance Call Control Status Chapter 3 Configuration and Management 3.6.2.3 RTP Figure 3-66 3.6.2.4 SIP Agent Figure 3-67 117 RTP Status SIP Agent Status Chapter 3 Configuration and Management 3.6.2.5 SIP Call Initiation Figure 3-68 3.6.2.6 Clear Figure 3-69 3.6.3 Clear Performance Message Diagnostics Table 3-56 118 SIP Call Initiation Status The Fault Management Menu Items Menu Description Ping Ping the specify IP device. Stun Check a Simple Traversal of User Datagram Protocol Through Network Address. Traceroute To determine the route taken by packets across the IP network Chapter 3 Configuration and Management 3.6.3.1 Ping This feature can be used to verify the path of packet transmission between VENUS 29xx Series and another node. For example, to check whether the Proxy Server is reachable or is alive. Make sure you configure the correct subnet mask, and the IP address of the default gateway. Figure 3-70 Ping Click “OK” button below the web page to do or click “Cancel” button to deny it. Figure 3-71 Figure 3-72 119 result of ping a connected IP device result of ping a disconnected IP device Chapter 3 Configuration and Management 3.6.3.2 Stun Figure 3-73 Stun Click “OK” button bellow the web page to do or click “Cancel” button to deny it. Figure 3-74 3.6.3.3 result of stun a disconnected Stun server Traceroute Figure 3-75 Traceroute Click “OK” button below the web page to do or click “Cancel” button to deny it. 3.6.4 Device Control Table 3-57 120 The Device Control Menu Items Chapter 3 Configuration and Management Menu Description F/W Upgrade Firm ware upgrade Config Up/Down Config up load and down load Syslog Upload Upload the recorded system log Reset to Default Restore the default configuration to the device. Reboot Reboot the device 3.6.4.1 F/W Upgrade VENUS 2908 Series allows software upgrade for feature improvement. The new firmware (the Application Program), in binary code format, can be remotely downloaded from a TFTP server and written into the internal flash memory of the VENUS 2908 Series. Check with our technical support for the availability of the latest software. Figure 3-76 Table 3-58 121 Firmware Upgrade Description of Firmware Upgrade Items Field Description Transport protocol Select the transport protocol Server address This item tells VENUS 29xx Series which IP address of TFTP server that includes the firmware. Server port This item tells VENUS 29xx Series which port of TFTP server that includes the firmware. User name User name of the server Chapter 3 Configuration and Management Field Description Transport protocol Select the transport protocol User Password User password of the server Binary file name This item tells VENUS 29xx Series that file should be loaded from TFTP server. The firmware must be in the binary format. Step 1: Input server IP address and firmware file name. Figure 3-77 122 Step 1 of F/W Upgrading Chapter 3 Configuration and Management Note: You need to run a TFTP server (such as Cisco TFTP server) for the upgrading except the TFTP server of the server has run. If the configuration is finished, click “OK” button below the web page to execute upgrade or click “Cancel” button to give up. The whole upgrading process will take about 140 seconds. Caution: Upgrade the software when there is no phone call in progress. Otherwise, VoIP service will be abruptly terminated Step 2: Download Figure 3-78 Step 2 of F/W Upgrading The download process will take about 20 seconds. If the TFTP server is not running or firmware file does not exist the upgrading will abort. 123 Chapter 3 Configuration and Management Caution: Do not write the software with incorrect checksum and do not reset the device while performing flash write. In case the flash write is abnormally disrupted, VENUS Series can still boot up using the Boot code. Re-download the software and re-program the flash again to recovery the AP software Figure 3-79 F/W Upgrading failure Step 3: Write to Flash Figure 3-80 124 Step 3 of F/W Upgrading Chapter 3 Configuration and Management The flash writing process will finish in 80 seconds after download. Step 4: Reboot system Figure 3-81 Step 4 of F/W Upgrading After upgrade the firmware the device will reboot and execute the new firmware. 3.6.4.2 Config Up/Down Get or set the whole device configuration by TFTP, FTP or HTTP. The Access Path: Maintenance>>Device Control>>Config Up/down Figure 3-82 125 Config Up/Down Chapter 3 Configuration and Management Table 3-59 Description of Config Up/Down Items Field Description Load Mode 1.Download(default) - Download a configuration file to the device by TFTP. 2.Upload – Upload the configuration of the device to a specify file by TFTP. Transport protocol Select a transport protocol Server Address Default is “0.0.0.0”. Server port Default TFTP Server port is 69. User name User name of server User Password User password of server Configuration file name The configuration File name to be Upload/Download Use Encrypted file 1.no(default) 2.yes If encrypt transmitting messages of the configuration file uploading or downloading. Note: You need to run a TFTP server (such as Cisco TFTP server) for the uploading or downloading except the TFTP server of the server has run. A. Upload Step 1: Set uploading parameters. 126 Chapter 3 Configuration and Management Figure 3-83 Set Config uploading parameters If the configuration is finished, click “OK” button below the web page to execute uploading or click “Cancel” button to give up. The whole process will take about 5 seconds. Step 2: Uploading Figure 3-84 Config uploading If the uploading has succeeded you will find a file named “v1.0” in you TFTP server root directory. If the TFTP server is not running now, the uploading will abort. 127 Chapter 3 Configuration and Management Figure 3-85 Config uploading failure B. Download Step 1: Set downloading parameters. Figure 3-86 Set config downloading parameters If the configuration is finished, click “OK” button below the web page to execute Upload/Download or click “Cancel” button to give up. The whole process will take about 5 seconds. 128 Chapter 3 Configuration and Management Step 2: downloading Figure 3-87 Config downloading If the downloading has succeeded the configuration will be changed to as the config file named “test.ini” in you TFTP server root directory. If the TFTP server is not running or config file does not exist the downloading will abort. Figure 3-88 3.6.4.3 Config downloading failure Syslog Upload Upload the recorded system log file via TFTP server. The Access Path: Maintenance>>Device Control>>Syslog Upload 129 Chapter 3 Configuration and Management Figure 3-89 Syslog Upload Table 3-60 Description of Syslog Upload Items 3.6.4.4 Field Description Load Mode 1. Upload – Upload the system log of the device to a specified file by TFTP. Transport protocol TFTP protocol Server address Default is “0.0.0.0”. Server port Default TFTP Server port is 69. Syslog file name The system log File name to be Uploaded Reset to Default This feature is used to reset all the settings to the factory defaults. Selecting this menu will cause a forced reset to the VENUS 29xx Series. The configuration defaults are: DHCP Client: Unchanged DNS Server: Disable Country Code: Generic WAN IP Address: Unchanged WAN IP Mask: Unchanged Default Gateway: Unchanged User Name: user No Password 130 Chapter 3 Configuration and Management Figure 3-90 Reset to Default Click the “Reset” button bellow the web page to execute restore or click “Cancel” button to give up. After click the “Reset” button the device will reboot with the default configuration. Figure 3-91 Reset finished Note: The Ethernet configuration will not be changed in this process. 3.6.4.5 Reboot After changing some configurations of the device, it may be required to restart the device to activate the new configuration. Use this menu to reset the VENUS 29xx Series. 131 Chapter 3 Configuration and Management Figure 3-92 Reset to Default Click the “Restart” button below the web page to reboot or click “Cancel” button to give up. Caution: Reset the gateway only when there is no phone call in progress. Otherwise, VoIP service will be abruptly terminated After click the “Restart” button the device will reboot. Figure 3-93 132 Reboot finished Chapter 3 Configuration and Management 3.7 Status 3.7.1 System information Click the “System info” of the top menu; come to “System info” page. This Page will display the basic system information of the VENUS 29xx as in the following figure. Figure 3-94 3.7.2 System information Status Ethernet Click the “Ethernet” of the top menu; come to “Ethernet” page. This Page will display Ethernet information of the VENUS 29xx in the following figure. 133 Chapter 3 Configuration and Management Figure 3-95 3.7.3 Ethernet Status 3Gmodem Info 3Gmodem Info shows the current status of 3G modem connection, user can also select to connect or disconnect 3G modem connections. 134 Chapter 3 Configuration and Management 3.7.4 Analog (FXS/FXO) Click the “Analog (FXS/FXO)” of the top menu; come to “Analog” page. This Page will display Analog information of the VENUS 29xx in the following figure. Figure 3-96 3.7.5 Analog Status Routing Table Click the “Routing Table” of the top menu; come to “Routing Table” page. This Page will display Routing Table information of the Proxy Server in the following figure. Figure 3-97 3.7.6 Routing Table Status ARP Table Click the “ARP Table” of the top menu; come to “ARP Table” page. This Page will display ARP Address information of the Proxy Server in the following figure. 135 Chapter 3 Configuration and Management Figure 3-98 Table 3-61 ARP Table Status Description of Routing Table Monitoring Items Field Description IP Address Proxy Server IP Address HW Address Proxy Serve MAC Address Iface 3.8 Interface Eth0, Eth1 or Eth2~4 FXS to FXO line extension example (1). Venus 2932 FXS : Configuration -> Quick Start -> Static IP 136 Chapter 3 Configuration and Management (2). Venus 2932 FXS : Configuration -> SIP Configuration -> General 137 Chapter 3 Configuration and Management (3). Venus 2932 FXS : Configuration -> Interface Configuration -> Analog(FXS/FXO) Configure hotline as 2001 for Port 1 (1001) since this FXS port will dial out to remote FXO directly. Configure hotline as 2002 for Port 2 (1002) since this FXS port will dial out to remote FXO directly. (4). Venus 2932 FXS : Configuration -> SIP Configuration -> Phone Routing Table 138 Chapter 3 Configuration and Management (5). Venus 2932 FXS : Configuration -> Save & Run (6). Venus 2932 FXS : Configuration -> SIP Configuration-> General-> INFO mode-> info 139 Chapter 3 Configuration and Management (7) Venus 2932 FXO : Configuration -> Quick Start -> Static IP 140 Chapter 3 Configuration and Management (8). Venus 2932 FXO : Configuration -> SIP Configuration -> General (9). Venus 2932 FXO : Configuration -> SIP Configuration -> Phone Routing Table 141 Chapter 3 Configuration and Management (10). Venus 2932 FXO : Configuration -> Save & Run (11). Venus 2932 FXO : Configuration -> Advanced Configuration -> Calling Feature -> Report Flash -> By info-plain-text 142 Chapter 3 Configuration and Management (12). Venus 2932 FXO : Configuration -> Interface Configuration -> Analog(FXS/FXO) Configure hotline as 1001 for Port 1 (2001) since this FXO port will dial out to remote FXS directly Configure hotline as 1002 for Port 2 (2002) since this FXO port will dial out to remote FXS directly (13). Venus 2932 FXO : Configuration -> Interface Configuration -> 143 Chapter 3 Configuration and Management Analog(FXS/FXO) Rep flash time(ms) default value is 200 This option is used for controlling the flash timer which FXO will generate when it receives flash notice from FXS INFO message. Depends on the PBX or PSTN line connects to this FXO port, the value can be adjusted for better compatibility. When setup complete, when user on FXS port off-hooks, it will be directly routed to remote FXO port. When FXO port is being called from PSTN or PBX side, the call will be directed to remote FXS port. 3.9 Navigation the Command Line Interface The Command Line Interface is designed mostly for technical support engineers. It provides a Command Line Interface (CLI) where user can enter commands 144 To setup detailed configuration To monitor detailed system status messages, and To diagnose the device Chapter 3 Configuration and Management Figure 3-99 CLI Main UI Within the CLI, enter “?” or “help”, the device will display all the commands available. Figure 3-100 Main CLI Tree Table 3-62 Type Sub-Type Sys Commands ? The Main CLI Tree Description Displays Command Help Table help Displays Command Help Table Status Commands st Displays System Status Information Configuration Commands save Save System Configuration set Set System Configuration show Show System Configuration Maintenance Commands mt Maintenance or Diagnostics the system Other Commands spy Set the spy level for debug logout Logout the system Caution: 145 Activating some of the commands supported in the Command Line Interface (CLI) during run-time may affect the normal service of the device. Chapter 3 Configuration and Management 3.9.1 Syntax The command line syntax is “command parameter …”. The following are some example commands: set tcid 3 rxgain –5 venus card 4 fxs ring_freq 20 3.9.2 Status Commands Display the system status information. Figure 3-101 Status Commands 146 Chapter 3 Configuration and Management Table 3-63 st Command Items Command Description st si System information st g3info 3G modem information st eth Ethernet information st analog Analog information st rt Route table information st arp ARP table information 3.9.3 Configuration Commands 3.9.3.1 Save Save the parameters have been changed to system. Figure 3-102 Prompt of Save command Table 3-64 3.9.3.2 Save Command Command Description Save Save the configuration of the VENUS 29xx Set Modify system parameters. Figure 3-103 Set command 147 Chapter 3 Configuration and Management Table 3-65 Set Command Items Command Sub-Command Set interface <options> set interface ethernet <options> (admin > set interface) set interface analog <options> set interface 3gmodem <options> set interface pstn<options> Set system <options> set system general <options> (admin > set set system ntp <options> system) set system ui <options> set system security <options> set system provision <options> set system snmp <options> set system tr069 <options> set system threshold <options> Set sip <options> set sip general <options> (admin > set sip) set sip realm <options> set sip group <options> set sip phone_route <options> set sip call_filter <options> set sip mainp_tel2ip_dst <options> set sip mainp_tel2ip_src <options> set sip mainp_ip2tel_dst <options> set sip mainp_ip2tel_src <options> Set advanced <options> set advance rtp <options> (admin > set advance) set advance call_feature <options> set advance region <options> set advance nat_traversal <options> set advance ddns <options> set advance dsp <options> set advance coding <options> 148 Chapter 3 Configuration and Management Command Sub-Command set advance tiu <options> Set data <options> set data dhcp <options> (admin > set data) set data nat_mapping <options> set data static_route <options> set data qos <options> set data vlan<options> 3.9.3.3 Show Show system parameters and state. Figure 3-104 Show command 149 Chapter 3 Configuration and Management Table 3-66 Show Command Items Command Sub-Command Description Show interface show interface ethernet <index|all> Display Ethernet port information show interface analog <index|all> Display voice port information (admin > show interface) show interface 3gmodem Display 3G modem information show interface pstn Display PSTN port information Show system show system general (admin > show system) Display general system information show system ntp Display NTP settings information show system ui Display User Interface settings information show system security Display security settings information show system provision Display provision settings information show system snmp Display SNMP settings information show system tr069 Display TR069 settings information show system threshold Display threshold settings information show sip general Display general SIP settings information show sip realm <index|all> Display SIP realm settings information show sip group <index|all> Display SIP group settings information show sip phone_route <index|all> Display SIP phone route settings information show sip call_filter <index|all> Display SIP call filter settings information show sip mainp_tel2ip_dst <index|all> Display SIP Digit Manipulation tel to IP destination settings information. Show sip (admin > show sip) 150 Chapter 3 Configuration and Management show sip mainp_tel2ip_src <index|all> Display SIP Digit Manipulation tel to IP source settings information. show sip mainp_ip2tel_dst <index|all> Display SIP Digit Manipulation IP to tel destination settings information. show sip mainp_ip2tel_src <index|all> Display SIP Digit Manipulation IP to tel source settings information. Show advanced show advance rtp (admin > show advance) 3.9.4 show advance call_feature Display call feature settings information show advance region Display advanced region settings information show advance nat_traversal Display advanced NAT traversal settings information show advance ddns Display advanced DDNS settings information show advance dsp Display advanced DSP settings information show advance coding <index|all> Display advanced coding settings information show advance tiu Display advanced tiu settings information Show data show data dhcp (admin > show data) Display DHCP settings information show data nat_mapping Display NAT mapping settings information show data static_route Display static route settings information show data qos Display QoS settings information show data vlan Display VLAN settings information Maintenance Commands Maintenance and diagnostics of the system. 151 Display advanced RTP settings information Chapter 3 Configuration and Management Figure 3-105 Maintenance commands Table 3-67 Command mt pm mt Command Items Sub-Command Description mt fm monitor Show the fm records mt fm clear Clear the fm records Mt pm top Show the top information of applications mt pm eth Show the ethernet interface information mt dia 152 mt pm rtp Show the RTP statistic information mt pm cc Show the call statistic information mt pm agent Show the sip statistic information mt pm ci Show the call initial statistic information mt pm nat Show the NAT statistic information mt pm dhcps Show the DHCP Server statistic information mt pm clear Clear the statistic information mt dia stun stun information mt dia ping Ping information mt dia traceroute Trace route information mt dia lt line test mt dia ps Process information mt dia ls List file information mt dia cat File cat command mt dia kill Kill command mt dia memory Memory information mt dia ccu Control Coordination Unit Chapter 3 Configuration and Management mt dc 3.9.5 mt dia st Signaling trace mt dia tr069 TR069 information mt dia sip SIP information mt dia mii Test mii register mt dia ilt Inter line test mt dia da Dsp alloction mt dc upgrade Firmware upgrade mt dc download Configure file download mt dc upload Configure file upload mt dc restore Configuration information Restore to default mt dc reboot Device warm start Other Commands Spy Open the spy as specify level. The spy messages are used to trace the running of the system. 153 Chapter 3 Configuration and Management Figure 3-106 Spy command 154 Chapter 3 Configuration and Management Table 3-68 155 Spy level Spy Level Description 0 GEN Level: superfluous information 1 Function Enter Level: entering function 2 Event Level: normal and expected event(i.e. link up) 3(Default) Minor Error Level: minor unexpected event 4 Major Error Level: major unexpected event 5 Fatal Error Level: fatal error 6 Off Level: Level to turn off Spy Information Chapter 4 Edit Configuration File Chapter 4. Edit Configuration File This Chapter describes the format of VENUS 29xx Series configuration file. The configuration file is actually composed of VENUS 29xx Series configuration parameters. Users are allowed to edit this file for their own need. By downloading the configuration file from a TFTP server to the device, user can easily perform the system configuration and don‟t have to go through the step-by-step configuration items provided by the terminal interface. User can upload the configuration file to TFTP server through menu tree. Please refer to Section 3.5.3.2 for information on configuration upload and download. 4.1 File Format The configuration file must be in ASCII text format, use the text mode editor like Microsoft Notepad, or Microsoft WordPad to edit the file. The rules of the file are: The file must start with the string “IAD Configuration File” at the 1st line (case sensitive). The parameters must be organized by its category name. The category name is defined as: “[” + menu name + “_” + sub-menu name + “]”. Such as “[interface_pstn]”. The parameter format defined as: item name + “=” + value. Such as “registrar_addr_0=192.168.1.217”. 4.2 Example File The following is an example configuration file. IAD Configuration File [interface_ethernet] ethernet_mode_0=1 157 Chapter 4 Edit Configuration File ip_mode_0=0 ip_address_0=192.168.1.222 net_mask_0=255.255.255.0 default_gateway_0=192.168.1.20 dns1_address_0=0.0.0.0 dns2_address_0=0.0.0.0 dhcp_iad_0=0 dhcp_dns_0=0 dhcp_server_addr1_0=0.0.0.0 dhcp_net_mask1_0=0.0.0.0 dhcp_server_addr2_0=0.0.0.0 dhcp_net_mask2_0=0.0.0.0 pppoe_user_name_0=user pppoe_user_pwd_0=123 pppoe_dns_0=0 pppoe_gateway_0=1 pppoe_reconnect_0=1 mtu_size_0=1500 ethernet_mode_1=0 ip_mode_1=0 ip_address_1=0.0.0.0 net_mask_1=0.0.0.0 default_gateway_1=0.0.0.0 dns1_address_1=0.0.0.0 158 Chapter 4 Edit Configuration File dns2_address_1=0.0.0.0 dhcp_iad_1=0 dhcp_dns_1=0 dhcp_server_addr1_1=0.0.0.0 dhcp_net_mask1_1=0.0.0.0 dhcp_server_addr2_1=0.0.0.0 dhcp_net_mask2_1=0.0.0.0 pppoe_user_name_1= pppoe_user_pwd_1= pppoe_dns_1=0 pppoe_gateway_1=1 pppoe_reconnect_1=1 mtu_size_1=1500 [interface_pstn] seizure_prefix=#*1 ring_off_time=40 lifeline_channel=1 ring_counter=0 seizure_prefix=#*1 ring_off_time=40 lifeline_channel=1 ring_counter=0 159 Chapter 4 Edit Configuration File [interface_analog] user_number_0=1000 user_name_0= register_mode_0=2 min_flash_time_0=50 max_flash_time_0=500 line_reversal_0=1 caller_id_mode_0=0 hotline_number_0= hotline_timeout_0=0 realm_index_0=0 local_port_0=5060 user_auth_id_0= user_auth_pwd_0= digitmap_0=x. always_number_0= busy_number_0= no_answer_number_0= wait_times_0=3 call_id_block_0=0 prefer_call_id_0= rx_gain_0=0 tx_gain_0=0 proto_0=6 last_set_state_0=2 160 Chapter 4 Edit Configuration File pref_fax_coding_0=1 companding_0=4 ec_config_0=1 fxs_offhook_db_0=20 fxs_onhook_db_0=20 fxs_seize_detect_0=150 fxs_orig_clear_detect_0=300 fxs_answ_clear_detect_0=300 fxs_cpc_wait_0=200 fxs_cpc_dur_0=850 fxs_ring_id_0=255 fxs_cid_type_0=1 fxs_local_batt_conn_rev_0=1 fxs_rem_batt_conn_rev_0=1 fxs_batt_ring_rev_0=0 answer_wait_0=65535 call_limit_0=65535 fax_holdover_0=2000 hangup_wait_0=65535 out_wait_0=400 out_type_0=0 tone_out_on_time_0=200 tone_out_off_time_0=200 tone_out_power_0=-130 pause_duration_0=1000 161 Chapter 4 Edit Configuration File plar_addr_len_0=0 plar_addr_digits_0= user_number_1=1001 user_name_1= register_mode_1=2 min_flash_time_1=50 max_flash_time_1=500 line_reversal_1=1 caller_id_mode_1=0 hotline_number_1= hotline_timeout_1=0 realm_index_1=0 local_port_1=5060 user_auth_id_1= user_auth_pwd_1= digitmap_1=x. always_number_1= busy_number_1= no_answer_number_1= wait_times_1=3 call_id_block_1=0 prefer_call_id_1= rx_gain_1=0 tx_gain_1=0 162 Chapter 4 Edit Configuration File proto_1=6 last_set_state_1=2 pref_fax_coding_1=1 companding_1=4 ec_config_1=1 fxs_offhook_db_1=20 fxs_onhook_db_1=20 fxs_seize_detect_1=150 fxs_orig_clear_detect_1=300 fxs_answ_clear_detect_1=300 fxs_cpc_wait_1=200 fxs_cpc_dur_1=850 fxs_ring_id_1=255 fxs_cid_type_1=1 fxs_local_batt_conn_rev_1=1 fxs_rem_batt_conn_rev_1=1 fxs_batt_ring_rev_1=0 answer_wait_1=65535 call_limit_1=65535 fax_holdover_1=2000 hangup_wait_1=65535 out_wait_1=400 out_type_1=0 tone_out_on_time_1=200 tone_out_off_time_1=200 163 Chapter 4 Edit Configuration File tone_out_power_1=-130 pause_duration_1=1000 plar_addr_len_1=0 plar_addr_digits_1= user_number_2=1002 user_name_2= register_mode_2=2 min_flash_time_2=50 max_flash_time_2=500 line_reversal_2=1 caller_id_mode_2=0 hotline_number_2= hotline_timeout_2=0 realm_index_2=0 local_port_2=5060 user_auth_id_2= user_auth_pwd_2= digitmap_2=x. always_number_2= busy_number_2= no_answer_number_2= wait_times_2=3 call_id_block_2=0 prefer_call_id_2= 164 Chapter 4 Edit Configuration File rx_gain_2=0 tx_gain_2=0 proto_2=6 last_set_state_2=2 pref_fax_coding_2=1 companding_2=4 ec_config_2=1 fxs_offhook_db_2=20 fxs_onhook_db_2=20 fxs_seize_detect_2=150 fxs_orig_clear_detect_2=300 fxs_answ_clear_detect_2=300 fxs_cpc_wait_2=200 fxs_cpc_dur_2=850 fxs_ring_id_2=255 fxs_cid_type_2=1 fxs_local_batt_conn_rev_2=1 fxs_rem_batt_conn_rev_2=1 fxs_batt_ring_rev_2=0 answer_wait_2=65535 call_limit_2=65535 fax_holdover_2=2000 hangup_wait_2=65535 out_wait_2=400 out_type_2=0 165 Chapter 4 Edit Configuration File tone_out_on_time_2=200 tone_out_off_time_2=200 tone_out_power_2=-130 pause_duration_2=1000 plar_addr_len_2=0 plar_addr_digits_2= user_number_3=1003 user_name_3= register_mode_3=2 min_flash_time_3=50 max_flash_time_3=500 line_reversal_3=1 caller_id_mode_3=0 hotline_number_3= hotline_timeout_3=0 realm_index_3=0 local_port_3=5060 user_auth_id_3= user_auth_pwd_3= digitmap_3=x. always_number_3= busy_number_3= no_answer_number_3= wait_times_3=3 166 Chapter 4 Edit Configuration File call_id_block_3=0 prefer_call_id_3= rx_gain_3=0 tx_gain_3=0 proto_3=6 last_set_state_3=2 pref_fax_coding_3=1 companding_3=4 ec_config_3=1 fxs_offhook_db_3=20 fxs_onhook_db_3=20 fxs_seize_detect_3=150 fxs_orig_clear_detect_3=300 fxs_answ_clear_detect_3=300 fxs_cpc_wait_3=200 fxs_cpc_dur_3=850 fxs_ring_id_3=255 fxs_cid_type_3=1 fxs_local_batt_conn_rev_3=1 fxs_rem_batt_conn_rev_3=1 fxs_batt_ring_rev_3=0 answer_wait_3=65535 call_limit_3=65535 fax_holdover_3=2000 hangup_wait_3=65535 167 Chapter 4 Edit Configuration File out_wait_3=400 out_type_3=0 tone_out_on_time_3=200 tone_out_off_time_3=200 tone_out_power_3=-130 pause_duration_3=1000 plar_addr_len_3=0 plar_addr_digits_3= user_number_4=1004 user_name_4= register_mode_4=2 min_flash_time_4=50 max_flash_time_4=500 line_reversal_4=1 caller_id_mode_4=0 hotline_number_4= hotline_timeout_4=0 realm_index_4=0 local_port_4=5060 user_auth_id_4= user_auth_pwd_4= digitmap_4=x. always_number_4= busy_number_4= 168 Chapter 4 Edit Configuration File no_answer_number_4= wait_times_4=3 call_id_block_4=0 prefer_call_id_4= rx_gain_4=0 tx_gain_4=0 proto_4=6 last_set_state_4=2 pref_fax_coding_4=1 companding_4=4 ec_config_4=1 fxs_offhook_db_4=20 fxs_onhook_db_4=20 fxs_seize_detect_4=150 fxs_orig_clear_detect_4=300 fxs_answ_clear_detect_4=300 fxs_cpc_wait_4=200 fxs_cpc_dur_4=850 fxs_ring_id_4=255 fxs_cid_type_4=1 fxs_local_batt_conn_rev_4=1 fxs_rem_batt_conn_rev_4=1 fxs_batt_ring_rev_4=0 answer_wait_4=65535 call_limit_4=65535 169 Chapter 4 Edit Configuration File fax_holdover_4=2000 hangup_wait_4=65535 out_wait_4=400 out_type_4=0 tone_out_on_time_4=200 tone_out_off_time_4=200 tone_out_power_4=-130 pause_duration_4=1000 plar_addr_len_4=0 plar_addr_digits_4= user_number_5=1005 user_name_5= register_mode_5=2 min_flash_time_5=50 max_flash_time_5=500 line_reversal_5=1 caller_id_mode_5=0 hotline_number_5= hotline_timeout_5=0 realm_index_5=0 local_port_5=5060 user_auth_id_5= user_auth_pwd_5= digitmap_5=x. 170 Chapter 4 Edit Configuration File always_number_5= busy_number_5= no_answer_number_5= wait_times_5=3 call_id_block_5=0 prefer_call_id_5= rx_gain_5=0 tx_gain_5=0 proto_5=6 last_set_state_5=2 pref_fax_coding_5=1 companding_5=4 ec_config_5=1 fxs_offhook_db_5=20 fxs_onhook_db_5=20 fxs_seize_detect_5=150 fxs_orig_clear_detect_5=300 fxs_answ_clear_detect_5=300 fxs_cpc_wait_5=200 fxs_cpc_dur_5=850 fxs_ring_id_5=255 fxs_cid_type_5=1 fxs_local_batt_conn_rev_5=1 fxs_rem_batt_conn_rev_5=1 fxs_batt_ring_rev_5=0 171 Chapter 4 Edit Configuration File answer_wait_5=65535 call_limit_5=65535 fax_holdover_5=2000 hangup_wait_5=65535 out_wait_5=400 out_type_5=0 tone_out_on_time_5=200 tone_out_off_time_5=200 tone_out_power_5=-130 pause_duration_5=1000 plar_addr_len_5=0 plar_addr_digits_5= user_number_6=1006 user_name_6= register_mode_6=2 min_flash_time_6=50 max_flash_time_6=500 line_reversal_6=1 caller_id_mode_6=0 hotline_number_6= hotline_timeout_6=0 realm_index_6=0 local_port_6=5060 user_auth_id_6= 172 Chapter 4 Edit Configuration File user_auth_pwd_6= digitmap_6=x. always_number_6= busy_number_6= no_answer_number_6= wait_times_6=3 call_id_block_6=0 prefer_call_id_6= rx_gain_6=0 tx_gain_6=0 proto_6=6 last_set_state_6=2 pref_fax_coding_6=1 companding_6=4 ec_config_6=1 fxs_offhook_db_6=20 fxs_onhook_db_6=20 fxs_seize_detect_6=150 fxs_orig_clear_detect_6=300 fxs_answ_clear_detect_6=300 fxs_cpc_wait_6=200 fxs_cpc_dur_6=850 fxs_ring_id_6=255 fxs_cid_type_6=1 fxs_local_batt_conn_rev_6=1 173 Chapter 4 Edit Configuration File fxs_rem_batt_conn_rev_6=1 fxs_batt_ring_rev_6=0 answer_wait_6=65535 call_limit_6=65535 fax_holdover_6=2000 hangup_wait_6=65535 out_wait_6=400 out_type_6=0 tone_out_on_time_6=200 tone_out_off_time_6=200 tone_out_power_6=-130 pause_duration_6=1000 plar_addr_len_6=0 plar_addr_digits_6= user_number_7=1007 user_name_7= register_mode_7=2 min_flash_time_7=50 max_flash_time_7=500 line_reversal_7=1 caller_id_mode_7=0 hotline_number_7= hotline_timeout_7=0 realm_index_7=0 174 Chapter 4 Edit Configuration File local_port_7=5060 user_auth_id_7= user_auth_pwd_7= digitmap_7=x. always_number_7= busy_number_7= no_answer_number_7= wait_times_7=3 call_id_block_7=0 prefer_call_id_7= rx_gain_7=0 tx_gain_7=0 proto_7=6 last_set_state_7=2 pref_fax_coding_7=1 companding_7=4 ec_config_7=1 fxs_offhook_db_7=20 fxs_onhook_db_7=20 fxs_seize_detect_7=150 fxs_orig_clear_detect_7=300 fxs_answ_clear_detect_7=300 fxs_cpc_wait_7=200 fxs_cpc_dur_7=850 fxs_ring_id_7=255 175 Chapter 4 Edit Configuration File fxs_cid_type_7=1 fxs_local_batt_conn_rev_7=1 fxs_rem_batt_conn_rev_7=1 fxs_batt_ring_rev_7=0 answer_wait_7=65535 call_limit_7=65535 fax_holdover_7=2000 hangup_wait_7=65535 out_wait_7=400 out_type_7=0 tone_out_on_time_7=200 tone_out_off_time_7=200 tone_out_power_7=-130 pause_duration_7=1000 plar_addr_len_7=0 plar_addr_digits_7= [system_general] device_name=00:90:bb:00:03:7c serial_number= sys_server_addr= clone_mac_addr= signal_tos=7 restart_wait=30 op_mode=13 176 Chapter 4 Edit Configuration File [system_ntp] ntp_mode=1 ntp_server_addr=192.168.1.218 ntp_server_port=123 polling_interval=1024 time_zone=-8 [system_usermgt] admin_name=admin admin_pswd=21232f297a57a5a743894a0e4a801fc3 operator_name=user operator_pswd=d41d8cd98f00b204e9800998ecf8427e monitor_name=guest monitor_pswd=d41d8cd98f00b204e9800998ecf8427e use_radius_login=0 radius_server_addr= radius_server_port=0 radius_share_secret= [system_ui] telnet_server_mode=0 telnet_server_port=23 telnet_idle_timeout=64 telnet_interface=0 177 Chapter 4 Edit Configuration File web_server_mode=1 web_server_port=80 web_idle_timeout=20 web_interface=1 [system_provision] prov_server_addr= prov_server_port=69 prov_protocal=0 prov_user_name= prov_user_pswd= prov_file_name= file_encryption=0 prov_timeout=0 [system_snmp] snmp_server_mode=0 snmp_server_port=161 snmp_trap_mode=0 snmp_trap_port=162 snmp_cdrtrap_mode=0 system_name= system_location= system_contact= get_community= 178 Chapter 4 Edit Configuration File set_community= trap_community= nat_pass_mode=0 nat_pass_interval=60 trap_dest_addr1= trap_dest_addr2= trap_dest_addr3= trap_dest_addr4= [system_tr069] acsurl= cpeport= mode= [sip_general] fqdn_mode=0 fqdn_name= dns_query_type=0 trust_proxy=0 t1_time=500 regst_auth=0 pwd_with_md5=0 use_port_url=0 compact_mode=0 invite_no_sdp=0 band_ring_bktone=0 invite_timeout=60 179 Chapter 4 Edit Configuration File session_expire_mode=0 session_expire_time=3600 min_session_expire=120 prack_mode=0 info_mode=0 subscrip_mode=0 pound_symbol_mode=0 ring_mode=0 discon_on_broken=0 broken_conn_timeout=60 current_disconnect=0 fallback_rout_table=0 prefer_rout_table=0 critical_digit_timer=4 partial_digit_timer=16 [sip_realm] realm_valid_0=1 domain_name_0= proxy_addr_0=192.168.1.217 proxy_port_0=5060 redu_proxy_addr_0= redu_proxy_port_0=0 registrar_addr_0=192.168.1.217 registrar_port_0=5060 180 Chapter 4 Edit Configuration File backup_reg_addr_0= backup_reg_port_0=0 registration_time_0=3600 reregist_timing_0=100 outbd_proxy_addr_0= outbd_proxy_port_0=5060 transport_way_0=0 aor_name_0= keep_alive_mode_0=0 keep_alive_interval_0=60 realm_valid_1=0 domain_name_1= proxy_addr_1= proxy_port_1=5060 redu_proxy_addr_1= redu_proxy_port_1=0 registrar_addr_1= registrar_port_1=5060 backup_reg_addr_1= backup_reg_port_1=0 registration_time_1=3600 reregist_timing_1=100 outbd_proxy_addr_1= outbd_proxy_port_1=5060 181 Chapter 4 Edit Configuration File transport_way_1=0 aor_name_1= keep_alive_mode_1=0 keep_alive_interval_1=60 realm_valid_2=0 domain_name_2= proxy_addr_2= proxy_port_2=5060 redu_proxy_addr_2= redu_proxy_port_2=0 registrar_addr_2= registrar_port_2=5060 backup_reg_addr_2= backup_reg_port_2=0 registration_time_2=3600 reregist_timing_2=100 outbd_proxy_addr_2= outbd_proxy_port_2=5060 transport_way_2=0 aor_name_2= keep_alive_mode_2=0 keep_alive_interval_2=60 realm_valid_3=0 182 Chapter 4 Edit Configuration File domain_name_3= proxy_addr_3= proxy_port_3=5060 redu_proxy_addr_3= redu_proxy_port_3=0 registrar_addr_3= registrar_port_3=5060 backup_reg_addr_3= backup_reg_port_3=0 registration_time_3=3600 reregist_timing_3=100 outbd_proxy_addr_3= outbd_proxy_port_3=5060 transport_way_3=0 aor_name_3= keep_alive_mode_3=0 keep_alive_interval_3=60 realm_valid_4=0 domain_name_4= proxy_addr_4= proxy_port_4=5060 redu_proxy_addr_4= redu_proxy_port_4=0 registrar_addr_4= 183 Chapter 4 Edit Configuration File registrar_port_4=5060 backup_reg_addr_4= backup_reg_port_4=0 registration_time_4=3600 reregist_timing_4=100 outbd_proxy_addr_4= outbd_proxy_port_4=5060 transport_way_4=0 aor_name_4= keep_alive_mode_4=0 keep_alive_interval_4=60 realm_valid_5=0 domain_name_5= proxy_addr_5= proxy_port_5=5060 redu_proxy_addr_5= redu_proxy_port_5=0 registrar_addr_5= registrar_port_5=5060 backup_reg_addr_5= backup_reg_port_5=0 registration_time_5=3600 reregist_timing_5=100 outbd_proxy_addr_5= 184 Chapter 4 Edit Configuration File outbd_proxy_port_5=5060 transport_way_5=0 aor_name_5= keep_alive_mode_5=0 keep_alive_interval_5=60 realm_valid_6=0 domain_name_6= proxy_addr_6= proxy_port_6=5060 redu_proxy_addr_6= redu_proxy_port_6=0 registrar_addr_6= registrar_port_6=5060 backup_reg_addr_6= backup_reg_port_6=0 registration_time_6=3600 reregist_timing_6=100 outbd_proxy_addr_6= outbd_proxy_port_6=5060 transport_way_6=0 aor_name_6= keep_alive_mode_6=0 keep_alive_interval_6=60 185 Chapter 4 Edit Configuration File realm_valid_7=0 domain_name_7= proxy_addr_7= proxy_port_7=5060 redu_proxy_addr_7= redu_proxy_port_7=0 registrar_addr_7= registrar_port_7=5060 backup_reg_addr_7= backup_reg_port_7=0 registration_time_7=3600 reregist_timing_7=100 outbd_proxy_addr_7= outbd_proxy_port_7=5060 transport_way_7=0 aor_name_7= keep_alive_mode_7=0 keep_alive_interval_7=60 [sip_group] group_number_0=10 group_name_0= register_mode_0=0 realm_index_0=0 local_port_0=5060 186 Chapter 4 Edit Configuration File group_auth_id_0= group_auth_pwd_0= involved_tcids_0=0 group_number_1=11 group_name_1= register_mode_1=0 realm_index_1=0 local_port_1=5060 group_auth_id_1= group_auth_pwd_1= involved_tcids_1=0 group_number_2=12 group_name_2= register_mode_2=0 realm_index_2=0 local_port_2=5060 group_auth_id_2= group_auth_pwd_2= involved_tcids_2=0 group_number_3=13 group_name_3= register_mode_3=0 187 Chapter 4 Edit Configuration File realm_index_3=0 local_port_3=5060 group_auth_id_3= group_auth_pwd_3= involved_tcids_3=0 group_number_4=14 group_name_4= register_mode_4=0 realm_index_4=0 local_port_4=5060 group_auth_id_4= group_auth_pwd_4= involved_tcids_4=0 group_number_5=15 group_name_5= register_mode_5=0 realm_index_5=0 local_port_5=5060 group_auth_id_5= group_auth_pwd_5= involved_tcids_5=0 group_number_6=16 188 Chapter 4 Edit Configuration File group_name_6= register_mode_6=0 realm_index_6=0 local_port_6=5060 group_auth_id_6= group_auth_pwd_6= involved_tcids_6=0 group_number_7=17 group_name_7= register_mode_7=0 realm_index_7=0 local_port_7=5060 group_auth_id_7= group_auth_pwd_7= involved_tcids_7=0 [sip_phonerout] dest_phone_prefix_0= src_phone_prefix_0= sip_ua_addr_0= sip_ua_port_0=0 [advanced_rtp] rtp_base_port=30000 189 Chapter 4 Edit Configuration File rtcp_mode=0 rtp_filter_mode=0 srtp_mode=0 srtp_crypto_suites=0 audio_codec=0 g711_ptime=20 g723_ptime=30 g726_ptime=20 g729_ptime=30 use_rfc2833=0 rfc2833_ptype=101 use_g726_codec=0 g726_16_ptype=2 g726_24_ptype=2 g726_32_ptype=2 g726_40_ptype=2 vad_mode=0 echo_cancel_mode=0 rtcp_window_size=32 rtcp_interval=15 service_class=0 security_mode=0 uncryption=0 [advanced_call] 190 Chapter 4 Edit Configuration File clip_mode=0 dtmf_prefix=D digit_timeout=4 call_wait_interval=3 call_wait_times=3 deny_2nd_dailing=0 max_call=0 e164_mode=0 dialing_prefix= emerg_call_num1= emerg_call_num2= emerg_call_num3= emerg_call_num4= emerg_call_mode=0 call_hold=0 call_hold_mode=0 call_waiting=0 three_way_mode=0 confer_server_url= attended_transfer=0 call_wait_deactive=*70 call_id_active=*67 af_active_prefix=*72 af_deactive_prefix=*73 call_return_function=*69 191 Chapter 4 Edit Configuration File call_redail_function=*68 unattended_transfer=*66 call_park_function=*61 call_pickup_function=*62 call_park_server= call_intercept=*63 fax_signal_method=1 t30_fax_codec=0 fax_tone_detection=0 modem_method=1 modem_codec=0 modem_tone_detect=0 [advanced_region] region_id=2 region_code= area_code= international_code= domestic_code= ring_frequency=25 ring_cadence_0=10,40,0,0,0,0,180000 ring_cadence_1=20,40,0,0,0,0,180000 ring_cadence_2=8,4,8,40,0,0,180000 ring_cadence_3=4,2,4,2,8,40,180000 ring_cadence_4=3,2,10,2,3,40,180000 192 Chapter 4 Edit Configuration File ring_cadence_5=5,1,0,0,0,0,600 ring_cadence_6=5,2,3,2,5,30,180000 ring_cadence_7=20,40,0,0,0,0,180000 ring_cadence_8=30,50,0,0,0,0,180000 ring_cadence_9=5,1,0,0,0,0,600 ring_cadence_10=10,40,0,0,0,0,180000 tone_timeout_0=40000 tone_numrow_0=2 tone_0_0=1,450,-100,0,0,0,0,0,0,350 tone_0_1=0,0,0,0,0,0,0,0,0,350 tone_timeout_1=180000 tone_numrow_1=2 tone_1_0=1,450,-100,0,0,0,0,0,0,1000 tone_1_1=0,0,0,0,0,0,0,0,0,4000 tone_timeout_2=40000 tone_numrow_2=2 tone_2_0=1,450,-100,0,0,0,0,0,0,700 tone_2_1=0,0,0,0,0,0,0,0,0,700 tone_timeout_3=16000 tone_numrow_3=1 tone_3_0=1,450,-100,0,0,0,0,0,0,-1 tone_timeout_4=16000 tone_numrow_4=1 tone_4_0=1,400,-100,0,0,0,0,0,0,-1 tone_timeout_5=-1 193 Chapter 4 Edit Configuration File tone_numrow_5=4 tone_5_0=1,450,-100,0,0,0,0,0,0,100 tone_5_1=0,0,0,0,0,0,0,0,0,100 tone_5_2=1,450,-100,0,0,0,0,0,0,400 tone_5_3=0,0,0,0,0,0,0,0,0,400 tone_timeout_6=0 tone_numrow_6=4 tone_6_0=1,600,-240,0,0,0,0,0,0,125 tone_6_1=0,0,0,0,0,0,0,0,0,125 tone_6_2=1,600,-240,0,0,0,0,0,0,125 tone_6_3=0,0,0,0,0,0,0,0,0,-1 tone_timeout_7=-1 tone_numrow_7=4 tone_7_0=1,450,-200,0,0,0,0,0,0,250 tone_7_1=0,0,0,0,0,0,0,0,0,250 tone_7_2=1,450,-200,0,0,0,0,0,0,250 tone_7_3=0,0,0,0,0,0,0,0,0,-1 tone_timeout_8=60000 tone_numrow_8=1 tone_8_0=1,950,0,0,0,0,0,0,0,-1 tone_timeout_9=-1 tone_numrow_9=1 tone_9_0=1,950,0,0,0,0,0,0,0,-1 tone_timeout_10=16000 tone_numrow_10=1 194 Chapter 4 Edit Configuration File tone_10_0=1,450,-100,0,0,0,0,0,0,-1 tone_timeout_11=600 tone_numrow_11=2 tone_11_0=1,450,-100,0,0,0,0,0,0,400 tone_11_1=0,0,0,0,0,0,0,0,0,40 tone_timeout_12=635 tone_numrow_12=4 tone_12_0=1,450,-200,0,0,0,0,0,0,400 tone_12_1=0,0,0,0,0,0,0,0,0,100 tone_12_2=2,2130,-150,2750,-150,0,0,0,0,85 tone_12_3=0,0,0,0,0,0,0,0,0,5000 tone_timeout_13=30000 tone_numrow_13=2 tone_13_0=1,450,-100,0,0,0,0,0,0,350 tone_13_1=0,0,0,0,0,0,0,0,0,350 tone_timeout_14=0 tone_numrow_14=1 tone_14_0=1,250,0,0,0,0,0,0,0,50 tone_timeout_15=0 tone_numrow_15=1 tone_15_0=1,350,0,0,0,0,0,0,0,5000 tone_timeout_16=-1 tone_numrow_16=2 tone_16_0=1,450,-100,0,0,0,0,0,0,700 tone_16_1=0,0,0,0,0,0,0,0,0,700 195 Chapter 4 Edit Configuration File tone_timeout_17=-1 tone_numrow_17=4 tone_17_0=1,400,-130,0,0,0,0,0,0,250 tone_17_1=0,0,0,0,0,0,0,0,0,250 tone_17_2=1,400,-130,0,0,0,0,0,0,250 tone_17_3=0,0,0,0,0,0,0,0,0,3250 [advanced_nat] nat_ip_addr=0.0.0.0 stun_server_addr= stun_server_port=0 polling_interval=64 [advanced_ddns] ddns_mode=0 ddns_server_addr= host_name= user_id= user_pswd= [advanced_dsp] allocation_method=0 long_loop_mode=0 [data_routing] 196 Chapter 4 Edit Configuration File dest_ip_addr_0=0.0.0.0 dest_net_mask_0=0.0.0.0 gateway_addr_0=0.0.0.0 metric_0=0 [data_natmap] nat_mode=1 protocol_mode_0=0 internal_ip_addr_0=0.0.0.0 inter_serv_port_0=0 exter_serv_port_0=0 [data_dhcp] dhcp_mode=0 dhcp_net_addr=0.0.0.0 dhcp_net_mask=0.0.0.0 domain_name= dns_ip_addr0=0.0.0.0 dns_ip_addr1=0.0.0.0 dns_ip_addr2=0.0.0.0 dns_ip_addr3=0.0.0.0 gw_ip_addr0=0.0.0.0 gw_ip_addr1=0.0.0.0 gw_ip_addr2=0.0.0.0 gw_ip_addr3=0.0.0.0 197 Chapter 4 Edit Configuration File default_lease_time=0 free_ip_low1=0.0.0.0 free_ip_low2=0.0.0.0 free_ip_low3=0.0.0.0 free_ip_low4=0.0.0.0 free_ip_low5=0.0.0.0 free_ip_high1=0.0.0.0 free_ip_high2=0.0.0.0 free_ip_high3=0.0.0.0 free_ip_high4=0.0.0.0 free_ip_high5=0.0.0.0 assign_host_name_0= assign_ip_addr_0=0.0.0.0 assign_mac_addr_0= [data_qos] qos_mode=0 signal_dscp=37 voice_dscp=37 mgt_dscp=0 data_dscp=0 signal_tos=6 voice_tos=6 mgt_tos=0 data_tos=0 198 Chapter 4 Edit Configuration File [data_vlan] vlan_mode=0 signal_vlan_id=0 voice_vlan_id=0 mgt_vlan_id=0 data_vlan_id=0 signal_vlan_prior=0 voice_vlan_prior=0 mgt_vlan_prior=0 data_vlan_prior=0 vlan_tag_0=0 vlan_tag_1=0 vlan_vid_0=0 vlan_vid_1=0 vlan_vid_2=0 vlan_priority_0=0 vlan_priority_1=0 vlan_priority_2=0 vlan_group_0=7 vlan_group_1=0 vlan_group_2=0 [fm_threshold] cpu_threshold=100 199 Chapter 4 Edit Configuration File ram_threshold=100 dsp_threshold=100 # end of configuration file 200 Chapter 5 Troubleshooting Chapter 5. Troubleshooting 5.1 Instruments The following instruments may help to allocate the problem: 5.2 A multi-meter: to identify the line condition, the power condition, etc. A PC: with a LAN card installed and the IP setup configured properly A network scope: to identify the network status and the traffic load over the network. Troubleshooting Turn off the power first. Follow the procedures below to allocate the problem: 1) Cable Connections Make sure all the cables are connected correctly and firmly. Check if you provide a correct power source. 2) The Power Source The LED indicators offer some helpful information for users to check the hardware status of VENUS 29xx Series. Check if the PWR LED is ON. Use the multi-meter to measure the power supply. 3) Boot up Diagnosis Observe the boot up sequence of the gateway. During the boot up phase, VENUS 29xx Series performs the hardware initialization, run-time AP software verification, interface module detection and then the hardware diagnosis procedure. Check if all the LEDs can display correctly. 201 Chapter 5 Troubleshooting The SYS ALM LED indicates the diagnosis state: while it is Yellow, the device is performing diagnosis. A Red SYS ALM LED indicates a hardware failure. A Green SYS LED indicates no hardware failure. Login to the Craft port Interface, and select the “Hardware Configuration and Diagnosis Report” menu to see if the device reports correct hardware configuration, type of interface cards installed, number of voice channel detected, and the diagnosis results. In case of hardware failures, record the indication of LEDs during the boot up phase, and report the diagnosis result generated by VENUS 29xx Series to our customer service. 4) IP Network Interface Connection Check the indicator for the WAN interface indicating normal condition. If the 10/100Base-T Fast Ethernet port is used, check if the 10/100BT LED is on. Verify if a correct Ethernet cable is used. To connect VENUS 29xx Series directly to another Ethernet port of a network node (for example a router), a cross cable, instead of a straight cable, may be used. 5) IP Address Configuration Check if the IP address was assigned statically or obtained dynamically from a DHCP server. If the DHCP client mode is enabled, look at the DHCP server for the exact IP address assigned to the gateway or monitor the display message of the DHCP server discovery status from the Terminal User Interface via the Craft port. Remember that the DHCP server must be located in the local network where the DHCP server can receive the broadcast packets sent from the gateway. Make sure there is unused IP address available on the DHCP server. If static IP address is enabled, make sure the net mask and the default Gateway are set correctly. Use the PC to perform a PING test to the gateway, or activate the PING feature from within the Craft port Interface to verify the IP packet transmission between the gateway and some other nodes. Try to PING the default gateway first, then the SIP Proxy Server. Check with your access service provider for a well-maintained WAN link. Use the Network Scope (or the Protocol Analyzer) to monitor the packets sent received by the VENUS 29xx Series. 6) Firewall and NAT 202 Chapter 5 Troubleshooting Normally, a public IP address should be used for VENUS 29xx Series. In case the VENUS 29xx Series is located in the local network behind the firewall or router, Make sure the IP packets is not blocked or modified. For the security purpose, a firewall server or VPN is usually installed to filter out unauthorized accesses from the outside world. Make sure the traffic to/from the VoIP gateway is not blocked. The NAT server may cause problem as well. The NAT server performs the Network Address Translation between the public IP address and the private IP address. It may not recognize some Text-based protocols (like SIP) used by the VoIP gateway and may cause incorrect IP address or port translation for a packet. 7) Off-hook the Telephone Handset Pick-up the phone and hear to the response. Check if the LED of the telephone port is turned ON. If no tone is heard, check the transmission between the Proxy and Registration Server and the gateway again. 8) Make a Local Call If the dial tone can be heard, try to dial a local number to another port on the same gateway. See it the ring back tone is heard and the called party are ringing. See if the Channel LED flashes while the phone rings. Answer the phone, and start conversation. Hear the voice quality. 9) Make an On-Net Call Try to make a call to another VoIP gateway somewhere located in the IP network. If the ring back tone is heard, but no voice can be heard after the called party answers the phone, the voice packets sent by these two gateways may be blocked somehow (reason like firewall, VPN, etc). Contact your service provider to check the setup of the routing path. The voice waves are converted to digital voice coding (such as G.711, G.723, G.729, etc) and encapsulated in RTP packets. RTP is a transport protocol running on the top of UDP. To make a VoIP phone call, a RTP connection is created for the caller and the called gateway. The UDP port used for RTP is not fixed. VENUS 29xx Series uses the UDP number started from 30000. 10) Hear the Voice Quality If the voice quality is not good, possible reasons include Low WAN link throughput not able to support enough bandwidth for voice traffic 203 Chapter 5 Troubleshooting (see the following table for calculation of maximum bandwidth required) Network congestion: a well maintained network flow control policy or protocol help to control the traffic and prioritize the service for different type of media Type of voice codec Network device delay: firewall, router, switch, access device, … etc all contribute latency to the traffic. A good network configuration in advance is very important. Type of the Voice Codec selected is a big factor and tradeoff to the voice quality. The PCM type codec (G.711 u-law or A-law) provide excellent voice quality, but consume large amount of network bandwidth. A higher compression rate codec provide fair voice quality and consumes less network bandwidth, however requires more CPU/DSP power which increase the voice latency. Table 5-1 204 Voice Codec Bandwidth Codec Types Bit Rate ITU-T G.711 A-Law PCM 64K ITU-T G.711 -Law PCM 64K ITU-T G.723.1 6.3K/5.3K ITU-T G.729A 8K ITU-T G.726. 16/24/32/40K Appendix A Supplemental Telephone Features Appendix A Supplemental Telephone Features For the traditional PSTN service providers, they used to invest on extra equipment or technology for those services and may charge extra to their customers. The supplemental telephone features like Call Forwarding, Call Waiting, Caller ID Display, Caller ID Blocking, Speed Dial, Call Return and 3-way Conference can be provided. The following Table describes some example procedures for VENUS 29xx Series to enable or disable several example supplemental features (The following example needs SIP Proxy server support). Table A-1 Features Supplemental Telephony Features Description Forward all the incoming Call Forward calls to a designated All (CFA) telephone number Examples All installed users can assign an always call forward number by menu tree or CLI. Once a new call incoming, the conversation will be forwarded to the specified user through the response 302. All installed users can assign a busy call Call Forward Forward all the incoming forward number by menu tree or CLI. Once a Busy calls while the local phone new call incoming and under busy, the is busy conversation will be forwarded to the (CFB) specified user through response 302. Forward the incoming calls Call Forward to a preset telephone No Answer number if the call is not answered after several (CFNA) rings All installed users can assign a No answer call forward number and ringing timeout time by menu tree or CLI. Once a new call incoming and ringing timeout, the conversation will be forwarded to the specified user through response 302. Caller ID Blocking The Caller ID (telephone number) and the registered The caller can hide its caller ID by selection Name of the local phone this feature. will not be displayed on the Called phone for privacy. Caller ID Display The Caller ID (telephone The called user can display caller ID by number) and the registered different mode in different country. Name will be displayed on 205 Appendix A Supplemental Telephone Features Features Description Examples the Called phone bye three mode: FSK, ETSI and DTMF. User also can disable the caller ID display function by selection mode Disable. Call Return To call back to the caller of the last incoming call. This To make a return call, please pickup the feature works even if last phone and press call return digits and default incoming call was not value is *69. answered. Call Waiting This feature allows interruption of a 3rd party to User can hear call waiting tone when a new a call in progress. incoming call under a conversation. He can Make the incoming call to press flash hook to hold the current wait until current conversation partner. Pressing another flash conversation finished. The hook will hold the 3rd party. talking person will be informed by short tone 3-Way conference User A makes a conversation with user B. User A presses flash hook to hold user B. This feature allows user to User A can dial user C to build second call. make two call calls and User A presses flash hook to start three-way mixed the RTP stream and conference. User A can press flash hook to make a 3 party joined disable User C conversation. Three-way conference. conference can‟t be built in User C ringing status for the current version. Call transfer 206 This feature allow user to make a consultation or un-consultation call transfer. User A makes a conversation with User B. User A press flash hook to hold User B. User A dial User C to make the second conversation. User A hang up the phone set when ringing for un-consultation call transfer or when call built for consultation call transfer. User B and User C make another call after User A hangs up. Appendix B Abbreviation Appendix B Abbreviation Abbreviation Stands for ARP Address Resolution Protocol BootP Bootstrap Protocol CLI Command Line Interface CPU Central Processing Unit DDN Digital Data Network DHCP Dynamic Host Configuration Protocol DNS Domain Name System or Domain Name Server DSP Digital Signal Processor FXS Foreign Exchange Station HTTP Hyper Text Transfer Protocol IAD Integrated Access Device IADMS IAD Management Server ICMP Internet Control Message Protocol IETF Internet Engineering Task Force ITU-T International Telecommunication Union - Telecommunication MDU Multi-Dwellings Units MGCP MEDIA GATEWAY CONTROL PROTOCOL MIB Management Information Base MTU Multi-Tenants Units NAT Network Address Translation NCS Network-based Call Signal protocol NGN Next Generation Network POTS Plain Old Telephone System PPPoE Point-to-Point Protocol over Ethernet PSTN Public Switched Telephone Network RARP Reverse Address Resolution Protocol RFC Request for Comments RTP Real Time Protocol 207 Appendix B Abbreviation SDP Session Description Protocol SIP Session Initiation Protocol SNMP Simple Network Management Protocol TCP Transmission Control Protocol TELNET Telecommunication Network Protocol TFTP Trivial File Transfer Protocol UA User Agent UI User Interface UDP User Datagram Protocol URL Uniform Resource Locator VAD Voice Activity Detection VoIP Voice over Internet Protocol VPN Virtual Private Network 208 Appendix C Code Determination Flow Chart Appendix C Code Determination Flow Chart Start Enter a phone number (D_no) Switch circuit to PSTN Lifeline Yes Does it match PSTN Lifeline prefix No Does it match the phonebook or extension number? Yes No Does it match the number of internal phone book? Yes No Is FXO auto_route enabled? Yes No Does it match DigitMap? Yes No No Dial from FXO to PSTN Does it match the number of SIP Proxy Server? Yes Does this system has a FXO port? No End 209 Yes You will be connected with the destination number via VoIP gateway