1
User Manual
Managing Content with ANCILE uPerform
™
Version 4.5
PROPRIETARY RIGHTS NOTICE
This user manual contains proprietary and confidential information of ANCILE Solutions, Inc. This manual is
furnished under license only for the use and information of the licensee, and the content is subject to change
without notice. Use of the contents of this manual for any purpose other than that for which it was provided is
prohibited. This manual may not be reprinted or redistributed to any third party without the prior written
consent of ANCILE Solutions, Inc. ANCILE Solutions, Inc. does not warrant or guarantee the contents of this
user manual.
ANCILE uPerform™, ANCILE uLearn™, ANCILE Info Pak™, and ANCILE uBenchmark™ are registered
trademarks of ANCILE Solutions, Inc. in the U.S. and foreign countries. All other product and company
names referenced herein are the registered or unregistered trademarks of their respective owners.
COPYRIGHT © 2012 ANCILE Solutions, Inc.
ALL RIGHTS RESERVED
ANCILE Solutions, Inc.
Contents
Chapter 1: Introduction............................................................................. 1
What is ANCILE uPerform? ........................................................................................................ 2
About This Manual................................................................................................................... 3
Who Should Read This Manual ............................................................................................... 3
Organization Of This Manual .................................................................................................. 3
Conventions Used In This Manual ........................................................................................... 4
Available Technical Support ........................................................................................................ 5
Chapter 2: Getting Started........................................................................ 7
Introduction to Managing Content ............................................................................................... 8
Accessing the Server Workspace ............................................................................................... 10
Managing Your Account ............................................................................................................ 13
Getting Help on the uPerform Server Workspace ...................................................................... 15
Exiting ........................................................................................................................................ 16
Chapter 3: Exploring the Server Workspace ......................................... 17
Introduction to the uPerform Server Workspace........................................................................ 18
Using the Server Workspace ...................................................................................................... 19
Using the Top Banner ............................................................................................................ 19
Using the Left Menu .............................................................................................................. 21
Using the Navigation Buttons ................................................................................................ 21
Using the Left Menu Options ................................................................................................. 22
Expanding and Collapsing the Left Menu.............................................................................. 24
Using Your Personal Page...................................................................................................... 24
Chapter 4: Managing Users, Roles, and Groups .................................. 29
Introduction to Managing Users, Roles, and Groups ................................................................. 30
Manually Creating and Updating User Accounts ...................................................................... 31
Creating and Managing Users Via User Information Source .................................................... 37
Working with User Information Sources ............................................................................... 38
Working With User Information Source Filters ..................................................................... 45
Managing uPerform Roles ......................................................................................................... 52
Creating and Updating Groups ................................................................................................... 55
i
Table of Contents
Chapter 5: Working With the Document Library ................................... 63
Introduction to the Document Library ....................................................................................... 64
Creating the Project .................................................................................................................... 66
Working with Templates ............................................................................................................ 69
Specifying Project Settings ........................................................................................................ 72
Populating the Document Library .............................................................................................. 76
Import a Document Library Structure .................................................................................... 77
Browsing the Document Library ................................................................................................ 79
Managing the Document Library ............................................................................................... 83
Managing Folders ................................................................................................................... 83
Managing Documents ............................................................................................................ 84
Managing Translations and Related Content ............................................................................. 93
Working with Translated Content .......................................................................................... 93
Viewing Translated Content................................................................................................... 96
Receiving Notifications About Documents............................................................................ 98
Working with Related Content ............................................................................................... 98
Using Version History.............................................................................................................. 101
Retention Period ....................................................................................................................... 103
Transaction Change Notifications ............................................................................................ 105
Managing the Recycle Bin ....................................................................................................... 108
Chapter 6: Working With the Website.................................................. 111
Introduction to the Website ...................................................................................................... 112
Building the Website via Context Assignment ........................................................................ 113
Using Website Folders for Context Assignment .................................................................. 113
Assigning a Website Context to Document Library Content ............................................... 115
Building the Website via Dynamic Website Folders ............................................................... 119
Working with Dynamic Website Folders ............................................................................. 119
Browsing the Website .............................................................................................................. 126
Publishing Content for Display on the Website ....................................................................... 127
Publishing Configuration ..................................................................................................... 127
Subscribing to Publish Events .................................................................................................. 134
Publishing Courses to an LMS ................................................................................................. 135
Viewing the End User Website ................................................................................................ 139
Configuring and Customizing the Website .............................................................................. 141
Chapter 7: Using Workflow .................................................................. 143
Introduction to Workflow......................................................................................................... 144
Creating and Starting a Workflow ........................................................................................... 145
Using Workflow Notifications ................................................................................................. 147
Updating a Workflow ............................................................................................................... 148
Participating in a Workflow ..................................................................................................... 149
Stopping a Workflow and Deleting a Workflow ..................................................................... 151
ii
ANCILE Solutions, Inc.
Viewing Workflow History ...................................................................................................... 153
Chapter 8: Collaborating on Content ................................................... 155
Introduction to Collaboration ................................................................................................... 156
Viewing Discussions ................................................................................................................ 157
Using Discussion Entries ......................................................................................................... 158
Using Subscriptions Within a Discussion ................................................................................ 160
Managing Discussions.............................................................................................................. 162
Using the Tell Others Feature .................................................................................................. 163
Chapter 9: Working with the Glossary................................................. 165
Introduction to the Glossary ..................................................................................................... 166
Specifying Term Definitions .................................................................................................... 167
Browsing the Glossary from the Editor.................................................................................... 169
Managing Glossary Settings..................................................................................................... 170
Adding Terms and Definitions ................................................................................................. 173
Updating Terms and Definitions .............................................................................................. 176
Managing Glossary Suggestions .............................................................................................. 179
Managing Synonyms ................................................................................................................ 181
Using Globalize ........................................................................................................................ 183
Globalizing Documents ........................................................................................................ 184
Subscribing to Glossary Events................................................................................................ 187
Tracking Term and Definition Usage....................................................................................... 188
Importing and Exporting a Glossary and Translations............................................................. 191
Chapter 10: Using Reports ................................................................... 197
Introduction to Reporting ......................................................................................................... 198
Working with Reports .............................................................................................................. 199
Create and Edit Custom Reports .............................................................................................. 205
Chapter 11: Using Author Templates .................................................. 211
Introduction to Author Templates ............................................................................................ 212
Managing Author Templates .................................................................................................... 214
Create and Open a New Author Template ........................................................................... 214
Specifying New Template Settings: General ....................................................................... 216
Specifying New Template Settings: Properties .................................................................... 224
Specifying New Template Settings: Phrases ........................................................................ 228
Specifying New Template Settings: Publications ................................................................ 230
Specifying New Template Settings: Styles .......................................................................... 266
Specifying New Template Settings: Blocks ......................................................................... 273
Specifying New Template Settings: Sections ...................................................................... 276
Export and Import an Author Template ................................................................................... 280
Delete an Author Template ...................................................................................................... 283
iii
Table of Contents
Chapter 12: Using Custom Skins and Modifying CSS Files............... 285
Introduction to Custom Skin Management .............................................................................. 286
Creating Skins .......................................................................................................................... 287
Managing Custom Skins .......................................................................................................... 288
Guidance on Modifying Cascading Style Sheets ..................................................................... 290
Chapter 13: Setting Up Online Help ..................................................... 293
Introduction to Online Help ..................................................................................................... 294
Configuring Oracle E-Business for Use with Context-Sensitive Help .................................... 302
Configuring SAP Portal for Use with Context-Sensitive Help ................................................ 306
Configuring SAP SRM 4-6 for Use with Context-Sensitive Help ........................................... 311
Configuring SAP CRM Web Client for Use with Context-Sensitive Help ............................. 315
Context-Sensitive Help for Siebel 8 ......................................................................................... 318
Configuring PeopleSoft 9 for Use with Context-Sensitive Help ............................................. 321
Configuring ANCILE Help Launchpad to Deliver Context-Sensitive Help............................ 322
Configuring Generic Web Pages for Use with Context-Sensitive Help .................................. 323
Providing Help to End Users .................................................................................................... 325
Appendix A: Incorporating Info Pak Content ...................................... 329
Introduction to Incorporating Info Pak Content ....................................................................... 330
Using Dual-Mode Functionality vs. Transformation Functionality ..................................... 331
Installing and Uninstalling the Migration Wizard.................................................................... 333
Preparing to Execute the Migration ......................................................................................... 334
Migration Prerequisites and Recommendations ................................................................... 334
Activities During Web Architect Processing ....................................................................... 335
Activities During Glossary Processing ................................................................................ 335
Activities During Document Check-In Processing .............................................................. 336
Activities During Template Processing................................................................................ 337
Activities During Document Transformation Processing .................................................... 337
Executing a Migration Run ...................................................................................................... 339
Reviewing the Migration Results ............................................................................................. 352
Using the Info Pak Properties Specified in the uPerform Project ........................................ 353
Executing the Transformation .................................................................................................. 355
Reviewing and Editing Transformed Documents and Simulations ......................................... 360
Reviewing and Editing Transformations.............................................................................. 360
Editing Transformed Info Pak Documents........................................................................... 361
Glossary of Terms................................................................................. 363
Index ...................................................................................................... 367
iv
Chapter 1: Introduction
ANCILE uPerform provides authors and administrators with a robust
content development, delivery, and management environment. From
recording and editing functionality through secure check in, check out,
workflow, and website deployment, ANCILE uPerform expedites your
development and delivery of training materials.
1
Chapter 1: Introduction
What is ANCILE uPerform?
The ANCILE uPerform application is a content development and delivery tool designed to enable
authors and administrators to create, manage, and distribute documents, simulations, and
eLearning courses. Specifically, ANCILE uPerform allows authors and content administrators to:
Create, edit, and manage content
Collaborate within the authoring team to review content and share information
Incorporate content in an electronic performance support system (EPSS) website and
online help
Solicit and receive feedback from users
Deliver content personalization features such as subscriptions and favorites to authors
and users
To manage content, authors and administrators can leverage check in/checkout, versioning,
workflow, and collaboration functionality. Users can access content via a standard web browser or
mobile device, provide feedback to authors, and collaborate with other users to share knowledge.
The ANCILE uPerform application consists of two parts:
Editor: used to record, create, and edit content.
Server: used to configure and manage the document library, website, glossary, and
workflow functionality.
2
ANCILE Solutions, Inc.
Chapter 1: Introduction
About This Manual
This manual provides details regarding the administration of content. Information about the
authoring of content is provided in the companion manual Creating Content with ANCILE
uPerform. Information about the technical administration of uPerform, including server
installation and configuration, is provided in the companion manual ANCILE uPerform
Administration.
Who Should Read This Manual
This manual includes overview information and step-by-step procedures for administrators who
manage documentation and training materials delivery to users. Administrators have the following
rights and responsibilities:
Participate in an approval workflow for content.
Receive and evaluate feedback from other authors and users.
Create the document library and website hierarchies.
Create and manage user accounts.
Establish project-wide settings such as workflow and template usage.
Manage editing rights: a system administrator has editing rights over the entire
uPerform installation; a project administrator has editing rights for one or more
projects within the uPerform installation.
In addition, this manual also references the end user who accesses content via online help or a
performance support website, shares content links with other users, and provides feedback to
authors.
Organization Of This Manual
Chapters 2 through Chapter 13 and Appendix A contains information intended for the
administrator or project administrator. This manual also contains a glossary with terms and
definitions relevant to the concepts discussed within this manual.
ANCILE Solutions, Inc.
3
Chapter 1: Introduction
Conventions Used In This Manual
The following conventions are used in this manual:
Style
Description
Bold
Indicates a field name, button name, or an option.
Example:
Click General on the left pane.
Italic
Indicates a screen or window title.
Example:
The Step Properties window is displayed.
SMALL CAPS AND
GREATER THAN SYMBOL
Indicates a menu path.
Example:
(>)
Select START > PROGRAMS > ANCILE UPERFORM.
Indicates an important concept or a caution.
Indicates a helpful hint or amplifying information.
4
ANCILE Solutions, Inc.
Chapter 1: Introduction
Available Technical Support
In addition to the online help delivered with uPerform, ANCILE offers several additional support
mechanisms:
The ANCILE Product Support Center is available at https://ancile.parature.com.
Optional instructor-led training. For additional information about our training
services, contact your sales representative.
ANCILE Solutions, Inc.
5
Chapter 2: Getting Started
The ANCILE uPerform server workspace provides access to several
functions, including project and user account creation, workflow setup,
glossary and publishing maintenance, reporting, website setup,
configuration, and customization.
7
Chapter 2: Getting Started
Introduction to Managing Content
The uPerform server interface is available via the Internet Explorer or Mozilla Firefox web
browsers. The procedures in this manual will assume you are using Internet Explorer.
The following functionality is available via the server workspace:
Create favorites, subscriptions, and 'tell others' notices
Participate in discussions
Create and maintain user accounts
Manage role and group assignments
Create and maintain projects, document libraries, and websites
Create and maintain the glossary
Create and maintain publishing settings
Create workflow routings
Generate reports
Refer to the ANCILE uPerform Administration manual for instructions on installing and
configuring the server and customizing the end user website.
8
ANCILE Solutions, Inc.
Chapter 2: Getting Started
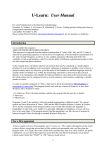
The following diagram illustrates the major functions of the uPerform server and how the server
supports the activities of the author, end user, and administrator.
ANCILE Solutions, Inc.
9
Chapter 2: Getting Started
Accessing the Server Workspace
The system administrator typically provides authors and project administrators with an account
and access rights to the server.
For detailed instructions on creating users, refer to Managing Users, Roles, and Groups (on page
29).
Logging Into the Server
1. Enter your uPerform server URL in your web browser Address field to display the Welcome
window.
If you are using Windows Authentication Single Sign-On (SSO), you must enable
uPerform as a trusted site in your web browser via the browser security options menu
in order to display the uPerform website.
2. Perform one of the following options:
If You Want To
Then
Explore the server workspace Refer to Exploring the Server Workspace (on page 17).
via a single sign-on (SSO)
connection
Log into the server
Go to Step 3.
3. Click Log In to the right of Welcome, Anonymous.
4. Enter your user name and password.
5. Click OK.
6. Perform one of the following actions:
If You Want To
Then
Log into the server for the
first time.
Go to Step 7.
Explore the server workspace. Refer to Exploring the Server Workspace (on page 17).
10
ANCILE Solutions, Inc.
Chapter 2: Getting Started
7. Complete the following fields:
Field
Description
Time Zone
Select your time zone from the Time Zone drop-down list to ensure the
correct date and time display on objects within the server.
Language
Select a language from the Language drop-down list to ensure the
desired interface language displays when you are working in the server.
8. Click Save.
Retrieving Your Password
If you click Cancel on the login screen, the Help Desk window is displayed. Password retrieval
does not apply if SSO is enabled.
1. Click Reset Password on the left menu of the server workspace.
2. Enter your username.
3. Click OK.
4. Click OK on the confirmation page.
Your password will be emailed to you.
Requesting a New User Account
1. Click Log In to the right of Welcome, Anonymous.
2. Click Cancel on the Login screen.
3. Click Request User Account on the left menu of the server workspace.
4. Complete the following fields:
Field
Description
First Name
Enter your first name.
Last Name
Enter your last name.
Password
Choose a password.
Password confirmation
Confirm the password.
Language
Select a language from the drop-down list.
ANCILE Solutions, Inc.
11
Chapter 2: Getting Started
Field
Description
E-Mail Address
Enter your email address. This is where you will
receive all notifications from the ANCILE uPerform
server.
The administrator receives this notification in the Help Desk screen available from the
server workspace and can act on the request to create a new account.
12
ANCILE Solutions, Inc.
Chapter 2: Getting Started
Managing Your Account
Your account includes information such as your name, password, time zone, language, and email
address.
Editing Your Account Information
1. Click My Account on the left menu of the server workspace.
2. Click Edit Properties on the left menu.
3. Edit the following fields:
If your uPerform user accounts are synchronized, you cannot change the first name,
last name, password, or email.
Field
Description
First Name
Edit the text of the first name.
Last Name
Edit the text of the last name.
Password
Enter a new password.
You should choose a password that is a combination of alphabetic and
numeric characters and one that is not a word found in a standard
dictionary. Your password cannot be blank, and it cannot contain
double-byte characters.
Password Confirmation
Re-enter the new password to confirm your entry.
Timezone
Select your time zone from the drop-down list.
Language
Select your interface language from the drop-down list.
For an end user account, this will also set the user's language for use in
content filtering of website documents based on language.
Email Address
Edit your email address.
ANCILE Solutions, Inc.
13
Chapter 2: Getting Started
4. Click Save.
If you changed your password, you will be prompted to sign into the uPerform server
using your new password.
14
ANCILE Solutions, Inc.
Chapter 2: Getting Started
Getting Help on the uPerform Server Workspace
The uPerform server About link provides detailed information regarding the server version. The
uPerform server Help link provides access to online help and the ANCILE Product Support
Center.
Viewing uPerform Server Product Information
1. Click About on the left menu of the server workspace.
2. Review the following information:
Option
Description
Server Version
Displays the installed version of the uPerform server.
Copyright
Displays uPerform copyright information.
Third Party Information
Displays copyright information for third-party products included in
ANCILE uPerform.
Accessing Help for the Server
1. Click Help on the left menu of the server workspace.
2. Select a help document hyperlink to display help.
Accessing the Product Support Center
1. Click Help on the left menu of the server workspace.
2. Click ANCILE uPerform Support to access the ANCILE Product Support Center.
ANCILE Solutions, Inc.
15
Chapter 2: Getting Started
Exiting
You do not need to logout of the uPerform server. However, if you have multiple uPerform web
browser windows open, closing a single browser window only ends the session for that window.
You must close all open instances of your supported web browser in order to log out of the
uPerform server.
16
ANCILE Solutions, Inc.
Chapter 3: Exploring the Server
Workspace
The ANCILE uPerform server workspace is available to both authors
and administrators via a supported web browser.
17
Chapter 3: Exploring the Server Workspace
Introduction to the uPerform Server Workspace
The server workspace allows authors to:
Manage personal account information
Create favorites and subscribe to content
Review and approve a list of content within a workflow
Create and participate in workflow
Participate in collaboration discussions
Assign content to website contexts
In addition, the following specific administrator functionality is provided:
Create and update projects, document libraries, and websites
Import a document library structure
Create and manage users, roles, and groups
Configure glossary and publishing settings
Create and manage workflows
Configure settings for a Learning Management System (LMS) to be used in
conjunction with eLearning courses
Generate reports
Administrators can also customize the end user website. For more information, refer to the
companion manual ANCILE uPerform Administration.
The server workspace is accessed via a standard web browser. Your home page within the
workspace is called your personal page.
18
ANCILE Solutions, Inc.
Chapter 3: Exploring the Server Workspace
Using the Server Workspace
Your uPerform personal page is divided into three main areas:
The top banner: Contains search functionality.
The left menu: Contains navigation buttons and options pertinent to your current
location and system access in uPerform.
Your personalized content area: Displays your favorites list, projects to which you are
assigned, any workflow items requiring your attention, and a list of alerts received as
a result of subscribing to content.
Using the Top Banner
The top banner provides access to search functionality to allow you to execute a quick search
using one or more words or a document type. Advanced searches can be performed within a
project. Search results include a hyperlink to the found object(s). The uPerform search engine
incorporates stemming to maximize search results. In other words, when you search for the word
"relate," the search will also find documents, emails, discussion topics, and folders with the word
"related."
In addition, skip links are available when a screen reader is being used in conjunction with
uPerform or when you are using keyboard navigation. Skip links allow you to skip to the main
content on the page or to the left menu.
ANCILE Solutions, Inc.
19
Chapter 3: Exploring the Server Workspace
Executing a Search
The following is a partial list of the file formats indexed by uPerform:
Microsoft Office formats
Adobe Acrobat .pdf format
HTML formats, including .htm and .html
XML formats, including .xml, .xsd, and .xsl
ASCII .txt format
Exact match searches must be enclosed in quotation marks. For example: "Entering a timesheet".
In addition, you can search for content containing Boolean operators, such as AND, OR, and
NOT. In Boolean searches, phrases with spaces must be contained in parentheses ( ). For Example
(transaction code) AND (last modified).
An exact match search (search text enclosed in quotations marks) and a Boolean search
(search text with boolean keywords AND, NOT, OR) cannot be executed at the same
time. A single search can only be an exact match or a Boolean search.
1. Perform one of the following options:
If You Want To
Then
Perform a basic search
In the top banner, enter a word or words in the
Search textbox.
Click Go to display the Search Results window.
Go to Step 4.
Perform an advanced search
In the top banner, click Advanced Search.
Go to Step 2.
2. Complete the following fields:
20
Field
Description
Terms
Enter a word(s), wildcard, and/or Boolean
operator.
Type
Select the content on which you would like to
perform a search. For example: uPerform
document.
Location
Select the project on which you would like to
perform the search.
ANCILE Solutions, Inc.
Chapter 3: Exploring the Server Workspace
3. Click Search.
4. Review the list of search results and, as desired, click on a result hyperlink to display the
content page.
Using Skip Links
Skip links are available when a screen reader is being used in conjunction with
uPerform or when you are using keyboard navigation.
If you are using a screen reader, skip links are the first objects a screen reader will
recognize. If you are using keyboard navigation, the links will display when you press
the tab key and bring focus to the links.
1. Perform one of the following options:
If you want to
Then
Skip to the main content.
Select Skip to main content when the screen
reader announces it or when the link is focused
after tabbing.
Skip to the left menu
Select Skip to navigation when the screen
reader announces it or when the link is focused
after tabbing.
Using the Left Menu
The left menu area contains both server navigation buttons and a list of options relevant to your
location, task, and system access.
Using the Navigation Buttons
The following buttons are available throughout the server workspace. Your specific location in the
website will affect whether a particular button is active.
Button
Description
Click this button to go to the top level of uPerform.
The top level displays a list of all uPerform projects to which you have
access.
Click this button to move up one level from your current location.
The use of the browser Back button is not recommended.
Click this button to go to your personal page.
ANCILE Solutions, Inc.
21
Chapter 3: Exploring the Server Workspace
Using the Left Menu Options
The options available on the left menu will vary based upon your location in the system and your
system access. The menu is divided into three sections: actions, areas, and inform. The left menu
can be collapsed to increase screen real estate.
The following options are available within the three sections on the left menu:
22
Option
Description
Action entries
Available actions will vary based on your current area and system
access.
Examples of action entries include: Assign Website Context and Start
Workflow.
My Account
Select this option to view or edit your account details (including your
password) and subscriptions.
For more information, refer to Editing Your Account Information (on
page 13).
ANCILE Solutions, Inc.
Chapter 3: Exploring the Server Workspace
Option
Description
Administration
Select this option to maintain system configuration settings, configure
publishing and glossary settings, customize the website, and maintain
users, roles, and groups.
For more information on system configuration settings and website
maintenance, refer to the ANCILE uPerform Administration manual.
For more information on server publishing, refer to Publishing Content
from the Server (on page 129).
For more information on users and groups, refer to Managing Users,
Roles, and Groups (on page 29).
Glossary
Select this option to view the glossary.
For more information, refer to Working with the Glossary (on page
165).
Workflow
Select this option to display links for creating and managing workflows.
For more information, refer to Using Workflow (on page 143).
Recycle Bin
Select this option to manage the recycle bin of deleted content. There is
one Recycle Bin per project.
For more information, refer to Managing the Recycle Bin (on page 108).
Reports
Select this option to generate document tracking, workflow, workflow
status, and custom reports.
For more information, refer to Using Reports (on page 197).
Help
Select this option to view or configure help documents available for
uPerform.
For more information, refer to Accessing Help for the Server (on page
15).
About
Select this option to view version details and third-party information on
the uPerform server.
For more information, refer to Viewing uPerform Server Product
Information (on page 15).
Add to My Favorites
Select this option to add the current content, folder, or discussion to
your list of favorites. Your favorites are displayed in the My Favorites
list on your personal page.
For more information, refer to Using the My Favorites List (on page
25).
Subscribe/Unsubscribe
Select this option to receive or stop alerts regarding changes to the
current content, folder, or discussion. Your alerts are displayed in the
My Alerts list on your personal page.
For more information, refer to Using the My Favorites List (on page
25).
Edit Subscription
Select this option to specify preferences for receiving subscription
notifications.
Tell Others
Select this option to send specified users a link to the current content,
folder, or discussion.
For more information, refer to Using the Tell Others Feature (on page
163).
ANCILE Solutions, Inc.
23
Chapter 3: Exploring the Server Workspace
Option
Description
Add Me to
Select the option to participate in author or website discussions.
Discussion/Remove Me from For more information, refer to Subscribing to a Discussion (see
Discussion
"Subscribing to a Folder or Discussion" on page 160).
Expanding and Collapsing the Left Menu
The display of the left menu can be collapsed to increase available screen real estate. The setting
for the left menu is linked to the user's account. Consequently, the browser will remember your
selected menu setting between browser sessions.
To collapse or expand the left menu, click the arrow icon below the website navigation buttons.
When an end user displays context-sensitive help, the left menu is always collapsed.
Using Your Personal Page
Your personal page contains your personalized information.
The following lists are available on every author and administrator personal page:
My Projects: Displays links to all projects to which you have access. From this list,
the website view of the project is also available.
My Review List: Displays content currently in a workflow assigned to you. The five
most recent links, based on the modification date, are displayed. To display all links,
click More....
24
ANCILE Solutions, Inc.
Chapter 3: Exploring the Server Workspace
My Favorites: Displays links to content, discussions, or folders that you have added
to your list of favorites. The five most recent links, based on the modification date,
are displayed. To display all links, click More....
My Alerts: Displays notifications about changes to content to which you have
subscribed. You can remove all or selected notifications from your personal page. To
display all links, click More....
Using the My Projects List
Your My Projects list displays those projects to which you have been granted access by the
administrator. Typically, these are the projects to which you are contributing or reviewing content.
From the My Projects list, you can access both the document library and the end user views of
the projects to which you have author rights.
1. Select one of the following options to view details about a project:
If You Want To
Then
Display the document library
view of a project
Click on the name of the project in the My Projects list.
For detailed information on document libraries, refer to Working With
the Document Library (on page 63).
Display the end user view of
a project
Click
to the right of the project in the My Projects list. Optionally,
click the View as End User link in the left pane on any project, folder,
or document cover page.
For detailed information on websites, refer to Working With the
Website (on page 111).
2. For detailed information on creating projects, see Populating the Document Library (on page
76).
Using the My Review List
Your My Review List displays content currently in a workflow assigned to you. To view a
workflow item in your review list:
1. Click on the document name in the My Review List to go to the document page.
2. Click I Approve or I do not Approve in the Workflow portion of the window.
ANCILE Solutions, Inc.
25
Chapter 3: Exploring the Server Workspace
Using the My Favorites List
Your My Favorites list displays content you have bookmarked. To create a favorite to display in
the list:
1. Navigate to the content item, discussion, or folder that you want to bookmark.
2. Click Add to My Favorites on the left menu to add the favorite to the list on your personal
page.
Using the My Alerts List
Your My Alerts list displays links to content to which you have subscribed. If you want to receive
notifications about changes to content or folders in uPerform, you can subscribe to the object.
Changes made to the content will initiate a message being sent to the subscriber.
You can select how you are notified of changes: via email or via a link on your personal page.
The document author is automatically subscribed to documents (and the related discussions) the
author adds to the server. This notification is sent via email and a link on your personal page.
Subscribing to Content
1. Navigate to the content item, discussion, or folder to which you want to subscribe.
2. Click Subscribe on the left menu.
26
ANCILE Solutions, Inc.
Chapter 3: Exploring the Server Workspace
3. Select one or more of the following options:
Option
Description
Post notifications to my
Personal Page.
Select this option to receive your subscription notification in the My
Alerts section of your uPerform personal page.
Send notifications in an email Select this option to receive your subscription notification via email
report to [your email
message.
address].
Specify one of the following email notification types: daily, weekly, or
immediately after an event.
If you specify an immediate email notification, you can elect to use the
default subject in the email subject line, add a prefix to the default
subject, or replace the default subject with custom text.
4. Click OK.
When the content is changed in the future, you will receive a notification on your
personal page and/or an email message. Subscription email messages contain a link to
the changed content.
Subscriptions to content within dynamic website folders will notify you when the
folder is renamed, subfolders are added or removed, or the search filter is changed;
however, due to the filters applied to this type of folder, you will not be notified when
documents are added, updated, or removed from the folder. End users are unable to
subscribe to dynamic website folders.
For more information on dynamic website folders, refer to Building the Website via
Dynamic Website Folders (on page 119).
Editing and Stopping a Subscription
1. Click
to go to your personal page.
2. Click My Account on the left menu.
3. Click My Subscriptions on the left menu to display a list of your subscriptions.
4. Select one of the following options:
If You Want To
Then
Unsubscribe to a listed item
Click Unsubscribe below the item name.
Click OK in the following confirmation window.
Edit your subscription to a
listed item
Click Edit Subscription below the item name.
Change your notification option(s), and click OK.
ANCILE Solutions, Inc.
27
Chapter 4: Managing Users, Roles, and
Groups
ANCILE uPerform manages access to content on the server via user
accounts and role assignments. User accounts can be created for end
users, authors, and administrators. Users are assigned to one of three
main roles, which provide access to particular projects. Groups are
optional and can be used to filter specific end user access to content on
the website.
User, role, and group management tasks are performed by a system
administrator.
29
Chapter 4: Managing Users, Roles, and Groups
Introduction to Managing Users, Roles, and Groups
Three types of users are available in uPerform: end user, author, and administrator. Within the
administrator designation there is a further subgrouping of administrators:
System administrator: has administrative access to the entire uPerform instance.
Project administrator: has administrative access to one or more projects within the
uPerform instance.
Glossary administrator: has administrative access to glossary functionalities.
Publishing administrator: has administrative access to publishing functionalities.
Roles are used to determine administrator and author access to content within the server, and also
to set up end user access to projects that are published on the website. Groups are an optional
functionality that can be used to restrict content access to a subset of users specified by the
administrator.
The end user population can access uPerform content via one of two account types:
Anonymous: No login to the uPerform website is required. If users access the website
anonymously, they will not have access to personalization options such as
subscriptions and favorites. An anonymous user can request an account. This request
sends a message to the Help Desk folder on the server. The system administrator can
act on this request to create a named account.
Named: The system administrator can create a named user account and assign the
user to specific groups and roles within uPerform.
30
ANCILE Solutions, Inc.
Chapter 4: Managing Users, Roles, and Groups
Manually Creating and Updating User Accounts
User accounts are created and then assigned to one or more project roles to provide access to the
project. Each project within uPerform has three roles associated with the project: administrator,
author, and user. These three roles are automatically created for each project upon project
creation. If a user is not part of one of these roles for a project, he will not see the project and its
contents when logged into uPerform unless an administrator has enabled anonymous access for
that project.
Only system administrators can create user accounts. Each user account must have a unique
identifier and a unique email address. You can create user accounts in two ways: manually or by
synchronizing via a directory server or file source. For more information on synchronization, refer
to Creating and Managing Users Via User Information Source (on page 37).
Adding a User
1. Click Administration on the left menu.
2. Click Users, Roles, and Groups in the Administration area.
3. Click Users in the Users, Roles, and Groups area.
4. Click Add New User on the left menu.
5. Complete the following required fields:
Field
Description
User ID
Enter the user's account identification.
Ligatures are not supported. For example: æ
First Name
Enter the user's first name.
Ligatures are not supported. For example: æ
Last Name
Enter the user's last name.
Ligatures are not supported. For example: æ
ANCILE Solutions, Inc.
31
Chapter 4: Managing Users, Roles, and Groups
Field
Description
Password
Enter the user's password.
The password cannot be blank. Only US ASCII characters 32-126 are
allowed. Double-byte characters are not supported.
Password Confirmation
Re-enter the new password to confirm your entry.
Time Zone
Select the user's time zone from the drop-down list.
Language
Select the desired interface language from the drop-down list.
For an end user account, this will also set the user's language for use in
content filtering of website documents based on language.
Email Address
Enter the user's email address.
6. Click Save.
When the user account is created, the user is automatically assigned to the All Users
group within uPerform.
A manually-created user will receive an email from the administrator. This email
contains the user's ID and password. The user can log into the server to change the first
and last name, the password, update the email address, and specify the local time zone
and preferred locale. To customize the email notification, refer to “Working with
Phrases” in the companion manual ANCILE uPerform Administration.
Assigning a User to a Project Role
The minimal uPerform role you should assign to a user interacting with the server from
the client is Author. This ensures the user will have access to server functionality
associated with creating content.
1. Click Projects on the upper left.
2. Select the project to which the user will be added.
32
ANCILE Solutions, Inc.
Chapter 4: Managing Users, Roles, and Groups
3. Click Edit Properties on the left menu.
4. Click Edit below the role to which the user will be assigned.
5. Perform one of the following options:
If You Want To
Then
Assign project roles manually Click uPerform Users.
Click All Users.
Perform a search or click on the first letter of the last name of the
desired user, select the user name, and click Add Selected.
Assign a group of users to the Click uPerform Groups.
end user role
Click the checkbox next to the group(s) you want to assign to the project
role.
6. Click OK.
7. Click Save.
Finding a User
1. Click Administration on the left menu.
2. Click Users, Roles, and Groups in the Administration area.
3. Click Users in the Users, Roles, and Groups area.
ANCILE Solutions, Inc.
33
Chapter 4: Managing Users, Roles, and Groups
4. Enter any part of the user's name into the search field, or click All Users to search all users in
the uPerform server.
If you imported users via a user information source, you can search for any attribute
that has been mapped into uPerform. For more information, refer to Adding a User
Information Source from a Directory Server (on page 38).
5. Click Find.
Updating a User Account
Users synchronized via a file source can change passwords. Users synchronized via a
directory server cannot change passwords. For more information, refer to Creating and
Managing Users Via User Information Source (on page 37).
1. Click Administration on the left menu.
2. Click Users, Roles, and Groups in the Administration area.
3. Click Users in the Users, Roles, and Groups area.
4. Enter any part of the user's name into the search field.
5. Click Find.
6. Select the user from the list.
7. Choose from the following options:
If You Want To
Then
Edit user information
Click Edit User in the left menu of the server
workspace.
Edit the user account information.
Edit the user ID
Edit User ID in the left menu of the server
workspace.
Edit the user ID.
This option is available only for manually
created users.
8. Click Save.
34
ANCILE Solutions, Inc.
Chapter 4: Managing Users, Roles, and Groups
Deleting a User Account
When you delete a user, the following actions occur:
The user status is changed to 'inactive', and the user is no longer available from the
address book.
The user is removed from all discussions, roles, and groups, and the user's
subscriptions and notifications are deleted.
1. Click Administration on the left menu.
2. Click Users, Roles, and Groups in the Administration area.
3. Click Users in the Users, Roles, and Groups area.
4. Enter any part of the user's name into the search field.
5. Click Find.
6. Select the user from the list.
7. Click Delete on the left menu of the server workspace.
8. At the prompt, click OK.
Recovering a User Account
1. Click Administration on the left menu.
2. Click Users, Roles, and Groups in the Administration area.
3. Click Users in the Users, Roles and Groups area.
4. Click Deleted Users on the left menu.
5. Select the name of the deleted user.
6. Click Recover User on the left menu.
Recovered users are not added back into roles nor are they resubscribed to discussions
or notifications.
ANCILE Solutions, Inc.
35
Chapter 4: Managing Users, Roles, and Groups
Responding to a Request for a User Account
An anonymous user can request an account. This request sends a message to the Help Desk on the
server. The administrator can act on this request to create an account. To expedite the processing
of these account requests, the administrator should subscribe to the Help Desk folder.
1. Click Administration on the left menu.
2. Click Users, Roles, and Groups in the Administration area.
3. Click Help Desk in the Users, Roles, and Groups area.
4. Click Create Account below the name of the requestor to go to the Create User window.
For detailed instructions on creating a user account, refer to Adding a User (on page 31).
Unlocking a User Account
A user can be locked out of an account when an invalid number of logon attempts
occur. Users can still access the uPerform client in disconnected mode, but will only
have anonymous access to the server until the account has been unlocked.
1. Click Administration on the left menu.
2. Click Users, Roles, and Groups.
3. Click Help Desk.
4. Click Unlock Account under Request Unlock Account for the user.
36
ANCILE Solutions, Inc.
Chapter 4: Managing Users, Roles, and Groups
Creating and Managing Users Via User Information Source
User information sources allow you to import and synchronize users from an external data source.
This is useful if you have a globally diverse directory management system and want to import and
synchronize your users with uPerform.
User information source functionality allows you to:
Import and synchronize user accounts in bulk via an XML-formatted file.
Import and sync user accounts from one or more directory servers.
Access your user account identification policies such as special characters, spaces,
and domains.
Sync a specific segment of a user base in a directory or file source via a filter, and
assign users to groups within uPerform.
Four steps are required for synchronizing users:
Create the user information source, which is a connection to a user store. The user
source can be an LDAP-compliant directory server, such as Microsoft Active
Directory or a well-formed XML file. Multiple user information sources can be
created to allow you to import users into uPerform from different locations. Refer to
the ANCILE uPerform Technical Specifications for a complete list of the supported
directory servers.
Create the filter, which allows you to retrieve a specific set of users from the user
information source and assign the users to a content group. Filters for a directory
server are LDAP queries; filters for XML user sources are XPath queries. Multiple
filters can be created for each user information source.
Assign the filter to a group, which allows you to assign access to content within
uPerform. If a filter is not assigned to a group, new users will not be imported to
uPerform and any existing users will be deactivated in uPerform if they are not
included within any other filters. If you are not utilizing group-based filtering, the
filter must be assigned to the All Users group.
Run the synchronization from the user information source, filter, or groups page.
Alternatively, the synchronization can be scheduled to run automatically. For more
information on scheduling tasks, refer to "Scheduling Automated Tasks" in the
companion manual ANCILE uPerform Administration.
ANCILE Solutions, Inc.
37
Chapter 4: Managing Users, Roles, and Groups
Working with User Information Sources
Adding a User Information Source from a Directory Server
1. Click Administration on the left menu.
2. Click Users, Roles, and Groups in the Administration area.
3. Click User Information Sources in the Users, Roles, and Groups area.
4. Click Add User Source on the left menu.
5. Enter a name for the source in the Name field.
6. Enter a description of the source in the Description field.
7. Select Directory Server from the source drop-down list.
8. Click Next.
9. Complete the following required fields:
Field
Description
Location
Enter the URL for the directory server. For
example: LDAP://acmeDS.com:389
Page Size
Enter the number of records to retrieve at one
time. If your director server supports page size
limits, ensure your page size is within that range.
If the directory server does not use paging, enter
-1.
Page size should not be set if the
directory server does not provide an
estimated number of results.
38
ANCILE Solutions, Inc.
Chapter 4: Managing Users, Roles, and Groups
Field
Description
Security Connection
Select the Simple or Anonymous radio button.
If you choose simple, enter the user name and
password of the user to use to connect to the
directory server.
Field Mapping
User ID: Enter the property name from the
directory server.
Unique Identifier: Enter the property name
from the directory server.
Email Address: Enter the property name from
the directory server.
First Name: Enter the property name from the
directory server.
Last Name: Enter the property name from the
directory server.
Enable Automatic Synchronization
This option allows you to automatically
synchronize filters created for this user source.
This will allow you to quickly synchronize from
a specific user source when a new file is
uploaded, file is updated on the web, changes are
made to the directory server, or changes are
made to the field mapping.
It is recommended that you leave this option
disabled until you are ready to synchronize user
accounts.
For more information on automatic
synchronization, refer to "Schedule Automated
Tasks" in the companion manual ANCILE
uPerform Administration.
Send Account Created Notifications
This option enables the uPerform server to send
an email to a user the first time the account is
synchronized.
ANCILE recommends enabling this
option when using XML files as the
user source to ensure you receive
password information sent via email.
10. Click OK.
Adding a User Information Source from a File Source
1. Click Administration on the left menu.
2. Click Users, Roles, and Groups in the Administration area.
3. Click User Information Source in the Users, Roles, and Groups area.
ANCILE Solutions, Inc.
39
Chapter 4: Managing Users, Roles, and Groups
4. Click Add User Source on the left menu.
5. Enter a name for the source in the Name field.
6. Enter a description of the source in the Description field.
7. Select File from the source drop-down list.
8. Click Next.
9. Perform one of the following:
40
Field
Description
Upload a file
Select the Upload File Path radio button, and
select Browse ... to navigate to the file location.
Go to Step 10.
Connect to a file over HTTP
Select Connect to a File and complete the
following fields:
Path: Enter the static path for the file to which
you want to connect.
User ID: Enter the User ID that has access to the
file.
Password: Enter the password for the user.
Password Confirmation: Confirm the
password.
Field Mapping
User ID: Enter the XPath string from the user
element in the file to the user ID.
Unique Identifier: Enter the XPath string from
the user element in the file to the unique
identifier. This allows uPerform to update the
user if it is changed in the directory server or file
source.
Email Address: Enter the XPath string from the
user element in the file to the email address.
ANCILE Solutions, Inc.
Chapter 4: Managing Users, Roles, and Groups
Field
Description
First Name: Enter the XPath string from the user
element in the file to the user's first name.
Last Name: Enter the XPath string from the user
element in the file to the user's last name.
Enable Automatic Synchronization
This option allows you to automatically
synchronize filters created for this user source.
This will allow you to quickly synchronize from
a specific user source when a new file is
uploaded, file is updated on the web, changes are
made to the directory server, or changes are
made to the field mapping.
It is recommended that you leave this option
disabled until you are ready to synchronize user
accounts.
For more information on automatic
synchronization, refer to "Schedule Automated
Tasks" in the companion manual ANCILE
uPerform Administration.
Send Account Created Notifications
This option enables the uPerform server to send
an email to a user based on their event
notification settings.
10. Click OK.
Editing User Information Source Properties
A user source cannot be edited if a filter assigned to it is synchronizing.
1. Click Administration on the left menu.
2. Click Users, Roles, and Groups in the Administration area.
3. Click User Information Sources in the Users, Roles, and Groups area.
4. Click on the [User Source] hyperlink.
5. Select Edit Properties from the left menu.
6. Choose from the following options:
If You Want To
Then
Edit a user information source from a
Directory server
Go to Step 7.
Edit a user information source from a
file
Go to Step 9.
ANCILE Solutions, Inc.
41
Chapter 4: Managing Users, Roles, and Groups
7. Complete the following fields:
Field
Description
Location
Enter the URL for the directory server.
Page Size
Enter the number of records to retrieve at one
time. If your director server supports page size
limits, ensure your page size is within that range.
If the directory server does not use paging, enter
-1.
Page size should not be set if the
directory server does not provide an
estimated number of results.
Security Connection
42
Select the Simple or Anonymous radio button.
If you choose simple, enter the user name and
password of the user to use to connect to the
directory server.
ANCILE Solutions, Inc.
Chapter 4: Managing Users, Roles, and Groups
8. Go to Step 10.
9. Choose from the following options:
If You Want To
Then
Upload a file
Select Upload File Path, and select Browse ... to
navigate to the file location.
Connect to a file over HTTP
Select Connect to a File, and complete the
following fields:
Path: Enter the static path for the file to which
you want to connect.
User ID: Enter the User ID that has access to the
file.
Password: Enter the password for the user.
Password Confirmation: Confirm the password
10. Complete the following fields:
Field
Description
Field Mapping
User ID: For a directory server, enter the
property name from the directory server. For a
file source, enter the XPath string from the user
element in the file to the user ID.
Unique Identifier: For a directory server, enter
the property name from the directory server. For
a file source, enter the XPath string from the user
element in the file to the unique identifier. This
allows uPerform to update the user if it is
changed in the directory server or file source.
Email Address: For a directory server, enter the
property name from the directory server. For a
file source, enter the XPath string from the user
element in the file to the email address.
ANCILE Solutions, Inc.
43
Chapter 4: Managing Users, Roles, and Groups
Field
Description
First Name: For a directory server, enter the
property name from the directory server. For a
file source, enter the XPath string from the user
element in the file to the user's first name.
Last Name: For a directory server, enter the
property name from the directory server. For a
file source, enter the XPath string from the user
element in the file to the user's last name.
Enable Automatic Synchronization
This option allows you to automatically
synchronize filters created for this user source.
This will allow you to quickly synchronize from
a specific user source when a new file is
uploaded, file is updated on the web, changes are
made to the directory server, or changes are
made to the field mapping.
It is recommended that you leave this option
disabled until you are ready to synchronize user
accounts.
For more information on automatic
synchronization, refer to "Schedule Automated
Tasks" in the companion manual ANCILE
uPerform Administration.
Send Account Created Notifications
This option enables the uPerform server to send
an email to a user based on their event
notification settings.
11. Click OK.
Deleting a User Information Source
A user source cannot be deleted if a filter assigned to it is synchronizing.
1. Click Administration on the left menu.
2. Click Users, Roles, and Groups in the Administration area.
3. Click User Information Sources in the Users, Roles, and Groups area.
4. Click on the [User Source] hyperlink.
5. Select Delete User Source on the left menu.
6. Click OK.
Clicking OK will delete the user source, its filter(s) and any users belonging to the
filter(s), unless the users belong to another filter.
44
ANCILE Solutions, Inc.
Chapter 4: Managing Users, Roles, and Groups
Working With User Information Source Filters
Filters are used to synchronize a specific segment of a user base in a directory server or file source
to groups within uPerform.
Adding a User Information Source Filter
1. Click Administration on the left menu.
2. Click Users, Roles, and Groups in the Administration area.
3. Click User Information Sources in the Users, Roles, and Groups area.
4. Select the [User Source] hyperlink.
5. Select Add Filter on the left menu
6. Complete the following fields:
Field
Description
Name
Enter a name for the filter.
Description
Enter a description for the filter.
Directory Server Base DN
Enter the Directory Server Base DN.
Example: OU=uPerform, DC=acme, DC=com
This option is not available if your
user information source is created
from a file.
Filter String
ANCILE Solutions, Inc.
For a directory server, enter an LDAP query.
Example:
(&(objectClass=user)(memberOf=CN=HumanR
esourses,OU=Groups,,OU=uPerform,DC=acme,
DC=com))
For a file user source, enter the XPath query to
the user. Example: /users/user[@group='HR']
45
Chapter 4: Managing Users, Roles, and Groups
7. Click OK.
8. To activate the filter, apply it to a group. For more information, refer to Assigning Content to
a Group (on page 61).
If a filter is not assigned to a group, users in the filter will not be added into uPerform
unless they are a member of another filter.
Editing a User Information Source Filter
A user source filter cannot be edited if it is synchronizing.
1. Click Administration on the left menu.
2. Click Users, Roles, and Groups in the Administration area.
3. Click User Information Sources in the Users, Roles, and Groups area.
4. Select the [User Source] hyperlink.
5. Select the [Filter Name] hyperlink.
6. Select Edit Properties.
7. Complete the following fields:
Field
Description
Name
Edit the name for the filter.
Description
Edit the description for the filter.
Directory Server Base DN
Edit the Directory Server Base DN.
Example: OU=uPerform, DC=acme, DC=com
This option is not available if your
user information source is created
from a file.
Filter String
Edit the filter string.
For a directory server, enter an LDAP
(&(objectClass=user)(memberOf=CN=Human
Resources,OU=Groups,OU=uPerform,DC=ac
me,DC=com))
For a file user source, enter the XPath query to
the user. Example: /users/user[@group='HR']
8. Click OK.
The filter is activated once it is applied to a group. To apply a filter to a group, refer to
Creating a Group.
46
ANCILE Solutions, Inc.
Chapter 4: Managing Users, Roles, and Groups
Deleting a User Information Source Filter
A user source filter cannot be deleted if it is synchronizing.
1. Click Administration on the left menu.
2. Click Users, Roles, and Groups in the Administration area.
3. Click User Information Sources in the Users, Roles, and Groups area.
4. Select the [User Source] hyperlink.
5. Select the [Filter Name] hyperlink.
6. Select Delete Filter on the left menu.
7. Click OK.
Members of the deleted filter will be removed from the groups to which the filter was
assigned. If members are not assigned to another group within uPerform, the accounts
will be deleted.
Synchronizing a User Information Source Filter
Administrators can synchronize accounts at a filter, directory server/file source, or
server level. Synchronizing from the user source page will synchronize all filters
associated to that user source. Synchronizing from the filter page will only synchronize
that filter. Synchronizing from the Groups page will synchronize all user sources and
filters. Before synchronizing, the filter needs to be assigned to a group. For more
information, refer to Creating a Group.
1. Click Administration on the left menu.
2. Click Users, Roles, and Groups in the Administration area.
3. Click User Information Sources in the Users, Roles, and Groups area.
4. Click on the [User Source] hyperlink.
ANCILE Solutions, Inc.
47
Chapter 4: Managing Users, Roles, and Groups
5. Choose from the following options:
If You Want To
Then
Synchronize all filters associated with
the user information source
Go to Step 6.
Synchronize a single filter to
add/update a specific group
Click on the [Filter Name] hyperlink, and go to
Step 6.
6. Select Synchronize on the left menu.
7. Click OK.
Optionally, schedule automatic synchronization using ANCILE uSchedule. For more information,
refer to "Schedule Automated Tasks" in the ANCILE uPerform Administration manual.
Subscribing to Synchronization Summary Notifications
1. Click Administration on the left menu.
2. Click Users, Roles, and Groups in the Administration area.
3. Click User Information Sources in the Users, Roles, and Groups area.
4. Click the [User Source] hyperlink containing the user source you want to view.
5. Choose from the following options:
If You Want To
Then
Subscribe to events for all filters
associated with a user information
source
Go to Step 6.
Subscribe to events for a single filter
Click on the [Filter Name] hyperlink.
Go to Step 6.
6. Click Subscribe on the left pane.
7. Choose from the following options:
48
Field
Description
Synchronization Succeeded
Check Synchronization Succeeded to be notified of
synchronizations that are successful.
Synchronization Failed
Check Synchronization Failed to be notified of
synchronizations that fail.
ANCILE Solutions, Inc.
Chapter 4: Managing Users, Roles, and Groups
Field
Description
Post notifications to my
Personal Page
Check Post notifications to my Personal Page to
be notified of your selected events on your personal
page.
Send notifications in an email Check Send notifications in an email report to
report to current user
[current user] be notified of your selected events
via email.
8. If Send notifications in an email report to [current user] is selected, select one of the
following options:
If You Want To
Then
Receive event notifications in a daily
email report
Select Add notifications to my daily email
report.
Receive event notifications in a weekly Select Add notifications to my weekly email
email report
report.
Receive event notifications
immediately after event
Select Send me an email immediately after
each event.
9. If Send me an email immediately after each event is selected, select one of the following
options:
If You Want To
Then
Use default subject in immediate email
notifications
Select Use default subject in email header.
Add a custom prefix to the subject in
immediate email notifications
Select Add prefix, entered below, to subject in
email header.
Enter a custom subject in immediate
email notifications
Select Replace default subject in email header
with text below.
10. If Add prefix, entered below, to subject in email header or Replace default subject in
email header with text below is selected, enter text.
11. Click OK.
Stopping a User Synchronization
Synchronization can be stopped at the User Information source level, filter level, or
group level. At the User Information source level the synchronization of any filters
assigned to that user information source will be stopped if those filters are processing
or waiting to process. At the filter level, only the synchronization for that filter will be
stopped. At the group level, all processing and waiting synchronizations will be
stopped.
1. Click Administration on the left menu.
2. Click Users, Roles, and Groups in the Administration area.
ANCILE Solutions, Inc.
49
Chapter 4: Managing Users, Roles, and Groups
3. Perform one of the following actions:
If You Want To
Then
Stop synchronization at the User
Information Source level
Click User Information Sources in the Users,
Roles, and Groups area.
Go to Step 4.
Stop synchronization at the Filter level
Click User Information Sources in the Users,
Roles, and Groups area.
Click on a filter.
Go to Step 4.
Stop synchronization at the Group level Click Groups in the Users, Roles, and Groups
area.
Go to Step 4.
4. Click Stop Synchronization in the left pane under Actions.
5. Click OK.
Viewing the Synchronization Log
1. Click Administration on the left menu.
2. Click Users, Roles, and Groups in the Administration area.
3. Click User Information Sources in the Users, Roles, and Groups area.
4. Click the [User Source] hyperlink containing the filter log you want to view.
5. Click View Log next the filter to view the log from the last synchronization.
6. From the Current Filter drop-down list, select one of the following options:
50
Field
Description
View All
Select View All to view all events in the log.
ANCILE Solutions, Inc.
Chapter 4: Managing Users, Roles, and Groups
Field
Description
Information
Select one of the following Information options:
Information: Select Information to view all
added, updated, and removed users.
Added: Select Added to view added users.
Updated: Select Updated to view updated users.
Removed: Select Removed to view removed
users.
Warning
Select Warning to view warnings from the most
recent sync.
Error
Select Error to view errors from the most recent
sync.
ANCILE Solutions, Inc.
51
Chapter 4: Managing Users, Roles, and Groups
Managing uPerform Roles
Roles are intended to identify a team of users with a common project, function, or activity. Role
functionality allows you to restrict access to project functionality to specific users.
When a project is created, the following three roles are automatically created and associated with
the project:
End User: Members of the user role can view published content within the project
website and participate in discussions associated with the content.
Author: Members of the author role can populate content for the project.
Administrator: Members of the administrator role can create document library and
website hierarchies and workflows.
Access is cumulative for the roles. In other words, a member of the administrator role can perform
all the actions of members of the user and author roles. A member of the author role can perform
all actions of the user role.
In addition, there are three instance-wide server roles that are created upon installation of the
uPerform server:
uPerform Glossary Administrators: Members of the glossary administrator role can
enable and disable the use of the central glossary and rich text in definitions, use the
glossary queue and glossary history list, manage glossary terms and definitions, run
imports and exports, and subscribe to glossary events.
uPerform Publishing Administrators: Members of the publishing administrator role
can enable and disable publishing conversion types for managed documents, use the
publish queue and publish history list, and subscribe to publish events.
uPerform System Administrators: Members of the system administrators role are
automatically added to both the glossary and publishing administrators roles.
(However, these members are not automatically removed from these roles if they are
removed from the system administrators role.) Refer to the ANCILE uPerform
Administration manual for details on using the system administrator role.
You cannot create or delete an instance-wide server role. However, you can modify a role to add
or remove users. Only administrators can modify roles.
52
ANCILE Solutions, Inc.
Chapter 4: Managing Users, Roles, and Groups
Assigning a User to the uPerform System, Glossary, or Publishing Administrator
Roles
1. Click Administration on the left menu.
2. Click Users, Roles, and Groups in the Administration area.
3. Click uPerform Roles in the Users, Roles, and Groups area.
4. Perform one of the following actions:
Field
Description
Add a user to the uPerform
System Administrators role
Click on uPerform System Administrators, and go to Step 5.
Add a user to the uPerform
Glossary Administrators role
Click on uPerform Glossary Administrators, and go to Step 5.
Add a user to the uPerform
Publishing Administrators
role
Click on uPerform Publishing Administrators, and go to Step 5.
5. Click uPerform Users.
6. Click All Users.
7. Click on the first letter of the last name of the desired user or use the search functionality.
8. Select the user name.
9. Click Add Selected.
10. Click OK.
11. Click Save.
Modifying a Role
1. Click Administration on the left menu.
2. Click Users, Roles, and Groups in the Administration area.
3. Click uPerform Roles in the Users, Roles, and Groups area.
4. Click on the role you want to modify.
5. Select uPerform Users to display and select the role members.
ANCILE Solutions, Inc.
53
Chapter 4: Managing Users, Roles, and Groups
6. Perform one of the following actions:
If You Want To
Then
Add a new user to the role
Refer to Assigning a User to the uPerform
System, Glossary, or Publishing Administrator
Roles (on page 53).
Delete a user from the role
Click uPerform Users.
Go to Step 7.
7. Select the user from the Selected list.
8. Click Remove.
Optionally, click Remove All to remove all users from the role.
9. Click OK.
10. Click Save.
Finding a Role
1. Click Administration on the left menu.
2. Click Users, Roles, and Groups in the Administration area.
3. Click uPerform Roles in the Users, Roles, and Groups area to display a list of all roles in the
uPerform system.
54
ANCILE Solutions, Inc.
Chapter 4: Managing Users, Roles, and Groups
Creating and Updating Groups
Groups are an optional functionality within uPerform that can be used to restrict content access to
a subset of users specified by the administrator. Group usage is not restricted to content within a
single project or subfolder within a project; you can assign groups to content across multiple
projects or subfolders in uPerform.
A group is created and then content is assigned to the group and made available for use on the end
user website. Users are then assigned to a group so they can access the content. For more
information on the end user website, refer to Working With the Website (on page 111).
The top-level group on the uPerform server is the default group to which every user is
automatically assigned. This group is called ANCILE uPerform Workspace All Users; however,
the name of this group may be different if it was changed during your server customization. If you
have made customizations, look for the name of the top-level content group that displays on the
Content Groups page. In order to restrict content access, you must create sub-level groups beneath
the top-level group. Refer to the procedures in this section for instructions on how to create and
manage groups.
Groups are manually created by the system administrator if group data is not imported
from a directory server.
Creating a Group
1. Click Administration on the left menu.
2. Click Users, Roles and Groups in the Administration area.
3. Click Groups under Users, Roles and Groups.
ANCILE Solutions, Inc.
55
Chapter 4: Managing Users, Roles, and Groups
4. Click on the root group in the tree view.
You can create a subgroup by clicking on any group within the tree view.
5. Click Add.
6. Complete the following fields:
Field
Description
Name
Enter a name for the group.
Description
Enter a description for the group.
7. To add users to the group, click uPerform Users.
8. Click All Users.
9. Click on the letter of the last name(s) of, or search for, the user(s) you want to add to the
group.
10. Select the user(s) from the list.
11. Click Add Selected.
12. Click OK.
56
ANCILE Solutions, Inc.
Chapter 4: Managing Users, Roles, and Groups
13. To add filters to the group, click Filters.
You must add a filter to the group in order to synchronize users with the uPerform
server. For more information on synchronization requirements, refer to Creating and
Managing Users Via User Information Source (on page 37).
14. Select one or more filters from the Available Filters list.
15. Click OK.
16. Click OK.
Editing a Group
1. Click Administration on the left menu.
2. Click Users, Roles, and Groups in the Administration area.
3. Click Groups under Users, Roles, and Groups.
4. Click on the group you want to edit.
ANCILE Solutions, Inc.
57
Chapter 4: Managing Users, Roles, and Groups
5. Click Edit.
6. Review/complete the following fields:
Field
Description
Name
Edit the name for the group.
Description
Edit the description for the group.
7. To edit users in the group, click uPerform Users.
8. Click All Users.
9. Click on the letter of the last name(s) of, or search for, the user(s) you want to add to the
group.
10. Select the user(s) from the list.
11. Click Add Selected.
12. Click OK.
13. To edit filters to the group, click Filters.
14. Select one or more filters from the Available Filters list.
15. Click OK.
16. Click OK.
17. Click OK.
58
ANCILE Solutions, Inc.
Chapter 4: Managing Users, Roles, and Groups
Deleting a Group
1. Click Administration on the left menu.
2. Click Users, Roles, and Groups in the Administration area.
3. Click Groups under Users, Roles, and Groups.
4. Click on the group you want to delete.
5. Click Delete.
6. Click OK.
This permanently deletes the group and any subgroup associated with the group. A
deleted group or subgroup cannot be restored.
Viewing Users in a Group
1. Click Administration on the left menu.
2. Click Users, Roles, and Groups in the Administration area.
ANCILE Solutions, Inc.
59
Chapter 4: Managing Users, Roles, and Groups
3. Click Groups under Users, Roles, and Groups.
4. Click on the group whose users you want to view.
5. Click View Users.
If more than 100,000 users are present in the group, the View Users button is disabled.
Synchronizing Groups
Synchronizing from the Groups page will synchronize all user sources and filters. For
more information on user source, refer to Creating and Managing Users Via User
Information Source (on page 37).
1. Click Administration on the left menu.
2. Click Users, Roles, and Groups in the Administration area.
3. Click Groups under Users, Roles, and Groups.
4. Click Synchronize on the left menu.
5. Click OK.
60
ANCILE Solutions, Inc.
Chapter 4: Managing Users, Roles, and Groups
Assigning Content to a Group
You must first enable group-based filtering before assigning filters to content. For
more information, refer to Specifying Project Settings (on page 72).
1. Click
on the upper left.
2. Select the project that contains the content for which you want to create a group filter.
3. Click Document Library.
4. Select the folder that contains the content for which you want to create a group filter.
5. Select the content for which you would like to create a group filter.
This functionality is not available for managed documents.
6. Click Assign Group Filter in the left navigation bar.
7. Drag the content from the Related Documents list to the corresponding group in the Content
Groups list.
8. Repeat Step 7 to add content to additional groups.
9. Click Save.
Deleting a Group Filter
1. Click
on the upper left.
2. Select the project that contains the group filter you want to delete.
3. Click Document Library.
ANCILE Solutions, Inc.
61
Chapter 4: Managing Users, Roles, and Groups
4. Select the folder that contains the group filter you want to delete.
5. Select the content for which you would like to delete a group filter.
6. Click Assign Group Filter in the left navigation bar.
7. Scroll over the name of the content in the Content Groups list.
8. Click Delete.
9. Click Save.
62
ANCILE Solutions, Inc.
Chapter 5: Working With the Document
Library
Folders and content are stored in the document library on the ANCILE
uPerform server. The document library allows the administrator to
establish a meaningful folder hierarchy within a project. Authors, in
turn, check content into these folders.
From the document library, authors and administrators can view
document properties, add managed documents, and view document
context and version history. The document library also provides
centralized storage of all discussions.
63
Chapter 5: Working With the Document Library
Introduction to the Document Library
Each uPerform server contains one or more projects. These projects contain a logical collection of
content called the document library. uPerform uses the document library to provide access to
content for your authors. The website structure associated with each project provides end users
with access to content on the website. For information on creating a website hierarchy, refer to
Working With the Website (on page 111).
Administrator functions in the document library include:
Create projects, folders and subfolders
Create a workflow
Add, assign, and update templates
Relate documents
Move content
Assign group filters
Set default translations
Import a document library structure
Add custom template reports to managed and web documents
Author functions in the document library include:
Add managed and web documents
Add a web document
Add a message to a discussion
View user discussion comments
View document properties, including version history
View usage statistics for a document
Participate in a workflow
64
ANCILE Solutions, Inc.
Chapter 5: Working With the Document Library
Create an ad-hoc workflow
Assign a website context to a folder and content
ANCILE Solutions, Inc.
65
Chapter 5: Working With the Document Library
Creating the Project
The uPerform server can contain one or more projects created by the system administrator. Each
project contains the following two folders:
Document library
Website
Within the document library and website areas, you implement a custom hierarchy for your
authors and end users, respectively.
In addition to these two areas, each project has one or more assigned templates. A template can be
used on multiple projects.
The following is an illustration of a typical project setup in uPerform.
Creating a Project
1. Log into the uPerform server via a web browser.
2. Click
.
3. Click New Project on the left menu.
66
ANCILE Solutions, Inc.
Chapter 5: Working With the Document Library
4. Complete the following information:
Field
Description
Project Name
Enter the name of the project.
Project Description
Enter amplifying information about the project and
its purpose.
Document Library
Description
Enter a description of the library associated with the
project.
Website Description
Enter a description of the website associated with
the project.
5. Click Save to display the project cover page.
Editing a Project
1. Log into the uPerform server via a web browser.
2. Click
.
3. Click on the name of the project to edit.
4. Click Edit Properties on the left menu.
ANCILE Info Pak Properties section is displayed on the General Properties form.
For detailed information on incorporating Info Pak content, refer to Incorporating Info
Pak Content (on page 329).
5. Edit the following information:
Field
Description
Name
Enter the name of the project.
Description
Enter amplifying information about the project and
its purpose.
ANCILE Solutions, Inc.
67
Chapter 5: Working With the Document Library
6. As needed, select one of the following options:
If You Want To
Then
Enable multi-language support to set a
name and description of the project for
any of the supported languages. This
language-specific name and description
will display based on the language
preference set in the user's account.
Click Add Multiple Languages.
Select a default language from the drop-down
list. (This language will be displayed if the user's
language is not available.)
Click Enable.
Go to Step 7.
Assign users to a role associated with
the project
For detailed instructions on assigning a user to a
role, refer to Assigning a User to a Project Role
(on page 32).
Specify project settings
For detailed instructions on enabling anonymous
access, refer to Specifying Project Settings (on
page 72).
7. Enter a name and description for the required languages in your environment.
From this screen you can also disable multiple language support.
8. Click Save.
Editing the Displayed uPerform Server Name
Editing the displayed uPerform server name allows you to customize what your end
users, authors, and administrators will see when they log onto the uPerform server.
1. Click
.
2. Click Edit Properties on the left menu.
3. Edit the following fields:
Field
Description
Name
Edit the name for the uPerform server.
Description
Enter or edit the description of the uPerform
server.
4. Click Save.
68
ANCILE Solutions, Inc.
Chapter 5: Working With the Document Library
Working with Templates
uPerform server offers several options when working with templates:
Assign a template to a project
Version a template
Roll back to a previous version
Republish documents from an updated template
Assigning a Template to a Project
1. Click Administration on the left menu.
2. Click Server Administration in the Administration area.
3. Click uPerform Templates in the Server Administration area.
4. Click on the name of the template to be assigned to the project.
5. Click Assign Template on the left menu.
6. Select the checkbox next to the desired project(s) in the Assign [Template Name].udt
window. Optionally, to assign a template to all projects in the list, click (select or unselect
all).
7. Click Save to assign the template to the project(s).
Versioning a Template
1. In the client, open the template you want to update.
2. Select FILE > CHECK IN > CHECK IN [TEMPLATE NAME].
ANCILE Solutions, Inc.
69
Chapter 5: Working With the Document Library
3. Optionally, select the Lock Template for Editing checkbox.
4. Click OK.
Rolling Back to a Previous Template Version
Rolling back to a previous template version sets the version of the template used to
publish content. Rolling back to a previous version permanently deletes the current
version of the template from the server.
1. Click Administration on the left menu.
2. Click Server Administration in the Administration area.
3. Click uPerform Templates in the Server Administration area.
4. Select a template from the list.
5. Click Rollback.
6. Click OK.
7. Optionally, republish the documents associated with the template. For more information, refer
to Republishing Documents (on page 132).
Viewing Template Properties
1. Click Administration on the left menu.
2. Click Server Administration in the Administration area.
3. Click uPerform Templates in the Server Administration area.
4. Perform one of the following options:
70
If You Want To
Then
View the template cover page
Select a template from the list.
ANCILE Solutions, Inc.
Chapter 5: Working With the Document Library
If You Want To
Then
View the version history of the
template
Select a template from the list.
Click the More or Hide link to display or hide
the version history.
The link displays only if there are three or more
versions of the template available.
Access an earlier version of a template
Select a template from the list.
Click on the template hyperlink below Version
History.
View a template
Select a template from the list.
Open the template from the uPerform client as
described in Using Author Templates (on page
211).
ANCILE Solutions, Inc.
71
Chapter 5: Working With the Document Library
Specifying Project Settings
By setting anonymous access on a project, end users will not be required to login to the uPerform
website when requesting help online. When anonymous access is enabled, the anonymous user
and the All Users group will be added to the End User role.
By providing optional group-based filtering to a project, you can identify the content to which end
users will have access. For more information, refer to Creating and Updating Groups (on page
55).
By limiting the number of major document versions that are stored per project, you can ensure
your authors have access to current versions by eliminating any outdated versions. In addition,
you can elect to remove additional versions, which can save space on the database server by
removing unnecessary content. Major versions are designated by a 0 in the first decimal place of a
version indicator (for example, 4.0).
A project administrator can specify assessment score tracking; as well as settings for authors,
allowing them to create ad-hoc workflows, and allowing them to specify website context. A
project administrator can also restrict check in, check out, delete, and rollback functionality to the
owner or administrator for content assigned to them.
By default, projects do not automatically have the above options enabled.
Enabling Project Settings
1. Click
on the left.
2. Click on the name of the project to edit.
72
ANCILE Solutions, Inc.
Chapter 5: Working With the Document Library
3. Click Edit Properties on the left menu.
4. Choose from the following options:
Field
Description
Maximum versions to store
Enter the number of major versions to store on
the server. The number must be greater than 0.
Remove additional versions now
Select this option to remove excess major
versions. This option is available only if the
Maximum major versions to store field contains
a number greater than 0.
This function permanently deletes non-inclusive
versions from the database server.
Allow Authors to Assign Website
Context
Select this option to allow authors to assign
website context for the documents in this project.
Allow Authors to Initiate Ad-Hoc
Workflows
Select this option to allow an author to enable an
ad-hoc workflow.
Enable Anonymous Access
Select this option to enable anonymous access
for the project.
Enable Assessment Score Tracking
Select this option to enable assessment score
tracking for the project.
Assessment scores are tracked for uPerform
courses and simulations with templates that have
SCORM 1.2 or SCORM 2004 packaging
enabled. For more information, refer to
Specifying New Template Settings: Publications.
ANCILE Solutions, Inc.
73
Chapter 5: Working With the Document Library
Field
Description
Enable Content Editing and deleting
only for owners and administrators
Select this option to restrict check in, check out,
delete, and rollback functionality to the owner or
administrator for content assigned to them.
Enable Group-Based Filtering
Select this option to enable group-based filtering
for the project.
5. Click Save.
Deleting a Project
Deleting a project will delete all content in both the document library and website; all associated
project groups; and the security policies, custom configurations, and modified properties of the
project.
A deleted project is not sent to the recycle bin. A deleted project cannot be restored.
1. Click
.
2. Click on the project name to go to the project cover page.
3. Click Delete Project on the left menu.
4. Read the instructions carefully to determine if you want to delete the project or simply remove
access to the project.
74
ANCILE Solutions, Inc.
Chapter 5: Working With the Document Library
5. Click I still want to delete.
6. Click Delete it already!.
ANCILE Solutions, Inc.
75
Chapter 5: Working With the Document Library
Populating the Document Library
After you have created the project, you are ready to create and populate, or import, the document
library with a folder hierarchy.
Manually Adding a Folder to the Document Library
1. Click
in the uPerform server workspace.
2. Click on the project name.
3. Click Document Library.
4. Click Add Folder on the left menu.
5. Complete the following information:
Field
Description
Name
Enter the name of the folder.
Description
Enter amplifying information about the folder and
its contents.
6. Click OK.
7. Repeat Step 4 through Step 6 to create additional folders and subfolders at the desired
locations.
76
ANCILE Solutions, Inc.
Chapter 5: Working With the Document Library
Import a Document Library Structure
If you have an existing document library structure in a system such as ARIS or SAP Solution
Manager, you can import this structure into a uPerform document library via an XML file to avoid
losing or having to recreate the document library structure. You can simply import the structure to
uPerform and begin populating your project. If you are working with double-byte characters, the
file should be in UTF-8 double-byte format.
To import a library structure, your target project must have an empty recycle bin and an empty
document library. A project or system administrator can import a structure.
Importing a Document Library Structure
1. Create or open a blank project.
2. Click Document Library.
3. On the left pane, click Import Document Library.
This option is disabled if the library contains content. Ensure the library is empty and
that any content related to the library is deleted from the recycle bin.
4. Complete the following fields:
Field
Description
Source XML file
Click Browse ... and locate the XML file
containing the document library structure you
want to import.
Document Library Structure Root
XPath
Specify an XPath query representing the root(s)
of the Document Library structure.
Document Library Folder XPath
Specify an XPath query representing a Document
Library folder. This is only searched from
beneath the Document Library Structure Root
XPath.
Folder Name XPath
Specify an XPath query representing the name of
a Document Library folder. This is expected to
be an attribute or sub-element of a node found by
the Document Library Folder XPath.
ANCILE Solutions, Inc.
77
Chapter 5: Working With the Document Library
Field
Description
Folder Description XPath
(Optional) Specify an XPath query representing
the description of a Document Library Folder.
This is expected to be an attribute or sub-element
of a node found by the Document Library Folder
XPath.
5. Click Save.
6. Click OK when the import is complete.
78
ANCILE Solutions, Inc.
Chapter 5: Working With the Document Library
Browsing the Document Library
All uPerform content has an associated binder and a cover page. The uPerform binder contains
multiple translations (if available) of a uPerform document. In the binder, the administrator can
set default translations, assign group filters, and edit related documents. The actual content is filed
in the Translations area of the binder.
The content hyperlinks within the Translations area will take you to the cover page that provides
helpful information on document properties and status. From the cover page, the author can create
a workflow, create and participate in discussions, and access versions.
Via standard hyperlink navigation, you can browse the document library and view the storage
hierarchy and content objects.
You can also access the document library via the TOOLS > LIBRARY/REPOSITORY
menu in the uPerform editor.
Navigating via the Document Library Context
A Document Library Context area is available on each binder and cover page. This area provides a
hierarchical display of the content location in the document library. You can click on a hyperlink
in the displayed hierarchy to navigate to another location in the document library.
ANCILE Solutions, Inc.
79
Chapter 5: Working With the Document Library
Viewing a Binder
1. Click
.
2. Click on the name of the project in which the binder is stored.
3. Click Document Library.
4. Navigate to the folder in which the binder is stored.
5. Click on the name of the binder you want to view.
6. Review the following information on the cover page:
80
Field
Description
Properties
Contains the date and time of the most recent
modification and the name of the modifier.
Translations
Contains language of the content and, if applicable,
associated translations.
Group Assignments
Contains the groups to which the binder has been
assigned.
Document Library Context
The location of the binder in the document library.
Website Context (if
applicable)
The location(s) in the website to which the binder is
linked.
For more information on specifying website context,
refer to Assigning a Website Context to Document
Library Content (on page 115).
Related Documents
Contains hyperlinks to other content you have
related to this document.
ANCILE Solutions, Inc.
Chapter 5: Working With the Document Library
Viewing a Cover Page
1. Click
.
2. Click on the name of the project in which the content is stored.
3. Click Document Library.
4. Navigate to the folder in which the content is stored.
5. Click on the name of the binder containing the content you want to view.
6. In the Translations section, click on the name of the content.
7. Review the following information on the cover page:
Field
Description
Version
The current version designator for this document. To
view previous versions of the document, refer to the
Version History area on the document cover page.
Status
Document locked by [name] - Indicates an author
has locked this document against another author's
edits.
Available - Indicates this document is available for
checkout and editing.
Last Modified
The date and time of the most recent modification
and the name of the modifier.
Last Published
The date and time of the most recent publication.
Owner
The name of the original creator of the file.
File Name
The name of the file.
Size
The size of the file.
Language
The language of the content.
Translation Status
Displays if the translation is enabled for viewing on
the end user website.
ANCILE Solutions, Inc.
81
Chapter 5: Working With the Document Library
Field
Description
uPerform Template
Displays the uPerform template associated with the
document.
Hit Count
Displays the number of views from the end user
website.
Hit count is determined per browser session when
logged in as an end user or when accessing the
server as an anonymous user. Hit count does not
provide any information on user who accessed the
document.
Workflow (if applicable)
If workflow has been initiated on this item, the
workflow setting, status, and reviewer sequence is
displayed in the upper right.
For more information on workflow, refer to Using
Workflow (on page 143).
Version History (if
applicable)
If earlier versions of this item exist, the previous
versions are displayed. You can rollback to the
previous version to make that version the current
version.
For more information on versioning, refer to Using
Version History (on page 101).
Document Library Context
The location in the document library in which the
content resides.
Website Context (if
applicable)
The location(s) in the website to which the content is
linked.
For more information on specifying website context,
refer to Assigning a Website Context to Document
Library Content (on page 115).
Author Discussion
Hyperlinks to discussion messages contributed by
authors.
For more information on author discussions, refer to
Using Subscriptions Within a Discussion (on page
160).
Website Discussion
Hyperlinks to discussion messages contributed by
end users.
For more information on website discussions, refer
to Using Subscriptions Within a Discussion (on page
160).
LMS Transactions
A history of alert messages received from a
Learning Management System (LMS). LMS
Transactions will display only if transactions exist
on the LMS.
For more information on publishing courses to an
LMS, refer to Publishing Courses to an LMS (on
page 135).
8. To return to the binder, click Return to Binder on the left menu.
82
ANCILE Solutions, Inc.
Chapter 5: Working With the Document Library
Managing the Document Library
After you have established your document library structure, you can manage the structure and
contents by updating folder properties, deleting folders, adding managed documents and web
documents, changing document owners, and deleting documents.
Managing Folders
Folders allow you to organize multiple documents within a project.
Updating Folder Properties
1. Click
in the uPerform server workspace.
2. Click on the project name.
3. Click Document Library.
4. Select the desired folder.
5. Click Edit Properties on the left menu.
6. Edit the following information:
Field
Description
Name
Edit the folder name.
Description
Edit the folder description.
ANCILE Solutions, Inc.
83
Chapter 5: Working With the Document Library
Field
Description
Add Multiple Languages
Enable multi-language support to set a name and
description of the folder for any of the supported
languages. This language-specific name and
description will display based on the language
preference set in the user's account.
Click Add Multiple Languages.
Select a default language from the drop-down list.
(This language will be displayed if the user's
language is not available.)
Click Enable.
From this screen you can also disable multiple language support.
7. Click Save.
Deleting a Folder
1. Click
in the uPerform server workspace.
2. Click on the project name.
3. Click Document Library.
4. Select the desired folder.
5. Click Delete Folder on the left menu.
Deleting a folder will move both the folder and its contents to the recycle bin. For
detailed information on managing the recycle bin, refer to Managing the Recycle Bin
(on page 108).
6. Click OK at the confirmation prompt.
Managing Documents
The server workspace provides access to several document functions: adding a managed
document, adding a web document, updating document properties, changing the document owner,
and deleting a document.
ANCILE uPerform documents are added to the server via the editor workspace. You
cannot add uPerform documents to the server via the server workspace.
84
ANCILE Solutions, Inc.
Chapter 5: Working With the Document Library
A managed document can be a non-uPerform/non-Info Pak file that is either created on the server
or an HTML document that is created directly from the uPerform server. uPerform now allows
you to create a simple HTML-based document with a rich-text editor. The editor also allows you
to see what the finished document will look like while the document is being created.
A web document is a link to a website or to a content location accessible via a unique web
address. The managed document and web document functionality allows you to maintain all of
your documentation and training file types and website links within the uPerform server.
A managed document is identified by a to the left of the document title in the document library.
A web document is identified by a to the left of the document title in the document library.
Web documents are not assigned to binders.
Administrators, authors with the proper privilege, or the owner with proper privileges may delete
a document through the server workspace. When the document is deleted, the document is moved
to the project's recycle bin. For detailed information on managing the recycle bin, refer to
Managing the Recycle Bin (on page 108).
Adding a Managed Document
1. Click
in the uPerform server workspace.
2. Click on the project name.
3. Click Document Library.
4. Navigate to the folder in which the managed document will be stored.
ANCILE Solutions, Inc.
85
Chapter 5: Working With the Document Library
5. Click Add Managed Document on the left menu.
6. Complete the following information:
Field
Description
Name
The default name is the name of the document. If
desired, edit the name of the document.
Description
Enter amplifying information about the managed
document.
Language
Select the appropriate language for the new
document. The default is your website default
language.
7. Perform one of the following:
If you want to
Then
Select a file (default)
To check in a file, click Select a file and click
Browse..., to locate and select the managed
document to upload.
Free Text
To add an HTML document, click Free Text. Enter
text and format using the rich text editor toolbar
controls.
You must have Java version 6 installed to enable uPerform's rich text editor.
8. Click Save.
86
ANCILE Solutions, Inc.
Chapter 5: Working With the Document Library
Updating a Managed Document
1. Select the managed document.
If you want to
Then
Edit and upload a new file
Click Get Latest Version.
Select Lock.
Edit and save the document.
Click Check In.
Select the appropriate version number.
Click Browse...
Navigate to the new version of the managed
document.
Click Open.
Edit Rich Text HTML document on the Click Lock.
server
Click Edit Content.
Select the appropriate version number.
Edit the content.
Selecting Lock allows you to prevent others from using the document while you are
checking in a new version.
2. Click Add Version.
Updating the managed document with versions also gives you the ability to revert back
to a previous version, if necessary.
3. Verify the updated version is available.
Adding a Web Document
1. Click
in the uPerform server workspace.
2. Click on the project name.
3. Click Document Library.
4. Navigate to the folder in which the web document will be stored.
ANCILE Solutions, Inc.
87
Chapter 5: Working With the Document Library
5. Click Add Web Document on the left menu.
6. Complete the following information:
Field
Description
URL
Enter the web address of the document or link (for
example, http://www.ancile.com).
Name
The default name is populated from the website. If
desired, enter a name of the web document.
Description
The default description is populated from the
website. If desired, enter amplifying information
about the web document.
7. Click OK.
Editing Properties for a Managed or Web Document
1. Click
in the uPerform server workspace.
2. Click on the project name.
3. Click Document Library.
4. Navigate to the folder in which the web or managed document is stored.
5. Click Edit Properties in the task pane.
6. Edit the name in the Name field.
7. Optionally, enter a description in the Description field.
8. Select a uPerform template from the Template listbox.
Selecting a template allows you to add a transaction code, and to associate uPerform template
properties within the template to your web or managed document. For more information on
template properties, refer to Specifying New Template Settings: Properties (on page 224).
88
ANCILE Solutions, Inc.
Chapter 5: Working With the Document Library
Changing the Document Owner
The system administrator has permission to change the owner of a document individually or in
bulk. The new owner of a document is automatically subscribed to the document.
The Bulk Change Owner option is only available at the project level.
1. Click
in the uPerform server workspace.
2. Click on the project name.
3. Perform one of the following options:
If You Want To
Then
Change the document owner for a
single document
Click Document Library.
Navigate to the folder containing the document
to be edited.
Click on the name of the binder containing the
content.
In the Translations section, click on the
document to go to the cover page.
Click Change Owner on the left menu.
Click uPerform Users to locate and specify the
new owner.
Change the document owner for all
documents in a project
Click Bulk Change Owner on the left menu.
Click uPerform Users to locate and specify the
current owner.
Click uPerform Users to locate and specify the
new owner.
Click Next.
4. Click Save.
Deleting Content
1. Click
in the uPerform server workspace.
2. Click on the project name.
3. Click Document Library.
4. Navigate to the folder containing the document to be deleted.
5. Navigate to the uPerform binder or document cover page.
ANCILE Solutions, Inc.
89
Chapter 5: Working With the Document Library
6. Click Delete on the left menu.
Deleting a document will move the document and its associated content, such as
previous versions and discussions, to the recycle bin. For detailed information on
managing the recycle bin, refer to Managing the Recycle Bin (on page 108).
7. Click OK at the confirmation prompt.
Editing the Hit Count and Assessment Results
To help determine how often a document is being used during a specific period of time you can
reset the hit count. Hit count is determined per browser session when logged in as an end user or
when accessing the server as an anonymous user. Hit count does not provide any information on
the user who accessed the document.
Resetting the hit count must be performed on a per document basis. Hit counts are available for
uPerform and managed documents. If you want to run a hit count report for all documents, refer to
Create and Edit Custom Reports (on page 205).
Assessment results are available for Info Pak simulations and uPerform simulations and courses.
For more information on tracking assessment results, refer to Using Reports (on page 197).
1. Click
in the uPerform server workspace.
2. Click on the project name.
3. Click Document Library.
4. Navigate to the folder containing the document to be edited.
5. Click on the name of the binder containing the content.
90
ANCILE Solutions, Inc.
Chapter 5: Working With the Document Library
6. Perform one of the following options:
If You Want To
Then
Reset the hit count for the
Click Reset Hit Count on the left menu.
binder and all of its translated This functionality is available only for uPerform and
content
managed documents.
Reset the hit count for a
single document
In the Translations section, click on the document to
go to the cover page.
Click Reset Hit Count on the left menu.
This functionality is available only for uPerform and
managed documents.
Clear assessment results for a Select Clear Assessment Results on the left menu.
single document
This functionality is available only for Info Pak
simulations and uPerform simulations and courses.
7. Click OK.
Moving Folders and Content
Administrators have access to move folders and content within the document library and the
website. You cannot move content between projects or between the document library and the
website.
If you have moved content within the document library and want this content to
display in a new location on the end user website, you must change the website context
for the content. For detailed information on website context, refer to Assigning a
Context to Content.
1. Click
in the uPerform server workspace.
2. Click on the project name.
3. Click Document Library or Website.
4. Navigate to the folder containing the content to be moved.
5. Click Move on the left menu.
6. Select the checkbox to the left of the folder or content name.
7. Click OK.
8. Navigate to the new location.
9. Click Paste Here on the left menu.
ANCILE Solutions, Inc.
91
Chapter 5: Working With the Document Library
10. Select the checkbox to the left of the new location name.
11. Click OK.
92
ANCILE Solutions, Inc.
Chapter 5: Working With the Document Library
Managing Translations and Related Content
In uPerform, translated content is linked to other content via a binder. A binder contains the
original document and all subsequent translations. Translated content may be either uPerform
content or managed documents. Translated uPerform content may be linked to other uPerform
content via a Save As operation or by creating new content in another language.
For example, your US team may have content that must be slightly modified to reflect the
business process in your UK office. You can save the US content to create translated UK content
and then incorporate the process and language edits required. In addition, another author can
create new French content and check this new document into the same binder as long as French
content does not already exist. When the original US content is changed, both the author of the
UK translated content and the French content will receive notification of the change and can then
review the translated content to potentially incorporate changes. In addition, you can enable and
disable a translation for display on the end user website.
When you check a translated document into the server, you are automatically subscribed to the
translation. When changes are made to the original document from which the translation was
made, you will receive a notification via email and a posting on your personal page.
Related content is uPerform content that is associated with other uPerform content within the
same project on the server. Related content does not share properties with other content but rather
allows you to identify content with similar characteristics for display on your end user website.
For example, within the "Acme Corp" project, you can have a "Sales Team" folder that contains a
document for filling out a timesheet. In that same project, you can have a "Sales Clerk" folder.
Some of the codes in the "Sales Team" document could be relevant to the "Sales Clerk." You can
relate this document from "Sales Team" folder to content in the "Sales Clerk" folder.
Working with Translated Content
Creating translated content allows you to customize content to reflect processes that differ
between location or business units. To create translated files, you must enable locales on the
server. For more information, refer to "Configuring Locale Settings" in the ANCILE uPerform
Administration manual.
Checking in translated content stores the translated content in the Translations area of the binder
containing the original uPerform content. In addition, uPerform allows you to use the uPerform
client to check in a completely separate document in another language. The additional document
must be of the same type and must be in another language than the original document.
ANCILE Solutions, Inc.
93
Chapter 5: Working With the Document Library
Creating Translated Content
1. Using the uPerform client, perform one of the following:
If You Want To
Then
Enable a translation of the original
document into a secondary language.
Open an existing uPerform document.
Click File>Save As... on the original document.
Go to Step 2.
Create a new document in a secondary
language.
Refer to Creating Content in the Creating
Content with ANCILE uPerform companion
manual.
Content must be checked into the server.
2. Select File > Save As....
3. Select the New Translation option.
4. Select a language from the drop-down list.
5. Click Save.
6. Enter a name in the File name field.
Avoid the use of special characters when naming your content.
7. Click Save.
Checking Translated Content Into the Server
1. Create or open the translated uPerform content using the uPerform client.
2. Select FILE > CHECK IN [FILENAME]....
This will open the Check In window and automatically select the appropriate check in
location for the translated file. It will also display all binders in the current project that
do not have a translated document in the current client document's language. You may
check the document into the pre-selected location or chose another binder.
Choosing another binder is only an option with new content, not with FILE>SAVE
AS content.
3. Click OK.
94
ANCILE Solutions, Inc.
Chapter 5: Working With the Document Library
Adding Translated uPerform Managed Documents
The original managed document must already reside in your project.
1. Select the desired managed document binder.
2. Click Add Translation.
3. Complete the following fields:
Field
Description
Name
Enter the document name
Description
Enter amplifying information about the
document.
Language
Select the desired language.
The list contains all available
languages that currently do not have
translations.
4. Perform one of the following:
If You Want To
Then
Select a file (default)
Click Browse... to locate and select the managed
document to upload.
Click Open.
Free Text
Enter text and use the toolbar to format the text.
5. Click Save to add the translated managed document.
ANCILE Solutions, Inc.
95
Chapter 5: Working With the Document Library
Viewing Translated Content
The parent content must be checked into the server first (or with the translated content via batch
mode) in order to establish the content association. The server will display a link to the translated
content in the Translations area in the binder.
From an end user's perspective, the uPerform server creates a language-based content filter for
associated content. If the end user's language is set to French, the French associated content
displays. If there is no associated content available in the end user's language, the content displays
in the default language. The end user can also see all versions of content by clicking Show All
Help Documents on the web page.
Viewing Translated Content From the Editor
1. From the uPerform editor, open the content which has associated content.
2. Select VIEW > TASK PANE > TRANSLATED DOCUMENTS.
The Translated Documents task pane opens to list all translated content for the
displayed file.
Viewing Translated Content From the Server
1. Click
in the uPerform server workspace.
2. Click on the project name.
3. Click Document Library.
96
ANCILE Solutions, Inc.
Chapter 5: Working With the Document Library
4. Navigate to the folder containing the file with translated content.
5. Click on the content name to go to the binder.
6. Scroll to the Translations area of the screen to view the translated documents.
7. Click on the translated document hyperlink to view detailed information about the document.
Setting the Default Translation
1. Navigate to the binder that contains the translation.
2. Click Set Default Translation in the left menu.
3. Select the default translation from the drop-down list.
4. Click Save.
Enabling and Disabling Translated Content
1. Click
in the uPerform server workspace.
2. Click on the project name.
3. Click Document Library.
4. Navigate to the folder containing the file with translated content.
ANCILE Solutions, Inc.
97
Chapter 5: Working With the Document Library
5. Click on the content name to go to the binder.
6. Under Translations, select the translation you want to enable or disable.
7. Perform one of the following:
If You Want To
Then
Enable a translation for display on the
end user website
Click Enable Translation in the left menu.
Disable a translation for display on the
end user website
Click Disable Translation in the left menu.
You cannot disable the default translation.
8. Click OK.
Receiving Notifications About Documents
When you check a translated document into the server, you are automatically subscribed to the
translation. When changes are made to the original document from which the translation was
made, you will receive a notification via email and a posting on your personal page.
Working with Related Content
Related content is uPerform content that is associated with other uPerform content within the
same project on the server. Related content is used in conjunction with group-based filtering.
Related content does not share properties with other content but rather allows you to identify
content with similar characteristics for display on your end user website. The act of relating
content is performed from a binder.
98
ANCILE Solutions, Inc.
Chapter 5: Working With the Document Library
Creating Related Content
1. Click
in the uPerform server workspace.
2. Click on the project name.
3. Click Document Library.
4. Select the folder containing the content for which you want to create a relationship.
5. Click on the content for which you want to create a relationship.
6. Click Edit Related Documents in the left menu.
7. In the tree view, expand the folder that contains the content you want to relate.
8. Select the checkbox(es) next to the content you want to relate.
9. Click Save.
Modifying Related Content
1. Click
in the uPerform server workspace.
2. Click on the project name.
3. Click Document Library.
4. Select the folder containing the file for which you want to edit a relationship.
5. Click on the content for which you want to edit a relationship.
ANCILE Solutions, Inc.
99
Chapter 5: Working With the Document Library
6. Click Edit Related Documents in the left navigation page.
7. In the tree view, expand the folder that contains the relationship you want to modify.
8. Select or deselect the checkbox(es) next to the content you want to add or remove from the
relationship.
9. Click Save.
Removing Related Content
1. Click
in the uPerform server workspace.
2. Click on the project name.
3. Click Document Library.
4. Select the folder containing the file for which you want to remove a relationship.
5. Click Edit Related Documents in the left navigation page.
6. In the tree view, expand the folder that contains the relationship you want to remove.
7. Deselect the checkbox(es) next to the relationship you want to remove.
8. Click Save.
100
ANCILE Solutions, Inc.
Chapter 5: Working With the Document Library
Using Version History
A version history is maintained for uPerform content. The version history for uPerform content
can be viewed from either the editor or server. The version history for a managed document can
be viewed from the server only. All versions of a document are listed chronologically. For more
information on using version history with the editor, refer to "Using Version History" in the
companion manual Creating Content with ANCILE uPerform.
You can also revert, or rollback, to an earlier version of content from the server workspace. This
action sets the latest version of a file to the previous version of the file.
Viewing the Version History from the Server
1. Click
in the uPerform server workspace.
2. Click on the project name.
3. Click Document Library.
4. Select the folder containing the content.
5. Click on the name of the binder containing the content you want to view.
6. Under Translations click on the name of the content.
The current version designator is displayed to the right of Version in the Document
Properties portion of the screen. A list of previous versions is displayed in the Version
History portion of the screen.
7. To access an earlier version of a document, click on the content hyperlink below Version
History.
Rolling Back to the Previous Version
1. Click
in the uPerform server workspace.
2. Click on the project name.
3. Click Document Library.
ANCILE Solutions, Inc.
101
Chapter 5: Working With the Document Library
4. Select the folder containing the content.
5. Click on the name of the binder containing the content you want to view.
6. In the Translations section, click on the name of the content.
A list of previous versions is displayed in the Version History portion of the screen.
7. Click Rollback on the left menu to set the current version of the document to the previous
version.
When you confirm the rollback, the current version of the document will be
permanently deleted from the server. You cannot roll back a transformed Info Pak
document (i.e. the resulting uPerform document). For more information on working
with legacy Info Pak documents, refer to Incorporating Info Pak Content (on page 329).
8. Click OK.
102
ANCILE Solutions, Inc.
Chapter 5: Working With the Document Library
Retention Period
uPerform allows system or project administrators to ensure the website content is current by
setting project or system-level retention policies. Once you have published a document, the
project retention policy will begin to track that document (including uPerform documents,
managed documents, and Info Pak documents). The only documents not covered by retention
periods are Student Guides, uPerform course packages, and web documents. Once the document
has reached the implemented number of days, the uPerform server can perform one of the
following:
Remove published content from the web server.
Send a notification to the author that the content is expired.
Administrators can change the periodicity and policies for each retention policy.
There are many reasons to implement a retention policy:
Ensure accuracy of the project documentation
Comply with legal requirements
Meet business goals regarding return on investment
Adding a Retention Policy
1. Click
in the uPerform server workspace.
2. Click on the project name.
3. Click Retention Period.
ANCILE Solutions, Inc.
103
Chapter 5: Working With the Document Library
4. Complete the following fields:
Field
Description
Enable retention periods for this project Allows Administrator to implement a retention
policy on the current project.
Number of days content is valid
Sets the number of days until the actions that
follow are triggered.
Delete Published Content
Removes the expired, published content from the
accessible website.
Send Notifications
Notifies the author and any subscribers to the
document that the document has expired.
Apply these settings to existing content Updates project content with the updated
with retention periods
retention policy.
5. Click Save.
uPerform server retention notifications are executed hourly. Notifications will be
triggered on the next available retention process after the content has expired. That is,
content that expires on 6 June, 2013 11:48AM will not have notifications sent until
12PM on 6 June 2013 rather than immediately.
104
ANCILE Solutions, Inc.
Chapter 5: Working With the Document Library
Transaction Change Notifications
uPerform allows system or project administrators to manually or automatically notify
authors/subscribers of changes to your enterprise application. Administrators can enter a list of
changed transaction codes, iView IDs, or screen IDs directly into the uPerform server interface.
Anyone subscribed to documents with these properties will be notified of the change. In addition,
administrators can create integration credentials that will allow ANCILE Help Launchpad to
automatically update uPerform with a list of changed transactions. Once Help Launchpad and
uPerform are set up, Help Launchpad will send a list of changed transactions based on a schedule
set within Help Launchpad.
To configure Help Launchpad to provide transaction change notification using uPerform, refer to
the Help Launchpad for ANCILE uPerform user manual.
Manually Entering Transaction Notifications
1. Click
in the uPerform server workspace.
2. Click on the project name.
3. Click Specify Changed Transactions.
4. Enter changed transactions into the Changed Transactions: field. Each transaction must be
on a separate line.
5. Select View Affected Documents to view the document names (not file names) that were
impacted by the changed transactions.
6. Click OK to send notifications.
ANCILE Solutions, Inc.
105
Chapter 5: Working With the Document Library
Creating Integration Credentials
1. Click ADMINISTRATION > SERVER ADMINISTRATION > INTEGRATION SETTINGS >
INTEGRATION CREDENTIALS in the uPerform server workspace.
2. Click Add Credential.
3. Complete the following fields:
Field
Description
Credential ID
This is a unique user ID. This user ID cannot be
synchronized nor can this ID be used to log into the
system as a user.
Password
Must adhere to password strength requirements.
Password Confirmation
Must match password.
4. Click Save.
Editing Integration Credentials
1. Click ADMINISTRATION > SERVER ADMINISTRATION > INTEGRATION SETTINGS >
INTEGRATION CREDENTIALS in the uPerform server workspace.
2. Select the credential to be changed.
3. Click Edit Credential.
4. Complete the following fields:
Field
Description
Credential ID
This is a unique user ID. This user ID cannot be
synchronized nor can this ID be used to log into
the system as a user.
Password
Must adhere to password strength requirements.
Password Confirmation
Must match password.
5. Click Save.
Deleting Integration Credentials
1. Click ADMINISTRATION > SERVER ADMINISTRATION > INTEGRATION SETTINGS >
INTEGRATION CREDENTIALS in the uPerform server workspace.
2. Select the credential to be changed.
106
ANCILE Solutions, Inc.
Chapter 5: Working With the Document Library
3. Click Delete Credential.
4. Click OK.
ANCILE Solutions, Inc.
107
Chapter 5: Working With the Document Library
Managing the Recycle Bin
The uPerform recycle bin acts as a safety net from which to restore deleted content. When a user
deletes content objects, discussions, folders, and subfolders, these items are moved to a recycle
bin; they are not permanently deleted from the uPerform server.
There is one recycle bin for each uPerform project. A project administrator can empty the recycle
bin for a project. The system administrator can restore or delete items for the entire server. When
restored, the item is returned to its original location in the uPerform document library. The restore
operation sets the owner of the object to the user who restored the item. When objects are deleted
from the recycle bin, they are permanently removed from the server.
A deleted project is not sent to the recycle bin. A deleted project, including all of its
documents, messages, and folders, cannot be restored.
Restoring an Item From the Recycle Bin
1. Log into the uPerform server via a web browser.
2. Click
.
3. Select the project from which the item was deleted.
4. Click Recycle Bin on the left menu.
5. Click on the hyperlink of the object to restore.
6. Click OK to restore the object.
Deleting an Item from the Recycle Bin
1. Log into the uPerform server via a web browser.
2. Click
.
3. Select the project from which the item was deleted.
4. Click Recycle Bin on the left menu.
5. Click Empty Recycle Bin.
108
ANCILE Solutions, Inc.
Chapter 5: Working With the Document Library
6. Select the checkbox(es) nest to the item(s) you want to delete.
7. Click OK.
ANCILE Solutions, Inc.
109
Chapter 6: Working With the Website
In addition to the document library view of content on the ANCILE
uPerform server, there is also a website view of content. This view
allows you to organize help content in a meaningful way for your end
users.
Publishing is also an important part of working with the website.
Publishing allows you to display final content on the website, as well
as publish courses to a Learning Management System (LMS).
111
Chapter 6: Working With the Website
Introduction to the Website
The document library is structured in a logical fashion for your authors. For example, your
document library might be organized by enterprise module. However, your end users might find it
easier to locate content stored by function or role (for example, sales order processing or sales
clerk). The website view in uPerform allows you to establish this user-friendly organization of
content and addresses the question: "What's the best way for end users to locate on-the-job help?"
uPerform provides two methods for creating a website hierarchy:
Building the website via context assignment - This method allows you to manually
populate the website by assigning context to document library content. This method is
well-suited for a small end user population and a small number of documents.
Building the website via dynamic website folders - This method automatically
populates your website using properties stored in the uPerform document. By
planning your hierarchy, and assigning values to properties within your template, you
can manage a multi-dimensional website that updates based on your published or
republished content. If you plan to include web and managed documents in your
dynamic website folders, you can assign templates using the instructions found in
Editing Properties for a Managed or Web Document (on page 88). This method is
well-suited for a larger end user community and a large number of documents.
If you are using optional group-based filtering, this option will affect the way content is displayed
on the website. For more information on group-based filtering and working with groups, refer to
Creating and Updating Groups (on page 55).
Within the website view, you will be linking to content in the document library.
Content is not copied or moved to achieve display in the website.
112
ANCILE Solutions, Inc.
Chapter 6: Working With the Website
Building the Website via Context Assignment
After creating a project and populating the document library view, you are ready to create the
website structure. In most training rollouts, the website structure is often based on your planned
curriculum design.
Building the website via context assignment allows you to manually organize your website by
assigning context to document library content. A website folder built by context assignment is
identified by a
to the left of the folder name.
Optionally, you can populate your website via dynamic website folders. For more information,
refer to Building the Website via Dynamic Website Folders (on page 119).
Using Website Folders for Context Assignment
Adding a Website Folder
1. Click
in the uPerform server workspace.
2. Click on the project name.
3. Click Website.
4. Click Add Folder on the left menu.
5. Complete the following information:
Field
Description
Name
Enter the name of the website folder.
Description
Enter amplifying information about the folder and
its contents.
6. Click OK.
7. Repeat Step 4 through Step 6 to create additional folders and subfolders at the desired
location(s).
ANCILE Solutions, Inc.
113
Chapter 6: Working With the Website
Updating Website Folder Properties
1. Click
in the uPerform server workspace.
2. Click on the project name.
3. Click Website.
4. Navigate to the desired folder.
5. Click Edit Properties on the left menu.
6. Edit the following information:
114
Field
Description
Name
Edit the website folder name.
Go to Step 8.
Description
Edit the amplifying information about the folder and
its contents.
Go to Step 8.
Add Multiple Languages
Enable multi-language
support to set a name and
description of the website
folder for any of the
supported languages. This
language-specific name and
description will display based
on the language preference
set in the end user's account.
Click Add Multiple Languages.
Select a default language from the drop-down list.
(This language will be displayed if the name or
description in the end user's language is not
available.)
Click Enable.
Go to Step 7.
Language Filter
Select Filtered to display the content in the end
user's language.
or
Select a language from the drop-down list to display
content only in the selected language.
Go to Step 8.
ANCILE Solutions, Inc.
Chapter 6: Working With the Website
7. As needed, enter a name and description for the languages listed.
From this screen you can also disable multiple language support.
8. Click Save.
Deleting a Website Folder
1. Click
in the uPerform server workspace.
2. Click on the project name.
3. Click Website.
4. Navigate to the desired folder.
5. Click Delete Folder on the left menu.
Deleting a folder will send the folder to the recycle bin. The documents will remain in
the document library folder. For detailed information on managing the recycle bin,
refer to Managing the Recycle Bin (on page 108).
6. Click OK at the confirmation prompt.
Assigning a Website Context to Document Library Content
When you assign a website context to a folder or document within the document library, you are
creating a link from the website to the folder or document. You are not copying or moving content
into the website. The link informs the uPerform server of the proper published content to display
on the website.
Assigning a context to a document library folder: Allows you to assign a context at
the folder level. All published content within that folder will be linked to the specified
website folder(s), as well as the related content. When you assign a context at the
document level, only that document and its related content (when published) will be
linked to the specified website folder(s).
Assign content to a website folder: Allows you to add documents and document
library folders into a single website folder. Documents must be within the same
project.
Both document library folders and content can be linked to more than one location within the
website. Website context assignment is available to administrators and to authors who have been
granted access by an administrator.
ANCILE Solutions, Inc.
115
Chapter 6: Working With the Website
Assigning a Context to Content or a Document Library Folder
1. Click
in the uPerform server workspace.
2. Click on the project name.
3. Click Document Library.
4. Navigate to the folder or document that you want to link to the website.
5. Click Assign Website Context on the left menu to display the first level of website folders
you have created.
6. Perform one of the following options:
If You Want To
Then
Expand all items in the tree view
Click Expand All.
Collapse all items in the tree view
Click Collapse All.
7. Click + to the left of the folder name to navigate to the desired folder(s).
8. Click the checkbox to the left of one or more folders to create contexts in the website
folder(s).
9. Click Save.
10. Repeat Step 4 through Step 9 to create additional context links from documents and document
library folders to website folders.
116
ANCILE Solutions, Inc.
Chapter 6: Working With the Website
Viewing Website Context
1. Click
in the uPerform server workspace.
2. Click on the project name.
3. Click Document Library.
4. Navigate to the folder or document for which you would like to view the context.
This will open the binder for uPerform and Info Pak documents.
5. Click Assign Website Context on the left menu to display the website context.
Removing a Context from Content or a Document Library Folder
1. Click
in the uPerform server workspace.
2. Click on the project name.
3. Click Document Library.
4. Navigate to the document or folder from which the context should be removed, and click on
the document or folder name.
5. Click Assign Website Context on the left menu to display the first level of website folders
you have created.
6. Click + to the left of the folder name to navigate to the desired folder(s).
ANCILE Solutions, Inc.
117
Chapter 6: Working With the Website
7. Deselect the checkbox to the left of one or more folders to remove contexts in the website
folder(s).
8. Click Save.
9. Repeat Step 4 through Step 8 to remove additional context links from documents or folders in
the document library.
Assigning Content to a Website Folder
1. Click
in the uPerform server workspace.
2. Click on the project name.
3. Click Website.
4. Navigate to the website folder for which you want to assign content.
5. Click Assign Content.
6.
Perform one of the following options:
If You Want To
Then
Expand all items in the tree view
Click Expand All.
Collapse all items in the tree view
Click Collapse All.
7. Click + to the left of the folder name to navigate to the desired content.
8. Perform one of the following options:
If You Want To
Then
Add one or more documents
Select the checkbox to the left of one or more
documents.
Add one or more folders
Select the checkbox next to one or more folders.
9. Click Save.
118
ANCILE Solutions, Inc.
Chapter 6: Working With the Website
Building the Website via Dynamic Website Folders
The dynamic website folder functionality automatically populates your website using template
properties stored within the content. By planning your hierarchy, and assigning values to stored
properties within your template, you can automatically build and manage a multi-dimensional
website. For more information on properties, refer to Specifying New Template Settings:
Properties (on page 224).
Dynamic website folders are updated when you add or remove documents and then republish.
Document types include uPerform documents, as well as managed and web documents. You can
also alter the properties specified within a dynamic website folder to add or remove content from
the folder.
A dynamic website folder is identified by a
to the left of the folder name in the author view.
Optionally, you can populate your website via context assignment. For more information, refer to
Building the Website via Context Assignment (on page 113).
Working with Dynamic Website Folders
Creating a Dynamic Website Folder
1. Click
in the uPerform server workspace.
2. Click on the project name.
3. Click Website.
4. Navigate to the destination folder for the dynamic website folder.
5. Click Add Dynamic Website Folder.
ANCILE Solutions, Inc.
119
Chapter 6: Working With the Website
6. Complete the following fields:
Field
Description
Name
Enter a name for the dynamic website folder.
Description
Enter amplifying information about the folder.
7. Perform one of the following options:
If You Want To
Then
Add multiple languages
Go to Step 8.
Create the dynamic website folder with Go to Step 12.
one language enabled
8. Click Add Multiple Languages.
9. Select a default language from the drop-down list.
10. Click Enable.
120
ANCILE Solutions, Inc.
Chapter 6: Working With the Website
11. Complete the following fields:
Languages are generated based on the locales specified by the system administrator.
Field
Description
Name
Enter a name for the folder.
Description
Enter amplifying information about the folder.
Default Language
Optionally, change the default language for the
folder.
12. Select a language filter from the drop-down list.
13. Click Next.
14. Select the template containing the properties from which you want to create your dynamic
website folder.
15. Optionally, select Search all templates to expand the dynamic website folder to other
templates with matching properties.
16. Click Next.
17. Select a template property from the Property drop-down list.
ANCILE Solutions, Inc.
121
Chapter 6: Working With the Website
18. Select a condition from the Condition drop-down list:
Field
Description
=
Contains the exact values to be specified in Step
19.
For example:
Transaction Code = ME25 will return all
documents with the Transaction Code property
set to ME25.
Contains Any
Contains any of the values to be specified in Step
19, which allows you to provide a comma
delimited list of values within the Value field.
For example:
Transaction Code Contains Any ME25, VA01
will return all documents with the Transaction
Code property set to ME25 OR VA01.
IS
Contains the exact value specified in Step 18.
19. Enter a value(s) in the Value field.
20. Click Add.
21. Repeat Steps 17 through 20 to add additional properties and filtering conditions to the
dynamic website folder.
22. Click Save.
Editing a Dynamic Website Folder
1. Click
in the uPerform server workspace.
2. Click on the project name.
3. Click Website.
4. Select the dynamic website folder.
5. Select Edit Properties.
6. Complete/review the following fields:
Field
Description
Name
Enter a name for the dynamic website folder.
Description
Enter amplifying information about the folder.
7. Optionally, edit the language filter.
122
ANCILE Solutions, Inc.
Chapter 6: Working With the Website
8. Perform one of the following options:
If You Want To
Then
Add multiple languages
Click Add Multiple Languages, and go to Step
9.
Disable multiple languages
Click Disable Multiple Languages, and go to
Step 12.
9. Select a default language from the list.
10. Click Enable.
11. Go to Step 13.
12. Click Next.
ANCILE Solutions, Inc.
123
Chapter 6: Working With the Website
13. Select the template containing the properties from which you want to create your dynamic
website folder.
Changing the template will remove all filter criteria from the folder.
14. Optionally, select Search all templates to expand the dynamic website folder to other
templates with matching properties.
15. Click Next.
16. Select a template property from the Property drop-down list.
17. Select a condition from the Condition drop-down list:
Field
Description
Contains Any
Contains the exact values to be specified in Step 17,
and will return all documents with the Transaction
Code property.
For example:
Transaction Code = ME25 will return all
documents with the Transaction Code property set to
ME25.
=
Contains any of the values to be specified in Step
17, which allows you to provide a comma delimited
list of values within the Value field.
For example:
Transaction Code Contains Any ME25, VA01
will return all documents with the Transaction Code
property set to ME25 OR VA01.
IS
Contains the exact value specified in Step 19.
18. Enter a value(s) in the Value field.
19. Click Add.
20. Repeat Steps 15 through 18 to edit additional filtering conditions in the dynamic website
folder.
21. Click Save.
124
ANCILE Solutions, Inc.
Chapter 6: Working With the Website
Deleting a Dynamic Website Folder
1. Click
in the uPerform server workspace.
2. Click on the project name.
3. Click Website.
4. Select the Dynamic Website Folder.
5. Click Delete Folder.
6. Click OK.
Deleting the dynamic website folder will move the folder and subfolders to the recycle
bin.
ANCILE Solutions, Inc.
125
Chapter 6: Working With the Website
Browsing the Website
Via standard hyperlink navigation, you can browse the website and view the hierarchy and
published content objects.
Navigating via the Website Context
Content objects include a Website Context area on the cover page. This area provides a
hierarchical display of the object's location in the website. You can click on a hyperlink in the
displayed hierarchy to navigate to another location in the website.
126
ANCILE Solutions, Inc.
Chapter 6: Working With the Website
Publishing Content for Display on the Website
In addition to local publishing, uPerform provides a mechanism to publish uPerform content,
managed documents, and web documents directly from the server. The publish queue on the
server can be configured to automatically publish at off-peak hours. In addition, uPerform content
will publish to the website even if the template is not assigned to the project in which the content
resides.
Note that all content must be assigned a website context (either at the document level
or the folder level) before published server content will display on the website.
Publishing Configuration
You must be a part of the uPerform Publishing Administrators role to configure publishing
settings and manage the publish queue. For detailed information on uPerform roles, refer to
Managing Users, Roles, and Groups (on page 29).
ANCILE uPerform content types available for publishing are controlled by the template used to
create the content. uPerform content formats available for publishing are controlled by the server.
If the template for the document has been updated, you can republish all documents associated
with the template.
Output formats for managed documents (in Microsoft Word, PowerPoint, and Excel formats) are
dictated by the conversion types enabled. Managed documents in other formats (for example, .pdf
and .zip files) are not technically published to an alternate format or type. However, you must add
these managed documents to the publish queue in order to have the managed document display on
the website. This final step in the development process allows you to maintain access control to
your managed documents.
Web documents are not technically published to an alternate format or type. However, you must
add the web document to the publish queue in order to have the web document display on the
website. This final step in the development process allows you to maintain access control to your
web documents. Web documents are immediately displayed on the website after being added to
the publish queue.
Enabling Conversion Types for uPerform and Managed Documents
1. Click Administration on the left menu of the server workspace.
2. Click Server Administration in the Administration area.
ANCILE Solutions, Inc.
127
Chapter 6: Working With the Website
3. Click Publishing in the Server Administration area.
4. Select one or more of the following conversion types to enable:
You must have at least one conversion type selected in order to publish content.
Field
Description
Enable a uPerform course to
convert to PDF, HTML, or
Word
Select the checkbox(es) in the uPerform Course area
to enable conversion to PDF, HTML, or Word.
Enable a uPerform document Select the checkbox(es) in the uPerform Document
to convert to PDF,
area to enable conversion to PDF, Simulation,
Simulation, HTML,
HTML, PowerPoint, or Word.
PowerPoint, or Word.
Enable Word (.doc) to
convert to PDF, Source, or
HTML
Select the checkbox(es) in the Word (.doc) area to
enable conversion to PDF, Source, or HTML.
Enable Word (.docx) to
convert to PDF, Source, or
HTML
Select the checkbox(es) in the Word (.docx) area to
enable conversion to PDF, Source, or HTML.
Enable Excel (.xls) to convert Select the checkbox(es) in the Excel (.xls) area to
to PDF or Source
enable conversion to PDF or Source.
Enable Excel (.xlsx) to
convert to PDF or Source
Select the checkbox(es) in the Excel (.xlsx) area to
enable conversion to PDF or Source.
Enable PowerPoint (.ppt) to
convert to PDF or Source
Select the checkbox(es) in the PowerPoint (.ppt)
area to enable conversion to PDF or Source.
Enable PowerPoint (.pptx) to
convert to Source
Select the checkbox in the PowerPoint (.pptx) area
to enable conversion to Source.
5. Click Save.
128
ANCILE Solutions, Inc.
Chapter 6: Working With the Website
Publishing Content from the Server
The uPerform server can be configured to automatically publish content in the publish queue daily
at off-peak hours. Content is automatically placed in the queue when 1) you add content to the
publish queue, 2) the content has completed workflow and the workflow includes the option to
automatically publish content when the workflow is completed, or 3) the content is updated from
the Glossary when the option is enabled.
For detailed information on creating a regular publishing task, refer to the ANCILE uPerform
Administration user manual.
For detailed information on using workflow functionality, refer to Using Workflow (on page 143).
Via the publish queue, you can also immediately process one or more documents. For complete
details on the publish queue, refer to Viewing the Publish Queue and History (on page 130).
Adding a Document or Folder to the Publish Queue
The following procedure applies to uPerform, managed, and web documents and can be
performed by the publishing administrator.
1. Click
in the uPerform server workspace.
2. Click on the project name.
3. Click Document Library.
4. Perform one of the following:
If You Want To
Then
Add a folder to the publish queue
Navigate to the folder that you want to publish.
Add a document to the publish queue
Navigate to the folder in which the document is
located.
Click on the document to be added to the queue.
5. Click Add to Publish Queue on the left menu.
6. Click OK at the confirmation prompt.
If you update a definition in the Glossary, content associated with the definition that
has been previously approved via workflow and published will be automatically sent
back to the publishing queue. This allows you to republish the content with the updated
definition.
ANCILE Solutions, Inc.
129
Chapter 6: Working With the Website
Viewing the Publish Queue and History
The publish queue displays the publish events scheduled to start. Both uPerform and managed
documents are displayed in the publish queue.
The publish history list displays a record of publishing events from the last 30 days.
After 30 days, history records are removed on a first-in/first-out basis. History records
are not archived.
Viewing the Publish Queue
1. Click Administration on the left menu of the server workspace.
2. Click Server Administration in the Administration area.
3. Click Publishing in the Server Administration area.
4. Click View Publishing Queue on the left menu.
5. Review the following information:
Field
Description
Document Name
The name of the document included in the publish
processing.
Project Name
The name of the project containing the document.
Date Last Modified
The date and time the document was last modified.
Entered By
The ID of the user who last added the document.
Date Entered
The date and time the document was added to the
queue.
Status
The current status of the publishing process for the
document.
6. As necessary, click Previous or Next to navigate through the queue.
7. Optionally, click Remove to remove a document from the publish queue, or click Publish
Now to immediately publish the document.
130
ANCILE Solutions, Inc.
Chapter 6: Working With the Website
8. Perform one or more of the following actions:
If You Want To
Then
Empty the publish queue
Click Delete All.
Immediately process the publish queue
Click Publish All.
You will need to refresh the web browser
window if you want to verify that publishing is
complete.
Refresh the publish queue
Click Refresh Queue.
Viewing the Publish History
1. Click Administration on the left menu of the server workspace.
2. Click Server Administration in the Administration area.
3. Click Publishing in the Server Administration area.
4. Click View History on the left menu.
5. Click on the hyperlink in the Documents Processed column to the right of the history date to
be reviewed.
6. Review the following information:
Field
Description
Document Name
The name of the document included in the publish
processing.
Date Started
Lists the date and time the publish process was
started.
Date Completed
Lists the date and time the publish process was
completed.
ANCILE Solutions, Inc.
131
Chapter 6: Working With the Website
Field
Description
Outcome
Lists the success or failure status of the publishing
process.
Formats
Lists the number of formats processed during the
publish activity.
You can click on this hyperlinked number to review
the format details.
7. As necessary, click Previous or Next to navigate through the history list.
8. Optionally, click Refresh Queue to refresh the list.
9. Optionally, click View Different Date to view documents published on other dates.
Republishing Documents
Use this procedure to republish updated uPerform, managed, and web documents,
associated with an updated template. It is not necessary to republish documents that are
up-to-date.
1. Click Administration on the left menu.
2. Click Server Administration in the Administration area.
3. Click uPerform Templates in the Server Administration area.
4. Select a template from the list.
5. Click Republish on the left menu.
132
ANCILE Solutions, Inc.
Chapter 6: Working With the Website
6. Perform one or more of the following options:
If You Want To
Then
Republish all documents
associated with the updated
template regardless of
approval status
Deselect Only add documents with an ‘approved’
status.
View a list of documents
associated with the updated
template
Click List Documents.
An approved document is the most recent
version that has been sent to the
publishing queue by the project
administrator and has approved workflow
status.
Only documents which require updating
will be listed.
7. Click OK.
Documents will be added to the publishing queue. For more information, refer to
Publishing Content for Display on the Website (on page 127).
ANCILE Solutions, Inc.
133
Chapter 6: Working With the Website
Subscribing to Publish Events
You can subscribe to be notified when the publish activity is complete. Subscription notices can
be delivered via your uPerform personal page, email message, or via both methods.
Subscribing to a Publish Event
1. Click Administration on the left menu of the server workspace.
2. Click Server Administration in the Administration area.
3. Click Publishing in the Server Administration area.
4. Click Subscribe on the left menu.
5. Select one or more of the following options:
Option
Description
Post notifications to my
Personal Page.
Select this option to receive your subscription
notification in the My Alerts section of your
uPerform personal page.
Send notifications in an email Select this option to receive your subscription
report to [your email
notification via email message.
address].
Specify one of the following email notification
types: daily, weekly, or immediately after an event.
If you select the Immediate radio button, specify a
notification type.
6. Click OK.
134
ANCILE Solutions, Inc.
Chapter 6: Working With the Website
Publishing Courses to an LMS
Courses with assessment sections can be tracked using a Learning Management System (LMS).
When you publish to an LMS, uPerform leverages the Package Exchange Notification Services
(PENS) standard to support the transfer of published content to the LMS.
Tracking functionality includes the collection, receipt, and update notifications which display in
the LMS Transactions area on the content cover page.
You must be a system administrator, project administrator, or publishing administrator to add,
enable, or disable an LMS instance within the uPerform server.
Adding a New LMS
If you plan to publish courses to the ANCILE uLearn LMS, ensure that anonymous
access is enabled for the project. For more information, refer to Specifying Project
Settings (on page 72).
1. Click Administration on the left menu of the server workspace.
2. Click Server Administration in the Administration area.
3. Click LMS Settings in the Server Administration area.
4. Click New LMS on the left menu.
5. Complete the following fields:
Field
Description
Name
Enter a name for the LMS.
Description
Enter a description for the LMS.
ANCILE Solutions, Inc.
135
Chapter 6: Working With the Website
Field
Description
Name
Enter a name for the LMS.
URL
Enter the website address of the LMS (For example:
http://acme.uLearn.com).
URL Encoding
Select the URL encoding format from the dropdown
list.
Authentication Required
Click the checkbox if you want to require
authentication.
Login
If authentication is required, enter the login name
associated with the LMS.
Password
If authentication is required, enter the password
associated with the LMS.
Password Confirmation
Confirm the password.
Track Alerts
Select Yes if you want to track alerts for collect,
receipt, and update messages to the uPerform server.
Active Server
Select Yes to enable communication with the LMS.
Select No to disable communication with the LMS.
E-Mail Address
Enter the email address where you can receive alert
notifications.
6. Click Save.
Modifying LMS Properties
1. Click Administration on the left menu of the server workspace.
2. Click Server Administration in the Administration area.
3. Click LMS Settings in the System Administration area.
4. Click on the name of the LMS you want to modify.
5. Click Edit Properties on the left menu.
6. As required, edit the following fields:
136
Field
Description
Name
Enter a name for the LMS.
Description
Enter a description for the LMS.
URL
Enter the website address of the LMS (For example:
http://acme.uLearn.com).
URL Encoding
Select the URL encoding format from the dropdown list.
ANCILE Solutions, Inc.
Chapter 6: Working With the Website
Field
Description
Authentication Required
Click the checkbox if you want to require
authentication.
Login
If authentication is required, enter the login name
associated with the LMS.
Password
If authentication is required, enter the password
associated with the LMS.
Password Confirmation
Confirm the password.
Track Alerts
Select Yes if you want to track alerts for collect,
receipt, and update messages to the uPerform server.
Active Server
Select Yes to enable communication with the LMS.
Select No to disable communication with the LMS.
E-Mail Address
Enter the email address where you can receive alert
notifications.
7. Click Save.
Assigning Projects to an LMS
Publishing any course from a project to which an LMS is assigned will result in PENS
notifications being sent to all LMSs associated with that project.
1. Click Administration on the left menu of the server workspace.
2. Click Server Administration in the Administration area.
3. Click LMS Settings in the System Administration area.
4. Click on the name of the LMS to be assigned to a project.
5. Click Assigned Projects in the left menu.
6. Click the checkbox next to the name of the project(s) to be assigned to the LMS.
7. Click Save.
ANCILE Solutions, Inc.
137
Chapter 6: Working With the Website
Unassigning Projects from an LMS
1. Click Administration on the left menu of the server workspace.
2. Click Server Administration in the Administration area.
3. Click LMS Settings in the System Administration area.
4. Click on the name of the LMS to be assigned to a project.
5. Click Assigned Projects on the left menu.
6. Deselect the checkbox next to the name of the project(s) to unassign from the LMS.
7. Click Save.
Enabling or Disabling an LMS
Enabling an LMS starts communication between the LMS and the uPerform server.
Disabling an LMS stops communication between the LMS and the uPerform server.
Disabling does not remove content already transmitted to the LMS. Communication
history is still available in the LMS Transactions area of the project cover page.
1. Click Administration on the left menu of the server workspace.
2. Click Server Administration in the Administration area.
3. Click LMS Settings in the System Administration area.
4. Click on the name of the LMS you want to enable or disable.
5. Click Edit Properties on the left menu.
6. Choose one of the following options:
If You Want To
Then
To enable an LMS
Select the Yes radio button associated with Active Server.
To disable an LMS
Select the No radio button associated with Active Server.
7. Click Save.
138
ANCILE Solutions, Inc.
Chapter 6: Working With the Website
Viewing the End User Website
From your My Projects list on your personal page you can access both the document library and
the end user website views of the project. To display the end user website view of your project,
click
to the right of the project name in the My Projects list and navigate to the desired
website folder.
You can also view the end user website via the View as End User link on the left menu, which is
available from website folders, documents, and projects.
When the website is displayed, end users who are logged in can toggle between viewing all help
content (Show All Help Documents), viewing just the help content applicable to the specified
language (Show Filtered Documents), or viewing content that has been related to the content
displayed (Show Related Documents). In addition, an anonymous end user can select a language
that they want the uPerform server to display.
ANCILE Solutions, Inc.
139
Chapter 6: Working With the Website
When the end user clicks on a help link, all available output formats are displayed.
140
ANCILE Solutions, Inc.
Chapter 6: Working With the Website
Configuring and Customizing the Website
Refer to the ANCILE uPerform Administration user manual for information on website
customizations.
ANCILE Solutions, Inc.
141
Chapter 7: Using Workflow
Workflow functionality in ANCILE uPerform allows you to automate
the process of routing content to reviewers. Using uPerform, you can
create and initiate workflow, and allow reviewers to approve or reject
content.
143
Chapter 7: Using Workflow
Introduction to Workflow
To facilitate review of content, uPerform allows you to create and initiate workflow processes.
During the workflow process, the content is circulated among a list of uPerform users who can
approve or reject the content.
144
ANCILE Solutions, Inc.
Chapter 7: Using Workflow
Creating and Starting a Workflow
In order to start a workflow on a document, the document must be checked into the server.
Administrators can create predefined workflow groups from the server workspace.
These workflow groups are available to all projects on the uPerform server.
Authors can create and start ad-hoc workflows if granted permission from the project
administrator. For more information, refer to Specifying Project Settings (on page
72).
Creating a Workflow
1. Click Workflow on the left menu to display a list of existing workflow groups.
2. Click New Workflow.
3. Enter the following information:
Field
Description
Name
Enter the name of the workflow group.
Description
Enter optional amplifying information about the
workflow.
Members
Click uPerform Users to add users to the workflow
group.
4. After selecting the users, use the up and down arrows to the right of the Members list to set
the sequence of reviewers in the approval process.
5. Click OK.
ANCILE Solutions, Inc.
145
Chapter 7: Using Workflow
Starting a Workflow
1. Go to the document cover page in the server workspace.
The document cover page for uPerform content is located within the Translations area
of the binder.
2. Click Start Workflow on the left menu.
3. Select one of the following options to specify approvers:
Option
Description
Use selected approval group
To use a predefined workflow, select the name.
Use individual approvers
added below
To create an ad hoc list of reviewers, click
uPerform Users and select the users.
Use the up and down arrows to set the sequence of
reviewers in the approval process.
This option always displays for an administrator.
This option displays for an author only if the project
administrator has enabled ad-hoc workflow
functionality on the project.
4. To publish the document when the predefined or ad-hoc workflow process is complete, select
the Automatically publish this document when the workflow process finishes. (approval
group option only) checkbox.
5. To enable versioning in workflow, select the Allow approvers with Editor rights to replace
the document (or add new versions) during the approval process checkbox.
6. Click Save.
7. Click OK on the confirmation page.
146
ANCILE Solutions, Inc.
Chapter 7: Using Workflow
Using Workflow Notifications
The uPerform workflow functionality includes email notifications to inform reviewers of
workflow tasks and to inform authors when the workflow has been completed. These notifications
occur automatically; no setup is required to enable workflow notifications.
Workflow notifications are sent via email.
A reviewer's My Review List displays documents in workflow that are assigned to the reviewer.
For more information, refer to Using the My Review List (on page 25).
Viewing a Reviewer Notification
As the workflow progresses through the list of reviewers, each reviewer will receive an email
notifying him of a document awaiting review.
The notification email subject line reads "You are needed to review the document "[Document
Name]". The email includes a hyperlink to the document.
Viewing an Author Notification
When the workflow for a document is complete, the workflow creator will receive an email
notification of workflow completion. The email includes a hyperlink to the document.
ANCILE Solutions, Inc.
147
Chapter 7: Using Workflow
Updating a Workflow
You can update a workflow and its members. Documents that are already in workflow will not be
affected by an update.
Updating a Workflow
1. Click Workflow on the left menu to display a list of existing workflows.
2. Click on the name of the workflow to be updated.
3. As desired, edit the name or description of the workflow.
4. As desired, reorder the list of reviewers using the up and down arrows.
5. To add or remove reviewers, click uPerform Users.
6. Click Save.
148
ANCILE Solutions, Inc.
Chapter 7: Using Workflow
Participating in a Workflow
When a workflow process begins for a document, the first user in the workflow queue receives an
email message indicating the document is awaiting review. The email also contains a link to the
document within the uPerform system.
Using the My Review List
Your My Review List displays content currently in a workflow assigned to you. The five most
recent documents are displayed. To display all documents, click More....
To view a workflow item in your review list:
1. Click
.
2. Click on the document name in the My Review List.
3. From the document cover page, you can review the latest version of the document to approve
or reject the document.
Making Comments or Changes During a Workflow
Reviewers are allowed to make changes to content during workflow if the author or administrator
who started the workflow has allowed approvers with editor rights access to edit the document.
Approving a Document During Workflow
1. Go to the document cover page in the server workspace.
The document cover page for uPerform content is located within the Translations area
of the binder.
2. Click I Approve in the Workflow area of the window.
3. Click OK.
When a document is approved by the final reviewer, the workflow creator receives
email notification of workflow completion.
ANCILE Solutions, Inc.
149
Chapter 7: Using Workflow
Rejecting a Document During Workflow
1. Go to the document cover page in the server workspace.
The document cover page for uPerform content is located within the Translations area
of the binder.
2. Click I do not Approve in the Workflow area of the window.
3. Complete the following information:
Field
Description
To
Enter any email address(es) in addition to previous
approvers and authors, or click Collaboration Users
to select users from a list.
Subject
Edit the default subject text, as necessary.
Message
As desired, add information to the default message
text.
4. Click OK.
When a document is rejected, all users in the notification To field receive an email
informing them of the rejection.
150
ANCILE Solutions, Inc.
Chapter 7: Using Workflow
Stopping a Workflow and Deleting a Workflow
Authors and administrators can stop a workflow. Reviewers who have completed their review are
notified via email. Restarting the workflow begins with the first reviewer.
Deleting a workflow is not the same as stopping a workflow. Deleted workflows cannot be
recovered.
Stopping a Workflow
1. Go to the document cover page in the server workspace.
The document cover page for uPerform content is located within the Translations area
of the binder.
2. Click Stop Workflow on the left menu.
3. Complete the following fields:
Field
Description
To
Enter the email address(es) or click uPerform Users
to select users from a list.
Subject
Edit the default subject text, as necessary.
Message
As desired, add information to the default message
text.
4. Click OK.
ANCILE Solutions, Inc.
151
Chapter 7: Using Workflow
Deleting a Workflow Group
1. Click Workflow on the left menu to display a list of existing workflows.
2. Click Delete Workflow on the left menu.
3. Select the checkbox to the left of the workflow to be deleted or, optionally, select the
checkbox next to Select All.
4. Click OK to confirm.
5. Click OK to delete.
Deleting a workflow is not the same as stopping a workflow. Deleted workflows
cannot be recovered. Documents using this workflow continue to be processed.
152
ANCILE Solutions, Inc.
Chapter 7: Using Workflow
Viewing Workflow History
Via the server workspace you can view a document's most recent workflow history so you can
keep track of workflow events as they occur. Events you can track include:
Version
Owner
Modified Date
Modified By
Workflow Status
Approval Setting
Approved by
Next Approver
Workflow Start Date
Workflow End Date
Viewing the Workflow History
1. Navigate to the document cover page.
The document cover page for uPerform content is located in the Translations area of
the binder.
2. Click Show Workflow History on the left menu.
3. Review the following information:
Field
Description
Version
The version number for the document in workflow.
Owner
The name of the uPerform user who owns the
document.
Modified Date
The last time the document was modified.
Modified By
The name of the uPerform user who last modified
the document.
ANCILE Solutions, Inc.
153
Chapter 7: Using Workflow
Field
Description
Workflow Status
The following values are available: Approved,
Rejected, and In Process
Approval Setting
Displays approved/rejected status for the document.
Approved by
If the document has been approved by one or more
reviewers during workflow, the approvers are
listed.
Next Approver
If the document is still within an active workflow,
the next approver in the sequence is displayed.
Workflow Start Date
The date the workflow began.
Workflow End Date
The date the workflow ended.
When a new version of a document is checked in, the version number will be
incremented and a new entry will display in the workflow history. Workflow history
information will be cleared out if a new version of a document is checked in, or is
automatically globalized when a definition is updated.
154
ANCILE Solutions, Inc.
Chapter 8: Collaborating on Content
Via the ANCILE uPerform server workspace, authors and
administrators can view both author-generated and user-generated
discussion forums. In addition, authors, administrators, and end users
can use the Tell Others feature to send hyperlinks to content of interest
to other uPerform users.
155
Chapter 8: Collaborating on Content
Introduction to Collaboration
There are two types of discussions in uPerform: document-level and folder-level.
Document-level: Document-level discussions are created automatically when a new
document is created and exist in both the Document Library (private) and Website
(public) spaces. Author-to-author discussions and end user-to-author feedback are
private to authors. End users contribute feedback via the Send Feedback link available
on website content pages. There are also public discussions that are viewable within
the website context. These include end user-to-end user discussions and end user-toauthor discussions. End users contribute to these public discussions via the Website
Discussion link available on website content pages.
Folder-level: Folder-level discussions are created by Administrators in the Document
Library or the website. They are not tied to a specific document or folder but exist as
independent entities. Administrators can create as many different discussions as they
like in a folder and they can be moved to other folders within their context. That is,
Document Library folder-level discussions must remain in the Document Library and
website discussions must remain in the website context.
Discussions can be viewed by authors and administrators via the server workspace.
156
ANCILE Solutions, Inc.
Chapter 8: Collaborating on Content
Viewing Discussions
You can view a summary list of both author and website discussions and also drill down to read
individual discussion messages. Discussions are displayed in a standard threaded format to
indicate the hierarchy of message replies.
Viewing a Discussion
1. Click
in the uPerform server workspace.
2. Click on the project name.
3. Click Document Library.
4. Navigate to the desired folder.
To view a folder-level discussion, click on the hyperlink of the discussion.
5. Perform one of the following options:
If You Want To
Then
View a folder-level discussion
Click on the hyperlink of the discussion.
View an author or website discussion
for uPerform content
Click on the content name.
Under Translations, select the translation that
contains the discussion you want to view.
Go to Step 7.
View an author or website discussion
for a managed document
Click on the content name.
Go to Step 7.
6. Perform one of the following options:
If You Want To
Then
View an Author Discussion
In the Author Discussion area, view a list of the
author discussion entries.
To view the contents of long messages or to view
all entries, click Author Discussion.
View a Website Discussion
In the Website Discussion area, view a list of the
user discussion entries.
To view the contents of long messages or to view
all entries, click on Website Discussion.
7. Click on the hyperlink of the message you want to read.
ANCILE Solutions, Inc.
157
Chapter 8: Collaborating on Content
Using Discussion Entries
You can create and reply to discussion entries from directly within the uPerform server
workspace.
Creating a Discussion Entry
1. Navigate to the desired folder in the uPerform server workspace.
2. Perform one of the following options:
If You Want To
Then
Create an author or website discussion
Go to Step 3.
Create a folder-level discussion
Click Add Discussion on the left menu.
Enter Name and Description.
Click Save.
3. Go to the document cover page in the server workspace.
The document cover page for uPerform content is located within the Translations area
of the binder.
4. Scroll down to the Author Discussion or Website Discussion area of the window.
5. Click Author Discussion or Website Discussion.
6. Click New Message on the left menu.
7. Complete the following fields:
Field
Description
Subject
Enter the message subject.
Content
Enter the text of the message.
8. Click Save.
158
ANCILE Solutions, Inc.
Chapter 8: Collaborating on Content
Replying to a Discussion Entry
1. Navigate to the desired folder in the uPerform server workspace.
2. Go to the document cover page in the server workspace.
The document cover page for uPerform content is located within the Translations area
of the binder.
3. Scroll down to the Author Discussion or Website Discussion area of the window.
4. Click Author Discussion or Website Discussion.
5. Click Reply to message on the left menu.
6. Complete the following fields:
Field
Description
Subject
Enter the message subject.
Content
Enter the text of the message.
7. Click Save.
ANCILE Solutions, Inc.
159
Chapter 8: Collaborating on Content
Using Subscriptions Within a Discussion
You can subscribe to a discussion to be notified of new messages in the discussion. You can
receive notifications regarding your subscription via email and/or your personal page.
An owner is automatically subscribed to the author and website discussions associated with
content created by the owner.
Subscribing to a Folder or Discussion
1. Go to the folder in the server workspace.
2. Select one of the following options to subscribe to the folder:
If You Want To
Then
Add to your favorites located on the
server home page.
Click Add To My Favorites.
(To remove from your favorites, click My
Favorites on the Home page and then click
Delete.)
Subscribe to the folder to receive a
notification when messages are posted
Click Subscribe on the left menu.
Specify your desired personal page notification
options.
Click OK.
(To unsubscribe from the folder, click
Unsubscribe on the left menu. Then, click OK.)
3. Select one of the following options to subscribe to a discussion:
If You Want To
Then
Subscribe to an Author or Website
Discussion
Go to Step 4.
Subscribe to a folder-level discussion
Navigate to the discussion cover page.
Click Subscribe on the left menu.
(To unsubscribe from the discussion, click
Unsubscribe on the left menu. Then, click OK.)
4. Navigate to the document cover page in the folder or server workspace.
The document cover page for uPerform content is located within the Translations area
of the binder.
5. Scroll down to the Author Discussion or Website Discussion area of the window.
160
ANCILE Solutions, Inc.
Chapter 8: Collaborating on Content
6. Click Author Discussion or Website Discussion.
7. Select one of the following options to subscribe to the document:
If You Want To
Then
Add to your favorites located on the
server home page.
Click Add To My Favorites.
(To remove from your favorites, click My
Favorites on the Home page and then click
Delete.)
Add yourself to the recipient list to
receive copies of messages posted to
the discussion
Click Add Me To Discussion. Then click Add
Me To Discussion again.
(To remove yourself from the discussion, click
Remove Me From Discussion on the left menu.
Then, click Remove Me From Discussion
again.)
Subscribe to the discussion to receive a Click Subscribe on the left menu.
notification when messages are posted Specify your desired personal page notification
options.
Click OK.
(To unsubscribe from the discussion, click
Unsubscribe on the left menu. Then, click OK.)
ANCILE Solutions, Inc.
161
Chapter 8: Collaborating on Content
Managing Discussions
Administrators can delete messages within a discussion thread.
Deleting a Message in a Discussion
1. Go to the document cover page in the server workspace.
The document cover page for uPerform content is located within the Translations area
of the binder.
2. Scroll down to the Author Discussion or Website Discussion area of the window.
3. Click Author Discussion or Website Discussion.
4. Click Remove Messages on the left menu.
5. Select the checkbox(es) of the message(s) to delete or, optionally, click Select All.
6. Click OK to confirm your selection(s).
7. Click OK to delete your selection(s).
162
ANCILE Solutions, Inc.
Chapter 8: Collaborating on Content
Using the Tell Others Feature
You can use the Tell Others feature to send an email containing a link to a particular object within
the uPerform server. A Tell Others link can be sent to one or more uPerform users.
The email message you send is customizable and contains a link to the item of interest to provide
quick and easy access.
Creating a Tell Others Notification
1. Go to the document cover page in the server workspace.
The document cover page for uPerform content is located within the Translations area
of the binder.
2. Click Tell Others on the left menu.
3. Complete the following information:
Field
Description
To
Enter one or more recipient email addresses.
If you specify multiple email addresses, separate
each with a comma.
To specify users from the uPerform address book,
click uPerform Users.
Subject
As desired, modify the default email subject text.
Message Content
As desired, provide additional text to the email
body.
ANCILE Solutions, Inc.
163
Chapter 8: Collaborating on Content
4. To copy yourself on the message, select the Copy yourself on message checkbox.
5. Click OK.
164
ANCILE Solutions, Inc.
Chapter 9: Working with the Glossary
ANCILE uPerform allows you to maintain a centralized database of
terms and definitions used in procedural content. This glossary
functionality ensures authors are using consistent and approved
definitions.
Authors can retrieve definitions and suggest alternate definitions.
Administrators manage the glossary settings, including the use of richtext formatting in definitions and the tracking of term usage.
The glossary functionality is available only in procedural content.
165
Chapter 9: Working with the Glossary
Introduction to the Glossary
Glossary functionality is provided with uPerform to allow you to maintain a database of terms and
definitions for procedural content that is checked into the uPerform server. The glossary allows
you to insert customized, business-specific definitions into your documents.
There is one glossary database for the entire uPerform instance. However, the definition for a term
may vary between the projects within the uPerform instance.
Maintaining terms and definitions in one repository allows for documents to be updated quickly
and accurately. New terms can be added, and changes can be made to definitions for existing
terms within the glossary.
Once you have standardized the valid terms and definitions, the globalization process is used to
update definitions (descriptions) of terms (fields) within the documents prior to making them
available to your users.
You can create and manage multiple definitions for a single term based on the folder location of
the document. Glossary will then insert the appropriate definition into your document based on
this location and the document language.
Only one language can be assigned to a definition.
Your administrator can enable or disable the use of a centralized glossary. If the centralized
glossary is disabled, authors can enter definitions directly into a document.
166
ANCILE Solutions, Inc.
Chapter 9: Working with the Glossary
Specifying Term Definitions
Terms and definitions are displayed in recorded Field/Description tables within the document
view of uPerform content. Field description tables that are inserted during editing as a step will
not support glossary functionality. The following is an illustration of a recorded Field/Description
table.
If your project is using a centralized glossary, definitions are created and managed by the
administrator and inserted into the document during check in or during a process called
globalization. You can also manually insert or update definitions during editing. In addition, you
can suggest a new definition for the administrator‟s consideration.
Updating Definitions
Prior to updating definitions from the editor, you must have checked the document into
the server and closed the document in the uPerform editor.
1. Select OPEN > OPEN FROM ANCILE UPERFORM SERVER....
2. Select the document to open.
3. Click OK.
4. Click the Document tab.
5. Select TOOLS > UPDATE TERM DEFINITIONS.
The Field/Description tables in the document are updated with definitions from the server.
Suggesting a Definition
1. Open a document in the editor.
2. Click the Document tab.
3. Navigate to the Field/Description table.
ANCILE Solutions, Inc.
167
Chapter 9: Working with the Glossary
4. Click Suggest Definition to the right of the definition cell.
You can review the alternate definitions available in other document library contexts
from the Suggest New Definition window.
5. Enter the definition in the Definition text box.
6. Optionally, click Format... to apply formatting options.
7. Click OK.
8. At the confirmation prompt, click Yes to submit the definition as a suggestion.
Entering a Definition When the Centralized Glossary is Disabled
1. Create or open a document in the editor.
2. Click the Document tab.
3. Navigate to the Field/Description table.
4. Enter the definition in the Description column of the Field/Description table.
168
ANCILE Solutions, Inc.
Chapter 9: Working with the Glossary
Browsing the Glossary from the Editor
From the editor, you can browse the entire glossary database and search for one or more specific
terms. The term page displayed when browsing the glossary lists all definitions for the term and
its synonyms.
If you are using the editor in standalone or offline mode, the glossary is not available
and the associated menu option is grayed out.
Viewing a Term and Associated Information
1. Select TOOLS > BROWSE GLOSSARY... from the editor to display the glossary page in a web
browser window.
2. Enter the term in the Find Term field.
3. Click Search.
4. Review the following information:
Field
Description
Definitions
Lists all definitions for the term.
Suggestions
Lists any suggestions contributed by authors. Only glossary
administrators can view suggestions.
Synonyms
Lists any synonyms available for the term.
ANCILE Solutions, Inc.
169
Chapter 9: Working with the Glossary
Managing Glossary Settings
The glossary administrator is typically responsible for maintaining the instance-wide glossary
settings. These settings affect all projects in the uPerform instance.
You must be a part of the uPerform Glossary Administrators group to configure glossary settings.
For detailed information on uPerform groups, refer to Managing Users, Roles, and Groups (on
page 29).
The following settings can be managed from the server workspace:
Using a centralized glossary: If you do not select to enable the centralized glossary,
authors can enter definitions directly into a uPerform document.
Using rich text in definitions: You can specify the use of rich text formatting (for
example, bold, italic, and underline) in your definitions.
Specifying a default language: You can indicate the language that will be used for a
definition if there is no definition in the document's language.
Enabling the Centralized Glossary
1. Click Administration on the left menu of the server workspace.
2. Click Server Administration in the Administration area.
3. Click Glossary in the Server Administration area.
4. Select the Enable Glossary checkbox.
5. Click Save.
170
ANCILE Solutions, Inc.
Chapter 9: Working with the Glossary
Disabling the Centralized Glossary
1. Click Administration on the left menu of the server workspace.
2. Click Server Administration in the Administration area.
3. Click Glossary in the Server Administration area.
4. Deselect the Enable Glossary checkbox.
5. Click Save.
Enabling Rich Text in Definitions
1. Click Administration on the left menu of the server workspace.
2. Click Server Administration in the Administration area.
3. Click Glossary in the Server Administration area.
4. Select the Allow Rich Text in Definitions checkbox.
5. Click Save.
Disabling Rich Text in Definitions
1. Click Administration on the left menu of the server workspace.
2. Click Server Administration in the Administration area.
3. Click Glossary in the Server Administration area.
4. Deselect the Allow Rich Text in Definitions checkbox.
5. Click Save.
ANCILE Solutions, Inc.
171
Chapter 9: Working with the Glossary
Setting the Default Language for Definitions
1. Click Administration on the left menu of the server workspace.
2. Click Server Administration in the Administration area.
3. Click Glossary in the Server Administration area.
4. Select the desired default language from the Default Language for Definitions drop-down
list.
A definition in the default language is used when a term does not have a definition in
the document language. For this reason, you should ensure that all terms have a
definition available in the default language.
5. Click Save.
172
ANCILE Solutions, Inc.
Chapter 9: Working with the Glossary
Adding Terms and Definitions
When you add a new term, the term is available to all projects in the uPerform instance. Each
project can have one or more unique definitions for the term.
Adding a Term and Definition
1. Click Glossary on the left menu of the server workspace.
2. Click Add Term on the left menu.
3. Enter the new term in the Enter the new term to add field.
4. Click Save to display the New Definition form.
5. Select the language for the definition from the Definition Language drop-down list.
6. Enter the definition in the text field.
If you have enabled the use of rich text in definitions, you can set the font, font size,
and other character attributes for your definition text. You can also use color in your
definition text and background and embed a hyperlink within the definition. For more
information, refer to Formatting a Definition (on page 177).
7. Click Save.
8. Add a context to the term as described in Assigning a Context to a Definition (on page 174).
ANCILE Solutions, Inc.
173
Chapter 9: Working with the Glossary
Adding a Definition to an Existing Term
1. Click Glossary on the left menu of the server workspace.
2. Enter the term to which the definition should be added in the Find Term field.
3. Click Search.
4. Click Add Definition on the left menu.
5. Select the language for the definition from the Definition Language drop-down list.
6. Enter the definition in the text field.
If you have enabled the use of rich text in definitions, you can set the font, font size,
and other character attributes for your definition text. You can also use color in your
definition text and background and embed a hyperlink within the definition. For more
information, refer to Formatting a Definition (on page 177).
7. Click Save.
8. Add a context to the term as described in Assigning a Context to a Definition (on page 174).
Assigning a Context to a Definition
1. Click Glossary on the left menu of the server workspace.
2. Enter the term to which the definition should be added in the Find Term field.
3. Click Search.
4. In the Definitions portion of the window, click Edit.
174
ANCILE Solutions, Inc.
Chapter 9: Working with the Glossary
5. Click Change Context on the left menu.
6. To apply this definition to all projects in the instance, select the [workspace name] checkbox.
To apply this definition only to specific projects or folders (contexts), select the checkbox for
the project(s) or folder(s).
The definition can reside in the glossary database without a context, but in order for a
definition to be used in a document; at least one context must be applied to the
definition.
7. Click Save.
ANCILE Solutions, Inc.
175
Chapter 9: Working with the Glossary
Updating Terms and Definitions
You cannot edit a term, but you can add a term as a synonym and delete the original term. For
additional information on synonyms, refer to Managing Synonyms (on page 181).
Editing a Definition
1. Click Glossary on the left menu of the server workspace.
2. Enter the term associated with the definition in the Find Term field.
3. Click Search.
4. Locate the desired definition and context in the Definitions portion of the window, and click
Edit.
5. Edit the definition.
6. Click Save.
Content associated with the updated definition will be automatically sent to the globalize queue.
Additionally, any content that has been approved via workflow and previously published will be
sent to the publishing queue. This allows you to republish the document. Workflow history is
retained for content related to the definition.
176
ANCILE Solutions, Inc.
Chapter 9: Working with the Glossary
Formatting a Definition
1. Click Glossary on the left menu of the server workspace.
2. Enter the term associated with the definition in the Find Term field.
3. Click Search.
4. Click Edit in the Definitions portion of the window.
5. Highlight the definition text and format as desired using the following options. Depending on
your rich-text formatting settings, some of these options may not be available:
Field
Description
Font
Select the desired font from the drop-down list.
Size
Select the desired font size from the drop-down list.
Bold, Italic, Underline
Select from the bold, italic, and underline options as
desired.
Numbering, Bullets
Format the highlighted text as a numbered or
bulleted list.
Text Color
Specify the desired color for the text.
Background Color
Specify the desired background color for the
definition text.
Insert Link
Format the highlighted text as a hyperlink to open in
the same window or a new window.
6. Click Save.
Workflow history is retained for content related to the definition.
Deleting a Term
1. Click Glossary on the left menu of the server workspace.
2. Enter the term to be deleted in the Find Term field.
3. Click Search.
4. Click Delete Term on the left menu.
5. Click OK.
Deleting a term removes the term and its definition from the glossary. If the term has
associated synonym(s), the definitions of the synonyms remain.
ANCILE Solutions, Inc.
177
Chapter 9: Working with the Glossary
Deleting a Definition
1. Click Glossary on the left menu of the server workspace.
2. Enter the term associated with the definition to be deleted in the Find Term field.
3. Click Search.
4. Locate the desired definition in the Definitions portion of the window.
5. Click Delete.
6. Click OK on the confirmation window displayed.
178
ANCILE Solutions, Inc.
Chapter 9: Working with the Glossary
Managing Glossary Suggestions
Authors can suggest alternate definitions for a term from the editor workspace.
The glossary administrator is responsible for reviewing glossary suggestions and accepting or
rejecting the suggestion.
You must be a Glossary Administrator to review and act on suggestions. For detailed information
on uPerform groups, refer to Managing Users, Roles, and Groups (on page 29).
Viewing Suggestions
1. Click Glossary on the left menu of the server workspace.
2. Click View All Suggestions to display a list of all terms with suggestions.
3. Click on a term to view the suggestion(s).
4. Scroll to the Suggestions portion of the window to view the suggestion list.
Suggestions in the same language and context of an existing definition display only as
a link. Click on a link to view the suggestion.
Accepting a Suggestion
1. Click Glossary on the left menu of the server workspace.
2. Click View All Suggestions to display a list of all terms with suggestions.
3. Click on a term to view the suggestion(s).
4. Scroll to the Suggestions portion of the window, and click Accept to add this suggestion as a
new definition.
Accepting a Suggestion Intended to Replace the Current Definition
1. Click Glossary on the left menu of the server workspace.
2. Click View All Suggestions to display a list of all terms with suggestions.
ANCILE Solutions, Inc.
179
Chapter 9: Working with the Glossary
3. Click on a term to view the suggestion(s).
4. Scroll to the Definitions portion of the window to view the suggestion hyperlink to the right of
Context and click on the suggestion hyperlink.
5. Under Suggestions, click Replace Existing to replace the current definition.
Accepting a Suggestion to Create a New Definition
1. Click Glossary on the left menu of the server workspace.
2. Click View All Suggestions to display a list of all terms with suggestions.
3. Click on a term to view the suggestion(s).
4. Scroll to the Definitions portion of the window to view the suggestion hyperlink to the right of
Context.
5. Click on the suggestion hyperlink, and select Add New.
6. Add a context to the definition as described in Assigning a Context to a Definition (on page
174).
Rejecting a Suggestion
1. Click Glossary on the left menu of the server workspace.
2. Click View All Suggestions to display a list of all terms with suggestions.
3. Click on a term to view the suggestion(s).
4. Scroll to the Suggestions portion of the window, and click Reject for the suggestion(s).
180
ANCILE Solutions, Inc.
Chapter 9: Working with the Glossary
Managing Synonyms
Synonyms allow the administrator to establish a relationship between two or more terms.
If you remove a synonym, you remove the relationship between the affected terms. However,
removing a synonym does not delete the term or definitions.
Adding a New Synonym for a Term
1. Click Glossary on the left menu of the server workspace.
2. Enter the existing term associated to which you want to add a new synonym in the Find Term
field.
3. Click Search.
4. Click Change Synonyms on the left menu.
5. Enter the new synonym in the Enter Synonym field.
6. Click Add.
To enter multiple synonyms, repeat Step 5 and Step 6.
7. Click Save.
Removing a Synonym
1. Click Glossary on the left menu of the server workspace.
2. Enter the term associated with the synonym in the Find Term field.
3. Click Search.
ANCILE Solutions, Inc.
181
Chapter 9: Working with the Glossary
4. Click Change Synonyms on the left menu.
5. In the Synonyms list, select the synonym(s) to be removed.
6. Click Remove Selected.
7. Click Save.
182
ANCILE Solutions, Inc.
Chapter 9: Working with the Glossary
Using Globalize
Definitions for terms in uPerform content can be updated using a process called globalization.
During globalization, definitions are inserted into documents and new terms in documents are
gathered for inclusion in the central glossary on the server. The globalization process affects only
text within recorded Field/Description tables. Text within Field/Description tables manually
inserted during editing is ignored.
If a term exists in the document, but not in the glossary, the term is added to the glossary with a
blank definition. The glossary will then need to be updated with a customized definition of the
new term. You can then globalize to distribute the update to the documents containing the term.
If your glossary administrator has enabled the centralized glossary, all uPerform documents will
be globalized upon check in. Non-uPerform documents, such as managed documents, are not
globalized.
The glossary functionality is not case-sensitive, meaning that a term in a document will be
considered the same as a term in the glossary regardless of whether the same capitalization rules
are applied. Purchase order and Purchase Order in documents are considered the same term. The
Glossary is character-string dependent, however; Purchase order (one space) is different than
Purchase order (two spaces).
During globalization, each globalized document receives a minor version update only if
modifications have been made to the document (for example, 1.1, 2.1, 3.2).
ANCILE Solutions, Inc.
183
Chapter 9: Working with the Glossary
Globalizing Documents
You can globalize a single document directly from the editor workspace. In addition, the globalize
queue on the server can be configured to automatically globalize documents daily at off-peak
hours. Documents are automatically placed in the queue when 1) the definition value is changed,
2) the definition is removed, 3) a new definition is added, or 4) the assigned definition context is
changed or removed, or a new context is added to terms that are contained in that document.
In addition, uPerform documents are automatically globalized when the documents are checked
into the server.
Globalizing a Single Document From the Editor
1. Select OPEN > OPEN FROM ANCILE UPERFORM SERVER....
2. Select the document to open.
3. Click OK.
4. Click the Document tab.
5. Select TOOLS > UPDATE TERM DEFINITIONS.
In this scenario, the document will not display in the globalize history list.
Globalizing a Batch of Documents on a Daily Frequency
The uPerform server can be configured to automatically globalize the documents in the globalize
queue daily during off-peak hours. Documents are automatically placed in the queue when 1) the
definition value is changed, 2) the definition is removed, 3) a new definition is added, or 4) the
assigned definition context is changed or removed, or a new context added.
For detailed information on creating a daily globalize task, refer to the ANCILE uPerform
Administration user manual.
Via the globalize queue, you can also immediately process one or more documents. For complete
details on the globalize queue, refer to Viewing the Globalize Queue and History (on page 185).
184
ANCILE Solutions, Inc.
Chapter 9: Working with the Glossary
Viewing the Globalize Queue and History
You must be a part of the uPerform Glossary Administrators group to configure glossary settings
and manage the glossary queue. For detailed information on uPerform groups, refer to Managing
Users, Roles, and Groups (on page 29).
The globalize queue displays the documents that require update. The globalize history list displays
a record of globalization events (both documents globalized upon check in and daily globalize
runs) for the current day. You can view history records from the last 30 days.
After 30 days, history records are removed on a first-in/first-out basis. History records
are not archived.
Viewing the Globalize Queue
1. Click Administration on the left menu of the server workspace.
2. Click Server Administration in the Administration area.
3. Click Glossary in the Server Administration area.
4. Click View Globalize Queue on the left menu.
5. Review the following information:
Field
Description
Document Name
The name of the document included in the globalize
processing.
Project Name
The name of the project containing the document.
Date Last Modified
The date of the last document modification.
Entered By
The author who last added the document.
Reason
The activity which caused the document to be added
to the queue.
Date Entered
The date and time the document entered the queue.
Status
The status of the globalization activity (In Queue,
Waiting, Processing, or a failure indicator) for the
current document.
6. As necessary, click Previous or Next to navigate through the queue.
ANCILE Solutions, Inc.
185
Chapter 9: Working with the Glossary
7. Perform one or more of the following actions:
If You Want To
Then
Empty the globalize queue
Click Delete All on the left menu.
Immediately process all documents in
the globalize queue
Click Globalize All on the left menu.
Refresh the globalize queue
Click Refresh Queue on the left menu.
Remove a single document
Click Remove next to the document you want to
remove.
Globalize a single document
Click Globalize Now next to the document you
want to globalize.
Viewing the Globalize History
1. Click Administration on the left menu of the server workspace.
2. Click Server Administration in the Administration area.
3. Click Glossary in the Server Administration area.
4. Click View History on the left menu.
5. Review the following information:
Field
Description
Document Name
Lists the title of the globalized document.
Date Started
Lists the date and time the globalize process was
started.
Date Completed
Lists the date and time the globalize process was
completed.
Terms Processed
Lists the number of uPerform terms processed
during the globalization activity.
You can click on this hyperlinked number to review
the list of terms processed.
Status
Lists the success or failure of the globalization for
the document.
Reason
Lists the reason the globalization task was initiated
(for example, Document Checked-In).
6. As necessary, click Previous or Next to navigate through the history list.
7. Optionally, click View Different Date on the left menu to select an alternate globalization
history date to review.
186
ANCILE Solutions, Inc.
Chapter 9: Working with the Glossary
Subscribing to Glossary Events
Glossary administrators can subscribe to be notified about various glossary activities. Subscription
notices can be delivered via the uPerform personal page or email message, or via both methods.
Subscribing to a Glossary Event
1. Click Glossary on the left menu of the server workspace.
2. Click Subscribe on the left menu.
3. Select one or more of the following events to which you want to subscribe:
Field
Description
Globalization Complete
A batch globalization task has completed.
New Term Added
A new term has been manually added to the glossary
or added as a result of globalization.
New Definition
A new definition has been manually added to the
glossary.
New Suggestion Added
An author has suggested a new definition for a term.
4. Select one or more of the following options:
Option
Description
Post notifications to my
Personal Page.
Select this option to receive your subscription
notification in the My Alerts section of your
uPerform personal page.
Send notifications in an email Select this option to receive your subscription
report to [your email
notification via email message.
address].
Specify one of the following email notification
types: daily, weekly, or immediately after an event.
5. Click OK.
ANCILE Solutions, Inc.
187
Chapter 9: Working with the Glossary
Tracking Term and Definition Usage
The following glossary reports are available to allow you to report on term usage and undefined or
unused terms:
Term Usage: Displays documents that include a particular term.
Undefined Terms: Displays terms found during globalization that do not have a
definition or an assigned context.
Unused Terms: Displays terms that are not used in any globalized document.
Term Summary by Project: Displays terms used in all projects in the uPerform
instance.
In addition, from the Globalization History list, you can click on a View All New Terms or View
All Undefined Terms hyperlink to view a summary of all new terms and all undefined terms
from the current day.
Viewing Term Usage
1. Click Glossary on the left menu of the server workspace.
2. Enter the term in the Find Term field.
3. Click Search.
4. Click View Term Usage on the left menu.
5. Review the following information:
Field
Description
Document
Hyperlinked title of the document in which the term
is used.
Click on the document name to go to the document
cover page.
Date Last Modified
Date and time of the last document modification.
Last Modified By
Name of the author who last modified the document.
6. As necessary, click Previous or Next to navigate through the report.
188
ANCILE Solutions, Inc.
Chapter 9: Working with the Glossary
Viewing Undefined Terms
1. Click Glossary on the left menu of the server workspace.
2. Click View Undefined Terms on the left menu.
3. Review the following information:
Field
Description
Term
Click on the hyperlinked term name to go to the
term page.
Date Last Modified
Date and time of the last term modification.
4. Optionally, to delete an undefined term, click Delete to the right of the term.
5. As necessary, click Previous or Next to navigate through the report.
Viewing Unused Terms
1. Click Glossary on the left menu of the server workspace.
2. Click View Unused Terms on the left menu.
3. Review the following information:
Field
Description
Term
Click on the hyperlinked term name to go to the
term page.
Date Last Modified
Date and time of the last term modification.
Number of Definitions
Number of definitions in the database for each term.
4. Optionally, to delete an unused term, click Delete to the right of the term.
5. As necessary, click Previous or Next to navigate through the report.
Viewing Term Summary by Project
1. Click Glossary on the left menu of the server workspace.
2. Click View Term Summary by Project on the left menu.
ANCILE Solutions, Inc.
189
Chapter 9: Working with the Glossary
3. Choose one of the following options:
Field
Description
Rebuild
Click to rebuild the term summary database.
View Existing
Click to view the existing term summary database.
4. Click Save at the prompt to access the Microsoft Excel XML spreadsheet.
In Microsoft Excel 2002, the file is opened as an XML file in the web browser; select
the save option in the browser to download the file to your local computer. In
Microsoft Excel 2003, the file is automatically opened in Excel. Support for displaying
the XML spreadsheet is not available in Microsoft Excel 2000.
5. Open the Microsoft Excel file, and review the following information for each project sheet
displayed:
190
Field
Description
Term
Name of the term.
Context
Context in which the term is used.
Default Language
Language specified in the glossary configuration
and the definition for the term in this language.
Other Languages
Additional definitions in other languages.
ANCILE Solutions, Inc.
Chapter 9: Working with the Glossary
Importing and Exporting a Glossary and Translations
Import functionality allows you to upload glossary terms and definitions from an external source,
as well as import a glossary from ANCILE uPerform. You must ensure the imported file is a tabdelimited text file where the first column contains the term and the second column contains the
definition. You can only import one definition per term. If you are working with double-byte
characters, the file should be in UTF-8 double-byte format.
Exporting a glossary allows you to create a tab-delimited file of term and definition pairs in a
selected language and context.
Exporting translations allows you to create an XLIFF file for translating existing definitions in
multiple languages.
If you plan to migrate an Info Pak glossary, ANCILE recommends that you use the
Migration Wizard. For more information, refer to Incorporating Info Pak Content (on
page 329).
Importing a Glossary
1. Click Administration on the left menu of the server workspace.
2. Click Server Administration in the Administration area.
3. Click Glossary in the Server Administration area.
4. Click Import on the left menu.
5. Click Import Glossary on the left menu.
ANCILE Solutions, Inc.
191
Chapter 9: Working with the Glossary
6. Complete the following fields:
Field
Description
Import Name
Enter a name for the import.
Import File
Click Browse..., and navigate to the file you want to
import.
Destination Language
Select the language for the definitions from the
drop-down list.
Definition Conflict
Resolution
From the drop-down list, select Replace Existing
Definitions, Add As Suggestion, or Skip
Definition.
Import Undefined Terms
Select the Import Undefined Terms checkbox to
import undefined terms.
7. Select the project(s) in the Destination Context(s) area to assign the glossary to the project(s).
8. Click Save.
Importing Translations
Ensure you have exported the glossary for translation and translated the file before
importing into the uPerform server. For more information on exporting a glossary or
translation file, refer to Exporting a Glossary (on page 193) and Exporting Translations
(on page 194).
1. Click Administration on the left menu of the server workspace.
2. Click Server Administration in the Administration area.
3. Click Glossary in the Server Administration area.
4. Click Import on the left menu.
5. Click Import Translations on the left menu.
192
ANCILE Solutions, Inc.
Chapter 9: Working with the Glossary
6. Complete the following fields:
Field
Description
Import Name
Enter a name for the import.
Import File
Click Browse..., and navigate to the file you want to
import.
Definition Conflict
Resolution
From the drop-down list, select Replace Existing
Definitions, Add As Suggestion, or Skip
Definition.
7. Click Save.
Viewing and Deleting the Imported Glossary or Translation
1. Click Administration on the left menu of the server workspace.
2. Click Server Administration in the Administration area.
3. Click Glossary in the Server Administration area.
4. Click Import on the left menu.
5. Perform one of the following options:
If You Want To
Then
View the imported glossary or
translation details
Click Details.
Delete an imported glossary or
translation
Click Delete.
You can only delete an imported
glossary or translation once the
import process is complete.
Exporting a Glossary
1. Click Administration on the left menu of the server workspace.
2. Click Server Administration in the Administration area.
ANCILE Solutions, Inc.
193
Chapter 9: Working with the Glossary
3. Click Glossary in the Server Administration area.
4. Click Export on the left menu.
5. Click Export Glossary on the left menu.
6. Complete the following fields:
Field
Description
Export Name
Enter a name to describe the exported content.
Example: My Export
Source Language
Select the source language for your terms and
definitions from the drop-down list.
Export Default Language
Select the Export Default Language checkbox to
export the default language for the Glossary if the
source language does not exist.
Export Undefined Terms
Select the Export Undefined Terms checkbox to
export undefined terms.
Export Unused Terms
Select the Export Unused Terms to export unused
terms.
7. Select the context to export definitions from in the Source Contents area.
8. Click Save.
9. Click View Details to download the file GlossaryExport_[date/time].txt.
Exporting Translations
1. Click Administration on the left menu of the server workspace.
2. Click Server Administration in the Administration area.
3. Click Glossary in the Server Administration area.
194
ANCILE Solutions, Inc.
Chapter 9: Working with the Glossary
4. Click Export on the left menu.
5. Click Export Translations on the left menu.
6. Complete the following fields:
Field
Description
Export Name
Enter a name to describe the exported content.
Example: My Export
Source Language
Select the source language for your terms and
definitions from the drop-down list.
Target Languages
Select the language(s) you want to export and
translate into or update.
7. Click Save.
8. Click View Details to download the file TranslationExport_[date/time].txt.
Viewing and Deleting Exported Glossaries and Translations
1. Click Administration on the left menu of the server workspace.
2. Click Server Administration in the Administration area.
3. Click Glossary in the Server Administration area.
4. Click Export on the left menu.
ANCILE Solutions, Inc.
195
Chapter 9: Working with the Glossary
5. Perform one of the following options:
196
If You Want To
Then
View the exported glossary or
translation details
Click Details.
Delete an exported glossary or
translation
Click Delete.
You can only delete an exported
glossary or translation once the
export process is complete.
ANCILE Solutions, Inc.
Chapter 10: Using Reports
To track your project progress and status, you can execute several
standard reports from the ANCILE uPerform server. In addition to the
provided document tracking, workflow status, and published content
report, you can also create and execute custom reports.
197
Chapter 10: Using Reports
Introduction to Reporting
Reports are used to track project progress and activity within the uPerform server. Reports can be
generated for uPerform and managed documents. Once a report is generated, the results can be
exported or viewed online. Four standard reports are available within the uPerform server:
Assessment Performance - Displays a detailed report for courses and assessments
assigned to a project. Assessment scores are tracked for uPerform courses and
simulations with templates that have SCORM 1.2 or SCORM 2004 packaging
enabled. For more information, refer to Specifying New Template Settings:
Publications.
Document Tracking - Displays a detailed report of the documents assigned to a
project
Published Content - Displays a detailed report of the published documents assigned to
a project
Workflow Status - Displays a detailed report of the document workflows assigned to
a project
System administrators have access to all reports. Project administrators have access only to
reporting functionalities within a project for which they are the administrator.
You can create a copy of a standard report and modify the copy using the Save As functionality.
This allows you to inherit fields and properties from one report to the next.
You can also create custom reports containing uPerform properties, as well as for hit counts on
uPerform content.
A few guidelines to consider regarding uPerform server reports:
Punctuation is ignored in content filtering with the exception of keywords separated
by a comma or an asterisk used to denote the presence or the absence of a value.
Stemming is incorporated on all filters. For example, if you enter "general" into a
filter field, you will receive a return for "generic."
The maximum number of hits that can be returned from a report is 10,000.
Reports do not support server-side paging, which can affect the wait time and
performance speed of the server.
198
ANCILE Solutions, Inc.
Chapter 10: Using Reports
Working with Reports
The following basic functionalities apply to all reports within the uPerform server: viewing,
exporting, deleting. For information on creating and editing custom and copied reports, refer to
Create and Edit Custom Reports (on page 205).
Viewing Reports
1. Click Reports in the left menu.
2. Choose from one of the following options:
If You Want To
Then
View an assessment performance report Click Assessment Performance Report, and go
to Step 5.
View a document tracking report
Click Document Tracking Report.
View a published content report
Click Published Content Report.
View a workflow status report
Click Workflow Status Report.
Workflow history information will be
cleared if a new version of a document
is checked in, or if the document is
automatically globalized when a
definition is updated.
View a custom report
Click on the name of the custom report.
3. Review the following fields:
Field
Description
Owner
The user who generated the report.
Click on this link to obtain information about the
user.
Last Modified:
If applicable, the date of the last report definition
modification.
ANCILE Solutions, Inc.
199
Chapter 10: Using Reports
Field
Description
Selected Columns
The columns specified for report generation.
Filter
Limitations for what the report will return.
4. Click View Report in the left menu.
5. Review the following information:
Field
Description
Field Name
Displays the built-in parameters for report
generation.
Condition
Displays the search parameters specified for the
report generation.
Value
Displays the name of the project for which you want
to generate a report.
Select a project from the drop-down list.
6. Click OK.
7. Review the list of documents available in the report.
8. Optionally, click Previous or Next to scroll to the next page.
200
ANCILE Solutions, Inc.
Chapter 10: Using Reports
Exporting Reports
1. Click Reports in the left menu.
2. Choose from one of the following options:
If You Want To
Then
Export an assessment performance
reports.
Click Assessment Performance Report, and go
to Step 5.
Export a document tracking report
Click Document Tracking Report.
Export a published content report
Click Published Content Report.
Export a workflow status report
Click Workflow Status Report.
Export a custom report
Click on the name of the custom report.
3. Review the following fields:
Field
Description
Owner
The user who generated the report. Click on this link
to obtain information about the user.
Last Modified:
If applicable, the date of the last document
modification.
Selected Columns
The columns specified for report generation.
Filter
Limitations for what the report will return.
4. Click View Report in the left menu.
5. Select a project from the Value field.
6. Click OK.
ANCILE Solutions, Inc.
201
Chapter 10: Using Reports
7. Click Export in the left menu.
8. Select an export format from the Export Format drop-down list.
9. Click OK.
The export may take several minutes.
10. Perform one of the following options:
If You Want To
Then
Open the exported report
Click the radio button next to Open with.
Click OK.
Save the exported report
Click the radio button next to Save to Disk.
Click OK.
Open the file locally on your computer.
Using Save as to Copy a Standard Report
1. Click Reports in the left menu.
2. Choose from one of the following options:
Copy functionality is not available for assessment reports.
202
If You Want To
Then
Copy a document tracking report
Click Document Tracking Report.
Copy a published content report
Click Published Content Report.
Copy a workflow status report
Click Workflow Status Report.
ANCILE Solutions, Inc.
Chapter 10: Using Reports
3. Click Save Report As in the left menu.
4. Complete the following fields:
Field
Description
Report Name
Enter a unique name for the report.
Description
Enter an optional description for the report.
Template
Optionally, select the template associated with the
report from the drop-down list. This gives you the
ability to create filters using template properties.
Search all templates
Select this option to determine if you want to search
properties for all templates.
Deselect this option to specify that you want the
search performed only on the template selected in
the Template drop-down list.
5. Click Next.
6. Select a column from the Available Columns listbox.
Custom template properties are noted with an asterisk (*).
7. Click the right arrow to move the field into the Selected Columns list box.
8. Optionally, click the left arrow to remove a field from the Selected Columns list.
ANCILE Solutions, Inc.
203
Chapter 10: Using Reports
9. Click the up and down arrows to reorder items in the Selected Columns list.
10. Repeat Steps 6 through 9 to add additional fields to the report.
11. Click Next.
12. Select a field name from the Field Name drop-down list.
13. Select a condition from the following list:
Field
Description
Contains Any
Contains any keyword.
Contains All
Contains all of the keywords.
Does not contain
Does not contain any of the keywords.
14. Choose from the following options:
If You Want To
Then
Specify the field name as a variable
object when generating reports
Select the Variable radio button.
Specify the field name as a fixed object Select the Fixed radio button.
when generating reports
15. Click Add.
16. Repeat Steps 12 through 15 to add additional filters to the report.
17. Optionally, click Delete next to a filter to remove it from the report.
18. Click Save.
Refer to Viewing Reports (on page 199) and Exporting Reports (on page 200) for
information on viewing the report output.
204
ANCILE Solutions, Inc.
Chapter 10: Using Reports
Create and Edit Custom Reports
Creating Custom Reports
1. Click Reports in the left menu.
2. Click New Report in the left menu.
3. Complete the following fields:
Field
Description
Report Name
Enter a name for the report.
Description
Enter a description for the report.
Template
Optionally, select the template associated with the
report from the drop-down list. This gives you the
ability to create filters using template properties.
Search all templates
Select this option to determine if you want to search
properties for all templates.
Deselect this option to specify that you want the
search performed only on the template selected in
the Template drop-down list.
4. Click Next.
ANCILE Solutions, Inc.
205
Chapter 10: Using Reports
5. Select a field from the Available Columns listbox.
6. Click the right arrow to move the field into the Selected Columns list box.
If you want to generate a report for usage statistics, select Hit Count, Hit Count Reset
On, and/or Hit Count Reset By.
Custom template properties are noted with an asterisk. For example: Transaction
Code(s)*
7. Repeat Steps 5 and 6 to add additional fields to the report.
8. Optionally, click the left arrow to remove fields from the Selected Columns list.
9. Click the up and down arrows to reorder fields in the Selected Columns list.
10. Click Next.
11. Select a field name from the Field Name drop-down list.
12. Select a condition from the following list:
Field
Description
Contains Any
Contains any keyword. Reports do not handle
comma delimited lists within the document
properties. The filter criteria look for an exact match
in the document property.
Contains All
Contains all of the keywords.
Does not contain
Does not contain any of the keywords.
13. Choose from the following options:
If You Want To
Then
Specify the field name as a variable
object when generating reports
Select the Variable radio button.
Specify the field name as a fixed object Select the Fixed radio button.
when generating reports
14. Click Add.
15. Repeat Steps 11 through 14 to add additional filters to the report.
206
ANCILE Solutions, Inc.
Chapter 10: Using Reports
16. Optionally, click Delete next to a filter to remove it from the report.
17. Click Save.
Refer to Viewing Reports (on page 199) and Exporting Reports (on page 200) for
information on viewing the report output.
Editing Custom and Copied Reports
1. Click Reports in the left menu.
2. Click on the name of the custom or copied report you want to edit.
3. Click Edit Report.
4. Complete the following fields:
Field
Description
Name
Enter a name for the report.
Description
Enter a description for the report.
Template
Optionally, select the template associated with the
report from the drop-down list. This gives you the
ability to create filters using template properties.
Search all templates
Select this option to determine if you want to search
properties for all templates.
Deselect this option to specify that you want the
search performed only on the template selected in
the Template drop-down list.
5. Click Next.
ANCILE Solutions, Inc.
207
Chapter 10: Using Reports
6. Select a field from the Available Columns listbox.
If you want to generate a report for usage statistics, select Hit Count, Hit Count Reset
On, and/or Hit Count Reset By.
Custom template properties are noted with an asterisk. For example: Transaction
Code(s)*
7. Click the right arrow to move the field into the Selected Columns list box.
8. Repeat Steps 6 and 7 to add additional fields to the report.
9. Optionally, click the left arrow to remove fields from the Selected Columns list.
10. Click the up and down arrows to reorder fields in the Selected Columns list.
11. Click Next.
12. Select a field name from the Field Name drop-down list.
13. Select a condition from the following list:
Field
Description
Contains Any
Contains any keyword.
Contains All
Contains all of the keywords.
Does not contain
Does not contain any of the keywords.
14. Choose from the following options:
If You Want To
Then
Specify the field name as a variable
object when generating reports
Select the Variable radio button.
Specify the field name as a fixed object Select the Fixed radio button.
when generating reports
15. Click Add.
16. Repeat Steps 12 through 15 to add additional filters to the report.
208
ANCILE Solutions, Inc.
Chapter 10: Using Reports
17. Optionally, click Delete next to a filter to remove it from the report.
18. Click Save.
Refer to Viewing Reports (on page 199) and Exporting Reports (on page 200) for
information on viewing the report output.
Deleting a Custom Report
By default, you cannot delete standard reports from the uPerform server.
1. Click Reports in the left menu.
2. Click on the name of the custom report.
3. Click Delete Report in the left menu.
4. At the prompt, click OK.
Reports are permanently deleted from the server. You cannot recover a deleted report.
ANCILE Solutions, Inc.
209
Chapter 11: Using Author Templates
Author templates in ANCILE uPerform control the formatting and
publishing options available to authors. Templates allow you to set
standards and maintain consistency within your authoring team.
211
Chapter 11: Using Author Templates
Introduction to Author Templates
A key capability of uPerform is the ability to allow administrators to establish and enforce
standards through the use of author templates. Author templates contain configuration and style
settings to control the appearance and content of your training materials. Templates help you to
enforce consistency via these predetermined formatting and configuration settings. Consistent
formatting enables your users to quickly and easily find information in all content.
Author templates provide control over the following elements:
Sections - represents a single, contiguous group of blocks in a document.
Blocks - a content element containing the information required to render a discrete
item in all available views.
Styles - a group of formatting options that relate to paragraphs or character text.
Publications - a designator indicating content output.
Phrases - a group of culture-specific boilerplate text items that are placed into a block
by default.
uPerform Properties - metadata such as document title, owner, and version used to
describe content.
Image, Data, and Language Management - allows you to control images, data fields,
and languages associated with a template.
Info Pak Properties - allows you to view a list of document types, content location,
and websafe paths of migrated ANCILE Info Pak documents.
You can edit author templates via the uPerform editor.
212
ANCILE Solutions, Inc.
Chapter 11: Using Author Templates
The following diagram illustrates many of the basic uPerform procedural document elements that
you can modify within the template:
ANCILE Solutions, Inc.
213
Chapter 11: Using Author Templates
Managing Author Templates
At the start of your project, you should create a new template and specify your configuration
settings.
Multiple templates can be used on a project. The project selection determines the templates that
are available to authors. Each uPerform file is linked to a template via the template‟s unique 32-bit
identifier.
Any author can create or modify a template, but only authors with proper permissions can check
the modified template into the uPerform server to make it available to other authors and
administrators.
During creation and edit, author templates are stored on your computer in the following locations:
For Windows XP: C:\Documents and Settings\[user name]\Application
Data\ANCILE\uPerform\Version X.X\templates
For Windows Vista and Windows 7: C:\User\App
Data\Roaming\ANCILE\uPerform\VersionX.X\templates
You can manage local templates directly through uPerform. Author templates have a .udt file
extension.
Create and Open a New Author Template
The following best practices apply to your use of author templates:
Create a new template using the uPerform FILE > NEW menu. Do not copy and
rename a .udt file. The copy process renames the file but does not modify the
template's unique identifier. A uPerform document is linked to a template via the
template identifier, not the template name.
After creating a .udt file, do not rename the file via Microsoft Windows Explorer as
this may cause an author to have multiple template files with the same identifier.
214
ANCILE Solutions, Inc.
Chapter 11: Using Author Templates
Creating a New Author Template
1. From the editor, select FILE > NEW.
2. Enter a name for the new template in the Name field.
3. Select Template from the Type drop-down list.
4. In the Template listbox, select a template from which you would like to create a new template.
5. Click OK.
Refer to the following subsections for more information on customizing the template.
Opening a Template
1. From the editor, select FILE > OPEN > TEMPLATE.
2. Select the template you want to open.
3. Optionally, select Lock template for editing.
4. Click OK.
The standard author template delivered with the product cannot be opened in the
editor.
ANCILE Solutions, Inc.
215
Chapter 11: Using Author Templates
Managing Local Templates
1. Select FILE > MANAGE LOCAL TEMPLATES....
2. Perform one of the following options:
If You Want To
Then
Import a template
Click Import....
Navigate to the template and click Open.
Click OK.
Export a template
Select a template from the list.
Click Export....
Navigate to the template and click Open.
Enter a name for the template.
Remove a template
Select a template from the list.
Click Remove.
Click Yes.
Specifying New Template Settings: General
Specifying General Settings: Information
1. From the editor, open the new template.
2. Click General on the status bar.
216
ANCILE Solutions, Inc.
Chapter 11: Using Author Templates
3. Click Information in the task pane.
4. Review the following information:
Field
Description
Name
Specifies the name of the new template.
GUID
Specifies the unique ID of the template.
Show file properties on first
save
Select the Show file properties on first save
checkbox to display the Properties... window to the
author upon the first save during a new recording.
Allow simulation publishing
on the uPerform Server
Enable or disable the Allow simulation publishing
on the uPerform Server checkbox to set the default
behavior on the document Properties... window. An
author can change this setting for an individual
document. This setting applies only to server
publishing of simulations.
Choosing this option enables simulation publishing
on the uPerform Server for all simulations created
using this template.
ANCILE Solutions, Inc.
217
Chapter 11: Using Author Templates
Field
Description
Show 'Press Return' step after Select Show 'Press Return' step after Field
Field Description Table
Description Table to display the return step after a
Field/Description table.
Field Label Separator
Specifies what character should be used to separate
multiple labels in a Field/Description table.
Callout Color
Select the color to be used for displayed callouts.
Optionally, click Select to choose a color.
5. Under Default Screen Display for Steps in the Document Editor, choose from the
following options:
Field
Description
Always display
Displays new screens for steps.
Never
Does not display new screens for steps.
Only if it is the first time this
screen is used
Displays a new screen in the document editor only
if the screen is different from the previous step.
6. Under Default Mask Settings, choose from the following options:
Field
Description
Background Color
Click Select to specify a default background color.
Border Color
Click Select to specify a default border color.
Border Size
Select a size from the drop-down list.
7. Select FILE > SAVE to save the template.
Specifying General Settings: Images
1. From the editor, open the new template.
2. Click General on the status bar.
218
ANCILE Solutions, Inc.
Chapter 11: Using Author Templates
3. Click Images in the task pane.
4. Perform one of the following options:
If You Want To
Then
Add an image to the template
Click Add.
Navigate to the image and click Open.
Update an image
Select the image to update, and click Update.
Navigate to the updated image, and click Open.
Delete a custom image
Select the custom image from the list, and click
Delete.
At the prompt, click Yes.
You cannot delete the standard images delivered
with uPerform.
A preview of the selected image will display to the right.
5. Select FILE > SAVE to save the template.
Specifying General Settings: Data Files
1. From the editor, open the new template.
2. Click General on the status bar.
ANCILE Solutions, Inc.
219
Chapter 11: Using Author Templates
3. Click Data Files in the task pane.
4. Perform one of the following options:
If You Want To
Then
Add a data file to the template
Click Add.
Navigate to the data file and click Open.
Update a data file
Select the data file to update, and click Update.
Navigate to the updated data file, and click
Open.
Modify a data file
Select a data file, and click Modify.
Edit the file, and select FILE > SAVE.
Basic knowledge of HTML, XSL, and Java is
required.
Optionally, click Change Editor ... to specify a
different data file editor.
Delete a custom data file
Select the custom data file from the list, and click
Delete.
At the prompt, click Yes.
You cannot delete the standard data files
delivered with uPerform.
5. Select FILE > SAVE to save the template.
Specifying General Settings: Languages
1. From the editor, open the new template.
2. Click General on the status bar.
220
ANCILE Solutions, Inc.
Chapter 11: Using Author Templates
3. Click Languages in the task pane.
4. Perform one of the following options:
If You Want To
Then
Manually select languages to be
enabled in this template
Deselect Use server languages.
Select or deselect one or more checkboxes in the
Visible column.
Select all languages to be used in this
template.
Select Check All.
5. Select FILE > SAVE to save the template.
Specifying General Settings: Hotspot Images
1. From the editor, open the new template.
2. Click General on the status bar.
ANCILE Solutions, Inc.
221
Chapter 11: Using Author Templates
3. Click Hotspot Images in the task pane.
4. Perform one of the following options:
If You Want To
Then
Add an image
Click Add.
Browse to the image and click Open.
Update an image
Select an image from the Images list and click
Update.
Browse to the updated image and click Open.
Delete an image
Select an image from the Images list and click
Delete.
Click Yes.
Choose a replacement image
Select an image from the Images list.
Click the Replacement Image drop down list and
select an image.
5. Select FILE > SAVE to save the template.
Specifying General Settings: View Info Pak Settings
Info Pak settings are available only for templates used in conjunction with the
Migration Wizard. Info Pak settings are not configurable within the template. For more
information on Migration Wizard, refer to Incorporating Info Pak Content (on page
329).
1. From the editor, open the new template.
2. Click General on the status bar.
222
ANCILE Solutions, Inc.
Chapter 11: Using Author Templates
3. Select Info Pak Settings from the Task Pane.
4. Review the following fields:
The following options are not configurable within the uPerform template.
Field
Description
Auto Generate Exercise
The Auto Generate Exercise option is selected
during the migration. This option is not
configurable within the uPerform template.
Procedure From Simulation
The Procedure from Simulation option is
selected during the migration. This option is not
configurable within the uPerform template.
Definition Styles
Displays the definition styles used in the original
Info Pak content. This option is not configurable
within the uPerform template.
Term Styles
Displays the term styles used in the original Info
pak content. This option is not configurable
within the uPerform template.
Section Mappings
Displays the mapped sections specified during
migration. This option is not configurable within
the uPerform template.
5. Click FILE > SAVE to save the template.
ANCILE Solutions, Inc.
223
Chapter 11: Using Author Templates
Specifying New Template Settings: Properties
Managing Built In Properties
1. From the editor, open the new template.
2. Click Properties on the status bar.
3. Select a built-in property from the Task Pane.
4. To make the property visible to authors in the Properties... window, click the Visible
checkbox.
5. Perform one of the following options:
If You Want To
Then
Move the value earlier in the list
Click Move Up one or more times as needed.
Move the value later in the list
Click Move Down one or more times as needed.
6. Click Modify.
224
ANCILE Solutions, Inc.
Chapter 11: Using Author Templates
7. Perform one of the following options:
If You Want To
Then
Make the value visible.
Check the Visible checkbox.
Make the value translatable.
Check the Translatable checkbox. This option is
only available if the Visible checkbox is
checked.
Add a value
Click Add.
Enter a value.
Click OK.
Modify a value
Select a value.
Click Modify.
Edit the text.
Click OK.
Delete a value
Select a value.
Click Delete.
Click Yes.
Add a custom phrase
Click Select Phrase.
Click Add.
Select a language from the left.
Enter the text in the Content area.
Click OK.
Select a phrase
Click Select Phrase.
Select a language from the Language drop-down
list.
Select a phrase from the Phrase listbox.
Optionally, enter text into the Phrases field to
search for text.
Click OK.
8. Select FILE > SAVE to save the template.
Creating and Managing Custom Properties
1. From the editor, open the new template.
2. Click Properties on the status bar.
ANCILE Solutions, Inc.
225
Chapter 11: Using Author Templates
3. Click Manage Custom Properties in the task pane.
4. Select one of the following options:
If You Want To
Then
Add a new custom property
Click Add.
Select a language from the drop-down list.
Enter a name.
Click OK.
Go to Step 5.
Modify an existing custom property
Go to Step 5.
Duplicate an existing custom property
Select a custom property from the Task pane and
click Duplicate.
Select a language from the drop-down list.
Enter a name.
Click OK.
Go to Step 5.
Delete the selected property
Select a custom property from the Task pane and
click Delete.
Click Yes.
Go to Step 5.
Move the property earlier or later in the Select a custom property from the Task pane and
list.
click Move Up or Move Down one or more
times as needed.
226
ANCILE Solutions, Inc.
Chapter 11: Using Author Templates
5. Select the custom property from the Task Pane.
6. Click Modify.
7. Perform one of the following options:
Based on the item selected, some options may not display.
If You Want To
Then
Make the property visible to authors
Check the Visible checkbox.
Make the property translatable
Check the Translatable checkbox. This option is
only available if the Visible checkbox is checked
and there are no values assigned to the property.
Add values to the property
Click Add.
Enter a value.
Click OK.
Modify values to the property
Select a value.
Click Modify.
Edit the text.
Click OK.
Delete values to the property
Select a value.
Click Delete.
Click Yes.
Move the value
Select a value.
Click Move Up or Move Down one or more
times as needed.
8. Click Select Phrase.
9. Perform one of the following options:
If You Want To
Then
Add a custom phrase
Click Add.
Select a language from the left.
Enter the text in the Content area.
Click OK.
Select a phrase
Select a language from the Language drop-down
list.
Select a phrase from the Phrase listbox.
Optionally, enter text into the Phrases field to
search for text.
Click OK.
10. Select FILE > SAVE to save the template.
ANCILE Solutions, Inc.
227
Chapter 11: Using Author Templates
Specifying New Template Settings: Phrases
Managing Phrases
1. From the editor, open the new template.
2. Click Phrases on the status bar.
3. Select a language from the Language drop-down list in the Task Pane.
4. Choose a phrase name.
The following table lists the phrases for actions during recording and the common
phrases for keyboard keys.
228
Field
Description
Click %s %t %u
%s = label
% t= control type
%u = image
Double-click %s %t %u
%s = label
% t= control type
%u = image
Right-click %s %t %u
%s = label
% t= control type
%u = image
Right double-click %s %t
%u
%s = label
% t= control type
%u = image
Type %s in the %t %u
%s = typed text
Drag %s to %t
%s = first image
%t = second image
ANCILE Solutions, Inc.
Chapter 11: Using Author Templates
Up, Down, Left, Right
Press "Up"
Press "Down"
Press "Left"
Press "Right"
Page Up, Page Down
Press "Page Up"
Press "Page Down"
Tab
Press "Tab"
Return
Press "Return"
Home, End
Press "Home"
Press "End"
Insert, Delete
Press "Insert"
Press "Delete"
5. Perform one of the following options:
If You Want To
Then
Add a phrase
In the content pane, click Add.
Select a language from the left navigation pane.
Enter the phrase in the Content pane.
Click OK.
Modify a phrase
Select a phrase in the content pane.
Click Modify.
Optionally, select a new language from the left
navigation pane.
Edit the phrase in the Content pane.
Duplicate a phrase
Select the phrase you want to duplicate from the
Content Pane.
Click Duplicate.
Delete a phrase
Select the phrase you want to delete.
Click Delete.
At the prompt, click Yes.
6. Select FILE > SAVE to save the template.
ANCILE Solutions, Inc.
229
Chapter 11: Using Author Templates
Specifying New Template Settings: Publications
Manage All Publications
1. From the editor, open the new template.
2. Click Publications on the status bar.
3. Click the checkbox in the Enabled column next to the publication types you want to enable.
230
ANCILE Solutions, Inc.
Chapter 11: Using Author Templates
4. Choose from the following options:
Field
Description
Course Preview
Select an option from the drop-down list to display
which style course you want to preview.
You can create an option by duplicating
and modifying the Course publication
type as described in Duplicating,
Deleting, and Moving Publication
Types (on page 232).
Simulation Preview
Select an option from the drop-down list to display
which style simulation you want to preview.
You can create an option by duplicating
and modifying the Simulation
publication type as described in
Duplicating, Deleting, and Moving
Publication Types (on page 232).
5. Select a publication type from the Manage All Publications list in the task pane.
6. Click Select Phrase.
7. Perform one of the following options:
If You Want To
Then
Add a custom phrase
Click Add.
Select a language from the left.
Enter the text in the Content area.
Click OK.
Select a phrase
Select a language from the Language drop-down
list.
Select a phrase from the Phrase listbox.
Optionally, enter text into the Phrases field to
search for text.
Click OK.
8. Perform one of the following options:
If You Want To
Then
Add a section
Click Add.
Select a section from the list.
Click OK.
Remove a section
Click Remove.
At the prompt, click Yes.
Move the section earlier in the list
Click Move Up one or more times as needed.
ANCILE Solutions, Inc.
231
Chapter 11: Using Author Templates
If You Want To
Then
Move the section later in the list
Click Move Down one or more times as needed.
Delete a section
Select the section.
Click Delete.
You cannot delete standard publications.
9. Review the publication type in the Type field.
The Type field is not configurable.
10. Enter a format name in the Name field.
11. Perform one of the following options:
If You Want To
Then
Use default publication settings
Select the checkbox next to Use Default
Publication Settings.
Create custom publication settings
Deselect the checkbox next to Use Default
Publication Settings.
Click a publication setting under the selected
publication type.
For more information, refer to Setting Default
Publication Settings.
12. Select FILE > SAVE to save the template.
232
ANCILE Solutions, Inc.
Chapter 11: Using Author Templates
Duplicating, Deleting, and Moving Publication Types
1. From the editor, open the new template.
2. Click Publications on the status bar.
3. Choose from the following options:
If You Want To
Then
Copy a publication type
Select the publication type you want to copy, and
click Duplicate.
Delete a publication type
Select the publication type you want to delete,
and click Delete.
Move the publication type earlier in the Click Move Up one or more times as needed to
list
determine where the publication type will display
in the uPerform website drop-down list.
Move the publication type later in the
list
Click Move Down one or more times as needed
to determine where the publication type will
display in the uPerform website drop-down list.
4. Select FILE > SAVE to save the template.
ANCILE Solutions, Inc.
233
Chapter 11: Using Author Templates
Setting Default Publication Settings
1. From the editor, open the new template.
2. Click Publications on the status bar.
3. Click Default Publication Settings in the task pane.
4. Select one of the following options:
234
If You Want To
Then
Modify document publication settings
Select Document under Default Publication
Settings in the task pane.
Refer to Default Publication Settings: Document
(on page 235) for more information.
Modify simulation publication settings
Select Simulation under Default Publication
Settings in the task pane.
Refer to Default Publication Settings:
Simulation: General Settings (on page 237),
Default Publication Settings: Simulation: User
Interface Settings (on page 240), Default
Publication Settings: Simulation: LMS Settings
(on page 242), and Default Publication Settings:
Simulation: Caption Settings (on page 243) for
more information.
Modify student guide publication
settings
Select Student Guide under Default Publication
Settings in the task pane.
Refer to Default Publication Settings: Student
Guide (on page 246) for more information.
ANCILE Solutions, Inc.
Chapter 11: Using Author Templates
If You Want To
Then
Modify guided help settings
Select Guided Help under Default Publication
Settings in the task pane.
Refer to Guided Help Settings: Guided Help
General Settings (see "Default Publication
Settings: Guided Help: General Settings" on
page 247), refer to Guided Help Settings: User
Interface Settings (see "Default Publication
Settings: Guided Help: User Interface Settings"
on page 249), refer to Guided Help Settings:
Guided Help Captions (see "Default Publication
Settings: Guided Help: Guided Help Captions"
on page 251), refer to Guided Help Settings:
Mobile Device Publication Settings (see "Default
Publication Settings: Guided Help: Mobile
Device Publication Settings" on page 252) for
more information.
Modify course package settings
Select Course Package under Default
Publication Settings in the task pane.
Refer to Default Publication Settings: Course
Package for more information.
Modify course publication settings
Select Course under Default Publication
Settings in the task pane.
Refer to Default Publication Settings: Course:
General Settings (on page 253), Default
Publication Settings: Course: User Interface
Settings (on page 255), Default Publication
Settings: Course: LMS Settings (on page 257),
Default Publication Settings: Course: Caption
Settings (on page 259), and Default Publication
Settings: Course: Page Settings (on page 260) for
more information.
Default Publication Settings: Document
1. From the editor, open the new template.
2. Click Publications on the status bar.
ANCILE Solutions, Inc.
235
Chapter 11: Using Author Templates
3. Select Document under Default Publication Settings in the task pane.
4. Complete/review the following fields:
Field
Description
Display the R/O/C column in Select Show R/O/C column to display the R/O/C
published output
column in published output.
Use full-text option value in
R/O/C column
Select Use full-text option value in R/O/C column
to display Required, Optional, or Conditional in the
document editor. Show R/O/C column must be
selected in order to enable this option.
Show Example Sections
Select Show Example Sections to display the
example sections.
Hide Empty Example
Sections
Select Hide Empty Example Sections to hide
empty example sections. Show Example Sections
must be selected in order to enable this option.
Mirror Margins
Select Mirror Margins to create booklet-style,
double-sided pages for PDF and Word outputs.
Publish Exercise Answers
Select Publish Exercise Answers to publish
exercise answers.
Insert a page break before
each screen shot
Select Insert a page break before each screen shot
to insert a break before screen shots.
Screen
Select minimum and maximum screen heights and
widths.
Select Show callouts to display callouts.
Callouts will only display in
publications containing screen captures.
The font, font size, and line thickness of
the callout is not configurable.
236
ANCILE Solutions, Inc.
Chapter 11: Using Author Templates
Field
Description
Margins
Select the unit of measurement and specify the
margins for the top, bottom, left, and right pages.
Page Size
Select common size, unit of measurement and
specify the height and width.
5. Select FILE > SAVE to save the template.
Default Publication Settings: Simulation: General Settings
1. From the editor, open the new template.
2. Click Publications on the status bar.
3. Select Simulation under Default Publication Settings in the task pane.
4. Select Simulation General Settings from the drop-down list.
5. Complete the following fields:
Field
Description
Case-Sensitive
Select the Case-Sensitive checkbox to require the
user to enter all text in the same case specified in the
action properties (provided an Edit action of type
'Exact String' is used).
Require enter press
Select the Require enter press checkbox to require
the user to press enter after an action.
Right click
Select the mouse and key combination to be used to
represent a right-click action in the simulation.
Image Quality
Select a percentage from the drop-down list.
The Image Quality option allows you
to specify the compression quality of
the image. ANCILE recommends the
default 85%.
Bookmark
Select Enabled, Disabled, or Mode Specific from
the drop-down list to select a display setting for
bookmarks in the published output.
Mode Order
Use the Move Up and Move Down buttons to
arrange the sequence of modes.
ANCILE Solutions, Inc.
237
Chapter 11: Using Author Templates
6. For Assessment mode, complete the following fields:
Field
Description
Enabled
Select to confirm that this mode is available for
publishing.
Help Mode
Select from Auto playback mode, Standard mode,
or Self-Test mode.
Note Display Delay
Select the wait time before notes are displayed.
Note Entry Animation
Select Fade In or Display.
7. For Auto playback mode, complete the following fields
Field
Description
Enabled
Select to confirm that this mode is available for
publishing.
Playback Timer
Specify the default wait time between steps during
auto playback.
Display mouse path
Select the Display mouse path checkbox to display
mouse movements associated with each step of the
simulation during auto playback.
Loop auto playback mode
Select this option to loop a simulation when viewed
in auto-playback mode.
Display action notes
Select to display action notes.
Display action note tail
Select to display action note tail.
Display hotspots
Select to display hotspots.
Enable simulation typing
sounds
Select the Enable simulation typing sounds
checkbox, and select a sound from the drop-down
list to enable typing sounds during simulation
playback.
For information on adding sound files to the
template, refer to Specifying General Settings: Data
Files (on page 219).
Default Action Display Delay Specify the default wait time for action display.
238
Default Action Animation
Delay
Select the default wait time for action animation.
Default Action Entry
Animation
Select Fade In or Display.
Default Action Exit
Animation
Select Fade Out or Hide.
ANCILE Solutions, Inc.
Chapter 11: Using Author Templates
8. For Self-Test mode, complete the following fields:
Field
Description
Enabled
Select to confirm that this mode is available for
publishing.
Help Mode
Select from Auto playback mode or Standard
mode.
Note Display Delay
Select the wait time for notes to display.
Note Entry Animation
Select Fade In or Display.
9. For Standard mode, complete the following fields:
Field
Description
Enabled
Select to confirm that this mode is available for
publishing.
Display action notes
Select the Display action notes checkbox to enable
the display and publishing of the auto-generated
action notes in simulations.
Display action note tail
Select to display action note tail.
Display hotspots
Select to display hotspots.
Note Display Delay
Select the wait time for notes to display.
Note Entry Animation
Select Fade In or Display.
10. For Home Page, complete the following fields:
These options are set in the document properties and are customizable. For more
information on customizing properties, refer to Specifying New Template Settings:
Properties (on page 224).
Field
Description
Title
Select Title to display the title on the home page.
Author
Select Author to display the author on the home
page.
Description
Select Description to display the description on the
home page.
Copyright
Select Copyright to display the copyright on the
home page.
Publish date
Select Publish Date to display the publish date on
the home page.
ANCILE Solutions, Inc.
239
Chapter 11: Using Author Templates
11. For Step Window, complete the following fields:
Field
Description
Show step window
Select the Show Step Window checkbox to display
the Steps window to users during simulation
playback.
Height
Select the height of the published step window.
Width
Select the width of the published step window.
Dock on startup
Select Dock on startup checkbox to set the dock
position on startup.
Dock Position
Select a dock position of right or left.
12. For Action Defaults, complete the following fields:
Field
Description
Border color
Select the color of the hotspot border.
Optionally, specify custom colors by clicking Select
to the right of the color drop-down list.
Border size
Select the size of the hotspot border.
Flashing
Select the checkbox next to Flashing to enable
flashing hotspots.
13. Select FILE > SAVE to save the template.
For more information on simulation output modes, refer to “Viewing Simulations” in
the companion manual, Creating Content with ANCILE uPerform.
Default Publication Settings: Simulation: User Interface Settings
1. From the editor, open the new template.
2. Click Publications on the status bar.
3. Select Simulation under Default Publication Settings in the task pane.
240
ANCILE Solutions, Inc.
Chapter 11: Using Author Templates
4. Select Simulation User Interface Settings from the drop-down list.
5. Select a skin from the Skins drop-down list.
A preview of the skin selection will display in the Preview window.
6. Complete the following fields:
Field
Description
Player Colors
Select a background color, and primary and
secondary colors for the banner background from
the drop-down list.
Text Colors
Select a primary color for the banner text from the
drop-down list.
Optionally, specify custom colors by clicking Select to the right of the color dropdown list.
7. Choose from the following options:
Field
Description
Enable Transitions
Enables a smooth, animated transmission from step
to step.
Reuse existing window
Uses the same window when an external link is
launched from a simulation.
Hide audio bar when audio is Hides the audio bar when audio is not present.
not present
Do not resize
Opens the simulation in the current window size.
Resize and center window
Opens the simulation at the size specified by the
screen width and height, and centers the simulation
window.
Start in full screen mode
Opens the simulation in full screen mode.
ANCILE Solutions, Inc.
241
Chapter 11: Using Author Templates
8. Under Screen, select a minimum and maximum screen height and width.
This option is available only if Resize and center window is selected.
9. Under Maximum Screen Size, select a minimum or maximum screen size.
10. Select FILE > SAVE to save the template.
Default Publication Settings: Simulation: LMS Settings
1. From the editor, open the new template.
2. Click Publications on the status bar.
3. Select Simulation under Default Publication Settings in the task pane.
4. Select Simulation LMS Settings from the drop-down-list.
5. Complete/review the following fields:
242
Field
Description
Create package
Click the Create Package checkbox to create LMSconformant output for integration with a Learning
Management System (LMS).
Show hints
Select the Show hints checkbox to display hints
during the simulation self test or assessment test.
Hints are nonessential data (for example, a user
name) required to complete the simulation.
Enable remote proxy support
Only select the Enable remote proxy support
checkbox if you are instructed to do so by ANCILE
Product Support.
Display username prompt
Select this option to display the username prompt on
the home page.
ANCILE Solutions, Inc.
Chapter 11: Using Author Templates
Field
Description
Package Type
Select SCORM 2004, SCORM 1.2, or AICC from
the drop-down list to select the output.
You can edit the SCORM and AICC
imsmanifest.xml file via the package editor. For
more information, refer to Default Publication
Settings: Package Editor (on page 263).
Package Status Value
Select a completion-type value from the drop-down
list.
This option is available only for SCORM 1.2 and
AICC.
Assessment URI
Enter a destination URI (Uniform Resource
Identifier) to send test results for capture by a
custom-built utility instead of an LMS. You can
create an Active Server Page (ASP) or Java Server
Page (JSP) on a web server to receive the output for
subsequent storage and reporting in a learning
management system. Any technology that accepts
the form Post method using HTTP can be used to
handle the output.
Example: http://www.yourcompany.com/results.asp
Note that if the student's web browser security
settings are set to High, warning messages will be
displayed.
The Create Package option must be
disabled in order to enter a URI.
6. Complete/review the following fields:
Field
Description
Include in results
Select the desired checkboxes to indicate the
information to be captured when the simulation self
test or assessment is completed.
Passing score
Specify the required passing score.
7. Select FILE > SAVE to save the template.
Default Publication Settings: Simulation: Caption Settings
1. From the editor, open the new template.
2. Click Publications on the status bar.
3. Select Simulation under Default Publication Settings in the task pane.
ANCILE Solutions, Inc.
243
Chapter 11: Using Author Templates
4. Select Simulation Caption Settings.
5. Highlight a phrase in the phrase list.
6. Click Select Phrase.
7. Perform one of the following options:
If You Want To
Then
Add a custom phrase
Click Add.
Select a language from the left.
Enter the text in the Content area.
Click OK.
Select a phrase
Select a language from the Language drop-down
list.
Select a phrase from the Phrase listbox.
Optionally, enter text into the Phrases field to
search for text.
Click OK.
8. Select FILE > SAVE to save the template.
Default Publication Settings: Simulation: Mobile Device
1. From the editor, open the new template.
2. Click Publications on the status bar.
3. Select Simulation under Default Publication Settings in the task pane.
244
ANCILE Solutions, Inc.
Chapter 11: Using Author Templates
4. Select Mobile Device Publication Settings.
5. Highlight an item in the Values list.
6. Perform one of the following options:
If You Want To
Then
Add a mobile device publication setting Click Add.
Enter Operating System.
Enter Browser.
Click OK.
Modify a mobile device publication
setting
Click Modify.
Enter Operating System.
Enter Browser.
Click OK.
Delete a mobile device publication
setting
Click Delete.
Click Yes.
The Operating System and Browser settings are detected during launch. At this time,
there are no custom settings for each mobile device.
7. Select FILE > SAVE to save the template.
ANCILE Solutions, Inc.
245
Chapter 11: Using Author Templates
Default Publication Settings: Student Guide
1. From the editor, open the new template.
2. Click Publications on the status bar.
3. Select Student Guide under Default Publication Settings in the task pane.
4. Complete/review the following fields:
Field
Description
Mirror Margins
Select Mirror Margins to create booklet-style,
double-sided pages for output.
Table of Contents
Select Publish Table of Contents to create a table
of contents for output.
Select Display section titles in the table of
contents to display the section titles in inserted
uPerform content in the published output.
Select Display course cover pages to display the
course cover page in published output.
Margins
Select the unit of measurement and specify the
margins for the top, bottom, left, and right pages.
Page Size
Select size and unit of measurement.
5. Choose from the following options:
If You Want To
Then
Copy a style
Select the style you want to copy, and click Add....
Delete a style
Select the style you want to delete, and click Delete.
Move the style earlier in the
list
Click Move Up one or more times as needed to
determine where the style will display in the table of
contents.
Move the style later in the list Click Move Down one or more times as needed to
determine where the style will display in the table of
contents.
6. Click Select Phrase to select a phrase for the player.
246
ANCILE Solutions, Inc.
Chapter 11: Using Author Templates
7. Perform one of the following options:
If You Want To
Then
Add a custom phrase
Click Add.
Select a language from the left.
Enter the text in the Content area.
Click OK.
Select a phrase
Select a language from the Language drop-down
list.
Select a phrase from the Phrase listbox.
Optionally, enter text into the Phrases field to
search for text.
Click OK.
8. Click Select Phrase.
9. Choose a phrase from the list.
10. Click OK.
11. Select FILE > SAVE to save the template.
Default Publication Settings: Course Package
1. From the editor, open the new template.
2. Click Publications on the status bar.
3. Select Course Package under Default Publication Settings in the task pane.
4. Select SCORM 2004 or SCORM 1.2 from the drop-down list to select the output.
5. If you are using SCORM 1.2, select a completion-type value from the drop-down list.
6. Select FILE > SAVE to save the template.
ANCILE Solutions, Inc.
247
Chapter 11: Using Author Templates
Default Publication Settings: Guided Help: General Settings
1. From the editor, open the new template.
2. Click Publications on the status bar.
3. Selected Guided Help under Default Publication Settings in the task pane.
4. Select Guided Help General Settings from the drop-down list.
5. Complete the following fields:
248
Field
Description
Playback Timer
Select the up-down controls to set the default time in
seconds that guided help displays for each page.
Allow User to Store
Preferences
Select Allow User to Store Preferences checkbox
to allow users to store preference settings for
playback time, screen location of Guided Help,
window size and window mode
(maximize/minimize).
ANCILE Solutions, Inc.
Chapter 11: Using Author Templates
6. Complete the following fields:
These options are set in the document properties and are customizable. For more
information on customizing properties, refer to Specifying New Template Settings:
Properties (on page 224).
Field
Description
Title
Select Title to display the title on the home page.
Author
Select Author to display the author on the home
page.
Description
Select Description to display the description on the
home page.
Copyright
Select Copyright to display the copyright on the
home page.
Publish date
Select Publish Date to display the publish date on
the home page.
7. Select FILE > SAVE to save the template.
Default Publication Settings: Guided Help: User Interface Settings
1. From the editor, open the new template.
2. Click Publications on the status bar.
3. Select Guided Help under Default Publication Settings in the task pane.
ANCILE Solutions, Inc.
249
Chapter 11: Using Author Templates
4. Select Guided Help User Interface Settings from the drop-down list.
5. Select a skin from the Skins drop-down list.
A preview of the skin selection will display in the Preview window.
6. Complete the following fields:
Field
Description
Player Colors Select primary and secondary colors from the drop-down list.
Text Colors
Select primary and secondary, and link text colors from the drop-down list.
Optionally, specify custom colors by clicking Select to the right of list.
250
ANCILE Solutions, Inc.
Chapter 11: Using Author Templates
7. Select from the following options:
Field
Description
Step Window
Under Step Window, select a height and width,
maximum image height and width, and screen position
and whether to maximize on startup.
General
Enables a smooth, animated transmission from step to
step.
Also allows the help to always display on top of all
other windows when running in Internet Explorer.
8. Select FILE > SAVE to save the template.
Default Publication Settings: Guided Help: Guided Help Captions
1. From the editor, open the new template.
2. Click Publications on the status bar.
3. Selected Guided Help under Default Publication Settings in the task pane.
4. Select Guided Help Captions.
5. Highlight a phrase in the phrase list.
6. Click Select Phrase.
ANCILE Solutions, Inc.
251
Chapter 11: Using Author Templates
7. Perform one of the following options:
If You Want To
Then
Add a custom phrase
Click Add.
Select a language from the left.
Enter the text in the Content area.
Click OK.
Select a phrase
Select a language from the Language drop-down
list.
Select a phrase from the Phrase listbox.
Optionally, enter text into the Phrases field to
search for text.
Click OK.
8. Select FILE > SAVE to save the template.
Default Publication Settings: Guided Help: Mobile Device Publication Settings
1. From the editor, open the new template.
2. Click Publications on the status bar.
3. Selected Guided Help under Default Publication Settings in the task pane.
4. Select Mobile Device Publication Settings from the drop-down list.
5. Perform one of the following options:
If You Want To
Then
Add a new operating
Click Add.
system/browser configuration Enter an operating system in the Operating System
field.
Enter the Browser type in the Browser field.
Click OK.
252
ANCILE Solutions, Inc.
Chapter 11: Using Author Templates
If You Want To
Then
Modify an existing operating Select an operating system/browser combination.
system/browser configuration Select Modify.
Change operating system/browser setting as desired.
Click OK.
Delete an existing operating Select an operating system/browser combination.
system/browser configuration Select Delete.
Click Yes.
The Operating System and Browser settings are detected by Guided Help during
launch. At this time, there are no custom settings for each mobile device.
6. Select FILE > SAVE to save the template.
Default Publication Settings: Course: General Settings
1. From the editor, open the new template.
2. Click Publications on the status bar.
3. Select Course under Default Publication Settings in the task pane.
4. Select Course General Settings from the drop-down list.
ANCILE Solutions, Inc.
253
Chapter 11: Using Author Templates
5. Complete the following fields:
These options are pulled from the document properties and are customizable. For more
information on customizing properties, refer to Specifying New Template Settings:
Properties (on page 224).
Field
Description
Title
Select Title to display the title on the home page.
Author
Select Author to display the author on the home
page.
Description
Select Description to display the description on the
home page.
Copyright
Select Copyright to display the copyright on the
home page.
Publish date
Select Publish Date to display the publish date on
the home page.
Simulation Stencil Mode
Order
Use the Move Up and Move Down buttons to set
the simulation stencil mode order.
Match the course stage size
Select Match the course stage size to display the
course at the same size as the imported PowerPoint.
Specific dimensions
Select Specific dimensions to display the course in
a specified width and height.
Increase slide size if possible
Select Increase slide size if possible to increase the
size of the slides.
6. Choose from the following player elements:
Field
Description
Back
Enables the Back button in the published course.
Exit
Enables the Exit button in the published course.
Exit Simulation
Enables the Exit Simulation button in the embedded
simulation in the published course.
Glossary
Enables the Glossary button in the published course.
Help
Enables the Help button in the published course.
History
Enables the History button in the published output.
Menu
Enables the Menu button in the published output.
Next
Enables the Next button in the published course.
Resources
Enables the Resources button in the published
output.
7. Select the Enable player element in published output checkbox to enable the use of the
selected element. Repeat this step for each player element.
8. Click Select Phrase to select a phrase for the player.
254
ANCILE Solutions, Inc.
Chapter 11: Using Author Templates
9. Perform one of the following phrases:
If You Want To
Then
Add a custom phrase
Click Add.
Select a language from the left.
Enter the text in the Content area.
Click OK.
Select a phrase
Select a language from the Language drop-down
list.
Select a phrase from the Phrase listbox.
Optionally, enter text into the Phrases field to
search for text.
Click OK.
10. Select one of the following feedback phrases:
Field
Description
Correct
Displays when the end user enters the correct
answer.
First Attempt Incorrect
Displays when the end user enters an incorrect
answer the first time.
Second Attempt Incorrect
Displays when the end user enters an incorrect
answer the second time.
11. Enter a URL in the URL field.
Based on the player element selected, this option may not display.
12. Select the Enabled checkbox next to the video format extension to enable the video format in
published output.
13. Select a video format and click Add, Modify, or Delete to make changes to the available
video formats.
14. Select FILE > SAVE to save the template.
Default Publication Settings: Course: User Interface Settings
1. From the editor, open the new template.
2. Click Publications on the status bar.
3. Select Course under Default Publication Settings in the task pane.
ANCILE Solutions, Inc.
255
Chapter 11: Using Author Templates
4. Select Course User Interface Settings from the drop-down list.
5. Select a skin from the Skins drop-down list.
A preview of the skin selection will display in the Preview window.
6. Complete the following fields:
Field
Description
Player Colors
Select a background color, course background user
interface color, and player primary and secondary
colors from the drop-down list. These colors will
display in the published course output.
Text Colors
Select primary and secondary, and link text colors
from the drop-down list. These colors will display in
the published course output.
Optionally, specify custom colors by clicking Select to the right of list.
7. Select from the following options:
Field
Description
Enable Transitions
Enables a smooth, animated transition from slide to
slide.
Reuse existing window
Uses the same window when an external link is
launched from the course.
Hide audio bar when audio is Hides the audio bar when audio is not present.
not present
Only display one popup at a
time
If selected, only one popup is displayed at any one
time.
Allow user to give up and fail Allows the user to quit and fail an assessment.
assessment simulations
256
Base progress on current
location
Shows percent complete based on where the user is
in the course.
Base progress on percentage
done
Shows percent complete based on how much of the
course a user has completed.
ANCILE Solutions, Inc.
Chapter 11: Using Author Templates
Field
Description
Allow Image Zooming
Specifies if image zooming is allowed and if it is the
default setting.
Do not resize
Opens the course in the current window size.
Resize and center window
Opens the course at the size specified by the screen
width and height, and centers the course window.
Start in full screen mode
Opens the course in full screen mode.
Screen
Choose the width and height for the course display.
Resize and center window must be enabled.
Width/Height
Specifies the size of the course page content within
the browser window.
Logo
Select a logo to display in the published course and
on the website.
Logos are managed in the Image area of the
template editor. For more information on images,
refer to Specifying General Settings: Images (on
page 218).
Hotspot Interaction
Select a stamp to indicate a hotspot in a course.
Select a color for the hotspot.
8. Select FILE > SAVE to save the template.
Default Publication Settings: Course: LMS Settings
1. From the editor, open the new template.
2. Click Publications on the status bar.
3. Select Course under Default Publication Settings in the task pane.
4. Select Course LMS Settings from the drop-down list.
5. Complete the following fields:
ANCILE Solutions, Inc.
257
Chapter 11: Using Author Templates
Field
Description
Create package
Click the Create Package checkbox to create
SCORM-conformant or AICC-conformant output
for integration with a Learning Management System
(LMS).
Show answers
Click the Show Answers button to display the
answer at the end of the course.
Enable remote proxy support
Only select the Enable Remote Proxy Support
checkbox if you are instructed to do so by ANCILE
Product Support.
Display username prompt
Select this option to display the username prompt on
the home page.
LMS Package Type
Select SCORM 2004, SCORM 1.2, or AICC from
the drop-down list to select the output.
For more information on packages, refer to Default
Publication Settings: Package Editor (on page 263).
Package status value
Select a completion-type value from the drop-down
list.
This option is available only for SCORM 1.2 and
AICC.
Assessment URI
Enter a destination URI (Uniform Resource
Identifier) to send test results for capture by a
custom-built utility instead of an LMS. You can
create an Active Server Page (ASP) or Java Server
Page (JSP) on a web server to receive the output for
subsequent storage and reporting in a learning
management system. Any technology that accepts
the form Post method using HTTP can be used to
handle the output.
Example: http://www.yourcompany.com/results.asp
Note that if the student's web browser security
settings are set to High, warning messages will be
displayed.
The Create Package option must be
disabled in order to enter a URI.
6. Complete the following fields:
258
Field
Description
Include in results
Select the desired checkboxes to indicate the
information to be captured when the course
assessment is completed.
Randomize questions in
playback
Select this option to randomize the order of
assessment pages.
Provide individual feedback
Select this option to provide feedback on individual
assessment questions.
Passing score
Specify the required passing score.
ANCILE Solutions, Inc.
Chapter 11: Using Author Templates
Field
Description
Users may retake
No questions: Users may not retake any questions.
Incorrect questions: Users may retake only those
questions that were answered incorrectly.
All questions: Users may retake all questions.
7. Select FILE > SAVE to save the template.
Default Publication Settings: Course: Caption Settings
1. From the editor, open the new template.
2. Click Publications on the status bar.
3. Select Course under Default Publication Settings in the task pane.
4. Select Course Caption Settings from the drop-down list.
5. Highlight a phrase in the phrase listbox.
6. Click Select Phrase.
7. Perform one of the following options:
If You Want To
Then
Add a custom phrase
Click Add.
Select a language from the left.
Enter the text in the Content area.
Click OK.
ANCILE Solutions, Inc.
259
Chapter 11: Using Author Templates
If You Want To
Then
Select a phrase
Select a language from the Language drop-down
list.
Select a phrase from the Phrase listbox.
Optionally, enter text into the Phrases field to
search for text.
Click OK.
8. Select FILE > SAVE to save the template.
Default Publication Settings: Course: Page Settings
1. From the editor, open the new template.
2. Click Publications on the status bar.
3. Select Course under Default Publication Settings in the task pane.
4. Select Course Page Settings from the drop-down list.
5. Complete the following fields:
260
Field
Description
Mirror Margins
Select Mirror Margins to create booklet-style,
double-sided pages for PDF and Word publication.
Show audio transcript
Select Show audio transcript to display the audio
transcript in published courses.
Show assessment section
Select Show assessment section to display the
assessment section in a published course.
Show answers
Select Show answers to display assessment
answers.
Show course links
Select Show course links to display links when you
publish a course to Word or PDF format.
ANCILE Solutions, Inc.
Chapter 11: Using Author Templates
6. Complete the following fields:
Field
Description
Header
Select Course Header, Student Guide Header,
Header, Course Footer, Student Guide Footer, or
Footer from the drop-down list to select the header.
Footer
Select Course Footer, Student Guide Footer,
Footer, Course Header, Student Guide Header,
or Header from the drop-down list to select the
footer.
Margins
Specify margins for Top, Bottom, Left, and Right.
Optionally, select the unit of measurement from the
Unit drop-down box.
Page Size
Specify the common sizes, height, width, and unit of
measurement.
7. Select FILE > SAVE to save the template.
Default Publication Settings: Course: Mobile Device Settings
1. From the editor, open the new template.
2. Click Publications on the status bar.
3. Selected Course under Default Publication Settings in the task pane.
ANCILE Solutions, Inc.
261
Chapter 11: Using Author Templates
4. Select Mobile Device Publication Settings from the drop-down list.
5. Perform one of the following options:
If You Want To
Then
Add a new operating
Click Add.
system/browser configuration Enter an operating system in the Operating System
field.
Enter the Browser type in the Browser field.
Click OK.
Modify an existing operating Select an operating system/browser combination.
system/browser configuration Select Modify.
Change operating system/browser setting as desired.
Click OK.
Delete an existing operating Select an operating system/browser combination.
system/browser configuration Select Delete.
Click Yes.
The Operating System and Browser pairs are detected during launch. At this time,
there are no custom settings for each mobile device.
6. Select FILE > SAVE to save the template.
262
ANCILE Solutions, Inc.
Chapter 11: Using Author Templates
Default Publication Settings: Package Editor
You can edit the SCORM and AICC imsmanifest.xml file via the package editor.
1. From the editor, open the new template.
2. Click Publications on the status bar.
3. Select Package Editor in the task pane.
4. Select the package file type from the Package File drop down list.
5. In the code box, insert the cursor where you want to insert a variable.
6. Select the variable(s) to be included from the Variables list.
7. Click the right arrow to add the variable(s) to the package file.
8. Edit the file as desired.
9. Repeat Steps 5 through 8 for each element you want to add.
10. Select FILE > SAVE to save the template.
ANCILE supports the following elements from the SCORM/AICC specifications:
Package File
Supported Data Elements
SCORM 1.2
Lesson Status (cmi.core.lesson_status)
Lesson Location (cmi.core.lesson_location)
Suspend Data (cmi.suspend_data)
Raw Score (cmi.core.score.raw)
Min Score (cmi.core.score.min)
Max Score (cmi.core.score.max)
Session Time (cmi.core.session_time)
Interactions (cmi.interactions)
ANCILE Solutions, Inc.
263
Chapter 11: Using Author Templates
Package File
Supported Data Elements
Interaction ID (cmi.interactions.n.id)
Interaction Time (cmi.interactions.n.time)
Interaction Type (cmi.interactions.n.type)
Interaction Correct Response
(cmi.interactions.n.correct_responses.n.pattern)
Interaction Student Response
(cmi.interactions.n.student_response)
Interaction Result (cmi.interactions.n.result)
*Interaction Description
(rwd.interactions.n.description)
SCORM 2004
Completion Status (cmi.completion_status)
Success Status (cmi.success_status)
Lesson Location (cmi.location)
Suspend Data (cmi.suspend_data)
Raw Score (cmi.score.raw)
Min Score (cmi.score.min)
Max Score (cmi.score.max)
Scaled Score (cmi.score.scaled)
Session Time (cmi.session_time)
Interactions (cmi.interactions)
Interaction ID (cmi.interactions.n.id)
Interaction Type (cmi.interactions.n.type)
Interaction Correct Response
(cmi.interactions.n.correct_responses.n.pattern)
Interaction Student Response
(cmi.interactions.n.student_response)
Interaction Result (cmi.interactions.n.result)
Interaction Description
(cmi.interactions.n.description)
AICC
Lesson Location (Core.Lesson_Status)
Lesson Status (Core.Lesson_Location)
Suspend Data (Core_Lesson)
Raw Score (Core.Score)
Session Time (Core.Time)
The following table explains the Data Elements:
264
Data Element
Explanation
Lesson Status
Element utilized to specify the completion status
of the SCO (completed/incomplete). This
element can also be utilized to specify the
mastery/success of the SCO (passed/failed).
Completion Status
Element utilized to specify the completion status
of the SCO (completed/incomplete).
Success Status
The element utilized to specify the mastery of the
ANCILE Solutions, Inc.
Chapter 11: Using Author Templates
Data Element
Explanation
SCO (passed/failed).
Lesson Location
The element used to specify the step/page at
which the learner terminated the SCO. Also
referred to as the SCO bookmark.
Suspend Data
The element utilized to persist content-specific
information, such as the pages/steps the learner
has viewed within the SCO. This element is
primarily utilized by uPerform courses.
Raw Score (0-100)
The element utilized for specifying the score
achieved by the learner within the SCO. The
value is based on the performance within the
assessment mode of a simulation, or within either
an assessment or terminated branch, with scoring
enabled, inserted into a course.
Min Score
The minimum score a learner can achieve within
a lesson. This value is currently always set to a
value of "0" (zero) within published uPerform
content.
Max Score
The maximum score a learner can achieve within
a lesson. This value is currently always set to a
value of "100" within published uPerform
content.
Scaled Score (0-10)
The element utilized to specify the performance
of a learner within the SCO that is scaled to fit
with the range of 0 – 1.0. The value is based on
the performance within the assessment mode of a
simulation, or within either an assessment or
terminated branch, with scoring enabled, inserted
into a course.
Session Time
The time the learner has spent in the lesson
during a given session.
Interactions
The data related to the questions/steps within an
assessment. The value is based on the
performance within the assessment mode of a
simulation, or an assessment inserted into a
course.
Interaction ID - The unique identifier of the
interaction.
Interaction Time - A timestamp at which the
interaction was completed.
Interaction Type - The type of the interaction.
Interaction Correct Response - The correct
answer for the interaction.
Interaction Student Response - The learner's
response to the interaction.
Interaction Result - The success outcome
(correct or incorrect/wrong)
Interaction Description - The description of the
ANCILE Solutions, Inc.
265
Chapter 11: Using Author Templates
Data Element
Explanation
interaction, utilized to persist the question stem
in uPerform. In the case of SCORM 1.2, this is a
custom data model element that is utilized by
ANCILE uLearn.
Specifying New Template Settings: Styles
Specifying Styles
1. From the editor, open the new template.
2. Click Styles on the status bar.
3. Perform one of the following options:
266
If You Want To
Then
Enable the use of language-specific
fonts
Select Enable Language Specific Style Fonts,
and go to Step 4.
Disable the use of language-specific
fonts
Deselect Enable Language Specific Style
Fonts, and go to Step 7.
ANCILE Solutions, Inc.
Chapter 11: Using Author Templates
4. Select Style Languages from the task pane.
5. Perform one of the following options:
If You Want To
Then
Manually select style languages to be
enabled in this template
Select or deselect one or more checkboxes in the
Enabled column.
Select all languages to be used in this
template.
Select Check All.
6. Select Manage All Styles from the task pane.
7. Click on the drop-down list below Action Note Style.
8. Select one of the following styles from the task pane:
Field
Description
Default Course Content Title
Text
The style to be used for the text displayed in the
content title area of a course.
Default Course Drag Drop
Text
The style to be used for the text displayed for drag
and drop in a course.
Default Course Page Title
Text
The style to be used for the text displayed as the
page title in a course.
Default Course Popup Text
The style to be used for the text displayed as a
popup in a course.
ANCILE Solutions, Inc.
267
Chapter 11: Using Author Templates
Field
Description
Default Course Questions
Text
The style to be used for the text displayed as
assessment questions in a course.
Default Course Text
The style to be used for the course text.
Default Course Title Text
The style to be used for the text displayed as the
course title.
Default Text
The style to be used for the page text.
Document Note
The style to be used for the document note.
Document Title
The style to be used for the document title that
displays at the top of a document.
Example
The style to be used for the example text.
Example Phrase
The style to be used for the example phrase text.
Generic Table Text
The style to be used for generic table text.
Guided Help User Interface
The style to be used for the text displayed in a
guided help user interface.
Link Text
The style to be used for the link text.
Page Description Text
The style to be used for the page description text.
Page Title Text
The style to be used for the page title text.
Screen Caption
The style to be used for the captions displayed above
screen captures in a document.
Section Name
The style to be used for sections displayed in your
document.
Simulation Note
The style to be used for simulation notes.
Simulation User Interface
The style to be used for simulation user interface.
Step
The style to be used for step text.
Step Number
The style to be used for the step number.
Table Header
The style to be used for the table header.
Table of Contents
The style to be used for table of contents heading
Table of Contents Heading 1- The style to be used for the levels within the table of
6
contents.
Table Text
The style to be used for the table text.
Top Navigation Text
The style to be used for the top navigation text
displayed in a uPerform course.
9. Click Modify.
10. Click Select Phrase.
268
ANCILE Solutions, Inc.
Chapter 11: Using Author Templates
11. Perform one of the following options:
If You Want To
Then
Add a custom phrase
Click Add.
Select a language from the left.
Enter the text in the Content area.
Click OK.
Select a phrase
Select a language from the Language drop-down
list.
Select a phrase from the Phrase listbox.
Optionally, enter text into the Phrases field to
search for text.
Click OK.
12. Complete the following fields:
Depending on the style selected, some of the following options may not be displayed.
Field
Description
Font
Click Select to choose a font
Size
Specify the font size.
Font Color
Select a font color from the drop-down list.
Optionally, click Select to create a custom color.
Effects
Click the checkbox(es) next to Bold, Underline,
Italic, or Strikethrough, to apply rich text
formatting.
Use Language Specific Fonts Click the checkbox next to Use Language Specific
Fonts and click Select to choose the language
specific font(s).
Justification
Specify a justification setting from the drop-down
list.
Margins
Specify margins for Top, Bottom, Left, and Right.
Optionally, select the unit of measurement from the
Unit drop-down box.
First Line
Specify the indent of the first line.
Optionally, select the unit of measurement from the
Unit drop-down box.
Background Color
Specify a background color from the drop-down list.
Optionally, click Select to create a custom color.
Gradient
Select the Gradient checkbox to apply a gradient to
section header backgrounds in HMTL outputs
viewable in supported versions of Internet Explorer.
ANCILE Solutions, Inc.
269
Chapter 11: Using Author Templates
Field
Description
Start Color
Specify a gradient start color from the drop-down
list.
Optionally, click Select to create a custom color.
End Color
Specify a gradient end color from the drop-down
list.
Optionally, click Select to create a custom color.
Orientation
Specify the orientation of the gradient from the
drop-down list.
Border Color
Specify a border color from the drop-down list.
Optionally, click Select to create a custom color.
Border Size
Specify the border width from the drop-down list.
Apply to Bottom Border
Only - HTML Only
Specify the style be applied only to the bottom
border.
13. Select FILE > SAVE to save the template.
Modifying, Duplicating, and Deleting Styles
1. From the editor, open the new template.
2. Click Styles on the status bar.
3. Click Manage All Styles from the task pane.
4. Select a style from the editor pane.
270
ANCILE Solutions, Inc.
Chapter 11: Using Author Templates
5. Choose from one of the following options:
If You Want To
Then
Modify the selected style
Click Modify, and refer to Specifying Styles (on
page 266).
Duplicate the style
Click Duplicate.
The duplicated style is added below the original
style. Modify the property to specify a new name
and characteristics. For more information, refer
to Specifying Styles (on page 266).
Delete the selected style
Click Delete.
At the prompt, click Yes.
6. Click FILE > SAVE to save the template.
Viewing Styles
1. From the editor, open the new template.
2. Click Styles on the status bar.
3. Click Applied Styles from the task pane.
A list of styles and their descriptions is displayed in the Editor Pane.
ANCILE Solutions, Inc.
271
Chapter 11: Using Author Templates
Changing Bulk Styles
1. From the editor, open the new template.
2. Click Styles on the status bar.
3. Click Bulk Style Change from the task pane.
4. Select a style from the list.
5. Click Load Style to view the current style settings for the item selected.
6. Using the Ctrl or Shift key, select one or more styles for which you want to apply a bulk
change.
7. Complete the following fields:
Field
Description
Font
Select the checkbox next to Font to specify a font.
Font Color
Select the checkbox next to Font Color to specify a
font color.
Size
Select the checkbox next to Size to specify a font
size.
Bold
Select the checkbox next to Bold, and select Yes or
No to specify a bold font.
Underline
Select the checkbox next to Underline, and select
Yes or No to specify an underline font.
Italic
Select the checkbox next to Italic, and select Yes or
No to specify an italic font.
Strikethrough
Select the checkbox next to Strikethrough, and
select Yes or No to specify a strikethrough font.
8. Click Apply.
9. Select FILE > SAVE to save the template.
272
ANCILE Solutions, Inc.
Chapter 11: Using Author Templates
Specifying New Template Settings: Blocks
Specifying Blocks
1. From the editor, open the new template.
2. Click Blocks on the status bar.
3. Perform one of the following options:
If You Want To
Then
Modify a block
Go to Step 5.
Duplicate a block
Select the block from the content area, and click
Duplicate.
Delete a block
Select the block from the content area, and click
Delete.
At the prompt, click Yes.
4. Optionally, select a step type from the Default Recorder Step drop-down list.
5. Select one of the following blocks from the task pane:
Field
Description
Activity
The block that contains the task information.
ANCILE Solutions, Inc.
273
Chapter 11: Using Author Templates
Field
Description
ASAP BPP
The block that contains the business process
description overview, input, output, comments, and
tips and tricks.
Configuration Information
The block that contains the configuration
information for the document.
Course Footer
The block that contains the course footer
information.
Course Header
The block that contains the course header
information.
Exercise/Data Sheet
The block that contains information relevant to the
end user's task.
Field
The block that contains the Field/Description table.
Footer
The block that contains the footer information.
Free Text
The block that contains the boilerplate freetext.
Header
The block that contains the header information.
Heading
The block that contains the heading boilerplate text.
If
The block that contains the If/Then table.
Note
The block that contains the note boilerplate text.
Purpose
The block that contains the trigger, prerequisites,
menu path, transaction code, and helpful hints.
Result
The block that contains the percent complete.
Screen Flow
The block that contains the screen flow image file.
Start the task using the menu
path
The block the contains the start transaction text.
Step
The block that contains the step boilerplate text.
Student Guide Footer
The block that contains the student guide footer
information.
Student Guide Header
The block that contains the student guide header
information.
Substep
The block that contains the substep boilerplate text.
Test Information
The block that contains the test history and
scenarios.
Test Scenarios
The block that contains the table specific to test
scenarios.
6. Click Modify.
7. Click Select Phrase.
274
ANCILE Solutions, Inc.
Chapter 11: Using Author Templates
8. Perform one of the following options:
If You Want To
Then
Add a custom phrase
Click Add.
Select a language from the left.
Enter the text in the Content area.
Click OK.
Select a phrase
Select a language from the Language drop-down
list.
Select a phrase from the Phrase listbox.
Optionally, enter text into the Phrases field to
search for text.
Click OK.
9. In the Content area, modify the text within the curly braces.
10. Perform one or more of the following options:
If You Want To
Then
Modify the format of displayed block
text
Highlight the text to be formatted.
Click Format..., and select from the Edit,
Format, or Justify options.
Insert an image, table, weblink, or line
at the cursor location in the displayed
block text
Click Format..., and select from the Table or
Insert options.
Insert a phrase or standard document
property code at the cursor location in
the displayed block text
Click INSERT... > PHRASE... [or] Standard
Code..., and select from the displayed list.
Determine where the block is used
View the This item is used by the items below
area.
11. Optionally, edit the source content of the block in the Source pane.
Basic knowledge of HTML, XML, and Java is required.
12. Under Format, select a style from the drop-down list.
13. Click the checkbox next to Visible to display the block in published documentation.
14. Select FILE > SAVE to save the template.
ANCILE Solutions, Inc.
275
Chapter 11: Using Author Templates
Specifying New Template Settings: Sections
Specifying Sections
1. From the editor, open the new template.
2. Click Sections on the status bar.
3. Select a section from the Task Pane.
4. Click the checkbox next to Visible to display the section in published documentation.
New sections will display in all new documents and older documents will be upgraded
to add newly added sections when opened.
5. Complete the following fields:
Field
Description
Header
Specify the header for the section.
Footer
Specify the footer for the section.
6. Click Select Phrase.
276
ANCILE Solutions, Inc.
Chapter 11: Using Author Templates
7. Perform one of the following options:
If You Want To
Then
Add a custom phrase
Click Add.
Select a language from the left.
Enter the text in the Content area.
Click OK.
Select a phrase
Select a language from the Language drop-down
list.
Select a phrase from the Phrase listbox.
Optionally, enter text into the Phrases field to
search for text.
Click OK.
8. Under Content, perform one of the following options:
If You Want To
Then
Add content to the section
Click Add.
Select a block from the list.
Click OK.
Remove content
Click Remove.
At the prompt, click Yes.
Move content to earlier in the list
Click Move Up one or more times as needed.
Move content to later in the list
Click Move Down one or more times as needed.
9. Determine where the section is used in the This item is used by the items below area.
10. Click FILE > SAVE to specify additional sections.
ANCILE Solutions, Inc.
277
Chapter 11: Using Author Templates
Modifying, Duplicating, and Deleting Sections
1. From the editor, open the new template.
2. Click Sections on the status bar.
3. Perform one of the following options:
278
If You Want To
Then
Modify a section
Select the section from the Manage All Sections
list in the content pane.
Click Modify.
For information on modifying a section, refer to
Specifying Sections (on page 276).
Duplicate a section
Select the section from the content area, and
click Duplicate.
The duplicated section is added below the
original section. Modify the property to specify a
new name and characteristics. For information,
refer to Specifying Sections (on page 276).
Delete a section
Select the section from the content area, and
click Delete.
At the prompt, click Yes.
ANCILE Solutions, Inc.
Chapter 11: Using Author Templates
If You Want To
Then
Move a section earlier in the list
Select the section.
Click Move Up one or more times as needed.
Move the section later in the list
Select the section.
Click Move Down one or more times as needed.
4. Click FILE > SAVE to save the template.
ANCILE Solutions, Inc.
279
Chapter 11: Using Author Templates
Export and Import an Author Template
ANCILE uPerform allows users to import and export author template phrases via the XML
Localization Interchange File Format (XLIFF) for translating template content in to multiple
languages. When a template is exported, one XLIFF file will be created for each language. When
a template is imported, it is updated to contain the translated phrases.
The file is formatted to facilitate translation by displaying the source (original) text co-located
next to the target translated text.
The XLIFF file can be edited in Notepad, in an HTML editor, or via a specialized
XLIFF editor such as Xliff Editor or Heartsome.
Exporting Template Content
1. Select FILE> MANAGE CONTENT LANGUAGE.
2. Select Export [template name].
3. Select the target export language(s).
Multiple languages can be selected. Click the checkbox beside the template name to
select all languages.
4. Click Export.
280
ANCILE Solutions, Inc.
Chapter 11: Using Author Templates
5. Optionally, select , to specify a destination folder other than the default.
Only the template will be exported. Any depending uPerform content will not be
represented in the output.
6. Click Export.
7. Click OK.
Importing Template Content
1. Select FILE> MANAGE CONTENT LANGUAGE.
2. Select Import [template name].
3. Select the template and language(s) to import.
ANCILE Solutions, Inc.
281
Chapter 11: Using Author Templates
4. Click Import.
5. Click OK.
The template is now updated to include the translated phrases, and will be included in
content using that template.
282
ANCILE Solutions, Inc.
Chapter 11: Using Author Templates
Delete an Author Template
Create a backup of the template file prior to deleting the template. Any existing
documents created with the deleted template cannot be opened after the template is
deleted.
Deleting an Author Template
1. Select FILE > MANAGE LOCAL TEMPLATES.
2. Select the template you want to delete.
3. Click Remove.
4. Click OK.
ANCILE Solutions, Inc.
283
Chapter 12: Using Custom Skins and
Modifying CSS Files
ANCILE uPerform allows you to manage custom skins for courses,
simulations, and guided help publications. You can deploy custom
skins with the uPerform client or server to allow multiple authors the
ability to share and use the custom skins. uPerform allows you to
modify CSS files to incorporate your corporate standards and
preferences.
285
Chapter 12: Using Custom Skins and Modifying CSS Files
Introduction to Custom Skin Management
Custom skin management simplifies the deployment of custom skins to multiple authors from the
uPerform client and server. Custom skins associated with courses, simulations, and guided help
can be imported from a local computer to uPerform, exported from uPerform to a local computer,
and checked in to the server.
Only System and Project Administrators can check in custom skins.
286
ANCILE Solutions, Inc.
Chapter 12: Using Custom Skins and Modifying CSS Files
Creating Skins
Creating Skins
If you do not want to leverage a standard skin delivered with uPerform, you can create a custom
skin.
1. Copy an existing skin from the [uPerform installation]\Client\appdata\skins\[Course or
Sim]\uPerform folder.
2. Paste the skin to the [uPerform installation]\Client\appdata\skins\[Course or Sim]\custom
folder.
3. Rename the skin (the folder name). For example: Custom Skin 001
4. Modify the skin.css located in the [uPerform installation]\Client\appdata\skins\[Course or
Sim]\custom\[renamed skin]\skin folder.
ANCILE Solutions, Inc.
287
Chapter 12: Using Custom Skins and Modifying CSS Files
Managing Custom Skins
Managing Local Custom Skins
1. In the editor, select FILE > MANAGE LOCAL CUSTOM SKINS....
Custom skins that exist on the uPerform server and are not already present on the
current user's system are automatically downloaded.
If you download a custom skin while connected to the server, the uPerform client will
perform a check of the local custom skin against the downloaded skin. If the local copy
has been modified, the uPerform client displays a message identifying the conflicted
skin state and provides the option to cancel the skin package download process. If you
continue to extract the skin to the [uPerform installation]\Client\appdata\skins\[Course
or Sim]\custom folder, it will overwrite the existing skin. If the local skin is older than
the version on the server, it will be overwritten automatically.
2. Perform one of the following options:
If You Want To
Then
Import a custom skin
Click Import....
Navigate to the .uskin file on your local computer
and click Open.
Click OK.
Deploy a custom skin
Select a skin from the list.
Click Export....
Deployed custom skins have a .uskin
file extension.
288
ANCILE Solutions, Inc.
Chapter 12: Using Custom Skins and Modifying CSS Files
If You Want To
Then
Delete a custom skin
Select a skin from the list.
Click Remove....
Click Yes.
If the skin is saved on the server, it
will re-display the next time you
access the Manage Local Custom
Skins window.
Check in a custom skin
Select a skin from the list.
Click Check In.
Click OK.
3. Click Close.
Rolling Back to a Previous Version of a Custom Skin
1. Click
in the uPerform server workspace.
2. Click on the project name.
3. Click Document Library.
4. Select the folder containing the custom skin.
5. Click on the name of the binder containing the skin you want to view.
6. In the Translations section, click on the name of the skin.
A list of previous versions is displayed in the Version History portion of the screen.
7. Click Rollback on the left menu to set the current version of the skin to the previous version.
When you confirm the rollback, the current version of the skin will be permanently
deleted from the server.
8. Click OK.
ANCILE Solutions, Inc.
289
Chapter 12: Using Custom Skins and Modifying CSS Files
Guidance on Modifying Cascading Style Sheets
Guidance on Modifying Cascading Style Sheets
You can modify the uPerformEndUserDocument.css file to incorporate your corporate standards
(for example, font and color scheme).
A complete tutorial on modifying cascading style sheets is beyond the scope of this
manual. Several books and websites discuss this topic in detail. In particular, the World
Wide Web Consortium (W3C) provides helpful information at
http://www.w3.org/Style/CSS/.
The following table provides general guidance on performing common customization tasks in the
style sheets.
290
If You Want To
Go To
Modify
Customize the placement of
the Continue button on
assessment stencils
The assessment section of the div#assessmentButtons to set the text
CSS file.
alignment and background.
div#assessmentButtons
input[type=button] to set the borders
and background of all the assessment
buttons.
input#btnContinue, input#btnRetry,
input#btnReset, input#btnShowMe
and input#btnSkipSim to set border,
color and text alignment of each
respective button individually.
ANCILE Solutions, Inc.
Chapter 12: Using Custom Skins and Modifying CSS Files
If You Want To
Go To
Override or replace images
displayed in the course menu
The menu section of the CSS div#courseImage to set the image URL
file.
for the course icon.
div#menuHereImage to set the image
URL for the menu here icon.
div#menuVisitedImage to set the
image URL for the menu visited icon.
div#menuMinusImage to set the image
URL for the menu minus icon.
div#menuPlusImage to set the image
URL for the menu plus icon.
div#menuAssessmentImage to set the
image URL for the menu assessment
icon.
div#assessmentPassedImage to set the
image URL for the assessment passed
icon.
div#postAssessmentPassedImage to
set the image URL for the post
assessment passed icon.
div#postAssessmentImage to set the
image URL for the post assessment
icon.
div#menuBranchImage to set the
image URL for the menu branch icon.
div#menuBranchChoiceImage to set
the image URL for the menu branch
choice icon.
div#branchConnectorImage to set the
image URL for the branch connector
icon.
div#singleBranchImage to set the
image URL for the single branch icon.
div#extendBranchImage to set the
image URL for the extend branch icon.
Modify the username prompt
in courses and simulations
The user name prompt page body.uiPromptPageBackground to set
section of the CSS file.
the background of the prompt page.
td.uiPromptBackground to set the
image URL or background of the
prompt box.
div#titleTextDiv to set the text color,
text alignment and font of the title.
div.uiPromptText to set the text color,
text alignment and font of the prompt
text.
ANCILE Solutions, Inc.
Modify
291
Chapter 12: Using Custom Skins and Modifying CSS Files
292
If You Want To
Go To
Modify
Customize the loading page
in courses, simulations, and
guided help
The loading section of the
CSS file.
div#LoadingMessage to set the
background color of the loading page.
div#LoadingMessage div#loadingText
to set the color and text alignment.
div#loadingImage to set the logo
dimensions and URL.
ANCILE Solutions, Inc.
Chapter 13: Setting Up Online Help
The ANCILE uPerform server works in conjunction with ANCILE
Help Launchpad to provide context-sensitive help within the SAP GUI
for Windows and HTML GUI environments. In addition, you can
specify a context-sensitive help solution directly from the uPerform
server for SAP Enterprise Portal (SAP EP), SAP CRM Web Client,
SAP SRM 7 Shopping application, Oracle E-Business, PeopleSoft,
web applications, and Siebel.
Online help allows your end users to access relevant help stored on the
uPerform server from within their current application.
293
Chapter 13: Setting Up Online Help
Introduction to Online Help
Online performance support materials are most effective when the materials are available to end
users quickly and conveniently. The most direct and effective link possible is one from a
particular task in an application to the relevant help in an online performance support system. You
can provide context-sensitive help for Oracle E-Business, SAP EP, SAP CRM Web Client, SAP
SRM Shopping application, Siebel, PeopleSoft, generic web pages, and applications supported
through Help Launchpad.
The procedures in this section cover basic set up procedures relevant to all supported applications,
including:
Creating a template
Recording a document and making it available for context-sensitive help
Specifying a connection to the uPerform server
Viewing and editing a connection to the uPerform server
Configuring the application for use with context-sensitive help
Requesting help
Creating a Template
If you are planning to provide context-sensitive help, you will need to create a template in which
to store context-identifiers. Context-identifiers are stored in the Transaction code property of the
uPerform template. Transaction code is a uPerform property used to identify a process, and is used
in two separate instances:
Transaction code property: The uPerform server matches this document property to
the associated screen when a call for help is made. This property is only populated
when you manually add a value to it. For situations where the Recorder automatically
captures the context identifier, the identifiers are stored in step properties.
Transaction code within the Purpose block: In a uPerform document, this displays
the value contained in the transaction code property. ANCILE recommends you
delete this section if you are providing context sensitive help for applications where
the context identifier would not be meaningful to an end user. In some applications,
such as SAP GUI for Windows and SAP HTML GUI, the context identifier is based
on the task or transaction and a single context identifier is applicable for the entire
document.For other applications, a screen-level context identifier is used. In these
cases there may be multiple identifiers per document or the identifier is too long to be
294
ANCILE Solutions, Inc.
Chapter 13: Setting Up Online Help
meaningful to end users. In this case, deleting the transaction code from the Purpose
block may be appropriate.
1. Create a template in uPerform.
A uPerform project administrator typically creates and customizes templates. For more
information, refer to Using Author Templates (on page 211).
2. Perform one of the following options:
If You Want To
Then
Provide context-sensitive help without
a Transaction Code property
Select the Blocks tab.
In the task pane, select Purpose.
In the Content area, delete the lines:
{Transaction Code}
{#TransactionCode#}
Provide context-sensitive help using a
Transaction Code property
Go to Step 3.
3. Click the Properties tab.
4. Enable the Transaction Code property.
The recorder may automatically capture the contextID; however, ANCILE
recommends enabling the Transaction Code property in case it is not automatically
captured.
5. Save the template.
ANCILE Solutions, Inc.
295
Chapter 13: Setting Up Online Help
Recording a Document and Making It Available for Context-Sensitive Help
1. Log into the supported application using a designated account.
2. Perform one of the following options:
If You Want To
Then
Record and edit the document
Using the template you created in Creating a
Template, record and edit the document using the
uPerform client and the procedures described in
the Creating Content with ANCILE uPerform
user manual.
Insert steps into a previously recorded
uPerform document
Update the template associated with the
uPerform document.
Open the uPerform document associated with the
template.
Select the Simulation tab.
Select INSERT > STEPS > FROM NEW
RECORDING.
Record the steps using the uPerform client and
the procedures described in the Creating Content
with ANCILE uPerform user manual.
Edit the uPerform document.
For more information on recording, editing, and
using the recorder toolbar, refer to the
companion manual Creating Content with
ANCILE uPerform.
3. Perform one of the following options:
If You Want To
Then
Provide context-sensitive help using
Oracle E-Business.
Specify an author account as described in
Specifying an Author Account for Oracle EBusiness.
Revisit the screens in the application for which
you want to provide context-sensitive help, and
click on the help icon on each screen captured in
the recorded document.
This will open up a new browser
window containing the context
identifier for the screen.
Highlight and copy the context identifier string
from the browser window.
Repeat until context identifiers for all screens
within the procedure have been collected.
Go to Step 4.
296
ANCILE Solutions, Inc.
Chapter 13: Setting Up Online Help
If You Want To
Then
Provide context-sensitive help using
SAP SRM version 4-6
Perform the steps described in Modifying the
Workplace Integration API.
Revisit the screens in the application for which
you want to provide context-sensitive help, and
click on the help icon on each screen captured in
the recorded document.
Highlight and copy the context identifier string
from the browser window.
Repeat until context identifiers for all screens
within the procedure have been collected.
Go to Step 4.
Provide context-sensitive help using
SAP EP, SAP CRM Web Client, SAP
SRM version 7, SAP GUI for
Windows, SAP HTML GUI, Siebel,
PeopleSoft 9, and generic web pages
If iView/Portal page IDs are not automatically
collected, enable and include the iView/Portal
Page IDs as needed. Refer to Enabling the
Required iView/Portal Page Options (on page
306), Locating the iView/Portal Page ID (on
page 307), and Including the iView/Portal Page
ID in Documents (on page 307).
Go to Step 9.
4. Open the uPerform document created in Step 2.
5. Select FILE > PROPERTIES.
6. Select Properties.
7. To provide context-sensitive help using Oracle E-Business, paste the identifier(s) into the
Transaction Code property.
8. Click OK.
9. Save the document.
ANCILE Solutions, Inc.
297
Chapter 13: Setting Up Online Help
10. From the uPerform client, check your document into the server.
When published, the document will be available for the end user via the help icon in
the application for which you want to provide context-sensitive help.
Specifying a Connection to the uPerform Server
1. In uPerform, select Administration in the left navigation pane.
2. Select Server Administration.
3. Select Integration Settings under Server Administration.
4. Select Context Sensitive Help Connection Profiles under Integration Settings.
5. Select New Connection Profile.
6. Complete/review the following fields:
This profile is configurable and can be edited or deleted based upon your end user
needs. You can specify as many connection profiles as necessary. You must specify a
connection for each instance of the application for which you want to provide contextsensitive help.
298
Field
Description
Name
Enter the name of the connection profile.
Description
Enter details describing the profile.
Application
Select the application from the drop-down list.
Base Help URL
Enter the URL of the help application for which you
want to provide context-sensitive help.
For example: http://[servername]/path
This option is not available for Help Launchpad or
Web Profiles.
ANCILE Solutions, Inc.
Chapter 13: Setting Up Online Help
Field
Description
Search Method
This option is available only for the Web
application. Select Transaction Code to search by
the uPerform transaction code property only, Full
Text (All Words) to allow an AND search based on
properties, or Full Text (Any Words) to allow an
OR search based on properties.
Width
Set the width of the browser window in which the
help will display.
Height
Set the height of the browser window in which the
help will display.
Location
Specify the location of the browser window in
which the help will display.
Stay on Top
Select this option to allow the browser window
containing help to display on top of all open
applications.
This option is available for use only with
Internet Explorer.
7. Click Save.
Viewing and Editing a Connection to the uPerform Server
1. In uPerform, select Administration in the left navigation pane.
2. Select Server Administration.
3. Select Integration Settings under Server Administration.
4. Select Context Sensitive Help Connection Profiles under Integration Settings.
5. Select the connection profile you want to view or edit.
6. Perform one of the following options:
If You Want To
Then
View the connection
Go to Step 7.
Edit the connection
Go to Step 8.
7. Review the following fields:
Field
Description
Application
The application specified for context-sensitive help.
Applications Help Web
Agent Profile Setting
This value is generated by uPerform and is not
configurable. (Oracle only)
ANCILE Solutions, Inc.
299
Chapter 13: Setting Up Online Help
Field
Description
Applications Help Web
Agent Profile Setting for
Authors
This value is generated by uPerform and is not
configurable.(Oracle only)
URL
This value is generated by uPerform and is not
configurable. (Help Launchpad, PeopleSoft, SAP
Portal, Siebel, and Web)
SR13 PlainHTML Server
Name
This value is generated by uPerform and is not
configurable.(SAP CRM only)
SR13 PlainHTML Server
Path
This value is generated by uPerform and is not
configurable.(SAP CRM only)
Search Method
This option is available only for the Web
application. Select Transaction Code to search by
the uPerform transaction code property only, Full
Text (All Words) to search based on properties, or
Full Text (Any Words) to search based on
properties.
Width
The width of the browser window in which the help
will display.
Height
The height of the browser window in which the help
will display.
Location
The location of the browser window in which the
help will display.
Stay On Top (IE Only)
This option allows the browser window containing
help to display on top of all open applications. This
option is available only for use with Internet
Explorer.
8. Click Edit Settings.
9. Edit/review the following fields:
300
Field
Description
Name
Enter the name of the connection profile.
Description
Enter details describing the profile.
Application
Select the application from the drop-down list.
ANCILE Solutions, Inc.
Chapter 13: Setting Up Online Help
Field
Description
Base Help URL
Enter the URL of the help provided by the
application.
Example: http://[servername]/path
Search Method
This option is available only for the Web
application. Select Transaction Code to search by
transaction code, Full Text (All Words) to search to
return results based on properties, or Full Text (Any
Words) to search to return results based on
properties, as well as words provided in the
document.
Width
Set the width of the browser window in which the
help will display.
Height
Set the height of the browser window in which the
help will display.
Location
Specify the location of the browser window in
which the help will display.
Stay on Top
Select this option to allow the browser window
containing help to display on top of all open
applications.
This option is available for use only with
Internet Explorer.
10. Click Save.
ANCILE Solutions, Inc.
301
Chapter 13: Setting Up Online Help
Configuring Oracle E-Business for Use with Context-Sensitive Help
Context-sensitive help allows you to provide end users with quick and convenient access to help
via an online performance support system. End users request help from the uPerform server via a
direct link in the Oracle E-Business application.
Specifying an Author Account for Oracle E-Business
The Oracle system administrator must create a designated author account in Oracle EBusiness. This account communicates with the uPerform server to generate the screen
data necessary to request help from Oracle E-Business.
You must log into Oracle E-Business using a designated author account in order to
record help-ready documents. Context-sensitive help is not available when logged in
via the author account.
For more information on creating user accounts, refer to the Oracle E-Business
documentation.
1. In uPerform, select Administration in the left navigation pane.
2. Select Server Administration.
3. Select Integration Settings under Server Administration.
4. Select Context Sensitive Help Connection Profiles under Integration Settings.
5. Select the connection profile.
302
ANCILE Solutions, Inc.
Chapter 13: Setting Up Online Help
6. Review the following system-generated values:
Field
Description
Applications Help Web Agent Profile
Setting
This value is pasted into the Applications Help
Web Agent profile setting for the end user in
Oracle E-Business. This value is generated by
uPerform and is not configurable.
Refer to Modifying Oracle E-Business End User
Accounts for Use with Context-Sensitive Help
(on page 303) for information on using this value
to modify end user accounts in Oracle.
Application Help Web Agent Profile
Setting for Authors
This value is pasted into the Application Help
Web Agent profile setting for the designated
author in Oracle E-Business. This value is
generated by uPerform and is not configurable.
7. Copy the URL from the Applications Help Web Agent Profile Settings for Authors field.
8. Paste the author setting URL into the Applications Web Help Agent profile setting User
column for the author in Oracle E-Business.
For more information on setting system profile values, refer to the Oracle E-Business
documentation.
9. Save the author settings.
ANCILE Solutions, Inc.
303
Chapter 13: Setting Up Online Help
Modifying Oracle E-Business End User Accounts for Use with Context-Sensitive
Help
You must modify all existing user accounts to enable context-sensitive help. An Oracle
E-Business administrator creates end user accounts based on the needs of the company.
While there are several options for defining system profile values for existing users,
this procedure demonstrates defining a system profile value for an individual user.
1. Log into Oracle E-Business as a system administrator.
2. Define system profile values for the user.
Refer to the Oracle E-Businessdocumentation for information about the System Profile
Values Site, Application, Responsibility, and User, and to choose which system
profile value is most appropriate for your end user community.
3. In uPerform, open the profile connection you created as described in Specifying a Connection
with the uPerform Server.
This profile contains all of the information necessary to manage a connection with
Oracle E-Business.
304
ANCILE Solutions, Inc.
Chapter 13: Setting Up Online Help
4. Copy the URL from the Applications Help Web Agent Profile Settings for End Users
field.
5. In Oracle E-Business, paste the end user setting URL into the Applications Web Help Agent
profile setting column of the system profile value you selected earlier in this section.
6. Save the end user settings.
ANCILE Solutions, Inc.
305
Chapter 13: Setting Up Online Help
Configuring SAP Portal for Use with Context-Sensitive Help
SAP EP is a web-based platform for delivering information from various sources to end users.
Using the URL to Help Topic setting, the SAP EP can display the correct content for each
iView/Portal Page in a browser window that displays on top of the SAP EP application.
Context-sensitive help allows you to provide end users with quick and convenient access to help
via an online performance support system. End users request help from the uPerform server via a
direct link in the SAP EP application.
When creating custom Help links in an application that will be hosted in an iView, consider using
an approach similar to that used in the context-sensitive solution for the iView itself.
Assign a unique identifier to each Help link. Recall that each iView in an SAP EP
system has a unique alphanumeric identifier (for example,
"com.sap.portal.createNewUser") that can be used as a reliable link between an iView
and its related help content. Each custom Help link should also have a unique
identifier that can be included in the properties of applicable uPerform documents.
Include the unique Help link identifier in uPerform documents. uPerform allows the
author to specify the iView ID(s) to which the document applies. The Help link
unique identifier should also be specified in the document.
Enabling the Required iView/Portal Page Options
To enable end users to access context-sensitive help for an iView/portal page, the Help option
must be enabled. Each iView/portal page Help option is disabled by default; however, an SAP EP
user with the appropriate permission to edit an iView/portal page can enable the Help option via
the Property Editor.
Each iView and portal page in a portal system can be contained in a tray. The tray includes the
name of the iView/portal page and a drop-down menu of options such as Refresh, Open in New
Window, Personalize, Details, and Help.
To enable the iView/portal page required options:
1. Log into SAP Enterprise Portal with Content Administrator permission.
306
ANCILE Solutions, Inc.
Chapter 13: Setting Up Online Help
2. In the Portal Catalog, right-click on the desired iView/portal page and select Open > Object.
An iView or portal page may display in several different contexts based on your role
within the SAP EP. For example, the "Create User" iView may be configured
differently for Super Administrators than it is for Content Administrators. In addition,
note the specific role(s) in which an iView/portal page is to be modified. If more than
one role applies, the iView/portal page must be edited for all roles.
3. In the editing area, select the Property Editor panel located to the right of the editing area.
4. In the Property Category list, select Show All.
5. For the Show 'Details' option property, click Yes.
6. For the Show 'Help' option property, click Yes.
7. For the Show Tray option property, click Yes.
8. Click Save.
Locating the iView/Portal Page ID
Each iView and portal page in SAP EP has a unique alphanumeric identifier, which is registered
in the portal content directory (PCD). The identifier is assigned when a new iView/portal page is
created in the Portal Content Studio. Because identifiers are unique, they can be used as reliable
links between an iView/portal page and its related help content.
To link an iView or portal page to help content, the iView/portal page ID must be included in the
properties of the applicable uPerform document(s). To allow authors to easily locate an
iView/portal page‟s ID, the Details option must be enabled. An author can determine the
iView/portal page ID via its details window by selecting the Details option within SAP EP. This
will display a new browser window containing the Portal Component and Object ID.
The Object ID is a string of alphanumeric characters. You may choose to use the entire Object ID
as the iView/portal page ID, or simply use the segment of the Object ID that follows the last "/"
divider.
Including the iView/Portal Page ID in Documents
ANCILE uPerform allows the author to populate properties within the document. The uPerform
server uses these properties to produce search results. For transaction-based SAP procedures, the
author can specify the SAP transaction code(s) to which the document applies. The author can
specify an iView/portal page ID, instead of a transaction code. uPerform provide a Properties
window for populating the Transaction Code(s) property within the document.
ANCILE Solutions, Inc.
307
Chapter 13: Setting Up Online Help
Setting the Help URL for an iView/Portal Page
The URL to Help Topic property was introduced in EP6 SP17 and EP7 SP10 as a simple way to
direct end users to the correct help URL; however, if you wish to configure the help URL for
iViews or portal pages for which the URL to Help Topic property is not available, you may do so
by using the PCD Inspector. The procedure for determining which procedure to use for setting the
help URL depends on the following criteria.
The version and service pack (SP) of your SAP EP system
Whether you wish to enable the Help option on an iView or portal page
SAP EP
Version
Service Pack
(SP) Version
Set Help URL for iViews
via
Set Help URL for
Portal Pages via
6
Prior to SP17
PCD Inspector
PCD Inspector
SP 17-20
Portal Content Administrator
PCD Inspector
Prior to SP 10
PCD Inspector
PCD Inspector
SP 10-12
Portal Content Administrator
PCD Inspector
SP 13
Portal Content Administrator
Portal Content
Administrator
0
PCD Inspector
PCD Inspector
7
7.30
Setting the Help URL Using Portal Content Administration
If you are setting the URL to Help Topic property for an iView/portal page, you may do so using
Portal Content Administration.
To set an iView/portal page URL to Help Topic property using Portal Content Administration:
1. Log into SAP Enterprise Portal with Content Administrator permission.
2. In the Portal Catalog, right-click on the desired iView/portal page and select OPEN > OBJECT.
An iView or portal page may display in several different contexts based on role within
the SAP EP. For example, the "Create User" iView may be configured differently for
Super Administrators and Content Administrators. Therefore, it is important to note
the specific role(s) in which an iView/portal page is to be modified. If more than one
role applies, then the iView/portal page must be edited for all roles.
3. Locate the Property Editor panel to the right of the editing area.
4. In the Property Category list, select Show All.
5. In the list of properties, scroll to the URL to Help Topic property.
308
ANCILE Solutions, Inc.
Chapter 13: Setting Up Online Help
6. Enter the connection profile URL.
7. Click Save.
Setting the Help URL Using the PCD Inspector
1. Log into SAP Enterprise Portal with Content Administrator permission.
2. From the Portal's top menu, click System Administration.
3. From the System Administration page, click Support.
4. From the Support page Top Level Areas list, click Portal Content Directory.
5. In the Test and Configuration Tools list, click PCD Inspector. You may see warnings at this
point; confirm these warnings and continue.
6. From the PCD Inspector browser, check the box next to portal_content.
7. Click Browse Into.
8. Repeat Step 6-7 as necessary until you reach the desired iView/portal page.
9. Select the checkbox next to the desired portal page, and click PropEditor. This will open a
new browser window for the PCD Generic Layer Property Editor.
10. Click Switch to PCM.
11. From the List of All Properties list, choose com.sap.portal.iview.HelpURL.
12. Click Edit.
13. Build the help call URL by appending the Object ID copied in the Locating the iView/Portal
Page ID (on page 307) to the URL generated when you specified a connection to the server
using the procedures found in Specifying a Connection with the uPerform Server.
14. Paste the URL into the Property Value field.
15. Click Save.
ANCILE Solutions, Inc.
309
Chapter 13: Setting Up Online Help
Modifying the Help Link in the Portal Masthead
By default, the Help link in the SAP EP masthead launches the SAP Help Portal; however, the
Portal Content Administrator can change the URL that is displayed by this Help link. For
example, you may wish to have this Help link display the home page of your custom or uPerformgenerated website or display a specific page on your corporate intranet.
To select the URL that is displayed by the Help link in the Portal masthead, perform the following
steps:
1. In the Portal Catalog, go to Portal Users > Standard Portal Users.
2. Right-click on the Default Framework page and select OPEN > OBJECT.
3. Check the Masthead iView checkbox and click Properties.
4. In the Property Editor, from the Property Category drop-down list, select Navigation.
5. In the Property Editor, locate the URL of Help Link property.
6. In the URL of Help Link property, enter the URL of the site you want to display.
7. Click Save.
310
ANCILE Solutions, Inc.
Chapter 13: Setting Up Online Help
Configuring SAP SRM 4-6 for Use with Context-Sensitive Help
SAP SRM captures context IDs and allows the SRM system to display the correct help content for
each screen in a separate browser window. The context-sensitive help solution for SAP SRM
provides custom help for only SRM Enterprise Buyers Professional (EBP) screens via the Help
link in each screen.
One of the things that can be contained within an SAP EP iView is the SAP SRM user interface.
In other words, a user can perform an SAP SRM transaction from within an iView. If a customer
wants context-sensitive help for an SAP EP iView (regardless of what the iView contains), then
the context-sensitive help solution for SAP EP is required.
Obtaining the Help Launchpad Code Supplement
Download the Help Launchpad Code Supplement for SAP SRM from the ANCILE Product
Support Center (https://ancile.parature.com). This code supplement was authored by ANCILE for
use by uPerform customers only. The code supplement file contains JavaScript code that redirects
the SAP SRM‟s existing Help link to a help page created with uPerform.
Modifying the Workplace Integration API
SAP Internet Transaction Server (ITS) embeds the wpintegration.js client-side script into every
SRM screen at runtime. This script provides programmatic access to several SRM screen
functions, including the Help link. By modifying the wpintegration.js script via the ABAP
Workbench, we are able to intercept and redirect help calls made from this Help link.
Refer to the appropriate instructions and SAP Note(s) for changing JavaScript files via
the ABAP Workbench.
To modify the Workplace Integration API:
1. Log into the appropriate SAP System using SAP GUI.
2. Open the ABAP Workbench Object Navigator using transaction SE80.
3. In the Object Navigator, select the Internet Service BBPGLOBAL. The Web Application
Builder is started.
4. Select WPINTEGRATION.JS from the Mime Objects located under the BBPGLOBAL item
in the Object list.
ANCILE Solutions, Inc.
311
Chapter 13: Setting Up Online Help
5. Right-click WPINTEGRATION.JS and select Change.
6. If prompted, click the green check.
7. If prompted, click Maint. in logon lang.
8. Click Save As Local File.
9. Create a backup copy of the wpintegration.js file (e.g., wpintegration.js.bak) on your local
computer.
10. In the Web Application Builder, scroll to the bottom of the wpintegration.js file.
11. Append the Help Launchpad code supplement to the end of the wpintegration.js file.
12. In the code supplement, locate and edit the following fields:
Field
Description
HELP_SERVER_LOCATION
Eneter the connection profile URL
HELP_FALLBACK_LOCATION Location of the fallback help, in case a scripting
error occurs during context-sensitive help.
The fallback help does not
automatically redirect the user to a
given website when there is a help
page that cannot be found. The
context-sensitive help solution for
SRM cannot determine whether or not
a specific help page exists on a given
website.
SCREEN_ID_TEXT
Message text used to indicate the screen ID.
SHOW_ID
Determines whether the screen ID is displayed in
the new window launched from the screen Help
link:
true = show screen ID
false = show help content
HELP_WINDOW_LEFT
Help window left position in pixels.
HELP_WINDOW_TOP
Help window top position in pixels.
HELP_WINDOW_WIDTH
Help window width in pixels.
HELP_WINDOW_HEIGHT
Help window height in pixels.
13. Save the wpintegration.js file.
14. Select the BBPGLOBAL Internet Service from the Object Navigator list.
15. Click Publish.
You should receive a message at the bottom of the screen stating the object published
successfully.
312
ANCILE Solutions, Inc.
Chapter 13: Setting Up Online Help
16. Refresh the SRM screen displayed in the web browser.
You may need to clear your browser's cache or Temporary Internet Files.
This modification affects all screens in the SRM system. Be sure to verify that each
screen has online help available.
Determining the Screen ID
Each screen in an SRM system has a unique alphanumeric identifier (ID). This ID can be used as
a reliable link between an SRM screen and its related help content. To link an SRM screen to
help content, the ID must first be included in the applicable uPerform document(s).
If the SHOW_ID property is set to true, any user with access to an SRM screen can determine its
ID using the Help link:
1. In the wpintegration.js file, ensure that the SHOW_ID property is set to true.
2. Save the wpintegration.js file.
3. Click Publish.
4. Refresh the SRM screen displayed in the web browser.
You may need to clear your browser's cache or Temporary Internet Files.
5. In the desired BSP application screen, select the Help link to open a new window that
displays the ID for the screen.
Including the SRM Screen ID in Documents
ANCILE uPerform allows the author to populate properties within the document. uPerform
leverage these properties when building website navigation and quick launch pages, while the
uPerform server uses these properties to produce search results.
uPerform provides a Properties window for populating the Transaction Code(s) property within
the document. To map a uPerform document to a SRM screen via the Properties tab:
1. Ensure that the Transaction Code(s) built-in property is marked as visible in the uPerform
template. By default, the display of all built-in properties is disabled in the template.
2. Open the desired uPerform document associated with the template.
3. Select FILE > PROPERTIES….
ANCILE Solutions, Inc.
313
Chapter 13: Setting Up Online Help
4. Click PROPERTIES on the left pane.
5. Select the Transaction Code(s) field.
6. Enter the iView/portal page ID or the screen ID in the Transaction Code(s) field. For multiple
pages or IDs, separate each with a comma.
7. Click OK.
8. Select FILE > SAVE to save your uPerform document.
Viewing Help Content for an SRM Screen
If the SHOW_ID property is set to false, any user with access to an SRM screen can view help
content for the screen using the Help link:
This modification affects the Help link for every SRM screen. Be sure to verify that
help content is ready for each available SRM screen before performing the following
steps. The Help link links blindly to a page that matches its ID.
1. In the wpintegration.js file, ensure that the SHOW_ID property is set to false.
2. Save the wpintegration.js file.
3. Click Publish.
4. Refresh the SRM screen displayed in the web browser.
You may need to clear your browser's cache or Temporary Internet Files.
5. In the desired Business Server Pages (BSP) application screen, select the Help link to open a
new browser window that displays help content for the screen.
314
ANCILE Solutions, Inc.
Chapter 13: Setting Up Online Help
Configuring SAP CRM Web Client for Use with Context-Sensitive Help
Before you can specify a connection between the uPerform server and SAP CRM Web Client, you
must activate context-sensitive help within SAP CRM Web Client. The context-sensitive help
option is indicated by a question mark (?) in the SAP CRM Web Client user interface. When a
user clicks on the ?, any help created for that screen will display. For more information on
activating context-sensitive help within SAP CRM Web Client, refer to the SAP CRM Web Client
documentation. Context-sensitive help for SAP CRM Web Client is available only through the IC
Web Client.
Context-sensitive help allows you to provide end users with quick and convenient access to help
via an online performance support system. End users request help from ANCILE uPerform via a
direct link in the SAP CRM Web Client application.
Configuring SAP CRM Web Client to Send a Help Request to the uPerform Server
The SAP system administrator must configure SAP CRM Web Client to send help
requests to the uPerform server. This configuration is specified by adding variants to
the PlainHtmlHttp tab of the SR13 transaction code.
1. Log into SAP CRM via the SAP GUI.
2. Enter the transaction code SR13.
ANCILE Solutions, Inc.
315
Chapter 13: Setting Up Online Help
3. On the DynamicHelp tab, delete any existing entries.
4. Click
.
5. Select the PlainHtmlHttp tab.
6. Complete the following fields:
316
Field
Description
Variant
Enter a variant name.
Example: ANCILEHelp
Platform
Enter a platform.
Example: ITS.
Area
Enter an area.
Example: XML_DOCU
Server Name
In uPerform, copy the URL from the SR13
PlainHtmlHttp Server Name field as described in
Viewing and Editing a Connection to the uPerform
Server (on page 299). This value is generated by
uPerform and is not configurable.
Paste the URL into the Server Name field.
Path
In uPerform, copy the URL from the SR13
PlainHtmlHttp Server Path field as described in
Viewing and Editing a Connection to the uPerform
Server (on page 299). This value is generated by
uPerform and is not configurable.
Paste the URL into the Path field.
ANCILE Solutions, Inc.
Chapter 13: Setting Up Online Help
Field
Description
Language
Enter the language key.
Example: For German, enter DE.
Default
Select this checkbox if the language specified is the
default help language.
7. Click
.
8. Start the SAP Reference IMG using the transaction code SPRO.
For more information on the SPRO transaction code, refer to SAP note 1038204.
9. Click Manage Worklist.
10. Click SAP Reference IMG.
11. Select KNOWLEDGE MANAGEMENT > SETTINGS IN THE APPLICATION SYSTEM >
SEQUENCE OF ENHANCEMENTS IN CUSTOMER NAME SPACES.
12. Double-click on Sequence of Enhancements in customer Namespace.
13. Select Execute.
14. Restart the SAP CRM Web Application Server.
ANCILE Solutions, Inc.
317
Chapter 13: Setting Up Online Help
Context-Sensitive Help for Siebel 8
Context-sensitive help allows you to provide end users with quick and convenient access to help
via an online performance support system. End users request help from the uPerform server via a
direct link in Siebel 8.
Obtaining the Siebel Custom Menu eScripts
Download the Siebel Custom Menu eScripts from the ANCILE Product Support Center
(https://ancile.parature.com). The following scripts were authored by ANCILE for use by
uPerform customers only. These scripts contain JavaScript code that redirects Siebel's existing
Help link to a help page created with uPerform.
uPerform_Service_PreCanInvokeMethod_Server.txt
uPerform_ServicePreInvokeMethod_Browser.txt
Creating a Custom Menu In Siebel 8
ANCILE recommends creating a custom menu in the test environment and migrating
the changes to the production environment after the changes have been compiled and
tested.
All actions within this procedure should be performed by a Siebel administrator using
Siebel Tools. The administrator should be familiar with the topics discussed in the
"Developing and Deploying Siebel Business Applications," document provided by
Oracle Siebel.
1. Create a new project to contain changes needed to add a context-sensitive help link from
Siebel 8 to the uPerform server. Be sure to include a name and description for the project.
2. Check out the context-sensitive help project.
3. Check out the menu used in the target application.
318
ANCILE Solutions, Inc.
Chapter 13: Setting Up Online Help
4. Create a new symbolic string for the menu item using the following values:
A symbolic string must be created for each locale.
Field
Description
Name
Enter a name for the symbolic string.
Current String Value
Enter the string value.
Project
Enter the project name created in Step 1.
Definition
Enter a definition.
Comment
Enter any amplifying information about the string.
5. Save the string.
6. Create a new business service using the following values:
Field
Description
Name
Enter a name for the service.
Project
Enter the project name created in Step 1.
Class
Enter CSSService.
Comment
Enter any amplifying information about the service.
7. Save the service.
8. Create a new Business Service Method called calluPerform.
9. Right-click on the business service you created in Step 6.
10. Select Edit Server Scripts.
11. Select eScript.
12. Paste the ANCILE-provided script into the Service_PreCanInvokeMethod method.
13. Save the server script.
14. Right-click on the business service you created in Step 6.
15. Select Edit Browser Scripts.
16. Select eScript.
17. Paste the code from the ANCILE-provided
uPerform_Service_PreInvokeMethod_Browser.txt script into the Server_PreInvoke
Method.
ANCILE Solutions, Inc.
319
Chapter 13: Setting Up Online Help
18. In the code pasted into the Server_PreInvoke Method, replace [URL from connection
profile] with the URL of the uPerform server specified in the connection profile (for example:
http://uperform.company.com/gm/1.11.5343?csh=
19. Save the browser script.
20. Using Siebel Tools, create a new command using the following values:
Field
Description
Name
Enter a name for the command.
Project
Enter the project name you created in Step 1.
Business Service
Enter the business service you created in Step 6.
Display Name
Enter a display name for the command.
Method
Enter callUperform.
21. Save the command.
22. Create a new menu item for the menu project using the following values:
Field
Description
Name
Enter a name for the menu item.
Caption
Enter the string reference created in Step 4.
Command
Enter the command created in Step 20.
Position
Select the appropriate position.
23. Save the menu project.
24. Compile, test, and migrate the changes to the production environment.
320
ANCILE Solutions, Inc.
Chapter 13: Setting Up Online Help
Configuring PeopleSoft 9 for Use with Context-Sensitive Help
Context-sensitive help allows you to provide end users with quick and convenient access to help
via an online performance support system. End users request help from the uPerform server via a
direct link in the PeopleSoft 9 application.
Creating the Custom Help Link in PeopleSoft 9
1. In the PeopleSoft application navigate to the PEOPLETOOLS >WEB PROFILE > WEB
PROFILE CONFIGURATION page.
2. Click Search.
3. Click the Profile Name you specified during the PeopleSoft Pure Internet Architecture
installation.
4. Change the value for the Help URL field to the URL from the connection profile you
specified in Specifying a Connection with the uPerform Server.
5. Click Save.
ANCILE Solutions, Inc.
321
Chapter 13: Setting Up Online Help
Configuring ANCILE Help Launchpad to Deliver Context-Sensitive
Help
ANCILE Help Launchpad works in conjunction with the uPerform client and server to help you
deliver content to end users through a direct link in the SAP Help system.
Configuring Help Launchpad to Provide Context-Sensitive Help via the uPerform
Server
To configure Help Launchpad to provide context-sensitive help using uPerform, refer to the Help
Launchpad for ANCILE uPerform user manual.
Please note that the following modifications must be made:
Help Launchpad should be set to launch as "Browser (not controlled)."
The screen size, location, and stay-on-top functionalities are controlled by uPerform,
and will override the Help Launchpad defaults/customizations.
322
ANCILE Solutions, Inc.
Chapter 13: Setting Up Online Help
Configuring Generic Web Pages for Use with Context-Sensitive Help
Context-sensitive help allows you to provide end users with quick and convenient access to help
via an online performance support system. End users request help from the uPerform server via a
direct link in the Internet Explorer 7, 8, or 9 application.
End users will need to install the uPerform_CSH.msi plug-in on their computers, which is
located in the uPerform server folder: [install]\Collaboration\WWW\ANCILEHlp, or you can
push the installation out via a system management server (SMS).
End users with the 64-bit version of Internet Explorer must install the uPerform_CSH_x64.msi
plug-in to use generic context-sensitive help. Both the 32-bit and 64-bit versions can be installed
side-by-side.
Installing the uPerform_CSH_x64.msi plug-in will not install context-sensitive help
into the default 32-bit version of Internet Explorer.
Creating the Help Link for Web Pages Using Internet Explorer
1. Close all instances of Internet Explorer.
2. Copy the uPerform_CSH.msi or uPerform_CSH_x64.msi file to your end user desktop
from the \WWW\ANCILEHlp folder.
3. Double-click on the uPerform_CSH.msi or uPerform_CSH_x64.msi package.
4. Click Next.
5. Click Next.
6. Click Next.
7. Optionally, select a language. The default is English US.
8. Enter the server URL (from the connection profile).
9. Click OK.
10. Click Finish.
ANCILE Solutions, Inc.
323
Chapter 13: Setting Up Online Help
11. Launch Internet Explorer.
12. Click the Help icon, or select HELP > REQUEST HELP FROM ANCILE UPERFORM to
confirm the help link has been properly installed.
324
ANCILE Solutions, Inc.
Chapter 13: Setting Up Online Help
Providing Help to End Users
If anonymous access has not been enabled for the project containing the requested help content,
the end user will have to login to the uPerform server when requesting help. This login
requirement can be avoided by enabling Single Sign-On. Refer to the companion manual,
ANCILE uPerform Administration, for detailed information on enabling Single Sign-On.
For detailed instructions on enabling anonymous access for a project, refer to Enabling Project
Settings.
Requesting Help
1. Log into the application as an end user.
2. Navigate to the desired screen.
3. Perform one of the following options
If You Want To
Then
View context-sensitive help for Oracle
E-Business, SAP CRM Web Client
2007, SAP Portal, Siebel 8, or
PeopleSoft 9
Click the help icon for a screen.
Go to Step 4.
View context-sensitive help for Generic Click the Request Context-Sensitive Help
Web Pages
toolbar button, or select HELP > REQUEST
CONTEXT-SENSITIVE HELP.
Go to Step 4.
Context-sensitive help can be
accessed from the right-click context
menu in Internet Explorer.
Modify server URL for Generic CSH
plug-in
Click the Request Context-Sensitive Help
toolbar button, or select HELP > ANCILE
UPERFORM HELP SETTINGS....
Enter a URL in the UPERFORM SERVER
URL: field.
Exclude URLs from context-sensitive
help for Generic CSH plug-in
Click the Request Context-Sensitive Help
toolbar button, or select HELP > ANCILE
UPERFORM HELP SETTINGS....
Enter a URL in the URLS TO EXCLUDE
FROM CONTEXT-SENSITIVE HELP: field.
ANCILE Solutions, Inc.
325
Chapter 13: Setting Up Online Help
If You Want To
Then
View context-sensitive help for
applications using Help Launchpad
Refer to the Help Launchpad for ANCILE
uPerform user manual.
Go to Step 4.
View context-sensitive help for
Windows-based applications.
Select the application's Help control.
Go to Step 4.
4. A new browser window will open, displaying the following potential help options:
If a single help document has been created, the document displays in the new browser
window.
If more than one help document has been created, a list of documents displays in the
browser window.
If no help document has been created, a zero search result window displays.
If stay-on-top is enabled, the help document remains on top of the application screen.
Stay-on-top is only supported for Internet Explorer 7 and 8.
5. Choose from the following options:
326
If You Want To
Then
Select a help document
Click on the hyperlink for the document you
wish to view.
Access the [Application Name] Help
Center
Click [Application Name] Help in the upper left
to display default help for the application.
This option is available if a BaseHelp URL was
specified when configuring the connection
profile.
Return to the application
Close the browser window.
Search for additional content
Enter a search term(s) in the Search field.
Click Search.
Search for two terms
Enter Term 1 followed by AND followed by
Term 2.
For example, Project AND accounting
This would find all uPerform content that
contains both Project and accounting.
Search for one term or another
Enter Term 1 followed by OR followed by Term
2.
For example, Project OR accounting
This would find all uPerform content that
contains either Project or accounting.
ANCILE Solutions, Inc.
Chapter 13: Setting Up Online Help
If You Want To
Then
Search for literal string
Enter the literal string in quotation marks.
For example, "Project Accounting"
This would find all uPerform content that
contains the exact string "Project Accounting".
Literal search strings cannot contain either # or ! within the string. These are stripped
out by the uPerform server as non-allowed characters.
ANCILE Solutions, Inc.
327
Appendix A: Incorporating Info Pak
Content
The Migration Wizard delivered with ANCILE uPerform allows you to
migrate your ANCILE Info Pak project into the uPerform server. In
addition, you can use the Migration Wizard to enable display of Info
Pak content from the uPerform website and to transform Info Pak
documents and simulations to uPerform documents.
329
Appendix A: Incorporating Info Pak Content
Introduction to Incorporating Info Pak Content
ANCILE uPerform includes a tool, the Migration Wizard, which allows you to migrate your Info
Pak project to uPerform. The Migration Wizard also allows you to link from your uPerform
website to content created and published by Info Pak. Finally, the Migration Wizard includes
functionality to allow you to transform Info Pak documents and simulations to uPerform
documents.
Your Info Pak - Web Architect and Info Pak - Glossary database information will be
migrated to uPerform when you use the Migration Wizard. You can choose to have
your Info Pak documents remain outside of uPerform and edit and publish these
documents using Info Pak. Alternately, you can transform your Info Pak documents to
uPerform documents that can be edited and published using uPerform.
The Migration Wizard performs four major functions:
Migrates the Info Pak - Web Architect database content to uPerform, creating your
document library in uPerform. The Migration Wizard creates placeholders to check in
the Info Pak documents. It also creates your website structure to match the website
generated by Info Pak.
Migrates the Info Pak - Glossary database content to uPerform, populating your
current terms and definitions in uPerform. Authors can then enter all new terms and
definitions into uPerform for use in the uPerform content. Any terms and definitions
that must also go into the Info Pak - Glossary for use in Info Pak documents must be
entered in the Info Pak - Glossary as well.
Creates links from your uPerform website. When navigating the uPerform website,
the end user will view a uPerform-generated website that points to existing Info Pak
and uPerform content that is glued together via links generated during the migration
process. This form of linking to both Info Pak content and uPerform content is
referred to as operating in "dual mode".
Transforms your Info Pak documents and simulations to uPerform documents. You
can then edit these uPerform documents and check them into the server and provide
them to your users via the uPerform website.
330
ANCILE Solutions, Inc.
Appendix A: Incorporating Info Pak Content
Using Dual-Mode Functionality vs. Transformation Functionality
If you will be creating new content with uPerform, but your end users still need to access Info Pak
content, the dual-mode functionality allows you to leverage your existing Info Pak content on the
uPerform website.
As system changes occur in the application(s) you are documenting, you may elect to transform
your Info Pak documents into uPerform documents. After transformation, you can edit the content
as necessary. Your new uPerform documents are then checked into the uPerform server and linked
to the website.
The following is a summary of some best practices you may want to consider as you plan your use
of the transformation functionality:
If you have a relatively small Info Pak content library (for example, less than 100
documents), you may want to transform your existing documents to uPerform and
edit the content as necessary. You would then use uPerform to create your website
hierarchy, manage glossary terms, and publish content. Going forward, you would
create all new content with uPerform.
If you have a large Info Pak content library, you may want to use the dual-mode
functionality to continue to use Info Pak to maintain your existing Info Pak
documentation that does not require change. Going forward, you would create all new
content in uPerform. You would then publish legacy Info Pak content using Info Pak
and publish uPerform content using the uPerform server. Your end result is a unified
website of Info Pak and uPerform content for your end users.
The following diagrams provide an overview of the Migration Wizard dual-mode functionality
and the transformation functionality.
ANCILE Solutions, Inc.
331
Appendix A: Incorporating Info Pak Content
332
ANCILE Solutions, Inc.
Appendix A: Incorporating Info Pak Content
Installing and Uninstalling the Migration Wizard
Installing the Migration Wizard
The Migration Wizard can be installed during installation of the uPerform client software.
You must have an administrator installation of Info Pak 5.51 or higher on your
computer in order to install the Migration Wizard.
For detailed information on installing the client, refer to "Getting Started: Creating Content" in the
companion manual Creating Content with ANCILE uPerform.
Uninstalling the Migration Wizard
To uninstall only the Migration Wizard, perform the following steps:
1. Select START > SETTINGS > CONTROL PANEL > ADD OR REMOVE PROGRAMS.
2. Select ANCILE uPerform Client from the Currently installed programs list.
3. Click Change.
4. Select the Modify radio button.
5. Click Next.
6. Deselect the Include the Migration Wizard and Migration Wizard checkboxes.
7. Proceed through the remaining uninstall wizard screens.
8. Close the Add or Remove Programs window.
For detailed information on uninstalling the client, refer to "Getting Started: Creating Content" in
the companion manual Creating Content with ANCILE uPerform.
ANCILE Solutions, Inc.
333
Appendix A: Incorporating Info Pak Content
Preparing to Execute the Migration
Migration Prerequisites and Recommendations
Ensure the following required prerequisites are met prior to beginning the migration:
The Migration Wizard is installed and ANCILE Info Pak version 5.51 or higher is
installed.
You have a login to the uPerform server, the server is currently operational, the server
is accessible from your computer and a blank project exists on the uPerform server.
You must have administrator rights to the project.
You have a template assigned to your blank project.
You have initialized Info Pak and set your working directory.
You have noted the location of your Info Pak parent and content folders.
You have noted the location of the Web Architect and Glossary profiles.
You have launched the uPerform client.
You have noted the location of the Info Pak template profile.
All instances of Microsoft Word are closed.
Create an ipcontent folder in the [Install Location]\collaboration\www\ location,
and place your Info Pak content into this folder.
334
ANCILE Solutions, Inc.
Appendix A: Incorporating Info Pak Content
Activities During Web Architect Processing
During migration of Info Pak - Web Architect data, the Migration Wizard gathers document data.
The Migration Wizard uses the Web Architect category data and hierarchy information to
establish the uPerform document library and website folder structure. The Migration Wizard
generates a link to the child output in the same order as the published link priority in Web
Architect. This link is activated once the uPerform content verification is run.
Within the uPerform document library, placeholders are created for parent documents. These
placeholders will be populated during document check in. The placeholder includes the Info Pak
GUID, filename, document title, document type, and version.
Web Architect HTX sets and the information contained within the sets is not migrated
to uPerform. Refer to the companion manual, ANCILE uPerform Administration for
more information on customizing your uPerform server environment.
Activities During Glossary Processing
During migration of Info Pak - Glossary data, the Migration Wizard gathers information about the
Glossary base definition for terms and applies this definition at the project level (to apply to only
the project selected at the beginning of migration).
The Glossary can be migrated without mapping properties to a context (folder) within the
document library, but the Info Pak base definition will become the uPerform project definition and
the Info Pak key property-based definitions will become uPerform suggestions.
Multiple migrations to one project are only permitted for the document check in activity. You
cannot migrate Web Architect and Glossary data into the same project more than once.
After migration, the Info Pak and uPerform glossaries do not remain synchronized. The
migrated data will be applied to uPerform documents only. Info Pak documents only
use the Info Pak - Glossary, and the Info Pak - Glossary must be maintained separately
if updates to it are required.
After migration, a glossary log is stored in the following default locations: In Windows
XP: C:\Documents and Settings\[username]\Application Data\ANCILE\Migration
Wizard\Version X.X\Logs\Glossary and in Windows Vista and Windows 7:
C:\Users\App Data\Roaming\Migration Wizard\version X.X\Logs\Glossary.
ANCILE Solutions, Inc.
335
Appendix A: Incorporating Info Pak Content
Activities During Document Check-In Processing
The check-in progress uses Microsoft Word to automatically check for and upgrade
Info Pak documents to version 5.51. Microsoft Word should not be used until the
upgrade process is complete.
The following Info Pak document types can be migrated to uPerform: parent, simulation, an
assimilated Microsoft PowerPoint file, an assimilated Microsoft Excel file, an assimilated
Microsoft Word file, an assimilated Microsoft Visio file, and an assimilated HTML file. Content
is processed in the following manner:
All simulation files (.ssf) are zipped prior to check in. The zipped file extension is
.zsd.
Assimilated HTML documents and all accompanying files are zipped prior to check
in. The extension of the zipped assimilated HTML file is .zhd.
Assimilated Microsoft Office content is checked in as-is without zipping prior.
Info Pak parent documents are zipped prior to check in. The extension of the zip file
is .zid.
All Microsoft Office documents in the specified parent folder are checked for an Info Pak GUID.
Any documents without an Info Pak GUID will not be checked into uPerform except as part of a
zip file for an Info Pak document.
Info Pak documents that were not imported into Web Architect will not be included in the
uPerform document library structure. However, the Migration Wizard will still detect these files if
they are in the parent folder and will upload them directly to the root of the project. You must use
uPerform to move these files to the correct location in the document library.
Prior to executing the migration, review the following important points regarding checking Info
Pak content into uPerform:
Only Info Pak content published to a filename can be migrated. If you are publishing
Info Pak content to ID or ID_filename, this content cannot be migrated.
Documents can only be checked into each uPerform server once. If you check
documents into the document library of a different project on the server, the migration
process will simply increment the version of the documents in the original document
library.
A global cascading stylesheet (CSS) file is used to control the appearance of Info Pak documents
on the uPerform website. This css file is stored on the uPerform application server at
WWW\RWDuPerform01\style. If you made customizations to your Info Pak stylesheet
(content.css), you must repeat those customizations in the InfoPakContent.css file. All Info Pak
documents linked to from uPerform will use the InfoPakContent.css; you cannot specify a local
336
ANCILE Solutions, Inc.
Appendix A: Incorporating Info Pak Content
stylesheet or omit the stylesheet. For more information on end user website customizations, refer
to the companion manual ANCILE uPerform Administration.
After migration, you will be prompted to view the log. To view the log, click Yes. The
check-in log is stored in the following default locations: In Windows XP,
C:\Documents and Settings\[username]\Application Data\ANCILE\uPerform\Version
X.X\Logs\Checkin, and in Windows Vista and Windows 7, C:\Users\App
Data\Roaming\ANCILE\uPerform\Version x.x\Logs\Checkin.
Activities During Template Processing
Before you can transform Info Pak documents and simulations, you must update a uPerform
template with Info Pak transformation settings. Updating a template with transformation settings
stores various Info Pak settings and if you choose to:
Automatically generate the exercise section
Transform the procedure section
Transform procedure from simulation, if a simulation is available
Section mapping used for transformation
When template processing is complete, you can open the template in the uPerform client to view
the transformation settings under GENERAL > INFO PAK SETTINGS. These settings are not
configurable within the uPerform template editor. To make changes to the Info Pak transformation
settings, you must use the Migration Wizard.
You must assign the template to the blank project you will use to transform Info Pak
documents.
Activities During Document Transformation Processing
During transformation of your Info Pak documents, the Migration Wizard transforms the sections
of your Info Pak documents to the sections in a uPerform document. You specify the mapping of
sections between Info Pak and uPerform in the initial Migration Wizard configuration.
After the Migration Wizard has completed the transformation processing, you can open the new
uPerform documents with the uPerform editor for quality assurance review and editing. In
particular, you must edit the procedure section in order to ensure your content displays properly
for publication. If you have content that contains a document and a simulation, it is recommended
that you edit in the simulation view. Finally, you can check the new uPerform documents into the
uPerform server in single or batch mode.
ANCILE Solutions, Inc.
337
Appendix A: Incorporating Info Pak Content
If you previously checked in an Info Pak document for dual-mode functionality and you then
transform this document and check it into the uPerform server, your Info Pak document is
replaced with the transformed document on the server. The resulting uPerform document receives
a new version designator. The website context assigned to the document and any associated
discussion content is retained with the transformed uPerform document.
After transformation, you should archive your Info Pak content library and, moving
forward, edit the uPerform documents.
338
ANCILE Solutions, Inc.
Appendix A: Incorporating Info Pak Content
Executing a Migration Run
The Migration Wizard is available from the Microsoft Windows Start menu. The Migration
Wizard interface is available in all languages supported by uPerform.
The Migration Wizard will gather information at each step for use in future steps, but no data will
be migrated until the Wizard is completed.
Uploading All Info Pak Data Into uPerform
1. Create an ipcontent folder in the [Install Location]\collaboration\www\ location.
2. Place your published Info Pak content into the ipcontent folder.
3. Select START > PROGRAMS > ANCILE UPERFORM > MIGRATION WIZARD to open the
migration wizard.
4. Review the prerequisites and, optionally, specify the interface language.
ANCILE Solutions, Inc.
339
Appendix A: Incorporating Info Pak Content
5. Click Next.
6. Select one of the following options:
If You Want To
Then
Execute a migration run for the first
time
Select the Migrate Info Pak content into a
uPerform project radio button.
Run a previous migration on a blank
project
Select the Migrate Info Pak Content into a
Uperform project radio button.
Batch check-in Info Pak documents
Select the Batch check-in Info Pak documents
radio button.
Update a uPerform template for transformation
Select the Update a uPerform template for
transforming Info Pak documents radio button, and refer to Updating a Template for Use
with Transformation (on page 348).
Transform Info Pak documents to
uPerform documents
Select the Transform Info Pak documents to
uPerform documents radio button, and refer to
Executing the Transformation (on page 355).
7. Click Next.
340
ANCILE Solutions, Inc.
Appendix A: Incorporating Info Pak Content
8. Perform one of the following options:
If You Want To
Then
Execute a migration for the first time
Select <new> from the Saved Migrations dropdown list, and enter a name in the Migration
Name field.
Run a previous migration run on a
blank project
Select a project from the Saved Migrations
drop-down list.
Optionally, edit the name in the Migration
Name field.
Import a migration file from a pre-3.1
version
Select Import ..., and specify the file.
Optionally, edit the name in the Migration
Name field.
9. Click Next.
10. Complete the following information:
Field
Description
uPerform server location
Enter the URL of your uPerform server.
Username
Enter the username for the uPerform server.
Password
Enter the password for the uPerform server.
Trust invalid SSL certificates Select this option if you are using SSL but your
certificate is not signed.
Use Proxy Authentication
(optional)
Click the Use Proxy Authentication checkbox if your
administrator has set up a proxy server for connecting
to the uPerform server.
Username
Enter the username for the proxy authentication.
Password
Enter the password for the proxy authentication.
Test Connection
Click Test Connection to test your connection to
uPerform.
ANCILE Solutions, Inc.
341
Appendix A: Incorporating Info Pak Content
Username, password, and proxy authentication are not necessary if using NTLM SSO.
Upon exiting the application, connection information is stored for future use in the
Migration Wizard Application Settings XML file located on the local computer in
C:\Users\<USER>\AppData\Roaming\ANCILE\MigrationWizard\Version
4.5X\AppSettings.xml.
11. Click Next.
12. Complete the following fields:
Field
Description
uPerform Project
Select the blank project you created for the migration.
uPerform Template
Select the uPerform template you want to use for
transforming documents.
13. Click Next.
342
ANCILE Solutions, Inc.
Appendix A: Incorporating Info Pak Content
14. Complete/review the following information:
Field
Description
Web Architect Profile
Browse to the location of your Web Architect profile.
Profile .xml files are typically stored in the following locations:
For Windows XP: C:\Documents and Settings\[Your
Username]\My Documents\Info pak\profiles\wa.
For Windows Vista and Windows 7: C:\Users\Documents\Info pak\profiles\wa.
Content URL
Enter the web server location of your published Info
Pak content. The Migration Wizard does not
validate URLs.
For example: http:\\[Install
Location]\collaboration\www\ipcontent.
Profile Settings
Review the settings for your Web Architect profile
to ensure they are correct.
15. Click Next.
16. Choose from the following options:
If You Want To
Then
Build the document library based on
directory structure
Select the Directory Structure radio button, and
go to Step 19.
Build the document library based on
document properties
Select the Document Properties radio button,
and go to Step 17.
17. Select the properties to use from the Properties Available list, and click >> to move these
properties into the Properties Selected list on the right. Use the up and down arrow buttons to
re-order the list of properties in the Properties Selected list.
You must select at least one property.
ANCILE Solutions, Inc.
343
Appendix A: Incorporating Info Pak Content
18. Optionally, click Preview to view the document library.
19. Click Next.
20. Complete the following:
These settings will update your template with the necessary Info Pak properties and
allow you to map sections for transformation.
Field
Description
Automatically Generate
Exercise Section
Select this option to automatically update the
exercise section in the uPerform document after
transformation.
Transform Procedure Section Select this option to transform the procedure section
from your Info Pak document into a uPerform
document.
This option determines if the procedure
section in the new uPerform document
should be populated based on the Info
Pak simulation or document. If this
option is disabled, new uPerform
documents will not contain any content
in the procedure section.
Transform Procedure from
Simulation if available
Select this option to transform the procedure section
from your Info Pak simulation.
Transform Procedure Section must
be enabled to use this option.
To transform an Info Pak procedure section from the
simulation, the Info Pak simulation must be in the
same directory as the parent document and the file
name must be the same. Simulations stored in other
directories will not be transformed with the parent
document.
344
ANCILE Solutions, Inc.
Appendix A: Incorporating Info Pak Content
21. Click Next.
22. Click on a section in the Info Pak Sections window.
23. Drag and drop the section on the corresponding section in the uPerform Sections window.
24. Review the mapped sections to ensure they are correct.
The Info Pak Overview section has been renamed 'Purpose' in uPerform. The procedure
section is not included in the mapping options because the Migration Wizard will
automatically create this section during transformation.
A section can only be mapped to one other section. Each section has a corresponding
color to easily identify the mapping after the drag-and-drop operation. The result of the
mapping is displayed in the Mapped Sections list. To remove a mapping, click on the
mapping in the Mapped Sections list and click Remove.
25. Click Next.
ANCILE Solutions, Inc.
345
Appendix A: Incorporating Info Pak Content
26. Perform one of the following options:
If You Want To
Then
Migrate your Info Pak glossary
Go to Step 27.
Skip the Info Pak glossary and proceed Click Next, and go to Step 29.
with the migration
27. Browse to the location of your Glossary profile.
Profile .xml files are typically stored at C:\Documents and Settings\[Your
Username]\My Documents\Info pak\profiles\glossary.
28. Click Next.
29. Select from the following options:
If You Want To
Then
Migrate no definitions
Select the None radio button.
Assign Info Pak default definitions to
the project root only
Select the Project root only checkbox.
Map any key-property specific
definitions to folders in the document
library
Select the All available contexts radio button.
This option is not available if the Info Pak
Glossary is based on language.
Ensure that all Info Pak - Glossary
definitions are added to uPerform, but
you have no key properties that match
document library folders
Select the Import definitions without context
as suggestions checkbox.
The Info Pak - Glossary key property definition
that does not match a context in uPerform will be
added as a suggestion at the project level.
If your Info Pak - Glossary key property is not language, you must select the uPerform
language that should be used for the Info Pak - Glossary definitions.
30. Click Next.
346
ANCILE Solutions, Inc.
Appendix A: Incorporating Info Pak Content
31. Review the summary list.
32. Click Start to begin the migration process.
Microsoft Word should not be used until the migration process is complete. During the
migration process, the screen displays the percent complete status of the process. To
cancel the process, click Stop. Stopping the process applies to the document check-in
process and Glossary processing, but does not 'undo' documents that were already
checked in. A confirmation and status message is displayed at the end of the migration
run. From this message, you can access a log of migration activities during the run.
33. If you want to transform your Info Pak documents to uPerform documents, refer to
Transforming Info Pak Documents (see "Transforming Info Pak Documents and Simulations"
on page 355).
Migrating Info Pak Documents to the uPerform Document Library
This activity does not migrate Web Architect or Glossary data. If the Web Architect
database has already been migrated, documents will be checked into the correct
location in uPerform; otherwise, the documents will be checked into the project root.
1. Select START > PROGRAMS > ANCILE UPERFORM > MIGRATION WIZARD to open the
Migration Wizard.
2. Review the prerequisites and, optionally, specify the interface language.
3. Click Next.
4. Select Batch check-in Info Pak documents.
5. Click Next.
6. Complete the following information:
Field
Description
uPerform server location
Enter the URL of your uPerform server.
Username
Enter the username for the uPerform server.
Password
Enter the password for the uPerform server.
Use Proxy Authentication (optional)
Click the Use Proxy Authentication checkbox
if your administrator has set up a proxy server
for connecting to the uPerform server.
Trust Invalid SSL Certificates
Select this option if you are using SSL but your
certificate is not signed.
Username
Enter the username for the proxy authentication.
Password
Enter the password for the proxy authentication.
7. Click Next.
ANCILE Solutions, Inc.
347
Appendix A: Incorporating Info Pak Content
8. Select a project from the uPerform Project drop-down list.
9. Click Next.
10. Click Browse... to specify an inbox.
11. Click Start to begin the check-in process.
The check-in progress screen displays the percent complete status of the process. To
cancel the process, click Stop. Stopping the process does not „undo‟ documents that
were already checked in. A confirmation and status message is displayed at the end of
the migration run. From this message, you can access a log of migration activities
during the run.
Published content child toolbar links in uPerform do not match Info Pak Web Architect
priority links.
Updating a Template for Use with Transformation
You can update a template to populate the template with Info Pak transformation
settings or update existing transformation settings.
1. Select START > PROGRAMS > ANCILE UPERFORM > MIGRATION WIZARD to open the
Migration Wizard.
2. Review the prerequisites and, optionally, specify the interface language.
3. Click Next.
4. Select Update a uPerform template for transforming Info Pak documents.
5. Click Next.
348
ANCILE Solutions, Inc.
Appendix A: Incorporating Info Pak Content
6. Complete the following information:
Field
Description
uPerform server location
Enter the URL of your uPerform server.
Username
Enter the username for the uPerform server.
Password
Enter the password for the uPerform server.
Trust invalid SSL certificates. Select this option if you are using SSL but your
certificate is not signed.
Use Proxy Authentication
(optional)
Click the Use Proxy Authentication checkbox if
your administrator has set up a proxy server for
connecting to the uPerform server.
Username
Enter the username for the proxy authentication.
Password
Enter the password for the proxy authentication.
Test Connection
Click Test Connection to test your connection to
the uPerform server.
Upon exiting the application, connection information is stored for future use in the
Migration Wizard Application Settings XML file located on the local computer in
C:\Users\<USER>\AppData\Roaming\ANCILE\MigrationWizard\Version
4.5X\AppSettings.xml.
7. Click Next.
8. Complete the following fields:
Field
Description
uPerform Project
Select the project that contains the template you
want to update.
uPerform Template
Select the template you want to update with the
transformation.
ANCILE Solutions, Inc.
349
Appendix A: Incorporating Info Pak Content
9. Click Next.
10. Click Browse, and locate the Info Pak profile you want to use to update the template.
11. Click Next.
12. Complete the following:
Field
Description
Automatically Generate Exercise
Section
Select this option to automatically update the exercise
section in the uPerform document after transformation.
Transform Procedure Section
Select this option to transform the procedure section from
your Info Pak document into a uPerform document.
This option determines if the procedure section in
the new uPerform document should be populated
based on the Info Pak simulation or document. If
this option is disabled, new uPerform documents
will not contain any content in the procedure
section.
Transform Procedure from
Simulation if available
Select this option to transform the procedure section from
your Info Pak simulation.
Transform Procedure Section must be enabled
to use this option.
To transform an Info Pak procedure section from
the simulation, the Info Pak simulation must be in
the same directory as the parent document and
the file name must be the same. Simulations
stored in other directories will not be transformed
with the parent document.
350
ANCILE Solutions, Inc.
Appendix A: Incorporating Info Pak Content
13. Click Next.
14. Click on a section in the Info Pak Sections window.
15. Drag and drop the section on a corresponding section in the uPerform Sections window.
16. Review the mapped sections to ensure they are correct.
The Info Pak Overview section has been renamed 'Purpose' in uPerform. The procedure
section is not included in the mapping options because the Migration Wizard will
automatically create this section during transformation.
A section can only be mapped to one other section. Each section has a corresponding
color to easily identify the mapping after the drag-and-drop operation. The result of the
mapping is displayed in the Mapped Sections list. To remove a mapping, click on the
mapping in the Mapped Sections list and click Remove.
17. Click Next.
18. Review the summary information.
19. Click Start.
When the template update is complete, you can choose to view the transformation log.
ANCILE Solutions, Inc.
351
Appendix A: Incorporating Info Pak Content
Reviewing the Migration Results
In uPerform, migrated Info Pak documents are displayed with a unique icon. In addition, the Info
Pak document titles include the associated document type within uPerform.
The document type displayed after the title is based on the DocType_Name property of the
original Info Pak document.
The Migration Wizard automatically verifies content from the uPerform server workspace.
Running content verification activates the Info Pak child output on the uPerform server.
This process may take several minutes after the migration is complete.
Optionally, if you want to execute content verification on a regular basis, use Microsoft Windows
Task Scheduler to setup a task on the server to periodically execute the ContentVerification.exe
file. Refer to the ANCILE uPerform Administration user manual for instructions on creating tasks
on the server.
After migration is complete, perform the following quality assurance and configuration tasks:
Review the document check-in log (generated if you have checked documents into
uPerform). This log is located in the following default locations: In Windows XP,
C:\Documents and Settings\[Your Username]\Application
Data\ANCILE\uPerform\Version X.X\Logs\BatchCheckin, and in Windows Vista,
C:\Users\App Data\Roaming\ANCILE\uPerform\Version X.X\Logs\BatchCheckin.
The log filename is prefaced with 'BatchCheckIn_' and is date- and timestamped.
Confirm that unintended documents have not been migrated.
Confirm the folder assignment of all documents.
352
ANCILE Solutions, Inc.
Appendix A: Incorporating Info Pak Content
Using the Info Pak Properties Specified in the uPerform Project
After migration, a link to Info Pak properties is displayed on the project properties page.
These Info Pak properties only exist after importing Web Architect data during migration. After
initial creation, these properties can only be modified from the uPerform system.
If you are not modifying your Info Pak publishing options (for example, specifying to use websafe
paths or specifying additional output formats) and the location of the published output does not
change, you do not need to edit these Info Pak properties from within uPerform.
If your publishing options or location change, you must edit these properties. Click + to the left of
ANCILE Info Pak Properties to expand the properties list.
ANCILE Solutions, Inc.
353
Appendix A: Incorporating Info Pak Content
In the event you do modify publishing options and/or content location, you must modify the
following properties:
The relevant child document type to add formats to the list
Content Location: You do not need to re-migrate data again if the content location is
changed. Simply change the value of this field and run content verification.
Web Safe Paths: Change the value in this field if all documents are republished with a
different websafe path setting in the Info Pak - Configuration tool and run content
verification.
You cannot add new custom child document types or new assimilated document types from this
interface. If you have new document types, you must execute a new migration.
354
ANCILE Solutions, Inc.
Appendix A: Incorporating Info Pak Content
Executing the Transformation
The Migration Wizard is available from the Microsoft Windows Start menu. The Migration
Wizard interface is available in all languages supported by uPerform.
The Migration Wizard will gather information at each step for use in future steps, but no
transformation activities will occur until the Wizard is completed.
If you are using multiple Info Pak project settings files, it is recommended that you
create and specify a unique uPerform template for each transformation run. If you have
created custom sections for use in your Info Pak documents, you must also create these
custom sections in your uPerform template.
Info Pak screenflows are not transformed to uPerform documents.
Transforming Info Pak Documents and Simulations
For information on best practices in planning and executing the transformation, refer to
the Transitioning from ANCILE Info Pak to ANCILE uPerform white paper on the
Product Support Center at https://products.ancile.com.
1. Select START > PROGRAMS > ANCILE UPERFORM > MIGRATION WIZARD to open the
migration wizard.
2. Review the prerequisites and, optionally, specify the interface language.
ANCILE Solutions, Inc.
355
Appendix A: Incorporating Info Pak Content
3. Click Next.
4. Select the Transform Info Pak documents to uPerform documents radio button.
5. Click Next.
6. Complete the following information:
356
Field
Description
uPerform server location
Enter the URL of your uPerform server.
Username
Enter the username for the uPerform server.
Password
Enter the password for the uPerform server.
Select Trust invalid SSL
certificates.
Select this option if you are using SSL but your
certificate is not signed.
Use Proxy Authentication
(optional)
Click the Use Proxy Authentication checkbox if
your administrator has set up a proxy server for
connecting to the uPerform server.
Username
Enter the username for the proxy authentication.
Password
Enter the password for the proxy authentication.
ANCILE Solutions, Inc.
Appendix A: Incorporating Info Pak Content
7. Click Next.
8. Select the project from the uPerform Project list.
9. Select a template from the uPerform Template list.
Only those templates containing Info Pak properties needed to perform a
transformation are displayed. For more information, refer to Migrating Info Pak
Documents to the uPerform Document Library (on page 347).
10. Click Next.
11. Complete the following information:
Field
Description
Inbox
Browse to the location of your Info Pak documents
and simulations.
Outbox
Specify the location to which the new uPerform
documents will be saved.
ANCILE Solutions, Inc.
357
Appendix A: Incorporating Info Pak Content
12. Click Next.
13. Click Start to begin the transformation process.
14. If prompted, click Yes to close all instances of Microsoft Word.
The transformation progress screen displays the status of the process. To cancel the
process, click Cancel. Stopping the process applies to the current document, but does
not 'undo' documents that were already transformed. A confirmation message is
displayed at the end of the transformation run. From this message, you can access a log
of transformation activities during the run.
15. Browse to the outbox location you specified for your uPerform documents to review and edit
the documents with the editor.
When the transformation process is complete, you will be prompted to view the
transformation log. To view the log, click Yes. The transformation Log is stored in the
default locations: In Windows XP, C:\Documents and Settings\[username]\Application
Data\ANCILE\Migration Wizard\Version X.X\Logs\Transformation, and in Windows
Vista and Windows 7, C:\Users\App Data\Roaming\ANCILE\Migration
Wizard\VersionX.X\Logs\Transformation.
16. Edit the document(s) using the procedures and information found in Reviewing and Editing
Transformed Info Pak Documents (see "Reviewing and Editing Transformed Documents and
Simulations" on page 360).
358
ANCILE Solutions, Inc.
Appendix A: Incorporating Info Pak Content
Transforming a Single Info Pak Document or Simulation
You can transform a single Info Pak document or simulation using the uPerform client.
Single document transformation can be performed in connected or disconnected mode.
If you are working in disconnected mode, ensure you have a local template containing
Info Pak transformation properties.
For information on best practices in planning and executing the transformation, refer to
the Transitioning from ANCILE Info Pak to ANCILE uPerform white paper on the
ANCILE Product Support Center at https://products.ancile.com.
1. Open the uPerform client.
2. Select FILE > OPEN.
3. Change File of types to Info Pak Document or Info Pak Simulation.
4. Navigate to the Info Pak file.
5. Click OK.
6. Select a template from the list.
Only those templates containing Info Pak properties needed to perform a
transformation are displayed. For more information, refer to Migrating Info Pak
Documents to the uPerform Document Library (on page 347).
7. Click OK.
This process may take several minutes.
8. Edit the document using the procedures and information found in Reviewing and Editing
Transformed Info Pak Documents (see "Reviewing and Editing Transformed Documents and
Simulations" on page 360).
ANCILE Solutions, Inc.
359
Appendix A: Incorporating Info Pak Content
Reviewing and Editing Transformed Documents and Simulations
Once you have transformed an Info Pak document or simulation to a uPerform document or
simulation, you must review the document to ensure proper formatting and content display. After
transformation, your content will be displayed using uPerform styles.
Reviewing and Editing Transformations
The following styles are lost when converting Info Pak documents: character scale,
outline, shading, and doublestrike.
The following list provides information on areas that may need particular attention:
Highly customized Info Pak documents will require more extensive quality reviews.
Highly customized documents include, but are not limited to manually inserted tables
and steps, an extensive Info Pak glossary, and notes inserted after screenshots.
Hotspots: During transformation, hot spot images are located and an image of the
hotspot (for example:
) is placed into the document to help you determine the
hotspot location. If you are working with content that contains a document and a
simulation, the hotspot should be edited in the simulation view. Once you have
specified the hotspot, you can delete the image.
Menus: During transformation, Info Pak images are located and the menu path is
specified in the associated step. If you are working with content that contains a
document and a simulation, the menu image should be edited in the simulation view.
Customized Step Text for Field/Description and If Then/Go To Tables: Any
customized step text inserted into tables will be inserted into the uPerform documents
as a step above the table. uPerform tables cannot contain custom step text and the
table must be modified within the document, or changed globally within the template.
Action Notes: Info Pak action notes that have been modified will be added as regular
notes in the uPerform document. The new note will match the step text.
Notes: An Info Pak note inserted between a screenshot and a step will be inserted
below the first step after the screen shot in the uPerform document.
Field/Description Tables: Info Pak images and notes in field/description tables will
transform only from the description column. Notes and images are not allowed in the
field column within uPerform. You must identify the proper place for these images or
notes from the field column and manually insert these into the uPerform document.
360
ANCILE Solutions, Inc.
Appendix A: Incorporating Info Pak Content
Customized action note text: During transformation, step text and action note text is
compared to determine if the text is the same for both; if it is not, a note containing
the action note text is inserted into the step, pointing to the hotspot. During quality
review, the author can choose which note to keep or edit the notes accordingly.
Values in simulations: If the value is set to the lesson default, it is transformed to use
the uPerform default stored in the template. Affected values include: case sensitivity,
auto playback timing, help text, and playback color
Editing Transformed Info Pak Documents
For more information, refer to refer to "Editing and Formatting Basics" and "Editing and
Formatting: Procedural Content" in the companion manual Creating Content with ANCILE
uPerform.
ANCILE Solutions, Inc.
361
Glossary of Terms
Author
A user who creates or edits content.
Context
Functionality that allows you to manually create a website structure by assigning website folders
to content within the document library.
Course
A collection of informational content and optional assessment tools such as multiple choice, dragand-drop, and fill-in-the-blank.
Course Package
A container for multiple uPerform content files output to a single master SCORM package.
Definition
Within the glossary functionality, amplifying information about a term used in the target
application. A term can have multiple definitions based on the context of the document.
Document
A set of instructions, images, and associated objects intended for use as online help or
performance support.
Editor
The application used to create and modify uPerform content.
End User
Any person who accesses performance support content through a website.
Flash
A file format developed by Adobe; this output type is used to display content within uPerform
courses and simulations.
Glossary
The uPerform function that enables the management of terms and definitions. Also, the name of
an ANCILE Info Pak application.
ANCILE Solutions, Inc.
363
Glossary of Terms
Guided Help
Published HTML content designed to be used during task execution.
Info Pak
An ANCILE product; includes Publisher, Web Architect, Glossary, and Help Launchpad
components.
Migration
The process of moving your Info Pak project(s) to uPerform.
Migration Wizard
A tool that allows you to migrate your Info Pak project(s) to uPerform, or transform your Info Pak
documents to uPerform documents.
Parent Document
A legacy document created by ANCILE Info Pak that can contain a screenflow, a BPP, procedural
information, configuration information, and testing information for a process or transaction. The
published child output of a parent document can be linked to display on the uPerform website.
Publication
Output published from uPerform content; a publication is meant to be consumed by an end user.
Publish
A process that exports content to a variety of types and formats, including cue card and Flash
simulation. Authors can publish locally to preview content, and administrators manage the server
publish queue to make content available to users.
Recorder
The uPerform functionality that captures author actions in one or more target applications to
produce a formatted document, simulation, and screenflow.
Simulation
A set of instructions, images, and associated objects intended for export as interactive output.
Skin
The skin files define the style of the uPerform interface elements. Using skins, you can change the
colors of the interface areas, set new fonts properties, use different images for icons in the
interface, etc.
Student Guide
A collection of concepts, procedures, and exercises related to a series of tasks or a process.
Suggestion
A proposed alternate definition entered by an author for evaluation as a potential new glossary
definition.
364
ANCILE Solutions, Inc.
Glossary of Terms
Template
A set of document, simulation, and course options that control formatting and content. Each
content file is created from a template which determines the basic structure for content and
specifies the content settings. The template also specifies information about the types and formats
of content that can be published.
Term
The name of a field or option in the target application being documented. A term can have one or
more definitions.
Transformation
The process of converting Info Pak documents to uPerform documents.
Translation
uPerform content that has been translated from the original. Translated content retains a link to the
original. In versions prior to 2.1, translated content was referred to as Associated Content.
uPerform Document
The XML content produced by uPerform as a result of recording author actions in a target
application; includes the document, simulation, and screenflow views.
uPerform Editor
The application used to create, record, and modify documents, simulations, and courses.
uPerform Server
The application used to store, manage, and distribute documents, simulation, and courses.
User
The consumer of final published content via online help or the website.
User Information Source
Allows you to import and synchronize users into uPerform from an external data source.
View
A way of displaying content to an author or user; there are four views of uPerform content
available: document, simulation, screenflow, and course.
Web Architect
The name of an ANCILE Info Pak application. Web Architect database information can be
imported into uPerform to develop the initial website structure.
Website
A collection of performance support materials such as procedures, simulations, and courses that
are available to end users via a web browser.
Workspace
The application interfaces available to authors and administrators to provide access to content
creation and management functions.
ANCILE Solutions, Inc.
365
Glossary of Terms
XML
Extensible Markup Language; the source format of uPerform content.
XSL
Extensible Stylesheet Language; the file used to control the format of the content displayed in an
XML file.
366
ANCILE Solutions, Inc.
Index
A
accepting • 179
suggestions • 179
suggestions to become new definition •
180
suggestions to replace definition • 179
accessing • 15
product support center • 15
account • 13
editing • 13
managing • 13
account information • 13
editing • 13
adding • 31, 85, 87, 113, 116, 118, 119, 129,
135, 173, 181
content from server • 129
content to website • 118
context to a folder • 116
definitions • 173
document library • 76
document to publish queue • 129
LMS • 135
managed documents • 85
synonym • 181
terms • 173
user account • 31
web documents • 87
advanced search • 19, 20
anonymous access • 72
approving documents • 149
assigning • 32, 69, 115, 137
context • 115
project to LMS • 137
template to a project • 69
ANCILE Solutions, Inc.
user to project • 32
author • 147
receiving notifications • 147
author account • 302
Oracle • 302, 304, 325
author discussion • 157
viewing • 157
author template • 211
creating • 214
manage locally • 216
open • 215
properties • 224
settings • 216
B
binder • 79, 80
view • 80
browsing • 79, 126
document library • 79
glossary • 169
website • 126
built-in properties • 224
C
changing owner • 89
documents • 89
checking in • 94
translations • 94
collaboration • 156
configuration • 127
publishing from server • 127
connection • 299
Oracle • 299
SAP CRM 2007 • 298, 315
content • 26
deleting • 89
subscribing • 26
context assignment • 113
adding • 116
assigning • 115
removing • 117
viewing • 117
context-sensitive help
Oracle • 299, 302, 304, 325
SAP CRM 2007 • 298, 315
Siebel 8 • 318
conventions • 4
conversion types • 127
367
Index
Copying • 202
Reports • 202
creating • 31
author template • 214
custom report • 205
discussions • 158
dynamic website folder • 119
groups • 55
project • 66
related content • 99
tell others • 163
user information source • 37, 38, 41, 45,
47
users • 31
workflow • 145
Custom Reports • 201, 205, 207, 209
Create • 205
Delete • 209
Edit • 207
customizing • 141
website • 141
D
default publication settings • 235, 237, 240,
242, 243, 253, 255, 257, 259, 260
definition • 167, 168
adding • 173
adding to an existing term • 174
assigning context • 174
deleting • 178
editing • 176
entering • 168
formatting • 177
suggesting • 167
updating • 167
deleting • 35
content • 89
custom report • 209
definition • 178
discussion • 162
dynamic website folder • 125
folders • 84
group filter • 61
project • 74
template from local computer • 283
term • 177
user account • 35
368
website folder • 115, 125
workflow • 152
disabling • 97
LMS • 138
rich text in glossary • 171
translated content • 97
discussions • 156, 157, 158, 159, 160, 162
creating • 158
deleting • 162
managing • 162
replying • 159
subscribing • 160
viewing • 157
document context • 79
navigating on server • 79
document cover page • 81
viewing • 81
document library • 64
adding • 76
browsing • 79
managing • 83
populating • 76
documents • 84
changing owner • 89
managing • 84
moving • 91
republishing • 132
dual-mode functionality • 331
dynamic website folders • 119, 122, 125
E
editing • 27
custom report • 207
definition • 176
during workflow • 149
dynamic website folder • 122
group • 57
project • 67
subscriptions • 27
enabling • 97
LMS • 138
rich text in glossary • 171
translated content • 97
end user account • 11
requesting • 11
end user website • 139
executing • 355
ANCILE Solutions, Inc.
Index
migration run • 339
transformation • 330, 337, 355, 359, 360,
361
Export • 201
F
filtering • 61
groups • 61
finding • 33
roles • 30, 52, 53, 54
user • 33
folders • 76, 83, 84, 113, 119
adding • 76
deleting • 84
managing • 83
updating • 83
font • 266
formatting • 177
definition • 177
G
glossary • 165
browsing • 169
default language for definitions • 172
disabling centralized • 171
enabling centralized • 170
settings • 170
glossary import • 193
glossary role • 53
assigning user • 53
group filter • 61
delete • 61
groups • 30, 55, 60, 61
creating • 55
edit • 57
filtering • 61
updating • 55
guided help • 248, 249, 251, 252
H
help • 15
Oracle • 302, 304, 325
help desk • 36
history • 130
queue • 130
view • 130, 131
hit count • 64, 81, 90
I
imported glossary • 193
ANCILE Solutions, Inc.
delete • 195
view • 193
Info Pak • 353, 360
properties in uPerform • 353
transformed document • 360
uploading data into uPerform • 339
Info Pak properties in uPerform • 353
installing • 333
managing content • 8
L
language-specific font • 266
left menu • 21
collapsing • 24
expanding • 24
options • 22
list
my alerts • 26
my favorites • 26
my projects • 25
my review • 25
LMS • 135
adding • 135
assigning project • 137
disabling • 138
enabling • 138
LMS properties • 136
unassigning project • 138
LMS settings • 242, 257
M
manage • 29, 83, 93, 108
managed documents • 85
adding • 85
enabling conversion types for managed
documents • 127
managing • 13
discussions • 162
document library • 83
documents • 84
folders • 83
roles • 52
suggestions • 179
synonyms • 181
your account • 13
Migration Wizard • 333
installing • 333
migrating Info Pak documents • 347
369
Index
migration run • 339
executing • 339
overview • 330
reviewing results • 352
uninstalling • 333
modifying • 53, 136
end user • 304
LMS properties • 136
related content • 99
roles • 30, 52, 53, 54
moving • 91
documents • 91
my alerts • 26
my favorites • 26
my projects • 25
my review • 25
my review list • 149
N
navigating • 79, 126
via document context • 79
via website context • 126
notifications • 98, 147
workflow • 147
O
options • 22
left menu • 22
Oracle • 299
connection • 299
create a template • 294
end user • 304
help • 325
P
password • 11
retrieving • 11
PENS • 135
PeopleSoft • 321
personal page • 24
populating • 76
document library • 76
preparing • 360
product information • 15
product support center • 15
accessing from server • 15
projects • 66
anonymous access • 72
creating • 66
370
deleting • 74
editing • 67
overview • 66, 72
properties • 224
built-in • 224
custom • 225
publish • 134, 135
content from the server • 129
courses to LMS • 135
publish queue • 129, 130
adding document • 129
history • 130
view • 130, 131
publishing role • 53
assigning user • 53
R
receiving notifications • 147
author • 147
reviewer • 147
recording
uPerform document • 296
recovering • 35
user account • 35
rejecting • 180
suggestions • 180
rejecting documents • 150
related content • 99, 100
create • 99
modify • 99
removing relationship • 100
removing • 117, 181
context • 117
synonym • 181
replying • 159
discussions • 159
reports • 188, 197, 199, 201, 202, 205, 207,
209
Export • 201
View Custom • 199
republishing • 132
requesting • 11
end user account • 11
user account • 36
retrieving • 11
password • 11
reviewer • 147
ANCILE Solutions, Inc.
Index
receiving notifications • 147
rich text • 171
disabling in glossary • 171
enabling in glossary • 171
roles • 30, 52, 53, 54
assigning user • 53
finding • 54
managing • 52
modifying • 53, 136
rollback • 70
version • 101
S
SAP CRM 2007 • 298, 315
configuration • 315
searching • 20
from server • 20
server • 10
help • 15
left menu • 21
logging into • 10
overview • 18
top banner • 19
workspace • 10
server configuration • 127
publishing from server • 127
server product information • 15
settings • 216
data files • 219
general • 216, 253
glossary • 170
images • 218
information • 216
languages • 220
LMS • 242, 257
package editor • 263
user interface • 240, 255
view Info Pak • 222
Siebel 8 • 318
skins • 285
creating • 287
managing • 288
stopping • 27, 151
subscriptions • 27
workflow • 151
styles • 266, 270, 271, 272
view • 271
ANCILE Solutions, Inc.
subscribing to content • 26
subscriptions • 27
discussions • 160
editing • 27
publish events • 134
stopping • 27
suggesting • 167
definition • 167, 168
suggestions • 179
accepting • 179
rejecting • 180
viewing • 179
synchronize • 60
groups • 60
synonyms • 181
adding • 181
managing • 181
removing • 181
T
tell others • 163
templates • 214, 215, 216, 218, 219, 220,
224, 225, 228, 233, 235, 237, 240, 242,
243, 253, 255, 257, 259, 260, 266, 270,
271, 272, 273, 276, 278, 283
assigning • 32, 69, 115, 137
creating • 214
deleting from local computer • 283
manage locally • 216
open • 215
properties • 224
settings • 216
update • 69, 70
updating for use with transformation • 348
version • 69
working with • 69
term definitions • 167
terms • 173, 176
deleting • 177
updating • 176
terms and definitions • 173
top banner • 19
transformation • 355
executing • 355
Info Pak • 355, 359
transformation editing • 360
transformation functionality • 331
371
Index
transforming documents • 355, 359
translated content • 97
disabling • 97
enabling • 97
translations • 93, 94, 96, 97, 98, 192
checking in • 94
create • 94
setting default • 97
viewing • 96
viewing from editor • 96
viewing from server • 96
U
unassigning • 138
project to LMS • 138
uninstalling • 333
Migration Wizard • 333
updating • 34
definition • 167, 168
folders • 83
groups • 55
terms • 176
user account • 34
website folders • 114
workflow • 148
uPerform • 2, 5
applications • 2
overview • 2
uPerform document • 296
recording • 296
user • 32, 33, 34, 35
assigning to project • 32
creating • 31
finding • 33
user account • 31
adding • 31
deleting • 35
recovering • 35
requesting • 11, 36
updating • 34
user information source • 37, 38, 41, 45, 47
adding • 38, 45
create • 37
editing • 41, 45
user manual • 4
conventions • 4
users, roles, and groups • 30
372
user information source • 37, 38, 41, 45,
47
V
verisioning • 70
version • 69
rollback • 101
templates • 69
version history • 101
overview • 101
viewing from server • 101
view • 80, 193, 195, 199
imported glossary • 193
viewing term summary • 189
viewing term usage • 188
viewing undefined terms • 189
viewing unused terms • 189
W
web documents • 87
adding • 87
web-based help • 323
website • 126
adding content • 118
browsing • 79, 126
creating • 113, 119
customizing • 141
viewing • 139
website context • 126
navigating on server • 126
website discussion • 157
website folders • 113
adding folders • 113, 119
deleting • 115, 125
updating • 114
website navigation • 21
workflow • 144, 145, 146, 147, 148, 149,
150, 151, 152, 153
approving documents • 149
creating • 145
deleting • 152
notifications • 147
rejecting documents • 150
stopping • 151
updating • 148
viewing history • 153
workspace • 10
server • 10
ANCILE Solutions, Inc.