1
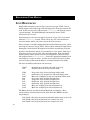
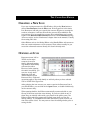
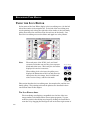
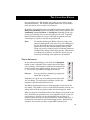
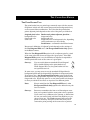
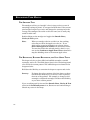
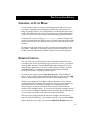
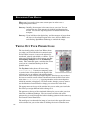
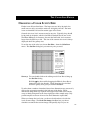
THE COLOR ICON EDITOR
THE COLOR ICON EDITOR
INTRODUCTION
This chapter explains how to use Resorcerer’s Color Icon Editor to design
icon images. The Editor is a full-color pixel-level editor that lets you edit
virtually any kind of Macintosh icon in 1-bit, 4-bit, and 8-bit color.
The Icon Editor edits the standard Finder icon families (or suites) as well as
Script/Keyboard icon families. It also supports both black and white an color
standalone icon resources, as well as color patterns of up to 8 bits depth.
You should be familiar with general aspects of resource editing, as explained
in the “Editing Resources” chapter earlier in the manual.
TOPICS COVERED
•
•
•
•
•
•
•
•
•
•
•
•
•
•
Icon resources
Creating a new icon
Opening an icon
Using the Icon Editor
Choosing colors and patterns
Using the painting tools
Creating an icon mask
Screen copying
Trying out your Finder icons
Changing a color icon’s size
Using the Colors menu
Finding Dialog Item References
Decompiling your icons
Closing the icon
97
RESORCERER USER MANUAL
ICON RESOURCES
Simple black and white icons are kept in resources of type ‘ICON’, each of
which consists of 32 32-bit long words of bitmap data. Given the resource ID
of an ‘ICON’ resource, the toolbox routine PlotIcon() will draw the icon in
a given rectangle. The Dialog Manager automatically draws ‘ICON’
resources for you as well.
General purpose color icons are kept in resources of type ‘cicn’, to be drawn
with the PlotCIcon() routine. These can be any size, and contain their
own color tables, masks, and 1-bit versions all in one resource.
Prior to System 7, the Mac displayed black & white Finder icons only, which
were kept in resources of type ‘ICN#’. These consist of 64 32-bit longwords of
bitmap data, with the first 32 being the icon and the second being its mask.
System 7 introduced the notion of “icon families” or “icon suites” made up of
three sizes of icons, each in 1-bit, 4-bit, and 8-bit depths. Each icon family
includes masks used to punch a hole in the background to draw the icons.
The toolbox routine PlotIconSuite() draws the appropriate member of an
icon family in a variety of states. In order to save space, the colors in these
icons are always taken from the Mac’s 4- and 8-bit standard color tables.
The Color Icon Editor edits these icon resources:
‘ICON’
‘cicn’
Standard 32 by 32 black and white (1-bit) icon
General color icons of any size and depth
‘ICN#’
‘ics#’
‘icm#’
‘icl8’
‘icl4’
‘ics8’
‘ics4’
‘icm8’
‘icm4’
Large 1-bit 32 by 32 icon and large family mask
Small 1-bit 16 by 16 pixel icon and small family mask
Mini 1-bit 12 high by 16 wide icon and mini family mask
Large color 32 by 32 pixel 8-bit/pixel icon
Large color 32 by 32 pixel 4-bit/pixel icon
Small color 16 by 16 pixel 8-bit/pixel icon
Small color 16 by 16 pixel 4-bit/pixel icon
Mini color 12 high by 16 wide 8-bit/pixel icon
Mini color 12 high by 16 wide 4-bit/pixel icon
The Editor also lets you edit the Script/Keyboard icon families. These
consist of three resources that have the same ID as the ‘KMAP’ resource
they belong to:
‘kcs#’ Small 1-bit 16 by 16 pixel icon and family mask (same as an ‘ics#’)
‘kcs8’ Small color 16 by 16 pixel 8-bit icon (same as an ‘ics8’)
‘kcs4’ Small color 16 by 16 pixel 4-bit icon (same as an ‘ics4’)
98
THE COLOR ICON EDITOR
CREATING A NEW ICON
If you are viewing resources in a File Window, click on the New button or
choose New Resource from the File menu. If the Types List is the Active
List, Resorcerer will ask you to specify the resource ID prior to creating the
resource; otherwise, it will use the next free resource ID available for the
icon resource. You can specify the resource ID at which Resorcerer’s search
begins in the Resource ID Preferences section of the Preferences dialog
(for more on this, see the “Preferences” chapter later in the manual). Usually
the starting ID is 128.
Other Editors such as the Dialog Editor or the Bundle Editor edit resources
that can contain references to icon resources. These editors usually let you
create the referenced resource directly if it doesn’t already exist.
OPENING AN ICON
Resorcerer treats ‘icl8’ or
‘ICN#’s as the major
resource for an icon
family, although opening
any member of the family
will start the editor.
However, before opening
the entire icon family, you
can view it only when
displaying ‘icl8’ and
‘ICN#’ resources in the
Resources List. Clipboard
operations apply to the whole family as well only when you have selected
‘icl8’ or ‘ICN#’ in the Types List.
After selecting the icon resource you want to open in the Resources List of
your File Window, you can click on the Open button, or double-click directly
on the resource entry.
When opening families, the Editor automatically creates and adds to your
file any of the nine icons that were missing. If you do not click on any of
them (they are initially white with a gray frame in the gallery area), the
Editor will discard these temporarily-created icons when you close the
editing window. If you Save the file while the Editor is open, however, all
nine icons will be saved. You may want to close the editing window prior to
saving the file.
99
RESORCERER USER MANUAL
USING THE ICON EDITOR
In the center of the Icon Editor display is the icon editing area. On the left
side of the window is the snapshot list. To the left of the icon editing area
are the painting tools. Along the right side of the window is the icon family
gallery that shows the actual size icons for each icon in the family. Just
above the icon editing area are the dither and Apple icon color palettes.
Note:
The mask parts of the ‘ICN#’, ‘ics#’, and ‘icm#’
resources are broken out as if they were separate
black-and-white icons. That’s why the icon editor
displays 12 icons for 9 resources.
When editing ‘cicn’ color icons, the gallery area
displays the dimensions of the icon and shows its
three parts: the color image, the 1-bit black and
white version (if any), and the 1-bit mask.
This section describes the icon editing area, the snapshot list, and the icon
family gallery. The painting tools and the palettes are described in their
own sections later in this chapter.
THE ICON E DITING AREA
The icon editing area displays a magnified view the bits of the icon
image similar to the fatbits editor in most paint programs. You can
make the pixels in the editing area larger by clicking the Icon Editor’s
zoom box or by dragging the small grow icon in the lower right corner of
100
THE COLOR ICON EDITOR
the icon editing area. The number next to the grow icon tells you the
magnification factor. The smallest magnification factor is 6 for Finder
icons, but can be as low as 2 for ‘cicn’ resources.
By default, the Icon Editor shows the grid lines between the pixels. The
Show Icon Gridlines option in the Editor’s menu (which will be titled
IconFamily, Icon, ColorIcon, or ScriptIcon, depending on the type
of icon you’re editing) lets you turn the grid lines on or off. In general,
black-and-white images are easier to edit with the grid lines on, and
color images are easier to edit with the grid lines off.
Note:
To minimize flashing, the Editor allocates a large, color
offscreen pixmap that is the same size as the editing area.
For the small editing areas (6x magnification) and 8-bit,
32x32 color icons, this offscreen pixmap takes up 36K.
When you grow the window larger, the amount of memory
needed for the pixmap will be much greater. If Resorcerer
is running low on memory, it will do the best it can, but
there may be flashing or the option may be disabled.
TAKING SNAPSHOTS
At any time during editing you can click on the Snapshot
button to take a snapshot of the current state of the image
you are editing. The snapshot is added to the snapshot list
on the left side of the editing window, where you can view
it. You can put any number of snapshots in the list.
Sorcery:
You can also take a snapshot by tapping the
Space Bar at any time.
Snapshots are a good way of recording various ideas while
you are editing. To restore from a snapshot, scroll to the
snapshot in the list and double-click on it.
The Editor automatically takes an initial snapshot of each icon in the
icon family. This makes it easy to revert individual family icons in your
editing session all the way back to before the first change you made.
When you close the Icon Editor and save the changes you’ve made to the
icons, the Editor can optionally save your snapshots as well, so you can
use them later. This lets you use the snapshot list as a library of
images, and means that you can quit Resorcerer without losing a lot of
intermediate work from an icon brainstorming session. Finder family
snapshots are saved in resources of type ‘iSNP’, keyboard icon
101
RESORCERER USER MANUAL
snapshots are saved in ‘kSNP’s, and general color icon snapshots are
saved in ‘cSNP’ resources. You turn snapshot saving on or off, or
change the snapshot resource type with the Preferences… command
in the Editor’s menu.
THE ICON F AMILY GALLERY
The icon family gallery shows all the icons in the family,
individually framed. The icon currently installed for
editing has a bold frame. To edit a different icon in the
family, click on it to install it in the icon editing area.
If there was no icon resource for a particular family
member, its frame is drawn in gray. Clicking on the frame
marks the icon as one you want to save with the rest.
To copy one icon in the icon family to another icon, click
and drag it to the destination. For instance, suppose that you’ve
designed a black-and-white icon, and now you want to use it as the
basis for an 8-bit icon. Click on the ‘ICN#’ box in the gallery and drag it
to the ‘icl8’ box.
When you copy a deeper color icon to a shallower one (for instance an
‘icl8’ to an ‘icl4’) the Editor maps the colors the best it can.
Sorcery:
If you hold down the Option key as you drag the icon, the
Editor dithers the colors to come up with an
approximation of the deeper colors. If you like, you can set
dithering as the default with the Preferences…
command in the Editor menu.
When you copy a color icon to black-and-white icon (but not a mask), the
Editor maps light colors to white and dark colors to black. You can use
the Preferences… command to force all non-black colors to either
black or white. When you copy to a mask, all colors map to black.
102
THE COLOR ICON EDITOR
CHOOSING COLORS AND PATTERNS
In addition to the standard palettes that let you select patterns and the
foreground and background colors, the Icon Editor has a dither chooser that
lets you dither colors by hand.
USING
THE
COLOR PALETTES
The palette just
above the editing
area lets you select a
foreground color from
a subset of all the colors available. For black-and-white icons, the
palette shows only the colors black and white. For 4-bit icons, it
displays all 16 possible colors. For 8-bit colors, the palette shows the 34
standard Apple icon colors instead of all the possible 256 8-bit colors.
To the left of this palette are
two rectangles that show the
foreground and background
color. When you edit an 8-bit
icon and you click on one of
these rectangles, the Editor
displays a popup palette that
contains all possible colors to choose from.
Note:
In the standard 256 color pop-up palette, the 34 Apple
colors are marked with a gray dot.
The small double-headed arrow next to the foreground and background
popup boxes lets you swap the foreground and background colors. This
makes it easy to use the “favorite colors” palette without having to use
the popup palette.
Sorcery:
USING
THE
To apply a color to the selection or to a shape, line,
character, or bucket fill that you’ve just drawn, hold down
the Shift key and click on any color in any palette.
PATTERN PALETTE
The rectangle just below the foreground and background
popup boxes and above the editing tools displays the current
color pattern, using the current foreground and background
colors, that the drawing and painting tools will use when
103
RESORCERER USER MANUAL
pouring paint or drawing the filled shapes: rectangle, rounded
rectangle, and oval.
When you click on the dither palette or its color popups, the pattern box
displays the dithered combination of the two colors and the painting
tools treat the combination as a single foreground color.
To choose a new pattern in the standard
foreground and background colors, or to
return to using the current foreground/
background colors after using dithered
colors, click on the pattern popup box. The
popup palette displays the standard patterns in the foreground color.
USING
THE
DITHER CHOOSER
The dither chooser at the top of the Editor
window lets you choose from among 65
evenly spaced dither patterns. The two
popups let you select the foreground and background colors that the
dither pattern will interpolate for you.
To choose a dither pattern, click and drag the mouse anywhere on the
dither chooser or in the arrow area just below. The dither pattern
appears in the pattern popup box just above the editing tools.
The two colors that the dither chooser combines are independent of the
standard foreground and background colors of the color palette. To copy
the color palette’s foreground and background colors to the dither
chooser, click on the small up arrow on the left between the two sets of
pop-up boxes.
If the Link Dither Colors to Fore/Back option in the Editor’s menu
is checked, the color palette foreground and background colors are
always copied to the dither chooser’s foreground and background.
104
Sorcery:
Double-clicking on the small up arrow between the color
palette and the dither chooser is toggles this option.
Sorcery:
To apply a dither pattern to a selection or to a shape or
line that you’ve just drawn, hold down the Shift key while
you use the dither chooser or its color popups.
THE COLOR ICON EDITOR
USING THE PAINTING TOOLS
The tool palette to the left of the icon editing area contains tools
that you probably recognize from most painting programs. The
selected tool is highlighted in the tool palette.
Resorcerer associates a key with each tool so that you can switch
from tool to tool quickly. You can see which key goes with which
tool by choosing the Preferences… command from the Editor’s
menu. If you don’t like the preset key equivalents, you can
change them to conform to your favorite paint program.
Note:
Be sure that each tool has a unique key assigned to it.
THE RECTANGULAR SELECTION TOOL
The rectangular selection tool lets you select rectangular
regions in the icon you are editing. Resorcerer uses the
standard selection marquee (“marching ants”) to show you the current
selection. But unlike most fatbits editors, the Editor draws the
selection marquee in the grid lines between pixels instead of using the
pixels to show the selection, which can be ambigous.
The rectangular selection tool works like similar tools in paint
programs. Each time you click and drag the mouse, Resorcerer discards
the previous selection, if any, and starts selecting a new region.
The Shift and Command modifier keys augment the effect of the
rectangular selection tool as follows:
Modifier Key
Shift
Effect
If held down after clicking the mouse, the modifier
constrains the selection to stay square.
If held down before clicking the mouse, the new
selection is added to the existing selection, enabling
you to create discontiguous selections. If the new
selection overlaps with the existing selection, the part
of the new selection that overlaps is subtracted from
the existing selection.
Command
If held down before clicking the mouse, the selection
shrinks to the smallest bounding box that contains all
the selected foreground-colored pixels.
105
RESORCERER USER MANUAL
Double-clicking on the rectangular selection tool selects the entire icon.
If you hold down the Command key as you double-click on the tool,
Resorcerer shrinks the selection to the bounding box of the icon with
respect to the background color.
If you’ve previously made a selection with the lasso selection tool, hold
down the Shift key as you click on the rectangular selection tool to
preserve the existing selection.
The All command in the Edit menu’s Select submenu has the same
effect as double-clicking the rectangular selection tool. However, if only
one pixel is selected, the All command selects all the pixels that match
the selected pixel’s color, and the tool changes to the lasso. This special
version of the All command is particularly useful when you want to
change every instance of a specific color to another color.
THE LASSO SELECTION T OOL
The lasso selection tool lets you select an arbitrary region of pixels. To
use the lasso tool, click and drag to enclose the pixels you want to select.
As with the rectangular selection tool, the lasso tool draws its selection
in the gridlines between pixels so that you can control precisely which
pixels will be included in the selection. When you release the mouse,
Resorcerer shrinks the selection to exclude background-colored pixels.
The Shift, Option, and Command modifier keys augment the effect of
the lasso selection tool as follows:
Modifier
Shift
Effect
The new selection is added to the existing selection,
enabling you to create discontiguous selections. If the
new selection overlaps with the existing selection, the
part of the new selection that overlaps is subtracted
from the existing selection.
Option
Any background-colored pixels are excluded from the
interior of a selection so that only non-backgroundcolored pixels are selected.
Command
The selection does not shrink to exclude backgroundcolored pixels.
By combining the Shift and Command modifiers, you can use the lasso
tool to control the selection precisely. For instance, if you have a
selection, but you have missed one pixel, hold down Shift-Command and
106
THE COLOR ICON EDITOR
lasso the missing pixel to add it to the selection. You can also use the
Shift-Command combination cut holes in a selection.
Double-clicking the lasso on a pixel selects all the adjacent pixels of the
same color. Note that the meaning of “adjacent” may or may not
include adjacent corner pixels depending on the bucket fill mode. For
more information about changing the meaning of adjacent pixels, see
the description of the paint bucket tool below.
Double-clicking on the lasso tool in its palette shrinks the selection from
the outermost editing bounds to select the largest non-backgroundcolored region.
The All command in the Edit menu’s Select submenu has the same
effect as double-clicking the lasso tool. However, if only one pixel is
selected, the All command selects all the pixels that match the selected
pixel’s color. This special version of the All command is particularly
useful when you want to change every instance of a specific color to
another color.
WORKING WITH SELECTIONS
Once you have used the rectangular selection tool or the lasso tool select
a region in the icon, you can manipulate it with the mouse or with
commands in the IconFamily and Edit menus.
To move the selected pixels, click the mouse anywhere inside the
selection and drag it. Since a selection can have holes in it, it may be
difficult to tell which pixels are part of the selection and which are not.
You can tell when the mouse is inside the selection because the cursor
changes to an arrow instead of one of the selection tools.
Sorcery:
You can also use the arrow keys to nudge the selection
pixel by pixel.
Sorcery:
If you hold down the Shift key as you drag the selection,
Resorcerer constrains the movement horizontally or
vertically.
To throw away a selection, drag it completely outside the icon editing
area or press the Delete key.
The Reverse command from the Select submenu lets you invert the
selection. The command selects all the pixels that are not selected and
unselects the pixels that are selected.
107
RESORCERER USER MANUAL
The Rotate Clockwise, Rotate Counterclockwise, Mirror Right
<—> Left, and Flip Top <—> Bottom commands in the Editor’s menu
let you rotate and flip the selection. If there is no selection, these
commands operate on the entire icon.
The Copy From Screen… command lets you copy from the screen into
the selection only. If there is no selection, this command copies from the
screen into the entire icon. To learn more about the Copy From
Screen… command, see “Screen Copying” later in this chapter.
To set the color of all the pixels in the selection to a given color, pattern,
or dithered combination, hold down the Shift key and choose one of the
colors in the favorite colors palette, the dither chooser, or the pop-up
palettes. The color of the pixels changes as you drag the mouse over
different colors.
To change every pixel of a particular color to another color, use the
rectangular selection tool or the lasso tool to select one pixel of the color
that you want to change. Next choose the All command from the Select
submenu in the Edit menu (or press A) to select all the pixels of that
color. Then hold down the Shift key as you click and drag the mouse
over one of the color palettes. The color of the pixels changes as you
drag the mouse over different colors.
c
As you edit an icon family, you usually want to make the similar
changes to all of the icons in the family. To help you with this,
Resorcerer maintains the selection when you switch to another icon of
the same size in the icon family.
Sorcery:
Because the Editor does not display the selection using
the fatbits themselves, you can use the selection to mark
an area of the icon while you continue to paint with the
Pencil tool. To do this, make a selection, and hold the
Shift key down to maintain it as you select the Pencil tool.
You can now draw pixels within the selected area.
THE EYE DROPPER T OOL
The eye dropper tool is available when you edit color icons. When you
select the eye dropper, it picks up the color under the cursor and sets
the foreground to that color. You can use the eye dropper to pick up any
color in the icon editing area or in an of the palettes. Resorcerer
automatically changes the cursor to the eye dropper tool when you
choose a color or dither pattern from one of the patterns.
108
THE COLOR ICON EDITOR
If you hold down the Option key when you are using one of the drawing
tools (pencil, line, bucket, rectangle, or oval), the cursor changes
temporarily to the eye dropper tool so that you can choose another
foreground color without interrupting your use of the current tool.
To switch between any other tool and the eye dropper tool, press the
Tab key.
THE PENCIL T OOL
Use the pencil tool to draw individual pixels. The color that the pencil
tool draws in depends on the original color
Original pixel color
background color
foreground color
other color
Pencil tool draws in…
foreground color
background color
foreground color or background color, depending
on the preferences you set with the
Preferences… command in the Editor’s menu
Holding down the Shift key constrains the pencil tool to draw either
horizontally or vertically.
Holding down the Shift key when you initially select the Pencil tool in
the tool palette keeps the current selection from being discarded when
you begin using the Pencil tool to draw pixels.
THE LINE T OOL
The line tool draws a 1-pixel-wide line in the foreground color. Click
and drag the mouse to draw a line.
Sorcery:
To change the color or pattern of the last line you drew,
hold down the Shift key as you choose a color or pattern
from one of the palettes. For example, to draw a gray line
(every other pixel on), hold down the Shift key as you
choose the gray pattern from the pattern pop-up palette.
If you are editing an 8-bit color icon and the Smooth Lines, Circles, &
Text option in the Editor’s menu is on, Resorcerer uses anti-aliasing
to smooth the line. Note that when this option is on, your icon will
probably contain colors that are not part of the Apple icon color set.
You can repaint a just-drawn line by holding the Shift key down and
clicking on any of the color palettes or the dither chooser.
109
RESORCERER USER MANUAL
THE ERASER TOOL
The eraser tool sets any pixel that you click to the current background
color. Normally, the eraser tool erases one pixel at a time, but you can
make the eraser a bit larger by Option-clicking on the eraser tool.
To erase the entire icon, double-click on the eraser tool.
Note:
The eraser tool works best for erasing a small area. To
erase a large area, use the rectangular selection tool or
the lasso tool to select the region you want to erase, then
press the Delete key.
THE TEXT TOOL
The text tool lets you place bit-mapped text in the icon. Since the icon
area is very small, you can only place a few characters into an icon. To
set the font, font size, and style, use the Set Text Style… command in
the Resource menu, or double-click on the text tool. Use the arrow
keys to nudge the current text and insertion cursor.
Sorcery:
To change the color of the text just after you type it, hold
down the Shift key and choose one of the favorite colors
palette or from the pop-up palette.
If you are editing an 8-bit icon and the Smooth Lines,
Circles, & Text option in the Editor’s menu is on, Resorcerer
uses anti-aliasing to smooth the text. The advantage of antialiasing is that it makes text at small size much more legible.
Smoothing nearly always introduces colors that are not part of
the Apple icon color set. These colors are to be avoided
because the colors in a Finder icon are transformed in various
ways (during selection, for example). For ‘cicn’s this doesn’t
matter, nor does it matter for Finder-style icons that you plan
to draw explicitly without modification with PlotIconSuite().
To see which colors are not part of the Apple icon color set, choose
Select Non-Apple Icon Colors from the Editor’s menu. You can then
recolor the selected pixels by hand, or you can use the Conform to
Apple Icon Colors command to map the offending colors to the nearest
Apple colors.
110
THE COLOR ICON EDITOR
THE PAINT BUCKET TOOL
The paint bucket lets you paint large connected areas with the current
fill pattern (which uses the current foreground and background colors),
or the current dither combination. The color that the paint bucket
paints adjacent pixels depends on the color of the pixel you clicked on.
Original pixel color
background color
foreground color
other color
Bucket tool paints adjacent pixels in…
foreground color
background color
foreground color or background color, depending
on the preferences you set with the
Preferences… command in the Editor’s menu
Resorcerer’s definition of “adjacent” pixels depends on the settings of
the Use Diagonal Fills and …On Foreground Pixels Only options
in the Editor’s menu.
When the Use Diagonal Fills option is off, an adjacent pixel is a pixel
of the same color that shares an edge with a given pixel. If the Use
Diagonal Fills option is on, the definition of adjacent is expanded to
include pixels that touch at the corner of a given pixel.
Sorcery:
You can switch between standard fill and diagonal
fill by double-clicking on the paint bucket tool.
When diagonal fill is on, the paint bucket tool has
an 8-pointed star in it.
In some cases, you may want to use the standard fill algorithm for
background pixels and the diagonal fill algorithm for foreground pixels.
If you choose the …On Foreground Pixels Only option in the menu,
the Editor uses the diagonal fill algorithm only on pixels painted in the
foreground color. When this option is on, the paint bucket tool changes
to show you which fill it will use as it passes over different pixels.
Note:
Keep in mind that the Use Diagonal Fills and …On
Foreground Pixels Only options also affect the way the
lasso tool works.
Sorcery:
Resorcerer remembers the last set of discontigous areas
that you’ve painted with the same paint colors or pattern.
If you want to try a different color, pattern, or dither from
the one you started with, hold down the Shift key as you
choose a new one. The Undo command will restore the
pixels to what they were prior to the first of any set of
consecutive paint pourings of the same color or pattern.
111
RESORCERER USER MANUAL
THE SMUDGER TOOL
The smudger tool lets you “smudge” colors in icons so that you can do
smoothing touchups by hand. It averages the RGB value of the current
pixel and the last pixel you touch, and changes the current pixel to the
average. The smudger tools works on all color icons, but it’s really only
useful for 8-bit icons.
Double-clicking on the smudger tool toggles the Smooth Lines,
Circles, & Text option.
Note:
When you smudge colors in an 8-bit icon, the resulting
colors may not be in the Apple icon color set. To see
which colors are not in the Apple icon color set, choose
Select Non-Apple Icon Colors from the Editor’s menu.
You can then recolor the selected pixels by hand, or you
can use the Conform to Apple Icon Colors command to
map the offending colors to the nearest Apple colors.
THE RECTANGLE, ROUNDED RECTANGLE, AND OVAL SHAPE T OOLS
The shape tools let you draw filled and unfilled rectangles, rounded
rectangles, and ovals. The filled shapes draw in the current foreground
color and in the current pattern. The unfilled shapes are framed in the
foreground color.
Hold down the Shift key to constrain the shapes to squares and circles.
Sorcery:
To change the color or pattern of the last shape you drew,
hold down the Shift key as you choose a color or pattern
from one of the palettes. For example, to change a solid
rectangle to a dithered rectangle, hold down the Shift key
as you select a dither pattern.
If you are editing an 8-bit icon and the Smooth Lines, Circles, & Text
option in the IconFamily menu is on, Resorcerer uses anti-aliasing to
smooth any curves in the shape.
112
THE COLOR ICON EDITOR
CREATING AN ICON MASK
An icon mask is used to erase the screen background in order to draw the
icon image. Sometimes just making the mask bits the same as the icon
image is enough; however, it is usually better to avoid internal holes in the
mask. This makes the icon easier to see against gray or black backgrounds
as well as easier for the user to select them when clicking with the mouse.
Under System 7, which uses the PlotIconSuite() routine, all large icons
use the icon mask from the ‘ICN#’ resource, all small icons use the icon mask
from the ‘ics#’ resource, and all mini icons use the icon mask from the ‘icm#’
resource.
To create an icon mask, drag one of the icons into the icon mask box in the
Icon Editor. Although you can drag a large icon into the smaller icon, you
should create the mask from a finished version of the corresponding icon.
SCREEN COPYING
You can easily copy an image directly from a background window into an
icon editing box or into any selected region in an icon. To do so, you must be
running under System 7 or under MultiFinder under System 6 if you are
using another application; if you have a desk accessory, though, you don’t
need MultiFinder. Or you can copy from another Resorcerer window
showing, for instance, a ‘TEXT’ or ‘PICT’ resource.
To being screen copying, choose Copy from Screen… from the Editor’s
menu. To exit screen copying mode without making a screen copy, press
(period). Screen-copying also times out after a short amount of time.
c.
While screen copying, the Icon Editor replaces the mouse cursor with the
standard selection (“marching ants”) marquee. The size of the marquee is 1
pixel larger than the icon image rectangle or the bounding box of the
selected region, so that the movement of the marquee will not hide the
borders of the candidate image. As you move the selection rectangle around
on your screen, the Editor constantly copies its contents into the editing box
so you can get a good idea of what the icon image will look like.
When you have properly placed the selection rectangle, click the mouse
button to make the final copy. If you make a mistake, you can choose Undo.
Before doing the screen copy, you can choose Hide File Windows from the
113
RESORCERER USER MANUAL
File menu if you need to clear some screen space in order to see a
background paint window.
Sorcery: Initially, the marquee is the same size as your icon. You can
enlarge the size of the marquee by clicking and dragging the
mouse. You can also tap the space bar to double the size of the
marquee.
Sorcery: If you hold down the Option key, and the marquee is larger than
the icon (or the selected region in the icon), the Icon Editor uses
anti-aliasing (QuickDraw dithering) to smooth the image.
TRYING OUT YOUR FINDER ICONS
The icon family gallery in the Icon Editor shows
you what your icon looks like in its normal state.
In the Finder, however, icons can be selected or
unselected, opened, unavailable, or off-line. To see
what your icon looks like in these states, use Try
Out Desktop Samples from the IconFamily
menu. This command opens a window that shows
your icon on a simulated desktop in all the
possible states.
The Try Out window draws all icons using
PlotIconSuite(). It creates a temporary suite
or partial suite of icons based on the depth of the
current icon you are editing, and excludes family
icons from the suite if they have higher depths. This lets you try out the 4bit icons on an 8-bit screen without interference from the 8-bit icons in the
suite (since PlotIconSuite() is paying attention to the screen depth at
which the window is displayed). For best results, though, you may want to
use the Monitors Control Panel to change your screen into 4-bit mode.
The popup menu at the top of the window lets you see what your icon looks
like when you assign different label colorings to it.
The patterns at the top of the simulated desktop let you see what your icon
looks like on different desktops. The two arrows on either side of the
patterns let you scroll through the built-in desktop patterns in the same way
the General Control Panel does.
The small grow icon beneath the image of your icon in the upper left corner
of the window lets you see the effect of drawing the icon in a smaller area.
114
THE COLOR ICON EDITOR
CHANGING A COLOR ICON’S SIZE
Finder icons all have fixed sizes. The large ones are 32 by 32 pixels, the
small ones are 16 by 16, and the minis are 12 high by 16 wide. The mini
icons are intended to be used in certain types of list views.
General color icon (‘cicn’) resources can be any size. Typically, they should
be 32 pixels by 32 pixels, which is the Editor’s default size for new ‘cicn’s.
The Menu Manager, for instance, does not deal well with ‘cicn’ resources
larger than 32 pixels on a side. The size of the current color icon is always
displayed above the gallery area.
To set the size of the color icon, choose Set Size… from the ColorIcon
menu. The Set Size dialog lets you enter any size you need.
Sorcery: You can double-click on the editing area’s Grow Box to bring up
the Set Size dialog.
c
Hold the
key down while dragging the Editor’s Grow Box to
change the icon’s size directly. While dragging, the size label
above the gallery area gives you numeric feedback.
To select from a number of standard sizes whose dimensions are powers of 2,
click on the appropriate sample in the left part of the dialog. These
dimensions range from 8 by 8 pixels in the upper left corner of the sample
array to 256 by 256 pixels in the lower right part of the sample array (only
partial samples are shown if one or the other dimension equals 256).
When you change the icon’s size, you have to decide what to do with the
icon’s current image. The Scale the image checkbox lets you choose
whether to maintain the current image (and possibly clip it if you are
115
RESORCERER USER MANUAL
decreasing the size) or to scale it to the new size. The sample array gives a
preview of what will happen for the standard sizes.
Sorcery: You can double-click on any sample in the array to both choose it
and dismiss the dialog.
USING THE COLORS MENU
Unlike Finder icons, which are always displayed using a fixed set of colors
kept in standard system color tables, general color icon (‘cicn’) resources
contain their own color tables. These are usually small subsets of the
standard tables.
When the Editor opens a ‘cicn’, it analyzes the internal
color table to see which standard color table the colors
appear to have come from. It then edits the resource
using the full standard table. An additional Colors
menu makes it easy to see which table the Editor is
using.
If the colors in the icon’s color table are a subset of a standard table, the
Editor automatically sets the Remove unused colors option. With this
option on, each time the Editor rebuilds the ‘cicn’ for saving, DeRez’ing, or
other uses, it excludes all unused colors from the standard table. In
addition, it reduces the internal depth of the ‘cicn’s pixmap to the minimum
possible needed to support the number of colors you’ve used. For instance,
even though you are using the standard 256 colors in your palettes, if the
icon uses 16 or less of these 256 colors, the Editor will rebuild the icon using
a 4-bit pixmap. Without the option on, the Editor builds an icon that uses
only a few of the standard 256 colors using an 8-bit deep pixmap, and all 256
colors will be added to the resource. You should usually use this option,
since icons built with minimal pixmaps can be 90% smaller than if not.
When a color in the ‘cicn’s color table cannot be found in any of the standard
color tables, the Editor checks the Custom Colors… entry in the menu.
To remap the colors from what they are to any of the standard colors, choose
the appropriate entry from the Colors menu. You can use Resorcerer’s
Color Table Editor to create a custom color table and install it by choosing
Custom Colors….
116
THE COLOR ICON EDITOR
FINDING DIALOG ITEM REFERENCES
Dialog item list (‘DITL’) resources contain Icon items that specifiy the
resource ID of an icon that the Dialog Manager will display automatically. If
a ‘cicn’ resource is found with the same ID the Dialog Manager uses it;
otherwise, if an ‘ICON’ resource is found, it is used (this is for compatibility
with earlier non-color systems).
The Find Dialog Item References command, which is available only in
the ColorIcon menu, searches through all ‘DITL’ resources in the same file
as the color icon you’re editing, and opens every dialog in which it finds an
icon item with a matching resource ID. The icon item is then highlighted
automatically for you.
DECOMPILING YOUR ICONS
When you’ve finished designing your icon resource(s), the icon editor can
decompile it into Rez source text, placing the text directly in the clipboard so
that you can switch to your development system’s text editor and paste the
resource declaration in your Rez source file.
To do this, make sure that no pixels are selected in any editing box, and
choose Copy from the Edit menu.
CLOSING THE ICON
When you have finished editing your icon, click in the editing window’s close
box to close the icon. This saves any changes you have made back to
Resorcerer’s in-memory copy of your file.
If you don’t want to save the changes you’ve made since opening the icon,
click in the Cancel button in the lower right of the window.
Depending on how your preferences are set, Resorcerer may confirm with
you whether to save or discard your changes (for more on this, see the
“Preferences” chapter later in the manual).
117
RESORCERER USER MANUAL
118