1
Multi-Languages QIG on the CD
===================================
Český: Českého průvodce rychlou instalací naleznete na přiloženém CD s
ovladači
Deutsch: Auf der beiliegend Treiber CD finden Sie deutsche Anleitung zur
Schnellinstallation.
Español: Incluido en el CD el G.R.I. en Español.
Français: Veuillez trouver l’français G.I.R ci-joint dans le CD
Italiano: Incluso nel CD il Q.I.G. in Italiano.
Magyar: A magyar telepítési útmutató megtalálható a mellékelt CD-n
Nederlands: De nederlandse Q.I.G. treft u aan op de bijgesloten CD
Polski: Skrócona instrukcja instalacji w języku polskim znajduje się na
załączonej płycie CD
Português: Incluído no CD o G.I.R. em Portugues
Русский: Найдите Q.I.G. на pусскoм языке на приложеном CD
Romania:Cd-ul cuprinde Ghid de instalare rapida in limba romana
Türkçe: Ürün ile beraber gelen CD içinde Türkçe Hızlı Kurulum Kılavuzu'nu
bulabilirsiniz
繁體及簡體中文:CD 片內含繁體中文及簡體中文快速安裝指南
1
Contents
1 Product Introduction ..............................................................................4
1-1 Package Contents........................................................................5
1-2 Front Panel ..................................................................................5
1-3 Back Panel...................................................................................6
2 Network Setup.......................................................................................8
Step 1:Getting Started ........................................................................8
Step2 : PC LAN IP Configuration .......................................................9
2.1 Router Configuration – PPPoE ..................................................12
2.2 Router Configuration - Cable Modem.........................................15
3 Advanced Setup ..................................................................................17
3-1 Change management password ................................................17
3-2 Firmware Upgrade .....................................................................18
3-3 System Restart and Reset to Default.........................................20
3-4 Wireless Setup...........................................................................20
2
Copyright© by Edimax Technology Co, LTD. all rights reserved. No part of this
publication may be reproduced, transmitted, transcribed, stored in a retrieval system,
or translated into any language or computer language, in any form or by any means,
electronic, mechanical, magnetic, optical, chemical, manual or otherwise, without the
prior written permission of this Company .
This company makes no representations or warranties, either expressed or implied,
with respect to the contents hereof and specifically disclaims any warranties,
merchantability or fitness for any particular purpose. Any software described in this
manual is sold or licensed "as is". Should the programs prove defective following
their purchase, the buyer (and not this company, its distributor, or its dealer) assumes
the entire cost of all necessary servicing, repair, and any incidental or consequential
damages resulting from any defect in the software. Further, this company reserves
the right to revise this publication and to make changes from time to time in the
contents hereof without obligation to notify any person of such revision or changes.
The product you have purchased and the setup screen may appear slightly different
from those shown in this QIG. For more detailed information about this product,
please refer to the User Manual on the CD-ROM. The software and specifications are
subject to change without notice. Please visit our web site www.edimax.com for the
update. All rights reserved including all brand and product names mentioned in this
manual are trademarks and/or registered trademarks of their respective holders .
Linux Open Source Code
Certain Edimax products include software code developed by third parties,
software code is subject to the GNU General Public License ("GPL") or GNU
Lesser General Public License ("LGPL"). Please see the GNU (www.gnu.org)
and LPGL(www.gnu.org) Websites to view the terms of each license.
The GPL Code and LGPL Code used in Edimax products are distributed
without any warranty and are subject to the copyrights of their authors. For
details, see the GPL Code and LGPL Code licenses. You can download the
firmware-files at http://www.edimax.com under "Download" page.
3
1 Product Introduction
Thank you for purchasing Edimax broadband router! This high cost-efficiency router
is the best choice for Small office / Home office users, all computers and network
devices can share a single xDSL / cable modem internet connection at high speed.
Easy install procedures allows any computer users to setup a network environment in
very short time - within minutes, even inexperienced. When the number of your
computers and network-enabled devices grow, you can also expand the number of
network slot by simple attach a hub or switch, to extend the scope of your network.
You can configure the router by running the Setup Wizard in the CD-ROM provided in
the package. The wizard provides quick setup for the Internet connection, SSID,
wireless security, firmware upgrade and changing router’s password. When you start
the Setup Wizard, you will get the following Welcome screen. Please choose the
language to start with and follow the easy steps in the Wizard. No instruction for the
Setup Wizard is given here.
If you lost the CD-ROM or you prefer the traditional web setup, please follow the
procedures in this Quick Installation Guide to configure the router
4
1-1 Package Contents
Before you starting to use this router, please check if there’s anything missing in the
package, and contact your dealer of purchase to claim for missing items:
□ Broadband router (main body, 1 pcs)
□ Quick installation guide (1 pcs)
□ One CD-ROM (Including the Setup Wizard, Multi-languages Quick Installation
Guide and User Manual)
□ 12V power adapter (1 pcs)
□ Ethernet Cable
□ 3dBi Antenna (2 pcs for BR-6424n/BR-6324nL or 3 pcs for BR-6574n )
□ Accessary and Holding Base
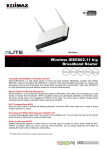
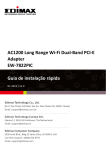
1-2 Front Panel
BR-6424n / BR-6324nL
BR-6574n
LED
PWR
WAN
1000M
WAN
LNK/ACT
Light
Status
ON
Router is ready
Amber
WAN port is connected at 1000Mbps (BR-6574n only)
Green
WAN port is connected at 100Mbps (BR-6574n only)
Off
WAN port is connected at 10Mbps (BR-6574n only)
ON
WAN is connected
Off
WAN is unconnected
Flashing
LAN(1-4)
1000M
Description
WAN port is sending / receiving data
Amber
WAN port is connected at 1000Mbps (BR-6574n only)
Green
WAN port is connected at 100Mbps (BR-6574n only)
5
LAN
LNK/ACT
(Port 1-4)
Off
WAN port is connected at 10Mbps (BR-6574n only)
ON
LAN port is connected
Off
LAN port is unconnected
Flashing
WLAN
LAN port is sending / receiving data
ON
Wireless network is switched on or WPS mode is on.
Off
Wireless LAN is disabled
Flashing
Wireless LAN is sending / receiving data
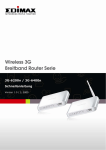
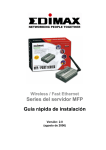
1-3 Back Panel
BR-6424n / BR-6324nL
BR-6574n
Item Name
Power
ON/OFF
Description
Power connector, connects to 12V power adapter
Enable / Disable wireless signal (For BR-6424n /
BR-6324nL only)
You can not connect the router via wireless adapter,
when you disable the wireless signal.
6
Reset / WPS
1-4
WAN
Reset the router to factory default settings (clear all
settings) or start WPS function.
(a) Press this button and hold for 20 seconds to clear
all settings.
(b) Press this button for 2 ~ 5 seconds to start WPS
function.
The router’s 4 LAN ports are where you connect your
LAN’s PCs, printer servers, hubs and switches etc.
Wide Area Network (WAN / Internet) port
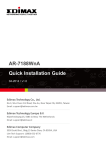
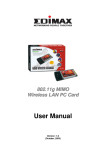
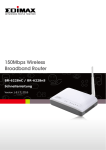
To improve wireless signal reception, please arrange the antennas as the picture
shown below (horizontal or vertical installation), and place the wireless access point
in open space. Please keep the distance between antennas, if the antennas are too
close to each other, wireless signal reception will be affected.
The access point shown in the following picture is 3-antenna model. If you’re using
2-antenna model, please also follow the instructions listed above.
or
7
2 Network Setup
Step 1:Getting Started
Instructions for using the router to share the Internet with multiple PCs. (Power on the
Modem and the Router.)
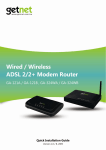
Cabling installation:
1.
Connect the Ethernet cable from the router’s WAN port to the LAN port of the
modem.
2.
Connect another Ethernet cable from the any LAN ports (1~4) on router to the
Ethernet socket on the PC.
3.
Check to make sure the router’s LINK LED is lit; to confirm the cable
connections are made correctly.
8
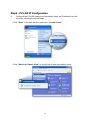
Step2 : PC LAN IP Configuration
1.
Configure the PC LAN setting to automatically obtain an IP address from the
router by following the below steps.
z
Click “Start” in the task bar then select the “Control Panel” .
z
Click “Switch to Classic View” on the left top to see more setting icons.
9
z
z
Find an icon “Network Connection” then Double-Click to open the network
connection setting.
You will see an icon “Local Area Connection”, select the icon then Right-Click
the mouse to open the sub-menu and select the “Properties”.
10
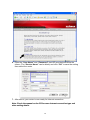
z
z
Select the “Internet Protocol (TCP/IP)” then click the “Properties”
Ensure the parameter marked in blue are checked in “Obtain an IP address
automatically” and “Obtain DNS server address automatically” then press
“OK” to close.
11
2.1 Router Configuration – PPPoE
Note: Please do not run the PPPoE software; otherwise the Internet connection
for the router may fail.
1. Enter the router’s default IP address: “192.168.2.1” into your PC’s web browser
and press “enter”.
2. The login screen below will appear. Enter the “User Name” and “Password” and
click “OK” to login.
The default User name is “admin” and the Password is “1234”,
12
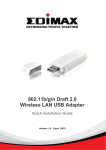
3. The main page will appear, click “Quick Setup” to setup the Internet
connection. Following example is for “PPPoE” WAN setting.
4. Select ‘(GMT) Greenwich Mean Time: (your country or city) then Click “Apply”
button.
5. Select “PPPoE xDSL”, the system will move into next step
13
6. Enter the “User Name” and “Password” that ISP provided and leave the
others. (The “Service Name” can be blank) and click “OK” to save the setting
then reboot the router
7. After reboot, your router is now ready for Internet connection.
Note: Check the manual on the CD for more Internet connection type and
other setting details
14
2.2 Router Configuration - Cable Modem
1. The following example is for U.K. Click on “Quick Setup”.
2. Select ‘(GMT) Greenwich Mean Time : “London”. Click “Next” button.
15
3. Select “Cable Modem”, the system will move into next step
4. Enter ”Host Name” and “MAC Address”. (The “Host Name” can be blank)
The MAC Address is provided by ISP (e.g. NTL) or click “Clone Mac Address”
button if you’re using the computer’s MAC Address.
Confirm with your ISP about MAC Address used, Click “OK” button to save the
settings then reboot the router.
5. After reboot, your router is now ready for Internet connection.
16
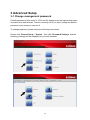
3 Advanced Setup
3-1 Change management password
Default password of this router is 1234, and it’s displayed on the login prompt when
accessed from web browser. There’s a security risk if you don’t change the default
password, since everyone can see it.
To change password, please follow the following instructions:
Please click ‘General Setup’ \ ‘System’ , then click ‘Password Settings’, and the
following message will be displayed on your web browser:
17
Here are descriptions of every setup items:
Current Password
New Password
Confirm Password
Please input current password here.
Please input new password here.
Please input new password here again.
When you finish, click ‘Apply’; If you want to keep original password unchanged,
click ‘Cancel’.
3-2 Firmware Upgrade
The system software used by this router is called as ‘firmware’, just like any
applications on your computer, when you replace the old application with a new one,
your computer will be equipped with new function. You can also use this firmware
upgrade function to add new functions to your router, even fix the bugs of this router.
To upgrade firmware, please follow the following instructions:
Please click ‘Tool’ and ‘Firmware Upgrade’ on the left of web management interface,
then the following message will be displayed on your web browser:
18
Click ‘Browse’ button first, you’ll be prompted to provide the filename of firmware
upgrade file. Please download the latest firmware file from our website, and use it to
upgrade your router.
After a firmware upgrade file is selected, click ‘Apply’ button, and the router will start
firmware upgrade procedure automatically. The procedure may take several minutes,
please be patient.
NOTE: Never interrupt the upgrade procedure by closing the web browser or
physically disconnect your computer from router. If the firmware you uploaded is
corrupt, the firmware upgrade will fail, and you may have to return this router to
the dealer of purchase to ask for help. (Warranty voids if you interrupted the
upgrade procedure).
NOTE: It’s recommended to use wired Ethernet connection to upload the
firmware file, please refrain from using wireless connection to upload the
firmware file. Also, please do not switch the broadband router or computer you
used to upload the firmware file off during firmware upgrade. This will cause
broadband router become malfunction and unusable.
19
3-3 Restart and Reset to Default Setting
If you found the router behaves strangely, you can perform a reset, sometimes it will
solve the problem.
You can either reset your router without losing your current settings or restore to
factory defaults. If you wish to reset the router to the factory default settings, select
“Factory Default Settings” then click “Restart”.
Alternatively, you can use the Reset button at the Real Panel of the router.
Please click ‘Apply’ to reset your router, and it will be available again after few
minutes, please be patient.
3-4 Wireless Setup
Please click ‘General Setup’ \ ‘Wireless’
20
SSID is the name of the wireless router. You may change your SSID to a meaningful
name so that you can identify your wireless router from others. You can use any
alphanumeric characters, up to 32 characters. By default the ESSID is ‘default’.
It’s very important to set wireless security settings properly! If you don’t,
hackers and malicious users can reach your network and valuable data without your
consent and this will cause serious security problem.
It’s recommended to use WPA to protect your wireless router from hackers. Select
‘Security Settings’ \ ‘ WPA-Pre-Shared Key ‘ and enter the Pre-Share Key below.
Use 8-32 alphanumeric characters. Please remember this key, you need this key to
connect to your wireless router wirelessly.
It’s not recommended to use a word that can be found in a dictionary due to
security reason.
21
Note: Please refer to the User Manual in the CD-ROM for more details
information on Internet connection type and to configure all others setting.
22
Federal Communication Commission Interference Statement
This equipment has been tested and found to comply with the limits for a Class B digital device, pursuant to Part
15 of FCC Rules. These limits are designed to provide reasonable protection against harmful interference in a
residential installation. This equipment generates, uses, and can radiate radio frequency energy and, if not
installed and used in accordance with the instructions, may cause harmful interference to radio communications.
However, there is no guarantee that interference will not occur in a particular installation. If this equipment does
cause harmful interference to radio or television reception, which can be determined by turning the equipment off
and on, the user is encouraged to try to correct the interference by one or more of the following measures:
1. Reorient or relocate the receiving antenna.
2. Increase the separation between the equipment and receiver.
3. Connect the equipment into an outlet on a circuit different from that to which the receiver is connected.
4. Consult the dealer or an experienced radio technician for help.
FCC Caution
This device and its antenna must not be co-located or operating in conjunction with any other antenna or
transmitter.
This device complies with Part 15 of the FCC Rules. Operation is subject to the following two conditions: (1) this
device may not cause harmful interference, and (2) this device must accept any interference received, including
interference that may cause undesired operation.
Any changes or modifications not expressly approved by the party responsible for compliance could void the
authority to operate equipment.
Federal Communications Commission (FCC) Radiation Exposure Statement
This equipment complies with FCC radiation exposure set forth for an uncontrolled environment. In order to avoid
the possibility of exceeding the FCC radio frequency exposure limits, human proximity to the antenna shall not be
less than 2.5cm (1 inch) during normal operation.
Federal Communications Commission (FCC) RF Exposure Requirements
SAR compliance has been established in the laptop computer(s) configurations with PCMCIA slot on the side
near the center, as tested in the application for Certification, and can be used in laptop computer(s) with
substantially similar physical dimensions, construction, and electrical and RF characteristics. Use in other devices
such a PDAs or lappads is not authorized.
This transmitter is restricted for use with the specific antenna tested in the application for Certification. The
antenna(s) used for this transmitter must not be co-located or operating in conjunction with any other antenna or
transmitter.
R&TTE Compliance Statement
This equipment complies with all the requirements of DIRECTIVE 1999/5/EC OF THE EUROPEAN PARLIAMENT
AND THE COUNCIL of March 9, 1999 on radio equipment and telecommunication terminal Equipment and the
mutual recognition of their conformity (R&TTE)
The R&TTE Directive repeals and replaces in the directive 98/13/EEC (Telecommunications Terminal Equipment
and Satellite Earth Station Equipment) As of April 8, 2000.
Safety
This equipment is designed with the utmost care for the safety of those who install and use it. However, special
attention must be paid to the dangers of electric shock and static electricity when working with electrical
equipment. All guidelines of this and of the computer manufacture must therefore be allowed at all times to ensure
the safe use of the equipment.
EU Countries Intended for Use
The ETSI version of this device is intended for home and office use in Austria, Belgium, Denmark, Finland, France,
Germany, Greece, Ireland, Italy, Luxembourg, Bulgaria, Cyprus, Czech Republic, Estonia, Hungary, Latvia,
Lithuania, Malta, Poland, Romania, Slovakia, Slovenia, the Netherlands, Portugal, Spain, Sweden, and the United
Kingdom.
The ETSI version of this device is also authorized for use in EFTA member states: Iceland, Liechtenstein, Norway,
and Switzerland.
EU Countries not intended for use
None
A declaration of conformity is available on www.edimax.com
N2037
23