1
User's Manual
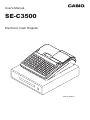
SE-C3500
Electronic Cash Register
(M size drawer)
Introduction
Thank you very much for purchasing this CASIO electronic cash register. START-UP is QUICK and
EASY!
For the basic settings of your cash register, please see “Quick Start Guide”.
Original Carton/Package
If for any reason, this product is to be returned to the store where purchased, it must be packed in the
original carton/package.
Location
Locate the Cash register on a flat, stable surface, away from heaters or areas exposed to direct sunlight,
humidity or dust.
Power Supply
Your cash register is designed to operate on standard household current (120 V, 220 V, 230 V, 240 V;
50/60 Hz). Do not overload the outlet by plugging in too many appliances.
Cleaning
Clean the cash register exterior with a soft cloth which has been moistened with a solution of a mild neutral detergent and water, and wrung out. Be sure that the cloth is thoroughly wrung out to avoid damage
to the printer. Never use paint thinner, benzene, or other volatile solvents.
The mains plug on this equipment must be used to disconnect mains power. Please ensure that the
socket outlet is installed near the equipment and shall be easily accessible.
Trademark
SD and SDHC Logos are trademarks of SD-3C,LLC.
E-2
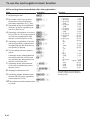
To use the cash register safely...............................................................................................E-4
To use the cash register’s basic function..............................................................................E-9
Getting started................................................................................................................................. E-10
Getting to know your cash register............................................................................................... E-15
How to read the printouts............................................................................................................... E-23
How to use your cash register.......................................................................................................E-24
Before opening your store.............................................................................................................. E-25
Registering items in departments.................................................................................................E-26
Basic setups and registrations......................................................................................................E-30
Other registrations..........................................................................................................................E-38
Daily sales reports..........................................................................................................................E-48
Advanced programmings and registrations........................................................................ E-51
Advanced registrations...................................................................................................................E-52
Character settings........................................................................................................................... E-72
Advanced programmings...............................................................................................................E-81
Programming functions of departments and PLUs in a lump....................................................E-94
Programming functions of departments and PLUs individually................................................E-97
Printing programmed data............................................................................................................ E-113
Printing various sales reports...................................................................................................... E-119
Using an SD card........................................................................................................................... E-127
Before you consider it as a problem........................................................................................... E-130
Specifications................................................................................................................................ E-134
E-3
To use the cash register safely
•Congratulations upon your selection of this CASIO product. Be sure to read the following safety precautions before using it for the first time. After reading this guide, keep it close at hand for easy reference.
•Please pay due attention to the following symbols to help you use the product safely and properly and
to avoid any personal injury or damage to the product.
*Danger
If this symbol is ignored and the product consequently misused, it can result in serious personal injury and/or death.
*Warning
If this symbol is ignored and the product consequently misused, it may result in
serious personal injury and/or death.
*Caution
If this symbol is ignored and the product consequently misused, it may result in
personal injury and/or property damage.
•The figures in this manual have the following meanings.
’
!
$
This symbol means be careful = a warning.
The example at left is a warning about an electrical shock.
This symbol indicates something you must not do = prohibited action. The example at left
means never disassemble the product.
This symbol indicates something you must do = an instruction.
The example at left indicates you should unplug the product from the outlet. Please note that
instructions that are difficult to express by a figure are indicated by +.
*Danger
If liquid that leaked from a battery gets in your eye, on your skin or clothes, deal with it immediately as follows.
-
1.Immediately rinse it off with lots of water.
2.Immediately get medical treatment.
Failing to act may result in a rash or loss of sight.
*Warning
Handling the register
$
• Should the register malfunction, start to emit smoke or a strange odor, or otherwise
behave abnormally, immediately shut down the power and unplug the AC plug from the
power outlet. Continued use creates the danger of fire and electric shock. Contact CASIO
service representative.
-
• Do not place containers of liquids near the register and do not allow any foreign matter
to get into it. Should water or other foreign matter get into the register, immediately shut
down the power and unplug the AC plug from the power outlet. Continued use creates the
danger of short circuit, fire and electric shock. Contact CASIO service representative.
• Should you drop the register and damage it, immediately shut down the power and unplug
the AC plug from the power outlet. Continued use creates the danger of short circuit, fire
and electric shock.
• Attempting to repair the register yourself is extremely dangerous. Contact CASIO service
representative.
• Never try to take the register apart or modify it in any way. High-voltage components
inside the register create the danger of fire and electric shock. Contact CASIO service
representative for all repair and maintenance.
!
E-4
To use the cash register safely
*Warning
Power plug and AC outlet
+
+
+
-
• Use only a proper AC electric outlet. Use of an outlet with a different voltage from the
rating creates the danger of malfunction, fire, and electric shock. Overloading an electric
outlet creates the danger of overheating and fire.
• Make sure the power plug is inserted as far as it will go. Loose plugs create the danger of
electric shock, overheating, and fire.
• Do not use the register if the plug is damaged. Never connect to a power outlet that is
loose.
• Use a dry cloth to periodically wipe off any dust built up on the prongs of the plug. Humidity can cause poor insulation and create the danger of electric shock and fire if dust stays
on the prongs.
• Do not allow the power cord or plug to become damaged, and never try to modify them in
any way. Continued use of a damaged power cord can cause deterioration of the insulation, exposure of internal wiring, and short circuit, which creates the danger of electric
shock and fire.
• Contact CASIO service representative whenever the power cord or plug requires repair or
maintenance.
*Caution
-
• Do not place the register on an unstable or uneven surface. Doing so can cause the
register - especially when the drawer is open - to fall, creating the danger of malfunction,
fire, and electric shock.
Do not place the register in the following areas.
+
• Areas where the register will be subject to large amounts of humidity or dust, or directly
exposed to hot or cold air.
• Areas exposed to direct sunlight, in a close motor vehicle, or any other area subject to
very high temperatures.
The above conditions can cause malfunction, which creates the danger of fire.
+
• Do not overlay bend the power cord, do not allow it to be caught between desks or other
furniture, and never place heavy objects on top of the power cord. Doing so can cause
short circuit or breaking of the power cord, creating the danger of fire and electric shock.
+
• Be sure to grasp the plug when unplugging the power cord from the wall outlet. Pulling on
the cord can damage it, break the wiring, or cause short, creating the danger of fire and
electric shock.
-
• Never touch the plug while your hands are wet. Doing so creates the danger of electric
shock. Pulling on the cord can damage it, break the wiring, or cause short, creating the
danger of fire and electric shock.
-
• At least once a year, unplug the power plug and use a dry cloth or vacuum cleaner to clear
dust from the area around the prongs of the power plug.
Never use detergent to clean the power cord, especially power plug.
+
• Keep small parts out of the reach of small children to make sure it is not swallowed accidentally.
E-5
To use the cash register’s basic function
*Caution
Only use the specified batteries.
-
• Do not disassemble, modify or short-circuit them.
• Do not put them in fire or water or heat them.
• Do not mix new and old batteries or different types of batteries.
• Orient the terminals +- correctly.
• Remove the batteries if the system will not be used for a long time.
• After batteries are spent, dispose of them as per local regulations.
• Do not try to recharge dry cell batteries.
Disposing of batteries:
-
E-6
• Make sure that you dispose of used batteries in accordance with the rules and regulations
in your local area.
To use the cash register’s basic function
When the cash drawer does not open!
In case of power failure or the machine is in malfunction,
the cash drawer does not open automatically. Even in
these cases, you can open the cash drawer by pulling
drawer release lever (see below).
Important: The drawer will not open, if it is locked with a
drawer lock key.
Drawer release lever
E-7
To use the cash register’s basic function
Manufacturer:CASIO COMPUTER CO., LTD.
6-2, Hon-machi 1-chome, Shibuya-ku, Tokyo 151-8543, Japan
Responsible within the European Union:CASIO EUROPE GmbH
CASIO-Platz 1, 22848 Norderstedt, Germany
Please keep all information for future reference.
The declaration of conformity may be consulted at http://world.casio.com/
Laite on liitettävä suojamaadoituskostkettimilla vaurstettuun pistorasiaan
Apparatet må tilkoples jordet stikkontakt
Apparaten skall anslutas till jordat nätuttag.
The main plug on this equipment must be used to disconnect mains power.
Please ensure that the socket outlet is installed near the equipment and shall be easily
accessible.
WARNING
This is a Class A product. In a domestic environment this product
may cause radio interference in which case the user may be required to take adequate measures.
GUIDELINES LAID DOWN BY FCC RULES FOR USE OF THE UNIT IN THE U.S.A.
(Not applicable to other areas)
WARNING: This equipment has been tested and found to comply with the limits for
a Class A digital device, pursuant to Part 15 of the FCC Rules. These limits are designed
to provide reasonable protection against harmful interference when the equipment is
operated in a commercial environment. This equipment generates, uses, and can radiate
radio frequency energy and, if not installed and used in accordance with the instruction
manual, may cause harmful interference to radio communications. Operation of this
equipment in a residential area is likely to cause harmful interference in which case
the user will be required to correct the interference at his own expense.
FCC WARNING: Changes or modifications not expressly approved by
the party responsible for compliance could void the user’s authority to operate
the equipment.
E-8
This mark applies in EU countries
only.
This product is also designed for IT power
distribution system with phase-to-phase
voltage 230 V.
To use the cash register’s basic function
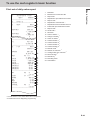
Loading memory protection batteries............................................................................. E-10
Installing paper roll............................................................................................................ E-11
Setting date, time, and tax table....................................................................................... E-13
To set Australian GST........................................................................................................ E-14
Getting to know your cash register...........................................................................E-15
General guide..................................................................................................................... E-15
To adjust the main display................................................................................................ E-16
To set the customer display.............................................................................................. E-16
To set the menu sheet........................................................................................................ E-17
Display................................................................................................................................ E-18
Keyboard............................................................................................................................. E-19
How to read the printouts.......................................................................................... E-23
How to use your cash register.................................................................................. E-24
Before opening your store......................................................................................... E-25
Checking the time and date.............................................................................................. E-25
Preparing bills and coins for change............................................................................... E-25
Registering items in departments............................................................................ E-26
Basic setups and registrations................................................................................. E-30
To program basic settings................................................................................................E-30
Programming departments............................................................................................... E-32
Registering departments’ preset data.............................................................................E-33
Programming PLUs............................................................................................................E-34
Registering PLUs’ preset data..........................................................................................E-35
Other registrations..................................................................................................... E-38
Discount..............................................................................................................................E-38
Reduction............................................................................................................................E-39
Registering various payment methods............................................................................E-40
Registering returned goods..............................................................................................E-42
Registrations without transactions..................................................................................E-44
Corrections.........................................................................................................................E-45
Daily sales reports..................................................................................................... E-48
Print out of daily sales report...........................................................................................E-49
E-9
Basic function
Getting started............................................................................................................ E-10
To use the cash register’s basic function
Getting started
This chapter shows how to setup the cash register and get it ready to operate.
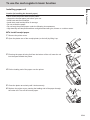
Loading memory protection batteries
Important: These batteries protect information stored in your cash register’s memory when there is a
power failure or when you unplug the cash register. Be sure to install these batteries first.
1 Remove the printer cover.
2 Remove the battery compartment cover.
3 Note the (+) and (–) markings in the battery compartment. Load a set of
two new “AA” type manganese batteries so that their plus (+) and minus
(–) ends are facing as indicated by the markings.
4 Replace the battery compartment cover and the printer cover.
Warning
•No battery is included in the accessories.
•Never try to recharge the batteries.
•Do not expose batteries to direct heat, let them become shorted or try to take them apart.
•Keep batteries out of the reach of small children. If your child should swallow a battery, consult a physician immediately.
•There is a risk of explosion if the batteries are replaced with improper type.
•Dispose of used batteries according to the instructions.
E-10
To use the cash register’s basic function
Basic function
Installing paper roll
Caution (in handling the thermal paper)
•Never touch the printer head and the platen.
•Unpack the thermal paper just before your use.
•Avoid heat and direct sunlight.
•Avoid dusty and humid places for storage.
•Do not scratch the paper.
•Do not keep the printed paper under the following circumstances:
•High humidity and temperature/direct sunlight/contact with glue, thinner or a rubber eraser.
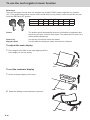
To install receipt paper
1 Remove the printer cover.
2 Open the platen arm of the receipt printer (on the left) by lifting it up.
3 Ensuring the paper is being fed from the bottom of the roll, lower the roll
into the space behind the printer.
4 Put the leading end of the paper over the printer.
5 Close the platen arm slowly until it locks securely.
6 Replace the printer cover, passing the leading end of the paper through
the cutter slot. Tear off the excess paper.
E-11
To use the cash register’s basic function
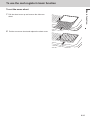
To install journal paper
1 By the same procedure of setting receipt paper, set journal paper on
the journal printer.
2Using j key, feed the paper about 20 cm.
3 Remove the paper guide of the take-up reel.
4
Slide the leading end of the paper into the groove on the spindle of the
take-up reel and wind it onto the reel two or three turns.
5
Replace the paper guide of the take-up reel.
6
Place the take-up reel into place behind the printer, above the roll
paper.
7 Press the j key to take up any slack in the paper.
8 Replace the printer cover.
E-12
To use the cash register’s basic function
Basic function
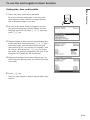
Setting date, time, and tax table
1 Plug in the power socket into a wall outlet.
Be sure to check the rating plate on the side of the
cash register to make sure that its voltage matches
that of the power supply in your area.
2 As soon as the power socket is plugged in, the dis-
play shows the language selection display. Choose
language and country by using ? or > keys then
press F key.
3 Display changes to date and time setting display. Moving the input area (reversed area) by ? or > keys,
input date, month, year and time from ten key pad.
Input the time by 24 - hour system. For example, 1356
for 1:56 pm. After then press F key. For Australian model, the setting is completed by this step To set
Australian GST, please see the next section.
4 Display then changes to tax table setting screen. Us-
ing ten key pad, input tax rates. You can set four kinds
of tax rates.
5Press F key.
Now your cash register is ready to operate basic registrations.
E-13
To use the cash register’s basic function
To set Australian GST
The following operation programs the cash register Australian GST (the Goods
and Service Tax) setting. It is not necessary to program this setting for other
countries than Australia.
Step
Operation
1 Turn the Mode switch to X position.
2 Enter the setting code “01012001” and press o key.
01012001o
3Press F key. Now your cash register complies with
F
(Pressing o key again cancels the setting.)
Australian GST. The printer prints “GST system was
changed”.
By setting Australian GST system;
•Australian special rounding system is programmed.
•Tax symbol (*) will be printed on receipts or journals.
•Taxable amount will not be printed.
•“GST INCLUDED” will be printed on receipts or journals for tax 1.
•“TAXABLE AMT” will be printed on receipts or journals for taxable 1 amount.
•“$” will be printed as the monetary symbol.
•“MOF” will be printed on receipts.
•Ten percent tax rate, add-in tax, and rounding off are programmed in tax table 1. No setting in other tax
tables.
•Other taxable amount and tax amount than TX1 (tax 1) and TA1 (taxable 1) will not be printed on sales
reports.
•The lowest significant digit is restricted to 0 or 5 for cash sales, received on account, paid out, and
money declaration amounts.
•Total line is printed even in direct (cash) sale.
E-14
To use the cash register’s basic function
Basic function
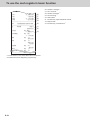
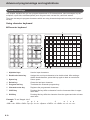
Getting to know your cash register
General guide
4
3
5
6
2
7
1
9
8
10
1
2
3
4
5
Drawer
SD card slot cover
Printer cover
Receipt printer
Journal printer
6
7
8
9
10
Customer display
Main display
Mode switch
Com port connector cover
Drawer lock
Mode switch
Use the mode keys to change the position of the mode switch and select the mode you want to use.
PGM (Programming)
This position is for setting your cash register to suit the needs of your
store.
RF (Refund)
Use this position to correct registered items.
OFF
The cash register turns off in this position.
REG (Register)
This position is for normal transactions.
X (Read)
This is the position used for issuing daily sales totals report without clearing the data.
Z (Reset)
This position is for issuing reports of daily totals with clearing the accumulated totals.
X2/Z2 (Periodic sale read/reset)
Used to obtain periodic sales reports without resetting total data.
E-15
To use the cash register’s basic function
Mode keys
There are two types of mode keys: the program key (marked “PGM”) and the operator key (marked
“OP”). The program key can be used to set the mode switch to any position, while the operator key can
select the REG and OFF position.
PGM
OP
OP key
PGM key
PGM
¡
RF
¡
OFF
¡
¡
REG
¡
¡
X
¡
Z
¡
X2/Z2
¡
Drawer
The drawer opens automatically whenever you finalize a registration and
whenever you issue a read or reset report. The drawer will not open if it is
locked with the drawer key.
Drawer key
Use this key to lock and unlock the drawer.
Magnetic plate
Use this plate for tacking the notes received from customer.
To adjust the main display
1 Put in fingers in the ditch of the main display and tilt it
to the angle you can see clearly.
To set the customer display
1 Lift the customer display until it stops.
2
E-16
Rotate the display so that customers can see it.
To use the cash register’s basic function
Basic function
To set the menu sheet
1 Pull the sheet cover up and remove the old menu
sheet.
2
Put the new menu sheet and replace the sheet cover.
E-17
To use the cash register’s basic function
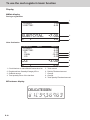
Display
Main display
During a registration
CLERK001
1 PLU001
3 DEPT001
REG
000011
•1.00
•6.00
SUBTOTAL
QT
1
2
•7.00
3
6.00
4
000011
•1.00
•6.00
•7.00
•10.00
•3.00
5
6
7
4
After finalization
CLERK001
1 PLU001
3 DEPT001
TL
CASH
CG
REG
CG
QT
1
2
3
4
•3.00
8
•10.00
9
4
Clerk Number or name/Mode/Consecutive No.
Registered item Quantity/Category/Price
Subtotal amount
Total quantity/Price of the last item
5
6
7
8
9
Total amount
Paid by/Tendered amount
Change
Change
Total quantity/Tendered amount
Customer display
DELICATESSEN
0123456'89
E-18
To use the cash register’s basic function
4
1
2
3
11
12
13
RECEIPT
FEED
JOURNAL
FEED
#/NS
MENU
SHIFT
TAX
PGM
HELP
ERR.CORR
CANCEL
RF
—
CLK #
SIGN
OFF
GUEST/
POST
RECEIPT
15
16
RECEIPT
ON/OFF
RA
PO
19
NB
NEW
/OLD
↑
18
22
14
5
6
7
8
9
10
C
%–
VAT
17
7
8
9
20
4
5
6
23
1
2
3
26
0
00
.
21
X/DATE/
TIME
↓
25
PRICE
SUBTOTAL
24
27
PLU
CA/AMT
TEND
28
29
CHK
8
16
24
32
40
48
56
64
72
7
15
23
31
39
47
55
63
71
6
14
22
30
38
46
54
62
70
5
13
21
29
37
45
53
61
69
4
12
20
28
36
44
52
60
68
3
11
19
27
35
43
51
59
67
2
10
18
26
34
42
50
58
66
1
9
17
25
33
41
49
57
65
Basic function
Keyboard
30
1
f
Hold this key down to feed receipt paper from the printer.
2
j
Hold this key down to feed journal paper from the printer.
3
N
Non-add key: Use this key to print reference number (to identify a personal check,
credit card, etc.) during a transaction. Use this function after a numeral entry.
No sale key: Use this key to open the drawer without any registration.
4
e
Use this key to correct registration errors or to cancel a transactions.
5
R
Use this key to input refunded amounts or to void preceding inputs.
6
m
Use this key to input reduction values.
7
C
Use this key to clear an entry that has not yet been registered.
8
p
Use this key to register discounts.
9
V
Use this key for printing breakdown of VAT.
10 09'^ Use these keys to input numbers.
11
@
Use this key to shift flat PLU keys to 1st to 3rd menu.
12
~
Use this key to set the tax status and tax table.
13
/
Use this key to look up the procedures to set date/time, tax table etc.
14
o
Use this key to input a clerk number.
15
16
SIGN
OFF
g
Use this key to sign clerk off the register.
Use this key to issue guest or post-finalization receipts..
E-19
To use the cash register’s basic function
17
Q
18
RA
19
]
Use this key following a numeric entry to register money paid out from the drawer.
20
S
Use this key for adding the latest registered total amount to the previous balance to
obtain a new balance.
21
Z
Use this key in a check tracking system to input check numbers in order to open new
checks and to reopen exsisting checks.
22
?
Use this key to move the cursor on the display up.
23
X
Use this key to input a quantity for a multiplication. Between transactions, pressing this
key displays the current time and date.
24
k
Use this key to register a check tendering.
25
>
Use this key to move the cursor on the display down.
26
:
Use this key to register unit prices for a PLU (subdepartment).
27
o
28
+
29
F
30
1
E-20
to
Use this key to switch issuing receipts on and off.
Use this key following a numeric entry to register money received for non-sale transactions.
Use this key to display and print the current subtotal (including tax) amount.
Use this key to input PLU (subdepartment) numbers.
72
Use this key to register a cash sale.
Use these keys to register items to departments.
To use the cash register’s basic function
You can allocate the following functions on the keyboard to suit your purpose of register. The keys shown
in < > in this manual are function allocated keys. To set these functions on the keyboard, please see
page E-111.
<Error correct / Cancel>
<Add check>
Use this key in a check tracking system to combine Use this key to correct registration errors and to
cancel registration of entire transactions.
the details of more than one check into a single
check.
<Flat-PLU>
<Addition (plus)>
Use this key to register items to flat-PLUs.
Use this key for registering surcharge.
<Help>
<Age verification>
Use this key to look up the procedures to set date/
time, tax table etc.
Use this key to enter tge birth date of the customer
for age verification.
<Manual tax>
<Arrangement>
Use this key to register a tax amount.
Use this key to activate an arrangement program
<Menu shift>
programmed in the arrangement file. Any operaUse this key to shift flat PLU keys to 1st ~ 3rd
tion that can be performed from the keyboard, as
menu.
well as mode, can be programmed in an arrange<Merchandise subtotal>
ment program, and can be performed merely by
Use this key to obtain subtotal excluding the addpressing this key. In addition, one numeric entry
on tax amount and the previous balance.
can be included in an arrangement program. In
<Multiplication>
this case, input the number and press this key.
Use this key to input a quantity for a multiplication
The mode control function of this key can be
operation. Between transactions, this key displays
programmed for all modes except for the OFF and
the current time and date.
PGM mode.
<Multiplication / For>
<Cash amount tendered>
Use this key to input a quantity for a multiplicaUse this key to register a cash sale.
tion operation and registration of split sales of
<Charge>
packaged items. Between transactions, this key
Use this key to register a charge sale.
displays the current time and date.
<Check tendered>
<New balance>
Use this key to register a check tender.
Use this key for adding the latest registered total
<Clerk number>
amount to the previous balance to obtain a new
Use this key to sign clerk on and off the register.
balance.
<Coupon>
<New check>
Use this key to register coupons.
Use this key in a check tracking system to input a
new check number in order to open a new check
<Credit>
under that number.
Use this key to register a credit sale.
<New / Old check>
<Currency exchange>
Use this key in a check tracking system to input
Use this key for calculating subtotal amounts or
check numbers in order to open new checks and
paying amount due in foreign currency.
to reopen existing checks. When the clerk inputs
<Customer number>
a check number, the register checks to see if that
Use this key to register the number of customers.
number already exists in the check tracking mem<Department>
ory. If there is no matching number in the memory,
Use these keys to register items to departments.
a new check is opened under the input number. If
<Department no. / Department shift>
the check number input matches a number already
Department no.: Use this key to input department
stored in the memory, that check is reopened for
numbers. Department shift: Use this key to shift
further registration or finalization.
the department key number.
<No sale>
<Discount>
Use this key to open the drawer between transacUse this key to register discounts.
tion.
E-21
Basic function
Allocatable functions
To use the cash register’s basic function
<Non-add>
Use this key to print reference numbers (personal
check number, card number, etc.)
<Non-add / No sale>
Non-add: Use this key to print reference number
(to identify a personal check, credit card, etc.)
during a transaction, use this key after some
numerical entries.
No sale: Use this key to open the drawer without
registering anything.
<Old check>
Use this key in a check tracking system to input the
number of an existing check (previously created
by the New check key) whose details are stored in
the check tracking memory. Existing checks are
reopened to perform further registration or to finalize them.
<Open>
Use this key to temporarily release a limitation on
the number of digits that can be input for a unit
price.
<Paid out>
Use this key following a numeric entry to register
money paid out from the drawer.
Use this key to convert the main currency to the
sub currency (the euro/the local money), when
registering a subtotal amount. This key is also
used for specifying sub currency while entering an
amount of payment or declaration in drawers.
<PLU/Subdepartment>
Use this key to input PLU (subdepartment) numbers.
<Premium>
Use this key to register premiums.
<Price>
Use this key to register unit prices for PLU (subdepartment).
<Post receipt>
Use this key to produce a guest or post-finalization
receipt.
<Receipt on/off>
Use this key twice to change the status “receipt
issue” or “no receipt.”
<Received on account>
Use this key following a numeric entry to register
money received for non-sale transactions.
<Reduction (minus)>
Use this key to input values for reduction.
<Refund>
Use this key to input refund amounts and void
certain entries.
E-22
<Sign off>
Use this key to sign clerk off the register.
<Subtotal>
Use this key to display and print the current subtotal (includes add-on tax) amount.
<Tax shift>
Use this key to change the Taxable status of the
next item.
<Tax program>
Use this key to program tax status and tax table
easily.
<Text recall (CHAR)>
Use this key to print preset characters.
<Tip>
Use this key to register tips.
<VAT>
Use this key to print a VAT breakdown.
To use the cash register’s basic function
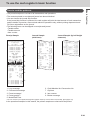
•The journal/receipts are records of all transactions and operations.
•The contents printed on receipts and journal are almost identical.
•You can choose the journal skip function.
If the journal skip function is selected, the cash register will print the total amount of each transaction,
and the details of premium, discount and reduction operations only, without printing department and
PLU item registrations on the journal.
•The following items can be skipped on receipts and journal.
•Taxable status
•Taxable amount
•Item counter
Receipt Sample
Journal Sample
(with items)
************************
* THANK YOU *
**
CALL AGAIN
**
************************
*
*
*
*
COMMERCIAL
COMMERCIAL
COMMERCIAL
COMMERCIAL
MESSAGE
MESSAGE
MESSAGE
MESSAGE
*
*
*
*
New Year
Sale
1st Anniversary
10% OFF
1
2
3
4
REG 20−06−2013 11:58
C01
0001
000123
1 DEPT001
1 DEPT002
5 DEPT003
T1
T1
•1.00
•2.00
•5.00
7 No
TA1
TX1
TL
CASH
CG
***
***
***
***
1
2
3
4
5
BOTTOM
BOTTOM
BOTTOM
BOTTOM
•3.00
•0.15
•8.15
•10.00
•1.85
MESSAGE
MESSAGE
MESSAGE
MESSAGE
***
***
***
***
5
6
7
ournal Sample (by half height
J
character)
REG 20−06−2013 11:58
C01
0001
000123
1 DEPT001
T1
•1.00
1 DEPT002
T1
•2.00
5 DEPT003
•5.00
7 No
TA1
•3.00
TX1
•0.15
TL
•8.15
CASH
•10.00
CG
•1.85
REG 20−06−2013 11:59
C01
0001
000124
1 DEPT001
T1
•1.00
1 DEPT012
T1
•1.00
5 DEPT003
•6.00
7 No
TA1
•2.00
TX1
•0.10
TL
•8.10
CASH
•10.00
CG
•1.90
REG 20−06−2013 11:59
C01
0001
000124
REG 20−06−2013 11:58
C01
0001
000123
1 DEPT001 T1
•1.00
1 DEPT002 T1
•2.00
5 DEPT003
•5.00
7 No
TA1
•3.00
TX1
•0.15
•8.15
TL
CASH
•10.00
CG
•1.85
REG 20−06−2013
11:59
C01
0001
000124
1 DEPT001 T1
•1.00
1 DEPT012 T1
•1.00
5 DEPT003
•6.00
7 No
TA1
•2.00
TX1
•0.10
•8.10
TL
CASH
•10.00
CG
•1.90
REG 20−06−2013
11:59
C01
0001
000125
8
9
Logo message
Commercial message
Preset message *
Preset graphic *
Mode/Date/Time
6
7
8
9
Clerk/Machine No./Consecutive No.
Q’ty/Item
Item counter
Bottom message
*You can choose to print preset message and graphic at the top or the bottom of the receipt. (See page E-31)
In the operation examples in this manual, the printout samples are what would be printed.
E-23
Basic function
How to read the printouts
To use the cash register’s basic function
How to use your cash register
The following describes the general procedure you should use in order to get the most out of your cash
register.
Before opening your store
•Plugged in? (page E-13)
•Enough paper roll? (pages E-11 and E-12)
•Date and time are correct? (pages E-25 and E-30)
•Enough small change in the drawer? (page E-25)
While the store is open
•Registrations (page E-26)
•Issuing latest total sales report if needed. (page E-48)
After closing the store
•Issuing day’s total sales report. (page E-48)
•Withdraw the money from the drawer.
After you withdraw all the money from the drawer, we recommend that you leave the
drawer open when you leave your store. (page E-25)
•Turn the Mode switch to OFF. (page E-15)
E-24
To use the cash register’s basic function
Basic function
Before opening your store
Checking the time and date
You can check the time or date on the display whenever there is no registration
being made.
Step
Operation
1Press X key to show the date and
X
2Press C key to clear the date/
C
Display
time on the display.
time display.
Preparing bills and coins for change
To prepare coins and bills for change, you can open the drawer by pressing n
key. This operation must be performed when registrations are not being made.
Opening the drawer by N key does not perform any calculation in the register. If you wish to
obtain a report that tells you the total amount in drawer, use RA key instead of N key. See
page E-44.
Step
Operation
1Press N. The cash drawer opens.
N
2 Prepare coins and bills in the
Printout
#/NS
•••••••••
drawer.
E-25
To use the cash register’s basic function
Registering items in departments
The following examples show how you can use the department keys in various
types of registrations.
Departments are used for categorizing items for example, department 01 for vegetables, department 02 for fruits, and department 03 for canned foods etc.
Single item sale
Sample Operation
Unit Price
Item
Payment
•1.00
Quantity
1
Dept.
01
Cash
•1.00
Step
Operation
1 Enter the unit price.
1'
2 Press corresponding department
!
3Press F key.
F
One •1.00 Dept. 01 item is sold and the customer
paid the same amount as the total amount.
Printout
1 DEPT001
TL
CASH
key.
•1.00
•1.00
•1.00
Further operations:
•For simpler operation of single item sales, see page E-54
Single item sales with change calculation
Sample Operation
Unit Price
Item
Payment
•12.34
Quantity
1
Dept.
01
Cash
•20.00
Step
Operation
1 Enter the unit price.
1234
2 Press corresponding department
!
3Press o key.
o
4 Enter the tendered amount then
20'F
key.
press F key. The display
shows the change to be paid.
E-26
One item is sold and the customer paid more than
the total amount.
Printout
1 DEPT001
TL
CASH
CG
•12.34
•12.34
•20.00
•7.66
To use the cash register’s basic function
Basic function
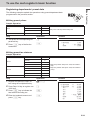
Repeat registration
Sample Operation
Unit Price
Item
Payment
•1.50
Quantity
3
Dept.
1
Cash
•10.00
Step
Operation
1 Enter the unit price.
150
2 Press corresponding department
!!!
3Press o key.
o
4 Enter the tendered amount then
10'F
Same priced multiple items are sold.
Printout
1 DEPT001
1 DEPT001
1 DEPT001
TL
CASH
CG
key repeatedly for the purchased
quantity.
•1.50
•1.50
•1.50
•4.50
•10.00
•5.50
press F key. The display
shows the change to be paid.
Multiple items registration using multiplication key
Sample Operation
Unit Price
Item
Payment
•1.00
Quantity
12
Dept.
1
Cash
•20.00
Step
Operation
1 Enter the the quantity then press
12X
2 Enter the unit price and press cor-
1'!
3Press o key.
o
4 Enter the tendered amount then
20'F
X key.
responding department key.
Twelve pieces of •1.00 item are sold and the customer paid more than the total amount.
Printout
12 DEPT001
TL
CASH
CG
•12.00
•12.00
•20.00
•8.00
press F key. The display
shows the change to be paid.
E-27
To use the cash register’s basic function
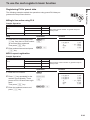
Split sales of packaged items
By using allocated <X/For/Date Time> key, you the register allows you split sales of packaged items.
Please see page E-111 for the key allocation.
Sample Operation
Unit Price
Item
Payment
4 for •10.00
Quantity
3
Dept.
1
Cash
•10.00
Three pieces of an item thats price is •10.00 for four
pieces are sold.
Step
Operation
Printout
1 Enter purchased quantity then
3<X/For/Date Time>
2 Enter the quantity of one set and
4<X/For/Date Time>
3 Enter the package price and press
10'!o
4 Enter the tendered amount and
10'F
press <X/For/Date Time> key.
press <X/For/Date Time> key.
3 DEPT001
TL
CASH
CG
•7.50
•7.50
•10.00
•2.50
corresponding department and
o keys.
press F key.
Department shift
If a key is allocated as <Dept. no./Dept. shift>, you can register items in depts. 73 through 144. To allocate <Department no./Department shift> function to a key, please see page E-111.
Sample Operation
Unit Price
Item
Payment
•1.00
Quantity
1
Dept.
73
Cash
•1.00
Department 73 is assigned by using <Dept. no./
Dept. shift> key.
Step
Operation
1 Press the key on which <Dept. no./
<Dept. no./Dept. shift>
Dept. shift> function is allocated.
1 DEPT026
TL
CASH
“SHIFT/No” will be shown at the
bottom of the display.
2 Enter the unit price and press cor-
10'!o
3Press F key to finalize the
F
responding department key. Then
press o key.
The item is registered in Dept. 73 in
this example.
transaction.
E-28
Printout
•1.00
•1.00
•1.00
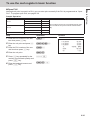
To use the cash register’s basic function
If you allocate <Dept. no./Dept. shift > function to a key, you can register items without using Department
key.
Sample Operation
Unit Price
Item
Payment
•13.00
Quantity
1
Dept.
31
Cash
•13.00
Registering an item in Dept. 31 without using
Department key.
Step
Operation
1 Enter Dept. number using ten key
31
<Dept. no./Dept. shift>
pad then press <Dept. no./Dept.
shift> key.
2 Enter the unit price and press :
13':o
3Press F key to finalize the
F
Printout
1 DEPT031
•13.00
TL
•13.00
CASH
•13.00
key. Then press o key.
The item is registered in Dept. 31 in
this example.
transaction.
E-29
Basic function
Department number entry
To use the cash register’s basic function
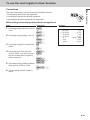
Basic setups and registrations
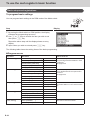
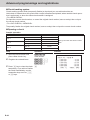
To program basic settings
You can program basic settings in the PGM mode of the Mode switch.
Step
Display
1 By turning the Mode switch to PGM position, the display
indicates the programming top menu.
2 Use ? or > keys to choose the item you wish to set
then press F key.
Repeat the above step until the display shows an entry
display.
3 Input values you wish to set and press F key.
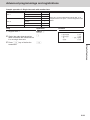
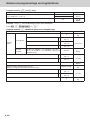
The following table shows the setting items of the basic programming.
Program menus
Top menu
Sub menu
What is to be set
[DEPT Setting]
DEPT name [DEPT0001
]
Sets name, unit price, taxable status, item
group and high amount limitation in each
department.
See page E-32.
Unit Price [ 12.00 ]
Taxable Status [NON TAX]
Group Link [03]
HAL (High amount limit) [0.00]
[PLU Setting]
PLU name [PLU0001
]
Sets name, unit price, taxable status, item
group, department link and open PLU in
each PLU.
See page E-34.
Unit Price [ 12.00 ]
Taxable Status [NON TAX]
Group Link [03]
DEPT Link [003]
Open PLU [Yes]
[Key Setting]
%-
[
]
-
RATE [ ]
CE
Taxable Status [ ]
Sets name, taxable status, and whether to
use taxable status or not in each function
key.
COUPON
[Date Setting]
TIME (24 HOUR) [19:56]
Sets date and time.
DAY [26]
MONTH [12]
YEAR 20[12]
[Clerk Setting]
Name [CLERK01
Secret No [1234]
E-30
]
Sets clerk’s name and number.
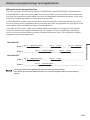
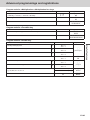
To use the cash register’s basic function
Sub menu
What is to be set
[Message Setting]
01 Logo 1
Sets logo, commercial, and bottom messages on receipts.
See page E-76.
02 Logo 2
03 Logo 3
04 Logo 4
05 Commercial 1
06 Commercial 2
07 Commercial 3
08 Commercial 4
01 Bottom 1
02 Bottom 2
03 Bottom 3
04 Bottom 4
[POP Setting]
POP Message No. 1 [ ]
POP Message No. 2 [ ]
POP Message No. 3 [ ]
Sets preset pop messages and illustration.
See page E-76.
POP Message No. 4 [ ]
POP Graphic No.[ ]
POP Print
All Message
All Graphic
[Tax Setting]
[RATE
]
[ROUND
]
[CAL TYPE ]
[General Setting]
Enable clerk
Journal 1/2 Print
Consective No. Reset [Yes]
Sets general controls of the register such
as clerk assignment, printing journal in
half size etc.
EJ clear (After Daily Z) [Yes]
EJ/Sales→SD (After XZ) [Yes]
[Water Mark Setting]
YES
NO
[SD card]
[Backup → SD]
[Restore← SD]
[Program→ SD]
[Program← SD]
Exchanges sales data, program data,
and receipt’s message data between the
register and an SD card.
See page E-127.
[SD Format ]
[Backup → Flash]
[AutoPropram→ SD]
[AutoProgram← SD]
[System Setting]
Used to set characters, functions of keys,
or calculation methods etc.
E-31
Basic function
Top menu
To use the cash register’s basic function
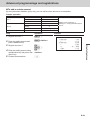
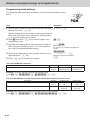
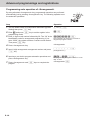
Programming departments
This section explains how you can set unit prices, taxable statuses, and item
groups. You can program each department linking to a certain group. For example, department 01 is for packed milk, department 02 is for cheese and both
belong to group 03 (dairy goods).
Sample Operation
Unit Price
Dept. 01
Taxable status
Group
•2.50
Non tax
02
Programming Dept. 01 as unit price •2.50, non taxable, belonging to Group 02.
Step
Display
1 Turn the Mode switch to PGM position. The display shows
the top screen of programming.
2Using ? or > keys, select [DEPT Setting] then press
F key. The display shows [DEPT Setting] screen.
3 Enter the department number (01 in this example) then
press F key. The display shows department selection
screen. You can change the department by using? or
> keys.
4Press F key. The display shows program input screen.
Input unit price and group link you wish to program. The
top column is for setting characters to the dept. You can
leave the column empty. If you wish to set characters now,
please see page E-72.
5 Select [Taxable Status] and press F key. The display
shows taxable status selection screen. Choose the taxable
status and press F key.
The display returns to the previous screen by pressing o key.
E-32
To use the cash register’s basic function
Basic function
Registering departments’ preset data
The following examples explain the operations using preset department data
programmed in the previous section.
Using preset prices
Sample Operation
Unit Price
Item
Payment
•2.50
Quantity
1
Dept.
02
Cash
•2.50
Step
Operation
1 Just press the corresponding De-
"
2Press F key to finalize the
F
Unit price •2.50 is preset in Dept. 02.
Printout
partment key.
1 DEPT002
TL
CASH
transaction.
•2.50
•2.50
•2.50
Using preset tax statuses
Sample Operation
Unit Price
Item 1
•2.00
Quantity
5
Dept.
03
Taxable
1
Unit Price
Item 2
•2.00
Quantity
1
Dept.
04
Taxable
Payment
2
Cash
•2.50
Step
Operation
1 Register five pieces of Dept. 03
5X#
2 Press Dept. 04 key to register one
$
3Press o key to indicate the
o
4 Enter the tendered amount and
F
item using the multiplication key.
•2.00 item.
total amount including tax.
press F key.
•Dept. 03 presets: Unit price •2.00, Tax status 1
(4%).
•Dept. 04 presets: Unit price •2.00, Tax status 2
(10%).
Printout
5 DEPT003
1 DEPT004
TA1
TX1
TA2
TX2
TL
CASH
CG
T1
T2
•10.00
•2.00
•10.00
•0.40
•2.00
•0.20
•12.60
•20.00
•7.40
E-33
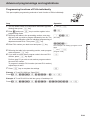
To use the cash register’s basic function
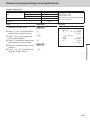
Programming PLUs
Like departments, you can program unit price, taxable status, and linking item
group in a PLU (Price Look Up). Using PLUs allow you to register items quickly
and accurately. You can use up to 7,000 PLUs.
Sample Operation
Unit Price
PLU 0014
Taxable status
Group
•2.50
Non tax
03
Programming PLU 0014 as unit price •2.50, non
taxable, belonging to Group 03.
Step
Display
1 Turn the Mode switch to PGM position. The display shows
the top screen of programming.
2Using ? or > keys, select [PLU Setting] then press
F key. The display shows [PLU Setting] screen.
3 Enter the PLU number (0014 in this example) then press
F key. The display shows [PLU Setting] screen. You
can change the PLU number by using? or > keys.
4Press F key. The display shows program input screen.
Input unit price and group link you wish to program. The
top column is for setting characters to the PLU. You can
leave the column empty. If you wish to set characters now,
please see page E-72.
5 Select [Taxable Status] and press F key. The display
shows taxable status selection screen. Choose the taxable
status and press F key.
The display returns to the previous screen by pressing o key.
E-34
To use the cash register’s basic function
Basic function
Registering PLUs’ preset data
The following examples explain the operations using preset PLU data programmed in the previous section.
Single item sales using PLU
Sample Operation
Unit Price
Item
•2.50
Quantity
1
PLU No.
Payment
14
Cash
•3.00
Step
Operation
1 Enter the PLU number and press
14+
o
+ key. One piece of PLU number
14 item has been registered.
Then press o key.
2 Enter tendered amount and press
One piece of PLU number 14 (preset unit price
•2.50) is sold.
Printout
3'F
1 PLU0014
TL
CASH
CG
•2.50
•2.50
•3.00
•0.50
F key.
PLU repeat registration
Sample Operation
Unit Price
Item
Payment
•2.50
Quantity
3
PLU No.
14
Cash
•10.00
Step
Operation
1 Enter the PLU number.
14
2Press + key repeatedly for the
+++
number of sold quantity. Three
pieces of PLU 14 have been registered.
Then press o key.
3 Enter the tendered amount and
Three pieces of PLU number 14 (preset unit price
•2.50) is sold.
o
Printout
1 PLU0014
1 PLU0014
1 PLU0014
TL
CASH
CG
•2.50
•2.50
•2.50
•7.50
•10.00
•2.50
10'F
press F key.
E-35
To use the cash register’s basic function
PLU registration with multiplication key
Sample Operation
Unit Price
Item
•2.00
Quantity
10
PLU No.
Payment
7
Cash
Ten pieces of PLU number 7 item (preset unit price
•2.00) are sold.
•20.00
Step
Operation
Printout
1 Enter the quantity sold then press
10X
X key.
Up to 9999.999 can be entered for
multiplication calculations.
10 PLU0007
TL
CASH
CG
2 Enter the PLU number and press
7+
o
3 Enter tendered amount and press
20'F
+ key.
Then press o key.
•20.00
•20.00
•20.00
•0.00
F key.
Split sales of packaged PLU item
By using allocated <X/For/Date Time> key, the register allows you split sales of packaged PLU items.
Please see page E-111 for the key allocation.
Sample Operation
Unit Price
Item
Payment
5 for •20
Quantity
3
PLU No.
28
Cash
Selling three pieces of an item that is priced •20.00
for five pieces.
•15.00
Step
Operation
1 Enter the quantity being purchased
3<X/For/Date Time>
and press <X/For/Date Time> key
for multiplication calculation. You
can enter up to 9999.999 for multiplication calculations.
3 PLU0028
TL
CASH
CG
2 Enter the packaged quantity and
5<X/For/Date Time>
3 Enter the PLU number of the item
28+
o
4 Enter the tendered amount and
15'F
press <X/For/Date Time> key. You
can enter up to 9999.999 for packaged quantity.
and press + key.
Then press o key.
press F key.
E-36
Printout
•12.00
•12.00
•15.00
•3.00
To use the cash register’s basic function
Although unit price is preset in a PLU, you can enter price manually if the PLU is programmed as “Open
PLU”. To program open PLU, see page E-30.
Sample Operation
Unit Price
Item 1
Quantity
1
PLU No.
30
Unit Price
Item 2
Payment
•32.80
•13.00
Quantity
2
PLU No.
31
Cash
PLU numbers 30 and 31 are programmed as open
PLU so that the unit prices can be entered manually.
•60.00
Step
Operation
1 Enter the PLU number of the first
30+
2 Enter the unit price and press :
3280:
3 Enter the PLU number of the sec-
31+
4 Enter the unit price.
13'
5Press : key repeatedly for the
::o
6 Enter the tendered amount and
60'F
item then press + key.
key.
ond item then press + key.
Printout
1 PLU0030
1 PLU0031
1 PLU0031
TL
CASH
CG
•32.80
•13.00
•13.00
•58.80
•60.00
•1.20
number of purchased quantity and
press o key.
press F key.
E-37
Basic function
Open PLU
To use the cash register’s basic function
Other registrations
Discount
The following example shows how you can use the p key for discount registrations.
Discounts on items and subtotals
Sample Operation
Item 1
Item 2
Discount
Subtotal discount
Payment
Dept. 01
•5.00
Quantity
1
Taxable
1 (preset)
PLU 16
•10.00 (preset)
Quantity
1
Taxable
2 (preset)
Rate
5% (preset in p)
Rate
3.5%
Taxable
Non taxable (preset)
Cash
•15.00
Step
Operation
1 Enter the unit price and correspond-
5'!
2 Enter the PLU number then press
16+
ing department key.
+ key. The preset unit price
(•10.00) is registered.
3Press p key. The discount
Five percent (preset in p key) discount on PLU number 16 (preset unit
price •10.00) and discount 3.5% on the
subtotal amount.
p
amount with the preset rate (5%) is
subtracted from the last item registered (PLU 16).
4Press o key for giving discount
o
5 Enter the discount rate manu-
3^5p
6Press o key to show the total
o
7 Enter the tendered amount and
15'F
on the subtotal amount.
ally and press p key. Discount
amount with inputted rate is subtracted from the subtotal amount.
Printout
1 DEPT001
1 PLU0016
5%
%ST
3.5%
%TL
CASH
CG
T1
T2
T2
•5.00
•10.00
-0.50
•14.50
-0.51
•13.99
•15.00
•1.01
Printout differs depending on preset tax
statuses.
amount including tax and discounts.
press F key.
•When you perform a discount operation on the last item registered, the tax of discount amount
is calculated in accordance with the tax status programmed to the item.
•When you perform a discount operation on a subtotal amount, the tax of discount amount from
subtotal is calculated in accordance with the tax status programmed in the p key.
•To program discount rate in p key, please see page E-30.
E-38
To use the cash register’s basic function
Basic function
Reduction
Using the reduction feature, you can subtract a certain amount from an item’s unit
price or from a subtotal amount.
Sample Operation
Item 1
Dept. 01
•5.00
Quantity
1
Taxable
1 (preset)
Reduction
Item 2
Subtotal
•0.25
PLU 45
•6.00 (preset)
Quantity
1
Taxable
1 (preset)
Reduction
•0.50 (preset)
Reduction
•0.75
Taxable
Payment
•Reducing •0.25 (manual input) from
item 1 unit price.
•Reducing •0.50 (preset amount) from
item 2.
•Reducing •0.75 (manual input) from
subtotal amount.
Non taxable (preset)
Cash
•10.00
Step
Operation
1 Register item 1 by inputting the unit
500!
2 Enter reduction amount manually
25m
3 Register item 2 by inputting the PLU
45+
4Press m key. Pressing m key
m
Printout
price and department key.
1 DEPT001
−
1 PLU0045
−
−
TL
CASH
CG
and press m key. •0.25 is subtracted from the unit price.
number and + key.
without numeral entry subtracts the
preset reduction amount (•0.50 in
this example) from the PLU’s unit
price.
T1
T1
T1
T1
•5.00
−0.25
•6.00
−0.50
−0.75
•9.50
•10.00
•0.50
Printout differs depending on preset tax
statuses.
5Press o key for reducing
o
6 Enter reduction amount manually
75m
7 Enter the tendered amount then
10'F
amount from the subtotal.
then press m key. The inputted
amount is subtracted from the subtotal amount.
press F key.
•You can input up to seven digits reduction amount manually.
•To program preset reduction amount, please see page E-30.
E-39
To use the cash register’s basic function
Registering various payment methods
Other than cash payments, you can register transactions made by checks,
charges, credits, or even mixed tendering.
Check sale
Sample Operation
Item
Unit Price
Quantity
Reference no. of check
Payment
•11.00
1
1234
Check
A •11.00 item is sold and customer paid by •20.00
check (check number 1234).
•20.00
Step
Operation
Printout
1 Register the item purchased.
11'!
2 If you wish to record reference num-
1234N
3 Enter the paid amount then press
20'k
ber such as a check number, enter
the number then press N key.
1 DEPT001
#
TL
CHECK
CG
•11.00
1234
•11.00
•20.00
•9.00
k key.
Charge sale
If <Charge> function is allocated to a key, you can register a charge sale. To allocate <Charge> function
on a key, please see page E-111.
Sample Operation
Item
Payment
Dept. 04
•15.00
Quantity
1
Charge
•15.00
A purchased item is transacted by charge sale.
Step
Operation
1 Register the item purchased and
15'$o
2 Press <Charge> key to finalize the
<Charge>
press o key.
charge transaction.
E-40
Printout
1 DEPT004
TL
CHARGE
•15.00
•15.00
•15.00
To use the cash register’s basic function
Basic function
Credit sale
Sample Operation
Item
Payment
Dept. 03
•10.00
Quantity
1
Credit
A purchased item is paid by a credit card.
•10.00
Step
Operation
Printout
1 Register the item purchased and
10'#o
2Press c key to finalize the trans-
c
press o key.
1 DEPT003
TL
CREDIT
action.
•10.00
•10.00
•10.00
Mixed payments (cash and check)
Sample Operation
Item
Payment
Dept. 04
•55.00
Quantity
1
Check
•30.00
Cash
•25.00
Customer paid •30.00 by check and the rest in cash
for •55.00 item.
Step
Operation
1 Register the item purchased and
55'$o
2 Enter the amount paid by a check
30'k
press o key.
then press k key.
3 Enter the paid cash amount then
25'F
Printout
1 DEPT004
TL
CHECK
CASH
CG
•55.00
•55.00
•30.00
•25.00
•0.00
press F key.
E-41
To use the cash register’s basic function
Registering returned goods
Registering returned goods in the REG mode
The following example shows how to operate for registering goods returned by
customer in the REG mode.
Sample Operation
Item 1
Item 2
Item 3
Refunded Item 1
Refunded Item 3
Payment
Dept. 01
•2.35
Quantity
1
Dept. 02
•2.00
Quantity
1
PLU 001
•1.20 (preset)
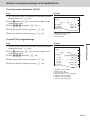
Quantity
1
Dept. 01
•2.35
Quantity
1
PLU 0001
•1.20 (preset)
Quantity
1
Cash
•2.00
Step
Operation
1 Register purchased item 1.
235!
2 Register purchased item 2.
2'"
3 Register purchased item 3.
1+
4Press R key prior to registering
R
5 Register returned item 1.
235!
6Press R key and register returned
R1+o
7Press F key as the customer
F
returned item 1.
item 3.
Then press o key.
paid exact amount.
E-42
Customer returned items 1 and 3 during the registration.
Printout
1 DEPT001
1 DEPT002
1 PLU0001
RF
1 DEPT001
RF
1 PLU0001
TL
CASH
•2.35
•2.00
•1.20
••••••••
−2.35
••••••••
−1.20
•2.00
•2.00
To use the cash register’s basic function
Basic function
Registering returned goods in the RF mode
When a customer returns goods after the transaction has been completed, use
RF mode for the refund operation.
Sample Operation
Refunded Item 1
Refunded Item 2
Dept. 03
•4.00
Quantity
1
Reduced
•0.15
PLU 002
•1.20 (preset)
Quantity
1
Discounted
Payment
5% (preset)
Cash
Step
A customer returned two items. Item 1
was sold with •0.15 reduction and item
2 was sold with pre-programmed 5%
discount.
•4.99
Operation
Printout
1 Turn the Mode switch to RF position.
2 Register the returned items by the 4'#
same operations as normal registra- 15m
tion and press o key.
2+
p
o
3Press F key and pay the total F
amount back to the customer.
1 DEPT003
−
1 PLU0002
5%
%−
TL
CASH
•4.00
−0.15
•1.20
−0.06
•4.99
•4.99
Important
•After the refund operation, please do not forget to return the Mode switch to REG position otherwise the
following registrations are stored as minus transactions.
E-43
To use the cash register’s basic function
Registrations without transactions
The followings are the operations other than normal sales transactions. Please do
not perform these operations during a sales transaction.
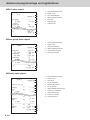
Registering money received on account
Use this operation when you put money in the drawer without any sales transactions such case as preparing change.
Sample Operation
Received amount
Prepared •70.00 in the drawer for change before opening the
store.
•70.00
Step
Operation
1 Enter the amount put in the drawer
70'
then press
RA
key.
Printout
RA
RA
$70.00
Registering money paid out from the drawer.
Use this operation when you withdraw money from the drawer without any sales transactions such case
as paying for a cash-on-delivery item.
Sample Operation
Paid out amount
•1.50
Paying •1.50 from the drawer.
Step
Operation
1 Enter the amount withdrawn from
150]
the drawer then press ] key.
Printout
PO
$1.50
Opening the drawer without putting money in or out
Use this operation to open the drawer without putting money in or out. The number of N key operations
will be printed on X or Z reports.
Step
Operation
1 Just press N key. The drawer
N
opens.
E-44
Printout
#/NS
•••••••••
To use the cash register’s basic function
Basic function
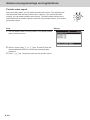
Corrections
There are three ways to correct erroneous operations that are;
•Correcting erroneous item not registered
•Correcting erroneous item already registered
•Cancelling all the items registered in a transaction
Correcting erroneously entered item not registered
Step
Operation
1 Correcting wrong unit price •2.00 to
2'
C
1'!
12X
C
11X
2'"
2
C
3+
15+
6'
C
15+
10':
10'
C
15'F
m
•1.00.
2 Correcting wrong quantity 12 to 11.
3 Correcting wrong PLU number 002
to 003.
4 Correcting open PLU unit price
•6.00 to •10.00. You must re-enter
the PLU number prior to entering
correct unit price.
5 Correcting wrong partially tendered
cash amount •10.00 to •15.00.
6 The remaining amount is paid by
Printout
1
11
1
1
DEPT001
DEPT002
PLU0003
PLU0015
TL
CASH
CHECK
•1.00
•22.00
•1.30
•10.00
•34.30
•15.00
•19.30
check.
E-45
To use the cash register’s basic function
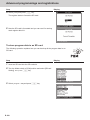
Correcting items immediately after the registration
Step
Operation
1 Registering an item.
1'!
2 By mistake, Dept. key has been
2'""
e
3 Cancelling wrong PLU registration
2+e
5+
pressed twice so cancelling the
preceding registration by e key.
(PLU No. 2) and re-registering correct PLU (PLU No. 5).
4 Cancelling a registration of an open
15+
PLU’s (PLU No. 15) wrong unit price 6':e
•6.00 and re-registering the item
15+
with the correct unit price •10.00.
10':
5 Cancelling a registration of an item 8X
with wrong quantity (8 pieces) and
4'$e
re-registering the item with the cor- 6X
rect quantity (6 pieces).
4'$
o
6 The remaining amount is paid by
check.
50p
Cancelling wrong subtotal discount eo
calculation (with rate of 50%) and
5p
re-calculating the discount amount
with the correct rate (5%).
R2'"
7 Cancelling wrong refund amount
(•2.00) and re-registering correct
e
amount (•2.20).
R220"
o
8 Getting the subtotal amount.
9 Cancelling partially tendered cash
20'F
amount (•20.00) and re-registering
e
correct amount (•15.00).
15'F
10The customer paid the balance due m
by check.
E-46
Printout
1 DEPT001
1 DEPT002
1 DEPT002
CORR
1 PLU0002
CORR
1 PLU0005
1 PLU0015
CORR
1 PLU0015
8 DEPT004
CORR
6 DEPT004
ST
50%
%−
CORR
ST
5%
%−
RF
1 DEPT
CORR
RF
1 DEPT002
TL
CASH
CORR
CASH
CHECK
•1.00
•2.00
•2.00
−2.00
•2.00
−2.00
•1.50
•6.00
−6.00
•10.00
•32.00
−32.00
•24.00
•38.50
−19.25
•19.25
•38.50
−1.93
•••••••••
−2.00
•2.00
•••••••••
−2.20
•34.37
•20.00
−20.00
•15.00
•19.37
Corrected items are not printed on
receipt if programmed as “Buffered
receipt printing”.
To use the cash register’s basic function
Step
Basic function
Voiding an item which has been already registered
Display
1 During a registration.
2Using ? or > keys, select the item you have misregistered.
3Press F key. The selected item is voided.
Cancelling all items in a transaction
Step
Display
1Press o key after items have been registered then
press e key.
2 Select [YES] on the pop up display.
3Press F key. The registered items are cancelled.
E-47
To use the cash register’s basic function
Daily sales reports
At the end of the business day, you can print categorized and summarized results
of the day. Reset report (Z) clears all the sales data whereas the data remains in
memory by Read report (X).
Please do not perform the Reset report (Z) printing while your store is open. It clears all the
sales data.
Step
1 Turn the Mode switch to X or Z position. The display shows
top display of sales reports.
2 Select [DAILY Z] (DAILY X when you set the Mode switch
to X) and press F key. The printer prints a sales
report.
Further operations:
•For individual reports, please see page E-119.
E-48
Display
To use the cash register’s basic function
20−06−2013 17:00
0001
000231
−−−−−−−−−−−−−−−−−−−−−−−−
Z
DAILY Z
−−−−−−−−−−−−−−−−−−−−−−−−
Z
DEPT
0001
0001015
1
2
DEPT001
6
Z
203.25
•1,108.54
DEPT002
183
•1,362.26
DEPT008
5
•17.22
−−−−−−−−−−−−−−−−−−−−−−−−
TL
421.25
•2,872.28
−−−−−−−−−−−−−−−−−−−−−−−−
Z
FIX
0001
0001011
GROSS
981.25
•6,574.40
NET
No 111
•7,057.14
CAID
•1,919.04
CHID
•139.04
CKID
•859.85
CRID(1)
•709.85
CRID(2)
•0.00
CRID(3)
•0.00
CRID(4)
•0.00
−−−−−−−−−−−−−−−−−−−−−−−−
RF
No
3
•10.22
CUST
CT 111
AVRG
•63.57
DC
•1.22
REF
•2.42
ROUND
•0.00
CANCEL
No
2
•12.97
−−−−−−−−−−−−−−−−−−−−−−−−
3
4
5
7
8
9
10
11
12
13
14
15
16
17
18
1
2
3
4
5
6
7
8
9
10
11
12
13
14
15
16
17
18
19
20
21
22
23
Basic function
Print out of daily sales report
Date/time
Machine No./consecutive No.
Report title
Department report title/reset counter
Report code
Department count/amount *1
Department total count/total amount
Fixed total report title/reset counter
Report code
Gross total *2
Net total *2
Cash in drawer *2
Charge in drawer *2
Check in drawer *2
Credit in drawer 1 *2
Credit in drawer 2 *2
Credit in drawer 3 *2
Credit in drawer 4 *2
Refund mode *2
Number of customer *2
Average sales per customer *2
Discount total *2
Refund key *2
24 Rounding total *2
25 Cancellation
19
20
21
22
23
24
25
*1 If total amount is zero, these items will not be printed.
*2 These items can be skipped by programming.
E-49
To use the cash register’s basic function
TA1
•2,369.69
TX1
•128.86
TA2
•2,172.96
TX2
•217.33
−−−−−−−−−−−−−−−−−−−−−−−−
GT
•00000000125478.96
−−−−−−−−−−−−−−−−−−−−−−−−
Z
TRANS
0001
0001012
CASH
No 362
•1,638.04
CHARGE
No 56
•1,174.85
RA
No
4
•810.00
PO
No
5
•520.00
•5.00
CORR
No 14
•39.55
RCT
No
3
NS
No
5
−−−−−−−−−−−−−−−−−−−−−−−−
26
27
28
29
30
31
32
33
*1 If total amount is zero, these items will not be printed.
*2 These items can be skipped by programming.
E-50
26
27
28
29
30
31
32
33
Taxable 1 amount *2
Tax 1 amount *2
Taxable 2 amount *2
Tax 2 amount *2
Grand total *2
Function key report title/reset counter
Report code
Function key count/amount *1
Advanced programmings and registrations
Advanced registrations.........................................................................................................E-52
Enabling clerk assignment.............................................................................................................E-52
Registrations with clerk assignment.............................................................................................E-53
Single item cash sales....................................................................................................................E-54
Other operations..............................................................................................................................E-56
Character settings.................................................................................................................. E-72
Using character keyboard.............................................................................................................. E-72
Using ten key pad............................................................................................................................ E-73
Setting characters........................................................................................................................... E-75
Setting pop messages on receipts................................................................................................ E-76
Advanced programmings...................................................................................................... E-81
Setting symbol characters............................................................................................................. E-78
Programming detail settings..........................................................................................................E-82
Programming functions of departments and PLUs in a lump...........................................E-94
Programming department and flat PLU functions in a lump......................................................E-94
Programming PLU functions in a lump.........................................................................................E-96
Programming functions of departments individually..................................................................E-97
Programming functions of PLUs individually...............................................................................E-99
Programming functions of transaction keys.............................................................................. E-100
Programming further clerk functions.......................................................................................... E-107
Programming auto operation of <Arrangement>....................................................................... E-110
Printing programmed data...................................................................................................E-113
To print programmed unit price or percentage (other than PLU)............................................. E-113
To print programmed characters (except PLUs)........................................................................ E-114
To print general programming (except PLUs)............................................................................. E-115
To print preset unit price of PLU.................................................................................................. E-116
To print preset characters of PLU................................................................................................ E-117
To print PLU programmings......................................................................................................... E-117
To print key allocation program................................................................................................... E-118
Printing various sales reports..............................................................................................E-119
Printing various sales reports...................................................................................................... E-119
To print individual department, PLU, and Flat PLU.................................................................... E-123
Periodic sales report..................................................................................................................... E-124
Using an SD card.................................................................................................................. E-127
To format an SD card..................................................................................................................... E-127
To store program data in an SD card........................................................................................... E-128
Before you consider it as a problem.................................................................................. E-130
Error code table............................................................................................................................. E-130
When “EJ FULL” sign appears on the display............................................................................ E-132
In case of power failure................................................................................................................. E-132
In case the register is locked up.................................................................................................. E-132
About the low battery indicator................................................................................................... E-133
Specifications....................................................................................................................... E-134
E-51
Useful features
Programming functions of departments and PLUs individually....................................... E-97
Advanced programmings and registrations
Advanced registrations
Enabling clerk assignment
By assigning a clerk, clerk number or name will be printed on receipts. The following operation enables the register to use the clerk assignment.
Step
Operation
1 Turn the Mode switch to PGM position. The display shows
programming top menu.
2Using ? and > keys, select [System Setting] and press
F key. [System Setting] is the last column on the programming top menu and is not shown on the first screen.
Keep pressing > key until it appears on the screen.
3Enter 3 from ten key pad then press o key. This
3o
4Enter 2722 from ten key pad and press o
2722o
5Enter 4 and eight zeros from the ten key pad then press
400000000F
operation sets the register in program mode.
key. Number 2722 is the program code for clerk assignment setting.
F key. Number 400000000 is the set code to enable
clerk assignment.
If you wish to disable the clerk assignment feature later on,
perform these steps and enter nine zeros in this step.
6Press o key to complete the setting.
o
You can also program fro enabling clerk operations by detail setting program. Please see page
E-91 “Set code 27”.
E-52
Advanced programmings and registrations
Registrations with clerk assignment
By signing a clerk on, the clerk name will be printed on receipts and sales reports.
Step
Operation
1 Enter the clerk number and
1o
press o key.
*
2 Perform registration operations.
The clerk name is printed on
receipts and displayed on top of
the display.
press o key. Or just press
key.
commercial message
REG
C01
20−06−2013 11:58
0001
000123
1 DEPT01
0o
*
T1
1
•1.00
1: Clerk Name/Machine No./Consecutive No.
SIGN
OFF
•During a registration, another clerk can take over the transaction. Enter another clerk’s clerk
number during a registration and press o key. The display shows the confirmation display.
Select [YES] then press F key.
•The clerk number is cleared when the Mode switch is turned to OFF position.
Further operation:
You can sign on the register by clerk’s secret number instead of clerk number. Also you can set characters for clerks’ names. To set clerks’ secret numbers and names, see page E-30.
E-53
Useful features
3 To sign a clerk off, enter 0 and
Printout
Advanced programmings and registrations
Single item cash sales
A department key or a PLU programmed as single item sale status finalizes the
transaction as soon as it is registered. This feature can be used only in cash
sales. To program single item sales status see pages E-97 and E-98.
Sample operation 1: Simple single item sale
Item
Dept. 01
•1.00
Quantity
1
Dept. 01 is programmed as single item sale and unit
Single item price is not preset.
Preset
Payment
Cash
•1.00
Step
Operation
1 Enter the unit price then press cor-
1'!
Printout
responding department key. The
transaction is finalized immediately
after the department key depression.
1 DEPT001
TL
CASH
•1.00
•1.00
•1.00
Sample operation 2: Single item sale with multiplication
Dept. 01
Item
•1.00
Selling three pieces of items of dept. 01 in which
unit price •1.00 and single item sale status is preSingle item programmed.
•3.00
Quantity
3
Preset
Payment
Cash
Step
Operation
1 Enter the quantity and press X
3X
2 Press corresponding department
!
key for multiplication.
key. The transaction is finalized immediately.
E-54
Printout
3 DEPT001
TL
CASH
•3.00
•3.00
•3.00
Advanced programmings and registrations
Sample operation 3: Single item sale with another item
Item 1
Dept. 03
•2.00
Quantity
1
Preset
Item 2
Payment
Normal
Dept. 01
•1.00
Quantity
1
Preset
Single item
Cash
•3.00
Step
Operation
1 Register item 1.
2'#
2 Single item sale department key
!
3Press F key to finalize the
F
does not finalize the transaction as
it is not single item sale.
Dept. 03 is a normal department while dept. 01 is
programmed as unit price •1.00 and single item sale
status.
Printout
1 DEPT003
1 DEPT001
TL
CASH
•2.00
•1.00
•3.00
•3.00
Useful features
transaction.
E-55
Advanced programmings and registrations
Other operations
Transactions with coupons
If <Coupon> function is allocated on a key, you can register items with coupons.
To allocate <Coupon> function on a key, please see page E-111.
Sample operation
Item 1
Item 2
Payment
Dept. 01
•3.00
Quantity
2
Coupon.
•0.50 × 2
Dept. 03
•4.00
Quantity
1
Coupon.
•1.00 (preset)
Cash
Customer paid two •0.50 coupons for
item 1 and a •1.00 coupon for item 2.
Amount•1.00 is preprogrammed in
<Coupon> key.
•8.00
Step
Operation
1 Register the item 1.
2X3'!
2 Use multiplication key for the
2X
3 Enter the amount of a coupon
50<Coupon>
4 Register item 2.
4'#
5Without entering a price of a
<Coupon>
6Press F key to finalize the
F
number of coupons.
and press <Coupon> key.
Printout
2 DEPT001
COUPON
1 DEPT003
COUPON
TL
CASH
•6.00
-1.00
•4.00
-1.00
•8.00
•8.00
coupon, press <Coupon> key for
preset coupon price.
transaction.
An error occurs if the register is programmed to prohibit credit balance and the result of a
calculation is negative.
E-56
Advanced programmings and registrations
Transactions with premium
If <Premium> function is allocated on a key, you can add premiums on items or on the subtotal. To allocate <Premium> function on a key, please see page E-111.
Sample operation
Dept. 01
•1.00
Quantity
1
Premium.
10%
Dept. 01
•2.00
Quantity
3
Subtotal
Premium.
15% (preset)
Payment
Cash
Item 1
Item 2
•8.17
Operation
1 Register the item 1.
1'!
2
10<Premium>
3 Register the item 2
3X2'!
4Press o key.
o
5 Press <Premium> key. Prepro-
<Premium>
6Press F key to finalize the
F
Printout
1 DEPT001
10%
%+
3 DEPT001
ST
15%
%+
TL
CASH
•1.00
Useful features
Step
Enter premium rate and press
<Premium> key.
•10% premium is added to item1.
•15% (preprogrammed in <Premium>
key) is added to the subtotal amount.
•0.10
•6.00
•7.10
•1.07
•8.17
•8.17
grammed premium rate will be
added to the subtotal.
transaction.
E-57
Advanced programmings and registrations
VAT breakdown printing
You can force printing of VAT breakdown at the finalize stage, regardless of whether the cash register is
programmed to print or skip printing of the VAT breakdown.
Please note that you need to allocate <VAT> function to a key. See page E-111.
Sample operation
Item 1
Item 2
Payment
Dept. 01
•1.00
Taxable status
1 (preset)
PLU 0001
•2.00 (preset)
Taxable status
2 (preset)
Cash
•3.00
Step
Operation
1 Register the item 1.
1'!
2
1+
Register the item 2
3Press V key to print break-
V
4Press F key to finalize the
F
downs of taxes.
transaction.
E-58
•Dept. 01 is programmed as taxable
1 and PLU 0001 is programmed as
taxable 2.
•Printing breakdowns of those taxes.
Printout
1 DEPT001
1 PLU0001
TA1
TX1
TA2
TX2
TL
CASH
T1
T2
•1.00
•2.00
•0.90
•0.10
•1.90
•0.10
•3.00
•3.00
Advanced programmings and registrations
Age verification
This function prohibits to register items if the customer is under the preprogrammed age.
Please note that you need to allocate <Age verification> function to a key. See page E-111.
Sample operation
Item 1
Dept. 01
•1.00
Quantity
1
Age limitation.
18
Dept. 03
Item 2
Payment
•2.00
Quantity
1
Age limitation.
20
Cash
•1.00
•Item 1’s age limitation is 18 and item
2’s age limitation is 20.
•Customer’s age is 18 so he or she is
able to purchase the item 1 but not
the item 2.
Customer’s birth date: May 03, 1995
Present date: April 03, 2013
Step
Operation
1 Register the item 1. The display
1'!
3 Register the item 1. The item is
0503
1995
<Age verification>
1'!
4 Register item 2. The display
2'#
5 Finalize the transaction.
F
Enter the customer’s birth date.
1 DEPT001
1 PLU0001
TA1
TX1
TA2
TX2
TL
CASH
Useful features
2
shows “PLEASE ENTER
BIRTHDATE”. The item 1 is not
registered yet.
Printout
T1
T2
•1.00
•2.00
•0.90
•0.10
•1.90
•0.10
•3.00
•3.00
registered.
shows “AGE DOES NOT PERMIT PRODUCT PURCHASE”
and you cannot register the item.
E-59
Advanced programmings and registrations
Check tracking system
Check tracking system holds (temporarily finalize) a check and you can add orders later on.
Held check is cleared when the guest check receipt is finalized and printed, when new/old check operation is performed, or when the same check number is assigned.
•For <NEW CHECK>
Re-input the correct check number, or cancel the original check number, issue a receipt, then re-input
the correct check number.
•For <OLD CHECK>, <NEW/OLD>
Temporarily finalize the original check number, issue a receipt, then re-input the correct check number.
Opening a check
Sample operation
Check number
Item 1
Item 2
Item 3
1234
Dept. 01
•10.00
Quantity
2
Dept. 02
•20.00
Quantity
2
Dept. 03
•30.00
Quantity
1
Step
Operation
Taking new order with check number
1234.
Printout
1 Input the check number and
1234
press <New check> key.
<New check>
10'!!
2 Register the ordered items.
20'""
30'#
3Press S key to close the check S
temporarily. If you wish to finalize
the check immediately, use the
transaction keys such as F
or k keys.
E-60
CHECK No.1234
1 DEPT001
•10.00
1 DEPT001
•10.00
1 DEPT002
•20.00
1 DEPT002
•20.00
1 DEPT003
•30.00
SRVC TL •90.00
Advanced programmings and registrations
Adding orders to a held check
Sample operation
Check number
Item 1
Item 2
1234
Dept. 01
•30.00
Quantity
1
Dept. 02
•10.00
Quantity
1
Step
Operation
Taking additional orders on the check
number 1234.
Printout
1 Input the check number and
CT
CHECK No.1234
1
ST
•90.00
1 DEPT001
•30.00
1 DEPT002
•10.00
SRVC TL
•130.00
Useful features
1234
press <Old check> key.
<Old check>
2 Register the additionally ordered 30'!
items.
10'"
3Press S key to close the check S
temporarily. If you wish to finalize
the check immediately, use the
transaction keys such as F
or k keys.
Issuing a guest check
Guest check shows the balance of a held (not finalized) check.
Step
Operation
1 Input the check number and
1234g
press g key.
Printout
CT
1
CHECK No.1234
1 DEPT001
•10.00
1 DEPT001
•10.00
1 DEPT002
•20.00
1 DEPT002
•20.00
1 DEPT003
•30.00
1 DEPT001
•30.00
1 DEPT002
•10.00
SRVC TL
•130.00
E-61
Advanced programmings and registrations
Closing a held check
Step
Operation
1 Input the check number and
1234
<Old check>
150'F
press <Old check> key.
2 Enter tendered amount and
Printout
CT
CHECK No.1234
press F key to close the
check.
ST
TL
CASH
CG
1
•130.00
•130.00
•150.00
•20.00
About Z key
The Z key works as the same function as <New check> when a new check is opened with a check
number which the same number is not existed.
When a check number is entered and if there is a held check with the same number, the Z button
works as the same function as <Old check> key.
Adding checks together
Using <Add check> key, you can add two or more held checks together.
Sample operation
Check 1
Check 2
Check No.
1234
Subtotal
•20.00
Check No.
3456
Subtotal
•30.00
Step
Operation
1 Input the check number and
1234
<Old check>
3456
<Add check>
press <Old check> key.
2 Input the number of adding
check and press <Add check>
key.
3Press S key to close the check
temporarily. If you wish to finalize
the check immediately, use the
transaction keys such as F
or k keys.
E-62
Putting check numbers 1234 and 3456
together.
S
Printout
CT
CHECK No.1234
1
ST
•20.00
ADD CHK
3456
ST
•30.00
SRVC TL• •50.00
Advanced programmings and registrations
About Flat PLU
If <Flat PLU> keys are allocated on the keyboard, you can use them as the same function as department
keys.
Instead of using department keys !"....., use flat PLU keys ()...... and use @ key instead of
<Dept. no./Dept. shift> key.
Text recall
If <Text recall> key is allocated, you can recall a stored text and print it on receipts or journals.
Sample operation
Check 1
Check 2
Check No.
1234
Subtotal
•20.00
Check No.
3456
Subtotal
Putting check numbers 1234 and 3456
together.
•30.00
Operation
1 Register the item 1.
46'!
2 Recall text 1.
1<Text recal>
3 Register the item 2.
10'"
4 Recall text 2.
2<Text recal>
5 Finalize the transaction.
oF
Printout
CT
3
1 DEPT001
•46.00
MEDIUM SIZE
1 DEPT002
•10.00
SMALL SIZE
TL
•56.00
CASH
•56.00
Useful features
Step
E-63
Advanced programmings and registrations
Inputting number of customers
If <Customer number> function is allocated on the keyboard, you can print the number of customers.
Sample operation
Item 1
Item 2
Unit price
•15.00
Dept.
01
Unit price
•5.00
Dept.
02
Number of customers
Payment
2
Cash
•20.00
Step
Operation
1 Input the number of customers
2<Customer number>
and press <Customer number>
key.
2 Register the items.
3Press o key.
15'!
5'"
o
4 Finalize the transaction.
F
E-64
Printing number of customers on a
receipt/journal.
Printout
CT
2
1 DEPT001
•15.00
1 DEPT002
•5.00
TL
•20.00
CASH
•20.00
Advanced programmings and registrations
Abount clerk interrupt function
There are two types of clerk interrupt function, PROCEDURE 1 and PROCEDURE 2 illustrated below.
In PROCEDURE 1, each clerk has a unique clerk interrupt buffer (memory), and the clerk interrupt function gives each individual clerk the ability to perform an independent registration operations. In this case,
each clerk is individually linked to a unique clerk interrupt buffer.
In PROCEDURE 2, multiple clerks use the same clerk interrupt buffer, and single clerk interrupt operation (clerk change during registration) can be performed even when any registration is in progress. In this
case, multiple clerks are linked to a single clerk interrupt buffer.
In the REG and RF modes, clerks can be changed while a transaction is in progress so that multiple
clerks can operate single register simultaneously. For example, if clerk 1 is registering a transaction,
clerk 2 can use the same machine to register a different transaction. Clerk 1 can continue the original
registration from the interrupted point.
PROCEDURE 1
Sign on
<NEW BALANCE>
Registration A
Sign on
Clerk 2
Sign on
<CASH>
Sign on
Finalization A
<NEW BALANCE>
Registration B
<RECEIPT>
Post receipt A
Sign on
<CASH>
Finalization B
PROCEDURE 2
Clerk 1
Clerk 2
Sign on
<NEW BALANCE>
Registration A
Sign on
Sign on
<CASH>
Finalization A+B
<NEW BALANCE>
Registration B
•The register must be programmed to allow the clerk interrupt function.
•You cannot use the clerk interrupt function on a register together with the check tracking
system.
E-65
Useful features
Clerk 1
Advanced programmings and registrations
Condiment/preparation PLUs
By programming, you can force the register to input condiment PLU or preparation PLU together with
main PLU. For the programming, please see pages E-97 and E-98.
Sample operation 1
Main PLU
Condiment PLUs
Payment
PLU0001
•10.00
PLU0011
•0.10
PLU0012
•0.20
PLU0013
•0.30
Cash
•10.60
Step
Operation
1 Register the main PLU item.
1+
2 Register condiment PLUs. If a
11+
12+
13+
F
condiment PLU is not registered,
an error occurs.
3 Finalize the transaction.
Registering main PLU0001 with condiment PLUs 0011, 0012, and 0013..
Printout
1 PLU0001
•10.00
PLU0011
•0.10
PLU0012
•0.20
PLU0013
•0.30
TL
•10.60
CASH
•10.60
Sample operation 2
Main PLU
Condiment PLUs
Payment
PLU0020
•20.00
PLU0021
•0.00
PLU0022
•0.00
PLU0023
•0.00
Cash
•20.00
Step
Operation
1 Register the main PLU item.
20+
2 Register preparation PLUs. If
21+
22+
23+
F
a preparation PLU is not registered, an error occurs.
3 Finalize the transaction.
E-66
Registering main PLU0020 with condiment PLUs 0021, 0022, and 0023.
Printout
1 PLU0020
•20.00
PLU0021
PLU0022
PLU0023
TL
•20.00
CASH
•20.00
Advanced programmings and registrations
Set menu
When a set menu is registered, the register stores the sales data of the menu but also stores sales data
(amount, quantity) of items in the set in respective PLU memory.
Sample operation
Set menu
Items in the set
Payment
PLU0035
•5.00
PLU0001
-
PLU0002
-
PLU0003
-
PLU0004
-
Cash
Registering a set menu.
Items in the set will be registered in
the respective PLU automatically.
•5.00
Step
Operation
1 Register the set menu.
35+
2 Finalize the transaction.
F
Printout
•5.00
Useful features
1 PLU0035
PLU0001
PLU0002
PLU0003
PLU0004
TL
CASH
•5.00
•5.00
Tips
By usein allocated <Tips> key, you can register and print the amount of tips.
Sample operation
Item 1
Item 2
Unit price
•3.00
Dept.
01
Unit price
•5.00
Dept.
02
Tip
Payment
A customer gave •0.80 tip to the clerk.
•0.80
Cash
•10.00
Step
Operation
1 Register items.
2Press o key.
3'!
5'"
o
3 Input the amount of the tip..
80<Tips>
4 Finalize the transaction.
F
Printout
1 DEPT001
1 DEPT002
TIP
TL
CASH
CG
•3.00
•5.00
•0.80
•8.80
•10.00
•1.20
E-67
Advanced programmings and registrations
Registrations with <Arrangement> key
By using allocated <Arrangement> key, the register performs programmed functions automatically.
Sample operation 1
Arrangement 1
Item 1
Item 2
Payment
PLU0001
•8.00 (preset)
Quantity
1
PLU0002
•5.00 (preset)
Quantity
1
Cash
Arrangement 1 is programmed as
selling one PLU0001 (•8.00 preset)
and PLU0002 (•5.00 preset) and paid
in exact amount of cash.
•13.00
Step
Operation
1 Just press <Arrangement> key.
<Arrangement>
Printout
1 PLU0001
1 PLU0002
TL
CASH
•8.00
•5.00
•13.00
•13.00
Sample operation 2
Arrangement 5
Item 1
Item 2
Payment
PLU0001
•1.00
Quantity
1
PLU0002
•2.00
Quantity
1
Cash
•3.00
Step
Operation
1 Enter arrangement number and
5<Arrangement>
press <Arrangement> key.
E-68
Arrangement 5 is programmed as
selling one Dept. 01 item with •1.00,
one Dept. 02 item with •2.00 and paid
in exact amount of cash..
Printout
1 DEPT001
1 DEPT002
TL
CASH
•1.00
•2.00
•3.00
•3.00
Advanced programmings and registrations
To add a certain amount
By using allocated <Addition (plus)> key, you can add a certain amount on a transaction.
Sample operation
Dept. 01
Item 1
Item 2
Payment
•1.00
Quantity
1
Add
•0.10
Dept. 01
•2.00
Quantity
3
Add
3 × •0.20 (preset)
Cash
•7.70
Step
Operation
1 Register the item 1.
1'!
2 Enter the adding amount and
10<Addition>
press <Addition> key.
3X
2'!
4 Enter the adding amount using 3X
multiplication key and press <Ad- <Addition>
dition> key.
F
5 Finalize the transaction.
Printout
1 DEPT001
+
3 DEPT001
+
TL
CASH
•1.00
•0.10
•6.00
•0.60
•7.70
•7.70
Useful features
3 Register the item 2.
•Adding •0.10 to the item 1.
•Adding 3 × •0.20 (preset amount) to
item 2.
E-69
Advanced programmings and registrations
To transact in Euro
By using P key, the register allows you to register items in the local currency
and transact in Euro or vice versa. To set the currency rate between Euro and
local currency, please see page E-91.
Sample Operation 1
Item
Unit price
•6.00
Quantity
1
Dept.
01
Exchange rate
€1.00 = •0.50
Payment
€15.00
Step
Operation
1 Register the item in local currency.
6'!
2Press ] key. The register calcu-
]
3Press o key to indicate the
o
4Press ] key before entering ten-
]
5 Enter the tendered amount in Euro.
15'
6Press F key. The display indi-
F
lates the price in Euro.
price in Euro.
dered amount in Euro.
cates the change in local currency.
E-70
Main currency: Local
Sub currency: Euro
A •6.00 item is sold and the customer
paid in Euro.
Printout
1 DEPT001
TL
EURO money
CASH
CASH
CG
T1
•6.00
•6.00
(€12.00)
€15.00
(•7.50)
•1.50
(€3.00)
Advanced programmings and registrations
Sample Operation 2
Item
Unit price
€12.00
Quantity
1
Dept.
01
Exchange rate
•1.00 = €2.00
Payment
Main currency: Euro
Sub currency: Local
A €12.00 item is sold and the customer
paid in local currency.
•10.00
Operation
1 Register the item in Euro.
12'!
2Press ] key. The register calcu-
]
3Press o key to indicate the
o
4Press ] key before entering ten-
]
5 Enter the tendered amount in local
10'
6Press F key. The display indi-
F
lates the price in local currency.
price in local currency.
dered amount in local currency.
Printout
€12.00
€12.00
(•6.00)
LOCAL money
CASH
•10.00
CASH
(€20.00)
CG
€8.00
(•4.00)
1 DEPT001
TL
Useful features
Step
currency.
cates the change in Euro.
E-71
Advanced programmings and registrations
Character settings
This chapter explains how you can program department or PLU descriptions, store messages, key descriptions, report title, total descriptions (such as gross total, net total etc.) and clerk names.
There are two ways to program characters which are using character keyboard and using multi typing of
ten key.
Using character keyboard
Character keyboard
1
A
J
DBL
SIZE
SPACE
2
3
SUBTOTAL
DEL
CA/AMT
TEND
4
6
5
a
j
S
s
B
b
K
k
T
t
C
L
U
c
l
u
D
M
V
d
m
v
E
N
W
e
n
w
F
O
X
f
o
x
G
P
Y
g
p
y
H
Q
Z
h
q
I
R
i
r
z
1
2
3
4
5
/
.
*
,
6
7
8
9
0
-
+
!
?
(
)
@
.
#
‘
%
:
&
CAPS
SHIFT
7
8
1 Alphabet keys
Used to input characters.
2 Double size letter key
Assigns the next input character to be double sized. After setting a
double sized character, press this key again to back to normal size.
3 Space key
Sets a space.
4 Delete key
Clears the last input character.
5 Program end key
Terminates the character programming.
6 Character enter key
Registers the programmed characters.
7 CAPS key
Pressing this key shifts a character from the lowercase letter to upper
case letter.
8 Shift key
Pressing this key shifts the character from the uppercase letter to lower
case letter.
Example: To set “Apple Juice”
A
p
p l e
J
u
i c e
<DBL> <A> <DBL> <Shift> <p> <p> <l> <e> <Space> <CAPS> <J><Shift> <u> <i> <c> <e> .
E-72
Advanced programmings and registrations
Using ten key pad
To set characters by using ten key, you need to press one of the ten key repeatedly until desired character appears on the display.
Multi typing keyboard
DBL
SIZE
SPACE
7
8
4
5
1
2
0
00
►
DEL
1
8
5
DEF
6
JKL
PQRS
TUV
MNO
3
WXYZ
.
1 Alphabet keys
SUBTOTAL
Useful features
GHI
3
9
ABC
2
6
CA/AMT
TEND
7
Hitting one of those keys repeatedly changes characters in the order
shown in the table below.
8
A → B → C → a → b → c → 8 → Ä → Å → Æ → Á → Â → À → Ã → Ç → â → ä →
à → å → æ → á → ã → ç returns to the beginning
9
D → E → F → d → e → f → 9 →
V
→ É → Ê → Ë → È →
→ é → ê → ë → è →
ƒ returns to the beginning
G → H → I → g → h → i → 4 → Í → Î → Ï → I → Ì → Ï → Î → Ì → í → í
returns to the beginning
B
J → K → L → j → k → l → 5 returns to the beginning
N
M → N → O → m → n → o → 6 → Ñ → Ö → Ø → Ó → Ô → Ò → Õ → ñ → ô → ö →
ò → ø → ó → õ returns to the beginning
Z
P → Q → R → S → p → q → r → s → 1 →
X
T → U → V → t → u → v → 2 →
returns to the beginning
C
W → X → Y → Z → w → x → y → z → 3 →
?
0
'
(Right cursor)
^
(Delete)
M
7 → @ → - → / → : → ! → ? → ~ → ( → ) → * → # → + → , → ^ → ; → < →
→ = → > → $ → ¥ → % & → [ → ] → ‘‘ → { → | → } → • → “ → . → \ → _ →
` → £ → √ → ¿ → ¡ → ∕ → § → space
returns to the beginning
TEL
→
→ ß returns to the beginning
→ Ü → Ú → Û → Ù → ü → û → ù → ú → µ
→ ÿ →
returns to the beginning
E-73
Advanced programmings and registrations
2 Double size letter key
Assigns the next input character to be double sized. After setting a
double sized character, press this key again for normal size.
3 Space key
Sets a space.
4 Clear key
Clears all the characters.
5 Delete key
Clears the last input character.
6 Program end key
Terminates the character programming.
7 Character enter key
Registers the programmed characters.
8 Right cursor key
Moves the cursor to the right.
Example: To set CLASS a
C
L
A
S
S
a
<DBL>888 555 <DBL> 8 1111 '1111 <Space> 8888
E-74
Advanced programmings and registrations
Setting characters
The following explanation shows how you can set a name in a PLU. You can also
set names to departments, function keys (p, m), and clerks by the same
method.
Sample Operation
To set “MILK” to PLU0001 by using ten key pad.
Step
Display
1 Turn the Mode switch to PGM position. The display shows
the program top menu.
Useful features
2Using > or ? keys, select [PLU Setting] and press
F key.
Enter the PLU number in which you wish to set characters
and press F key.
3 On the next screen, make sure that the PLU number you
wish to set is selected. If you wish to change it, use > or
? keys.
Press F key.
4 Select the top column of the [PLU Setting screen] and
input the character you wish to set. In this example,
6444555'55 (for MILK). Then
press F key to complete the setting.
E-75
Advanced programmings and registrations
Setting pop messages on receipts
You can set pop messages printed on receipts.
New Year
Sale
1st Anniversary
10% OFF
1
2
3
4
1
2
3
4
5
Pop message 1st. line
Pop message 2nd. line
Pop message 3rd. line
Pop message 4th. line
Pop illustration
5
To set pop message
Step
Display
1 Turn the Mode switch to PGM position and select [POP Setting] then press F key.
2 Select [All Message] and press F key. Preset messages will be printed.
3 Select the line number of the pop message and press
F key.
4 Referring printed preset messages, input the message
number you wish to set and press F key.
5 Repeat the steps 3 and 4 for other message lines.
To set other messages
To set logo message, commercial message, and bottom message (refer to page E-23 “Receipt sample”),
perform the same procedure as the above operations except selecting [Message Setting] in step 1.
E-76
Advanced programmings and registrations
To set pop illustration
Step
Display
1 Turn the Mode switch to PGM position and select [POP Setting] then press F key.
2 Select [All Graphic] and press F key. The printer prints
preset pop illustrations.
Useful features
3 From the printout, select an illustration you wish to print on
receipts.
4 Select [POP Graphic No. [
] ] and input the illustration
number from ten key pad. Then press F key.
5 Select [POP Print] and press F key. Make sure that the
illustration you select comes out from the printer.
E-77
Advanced programmings and registrations
Setting symbol characters
You can change the symbols or titles of sales reports for example, printing “CASH
IN DRW” on the sales reports instead of “CAID” for cash amount in drawer.
Step
Operation
1 Turn the Mode switch to PGM position and select [System
>▪▪▪▪▪>F
Setting] then press F key.
[System Setting] is the last column on the programming top
menu and is not shown on the first screen. Keep pressing
> key until it appears on the screen.
2Enter 2 and press o key to set the register in the
2o
3 Referring the following tables, enter two-digit memory num-
BB
character setting mode.
ber and program code. Then press o key.
4 Referring the character entry methods on pages E-72 and
BBo
[Memory No.](Program code)
BB▪▪▪▪▪BBF
E-73, input characters you wish to set and press F key. (Character keys)
5 If you wish to set in the next memory number, repeat step
4. If you wish to set other memory number than the next
number, repeat steps 3 and 4.
6Press o key to complete the setting.
o
Example: To set “CASH IN DRW” in memory number 3
Press 2o0301[C][A][S][H][SPACE][I][N][SPACE][D][R][W]Fo
E-78
Advanced programmings and registrations
Sales report symbols
Memory No. Program code Contents
Default character
01
Gross total
GROSS
02
Net total
NET
03
Cash in drawer
CAID
04
Charge in drawer
CHID
05
Check in drawer
CKID
06
Credit 1 in drawer
CRID(1)
Credit 2 in drawer
CRID(2)
Credit 3 in drawer
CRID(3)
09
Credit 4 in drawer
CRID(4)
10
Cash in drawer for sub currency
CAID2
11
Charge in drawer for sub currency
CHID2
12
Check in drawer for sub currency
CKID2
17
Refund mode total
RF
18
Customer count
CUST
19
Average sales per customer
AVER
20
Clerk commission 1 total
C-1
Clerk commission 2 total
C-2
21
22
01
Foreign currency cash in drawer
CECA1
23
Foreign currency check in drawer
CECK1
26
Reduction
DC
27
Coupon
COUPON
28
Item return
REF
29
Rounding for sub currency
ROUND
30
Rounding
ROUND
31
Cancellation
CANCEL
33
Taxable amount 1
TA1
34
Tax 1
TX1
35
Taxable amount 2
TA2
36
Tax 2
TX2
37
Taxable amount 3
TA3
38
Tax 3
TX3
39
Taxable amount 4
TA4
40
Tax 4
TX4
41
Non taxable amount
NON TAX
Useful features
07
08
Memo for your settings
E-79
Advanced programmings and registrations
Other symbols
Numbers in ( ) are digits to be used.
Memory No. Program code Contents
Default character
01
main currency symbol (2), @ (2), No.(2), split
pricing (2), not used (4), sub currency symbol
(2)
02
No. of item sold (2), No. of customers (2), not
used (6), multiplication display(2)
N o C T @
L B
03
multiplication symbol (6), not used (6)
X
B U S Y
04
taxable symbols (3 each)
T 1
06
taxable symbols (3 each)
T 1 2 T 1 3 T 1 4
08
foreign currency (2 each) not used (8)
09
10
23
mode symbols (4 each) (REG, RF, not used)
•
*
@ N o /
T 1
*
R E G
mode symbols (4 each) (PGM, Daily X, Daily Z,
P
Periodic)
*
*
R
F
X
mode symbols (4 each) (not used, PGM read)
T R G
12
decimal (1) (for amount/ q’ty), separator (main/
sub 1 each), not used (3), square (7)
. . , . . ,
13
am, pm (3each) ST symbol on main display (2)
16
subtotal symbol on main display (16)
S T
17
subtotal symbol for discount/premium (16)
S T
18
post receipt total symbol (16)
T L
19
change symbol (16)
C G
grand total symbol (16)
G T
01
20
* Q T
T 3
11
A M
* *
T 4
T 5
T 2 3
*
R
Z
X Z
P G M X
X
P M S T
Title of sales reports
Memory No. Program code Contents
Default character
01
Fixed total report title
FIX
02
Transaction key report title
TRANS
03
PLU sales report title
PLU
04
Department sales report title
DEPT
Group sales report title
GROUP
06
Clerk sales report title
CASHIER
08
Hourly sales report title
HOURLY
09
Monthly sales report title
MONTHLY
16
Flash report title
FLASH
05
24
Memo for your settings
Text recall character
Memory No. Program code Contents
01
02
03
04
E-80
Text recall character 01
39
Text recall character 02
Text recall character 03
Text recall character 04
Default character
Memo for your settings
Advanced programmings and registrations
Advanced programmings
This section explains how you can program detail settings of the register such as setting register’s specific number, whether to reset consecutive number on the receipt after a Reset (Z) report or not, whether
to print taxable amounts on receipts or not, etc.
The following table lists what can be programmed in this settings.
Set code
Settings
No. of digit to
be set
Cash register’s unit number
4
03
Whether to reset consecutive number after Reset (Z) report or not
8
04
Tax and rounding systems
10
05
Contents of receipt/journal print
10
06
Calculation and operation methods
10
08
Contents of sales reports
10
10
Whether to print taxable amount or not
10
14
Currency exchange
8
15
Printing methods of sales reports
10
16
Printing methods of grand total
7
17
Date/time printing on journals/receipts
4
18
Print control for guest receipt
6
19
Double height character printing on receipts
7
21
Printing methods of messages
10
25
Entry restriction
1
26
Check tracking
7
27
Clerk operation selections
9
28
Euro settings 1
10
29
Euro settings 2
10
30
Receipt message/Compressed journal print selection
5
34
Backlight on/off selection
4
Useful features
02
E-81
Advanced programmings and registrations
Programming detail settings
To program the detail settings of the register, please follow the operations shown
below.
Step
Operation
1 Turn the Mode switch to PGM position and select [System
>▪▪▪▪▪>F
Setting] then press F key.
[System Setting] is the last column on the programming top
menu and is not shown on the first screen. Keep pressing
> key until it appears on the screen.
2Enter 3 and press o key to set the register in the
3o
programming mode.
3 Referring the following tables, enter two-digit set code you
wish to program followed by two 2s. “22” is the identification code for programming detail settings.
BB22
[set code]
For example, if you wish to program tax
system:
4 Referring the tables below, enter program code of up to 10
0422
BB▪▪▪▪▪BBF
5Press o key to complete the program.
o
digits and press F key.
[Program code (up to 10 digits)]
Set code 02 (Machine number)
Description
Machine number
Selection
Machine
number
Program code
Default value
BBBB
D4 D3 D2 D1
ºººº
D4 D3 D2 D1
Example: To set the register’s specific unit number 1234.
Press 3o0222o1234Fo
Set code 03 (Whether to reset consecutive number after Reset (Z) report or not)
Description
Reset consecutive number after daily reset report is issued.
Must be “0000000” (seven zeros)
Selection
Yes = 0
No = 1
Program code
Default value
B
D8
º
D8
B to B
D7 to D1
º to º
D7 to D1
Example: Not resetting the consecutive number after Z report printing.
Press 3o0322o10000000Fo
E-82
Advanced programmings and registrations
Set code 04 (Tax and rounding systems)
Description
Selection
Program code
Initial value
Apply rounding for registration: No rounding = 0, IF1 = 1, IF2 = 2,
Danish = 3, Singaporean = 5, Finnish = 6, Australian = 7, South
African = 8, Other roundings = 9 (Refer to D1)
See the following tables for IF1 and IF2
0 to 9
B
D10
º
D10
Tax system:
Single tax system (1 ~ 4) = 0, Singaporean tax system = 3
0 or 3
B
D9
º
D9
BB
D8 to D2
ºº
D8 to D2
B
D1
º
D1
Must be “0000000”
Other rounding: New Zealander (A) = 0, New Zealander (B) = 1 ,
Malaysian = 2, Norwegian/Czech = 3 (D10 must be set to “9”.)
0 to 3
Rounding systems for each country
IF 1 rounding
Australian rounding
Result
Last digit of ST/CA CG
Result
0 to 2
0
0 to 2
0
3 to 7
5
3 to 7
5
8 to 9
10
8 to 9
10
IF 2 rounding
Last digit of ST
South African rounding
Result
Last digit of ST
Result
0 to 4
0
0 to 4
0
5 to 9
10
5 to 9
5
Danish rounding
New Zealander (A/B) rounding
Last 2 digits of ST/CA CG
Result
Last digit of ST/CA CG
Result
00 to 24
00
0 to 4/5
0
25 to 74
50
5/6 to 9
10
75 to 99
100
Malaysian rounding
Singaporean rounding
Last digit of ST/ CA CG
Result
Last digit of item, %- REG
Result
0 to 2
0
0 to 2
0
3 to 7
5
3 to 7
5
8 to 9
10
8 to 9
10
Norwegian/Czech rounding
Finnish rounding
Last digit of ST
Result
Last digit of ST/CA CG
Result
00 to 49
00
0 to 2
0
50 to 99
100
3 to 7
5
8 to 9
10
E-83
Useful features
Last digit of ST
Advanced programmings and registrations
Set code 05 (Receipt printing selections)
Description
Print total line during finalization.
24- hour system (0) or 12 -hour system (2)
Buffered receipt print (enables key operations during printing)
Selection
Yes = 0
a
No = 1
b Select 0 or 2
No = 0
Yes = 2
Skip item prints on journal. (journal skip)
Program code
Default value
B
(a+b) D10
º
(a+b) D10
B
D9
º
D9
B
D8
º
D8
ººº
D7 D6 D5
ººº
D7 D6 D5
No = 0
Yes = 1
Yes = 0
No = 2
B
(a+b) D4
º
(a+b) D4
ºº
D3 D2
ºº
D3 D2
Yes = 0
No = 2
B
D1
º
D1
No = 0
Yes = 1
Must be “000”
Print number of item sold. (item counter)
a
Print tax symbols.
b
Must be “00”
Print number of customers
Example:
•On a receipt, not printing total amount (a = 1), printing 12 -hour system (b = 2): D10 = 3 (1 + 2).
•Buffered receipt printing: D9 = 2.
•Not printing items on journal (journal skip): D8 = 1.
•D7 – D5 must be 000.
•Printing number of items (a = 1), not printing tax symbols (b = 2): D4 = 3 (1 + 2).
•D3 – D2 must be 00.
•Not printing number of customers: D1 = 2.
Press 3o0522o3210003002Fo
E-84
Advanced programmings and registrations
Set code 06 (Calculation and operation methods)
Description
Succeeds the taxable status and commission status of previous item when +/ - operation is performed.
Selection
a
Yes = 0
No = 1
Force money declarations before read(X) or reset (Z) reports
operations.
b
No = 0
Yes = 4
Force to press o key before finalization.
a
No = 0
Yes = 1
Allow finalization when subtotal amount is zero or minus.
b
Yes = 0
No = 2
Allow multiple refund operation.
c
Yes = 0
No = 4
Program code
Default value
B
(a+b) D10
º
(a+b) D10
B
(a+b+c) D9
º
(a+b+c) D9
No = 0
Yes = 1
B
D8
º
D8
Include commission in net total.
No = 0
Yes = 2
B
D7
º
D7
B
(a+b+c) D6
º
(a+b+c) D6
ºº
D5 D4
ºº
D5 D4
B
D3
B
D3
ºº
D2 D1
ºº
D2 D1
Clears the key buffer when a receipt is issued. (REG mode
only)
a
No = 0
Yes = 1
Sounds key catch tone.
b
Yes = 0
No = 2
Allow to issue post receipt, even the original one is issued.
c
No = 0
Yes = 4
Must be “00”
Numeric entry of flat PLU
(1): Treats as amount override
(2): Treats as quantity extention
Must be “00”
!=0
@=2
Useful features
Affects the results of +/ -. %+/ %- calculations to items. (Net
totaling)
Example:
•A +/- operation not succeeds taxable status and commission status (a = 1), amount in drawer should be
declared before Z reporting (b = 4): D10 = 5 (1 + 4).
•o key must always be pressed for a finalization (a = 1), not allowing zero or minus subtotal in a
transaction (b = 2), not allowing multiple refund operations (c = 4): D9 = 7 (1 + 2 + 3).
•Affecting the result of +/-, %+/%- to an item: D8 = 1.
•Not including commission in net total: D7 = 2.
•Clearing key buffer when a receipt is issued (a = 1), not sounding key catch tone (b = 2), issues post
receipts even the original receipt is issued (c = 4): D6 = 7 (1 + 2 + 3).
•D5 – D4 must be 00.
•Numeral entry of flat PLU is processed as quantity. D3 = 2.
•D1 and D2 must be 00.
Press 3o0622o5712700200Fo
E-85
Advanced programmings and registrations
Set code 08 (Fixed total print control)
Description
Print gross sales total (GROSS) on fixed total report.
Print net sales total (NET) on fixed total report.
Print cash in drawer (CAID) on fixed total report.
Selection
a
Yes = 0
No = 1
b
Yes = 0
No = 2
c
Yes = 0
No = 4
Print charge in drawer (CHID) on fixed total report.
Print check in drawer (CKID) on fixed total report.
Print credit in drawer on (CRID(1) ~ (4)) on fixed total report.
Yes = 0
No = 2
a
Yes = 0
No = 1
b
Yes = 0
No = 4
Must be “0”
Print RF mode total (RF) on fixed total report.
Print the net number of customers (CUST) on fixed total report.
Print average sales per customer (AVER) on fixed total report.
Must be “0”
Print commission 1 total (C-1) on fixed total report.
Yes = 0
No = 4
a
Yes = 0
No = 1
b
Yes = 0
No = 2
c
a
Yes = 0
No = 1
b
Yes = 0
No = 2
c
Yes = 0
No = 4
Print <MINUS>, <COUPON>,<%-> and mix & match operation
a
net total (DC) on fixed total report.
Yes = 0
No = 1
Print total number of <REFUND> operation (RF) on fixed total
report.
b
Yes = 0
No = 2
a
Yes = 0
No = 1
b
Yes = 0
No = 2
c
Yes = 0
No = 4
Print commission 2 total (C-2) on fixed total report.
Print foreign currency cash in drawer (CECA1, CECA2) and
check in drawer (CECK1, CECK2) on fixed total report.
Print nontaxable totals (NON TAX) on fixed total report.
Print rounded fractions (ROUND) on fixed total report.
Print number of cancellation (CANCEL) on fixed total report.
E-86
Program code
Default value
B
(a+b+c) D10
º
(a+b+c) D10
B
D9
º
D9
B
(a+b) D8
º
(a+b) D8
º
D7
º
D7
B
D6
º
D6
B
(a+b) D5
™
(a+b) D5
º
D4
º
D4
B
(a+b+c) D3
¶
(a+b+c) D3
B
(a+b) D2
£
(a+b) D2
B
(a+b+c) D1
£
(a+b+c) D1
Advanced programmings and registrations
Set code 10 (Print control of taxable amount)
Description
Print taxable amount 1 on receipt/journal.
Print taxable amount 2 on receipt/journal.
Print taxable amount 3 on receipt/journal.
a
b
c
Print taxable amount 4 on receipt/journal.
Selection
Yes = 0
No = 1
Yes = 0
No = 2
Yes = 0
No = 4
Yes = 0
No = 1
Program code
Default value
B
(a+b+c) D10
º
(a+b+c) D10
B
D9
º
D9
º to º
D8 to D1
º to º
D8 to D1
Selection
Program code
Default value
0 to 9
B
D8
º
D8
B
(a+b) D7
º
(a+b) D7
B
D6
º
D6
B
(a+b) D5
º
(a+b) D5
º to º
D4 to D1
º to º
D4 to D1
Must be “00000000” (eight zeros)
Set code 14 (Currency exchange)
Description
Monetary mode of CECA1 and CECK1 in fixed total report.
CECA: Foreign currency cash in drawer
CECK: Foreign currency check in drawer
Decimal for CECA1 and CECK1 in fixed total report:
Period = 0, Comma = 1
Separator for CECA1 and CECK1 in fixed total report:
Comma = 0, Period = 4
Monetary mode of CECA2 and CECK2 in fixed total report.
Decimal for CECA2 and CECK2 in fixed total report:
Period = o, Comma = 1
Separator for CECA2 and CECK2 in fixed total report:
Comma = 0, Period = 4
Always “0000”
Period = 0
Comma = 1
Comma = 0
b
Period = 4
a
0 to 9
Period = 0
Comma = 1
Comma = 0
b
Period = 4
a
E-87
Useful features
Example:
•On the fixed total report, not printing gross sales total (a = 1), not printing net sales total (b = 2), not
printing cash in drawer. (c = 4): D10 = 7 (1 + 2 +4 ).
•Not printing amount in drawer on fixed total report: D9 = 1.
•On fixed total report, not printing check amount in drawer (a = 1), not printing credit amount in drawer (b
= 4): D8 = 5 (1 + 4).
•D7 must be always 0.
•Not printing refunded amount in RF mode on fixed total report: D6 = 4.
•Not printing total number of customers on fixed total report (a = 1), not printing average sales amount
per customer (b = 2): D5 = 5 (1 + 4).
•D4 must be always 0.
•On fixed total report, not printing commission 1 amount (a = 1), not printing commission 2 amount (b =
2), not printing amount of foreign currency cash and check (c = 4): D3 = 7 (1 + 2 + 3).
•On fixed total report, not printing net total of <MINUS>, <COUPON>, <%-> etc. (a = 1), not printing
<REFUND> and <VOID> amounts (b = 2): D2 = 3 (1 + 2).
•On fixed total report, not printing non-taxable amounts (a = 1), not printing rounded down amount (b =
2), not printing cancelled amount (c = 4): D1 = 7 (1 + 2 + 3).
Press 3o0822o7150450737Fo
Advanced programmings and registrations
Set code 15 (Printing methods of sales reports)
Description
Department zero skip (Departments of sales amount zero are
not printed on sales reports.)
Selection
a
Yes = 0
No = 1
Clerk zero skip (Zero amounted clerks are not printed on sales
b
reports.)
Yes = 0
No = 2
Transaction key zero skip (Transaction keys of sales amount
zero are not printed on sales reports.)
a
Yes = 0
No = 1
PLU zero skip (Zero amounted PLUs are not printed on sales
reports.)
b
Yes = 0
No = 2
Hourly sales report skip (Zero amounted time zones are not
printed on sales reports.)
c
Yes = 0
No = 4
Group zero skip (Zero amounted groups are not printed on
sales reports.)
Yes = 0
No = 1
Must be “0”
Program code
Default value
B
(a+b) D10
º
(a+b) D10
B
(a+b+c) D9
º
(a+b+c) D9
B
D8
º
D8
º
D7
º
D7
Prohibit to issue “OPEN CHECK Z” report
No = 0
Yes = 1
B
D6
º
D6
Print PLU numbers on the PLU report.
No = 0
Yes = 4
B
D5
º
D5
B
(a+b) D4
º
(a+b) D4
ººº
D3 D2 D1
ººº
D3 D2 D1
Selection
Program code
Default value
No = 0
Yes = 1
B
D7
º
D7
Print sales ratio on sales reports.
Issue double Z repors.
a
No = 0
Yes = 1
b
No = 0
Yes = 2
Must be “000”
Set code 16 (Printing methods of grand total)
Description
Print range of consecutive number on fixed total report.
Must be “00111”
Print grand total on daily sales reset (Z) report.
E-88
ºº¡¡¡ ºº¡¡¡
D6 D5 D4 D3 D2 D6 D5 D4 D3 D2
Yes = 0
No = 1
B
D1
º
D1
Advanced programmings and registrations
Set code 17 (Date/time printing on journals/receipts)
Description
Print date on journal.
Print consecutive number on receipt/journal.
Print time on receipt.
Print time on journal.
Selection
Program code
Default value
B
(a+b) D4
º
(a+b) D4
B
(a+b) D3
º
(a+b) D3
ºº
D2 D1
ºº
D2 D1
Selection
Program code
Default value
No = 0
Yes = 4
B
D6
º
D6
º
D5
º
D5
B
(a+b) D4
º
(a+b) D4
B
D3
º
D3
ºº
D2 D1
ºº
D2 D1
a
Yes = 0
No = 2
b
Yes = 0
No = 4
a
Yes = 0
No = 1
b
Yes = 0
No = 2
Must be “00”
Set code 18 (Print control for guest receipt)
Description
Classify registered items by groups on guest receipts.
Must be “0”
Print time on guest receipts
Merge the same registrations in a guest receipt (item consolidation)
a
Yes = 0
No = 1
b
Yes = 0
No = 2
Yes = 0
No = 4
Must be “00”
Useful features
Print date on guest receipts.
Set code 19 (Double height character printing on receipts)
Description
Print receipt in double height characters
Must be “000000” (six zeros)
Selection
Program code
Default value
No = 0
Yes = 1
B
D7
º
D7
ºººººº ºººººº
D6 D5 D4 D3 D2 D1 D6 D5 D4 D3 D2 D1
E-89
Advanced programmings and registrations
Set code 21 (Printing methods of messages)
Description
Print graphic type logo.
(If “No” is selected, character logo will be printed.)
Print commercial message on guest receipts.
Print bottom message on guest receipts.
Selection
Program code
Default value
No = 0
Yes = 2
B
D10
™
D10
B
(a+b) D9
º
(a+b) D9
ºº
D8 D7
ºº
D8 D7
B
(a+b) D6
º
(a+b) D6
ºººº
D5 D4 D3 D2
ºººº
D5 D4 D3 D2
º
D1
º
D1
Program code
Default value
B
(a+b) D1
º
(a+b) D1
Program code
Default value
B
(a+b+c) D7
º
(a+b+c) D7
B
D6
º
D6
B
D5
º
D5
º to º
D4 to D1
º to º
D4 to D1
a
No = 0
Yes = 1
b
No = 0
Yes = 2
Must be “00”
Print commercial message on receipts in REG/RF mode.
Print bottom message on receipts in REG/RF mode.
a
No = 0
Yes = 1
b
No = 0
Yes = 2
Must be “0000”
Must be “0”.
Set code 25 (Entry restriction)
Description
Restrict (to 0 or 5) to the last digit for amount tender.
Restriction (to 0 or 5) to the last digit for <CASH>. <RC>,
<PD>, money declaration amount.
Selection
a
No = 0
Yes = 1
b
No = 0
Yes = 4
Set code 26 (Check tracking)
Description
Force to enter check number
Force to enter number of customersl.
Force to issue guest receipts.
Selection
a
No = 0
Yes = 1
b
No = 0
Yes = 2
c
No = 0
Yes = 4
Must be “0”
Tax calculation by new balance.
(Calculation result is not saved into the totalizer)
Must be “0000” (four zeros)
E-90
No = 0
Yes = 1
Advanced programmings and registrations
Set code 27 (Clerk operation selections)
Description
Selection
Program code
Default value
Allow clerk interruption.
No = 0
Yes = 1
B
D10
º
D10
Allow clerk functions.
No = 0
Yes = 4
B
D9
º
D9
º to º
D8 to D1
º to º
D8 to D1
Selection
Program code
Default value
Yes = 0
No = 1
B
D10
º
D10
0,1 or 2
B
D9
º
D9
Exchange
rate
B to B
D8 to D3
º to º
D8 to D3
0 to 6
B
D2
º
D2
B
D1
º
D1
Must be “00000000”
Set code 28 (Euro 1)
Description
Define Euro as the main currency.
Select rounding option:
Round off = 0, Cut off = 1, Round up = 2
Exchange rate (in 6 digits)
Must be “0”
Useful features
Decimal point position of exchange rate:
Integer only = 0, 1st decimal place = 1, 2nd decimal place =
2, 3rd decimal place = 3, 4th decimal place = 4, 5th decimal
place = 5, 6th decimal place = 6
Example: (D8 ~ D2): 1 Euro = 1.955 DM; set “0019553”
1 Euro = 1957.77319 Lit; set “1957772”
Example 1: To set Euro as main currency, rounding off, exchange rate €1.00 = DM 1.9558
3o2822o0001955840Fo
Example 2: To set Euro as sub currency, rounding up, exchange rate €1.00 = £0.8573
3o2822o1200857340Fo
E-91
Advanced programmings and registrations
Set code 29 (Euro 2)
Description
Selection
Program code
Default value
ADD mode of sub currency:
0. = 0, 0.0 = 1, 0.00 = 2, 0.000 = 3
0 to 3
B
D10
º
D10
Apply rounding for sub currency. *
No rounding = 0, IF1 = 1, IF2 = 2, Danish = 3, Finnish = 6,
Australian = 7, South African = 8
0 to 8
B
D9
º
D6
º
D8
º
D8
B
(a+b+c) D7
º
(a+b+c) D7
B
(a+b+c) D6
º
(a+b+c) D6
B
(a+b+c) D5
º
(a+b+c) D5
B
(a+b) D4
º
(a+b) D4
ººº
D3 D2 D1
ººº
D3 D2 D1
Must be “0”
Print tendered amount in sub currency converted to main
currency.
a
No = 0
Yes = 2
Selection of the currency of subtotal printout:
1 Main currency only, 2 Main and sub currency
b
!=0
@=2
c
No = 0
Yes = 4
Selection of the currency of change: 1 Main currency only, 2
Sub currency
a
!=0
@=1
Print the cash in drawer in sub currency on fixed total reports.
(If the cash in drawer of main currency is skipped, this line is
also skipped.)
b
No = 0
Yes = 2
c
!=0
@=4
a
!=0
@=1
b
No = 0
Yes = 1
Restrict the last digit for sub currency monetary amount entries
c
to 0 or 5.
No = 0
Yes = 4
Print total in sub currency by double sized letter.
Display symbols of sub currency: 1 e (Euro), 2 l (Local)
Restrict (to 00, 25, 50, 75) on last two digits for amount tendered: 1 Main currency, 2 Sub currency
(It is necessary to set this restriction to <CASH> key.)
Print rounding total of sub currency on fixed totalizer report.
Selection of the change amount printout: 1 Main and sub currency, 2 Dependent upon D6 -a of this worksheet
Calculation method of change amount in sub currency:
1 Convert the change amount in main currency into sub currency.
2 Subtract the equivalent value of subtotal amount in sub currency from the equvalent value of the tendered amount in sub
currency,
Must be “000”
E-92
a
b
!=0
@=1
!=0
@=2
000
Advanced programmings and registrations
Set code 30 (Thermal printer control)
Description
Print preset receipt message and graphic.
Print preset receipt message and graphic:! at the bottom of
the receipt, @ at the top of the receipt
Journal compressed print (print half height characters)
Selection
Program code
Default value
B
(a+b) D5
º
(a+b) D5
B
D4
º
D4
ººº
D3 D2 D1
ººº
D3 D2 D1
Selection
Program code
Default value
Functions = 0
Not functions = 1
B
D4
º
D4
ººº
D3 D2 D1
ººº
D3 D2 D1
a
No = 0
Yes = 1
b
!=0
@=2
Yes = 0
No = 1
Must be “000”
Set code 34 (Backlight control)
Description
Backlight
Must be “000”
Useful features
E-93
Advanced programmings and registrations
Programming functions of departments and PLUs in a lump
There are two methods to set functions of departments or PLUs which are programming at once and
programming individual functions.
Programming department and flat PLU functions in a lump
This method programs function of a department at one time.
For shifted departments, press <Department no./Department shift> key first.
For shifted flat PLU, press @ key first.
Step
Operation
1 Turn the Mode switch to PGM position and select [System
>▪▪▪▪▪>F
2Enter 3 and press o key to set the register in the
3o
3 You can skip this step if you program in departments 01
<Dept.no./Dept. shift>
Setting] then press F key.
programming mode.
through 25. If you wish to program in departments 26
through 50, press <Dept.no./Dept. shift> key.
4 Referring following table, input 12- digit program code.
5 Press the department key you wish to program
BB▪▪▪▪▪BB
[Program code (12 digits)]
!
For example, programming in dept. 26.
6 Repeat steps 3 through 5 if you wish to program functions
in another departments.
7Press o key to complete the program.
o
Example:
Programming department 26 as;
•Normal item: D12 = 0.
•D11 through D8 must be 0000.
•US taxable status 1 (a = 1) and 2 (b = 2): D7 = 3 (1 + 2)
•Allowing zero unit price (a = 1), not allowing negative unit price (b = 0), hash item (c = 4): D6 = 5 (1 + 0 +
4).
•D5 must always be 0.
•Limiting minimum entry digit: 3 digits: D4 = 3.
•As this example is for setting functions in a department, D3 should be 0.
•Applying commission 1 (a = 1), not applying commission 2 (b = 0): D2 = 1 (1 + 0).
•D1 must always be 0.
Press 3o@00000350301!o
E-94
Advanced programmings and registrations
Department and PLU lump set code
Description
Age limitation
00: No limitation
Single item sales:
Normal item = 0, Single item = 3
Must be “0”
Only for PLUs and flat PLUs
Normal item = 0, Condiment item = 1, Preparation item = 2
Must be “00”
Taxable status 1
Taxable
status
Taxable
status for
USA
Taxable status 3
Default value
00 to 99
BB
D14 D13
ºº
D14 D13
0 or 3
B
D12
º
D12
0
º
D11
º
D11
0, 1 or 2
B
D10
º
D10
00
ºº
D9 D8
ºº
D9 D8
a
No = 0
Yes = 1
b
No = 0
Yes = 2
c
No = 0
Yes = 4
Non tax = 0, Taxable 1 = 1, Taxable 2 = 2, Taxable 3
= 3, Taxable 4 = 4, Taxable 1 & 2 = 5, Taxable 1 & 3
= 6, Taxable 1 & 4 = 7
Enable zero unit price.
Enable negative price.
Hash item
a
No = 0
Yes = 1
b
No = 0
Yes = 2
c
No = 0
Yes = 4
Must be “0”
Low digit limitation (LDL) for manually entered unit price.
Open PLU (only for PLU)
Commission 1 (give commission on items)
Commission 2
Program code
B
(a+b+c) D7
º
D7
B
D7
B
(a+b+c) D6
º
(a+b+c) D6
0
º
D5
º
D5
Number of
digits
B
D4
º
D4
No = 0
Yes = 4
B
D3
º
D3
B
(a+b) D2
º
(a+b) D2
a
No = 0
Yes = 1
b
No = 0
Yes = 2
Useful features
Taxable
status for
Canada
Taxable status 2
Selection
E-95
Advanced programmings and registrations
Programming PLU functions in a lump
This method programs functions of a PLU at one time.
Step
Operation
1 Turn the Mode switch to PGM position and select [System
>▪▪▪▪▪>F
2Enter 3 and press o key to set the register in the
3o
3 Enter four-digit PLU number then press
0014
Setting] then press F key.
programming mode.
PLU/
S.DEPT
key.
4 Referring the table in the previous section, input 12- digit
program code.
5Press F key.
For example, to program PLU number
fourteen.
BB▪▪▪▪▪BB
[Program code (12 digits)]
F
6 Repeat steps 3 through 5 if you wish to program functions
in another PLU.
7Press o key to complete the program.
E-96
PLU/
S.DEPT
o
Advanced programmings and registrations
Programming functions of departments and PLUs individually
Programming functions of departments individually
This part explains programming methods of each function of departments individually.
Step
Operation
1 Turn the Mode switch to PGM position and select [System
>▪▪▪▪▪>F
2Enter 3 and press o key to set the register in the
3o
Setting] then press F key.
programming mode.
3 Referring the following table, enter two-digit set code you
4 You can skip this step if you program in departments 01
<Dept. no./Dept. shift>
through 25. If you wish to program in departments 26
through 50, press <Dept. no./Dept. shift> key.
5 Referring the following table, enter program code and press
the department key in which you wish to set.
6 If you wish to set the same function in another department,
press the corresponding dept. key.
123#
This example is for linking dept. 03 to item
group 123 assuming set code 11 has been
entered in step 3 and <Dept. no./Dept. shift>
key is not pressed in step 4.
$
This example is for setting the same linking
group in dept. 04.
7 Repeat steps 4 and 5 to set another function in another
department.
8Press o key to complete the program.
o
E-97
Useful features
wish to program followed by two 6s. The “66” is the identification code for individual programming of departments and
PLUs. Then press o key.
BB66o
(set code)
Advanced programmings and registrations
Set code table
Set code
01
Description
Normal item /condiment item /preparation item
Normal item = 0, Condiment item = 1, Preparation item = 2
Selection
Program code
0,1 or 2
B
0
º
D2
D2 must be 0
Taxable status 1
For singapore
03
Taxable
status
Taxable status 3
For other
countries
04
Taxable status 2
Allow negative unit price.
Commission 2
Linking group (000 to 999)
11
15
18
26
c
No = 0
Yes = 4
Set menu table number (only for PLU)
BB
D2 D1
No = 0
Yes = 4
B
a
No = 0
Yes = 1
b
No = 0
Yes = 2
c
No = 0
Yes = 4
Number of
minimum
digit
a
No = 0
Yes = 1
b
No = 0
Yes = 2
B
(a+b+c)
B
B
(a+b)
000 to 999
BBB
D7 D6 D5
0
º
D4
000 to 999
BBB
D3 D2 D1
Table No.
BBBB
D4 D3 D2 D1
Maximum amount of manual input unit price (up to 9999.99)
Single item control: Normal item = 0, Single item = 3
Age limitation (no limitation if “00” is set)
Example: To program dept. 02 to allow manual input unit price up to •99.00.
3o1566o9900"o
E-98
B
(a+b+c) D1
00 to 04
Must be 0
Linking dept. (000 to 999) (Only for PLU)
13
No = 0
Yes = 2
Minimum digit of manual input unit price
Commission 1
09
b
Open PLU (Only for PLU)
Hash item
07
No = 0
Yes = 1
Non tax = 00, Taxable 1 = 01, Taxable 2
= 02, Taxable 3 = 03, Taxable 4 = 04, All
taxable = 99 (only for transaction keys)
Allow unit price 0
05
a
BBBBBB
D6 D5 D4 D3 D2 D1
0 or 3
B
Age
BB
Advanced programmings and registrations
Programming functions of PLUs individually
This part explains programming methods of each function of PLUs individually.
Step
Operation
1 Turn the Mode switch to PGM position and select [System
>▪▪▪▪▪>F
2Enter 3 and press o key to set the register in the
3o
Setting] then press F key.
programming mode.
3 Referring the tables in the proceeding section, enter two-
digit set code you wish to program followed by two 6s. The
“66” is the identification code for individual programming of
departments and PLUs. Then press o key.
5 Referring the table in the preceding section, enter program
code and press F key.
6 If you wish to set the same program code in the next PLU
0005+
This example is for setting a program in PLU
0005.
B▪▪▪▪▪BF
(Program code)
F
number, press F key again.
Perform step 5 if you wish to set another program code to
the next PLU number.
To program in another PLU number (not next PLU number),
repeat steps 4 and 5.
7Press o key to complete the settings.
o
Example 1: To set PLU 0001 as “Open PLU”.
Press 3o0466o0001+4Fo
Example 2: To set PLU0012 to link item group 12 and dept. 04.
Press 3o1166o0012+0120004Fo
E-99
Useful features
4 Enter PLU number you wish to set and press + key.
BB66o
(set code)
Advanced programmings and registrations
Programming functions of transaction keys
This section explains how you can program functions in each transaction keys
such as F, h or m keys. For example, programming F key to force
entry of tendered amount.
Step
Operation
1 Turn the Mode switch to PGM position and select [System
>▪▪▪▪▪>F
2Enter 3 and press o key to set the register in the
3o
Setting] then press F key.
programming mode.
3 Referring the following tables, enter the program code then
press corresponding transaction key.
B▪▪▪▪▪Bm
(Program code)
The above example is for programming minus
key.
4 If you wish to program another transaction key, return to
step 3.
5Press o key to complete the program.
E-100
o
Advanced programmings and registrations
Program code tables
Default value of all the program codes are “0”.
Program code for F, <Charge> and k keys.
Description
Restrict to 00/55 on last two digits for amount tendered (only for
F in Danish rounding)
Must be “00”.
Prohibit partial payment.
Prohibit tendered amount entry
Force to enter tendered amount.
Program code
No = 0
Yes = 4
B
D10
00
ºº
D9 D8
a
No = 0
Yes = 1
b
No = 0
Yes = 2
c
No = 0
Yes = 4
No = 0
Yes = 1
French food coupon
No = 0
Yes = 1
Perform Finnish rounding
No = 0
Yes = 4
Maximum amount for subtotal and tendered amount.
e.g.) •9000, D4 = 9, D3 = 3
Maximum amount of change due.
D4: Maximum value (0 ~ 9)
D3: Number of zeros (0 ~ 9)
Maximum value (0 ~ 9)
Number of zeros (0 ~ 9)
B
(a+b+c) D7
B
D6
B
(a+b) D5
BB
D4 D3
BB
D2 D1
Example : To set F key as prohibiting partial payment (a = 1), not prohibiting tendered amount entry
(b = 0), and forcing to enter tendered amount (c = 4): D7 = 6.
Press 3o6000000Fo
E-101
Useful features
Print breakdown of VAT.
(Option for Single item or Currency exchange (including partial
tendering foreign currency).)
Selection
Advanced programmings and registrations
Program code for
RA
and ] keys
Description
Maximum amount.
e.g.) •10,000; D4 = 1, D3 = 4.
Selection
Program code
Maximum value (0 ~ 9)
BB
D4 D3
Number of zeros (0 ~ 9)
Must be “00”
ºº
D2 D1
00
Example :To set P key not allowing to enter more than $900.
Press 3o9200Po
Program code for m , <Addition (plus)> and <Coupon> keys
Description
D8 must be 0
Taxable status 1
For singapore
Taxable
status
Taxable status 2
Taxable status 3
For other
countries
Allow credit balance (<Addition (plus)> only)
Must be “0”
E-102
º
D8
b
No = 0
Yes = 2
c
No = 0
Yes = 4
00 to 04
a
No = 0
Yes = 1
b
No = 0
Yes = 2
Maximum digit of manual input unit price
(Setting “9” programs NOT allowing manual entry.)
Give commission 2
0
No = 0
Yes = 1
Must be “00”
Give commission 1
Program code
a
Non tax = 00, Taxable 1 = 01, Taxable 2 = 02, Taxable 3 = 03, Taxable 4 = 04, All taxable = 99 (only for
transaction keys)
Allow credit balance (m<Coupon> only)
Selection
B
(a+b+c) D7
BB
D8 D7
B
(a+b) D6
00
ºº
D5 D4
Number of digit
B
D3
a
No = 0
Yes = 1
b
No = 0
Yes = 2
0
B
(a+b) D2
º
D1
Advanced programmings and registrations
Program code for p key
Description
Selection
Program code
0
º
D8
D8 must be 0
Taxable status 1
For singapore
Taxable
status
Taxable status 2
Taxable status 3
For other
countries
a
No = 0
Yes = 1
b
No = 0
Yes = 2
c
No = 0
Yes = 4
Non tax = 00, Taxable 1 = 01, Taxable 2 = 02, Taxable 3 = 03, Taxable 4 = 04, All taxable = 99 (only for
transaction keys)
Prohibit manual rate entry.
Rounding: Round off = 0, Cut off = 1, Round up = 2
BB
D8 D7
No = 0
Yes = 2
B
D6
0, 1 or 2
B
D5
00
ºº
D4 D3
Give commission 2
a
No = 0
Yes = 1
b
No = 0
Yes = 2
Must be “0”
0
B
(a+b)D2
º
D1
Program code for b and <#/NS> keys
Description
Selection
Program code
Allow mode change or clerk change after the key operation as first
transaction. (Only for Non-add function)
Yes = 0
No = 1
B
D7
Must be “000000”
000000
ºººººº
D6 D5 D4 D3 D2 D1
Selection
Program code
Print when the key is pressed.
No = 0
Yes = 4
B
D6
Always “00000”
00000
ººººº
D5 D4 D3 D2 D1
Program code for o key
Description
E-103
Useful features
00 to 99
Must be “00”
Give commission 1
B
(a+b+c) D7
Advanced programmings and registrations
Program code for <Age verification> key
Description
Selection
Program code
Yes = 0
No = 1
B
D10
000000000
All º
D9 to D1
Selection
Program code
0 to 4
B
D7
Define foreign currency totalizer number. (0, 1, 2)
(Totalizer 1 is defined if “0” is set)
0, 1 or 2
B
D6
Roundings
Round off = 0, Cut off = 1, Round up = 2
0, 1 or 2
B
D5
0
º
D4
0 to 9
B
D3
Print the registered date.
Must be “000000000” (nine zeros).
Program code for <Currency exchange> key.
Description
Define foreign currency symbol (0, 1, 2, 3, or 4). See “Setting symbol
characters” on pege E-80. Setting “0” defines the local currency.
Must be “0”.
ADD (decimal point position)
0. = 0, 0.0 = 1, 0.00 = 2, 0.000 = 3
Symbol for decimal point
Point = 0
Comma = 1
Symbol for separator
Comma = 0
Point = 4
Must be “0”
B
D2(a+b)
e.g.) for 1,234.56
D2 = 0+0
0
º
D1
Selection
Program code
No = 0
Yes = 1
B
D7
Program number
B to B
D6 to D1
Selection
Program code
File number
BB
D6 D5
0000
All º
D4 to D1
Program code for <Arrangement> key
Description
Process numeric entry as programmed arrangement number.
Arrangement program number.
Program code for <Text recall> key
Description
Character file number.
Must be “0000”
E-104
Advanced programmings and registrations
Program code for <Multiplication> <Multiplication for> keys
Description
Multiplication procedure
! Quantity × Amount, @ Amount × Quantity
Roundings: Round off = 0, Cut off = 1, Round up = 2
Must be “0000”
Selection
Program code
!=0
@=1
B
D6
0, 1, or 2
B
D5
0000
ºººº
D4 D3 D2 D1
Program code for <Tax shift> key
Selection
Program code
Taxable status (01 ~ 04) (Taxable 1 if “00” is set)
Description
01 to 04
BB
D8 D7
Must be “000000”
000000
ºººººº
D6 D5 D4 D3 D2 D1
Program code for <Credit> key.
Description
Prohibit tendered amount entry
Force to enter tendered amount.
Selection
a
No = 0
Yes = 1
b
No = 0
Yes = 2
c
No = 0
Yes = 4
Print breakdown of VAT.
French food coupon
Performs Finnish rounding
Maximum amount for subtotal and tendered amount.
e.g.) •9,000, D4 = 9, D3 = 3
Must be “00”
No = 0
Yes = 1
a
No = 0
Yes = 1
b
No = 0
Yes = 4
D4: Maximum value (0 ~ 9)
D3: Number of zeros (0 ~ 9)
00
Program code
B
(a+b+c) D7
B
D6
B
(a+b)D5
BB
D4 D3
ºº
D2 D1
E-105
Useful features
Prohibit partial payment.
Advanced programmings and registrations
Program code for <New balance> key
Description
Cancel the transaction if no item is registered.
Must be “00”.
Function after normal (not in check tracking) registration.
Error = 0, Auto cash = 1 (see below)
Print breakdown of VAT.
Must be “00000”
Selection
Program code
No = 0
Yes = 4
B
D10
00
ºº
D9 D8
0 or 1
B
D7
No = 0
Yes = 1
B
D6
00000
º to º
D5 to D1
Auto cash: <New balance> key functions as key if it is pressed without opening a new check or calling
old check in the check tracking system.
E-106
Advanced programmings and registrations
Programming further clerk functions
This section explains how you can set further programming for clerks such as
setting clerks’ secret number, setting the register in training mode or setting commission rates given to clerks. In the training mode, the register operates normally
but the results will not be stored in the memory. You can use this feature for
getting to know the operations of the cash register for yourself or for newly hired
clerks.
Setting check number for clerk interruption and clerks’ secret number
Step
Operation
1 Turn the Mode switch to PGM position and select [System
>▪▪▪▪▪>F
2Enter 3 and press o key to set the register in the
3o
3 Enter 2 -digit clerk number followed by 07. The “07” is the
1007o
Setting] then press F key.
programming mode.
identification code for further program of clerks. Then press (Clerk no.)
4 Enter the program code and press F key. The ex-
ample on the right is for setting check number “123456” for
clerk interruption and clerk’s secret number “7890”.
Useful features
o key. The example on the right is for programming to
clerk number 10.
123456789
(program code)
F
5 If you wish to set the same program to the next clerk
number, perform the step 4 again. When you set to another
clerk (not next clerk number), repeat steps 3 and 4.
6Press o key to complete the settings.
o
Program code for check number for clerk interruption and clerks’ secret number
Description
Must be “000000” (six zeros).
Clerks’ secret number
Selection
Program code
000000
ºººººº
D10 D9 D8 D7 D6 D5
Secret number
BBBB
D4 D3 D2 D1
E-107
Advanced programmings and registrations
Other clerk settings
Step
Operation
1 Turn the Mode switch to PGM position and select [System
>▪▪▪▪▪>F
2Enter 3 and press o key to set the register in the
3o
3 Enter 2 -digit clerk number followed by 07. The “07” is the
1007o
Setting] then press F key.
programming mode.
identification code for further program of clerks. Then press (Clerk no.)
o key. The example on the right is for programming to
clerk number 10.
4 Referring the following tables, input the set code you wish
68o
to program and press o key. The example on the right
is for setting a commission rate.
(set code)
ample on the right is for setting 8.5% to commission rate 1
and 5% to commission 2.
(program code)
5 Enter the program code and press F key. The ex-
08500500F
6 If you wish to set the same program to the next clerk
number, perform the step 5 again. When you set to another
clerk (not next clerk number), repeat steps 3 through 5.
7Press o key to complete the settings.
o
Set code 67 (Training mode)
Description
Training mode
Selection
Program code
No = 0
Yes = 1
B
D6
Must be “00000”
ººººº
D5 D4 D3 D2 D1
Example 1: To set the clerk number 15 as a clerk being trained.
Press 3o1507o100000Fo
Set code 68 (Commission rates)
Description
Selection
Program code
Commission rate 1 (integer)
00 to 99
BB
D8 D7
Commission rate 1 (decimal)
00 to 99
BB
D6 D5
Commission rate 2 (integer)
00 to 99
BB
D4 D3
Commission rate 2 (decimal)
00 to 99
BB
D2 D1
E-108
Advanced programmings and registrations
Programming set menu
This program sets the menu number and sub items’ (included in the menu) PLU
number. You can set up to 15 items in a set menu.
Step
Operation
1 Turn the Mode switch to PGM position and select [System
>▪▪▪▪▪>F
2Enter 3 and press o key to set the register in the
3o
Setting] then press F key.
programming mode.
3 Enter 2 -digit set menu number followed by 28. The “28” is
the identification code for setting menu programming. Then
press o key.
1028o
This example is for programming set menu
number 10.
4 If you wish to use allocated flat PLU, proceed to step 5. If
0012
5 If you wish to use allocated <flat PLU> key, press <Flat
(@) <Flat PLU>
6Press F key. If you wish to set another item in the
F
7Press o key to complete the settings.
o
This example is for setting PLU 0012 in the
menu.
PLU> key. If you use shifted flat PLU, press @ and <Flat
PLU> keys.
menu, preform the step 4 or 5. To set another menu, repeat
the steps 3 through 5.
E-109
Useful features
you use normal PLU, enter 4- digit PLU number of an item
included in the menu and press PLU/
key.
S.DEPT
PLU/
S.DEPT
Advanced programmings and registrations
Programming auto operation of <Arrangement>
By using allocated <Arrangement> key, programmed operations are performed
automatically just by pressing <Arrangement> key. The following explains to set
the automatic operations.
Step
Operation
1 Turn the Mode switch to PGM position and select [System
>▪▪▪▪▪>F
2Enter 3 and press o key to set the register in the
3o
Setting] then press F key.
programming mode.
3 Enter 4- digit record number followed by 38. The “38” is the
identification code for arrangement programming. If you
enter “0000”, the register serches a vacant record number.
Then press o key.
4 Press <Arrangement> key.
5 Input 6-digit arrangement arrangement number and press
F key.
6 Input keys you wish to program automatic operations and
press <Arrangement> key.
7 Press <Arrangement> and o keys to complete the
program.
E-110
000038o
This example is for searching a vacant arrangement program number.
<Arrangement>
BBBBBBF
(Arrangement no.)
12x50!F
For programming to register a dozen of •0.50
dept. 01 item.
<Arrangement>o
Advanced programmings and registrations
Key allocation
This section explains how you can allocate various functions on the keyboard.
Before you allocate functions on the keyboard, please execute daily and periodic reset (Z)
report.
Allocatable keys
RECEIPT
FEED
JOURNAL
FEED
036
033
026
021
049
057
065
073
081
089
097
105
113
040
038
035
032
025
020
048
056
064
072
080
088
096
104
112
047
055
063
071
079
087
095
103
111
046
054
062
070
078
086
094
102
110
037
034
031
024
019
7
8
9
030
023
018
045
053
061
069
077
085
093
101
109
4
5
6
029
022
015
044
052
060
068
076
084
092
100
108
1
2
3
028
SUBTOTAL
043
051
059
067
075
083
091
099
107
0
011
012
027
013
042
050
058
066
074
082
090
098
106
Step
Operation
1 Turn the Mode switch to PGM position and select [System
>▪▪▪▪▪>F
2Enter 4 and press o key to set the register in the
4o
Useful features
C
Setting] then press F (#013) key.
programming mode.
3 If you are allocating department or flat- PLU function, enter
BBBB
the department or flat PLU number in 4 digits. If not, skip
this step.
Dept. or flat PLU number
you wish to allocate.
This example is for allocating <Flat PLU>
function.
4 Referring the following table, input 3- digit function code
063
5 Referring the above figure, press corresponding key.
6 Repeat step 3 through 5 for another key location.
7Press o key to complete the settings.
o
Example 1: To allocate <Flat PLU> number 1000 on #113 key:
4o1000063[113]o
Example 2: To allocate <Addition (Plus)> on #049 key:
4o029[049]o
E-111
Advanced programmings and registrations
Function
Cash/amount tendered
Code
Function
001
Non-add
Charge
002
Check tendered
003
Credit
Code
Function
Code
040
Multiplication
082
Non-add/no sale
041
Multiplication / For
083
No sale
042
New check
091
004
Customer number
043
Old check
092
New balance
006
Arrangement
044
New/old check
093
Text recall
010
Currency exchange
045
Add check
094
Tip
015
VAT
046
Age verification
106
Received on account
020
PLU
048
Help
141
Paid out
021
Price
049
Sign off
150
Coupon
023
Department
051
Tax Program
151
Reduction (Minus)
027
Tax shift
057
Dept no./Dept shift
152
Discount
028
Flat PLU
063
Cancel
236
Addition (Plus)
029
Menu shift
064
“00” double zero *1
096
Premium
030
Open
067
“000” triple zero *1
097
Manual tax
032
Clerk number
072
“.” decimal point *
098
Refund
033
Subtotal
075
Error correct/cancel
034
Receipt on/off
076
Receipt
038
Merchandise subtotal
080
*
1
Two zero key, three zero key, decimal point key can only be allocated on #011 and #012 keys.
E-112
1
Advanced programmings and registrations
Printing programmed data
After programs have been set, you can print the programmed data.
To print programmed unit price or percentage (other than PLU)
Step
1 Turn the Mode switch to PGM position and select [System Setting] then press F key.
2Enter 1 and press o key.
3Press o key again. The printer starts to print preset data.
Useful features
Printout
1: Program read symbol
P01....................
CASH
−
%−
DEPT001
DEPT002
@0.00
@1.00
10%
0001−05
@1.00
0002−05
@2.00
1
2: Transaction key unit price or rate
3: Department descriptor/rec-#/05
4: Unit price
2
3
4
E-113
Advanced programmings and registrations
To print programmed characters (except PLUs)
Step
1 Turn the Mode switch to PGM position and select [System Setting] then press F key.
2Enter 2 and press o key.
3Press o key again. The printer starts to print preset data.
Printout
1: Program read symbol
P02....................
GROSS
NET
CAID
CATL
0001−01
0002−01
0003−01
0004−01
0005−01
0001−02
0002−02
0003−02
0004−02
0001−05
0002−05
0003−05
0004−05
0001−06
0002−06
0003−06
0004−06
0001−07
0002−07
0003−07
0004−07
CASH
CHECK
PD
DEPT001
DEPT002
DEPT03
GROUP01
GROUP02
GROUP03
C01
C02
C03
GT
0001−20
• @No/ ** /
NoCT @LB *QT
X
BUSY
FIX
TRANS
PLU
DAILY X
PERIODIC 1X
PERIODIC 2X
0001−23
0002−23
0003−23
0001−24
0002−24
0003−24
0004−24
0001−29
0002−29
0003−29
0004−29
0001−39
CHARACTER RECALL********
****************
0002−39
2: Fix total character
3: Transaction key character
4: Department character
2
5: Group character
6: Clerk character
7: GT character
3
8: Special character
9: Report header character
10: Batch X/Z character
4
5
6
7
0001−32
YOUR RECEIPT
0002−32
THANK YOU
E-114
1
8
9
10
11
12
11: Receipt message
12: Text recall character
Advanced programmings and registrations
To print general programming (except PLUs)
Step
1 Turn the Mode switch to PGM position and select [System Setting] then press F key.
2Enter 3 and press o key.
3Press o key again. The printer starts to print preset data.
Printout
1: Program read symbol
P03....................
CASH
CHECK
PD
11−66
15−66
C01
67
68
0001−09
0002−09
0001−22
0002−22
0003−22
0001−05
00000000000000
00000000
@1.23
0002−05
0001−07
0000010001
0000000000
00000000
0002−07
00:00 −> 01:00
01:00 −> 02:00
02:00 −> 03:00
2200000000
0000000000
0000000000
2
3
4
2: Transaction key program
3: Key character/rec-#/file-#
4: Key program
5: D
epartment program/Key character/rec-#/
file-#
6: Key program
7: Address code 11 program
5
6
7
8
9
10
11
12
Useful features
DEPT001
0001−02
00000000000000
0002−02
00000000000000
0003−02
00000000000000
1
8: Address code 15 program
9: Clerk program/Clerk name/rec-#/file-#
10: Check #/secret-#
11: Compulsory
12: Commission rate
13: Time range program
14: General control program
15: Tax table
16: Batch X/Z program
13
14
0001−28
0002−28
0001−25
TX1
TX1
TX1
DAILY X
00
PERIODIC
10.25%
0000
5003
0001−29
11−12−17−15−00
00−00−00−00−00
1X
0002−29
15
16
E-115
Advanced programmings and registrations
Printout
17: Clerk detail link program
0001−30
NET
0001−38
REG1
1
2
DEPT001
CASH
0002−38
0001−62
MC#01
0001−98
0002−98
17
0001−01
0020−01
000001
204−000
001−000
002−000
026−051
013−001
000000
00000000000000
0000000000
18: A
rrangement program/Rec-#/file-#/arrange
no.
19: Key descriptor/rec-#/file-#
20: Scheduler program
18
19
21: I/O parameter table
20
0001−91
00000000
00000000000000
00000000000000
21
To print preset unit price of PLU
Step
Printout
1 Turn the Mode switch to PGM position and select [System
Setting] then press F key.
2Enter 6 and press o key to set the register in the
programming mode.
3Enter 104 and press o key.
4 Enter starting PLU number and press F key. For
P01....................
1
#0001 − #0884
PLU0001
0001−04
@1.00
PLU0002
0002−04
@2.00
2
3
4
example, if you wish to print from PLU number 0001, input
0001F.
5 Enter the last PLU number and press F key. For
example, if you wish to print up to PLU number 0884, input
0884F.
E-116
1: Program read symbol
2: Range of PLU No.
3: PLU name/rec-#/04
4: Unit price
Advanced programmings and registrations
To print preset characters of PLU
Step
Printout
1 Turn the Mode switch to PGM position and select [System
Setting] then press F key.
2Enter 6 and press o key to set the register in the
programming mode.
3Enter 204 and press o key.
4 Enter starting PLU number and press F key.
5 Enter the last PLU number and press F key.
P02....................
1
#0001 − #0010
PLU0001
0001−04
PLU0002
0002−04
PLU0003
0003−04
2
3
1: Program 2 mode symbol
2: Range of PLU No.
3: PLU character
To print PLU programmings
Step
Printout
Setting] then press F key.
2Enter 6 and press o key to set the register in the
programming mode.
3Enter 304 and press o key.
4 Enter starting PLU number and press F key.
5 Enter the last PLU number and press F key.
P03....................
1
#0001 − #0010
PLU0001
0001−04
00000000000000
11−66
000000
13−66
<− 0001−28
14−66
0
15−66
@1234.56
PLU0002
0002−04
2
3
4
5
6
Useful features
1 Turn the Mode switch to PGM position and select [System
7
1: Program 3 mode symbol
2: Range of PLU No.
3: PLU name/rec-#/file-#
4: Address code 01 ~ 10, 18 program
5: Address code 11 program
6: Address code 13 program
7: Address code 15 program
E-117
Advanced programmings and registrations
To print key allocation program
Step
Printout
1 Turn the Mode switch to PGM position and select [System
Setting] then press F key.
2Enter 4 and press o key to set the register in the
programming mode.
3Press o key.
P03....................
1-----------------------------00
0015-02
011-096
.
0009-02
012-098
CASH
0004-02
013-001
1: Program read symbol
2: Function character/rec-#/file-#
3: Hard key code/function code
E-118
1
2
3
Advanced programmings and registrations
Printing various sales reports
You can print categorized sales reports such as PLU sales report, item group sales report, hourly sales
report etc.
•Please do not perform the reset (Z) report during the business hour as it clears stored sales data from
the memory.
•Please see page E-49 for printout sample of a daily report.
Printing various sales reports
The followings are the example operation for printing an electronic journal of
February 28, 2013.
Step
Display
1 Turn the Mode switch to X or Z position. The display shows
Useful features
the top menu of sales reports.
2Using ? or > keys select the report you wish to obtain.
The example on the right is for selecting electronic journal.
As it is the lowest column, [EJ ] is hidden from the default top menu. Select it by keep pressing > key.
3Press F key. The display shows the next screen asking date or consecutive number. Select [Date] and press
F key.
4 Input year, month, and day from ten key pad. The journal of
assigned date will be printed if you press F key.
E-119
Advanced programmings and registrations
PLU sales report
X
PLU
0000014
PLU0001
17
0.53%
•17.00
#0001
PLU0100
42
4.03%
•69.00
#0100
−−−−−−−−−−−−−−−−−−−−−−−−
TL
188.61
•516.10
1
2
3
4
5
1
2
3
4
5
6
7
Read symbol/report title
1
2
3
4
5
6
Read symbol/report title
1
2
3
4
5
6
7
8
9
10
11
Read symbol/report title
Report code
PLU name/Quantity
Sales ratio/PLU amount
PLU code
Total Quantity
Total amount
6
7
Item group sales report
X
GROUP
0000016
GROUP01
203.25
33.87%
•1,108.54
GROUP02
183
40.58%
•1,327.80
GROUP03
12
0.40%
•13.25
GROUP99
13
0.54%
•17.80
−−−−−−−−−−−−−−−−−−−−−−−−
TL
862
•3,272.00
1
2
3
4
Report code
Group No./Quantity
Sales ratio/group amount
Total quantity of group
Group total amount
5
6
Hourly sales report
X
HOURLY
0000019
00:00−>01:00
CT
GROSS
NET
1.90%
1
•1.10
No
1
•1.20
1
2
3
4
5
6
7
23:00−>00:00
CT
1
GROSS
•3.45
NET
No
1
3.90%
•3.59
−−−−−−−−−−−−−−−−−−−−−−−−
TL
CT
280
GROSS
•1,937.61
NET
No
25
•2,096.80
E-120
8
9
10
11
Report code
Time zone
No. of customers
Gross sales amount
No. of receipts
Sales ratio/net sales amount
Total No. of customers
Gross total amount
Total No. of receipt
Net total amount
Advanced programmings and registrations
Monthly sales report
X
0000020
1
2
1236.76
•12,202.57
No 214
•12,202.57
3
4
5
6
7
MONTHLY
1......
GROSS
NET
31......
GROSS
8
9
10
11
12
13
14
Read symbol/report title
1
2
3
4
5
6
7
Read report symbol/report title
Report code
Month
Gross symbol/Quantity
Gross sales amount
Net symbol/No. of customers
Net sales amount
Total symbol
Gross symbol/Quantity
Gross sales amount
Daily gross sales average
Net symbol/No. of customers
Net sales amount
Daily net sales average
Useful features
2132
•14,187.57
NET
No 205
•13,398.76
−−−−−−−−−−−−−−−−−−−−−−−−
TL
GROSS
9746.63
•161,022.49
•16.52
NET
No 2351
•161,022.49
•68.49
1
2
3
4
5
6
7
8
9
10
11
12
13
14
Flash report
X
FLASH
0000071
DECLA
GROSS
NET
CAID
•6,919.04
•0.00
111.15
•7,054.14
No 120
•7,263.20
•6,919.04
1
2
3
4
5
Report code
Declared amount
Difference
Gross total
Net total
Cash in drawer
6
7
About “Declared money” and “Cash in drawer”
If you programmed the register to force entry of total amount in drawer, you need to count the money in
the drawer and input the amount (money declaration) before read (X) or reset (Z) report printing. On the
other hand, “Cash in drawer” is the total money in the drawer calculated by the register so that you can
compare the actual amount and the calculated amount.
To program money declaration, please see page E-85.
E-121
Advanced programmings and registrations
Open check report
Z
OPEN CHECK
0001025
REG 06−20−2013 11:58
C01
0001
000004
TABLE No.123456
CT 12
CHECK No.123
•250.00
REG 06−20−2013 11:58
C01
MC#01
000006
TABLE No.111111
CT 14
CHECK No.12345678
BUSY
•300.00
-------------------------------TL
No
28
•1,374.00
1
2
3
4
5
6
7
1
2
3
4
5
6
7
8
9
10
Report header/title
1
2
3
Report header/title
Report code
Mode symbol/date/time
Clerk descriptor/Mc- No./consecutive No.
Table No./No. of customer
Check No.
Subtotal amount
Print “BUSY”, if the check is currently opened.
No. of open check
Open check total
8
9
10
Electronic journal
X
E−JOURNAL
0000058
REG 06−20−2013 11:58
C01
0001
000123
1 DEP0T01
T1
•1.00
1 DEPT002
T1
•2.00
5 DEPT003
•5.00
7 No
TA1
•3.00
TX1
•0.15
TX1
•0.10
TL
•8.10
CASH
•10.00
CG
•1.90
REG 06−20−2013 11:59
C01
0001
000124
1
2
Report code
Journal image
3
About electronic journal
Instead of printing days’ sales journal, the register stores daily sales report in the memory and you can
obtain the report by assigning day or consecutive number.
E-122
Advanced programmings and registrations
To print individual department, PLU, and Flat PLU
Instead of printing sales reports in a lump, you can obtain reports of specific
departments, PLUs, or Flat PLUs.
Step
Printout
1 Turn the Mode switch to X position.
2 Just press department keys or enter PLU numbers.
For example, # for Dept.003.
1
() for flat PLUs 0001 and 0002.
DEPT
SHIFT/
DEPT#
89
DEPT
SHIFT/
DEPT#
for PLUs 1 and 89.
3Press o key to exit from individual report printing.
X
1
INDIVIDUAL
DEPT028
8.13%
PLU0001
0.53%
#0001
38
•257.53
17
•17.00
7
8
1: Read symbol/report title
2: Department Name/No. of items
3: Sales ratio/amount
4: PLU Name/No. of items
5: Sales ratio/PLU amount
6: PLU code
7: Total No. of items
8: Total amount
E-123
Useful features
----------------------------------------------TL
88.61
•516.10
2
3
4
5
6
Advanced programmings and registrations
Periodic sales report
Apart from daily report, you can obtain periodic sales report. The register prints
total sales data from the last periodic report. Namely, if you do this operation
monthly, you can obtain monthly sales reports. The cash register allows you to
obtain two kinds of periodic reports so that not only monthly reports, you can also
get weekly reports.
Step
1 Turn the Mode switch to X2/Z2 position. The display shows
report selection screen.
2 Select a report using ? or > keys. Z1 and Z2 clear the
accumulated data while X1 and X2 store the sales data
remained.
3Press F key. The printer prints our the periodic report.
E-124
Display
Advanced programmings and registrations
−−−−−−−−−−−−−−−−−−−−−−−−
ZZ1 PERIODIC 1Z
−−−−−−−−−−−−−−−−−−−−−−−−
ZZ1 DEPT
0001
0001115
DEPT001
8.13%
DEPT002
38
•257.53
18
•1,362.26
−−−−−−−−−−−−−−−−−−−−−−−−
TL
88.61
•1,916.10
−−−−−−−−−−−−−−−−−−−−−−−−
ZZ1 FIX
0001
0001111
GROSS
2
3
4
5
6
7
8
9
10
11
12
13
14
15
16
17
18
19
20
21
22
23
24
25
Report title
Department report title/reset counter
Report code
Department Name/No. of items *1
Sales ratio/amount *1
Total No. of items
Total amount
Fixed total report title/reset counter
Report code
Gross total *2
Net total *2
Cash in drawer *2
Charge in drawer *2
Check in drawer *2
Credit in drawer 1 *2
Credit in drawer 2 *2
Credit in drawer 3 *2
Credit in drawer 4 *2
Refund mode *2
Useful features
981.25
•6,574.40
NET
No
111
•7,057.14
CAID
•6,919.04
CHID
•139.04
CKID
•859.85
CRID(1)
•709.85
CRID(2)
•0.00
CRID(3)
•0.00
CRID(4)
•0.00
−−−−−−−−−−−−−−−−−−−−−−−−
RF
No
3
•10.22
CUST
CT
111
AVRG
•63.57
DC
•1.22
REF
•2.42
ROUND
•0.00
CANCEL
No
2
•12.97
−−−−−−−−−−−−−−−−−−−−−−−−
TA1
•2,369.69
TX1
•128.86
TA2
•2,172.96
TX2
•217.33
1
1
2
3
4
5
6
7
8
9
10
11
12
13
14
15
16
17
18
19
20
21
22
23
24
25
26
27
28
29
Customer number *2
Average sales per customer *2
Discount total *2
Refund key *2
Rounding total *2
Cancellation *2
Taxable 1 amount *2
Tax 1 amount *2
Taxable 2 amount *2
Tax 2 amount *2
26
27
28
29
E-125
Advanced programmings and registrations
−−−−−−−−−−−−−−−−−−−−−−−−
ZZ1 TRANS
0001
0001112
CASH
No
362
•1,638.04
CHARGE
No
56
•1,174.85
RC
No
4
•810.00
PD
No
5
•5.00
CORR
No
14
•39.55
RCT
No
3
NS
No
5
−−−−−−−−−−−−−−−−−−−−−−−−
ZZ1 CASHIER
0001
0001117
C01
NET
C02
*
*
1
2
1
2
3
1
2
3
4
5
6
7
8
Function key report title/reset counter
Report code
Function key count/amount *1
Clerk report title/reset counter
Report code
Clerk name
Net total
Clerk name
4
5
...............1
No
111
•1,845.35
6
...............1
8
7
Zero totalled departments/functions (the amount and item numbers are both zero) are not printed.
These items can be skipped by programming.
E-126
Advanced programmings and registrations
Using an SD card
You can store sales data or program data to an SD card or you can restore the data from SD card to
your cash register.
The following table explains what you can do with an SD card.
[Backup→SD]
Stores sales data and program data of register to SD card.
[Restore←SD]
Restores sales data and program data from SD card to register.
[Program→SD]
Stores all or certain program data to SD card.
[Program←SD]
Restores all or certain program data from SD card to register.
[Backup→Flash]
Stores program data into the register’s built-in flash memory (for a case of power failure with
flat batteries).
[SD Format]
Formats an SD for the first usage.
The following sections explain the operation examples of the features using an SD card.
To format an SD card
When you use a new SD card, you must format the SD card first.
Useful features
All the data stored in the SD card will be cleared if you execute formatting.
Step
Display
1 Insert an SD card into the SD card slot.
2 Turn the Mode switch to PGM position and select [SDcard
Setting].
3Press F key.
Select [SD Format] on the SD card setting screen.
E-127
Advanced programmings and registrations
Step
Display
4 Select [YES] and press F key.
The register starts to format the SD card.
5 Now the SD card is formatted and you can use it for storing
cash register data in it.
To store program data in an SD card
The following operation explains how you can back up all the program data in an
SD card.
Step
1 Insert an SD card into the SD card slot.
2 Turn the Mode switch to PGM position and select [SDcard
Setting]. Then press F key.
3Select [Program→SD] and press F key.
E-128
Display
Advanced programmings and registrations
Step
Display
4 Select [YES] and press F key.
5 After for a while, the display indicates “Backup complete”.
Useful features
E-129
Advanced programmings and registrations
Before you consider it as a problem
Error code table
Error code
Message
Meaning
Action
E001
Wrong mode
Mode switch position changed
before finalization.
E003
Wrong operator
The signed on clerk differs from the Input correct check number or asclerk performed the tracking check sign the proper clerk number.
registration.
E004
Error INIT/FC
Initialization or unit lock clear opera- Complete operation.
tion in progress.
E008
Please sign on
Registration without entering a clerk Enter a clerk number.
number.
E010
Close the drawer
The drawer is left open longer than Close the drawer.
the program time (drawer open
alarm).
E011
Close the drawer
Attempt to register while the cash
drawer is open.
Close the drawer.
E016
Change back to REG mode
Two consecutive transactions attempted in the refund mode.
Switch to another mode and then
back to the RF mode for the next
transaction.
E017
Enter CHK/TBL number
Attempt made to register an item
without inputting a check number.
Input a check number.
E018
Enter Table number
Attempt made to register an item
without inputting a table number.
Input a table number.
E019
Enter number of customers
Finalize operation attempted without Enter the number of customer.
entering the number of customer.
E021
No DEPT Link
No department linked PLU is
registered.
Correct the program.
E026
Enter condiment/preparation
PLU
No condiment/preparation PLU is
registered.
Register condiment/preparation
PLU.
E029
In the tender operation
Item registration is prohibited, while Finalize the transaction.
partial tender.
E031
Press ST key
Finalization of a transaction attempted without confirming the
subtotal.
E033
Enter tendered amount
Finalize operation attempted without Enter the amount tendered.
entering amount tender.
E035
Change amount exceeds limit
Change amount exceeds preset
limit.
E036
Remove money from the drawer Contents of the drawer exceed
programmed limit.
Perform paidout operation.
E037
Digit or amount limitation over
High amount lock out/low digit lock
out error
Enter correct amount.
E038
Perform money declaration
Read/reset operation without declar- Perform money declaration.
ing cash in drawer.
E040
Issue guest receipt
Attempt to register a new transac- Issue a guest receipt.
tion without issuing a guest receipt.
E046
REG buffer full
Registration buffer full.
Finalize the transaction.
E049
CHECK memory full
Check tracking index memory full.
Finalize and close the check number currently used.
E-130
Return the mode switch to its
original setting and finalize the
operation.
Press o key.
Input amount tendered again.
Advanced programmings and registrations
Error code
Message
Meaning
Action
E050
DETAIL memory full
Check tracking detail memory full.
Finalize and close the check number currently used.
E051
CHK/TBL No. is occupied
Attempt to made use <New Check>
to open a new check using a
number that is already used for an
existing check in check tracking
memory.
Finalize and close the check that is
currently under the number that you
want to use or use a different check
number.
E053
CHK/TBL No. is not opened
Attempt made to use <Old Check> Use the correct check number (if
reopen a new check using a number you want to reopen a check that
that is not used for an existing check already exists in check tracking
in check tracking memory.
memory) or use <New Check> to
open a new check.
E075
Negative balance cannot be
finalized
Attempt to finalize a transaction
when balance is less than or equal
to zero.
E101
PLU maintenance file full. Press Scanning PLU direct maintenance/
<#2> to exit
batch maintenance file becomes
full.
Terminate the maintenance.
E103
PLU Code is not exist. Input the PLU code is not existed in the file.
PLU Code
Enter proper PLU code.
E105
PLU file full
Scanning PLU file full
Modify the designated item.
E106
Item exists in the PLU FILE
The designated item has already
existed in the scanning PLU file.
E112
Close the journal platen arm
The journal platen arm is opened.
Close the journal platen arm.
E114
Close the receipt platen arm
The receipt platen arm is opened.
Close the receipt platen arm.
E139
Negative balance is not allowed Attempt to register <–> or <CPN>
when the balance becomes negative.
Register item(s) until the balance
becomes positive amount.
E146
Arrangement file full
Arrangement file is full.
Set the arrangement properly.
E200
Insert SD
SD is set.
Set SD.
E201
Illegal Format
Illegally formatted SD
Format the SD.
E202
File not found
The designated file is not found in
the SD.
Enter proper file name.
E205
File already exist.
Can not write, because designated
file has already been in the SD.
Check the operation and retry.
E-131
Useful features
Enter proper minus/coupon amount.
Advanced programmings and registrations
When “EJ FULL” sign appears on the display
When the register shows this sign, issue electronic journal
read report (if necessary) and reset the memory immediately.
In case of power failure
If the power supply to the cash register is cut by a power failure or any other reason, simply wait for
power to be restored. The details of any ongoing transaction as well as all sales data in memory are
protected by the memory backup batteries. (This is the reason to install the batteries.)
•Power failure during a registration
The subtotal for items registered up to the power failure is retained in memory. You will be able to continue with the registration when power is restored.
•Power failure during printing a read / reset report
The data already printed before the power failure is retained in memory. You will be able to issue a
report when power is restored.
•Power failure during printing of a receipt / journal
Printing will resume after power is restored. A line that was being printed when the power failure occurred is printed in full.
•Other
The power failure symbol is printed and any item that was being printed when the power failure occurred is reprinted in full.
In case the register is locked up
If you make a mistake in operation, the cash register may lock up to avoid damage to programs and
preset data. Should it happens, you can use the following procedure to clear the lock up without losing
any data.
1 Power off the register.
2 Insert the PGM key in the mode switch.
3 Press down f, and turn the mode switch to PGM mode.
4 The display shows 0.00, then release f
5Presss,o then issue a receipt.
E-132
Advanced programmings and registrations
About the low battery indicator
If this indicator appears when you switch the cash register on,
it can mean one of three things:
•No memory backup batteries are loaded in the cash register.
•The power of the batteries loaded in the unit is below a
certain level.
•The batteries loaded in the unit are dead.
Important !
Whenever the low battery indicator appears on the display, load a set of two new batteries as soon as
possible. If there is a power failure or you unplug the cash register when this indicator appears, you will
lose all of your sales data and settings.
Be sure to keep the power cord of the cash register plugged in whenever you replace the batteries.
No. of totalizers
Amount
(10 digits)
No. of items
(4 digits)
Department
200
O *1
O *3
PLU
7000
O*
O*
Hourly sales
24
O*
Monthly sales
31
O *1
Clerk
50
O *1
Transaction key & fix total
--
Non resettable grand sales total
1
Reset counter
8
Comsecutive No.
1
1
Count
(4 digit)
Periodic
totalizer
O
3
O *4
1
O *5
O *5
O *5
O * or O * or O * or O *
1
O*
No. of items
(4 digits)
3
4
O
5
2
O *4
O
O*
5
-9,999,999.99 ~ 99,999,999.99
-9,999,999,999,999.99 ~ 99,999,999,999,999.99
3
* -99,999.999 ~ 999,999.999
4
* 1 ~ 9999
5
* 1 ~ 999999
Specifications and design are subject to change without notice.
*
*
1
2
E-133
Useful features
Contents
Category
Advanced programmings and registrations
Specifications
Entry
10-key system, buffer memory 8 keys (2-key roll over)
Department
Full key system
Main display
26 characters x 10 lines, Dept. name, PLU name, Total, Transaction names,
Change
Customer display
20 characters x 1 line. Amount 10 digits (zero suppression)
Printer
Receipt
Thermal alpha-numeric system 24 digits, receipt on/off key
Store name or slogan is printed automatically
Journal
Thermal alpha-numeric system 24 digits
Automatic take up roll winding
Paper roll
58 (W) × 80 (D) mm
Paper thickness
0.06 to 0.08 mm
Paper feed
Receipt and Journal
Print speed
About 14 l/s
Listing capacity
Amount
9999999999
Quantity
9999.999
Tendered amount
9999999999
Percent
99.99
Tax rate
9999.9999
Numbers
9999999999999999
Chronological data
Date print
Automatic date printout on receipt and journal, automatic calendar
Time print
Automatic time printout on receipt and journal, 24-hour system/12-hour system
Alarm
Key catch tone, error alarm
Memory protection battery
The effective service life of memory protection batteries (two new size AA manganese batteries) is approximately one year from installation into the machine.
Power supply/power consumption
See the rating plate.
Operation temperature
32˚F to 104˚F (0˚C to 40˚C)
Humidity
10 to 90%
Dimensions
220 mm (H) × 400 mm (W) × 450 mm (D) (8.6” (H) × 15.7” (W) × 17.7” (D))
Weight
10 kg (22 lbs.).
E-134
Useful features
E-135