1
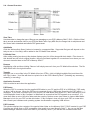
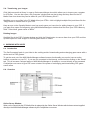
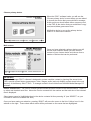
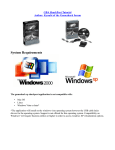
Instruction Manual For PSP® Get Connected! for SONY PSP® with additional support for SONY PLAYSTATION®2 1. General Introduction 2. Getting Started a. Product Contents b. System Requirements c. Installation and Connection d. General Overview 3. Working with Video a. Introduction and Overview b. Suitable Source Media 4. Working with Music a. Introduction b. Transferring your Music 5. Working with Images a. Introduction b. Transferring your Images 6. Working with Saves a. Introduction b. Overview c. Getting new Game-Saves on your PSP d. Understanding Game-Saves and Power-Saves 7. Connecting to your PS2™ a. Introduction b. Overview c. Media Manager PS2™ software disc overview 8. Technical Support 1. General Introduction The Get Connected! pack for SONY’s handheld PSP device is the fully featured way to connect your PSP to your PC or even your PS2™ console! Use the Get Connected! pack’s high-speed USB lead to instantly connect your PSP to a world of content management via your PC using the included Max Media Manager software. Or even use the included Media Manager PS2™ software with the USB lead to allow your PSP to function as a storage device for your PS2™ game-saves! 2. Getting Started 2.a. Product Contents Your Get Connected! product should include the following, so check the box to make sure everything is there: • • • • 1 1 1 1 x x x x High Speed USB lead (MINI USB to USB) MAX Media Manager PC software disc Media Manager PS2™ software disc User manual Please ensure you identify and use the correct discs for installing the PC software (silver under-side) and the PS2™ software (blue under-side). 2.b. System Requirements To get maximum functionality out of your Get Connected! pack you need a set-up that meets the following minimum requirements: MINIMUM SYSTEM REQUIREMENTS Computer Computer with a Pentium 3 (or equivalent) processor with one free USB / Processor port. (P4 1G+ recommended for video encoding) Communication Internet connection (optional for software updates and to access online content) Operating System Microsoft Windows® 98 Second Edition (Windows® XP recommended) Memory 128Mb RAM Install size: 40Mb plus additional hard drive space for storing media (1Gb recommended for large video files) Display 800X600 SVGA or higher, True Colour Drive CD-ROM drive (for installation) Optional Expansion SONY PS2™ (optional) Additional Memory Stick™ DUO memory cards (optional) 2.c. Installation and Connection Insert the CD-ROM titled "Max Media Manager PC Application" into your PC CD-ROM drive and wait a couple of seconds (if you have auto-run enabled) for the installation to start. If you don’t have auto-run enabled find the SETUP.EXE program on the CD and run it. Follow the on-screen instructions. Since the PSP acts as a standard Removable Storage Device in Windows® no additional driver installation is required. Connect the MINI USB end of the USB cable to your PSP and the other end to a free USB slot on your PC. Windows® will only recognize the PSP once it has been put in USB MODE. To do this choose ‘USB Connection’ from the ‘Settings’ menu on your PSP. If you find that your PSP is not recognized by Windows® (look in ‘My Computer’ for a new storage device with a new drive letter) or the Max Media Manager software then consult your Windows®’ or PC manufacturer’s documentation. For instructions on how to connect your PSP to your PS2™ see section 7. When you first run your PC application you will be asked whether you would like to look online for an upgraded version of the software. It is highly recommended that you do this as new features and improved support for different file formats are being added all the time. 2.d. General Overview View Tabs Use these tabs to change the type of files you are managing on your PSP’s Memory Stick™ DUO. Click the ‘Video’ tab to encode and transfer video to your PSP, the ‘Music’ tab to copy MP3 files, the ‘Images’ tab to add pictures and the ‘Saves’ tab to download and transfer PSP game-saves. Add Media Click the ‘Add media to library’ button to browse for a supported files. Supported file types will depend on the tab you are on. Your file(s) will be added to the PC Media View window. PC Media View After adding media (see above) this window displays your list of files along with their details. Files shown in this window are still in their original location, they are just listed together for convenience from where you can choose to transfer them to the PSP’s Memory Stick™. Remove Highlighting a file and then clicking ‘Remove’ will simply remove it from your PC Media View window. The file itself will be left in its original location. Transfer Highlight one or more files in the PC Media View (use CTRL+ click to highlight multiple files) and then click the ‘Copy’ button. Your files will then be copied over to the PSP’s Memory Stick™ (including any necessary renaming or encoding). Application Controls Used to minimize and close the application. PSP Status When the PSP is connected via the supplied USB cable to your PC and the PSP is in USB Mode, ‘PSP ready on drive:’ will be shown. When the PSP is not connected or not in USB mode ‘Searching for PSP’ will be displayed. If you have connected your PSP and put it in USB Mode (See section 2.c.) and ‘Searching for PSP’ is still displayed check in ‘My Computer’ in Windows® to ensure that the PSP appears as a new drive. If it does then make a note of the drive letter and then use the Options screen (see below) to instruct Max Media Manager to look for your PSP on that drive letter. If ‘My Computer’ does not show your PSP as a new drive then consult your hardware and operating system documentation regarding USB devices. PSP Contents This window displays the contents of the special video folder on the Memory Stick™ DUO inserted in your PSP. If no files are shown then no PSP compatible video media is on your Memory Stick™. As you use the Max Media Manager software to add video files to your Memory Stick™ you will see the contents shown here. Capacity Bar This bar displays the total capacity of your Memory Stick™ DUO (the figure in brackets) and the amount of free space available. Space on your Memory Stick™ is used by all files you add to it, therefore, if you have a lot of game-saves or MP3 files on your Memory Stick™, then less space will be available for storing video files. This shared capacity can explain why even when no files are shown in the PSP Contents window the Capacity Bar shows full or nearly full because the space is being used by other types of files. Status Bar When you copy files across to the Memory Stick™ in your PSP the status of the transfer will be displayed in the Status Bar area at the bottom of the screen. Options Click the options button to change a number of settings relating to the MAX Media Manager software including specifying a drive letter for your PSP (which will stop it from searching all drive letters) and on some versions of the software allow you to change the default encoding options for video files. You can also use the Options screen to check for a newer version of the software, which you should do periodically. 3. Working with Video 3.a. Introduction and Overview Your PSP can function as a fully-fledged handheld movie player especially when used in conjunction with a high capacity Memory Stick™ DUO (up to 1GB cards are currently available) and the included MAX Media Manager software on the PC to convert your source media into PSP friendly movie files. The PSP will only allow playback of video files correctly named, filed and encoded to the PSP specification. Having added media to your PC Media View library, when you highlight a video file and click copy MAX Media Manager will automatically convert and encode your video files into PSP compatible video then copy them to the Memory Stick™ in your PSP. Your movie files will automatically be renamed during this process, necessary for them to be played on the PSP. The status bar at the bottom of the screen will display the progress of the process which may take several minutes when working with large video files. 3.b. Suitable Source Media The following types of video file are accepted source media for the MAX Media Manager software: • • • • • • • • AVI MPG / MPEG VOB (DVD) WMV MOV MPE 3GP MP4 We are always looking to expand our support for new file types, so ensure you have the latest version of the software for maximum support (see section 2.c.) TOP TIP: If you want to enjoy clips from your DVD movies on your PSP, use a program like DVD Shrink (http:// www.dvdshrink.org/) to rip your DVDs into suitable sized vob files before using Max Media Manager to encode the clips into PSP friendly video. 4. Working with Music 4.a. Introduction Use the MAX Media Manager software to automatically put your MP3 music files on your PSP’s Memory Stick™ to play back when you’re on the move. The PSP can natively play a wide range of MP3 specifications and should be able to play just about any MP3 file you already have on your PC without the need for reencoding. 4.b. Transferring your Music Take a look at the overview for the screen layout described in section 2.d. and familiarize yourself with the basic functionality of the MAX Media Manager interface. Click the ‘Music’ tab at the top of the screen to put the MAX Media Manager software in music mode. Adding MP3s Click ‘Add new media to library’ to open a file browse dialogue box with allows you to search your computer for MP3 files. You can also open a ‘My Computer’ window and use that to drag-and-drop files into the PC Media View from where they can be added to your PSP’s Memory Stick™. Highlight one or more files in the PC Media View (use CTRL+ click to highlight multiple files) and then click the ‘Copy’ button to transfer them to your PSP. Keep an eye on the Capacity Meter to see how much space you have free for adding MP3s to your PSP. If you want more space for MP3s try using MAX Media Manager to delete other files from your PSP’s Memory Stick™ like videos, game-saves or images. Deleting MP3s Highlight files in the PSP Contents window and click the Delete button to remove them from your PSP and free up more space for other MP3s or files like game-saves or videos. 5. Working with Images 5.a. Introduction Your PSP’s fantastic screen and Memory Stick™ DUO storage makes it the perfect machine for showing off your digital pictures on the move, so why not use your Get Connected! pack to copy your pictures from your PC to your PSP? The PSP requires your images to be in JPG format (native format for most digital cameras). It is also worth remembering that the PSP’s screen is 480 x 272, so if you want to maximize the number of pictures you fit on your PSP (without distortion) you could use the software that came with your digital camera or scanner to resize your images. If you choose not to resize your images, the PSP will still display them and gives you options on how to scale the image on screen. 5.b. Transferring your Images Click ‘Add new media to library’ to open a file browse dialogue box which allows you to browse your computer for JPG files. You can also open a ‘My Computer’ window and use that to drag-and-drop files into the PC Media View from where they can be added to your PSP’s Memory Stick™. Highlight one or more files in the PC Media View (use CTRL+ click to highlight multiple files) and then click the ‘Copy’ button to transfer them to your PSP. Keep an eye on the Capacity Meter to see how much space you have free for adding images to your PSP. If you want more space for images try using MAX Media Manager to delete other files from your PSP’s Memory Stick™ like videos, game-saves or MP3s. Deleting Images Highlight files in the PSP Contents window and click the Delete button to remove them from your PSP and free up more space for other images or files like game-saves or videos. 6. Working with Saves 6.a. Introduction The Get Connected! pack is your ticket to the exciting world of downloading and exchanging game-saves with a whole world of PSP gamers. To get the most out of the MAX Media Manager software’s saves functionality you need to have an active Internet connection on your PC. If you are not connected to the Internet, connect before clicking on the ‘Saves’ tab. This is because a unique feature of MAX Media Manager is its ability to connect directly to the renowned Codejunkies.com server to give PSP users a taste of the power of exchanging and downloading PSP gamesaves online. 6.b. Overview Online Server Window When on the ‘Saves’ tab the PC Media View is replaced by the Online Server Window which shows content supplied directly to the MAX Media Manager software by the Codejunkies.com server. Transfer Having highlighted a game-save file, clicking the Transfer button will begin to download the game-save from the Codejunkies.com server directly to you PSP’s Memory Stick™ for use in your game. PSP Contents When on the ‘Saves’ tab, the PSP Contents window will be displaying any PSP game-saves you already have on your Memory Stick™. When you transfer a new save to your PSP you will see it appear here confirming the download. Capacity Bar Game-saves share space with all other types of files on your PSP’s Memory Stick™. If you find you don’t have room for a game-save, try deleting other files such as videos, images or music. Delete When using the ‘Saves’ tab, the ‘Delete’ button will delete the highlighted game-save(s). Be careful when deleting game-saves especially if they are your own hard work! 6.c. Getting new Game-Saves on your PSP Providing your PC is connected to the Internet, the Online Server Window will be displaying the online gamesave content available to users of MAX Media Manager. This content is arranged into server folders and then grouped by game-name. Click the [+] symbol next to a server folder (such as ‘Online Game-Saves’ or ‘Online Power-Saves’) and gamename folders (like Ape Escape: On the Loose) to expand their content where saves available for download will be displayed. After clicking a [+] symbol be patient while the content is downloaded. If you see a game-save you would like to download, click to highlight it and then click the ‘Copy’ button to download and transfer it to your PSP. Be patient as depending upon the size of the game-save, this may take up to a minute. What to download It might sound obvious, but think about what saves you are downloading. Only download game-saves which you actually have the games for (a game-save on its own isn’t really much use!). Also, look carefully at the version of the game (US/EURO/JAP etc.) to make sure that a game-save that looks similar is indeed for your exact version of the game. If you find that a game-save will not load up from within your game it is likely that it’s for a different version: you should check for other versions available to download. 6.d. Understanding Game-Saves and Power-Saves MAX Media Manager is intended to give you a taste of the world of exchanging and downloading PSP gamesaves online but to get the most out of the content, it is important to understand what it is. You will see two types of save files available on the Codejunkies.com server for you to download and use on your PSP: Game-Saves and Power-Saves. Game-Saves Saves listed within a folder described as ‘Game-Saves’ or ‘Community Saves’ are saves that have been created by gamers playing PSP games conventionally and making saves in the same way you do. Of course, the best Game-Saves are those whose creators have accomplished impressive feats in a game like ‘100% Complete’, ‘All Levels Open’ etc., or made the save at an interesting point like ‘Just before last fight’. The majority of Game-Saves available to the MAX Media Manager software have been created and uploaded by users of Datel’s market leading Action Replay for PSP software which allows users to upload their GameSaves directly to the server. Power-Saves If normal Game-Saves (see above) can boost your enjoyment of your PSP games, imagine what Power-Saves can do! Power-Saves are like ‘genetically engineered’ game-saves which have been disassembled, modified and put back together by a team of highly skilled game code engineers in order to provide gamers with a set of unique circumstances that would never be possible to achieve through normal game play. Power-Saves can put you at the very start of a game with a full arsenal of weapons or make hundreds of cars available right from the start as you progress through story mode racing. Power-Saves might give you 10,000 lives or a million bullets! Power-Saves are the essence of Datel’s full blown PSP enhancement product ‘Action Replay’ which includes access to a comprehensive and constantly expanding database of Power-Saves to bust your games wide-open. Power-Saves sampler A strictly limited sample of Power-Saves are available through this MAX Media Manager software. To access the full database and get your hands on the Power-Saves first check out www.codejunkies.com for full details of Action Replay for PSP. 7. Connecting to your PS2™ 7.a. Introduction Another exclusive feature of the Get Connected! pack is that it allows you to connect your PSP to a SONY PS2™ via USB, allowing you to exchange files between the two consoles. If you’re struggling for space on your PS2™ memory cards why not connect your PS2™ to your PSP and transfer some of your game saves to your PSP’s Memory Stick™ DUO for safe keeping? There are so many possible applications for exchanging files between your PS2™ and PSP, we’re here to so you can Get Connected! – What you do once you are is up to you! 7.b. Getting Started To Get Connected! between your PS2™ and your PSP: • Connect the MINI USB end of the USB lead to your PSP and the other end to a USB port on the front of your PS2™ console. • Power-up your PS2™, insert the Media Manager PS2™ software disc and then reboot your console. • Turn on your PSP and choose USB Connection from the Settings menu. 7.c. Media Manager PS2™ software disc overview When using the Media Manager PS2™ software, the general key functionality is as follows: ‘X’ to press, choose or confirm or to type a key ‘Triangle’ to go back ‘Square’ to delete ‘D-pad’ or ‘Analogue stick’ to scroll lists. Choose primary device When the PS2™ software loads, you will see the ‘Choose primary device’ screen where you are asked to choose the device that you would like to manage. At this point you should select either a memory card or the PSP as the device that you would like to copy/ save/move/delete game saves from. Highlight a device to use as the primary device. Press ‘X’ to select and continue. Main screen Once you have selected a primary device you will see the main interface where you can view the content of your chosen device and choose from a number of actions that can be performed. IMPORTANT: The Media Manager PS2™ software is designed to protect sensitive content by ignoring files stored in the PSP’s special content folders (game-saves, video, images, audio) and only display content stored in the root directory of the Memory Stick™ DUO. To manage content in those folders use the MAX Media Manager PC software. Device contents list – The Device contents window shows the saves stored on the selected device. Press ‘X’ to select and deselect save files. Above the ‘Device contents list’ the number and the total size of the selected files is displayed. Select game saves by highlighting them in the device contents list then pressing ‘X’ (use ‘SELECT’ on your controller to select or unselect ALL files). Once you have made your selection, pressing ‘RIGHT’ will move the cursor to the list of ‘Action Icons’ in the window on the right. These select which action will be performed on the saves that are highlighted. Using the Actions Menu Action selector With the Actions Menu active, use UP and DOWN to highlight different actions that you can perform on the saves selected in the device contents window then press ‘RIGHT’ again on your controller to select the target device. For example, to move two saves from the memory card in Slot 1 to your PSP console you would do the following: 1. Choose MEM 1 as your primary device (on the first screen). 2.Highlight the saves you want to move and use ‘X’ to select them. 3. Press ‘RIGHT’ to move onto the Actions Menu and then and ‘DOWN’ once to highlight the MOVE action. 4. Press ‘RIGHT’ again twice to choose the PSP as the target device. 5. Press ‘X’ to move the two selected files from MEM 1 to the PSP. 6.At the top of the screen a progress bar will appear indicating the transfer status. 7. Once complete, you can confirm the move noticing that the files are no longer listed on MEM 1. Use ‘CIRCLE’ to return to the ‘Choose primary device’ screen and then choose the PSP as your primary device (by pressing ‘X’). When the contents are displayed on the main screen, the new files should be present. Action Icon description COPY Copy a file from one device to another. The original file will be left on the primary device. MOVE Move a file from one device to another. The original file will be deleted from the primary device. DELETE Permanently delete a file from your primary device. CRUSH Creates a compressed copy of the selected save. The original save remains in its uncompressed form on the primary device. Saves cannot be used ‘in-game’ on the PS2™ when crushed, they must first be UNCRUSHED. UNCRUSH Creates an uncompressed copy of the selected compressed save. Only compressed saves can be uncompressed. The original save remains in its compressed form on the primary device. 8. Technical support If you are experiencing difficulties any aspect of your Get Connected! product please ensure that you have read and understood the contents of this user manual before contacting Datel’s technical support department. When you contact Datel customer services or technical support department, please have ready the version number of the software you are using (normally found on the inner ring on the underside of the software disc) along with when and where you purchased the product. If you are having difficulties with the PS2™ software please have ready the PS2™ revision number (SCPH#) found on a sticker on the reverse of the console. © 2005 Datel Design & Development Ltd. Get Connected is a trademark of Datel Design & Development Ltd. PlayStation 2 and PSP are registered trademarks of Sony Computer Entertainment Inc. The Get Connected! pack is a 100% unofficial product and is NOT sponsored, endorsed or approved by Sony Computer Entertainment Inc, nor any games developer or publisher.