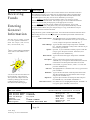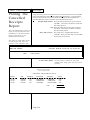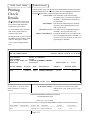
1
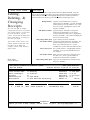
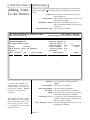
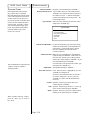
PINELLAS COUNTY
SCHOOL DISTRICT
MANATEE ACCOUNTING SYSTEM
USER'S MANUAL
We would like to acknowledge and thank
Linda Lewis, Internal Auditor, Escambia County School District,
for the work she put into the creation of this handbook.
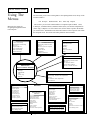
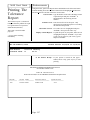
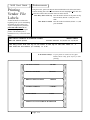
TABLE OF CONTENTS
Chapter 1 – Introduction….…………………………..………………………… 1-1
Chapter 2 – Accounts………………..…………………………………………… 2-1
Chapter 3 – Receipts..……………………………………………………………. 3-1
Chapter 4 – Purchase Orders …………………………………………………... 4-1
Chapter 5 – Disbursements …………………………………………………….. 5-1
Chapter 6 – Transfers & Adjustments ........................................................... 6-1
***NOTE: Using your mouse, point to the chapter you wish to access and double-click the
left button. You will then be on the first page of that chapter.
Using your mouse, point to the section of the chapter you wish to access and
single-click the left button. You will then be on the first page of that section.
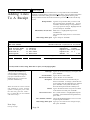
MAS User's Guide
Chapter
1
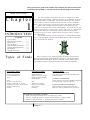
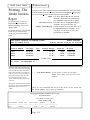
INTRODUCTION
Contents
Types of Funds ............................... 1-1
School Internal Fund Tasks ............. 1-2
Starting MAS................................... 1-3
Using The Menus ............................ 1-4
Using The MAS Function Keys ..... 1-5
Changing the Identification File ....... 1-6
Quitting MAS.................................. 1-8
Changing A Password ...................... 1-9
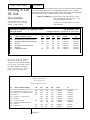
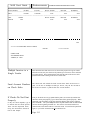
Types of Funds
Appropriated Funds:
Sources
County appropriations
State and Federal Aid
Grants
This User's Guide is designed to be a how-to manual for school
internal fund management, primarily focusing on the Manatee Accounting System (MAS). Additionally, this manual contains specific guidance
on a number of school internal fund activities not currently handled in
MAS. Each of these topics will be discussed in the chapters that follow.
MAS is the computer software program used by schools and
centers to account for their school internal funds. It is menu-driven, has
built-in help features, includes many reports, and works in a manner that
schools and centers are accustomed. MAS includes all of the tools
needed to record receipts, disbursements, purchase orders, transfers
and adjustments.
This chapter includes a brief introduction to school internal funds,
how to start the MAS program, how the MAS menus work, several short
cuts, and some help features.
There are at least 3 types of funds available to schools: school internal
funds, appropriated funds, and PTA/Booster club funds. This guide primarily
deals with school internal funds. However, indirectly it deals with the other 3
types when they interact with and/or become part of school internal funds.
School Internal Funds:
Sources
Student fund raisers
Athletic activity gate receipts
Student payments/club dues
Donations/gifts
Uses
Payment of all personnel
Supplies, textbooks & software
Equipment & facility improvements
Building maintenance
Utilities
Uses
Athletic event expenses
Student activity expenses
Club expenses
Field trips
PTA/Booster Funds:
May be Completely Separate
Not under the control of schools or PCSB, and not
audited by PCSB
Not Subject to PCSB Policies
Except when given to schools or PCSB and deposited
into internal funds or appropriated funds.
Cannot Use PCSB's Tax Exempt Status
Must have IRS tax exempt status on their own.
Must have sales tax exemption status on their own.
PTA/Booster Donations to Schools
• Funds raised by PTA/Boosters for use directly by school
• Given to schools & placed in School Internal Funds or Approp. Funds
• Subject to Internal Funds or Appropriated funds guidelines
Page 1-1
MAS User's Guide
School
Internal Fund
Tasks
Introduction
There are a number of different tasks required to process and manage school
internal funds, everything from the daily receipting and disbursing of funds to
closing out a fiscal year. Most are performed entirely in the Manatee Accounting System (MAS), while some are performed all or in part outside of MAS. This
guide includes instructions on how to perform tasks in MAS. The chart below
gives an overview of school internal fund tasks and where they are explained in
this guide.
Daily Tasks
Receipting Funds
Chapter 3
Paying Bills & Writing Checks
Chapter 4
Procuring & Purchasing
Chapter 5
Transferring Funds Between Accounts
Chapter 6
Back-up Disk Procedures
Chapter 8
Maintenance Tasks
Setting Up Accounts
Fund and Cash Accounts - Chapter 2
Closing Out the Month & Running Reports
Chapter 8
Closing Out the Year & Running Reports
Chapter 9
Making Adjustments
General - Chapter 5
Banking - Chapter 7
Maintaining MAS
Logons / Passwords - Chapter 1
School Identification File - Chapter 1
Page 1-2
Introduction
MAS User's Guide
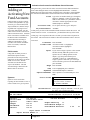
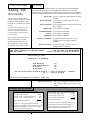
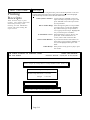
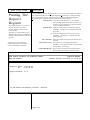
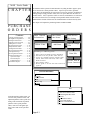
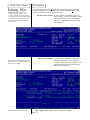
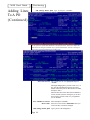
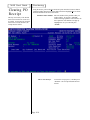
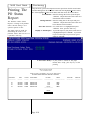
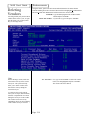
From the Desktop select Manatee Accounting. Double-click on the Manatee icon.
Starting MAS
After a few seconds, the MAS
opening screen will appear.
Either wait a few seconds once
you see this screen or press any key to
proceed without delay. You will then
proceed to the system menu.
Getting into MAS is as simple as
double-clicking on the Manatee icon,
entering your logon name, and
password.
MANATEEACCOUNTING SOFTWARE
Manatee
Accounting
System
Manatee Accounting Software/Windows NT
Version 8.0
Copyright 1984-1998 by:
Manatee Development
Corporation of Boca, Inc.
All Rights Reserved
This software
constitutes a trade
secret of Manatee
Development
Corporation of Boca,
Inc.
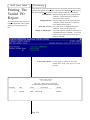
SCHOOL SELECTION
SCHOOLS
a. 1
b. 2
ANY OLD SCHOOL - 98-99
ANY OLD SCHOOL - 99-00
Choose your School Select/highlight your school by using the mouse
(point and one left click) or use the arrow keys
and press <ENTER>.
THE SCHOOL DISTRICT OF PINELLAS COUNTY
ANY OLD SCHOOL
PASSWORD ACCESS
PASSWORD ACCESS
Please Enter Your Login Name =>
Please Enter Your Password =>
If you have not backed up
recently, you will receive
a brief message at this
time. If you have worked
on MAS since your last
backup, go ahead and
backup immediately (discussed
later in this manual).
Enter Your Login Name Type your login name (up to 8 characters)
and press <ENTER>.
Enter Your Password Type your password and press <ENTER>.
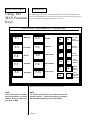
You are now in MAS and will see the pull-down menus across the top of the window.
Page 1-3
MAS User's Guide
Introduction
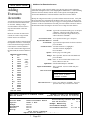
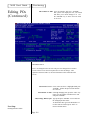
Using The
Menus
The first menu you see when entering MAS is the Opening Menu across the top of the
window as follows:
Menus are the means for
navigating through MAS-from
File to Reports.
This is where you access the 6 main modules or component parts of MAS: 1) File,
2) Receipts, 3) Disbursements, 4) Purchase Orders (POs), 5) Transfers & Adjustments
(Trans+Adj), 6) Reports. To select a menu item, use the mouse to point to the module
you wish to select and hold down the left mouse button to select a specific area within
the componet menu. This works in all of the pull-down menus in MAS.
File Receipts
RECEIPTS
Disbursements POs Trans+Adj Reports
DISBURSEMENTS
Create Cash Receipt
Edit Exiting Cash Receipt
Edit List
Deposit Edit List
Post Cash Receipts
Void Cash Receipt
Official Receipts
MAINTENANCE
Create New Vendor Invoice
Edit Existing Vendor Invoice
Edit List
Select Invoices For Payment
Print Checks
Manual Checks
Void Checks
Bank Reconciliation
Popups
File Maintenance
Utilities
Backup
Restore
Exit This School
Quit
PURCHASE ORDERS
Create New Purchase Order
Edit Exisiting Purchase Order
Edit List
Print Purchase Orders
Receive Items Ordered
Convert to Vendor Invoices
DROP-DOWN
MENUS ACROSS WINDOW
File
Receipts
DisbursementsISBURSEMENTS
POs
Trans+Adj
Reports
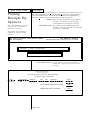
CASH RECEIPT REPORTS
Receipts Register
Deposits Register
Sales Tax Register
Receipts Journal
Voided Receipts
Cancelled Receipts
Receipts Tolerance
Receipts to Account
Receipts by Sponsor
LABELS
Account File Folder Labels
Vendor File Folder Labels
Vendor Plain Paper Labels
Vendor Mailing Labels
TRANSFERS AND ADJUSTMENTS
Create Transfers and Adjustments
Edit Exisiting Transfers and Adjustments
Edit List
Post Transfers And Adjustments
Print Vouchers
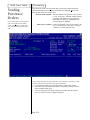
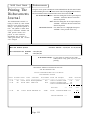
REPORTS
DISBURSEMENTS
REPORTS
Disbursements Register
Disbursements Journal
Examine Detail of Check
Voided Checks
Skipped Checks
Cash Requirements
Tolerance
Checks to Vendors
Vendor Invoices
Year-to-date Vendor Payments
Page 1-4
GENERAL
ACCOUNTING REPORTS
Transfers/Adjustment Journal
General Ledger
Account Ledger
Trial Balance
Budget Report
Encumbrances
Sponsor's Accounts
Monthly Report
Principal's Monthly Report
Year-to-Date Report
SUB ACCOUNTS
Account Activity by Sub Account
Sub Account Activity by Account
PURCHASE ORDERS
Open Purchase Orders
Purchase Order Status
Void Purchase Orders
MAINTENANCE LISTS
Chart of Accounts
Funds
Sub Accounts
Vendors
Sponsors
Distribution of Purchase Orders
Vendor Mailing Labels
Introduction
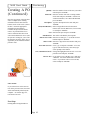
MAS User's Guide
Using The
MAS Function
Keys
The function keys (F1-F10) are located along the top of your keyboard. In MAS, they
serve to pop-up helpful items on your screen. Press <ESC> to remove the pop-ups from
the screen and return to the MAS screen where you were.
POP-UP KEY ASSIGNMENTS - Function Keys
F-1
Not Used
F-2
Vendors
F-3
Accounts
F-4
Sponsors
F-5
Funds
F-6
Sub Accounts
F-7
F-9
F-8
Calendar
Calculator
F-10
D
Alt
I
Vendor
Invoices
Alt
P
Printer
Selection
Ctrl
D
Daily
Closing
Routine
Ctrl
M
Monthly
Closing
Routine
Ctrl
Y
Fiscal
Year-End
Closing
Rountine
System Status
Screen Cover
Some of these pop-ups only work when in relevant screens.
NOTE:
The F-3 pop-up key is useful for
quickly checking an account
balance. It may be used at any
time while in MAS.
NOTE:
The Control (Ctrl) function key combinations are for
closing routines. Contact the Auditing & Property
Records Department before use of this feature.
Page 1-5
Purchase
Order
Disposition
Alt
MAS User's Guide
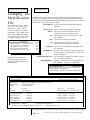
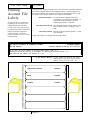
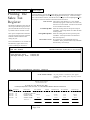
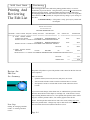
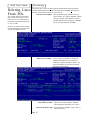
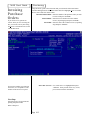
Changing The
Identification
File
Introduction
Using the mouse, point to and click on the File menu. This will display the choices in
this menu. From the File menu, select/highlight File Maintenance and slide the mouse
pointer then to select/highlight Identification File Maintenance, and then release the left
mouse button. This is the screen you will see:
School District Type the name of the school district and press
<ENTER>.
The Identification File is where
you set up your school's basic
information - name, address,
printer type and other default
information. Once initially set up
(during the installation of MAS)
there should be little if any need
to change anything in this file.
Name of School Type your school's name and press <ENTER>.
Address Type your school's street address and press
<ENTER> twice (there are 2 address lines).
City Type the name of the city your school is in and
press <ENTER>.
State Type in the state and press <ENTER>.
PRINTERS
a.
b.
c.
d.
e.
EPSON GRAPHICS - NARROW CARRIAGE
HP LASERJET 2 AND LASERJET 3
HP LASERJET 4 AND LASERJET 5
HP RUGGED WRITER PRINTER
IBM LASER - EPSON EMULATION
Most schools have a HP Laser
printer and should use selection c.
Only those with dot matrix printers
should select a.
LPT1
LPT1
LPT1
LPT1
LPT1
Zip Type your school's zip code (5 digits or the
extended 9 digit code) and press <ENTER>.
Telephone Type your area code and telephone number, then
press <ENTER>.
Default Printer Press the <ALT> and P keys simultaneously to popup a list of printers. Select the one you wish to use
and press <ENTER>.
External Backup System? Type N and press <ENTER> to indicate you do not
have an external backup device.
Backup Dictionary Highlight your selection (any are appropriate) and
press <ENTER>. Balance is recommended.
BACKUP DICTIONARY
Faster Backups, but Least Efficient Compression
Balance Speed and Efficiency
Slower Backups, but Most Efficient Compression
THE SCHOOL DISTRICT OF PINELLAS COUNTY
ANY OLD SCHOOL
IDENTIFICATION FILE MAINTENANCE
Current Period: 07/01/99 to 07/31/99
School District
Name of School
Address
=> THE SCHOOL DISTRICT OF PINELLAS COUNTY
=> ANY OLD SCHOOL
=> 123 APPLE WAY
City
Telephone
=> LARGO
=> 727-588-1212
Beginning of Fiscal Year
End of 1st Period
End of 2nd Period
End of 3rd Period
End of 4th Period
State =>FL
Zip =>32501
School ID Number =>cost center number
=>07/01/99
=>07/31/99
=>08/31/99
=>09/30/99
=>10/31/99
Last Period Closed
End of 7th Period
End of 8th Period
End of 9th Period
End of 10th Period
=>06/30/00
=>01/31/00
=>02/28/00
=>03/31/00
=>04/30/00
Default Printer =>HPPCL
HP LaserJet 4 and LaserJet 5
Do you use an external backup system? (Y/N) =>N
Backup Library => B
Above Info Correct? If the information is correct, type Y and press <ENTER>. If the information
Page 1-6
is incorrect, type N, press <ENTER> and make the neccessary changes.
MAS User's Guide
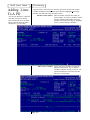
Changing The
Identification
File
(Continued)
Introduction
Use Generated Receipt #s Leave Y in this field & press <ENTER>.
Next Receipt Number Leave this the same, unless in unusual circumstances you need to change the next receipt
number, and press <ENTER>.
Use Pre-printed Receipts Select N and press <ENTER>.
Default Cash Account Type in 1111.00 and press <ENTER>.
Use Generated PO #s Leave Y in this field and press <ENTER>.
Next PO Number Leave this the same, unless in unusual circumstances you need to change the next purchase
order number, and press <ENTER>.
MAS will give you the option to
assign your own receipt and purchase
order numbers as you enter them.
However, this is not recommended.
Use Pre-printed POs Select N and press <ENTER>.
Purchase Order Prefix Leave this field blank (except PTECs as needed)
and press <ENTER>.
Default Cash Account Type in 1111.00 and press <ENTER>.
Default Sales Tax Exemp. # Type in the sales tax exemption number & press
<ENTER>.
Once set-up, there should be little if
any need to change anything in this
file.
Sales Tax Rate Leave this field blank and press <ENTER>.
Sales Tax Liability Account Type in 6-3450.00 and press <ENTER>.
Sales Tax Liability Acct. Name This field is automatically filled in by the computer.
Federal Tax I.D. Number Type in 59-6000799 and press <ENTER>
Min Amt to Incl on Form 1099 Type in 1 and press <ENTER>
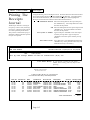
THE SCHOOL DISTRICT OF PINELLAS COUNTY
ANY OLD SCHOOL
IDENTIFICATIONFILEMAINTENANCE
Current Period: 07/01/99 to 07/31/99
CASH RECEIPTS INFORMATION:
Use system generated cash receipt numbers? (Y/N)
=>N
Next cash receipt number
=>
Use pre-printed official receipts? (Y/N)
=>N
Default cash account for cash receipts
=>1111.00
Checking
PURCHASE ORDERS / CASH DISBURSEMENTS INFORMATION:
Use system generated purchase order numbers? (Y/N)
=>Y
Next purchase order number
=>
Use pre-printed purchase orders? (Y/N)
=>N
Include accounts on non-preprinted PO forms? (Y/N)
=>N/A
Purchase Order Prefix
=>
Default cash account for cash disbursements
=>1111 Checking
SALES TAX INFORMATION:
Default sales tax exemption number
=>62-08-137994-57C
Default sales tax rate
=> 7.0
Sales tax liability account
=>6-3450
Sales tax liability account name
=>Sales Tax
FORMS 1099 INFORMATION:
Federal tax identification number
=>59-6000799
Minimum amount to include on form 1099
=>1
140
23
Above Info Correct>? If the information is correct, type Y and press
<ENTER>. If the information is incorrect, type N,
press <ENTER> and make the necessary changes.
Page 1-7
MAS User's Guide
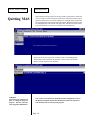
Quitting MAS
Introduction
When finished working in MAS for the day and the system has been backed up
(refer to Chapter 8 of this manual for instructions), follow these simple steps to
quit the program before you turn the computer off. Using the mouse, point to the
File menu and single-click with the left mouse button. Drag the mouse down and
select/highlight Exit This School and single click with the left mouse button.
Type Y when asked if you want to exit and press the <ENTER> key.
Are you sure you want to exit? (Y/N) Y
Then, using the mouse, single click on the File menu, select/highlight Quit,
and the single-click with the left mouse button. This will take you out of the
Manatee system and back to the Desktop.
Quit
WARNING:
Do not turn your computer off
prior to exiting the program
properly. This may cause the
entire program to malfunction.
Note: Under no circumstances should the X in the top right hand corner of
the Manatee window be used to close the Manatee System. The steps above
must be followed to correctly close the program.
Page 1-8
MAS User’s Guide
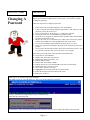
Changing A
Password
Introduction
As with all passwords, your Manatee password should be changed every 90
days to protect against unauthorized use of the system. You cannot be in MAS
to change the password.
Follow the steps below to change the password:
1.
2.
3.
4.
5.
6.
7.
8.
9.
Please click on the start button and then go into All Programs.
Is there a program listed stating Manatee Applications? And, when you click
on that do you see the word Access?
If yes, proceed with #4. If no, skip # 4 - # 9 and go to # 10 below.
Now log all of the way out of the Manatee program and then,
Select the Access program as instructed below and then follow the directions
across the bottom of the screen.
Be sure the screen is at its maximized size which can be achieved by singleclicking on the middle box in the top right hand corner of the screen.
Use your current Manatee login and password to log into Access, and
Select your login name and change the password as instructed by the screen
prompts.
After you have answered the question “Is the above information correct?” with
a Y, press the escape key until you are out of the Access program.
If the answer to #4 is no, please follow the below listed instructions.
10.
11.
12.
13.
14.
15.
16.
17.
18.
19.
20.
Log all the way out of Manatee.
Double-click on the My Computer icon.
Double-click on the Local Disk C: icon
Find the Manatee folder.
Double-click on the Manatee Folder.
Find the Access9.exe icon which should be near the top of the listing.
Double-click on the Access9.exe icon.
Press <Enter> past the cover page.
Highlight the school of the password you wish to change.
Follow the prompts across the bottom of the screen.
Refer to #6 - #9 above.
After step 5 or 15, the following screen will appear:
The default is N for no. Press the Enter key. There is no need to index the system files.
At step 7, enter the current login at this screen, press the Enter key.
Then enter the current password.
As noted above, follow the instruction prompts across the bottom of the screen to complete the change of the password.
Page 1-9
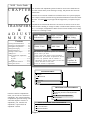
Using your mouse, point to the section of the chapter you wish to access and
single-click the left button. You will then be on the first page of that section.
MAS User's Guide
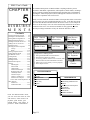
CHAPTER
2
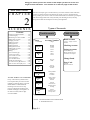
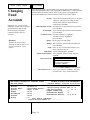
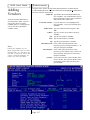
There are two major types of school activity accounts: Fund accounts and Cash
accounts. Fund accounts are the internal accounts you use to track financial
activity within your school. Cash accounts are the bank accounts that you deposit
funds into and pay bills from. They include your checking account, and any
savings and certificate of deposit accounts you might have.
ACCOUNTS
Types of Accounts
Contents
Keeping Accounts In Balance ............ 2-2
Account Integrity .............................. 2-2
Maintaining Accounts In MAS ......... 2-3
Adding New Accounts ...................... 2-4
Changing Accounts ............................ 2-6
Deleting Accounts ............................. 2-7
Adding Sponsors ............................... 2-8
Deleting Sponsors .............................. 2-9
Adding Sub Accounts ...................... 2-10
Deleting Sub Accounts .................... 2-11
Account Reports ............................. 2-12
Printing:
List of Fund Types ...................... 2-13
Chart of Accounts ........................ 2-14
List of Sub Accounts .................... 2-15
List of Sponsors ........................... 2-16
Account File Labels ...................... 2-17
Detail Account Inquiry ................. 2-18
Account Activity By Sub Acct .... 2-19
Sub Account Activity By Acct .... 2-21
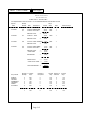
Fund Accounts
Cash Accounts
t
t
Type
1 Number
$ Type + 4 digit Account
Number
Athletics *
1
Baseball
Football
Track
Soccer
Checking Account
Music
2
Music
Band
Chorus
Classes
3
Class of
Grade
Savings Accounts
Passbook Savings
Money Market Savings
Certificates of Deposit
Change Funds
Departments
5
Every school activity fund transaction requires that you enter account
numbers to indicate where you want
funds added or subtracted from.
Entering an account is a 2 step
process comprised of entering one
number Fund type (1 through 8 or $
for cash accounts) and a 4 digit
account number.
Bank Accounts
4 Digits
Clubs
4
Account Numbers on Transactions
Account Number
Drama
Beta Club
German
Library/Media
Guidance
Yearbook
Trusts
6
Adopt-a-Class
Field Trips
Rentals
General
7
General
School Store
School Pictures
Vending
School Board
Trust
8
Tuition
Facility Lease
Early Exams
* NOTE: Centralized Athletics are included in Fund
8 - School Board Trust.
Page 2-1
Petty Cash
Internal
Home Economics
MAS User's Guide
Keeping
Accounts In
Balance
Accounts
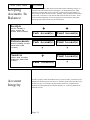
By design, MAS requires that the total of all Cash accounts (checking, savings, etc.)
equal the total of all Fund accounts (1 through 8). As demonstrated below, MAS
does this by requiring that when you increase a Cash account (receipt funds) you
also increase a Fund account or accounts. Similarly, when you disburse funds, MAS
requires that you decrease a Cash account and a Fund account or accounts. Transfers are different in that they involve increasing one or more Fund accounts while
decreasing other Fund account(s) by the same amount.
Receipts
Increases Checking or
Savings Account and
Increases Fund Account(s)
Disbursements
Decreases Checking Account
and Decreases Fund
Account(s)
+
+
Cash Account(s)
Fund Account(s)
Cash Account(s)
Fund Account(s)
-
-
+
Fund Account(s)
Fund Account(s)
-
Transfers
Increases Fund Account(s)
and Decreases Other Fund
Account(s)
Account
Integrity
In order to properly reflect the financial activity in your accounts, you need to receipt
and disburse funds for specific activities to or from the specific Fund accounts set up
for these activities. For example, all yearbook sales need to be receipted into the
Yearbook account and all bills for yearbook materials, etc., need to be paid from the
Yearbook account.
Page 2-2
MAS User's Guide
Maintaining
Accounts In
MAS
Accounts
File maintenance in MAS means maintaining the main computerized files - those for
general school information, funds, cash accounts, fund accounts, sub accounts, and
sponsors. Another main file, the Vendor file, is discussed in another chapter. These
computer files help you classify transactions and print descriptive information on
reports. Cash accounts, for instance, include information and descriptions on all
checking and savings accounts set up by the school. Before using a cash account,
fund account, sponsor, or vendor for the first time in any transaction, they must first
be set up in their respective computer file.
PULL-DOWN MENUS
MAS allows you to maintain your
accounts via the File/File Maintenance menu and print account
reports via the Reports menu.
File
Receipts
Disbursements
POs
Trans+Adj
Reports
FILE MENU
Popups
File Maintenance
Utilities
Backup
Restore
Exit This School
Quit
FILE MAINTENANCE
REPORTS MENU
From the File/File Maintenance menu,
you can add or change general
information about your school,
sponsors, accounts, vendors. Any
change to the fund types will be
initiated by the District Office.
Cash Receipts
Disbursements
Purchase Orders
General Accounts
Sub Accounts
Maintenance Lists
Labels
LABELS
From the Reports menu, you can
print various account listings,
everything from a Chart of
Accounts to account file folder
labels.
Account File Folder Labels
Vendor File Folder Labels
Vendor Plain Paper Labels
Vendor Mailing Labels
Identification File Maintenance
Fund Types File Maintenance
Sponsor File Maintenance
Account File Maintenance
Sub Account File Maintenance
Vendor File Maintenance
Reports File Maintenance
Printer Definition
Layout of Checks
Format of Purchase Orders
Purchase Orders Distribution
Electronic Cash Drawer
Daily Macro
Month-End Macros
Year-End Macro
GENERAL ACCOUNTS REPORTS
SUB ACCOUNTS
Account Activity by Sub Account
Sub Account Activity by Account
MAINTENANCE LISTS
Chart of Accounts
Funds
Sub Accounts
Vendors
Sponsors
Distribution of Purchase Orders
Backup Log
Page 2-3
Transfers/Adjustments Journal
General Ledger
Account Ledger
Trial Balance
Budget Report
Encumbrances
Sponsor's Accounts
Monthly Report
Principal's Monthly Report
Year-to-Date Report
MAS User's Guide
Adding or
Activating New
Fund Accounts
Fund accounts are used to classify
revenues and expenditures by type
of activity (i.e. Class of 2000, Field
Trips, Football, etc.). Before receipting funds into or paying invoices
from a new fund account, you will
either need to activate an account or
add an extension account. A Master
Chart of Accounts is available from
the District office and should be
referenced before activating or
adding account numbers. If the
account is not listed on the Master
Chart of Accounts, contact the
District office.
Activation of an Account from the Master Chart of Accounts:
Using the mouse, point to the File menu. Press the left mouse button and hold it
down while sliding the mouse to select/highlight File Maintenance. Continue
holding down the left mouse button, slide the mouse to the right to select/highlight
the Account File Maintenance selection and then release the left mouse button.
Account Type in the one number fund type (1 through 8)
and press <ENTER>. Then type a new 4 digit
fund account number (use your Master Chart of
Accounts to find the appropriate account
number) and press <ENTER>.
Account is not on file,
Do you wish to add acct.?
To set up this account, type Y and press
<ENTER>.
At this point, you will see the information fields for this account on the screen. All
of these fields are correct. As noted below, you should not alter any of the fields
on this page. The exception to this rule is if/when you wish to have a Sponsor for
the account. This will need to be added. Follow the instructions below to activate
an account.
Account Name Press <ENTER>.
Use Sub Accounts Accounts in Funds 1-7, highlight Y
Accounts in Fund 8, highlight N
Press <ENTER>.
Sponsor If you want to assign a sponsor to this account
and have already added the sponsor to the
sponsor file (see Adding Sponsors in this
chapter), type the sponsor ID and press
<ENTER>. If, however, you do not want to
assign a sponsor at this time (you can assign
one at a later date), just leave the field blank and
press <ENTER>.
Sub Accounts
Using Sub Accounts provides a
detailed description of what a
particular account was specifically
charged for or the purpose for which
funds were received. The Sub
Accounts used in MAS are the
object code numbers. The Sub
Account listing is attached to the
Master Chart of Accounts.
Budget Press <ENTER>.
Notify Leave Y highlighted, press <ENTER>.
Input Status Select Enabled and press <ENTER>.
Export Account Number This is optional. Leave blank and press <ENTER>.
Close-To Accounts
Sponsors
Sponsors can be used when
reporting on fund accounts to sort or
select accounts for a given sponsor.
CLOSE-TO-ACCOUNTS
Monthly Transfer of Balance
Year-End Transfer of Balance
No Transfer of Balance
Select No Transfer of Balance. Press <ENTER>
Above Info Correct>? If it is, type Y and press <ENTER>. If it is not, press
the <ESC> key to return to the menu.
THE SCHOOL DISTRICT OF PINELLAS COUNTY
ANY OLD SCHOOL
Account
Account Name
Sponsor
Budget
Encumbered
Balance
=>2 4000.00
=>Instrument Rental
=>Hall J Hall
=>0.00
=>0.00
=>0.00
PRIMARY FILE MAINTENANCE
Current Period: 07/01/00 to 07/31/00
Active During Current Year => N
Use Sub Accounts
=> Y
Budget Remaining
=>
Unencumbered Budget =>
Unencumbered Balance=>
Input Status => Enabled
Export Account Number => ....^....^....
Page 2-4
0.00
0%
MAS User's Guide
Adding
Extension
Accounts
Addition of an Extension Account:
Using the mouse, point to the File Menu. Press the left mouse button and hold it
down while sliding the mouse to select/highlight File Maintenance. Continue holding
down the left mouse button, slide the mouse to the right to select/highlight the
Account File Maintenance selection and then release the left mouse button.
An extension account is an extension
of an account from the Master Chart
of Accounts. Adding a 2-digit
account number at the end of the 4digit account number creates the
extension.
Before an extension account can be
created, the "main" 4-digit account
number must be activated first.
An extension number is assigned from
the alphabetic list below. For example,
if the extension name begins with the
letters BA, the extension number is
.05, if the extension name begins with
the letters KR, the extension number is
.48.
Alphabetic Extension Listing
A
1-4
B
5-9
NOTE:
C
10-14
This
D
15-19
listing
E
20-24
is a
F
25-29
guide.
G
30-34
H
35-39
I,J
40-44
K
45-49
L
50-54
M
55-59
N
60-64
O
65-69
P,Q
70-74
R
75-79
S
80-84
T
85-89
U,V
90-94
W,X,Y,Z 95-99
Identify the 4-digit account where you wish to add an extension account. Verify that
this account has been activated from the Master Chart of Accounts. If this account
has not been activated, follow the steps on page 2-4 of this guide before addition the
extension. If this account had been activated, proceed to add the extension. Refer to
the information in the left margin to select the correct 2-digit extension number.
Account Type in the one number fund type (1-8) and press
<ENTER>. Then type in the 4-digit account
number followed by the 2-digit extension you
wish to add. Press <ENTER>.
Account is not on file, To set up this account, type Y and press
Do you wish to add acct.? <ENTER>
Account Name Type a brief description/title for the account and
press <ENTER>.
Use Sub Accounts Accounts in Funds 1-7, highlight Y
Accounts in Fund 8, highlight N
Press <ENTER>.
Sponsor Refer to page 2-4 of this guide.
Budget This is optional. Just leave the field blank and
press <ENTER>.
Notify Enter "Y" to be warned when account is overdrawn, otherwise enter "N".
Input Status Select Enabled and press <ENTER>.
Export Account Number This is optional. Just leave blank and press
<ENTER>.
Close-To Accounts
Monthly Transfer of Balance
Year-End Transfer of Balance
No Transfer of Balance
Select No Transfer of Balance.
Above Info Correct>? If it is, type Y and press <ENTER>. If it is not,
press the <ESC> key to return to the menu.
THE SCHOOL DISTRICT OF PINELLAS COUNTY
ANY OLD SCHOOL
Account
Account Name
Sponsor
Budget
Encumbered
Balance
Notify
CLOSE-TO-ACCOUNTS
PRIMARY ACCOUNT FILE MAINTENANCE
Current Period: 07/01/00 to 07/31/00
=>2 4000.05
Active During Current Year => N
=>Band Instrument Rental
Use Sub Accounts
=> Y
=>Hall J Hall
Budget Remaining
=>
=>0.00
Unencumbered Budget
=>
=>0.00
Unencumbered Balance
=> 0.00 0%
=>0.00
=>Y
Input Status =>Enabled
Export Account Number => ....^....^....
Page 2-5
MAS User's Guide
Accounts
Using the mouse, point to the File Menu. Press the left mouse button and hold it
down while sliding the mouse to select/highlight File Maintenance. Continue holding
down the left mouse button, slide the mouse to the right to select/highlight the
Account File Maintenance selection and then release the left mouse button.
Changing
Fund
Accounts
During the year, you may wish to
change the account name or sponsor
associated with a fund account.
Before changing a fund name,
contact the District office for
assistance.
Account Type in the one number fund type (1-8) and press
<ENTER>. Then type in the 4-digit account
number followed by the 2-digit extension, if
required. Press <ENTER>.
Edit, or Re-Enter Account To change the account information, type E and
press <ENTER>
Account Name Type a brief description/title for the account and
press <ENTER>.
Use Sub Accounts Accounts in Funds 1-7, highlight Y
Accounts in Fund 8, highlight N
Press <ENTER>.
Sponsors
Sponsor Refer to page 2-4 of this guide.
Sponsors can be used when
reporting on fund accounts to sort
or select accounts for a given
sponsor.
Budget This is optional. Just leave the field blank and
press <ENTER>.
Notify Enter "Y" to be warned when account is overdrawn, otherwise enter "N".
Input Status Select Enabled and press <ENTER>.
Export Account Number This is optional. Just leave blank and press
<ENTER>.
Close-To Accounts
CLOSE-TO-ACCOUNTS
Monthly Transfer of Balance
Year-End Transfer of Balance
No Transfer of Balance
Select No Transfer of Balance. Press <ENTER>
Above Info Correct>? If it is, type Y and press <ENTER>. If it is not,
press the <ESC> key to return to the menu.
THE SCHOOL DISTRICT OF PINELLAS COUNTY
ANY OLD SCHOOL
Account
Account Name
Sponsor
Budget
Encumbered
Balance
Notify
PRIMARY ACCOUNT FILE MAINTENANCE
Current Period: 07/01/00 to 07/31/00
=>2 4000.00
Active During Current Year => N
=>Instrument Rental
Use Sub Accounts
=> Y
=>Hall J Hall
Budget Remaining
=>
=>0.00
Unencumbered Budget
=>
=>0.00
Unencumbered Balance
=> 0.00 0%
=>0.00
=>Y
Input Status =>Enabled
Export Account Number => ....^....^....
Page 2-6
MAS User's Guide
Deleting Fund
Accounts
Accounts
Using the mouse, point to the File menu. Press the left mouse button and hold it
down while sliding the mouse to select/highlight File Maintenance. Continue
holding down the left mouse button, slide the mouse to the right to select/highlight
the Account File Maintenance selection and then release the left mouse button.
Account Type in the one number fund type (1 through 8)
and press <ENTER>. Then type the 4-digit fund
account number and press <ENTER>. If you do
not know the account number, leave the field
blank and press <ENTER> to pop-up a list.
You will generally only need to delete
fund accounts after the end of a year,
when they are no longer active.
Contact the District Office before
deletion of accounts.
Edit, delete or re-enter To delete the account, type D and press
<ENTER>.
Are you sure? If the account has a zero balance and you are
ready to delete it, type Y and press <ENTER>.
THE SCHOOL DISTRICT OF PINELLAS COUNTY
ANY OLD SCHOOL
Account
Account Name
Sponsor
Budget
Encumbered
Balance
PRIMARY ACCOUNT FILE MAINTENANCE
Current Period: 07/01/00 to 07/31/00
Active During Current Year => N
=>1 0200.00
Use Sub Accounts
=> Y
=>Athletics - General
=>Hall J Hall
Budget Remaining
=>
=>0.00
Unencumbered
Budget
=>
=>0.00
Unencumbered
Balance
=>0.00
0%
=>0.00
Input Status =>Enabled
Export Account Number => ....^....^....
Active in the current fiscal year if
receipts, disbursements, purchase
orders, transfers, or adjustments
were made this fiscal year from this
account. Also active if any checks or
purchase orders were outstanding
at the beginning of the current fiscal
year and cite the account.
Do you wish to Edit this Account, Delete this Account, or Re-enter?(E/D/R) =>D
Are you sure? If the accout has a zero
balance and you are ready to delete it,
type Y and press <ENTER>.
Note:
Before deleting a fund account,
make sure it has a zero balance. The
system will only allow you to delete
accounts that have a zero balance
and have had no activity during the
current fiscal year. In fact, you will
not be given the option to delete the
account on this screen unless this is
the case. Before closing the year,
make sure you transfer any remaining funds from accounts that you
intend to close. Accounts must be
inactive for an entire year before
their balances may be transferred
and the accounts deleted.
Page 2-7
MAS User's Guide
Adding
Sponsors
Accounts
Using the mouse, point to the File menu. Press the left mouse button and hold it
down while sliding the mouse to select/highlight File Maintenance. Continue
holding down the left mouse button, slide the mouse to the right to select/highlight
the Sponsor File Maintenance selection and then release the left mouse button.
Sponsor Type in a brief, easily remembered ID for the
sponsor and press <ENTER>. For instance, use
a sponsor's first initial and up to 5 characters of
his/her last name.
For reporting purposes, you can
assign sponsors to accounts. This
allows you, for instance, to run a
report listing all account information
for a given sponsor. However, before
assigning a sponsor to an account,
you will need to add the sponsor to
MAS.
Add Sponsor? If you are sure you wish to add this sponsor,
type Y and press <ENTER>. Otherwise type N
and press <ENTER>.
Sponsor Name Type the sponsors first name and last name,
then press <ENTER>.
THE SCHOOL DISTRICT OF PINELLAS COUNTY
ANY OLD SCHOOL
SPONSORS FILE MAINTENANCE
Current Period: 07/01/00 to 07/31/00
Sponsor
=>JJONES
Sponsor Name =>JOHN JONES
Is the above information correct? (Y/N) =>Y
Above Info. Correct? If it is, type Y and press <ENTER>. If it is not,
select N and make the necessary changes.
Upon adding the sponsor on this
screen, you will need to attach it
to the account(s) that they are
responsible for. To do so, see
Changing Fund Accounts earlier
in this chapter.
Page 2-8
MAS User's Guide
Deleting
Sponsors
When a person is no longer a
sponsor, or when they leave your
school, you can delete them using
the Sponsors File Maintenance
screen.
Accounts
Using the mouse, point to the File menu. Press the left mouse button and hold it
down while sliding the mouse to select/highlight File Maintenance. Continue
holding down the left mouse button, slide the mouse to the right to select/highlight
the Sponsor File Maintenance selection and then release the left mouse button.
Sponsor Type in the ID for the sponsor and press
<ENTER>.
Edit or Delete Sponsor? If you are sure you wish to delete this sponsor,
type D and press <ENTER>. Otherwise press
<ESC> to return to the menu.
THE SCHOOL DISTRICT OF PINELLAS COUNTY
ANY OLD SCHOOL
SPONSORS FILE MAINTENANCE
Current Period: 07/01/00 to 07/31/00
Sponsor
=>JONES
Sponsor Name =>JOHN JONES
Do you wish to Edit or Delete this sponsor? (E/D) =>D
Are You Sure? If you are, type Y and press <ENTER>. If not,
select N to escape.
Page 2-9
MAS User's Guide
Accounts
Using the mouse, point to the File menu. Press the left mouse button and hold it
down while sliding the mouse to select/highlight File Maintenance. Continue
holding down the left mouse button, slide the mouse to the right to select/highlight
the Sub Account File Maintenance selection and then release the left mouse button.
Adding Sub
Accounts
Sub Account Type in a 4-digit sub account number and press
<ENTER>.
Sub Accounts are used to further
classify revenues (donations, vending
profits, etc.) and expenditures (dues,
uniforms, etc.), within any given fund
account.
Do you wish to add? To set up this new sub account, type Y and
press <ENTER>.
Sub Account Name Type a description/title for the sub account and
press <ENTER>.
The Master Sub Account list is maintained by the Auditing Department.
Schools are not authorized to add sub
accounts and must contact the District
office for changes.
Cash Receipts Type Y and press <ENTER>.
Cash Disbursements Type Y and press <ENTER>.
Transfers Type Y and press <ENTER>.
Adjustments Type Y and press <ENTER>.
Sub Accounts used in MAS are the
object code numbers. The Sub
Account listing is attached to the
Master Chart of Accounts. Fund 8
accounts do not use Sub Accounts.
Primary Accounts From Type the first fund account (not $-1111.00
account) to use sub accounts and press
<ENTER>.
Primary Accounts To Type the last Fund 7 account to use sub
accounts and press <ENTER>.
THE SCHOOL DISTRICT OF PINELLAS COUNTY
ANY OLD SCHOOL
SUB ACCOUNTS FILE MAINTENANCE
Current Period: 07/01/00 to 07/31/00
Sub Account => 0510
Description => SUPPLIES
Cash Receipts
Cash Disbursements
Transfers
Adjustments
For Use with Primary Accounts From =>
To =>
=>Y
=>Y
=>Y
=>Y
1 0200.00 Athletics - General
7 0550.00 Vending
Is the above information correct? (Y/N) =>Y
Above Info Correct>? If it is, type Y and press <ENTER>. If it is
not, press the <ESC> key to return to the
menu.
Uses for Sub Accounts
Sub Account 3440 - Gifts/Grants/Bequests
Account 6-2400 - Donation
Account 7-0545 - Unrestricted Donations
Account 6-1501 - Adopt-A-School
$1,200
800
400
Total - Gifts/Grants/Bequests
$2,400
By entering receipts from donations within the
donation account numbers and the sub account number
for Gifts/Grants/Bequests, you can easily track the
total money received from donations.
Page 2-10
Sub Account 3482 - Revenue from Sales
Account 4-1650 - Drama Club
Account 4-2100 - French Club
Account 4-2800 - Interact Club
$1,000
300
200
Total - Revnue from Sales
$1,500
By entering receipts from fund-raisers with the Club
account numbers and the sub account number for
Revenue from Sales, you can easily track the total
revenue from fund-raising sales for all clubs.
MAS User's Guide
Deleting Sub
Accounts
Accounts
Using the mouse, point to the File menu. Press the left mouse button and hold it
down while sliding the mouse to select/highlight File Maintenance. Continue
holding down the left mouse button, slide the mouse to the right to select/highlight
the Sub Account File Maintenance selection and then release the left mouse button.
Sub Account Type in a 4-digit sub account number and press
<ENTER>.
You may only delete sub accounts at
the direction of the District office at
the end of a year, when they are no
longer active.
Edit or Delete To delete the sub account, type D and press
<ENTER>.
THE SCHOOL DISTRICT OF PINELLAS COUNTY
ANY OLD SCHOOL
SUB ACCOUNTS FILE MAINTENANCE
Current Period: 07/01/00 to 07/31/00
Sub Account => 0510
Description => SUPPLIES
Cash Receipts
Cash Disbursements
Transfers
Adjustments
For Use with Primary Accounts From =>
To =>
=>Y
=>Y
=>Y
=>Y
1 0200.00 Athletics - General
7 0550.00 Vending
Do you wish to Edit or Delete this sub account? (E/D)=>D
Note:
The system will only allow you
to delete sub accounts that
have had no activity during the
fiscal year. In fact, you will not
be given the option to delete the
sub account on this screen
unless this is the case.
Are you sure? If the sub account has a zero balance
and you are ready to delete it, type Y and
press <ENTER>.
Page 2-11
MAS User's Guide
Account
Reports
There are several different reports
for viewing information by account or sub account. They are
accessible from the General
Accounting Reports and Sub
Accounts menus.
Each of these reports will be
discussed on the pages that
follow.
Accounts
PULL-DOWN MENU
File
Receipts
Disbursements
POs
Trans+Adj
Reports
REPORTS MENU
Cash Receipts
Disbursements
Purchase Orders
General Accounts
Sub Accounts
Maintenance Lists
Labels
SUB ACCOUNTS
Account Activity by Sub Account
Sub Account Activity by Account
MAINTENANCE LISTS
Tips on Running Reports
LABELS
Before printing reports, make sure
you have the proper (plain, white)
paper in the printer and that the top
of the page is aligned correctly.
Account File Folder Labels
Vendor File Folder Labels
Vendor Plain Paper Labels
Vendor Mailing Labels
Many of the reports can be
displayed on the screen as an
alternative to being printed. When
displaying reports on the screen,
press the <PAGE UP> and <PAGE
DOWN> keys to move up and
down in the report. At the end of
the report, press page down until
the report totals appear (if applicable).
Chart of Accounts
Funds
Sub Accounts
Vendors
Sponsors
Distribution of Purchase Orders
Backup Log
GENERAL ACCOUNTS REPORTS
Transfers/Adjustment Journal
General Ledger
Account Ledger
Trial Balance
Budget
Encumbrances
Sponsors Accounts
Monthly Report
Principal's Monthly Report
Year-to-Date Report
Page 2-12
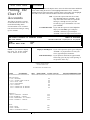
MAS User's Guide
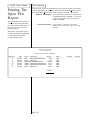
Printing A List
Of Fund Types
Accounts
Using the mouse, point to the Reports menu. Press the left mouse button and hold it
down while sliding the mouse to select/highlight Maintenance Lists. Continue
holding down the left mouse button, slide the mouse to the right to select/highlight
the Funds selection and then release the left mouse button.
Display or Print Report? Because this is such a short report (only 8
items), you will probably only wish to display it
on your screen. To do so, type D and press
<ENTER>.
If you need to know what funds
are set up, you can display or print
a listing.
If, however, you wish to print it, type P and
press <ENTER>.
THE SCHOOL DISTRICT OF PINELLAS COUNTY
ANY OLD SCHOOL
Fund
Description
1
2
3
4
5
6
7
8
ATHLETICS
MUSIC
CLASSES
CLUBS
DEPARTMENTS
TRUSTS
GENERAL
SCHOOL DISTRICT TRUST
FUND LIST
Current Period: 07/01/00 to 07/31/00
<<< A L L >>>
To scroll,
use PgUp/PgDn =>
When finished viewing the report
on screen, press <ESC> twice to
return to the menu.
Page 2-13
MAS User's Guide
Accounts
Using the mouse, point to the Reports menu. Press the left mouse button and hold it
down while sliding the mouse to select/highlight Maintenance Lists. Continue
holding down the left mouse button, slide the mouse to the right to select/highlight
the Chart of Accounts selection and then release the left mouse button.
Printing The
Chart Of
Accounts
Code If you want to print a full chart of accounts,
leave this blank and press <ENTER>. If you
only want a chart of accounts for a particular
fund type (1 through 8) or for your cash
accounts ($), type a valid number or "$" and
press <ENTER>.
The Chart of Accounts is a report
of all fund and cash accounts. It is
useful when deciding which
account number to use on transactions and when activiting or setting
up new accounts.
Account Name Order If you want the report to be sorted alphabetically by account name, type Y and press
<ENTER>. Otherwise, type N and press
<ENTER> to have the report sorted in account
THE SCHOOL DISTRICT OF PINELLAS COUNTY
ANY OLD SCHOOL
Code
Account Name Order
CHART OF ACCOUNTS
Current Period: 07/01/00 to 07/31/00
=>All
=>N
number order.
NOTE: If you choose to display
this report, not all the columns
will be shown on the screen.
Display or Print Report? If you wish to print the report, type P and press
<ENTER>. If you just want to see it on your
screen, type D and press <ENTER>.
Is the Printer Ready? If your printer is turned on, has paper loaded,
and is ready, press any key to start printing. If
not, press the <ESC> key.
PINELLAS COUNTY SCHOOLS
ANY OLD SCHOOL #1234
CHART OF ACCOUNTS
Account
Account Name
============ ===============
Spon
Sponsor Name Use Sub Close To
Export/Consolidation Account
====== ============= ======= ============ ========================
CASH ACCOUNTS
$ 1111.00 CHECKING
$ 1111.01 SECOND CASH ACCOUNT
$ 1112.00 PETTY CASH
$ 1115.00 INVESTMENTS
$ 1115.01 SAVINGS
$ 1115.02 CERTIFICATE OF DEPOSIT
$ 1115.03 CERTIFICATE OF DEPOSIT
NO
NO
NO
NO
NO
NO
NO
ATHLETICS
1 0200.00 ATHLETICS - GENERAL
1 0510.00 BASEBALL - VARSITY
1 0750.00 BASKETBALL - JR. VARSITY
1 2020.00 FOOTBALL - VARSITY
YES
YES
YES
YES
MUSIC
2 1000.00 BAND
2 1500.00 CHORUS
2 4000.00 INSTRUMENT RENTAL
YES
YES
YES
Page 2-14
MAS User's Guide
Accounts
Using the mouse, point to the Reports menu. Press the left mouse button and hold it
down while sliding the mouse to select/highlight Maintenance Lists. Continue
holding down the left mouse button, slide the mouse to the right to select/highlight
the Sub Accounts selection and then release the left mouse button.
Printing A List
Of Sub
Accounts
Display or Print Report? Because this is such a short report, you may
only wish to display it on your screen. To do
so, type D and press <ENTER>.
If you need to know what sub
accounts are set up, you can
display or print a listing.
If, however, you wish to print it, type P and
press <ENTER>.
THE SCHOOL DISTRICT OF PINELLAS COUNTY
ANY OLD SCHOOL
SUB ACCOUNTS LIST
Current Period: 07/01/00 to 07/31/00
Sub.
CR
CD
TR
AD
CR
CR
CR
CD
CD
CD
CD
CD
CD
TR
TR
TR
TR
TR
TR
AD
AD
AD
AD
AD
AD
0310
0320
0330
0350
0360
0370
Sub Account Description
PROFESSIONAL/TECHNICAL SVCS
INSURANCE & BOND PREMIUMS
TRAVEL
REPAIRS & MAINTENANCE
RENTALS
COMMUNICATION
CR
From
1
1
1
1
1
1
0200.00
0200.00
0200.00
0200.00
0200.00
0200.00
To
7 0550.00
7 0550.00
7 0550.00
7 0550.00
7 0550.00
7 0550.00
If you have more sub accounts
than will fit on screen, use the
<PAGE UP> and <PAGE DOWN>
keys to move up and down in the
list. When finished viewing the
report on screen, press <ESC>
twice to return to the menu.
PINELLAS COUNTY SCHOOLS
ANY OLD SCHOOL #1234
SUB ACCOUNT LIST
CR
CD
TR
AD
From
To
Sub.
Sub Account Description
===== ========================= ===== ======= ======= ====== ============= =================
CR
CD
TR
AD
1 0200.00
7 0550.00
0310 PROFESSIONAL/TECHNICAL SVCS
CR
CD
TR
AD
1
0200.00
7 0550.00
0320 INSURANCE & BOND PREMIUMS
CR
CD
TR
AD
1
0200.00
7 0550.00
0330 TRAVEL
CD
TR
AD
1
0200.00
7 0550.00
0350 REPAIRS & MAINTENANCE
0360 RENTALS
CD
TR
AD
1 0200.00
7 0550.00
0370 COMMUNICATION
CR
CD
TR
AD
1 0200.00
7 0550.00
CD
TR
AD
1 0200.00
7 0550.00
0390 OTHER PURCHASED SERVICES
0510 SUPPLIES
CR
CD
TR
AD
1 0200.00
7 0550.00
0520 TEXTBOOKS
CR
CD
TR
AD
1 0200.00
7 0550.00
Page 2-15
MAS User's Guide
Printing A
Listing Of
Sponsors
Accounts
Using the mouse, point to the Reports menu. Press the left mouse button and hold it
down while sliding the mouse to select/highlight Maintenance Lists. Continue
holding down the left mouse button, slide the mouse to the right to select/highlight
the Sponsors selection and then release the left mouse button.
Display or Print Report? Because this is such a short report , you will
probably only wish to display it on your screen.
To do so, type D and press <ENTER>.
If you need to know what sponsors are set up, you can display or
print a listing.
If, however, you wish to print it, type P and
press <ENTER>.
THE SCHOOL DISTRICT OF PINELLAS COUNTY
ANY OLD SCHOOL
Sponsor
JJONES
LSMITH
TBROWN
SPONSOR LIST
Current Period: 07/01/00 to 07/31/00
Sponsor Name
JOHN JONES
LINDA SMITH
TOM BROWN
<<< A L L >>>
To scroll,
use PgUp/PgDn =>
If you have more sponsors than
will fit on screen, use the <PAGE
UP> and <PAGE DOWN> keys to
move up and down in the list.
When finished viewing the report
on screen, press <ESC> twice to
return to the menu.
Page 2-16
MAS User's Guide
Accounts
Printing
Account File
Labels
Account file labels are useful at the
beginning of the year when establishing file folders for each fund
account. This 'report' is designed to
be printed on pin-fed file folder labels
that are specifically designed for
computer printers. The default
layout is intended for Avery 1 across
file folder labels.
Using the mouse, point to the Reports menu. Press the left mouse button and hold it
down while sliding the mouse to select/highlight Labels. Continue holding down
the left mouse button, slide the mouse to the right to select/highlight the Account
File Folder Labels selection and then release the left mouse button.
Print In Name Order? To print the labels in alphabetical order by
account name, type Y and press <ENTER>. To
print labels in numerical order by account
number, type N and press <ENTER>.
How Many Lines from Top Enter the number of lines for the printer to skip
between labels (default = 4) and press <ENTER>.
How Wide are Labels Enter the width of each label (default = 3.5) and
press <ENTER>.
NOTE: This feature is not designed for laserprinter labels.
THE SCHOOL DISTRICT OF PINELLAS COUNTY
ANY OLD SCHOOL
ACCOUNT LABELS
Current Period 07/01/00 to 07/31/00
Do you want to print labels in account name order? (Y/N) => Y
How many lines from the top of one label to the top of the next label => 4
How wide are the labels (in inches) => 3.50
ATHLETICS-GENERAL
1 0200.00
BAND
2 1000.00
CHORUS
2 1500.00
Page 2-17
○ ○ ○ ○ ○ ○ ○ ○ ○ ○ ○ ○ ○ ○ ○ ○ ○ ○ ○ ○ ○ ○ ○ ○ ○ ○ ○ ○ ○ ○ ○ ○ ○ ○ ○ ○
○ ○ ○ ○ ○ ○ ○ ○ ○ ○ ○ ○ ○ ○ ○ ○ ○ ○ ○ ○ ○ ○ ○ ○ ○ ○ ○ ○ ○ ○ ○ ○ ○ ○ ○ ○
Is the Printer Ready? If your printer is turned on, has paper
loaded, and is ready, press any key to start
printing. If not, press the <ESC> key.
MAS User's Guide
Accounts
Using the mouse, point to the Reports menu. Press the left mouse button and hold it
down while sliding the mouse to select/highlight General Accounts. Continue
holding down the left mouse button, slide the mouse to the right to select/highlight
the Account Ledger selection and then release the left mouse button.
Detail
Account
Inquiry
Account Number Type the Account Number and press <ENTER>
(or press <ENTER> on the blank field, highlight
the desired account from the pop-up list, and
press <ENTER>).
To check on detailed posted transactions for an account for a userspecified period of time, use the
Account Ledger Report. This screen
displays checks, receipts, transfers,
and adjustments that have been
posted.
From Type the beginning date for the report and
press <ENTER>. All transactions posted on or
after this date will be displayed.
To Type the ending date for the report and press
<ENTER>. All transactions posted on or before
this date will be displayed.
Above Info Correct? If so, make sure a Y is highlighted and press
<ENTER>. If not, press the <ESC> key, and
then correct the information.
THE SCHOOL DISTRICT OF PINELLAS COUNTY
ANY OLD SCHOOL
ACCOUNT LEDGER
Current Period: 07/01/00 to 07/31/00
Account Number =>1 0200.00
=>Athletics - General
Account Name
=>150.00
Balance
Date
Sub.
07/10/00
07/12/00
07/20/00
07/31/00
07/31/00
07/31/00
07/31/00
3482
3440
3440
0510
0510
0510
0510
SC
Reference
CR
TR
TR
CD
CD
CD
CD
21
14
15
1939
1940
1941
1942
Type of Transaction
CR
CD
TR
AD
Description
Revenue From Sales
Gifts/Grants/Bequests
Gifts/Grants/Bequests
Supplies
Supplies
Supplies
Supplies
From => 07/01/00
To
=> 07/31/00
Increase
250.00
50.00
50.00
Decrease
35.00
35.00
35.00
35.00
Reference
= Cash Receipt
= Cash Disbursement
= Transfer
= Adjustment
Check Number
Receipt Number
Batch Number
<<<ALL>>>
To scroll, use PgUp/PgDn =>
Note:
Receipts, invoices, transfers and
adjustments that have been
entered but not posted will not
appear on this screen.
If there are more transactions than will fit on the screen, use the <PAGE
UP> and <PAGE DOWN> keys to move up and down. Pressing <PAGE
DOWN> at the end of the report/list will display the column totals.
Page 2-18
MAS User's Guide
Printing
Account
Activity By
Sub Account
Accounts
Using the mouse, point to the Reports menu. Press the left mouse button and hold it
down while sliding the mouse to select/highlight Sub Accounts. Continue holding
down the left mouse button, slide the mouse to the right to select/highlight the
Account Activity by Sub Accounts selection and then release the left mouse
button.
Accounts Numbered from Enter the first account you wish to report on by
typing the Account Category (1-8), pressing
<ENTER>, typing the Account Number, and
then pressing <ENTER> again.
to Enter the last account you wish to report on by
typing the Account Category (1-8), pressing
<ENTER>, typing the Account Number, and
then pressing <ENTER> again.
The Account Activity report is a
detailed or summary listing of all
activity in a user defined range of
accounts, broken down by sub
account.
Sub Accounts from Enter the first sub account number you wish to
report on and press <ENTER>.
to Enter the last sub account number you wish to
report on and press <ENTER>.
Transactions dated from Enter the date of the first transaction to be
included on the report and press <ENTER>.
to Enter the date of the last transaction to be
included on the report and press <ENTER>.
Include Sources from Type Y or N in each of the four fields to indicate
whether or not you want disbursements (CD),
receipts (CR), transfers (TR), and/or adjustments
(AD) to print on the report. Any combination
can be selected.
Summary or Detail Type S and press <ENTER> to include only
summary information (sub account and account
totals) on the report. Or type D and press
<ENTER> to include detail information (transactions) on the report.
Tolerance Level Enter the dollar amount of transactions that you
wish to be the minimum for the report and press
<ENTER>. To print all transactions, leave this
field as 0.00 and press <ENTER>.
Above Info. Correct? If so, type Y and press <ENTER>.
Page 2-19
MAS User's Guide
Accounts
THE SCHOOL DISTRICT OF PINELLAS COUNTY
ANY OLD SCHOOL
Accounts Numbered from
to
=>1 0200.00
=>7 0550.00
Sub Accounts from
to
=>0310
=>3498
ACCOUNT ACTIVITY
Current Period: 07/01/00 to 07/31/00
Transactions dated from =>07/01/00
to
=>07/31/00
Include Sources from CD
CR
TR
AD
=>Y
=>Y
=>Y
=>Y
Summary or Detail (S/D) =>S
Tolerance Level
=>
0.00
Is the above information correct? (Y/N) =>
Is the Printer Ready? If your printer is turned on, has paper
loaded, and is ready - press any key to start
printing. If not, press the <ESC> key.
PINELLAS COUNTY SCHOOLS
ANY OLD SCHOOL #1234
ACCOUNT ACTIVITY BY SUB ACCOUNT
Accounts from 1-0200.00 to 7-0550.00,
Includes Transactions From Cash
Account
Account Name
============= ===============
6 1501.00
ADOPT-A-SCHOOL
Sub Accounts from 0310 to 3498, Transactions from 07/01/00 to 07/31/00
Disbursements, Cash Receipts, Transfers, Adjustments of +/- 0.00 or more
Sub.
Sub Account Name
Description
SC Reference
Amount
======= =================== ============= ============= ========
0350
0510
0790
3440
Total for ATHLETICS
==>
Total for MUSIC
----------==>
0.00
Total for CLASSES
-----------==>
0.00
REPAIRS & MAINTENANCE
SUPPLIES
MISCELLANEOUS EXPENSE
GIFTS/GRANTS/BEQUESTS
Page 2-20
0.00
(
(
(
Total for Account
30.17)
43.65)
3.65)
625.00
----------==>
547.53
Grand Total
==>
547.53
MAS User's Guide
Printing Sub
Account
Activity By
Account
The Sub Account Activity report is
a detailed or summary listing of all
activity in a user defined range of
sub accounts, broken down by
account. It is useful for determining, for instance, all vending
machine receipts by account.
Accounts
Using the mouse, point to the Reports menu. Press the left mouse button and hold it
down while sliding the mouse to select/highlight Sub Accounts. Continue holding
down the left mouse button, slide the mouse to the right to select/highlight the Sub
Account Activity by Accounts selection and then release the left mouse button.
Sub Accounts from Enter the first sub account number you wish to
report on and press <ENTER>.
to Enter the last sub account number you wish to
report on and pressing <ENTER>.
Accounts Numbered from Enter the first account you wish to report on by
typing the Account Category (1-8), pressing
<ENTER>, typing the Account Number, and
then pressing <ENTER> again.
to Enter the last account you wish to report on by
typing the Account Category (1-8), pressing
<ENTER>, typing the Account Number, and
then pressing <ENTER> again.
Transactions dated from Enter the date of the first transaction to be
included on the report and press <ENTER>.
to Enter the date of the last transaction to be
included on the report and press <ENTER>.
Include Sources from Type Y or N in each of the four fields to indicate
whether or not you want disbursements (CD),
receipts (CR), transfers (TR), and/or adjustments
(AD) to print on the report. Any combination
can be selected.
Summary or Detail Type S and press <ENTER> to include only
summary information (sub account and account
totals) on the report. Or type D and press
<ENTER> to include detail information (transactions) on the report.
Tolerance Level Enter the dollar amount of transactions that you
wish to be the minimum for the report and press
<ENTER>. To print all transactions, leave this
field as 0.00 and press <ENTER>.
Above Info. Correct? If so, type Y and press <ENTER>.
Page 2-21
MAS User's Guide
Accounts
THE SCHOOL DISTRICT OF PINELLAS COUNTY
ANY OLD SCHOOL
Sub Accounts from
to
=>0310
=>3498
Accounts Numbered from
to
=>1 0200.00
=>7 0550.00
SUB ACCOUNT ACTIVITY
Current Period: 07/01/00 to 07/31/00
Transactions dated from =>07/01/00
to
=>07/31/00
Include Sources from CD
CR
TR
AD
=>Y
=>Y
=>Y
=>Y
Summary or Detail (S/D) =>S
Tolerance Level
=>
0.00
Is the above information correct?
(Y/N) =>
Is the Printer Ready? If your printer is turned on, has paper
loaded, and is ready - press any key to start
printing. If not, press the <ESC> key.
PINELLAS COUNTY SCHOOLS
ANY OLD SCHOOL #1234
SUB ACCOUNT ACTIVITY BY ACCOUNT
Sub Accounts from 0310 to 3498, Accounts from 1-0200.00 to 7-0550.00, Transactions fom 07/01/00 to 07/31/00
Includes Transactions From Cash Disbursements, Cash Receipts, Transfers, Adjustments of +/- 0.00 or more
Sub.
Sub Account Name
============= ===============
0350 REPAIRS & MAINTENANCE
Account Account Name
Description
SC Reference
Amount
======== ================ ============== ============= ==========
6 1501.00 ADOPT-A-SCHOOL
(
30.17)
-------Total for Sub Account
0510 SUPPIES
6 1501.00 ADOPT-A-SCHOOL
30.17)
(
43.65)
--------Total for Sub Account
0790 MISCELLANEOUS EXPENSE
==>(
6 1501.00 ADOPT-A-SCHOOL
==>(
43.65)
(
3.65)
--------Total for Sub Account
==>(
3.65)
--------Grand Total
Page 2-22
==>(
77.47)
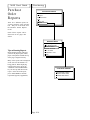
Using your mouse, point to the section of the chapter you wish to access and
single-click the left button. You will then be on the first page of that section.
MAS User's Guide
CHAPTER
3
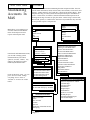
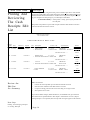
The Receipts portion of MAS includes everything needed to process receipts,
modify and/or void receipts, print receipt vouchers, and print reports on
receipts.
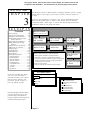
Central to the preparation of receipts is the process diagrammed below.
These are the general steps to follow in the normal course of entering
receipts into MAS. These steps, as well as the other receipt processes are
explained in detail on the pages that follow.
RECEIPTS
Contents
Receiving Funds ............................... 3-2
Entering General Information .......... 3-2
Entering Account Information ......... 3-3
Printing and Reviewing the Cash
Receipts Edit List .................... 3-4
Printing The Deposit Edit List ........ 3-5
Editing, Deleting, & Changing
Receipts ................................... 3-6
Deleting Lines From A Receipt ....... 3-7
Adding Lines To A Receipt ............. 3-8
Posting Receipts .............................. 3-9
Voiding Receipts ............................ 3-10
Printing Receipts ........................... 3-11
Receipt Reports ............................. 3-12
Printing Receipt Reports:
Receipts Register ....................... 3-13
Deposit Register ........................ 3-14
Sales Tax Register ...................... 3-16
Receipts Journal ........................ 3-17
Voided Receipts ......................... 3-18
Cancelled Receipts ..................... 3-19
Tolerance .................................. 3-20
Account ..................................... 3-21
By Sponsor ................................ 3-22
Receive Funds
(Monies Collected Form)
Enter General
Info. in MAS
Enter Account
Info. in MAS
Delete Lines
Print/Review
Edit Listing
Edit & Change
Receipts
Add Lines
The receipt process is the series of steps to follow in
MAS to receive funds from staff and students.
1. Enter general and detail account information.
2. Print and review the receipt & deposit edit lists.
3. Correct any problems with the receipts entered, delete
detail account lines from the receipts, or add detail
account lines to the receipts.
4. Post receipts in MAS.
5. Fill out a deposit slip and take receipts to bank
Post Receipts
in MAS
Deposit Receipts
at Bank
PULL-DOWN MENUS
From the Cash Receipts menu,
you can access the menu to
enter/edit receipts, post receipts
that have been entered, void
previously posted receipts, or
print out official receipts.
File
Receipts
Disbursements
PO's
Trans+Adj
Reports
From the Receipts pull-down menu,
you can enter new receipts, view
posted receipts, edit unposted
receipts, and print out a listing of all
entered but unposted receipts.
Page 3-1
Receipts
Create Cash Receipts
Edit Existing Cash Receipt
Edit List
Deposit Edit List
Post Cash Receipts
Void Cash Receipts
Official Receipts
MAS User's Guide
Receiving
Funds
Entering
General
Information
The first step in creating a receipt
is to enter general information
about the receipt (cash account,
date, received from, etc.).
Receipts
Funds collected for deposit into school internal fund accounts should be turned in to
the bookkeeper/secretary on a timely basis accompanied by either a Signature Sheet
or a Verification of Funds form . After reconciling the funds turned in with the form,
the bookkeeper/secretary may use one of two methods to post receipts:
Method 1: enter/post a receipt in MAS, print a copy, and give it to the
individual who turned in the funds. This receipt copy serves as confirmation that the
funds were received and posted properly to the appropriate account(s).
Method 2: enter all receipts in MAS at the end of the day, print a Cash
Receipt/Deposit Edit List, verify the accuracy of receipts entered for the day with the
receipts entered in MAS, then post receipts and give a copy of the official receipt to
each individual who turned in the funds.
Using the mouse, point to the Receipts menu. Press the left mouse button and hold it down
while sliding the mouse to select/highlight Create Cash Receipts and then release the left
mouse button.
Cash Account Number The highlighted Cash Account Number on the Create
Cash Receipts screen should be correct, ($1111.XX) but if
it is not, change it and press the <ENTER> key. *
Date of Receipt Type in the date of the receipt and press the <ENTER>
key. The date will default to today's date or the last day of
the currently open month.
*Note: Contact auditing immediately
Sponsor Optional. If you would like to identify a sponsor with the
receipt, type in the sponsor's name. Otherwise, leave
blank and press the <ENTER> key.
if the cash account number is not
correct.
Received from Type in the name of the payor and press the <ENTER>
key.
Description Type in a description for the receipt and press the
<ENTER> key. The signature sheet number (SS#) must be
entered first in the description field when one is used.
Reference Leave blank, or type the check #, "Chks" or "Cash" and
press the <ENTER> key.
Sales Tax The highlighted tax % should be 0.00. If not, type 0.00 and
press <ENTER>.
Bank Date Type in the date the funds will be deposited in the bank.
The date will default to the day after the date of receipt
and press the <ENTER> key.
You do not enter the total amount of
the receipt here, "above the line".
The system will compute the total
amount by adding up the amounts
credited to fund accounts as
described on the following page.
Deposit No. Type the deposit number for the deposit date and press
the <ENTER> key. The number will default to 1.
Above Info. Correct? If so, make sure a Y is highlighted and press <ENTER>. If
not, type N, press <ENTER>, and correct it.
THE SCHOOL DISTRICT OF PINELLAS COUNTY
ANY OLD SCHOOL
Cash Account Number
Cash Account Name
Date of Receipt
Sponsor
Received from
Description
=>1111.00
=>CHECKING
=>7/15/00
=>
=>LAURA JOHNSON
=>LIBRARY BOOK LATE FEE
Page 3-2
Next Step:
Entering Account Information
CREATE CASH RECEIPTS
Current Period: 07/01/00 to 07/31/00
Receipt No.
Reference
Sales Tax
Bank Date
Deposit No.
Amount =>
=>
=>Cash
=>0.00
=>7/16/00
=>1
128
MAS User's Guide
Receipts
Entering
Account
Information
Fund Type Type in the Account Category (1 through 8) and
press the <ENTER> key.
Account Number Type in the account number and press <ENTER>. Or press the <ENTER> key without
entering an account number to view a pop-up list
of accounts. Highlight the one you want and
press <ENTER>.
After entering general information, the system will allow you to
allocate receipts to many fund
accounts using the lower half of
the receipt screen.
Keep repeating these steps until
the entire receipt is accounted
for.
Sub Account Number Type in the sub account number and press
<ENTER>. A sub account is required only if the
account number entered uses sub accounts.
Press the <ENTER> key without entering a sub
account number to view a pop-up list of sub
accounts. Highlight the one you want and press
<ENTER>.
Description The sub account name will automatically be
shown in this field. To change it, delete the sub
account name using the <DELETE> key and
then press <ENTER>. The system will then carry
down the description from the summary area.
Amount Type in the amount of the receipt to be credited
to this fund account and sub account and press
<ENTER>.
When all lines have been entered
and validated as correct (and the
system is waiting for you to enter
the next line), press the <ESC>
key to signal that you are finished
with that receipt.
Above Line Correct? If it is, make sure Y is highlighted and press
<ENTER>. If not, type N, press <ENTER> and
correct it.
Save, Abandon, Continue? Change the highlighted field to an S to save the
receipt and press <ENTER>.
Quick Posting
You have the option of posting
the receipt directly from this
screen and printing a receipt. No
changes may be made to the
receipt once this option is chosen, nor will the receipt appear on
the edit lists. The deposit date
may be edited after posting.
Post and Print Receipt? If you want to post the receipt immediately and
print a copy of the receipt, type Y and press
<ENTER>. Otherwise, leave N highlighted and
press <ENTER>.
Show Account Balances? If you want the fund account balances on the
receipt, type Y and press <ENTER>. If not leave
N highlighted and press <ENTER>.
THE SCHOOL DISTRICT OF PINELLAS COUNTY
ANY OLD SCHOOL
Cash Account Number
Cash Account Name
Date of Receipt
Sponsor
Received from
Description
Account
5
2100.26
Sub.
=>1111.00
=>CHECKING
=>07/15/00
=>
=>LAURA JOHNSON
=>LIBRARY BOOK LATE FEE
Account Name
3495
MEDIA - FINES
Next Step:
...(if posting option is not chosen)
Printing & Reviewing the Edit List
Page 3-3
CREATE CASH RECEIPTS
Current Period: 07/01/00 to 07/31/00
Receipt No.
Reference
Sales Tax
Bank Date
Deposit No.
Amount =>
Description
LIBRARY BOOK LATE FEE
=>
=>Cash
=>0.00
=>7/16/00
=>1
128
5.45
Amount
5.45
MAS User's Guide
Receipts
Printing And
Reviewing
The Cash
Receipts Edit
List
After entering receipts, using the mouse, point to the Receipts menu. Press the left
mouse button and hold it down while sliding the mouse to select/highlight Edit List
and then release the left mouse button. If there are no unposted receipts outstanding, the computer will beep and give you a message to that effect.
Is the Printer Ready? If the printer is ready, press any key and the edit
list will print.
The printer will produce a report of all receipts entered to date that have not been
posted to the fund and cash accounts.
PINELLAS COUNTY SCHOOLS
ANY OLD SCHOOL #1234
CASH RECEIPTS EDIT LIST
Receipt
Number
125
Date
Reference
07/01/00
Deposit
Line
07/02/00-1
1
Description
JOHN SMITH
DONATIONS
Account Sub.
$ 1111.00
1 0200.00 3440
Account Name
Amount
CHECKING
ATHLETICS - GENERAL
RECEIPT TOTAL - ->
126
07/01/00
07/02/00-1
1
KAREN DUNN
$ 1111.00
SALES-FUND RAISING 2 1000.00 3482
CHECKING
BAND
RECEIPT TOTAL - ->
127
07/04/00
07/05/00-1
1
T. GALE
$ 1111.00
SALES-FUND RAISING 4 0440.00 3482
CHECKING
BETA CLUB
RECEIPT TOTAL - ->
128 07/15/00
07/16/00-1
1
LINDA JOHNSON
FINES
$ 1111.00
5 2100.26 3495
500.00
500.00
38.00
38.00
70.00
70.00
CHECKING
MEDIA - FINES
5.45
RECEIPT TOTAL - ->
5.45
Make sure that the:
Review the
Edit List
for Accuracy
•
•
•
•
total for each receipt adds up to the amount of funds received
fund accounts coded for each detail line are accurate
receipts are being posted to the correct checking or savings account
descriptions are accurate
If you need to make changes, delete detail lines, or add detail lines, proceed with
these functions as explained later in this chapter. If the edit list is correct, skip to
Posting Receipts. Once posted, these receipts will no longer appear on this edit list.
Next Step:
Editing and Changing Receipts
or Posting Receipts
Page 3-4
MAS User's Guide
Printing The
Deposit Edit
List
Receipts
After entering receipts for a given deposit, using the mouse, point to the Receipts
menu. Press the left mouse button and hold it down while sliding the mouse to
select/highlight Deposit Edit List and then release the left mouse button. If there are
no unposted receipts outstanding, the computer will beep and give you a message to
that effect.
Is the Printer Ready? If the printer is ready, press any key and the edit
list will print.
The printer will produce a deposit report of all receipts entered to date where at least
one receipt in the deposit has not been posted to the fund and cash accounts.
PINELLAS COUNTY SCHOOLS
ANY OLD SCHOOL #1234
DEPOSIT EDIT LIST
Account
$ 1111.00
Account Name
CHECKING
Deposit
Date
Receipt
Number
07/02/00-1
125
126
Receipt
Date
07/01/00
07/01/00
Received of
Not Posted
JOHN SMITH
KAREN DUNN
127
0704/00
T. GALE
128
0715/00
LAURA JOHNSON
Review the
Edit List
for Accuracy
Next Step:
129
130
07/19/00
07/19/00
0.00
70.00
JOHN LANDRY
COCA COLA
5.45
538.00
70.00
0.00
5.45
DEPOSIT TOTAL - ->
07/20/00-1
538.00
500.00
38.00
70.00
DEPOSIT TOTAL - ->
07/16/00-1
Deposit
Total
500.00
38.00
DEPOSIT TOTAL - ->
07/05/00-1
Posted
70.00
5.45
0.00
10.00
45.00
5.45
10.00
45.00
DEPOSIT TOTAL - ->
55.00
0.00
55.00
ACCOUNT TOTAL - ->
668.45
0.00
668.45
GRAND TOTAL
668.45
0.00
668.45
- ->
Make sure that the:
•
•
•
•
total for each receipt adds up to the amount of funds received
grand total is equal to the total amount of funds you have ready for deposit
receipts are being posted to the correct checking or savings account
descriptions are accurate
If you need to make changes, delete detail lines, or add detail lines, proceed with these
functions as explained later in this chapter. If the edit list is correct, skip to Posting
Receipts. Once posted, these receipts will no longer appear on this edit list.
Editing and Changing Receipts
or Posting Receipts
Page 3-5
MAS User's Guide
Receipts
If you need to CHANGE a receipt that has NOT YET BEEN POSTED, using the
mouse, point to the Receipts menu. Press the left mouse button and hold it down
while sliding the mouse to select/highlight Edit Existing Cash Receipt and then
release the left mouse button to proceed to the Edit Cash Receipt screen.
Editing,
Deleting, &
Changing
Receipts
You can only edit or change
receipts that you have not posted.
You cannot change a receipt that
has been posted to your accounts. If you wish to delete lines
from or add lines to a receipt, see
the next two pages.
Receipt Number Type the receipt number that you want to
change and press <ENTER>. Or press <ENTER>
without entering a receipt number to view a popup list of receipts. Highlight the one you want
and press <ENTER>.
Edit, Delete, Continue Type E and press <ENTER> to change the
general receipt information. If you want to
continue with detail, make sure C is highlighted
and press <ENTER>. The system will display the
first 11 lines of the receipt.
Add, Change, Delete, Quit Type C (change) and press <ENTER>.
Line Number to Edit Type the line number and press <ENTER>. The
system will display the line you entered and
allow you to make changes to it. Use the
<ENTER> key to move from one field to the next.
This screen can be used to view
already posted receipts, but will
not allow you to make any
changes to them other than the
deposit date.
Above Line Correct If it is, make sure the Y is highlighted and press
<ENTER>. If not, type N and make the necessary changes.
Line Number to Edit When corrections have been completed, press
the <ESC> key. If not, type the number of
another line to edit and press <ENTER>.
Next Step:
Add, Change, Delete, Quit Type Q to save and leave the changed receipt,
then press <ENTER>.
Posting Receipts
THE SCHOOL DISTRICT OF PINELLAS COUNTY
ANY OLD SCHOOL
Cash Account Number
Cash Account Name
Date of Receipt
Sponsor
Received from
Description
Line
1
2
Account
5 2100.53
6 2605.00
=>
=>
=>
=>
=>
=>
Sub.
3495
3440
EDIT CASH RECEIPTS
Current Period: 07/01/00 to 07/31/00
1111.00
Checking
07/05/00
John Smith
Lost book and Field Trip
Account Name
Media - Fines
Field Trips/Gr.5
Receipt No.
Reference
Sales Tax
Bank Date
Deposit No.
Amount =>
Description
Lost Book Fine
Tallahassee Trip
=>
=>
=>
=>
=>
1
Chk #252
0.00
07/07/00
1
150.00
Amount
5.00
135.00
<<< ALL >>>
Would you like to Add, Change, Delete lines, or Quit? (A/C/D/Q/PgUp/PgDn) =>
Page 3-6
MAS User's Guide
Receipts
Deleting
Lines From A
Receipt
If you need to DELETE detail lines from a receipt that has NOT YET BEEN POSTED,
using the mouse, point to the Receipts menu. Press the left mouse button and hold it
down while sliding the mouse to select/highlight Edit Existing Cash Receipt and then
release the left mouse button to proceed to the Edit Cash Receipt screen.
Receipt Number Type the receipt number that you want to delete
lines from and press <ENTER>. Or press the
<ENTER> key without entering a receipt number
to view a pop-up list of receipts. Highlight the
one you want and press <ENTER>.
You can only delete lines from
receipts that you have not posted.
You cannot change a receipt that has
been posted to your accounts, except
for the bank (deposit) date.
Edit, Delete, Cont., Re-enter To delete the entire receipt, type D and press
<ENTER>. If you want to delete a portion of the
receipt, make sure C is highlighted and press
<ENTER>.
The system will display the first 11 lines of the
receipt
Add, Change, Delete, Quit Type D to indicate you wish to delete lines and
press <ENTER>.
Line Number to Delete Type the number and press <ENTER>.
When deletion(s) have been completed, press
the <ESC> key. If not, type the number of
another line to delete and press <ENTER>.
THE SCHOOL DISTRICT OF PINELLAS COUNTY
ANY OLD SCHOOL
Cash Account Number
Cash Account Name
Date of Receipt
Sponsor
Received from
Description
Line
Account
1
5 2100.53
2
6 2605.00
=>
=>
=>
=>
=>
=>
Sub.
3498
3440
EDIT CASH RECEIPTS
Current Period: 07/01/00 to 07/31/00
1111.00
Checking
07/05/00
John Smith
Lost book and Field Trip
Account Name
Media - Lost Books
Field Trips/Gr.5
Receipt No.
Reference
Bank Date
Deposit No.
Amount =>
Description
Lost Book Fine
Tallahassee Trip
=>
1
=> Chk #252
=> 07/07/00
=> 1
150.00
Amount
15.00
135.00
<<< ALL >>>
Line number to delete => 2
The system will delete the line
number entered. If finished
deleting lines, press the <ESC>
key.
Add, Change, Delete, Quit Type Q to save and leave the changed
receipt, then press the <ENTER> key.
Next Step:
Posting Receipts
Page 3-7
MAS User's Guide
Receipts
If you need to ADD additional detail lines to a receipt that has NOT YET BEEN
POSTED, using the mouse, point to the Receipts menu. Press the left mouse button
and hold it down while sliding the mouse to select/highlight Edit Existing Cash
Receipt and then release the left mouse button to proceed to the Edit Cash Receipt
screen.
Adding Lines
To A Receipt
Receipt Number Type the receipt number that you want to add
lines to and press the <ENTER> key. Or press
<ENTER> without entering a receipt number to
view a pop-up list of receipts. Highlight the one
you want and press <ENTER>.
Edit, Delete, Cont., Re-enter Make sure C is highlighted and press the
<ENTER> key.
The system will display the first 11 lines of the
receipt
Add, Change, Delete, Quit Type A and press <ENTER>.
THE SCHOOL DISTRICT OF PINELLAS COUNTY
ANY OLD SCHOOL
Cash Account Number
Cash Account Name
Date of Receipt
Received of
Description
Line
1
=>
=>
=>
=>
=>
EDIT CASH RECEIPTS
Current Period: 07/01/00 to 07/31/00
1111.00
Checking
07/12/00
Sue Jones
Book Fine
Receipt No.
Reference
Deposit Date
Deposit No.
Amount =>
Account
Sub.
Account Name
5 2100.26
3495
Media - Fines
Description
Library Fine
=>
2
=>Cash
=>07/13/00
=> 1
1.50
Amount
1.50
Would you like to Add, Change, Delete lines or Quit? (A/C/D/Q/PgUp/PgDn):
If you press the <ENTER> key
without entering a fund type or
account number, you will get the
pop-up list of funds/accounts.
Highlight the one you want and
press the <ENTER> key.
Fund Type Type in an Account Category (1 through 8) and
press <ENTER>.
Account Number Type in the Account Number.
Sub Account Number Type in the Sub Account Number.
Description The sub account name will automatically be
shown in this field. To change it, delete the sub
account name using the <DELETE> key and then
press <ENTER>. The system will then carry
down the description from the summary area.
When all lines have been entered
and validated as correct (and the
system is waiting for you to enter
the next line), press the <ESC>
key to signal that you are finished
with that receipt.
Amount Type in the amount of the receipt to be credited
to this fund account and press <ENTER>.
Above Line Correct? If it is, make sure the Y is highlighted and press
<ENTER>. When finished entering detail lines,
press <ESC>.
Save, Abandon, Continue? Change the highlighted field to an S to save the
receipt and press <ENTER>.
Next Step:
Add, Change, Delete, Quit Type Q to save and leave the changed receipt,
then press <ENTER>.
Posting Receipts
Page 3-8
MAS User's Guide
Posting
Receipts
Do not post receipts until you have
reviewed them and have made any
changes, deletions or additions.
Once you have posted receipts, you
will not be able to change them.
Keep a copy of the Edit List as
backup for the bank deposit.
Receipts
To POST a receipts. Using the mouse, point to the Receipts menu. Press and hold
the left mouse button down while sliding the mouse to select/highlight Post Cash
Receipts. You will be given three options for posting cash receipts: 1) Current
Period, 2) Date of Receipt, or 3) Receipts Number. Select/highlight Current Period
and then release the left mouse button.
The system will list all the unposted receipts for the period.
Post These Receipts? Since you have reviewed and approved the Edit
Listing, change the highlighted field to a Y and
press <ENTER>.
THE SCHOOL DISTRICT OF PINELLAS COUNTY
ANY OLD SCHOOL
Receipt No
2
Date
07/12/00
POST ALL CASH RECEIPTS
Current Period: 07/01/00 to 07/31/00
Received of
Sue Jones
Description
Bookfair
Amount
150.00
POSTING RECEIPT 2
Posting to Account =>5 2100.05
Total Posted
=>
150.00
<<< A L L >>>
Do you want to post these receipts? (Y/N => Y
Ideally, receipts should be
entered into MAS as funds are
received and posted in batches
corresponding to (and equal to)
each bank deposit.
Print These Receipts? Make sure Y is highlighted and that paper is
in the printer, then press <ENTER>.
Show Account Balances? If you want the fund account balances on
the receipts, type Y and press <ENTER>. If
not, leave N highlighted and press <ENTER>.
Next Step
Deposit Receipts in Bank
Page 3-9
MAS User's Guide
Receipts
Voiding
Receipts
To VOID a receipt. Using the mouse, point to the Receipts menu. Press and hold the
left mouse button down while sliding the mouse to select/highlight Void Cash
Receipts and then release the left mouse button.
Receipt Number to Void Enter the number of the receipt that you wish to
void. Or press the <ENTER> key without
entering a receipt number to view a pop-up list of
receipts. Highlight the one you want and press
<ENTER>.
Receipts may be voided once they
have been posted. However, there
are only two acceptable reasons for
voiding a receipt. (1) The receipt is
a duplicate, or (2) the receipt was
written for the wrong amount. And
the error was detected BEFORE the
money was taken to the bank.
Although entering a reason is
optional in MAS, the Internal
Funds policies require that the
reason be stated. If a receipt is
posted to the wrong account and/
or the error in the amount is
detected AFTER the deposit is
taken to the bank, an adjustment
shall be used for the correction.
Reason for Void Type a description of the reason the receipt is
being voided and press <ENTER>.
Above Info. Correct? If the receipt number entered is the one you wish
to void, type Y and press <ENTER>. If the
receipt displayed is not the one you wish to
void, type N and press <ENTER>.
THE SCHOOL DISTRICT OF PINELLAS COUNTY
ANY OLD SCHOOL
Cash Account Number
Cash Account Name
Date of Receipt
Sponsor
Received from
Description
=>
=>
=>
=>
=>
=>
1111.00
Checking
07/15/00
John Smith
Picture Money
Void Date
=> 07/15/00
Reason for Void
=> Duplicate Receipt
Carefully view this screen and the
corresponding information for
the receipt. Once you complete
this step, the receipt will be
voided permanently.
Page 3-10
VOID CASH RECEIPTS
Current Period: 07/01/00 to 07/31/00
Receipt No.=>
Reference =>
Amount
=>
3
12.50
MAS User's Guide
Receipts
To PRINT a receipt. Using the mouse, point to the Receipts menu. Press and
hold the left mouse button down while sliding the mouse to select/highlight
Official Receipts and then release the left mouse button.
Printing
Receipts
There are three ways to print
receipts. Two of these have been
discussed previously in the
Entering Account Information
section and in the Posting Receipts section.
Select by Date or Number? Type D and press <ENTER> to have the
report sorted by receipt date or type N and
press <ENTER> to have the report sorted
by receipt number.
Date or Number Range Enter the beginning date or receipt number
you wish to print. Or press the <ENTER>
key without entering a receipt number to
view a pop-up list of receipts. Highlight the
one you want and press <ENTER>.
Is information correct? If the information is correct, select Y and
press enter. If the information is not
correct, select N and re-enter the data.
Show Account Balances? If you want the fund account balances on
the receipts, type Y and press <ENTER>. If
not, leave N highlighted and press <ENTER>.
Printer Ready? If the printer is ready, press any key to print
the voucher.
THE SCHOOL DISTRICT OF PINELLAS COUNTY
ANY OLD SCHOOL
PRINT CASH RECEIPT
Current Period: 07/01/00 to 07/31/00
Select receipts by receipt date or receipt number order? (D/N)=>D
Date Range of Receipts
Include receipts dated from => 07/01/00
through
=> 07/31/00
Is the above information correct? (Y/N) =>Y
Do you want to show account balances? (Y/N) =>Y
Page 3-11
MAS User's Guide
Receipt
Reports
There are 9 different reports for
viewing receipt information. They are
all accessible from the Cash Receipts
Reports menu.
The Receipts Register, Deposits
Register, Sales Tax Register, Receipts Journal, Void Receipts, and
Cancelled Receipts, Tolerance
Account, and By Sponsor reports
will each be discussed in the pages
that follow.
Receipts
PULL-DOWN MENUS
File
Receipts
Disbursements
POs
Trans+Adj
Reports
REPORTS MENU
Cash Receipts
Disbursements
Purchase Orders
General Accounts
Sub Accounts
Maintenance Lists
Labels
CASH RECEIPTS REPORTS
Receipts Register
Deposits Register
Sales Tax Register
Receipts Journal
Void Receipts
Cancelled Receipts
Receipts Tolerance
Receipts to Account
Receipts by Sponsor
Page 3-12
MAS User's Guide
Receipts
Using the mouse, point to the Reports menu. Press the left mouse button and hold it
down while sliding the mouse to select/highlight Cash Receipts. Continue holding
down the left mouse button, slide the mouse to the right to select/highlight the
Receipts Register selection and then release the left mouse button.
Printing The
Receipts
Register
Select by Date or Number Type D and press <ENTER> to have the report
sorted by receipt date or type N and press
<ENTER> to have the report sorted by receipt
number.
The Receipts Register is a chronological listing of receipts that have
been posted for a user-specified
period of time.
The register is useful when reconciling savings/checking accounts to
bank statements.
Cash Account The cash account number, $ 1111.00, should
automatically appear in this field. If it does not*,
enter this account number. DO NOT use another
account number in this field.
From Rec. Date/Number Enter the starting date/receipt number for the
report and press the <ENTER> key. All receipts
dated/numbered on or after this date/number will
be printed.
Through Rec. Date/Number Enter the ending date/receipt number for the
report and press <ENTER>. All receipts dated/
numbered on or before this date/number will be
printed.
Above Info. Correct? If so, make sure a Y is highlighted and press
<ENTER>. If not, press the <ESC> key and make
the necessary correction(s).
* If account $ 1111.00 does not
automatically appear in this field,
contact Auditing for assistance.
Display or Print Report? To print the report on your printer, make sure P is
highlighted and press <ENTER>. If you wish to
just view the report on your screen, type D and
press <ENTER>.
THE SCHOOL DISTRICT OF PINELLAS COUNTY
ANY OLD SCHOOL
CASH RECEIPTS REGISTER
Current Period: 07/01/00 to 07/31/00
Select by receipt Date or receipt Number? (D/N)=> D Receipt Date Order
Cash Account
=>1111.00 Checking
From Receipt Date
=>07/01/00
Through Receipt Date =>07/31/00
Is the Printer Ready? If your printer is turned on, has paper
loaded, and is ready, press any key to
start printing.
PINELLAS COUNTY SCHOOLS
ANY OLD SCHOOL #1234
CASH RECEIPTS REGISTER
For Receipts Deposited to Cash Account $ 1111.00 Checking Numbered Between 125 and 130
Receipt No
125
126
127
128
129
130
Date
Received of
Reference
07/01/00
07/01/00
07/04/00
07/15/00
07/19/00
07/19/00
JOHN SMITH
KAREN DUNN
T. GALE
LAURA JOHNSON
JOHN LANDRY
COCA COLA
Dep Date No. Voided
07/02/00
07/02/00
07/05/00
07/16/00
07/20/00
07/20/00
Reason for Void
1
500.00
1
38.00
1
70.00
1
5.45
1
10.00
1 07/19/00 *****VOID***** DUPLICATE POSTING
TOTAL - ->
Page 3-13
Amount
623.45
MAS User's Guide
Printing The
Deposit
Register
Receipts
Using the mouse, point to the Reports menu. Press the left mouse button and hold it
down while sliding the mouse to select/highlight Cash Receipts. Continue holding
down the left mouse button, slide the mouse to the right to select/highlight the
Deposits Register selection and then release the left mouse button.
Cash Account The cash account number, $ 1111.00, should
automatically appear in this field. If it does not*,
enter this account number. Do Not use another
account number in this field.
The Deposit Register is a listing of
deposits and their associated
receipts during a user-specified
period of time.
This report is useful when trying to
determine the frequency of deposits
and the receipts associated with each
deposit.
Deposits from Enter the starting date for the report and press
<ENTER>. All deposits on or after this date will
be printed.
to Enter the ending date for the report and press
<ENTER>. All deposits on or before this date
will be printed.
Days Tolerance Enter the number of days between deposits to be
reported.
* If account $ 1111.00 does not
automatically appear in this field,
contact Auditing for assistance.
Above Info. Correct? If so, make sure Y is highlighted and press
<ENTER>. If not, press the <ESC> key and make
the necessary correction(s).
Is the Printer Ready? If your printer is turned on, has paper loaded,
and is ready, press any key to start printing.
THE SCHOOL DISTRICT OF PINELLAS COUNTY
ANY OLD SCHOOL
Cash Account
=>1111.00 CHECKING
Deposits From
To
=>07/01/00
=>07/31/00
Days Tolerance
=> 5
Is the above information correct? (Y/N)=>Y
Page 3-14
DEPOSIT REPORT
Current Period: 07/01/00 to 07/31/00
MAS User's Guide
Receipts
PINELLAS COUNTY SCHOOLS
ANY OLD SCHOOL #1234
DEPOSIT REPORT
For Deposits Made to Cash Account $ 1111.00 CHECKING Between 07/01/00 AND 07/31/00
Deposit
Date
Receipt
Number
07/03/00-1
07/04/00-1
125
126
131
07/05/00-1
127
Date
Received of
07/03/00 JOHN SMITH
07/03/00 KAREN DUNN
07/03/00 COCA COLA
500.00
38.00
45.00
DEPOSIT TOTAL
583.00
07/20/00-1
Day of Week
SUNDAY
MONDAY
TUESDAY
WEDNESDAY
THURSDAY
FRIDAY
SATURDAY
- ->
07/04/00 T. GALE
DEPOSIT TOTAL
07/18/00-1
Amount
128
129
130
70.00
- ->
5.45
DEPOSIT TOTAL
5.45
07/19/00 JOHN LANDRY
07/19/00 COCA COLA
10.00
45.00
DEPOSIT TOTAL
* LESS VOIDS
- ->
- ->
55.00
45.00
NET DEPOSIT
- ->
10.00
GROSS TOTAL
- ->
* LESS TOTAL VOIDS - - >
713.45
45.00
TOTAL NET DEPOSIT - ->
668.45
Number of Average
Receipts
Days
Number of
Exceptions
Days
MON
MON
MON
111-
TUES
1-
MON
1-
WED
WED
11-
Tolerance Graph
70.00
07/17/00 LAURA JOHNSON
- ->
Day of
Week
Average Number of
Days Tolerance
Average
Days
0
4
1
2
0
0
0
0.00
1.00
1.00
1.00
0.00
0.00
0.00
0
0
0
0
0
0
0
0.00
0.00
0.00
0.00
0.00
0.00
0.00
0
4
1
2
0
0
0
1.00
1.00
0.00
0.00
1.00
0.00
0.00
7
1.00
0
0.00
7
1.00
Page 3-15
MAS User's Guide
Receipts
Printing The
Sales Tax
Register
Using the mouse, point to the Reports menu. Press the left mouse button and hold it
down while sliding the mouse to select/highlight Cash Receipts. Continue holding
down the left mouse button, slide the mouse to the right to select/highlight the Sales
Tax Register selection and then release the left mouse button.
Cash Account The cash account number, $ 1111.00, should
automatically appear in this field. If it does not*,
enter this account number. DO NOT use another
account number in this field.
The Sales Tax Register report lists all
the receipts made during a specified
period and breaks down the receipts
by taxable and non-taxable revenue.
From Receipt Date Enter the starting date for the report and press
<ENTER>. All receipts made on or after this date
will be printed.
This report is helpful when determining how much tax has been collected
from the schools taxable income
during the year.
Through Receipt Date Enter the ending date for the report and press
<ENTER>. All receipts made on or before this
date will be printed.
If account number $ 1111.00 does not
automatically appear in this area,
contact Auditing for assistance.
Above Info. Correct? If so, make sure Y is highlighted and press
<ENTER>. If not, press the <ESC> key and make
the necessary correction(s).
THE SCHOOL DISTRICT OF PINELLAS COUNTY
ANY OLD SCHOOL
Cash Account
From Receipt Date
Through Receipt Date
SALES TAX REGISTER
Current Period 07/01/00 to 07/31/00
=>1111.00 CHECKING
=>08/01/00
=>08/31/00
Is the above information correct? (Y/N)=>Y
Is the Printer Ready?
If your printer is turned on, has paper
loaded, and is ready, press any key to start
printing.
PINELLAS COUNTY SCHOOLS
ANY OLD SCHOOL #1234
SALES TAX REGISTER
For Receipts Deposited to Cash Account $ -1111.00 CHECKING Between 08/01/00 and 08/31/00
Date
Receipt No
08/01/00
08/01/00
08/01/00
08/01/00
08/05/00
135
136
137
139
138
Received of
Non-Taxable
STUDENTS
126.17
VOIDED ON 08/01/00
KATHY HART
210.00
SCHOOL STORE
SCHOOL STORE
32.25
TOTALS - ->
368.42
Page 3-16
Taxable
Total Revenues
Tax Collected
Total Receipt
126.17
0.00
126.17
27.91
210.00
27.91
32.25
0.00
2.09
0.00
210.00
30.00
32.25
27.91
396.33
2.09
398.42
MAS User's Guide
Receipts
Printing The
Receipts
Journal
Using the mouse, point to the Reports menu. Press the left mouse button and hold it
down while sliding the mouse to select/highlight Cash Receipts. Continue holding
down the left mouse button, slide the mouse to the right to select/highlight the
Receipts Journal selection and then release the left mouse button.
The Receipts Journal is a listing of
receipts by cash account (checking/
savings etc.) that have been posted
for a user-specified period of time.
The journal is useful when trying to
determine whether and when specific
receipts were posted.
For transactions between Enter the starting date for the report and press
the <ENTER> key. All receipts dated on or after
this date will be printed.
and Enter the ending date for the report and press the
<ENTER> key. All receipts dated on or before
this date will be printed.
Sort by Date or Number Type D and press <ENTER> to have the report
sorted by receipt date or type N and press
<ENTER> to have the report sorted by receipt
number.
Above Info. Correct? If so, make sure a Y is highlighted and press the
<ENTER> key. If not, press the <ESC> key and
make the necessary correction(s).
THE SCHOOL DISTRICT OF PINELLAS COUNTY
ANY OLD SCHOOL
CASH RECEIPTS JOURNAL
Current Period: 07/01/00 to 07/31/00
For Transactions between =>07/01/00
and
=>07/31/00
Sort by cash receipt Number or Date of transaction? (N/D) =>D
Is the Printer Ready? If your printer is turned on, has paper
loaded, and is ready, press any key to start
printing.
PINELLAS COUNTY SCHOOLS
ANY OLD SCHOOL #1234
CASH RECEIPTS JOURNAL
From 07/01/00 to 07/31/00 by Cash Receipt Number
Cash AC Receipt No
Date
1111.00
1111.00
1111.00
1111.00
1111.00
1111.00
1111.00
1111.00
07/01/00 JOHN SMITH
7 0545.00
07/01/00 KAREN DUNN
2 1000.80
07/04/00 T. GALE
2 1000.80
07/15/00 LAURA JOHNSON 5 2100.27
07/19/00 JOHN LANDRY
4 2100.00
07/19/00 COCA COLA
7 0550.13
07/19/00 COCA COLA
7 0550.13
07/01/00 COCA COLA
7 0550.13
125
126
127
128
129
130
130
131
Received of
Account Sub
3440
3482
3482
3495
3495
3495
3495
3495
Description
Amount
DONATIONS
500.00
SALES-FUND RAISING
38.00
SALES-FUND RAISING
70.00
FINES
5.45
DUES COLLECTED
10.00
VENDING COMMISSIONS 45.00
VENDING COMMISSIONS (45.00)
VENDING COMMISSIONS 45.00
TOTAL CASH RECEIPTS
Page 3-17
Receipt Total
500.00
38.00
70.00
5.45
10.00
45.00
(45.00)
45.00
- ->
668.45
MAS User's Guide
Receipts
Printing The
Voided
Receipts
Report
Using the mouse, point to the Reports menu. Press the left mouse button and hold it
down while sliding the mouse to select/highlight Cash Receipts. Continue holding
down the left mouse button, slide the mouse to the right to select/highlight the
Voided Receipts selection and then release the left mouse button.
Cash Account The cash account number, $ 1111.00, should
automatically appear in this field. If it does not*,
enter this account number. DO NOT use another
account number in this field.
Receipts voided from Enter the starting date for the report and press
<ENTER>. All receipts voided on or after this
date will be printed.
The Voided Receipts report is a
listing of receipts that have been
voided during a user-specified period
of time.
to Enter the ending date for the report and press
<ENTER>. All receipts voided on or before this
date will be printed.
Above Info. Correct? If so, make sure Y is highlighted and press
<ENTER>. If not, press the <ESC> key and make
the necessary correction(s).
* If account number $ 1111.00 does
not automatically appear in this area,
contact Auditing for assistance.
Display or Print Report? To print the report, make sure P is highlighted
and press <ENTER>. If you wish to just view the
report on your screen, type D and press <ENTER>.
THE SCHOOL DISTRICT OF PINELLAS COUNTY
ANY OLD SCHOOL
Cash Account
Receipts Voided From
To
VOIDED CASH RECEIPTS
Current Period: 07/01/00 to 07/31/00
=>1111.00 CHECKING
=>07/01/00
=>07/31/00
Is the Printer Ready? If your printer is turned on, has paper
loaded, and is ready, press any key to start
printing.
PINELLAS COUNTY SCHOOLS
ANY OLD SCHOOL #1234
VOIDED CASH RECEIPTS
From Cash Account $ -1111.00 CHECKING Cash Receipts Voided between 07/01/00 and 07/31/00
Receipt No
130
Date
07/19/00
Vd Date Received of
07/19/00 COCA COLA
Amount Reason for Void
45.00
Total - -> 45.00
Page 3-18
DUPLICATE POSTING
MAS User's Guide
Receipts
Printing The
Cancelled
Receipts
Report
Using the mouse, point to the Reports menu. Press the left mouse button and hold it
down while sliding the mouse to select/highlight Cash Receipts. Continue holding
down the left mouse button, slide the mouse to the right to select/highlight the
Cancelled Receipts selection and then release the left mouse button.
Receipts dated between Enter the starting date for the report and press
<ENTER>. All receipts cancelled on or after this
date will be printed.
and Enter the ending date for the report and press
<ENTER>. All receipts cancelled on or before
this date will be printed.
The Cancelled Receipts report is a
listing of receipts that have been
abandoned or discarded before
being posted during a user
specified period of time.
Above Info. Correct? If so, make sure Y is highlighted and press
<ENTER>. If not, press the <ESC> key and make
the necessary correction(s).
This report is useful when trying
to find receipts that were not
posted or were otherwise "lost."
THE SCHOOL DISTRICT OF PINELLAS COUNTY
ANY OLD SCHOOL
CANCELLED RECEIPTS
Current Period 07/01/00 to 07/31/00
Receipts dated between =>07/01/00
and
=>07/31/00
Is the Printer Ready? If your printer is turned on, has paper
loaded, and is ready, press any key to start
printing.
PINELLAS COUNTY SCHOOLS
ANY OLD SCHOOL #1234
CANCELLED RECEIPTS
Cash AC
Date
1111.00
1111.00
1111.00
07/01/00
07/01/00
07/15/00
Receipt No
125
126
129
Received of
JOHN SMITH
KAREN DOLE
JAN CLARK
Description
DONATION
CANDY SALE
FACULTY DUES
Total
Page 3-19
- ->
Amount
0.00
0.00
0.00
0.00
MAS User's Guide
Receipts
Printing The
Tolerance
Report
Using the mouse, point to the Reports menu. Press the left mouse button and hold
it down while sliding the mouse to select/highlight Cash Receipts. Continue
holding down the left mouse button, slide the mouse to the right to select/
highlight the Receipts Tolerance selection and then release the left mouse button.
Cash Account Type the number of the cash (checking)
account to print the report and press <ENTER>. Leave this field blank if you want to
include all accounts in your report.
The Receipts Tolerance report is a
numerical listing of all receipts
collected that are equal to or greater
than a user specific dollar amount
(tolerance).
Amount or Number? To list receipts numerically by cash receipt
number make sure N is highlighted and press
<ENTER>. To list receipts by the amount of
the receipt, make sure A is highlighted and
press <ENTER>.
Tolerance Level Enter the cut off for the report. Only receipts
collected for an amount equal to or exceeding
this amount will be printed.
Above Info. Correct? If so, make sure a Y is highlighted and press
<ENTER>. If not, press the <ESC> key and
make the necessary correction(s).
Display or Print Report? To print the report, make sure P is highlighted
and press <ENTER>. If you wish to just view
the report on your screen, type D and press
<ENTER>.
THE SCHOOL DISTRICT OF PINELLAS COUNTY
ANY OLD SCHOOL
EDIT CASH RECEIPTS
Current Period: 07/01/00 to 07/31/00
CASH RECEIPT TOLERANCE
Cash Account (blank for all)
=> 1111.00 CHECKING
Report by Amount or Number (A/N) => NUMBER
Tolerance Level
=>
50.00
Is the Printer Ready? If your printer is turned on, has paper
loaded, and is ready - press any key to start
printing.
PINELLAS COUNTY SCHOOLS
ANY OLD SCHOOL #1234
CASH RECEIPTS TOLERANCE
For Receipts Deposited to Cash Account $ -1111.00 CHECKING of 50.00 or Greater
Receipt No
125
127
135
Date
Account
Received of
Dep Date
No.
07/01/00
07/04/00
08/01/00
$ 1111.00
$ 1111.00
$ 1111.00
JOHN SMITH
T. GALE
STUDENTS
07/02/00
07/05/00
08/02/00
1
1
1
Amount Voided
500.00
70.00
126.17
Gross Cash Receipts Total - ->
Less Voided Cash Receipts - ->
696.17
0.00
Net Cash Receipts
696.17
Page 3-20
- ->
Reason for Void
MAS User's Guide
Receipts
Using the mouse, point to the Reports menu. Press the left mouse button and hold it
down while sliding the mouse to select/highlight Cash Receipts. Continue holding
down the left mouse button, slide the mouse to the right to select/highlight the
Receipts by Account selection and then release the left mouse button.
Printing
Receipts By
Account
Include Accounts From Enter the fund (1-8) and 4-digit account number
that you wish to begin the report with, and press
<ENTER>.
To Enter the fund (1-8) and 4-digit account number
that you wish to end the report with, and press
<ENTER>.
The Cash Receipt by Account
report is a list of receipts posted
to each account within a range of
accounts.
Above Info. Correct? If so , make sure Y is highlighted and press
<ENTER>. If not, press the <ESC> key and make
the necessary correction(s).
This report is useful for viewing all
collections within a range of
accounts and/or a specific
account.
THE SCHOOL DISTRICT OF PINELLAS COUNTY
ANY OLD SCHOOL
EDIT CASH RECEIPTS
Current Period: 07/01/00 to 07/31/00
CASH RECEIPTS BY ACCOUNT
Include Accounts From
To
=> 1 0750.80 BASKETBALL - BOYS
=> 1 0850.80 BASKETBALL - GIRLS
Is the Printer Ready?
If your printer is turned on, has paper
loaded, and is ready, press any key to start
printing.
PINELLAS COUNTY SCHOOLS
ANY OLD SCHOOL #1234
CASH RECEIPTS BY ACCOUNT
For Receipts Posted to Accounts From 1-0750.80 To 1-0850.80
Account
1 0750.80
Account Name
BASKETBALL - BOYS
Receipt No
133
Date
Description
07/29/00 MICHAEL COOPER-SALES-FUND RAISING
TOTALS FOR ACCOUNT 1-0750.80, BASKETBALL - BOYS
1 0850.80
BASKETBALL - GIRLS
132
Amount
30.00
- ->
07/28/00 DONNA BROWN-SALES-FUND RAISING
TOTALS FOR ACCOUNT 1-0850.80, BASKETBALL - GIRLS
GRAND TOTAL FOR ALL ACCOUNTS
Page 3-21
30.00
22.00
- ->
22.00
- ->
52.00
MAS User's Guide
Receipts
Using the mouse, point to the Reports menu. Press the left mouse button and hold it
down while sliding the mouse to select/highlight Cash Receipts. Continue holding
down the left mouse button, slide the mouse to the right to select/highlight the
Receipts by Sponsor selection and then release the left mouse button.
Printing
Receipts By
Sponsor
Sponsor Enter the name of the sponsor to be included in
the report. You can get a pop-up list of the
current sponsors by pressing the <F4> key.
The Cash Receipts by Sponsor
report is a list of receipts by
sponsor to accounts.
Above Info. Correct? If so , make sure a Y is highlighted and press
<ENTER>. If not, press the <ESC> key and make
the necessary correction(s).
This report can be helpful in
tracking the activity of each
sponsor.
THE SCHOOL DISTRICT OF PINELLAS COUNTY
ANY OLD SCHOOL
SPONSOR => HART
CASH RECEIPTS SPONSOR
Current Period: 07/01/00 to 07/31/00
KATHY HART
Is the above Information Correct? (Y/N) => Y
Is the Printer Ready?
If your printer is turned on, has paper
loaded, and is ready, press any key to start
printing.
PINELLAS COUNTY SCHOOLS
ANY OLD SCHOOL #1234
CASH RECEIPTSBY SPONSOR
For Sponsor: HART KATHY HART
Account
Account Name
2 1000.80
BAND
Receipt No
157
Page 3-22
Date
Sub
08/01/00 3482
Description
Amount
SALES-FUND RAISING
210.00
TOTALS FOR ACCOUNT 2-1000.80, BAND - ->
210.00
GRAND TOTAL FOR ALL ACCOUNTS
210.00
- ->
MAS User's Guide
CHAPTER
The Purchase Orders portion of MAS includes everything needed to prepare, print,
receive and invoice school purchase orders. Upon receipt of orders, purchase
orders (POs) can automatically be converted to invoices for payment. In addition to
printing and processing purchase orders, there are reports that track the status of
purchase orders. Also, as purchase orders are entered, encumbrances are entered in
the various accounts cited. For example, a $300 purchase made from the General
Administration account will decrease the available balance in that account by $300.
This chapter will explain the purchasing features included in MAS.
PURCHASE
O R D E R S
Contents
Creating A Purchase Order .............. 4-2
Printing/Reviewing Edit List ............ 4-4
Editing Purchase Orders .................. 4-5
Deleting Lines From A PO .............. 4-7
Adding Lines To A PO .................... 4-8
Printing Purchase Orders ............... 4-10
Sample Purchase Order .................. 4-11
Voiding Purchase Orders ............... 4-12
Receiving Purchase Orders ............ 4-13
Clearing PO Receipt ...................... 4-14
Invoicing Purchase Orders ............. 4-15
Purchase Order Reports ................ 4-16
Open POs Report ..................... 4-17
PO Status Report ..................... 4-18
Voided PO Report .................... 4-19
Encumbrance Report ..................... 4-20
Enter General
Information
Enter Detail
Line-Items
Delete Lines
Add Lines
Purchasing is a multi-step process:
1. Enter general and detail line-item information.
2. Print and review the purchase orders edit list.
3. Correct any problems with the purchase orders
entered, delete detail line-items, and/or add
detail line-items.
4. Print purchase orders.
5. Receive goods or services and create invoices for
payment.
Print/Review
Edit Listing
Edit & Change
POs
Print POs
Receive POs &
Create Invoices
PULL-DOWN MENUS
File
Receipts
Disbursements
POs
Trans+ Adj
Reports
POs
Create New Purchase Order
Edit Existing Purchase Order
Edit List
Print Purchase Orders
Receive Items Ordered
Convert to Vendor Invoices
From the Purchase Orders menu, you
can enter new purchase orders, edit
unprinted purchase orders, print out a
listing of all entered but not printed
purchase orders, print purchase
orders, items received against purchase orders and invoice purchase
orders.
Page 4-1
MAS User's Guide
Creating A
PO
Purchasing
Using the mouse, point to the POs menu and hold down the left mouse button.
Continue holding down the left mouse button and select/highlight Create New
Purchase Order and then release the mouse button.
Vendor ID Enter the 5 character vendor ID. To get a list of
existing vendors, leave the field blank and press
<ENTER>.
Generating purchase orders is a
multi-step process. The first step is
to enter general information about
the purchase to be made.
PO Date Type in the date of the purchase order and press
<ENTER>.
Discount Percent Enter the discount amount or press <ENTER> to
leave it blank.
Vendors
If the desired vendor is not established, type a new vendor alpha/ID in
the Vendor ID field. Then follow the
steps for adding vendors in the
Adding Vendors section previously
discussed in this manual (page 4-17).
After adding the vendor, the system
will bring you back to the Enter
Purchase Orders screen.
Discount Days Enter the number of days you have to receive an
early payment discount or press <ENTER> to
leave it blank. NOTE: This line is skipped if no
discount percent is entered.
Net Days Enter the net due days or press <ENTER> to
leave it blank.
Ship Via This will default to "Best Way." If you would like
to enter another shipping method, enter the
abbreviation (Mail, UPS, Fed-Ex, etc.) and press
<ENTER>.
Priority Level
When the PO is received and ready
for payment, priority 1 automatically
selects the invoice for payment.
Priority 1 invoices do not have to be
selected for payment (as explained in
the next chapter) before printing
checks. We recommend use of
priority 2. These invoices do have to
be selected for payment.
Cash Account Enter the number of the checking account that
you will pay the purchase order from and press
<ENTER>. The checking account number should
be automatically default in this field. If not,
contact auditing immediately.
Priority Level Type a number between 1 and 9 (1=highest
priority and 9=lowest priority) and press <ENTER>. Refer to priority level note on the left side
of this page.
Sales Tax
Tax When/if sales taxable items are purchased leave
this field blank. Include the sales tax due as a
seperate line item on the PO. Also, when taxable
items are purchased, cross out the sales tax
exemption number on the PO.
This sales tax field does not cause
sales tax to be included. You will
later be asked to identify the purchase as taxable or non-taxable.
Leave this field blank.
Sponsor Enter the name of the sponsor involved or press
<ENTER> to leave it blank.
Next Step:
Entering Account
Information
Date Required Enter the date you need the order and press
<ENTER>.
Above Info. Correct? If so, make sure a Y is highlighted and press
<ENTER>. If not, type N, press <ENTER>,
make corrections and then appropriately answer
this question to complete the PO.
Page 4-2
MAS User's Guide
Purchasing
Creating A PO
(Continued)
Quantity Enter the number of units of the item you wish to
order and press <ENTER>.
Item Code Enter the vendors item code or catalog number
for the item and press <ENTER>. If there is no
vendor item number, leave this field blank and
press <ENTER>.
Once the top portion of the purchase
order is completed, the ordering
information is then entered on the
bottom section of the screen ("below
the line"). Enter the appropriate
information for the purchase.
Continue this process until all the
items to be purchased have been
entered. When all lines have been
entered and validated as correct (and
the system is waiting for you to enter
the next line), press the <ESC> key to
signal that you are finished with that
purchase order.
Description Type the description for this item and press
<ENTER>.
UM (Unit of Measure) Enter a 2 digit abbreviation for the unit of
measure (EA for each, BX for box, CT for carton,
etc.) and press <ENTER>.
Cost Enter the unit price and press <ENTER>.
Extended Cost This will be calculated by the computer.
Allocate to Account Enter the account type (1 - 8) and the account
number and press <ENTER>.
Sub Account Enter the 4 digit sub account number and press
<ENTER>.
Above Info. Correct? If it is, type Y and press <ENTER>. If it is not,
type N, make the necessary correction(s) per
screen prompts and continue.
Save, Abandon or Cancel? Change the highlighted field to an S to save the
purchase order and press <ENTER>.
Receive PO? If you wish to receive the PO, type Y and press
<ENTER>. You will be taken to the receive PO
screen. If you do not wish to receive the PO,
select N and press <ENTER>.
Sales Taxable
If you selected zero as the sales tax
rate on the previous screen, this field
will be automatically filled in by the
computer. As noted on page 4-2,
leave the tax rate 0.00.
Next Step:
Printing & Reviewing the Edit List
Page 4-3
MAS User's Guide
Printing And
Reviewing
The Edit List
Purchasing
After entering purchase orders and before printing purchase orders, it is recommended that you print an edit list. Using the mouse, point to the POs menu and hold
down the left mouse button. Continue holding down the left mouse button and
select/highlight Edit List and then release the mouse button. If there are no purchase
orders that have not been printed, the computer will beep and give you a message to
that effect.
Is the Printer Ready? If the printer is ready, press any key and the edit
list will print.
PINELLAS COUNTY SCHOOLS
ANY OLD SCHOOL #1234
PURCHASE ORDERS EDIT LIST
PO Number Vendor PO Date Req Date Quantity Item Code
Items Description
UM
=========== ====== ======== ======== ======= ========= ================== ==
27 PCSB
03/29/00 03/29/00
Pinellas County Schools
1.00 WIDGETS
SUPREME WIDGETS EA
Allocate to Account ==> 6 0050.70 0510 PARKER CLASS ADOPTION SUPPLIES
Cost Per Unit
Extended Cost
============== ===============
1.00 WIDGETS
BRAND B OF WIDGETS EA
Allocate to Account ==> 6 0050.70 0510 PARKER CLASS ADOPTION SUPPLIES
PO TOTAL
50.00
50.00
30.00
30.00
--------------------85.60
==>
31 SAMS 08/15/00 08/15/00
SAM'S CLUB
1.00 XVF
TEST ONLY
EA
5.00
Allocate to Account ==> 7 0350.00 0310 GENERAL ADMINISTRATION PROFESSIONAL/TECHNICAL SVCS
5.00
---------------------
Review the
Edit List
for Accuracy
PO TOTAL
==>
GRAND TOTAL
==>
5.00
--------------------90.60
===============
The printer will produce a report of all purchase orders entered to date that have not
yet been printed.
Make sure that the:
•
•
•
quantities ordered, item codes, and cost (unit prices) are correct
fund accounts and sub-accounts coded for each detail line are accurate
descriptions of items are accurate both for the vendor and for the school
records.
If you need to make changes, delete detail lines, or add detail lines, proceed to these
functions discussed later in this chapter (4-5 through 4-9). If the edit list is correct,
skip to Printing Purchase Orders (4-10). Once printed, these purchase orders will no
longer be "tentative purchase orders", nor will they appear on the edit list.
Next Step:
NOTE: After the purchase order has been sent to the vendor, editing may not be
done to the purchase order. Changes may only be made on the receiving screen or
(once the PO has been invoiced) in the Edit Invoice screen.
Editing & Changing Purchase
Orders or Printing Purchase
Orders
Page 4-4
MAS User's Guide
Editing POs
Remember: Once a PO has been
printed, approved, and sent to the
vendor, it cannot be changed. Changes,
which must be made at that point, should
be made when Receiving the PO or (once
the PO has been invoiced) in the Edit
Invoice Screen.
If you wish to delete lines from or
add lines to a purchase order, see
the next two pages.
Steps continued on next page.
Purchasing
Using the mouse, point to the POs menu and hold down the left mouse button.
Continue holding down the left mouse button and select/highlight Edit Existing
Purchase Order and then release the mouse button.
Purchase Order Number Enter the number of the purchase order you
wish to change. If you press <ENTER> without
entering a PO number, the list of PO numbers
will pop up. Highlight the one you want and
press <ENTER>.
Edit, Void, or Continue Type E and press <ENTER> to change any
general PO information. Type C and press
<ENTER> to display the body of the PO. The
system will display the first 4 lines of the PO.
Follow the screen prompts.
Add, Change, Delete, Quit Type C and press <ENTER>.
Page 4-5
MAS User's Guide
Purchasing
Editing POs
(Continued)
Line Number to Edit Type the number and press <ENTER>.
The system will display the line you entered
and allow you to make changes to it. Use
the <ENTER> key to move from one field
to the next.
Edit Made to PO 32:
Line 1 was changed in the cost field. The price was changed from 150.00 to
149.99. Please review the screen print above to note the change. After
question is answered with a Y, the new information will be reflected on the
screen.
Above Line Correct If it is, make sure the Y is highlighted and press
<ENTER>. Follow this process until all lines
are corrected.
Line Number to Edit If through changing lines, press the <ESC> key.
If not, type the number of another line to edit
and press <ENTER>.
Add, Change, Delete, Quit Type Q and press <ENTER> to save and leave
the changed purchase order.
To edit another PO, type in the PO number. If
no other edits are needed, press <ESC> to
return to the POs menu.
Next Step:
Printing Purchase Orders
Page 4-6
MAS User's Guide
Deleting Lines
From
POs
You can only delete lines from POs
that you have not already received
and invoiced. You cannot change a
PO that has been printed and posted
to your accounts.
Purchasing
Using the mouse, point to the POs menu and hold down the left mouse button.
Continue holding down the left mouse button and select/highlight Edit Existing
Purchase Order and then release the mouse button.
Purchase Order Number Enter the number of the purchase order you
wish to change. If you press <ENTER> without
entering a purchase order number, the list of
purchase order numbers will pop up. Highlight
the one you want and press <ENTER>.
Do not try to delete a PO by deleting
all of it's detail lines. Instead, see the
section on voiding POs (4-12).
Edit, Void, or Continue Type E and press <ENTER> to change any
general PO information. Type C and press
<ENTER> to display the body of the PO. The
system will display the first 4 lines of the PO.
Follow the screen prompts.
Add, Change, Delete, Quit Type D and press <ENTER>.
Line Number to Delete Type the line number and press <ENTER>.
After deleting the desired line, press <ESC>.
Add, Change, Delete, Quit Type Q and press <ENTER>. Press <ESC> to
return to the menu.
Page 4-7
MAS User's Guide
Adding Lines
To A PO
You can only add lines to a purchase
order that you have not already
received and invoiced. You cannot
change a PO that has been printed
and posted to your accounts.
Purchasing
Using the mouse, point to the POs menu and press down the left mouse button.
Continue holding down the left mouse button and select/highlight Edit Existing
purchase order and then release the mouse button.
Purchase Order Number Enter the number of the purchase order you
wish to change. If you press <ENTER> without
entering a purchase order number, the list of
purchase order numbers will pop up. Highlight
the one you want and press <ENTER>.
Edit, Void, or Continue Type E and press <ENTER> to change any
general PO information. Type C and press
<ENTER> to display the body of the P.O. The
system will display the first 4 lines of the PO.
Follow the screen prompts.
Page 4-8
MAS User's Guide
Adding Lines
To A PO
(Continued)
Purchasing
Add, Change, Delete, Quit Type A and press <ENTER>.
At this point, the system adds a blank line to the purchase order. Fill in and complete the
fields in this line using the <ENTER> key to go from field to field. Note line 3 in the print
screen below for the item added to this purchase order.
Above Line Correct If it is, make sure the Y is highlighted and press
<ENTER>.
If through changing lines, press the <ESC> key. If
not, enter the information for the line item to be
added. Follow this process until all lines are added,
then press <ESC>.
When all lines have been entered and validated as
correct (and the system is waiting for you to enter
the next line), press the <ESC> key to signal that
you are finished.
Save, Abandon or Cancel? Select S and press <ENTER>.
Receive PO? Select Y to receive the PO. Remember: Once you
receive the PO, it can not be changed.
Add, Change, Delete, Quit Type Q to leave the changed PO.
Page 4-9
MAS User's Guide
Printing
Purchase
Orders
Purchasing
To print purchase orders, using the mouse, point to the POs menu and press down
the left mouse button. Continue holding down the left mouse button and select/
highlight Print Purchase Orders and then release the mouse button.
Print Single or All Tentative POs To just print 1 purchase order, type S and press
<ENTER>. To print all purchase orders that you
have entered that have not already been printed,
type T and press <ENTER>.
Number of Copies to Print If you just need 1 copy of the purchase order,
type 1 and press <ENTER>. If you need duplicate copies, type in the number of copies you
want and press <ENTER>.
Purchase Order to Print If you chose to print just 1 purchase order, type
the number of that purchase order and press
<ENTER>.
Is the Printer Ready? If your printer is turned on, has paper loaded, and
is ready - press any key to start printing.
A sample purchase order has
been included on the following
page.
Next Step:
Receiving Purchase Orders
Page 4-10
MAS User's Guide
Purchasing
Page 4-11
MAS User's Guide
Voiding
Purchase
Orders
If you wish to delete an entire purchase
order, use the Edit Purchase Orders
screen. Once deleted, you will not be
able to use the purchase order number
again.
Purchasing
Using the mouse, point to the POs menu and press down the left mouse button.
Continue holding down the left mouse button and select/highlight Edit Purchase
Order and then release the mouse button.
Purchase Order Number Enter the number of the purchase order you wish
to void. If you press <ENTER> without entering
a purchase order number, the list of purchase
order numbers will pop up. Highlight the one
you want and press <ENTER>.
Edit, Void, or Continue Look at the purchase order to ensure that it is the
one you wish to delete. Then type V and press
<ENTER> to void the purchase order.
After voiding a PO, follow the steps listed below so documentation pertaining to voided
purchase orders will be adequate at the time of the annual audit.
1. Go to the Reports menu, select Purchase Orders, Void Purchase Orders.
2. Fill in the correct information in the fields so the purchase order just voided
will be included on this report.
3. After the report prints, document in this space available why this purchase
order was voided. Provide a complete description.
Page 4-12
MAS User's Guide
Receiving
Purchase
Orders
The quantity and unit price fields will
default to the amounts entered on the
original PO. If not all units were
received and/or if the unit price
changed, type in the number of units
received and/or the new price.
In all cases when the total price of
the PO will increase after changes
made, the principal must approve the
increase in price on the copy of the
original PO before it is paid.
After entering the receipt information for
all lines, the system will ask if you would
like to generate an invoice. If the answer
is yes, the system will produce an
invoice for the amount of the units
received.
Purchasing
Using the mouse, point to the POs menu and press down the left mouse button.
Continue holding down the left mouse button and select/highlight Receive Items
Ordered and then release the mouse button.
A full or partial PO can be received and invoiced. However, when the second portion
of a PO is received, the invoice must be created through Disbursements. Refer to
page 5-2 for these instructions.
Purchase Order Number Enter the number of the purchase order you wish
to receive and press <ENTER>.
Enter Date PO Received Enter the date that the items on the purchase
order were received and press <ENTER>.
Above Info. Correct? If so, make sure a Y is highlighted and press
<ENTER>. If not press the <ESC> key and start
again.
Quantity Received Enter the number of units received and press
<ENTER>.
Unit Price Unless the unit price changed after the order was
placed, leave this field unchanged and press
<ENTER>.
Above Line Correct? If it is, type Y and press <ENTER>.
Generate an Invoice? To have the system produce an invoice
automatically, type Y and press <ENTER>.
Invoice Number Enter the invoice number from the invoice (or
packing slip) and press <ENTER>. If an invoice
number is not present on the invoice, use the
invoice date.
Invoice Date Enter the date of the vendor's invoice (or packing
slip) and press <ENTER>.
Above Line Correct If it is, make sure the Y is highlighted and press
<ENTER>. If not, press N, and make the
necessary correction(s).
Next Step:
Edit Invoice and Print Check
Page 4-13
MAS User's Guide
Clearing PO
Receipt
This step is necessary if the PO has
been received in error or if a PO is to
be voided. A PO cannot be voided if
it has been received; therefore, the
receipt must be cleared.
Purchasing
Using the mouse, point to the POs menu and press down the left mouse button.
Continue holding down the left mouse button and select/highlight Receive Items
Ordered and then release the mouse button.
Purchase Order Number Enter the number of the purchase order you
wish to change. If you press <ENTER>
without entering a purchase order number, the
list of purchase order numbers will pop up.
Highlight the one you want and press
<ENTER>.
Edit or Clear Receipt?
To clear the receipt, press C, and then press
<ENTER>. The receipt of this PO has been
cleared.
Page 4-14
MAS User's Guide
Invoicing
Purchase
Orders
Purchasing
Using the mouse, point to the POs menu and press down the left mouse button.
Continue holding down the left mouse button and select/highlight Covert to Vendor
Invoice, then release the mouse button.
Purchase Order Number Enter the number of the purchase order you wish
to invoice and press <ENTER>.
Invoice Number Enter the invoice number from the vendor's
invoice (or packing slip) and press <ENTER>.
If you chose not to generate an
invoice when you were receiving the
PO, you can do so at any time using
the Covert to Vendor Invoices screen
with the POs menu.
If an invoice number is not listed on
the invoice, it is acceptable to enter
the date of the invoice in its place.
Invoice Date Enter the date of the vendor's invoice (or packing
slip) and press <ENTER>.
Above Info. Correct? If so, make sure a Y is highlighted and press
<ENTER>. If not press the <ESC> key. If not,
press N and correct the information.
Next Step:
Selecting invoices for payment and
printing computer checks.
Refer to Chapter 5.
Page 4-15
MAS User's Guide
Purchase
Order
Reports
There are 4 different reports for
viewing purchase order information. They are all accessed from
the Purchase Orders Reports
menu.
Purchasing
PULL-DOWN MENUS
File
Receipts
Disbursements
POs
Trans+Adj
Reports
Each of these reports will be
discussed on the pages that
follow.
REPORTS MENU
Cash Receipts
Cash Disbursements
Purchase Orders
General Accounts
Sub Accounts
Maintenance Lists
Labels
Tips on Running Reports
Before printing reports, make sure
you have the proper (plain, white)
paper in the printer and that the top
of the page is aligned correctly.
Many of the reports can be displayed
on the screen as an alternative to
being printed. When displaying
reports on the screen, press the
<PAGE UP> and <PAGE DOWN>
keys to move up and down in the
report. At the end of the report,
press <PAGE DOWN> until the
report totals appear (if applicable).
PURCHASE ORDERS
Open Purchase Orders
Purchase Order Status
Void Purchase Orders
Page 4-16
MAS User's Guide
Printing The
Open POs
Report
The Open Purchase Orders report is
a listing of all purchase orders that
have been entered, but that have not
been received or have only been
partially received.
Purchasing
Using the mouse, point to the Reports menu and press down the left mouse button.
Continue holding down the left mouse button and select/highlight Purchase Orders,
then select/highlight Open Purchase Orders and then release the mouse button.
Display or Print Report? To print the report on your printer, make sure a P
is highlighted and press <ENTER>. If you wish
to just view the report on your screen, type D
and press <ENTER>.
Is the Printer Ready? If your printer is turned on, has paper
loaded, and is ready, press any key to start
printing.
This report is useful when trying to
calculate all outstanding obligations
or when preparing the annual
accounts payable report.
PINELLAS COUNTY SCHOOLS
ANY OLD SCHOOL #1234
OPEN PURCHASE ORDERS
PO Number
----------------27
31
19
20
21
33
Date
-----------03/29/00
08/15/00
02/02/00
02/02/00
02/07/00
08/15/00
Vendor Vendor Name
PO Total
----------- ----------------------------------------------------PCSB
PINELLAS COUNTY SCHOOL
85.60
SAMS
SAM'S CLUB
5.00
TBACOM TBA COMMUNICATIONS
2,862.00
LAKESH LAKESHORE LEARNING MAT
144.43
LAKESH LAKESHORE LEARNING MAT
149.27
SAMS
SAM'S CLUB
193.93
------------------3,440.23
Page 4-17
Status
-----------------------TENA
TENA
OPEN
OPEN
OPEN
OPEN
Invoice No
Check No
----------------- --------------
MAS User's Guide
Printing The
PO Status
Report
Purchasing
Using the mouse, point to the Reports menu and press down the left mouse button.
Continue holding down the left mouse button and select/highlight Purchase Orders,
then select/highlight Purchase Order Status and then release the mouse button.
From PO Date Enter the starting date for the report and press
<ENTER>. All purchase orders with a date on or
after this date will be included.
Through PO Date Enter the ending date for the report and press
<ENTER>. All purchase orders with a date on or
before this date will be included.
The Purchase Orders Status
Report is a listing of all purchase
orders entered during a userspecified period of time.
The status report is useful for
determining the status of all
purchase orders and can serve as
a purchase order log.
Above Info. Correct? If so, make sure a Y is highlighted and press
<ENTER>. If not, press the <ESC> key.
Display or Print Report? To print the report on your printer, make sure a P
is highlighted and press <ENTER>. If you wish
to just view the report on your screen, type D
and press <ENTER>.
Is the Printer Ready? If your printer is turned on, has paper
loaded, and is ready, press any key to start
printing.
PINELLAS COUNTY SCHOOLS
ANY OLD SCHOOL #1234
PURCHASE OR DERS STATUS REPORT
Purchase Orders Dated from 08/01/00 to 08/31/00
PO Number
----------------30
31
32
33
Date
------------
Vendor
-----------
Vendor Name
-------------------------------
PO Total
----------------------
08/15/00
08/15/00
08/15/00
08/15/00
SAMS
SAMS
SAMS
SAMS
SAM'S CLUB
SAM'S CLUB
SAM'S CLUB
SAM'S CLUB
0.00
5.00
0.00
193.93
---------------------198.93
Page 4-18
Status
-----------------------TENA
TENA
VOID
OPEN
Invoice No
-----------------
Check No
--------------
MAS User's Guide
Purchasing
Using the mouse, point to the Reports menu and press down the left mouse button.
Continue holding down the left mouse button and select/highlight Purchase Orders,
then select/highlight Void Purchase Orders and then release the mouse button.
Printing The
Voided PO
Report
From PO Date Enter the starting date for the report and press
<ENTER>. All purchase orders voided on or
after this date will be printed.
Through PO Date Enter the ending date for the report and press
<ENTER>. All purchase orders voided on or
before this date will be printed.
The Void Purchase Orders report is a
listing of all purchase orders voided
during a user-specified period of
time.
Above Info. Correct? If so, make sure a Y is highlighted and press
<ENTER>. If not, press the <ESC> key.
Display or Print Report? To print the report on your printer, make sure a P
is highlighted and press <ENTER>. If you wish
to just view the report on your screen, type D
and press <ENTER>.
Is the Printer Ready? If your printer is turned on, has paper
loaded, and is ready, press any key to start
printing.
PINELLAS COUNTY SCHOOLS
ANY OLD SCHOOL #1234
VOIDED PURCHASE ORDERS
Purchase Orders Dated from 08/01/00 to 08/31/00
PO Number
-----------------32
Date
------------08/15/00
Vendor
Vendor Name
------------------- ------------------------------------SAMS
SAM'S CLUB
Page 4-19
VD Date
-----------------09/25/00
MAS User's Guide
Printing The
Encumbrance
Report
Purchasing
Using the mouse, point to the Reports menu and press down the left mouse button.
Continue holding down the left mouse button and select/highlight General Accounts,
then select/highlight Encumbrances and then release the mouse button.
Accounts Numbered From Enter the fund (1-8) and 4 digit account number
that you wish to begin the report with, pressing
<ENTER> after each.
To Enter the fund (1-8) and 4 digit account number
that you wish to end the report with, pressing
<ENTER> after each.
The Encumbrances report is a listing
of all outstanding obligations (or
encumbrances) for a user-specified
range of accounts and sub accounts.
Sub Accounts From Enter the sub account number that you wish to
begin the report with and press <ENTER>.
To Enter the sub account number that you wish to
end the report with and press <ENTER>.
The Encumbrances report will list
unpaid invoices and/or outstanding
purchase orders.
Above Info. Correct? If so, make sure a Y is highlighted and press
<ENTER>.
Is the Printer Ready? If your printer is turned on, has paper
loaded, and is ready, press <ENTER> to
begin printing.
PINELLAS COUNTY SCHOOLS
ANY OLD SCHOOL #1234
ENCUMBRANCE REPORT
Accounts from 1-0200.00 to 8-5450.77, Sub Accounts from 0310 to 3498
Account Sub.
----------- -------6 0050.70 0510
6 0050.70 0510
Account Name
---------------------------------PARKER CLASS ADOPTION
PARKER CLASS ADOPTION
SC Vendor
------ ----------PO PCSB
PO PCSB
Invoice Number
Purchase Order Description
Amount
------------------------------------------ -------------------------------27
SUPREME WIDGETS
52.50
27
BRAND B OF WIDGETS 32.10
--------------Totals for Sub Account SUPPLIES
==>
85.60
--------------Totals for Account PARKER CLASS ADOPTION
6 0050.72 0510
6 0050.72 0510
PRE-K ADOPT A CLASS
PRE-K ADOPT A CLASS
PO LAKESH
PO LAKESH
20
20
Totals for Sub Account SUPPLIES
WORM VIEWER
24.95
COLOR DISCOVERY 0.05
--------------==>
25.00
---------------
Totals for Account PRE-K ADOPT A CLASS
Page 4-20
==>
85.60
---------------
==>
25.00
MAS User's Guide
CHAPTER
DISBURSE
M E N T S
The Disbursements portion of MAS includes everything needed to process
payments to individuals, organizations, and companies (called vendors). Printing a
check or entering a manual check in MAS requires the initial entry of information
regarding the vendor and payment (invoice) through the creation of an invoice or
conversion of a purchase order to an invoice.
Ideally, invoices should be entered into MAS or their purchase orders converted to
invoices as they are received and paid when they are due. To do this, take advantage of the due date/discount date fields on the invoice screen. If, for example an
invoice is due in 30 days, enter "30" in the Net Due Days field on the Create New
Vendor Invoices screen. If a discount is available for early payment, enter the
discount percentage and number of days for which the discount is valid.
Contents
Entering General Invoice Info ......... 5-2
Entering Account Information ......... 5-3
Printing & Reviewing Edit List ....... 5-4
Editing & Changing Invoices ........... 5-5
Deleting Lines From An Invoice ..... 5-6
Adding Lines To An Invoice ........... 5-7
Deleting Invoices ............................. 5-8
Selecting Invoices for Payment
Groups .................................... 5-9
Single ..................................... 5-10
Printing Computer Checks ............ 5-11
Posting Manual Checks ................. 5-14
Fast Manual Checks ...................... 5-15
Voiding Checks ............................. 5-16
Adding Vendors ............................ 5-17
Deleting Vendors ........................... 5-19
Disbursement Reports .................. 5-20
Printing
Disb. Register ........................ 5-21
Disb. Journal ......................... 5-22
Check Details ........................ 5-23
Voided Checks Report .......... 5-24
Skipped Checks List ............. 5-25
Cash Requirements ................ 5-26
Tolerance Report ................... 5-27
Checks to Vendors List ......... 5-28
Vendor Invoices Report ........ 5-29
Year-to-Date Vendor Payments.5-30
Other Reports
Vendor List ........................... 5-31
Vendor File Labels ................. 5-32
Enter General
Information
Delete Lines
Enter Account
Information
Print/Review
Edit Listing
Edit & Change
Invoices
Add Lines
Paying bills is a multistep process:
1. Enter general and detail account information.
2. Print and review the invoice edit list.
3. Correct any problems with the invoices entered, delete
detail account lines, and/or add detail account lines.
4. Select invoices with a priority of 2-9 for payment.
5. Print computer checks.
Select Invoices
for Payment
Print
Checks
PULL-DOWN MENUS
File
Receipts
Disbursements
POs
Trans+ Adj
Reports
From the Disbursements menu,
you can access the menu to enter/
edit invoices, select invoices for
payment, print checks, post
manual checks, void checks, or
perform a bank reconciliation.
Page 5-1
DISBURSEMENTS
Create New Vendor Invoice
Edit Existing Vendor Invoice
Edit List
Select Invoices For Payment
Print Checks
Manual Checks
Void Checks
Bank Reconciliation
MAS User's Guide
Disbursements
Using the mouse, point to the Disbursements menu. Press the left mouse button
and hold it while sliding the mouse button to select/highlight Create New Vendor
Invoice and then release the left mouse button.
Entering
General
Invoice
Information
Vendor ID Enter the 6 character vendor ID. To get a list of
existing vendors, leave the field blank and press
<ENTER>. Use the mouse to point and click OR
the arrow keys to make the selection from
<TOP>, <BOTTOM>, <FORWARD>, <BACK>,
<CANCEL>, to scroll through the list until the
desired vendor is highlighted. If the desired
vendor is on the list, highlight the vendor and
press <ENTER>.
Printing checks is a multi-step process
and can be accomplished by printing
computer-generated checks or by
writing manual checks. In either case,
the first step is to enter general
information about the payment
(invoice) to be made.
Invoice Number Type in the vendor's invoice number and press
<ENTER>.
Date Type in the date of the invoice and press
<ENTER>.
If the desired vendor is not established, type a new vendor ID in the
Vendor ID field. Then follow the steps
for adding vendors in the Adding
Vendors section of this chapter. After
adding the vendor, the system will
bring you back to the Create Vendor
Invoice screen.
Sponsors can be added from the
Create Vendor Invoice screen as
above.
Priority 1 automatically selects the
invoice for payment. Priority 1
invoices do not have to be selected
for payment (as explained later in this
chapter) before printing checks.
Priority "P" allows you to print and
post a single check directly from the
Create Vendor Invoices screen.
Priority "M" allows you to post a
manual check directly from the Create
Vendor Invoices screen.
Discount Percent Enter the early payment discount amount or
press <ENTER> to leave it blank (i.e., 5%
discount is entered as 5.00).
Discount Days Enter the number of days you have to receive
an early payment discount or press <ENTER> to
leave it blank.
Net Due Days Enter the due date or press <ENTER> to leave it
blank.
Cash Account The checking account number should already
be in this field. If not, enter the number of the
checking account to pay the invoice from and
press <ENTER>. *
Priority Level Type a number between 1 and 9 or "P" or "M"
(1=highest priority and 9=lowest priority,
"P"=print check immediately, "M"=post manual
check immediately) and press <ENTER>. The
default priority comes from the vendor file for
the vendor being paid. We recommend using
priority 2.
Sponsor Enter the name of the sponsor involved or press
<ENTER> to leave it blank.
Above Info. Correct? If so, make sure Y is highlighted and press
<ENTER>. If not, press <ESC>.
* Contact Auditing immediately
if the checking account number
was not automatically reflected
in this field.
THE SCHOOL DISTRICT OF PINELLAS COUNTY
ANY OLD SCHOOL #1234
Vendor ID =>PENCIL
THE PENCIL COMPANY
123 SCHOOL STREET
PENSACOLA
Cash Account
Sponsor
Invoice Nmbr =>2543
FL 32507
=>1111.00 CHECKING
=>
Next Step:
Entering Account Information
Page 5-2
CREATE VENDOR INVOICES
Current Period: 07/01/00 to 07/31/00
Invoice Date
Discount Percent
Discount Days
Net Due Days
Invoice Amount
Priority Level
=>07/01/00
=> 0.00
=>
=>
=>30
=>07/31/00
=>
=>2
MAS User's Guide
Disbursements
Fund Type Type in the Account Category (1 through 8 and
press <ENTER>. Press <ENTER> without
entering a fund type, to get the pop-up list of
fund types. Highlight the one you want and
press <ENTER>.
Entering
Account
Information
Account Number The system will ask for an Account Number.
Press <ENTER> without typing an account
number, to get the pop-up list of accounts.
Highlight the one you want and press <ENTER>.
After entering general information,
the system will allow you to
allocate invoices to many fund
accounts using the lower half of
the invoice screen. Keep repeating
these steps until the entire invoice
is accounted for.
Sub Account Number For accounts using sub accounts, the system
will ask for a sub account number. Press
<ENTER> without typing a sub account number
to get the pop-up list of sub accounts. Highlight the one you want and press <ENTER>.
Credit Memos: If a credit memo is
issued by a vendor, enter all
information as a normal invoice
except for the amount. The
amount should be entered with a
minus (-) preceding the numeral
entered.
Description The system will show the sub account title as
the description. To change it, press the insert
key and type in a more specific description for
this line and press <ENTER>. If you wish to
leave the description as is, just press <ENTER>.
The description on the detail lines of the
invoice is what shows in the general ledger
when the account activity is listed.
If the amount of the invoice entered
exceeds the balance in the account, a
warning is displayed to that effect.
Amount Type the amount of the invoice to be credited
to this fund account and press <ENTER>.
Above Line Correct? If it is, type Y and press <ENTER>. If not, type
N, press <ENTER> and make the necessary
changes.
Completion When all lines have been entered, press <ESC>.
Next Step:
Printing & Reviewing the Edit List
Save, Abandon or Continue? Change the highlighted field to an S to save the
receipt and press <ENTER>.
THE SCHOOL DISTRICT OF PINELLAS COUNTY
ANY OLD SCHOOL #1234
Vendor ID =>PENCIL Invoice Nmbr =>2543
THE PENCIL COMPANY
123 SCHOOL STREET
PENSACOLA
FL 32507
Cash Account =>1111.00 Checking
Sponsor
=>
Account
Sub.
Account Name
7 0500.00
0510
School Store
Page 5-3
CREATE VENDOR INVOICES
Current Period: 07/01/00 to 07/31/00
Invoice Date
Discount Percent
Discount Days
Net Due Days
Invoice Account
Priority Level
Description
Pencils
=>07/01/00
=> 0.00
=>
=>
=>30
=>07/31/00
=>
15.00
=> 2
Amount
15.00
MAS User's Guide
Printing And
Reviewing
The Edit List
Disbursements
After entering invoices and before printing checks:
Using the mouse, point to the Disbursements menu and hold down the left mouse
button. Select/highlight Edit List and then release the mouse button. If there are no
unposted invoices outstanding, the computer will beep and give you a message to
that effect.
Is the Printer Ready? If the printer is ready, press any key and the
Edit List will print.
The printer will produce a report of all invoices entered to date for which checks
have not been cut and that have not been posted to the fund and cash accounts.
THE SCHOOL DISTRICT OF PINELLAS COUNTY
ANY OLD SCHOOL #1234
VENDOR INVOICES EDIT LIST
Vendor Payable to this Order of
Invoice Number
Line
Account Sub.
---------- -------------------------------- ----------------------- ------------ ------------ ---------PENCIL THE PENCIL COMPANY
2543
1
7 0500.00 0510
Inv Date => 07/01/00 Terms => NET 0
Cash A/C => 1111.00 Prior => 2
Review the
Edit List
for Accuracy
Acct Name
Description
Amount
---------------------- ------------------------ ----------School Store
Pencils
15.00
INVOICE TOTAL =>
15.00
GRAND TOTAL =>
15.00
Make sure that the:
•
•
total for each invoice adds up to the totals on the vendor invoices
fund accounts and sub accounts coded for each line are accurate
If changes to an invoice are needed, follow the steps discussed on the following
pages. If the edit list is correct, skip to the Selecting Invoices for Payment. Once
posted, these invoices will no longer appear in this edit listing.
Next Step:
Editing & Changing Invoices
or Selecting Invoices for Payment
Page 5-4
MAS User's Guide
Disbursements
Using the mouse, point to the Disbursements menu and hold down the left mouse
button. Select/highlight Edit Existing Vendor Invoice and then release the mouse
button.
Editing And
Changing
Invoices
You can only edit or change
invoices that you have not already
paid (posted). You cannot change
an invoice or check that has been
posted to your accounts. If you
wish to delete lines from or add
lines to an invoice, see the next
two pages.
Vendor ID Enter the vendor ID for the invoice you wish to
change. Pressing <ENTER> without entering a
vendor ID, gives you the pop-up list of vendor
IDs. Highlight the one you want and press
<ENTER>.
Invoice Number Type the invoice number you want to change &
press <ENTER>. Pressing <ENTER> without
entering an invoice ID, will give the pop-up list
of invoices for this specific vendor. Highlight
the one you want and press <ENTER>.
Edit, Delete, Continue To continue, make sure C is highlighted and
press <ENTER>. The system will display the
first 11 lines of the invoice. Or to change the
general invoice information, type E and then
<ENTER>.
Add, Change, Delete, Quit Type C and press <ENTER>.
Line Number to Edit Type the number and press <ENTER>. The
system will display the line you entered and
allow you to make changes to it. Use the
<ENTER> key to move from one field to the
next.
Above Line Correct If it is, make sure the Y is highlighted and press
<ENTER>. If not, type N press <ENTER>, and
make the necessary changes.
Line Number to Edit If finished changing lines, press <ESC>. If not,
type another line number to edit and press
<ENTER>.
Next Step:
Priority 1 - Print checks
Priority 2-9 - Selecting Groups of
Invoices for Payment or Single
Invoices for Payment
Add, Change, Delete, Quit Type Q to save and leave the changed invoice,
then press <ENTER>.
THE SCHOOL DISTRICT OF PINELLAS COUNTY
ANY OLD SCHOOL #1234
EDIT VENDING INVOICES
Current Period: 07/01/00 to 07/31/00
Vendor ID =>POECO
Invoice Number =>1237
Invoice Date
OFFICE EQUIPMENT CO.
Discount Percent =>
205 West Garden Street
Discount Days
Net Due Days
Largo
FL 33773
Invoice Amount
Cash Account
=>1111.00 Checking
Priority Level
Sponsor
=>
PO Number
Line Account Sub.
Account Name
Description
1
7 0350.00 0510
General/Administration
Page 5-5
Office Supplies
=> 07/01/00
=>
=>
=>30 => 07/31/00
=>
23.00
=>2
=>
Amount
23.00
MAS User's Guide
Disbursements
Deleting Lines
From An
Invoice
Using the mouse, point to the Disbursements menu and hold down the left mouse
button. Select highlight/select Edit Existing Vendor Invoice and then release the
mouse button.
Vendor ID Enter the short vendor ID for the invoice you
wish to delete lines from.
Invoice Number Type the invoice number that you want to
delete lines from & press <ENTER>.
You can only delete lines from
invoices that you have not already
paid (and posted). You cannot
change an invoice that has been
posted to your accounts.
Edit, Delete, Continue Make sure C is highlighted and press <ENTER>.
The system will display the first 11 lines of the
invoice
Add, Change, Delete, Quit Type D to indicate you wish to delete lines and
press <ENTER>.
Do not try to delete an invoice by
deleting all of it's detail lines.
Instead, see the section on deleting invoices.
Line Number to Delete Type the number and press <ENTER>.
THE SCHOOL DISTRICT OF PINELLAS COUNTY
ANY OLD SCHOOL #1234
EDIT VENDOR INVOICES
Current Period: 07/01/00 to 07/31/00
Vendor ID =>POECO Invoice Number =>1237
OFFICE EQUIPMENT CO.
205 West Garden Street
Largo
FL 33773
Cash Account
=>1111.00
Checking
Sponsor
=>
Line Account Sub.
Account Name
1
7 0350.00 0510
Invoice Date
Discount Percent
Discount Days
Net Due Days
Invoice Amount
Priority Level
PO Number
Description
General Administration
=> 07/01/00
=>
=>
=>
=>30 => 07/31/00
=>
23.00
=>2
=>
Amount
Office Supplies
23.00
<<<A L L>>>
Line number to delete => 1
The system will delete the line number
entered.
Add, Change, Delete, Quit Type Q to save and leave the changed
invoice, then press <ENTER>.
If finished deleting lines, press the
<ESC> key.
Page 5-6
MAS User's Guide
Disbursements
Adding Lines
To An Invoice
Using the mouse, point to the Disbursements menu and hold down the left mouse
button. Select/highlight Edit Existing Vendor Invoice and then release the mouse
button.
Vendor ID Enter the short vendor ID for the invoice you
wish to add lines to.
Invoice Number Type the invoice number that you want to add
lines to & press <ENTER>.
Edit, Delete, Continue Make sure C is highlighted and press <ENTER>. The system will display the first 11 lines
of the invoice
Add, Change, Delete, Quit Type A and press <ENTER>.
THE SCHOOL DISTRICT OF PINELLAS COUNTY
ANY OLD SCHOOL #1234
EDIT VENDOR INVOICES
Current Period: 07/01/00 to 07/31/00
Vendor ID =>POECO
Invoice Nmbr=>1237
OFFICE EQUIPMENT CO.
205 West Garden Street
Invoice Date
Discount Percent
Discount Days
Net Due Days
Invoice Amount
Priority Level
PO Number
Description
Largo
FL 33773
Cash Account =>1111.00 Checking
Sponsor
=>
Line Account
Sub.
Account Name
1
7 0350.00
0510
General Administration
If you press the <ENTER> key
without entering a fund type or
account number, you will get the
pop-up list of accounts. Highlight
the one you want and press
<ENTER>.
When all lines have been entered
and validated as correct (and the
system is waiting for you to enter
the next line), press the <ESC>
key to signal that you are finished
with that invoice.
=>07/01/00
=>
=>
=>
=>30
=>07/31/00
=>
23.00
=>2
=>
Amount
Office Supplies
23.00
Fund Type Type in a number (1 through 8) and press
<ENTER>.
Account Number Type in the Account Number.
Sub Account Number Type in the Sub account Number.
Description Type in a description and press <ENTER>.
Amount Type in the amount of the invoice to be charged
to this fund account and press <ENTER>.
Above Line Correct? If it is, make sure the Y is highlighted and press
<ENTER>. If not, type N press <ENTER>, and
make the necessary change(s).
Save, Abandon or Cancel? Change the highlighted field to an S to save the
receipt and press <ENTER>.
Page 5-7
MAS User's Guide
Deleting
Invoices
If you wish to delete an entire
unpaid invoice, use the Edit
Vendor Invoices screen. Once
deleted, you will not be able to use
the invoice number again for the
same vendor.
Disbursements
Using the mouse, point to the Disbursements menu and hold down the left mouse
button. Select/highlight Edit Existing Vendor Invoice and then release the mouse
button.
Vendor ID Enter the short vendor ID for the invoice you
wish to delete.
Invoice Number Type the invoice number that you want to
delete & press <ENTER>.
Edit, Delete, Continue Look at the invoice to ensure that it is the one
you wish to delete. Then type D and press
<ENTER> to delete the invoice.
THE SCHOOL DISTRICT OF PINELLAS COUNTY
ANY OLD SCHOOL #1234
EDIT VENDOR INVOICES
Current Period: 07/01/00 to 07/31/00
Vendor ID =>POECO
Invoice Nmbr=>1237
Invoice Date
OFFICE EQUIPMENT CO.
Discount Percent =>
205 West Garden Street
Discount Days
Net Due Days
Largo
FL 33773
Invoice Amount
Cash Account =>1111.00 Checking
Priority Level
Sponsor
=>
PO Number
Line Account Sub.
Account Name
Description
=>07/01/00
=>
=>30
=>
=>2
=>
Do you wish to Edit, Delete, or Continue with detail? (E/D/C)=>D
Page 5-8
=>
=>07/31/00
23.00
Amount
MAS User's Guide
Selecting
Groups Of
Invoices For
Payment
Disbursements
Using the mouse, point to the Disbursements menu and hold down the left mouse
button. Continue holding down the left mouse button and select/highlight Select
Invoices for Payment and then select Due Date/Discount Date and then release the
mouse button. Alternatively, you can select individual invoices for payment by
vendor/invoice ID as shown on the following page.
SELECT INVOICES FOR PAYMENT
Vendor Invoice Number
Due Date and Discount Date
Invoices Selected for Payment Report
Check Request Forms
Selecting invoices for payment is
the process used to choose which
invoices to pay and is the last step
before printing the checks. The
easiest and quickest way to do this
is to select all invoices due for
payment today by due date.
Cash Account Accept the default number * of the checking
account $1111.00 from which the check(s) will
be issued and press <ENTER>.
Invoices entered with a priority of 1
are automatically selected for
payment and need not be selected
using this screen.
Due Date Unless you wish to enter a date other than the
current date, just leave the default date and
press <ENTER>. This will select all invoices
with a due date on or before the current date.
* If the checking account number
is not in this field, contact
Auditing immediately.
Discount Date Unless you wish to enter a date other than the
current date, just leave the default and press the
<ENTER>. This will select all invoices with a
discount date (if applicable) on or before the
current date.
THE SCHOOL DISTRICT OF PINELLAS COUNTY
ANY OLD SCHOOL #1234
SELECT INVOICES FOR PAYMENT
Current Period: 07/01/00 to 07/31/00
Select for payment from cash account =>1111.00 Checking
Due Date (blank selects all invoices) =>07/01/00
Earliest Discount Date
=>07/31/00
Above Info. Correct? If it is correct, make sure the Y is highlighted
and press <ENTER>. This will select the
invoices for payment. Press the <ESC> key to
return to the menu.
Next Step:
Printing Computer Checks
Page 5-9
MAS User's Guide
Selecting
Single
Invoices For
Payment
Disbursements
Using the mouse, point to the Disbursements menu and hold down the left mouse
button. Continue holding down the left mouse button and select/highlight Select
Invoices for Payment and then select Vendor Invoice Date and then release the
mouse. This choice will select invoices for payment by invoice number. Alternatively, you can select all invoices due on a given date as shown on the previous
page.
SELECT INVOICES FOR PAYMENT
Vendor Invoice Number
Due Date/Discount Date
Invoice Selected for Payment Report
Check Request Forms
If you need to select one or just a
few invoices for payment, select
them by Vendor Invoice Number.
You can also use this function to
un-select invoices that you have
previously selected for payment as long as you have not already
paid them.
Cash Account Accept the default number * of the checking
account $1111.00 which is the account that the
check will be issued from and press <ENTER>.
Vendor Type the short vendor ID code and press
<ENTER>.
* If the checking account number
is not in this field, contact
Auditing immediately.
Edit Auth. for Payment? Type Y and press <ENTER>.
The system will display all invoices outstanding
for the selected vendor and will take you to the
last column of the first invoice.
You can authorize all or just a few
of the outstanding invoices for the
vendor simply by putting a Y in the
pay field.
Pay Type Y and press <ENTER> to select the
invoice for payment. The system will take you
to the next line (invoice). Type N and press
<ENTER> to unselect an invoice for payment.
Discount Taken If there is a discount to be taken, you must
press <ENTER> to accept the default amount.
Otherwise, change it and press <ENTER>.
If there is no discount associated
with the invoice, you will not be
asked to change the Discount
Taken field.
THE SCHOOL DISTRICT OF PINELLAS COUNTY
ANY OLD SCHOOL #1234
SELECT INVOICES FOR PAYMENT
Current Period: 07/01/00 to 07/31/00
Cash Account =>1111.00 Checking
Vendor
=>SAMS Sams Club
Invoice Number
Invoice
Date
Net Due
Date
28674
07/01/00
07/31/00
When through authorizing invoices for
payment, press the <ESC> key.
Disc.
Perc.
Discount
Date
Discount
Taken
0.00
Remittance
Pay
21.45
Y
Edit Auth. for Payment? Type N and push the <ENTER> key to
indicate that you are through authorizing
invoices for payment.
Then press <ESC> twice to exit to the
menu.
Next Step:
Printing Computer Checks
Page 5-10
MAS User's Guide
Disbursements
To print computer checks, select Print Checks from the Disbursements menu. Using
the mouse, point to the Disbursements menu and hold down the left mouse button.
Select/highlight Print Checks and then release the mouse button.
Printing
Computer
Checks
Cash Account The default account should already be highlighted. Press <ENTER>.
Printing computer checks is the
last step in the payment process.
Before printing checks, you must
have selected invoices for payment
first (see prior 2 pages). Check to
be sure that the starting check
number corresponds to the
checks you have loaded in the
printer.
Print an alignment form? Unless you have never printed checks and need
to know if they will line up on the printer, type N
and press the <ENTER> key to skip this step.
Check Date Enter the current date and press <ENTER>.
First Check Number The highlighted check number should match the
first check number to be printed. If the starting
check number on the checks is different, enter
that number here (see caution). Press <ENTER>.
Above Information Correct? If it is correct, select Y and press <ENTER>. If
not, select N and make the corrections.
Printer Ready? Make sure your computer checks are loaded
properly in the printer, then press any key to tell
the system to print the checks.
Caution:
If you enter a check number that is
over 100 checks greater than the last
check printed, the system will flash a
warning. Verify that you have the right
check number.
THE PINELLAS COUNTY SCHOOL DISTRICT
ANY OLD SCHOOL #1234
PRINT CHECKS
Current Period: 07/01/00 to 07/31/00
Pay from cash account =>1111.00 Checking
Check date
=>07/01/00
First check number
=> 1207
PRINT COMPLETE
Check Number
Vendor
Number of Checks
Total Payments
=>
1207
=> SAMS Sams Club
=>
1
=>
21.45
Did checks print properly (Y/N)? => Y
When the checks have completed
printing, the system will display a
summary of the checks printed
and will ask if the checks printed
properly.
Checks Print Properly?
Continued on next page...
Page 5-11
Make sure that the checks did print properly, and the check numbers are correct. If
OK, type Y and press <ENTER>. This will
post the checks to your fund accounts.
MAS User's Guide
Disbursements
Page 5-12
SAMPLE: LASER CHECK LAYOUT
MAS User's Guide
Disbursements
SAMPLE: CONTINUOUS FEED CHECK LAYOUT
Invoice Number
Inv Date
Account
Invoice Amount
Discount
Remittance
-------------------------------- ---------------------- ---------------------- -------------------------------- -------------------------- ------------------28674
07/01/00
7-0350.00*
21.45
0.00
21.45
------------------------------- ---------------------- ----------------------- ------------------------------- ---------------------------- ------------------Date
Number
Invoice Amount
Discount
Remittance
07/01/00
1207
21.45
0.00
21.45
1207
*********21 DOLLARS AND 45 CENTS
07/01/00
*********21.45
SAMS CLUB
222 AIRPORT BLVD
TAMPA, FL 33207
Multiple Invoices to a
Single Vendor
Note that when more than one invoice is selected for payment for a given vendor
and cash account, only one check will be printed (up to 8 invoices can be included
on a single check). This combined check will equal the total of the invoices to be
paid and will include a listing of the invoices on the stub.
Fund Account Numbers
on Check Stubs
The check stub will include the fund account from which each invoice is
paid. In the case of multiple accounts per invoice, only the first account is
listed and an asterisk is printed after this account number.
If Checks Do Not Print
Properly
If any or all checks are torn, get jammed in the printer, are incorrectly numbered or
otherwise do not print properly, type N when asked if they printed properly. When
prompted, enter the number of the first check that did not print properly and then
press <ENTER>. The system will post all checks printed before this one and will not
post the checks beginning with this one. The invoices associated with the misprinted checks will remain on file in a "selected" status. You will need to print them
again, so you will be returned to the Print Checks screen.
If only one check misprints, type Y
to indicate that all checks printed.
Then void the misprinted check
using the instructions discussed
later in this chapter.
Page 5-13
MAS User's Guide
Disbursements
To post manual checks to your accounts:
Using the mouse, point to the Disbursements menu and hold down the left mouse
button. Continue holding down the left mouse button and select/highlight Manual
Checks. Release the mouse button.
Posting
Manual
Checks
Cash Account The highlighted Cash Account Number *
should be correct. If it is not, change it and
press <ENTER>.
An alternative to printing computer
checks is to type up manual checks
and post them into MAS after the fact.
This is particularly useful for times
when MAS is unavailable.
Vendor Number Type the short vendor ID code and press
<ENTER>.
Invoice Number Type the number of the invoice that was paid
with the manual check and press <ENTER>.
Above Line Correct? If it is, make sure the Y is highlighted and press
<ENTER>. If not, type N press <ENTER>, and
make the necessary correction(s). Once all
invoices have been entered, press <ESC>.
Note: If a manual check is written for
payment of more than one invoice,
you must use the method described
on the following page to post the
check.
The system will update the amount of remittance in the top portion of the screen for each
invoice entered in the detail.
When all invoices for a particular
check have been entered, verify that
the check amount is correct and press
<ESC> to signal that you are finished
with that manual check.
Check Number Type the check number that was used to make
the payment and press <ENTER>.
Check Date Type in the date the check was written and
press <ENTER>.
THE SCHOOL DISTRICT OF PINELLAS COUNTY
ANY OLD SCHOOL #1234
Cash Account =>1111.00
Vendor
=>AWARD
Award Master
123 Business Avenue
Largo
FL
Invoice Totals
Total Discounts
Total Remittance
Check Number
Check Date
33779
Invoice Number
920688
Checking
Invoice
Date
07/02/00
* If the cash account number is
not correct or does not appear in
this area, contact Auditing
immediately.
ENTER MANUAL CHECKS
Current Period: 07/01/00 to 07/31/00
Net Due
Date
Disc.
Perc.
08/01/00
Discount
Date
Discount
Taken
0.00
=>
=>
=>
12.95
0.00
12.95
=>
1928
=> 07/08/00
Remittance
12.95
Above Info. Correct? If it is correct, make sure the Y is highlighted
and press <ENTER>. If not, type N press
<ENTER> and make the necessary
correction(s).
At this time, the check will be posted to your
fund and cash account.
Note:
The posting process for manual
checks does require the input of
invoices.
Page 5-14
MAS User's Guide
Disbursements
Fast Manual
Checks
To post fast manual checks follow the steps for entering an invoice, as
outlined previously in this chapter, with the following exception:
Priority Level Type M (the code for a manual check) and
press <ENTER>.
Another way of printing manual
checks is to enter M in the priority
field of the invoice. After you finish
entering the invoice information,
the system will prompt you for
check information and will then
post the manual check immediately.
THE SCHOOL DISTRICT OF PINELLAS COUNTY
ANY OLD SCHOOL #1234
Vendor Number =>AWARD
Award Master
123 Business Avenue
CREATE VENDOR INVOICES
Current Period: 07/01/00 to 07/31/00
Invoice Nmbr =>3478
Largo
FL 33779
Cash Account =>1111.00 Checking
Sponsor
=>
Invoice Date
=>06/30/00
Discount Percent => 0.00
Discount Days
=>
=>
Net Due Days
=> 30
=>07/29/00
Invoice Amount
=>
Priority Level
=>M
After entering all information for the invoice and saving it, a screen will pop
up asking for check information.
This type of manual check
should only be used for a check
payment for a single invoice only.
If a manual check is for payment
of more than one invoice, use
the method described
previously.
Check Number Type the number of the manual check that
was used to pay the invoice and press
<ENTER>.
Check Date Enter the date of the manual check and
press <ENTER>.
MAS will then calculate and display the
discount (if any) and remittance amount.
THE SCHOOL DISTRICT OF PINELLAS COUNTY
ANY OLD SCHOOL #1234
CREATE VENDOR INVOICES
Current Period: 07/01/00 to 07/31/00
Vendor ID =>AWARD Invoice Nmbr =>3478
Award Master
123 Business Avenue
Invoice Date
Discount Percent
Discount Days
Net Due Days
Invoice Amount
Priority Level
Largo
FL 33779
Cash Account =>1111.00 Checking
Sponsor
=>
MANUAL CHECK INFORMATION
Account Sub. Acc
7 0350 0700
Check Number
Awa Check Date
Discount
Remittance
=>
1929
=> 07/10/00
=>
0.00
=> 123.00
=>06/30/00
=> 0.00
=>
=>
=> 30
=>07/29/00
=>
123.00
=>M
Amount
123.00
Above Info. Correct? If so, make sure a Y is highlighted and press
the enter key. If not press <ESC> .
Page 5-15
MAS User's Guide
Disbursements
To void checks that have already been paid:
Using the mouse, point to the Disbursements menu and hold down the left mouse
button. Select/highlight Void Checks and then release the mouse button.
Voiding
Checks
Cash Account The highlighted Cash Account Number *
should be correct. If it is not, change it and
press <ENTER>.
Voiding a check reverses all of the
original transactions in all of the cash
and fund accounts that were affected
by the check. You have the option to
return the original invoice to an
unpaid and un-selected status, ready
to be selected and paid again. You
will, however, also see the voided
invoices on all reports and inquiry
screens with an A, B, C, etc. suffix and
credit (negative) amounts.
Check Number Type the number of the check you wish to void
and press <ENTER>.
The system will show the payee, amount, and
date of the check.
Void Date The highlighted date should be correct. If not,
type in the date the check was voided and press
<ENTER>.
Save Invoice Type Y and <ENTER> if you wish to save the
invoice(s) associated with this check for later
repayment. If you will never pay this invoice
again, type N and press <ENTER>.
* If the account number is
incorrect or does not appear in
this area, contact Auditing
immediately.
Reason for Void Type in a descriptive reason for voiding the
check and press <ENTER>.
Above Info. Correct? If it is correct, make sure the Y is highlighted
and press <ENTER>. If not, press N and make
the necessary correction(s).
At this time, the check will be voided from your
fund and cash accounts.
THE SCHOOL DISTRICT OF PINELLAS COUNTY
ANY OLD SCHOOL #1234
Cash Account
Check Number
Payable to
Check Date
Check Amount
Void Date
Save Invoice
=>
=>
=>
=>
=>
=>
=>
VOID CHECKS
Current Period: 07/01/00 to 07/31/00
1111.00
1927
Award Masters
07/08/00
17.65
07/08/00
Y
Reason for Void => Check written for wrong amount
Is the above information correct?(Y/N) =>Y
Page 5-16
MAS User's Guide
Adding
Vendors
All Invoices paid in MAS must be
associated with a vendor. However,
only in cases where you will be
refunding money to a student/parent
you can use the preestablished
"1TIME" vendor.
Disbursements
Using the mouse, point to the File menu and hold down the left mouse button.
Continue holding down the left mouse button and select/highlight File Maintenance
and then release the mouse button.
Vendor ID Type an ID in the Vendor Number Block and
press <ENTER>. The vendor ID will consist of
letters and should be a brief, easily remembered
abbreviation of the vendor name.
Create this Vendor? If you do, make sure a Y is highlighted and
press <ENTER>. If not, type N and then press
<ENTER>.
Vendor Name Type the vendor's full name and press <ENTER>.
Address Type the vendor's street address and press
<ENTER>.
City Type the city and press <ENTER>.
State Type the state and press <ENTER>.
Zip Type the zip code and press <ENTER>.
Discount Percent If the vendor offers discounts for timely
payment, type the percentage discount (i.e., for
2% type 2.0) and press <ENTER>.
Note:
Pressing the <ENTER> key on a
blank, optional field (such as Contact,
Discount Terms, etc.) will skip to the
next field. If you do not wish to enter
contact or discount information, for
instance, just leave them blank.
Discount Days If the vendor offers discounts for timely
payment, type the number of days you have to
send in payment and still receive a discount,
then press <ENTER>.
Net Days If you wish to have the system calculate when
invoices are due, then enter the number of days
in which the vendor requires payment, then
press <ENTER>.
Page 5-17
MAS User's Guide
Disbursements
Discount Terms
Entering discount terms (percent,
days, and net days) is optional.
Discount information entered on this
screen will be applied to all invoices
for this vendor. These entries are
used by the system to calculate when
invoices are due and the amount of
any discounts. Generally, vendors
offer a specified percentage "price
break" on payments made within a
specified number of days after
invoices are sent out.
Customer Number Optional. Leave blank and press <ENTER>.
Payment Priority Level Type a number between 1 and 9 and press the
<ENTER> key to indicate the relative priority of
the vendor's invoices. 1 indicates the highest
priority and 9 indicates the lowest priority. We
recommend priority 2.
Type of Entity Enter one of the following one-character codes
and press the <ENTER> key:
Type of Entity
Corporation
Government Body
Non-profit Organization
Partnership
Individual
Other
Federal Tax ID Number For the Tax ID Number, type the social security
number for an individual, or a tax ID number for
other entities. The hyphens must be entered.
Press the <ENTER> key when the field is
correctly completed.
Send Form 1099 Make sure a Y is highlighted if a 1099 might be
required, and press <ENTER>. If this is the case,
also enter any calendar year-to-date payments
made to this vendor and press <ENTER>. Or just
leave this blank and press <ENTER>.
If a 1099 form is not required for the vendor, type
N and press the <ENTER> key.
The Tax ID Number is required for all
vendors, except for refunds to
students/parents.
Input Status Select Enabled and press <ENTER>.
Above Info Correct? If it is, make sure the Y is highlighted, press the
<ENTER> key and proceed.
If, however, the information that you entered is
not correct, change the Y to an N, press the
<ENTER> key and re-enter the information as
necessary.
Contact Optional. If desired, type in the name, for a
contact and press <ENTER>.
Title Optional. If desired, type the title (i.e., sales rep)
of the vendor contact and press <ENTER>.
Phone Optional. If desired, type in the vendor's phone
number for the contact and press <ENTER>.
When finished entering vendors,
press the <ESC> key to return to
the menu.
Page 5-18
MAS User's Guide
Deleting
Vendors
You will generally only need to delete
vendors at the end of a year, or right
after the fiscal year is closed, when
they are no longer active.
Disbursements
Using the mouse, point to the File menu and hold down the left mouse button.
Continue holding down the left mouse button and select/highlight File Maintenance
and then Vendor File Maintenance and then release the mouse button.
Vendor ID Type an identifying ID in the Vendor Number
Block and press <ENTER>.
Delete this Vendor? If you want to, type Y and press <ENTER>.
Note:
Are You Sure? If so, type Y and <ENTER> to delete the vendor.
If not, leave N highlighted and press <ENTER>.
The vendor will not be deleted.
Before deleting a vendor, make sure
it has had no activity in the current
fiscal year. The system will only
allow you to delete vendors that
have had no activity during the
current fiscal year.
A vendor is active in the current
fiscal year if receipts, disbursements,
transfers or adjustments were made
during the fiscal year to this vendor.
The vendor is also active if any
outstanding checks at the beginning
of the current fiscal year were for
Page 5-19
MAS User's Guide
Disbursement
Reports
There are 11 different reports for
viewing invoices, checks, and
other disbursement information.
They are all accessed from the
Disbursements Reports menu.
Disbursements
PULL-DOWN MENUS
File
Receipts
Disbursements
POs
Trans+Adj
Reports
Each of these reports will be
discussed individually in this
section.
REPORTS
Cash Receipts
Disbursements
Purchase Orders
General Accounts
Sub Accounts
Maintenance Lists
Labels
Tips on Running Reports
DISBURSEMENTS REPORTS
Before printing reports, make sure you
have the proper (plain, white) paper in
the printer and that the top of the page
is aligned correctly.
Disbursements Register
Disbursements Journal
Examine Detail of Check
Voided Checks
Skipped Checks
Cash Requirements
Tolerance
Checks to Vendors
Vendor Invoices
Year-to-date Vendor Payments
Many of the reports can be displayed
on the screen as an alternative to
being printed. When displaying
reports on the screen, press the
<PAGE UP> and <PAGE DOWN>
keys to move up and down in the
report. At the end of the report, press
page down until the report totals
appear (if applicable).
Note:
When displaying a report rather than
printing it, some of the information
may not be seen on the screen. Some
columns can only be viewed when
printed.
Page 5-20
MAS User's Guide
Disbursements
Printing The
Disbursements
Register
The Disbursements Register (Check
Register) is a chronological listing of
checks that have been paid and
posted for a user- specified period of
time from a specific cash account.
The register is useful when reconciling
savings/checking accounts to bank
statements.
Using the mouse, point to the Reports menu and hold down the left mouse button.
Continue holding down the left mouse button and select/highlight Disbursements
and then Disbursements Register and then release the mouse button.
Select by Date or Number? Type D to print the report by date or N to print
it by check number. Press <ENTER>.
Cash Account Type the number of the cash (checking)
account to print the report and press <ENTER>.
It should default to the checking account
number. *
From Check Date/Number Enter the starting date/number for the report
and press <ENTER>. All checks dated/
numbered on or after this date/number will be
printed.
Through Check Date/Number Enter the ending date/number for the report and
press <ENTER>. All checks dated/numbered on
or before this date/number will be printed.
Above Info. Correct? If so, make sure a Y is highlighted and press
<ENTER>. If not, press the <ESC> key.
* If not, contact Auditing
immediately.
Display or Print Report? To print the report on your printer, make sure a
P is highlighted and press <ENTER>. If you
wish to just view the report on your screen,
type D and press <ENTER>.
THE SCHOOL DISTRICT OF PINELLAS COUNTY
ANY OLD SCHOOL #1234
CHECK REGISTER
Current Period: 07/01/00 to 7/31/00
Select by check Date or check Number? (D/N) =>D Check Date Order
Cash Account
=>1111.00 Checking
From Check Date
=>07/01/00
Through Check Date =>07/31/00
Is the Printer Ready? If your printer is turned on, has paper
loaded, and is ready, press any key to start
printing.
THE SCHOOL DISTRICT OF PINELLAS COUNTY
ANY OLD SCHOOL #1234
CHECKS REGISTER
By Check Date from 07/01/00 to 07/31/00
Account Ck Date Check No
---------- -------------- ------------------$1111.00 07/01/00
1206
$1111.00 07/01/00
1207
$1111.00 07/01/00
1208
Paid to the Order of
Amount
Reason why Check was Voided
-------------------------------------------- ----------------- --------------------------------------------------OFFICE EQUIPMENT COMPANY
17.00
SAMS CLUB
21.45
THE PENCIL COMPANY
*VOID* 07/01/00
CANCELLED ORDER
38.45
Page 5-21
MAS User's Guide
Disbursements
Printing The
Disbursements
Journal
The Disbursements Journal is a
listing of checks by cash account
that have been paid and posted
during a user-specified period of
time. The journal is useful when
trying to determine whether and
when specific checks were
posted. It is also useful for
determining the accounts to
which given checks and invoices
were charged.
Using the mouse, point to the Reports menu and hold down the left mouse button.
Continue holding down the left mouse button and select/highlight Disbursements
and then Disbursements Journal and then release the mouse button.
For Transactions between Enter the starting date for the report and press
<ENTER>. All checks dated on or after this
date will be printed.
and Enter the ending date for the report and press
<ENTER>. All checks dated on or before this
date will be printed.
Above Info. Correct? If so, make sure a Y is highlighted and press
<ENTER>. If not, press the <ESC> key.
THE SCHOOL DISTRICT OF PINELLAS COUNTY
ANY OLD SCHOOL #1234
For Transactions between
and
CASH DISBURSEMENTS JOURNAL
Current Period: 07/01/00 to 07/31/00
=>07/01/00
=>07/31/00
Is the Printer Ready? If your printer is turned on, has paper
loaded, and is ready, press any key to start
printing.
THE SCHOOL DISTRICT OF PINELLAS COUNTY
ANY OLD SCHOOL #1234
CASH DISBURSEMENTS JOURNAL
From 07/01/00 to 07/31/00
Cash AC Ck Number
======= ========
1111.00
1206
1111.00
1207
Ck Date
Vendor
Vendor Name
Invoice Number Account
======
====== ============== ============ ======
07/01/00 POECO OFFICE EQUIPMENT
8295
7 0350.00
07/01/00 SAMS SAMS CLUB
28674
7 0350.00
7 0350.00
Sub. Description
Amount
=== ===========
=========
0510 OFFICE SUPPL
17.00
0510 INSTRUCTION
8.95
0700 OTHER EXPENSES 12.50
Invoice Total
1111.00
1208
07/01/00
PENCIL THE PENCIL CO.
*VOID*
07/01/00
CANCELLED ORDER
Total Cash Disbursement
Page 5-22
==>
==>
21.45
0.00
Check Total
========
17.00
21.45
0.00
38.45
MAS User's Guide
Disbursements
Printing
Check
Details
Using the mouse, point to the Reports menu and hold down the left mouse button.
Continue holding down the left mouse button and select/highlight Disbursements
and then Examine Detail of Check and then release the mouse button.
Cash Account Enter the number of the cash (checking)
account the check was written from and press
<ENTER>. It should default to the checking
account number. *
The Examine Detail of Check report
gives a screen view or report of the
invoice and account information
included on a specific check.
Check Number Enter the check number and press <ENTER>.
Or just leave this field blank and press <ENTER> to pop-up a list.
Above Info. Correct? If so, make sure a Y is highlighted and press
<ENTER>. If not, press the <ESC> key.
It is useful when trying to determine
what invoices and accounts are
associated with a check
Pressing the "Tab" key will reveal the
PO number associated with the check
under the "Description" column.
Display or Print Report? To print the check detail on your printer, make
sure a P is highlighted and press <ENTER>. If
you wish to just view the report on your screen,
type D and press <ENTER>.
* If not, contact Auditing immediately.
THE SCHOOL DISTRICT OF PINELLAS COUNTY
ANY OLD SCHOOL #1234
Cash Account
Check Number
Paid to the Order of
Check Date
Invoice Number
8295
DETAIL OF CHECK
Current Period 7/01/00 to 7/31/00
=>1111.00 Checking
=>1206
=>OFFICE EQUIPMENT COMPANY
=>07/01/00
Account
Sub.
Description
7 0350.00
0510
OFFICE SUPPLIES
Check Total =>
Amount
17.00
17.00
Invoice Total
17.00
<<< A L L >>>
If you choose to print the check
detail information, it looks as
follows:
Is the Printer Ready? If your printer is turned on, has paper
loaded, and is ready, press any key to start
printing.
THE SCHOOL DISTRICT OF PINELLAS COUNTY
ANY OLD SCHOOL #1234
DETAIL OF CHECK
Check Number 1206 Drawn From account $-1111.00 to OFFICE EQUIPMENT COMPANY on 07/01/00 for $17.00
Invoice Number
============
8295
Purchase Order
Account Sub. Description
============ ======== ===== ===================
7-0350.00 0510 OFFICE SUPPLIES
Page 5-23
Amount
===========
17.00
Invoice Total
==============
17.00
MAS User's Guide
Disbursements
Printing The
Voided Checks
Report
Using the mouse, point to the Reports menu and hold down the left mouse button.
Continue holding down the left mouse button and select/highlight Disbursements
and then Voided Checks and then release the mouse button.
Cash Account Type the number of the cash (checking)
account to print the report and press <ENTER>.
It should default to the checking account
number. *
The Voided Checks report is a
chronological listing of checks that
have been voided during a user
specified period of time.
Checks Voided From Enter the starting date for the report and press
<ENTER>. All checks voided on or after this
date will be printed.
To Enter the ending date for the report and press
<ENTER>. All checks voided on or before this
date will be printed.
This report is useful for audit purposes.
Above Info. Correct? If so, make sure a Y is highlighted and press
<ENTER>. If not, press the <ESC> key.
* If not, contact Auditing
immediately.
Display or Print Report? To print the report on your printer, make sure a
P is highlighted and press <ENTER>. If you
wish to just view the report on your screen,
type D and press <ENTER>.
THE SCHOOL DISTRICT OF PINELLAS COUNTY
ANY OLD SCHOOL #1234
Cash Account
Checks Voided From
To
VOIDED CHECKS
Current Period: 07/01/00 to 07/31/00
=>1111.00 Checking
=>07/01/00
=>07/31/00
Is the Printer Ready? If your printer is turned on, has paper
loaded, and is ready - press any key to start
printing.
THE SCHOOL DISTRICT OF PINELLAS COUNTY
ANY OLD SCHOOL # 1234
V O I D E D C H E CK S
From Cash Account $-1111.00 CHECKING Checks Voided between 07/01/00 and 07/31/00
Check No
Ck Date Vd Date
=========== ======== =========
1208
07/01/00
07/01/00
Paid to the Order of
==========================
THE PENCIL COMPANY
Total
Page 5-24
==>
Amount Reason Why Check was Voided
======== =======================
2.00
CANCELLED ORDER
2.00
MAS User's Guide
Printing The
Skipped
Checks List
The Skipped Checks List is a numerical listing of checks that have been
skipped during a user specified period
of time. These are checks that will not
appear in the system as posted or
voided.
This list is useful for audit purposes.
Disbursements
Using the mouse, point to the Reports menu and hold down the left mouse button.
Continue holding down the left mouse button and select/highlight Disbursements
and then Skipped Checks and then release the mouse button.
Cash Account Type the number of the cash (checking)
account to print the report and press
<ENTER>. It should default at the checking
account number. *
From Check Number Enter the starting check number for the report
and press <ENTER>. All checks skipped on or
after this number will be printed.
Through Check Number Enter the ending check number for the report
and press <ENTER>. All checks skipped on or
before this number will be printed (do not enter
a number much greater than the last check
printed).
Above Info. Correct? If so, make sure a Y is highlighted and press
<ENTER>. If not, select N and press <ENTER>. Make necessary corrections.
* If not, contact Auditing
immediately.
Display or Print Report? To print the report on your printer, make sure a
P is highlighted and press <ENTER>. If you
wish to just view the report on your screen,
type D and press <ENTER>.
THE SCHOOL DISTRICT OF PINELLAS COUNTY
ANY OLD SCHOOL #1234
SKIPPED CHECK REGISTER
Current Period: 07/01/00 to 07/31/00
Cash Account
=> 1111.00 Checking
From Check Number
=>
1206
Through Check Number =>
1214
Is the Printer Ready? If your printer is turned on, has paper
loaded, and is ready, press any key to start
printing.
THE SCHOOL DISTRICT OF PINELLAS COUNTY
ANY OLD SCHOOL #1234
SKIPPED CHECK LIST
From Cash Account $-1111.00 CHECKING Checks Numbered from 1206 To 1214
5 Skipped Checks
=================================================================================================
1209
1210
1211
1212
1213
Page 5-25
MAS User's Guide
Disbursements
Printing The
Cash
Requirements
Report
Using the mouse, point to the Reports menu and hold down the left mouse button.
Continue holding down the left mouse button and select/highlight Disbursements
and then Cash Requirements and then release the mouse button.
Today's Date Type the date of today and press <ENTER>.
Sure About Date? Type Y and press <ENTER>.
Is the Printer Ready? If your printer is turned on, has paper loaded,
and is ready, press any key to start printing.
The Cash Requirements report is a
listing of unpaid invoices by vendor
that is run in vendor number order. It
segregates invoices into four categories of due dates - past due, due in the
next 7 days, due in 8 to 21 days, and
due after 21 days.
This report is useful for determining
when invoices are due and how much
cash to have on hand.
THE SCHOOL DISTRICT OF PINELLAS COUNTY
ANY OLD SCHOOL #1234
CASH REQUIREMENTS
Current Period: 07/01/00 to 07/31/00
Today's Date => 07/08/00
THE SCHOOL DISTRICT OF PINELLAS COUNTY
ANY OLD SCHOOL #1234
CASH REQUIREMENTS
Based Upon Aging Date of 07/01/00
Invoice Number Inv Date Dis Date Due Date Total Payment
============ ======= ====== ======= ===========
PENCIL
THE PENCIL COMPANY
2543
THE PENCIL COMPANY
07/08/00
07/09/00
Next 8-21 days
Thereafter
============= ===========
2.00
2.00
Page 5-26
Past Due Next 7 Days
====== ============
0.00
2.00
0.00
0.00
MAS User's Guide
Disbursements
Using the mouse, point to the Reports menu and hold down the left mouse button.
Continue holding down the left mouse button and select/highlight Disbursements
and then Tolerance and then release the mouse button.
Printing The
Tolerance
Report
Cash Account Type the number of the cash (checking) account
to print the report and press <ENTER>. It
should default to the checking account
number. *
The Tolerance report is a numerical
listing of all checks paid that are equal
to or greater than a user specified
dollar amount (tolerance).
Tolerance Level Enter the cut-off level for the report. Only
checks paid for an amount equal to or exceeding
this amount will be printed.
Above Info. Correct? If so, make sure a Y is highlighted and press
<ENTER>. If not, press the <ESC> key.
This report is useful for audit
purposes.
Display or Print Report? To print the report on your printer, make sure a P
is highlighted and press <ENTER>. If you wish
to just view the report on your screen, type D
and press <ENTER>.
* If not, contact Auditing
immediately.
THE SCHOOL DISTRICT OF PINELLAS COUNTY
ANY OLD SCHOOL # 1234
Cash Account
Tolerance Level
CHECK TOLERANCE
Current Period: 07/01/00 to 07/31/00
=>1111.00 Checking
=>
20.00
Is the Printer Ready? If your printer is turned on, has paper
loaded, and is ready, press any key to start
printing.
THE SCHOOL DISTRICT OF PINELLAS COUNTY
ANY OLD SCHOOL #1234
CHECK TOLERANCE
From Cash Account $1111.00 CHECKING Greater than or Equal to 20.00
Check No
===========
1207
Ck Date Vendor
======== ===========
07/01/00 SAMS
Paid to the Order of
===================
SAMS CLUB
Page 5-27
Amount of Check
=================
21.45
MAS User's Guide
Disbursements
Printing The
Checks To
Vendors List
Using the mouse, point to the Reports menu and hold down the left mouse button.
Continue holding down the left mouse button and select/highlight Disbursements
and then Checks to Vendor and then release the mouse button.
Vendor Type in the short vendor ID code and press
<ENTER>. Or just leave this field blank and
press <ENTER> to pop-up a list of vendors.
Above Info. Correct? If so, make sure a Y is highlighted and press
<ENTER>. If not, press the <ESC> key.
The Checks to Vendors report is a
numerical listing of all checks paid to a
specific vendor.
Display or Print Report? To print the report on your printer, make sure a
P is highlighted and press <ENTER>. If you
wish to just view the report on your screen,
type D and press <ENTER>.
This report is useful to verify the
payment of vendor invoices and for
audit purposes.
THE SCHOOL DISTRICT OF PINELLAS COUNTY
ANY OLD SCHOOL #1234
Vendor
=> PENCIL
CHECKS TO VENDORS
Current Period: 07/01/00 to 07/31/00
The Pencil Company
Is the Printer Ready? If your printer is turned on, has paper
loaded, and is ready, press any key to start
printing.
THE SCHOOL DISTRICT OF PINELLAS COUNTY
ANY OLD SCHOOL #1234
VENDOR CHECKS
Checks paid to vendor: PENCIL THE PENCIL COMPANY
Cash AC Check No
CK Date
Clr Date
Vd Date
Amount of Check
Reason Why Checks was Voided
----------- ------------------ ----------------- ----------------- --------------- --------------------------------- -------------------------------------------1111.00
1208
07/01/00
07/01/00
CANCELLED ORDER
1111.00
1214
07/01/00
3.40
Total Checks =>
2
3.40
Page 5-28
MAS User's Guide
Disbursements
Printing The
Vendor Invoices
Report
Using the mouse, point to the Reports menu and hold down the left mouse button.
Continue holding down the left mouse button and select/highlight Disbursements
and then Vendor Invoices and then release the mouse button.
Vendor Type in the short vendor ID code and press
<ENTER>. Or just leave this field blank and
press <ENTER> to pop-up a list of vendors.
The Vendor Invoices report is a
numerical listing of all paid and
unpaid (outstanding) invoices for a
specific vendor.
Above Info. Correct? If so, make sure a Y is highlighted and press
<ENTER>. If not, press the <ESC> key.
Display or Print Report? To print the report on your printer, make sure a
P is highlighted and press <ENTER>. If you
wish to just view the report on your screen,
type D and press <ENTER>.
To check on the status of a particular
invoice or a set of invoices for a
vendor, use the Vendor Invoices
report.
THE SCHOOL DISTRICT OF PINELLAS COUNTY
ANY OLD SCHOOL #1234
Vendor
=> SAMS
Invoice Number
Inv Date
8674
9578
8882
07/01/00
07/05/00
07/01/00
VENDOR INVOICES
Current Period: 07/01/00 to 07/31/00
Sams Club
Spon
Invoice Amount
Check No
21.45
79.45
17.65
1207
1233
1227
CK Date
07/01/00
07/10/00
07/08/00
<<< A L L >>>
To scroll, use PgUp/PgDn =>
The system will display all invoices for
the vendor. If the invoice has been paid,
a check number and check date will be
listed. If no Check No. or CK Date are
listed, the invoice has not yet been paid.
If an invoice does not show up on the
list, it has not been input into the
system, which may mean you have not
received it.
Is the Printer Ready? If your printer is turned on, has paper
loaded, and is ready - press any key to start
printing.
This report is useful for tracking pending
payments to vendors and for determining
the payment status of invoices to a
If there are more transactions than will fit on the screen, use the <PAGE UP>
vendor.
and <PAGE DOWN> keys to move up and down.
THE SCHOOL DISTRICT OF PINELLAS COUNTY
ANY OLD SCHOOL
VENDOR INVOICES
SAMS SAMS CLUB
Invoice Number Inv Date Spon Invoice Amount Check No
CK Date
-------------------- ------------ ----------- ---------------------- -------------------- ------------------8674
07/01/00
21.45
1207
07/01/00
Page 5-29
MAS User's Guide
Disbursements
Printing The
Year-to-dateVendor
Payments Report
Using the mouse, point to the Reports menu and hold down the left mouse
button. Continue holding down the left mouse button and select/highlight
Disbursements and then Year-to-Date and then release the mouse button.
Tolerance Level Enter the cutoff level for the report. Only
total vendors with total payments this fiscal
year equal to or exceeding this amount will
be printed.
Above Info. Correct? If so, make sure a Y is highlighted and press
<ENTER>. If not, press the <ESC> key.
The Vendor Tolerance report is a
listing of total payments to vendors
in excess of a user specified amount.
Display or Print Report? To print the report on your printer, make
sure a P is highlighted and press <ENTER>.
If you wish to just view the report on your
screen, type D and press <ENTER>.
This report is useful for audit
purposes.
THE SCHOOL DISTRICT OF PINELLAS COUNTY
ANY OLD SCHOOL #1234
Tolerance level
=>
YEAR-TO-DATE VENDOR PAYMENTS
Current Period: 07/01/00 to 07/31/00
20.00
Is the Printer Ready? If your printer is turned on, has paper
loaded, and is ready, press any key to start
printing.
THE SCHOOL DISTRICT OF PINELLAS COUNTY
ANY OLD SCHOOL #1234
VENDOR TOLERANCE
Vendors with Fiscal Year-to-date Payment Greater than or Equal to 20.00
Vendor
----------SAMS
Vendor Name
--------------------------------------SAMS CLUB
Total Vendors =>
Fiscal year Pymt
-------------------------21.45
1
21.45
Page 5-30
MAS User's Guide
Disbursements
Using the mouse, point to the Reports menu and hold down the left mouse button.
Continue holding down the left mouse button and select/highlight Maintenance
Lists and then Vendors and then release the mouse button.
Printing The
Vendor List
Vendor Name Order? To have the report sorted by vendor name, type
Y and press <ENTER>. Otherwise, to have the
report sorted by vendor ID, type N and press
<ENTER>.
The Vendor List is a listing of all
vendors that have been setup.
This report is useful when entering
invoices.
Display or Print Report? To print the report on your printer, make sure a
P is highlighted and press <ENTER>. If you
wish to just view the report on your screen,
type D and press <ENTER>.
THE SCHOOL DISTRICT OF PINELLAS COUNTY
ANY OLD SCHOOL #1234
Vendor Name Order
VENDOR LIST
Current Period: 07/01/00 to 07/31/00
=> Y
Is the Printer Ready? If your printer is turned on, has paper
loaded, and is ready, press any key to start
printing.
THE SCHOOL DISTRICT OF PINELLAS COUNTY
ANY OLD SCHOOL #1234
VENDOR LIST
Allow
ID
Vendor Name
Contact
Phone Tax ID Type of Entity
1099?
Entry
------------ --------------------------------------------------------------- ------------ ------------ --------------------- ----------- -------------AWARD
AWARD MASTERS
CORPORATION NO
YES
COKE
COCA COLA
CORPORATION NO
YES
1TIME
ONE TIME VENDOR
ONE TIME VENDOR
OTHER
NO
YES
PDECO
OFFICE EQUIPMENT COMPANY
CORPORATION NO
YES
SAMS
SAMS CLUB
CORPORATION NO
YES
PENCIL
THE PENCIL COMPANY
CORPORATION NO
YES
Page 5-31
MAS User's Guide
Printing
Vendor File
Labels
Vendor file labels are useful at the
Disbursements
Using the mouse, point to the Reports menu and hold down the left mouse button.
Continue holding down the left mouse button and select/highlight Labels and then
Vendor File Folder Labels and then release the mouse button.
How Many Lines from Top
Enter the number of lines for the printer to skip
between labels (default = 4) and press <ENTER>.
How Wide are Labels Enter the width of each label (default = 3.5) and
press <ENTER>.
beginning of the year for establishing
file folders for each vendor. This
'report' is designed to be printed on
pin-fed file folder labels that are
specifically designed for computer
printers. The default layout is
intended for Avery 1 across file folder
labels.
THE SCHOOL DISTRICT OF PINELLAS COUNTY
ANY OLD SCHOOL #1234
VENDOR LABELS
Current Period: 07/01/00 to 07/31/00
How many lines from the top of one label to the top of the next label =>
How wide are the labels (in inches) => 3.50
4
Is the Printer Ready? If your printer is turned on, has paper
loaded, and is ready, press any key to start
printing.
AWARD MASTERS
AWARD
BENTON TROPHIES
BENTON
BROWN OFFICE SUPPLY
BROWN
CAMERA AMERICA
CAMERA
DAIRY FRESH
DAIRY
PINELLAS COUNTY SCHOOL BOARD PCSB
Page 5-32
MAS User’s Guide
To Clear Encumbrances and/or Open Purchase Orders
Periodically, review the encumbrances reported on the Trial Balance report to
verify the validity of the items noted.
Clear
Encumbrances
Clear Open
Purchase
Orders
Below are the instructions to clear items which have canceled or paid so the
encumbrance is removed from the financial reports.
1.
2.
3.
4.
5.
6.
7.
8.
Run an Encumbrance Report for all accounts ranging from the first non dollar
sign account number through the end of the active account numbers in the 8’s.
The sub account or transaction code range is 0310 through 3498 (if requested).
Print an Open Purchase Order report.
From these reports, determine which outstanding purchase orders and/or
encumbrances are valid.
If a purchase order has been paid and the invoice number and check number
appear in the far right columns of the open purchase order report, it is likely
that there is a glitch in the system, which can most time be cleared as follows:
a. Determine the version of MAS that you have by going to a plain blue
screen in MAS, press the F10 key and the version number will be
displayed.
b. Go to Purchase Orders – get drop down screen
c. Choose Receive items ordered – enter the purchase order number
d. Version 8 of MAS - “Re-receive” all of the items ordered and if
prompted, DO NOT generate an invoice.
e. Version 9 of MAS – “Receive” all items as a negative which will clear the
receipt of merchandise. DO NOT generate an invoice.
If an invoice number and no purchase order number appear on the
encumbrance report, it is likely that an invoice was created through
disbursements and there was no purchase order related to this invoice. Or, the
payment voucher was voided, which cleared the purchase order, and the
invoice was saved so another check could be printed. If the invoice is not valid
or has been paid, try the following:
a. You must know the vendor ID code (for example PCSB or SBPC could be
used to identify the district). The vendor ID code is on the encumbrance
report.
b. Go to Disbursements – get the drop down screen
c. Select Edit Existing Vendor Invoice – enter the vendor ID code and
invoice number
d. Hopefully, the prompt at the bottom of the screen will ask it you want to
edit, delete etc. At that point, enter a D to delete the invoice, then press
the Enter key. Document this action for audit on the encumbrance report
printed in number 1 above.
If the purchase order has not been received or invoiced and should be voided,
try the following:
a. Go to Purchase order – get drop down screen
b. Select Edit existing purchase order and enter the purchase order number
c. Hopefully, the prompt at the bottom of the screen will ask it you want to
edit, Void etc. At that point, enter a V to void the purchase order.
Document this action.
If the purchase order has been received, but not invoiced, try the following:
a. Go to Purchase order – get drop down screen
b. Select Receive items ordered – enter the purchase order number
c. Version 8 of MAS – Now clear the receipt of merchandise.
d. Version 9 of MAS – “Receive” all items as a negative which will clear the
receipt of merchandise.
e. Follow steps b and c of 5 above.
Page 5-33
MAS User's Guide
CHAPTER
The Transfers and Adjustments portion of MAS is used to move funds between
accounts, transfer money from checking to savings, and perform other non-cash
transactions.
Transfers are movements of funds between fund accounts for a specified purpose.
For example, a transfer would be moving funds from the Band account to the Choral
account. A transfer must be pre-approved and supported by a completed requisition.
TRANSFERS
&
A D J U S T
M E N T S
Adjustments are transactions that involve an increase or decrease in one or more
cash accounts (checking or savings accounts) or fund accounts (Athletics, Library,
etc.). For example, an adjustment would be used to record a monthly service charge
assessed on a checking account.
Enter General
Information
Enter Account
Information
Print/Review
Edit Listing
Contents
Entering General Information .......... 6-2
Entering Account Information ......... 6-3
Printing/Reviewing Edit List ........... 6-4
Editing and Changing ....................... 6-5
Deleting Detail Lines ....................... 6-6
Deleting Transfers/Adjust. .............. 6-7
Adding Lines ................................... 6-8
Posting Transfers & Adjustments
Groups .................................... 6-9
By Date ................................. 6-10
Single ..................................... 6-11
Printing Transfer Vouchers ........... 6-12
Printing The Journal ...................... 6-13
Delete Lines
Add Lines
Edit / Change
Transfers &
Adjustments
The transfers & adjustments process is a multi-step
process where you must:
1. Enter general and detail account information.
2. Print/review the transfers & adjustments edit list.
3. Correct any problems with the transfers or
adjustments entered, delete detail account lines,
and/or add detail account lines.
4. Post the transfers & adjustments.
Post
Transfers &
Adjustments
PULL-DOWN MENU
File
Receipts
Disbursements
POs
Trans+Adj
Reports
TRANSFERS AND ADJUSTMENTS
From the Transfers & Adjustments
menu, you can enter new transfers or
adjustments, edit unposted transfers
or adjustments, print out a listing of all
entered but unposted transfers or
adjustments, post transfers and
adjustments, or print transfer &
adjustment vouchers.
Create Transfers and Adjustments
Edit Existing Transfers and Adjustments
Edit List
Post Transfers and Adjustments
Print Vouchers
POST TRANSFERS AND ADJUSTMENTS
Current Period
Date of Transaction
Transaction Number
Page 6-1
Procedures Manual
Entering
General
Transfer Or
Adjustment
Information
Transfers & Adjustments
Using the mouse, point to the Trans+Adj menu and press down the left mouse
button. Continue holding down the left mouse button and select/highlight Create
Transfers and Adjustments and then release the left mouse button.
Batch Type Enter the type of transaction you are performing
(T for a transfer or A for an adjustment) and
press <ENTER>.
Batch Date Enter the date of the transfer/adjustment and
press <ENTER>.
Batch Description Enter a brief description of the transaction being
performed.
Bank Date This is important for transfers or adjustments that
involve the bank. Leave the current date (the
default) and press <ENTER> unless the bank
date is other than today's date.
Transfers and adjustments are
entered and identified by batch
numbers.
THE SCHOOL DISTRICT OF PINELLAS COUNTY
ANY OLD SCHOOL #1234
Batch
Batch
Batch
Batch
Number
Type (T/A)
Date
Description
Account Sub.
=>
1
=> T TRANSFER
=> 07/09/00
=> YEARBOOK AD
Cash Balance =>
Fund Balance =>
Net Balance =>
Bank Date > 07/09/00
Account Name
Bank Date?
The bank date field is used to
differentiate adjustments such as
service charges or interest
charges that are posted at a
different time by the bank (generally before) than when you post
them in MAS. For example, a bank
service charge may be posted to
your bank account on July 31st.,
but you may not post it in MAS
until August 3rd. August 3rd
would be the batch day, July 31st
would be the bank date.
CREATE TRANSFER/ADJUSTMENTS
Current Period: 07/01/00 to 07/31/00
Description
To
From
Above Info. Correct? If so, enter a Y and press <ENTER>. Otherwise, enter an N and press <ENTER>.
Next Step:
Entering Account Information
Page 6-2
Procedures Manual
Transfers & Adjustments
Entering
Account
Information
Fund Type Type in the Account Category (1 through 8 or $
for cash accounts) and press <ENTER>.
Account Number The system will ask for the Account Number.
Press <ENTER> without entering an account
number to get a pop-up list of accounts.
Highlight the one you want and press <ENTER>.
After entering general information, the
system will allow you to indicate the
fund accounts and cash accounts to
increase and/or decrease. Transfers
may increase a number of fund
accounts and decrease a number of
fund accounts, but must net to zero.
Adjustments may increase and/or
decrease cash accounts and fund
accounts, but must also net to zero.
Examples of specific adjustments are
provided in the procedures section of
this manual, and in Chapter 13 of the
Auditing & Property Records Department Procedure Handbook.
(The Orchid Book)
Sub Account Number The system will ask for the sub account number.
Press <ENTER> without entering a sub account
number to get a pop-up list of sub accounts.
Highlight the one you want and press <ENTER>.
Description The system will carry over the description of the
sub account. To carry down the description
from above the line, delete the sub account
name and press <ENTER>. If you would like a
different description, press the <INSERT> key
and type over the sub account name.
To/Receipts Type in the amount of the transfer or adjustment
to be added to this account and press <ENTER>. However, if this account is to be
decreased, press <ENTER> to move to the next
column.
From/Disbursements If this account is to be decreased, type in the
amount of the transfer or adjustment to be
subtracted from this account and press <ENTER>.
When all lines have been entered
and validated as correct (and the
system is waiting for you to enter
the next line), press the <ESC>
key to signal that you are finished
with that transfer or adjustment.
Above Line Correct? If correct, make sure the Y is highlighted and
press <ENTER>. If incorrect, select N and make
necessary changes.
Save, Abandon, Continue? Change the highlighted field to an S to save the
batch and press <ENTER>.
Post & Print? If you want to post the transfer/adjustment
immediately and print a copy make sure Y is
highlighted and press <ENTER>. If not, highlight
N and press <ENTER>.
If you attempt to save a transfer or
adjustment where the net balance
does not equal zero, the system will
warn you that the batch is out of
balance and will not save the transfer/
adjustment.
THE SCHOOL DISTRICT OF PINELLAS COUNTY
ANY OLD SCHOOL #1234
Batch
Batch
Batch
Batch
Number
Type (T/A)
Date
Description
CREATE TRANSFER/ADJUSTMENTS
Current Period: 07/01/00 to 07/31/00
=>
1
=> T TRANSFER
=> 07/09/00
=> YEARBOOK AD
Account
Sub.
Account Name
4 0440.00
5 5000.00
0790
3482
BETA CLUB
YEARBOOK
Cash Balance =>
Fund Balance =>
Net Balance =>
Bank Date >
Description
MISCELLANEOUS EXPENSE
ADVERTISING/SALES
Next Step:
Printing & Reviewing the Edit List
Page 6-3
To
0.00
0.00
0.00
07/09/00
From
35.00
35.00
Procedures Manual
Transfers & Adjustments
After entering transfers and adjustments for the day, using the mouse, point to the
Trans+Adj menu and press down the left mouse button. Continue holding down the
left mouse button and select/highlight Edit List and then release the left mouse
button. If there are no unposted batches of outstanding transfers or adjustments, the
computer will beep and give you a message to that effect.
Printing And
Reviewing
The Edit List
Is the Printer Ready? If the printer is ready, press any key and the edit
list will print.
The printer will produce a report of all transfers and adjustments entered to date that
have not been posted to the fund and cash accounts.
THE SCHOOL DISTRICT OF PINELLAS COUNTY
ANY OLD SCHOOL #1234
TRANSFERS/ADJUSTMENTS EDIT LIST
Batch
Number SC Date Batch Balance Line Description
Account Sub.Account Name
Increase Decrease
===== = == ==== ============ ===== ============= ============ ============== ======== ===========
1
TR 07/09/00 0.00
1 ADVERTISING/SALES 5 5000 3482 YEARBOOK
35.00
0.00
2 MISC. EXPENSE
4 0440 0790 BETA CLUB
0.00
35.00
CASH TOTALS ==>
FUND TOTALS ==>
0.00
35.00
0.00
35.00
Review the
Edit List
for Accuracy
Each transfer or adjustment (batch)
must be balanced (Batch Balance=0)
before it can be posted. This means
that the total of all increases equals
the total of all decreases.
Make sure that the:
•
•
•
net balance for each transfer and adjustment batch is equal to zero
fund and/or accounts coded for each detail line are accurate
descriptions are accurate
If you need to make changes, delete detail lines or add detail lines, follow the instructions given later in this chapter. If everything is OK with the edit list, skip to the Post
Transfers and Adjustments section. Once posted, these transfers and adjustments
will no longer appear on the edit listing.
Next Step:
Editing/Changing Transfers &
Adjustments or Posting Transfers
& Adjustments
Page 6-4
Procedures Manual
Transfers & Adjustments
If you need to change a transfer or an adjustment that has not been posted, using
the mouse, point to the Trans+Adj menu and press down the left mouse button.
Continue holding down the left mouse button and select/highlight Edit Existing
Transfers and Adjustments and then release the left mouse button.
Editing And
Changing
Transfers &
Adjustments
Batch Number
Be advised that you can only edit or
change transfers and adjustments that
have not been posted. If you wish to
delete lines from or an add lines to a
transfer or an adjustment, see the next
two pages.
Enter the number of the transfer or adjustment
and press <ENTER>. To get a listing of
batches, leave the space blank and press
<ENTER>. Highlight the one you want
and press <ENTER>.
Edit, Delete, Continue To change any information on the top portion of
the screen, select E and then press <ENTER>.
Change the information and then select Y for is
information correct? If top portion is correct,
select C and press <ENTER>.
Add, Change, Delete, Quit Type C and press <ENTER>. The system will
display the first 11 lines of the transfer/adjustment.
Line Number to Edit Type the number of the line to edit and press
<ENTER>. The system will display the line you
entered and allow you to make changes to it.
Use the <ENTER> key to move from one field to
the next.
If you attempt to save a transfer or
adjustment where the net balance
does not equal zero, the system will
warn you that the batch is out of
balance and will not save it.
Above Line Correct If correct, make sure the Y is highlighted and
press <ENTER>. If incorrect, select N and make
necessary changes.
Line Number to Edit If finished changing lines, press the <ESC> key.
If not, type the number of another line to edit
and press <ENTER>.
Next Step:
Posting Transfers and Adjustments
Add, Change, Delete, Quit Type Q to save and leave the changed transfer
or adjustment, then press <ENTER>.
THE SCHOOL DISTRICT OF PINELLAS COUNTY
ANY OLD SCHOOL #1234
Batch
Batch
Batch
Batch
Number
Type (T/A)
Date
Description
Line
Account
1 4 0440.00
2 5 5000.00
EDIT TRANSFER/ADJUSTMENTS
Current Period: 07/01/00 to 07/31/00
=>
1
=> T
=> 07/09/00
=> YEARBOOK AD
Sub.
0790
3482
Cash Balance =>
Fund Balance =>
Net Balance =>
Bank Date > 07/09/00
Account Name
BETA CLUB
YEARBOOK
Description
MISCELLANEOUS EXPENSE
ADVERTISING/SALES
To
0.00
0.00
0.00
From
35.00
35.00
<<< A L L >>>
Would you like to Add, Change, Delete lines, or Quit? (A/C/D/Q/PgUp/PgDn)=>
Page 6-5
Procedures Manual
Transfers & Adjustments
If you need to delete detail lines from a transfer or adjustment that has not yet been
posted, using the mouse, point to the Trans+Adj menu and press down the left
mouse button. Continue holding down the left mouse button and select/highlight
Edit Existing Transfers and Adjustments and then release the left mouse button.
Deleting
Detail Lines
Batch Number Enter the number of the transfer or adjustment
and press <ENTER>. Press <ENTER> without
entering a batch number to get a pop-up list of
batches. Highlight the one you want and press
<ENTER>.
You can only delete lines from
transfers and adjustments that
have not been posted.
To delete an entire batch, type D
at the Edit, Delete, or Continue
prompt.
Edit, Delete, Continue Make sure C is highlighted and press <ENTER>.
The system will display the first 11 lines of the
transfer or adjustment
Add, Change, Delete, Quit Type D to indicate you wish to delete lines and
press <ENTER>.
Line Number to Delete Type the appropriate number(s) and press
<ENTER>.
THE SCHOOL DISTRICT OF PINELLAS COUNTY
ANY OLD SCHOOL #1234
Batch
Batch
Batch
Batch
Number
Type (T/A)
Date
Description
Line Account
1 4 0440.00
2 5 5000.00
EDIT TRANSFER/ADJUSTMENTS
Current Period: 07/01/00 to 07/31/00
=>
1
=> T
=> 07/09/00
=> YEARBOOK AD
Cash Balance =>
Fund Balance =>
Net Balance =>
Bank Date >
Sub.
Account Name
0790
3482
BETA CLUB
YEARBOOK
Description
MISCELLANEOUS EXPENSE
ADVERTISING/SALES
0.00
0.00
0.00
07/09/00
To
From
35.00
35.00
<<< A L L >>>
Line number to delete =>2
The system will delete the line
number entered. If finished
deleting lines, press the <ESC>
key.
If you attempt to save a transfer or
adjustment where the net balance
does not equal zero, the system will
warn you that the batch is out of
balance and will not save the
transfer/adjustment.
Add, Change, Delete, Quit Type Q to save and leave the changed
transfer or adjustment, then press <ENTER>.
Page 6-6
Procedures Manual
Transfers & Adjustments
Deleting
Transfers And
Adjustments
To delete an entire transfer or adjustment that has not yet been posted, using the
mouse, point to the Trans+Adj menu and press down the left mouse button. Continue holding down the left mouse button and select/highlight Edit Existing Transfers
and Adjustments and then release the left mouse button.
Batch Number Enter the number of the transfer or adjustment
and press <ENTER>. Press <ENTER> without
entering a batch number to get a pop-up list of
batches. Highlight the one you want and press
<ENTER>.
You can only delete transfers and
adjustments that have not been
posted.
Edit, Delete, Continue Make sure D is highlighted and press <ENTER>.
The transfer/adjustment is then deleted.
Once the transfer or adjustment
has been deleted, the system will
return you to the opening screen
for editing transfers and adjustments. Press <ESC> to return to
the transfers and adjustments
menu.
THE SCHOOL DISTRICT OF PINELLAS COUNTY
ANY OLD SCHOOL #1234
Batch
Batch
Batch
Batch
Number
Type (T/A)
Date
Description
Line Account
1 4 0440.00
2 5 5000.00
EDIT TRANSFER/ADJUSTMENTS
Current Period: 07/01/00 to 07/31/00
=>
1
=> T
=> 07/09/00
=> YEARBOOK AD
Sub.
0790
3482
Cash Balance =>
Fund Balance =>
Net Balance =>
Bank Date >
Account Name
BETA CLUB
YEARBOOK
Description
MISCELLANEOUS EXPENSE
ADVERTISING/SALES
<<< A L L >>>
Page 6-7
0.00
0.00
0.00
07/09/00
To
From
35.00
35.00
Procedures Manual
Transfers & Adjustments
Adding Lines
To A Transfer
Or Adjustment
If you need to add additional detail lines to a transfer or adjustment that has not yet
been posted, using the mouse, point to the Transfer+Adj menu and press down the
left mouse button. Continue holding down the left mouse button and select/
highlight Edit Existing Transfers and Adjustments and then release the left mouse
button.
Batch Number Enter the number of the transfer or adjustment
and press <ENTER>. Press <ENTER> without
entering a batch number to get a pop-up list of
batches.
Edit, Delete, Continue Make sure C is highlighted and press <ENTER>.
The system will display the first 11 lines of the
transfer/adjustment
Add, Change, Delete, Quit
THE SCHOOL DISTRICT OF PINELLAS COUNTY
ANY OLD SCHOOL #1234
Batch
Batch
Batch
Batch
Number
Type (T/A)
Date
Description
=>
1
=> T
=> 07/09/00
=> YEARBOOK AD
Line
Account
Sub.
1
2
3
4 0440.00
5 5000.00
0790
3482
EDIT TRANSFER/ADJUSTMENTS
Current Period: 07/01/00 to 07/31/00
Cash Balance =>
Fund Balance =>
Net Balance =>
Bank Date >
Account Name
BETA CLUB
YEARBOOK
Type A and press <ENTER>.
Description
MISCELLANEOUS EXPENSE
ADVERTISING/SALES
0.00
0.00
0.00
07/09/00
To
From
35.00
35.00
Fund Type Type in a number (1 through 8) and press
<ENTER>.
Account Number Type in the Account Number.
Sub Account Number Type in the Sub Account Number if the Account Number entered uses sub account.
Description Type in a description as needed, and press
<ENTER>.
When all lines have been entered
and validated as correct (and the
system is waiting for you to enter
the next line), press the <ESC>
key to signal that you are finished
with that transfer or adjustment.
If you attempt to save a transfer or
adjustment where the net balance
does not equal zero, the system will
warn you that the batch is out of
balance and it will not save the
transfer or adjustment.
To/Receipts Type in the amount of the transfer or adjustment
to be added to this account and press <ENTER>.
From/Disbursements If this account is to be decreased, type in the
amount of the transfer or adjustment to be
subtracted from this account and press <ENTER>.
Above Line Correct? If correct, make sure the Y is highlighted and
press <ENTER>. If incorrect, select N and make
necessary changes.
Save, Abandon, Continue?
Page 6-8
Change the highlighted field to an S to save the
batch and press <ENTER>.
Procedures Manual
Posting
Groups Of
Transfers &
Adjustments
Transfers & Adjustments
Using the mouse, point to the Trans+Adj menu and press down the left mouse
button. Continue holding down the left mouse button and select/highlight Post
Transfers and Adjustments and then, moving the mouse to the right, select/highlight
Current Period and then release the left mouse button.
POST TRANSFERS AND ADJUSTMENTS
Current Period
Date of Transaction
Transaction Number
The system will display all unposted transfer and adjustment batches.
Do you want to post these? Type Y and press the <ENTER> key to post
all of these batches to the fund and/or cash
accounts indicated.
Print Receipt? Make sure Y is highlighted and that paper is
in the printer, then press <ENTER>.
THE SCHOOL DISTRICT OF PINELLAS COUNTY
ANY OLD SCHOOL #1234
Batch Nmbr
1
SC
Date
TR
07/09/00
POST ALL TRANSFER AND ADJUSTMENTS
Current Period: 07/01/00 to 07/31/00
Description
YEARBOOK AD
Cash
0.00
<<< A L L >>>
Do you want to post these transfers and adjustments? (Y/N)=>Y
Note:
If any of the current, unposted
transfers/adjustments are out of
balance, you will not be able to
post any of them.
Alternative Method:
As an alternative to posting all
current transfers and adjustments,
you can post them by date or post
individual transfers and adjustments
by batch (transaction number), as
explained on the following pages.
Page 6-9
Fund
0.00
Procedures Manual
Posting
Transfers &
Adjustments
By Date
Transfers & Adjustments
Using the mouse, point to the Trans+Adj menu and press down the left mouse
button. Continue holding down the left mouse button and select/highlight Post
Transfers and Adjustments and then, moving the mouse to the right, select/
highlight Date of Transaction and then release the left mouse button.
Batch Date Enter the date that the transfers/adjustments
you wish to post were entered and press
<ENTER>. The system will then display a
listing of all transfers and adjustments with that
date.
Post these Batches? Type Y and press the <ENTER> key to post all
of the batches for the entered date.
As an alternative to posting all
transfers & adjustments at once (see
previous page), you can post the
transfers and adjustments that were
entered on a given date.
Print Receipt? Make sure Y is highlighted and that paper is
in the printer, then press <ENTER>.
THE SCHOOL DISTRICT OF PINELLAS COUNTY
ANY OLD SCHOOL #1234
Batch Date => 07/08/00
Batch Nmbr SC
Date
1
TR 07/08/00
POST TRANSFERS AND ADJUSTMENTS BY DATE
Current Period: 07/01/00 to 07/31/00
Description
YEARBOOK AD
Cash
Fund
0.00
<<< A L L >>>
Do you want to post these transfers and adjustments? (Y/N) =>Y
Page 6-10
0.00
Procedures Manual
Transfers & Adjustments
Posting Single
Transfers &
Adjustments
As an alternative to posting all
receipts at once, you can individually
post transfers and adjustments.
Using the mouse, point to the Trans+Adj menu and press down the left mouse
button. Continue holding down the left mouse button and select/highlight Post
Transfers and Adjustments and then, moving the mouse to the right, select/highlight
Transaction Number and then release the left mouse button.
Batch Number Enter the number of the transfer or adjustment
and press <ENTER>. Press <ENTER> without
entering a batch number to get a pop-up list of
batches. Highlight the one you want and press
<ENTER>.
Do you want to post batch? Type Y and press the <ENTER> key to post the
batch to the fund and cash accounts indicated.
Print Receipt? Make sure Y is highlighted and that paper is
in the printer, then press <ENTER>.
THE SCHOOL DISTRICT OF PINELLAS COUNTY
ANY OLD SCHOOL #1234
Batch
Batch
Batch
Batch
Number
Type (T/A)
Date
Description
Line Account
1 4 0440.00
2 5 5000.00
POST SINGLE TRANSFER AND ADJUSTMENTS
Current Period: 07/01/00 to 07/31/00
=>
1
=> T
=> 07/09/00
=> YEARBOOK AD
Sub.
0790
3482
Cash Balance => 0.00
Fund Balance => 0.00
Net Balance => 0.00
Account Name
BETA CLUB
YEARBOOK
Description
MISCELLANEOUS EXPENSE
ADVERTISING/SALES
<<< A L L >>>
Page 6-11
Increase
Decrease
35.00
35.00
Procedures Manual
Transfers & Adjustments
Using the mouse, point to the Trans+Adj menu and press down the left mouse
button. Continue holding down the left mouse button and select/highlight Post
Transfers and Adjustments and then, moving the mouse to the right, select/highlight
Print Vouchers and then release the left mouse button.
Printing
Transfer
Vouchers
Batch Number Enter the number of the transfer or adjustment
that you wish to print. Press the <ENTER> key
without entering a batch number to view a popup list of transfers/adjustments. Highlight the
one you want and press the <ENTER> key.
There are two ways to print
transfer/adjustment vouchers.
One of these has been discussed
previously in the General Ledger
Posting section.
The system will display the general information
for the batch number entered.
THE SCHOOL DISTRICT OF PINELLAS COUNTY
ANY OLD SCHOOL #1234
Batch
Batch
Batch
Batch
Number
Type (T/A)
Date
Description
=>
1
=> T
=> 07/09/00
=> YEARBOOK AD
PRINT TRANSFER/ADJUSTMENTS VOUCHERS
Current Period: 07/01/00 to 07/31/00
Cash Balance => 0.00
Fund Balance => 0.00
Net Balance => 0.00
Printer Ready? If the printer is ready, press any key to print the
voucher.
THE SCHOOL DISTRICT OF PINELLAS COUNTY
ANY OLD SCHOOL #1234
TRANSFER AUTHORIZATION VOUCHER
============================================================================================
Date 07/09/00
Transfer Number 1
============================================================================================
Description YEARBOOK AD
============================================================================================
Account Sub.
Account Name
Increase
Decrease
======== ====== ============================= ============= ==============
5 5000.00 3482
YEARBOOK
35.00
4 0440.00 0790
BETA CLUB
35.00
THE FOREGOING REPORT OF TRANSFERS IS ACCURATELY REPRESENTED AND APPROVED
Teacher (Sponsor)/Treasurer
Principal
Page 6-12
Procedures Manual
Printing The
Transfers &
Adjustments
Journal
The Transfers and Adjustments
journal is a listing of transfers or
adjustments by batch number or
account (checking/savings etc.)
that have been posted for a userspecified period of time.
Transfers & Adjustments
Using the mouse, point to the Reports menu and press down the left mouse button.
Continue holding down the left mouse button and select/highlight General Accounts
and then, moving the mouse to the right, select/highlight Transfers/Adjustments
Journal and then release the left mouse button.
For transactions between Enter the starting date for the report and press
<ENTER>. All transfers or adjustments dated
on or after this date will be printed.
and Enter the ending date for the report and press
<ENTER>. All transfers or adjustments dated
on or before this date will be printed.
In Batch or Account Order Type B and press <ENTER> to have the report
sorted by batch number. Or type A and press
<ENTER to have the report sorted by account
number.
Above Info. Correct? If so, make sure a Y is highlighted and press
<ENTER>. If not, press <ESC>.
THE SCHOOL DISTRICT OF PINELLAS COUNTY
ANY OLD SCHOOL #1234
Transfers or Adjustments => T
TRANSFERS AND ADJUSTMENTS JOURNAL
Current Period: 07/01/00 to 07/31/00
TRANSFERS
For Transactions between => 07/01/00
and
=> 07/31/00
Report in Batch number or Account number order (B/A) => B
Is the Printer Ready? If your printer is turned on, has paper
loaded, and is ready, press any key to start
printing.
THE SCHOOL DISTRICT OF PINELLAS COUNTY
ANY OLD SCHOOL #1234
TRANSFERS JOURNAL
From 07/01/00 to 07/31/00
Batch No.
Account Sub. Account Name
Date
SC
Description
Increase Decrease
========== ========== ===== ==================== ====== === =============== ======== =========
1
5 5000.00 3482 YEARBOOK
07/09/00 TR Advertising/Sales
35.00
4 0440.00 0790 BETA CLUB
07/09/00 TR Misc. Expense
35.00
CASH TOTALS ==>
FUND TOTALS ==>
0.00
35.00
0.00
35.00
CASH TOTALS ==>
FUND TOTALS ==>
0.00
35.00
0.00
35.00
THE FOREGOING REPORT OF TRANSFERS IS ACCURATELY REPRESENTED AND APPROVED
Bookkeeper/Secretary
Principal
Page 6-13