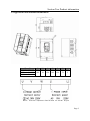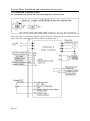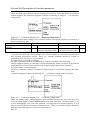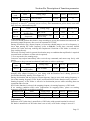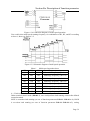
1
Foreword
Foreword
Thanks for purchasing frequency converter of CDI9100-S series manufactured by Delixi
(Hangzhou) Inverter Co., Ltd.
For ensuring correct application of the device, please read the manual carefully before operates
it. Incorrect application should cause abnormal operation, fault, decrease service life, even
cause body injures. The manual belongs to standard accessory; please keep it carefully for
further reference.
Besides operating instruction, the manual also provide user with connection diagram in purpose
of reference. Please contact agent, or Customer Center of our Company for any difficulty or
special requirement.
The manual includes operating instruction relating to CDI9100-S series converter with power
level of 0.4KW~1.5KW. While the Company could modify content in it without any early
information.
Please confirm following content during unpackaging:
1. If the product is damaged during process of transportation, if parts are damaged and
dropped, or if main body is bruised.
2. If rated value marked on nameplate is consistent with your order requirement, or if there are
ordered unit, acceptance certificate, operation manual and guarantee shed in package.
The Company strictly complies with quality system during production and packaging, for any
inspection miss, please contact our Company or supplier for settlement.
People should not reprint,
transmit, and use the manual
or content relating to it
without written permission
of the Company, who will
assume legal responsibility
for damage caused in
violation of the item.
Page I
Contents
Contents
Section One Safe operation and precautions........................................................................... 1
Section Two Product information ........................................................................................... 2
2.1 Nameplate data and naming rule...................................................................................... 2
2.2 Technical specification of CDI9100-S series converter ................................................... 3
2.3 CDI9100-S series converter............................................................................................. 4
2.4 Appearance and installation dimension............................................................................ 5
2.5 Routine maintenance ....................................................................................................... 6
Section Three Installation and connection of converter.......................................................... 8
3.1 Installation of front cover and number keyboard ............................................................. 8
3.2 Selection of installing position ........................................................................................ 8
3.3 Connection of main loop and the precautions.................................................................. 9
3.4 Connection of control circuit ......................................................................................... 10
3.4.1 Terminal arrangement and connection diagram of control circuit......................... 10
3.4.2 Function of control circuit termina ........................................................................ l2
3.5 Grounding...................................................................................................................... 13
Section Four
Keyboard operation and running ..................................................................... 14
4.1 Selection of operating mode .......................................................................................... 14
4.2 Test run and inspection .................................................................................................. 14
4.3 Operating method of keyboard ...................................................................................... 15
4.3.1 Keystroke and function......................................................................................... 15
4.3.2 Display method of keyboard................................................................................. 16
4.3.3 Method of “check/set parameter” (via number keyboard) .................................... 17
4.3.4 Frequency setting of keyboard.............................................................................. 18
Section Five Functional parameter sheet .............................................................................. 19
Section Six
Description of function parameter ................................................................... 26
6.1 Sort P00 Basic function parameter ................................................................................ 26
6.2 Sort P01 Secondary function parameter......................................................................... 33
6.3 Sort P02-Input/output terminal and multi-speed running function ................................ 37
6.4 Sort P03 Other function parameter ................................................................................ 46
6.5 Sort P04 Display functional parameter .......................................................................... 47
6.6 Sort P05 Factory parameter ........................................................................................... 47
Section Seven Fault recovery ............................................................................................... 48
7.1 Trouble shooting of motor ............................................................................................. 48
7.2 Fault diagnosis and recovery of converter. .................................................................... 49
Page II
Section One Safe operation and precautions
Section One Safe operation and precautions
Please read the manual carefully before install, operate, maintain or check CDI9000-S series
converter.
For ensuring personal safety, device safety and property safety, please read the manual carefully
before usage of the device. The precautions about safe operation can sort to “warning”or “be
careful”.
: Potentially dangerous condition, which maybe cause severe body
injuries or dead if relevant requirement is ignored.
Warning
Note
: Potentially dangerous condition, which maybe cause middle,
light injuries or device damage if relevant requirement is ignored,
it also applies to unsafe operation.
Precautions for safe operation:
1. Installation and maintenance should be performed by professional only.
2. Verify if the rated voltage of converter is same as the AC power supply voltage
3. Do not make supply power of AC loop connect with outputting terminal U, V and W.
The connection will damage converser, thus guarantee card sho8uld be nonserviceable.
Warning
4. Please connect to input power supply only after assembled panel, and don’t disassemble
external converter after electrified.
5. Do not touch high-voltage terminal in converter.
6. Do not connect or disconnect lead and connector if the circuit is electrified.
7. Do not touch CMOS element because the vulnerability of it.
8. Do not perform voltage test with the device.
1. Do not modify factory parameter of converter without authorization, or damage might be
caused.
2. For converter of which storage period exceeds half year, please increase the input voltage
gradually by using regulator, to prevent from electric shock and explosion.
3. To prevent from electric shock, please perform maintenance ten minutes after powerdown,
and check if charging indicator crushed out completely, or voltage at positive and negative
bus is lower than 36V.
Note
4. All parts should be replaced by professional only. It is strictly prohibitive to remain stub or
metal object in machine, to prevent from fire.
5. After replaced control board, please perform relevant parameter setting before operation to
prevent from damage of materials.
Page 1
Section Two Product information
Section Two Product information
2.1 Nameplate data and naming rule
Nameplate data: Take Type CDI9100-S-G0R7T2 as an example:
Nameplate data
CDI
9100-S
G
Type description
0R7 T2
Delixi converter
Design number
Series number
G: General type P: Pump type
ZS: Injection Moulding type
GS: Isobaric water supply system
GY: Intelligent machine
Power of equipped electromotor (KW)
0R4=0.4KW
0R7=0.75KW
1R5=1.5KW
Page 2
Voltage class (rated
voltage):
T2=200V-230V
T4=380-415V
T6=660-690V
T11=1140V
Section Two Product information
2.2 Technical specification of CDI9100-S series
Control mode
Frequency Resolution
Control
Operation
Frequency accuracy
V/F rate
Torque compensation
Operating
mode
Frequency
setting
Starting
signal
Multiple
stage speed
Acceleration
Input
and
signal
deceleration
time
Emergency
stop
Inching
motion
Automatic
operation
Fault reset
Running
state
Output
Fault output
signal
Analog
output
Running function
Converter protection
Protective
function
Instantaneous
powerdown
Display
Key
board
Environment
Cooling mode
Running
information
Error
information
Ambient temperature
Storage temperature
Ambient humidity
Height/vibration
Application position
Control of space voltage vector
Digital : 0.01 Hz, Analog: 0.05 Hz / 50 Hz, Output frequency range:
0–400Hz
Digital: 0.01 % of peak output frequency
Analog: 0.1 % of peak output frequency
Linear, square root, random V/F
Manual torque compensation (0 - 30 %)
Key board/ terminal
Analog: VF terminal, IF terminal
Digital: Key board
Corotation, reversion
Up to eight speed is allowable (by using multiple function terminal)
0.1-3600 second, acceleration and deceleration time is switchable,
Type: linear
Interrupt output of converter.
Idle operation
Operate automatically according to parameter set (7 stage speed)
Reset fault state automatically if protective function is effective
Frequency inspection class, overload alarm, over voltage, under voltage,
overheat, running, stop, constant speed, automatic program running
Contact output: AC250V 1A, DC 30V 1A
FM output: 0 - 10V
DC brake, frequency limit, slip compensation, reversion protection etc.
Over voltage, module fault protection, under voltage, overheat, fault
protection.
Lower than 15 msec: Continuous operation
Bigger than 15 msec: Automatic restart is allowable
Set frequency, output frequency, output voltage, bus voltage, input signal,
feedback value, module temperature.
Running state of fault protection, four fault information are saved.
-10 ℃ ~ 40 ℃
-20 ℃ ~ 65 ℃
90 % RH in max .(no dewing)
Below 1,000 m, below 5.9m/sec²(=0.6g)
No corrosive gas, inflammable gas, oil mist, dust and others
Air-blast cooling
Page 3
Section Two Product information
2.3 CDI9100-S series converter
Type
Rated voltage
Rated power
Rated output current
Motor
CDI9100-S-G0R4T2
200-230v
0.4KW
2A
0.4KW
CDI9100-S-G0R7T2
200-230v
0.75kW
4A
0.75kW
CDI9100-S-G1R5T2
200-230v
1.5kW
7A
1.5kW
Order explanation:
During order, please enter type, specification of the product, and provide
parameter, load type, or other information relating to the motor as much as
possible. For any special requirement, please consult with technology
department of the Company.
Page 4
Section Two Product information
2.4 Appearance and installation dimension
型
号
CDI9100-S-0R4T2
CDI9100-S-0R7T2
CDI9100-S-1R5T2
W
W1
H
H1
D
D1
¢d
100
91
150
142
116
72
5
Note:Terminal sequence should base on actual object
Page 5
Section Two Product information
2.5 Routine maintenance
(1)
Routine maintenance
Under influence of temperature, humidity, dust and vibration, internal elements of
converter should be aged, which should cause potential fault, or decrease service life of
converter. Therefore, it is significant to perform routine maintenance and regular inspection
with the converter.
Routine maintenance item:
A If running sound of motor is abnormal.
B
If vibration is created during operation of motor.
C
If installing condition of converter is changed.
D If radiating fan of converter works normally.
E
If converter is in state of overheat.
Daily cleanness:
A Keep cleanness of converter.
B
Remove dust from surface of converter effectively, to prevent converter from
incursion of dust, or metal dust.
C
Remove oil sludge form radiating fan of converter effectively.
(2) Regular inspection
Please inspect corner pockets of converter regularly.
Regular inspection item:
A Inspect air flue, and clean it regularly.
B
Inspect if screw is loosened.
C
Inspect if converter is corrosive.
D Inspect if there is arc on surface connecting terminal.
E
Insulated test of major loop
Note: Please disconnect major loop and converter while testing insulation resistance by using
megohmmeter (500V DC megohmmeter). Do not measure insulation of control loop with
megohmmeter. And high voltage test is needless (finished in ex works).
(3) Replacement of wearing parts
Wearing parts of converter includes cooling fan, filter ELCC, of which service life depend on
operating environment and maintenance condition closely.
User could confirm replacement period according to the operating time.
A
Cooling fan
Potential damage reason: Shaft abrasion and vane aging.
Critical standard: If there is crack on vane of fan, or if abnormal sound occurs during starting.
B
Filter ELCC
Potential damage reason: Bad input power, higher ambient temperature, frequent load switch,
or aging of electrolyte.
Critical standard: If liquid leaks, if safety valve bulged out, measure of static capacitance, and
measure of insulated resistance.
(4) Storage of converter
After purchased the device, please pay attention to following points while storing it:
A Please store it in original package as much as possible.
B
Long term storage should cause aging of ELCC, please electrify it for 5 hours
above twice a year during storing, in mode of raising voltage to rated voltage
slowly via transformer.
(5) Guarantee of converter
Maintenance free is limited to the converter only.
For fault or damage occurs during normal application of device sold in home (delivery date):
A Perform guaranteed repair, guaranteed exchange, guaranteed return in one month
after delivery.
Page 6
Section Two Product information
B
C
Perform guaranteed repair, guaranteed exchange in three months after delivery.
And perform guaranteed repair in 15 months after delivery.
For exported device (not included China), the Company should provide guaranteed repair in six
months after delivery at purchase site.
For products manufactured by the Company, we will provide paid service for life anytime, or
anywhere applied it.
All sale, product, and agent units of the Company should provide products with after sale
service, of which service terms include:
A Provide “Class Ⅲ” inspection service at site of the unit. (Include fault elimination)
B
Refer to after sell service contract concluded between the Company and agents.
C
Request for compensated after-sell service from agent of the Company (without
reference to guaranteed repair).
Our Company should take responsibility of guaranteed repair, guaranteed exchange, and
guaranteed return for quality and accident responsibility relating to the product, but user could
affect insurance for further responsibility compensation guarantee from insurance agent.
Guarantee term of the product should be effective in 15 months after delivery.
For fault caused in following reason, user could obtain compensated maintenance only even
guarantee term is effective:
A Problem caused in incorrect operation (based on user’s manual) or repair,
modification without authorization.
B
Problem caused in violation of critical requirement.
C
Damage caused in undeserved transportation after purchased.
D Aging or fault caused in bad environment.
E
Damage caused in earthquake, fire, disaster, lightning strike, abnormal voltage or
other natural disaster and incidental disaster.
F
Damage occurs in transportation. (Note: transportation mode should be appointed
by user of themselves, the Company should assist agent to conduct transfer of
goods).
G Brand, trade mark, SN, nameplate marked by manufacturer is damaged or
unjustifiable.
H Failure to pay off fund according to purchase contract.
I
Failure to describe actual conditions relating to installation, distribution, operation,
maintenance, or other condition to the Company.
The Company should carry out responsibility of “Three guarantee” abovementioned only after
received the returned goods, and confirmed responsibility attribution.
Should it involve an unpaid or untimely settlement due to the buyer, the ownership hereof still
belongs to the supplier. In addition, the latter will assume no liability hereinabove, and the
buyer shall have no disagreement.
All relevant service fees shall be calculated in accordance with the identical standards of the
factory. In the event that an agreement or a contract exist, its priority shall be performed.
Page 7
Section Three Installation and connection of converter
Section Three Installation and connection of converter
3.1 Installation of front cover and number keyboard
1. Installation of front cover
1. Raise unit body by propping the seat; do not hold front cover and
raise the unit while moving it.
Otherwise main body maybe fall down and cause body injure.
2. Please install converter onto nonflammable materials (for example:
Metal).
Violation of the rule maybe causes fire.
Warning
3. Please install a fan or other cooling device if installed device in a
cabinet, of which inlet temperature should be lower than 40℃.
Overheat maybe causes fire or damages the device.
This Section describes the necessary construction, setting condition, and space required by
installation of CDI9100-S series converter.
It is needless to take down front cover and manipulater for general installation. Please
disassemble manipulater carefully because it connects with internal circuit via cables. Pull out
cable before assemble manipulater and panel, or plug should be damaged.
2. Installation of number keyboard
Please disassemble and reassemble number keyboard according to following method:
A Disassemble number keyboard:
Press lock clasp of number keyboard and take out it from front cover.
B Reassemble number keyboard:
Press number keyboard into keyboard frame of panel, the lock clasp should lock number
keyboard automatically.
3.2 Selection of installing position
Selection of installing position:
1. Prevent from sunniness; Don’t use in the open air directly.
2. Don’t use in the corrosive gas and liquid environment.
3. Don’t use in the oil fog and splash environment.
Warning
4. Don’t use in the salt spray environment.
5. Don’t use in the moist and rain environment.
6. Please equip the unit with filters device if metal dust or fiber wadding
existing in air.
7. Do not use the unit in mechanical shock or vibration condition.
8. It is necessary to adopt cooling measure if ambient temperature is
higher than 40℃.
9. It is recommended to use the unit in temperature range of
-10℃~+40℃ because fault maybe occur in overcool or overheat
condition.
10. Keep the unit away from power supply noise, high-power application,
such as electric welder should impact application of the unit.
11. Emissive material should impact application of the unit.
12. Keep the unit away from combustible material, attenuant and solvent.
For ensuring perfect performance and long-term service life, please comply abovementioned
advices while installing CDI9100-S series converter to prevent the unit from damage.
Page 8
Section Three Installation and connection of converter
3.3 Connection of main loop and the precautions
The Chapter describes connection of main loop of CDI9100-S series converter.
1. Do not make power supply of AC main loop connect with output
terminal U, V, and W.
2. Please connect unit only after shut down the power supply.
3. Verify if the crating voltage of converter is same as the input voltage
of it.
Dangerous
4. Do not perform withstand test with converter.
5. Fasten terminal screw with appointed fasten torque.
1. Please check if grounding terminal is grounded before connect main
loop. (Refer to 3.5)
2. Terminal sequence should base on actual object.
3. Rated input voltage: AC single-phase220V Frequency: 50/60Hz
Note
4. Allowable fluctuation voltage: 10~ - 15% (fluctuation ±20%)
Frequency: ±2%
Connection of 0.4-1.5KW main loop of CDI9100-S series:
Note:Terminal sequence should base on actual object
Page 9
Section Three Installation and connection of converter
3.4 Connection of control circuit
3.4.1 Terminal arrangement and connection diagram of control circuit
Following figure is connection diagram of main loop and control loop. It is possible to run the
motor only after connected main loop if number keyboard is used.
Page 10
Section Three Installation and connection of converter
Note:
1. For control terminal, frequency setting and monitor instrument, shielding wire or twisted
pair wire required (wiring in ellipse).
2. It is possible to select voltage or current input of main support frequency via parameter of
P02.09 or P02.10, and select terminal control via parameter of P02.00-P02.06.
3. Maximal output current of 10V (+10V) control loop terminal is 50mA.
4. Multi-function analog output is used for monitoring instruction (such as output frequency
meter, current meter etc.), while not be used for feeding back control system.
5. COM and GND are common terminal of I/O signal and analog signal, please not connect or
ground these common terminals mutually.
6. For prevent from interfere, please distributing control loop apart from main loop and heavy
current loop (relay contact, 220V program loop).
7. Input switch of external terminal (except relay contact) is passive input signal, power input
maybe damage the converter.
8. For prevent from failure action caused in noise interfere, please deleave lead of control
circuit apart from lead of main loop and other power cable. Connection of control circuit
adopts twisted wire or double twisting wire, via which connect external shielding case to
grounding terminal of converter in distance of 50m below.
9. In the block chart, J1 is switch, of which functions include:
J1is used for selecting current/voltage signal input for IF or VF channel. J1 switch locate at side
I while selecting current input, while locate at side V while selecting voltage input.
10. J2 is BI switch, of which functions include:
J2 is used for selecting current/voltage signal output for FM channel. J2 locate at side I while
selecting current output, while locate at side V while selecting voltage output.
Page 11
Section Three Installation and connection of converter
3.4.2 Function of control circuit terminal:
Following sheet summarize function of control circuit terminal, which is connected according
to function respectively.
Sort
Terminal Signal function
Description
Signal level
FWD
Run/stop in positive Run
in
positive MF contact input, Photoelectric
MF
direction
direction
while set via
input
coupler insulation
signal
closing, and stop P02.01~P02.04
Input: ON/OFF
while opening.
Internal
24VDC/8mA
REV
Run/stop in reversal Run
in
reversal
direction
direction
while
closing, and stop
while opening.
D1
Multi-speed
Become
effective
command 1
after closed
D2
Multi-speed
Become
effective
command 2
after closed
D3
Multi-speed
Become
effective
command 3
after closed
D4
Three-wire running Become
effective
control
after closed
COM
MF common input
terminal
Analog 10V
+10V power output
+10V power supply of analog command.
+10V
input
Maximum allowed
signal
current 20mA
VF
Analog
output 0~+10V/100%
P02.09 and P02.10
0~ +10V (20KΩ)
voltage
seeting
IF
Analog
output 0/4~20mA/100%
0/4~20mA (250Ω)
current
GND
Common ground of
analog signal
P24
Power supply of External
power
Output
between
digital signal
supply is provided
COM
DC24V,
200mA in max.
TA
Fault indicator
Close
during P02.06=10
Contact capability
(NO/NC contact)
operation
250VAC, 1A or
TB
below
TC
P24
Power supply of External
power
Output
between
MF
digital signal
supply is provided
COM
DC24V,
output
200mA in max.
signal
TA
Fault indicator
Close
during P02.06=10
Contact capability
(NO/NC contact)
operation
250VAC, 1A or
TB
below
TC
Analog FM
Frequency
meter 0 ~ +10V/frequency
Output 0~+10V
output
output
Fmax.
Load 2mA or below
signal
Page 12
Section Three Installation and connection of converter
3.5 Grounding
1. Grounding resistance value:
200V level: 100Ω or value below it.
2. Do not ground CDI9100-S series converter with common grounding of heavy current
devices, such as electric welder, electric motor etc. Depart grounding wire in guide pipe
from lead of other heavy current devices.
3. Please use approved grounding wire of which length should be as shorter as possible.
4. Please ground devices according to figure (a) if several CDI9100-S converters are used in
series; do not loop grounding wire in mode shown in figure (c).
5. Please connect grounding wire of CDI9100-S converter and the motor as shown as figure
(d).
(a) Correct
(d)Correct
(b) Incorrect
(c) Non-recommended
(e)Non-recommended
6. Connection inspection:
Please perform following items if installation and connection are completed.
A If connection is correct.
B If stub or screw remains in device.
C If screws are fastened firmly.
D If bare conductor on terminal contacts with other terminals.
Page 13
Section Four Keyboard operation and running
Section Four Keyboard operation and running
4.1 Selection of operating mode
CDI9100-S series converter provides two control modes of keyboard operation and terminal
operation, via which user could select and use relevant control mode according to local
environment and operating requirement. For details, please refer to description of parameter
P00.00.
4.2 Test run and inspection
1. Precautions and inspection before test run
For ensuring operation safety, please relieve mechanical connector before first operation to
separate motor from mechanical equipment and prevent from dangerous. Please perform
following inspection before test run:
A
If connection between lead and terminal is correct.
B
If lead thrum cause short circuit.
C
If screw terminal is fastened firmly.
D
If motor is installed firmly.
2. Test run
After preparation, connect to power supply and inspect if frequency converter works normally.
After connected to power supply, indicator of number keyboard is luminous.
Please cut off power supply immediately if any problem abovementioned occurs.
3. Operating inspection
Please verify following items during operation:
A
If motor rotates smoothly.
B
If rotation direction of motor is correct.
C
If abnormal vibration or noise occurs accompanying with operation of motor.
D
If acceleration and deceleration are smooth.
E
If current match with load value.
F
If LED state indicator and number keyboard displays correctly.
Page 14
Section Four Keyboard operation and running
4.3 Operating method of keyboard.
4.3.1 Keystroke and function
Installation dimension
of operating keyboard
Indicator Function
36mm*70mm
No.
Name
1
FOR
Chinese
Name
Corotation
2
REV
Reverse
3
RUN
Run
4
STOP
Stop
Function Description
Corotation Indicator,
When corotation it is
light, reverse it is.not
light..
Reverse.Indicator,
When Reverse it is
light, corotation it is not
light.
When the converter is
running, it is light.
When the converter is
stopping, it is light.
Page 15
Section Four Keyboard operation and running
4.3.2 Display method of keyboard
1. Monitor mode of running information
It is possible to check current state information of converter by press >> if monitor mode is run.
2. Fault/alarm monitor mode
A
In state of running monitor, the unit should display information relating to fault and
warning if fault and alarm occurs.
B
Reset fault by press STOP/RESET if fault disappears.
C
Please cut off power supply and reset the unit if serious fault occurs.
D
Keyboard should display fault code continuously until fault is eliminated (refer to
Section Seven).
3. Parameter setting method
Converter parameter and inspection on running state of converter are settable.
Please adjust parameter value properly to obtain perfect running state.
Page 16
Section Four Keyboard operation and running
4.3.3 Method of “check/set parameter” (via number keyboard)
Note: It is possible to increase or decrease value step by step by press △,▽
while modifying function code of parameter P, and move it in cooperation of >>
after enter into parameter setting.
And it is impossible to modify data under following conditions.
1. It is impossible to adjust parameter during operation of converter. (Refer to
function sheet)
2. Start protective function in P03.04 (write protection).
Page 17
Section Four Keyboard operation and running
4.3.4 Frequency setting of keyboard
It is possible to set frequency via mode of number keyboard and keyboard POT, which should
be selected by modifying parameter P00.01.
1. Set frequency via number keyboard directly
A
Set value of parameter P00.01 as 1.
B
Enter into frequency setting by pressing △, ▽ during operation of converter;
C
Adjust frequency to required value by pressing △, ▽, for example: 48.00Hz.
D
After adjustment, the set frequency should be saved into parameter P00.02 automatically.
E
Press MODE to return to parameter setting, and press MODE again to return running
monitor mode.
F
It is possible to modify frequency setting value during operation only.
2. Set frequency via keyboard POT
Firstly, set value of P00.01as 0, and adjust frequency to required value by rotating POT knob on
keyboard rightwards or leftwards, of which setting value should not be saved to P00.02
automatically.
Page 18
Section Five Functional parameter sheet
Section Five Functional parameter sheet
Description
1. According to the function, functional parameter of CDI9100-S common converter could be
divided into four sorts, which includes several function code of different value. In keyboard
operation, parameter sort corresponds to Level 1 menu, function code corresponds to Level
2 menu, and setting value of function code corresponds to Level 3 menu.
2. P××.×× in function sheet or other section of the manual denotes “××” function code of sort
“××”; For example, “P00.01” denotes 01 function code of sort P00.
3. Content explanation of function sheet:
List 1 “Sort”: name and SN of function parameter team; List 2 “function code”: SN of function
code parameter; List 3 “Name”: complete name of function parameter; List 4 “setting range”:
effective setting value range of function parameter; List 5 “Minimal unit”: minimal unit of
setting value of function parameter; List 6 “Factory setting”: factory setting value of function
parameter; List 7 “modification limit”: modification property of function parameter (if
modification is allowable, and the condition); List 8 “reference page”:reference page number of
function parameter.
Modification limit of parameter is explained as following:
“○” denotes setting value of the parameter is modifiable in state of stop or running;
“×” denotes setting value of the parameter is nonmodifiable (set in factory) in running state.
Explanation:
1. Please read the manual carefully while modifying parameter of converter. And contact our
Company for any problem occurs during operation. No data submits to customer
modification, violation of it maybe causes serious fault, or significant property loss, of
which consequences should be born by User!
2. It denotes user’s operation is error if “d.Err” displayed on LED.
Page 19
Section Five Functional parameter sheet
Sort
5.1
Sort P00-Basic function parameter
Function Name
Setting range
code
P00.00 Selection
of 0: Panel control RUN/STOP
operation control 1: Operation control of
external terminal
mode
2: Host control
Basic
P00.01 Setting
mode 0: Keyboard POT
function
selection
of 1: Number setting
2: Terminal VF
operation
parameter
3: Terminal IF
frequency
4: Number
keyboard+
analog terminal
5: VF+IF
6: UP/DOWN
Control
mode
1
of
increase/decrease terminal
7: UP/DOWN
Control
mode
2
of
increase/decrease terminal
8: Control mode 1 of
external pulse
9: Control mode 2 of
external pulse
P00.02 Keyboard
0.00 ~ maximum frequency
frequency setting
P00.03 Running direction 0: Corotation
controlled
via 1: Reversion
panel
P00.04 Maximum
50.00~400.0Hz
frequency
P00.05 Rated
motor 25.00~maximum frequency
frequency
P00.06 Rated
motor 200~450V
voltage
P00.07 V/F curve mode 0: Linear
1: Square 1
2: Square 2
3: Double broken line
P00.08 Torque
offset 0~30%
voltage
P00.09 Middle voltage
0~100%
P00.10 Middle frequency 0~Rated motor frequency
P00.11 Acceleration time 0.1~3600S
1
P00.12 Deceleration time 0.1~3600S
1
P00.13 Upper frequency Lower frequency limit ~
limit
maximum frequency
P00.14 Lower frequency 0.00~upper frequency limit
limit
P00.15 Stop mode of 0 Stop
lower frequency 1 Run
limit
Page 20
Min. unit Factory
setting
1
0
Modification Reference
limit
26
×
1
0
×
0.01Hz
50.00Hz ○
1
0
0.01Hz
50.00Hz ×
0.01Hz
50.00Hz ×
1V
220V
×
1
0
×
1%
3%
×
30
1%
0.01Hz
0.1S
50%
×
25Hz
×
Type(*1) ○
31
0.1S
Type(*1) ○
0.01Hz
50.00Hz ○
0.01Hz
0.00Hz
○
1
0
×
29
○
32
Section Five Functional parameter sheet
5.2
Sort
Secondary
function
parameter
Sort P01-secondary function parameter
Function
code
P01.00
Name
Setting range
Startup frequency
0.00~10.00Hz
P01.01
Startup frequency
Holding time
Stop mode
0.0~10.0S
P01.02
P01.03
P01.04
P01.05
P01.06
P01.07
P01.08
P01.09
P01.10
P01.11
P01.12
P01.13
P01.14
P01.15
P01.16
P01.17
P01.18
P01.19
P01.20
P01.21
P01.22
P01.23
Original frequency
of DC powerdown
DC brake voltage
of powerdown
DC brake time of
powerdown
Dead zone time
Stopping
mode
selection
of
ambient fault
Function of power
on
Waiting time of
power on
Waiting time of
fault recovery
Fault
recovery
frequency
Offset frequency
Frequency setting
gain
Inch
frequency
setting
Acceleration time
of inch frequency
Deceleration time
of inch frequency
Acceleration time 2
Deceleration time 2
Acceleration time 3
Deceleration time 3
Acceleration time 4
Deceleration time 4
UP/DOWN setting
frequency
Min.
unit
0.01H
z
0.1S
Factory
setting
0.00Hz
Modification
limit
○
0.0S
○
1
0
×
0.00Hz
×
0~15%
0.01H
z
1%
0%
×
0.0~20.0S
0.1S
0.0S
×
0.0~20.0S
0: Unforced stop
1: Powerdown
mode
0: No action
1: Act
0.1~20.0S
0.1S
1
0.0S
1
○
○
1
0
×
0.1S
2.0S
×
1~60S
1S
5S
×
0~3
1
3
×
-50.0~+50.0Hz
1~200%
0.1Hz
1%
0.0Hz
100%
×
×
0.1~50.00Hz
2.00Hz
○
0.1~60.0S
0.01H
z
0.1S
1.0S
○
0.1~60.0S
0.1S
1.0S
○
0.1~3600S
0.1~3600S
0.1~3600S
0.1~3600S
0.1~3600S
0.1~3600S
0.01~2.50 Hz/S
0.1S
0.1S
0.1S
0.1S
0.1S
0.1S
0.01H
z/S
1.0S
1.0S
1.0S
1.0S
1.0S
1.0S
1.0Hz/S
○
○
○
○
○
○
×
0: Decelerating
stop
1: Unforced stop
0.00~10.00Hz
Reference
33
34
35
36
Page 21
Section Five Functional parameter sheet
5.3 Sort P02-input/output terminal and multiple-speed running parameter
Sort
Function Name
code
input/output P02.00 Running control
terminal
mode selection of
External terminal.
And
multiple- P02.01 D1
speed
terminal function
running
parameter
P02.02 D2
terminal function
Setting range
0:
1:
2:
0:
1:
2:
3:
4:
5:
6:
7:
8:
9:
10:
11:
P02.03 D3
terminal function 12:
13:
14:
Dual-wire control mode 1
Dual-wire control mode 2
Three-wire control-self-hold
Unused
Multiplex frequency terminal 1
Multiplex frequency terminal 2
Multiplex frequency terminal 3
Inch control of corotation
Inch control of reversion
Three-wire running control
Acceleration
time
/deceleration time terminal 1
Acceleration/deceleration
time terminal 2
Free parking input
External reset input
Frequency up(UP)
Frequency down (Down)
DC brake control
NORM OPEN input of
external fault
NORM CLOSR input of
external fault
PLC running pause instruction
15:
P02.04 D4
16:
Terminal
function
P02.05 Not set(set aside) 0: Running signal of converter
1: Frequency arriving signal
2: Frequency level inspection
signal
3: Overload alarm signal
4: Stoppage caused in external
fault
5: Stoppage
caused
P02.06 Functional
undervoltage
selection
6: Output frequency achieves
of relay
to upper limit
output
7: Output frequency achieves
terminal
to lower limit
8: Programmable multi-speed
running is finished.
9: Running in Zero speed
10: Fault display
P02.07 Frequency
0.00~10.00HZ
achieves
inspection width
0.00~maximum frequency
P02.08 Frequency level
signal inspection
Page 22
Min. Factory Modificatio Refere
unit setting n limit
nce
1
0
×
37
1
1
×
1
2
×
1
3
×
1
6
×
38
41
1
10
×
0.01 2.50Hz ○
Hz
0.01 10.00H ○
Hz z
42
Section Five Functional parameter sheet
Function Name
code
P02.09 Analog quantity input
terminal
VF selection
P02.10 Analog quantity input
terminal
IF selection
P02.11 Secondary adjustment
volume setting.
P02.12 Feed channel selection of
secondary volume.
P02.13 Analog output setting
P02.14
Progra P02.15
mmable
multipl
e-speed
running P02.16
P02.17
P02.18
P02.19
P02.20
P02.21
P02.22
P02.23
P02.24
P02.25
P02.26
P02.27
P02.28
P02.29
P02.30
P02.31
Setting range
Min. Factory Modifica Refer
unit setting tion limit ence
43
1
0
×
0: 0~10V/0~20mA
1: 10~0V/20~0mA
2: 0~5V/0~10mA
3: 5~0V/10~20mA
4: 2~10V/4~20mA
5: 10~2V/20~4mA
1.0%~20.0%
1
0.1% 1.0%
×
0:
1
0
×
1
0
○
VF
1:
IF
0: Output frequency
1: Output voltage
Analog output gain
0.50~2.00
Programmable
0: No action
multiple-speed running
1: Single cycle
setting (simple PLC
2: Continuous cycle
running)
3: Hold final value
Running frequency in stage Lower frequency
1
limit~upper
frequency limit
Running direction in stage 0: Corotation
1
1: Reversion
Running time of stage 1
0.0~3600S
Acceleration and
1~4
deceleration time in stage 1
Running frequency in stage Lower frequency
4
limit~Upper
frequency limit
Running direction in stage 0: Corotation
2
1: Reversion
Running time of stage 2
0.0~3600S
Acceleration and
1~4
deceleration time in stage 2
Running frequency in stage Lower frequency
4
limit~Upper
frequency limit
Running direction in stage 0: Corotation
3
1: Reversion
Running time of stage 3
0.0~3600S
Acceleration and
1~4
deceleration time in stage 3
Running frequency in stage Lower frequency
4
limit~Upper
frequency limit
Running direction in stage 0: Corotation
4
1: Reversion
Running time of stage 4
0.0~3600S
Acceleration and
1~4
deceleration time in stage 4
0
0.01 1.00
1
0
×
○
×
44
45
0.01 5.00Hz ○
Hz
1
0
○
0.1S 10.0S ○
1
1
○
46
0.01 10.00H ○
Hz z
1
0
○
0.1S 10.0S ○
1
1
○
0.01 15.00H ○
Hz z
1
0
○
0.1S 10.0S ○
1
1
○
0.01 20.00H ○
Hz z
1
0
○
0.1S 10.0S ○
1
1
○
Page 23
Section Five Functional parameter sheet
Function Name
code
P02.32 Running frequency in stage
5
P02.33 Running direction in stage
5
P02.34 Running time of stage 5
P02.35 Acceleration
and
deceleration time in stage 5
P02.36 Running frequency in stage
6
P02.37 Running direction in stage
6
P02.38 Running time of stage 6
P02.39 Acceleration
and
deceleration time in stage 6
P02.40 Running frequency in stage
7
P02.41 Running direction in stage
7
P02.42 Running time of stage 7
P02.43 Acceleration
and
deceleration time in stage 7
5.4
Setting range
Min.
unit
Lower frequency limit ~ 0.01
Hz
Upper frequency limit
0: Corotation
1
1: Reversion
0.1S
0.0~3600S
1
1~4
Factory Modifica Refere
setting tion limit nce
46
30.00Hz ○
0
○
10.0S
1
○
○
Lower frequency limit ~
Upper frequency limit
0: Corotation
1: Reversion
0.0~3600S
1~4
0.01 40.00Hz ○
Hz
1
0
○
Lower frequency limit ~
Upper frequency limit
0: Corotation
1: Reversion
0.0~3600S
1~4
0.01 50.00Hz ○
Hz
1
0
○
0.1S 10.0S
1
1
0.1S 10.0S
1
1
○
○
○
○
Sort P03-other function parameter
Sort
Function Name
code
Advanced P03.00 CF
application
adjustment
P03.01 Reversion
protection
P03.02 Display
factor setting
P03.03 Monitor
contentof
LED
P03.04 Parameter
input
protection
P03.05 Parameter
initialization
Page 24
Setting range
1~12KHz
0: No action
1: Act
0.1~200.0
Min. Factory Modification Reference
unit setting limit
46
1KHzType ×
(*2)
1
0
×
0.1
0:Output frequency 1: Setting 1
frequency
2:Output voltage 3:Bus voltage
4:Input signal 5:Feedback value
display
6: Module temperature
1
0: All data are alterable
1:Only P00.02 and the function
are alterable
2: Only the function is alterable
1
0: No action
1: Eliminate fault record
2: Reset
(Remark:Function 2 should
be displayed 5 seconds after
pressed continuously)
1.0
○
0
○
0
○
0
×
47
Section Five Functional parameter sheet
5.5
Sort P04-Display function parameter
Sort
Function
code
Name
P04.00
Output
frequency
Setting
frequency
Output
voltage
Bus voltage
Input signal
Feedback
value
display
Module
temperature
Cumulative
operation
time
1st
fault
record
2nd
fault
record
3rd
fault
record
fault
4th
record
P04.01
P04.02
P04.03
P04.04
P04.05
P04.06
P04.07
P04.08
P04.09
P04.10
P04.11
5.6
Sort
Setting
range
Min.
unit
Factory
setting
Modification
limit
Reference
Hz
*
47
Hz
*
V
*
V
Hz
*
*
*
℃
*
Hour
*
*
*
*
*
Sort P05-Factory parameter
Function
code
P05.00
Name
Factory password
input
Setting
range
****
Minimm
unit
Factory
setting
Modification
limit
-
Refer
ence
47
Page 25
Section Six Description of function parameter
Section Six Description of function parameter
6.1 Basic function parameter Sort P00
Function
code
Name
Setting range
Unit
Factory
Modified
Selection of 0 Panel control RUN/STOP
operation
1 Operation control of external terminal 1
0
×
control mode 2 Host control
For connecting mode of operation command control of external terminal, please refer to
Chapter 3.5 and description relating to P02.00~P02.06 of Sort P02.
Function Name
Setting range
Unit Factory
Modified
code
1
0
×
P00.01
Setting mode 0 Keyboard POT
selection of 1 Number setting
2 Terminal VF
running
3 Terminal IF
frequency
4 Number keyboard + analog terminal
5 VF+IF
6 Control mode 1 of raising /down going
terminal
7 Control mode 2 of raising /down going
terminal
8 Control mode 1 of terminal pulse
9 Control mode 2 of terminal pulse
0: It is possible to set running frequency via potentiometer on operating panel in state of
running or power down.
1: Under running state of converter, user could modify setting frequency via△, ▽ on panel
directly, and save modified value into P00.02 automatically to renovate current frequency
of converter (noneffective during power down). Under running or powerdown state, current
frequency should be modified accompanying with modification of value of P00.02.
2: Control of Terminal VF
VF 为 is voltage signal input channel, of which seven kinds of analog signal input range are
optional. User could confirm corresponding relation between VF input voltage range and
setting frequency via modifying parameter of P02.09 function code.
Under this frequency setting mode, VF is used for individual frequency setting.
3: IF terminal control
IFis voltage/current signal input channel, of which seven kinds of signal input range are
optional. User could confirm corresponding relation between IF input voltage range and setting
frequency via modifying parameter of P02.10 function code.
Under this frequency setting mode, IF is used for individual frequency setting.
4: Number keyboard+analog terminal control
Under the mode, digital setting value of P00.02 function code is used as primary setting, while
setting value of one analog signal input of these two analog signal channel is used as secondary
setting, and summation of these two values is used as current setting frequency of converter.
These two setting values should be summarized only, if the setting mode is selected.
Under the setting mode, user could modify the part set via P00.02 function code (digital setting
value of current setting frequency) by using △,▽, confirm the setting value and save it into
P00.02 by pressing key of ENTER
Under running or powerdown state, digital setting value should be renovated if value of P00.02
is changed.
Under the setting mode, user needs to set this part set by analog signal via adjusting value of
P02.09~P02.12 according to actual condition.
For analog signal used as secondary setting, user could achieve secondary setting value by
multiplying frequency value of P02.09or P02.10 with value of P02.11
5: VF+IF control
Page 26
P00.00
Section Six Description of function parameter
Under the setting mode, user could set frequency of current converter via input of these two
analog signal channels, confirm one of these two analog channel as primary setting value via
value of parameter P02.12, confirm another analog channel as secondary setting value, and
achieve current setting frequency by summarizing these two values.
These two setting values should be summarized only, if the setting mode is selected.
Frequency value between analog signal of primary setting and corresponding parameter P02.09
or P02.10.
For analog signal used as secondary setting, user could achieve secondary setting value by
multiplying frequency value of corresponding parameter P02.09 or P02.10 with value of
parameter P02.11.
Explanation:
Under frequency setting mode of number keyboard+analog terminal and VF+IF:
1. In case that analog input signal of VF channel is ambipolar input, user could dispose it in
mode of absolute value, which should not include diversion information.
2. IF selects voltage/current signal input according to position of JP2jumper on control board.
If current input is selected, short-circuit block of JP2 jumper locate at side of I, and input
resistance of the channel is 500Ω.
3. Under VF+IF frequency setting mode, one of these two analog channels is used as primary
setting, and the other is used as secondary setting. Hereinto, one channel with no analog
signal input is allowable, and setting another channel to setting frequency value according
to value of P02.12 is allowable (set as secondary setting or primary setting).
4. In case that secondary setting channel is selected, user could achieve setting frequency of
secondary setting by summarizing secondary adjusting frequency value with frequency
value of primary setting. But the setting frequency is limited to upper frequency limit and
lower frequency limit.
5. Under VF+IF frequency setting mode, is input, after input secondary setting signal by
selected secondary setting channel (VF), system creates ambipolar secondary adjusting
value (define as percent of maximal frequency setting value), which should create
corresponding secondary adjusting frequency value to perform fine adjustment with setting
frequency of primary setting.
Relation among secondary setting, secondary adjusting volume, secondary adjusting frequency
value created by input signal of secondary setting channel is shown as following sheet:
Input signal of secondary Lower input signal value of Middle input signal value of Upper input signal value of
secondary setting channel secondary setting channel
secondary setting channel
setting channel
Secondary adjusting value
Min. secondary adjusting Middle secondary adjusting value Max. secondary adjusting
value
value
EX: set maximal frequency as 50 Hz; set input range of analog signal as 0 ~ 10 V;
Set secondary adjusting value as 10 % (refer to function code of P02.16);
Voltage setting signal, secondary adjusting value, secondary adjusting frequency value input via secondary setting channel
are:
0 ~ 10 V
0V
5V
10 V
10%
10%
10 %
10 %
Secondary
adjusting 0 Hz
2.5 Hz
5 Hz
frequency value.
Page 27
Section Six Description of function parameter
6: Control mode 1 of up/down terminal
Under the mode, user could set current frequency of converter via setting function of external
control terminal. The connection diagram is shown as following if setting 6、7 via frequency
setting mode
Figure 6.1.1 Connection diagram of 6、7 frequency setting mode
Relation between state setting of two external switches and current frequency of converter is
shown as following sheet:
Open/Close state of UP terminal
Open
Close
Open/Close state of DOWN Open Close
Open
Close
terminal
Current frequency
Hold Decrease continuously
Increase continuously
Hold
(To lower frequency limit) (To upper frequency limit)
Under the setting mode: Current setting frequency of converter is set to zero automatically
every time after powerup. And converter sets current frequency as zero after received STOP
and executed powerdown process. These two external terminals should be invalid in
powerdown state or in process of powerdown.
7. Control mode 2 of up/down terminal
The basic operation is same as Control mode 1 of up/down terminal, but differ from:
Current setting frequency of converter is saved automatically during execution of powerdown
command after received STOP, which is used as initial setting value of next operation.
8: Control mode 1 of terminal pulse
Function of external terminal is defined as Control mode 1 of up/down terminal, but differ
from:
Connection diagram is shown as following if 8、 9 frequency setting mode is selection.
Figure 6.1.2 Connection diagram of 8、 9 frequency setting mode
Under the setting mode: setting frequency increases/decreases for one time each time after
received a pulse signal, of which P01.23 setting value apart from time. Current frequency is set
as zero automatically every time after powerup. And converter sets current frequency as zero
after received STOP and executed powerdown process. These two external terminals should be
invalid in powerdown state or in process of powerdown.
Page 28
Section Six Description of function parameter
9. Control mode 2 of terminal pulse
Setting frequency increases/decreases for one time each time after received a pulse signal, of
which P01.23 setting value apart from time. The basic operation is same as Control mode 1 of
up/down terminal, but differ from:
Current setting frequency of converter is saved automatically during execution of powerdown
command after received STOP, which is used as initial setting value of next operation.
Explanation:
1. Under following operating mode, running frequency of converter apart from these ten
frequency setting modes and frequency setting value abovementioned:
Inch running frequency, multi-speed running frequency, and programmable multi-speed
running
Function
code
Name
Setting range
Unit
Factory
Modification
Keyboard
0.00~upper frequency
0.01Hz 50.00Hz
O
frequency setting
limit
Panel control
0 Corotation
P00.03
1
0
O
Running direction
1 Reversion
Upper frequency
P00.04
50.00~400.0Hz
0.01Hz 50.00Hz
×
limit
Rated frequency
25.00~ upper frequency
P00.05
0.01Hz 50.00Hz
×
of motor
limit
Rated voltage of
P00.06
100~450V
1V
220V
×
motor
Upper frequency limit denotes upper allowable frequency output by converter, shown as Fmax
in figure 6.1.7. Rated input voltage of motor is corresponding to voltage of motor running in
rated frequency.
Function
Name
Setting range
Unit Factory Modification
code
V/Fcurve 0 linear
2 square 2
P00.07
1
0
×
mode
1 square 1 3 double broken line mode
In figure 6.1.3, figure 6.1.4, figure 6.1.5, and figure 6.1.6, curve 1 denotes V/F curve after
plused torque offset voltage under respective V/F curve mode; and curve 2 denotes V/F curve
without addition of offset voltage under respective V/F curve mode.
P00.02
0: Linear mode
Figure 6.1.3 Constant torque V/F curve
Page 29
Section Six Description of function parameter
1: Square 1 mode
Figure 6.1.4 Degressive torque mode 1
2: Square 2 mode
Figure 6.1.5 Degressive torque mode 2
3: Double broken line mode
User could custom V/F curve mode via setting parameter P00.09, P00.10, according to actual
requirement.
Figure 6.1.6 Broken line V/F curve
Explanation:
For general load, curve 0 is optional; for square torque equipment, such as pump, the curve 1 is
optional.
Function code
Name
Setting range Unit Factory Modification
P00.08
Torque offset voltage 0~30%
1%
3%
×
For offsetting low frequency torque characteristic, system should raise output voltage in low
frequency operating zone, shown as Vb in figure 6.1.3,
Page 30
Section Six Description of function parameter
Figure 6.1.4, Figure 6.1.5, and Figure 6.1.6.
Explanation:
In general condition, 3% of default value could meet requirement. For overcurrent fault occurs
during starting up, please increase the parameter value from zero step by step until starting
requirement is achieved. Do not raise parameter value at one moment to prevent from damage
of equipment.
Function
Name
Setting range
Unit
Factory Modification
code
P00.09
Middle voltage
0~100%
1%
50%
×
P00.10
Middle frequency 0~rated frequency of motor 0.01Hz 25.00Hz
×
Set middle voltage and middle frequency in any V/F curve required by user. And enter into
broken line mode if parameter P00.07 is 3.
Middle voltage is percent of rated voltage of motor, namely, Vm in Figure 6.1.6.
Middle frequency is a frequency value between lower frequency limit and rated frequency of
motor, namely, Fm in Figure 6.1.6.
Function
Name
Setting range
Unit
Factory
Modification
code
P00.11
Acceleration time 1
0.1~3600S
0.1S
Type (*1)
O
P00.12
Deceleration time 1
0.1~3600S
0.1S
Type (*1)
O
Acceleration time 1 denotes time required for raise to upper frequency limit from "forbid” state,
namely, T1 in Figure 6.1.7.
Deceleration time 1 denotes time required for decreasing maximal output frequency to “forbid”
state, namely, T2 in Figure 6.1.7.
Figure 6.1.7 Definition of acceleration time and deceleration time
Following figure is switch process of acceleration time and deceleration time:
Figure 6.1.8 Switch of acceleration time and deceleration time
Page 31
Section Six Description of function parameter
Function
code
Name
Setting range
Unit
Factory
Modification
Upper frequency Lower frequency limit ~
0.01Hz 50.00Hz
O
limit
maximal frequency
Lower frequency 0.00~Upper
frequency
P00.14
0.01Hz 0.00Hz
O
limit
limit
Upper frequency limit denotes maximal setting frequency allowed by user, namely, UF in
figure 6.1.9.
Lower frequency limit denotes minimal setting frequency allowed by user, namely, LF in figure
6.1.9.
P00.13
Figure 6.1.9 Schematic diagram for definition of limit frequency parameter
Explanation:
1.
Please set maximal frequency, upper frequency limit, lower frequency limit carefully
according to nameplate parameter and operating condition of controller motor.
2.
Limited range of lower frequency limit and upper frequency limit are noneffective for
operation of JOG.
3.
Besides upper frequency limit, lower frequency limit, output frequency of converter is
also limited by setting value of starting frequency, starting frequency of DC brake, and
jump frequency.
4.
Output frequency of converter should run with lower frequency limit if setting frequency
is lower than lower frequency limit; Output frequency of converter should run with upper
frequency limit if setting frequency is higher than upper frequency limit.
Function code
Name
Setting range Unit Factory Modification
Lower frequency limit
0 Stop
P00.15
1
0
×
Running mode
1 Run
Page 32
Section Six Description of function parameter
6.2 Secondary function parameter Sort P01
Function
code
Name
Setting range
Unit
Factory
Modification
Starting
0.00~10.00Hz
0.01Hz 0.00Hz
O
frequency
Frequency function, switch converter into operating state from state of powerdown: running
frequency in case of 1st powerup, power recovery after instantaneous power down, reset after
fault, free stop, and normal stop etc.
Function
Name
Setting range
Unit
Factory Modification
code
Starting frequency
P01.01
0.0~10.0S
0.1S
0.0S
O
Holding time
0 Decelerative stop
P01.02
Stop mode
1
0
×
1 Free stop
0: Decelerative stop
Converter should perform decelerative stop according to preset deceleration time and mode via
decreasing output frequency after received command of “STOP”.
During decelerative stop, output frequency of converter should jump to zero if set frequency is
lower than starting DC brake frequency (refer to P01.03); at this time, converter should
perform DC brake and stop working after implement if function of DC brake is selected; or
stop working directly.
The mode is mainly used for general deceleration stop or condition that rapid brake is required
(external brake resistance or brake unit is required).
1: Free stop mode (free running stop)
Converter stop output immediately after received stop command; and motor stop freely with
inertia.
It is general to adopt external mechanical band brake to achieve rapid stop.
Function
Name
Setting range
Unit
Factory Modification
code
Starting frequency
P01.03
0.00~10.00Hz
0.01Hz 0.00Hz
×
of DC brake
Starting frequency of DC brake: it denotes the transition point frequency of converter while
abruptly drop output frequency to zero along with deceleration curve during process of
deceleration and stop, namely, Fd in Figure 6.2.1.
During deceleration and stop process, output frequency jump to zero while setting frequency is
lower than starting frequency of DC brake, and deactivate DC brake function set by converter.
Starting frequency of DC brake is effective in deceleration process while switching between
corotation and reversion.
If DC brake function is selected, the stopping frequency is starting frequency of DC brake.
If no running condition offers strict requirement on stopping brake, please set starting
frequency of DC brake as smaller as possible.
Function code
Name
Setting range
Unit
Factory Modification
P01.04
DC brake voltage 0~15%
1%
0%
×
P01.05
DC brake time
0.0~20.0S
0.1S
0.0S
×
DC brake time: time for output DC brake voltage during stopping process of converter.
Explanation:
Parameter of DC brake time is noneffective if DC brake with external terminal is selected.
DC brake is noneffective if DC brake time is set as 0.0S, or DC brake voltage is set as 0%.
P01.00
Page 33
Section Six Description of function parameter
Function
code
Name
Setting range
Unit
Factory
Modification
Dead time of corotation
0.0~20.0S
0.1S
0.0S
O
and reversion
Dead time of corotation and reversion: it denotes waiting time and holding time of converter in
process of decreasing output frequency to zero during direction switch after received reverse
running command, shown as T0 in figure 6.2.1.
P01.06
Figure 6.2.1 Dead time of corotation and reversion
Function
code
Name
Setting range
Unit
Factory
Modification
Stop mode selection of 0 Unforced stop
1
1
O
external fault
1 Powerdown mode
Explanation:
1.
Stop in stopping mode denotes stop according to setting of P01.02.
2.
Free stop denotes converter stop output after received stop command; and motor stop
freely with inertia
Function
Name
Setting range
Unit
Factory Modification
code
Power switch
0 No action
P01.08
1
0
×
function
1 Act
0: No action, forbid converter restarting motor after instant power failure or recovery of
powerdown.
1: Act, allow converter automatically execute power switching function after instant power
failure or recovery of powerdown.
Explanation:
In case that P01.08=1: under keyboard control mode, converter automatically executes
power-switching function to recover power supply after powerdown and instant poweroff.
Under control mode of external terminal, power-switching function should be noneffective if
current combination state of FWD/REV is noneffective during power recovery after
powerdown and instant poweroff.
Function
Name
Setting range
Unit Factory Modification
code
Waiting time for power
P01.09
0.1~20.0S
0.1S
2.0S
×
switching function
During waiting time for power switching function, motor should start up once running
command is output. The time setting principle is mainly based on operation recovery time of
devices relating to converter.
P01.07
Page 34
Section Six Description of function parameter
Function
code
Name
Setting range
Unit
Factory
Modification
Waiting time for test recovery
1~60S
1S
5S
×
of fault.
P01.11
Time for test recovery of fault. 0~3
1
3
×
Converter stop outputting if fault occurs during operation; converter should reset fault
automatically and go on running by setting reset interval via P01.10.
Time of automatic reset is set via P01.11, which denotes allowable time of automatic reset
before manual reset or electrifying operation of next time, namely, system should perform
automatic reset before time parameter decreases to Zero, except manual reset or reset via reset
signal of external terminal is executed.
The parameter should recover to original setting value after manual reset or external terminal
reset is executed.
Function
Name
Setting range
Unit
Factory Modification
code
P01.12
Bias frequency
-50.0 ~ +50.0Hz
0.1Hz
0.0Hz
×
It is possible to set output frequency via adjusting bias frequency P01.12 and frequency setting
gain P01.13 under frequency setting of analog signal. Output frequency = analog
signal×frequency setting gain+bias frequency.
P01.10
Figure 6.2.2 Bias frequency
Function
Name
Setting range Unit Factory Modification
code
P01.13
Frequency setting gain
1~200%
1%
100%
×
It denotes compensation while analog signal is lower than 5V/10/20mA. EX: it is possible to
achieve 0~HF adjustment if frequency setting gain is 200%, no matter whether input signal
achieve 2.5V/5V/12mA.
Figure 6.2.3 Frequency setting gain
Page 35
Section Six Description of function parameter
Function
Name
Setting range
Unit
Factory
Modification
code
P01.14
Inch frequency
0.1~50.00Hz
0.01Hz
2.00Hz
O
P01.15
Inch acceleration time 0.1~60.0S
0.1S
1.0S
O
P01.16
Inch deceleration time 0.1~60.0S
0.1S
1.0S
O
P01.14~P01.16 denotes parameter of inch running, shown as figure 6.2.4.
In figure, ft is inch running frequency, t1 is inch acceleration time, t3 is inch deceleration time,
t2 is inch running time, which is obtained via subtracting inch acceleration time from the time
interval between effective and noneffective inch running command executed by panel or
external terminal.
User could perform inch running command via operating panel and control terminal.
Figure 6.2.4 Inch running parameter
Function code
Name
Setting range
Unit
Factory Modification
P01.17
Acceleration time 2
0.1~3600S
0.1S
1.0S
O
P01.18
Deceleration time 2
0.1~3600S
0.1S
1.0S
O
P01.19
Acceleration time 3
0.1~3600S
0.1S
1.0S
O
P01.20
Deceleration time 3
0.1~3600S
0.1S
1.0S
O
P01.21
Acceleration time 4
0.1~3600S
0.1S
1.0S
O
P01.22
Deceleration time 4
0.1~3600S
0.1S
1.0S
O
User could select acceleration time/deceleration time 1, 2, 3, 4 (define acceleration
time/deceleration time in P00.11、P00.12) as acceleration time/deceleration time in running
process of converter via control terminal. As well as define them as acceleration
time/deceleration time for frequency switching in each stage of simple PLC operation, please
refer to function code P02.19、P02.23、P02.27、P02.31、P02.35、P02.39、P02.43 in P02
parameter sort.
Function
Name
Setting range
Unit
Factory Modification
code
UP/DOWN
P01.23
0.01 ~ 2.50 Hz/S
0.01Hz/S 1.0Hz/S
×
Setting speed
Increase/decrease volume of setting frequency while setting frequency via UP/DOWN terminal.
Increase/decrease volume of setting frequency while setting frequency via external pulse
control, which is foreign to time.
Page 36
Section Six Description of function parameter
6.3 Sort P02-Input/output terminal and multi-speed running function
Function
code
Name
Setting range
Running control
0 Dual-wire control mode 1
selection of
1 Dual-wire control mode 2
P02.00
external
2 Three-wire control mode
terminal
0: Dual-wire control mode 1
1:
Unit
Factory
Modification
1
0
×
Figure 6.3.1 Dual-wire control mode 1
Dual-wire control mode 2
Figure 6.3.2 Dual-wire control mode 2
2: Three-wire control mode—selfhold function
Figure 6.3.3 Three-wire control mode
Page 37
Section Six Description of function parameter
In figure 6.3.3, SB1 is NC stop button, SB2 is NO running button, SB1 and SB2 is pulse edge
effect; K is running direction button; Di is the terminal in D1~D4 defined as terminal of
three-wire control mode (6).
Function
code
Name
Setting range
Unit
Factory
Modification
0 Unused
1 Multi-speed terminal 1
D1 terminal 2 Multi-speed terminal 2
P02.01
1
1
×
function
3 Multi-speed terminal 3
4 Inch control of corotation
5 Inch control of reversion
6 Three-wire control mode
7 Acceleration time/deceleration
D2 terminal time terminal 1
P02.02
1
2
×
function
8 Acceleration time/deceleration
time terminal 2
9 Free stop input
10 External reset input
11 Progressive increase of
D3 terminal frequency(up)
P02.03
1
3
×
function
12Decrease of frequency(down)
13 DC brake control
14 NO input of external fault
D4 terminal 15 NC input of external fault
1
6
×
P02.04
function
16 PLC pause
D1~D4 control terminal is programmable switching value input terminal. User could define
function of D1~D4 respectively via setting value of P02.01~P02.04, refer to sheet 1.
EX: Function of terminal D1 is defined as “Free stop input command” if P02.01=9; it is
possible to achieve function of free stop during operation if D2 is in state of ON.
Explanation:
A function is nonselectable after selected by a terminal, and programmable switching value
input terminal could select Nonfunction only (set to 0 synchronously).
1~3: Multi-speed running terminal
User needs to define three switch value input terminals as multi-speed running control terminal
if Multi-speed running is selected; select a multi frequency set in P02.16, P02.20, P02.24,
P02.28, P02.32, P02.36, P02.40 via combination state of ON/OFF of these three terminal,
which has precedence over frequency set via frequency setting mode of P00.01; stage
frequency selected by multi-speed running terminal is used as setting frequency of converter.
Please refer to explanation relating to this.
It is possible to achieve multi-speed control via external switch if P02.01=1, P02.02=2,
P02.03=3, shown as figure 6.3.2.
Page 38
Section Six Description of function parameter
Figure 6.3.4 Connection diagram of multi-speed operation
User could select multi-speed running frequency via combination of K1, K2, and K3 according
to sheet 1, shown as figure 6.3.5.
Figure 6.3.5 Schematic diagram of multi-speed operation
K3
OFF
Sheet 1
Multi-speed operation sheet
K2
K1
Frequency setting
OFF
OFF
No multi-frequency operation
OFF
OFF
ON
Multistage frequency 1(P02.16)
OFF
ON
OFF
Multistage frequency 2(P02.20)
OFF
ON
ON
Multistage frequency 3(P02.24)
ON
OFF
OFF
Multistage frequency 4(P02.28)
ON
OFF
ON
Multistage frequency 5(P02.32)
ON
ON
OFF
Multistage frequency 6(P02.36)
ON
ON
ON
Multistage frequency 7(P02.40)
4~5: Inch control of corotation and reversion
Under terminal control mode (P00.00=1), user could perform inch running control after defined
external terminal.
JOGF is corotation inch running (set one of function parameters P02.01~P02.04 as 4), JOGR
is reversion inch running (set one of function parameter P02.01~P02.04 as5), setting
Page 39
Section Six Description of function parameter
frequency of inch running and acceleration time/deceleration time is defined in parameter
P01.14~P01.16.
6: Three-wire running control
The function is used for defining input terminal for input of corotation/reversion running
command under control mode of external terminal (P00.00=1), and three-wire running mode is
selected. Please refer to P02.00, function introduction of three-wire running control.
7~8: Acceleration time/deceleration time terminal 1, 2
It is possible to achieve selection of 1~4 acceleration time/deceleration time via ON/OFF
combination of multi-speed Acceleration time/deceleration time terminal. Besides
programmable multi-speed running and inch running, converter should select acceleration
time/deceleration time 1 automatically if the function is undefined. For the state combination,
please refer to following sheet.
Acceleration
Acceleration
Selection of acceleration time /
time/deceleration
time/deceleration
deceleration time
time terminal 1
time terminal 2
OFF
OFF
Acceleration time 1/ Deceleration
time 1
ON
OFF
Acceleration time 2/ Deceleration
time 2
OFF
ON
Acceleration time 3/ Deceleration
time 3
ON
ON
Acceleration time 4/ Deceleration
time 4
9: Free stop input
Converter stops outputting immediately and enters into stop stage, motor stop freely if terminal
for defining the function is in stage of ON.
10: External reset input
User could reset the unit via external terminal is fault alarm occurs. The function is level effect
of input signal.
11~12: Increase/decrease frequency command
Please refer to explanation relating to frequency setting mode 6, 7, 8, and 9 in parameter
P00.01.
13: DC brake control
Converter should decrease output frequency according to deceleration stop mode after received
stop command if terminal for defining the function is in state of ON and function parameter
P01.03=0; converter should jump output frequency to zero if output frequency is lower than
starting frequency of DC brake, and perform DC brake control via parameter P01.04~P01.06.
14~15: NO input and NC input of external fault.
User could input fault signal of external device to execute fault monitor and interlock via the
terminal. After received fault signal of external device, converter should execute fault stop and
display fault code “EF”; the signal is noneffective during normal stop process. These two input
modes of NO, NC are optional for fault signal of external device. User could define D4 as NC
or NO.
16: Programmable multi-speed pause command.
After defined the function, the converter should achieve pause control with programmable
multi-speed running if the terminal is in state of ON, and recover running of it if the terminal is
in state of OFF, under state of programmable multi-speed running.
Page 40
Section Six Description of function parameter
Function
code
Name
Setting range
P02.05
DO function
selection
of
opencircuited
collector
output terminal
P02.06
Function
selection
of
relay
output
terminal
0 Running signal
1 Frequency achievement
signal
2 Frequency level detecting
signal
3 Overload alarm signal
4 External fault stop
5 Undervoltage stop
6 Output frequency reaches to
upper limit
7 Output frequency reaches to
lower limit
8 Programmable multi-speed
running is finished
9 Null speed running
10 Fault indicator
Unit
Factory
Modification
1
0
×
1
10
×
0: Running signal
Terminal outputs indicator signal under running state of converter.
1: Frequency reaches to detecting signal
Please refer to function explanation of P02.12.
2: Frequency level detecting signal
Please refer to function explanation of P02.13.
3: Overload alarm signal
Terminal outputs indicator signal under overload of converter.
4: External fault stop
Terminal outputs indicator signal and LED displays "EF” if these two output terminals of
switch received fault signal of external device during operation of converter.
5: Undervoltage stop
Terminal outputs indicator signal and LED displays “P.oFF”if DC bus voltage occurs is in state
of undervoltage.
6: Output frequency reaches to upper limit
Terminal outputs indicator signal if output frequency of converter reaches to lower frequency
limit.
7: Output frequency reaches to lower limit
Terminal outputs indicator signal if output frequency of converter reaches to upper frequency
limit.
8: Programmable multi-speed running is finished
Terminal outputs indicator signal for one second if a running stage of programmable
multi-speed running is finished.
9: Null speed running
Start up motor from null speed while starting converter.
10: Fault indicator
Send out indication during fault of converter.
Function
Name
Setting range
Unit
Factory Modification
code
Frequency reaches
P02.07
0.00~10.00Hz
0.01Hz 2.50Hz
O
to detecting width
Page 41
Section Six Description of function parameter
Figure 6.3.6 Frequency reaches to signal, or detecting width
Shown as figure 6.3.6, output indicator signal if output frequency is in positive, negative
detecting width of setting frequency.
Function
code
Name
Setting range
Unit
Factory
Modification
Frequency level
0.00~maximal
0.01Hz 10.00Hz
O
signal detection
frequency
Output indicator signal if output frequency exceeds a certain value.
During dropping process of output frequency, should go on outputting indicator signal until
output frequency drop to certain value, shown as figure 6.3.7.
P02.08
Figure 6.3.7 Schematic diagram of frequency level detecting signal
Page 42
Section Six Description of function parameter
Function
code
Name
P02.09
VF
selection of
analog
volume
input
terminal
Setting range
0
2
4
6
0~10V
0~5V
2~10V
–10V~+10V
1 10~0V
3 5~0V
5 10~2V
Unit
Factory
Modification
1
0
×
0 0~10V/0~20mA
1 10~0V/20~0mA
2 0~5V/0~10mA
P02.10
1
0
×
3 5~0V/10~20mA
4 2~10V/4~20mA
5 0~2V/20~4mA
Analog signal channel 1 (VF) is input terminal of voltage signal, into which input ambipolar
voltage signal is allowable.
Analog signal channel 2 (IF) is input terminal of voltage/current signal, of which position is
selected via JP1 jumper on control panel. Short-circuit block of jumper locate at side I while
inputting current signal.
Input/output characteristic of analog input signal and setting frequency for application of
frequency setting channel is shown as sheet 2
IF selection
of analog
volume
input
terminal
Sheet 2
Input/output characteristic of analog input signal and setting frequency
Relation between input
P02.09 P02.10
Input range of
Setting
Active
analog signal and setting
Setting Setting
VF and IF
frequency(f)range
mode
frequency
value value
0
0
0~10V or
0~Fmax
Positive
f
0~20mA
interaction
fmax
10V(20mA)
0
1
1
10~0V or
20~0mA
0~Fmax
Retroaction
f
fmax
0
2
2
0~5V or
0~10mA
V(I)
0~Fmax
Positive
interaction
V
10V(20mA)
f
fmax
0
5V(10mA)
V(I)
Page 43
Section Six Description of function parameter
3
3
5~0V or
10~0mA
0~Fmax
Retroaction
f
fmax
4
4
2~10V or
4~20mA
0~Fmax
Positive
interaction
f
fmax
0 2V(4mA)
5
5
10~2V or
20~4mA
0~Fmax
Retroaction
IF
-10V ~ +10V
UNDEF
V
10V(20mA)
f
fmax
0 2V(4mA)
6
V
10V(10mA)
0
- Fmax ~ Positive
interaction
+Fmax
V
10V(20mA)
f
fmax
-10V
0
10V
V
-fmax
Function
code
Name
Setting range
Unit
Factory
Modification
Setting of secondary
1.0%~20.0%
0.1%
1.0%
×
adjusting value
Selection of secondary 0: VF
P02.12
1
0
×
setting channel.
1: IF
These two function code are effective if P00.01=4, 5. under mode of number keyboard+analog
terminal and VF+IF, user could perform minitrim with secondary setting based on primary
setting. Setting frequency=primary setting frequency value+input signal of analog
terminal×setting value of secondary adjusting volume.
Function code
Name
Setting range
Unit Factory Modification
Analog output
0 Output frequency
P02.13
1
0
O
setting
1 Output voltage
P01.14
Analog output gain 0.50~2.00
0.01
1.00
O
CDI9100-S general converter adopts a analog volume output terminal (FM) to output voltage
signal of 0~10V.
Output frequency 0~maximal frequency, correspond to analog volume output of 0 ~10V.
Output voltage
0~rated voltage, correspond to analog volume output of 0 ~10V.
P02.11
Page 44
Section Six Description of function parameter
Function
code
Name
Setting range
Unit
Factory
Modification
P02.15
Setting of
programmable
multi-speed operation
(simple PLC)
0 No action
1 Single cycle
2 Continuous cycle
3 Keep final value
1
0
×
0: No action
1: Single cycle (stop after ran one cycle)
2: Continuous cycle (perform cycle operation continuously according set stage parameter).
3: Keep final value (run with setting frequency of final stage after ran for one cycle)
Except inch running, programmable multi-speed running has precedence over setting frequency
set via P00.01 frequency setting mode, and multi-speed running of external terminal.
f6
f2
f7
f5
f1
f3
f4
T1
T2
T3
T4
T5
T6
T7
Figure 6.3.8 Schematic diagram of programmable multi-speed running
Modificati
Name
Setting range
Unit
Factory
on
Running
Lower frequency limit~upper
frequency in
P02.16
0.01Hz 5.00Hz
O
frequency limit
stage 1
The function code sets running frequency in stage 1, which is used as setting frequency in stage
1 of programmable multi-speed running, or stage 1 of external terminal control mode.
Function
Name
Setting range
Unit
Factory Modification
code
Running
P02.17
direction in 0 Corotation 1 Reversion
1
0
O
stage 1
The function code sets running direction in stage 1, which is used as setting direction in stage 1
of programmable multi-speed running, while not used as it in stage 1 of external terminal
control mode.
Function
Name
Setting range
Unit
Factory Modification
code
Running time in
P02.18
0.0~3600S
0.1S
10.0S
O
stage 1
The function code sets total running time of stage 1 that is used as running time in stage1 of
programmable multi-speed running, which includes acceleration time/deceleration time in stage
1.
Functio
n code
Page 45
Section Six Description of function parameter
Function
code
Name
Setting range
Unit
Factory
Modification
Acceleration time/deceleration
1~4
1
1
O
time in stage 1
The function code is used for selecting time parameter P00.12~P00.13, P01.23~P01.28of
acceleration time/deceleration time in the stage.
1: Acceleration time/deceleration time 1, set by function code P00.11~P00.12.
2: Acceleration time/deceleration time 2, set by function code P01.17~P01.18.
3: Acceleration time/deceleration time 3, set by function code P01.19~P01.20.
4: Acceleration time/deceleration time 4, set by function code P01.21~P01.22.
P02.19
Note: P02.20~P02.43 is function parameter of stage2~stage 7, the explanation
is same as it of stage 1.
Explanation:
1.
Starting and stopping command of programmable multi-speed running is determined by
control mode of current running command (set via function code P00.00)
2.
User could jump over a certain stage if set the running time of the stage as Zero, via
which mode user could set stage number easily.
3.
After set switching volume input terminal as programmable multi-speed pause (function
16), user could achieve pause function of programmable multi-speed pause via the
terminal. Programmable multi-speed running should pause and converter runs in speed of
zero if the terminal is in state of ON; and converter recovers the stage prior to pause of
programmable multi-speed pause and go on running if the terminal is in stage of OFF.
4.
If function code P03.01=1(Reversion is forbidden), programmable multi-speed running is
forbidden if running direction of stage 1 is set as “Reversion”; and converter stops
running if running direction of middle stage is set as “Reversion”.
6.4 Sort P03 other function parameter
Function code
Name
Setting range
Unit
Factory
Modification
P03.00
CF adjustment
1~12 kHz
1kHz
Type (*2)
×
The function sets CF of PWM output, which has 12 kinds of switches (1~12) are optional.
Function
Name
Setting range
Unit
Factory Modification
code
P03.01
Reversion prevention 0 No action 1 Act
1
0
×
P03.02
Display factor setting 0.1~200.0
0.1
1.0
O
The function effects output frequency display only; display value =output frequency×display
factor setting.
Function code
Name
Setting range
Unit Factory Modification
0 Output frequency
1 Setting frequency
2 Output voltage
LED running
3 Bus voltage
P03.03
1
0
O
monitor content
4 Input signal
5 Feedback value
6 Module temperature
The function denotes selection of monitor content of LED on keyboard under running stage.
Page 46
Section Six Description of function parameter
Function
code
Name
Setting range
Unit
Factory
Modification
0 All data is modifiable
1 Only P00.02 and the function
P03.04
1
0
O
are modifiable
2 Only the function is modifiable
The function code is modifiable at any time; modification other functions code could be
displayed as “d.Err” only in stage of RO.
Function
Name
Setting range
Unit Factory Modification
code
0 No action
1 Clear memory information
Initialization 2 Factory reset
P03.05
1
0
×
of parameter (Remark: It is possible to display
function 2 only after press it
continuously for five seconds.
0: No action
Parameter modification is based on setting state of parameter write protection and current
operating state of converter.
1: Clear memory information
After set it to 1 and confirm the setting, converter should clear fault memory information.
The operation should clear all parameter memory between P04.08~P04.11, in the process,
LED should display “―――――” ; while reading function code value of P04.08~P04.11,
LED should display “NON”
2: Factory reset
After set it to 2 and confirm the setting (press △ for five seconds), converter should reset all
parameter value of P00~P03 to default value, and LCD should display “―――――”.
Parameter
write
protection
6.5 Sort P04 Display functional parameter
P04.00~P04.11 display current parameter of converter, of which display functions include:
Function code
P04.00
P04.01
P04.02
P04.03
P04.04
P04.05
Name
Output frequency
Setting frequency
Output voltage
Bus voltage
Input signal
Feedback value
Function code
P04.06
P04.07
P04.08
P04.09
P04.10
P04.11
Name
Module temperature
Cumulative operating time.
1st fault record
2nd fault record
3rd fault record
4th fault record
6.6 Sort P05 Factory parameter
Function
code
Name
Setting range
Minimum
unit
Factory
****
password input
Factory password input, display special function sort of factory.
P05.00
Factory
setting
Modification
limit
--
Page 47
Section Seven Fault recovery
Section Seven Fault recovery
7.1 Trouble shooting of motor
Please check out reason and adopt relevant measure if following problems occurs during
operation of motor.
Please contact agent of Delixi if these problems have not been solved via inspection and
measure.
Fault
Inspection signal
If power voltage is input onto power
terminal of R, S, T?
Motor
is irrotational
Measure if voltage at output terminals of U,
V, W is correct by using rectifier voltmeter?
If motor is locked because overload?
If fault displayed on manipulater screen?
If corotation or reversion command is
input?
If frequency setting signal is input?
Motor rotates in
reversed
direction
Motor
is
rotational, while
speed
transmission is
incapable
Rotate speed of
motor
(circle
/min) is too
higher or too
lower.
Rotate
speed
(circle
/min)is
unstable during
operation
of
motor
Page 48
If setting of running mode is correct?
If connections of terminal of U, V, W are
correct?
If corotation or reversion command is input
correctly?
If connection of frequency setting circuit is
correct?
If setting of running mode is correct?
If load is too bigger?
If rated value of motor (number of poles,
voltage) is correct.
If transmission ratio is correct?
If setting value of maximal output
frequency is correct?
Check if voltage among motor terminals is
decreased excessively?
If the load is too bigger.
If load alteration is too bigger?
If power supply network is stable?
Measure
Connect to power supply;
Electrify again after shutdown
power supply
Inspect voltage;
Check if terminal screw is fastened
firmly.
Electrify again after shutdown
power supply
Reduce load and eliminate lock.
Inspect fault according to fault
sheet.
Inspect connection
Correct connect
Inspect frequency setting voltage.
Input setting correctly
Connect according to phase order
of U, V, W of motor.
Correct connect
Correct connect
Check selection of running mode
by using manipulater
Decrease load
Check technical parameter on
nameplate of motor.
Check variable unit (gear etc.)
Check setting value of maximal
output frequency
Check V/F characteristic value
Decrease load
Decrease load alteration
Increase motor capability
converter.
Check bus voltage
of
Section Seven Fault recovery
7.2 Fault diagnosis and recovery of converter
Fault display
Explanation
Details
Module fault
Automatic
module
protection
caused
in
external fault of converter.
Overvoltage
DC voltage of main loop
exceed
setting
value
during
constantrate
operation of converter.
Under
voltage
Voltage
of
bus
is
inadequate
during
operation.
Inspect level: 180AC
Overheat
Radiator
temperature
inspection value (80℃
about, from temperature
switch)
Measure
Inspect coil resistance of
motor.
Inspect insulation of motor.
Breakage
of
inverter
module.
Inspect level, 400VDC
about
Extend deceleration time.
If input voltage is too
higher.
If bus voltage is displayed
correctly.
Inspect power connection.
Correct input voltage.
If input voltage is too lower.
If voltage of bus is
displayed correctly.
Inspect blower and ambient
temperature
Ventilation condition of
radiator,
Remove dirt from inlet of
radiator.
Page 49