1
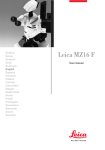
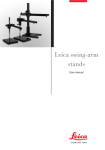
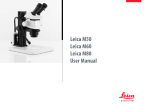
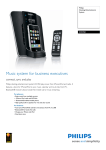
Leica
MZ16 FA
User manual
Dear User,
Dear User,
We thank you for your faith in our product, and
hope it brings you both enjoyment and success.
With the new Leica MZ16 FA from Leica Microsystems, you have purchased the best fluorescence stereomicroscope on the market. Discover
how you will automatically gain more information
faster using the world’s first motorized, automated, fully apochromatic fluorescence stereomicroscope. The Leica MZ16 FA controls the filter
changer, zoom, focus, UV shutter and double iris
diaphragm at the touch of a button, and replicates
your multifluorescence experiments very quickly,
exactly and ergonomically. The Leica MZ16 FA is
the highest-performance fluorescence stereomicroscope with the greatest zoom (16:1), the
highest resolution (840 Lp/mm), the highest magnification (115× with standard optics), a patented
illumination and filter system for the most intense
fluorescence, and the HL RC™ high-performance
transmitted-light base for excellent contrast.
2Leica MZ16 FA – User manual
2
In developing our instruments, we place great
value on simple, self-explanatory operation.
However, please take the time to read the user
manual and the operating safety information to
become familiar with the advantages and options
of your Leica MZ16 FA high-performance stereomicroscope, so that you can use it optimally and
safely.
Should you ever have any questions, please
consult your local Leica representative. You will
find the address of your nearest local representative, as well as valuable information about
Leica Microsystems products and services,
from Leica Microsystems on our web site at
www.leica-microsystems.com. We are gladly at
your service. Customer service is a big thing with
us. Not only before the sale, but afterwards as
well.
Leica Microsystems (Switzerland) Ltd
Business Unit Stereomicroscopy
www.stereomicroscopy.com
Leica MZ16 FA – User manual
Operating controls
7
6
5
4
3
2
8
1
Fig. 1 Leica MZ16 FA with ErgoTube®
1
2
3
4
Display with function keys
Motorized filter changer with four filter holders
Filter holder for an individually selectable filter
ErgoTube® with variable viewing angle of
10° – 50
5 Adjustable eyepiece tubes for adjusting the
interpupillary distance from 52–76mm
6 Knurled rings to adjust diopters from +5 to –5
7 Adjustable and attachable eyecups
8 Motorized focus system on/off switch
Additional operating controls, see page 38.
3
Leica MZ16 FA – User manual
Contents
Page
1. Safety concept . . . . . . . . . . . . . . . . . . . . . . . . . . .
1.1 The user manual . . . . . . . . . . . . . . . . . . . . . . . . .5
1.1.1 Diagrams . . . . . . . . . . . . . . . . . . . . . . . . . . .5
1.1.2 Symbols used . . . . . . . . . . . . . . . . . . . . . . .6
1.2 Safety instructions . . . . . . . . . . . . . . . . . . . . . . .6
1.3 Light source . . . . . . . . . . . . . . . . . . . . . . . . . . . . .9
2.
Overview of the instrument . . . . . . . . . . . . . .10
3. Assembly . . . . . . . . . . . . . . . . . . . . . . . . . . . . . . . .
3.1 Assembly sequence . . . . . . . . . . . . . . . . . . . . .12
3.1.1 Assembly diagram . . . . . . . . . . . . . . . . . .13
3.2 Assembly of stereomicroscope with stand . .14
3.2.1 Video/photo tube . . . . . . . . . . . . . . . . . . .14
3.2.2 UV protection screen . . . . . . . . . . . . . . .15
3.3 Light source . . . . . . . . . . . . . . . . . . . . . . . . . . . .15
3.3.1 Lamp housing 106 z . . . . . . . . . . . . . . . . .15
3.3.2 Supply units . . . . . . . . . . . . . . . . . . . . . . .15
3.4 Electrical connections . . . . . . . . . . . . . . . . . . .16
3.5 Equipping the filter changer . . . . . . . . . . . . . . .16
3.5.1 Filter sets for fluorescence . . . . . . . . . .17
3.5.2 Filter holders without transponders . . .17
3.5.3 Inserting the filter . . . . . . . . . . . . . . . . . .17
3.5.4 Slot for filter slide . . . . . . . . . . . . . . . . . .17
4
4. Operation . . . . . . . . . . . . . . . . . . . . . . . . . . . . . . . . . .
4.1 Functional principle . . . . . . . . . . . . . . . . . . . . .18
4.2 Starting up . . . . . . . . . . . . . . . . . . . . . . . . . . . . .18
4.2.1 Disconnecting from the power supply . .18
4.3 Button functions of the Leica MZ16 FA . . . .19
4.3.1 Menu selection OPT . . . . . . . . . . . . . . . .19
4.4 Motorized functions . . . . . . . . . . . . . . . . . . . . .20
4.5 Manual controls . . . . . . . . . . . . . . . . . . . . . . . .20
4.5.1 Changing button assignments . . . . . . . .21
4.5.2 Zoom (changing magnification) . . . . . .21
4.5.3 Focusing . . . . . . . . . . . . . . . . . . . . . . . . . .21
4.5.4 Filter change . . . . . . . . . . . . . . . . . . . . . .21
4.5.5 UV shutter . . . . . . . . . . . . . . . . . . . . . . . . .22
4.5.6 Double iris diaphragm . . . . . . . . . . . . . .22
4.5.7 Storing, activating, and
deleting current settings . . . . . . . . . . . .22
4.5.8 A typical work process . . . . . . . . . . . . . .23
4.5.9 Observation without fluorescence . . . .24
4.6 Footswitch . . . . . . . . . . . . . . . . . . . . . . . . . . . . .24
4.7 Dioptric correction . . . . . . . . . . . . . . . . . . . . . .25
4.8 Focusing and observing the specimen . . . . .25
4.8.1 Reflexes . . . . . . . . . . . . . . . . . . . . . . . . . .26
4.9 Calibrating the motorized zoom . . . . . . . . . . .26
4.10 Measuring . . . . . . . . . . . . . . . . . . . . . . . . . . . . .28
4.10.1 Selecting the reference circle
and unit of measure . . . . . . . . . . . . . . .28
4.10.2 Measuring . . . . . . . . . . . . . . . . . . . . . . . 28
5.
5.1
5.2
5.3
5.4
Annex . . . . . . . . . . . . . . . . . . . . . . . . . . . . . . . . . . .
Filter sets . . . . . . . . . . . . . . . . . . . . . . . . . . . . . .29
Electrical connection diagrams . . . . . . . . . . .30
Technical data . . . . . . . . . . . . . . . . . . . . . . . . .31
Optical data . . . . . . . . . . . . . . . . . . . . . . . . . . . .39
Leica MZ16 FA – User manual
1. Safety concept
1.1 The user manual
Included with your Leica MZ16 FA fluorescence
stereomicroscope is an interactive CD-ROM with
all pertinent user instructions in German, English,
French, Spanish, Italian, Portuguese, Dutch,
Danish, Swedish, Finnish and Greek. Keep it in a
safe place, and readily accessible to the user.
User manuals and updates are also available for
you to download and print from our web site at
www.stereomicroscopy.com.
The Leica MZ16 FA is the motorized and automated fluorescence stereomicroscope of the
Leica M stereomicroscope series. This operating
manual describes the special functions of the
Leica MZ16 FA and contains important instructions for its operational safety, maintenance, and
accessories. Like all instruments of the Leica M
stereomicroscope series, the Leica MZ16 FA consists of modules, which allow an almost unlimited
variety of custom equipment configurations.
The identical modules, such as stands, binocular
tubes, accessories, etc. are described in User
Manual M2-105-0 for Leica M stereomicroscopes,
which also contains additional safety instructions
pertaining to the stereomicroscope, accessories
and electrical accessories, as well as care
instructions.
Before installing, operating or using the
instruments, read the user manuals listed above.
In particular, please follow all safety instructions.
To maintain the unit in its original condition and to
ensure safe operation, the user must follow the
instructions and warnings contained in these user
manuals.
1.1.1 Diagrams
(1.2) Numbers in parentheses within the descriptions pertain to diagrams and the items in the diagrams. Example (1.2): Figure 1 is located on page 3,
and item 2 is the filter changer.
Special manuals are provided for a number of
accessories:
– User Manual M2-216-1 for lamp housing with
high-pressure mercury burner.
– User Manual for ebq 100 isolated supply unit
for 100W high-pressure mercury burners.
– User Manual M2-267-1 for the motorized focus
system.
Leica MZ16 FA – Safety
User manual
concept 5
5
1.1.2 Symbols used
1.2 Safety instructions
Description
Warning of a danger
This symbol indicates especially important
information that, if not observed,
– can cause hazards to personnel,
– can lead to functional disturbances and
damaged instruments.
Warning of hazardous electrical voltage
This symbol indicates especially important information that, if not observed,
– can cause hazards to personnel,
– can lead to functional disturbances and
damaged instruments.
Danger due to hot surface
This symbol warns against touching hot surfaces,
e.g. those of light bulbs.
Important information
This symbol indicates additional information or
explanations that intend to provide clarity.
Action
왘 This symbol refers to actions described in the
text that are to be carried out.
Additional notes
• This symbol indicates additional notes and
explanations provided in the text.
6
The Leica MZ16 FA is a motorized fluorescence
stereomicroscope with 16:1 zoom, digital display
and automatic functions for fluorescence applications. The optics system consists of 2 observation
beam paths, a patented TripleBeam® third beam
path specifically for fluorescence illumination and
the patented FLUOIII® filter system. The entire
imaging system, including the 16:1 zoom, objective
and ErgoTube® is apochromatically corrected.
Motorized zoom, filter changer, shutter and double
iris diaphragm are motorized. They can be controlled manually, and their positions can be stored.
The Leica MZ16 FA consists of these modules:
– Motorized stereomicroscope
– Stand, binocular tube, objective, eyepieces and
(if applicable) accessories for photography, etc.
– Power supply
– Filter sets with barrier and excitation filters on
one filter holder with transponder
– Three filter holders without transponder for
transmitted light observation and protection
from UV light
– Filter holder for individual filters
– UV protection screen
– 106 z lamp housing with 50W or 100W highpressure mercury burner with stray-light
protection
– Supply unit
Leica MZ16 FA – Safety concept
Permitted uses
Place of use
With the Leica MZ16 FA fluorescence stereomicroscope, entire fluorescent specimens can be
examined three-dimensionally and unprepared,
manipulated, sorted and documented. The separate beam path for the fluorescence illumination
in the Leica MZ16 FA as well as the very bright
high-pressure mercury burner and specially
selected filter sets enable you to distinguish the
finest structures and enhance the quantity of
information for incident light fluorescence. Special filter holders also enable observation without
fluorescence in transmitted light or incident light.
– The Leica MZ16 FA may only be operated in
a closed, dust-free room, which is free of oil
vapors and other chemical vapors, as well
as extreme humidity, and within a temperature
range of +10 to +40.
– Electrical components must be assembled at
least 10cm away from the wall and from flammable substances.
– Large temperature fluctuations, direct sunlight
and vibrations should be avoided. These conditions can distort measurements and micrographic images.
– Stereomicroscopes in warm and warm-damp
climatic zones require special care in order to
prevent the build up of fungus.
Non-intended use
If the Leica MZ16 FA, its components and accessories are used other than as described in the
user manual, injury or property damage may
occur. Never:
– Install other plugs or cables.
– Change, rebuild or take apart parts, if not
specifically instructed to in this in the manual.
– Allow unauthorized persons to open parts.
– Use the MZ16 FA for examining, or operating
on the human eye.
The devices and accessories described in this
operating manual have been tested for safety and
potential hazards. The responsible Leica affiliate
or the main plant in Wetzlar must be consulted
whenever the device is altered, modified or used
in conjunction with non-Leica components that
are outside of the scope of this manual.
Unauthorized alterations to the device or noncompliant use shall void all rights to any warranty
claims!
Leica MZ16 FA – Safety
User manual
concept
Responsibilities of the person(s) in charge of
instrument
Ensure that
– the Leica MZ16 FA and accessories are operated, maintained and repaired only by authorized and trained personnel.
– the operating personnel has read, understands,
and is observing these instructions as well as
those listed on page 5, and, in particular, the
safety instructions.
Transport
– Use the original packaging for shipping or
transporting the stereomicroscope and its
accessory components.
– In order to prevent damage from vibrations,
disassemble all moving parts that (according to
the user manual) can be assembled by the customer and pack them separately. These include
the objective, binocular tube, eyepieces, lamp
housing, burner in the 106 z lamp housing, etc.
7
Repairs and servicing
– Only Leica Microsystems-trained service technicians, or technical specialists assigned by
the person in charge of the instrument, are
permitted to carry out repairs.
– Only original Leica Microsystems spare parts
may be used.
– Disconnect the power cable before opening voltage-carrying parts, such as the Leica MZ16 FA,
the power supply or the supply unit.
Touching the live circuit can cause injury.
Installation in third-party products
When installing Leica products into third-party
products, note the following:
The manufacturer of the complete system or its
dealer is responsible for following all applicable
safety instructions, laws and guidelines.
Health risks
Workplaces with stereomicroscopes both
improve and make visual tasks easier, but they
also place high demands on the human visual
apparatus and the muscular "holding apparatus"
of the user. Depending on the duration of uninterrupted work, asthenopia and musculoskeletal
problems may occur. For this reason, appropriate
measures for reduction of the workload must be
taken:
– Optimal arrangement of workplace, work
assignments and work flow (changing tasks
frequently).
– Thorough training of the personnel, giving
consideration to ergonomic and organization
aspects.
The ergonomic design and construction of Leica M
series stereomicroscopes are intended to reduce
the exertion of the user to a minimum.
Disposal
– The product must be disposed of in accordance
with locally applicable laws and regulations.
– Dispose of used high-pressure mercury burners as hazardous waste.
Legal requirements
Direct contact with eyepieces is a potential
transmission method for bacterial and viral infections of the eye.
The risk can be kept to a minimum by using personal eyepieces for each individual or detachable
eyecups.
Adhere to general and local regulations relating to
accident prevention and environmental protection.
Conformity with European Community directive
The Leica MZ16 FA and its accessories are constructed in accordance with the latest technologies and are provided with a statement of conformity with EC requirements.
8
Leica MZ16 FA – Safety concept
1.3 Light source: safety instructions
Precautions by the manufacturer
Lamp housing
– UV protection screen in front of the specimen
plane prevents the user from looking directly
into the UV rays.
– Automatic shutter locking during rotation of the
filter changer, observation without fluorescence and removal of the filter holders prevents UV radiation from reaching the eyes.
– Filter holders without transponders in the free
positions of the rapid filter changer prevent
direct UV radiation from reaching the eyes.
– UV filters in the observation beam path protect
the eyes.
– The stray-light protection on the lamp housing
prevents irradiation of the hands.
The Leica MZ16 FA may be used only together
with the Leica 106 z lamp housing for the 100W or
50W mercury burner, supply unit and stray-light
protection.
Warning
UV radiation can harm the eyes.
Therefore:
– Never look into the light spot on the specimen
plane without a UV protection screen.
– Always fill all of the filter positions with filter
holders.
– Fill the empty filter positions with filter holders
without transponders.
– Do not select a white, strongly reflective
background for the stage.
– Never open the lamp housing while the lamp
is switched on.
Risk of explosion, UV exposure, blinding!
Leica Microsystems accepts no liability for
damages resulting from the use of lamp housings
from other manufacturers.
– Never open the lamp housing while the lamp is
switched on. Unplug the supply unit from the
power supply:
Risk of explosion, UV exposure, blinding!
– Before opening the lamp housing, allow it to
cool off for at least 15 minutes.
Danger of explosion, danger of burns.
– Never cover the air duct on the lamp housing.
Danger of fire!
– Use the stray-light protection.
Danger to eyes from UV radiation.
Supply unit
Always unplug the supply unit from the power
supply:
– When installing and disassembling the lamp
housing
– Before opening the lamp housing
– When replacing the high-pressure mercury
burner and other parts, such as the heatabsorbing filter or the collector
– During maintenance work on the supply unit.
Leica MZ16 FA – Safety concept
9
2. Overview of the instrument
9
8
12
5
2
4
10
3
11
16
1
14
Fig. 2 Left side of the Leica MZ16 FA with ErgoTube® from the user’s perspective
1 Stand (transmitted or incident light stand with
corresponding illumination). Pictured here is
the HL RC™ transmitted-light base for best
relief contrast.
2 Focusing drive: motorized focus system with
column (pictured) or manual coarse/fine drive
(see User Manual M1-105-0)
3 Focusing stop
4 Microscope carrier
10
5 The Leica MZ16 FA with two observation beam
paths and a TripleBeam® third beam path,
motorized FLUOIII® filter system and adapter for
106 z lamp housing
6 Filter sets: the scope of delivery includes three
filter holders without transponders for empty
filter positions and transmitted or incident light
observation without fluorescence. Additionally,
filter sets of your choice for fluorescence
(excitation and barrier filter on one filter holder)
are available.
Leica MZ16 FA – Overview of the instrument
8
7
6
12
5
2
4
10
11
3
16
1
14
Fig. 3 Right side of the Leica MZ16 FA from the user’s perspective with trinocular tube, video objective
and Leica DC500 digital camera
7 Filter holder for an individually selectable filter,
12 Leica 106 z lamp housing for 50W or 100W
such as a gray filter
mercury burner with stray-light protection
(not pictured)
8 ErgoTube® (2.8) or trinocular tube (3.8), pictured
with video objective and Leica DC500 digital
13 Supply unit for 106 z lamp housing (not pictured)
camera
14 Manual controls for zoom, motorized focus,
9 Wide-field eyepieces for persons wearing
filter changer, shutter with connection to optics
glasses
carrier and/or footswitch (not pictured)
10 Interchangeable objective planachromatic or
15 Transformer (not illustrated)
planapochromatic
16 Gliding stage (optional)
11 UV protection screen with arm
Leica MZ16 FA – Overview of the instrument
11
3. Assembly
Basic components such as the stand, column,
microscope carrier, binocular tubes and optical
accessories are, thanks to their modular design,
identical for all Leica M series stereomicroscopes. Therefore, please refer to User Manual
M2-105-0 for Leica M stereomicroscopes for
installation and assembly instructions.
The connections of the manual controls,
footswitch, and PC, as well as the assembly of the
UV protection screen, are described in the user
manual you are now reading.
The lamp housing, supply unit and adjustment of
the high-pressure mercury burner are described
in User Manual M2-216-1.
3.1 Assembly sequence
The microscope components are best assembled
in this order:
– Stand: base and column with focusing drive
(manual or motorized) and focus and focusing
stop
– Microscope carrier
– Leica MZ16 FA optics carrier
– Binocular or trinocular tube
– Eyepieces and eyecups
– Stage plate or special stage (gliding stage,
heating stage)
– Objective
– UV protection screen with arm
– with light source
– Lamps: high-pressure mercury burner in lamp
housing; for the HL RC™ transmitted-light
stand, fiber-optic light guide with light source
– Supply unit for lamp housing
– Electrical connections
– Manual controls and/or footswitch and PC
(if applicable)
– Equipment of filter changer
Either the integrated clamping screws or an Allen
key is necessary for assembly; these are included
in delivery.
12
Leica MZ16 FA – Assembly
3.1.1 Assembly diagram
10 447 160
10 445 301
10 445 302
10 445 303
10 446 237
10 446 238
10 446 197
10 445 822
10 446 229
10 446 271
10 447 080
10 446 260
RS 232
10 447 063
10 446 182
10 447 157
10 447 051
10 447 050
10 446 157
10 445 819
10 447 101
10 447 075
Plan/Planapo
10 447 220
10 447 221
10 447 217
10 447 222
10 447 218
10 447 223
10 447 219
10 447 224
10 447 225
10 447 226
10 447 227
10 446 176 / 10 447 041
10 446 227
10 446 301
10 447 106 / 10 447 185
10 445 631
10 445 363
10 445 387
10 445 367
10 446 359
Leica MZ16 FA – Assembly
13
3.2 Assembly of stereomicroscope with
stand
– Insert the eyepieces (4.9) in the tubes and
fasten them using the clamping screws. If
necessary, attach soft eyecups (see User
Manual M2-105-0).
– Screw the objective (4.10) into the bottom of
the optics carrier (4.5) counterclockwise.
Do not yet connect the stereomicroscope
and peripherals to the power supply!
Focusing drive ➔ stand base
왘 Fasten the manual or motorized focusing drive
(4.2) to the column according to User Manual
M2-105-0 (manual) or M2-267-1 (motorized) on
the base (4.1).
Tool: Allen key.
왘 Fasten the focusing stop (4.3) using the clamping screw on the stand column under the
focusing drive.
When using the motorized focus, be
certain to read the corresponding User Manual
M2-267-1, in particular the safety instructions.
Microscope carrier ➔ focusing drive
왘 Fasten the microscope carrier (4.4) to the Leica
3.2.1 Video/photo tube
We recommend using the trinocular video/phototube (4.8) or the HU video/phototube with 100%
light in the video/photo output, in order to achieve
shorter exposure times at low fluorescence levels.
왘 Insert the video/photo tube (4.8) into the ring
connector on the FLUOIII® filter system according to User Manual M2-105-0 and fasten it
using the clamping screw.
왘 Fasten a binocular tube to the HU video/photo
tube using a clamping screw.
MZ16 FA according to User Manual M2-105-0
on the focusing drive (4.2).
Tool: Allen key.
Optics carrier ➔ microscope carrier
The Leica MZ16 FA optics carrier and the
FLUOIII® filter system make up a single unit,
which is factory-adjusted. They may not be taken
apart.
왘 Insert the Leica MZ16 FA optics carrier (4.5)
according to User Manual M2-105-0 into the
microscope carrier (4.4) and fasten it using
a clamping screw.
12
8
7
6
5
2
4
10
3
11
Additional components
왘 Fasten the other components and other individual accessories according to User Manual
M2-105-0:
– Insert the binocular tube (2.8) into the ring
connector on the FLUOIII® filter system and
fasten it using the clamping screw.
14
16
1
14
Fig. 4 Right side of the Leica MZ16 FA
Leica MZ16 FA – Assembly
3.2.2 UV protection screen ➔ microscope
carrier
왘 Fasten the UV protection screen (5.1) using a
hexagon-head screw (5.3) to the left or right
side of the microscope carrier.
Tool: Allen key.
Always position the UV protection screen
so that the operator can never look directly at the
light spot (see page 9):
왘 Set the UV protection screen (5.1) laterally
using the arm (5.2).
왘 Loosen the hexagon-head screw (5.3).
왘 Move the UV protection screen up or down
using the arm.
왘 Tighten the hexagon-head screw (5.3).
3.3 Light source
The Leica 106 z lamp housing is the light source
for the Leica MZ16 FA and is used with 100W or
50W mercury lamps, corresponding supply units
and stray-light protection.
Please read
– the separate User Manual M2-216-1 for the
Leica lamp housing
– the user manual and safety instructions for the
ebq 100 supply unit
– the user manual and safety instructions
provided by the lamp manufacturer, and, in
particular, the section on how to proceed if a
lamp breaks and releases mercury.
Do not switch on the supply unit until
you have read and familiarized yourself with
the functions of the Leica MZ16 FA in transmitted
light, provided in the «Operation» chapter.
After it is switched on, the burner must be
adjusted immediately.
3.3.1 Lamp housing 106 z
Fasten the 106 z lamp housing (4.12) to the adapter
part as described in User Manual M2-216-1.
3
2
3.3.2 Supply units
1
The supply unit for 50W mercury burners is
described in User Manual M2-216-1.
The 100W mercury burners are powered by the
ebq 100 supply unit. Please read the separate
instruction manual provided by the manufacturer.
Fig. 5 UV protection screen
1 UV protection screen
2 Arm
3 Hexagon-head screw
Leica MZ16 FA – Assembly
15
3.4. Electrical connections
3.5 Equipping the filter changer
The connections are used differently according to
the configuration. Diagrams with connections and
paths for typical configurations with manual
controls, motorized focus, footswitch, and PC are
provided on page 29.
The patented FLUOIII® filter system consists
of a filter changer for barrier and excitation filters,
a built-in motorized shutter and a filter insert for a
filter holder with your choice of filter.
PWR: Connection for Leica MZ16 FA power pack,
or empty (for feed from power pack of motorized
focus
CTL1: Foot switch connection
and/or PC interface kit (with Y cable)
CTL2: Connection for manual controls, or empty
(when connected to the second CTL2 socket)
CTL2: Connection for manual controls, or empty
(when connected to the first CTL2 socket) or connection for short connecting cable for connecting
CTL2 to motorized focus
The filter changer can hold a total of 4 filter sets.
The filter sets for fluorescence are marked and
equipped with a transponder for automatic filter
detection (see page 17 for details).
For models equipped with motorized focus,
be certain to adhere the cable clip to the motorized focus and insert the short connecting cable.
Otherwise the cable could be squeezed between
the stop and motorized focus during focusing.
If you are using fewer than four filter holders with fluorescence filters, be absolutely certain to insert the included filter holders without
transponders with closed illumination beam path
into the free positions.
Otherwise, there is a risk of danger to the eyes
from direct UV radiation from the third beam path.
Also, they protect the system from dust.
Connection to PC
The connection to a PC requires a standard PC
with RS232 interface and a Leica PC Interface Kit.
The individual commands are described in a separate command description supplied with the PC
Interface Kit.
Three filter holders without transponders are
included in the scope of delivery of the Leica
MZ16 FA. These filter holders have two empty
openings for the observation beam paths. The
third opening to the illumination beam path is
closed.
2
1
Fig. 6 Rear side of Leica MZ16 FA with connections to power supply, motorized focus, manual
controls, footswitch, PC
16
Fig. 7 Filter changer, equipped with filter holders
1 Filter sets
2 Filter slide for filter holder with individual filters
Leica
Leica
MZ16
MZ16
FA FA
– User
– Assembly
manual
3.5.1 Filter sets for fluorescence
The filter sets for fluorescence contain, on one
filter holder, two barrier filters to the visual beam
paths and one excitation filter to the illumination
beam path. A transponder is located on the fluorescence filters with the specific filter data. The
transponder guarantees dependable automatic
operation with filter recognition. The filter sets are
labeled (see page 28).
Please order Leica filter sets for fluorescence from Leica Microsystems. The transponders on the filter sets are required to ensure
proper function of the automatic filter detection.
3.5.2 Filter holders without transponders
Three filter holders without transponders are
included in the scope of delivery of the Leica
MZ16 FA. These filter holders have two empty
openings for the observation beam paths. The
third opening, to the illumination beam path, is
closed. Use these filter holders
– if you want to change to transmitted light or
incident light observation without fluorescence
– at all times in empty filter changer positions, in
order to protect yourself from UV radiation and
protect the system from dust.
3.5.3 Inserting the filter
When inserting the filter sets, avoid touching the filters if at all possible, in order to avoid
fingerprints. If you touch them, clean the filters
using a soft, lint-free cloth and pure alcohol.
왘 Insert the filter holder (7.1) into the filter
changer (2.6) such that the label (e.g. GFP1) is
upright and legible on the right side of the slide
slot.
• Ensure that the contour of the filter holder
matches the contour of the microscope.
왘 Then, connect the power supply to the power,
so that you can rotate the motorized filter
changer.
왘 Rotate the filter changer using the F keys on the
manual controls, until the stop (see page 21).
• If the filter holder has not been inserted
correctly, the filter changer does not rotate.
Insert a total of four filter holders.
3.5.4 Slot for filter slide
There is a slot (7.2) in the filter changer system for
an individually selectable filter, for example a gray
filter.
If you are using fewer than four filter holders with fluorescence filters, be absolutely certain to insert the included filter holders without
transponders with closed illumination beam path
into the free positions.
Otherwise, there is a risk of danger to the eyes
from direct UV radiation from the third beam path.
Leica MZ16 FA – Assembly
User manual
17
17
4. Operation
4.1 Functional principle
• The most important functions of the Leica
MZ16 FA are motorized and automated.
• Motorized functions: zoom, motorized focus
(optional), filter changer, aperture and double
iris diaphragm.
• Automated functions: automatic filter detection,
automatic shutter, automatic control of five
working procedures, calculation of measurements, the current total magnification, and the
field of view diameter.
• Memory functions: zoom, motorized focus
(optional), filter changer, and double iris
diaphragm.
• Variable function keys: the microscope is delivered with pre-assigned functions of the function keys of the manual control system and the
footswitch. These functions can be reprogrammed and/or adapted to your individual
wishes.
• The selector buttons of the Leica MZ16 FA are
intended for selecting the objective, eyepieces,
video objective and acoustic signal. The data
are used when calculating the magnification,
the field of view diameter and the measurements.
• The current total magnification, field of view
diameter and measurements are displayed
on-screen.
• Light emitting diodes for the aperture of the
double iris diaphragm.
4.2 Starting up
Caution:
Do not switch on the supply unit for the highpressure mercury burner yet.
After it is switched on, the burner must be
adjusted immediately. First, work in transmitted
light mode in order to familiarize yourself with the
microscope’s controls.
Follow the safety instructions.
왘 Attach the power supply to an outlet.
All motorized microscope components first
undergo an initialization phase. The display indicates:
init V1.xx (software version, e.g. SW V1.xx)
The unit is being initialized (beeps).
MZ16 FA appears quickly to indicate that initialization
is finished (beeps twice).
Display of the current magnification
Factory settings
Objective 1.0×
Eyepiece 10×
Video objective 0.63×
CAL C dist. (reference distance)
REF FOV (field of view diameter)
Acoustic signal on
4.2.1 Disconnecting from the power supply
Unplug the power cable from the power
supply.
Status when unplugging the power cable:
– The selection under OPT, the calibration and
the diameters of the reference circles remain
the same.
– The positions stored using the manual control
system (Set button) are cleared.
– The last selected function on the footswitch
remains active if you switch on the system
without activating the footswitch.
18
Leica MZ16 FA – Use
4.3 Button functions of the Leica MZ16 FA
In the menu, the Z up/down zoom buttons on the
manual control system assume the function of
selection keys (see Fig. 9).
OPTic
• Select eyepiece and objective factors
• Select the factor
• Acoustic signal (on/off)
SELect
Confirm and display the selection
CALibration
Calibrating the motor zoom
REFerence
Display diameter of reference circle for measurements
SEL + CAL (simultaneously)
Travel to the calibrated zoom position
Select the objective factor
Z up/down zoom buttons
왘 Confirm and display the selection
SEL (beep)
Select video objective factor Z zoom up/down
buttons
왘 Confirm and display the selection
SEL (beep)
This factor does not influence the calculation
or display of the magnification or of the measurements. During image capture via digital camera, it
calculates the magnification of the live image.
Acoustic signal on/off (beep)
Z up/down zoom buttons
왘 Confirm and display the selection
SEL (beep)
3
2
1
SEL (press for approx. 2 seconds)
Reset user settings to factory settings
Display: def. val.
4.3.1 Menu selection OPT
Selection of eyepiece / objective / video objective /
acoustic signal
In the menu, the Z up/down zoom buttons on the
manual control system assume the function of
selection keys (see Fig. 9).
OPT
Select the eyepiece factor
Z up/down zoom buttons
왘 Confirm and display the selection
SEL (beep)
Fig. 8 Display with function keys
1 Function keys:
OPT Selection of eyepiece / objective / video
or photo objective / acoustic signal
SEL Confirm and display the selection
CAL Calibrate motor zoom
REF Display diameter of reference circle for
measurements
2 Display: objective magnification / eyepiece
magnification / video objective / total magnification / field of view diameter / measurements
3 Light emitting diodes aperture of the double iris
diaphragm.
Leica MZ16 FA – Use
19
4.4 Motorized functions
The motorized zoom, focus, filter changer, shutter
and double iris diaphragm allow ergonomic work
using the manual controls. The store button
allows you to store five combinations of zoom,
focus, filter changer, and double iris diaphragm
and to replicate experiments quickly and exactly.
Compared to a manual stereomicroscope, the
automated and motorized Leica MZ16 FA offers:
– Improved ergonomics
– Uniform and simple operation
– More flexibility for the user
– Free hands for manipulation tasks
– Faster replication of repetitive tasks.
FW
Set
+
Fo –
+
Z
–
F
ZW
Sh
If desired, either zoom, shutter or filter changer can
be operated using the footswitch. This frees both
hands for manipulation, sorting and preparation.
DI
4.5 Manual controls
The manual controls (Fig. 9) can be arranged as
desired at the workplace–ideal for both left and
right-handers. The touch-free settings of the Leica
MZ16 FA prevent vibrations, which can cause
distortion, particularly at high magnification.
The manual controls are configured ergonomically, and the outer edge is illuminated, so that it is
also visible in darkness.
Every user can store individual functions of the
buttons and dials using a PC and recall them using
a password (see Manual M2-216-3). On the following pages, the functions are described according
to their preset factory button assignments.
20
Fig. 9 Manual controls: factory preset button
assignments
Set
Store the current positions of
zoom/focus/filter changer/double iris
diaphragm for five combinations.
Z
Function 1: Zoom up/down, quick zoom
Function 2: menu selection buttons
ZW Zoom up/down, fine zoom
Fo
FW
Focus up/down, quick focus
Focus up/down, fine focus
F
Filter changer, clockwise/counterclockwise rotation
Sh
Shutter for opening/closing the
illumination beam path (only possible
in fluorescence mode)
DI
Aperture of the double iris diaphragm
Leica MZ16 FA – Use
4.5.1 Changing button assignments
4.5.3 Focusing: Fo and FW
Each user can individually select the functions of
the buttons and wheels using a PC. Multiple users
can store their own configurations and recall
them using passwords. The scope of delivery
includes a CD-ROM with the configuration
program and its description.
Use the Fo buttons to focus quickly, and use the
focus wheel FW for fine and precise up/down
focusing.
4.5.2 Zoom (change magnification):
Z and ZW
FW Precise fine focusing with focus wheel
Use the Z buttons to zoom quickly, using the zoom
wheel ZW for fine and precise movements up and
down.
For fine focusing with the focus wheel FW,
the system recognizes the level of magnification.
The higher the magnification, the more slowly the
motorized focus moves.
Z Zoom buttons
– Constant pressure: motorized zoom travels
continuously up/down.
Fo Focus buttons
– Constant pressure: the motorized focus travels
continuously up/down.
4.5.4 Filter change: F
Precise fine setting using the ZW wheel.
– One quick click: the motorized zoom adjusts to
the highest/next level of magnification.
The speed accelerates to the maximum
speed. The motorized zoom stops when the Z
button is clicked again or the ZW zoom wheel is
moved.
ZW Precise zooming using the zoom wheel.
Leica MZ16 FA – Use
For observation with fluorescence light,
always position the aperture protection correctly
to protect the observer (page 15).
F buttons Filter changer left/right rotation buttons
At the touch of a button, the filter changer rotates
to the left or the right into the next position at
maximum speed. During this process, the shutter
automatically closes the illumination beam path to
preserve sensitive specimens and protect users
from UV radiation. The active filter set is always
the one with its label visible on the left side of the
slide slot. The UV shutter opens automatically if a
fluorescence filter with transponder is in position,
and stays closed if a filter holder without
transponder is in position.
21
4.5.5 UV shutter: Sh
4.5.7 Store the current position: Set
The UV shutter Sh opens and closes the illumination beam path.
The MZ16 FA offers you the ability to reproduce
your multifluorescence experiments exactly, cutting the time needed for this immensely. Store the
typical working procedures with the desired positions for zoom, focus, filter changer, and double
iris diaphragm. For the next experiment, the Leica
MZ16 FA automatically configures all settings at
the touch of a button.
The UV shutter closes the illumination
beam path automatically and cannot be opened
manually
• during the filter change process.
• if the system recognizes a filter holder in the
filter changer without a transponder in the
beam path.
• if you remove a filter holder from the filter
changer and then turn the filter changer to
an empty position.
The UV shutter opens automatically if a fluorescence filter with transponder is in position. If this
occurs, you can close or open the UV shutter
using the Sh button on the manual controls.
Set Store the current positions of zoom/focus/filter changer/double iris diaphragm for a maximum
of five combinations.
– Store: Hold down the button for approx. two
seconds until a short signal is heard.
– Quickly move to positions: press button quickly
– Clear: press button for approx. four seconds,
until a long signal is heard.
Sh UV shutter open/close
When work is interrupted, you do not have to
switch off the high-pressure mercury burner to
preserve sensitive preparations from burning out
or bleaching out. Frequently switching the mercury lamp on and off decreases its life and causes
delays, as the lamp can only be lit after it has
cooled off. Instead, you can close the UV shutter
at the touch of a button and reopen it when you
return to your workplace.
4.5.6 Double iris diaphragm: DI
FW
Set
+
Fo –
+
Z
–
F
ZW
Sh
You can use the DI to regulate the aperture and
enhance the depth of field for plastic specimens.
On-screen display of the aperture with light-emitting diodes. Each light-emitting diode stands for
20%. If all LEDs are lit, the double iris diaphragm is
completely open.
DI
Fig. 10 Manual controls: factory preset button
assignments
22
Leica MZ16 FA – Use
You can use the Set store button on the
manual controls to store, activate or clear the current positions of zoom/focus/filter changer/double
iris diaphragm.
• A maximum of five combinations can be stored.
• If a sixth combination is stored, the one nearest
to it will be cleared.
• Each combination can be cleared individually.
• The system will travel to each of the individual
combinations in the sequence in which they
were stored.
• Switching off the system clears the stored
combinations.
Activating the stored positions
Quickly move to positions: press Set button
quickly
• The Leica MZ16 A automatically sets the stored
positions of zoom, focus, filter changer, double
iris diaphragm.
Deleting the stored positions
Press the Set button for approx. four seconds,
until a long signal is heard.
4.5.8 A typical work process might be as
follows:
1. First, you want to examine your specimen in
overview in bright field transmitted light.
왘 Use the zoom keys Z to switch to the lowest level
of magnification and then use the zoom wheel
ZW to adjust the magnification to exactly the
level you desire.
왘 Rotate the filter changer using the F keys until the
filter holder without transponder for transmitted
or incident light observation without fluorescence is positioned in the beam path.
왘 Focus using the focusing buttons Fo and make
fine adjustments using the focus wheel FW.
왘 As necessary, adjust the depth of field of the
double iris diaphragm using the DI wheel.
왘 To store all positions: Press the Set button for
approx. two seconds until a short signal is heard.
For fluorescence, always position the
aperture protection correctly to protect the
observer (page 15).
2. You now want to change to fluorescence observation, while maintaining the same zoom setting.
왘 Rotate the filter changer using the F buttons until
the desired fluorescence filter is positioned in the
beam path.
왘 As necessary, make fine adjustments to the focus
level using the focus wheel FW, and to the double
iris diaphragm using the DI wheel.
왘 To store the new positions: Press the Set button
for approx. two seconds until a short signal is
heard.
3. You now want to change to a high level of magnification, while maintaining the same zoom setting.
왘 Use the zoom keys Z to switch to the highest level
of magnification or use the zoom wheel ZW to
adjust the magnification to exactly the level you
desire.
왘 As necessary, make fine adjustments to the focus
level using the focus wheel FW, and to the double
iris diaphragm using the DI wheel.
왘 To store the new positions: Press the Set button
for approx. two seconds until a short signal is
heard.
Leica MZ16 FA – Use
23
4.5.9 Observation without fluorescence
4.6 Footswitch
If you want to change to transmitted light or incident light observation without fluorescence, use a
filter holder without transponder with closed illumination beam path. The openings in this filter
holder are empty; there is no barrier filter in the
beam path. The color reproduction is genuine.
As desired, either zoom, shutter or filter changer
can be operated using the footswitch. This frees
both hands for manipulation, sorting and preparation.
• Three filter holders without transponders are
included in the scope of delivery of the Leica
MZ16 FA.
• The Leica MZ16 FA system recognizes that a
filter holder without transponder is in position.
The shutter remains closed to prevent the filter
holder from overheating.
– Zoom: right switch up / left switch down
– Shutter: right switch open / left switch closed
– Filter changer: right switch clockwise rotation /
left switch counterclockwise rotation
The footswitch is preset at the factory to control
the zoom. You can change the functions by
operating the footswitch when switching on the
system:
왘 The zoom control function on the footswitch
remains active if you switch on the system
without pressing the footswitch.
왘 The shutter control function is activated if you
press the footswitch while switching on the
system.
왘 If you want to use the footswitch to control the
filter changer, switch the system off again and
then on, and press the footswitch while switching the system on.
The last selected function on the footswitch
remains active if you switch on the system without
activating the footswitch.
Fig. 11 Foot switch
24
Leica MZ16 FA – Use
4.7 Dioptric correction
4.8 Focussing and observing the specimen
Please refer to User Manual M1-105-0 for
adjusting the individual settings of the Leica
MZ16 FA, such as interpupillary distance, eyelenses, eyepoint, eyecups, viewing angle, etc.
Follow the safety instructions.
After switching on the supply unit, adjust the
burner immediately (User Manual M2-216-1).
For fluorescence observation, always position
the aperture protection correctly to protect the
observer (page 15).
Perform dioptric correction in transmitted
light or incident light.
왘 Use the F buttons on the manual controls to
rotate the filter holder without transponder and
with closed illumination beam path into the
beam path (page 21).
• The shutter closes automatically.
왘 Open the double iris diaphragm completely
using the wheel DI on the manual controls
(all LEDs are lit up).
왘 Illuminate the flat object using transmitted light
or oblique incident illumination.
왘 Perform the dioptric correction in accordance
with User Manual M1-105-0.
In the filter changer, all four positions must
be equipped with filter holders.
The active filter set is the one with its label visible
on the left side of the slide slot.
왘 Switch on the supply unit. Wait two to three
minutes (User Manual M2-216-1).
왘 If you have not done so already, adjust the
burner as described in User Manual M2-216-1.
왘 Rotate the desired filter into the beam path
using the F buttons on the manual controls.
Automatic filter detection: on the filter holders with fluorescence filters, there is a transponder with the specific filter data. The Leica MZ16
FA system recognizes whether a fluorescence
filter is in position and opens the UV shutter
accordingly.
If the system recognizes a filter holder without
transponder, the UV shutter remains closed.
왘 Use the Z buttons to adjust to the lowest level
of magnification.
• This provides a better overview and allows you
to find areas that are of interest more easily.
왘 Use the Fo buttons to focus, and use the focus
wheel FW to fine focus.
왘 Use the Z buttons to select a higher magnification or to switch to the highest magnification to
observe greater details.
왘 As necessary, set the magnification exactly
using the ZW zoom wheel.
Leica MZ16 FA – Use
25
4.8.1 Reflexes
4.9 Calibrating the motorized zoom
When using the 1.6× planapochromatic objective,
a light reflex appears between zoom positions
0.8 and 1.6, which disappears at higher zoom
settings. This reflex does not occur when using
the 1.0× and 0.63× planapochromatic objectives.
The adjustment accuracy of the motor zoom is
factory-set to ±5%. If you want to work more
precisely (for example, while measuring), you
can calibrate the system. The calibration is stored
until it is modified or cleared.
• Always perform the calibration at a ratchet
step (50.0 in the example).
• Calibration modes: Magnification (C magn.)
or reference distance (C dist.)
• Calibration aids: Stage micrometer in the
specimen plane and graticule (10447182) in the
eyepiece. The diameter of the inner circle
measures 7mm. For more information on
inserting the graticule, see User Manual
M2-105-0.
• The optional gliding stage facilitates the
precise movement of the stage micrometer.
At Limit
If this message appears on the display during
calibration of the reference distance with the
handwheel, you have traveled beyond the
adjustable range.
Initializing calibration
Clearing previous calibrations
(see p. 27).
왘 Move to the desired zoom ratchet step by
pressing the Z zoom button on the manual
controls (in the example, 50.0).
왘 Initialize the calibration using the CAL button on
the Leica MZ16 FA.
26
Leica MZ16 FA – Use
Selecting a calibration mode
Calibrating the reference distance (CD)
왘 Use the Z zoom button on the manual controls
Initialize the calibration and select the calibration
mode see p.26.
to select a calibration mode:
magnification (C magn.) or reference distance
(C dist.); in the example, it is C magn.
왘 Confirm and display your selection using the
SEL button (beep).
Depending on the selected calibration mode,
continue with the section "Calibrating CM" or
"Calibrating CD."
Calibrating magnification (CM)
Display after confirming the selection: CM 50.3 in
the example (CM = process start)
Look into the eyepieces. In the example, we are
working with 10× eyepieces.
Focus the stage micrometer.
• In the example, the diameter of the small circle
of 7mm at zoom position 50 (with 10× eyepieces) corresponds to a distance of 1.40mm
on the specimen micrometer (7:5).
(With 16× eyepieces, the distance corresponds
to 2.24mm.)
Adjust the magnification using the ZW wheel on
the manual controls exactly so that the diameter
of the small circle (inside line) matches the distance of 1.40 on the stage micrometer.
Confirm and display the calibration: press the
CAL button twice (beeps).
• In the display appears (in the example) A 50:
i.e. A = mark of zoom position at which
calibration was performed.
Leica MZ16 FA – Use
User manual
27
• After confirming the selection using the
SEL button, the following appears in the display
(in the example): CD 1.418
(CD = start of procedure)
왘 Look into the eyepieces.
왘 Focus the stage micrometer.
왘 Adjust the magnification using the ZW handwheel on the manual controls exactly, so that
the diameter of the small circle (inside line)
matches the distance of 1.40 on the stage
micrometer.
왘 Confirm and display the calibration: press the
CAL button twice (beeps).
• In the display appears (in the example)
A 50: A = mark of zoom position at which
calibration was performed.
Clearing the calibration
Press the CAL key at any zoom position.
• Display, depending on the mode selected:
C dist. or C magn.
왘 Press the SEL button.
• Display: according to the mode selected
CD XXX or CM XXX.
왘 Press the CAL button for 2 seconds (2 beeps).
• To indicate that the calibration was cleared, the
A in front of the magnification is cleared.
27
4.10 Measuring
With the help of the stage micrometer in the specimen plane and the graticule (10447182) with two
reference circles in the eyepiece, you can perform exact measurements. To insert the graticule
see User Manual M2-105-0.
As the reference circle for measurements, you
can select either the large or small reference circle on the graticule in the eyepiece, or the complete field of view. The selected reference circle
remains stored until it is cleared or replaced by a
different mode. After the reference circle has
been selected and the baseline adjusted to the
reference circle, the Leica MZ16 FA displays the
measurements at the desired magnification with
the selected unit of measure.
4.10.1 Selecting the reference circle and
unit of measure
왘 Activate the menu using the REF button.
• The display shows the reference circle C2
(or C1 or FOV) selected last and the diameter for
the current magnification. The current magnification is displayed again after three seconds.
왘 Activate the selection menu using the
REF button while the current reference circle
is still being displayed.
왘 Select Circle 1 or 2 or FOV (field of view) using
the Z zoom buttons on the manual controls.
왘 Confirm and display your selection using the
SEL button (beep).
• Depending on the selection chosen, the following is displayed: C2 (or C1 or FOV) and mm
(or inches or mil).
왘 Select mm, inches or mil using the Z zoom
buttons on the manual controls.
왘 Confirm and display your selection using the
SEL button (beep).
• The current magnification is displayed again
after three seconds.
왘 Return to the unit of measure display using the
REF button.
28
4.10.2 Measuring
We recommend using the optional gliding
stage for very fine positioning of the specimen for
measurement purposes.
왘 Set the magnification you want to use for measurement exactly using the Z zoom buttons on
the manual controls or the ZW wheel.
왘 Focus the specimen.
왘 Activate the menu using the REF button.
왘 Activate the selection menu using the
REF button while the current reference circle
is still being displayed.
왘 Observe which reference circle most closely
matches the specimen portion you want to
measure, and select Circle 1 or Circle 2 or FOV
(field of vision) accordingly using the Z zoom
buttons on the manual controls.
왘 Confirm and display your selection using the
SEL button (beep).
• Depending on the selection chosen, the following is displayed: C2 (or C1 or FOV) and mm
(or inches or mil).
왘 Select mm, inches or mil using the Z zoom
buttons on the manual controls.
왘 Confirm and display your selection using the
SEL button (beep).
• The current magnification is displayed again
after three seconds.
왘 Observe the specimen portion you want to
measure and set the magnification using the
ZW zoom wheel on the manual controls so that
the reference circle is completely filled by the
specimen portion.
왘 Display the measurement using the REF button.
• The current magnification is displayed again
after three seconds.
왘 Return to the unit of measure display using the
REF button.
Leica MZ16 FA – Use
5. Annex
5.1 Filter sets
Filter sets
Excitation filter
Barrier filter
Designation
GFP
425/60nm (395–455nm)
480nm
GFP1
GFP Plus
480/40nm (460–500nm)
510nm
GFP2
GFP Plants
470/40nm (450–490nm)
525/50nm (500–550nm)
GFP3
UV
360/40nm (340–380nm)
420nm
UV
Violet
425/40nm (405–445nm)
460nm
V
Blue
470/40nm (450–490nm)
515nm
B
Green
546/10nm (541–551nm)
590nm
G
CFP
436/20nm (426–446nm)
480/40nm (460–500nm)
CFP
YFP
510/20nm (500–520nm)
560/40nm (540–580nm)
YFP
Texas Red
560/40nm (540–580nm)
610 LP nm
TXR
DsRED
545/12nm (510–560nm)
620/60nm (590–650nm)
DSR
Leica MZ16 FA – Annex
29
5.2 Electrical connection diagrams
Configuration: Leica MZ16 FA with manual
controls
Configuration: Leica MZ16 FA with manual
controlsand motorized focus
HANDCONTROL
HANDCONTROL
Power Supply
Power Supply
MOTOR
FOCUS
LEICA MZ16 FA
LEICA MZ16 FA
Configuration: Leica MZ16 FA with manual
controls and PC
Configuration: Leica MZ16 FA with manual
controls, motorized focus, footswitch and PC
HANDCONTROL
HANDCONTROL
POWER SUPPLY
POWER SUPPLY
PC
MOTOR
FOCUS
FOOT SWITCH
LEICA MZ16 FA
LEICA MZ16 FA
PC
30
Leica MZ16 FA – Annex
5.3 Technical data
Optics carrier
Designation
Microscope type
100% apochromatic optics system
Motorized functions
Control system
Manual controls, illuminated,
switch positions via PC
individually configurable
Foot switch
PC connection
Display
Automated functions
Double iris diaphragm for balancing
the depth of field
Leica MZ16 FA – Annex
Leica MZ16 FA
Motorized and automated fluorescence stereomicroscope with
apochromatic optics system, patented TripleBeam® third beam
path and patented FLUOIII® fluorescence filter system.
CMO design (common main objective), lead-free
Zoom, filter changer, UV shutter, double iris diaphragm, motorized focus (optional)
Manual control system, foot switch
– For control of zoom, filter changer, UV shutter, double iris
diaphragm, motorized coarse and fine settings for zoom
and focus, focus speed corresponding to zoom
(the higher the finer)
– Buttons for storing the positions of zoom, filter changer,
double iris diaphragm, motorized focus
For zoom, filter changer or UV shutter
Via RS232 interface
For objective magnification, eyepiece magnification, total
magnification, measured values, aperture of the double iris
diaphragm, camera objective
– Absolute or user-defined calculation of the total magnification
– Filter detection
– Control system for stored functions such as zoom, focus,
filter change, double iris diaphragm
– UV shutter
– Calibration of measured values when changing zoom
– Automatic control of multifluorescence experiments
Installed, motorized
31
Fluorescence system
Illumination beam path
TripleBeam®
FLUOIII® Filter System
Fluorescence filter
transponder
Filter sets
Filter holder without transponder
Light source
Safety measures
Optical data
Zoom
Switchable zoom positions for
(repetitive tasks)
Data
– Zoom range
– Resolution
– Numerical aperture
– Field of view
Maximum values
– Magnification
– Resolution
– Visible structural width
– Numerical aperture
– Field of view
Optical accessories
Objective
Working distances
Binocular tube, ergonomic
Eyebase (interpupillary distance)
Wide-field eyepieces for persons
32
2 observation / 1 separate illumination beam path for intensive
fluorescence illumination, coupling to the zoom optics
Horizontally integrated quick changer for 4 filter sets,
motorized, automatic and motorized UV shutter
Excitation filter and barrier filter on a filter holder with
GFP, GFP Plus, GFP Plants, UV, violet, blue, green, CFP, YFP, TXR,
DSR with transponder, filter holder without transponder for
transmitted light
For transmitted light or incident light observation without
fluorescence
High-intensity mercury lamp 50 or 100W, lamp housing 106 z, chromatically corrected collector, focusable, centerable lamp mount
UV protection screen, UV barrier filter, stray-light protection
for lamp housing, filter holder for transmitted light or empty
filter positions, automatic UV shutter for filter change and
transmitted light
16:1, motorized
5 individually stored positions
with standard optics (objective 1×/eyepieces 10×)
7.1× – 115×
420 Lp/mm
0.14
∅ 29.6mm – 1.8mm
(based on optics combination)
920×
840 Lp/mm
0.6 micron
0.28
∅ 59mm
Planapochromatic 1×, 2×, 1.6×, 0.63×, lead-free
Planachromatic 1.0×, 0.5×, 0.8× with long focal length, lead-free
55mm (Planapo 1×), 19mm (Planapo 1.6×), 15mm (Planapo 2×),
97mm (Planapo 0.63×), 60mm (Plan 1×), 112mm (Plan 0.8×),
135mm (Plan 0.5×)
Apochromatic ErgoTube® 10° – 50° with synchronous interpupillary distance adjustment, various ErgoModules® (optional)
ErgoTube® and ErgoModule® are registered with the ‹United
States Patent and Trademark Office›.
55mm – 75mm
10×, 16×, 25×, 40×, distortion-free, wearing glasses
plug-on eyecups for protection from infection
Leica MZ16 FA – Annex
Stands, illuminators
Transmitted light
Incident light
Stand for large objects
Motorized focus
Manual focusing drive
Stages
Illuminators
Various accessories
Video system
Photography
Software
Measuring
Leica MZ16 FA – Annex
Stand HL RC™ high-performance base with innovative contrast
methods, stands for bright field and bright/dark field
Stand With stage plate, black/white
Swinging arm stand, stage clamp stand, universal stand
With 300mm or 500mm column, control via hand switch, foot
switch or PC
Coarse/fine focus, adjustable ease of movement, with 300mm or
500mm column
Leica MATS heating stage thermocontrol system, gliding stage,
polarization
Cold light sources
Leica IC A, integrated
– Digital camera systems for fluorescence Leica DC350 F,
DFC350 F, DC300 F, DFC300 F, DC300 FX, DFC300 FX, DC350 FX,
DFC350 FX, DC480, DC500
– Leica MPS60 modular photomicrographic system with data
back
For image grabbing, archiving, processing and analysis: Leica
Image Manager with Image Overlay and Multifocus modules,
FW4000, QWin
Measurement graticule for automatic calibration and
measurement
33
Technical data
Weight
Power pack
ebq 100 supply unit
Column with motorized focus on
incident light or transmitted light
basis, type MST31
Focusing drive, coarse/fine
34
– Leica MZ16 FA optics carrier
– Lamp housing
– Filter set
– Manual controls
– Planapochromatic objective 1×
– Focusing drive, coarse/fine,
with column
– Microscope carrier
– Input voltage
– Input frequency
– Output voltage
– Supply connector
– Low-voltage connector Mini-DIN
– Operating temperature
– Relative humidity
– Storage temperature
For indoor use only.
– Supply voltage
– Frequency
– Power consumption
– Fuses
– Ambient temperature
– Relative humidity
– Overvoltage category
– Degree of pollution
(see instructions provided)
– Resolution
– Input voltage
– Input frequency
– Input current
– Operating voltage
– Operating temperature
– Storage temperature
– Maximum mechanical loading
maximum load
– 1 micron resolution at 5 kg load
– 2 micron resolution at 10 kg load
3.14 kg
2.5 kg
20 g
390 g
21.1 kg
1.15 kg
0.495 kg
85 V to 264 V
47 Hz to 63 Hz
12 VDC
IEC 320
5-pole
+10°C to +40°C
< 85 %
–20°C to +55°C
90–250 V~
50–60 Hz
155 VA max.
2×T2A (IEC 127)
15 – 35°C
maximum 80%
up to 30°C
II
2 microns
85 to 264 VAC
47 to 440 Hz
max. 0.80 A at 115 VAC
max. 0.50 A at 230 VAC
30V
+10°C to +40°C
–20°C to +55°C
12 kg
<15 kg
Leica MZ16 FA – Annex
Operating controls
3
2
1
FW
Set
+
Fo –
+
Z
–
F
ZW
Fig. 13 Display with function keys
Sh
DI
Fig. 12 Manual controls: factory preset button
assignments
Set
Store the current positions of
zoom/focus/filter changer/double iris
diaphragm for five combinations.
1 Function keys:
OPT Selection of eyepiece / objective /
video or photo objective / acoustic signal
SEL Confirm and display the selection
CAL Calibrate motor zoom
REF Display diameter of reference circle for
measurements
2 Display: objective magnification / eyepiece
magnification / video objective / total magnification / field of view diameter / measurements
3 Light emitting diodes aperture of the double iris
diaphragm
Z
Function 1: Zoom up/down, quick zoom
Function 2: menu selection buttons
ZW Zoom up/down, fine zoom
Fo
FW
Focus up/down, quick focus
Focus up/down, fine focus
F
Filter changer, clockwise/counterclockwise rotation
Sh
Shutter for opening/closing the
illumination beam path
(only possible in fluorescence mode)
DI
Aperture of the double iris diaphragm
Additional operating elements see page 3.
Leica MZ16 FA – Annex
38
5.4 Optical data
Objectives
1× Plan
1× Planapo
0.5× Plan
0.63× Planapo
0.8× Plan
1.6× Planapo
2× Planapo
19 Planapo
15 Planapo
Field of view
diameter (mm)
Total magnification
Field of view
diameter (mm)
Total magnification
Field of view
diameter (mm)
Total magnification
Field of view
diameter (mm)
Total magnification
Field of view
diameter (mm)
112 Plan
Total magnification
97 Planapo
Field of view
diameter (mm)
135 Plan
Total magnification
Magnification changer
Working distances in mm
60 Plan
55 Planapo
10×/21B
0.71
0.8
1
1.25
1.6
2
2.5
3.2
4
5
6.3
8
10
11.5
7.1
8
10
12.5
16
20
25
32
40
50
63
80
100
115
29.6
26.3
21
16.8
13.1
10.5
8.4
6.6
5.3
4.2
3.3
2.6
2.1
1.8
3.5
4
5
6.3
8
10
12.5
16
20
25
31.5
40
50
57.5
59.1
52.5
42
33.3
26.3
21
16.8
13.1
10.5
8.4
6.7
5.3
4.2
3.7
4.5
5.1
6.4
8
10.2
12.8
16
20.5
25.6
32
40.3
51.2
64
72.5
47
41.2
32.8
26.3
20.6
16.4
13.1
10.2
8.2
6.6
5.2
4.1
3.3
2.9
5.7
6.4
8
10
12.8
16
20
25.6
32
40
50.4
64
80
92
37
32.8
26.3
21
16.4
13.1
10.5
8.2
6.6
5.3
4.2
3.3
2.6
2.2
11.4
12.8
16
20
25.6
32
40
51.2
64
80
100.8
128
160
184
18.5
16.4
13.1
10.5
8.2
6.6
5.3
4.1
3.3
2.6
2.1
1.6
1.3
1.1
14.2
16
20
25
32
40
50
64
80
100
126
160
200
230
14.8
13.1
10.5
8.4
6.6
5.3
4.2
3.3
2.6
2.1
1.7
1.3
1.1
0.9
16×/14B
0.71
0.8
1
1.25
1.6
2
2.5
3.2
4
5
6.3
8
10
11.5
11.4
12.8
16
20
25.6
32
40
51.2
64
80
100.8
128
160
184
19.7
17.5
14
11.2
8.8
7
5.6
4.4
3.5
2.8
2.2
1.8
1.4
1.2
5.7
6.4
8
10
12.8
16
20
25.6
32
40
50.4
64
80
92
39.4
35
28
22.4
17.5
14
11.2
8.8
7
5.6
4.4
3.5
2.8
2.4
7.2
8.2
10.2
12.8
16.4
20.5
25.6
32.8
41
51.2
64.5
81.9
102.4
115.9
31.3
27.3
22
17.5
13.7
10.9
8.8
6.8
5.5
4.4
3.5
2.7
2.2
1.9
9.1
10.2
12.8
16
20.5
25.6
32
41
51.2
64
80.6
102.4
128
147.2
24.6
22
17.5
14
10.9
8.8
7
5.5
4.4
3.5
2.8
2.2
1.8
1.5
18.2
20.5
25.6
32
41
51.2
64
81.9
102.4
128
161.3
204.8
256
294.4
12.3
10.9
8.8
7
5.5
4.4
3.5
2.7
2.2
1.8
1.4
1.1
0.9
0.8
22.8
25.6
32
40
51.2
64
80
102.4
128
160
201.6
256
320
368
9.8
8.8
7
5.6
4.4
3.5
2.8
2.2
1.8
1.4
1.1
0.9
0.7
0.6
25×/9.5B
0.71
0.8
1
1.25
1.6
2
2.5
3.2
4
5
6.3
8
10
11.5
17.7
20
25
31.3
40
50
62.5
80
100
125
157.5
200
250
287.5
13.4
11.9
9.5
7.6
5.9
4.8
3.8
3
2.4
1.9
1.5
1.2
1
0.8
8.9
10
12.5
15.6
20
25
31.3
40
50
62.5
78.8
100
125
143.8
26.8
23.8
19
15.2
11.9
9.5
7.6
5.9
4.8
3.8
3
2.4
1.9
1.7
11.1
12.8
16
20
25.6
32
40
51.2
64
80
100.8
128
160
181.1
21.2
18.6
14.8
11.9
9.3
7.4
5.9
4.6
3.7
3
2.4
1.9
1.5
1.3
14.2
16
20
25
32
40
50
64
80
100
126
160
200
230
16.7
14.8
11.9
9.5
7.4
5.9
4.8
3.7
3
2.4
1.9
1.5
1.2
1
28.3
32
40
50
64
80
100
128
160
200
252
320
400
460
8.4
7.4
5.9
4.8
3.7
3
2.4
1.9
1.5
1.2
0.9
0.7
0.6
0.5
35.4
40
50
62.5
80
100
125
160
200
250
315
400
500
575
6.7
5.9
4.8
3.8
3
2.4
1.9
1.5
1.2
1
0.8
0.6
0.5
0.4
40×/6B
0.71
0.8
1
1.25
1.6
2
2.5
3.2
4
5
6.3
8
10
11.5
28.4
32
40
50
64
80
100
128
160
200
252
320
400
460
8.4
7.5
6
4.8
3.8
3
2.4
1.9
1.5
1.2
1
0.8
0.6
0.5
14.2
16
20
25
32
40
50
64
80
100
126
160
200
230
16.9
15
12
9.6
7.5
6
4.8
3.8
3
2.4
1.9
1.5
1.2
1
17.9
20.5
25.6
32
41
51.2
64
81.9
102.4
128
161.3
204.8
256
289.8
13.4
11.7
9.4
7.5
5.9
4.7
3.8
2.9
2.3
1.9
1.5
1.2
0.9
0.8
22.7
25.6
32
40
51.2
64
80
102.4
128
160
201.6
256
320
368
10.5
9.4
7.5
6
4.7
3.8
3
2.3
1.9
1.5
1.2
0.9
0.8
0.6
45.4
51.2
64
80
102.4
128
160
204.8
256
320
403.2
512
640
736
5.3
4.7
3.8
3
2.3
1.9
1.5
1.2
0.9
0.8
0.6
0.5
0.4
0.3
56.8
64
80
100
128
160
200
256
320
400
504
640
800
920
4.2
3.8
3
2.4
1.9
1.5
1.2
0.9
0.8
0.6
0.5
0.4
0.3
0.3
Eyepieces
Leica MZ16 FA – Annex
39
Leica Microsystems – the brand
for outstanding products
Leica, the leading brand for microscopes and scientific instruments, developed from
five brand names, all with a long tradition: Wild, Leitz, Reichert, Jung and Cambridge
Instruments. Yet Leica symbolizes innovation as well as tradition.
Leica Microsystems – an international company
with a strong network of customer services
Australia:
Austria:
Canada:
China:
Denmark:
France:
Gladesville, NSW
Vienna
Richmond Hill/Ontario
Hong Kong
Herlev
Rueil-Malmaison
Cédex
Bensheim
Milan
Tokyo
Seoul
Rijswijk
Lisbon
Germany:
Italy:
Japan:
Korea:
Netherlands:
Portugal:
Singapore:
Spain:
Barcelona
Sweden:
Sollentuna
Switzerland:
Glattbrugg
United Kingdom: Milton Keynes
USA:
Bannockburn/Illinois
Tel.
Tel.
Tel.
Tel.
Tel.
+1 800 625 286
+43 1 486 80 50 0
+1 905 762 20 00
+8522 564 6699
+45 44 5401 01
Fax
Fax
Fax
Fax
Fax
+61 2 9817 8358
+43 1 486 80 50 30
+1 905 762 89 37
+8522 564 4163
+45 44 5401 11
Tel.
Tel.
Tel.
Tel.
Tel.
Tel.
Tel.
Tel.
Tel.
Tel.
Tel.
Tel.
Tel.
+33 1 4732 8585
+49 6251 1360
+39 02 57 486 1
+81 3 543 596 09
+82 2 514 6543
+31 70 41 32 130
+35 1 213 814 766
+65 6 77 97 823
+34 93 494 9530
+46 8 625 45 45
+41 44 809 34 34
+44 1908 246 246
+1 800 248 0123
Fax
Fax
Fax
Fax
Fax
Fax
Fax
Fax
Fax
Fax
Fax
Fax
Fax
+33 1 4732 8586
+49 6251 136 155
+39 02 5740 3273
+81 3 543 596 15
+82 2 514 6548
+31 70 41 32 109
+35 1 213 854 668
+65 6 77 30 628
+34 93 494 9532
+46 8 625 45 10
+41 44 809 34 44
+44 1908 609 992
+1 847 405 0164
and representatives of Leica Microsystems
in more than 100 countries.
In accordance with the ISO 9001 certificate, Leica Microsystems (Switzerland) Ltd,
Business Unit Stereo & Macroscope Systems has at its disposal a management system
that meets the requirements of the international standard for quality management. In
addition, production meets the requirements of the international standard ISO 14001 for
environmental management.
Leica Microsystems (Switzerland) Ltd
Business Unit SM
CH-9435 Heerbrugg
Telephone +41 71 726 33 33
Fax +41 71 726 33 99
www.leica-microsystems.com
www.stereomicroscopy.com
The companies of the Leica Microsystems
Group operate internationally in four business
segments, where we rank with the market
leaders.
●
Microscopy Systems
Our expertise in microscopy is the basis for all
our solutions for visualization, measurement
and analysis of microstructures in life sciences
and industry. With confocal laser technology
and image analysis systems, we provide threedimensional viewing facilities and offer new
solutions for cytogenetics, pathology and materials sciences.
●
Specimen Preparation
We provide comprehensive systems and services for clinical histo- and cytopathology
applications, biomedical research and industrial quality assurance. Our product range
includes instruments, systems and consumables for tissue infiltration and embedding,
microtomes and cryostats as well as automated stainers and coverslippers.
●
Medical Equipment
Innovative technologies in our surgical microscopes offer new therapeutic approaches in
microsurgery.
●
Semiconductor Equipment
Our automated, leading-edge measurement and
inspection systems and our E-beam lithography
systems make us the first choice supplier for
semiconductor manufacturers all over the world.
Illustrations, descriptions and technical data are not binding and may be changed without notice.
M2-116-5en • © Leica Microsystems (Switzerland) Ltd • CH-9435 Heerbrugg, 2003 • Printed in Switzerland – IX.2003 – RDV
Leica Microsystems’ mission is to be the world’s first-choice provider of innovative
solutions to our customers’ needs for vision, measurement, lithography and analysis
of microstructures.