1
Captain Cook’s Tuck
Box
Healthy eating for children
by
Anastasis Software
Schools edition user manual
© Anastasis Ltd 2005-2009 “Captain Cook’s Tuck Box” is a registered trade mark.
Microsoft product screen shot reprinted with permission from Microsoft Corporation.
2
© Anastasis Ltd 2005-2009
Captain Cook’s Tuck Box
Congratulations on your purchase of the UK’s no. 1 cookery programme for children!
Captain Cook’s Tuck BoxTM contains 208 recipes for children aged from 5 years old and
upwards, presented to you by Captain Cook the Parrot. Let him show you how to
prepare some of the tastiest food you have ever tried, design colourful menus for a
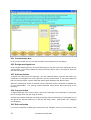
special meals, and print out certificates of achievement when you complete each stage
of Captain Cook’s Cookery Course.
CONTENTS
Page
1
2
3
4
5
6
7
8
9
10
11
12
13
14
15
16
17
18
19
20
21
22
23
24
25
26
27
28
29
30
31
32
33
How to cook ............................................................................................................. 4
Introduction .............................................................................................................. 4
Getting started (teachers)......................................................................................... 6
Getting started (pupils) ............................................................................................. 6
Network settings....................................................................................................... 7
Accessibility ............................................................................................................. 8
Personal users ......................................................................................................... 8
Personal settings...................................................................................................... 8
Captain Cook the Parrot........................................................................................... 9
Cookery books...................................................................................................... 9
Recipes .............................................................................................................. 12
Meal menus........................................................................................................ 21
Library ................................................................................................................ 22
The Administrator ............................................................................................... 24
User names ........................................................................................................ 24
“Windows” skills.................................................................................................. 25
Welcome screen................................................................................................. 28
Kitchen screen.................................................................................................... 30
Settings screen................................................................................................... 31
Cookery books screen ........................................................................................ 33
Recipes screen................................................................................................... 35
Find recipes screen ............................................................................................ 39
Meal menus screen ............................................................................................ 42
Progress screen ................................................................................................. 45
Food types screen .............................................................................................. 47
Meal types screen .............................................................................................. 49
Origins screen .................................................................................................... 51
Ingredients screen .............................................................................................. 53
Recipe timer ....................................................................................................... 55
Progress Records screen ................................................................................... 56
Classes and Pupils screen.................................................................................. 59
Printer settings.................................................................................................... 61
Technical support ............................................................................................... 61
© Anastasis Ltd 2005-2009
3
1 How to cook
1.1
Here are some simple tips to get you started.
1. Choose a recipe and print it out.
2. Buy any ingredients or utensils that you need
3. Clear a good space on the kitchen worktop. Clutter will slow you down and can be
dangerous.
4. Wash your hands and put an apron on.
5. Spray the working surfaces with an anti-bacterial cleaner and wipe them with a clean
dry paper towel.
6. Assemble the ingredients and utensils that you need.
7. Follow the instructions in the recipe.
8. If you are not sure what to do or if you need help, ask someone!
9. Wash up and put away afterwards.
10. Enjoy the tasty dish you have prepared!
1.2
Here are some extra tips.
1. Read the item on "Safety and Hygiene in the Kitchen" which is in the Library before
you do any cooking.
2. Look at any videos provided for the recipe that you have chosen. (You can click on
the underlined words in the recipe instructions.)
3. If you are preparing food for a meal, decide what time you want to start the meal.
Look at how long the recipe or recipes will take altogether. Take the total time away
from the time the meal is to start and you will know when you should start cooking.
Always allow a little extra time for emergencies.
4. Before you start cooking, ask someone else to help by doing the washing and wiping
up afterwards. Then you won't have to do everything yourself.
5. Afterwards add notes to the recipe in your personal cookery book for future reference.
For example, if the recipe said that a cake should be cooked for 40 minutes and you
found that this was 5 minutes too long in your oven, change the cooking time to 35
minutes. Then you won't burn the cake next time you use the recipe.
Note: These activities include Planning, Preparation, Teamwork and Assessment. Try to include
each of these in any project that you undertake.
2 Introduction
2.1
What is Captain Cook’s Tuck Box?
Captain Cook's Tuck BoxTM is a computer programme that helps children in an entertaining way to
TM
learn to cook. It also helps them to learn I.T. skills, as it includes a full range of Windows
features. It has been designed for use in schools and families.
2.2
Features
The features of Captain Cook's Tuck Box include:
•
•
•
•
•
•
4
208 recipes written especially for children, collected in three cookery books for Beginners
(ages 5 to 7, Key Stage 1), Juniors (ages 7 to 11, Key Stage 2) and Seniors (ages 11 to
13, Key Stage 3).
120 skills, of which the 64 most important are covered by just 15 basic recipes.
Videos of children carrying out many of the common cookery tasks
All pupils can make their own private cookery book, either by pasting in favourite recipes
from the cookery books provided, or by entering their own.
Additional themed cookery books can be created, using recipes provided or teachers'
own recipes. These are available to all pupils.
Search facility allows quick access to suitable recipes, e.g. recipes which take less than
© Anastasis Ltd 2005-2009
•
•
•
•
•
•
•
•
•
2.3
30 minutes to prepare and cook, recipes without nuts or meat, recipes for parties.
Special occasion recipes, e.g. for Mothers' Day, Fathers' Day, Christmas, Easter, Bonfire
night, etc. All recipes can be printed out. (A printer must be provided.)
Ingredient quantities can be scaled automatically for 1 to 999 people.
Meal menus can easily be designed and printed out for special occasion meals.
Every user has a Progress Chart, and on completing each of three stages can print out a
certificate of progress.
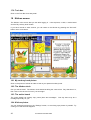
Educational reference library consists of "Dictionary of Food”, "Dictionary of Cooking”,
"Healthy Eating Guidelines”, “Healthy menus” and "Safety and Hygiene in the Kitchen".
Fully customisable settings for each individual user, including measurement systems,
personal photograph, music and sound effects.
Interactive kitchen clock teaches telling the time.
Tip of the day and joke of the day features on kitchen notice board.
Spoken comments by Captain Cook, an animated parrot who once belonged to a ship's
cook. (A sound system must be provided.)
Cookery skills
The recipes provided cover 120 cookery skills. The skills covered by the 15 basic recipes are:
2.3.1
•
•
•
•
•
•
•
2.3.2
•
•
•
•
•
•
•
•
•
•
•
•
2.3.3
•
•
•
•
•
•
•
•
•
•
•
•
•
•
Beginners' Cookbook
Buttering bread
Cleaning and washing up
Cooking over a low heat
Cutting bread or buns
Cutting crusts off sliced bread
Grating cheese
Grilling
•
•
•
•
•
•
Hard boiling an egg
Mixing
Slicing a banana
Spreading margarine on bread
Stirring
Toasting bread under a grill
Juniors' Cookbook
Baking
Beating an egg
Beating fat
Boiling
Breaking a egg
Chopping parsley, celery, spring
onions, garlic, etc.
Creaming butter or margarine
Folding in flour or cream
Food colouring
Frying
Grating hard fruit or root vegetables
Kneading
•
•
•
•
•
•
•
•
•
•
•
•
•
Mashing
Melting chocolate over hot water
Micro waving
Opening a tin
Pastry making
Peeling fruit or potatoes
Poaching fish
Pouring boiling water
Refrigerating
Rolling pastry
Shredding lettuce
Sifting flour or icing sugar
Water icing
•
Mixing cornflour (plain, blancmange or
custard)
Peeling onions
Rubbing fat in flour
Separating an egg
Simmering
Skinning chicken legs
Slicing apples, lemons, cucumber,
radishes, etc.
Squeezing an orange or lemon
Tossing a salad
Tossing or turning food in a frying pan
Whipping cream
Whisking
Seniors' Cookbook
Batter making
Chopping onions or tomatoes
Coring apples or pears
Cubing or dicing meat
Defrosting
Draining in a colander
Drying meringue
Flaking chocolate
Freezing
Frying in a saucepan
Gelatine
Grating lemon or orange rind
Halving and stoning olives
Lining a tin with greaseproof paper
•
•
•
•
•
•
•
•
•
•
•
© Anastasis Ltd 2005-2009
5
2.4
The basic recipes
The basic recipes are 15 recipes which children have to complete to earn their Progress
Certificates. They cover the 64 most important cookery skills. The basic recipes are:
2.4.1
•
•
•
•
2.4.2
•
•
•
•
•
2.4.3
•
•
•
•
•
•
Beginners' Cookbook
Fruit and yogurt
Draughts board sandwiches
Salami supper
Play dough
Juniors' Cookbook
Short crust pastry
Chicken and ham salad
Mocha fudge
Junior cakes
Fish cakes
Seniors' Cookbook
Pancake pie
Herby pizza
Tuna slice
Chicken in apple juice
Chocolate orange mousse
Lamb Bhuna
You can print out all the recipes and meal menus if you have a printer.
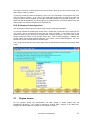
3 Getting started (teachers)
3.1
Choose a password
If you are the teacher or other staff member who is going to manage the programme, you should
first choose a password. Go to the "Welcome" screen by clicking the "Back" button in the bottom
left-hand corner until you reach it. Type "Administrator" in the box that says "Enter your name
here", and click "Go". Next, click the "Settings" button at the bottom to go to the "Settings"
screen. Enter a password of your choice in the "Name" box. Make a note of it somewhere so
that you don't forget it. Next time you open Captain Cook's Tuck Box type your new password in
the name box.
3.2
Enter a class and some pupils
Now enter a class and some pupils. On the Menu bar, select “Edit | Classes and Pupils”. Follow
the instructions on the screen, or read Section 30 “Classes and Pupils screen”. If you want to
make your own personal cookery book, make up a fictitious class name (e.g. “Staff room”) and
enter your own name into it as the only pupil. You can then log in using this name.
3.3
Make your personal cookery book and look at the recipes
Now read Section 4, Getting Started for Pupils, to learn what to do next!
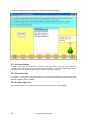
4 Getting started (pupils)
4.1
Making your personal cookery book
On the "Welcome" screen, which is the first screen displayed, click the small arrow button to the
right of the "Name" box and click on your name. If it is not there, ask your teacher to enter your
6
© Anastasis Ltd 2005-2009
name for you. Click "Go".
You will be asked if you want to choose how your cookery book looks. Click "Later" and you will
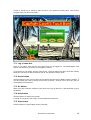
go to the kitchen, where you will see a picture, a clock, a notice board on the wall and a book.
Click on the picture of a book.
You will be asked if you want to make your personal cookery book now. Click "Yes". You will go
to the "Cookery books" screen. Follow the instructions at the top of the screen to choose recipes
from the cookery books available and copy them into your personal cookery book. Then click
"Done".
Back in the kitchen, click on the book again. This time you will go to the "Recipes" screen. Here
you can look at all the recipes in your cookery book, use them, change them, or print them out.
Click "Go back" in the bottom left-hand corner. You will return to the kitchen. Now click the
"Settings" button next to the "Go back" button. You will go to the "Settings" screen where you can
choose how your cookery book looks and sounds. When everything is how you want it, click
"Done".
When you have finished using Captain Cook's Tuck Box, just click "Goodbye" in the bottom righthand corner.
5 Network settings
If your school has a network the database files can be kept on a server, from which every
computer with a copy of the programme on it can access the recipes and most of the other
information.
Advantages of networking Captain Cook's Tuck Box
1. The network administrator can regularly back up the server files to some separate storage
medium. This means that the pupils' work will not be lost if a single computer fails.
2. Teachers who log in as the Administrator will be able to see the progress records of all the
pupils.
3. Pupils will have access to their personal cookery book and progress record from any computer
that has a copy of the programme on it.
How to store the database files on a server
When the programme is installed, you are asked to choose a folder for the database files. If you
choose a folder on a server to which all the computers on the network have access, then Captain
Cook's Tuck Box will be set up for networking. The same server folder for the database files must
be chosen every time you install the programme on a local PC.
If you previously chose folders for the database files on the computers on which the programme
was installed then you will have to move the database files to a server in order to network the
programme. In this case carry out the following steps.
1. If you used the default settings on the installation programme you will find two folders
named "database" and "backup" in the "C:\Documents and Settings\All Users\Application
Data\Anastasis\CapnCook" folder.
2. Create on the server a folder named "..\Anastasis\CapnCook" plus whichever of the
following matches the licence: "\Schools25", "\Schools50","\Schools100" or "\SchoolsSite", e.g.
"..\Anastasis\CapnCook\Schools25".
© Anastasis Ltd 2005-2009
7
3. Move the "database" and "backup" folders from the local computer to the new folder on the
server. You will then have two folders on it, e.g. "..\Schools25\database" and
"..\Schools25\backup".
4. Log in as the Administrator to each PC on which Captain Cook's Tuck Box is installed and
run the programme. You will be asked for the location of the two folders. Enter this
information and the programmes will then run normally.
On installing each additional copy of the programme on a classroom computer, select the same
folder on the server for the database files.
Locked database
It is important to prevent several work stations trying to modify the data files simultaneously, so
while one computer is connected to the database it locks it to prevent other computers from
connecting to it at the same time.
If the power supply fails or a pupil switches off a computer while the database is locked then it
may be impossible to continue to use the programme. If this happens, close Captain Cook's Tuck
Box and restart it.
6 Accessibility
All the controls in Captain Cook's Tuck Box can be reached by clicking on them with the mouse or
else by the successive use of the Tab key or the arrow keys. A third way to reach controls which
have an underlined letter on or beside them is to type the letter while the Alt key is pressed down.
This usually operates the control as well.
The tab key normally moves focus in rows from left to right across the screen starting at the top
and working downwards. If you want to move in the opposite direction press Shift + Tab until you
reach the control you want. For drop-down and list boxes use the up and down arrow keys to
select the item you want.
The active control is indicated by a broken line around it, or for items in the kitchen by a yellow
colour. It can be operated by clicking on it with the mouse or by pressing the Enter key. In some
cases double-clicking on a control will both select and operate it as the same time.
The principal mouse key can be changed using Microsoft's Control Panel|Accessibility Options.
For users who have difficulty in recognizing certain colours, the background and foreground
colours can be changed on the "Settings" screen. It is not possible to change the colour or size of
the text.
7 Personal users
If you log in on the Welcome screen by entering your name or some special name that the
Administrator chooses for you then you are a personal user. If you log in as "Anyone" you are not
a personal user. Only children or teachers logged in as a personal user can have a personal
cookery book.
The Administrator (usually a teacher) who logs in with a special password is not a personal user.
8 Personal settings
Individual users can customize Captain Cook’s Tuck Box to make it look and behave in the way
8
© Anastasis Ltd 2005-2009
they like best. If you log in as a personal user or the Administrator, the "Settings" screen will let
you choose your measurement system, photograph, music, sound effects, etc. The items
available are:
•
•
•
•
•
•
•
User's name - change your log in name
User's birthday - produces a surprise on your birthday
Weights and measures - specify whether measurement units are shown as metric (gm,
litres, etc) or imperial (oz, pints, etc), and whether oven temperatures are shown in
degrees Celsius or Fahrenheit or as Gas Marks
Kitchen - choose one of four options
Picture - choose one of three options or else install your own photograph or picture
Effects - turn pop-up help, parrot, music or sounds on or off, and choose your music
Colours - choose background and foreground colours for the programme
If you log in as Anyone some of the options above will not appear.
You can reach the "Settings" screen via the "Settings" button or the Menu bar. On the Menu bar
there is an item "Settings", which has two options, "General Settings" and "Personal Settings".
For personal users and the Administrator "Personal Settings" only is enabled: this will take you to
the "Settings" screen. If you log in as Anyone "General Settings" only will be enabled. This will
take you to the "Settings" screen with reduced options.
9 Captain Cook the Parrot
Captain James Cook was a famous British sea-captain and explorer who found Australia. (The
Aborigines who lived there didn't know it had been lost!) However in this programme Captain
Cook is a parrot who once belonged to a ship's cook. So he knows a lot about cookery and a lot
about ships. If you have speakers installed and switched on he will talk to you as he flaps around
the screen. If you still cannot hear him, try clicking “Sounds” on the “Settings” screen.
There are several things you can do with Captain Cook:
•
•
•
•
•
•
You can drag him to places of your choice on the screen, but he won't like it!
If you are very quick you will be able to catch him when he is flying.
You can hide him by right-clicking on him and clicking the word "Hide"
Or you can hide by shutting him up in the tuck box on the "Settings" screen. But if you do
shut him up, beware! You may hear some naughty seafaring words before you close the
lid!
You can stop him squawking and just read the words he says by unticking "Sounds" on
the "Settings" screen.
You can show him again on the "Settings" screen by ticking "Parrot", or by selecting File |
Parrot | On/Off from the menu when you are in the Kitchen.
If that doesn't work for some reason, try the following:
•
close Captain Cook's Tuck Box
•
use "My Computer" or "Windows Explorer" to select the project folder (usually
"C:\Program Files\Anastasis\CapnCook") and open the "Agent" folder
•
double-click on the file "MSAgent.exe".
Windows 7 regrettably does not supply the required Microsoft software and does not permit this
method of installation. So if your computer runs Windows 7, please look at the on-screen Help
under “Captain Cook” and follow the instructions.
10
Cookery books
10.1 Overview
Every recipe is stored in a cookery book. There are three kinds of cookery book:
© Anastasis Ltd 2005-2009
9
•
•
•
Tuck Box cookery books, provided with the programme
Personal cookery books, created by individual users
General cookery books, created by the Administrator
Each user may have one personal cookery book. Personal cookery books can be seen only by
the individual user who made them. The others can be seen by everyone.
New cookery books from Anastasis Software may also be installed by the Administrator, if and
when they are available. When a new book is saved in the folder that Captain Cook's Tuck Box is
in, the menu item File | Install Cookery Book will be enabled. By selecting this you can install a
new book.
10.2 Tuck Box cookery books
Three "Tuck Box" cookery books are provided by Captain Cook with recipes from his tuck box:
"Beginners' Cookbook"
"Juniors' Cookbook"
"Seniors' Cookbook"
- 30+ recipes for ages 5 to 7, Key Stage 1
- 70+ recipes for ages 7 to 11, Key Stage 2
- 80+ recipes for ages 11 to 13, Key Stage 3.
The recipes are categorized by 32 Meal Types from "Barbecues" to "Vegetarian foods" . Tuck
Box cookery books can be viewed by everybody, but they cannot be changed.
10.3 Personal cookery books
If you log in as a personal user you can create your own private cookery book by pasting in
selected recipes from a Tuck Box cookery book or a General cookery book. Once you have
made your Personal cookery book, you can also type your own recipes into it. No-one but you
can add, see, change or delete recipes in your Personal cookery book. Why not paste in just the
recipes you have cooked, adding your own comments to them? Then your cookery book will be a
record of everything you have tried and what you thought of it!
The number of personal cookery books that can be created depends on the licence. Licences for
25, 50 or 100 pupils are available, or for an unlimited number of pupils on one school site.
10.4 General cookery books
General cookery books are cookery books created by the Administrator that can be viewed by
everybody. For example a teacher might create a book of class recipes. No one but the
Administrator can add, change or delete recipes in a General cookery book.
An unlimited number of General cookery books can be created.
10.5 Creating a cookery book
If you log in as a personal user and have not yet made a personal cookery book then you can do
this by going to the kitchen and clicking "My cookery book". This will take you to the "Cookery
books" screen where you can create your cookery book.
The Administrator can create an unlimited number of other cookery books which everyone can
see. To do this the Administrator should click the "Cookbooks" button and choose "Make a new
cookery book". This option is unavailable to other users.
If you log in as "Anyone" you will not be able to create a cookery book.
10.6 Viewing a cookery book
If you log in as a personal user you can view your personal cookery book by going to the kitchen
and clicking "My cookery book". This will take you to the "Recipes" screen where you can view all
your recipes.
10
© Anastasis Ltd 2005-2009
To view one of the other cookery books, click the "Cookbooks" button at the bottom of the screen.
You can then choose to look at one particular cookery book or (unless you are the Administrator)
all the cookery books except other people's personal cookery books. Follow the instructions on
the screen, click "OK" and you will go to the "Recipes" screen where you can look at the recipes
in the book or books that you have chosen.
You cannot view a cookery book which belongs to another personal user.
10.7 Changing a cookery book
Changing a cookery book means changing its name or adding a recipe to it or deleting a recipe
from it. To change a recipe, see Section 10.4 "Changing a recipe".
Personal users can change their personal cookery book and the Administrator can change
General cookery books, but otherwise cookery books cannot be changed.
To change a cookery book, click the "Cookbooks" button at the bottom of the screen, then click
"Change a cookery book" and follow the instructions. You will go to the "Cookery books" screen
where you can change the book you have chosen.
10.8 Deleting a cookery book
Deleting a cookery book means deleting the cookery book's name and all the recipes that are in it.
You should think carefully before doing this, and if necessary first transfer any recipes that you
want to save to another cookery book.
Personal users can delete their Personal cookery book and the Administrator can delete General
cookery books, but otherwise cookery books cannot be deleted.
To delete a cookery book, click the "Cookbooks" button at the bottom of the screen, then click
"Throw out a cookery book" and follow the instructions.
If you wish to delete all a class's cookery books at the end of a school year, then all that is
necessary is to log in as Administrator and delete the class, or all the names of the children in the
class. Their personal cookery books and other records will then be deleted as well. See Section
14.5 “Deleting a user name”.
10.9 Installing a new cookery book
New cookery books from Anastasis Software may be installed by the Administrator. When a new
book has been saved in the folder that Captain Cook's Tuck Box is in, the menu item File | Install
Cookery Book will be enabled. Click this to install the new book.
If the new book is a revised edition of an existing book it will replace the existing one.
Information about new cookery books will be provided on the Anastasis web site.
10.10 Glennis the Menace's recipes
When you are creating a cookery book or changing a cookery book one of the cookery books that
you can copy recipes from is "Glennis the Menace's Recipes". Glennis is Dennis's older sister.
She is just as bad as Dennis but she is brainy too. You can tell that she is brainy because she
can spell "recipes". She got some of her recipes from their Gran, and others she invented herself.
Unfortunately Dad put Glennis's recipe book on a bonfire after she had used it to cook a special
birthday tea for Mum - you can guess what the tea was like! Dennis managed to save just the
contents page, so we know the names of the recipes but nothing more. (See Section 15.9
“Saving your work”.)
If you copy the recipe names into your personal cookery book perhaps you can invent your own
menacing recipes for them. But take care not to poison anyone!
© Anastasis Ltd 2005-2009
11
By the way, Dennis thought up how to get some cows' eyes for the Pickled Cows' Eyes recipe.
He collected some beer cans and put them on his cartie outside a pub with a notice saying "Free
cans of beer (empties)". Then he went to the abattoir (where they cut up meat) and yelled, "Free
cans of beer at the King's Head pub!" All the men in the abattoir ran out to get them, so Dennis
then had a free hand to collect some cows' eyes with the help of his trusty pen knife.
Glennis was so pleased when Dennis gave her a bag full of cows' eyes that she nearly gave him
a kiss. Yeuch!
If you want to do that recipe I suggest that you use bulls' eyes instead. You can buy them in a
sweet shop!
11 Recipes
11.1 Overview
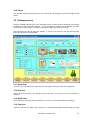
Recipes can be created, viewed, printed or changed on the "Recipes" screen, or deleted on the
"Cookery books" screen. Every recipe is stored in a cookery book.
•
•
•
Recipes in a Tuck Box cookery book can be viewed and printed out by everyone but
cannot be created, changed or deleted.
Recipes in a personal cookery book can be created, viewed, printed, changed or deleted
only by the owner of the cookery book.
Recipes in a General cookery book can be created, changed or deleted only by the
Administrator, but can be viewed or printed out by everyone.
The recipes in the three Tuck Box cookery books were written by four aunties of the ship's cook
that Captain Cook the parrot belonged to. The cook kept them (the recipes, not the aunts) in a
tuck box in his cabin, together with a huge bag of aniseed balls that his favourite aunt gave him
when he left port. That is why the programme is called "Captain Cook's Tuck Box."
11.2 Creating a recipe
To create a recipe click the "Recipes" button and choose "Make a new recipe". Think of a name
for your new recipe, follow the instructions on the screen and click "OK". You will go to the
"Recipes" screen. Then just follow the instructions on the screen.
Remember to save your work your work regularly! (See Section 15.9 “Saving your work”.)
11.3 Viewing a recipe
To view a recipe click the "Recipes" button and choose "Look at a recipe". Follow the instructions
on the screen and click "OK". You will go to the "Recipes" screen where you can view the recipe
you have chosen.
You can view recipes from your personal cookery book, from Tuck Box cookery books, or from
General cookery books. You cannot view a menu made by another personal user.
11.4 Changing a recipe
To change a recipe first find it on the "Recipes" screen. On the "Recipes" screen, click the
"Change" button. A lot of boxes and buttons will appear. You can use these to make whatever
changes you want to. When you have finished, click "Done". Remember to save your work your
work regularly! (See Section 15.9 “Saving your work”.)
You can change a recipe only if it is in your personal cookery book, or if you have logged in as the
Administrator and it is in a General cookery book.
12
© Anastasis Ltd 2005-2009
11.5 Printing a recipe
To print a recipe you will need a printer connected to the computer and switched on, with A4
paper in it.
Find the recipe on the "Recipes" screen and click the "Print" button. You can then print the recipe
out in the normal way.
11.6 Finding a recipe
To find a recipe or recipes click the "Recipes" button, choose "Find a recipe" and click "OK". You
will go to the "Find recipes" screen. Follow the instructions on the screen to find the recipes you
want. Then click "Find" to see them.
You can search for recipes by:
•
•
•
•
•
•
•
•
•
•
Recipe name (whole or part)
Cookery book
Origin
Meal type
Preparation time
Total time
Score (exact/exact or higher)
Skill level (exact/exact or easier)
Ingredients (up to 3, included/excluded)
Instruction word (whole or part, included/excluded)
Be careful when you choose a Preparation time, Total time, Score or Skill level, because in some
recipes these values may not be set. For example, if you choose a Preparation time of 20
minutes or less and the programme finds a recipe in which the Preparation time is blank, it won't
know how long the recipe takes to prepare, so it will leave it out of the recipes found list. No Tuck
Box cookery book recipes have a Score, so leave the Score box blank if you want to find Tuck
Box recipes.
11.7 Deleting a recipe
You can delete a recipe only if it is in your personal cookery book, or if you have logged in as the
Administrator and it is in a General cookery book.
Recipes are deleted from a cookery book, so to delete a recipe click the "Cookbooks" button,
choose "Change a cookery book" and follow the instructions on the screen. You will go to the
"Cookery books" screen. Follow the instructions on the screen to rub out the chosen recipe.
11.8 Importing recipes
New cookery books can be added when they become available from Anastasis Software. To
import a cookery book select "File | Import Recipes" on the Menu bar, and follow the instructions.
11.9 Edit mode
Recipes can be displayed in two ways: in "Edit mode" or in "View mode. In Edit mode there are
lots of buttons and boxes that let you change the recipe.
If the recipe is in View mode then a "Change" button will be visible on the right of the "Print"
button on the "Recipes" screen. Click the "Change" button to put the recipe in Edit mode.
However if the recipe is not in a cookery book that you have made then you won't be able to
change it, so Edit mode won't be available.
11.10 View mode
Recipes can be displayed in two ways: in "View mode" or in "Edit mode. In View mode recipes
are easier to read, but they cannot be changed.
© Anastasis Ltd 2005-2009
13
If the recipe is in Edit mode then a "View" button will be visible on the right of the "Print" button on
the "Recipes" screen. Click the "View" button to put the recipe in View mode.
11.11 Scaling
Scaling is what happens to the ingredient quantities when you change the number of servings for
a recipe. For example, the quantities for the Gingerbread men recipe were originally enough for 4
gingerbread men. One of the ingredients is "2 tablespoons of milk". If you change the number of
servings from 4 to 1, then this ingredient will change to "2 teaspoons of milk", because that is
about one quarter of 2 tablespoons. If you like the gingerbread men so much that you decide to
make a hundred of them, the ingredient will change to "5 teacups of milk", because it would take
ages to measure out 50 tablespoons. If you go really potty and set the number of servings to 999,
then guess what? It says "1 bucket of milk"!
11.12 Changing the number of servings
For a recipe in your personal cookery book, or in a General cookery book if you have logged in as
the Administrator, click the "Change" button on the "Recipes" screen and then change the number
in the "Number of servings" box. For a recipe in a cookery book that you can't change, click "Edit
| Number of Servings" on the Menu bar.
When you change the number of servings for a recipe on the "Recipes" screen, the ingredient
quantities displayed on the "Recipes" screen will change automatically. So if you have a recipe
for 4 people and you want to make enough for 3 people you don't have to do a lot of hard sums,
just change the number of servings to 3!
11.13 Oven temperatures
Captain Cook's Tuck Box lets you choose the temperature scale which you want to see in the
recipes. Go to the Settings screen to choose the one you want.
Gas Mark or
Regulo
Fahrenheit
Celsius or
Centigrade
Description
0
1/4
1/2
1
2
3
4
5
6
7
8
9
10
200
225
250
275
300
325
350
375
400
425
450
475
500
95
105
120
135
150
165
175
190
205
220
230
245
260
Lowest possible
Extremely cool
Very cool
Cool
Moderately cool
Warm
Moderate
Moderately hot
Fairly hot
Hot
Very hot
Extremely hot
Hottest possible
11.14 Food types
Food types are basic foods that are used in recipe ingredients, like sugar, tomatoes or ship's rats.
(The cook on Captain Cook's ship ran out of food on one voyage so he had to experiment.
Captain Cook nearly became an ingredient himself!)
If you enter a recipe of your own, it may have some food types in it that Captain Cook has never
heard of. In this case, you will have to tell him how they are measured (for example in millilitres or
in grammes), and how they are spelt in the singular and the plural. As food types are very
important, only the Administrator can do this.
14
© Anastasis Ltd 2005-2009
Food types are entered, changed or deleted on the "Food types" screen, which is reached by
going to "Edit | Food" on the Menu bar. For security reasons only the Administrator has access to
this screen. If the Administrator is making or changing a recipe and enters a new food on the
"Ingredients" screen, then the Food types screen will pop up automatically.
11.15 Ingredients
Ingredients are the foods which are used in a recipe. They usually have a quantity, and
sometimes a preparation method as well. "2 medium onions peeled" is an ingredient.
Ingredients can be added, changed or removed on the "Ingredients" screen, which you reach by
clicking the "Ingredients" button on the "Recipes" screen when you are making or changing a
recipe. Remember that you can only change recipes in your personal cookery book, or in a
General cookery book if you are the Administrator. So if you are looking at a recipe in another
cookery book you won't see the "Ingredients" button.
11.16 Meal types
Meal types such as "Meat and poultry", "Salads" and "Cakes" are assigned to recipes. They are
used when searching on the "Find recipes" screen for a recipe suitable for a particular type of
meal. If you enter your own recipes you can assign meal types to them. You can also add or
delete meal types from recipes in your personal cookery book by clicking the "Meal types" button
on the "Recipes" screen. There are 32 meal types provided, but the Administrator can add more
if necessary.
Meal types are added, changed or deleted on the "Meal types" screen, which is reached by going
to "Edit | Meal Types" on the Menu bar. For security reasons only the Administrator has access to
this screen.
Here is a list of the meal types provided:
•
•
•
•
•
•
•
•
•
•
•
•
•
•
•
•
Barbecues
Biscuits
Breakfasts
Cakes
Celebrations
Cheese dishes
Desserts, cold
Desserts, hot
Drinks
Egg dishes
Fish and seafood
Healthy eating
Ices and yogurt
International food
Meat and poultry
Microwave food
•
•
•
•
•
•
•
•
•
•
•
•
•
•
•
•
Packed lunches and picnics
Party food
Pastas
Pastry
Pizzas
Play food
Rice and rice dishes
Salads
Sandwiches, cold
Sandwiches, hot
Sauces and dressings
Savoury snacks
Soups and starters
Spreads
Sweets (confectionery)
Vegetarian
11.17 Origins
Origins are where recipes come from. The recipes in the Tuck Box cookery books came from the
four aunts of the ship's cook who owned Captain Cook the parrot. If you add your own recipes to
your personal cookery book you may want to enter where they came from - perhaps a magazine
or a favourite cookery book or even from the school dinner lady! An origin can be added to a
recipe from the list in the "Origin" box on the "Recipes" screen.
New origins can be added to the list of origins available, and origins on the list can be changed or
deleted, on the "Origins" screen. This is reached by going to "Edit | Origins" on the Menu bar.
You can also add a new origin in the "Origin" box on the Recipes screen. For security reasons
© Anastasis Ltd 2005-2009
15
only the Administrator has access to this screen. The Administrator can also add a new origin in
the "Origin" box on the Recipes screen.
11.18 Recipes for special days
On special days like Christmas Day recipe suggestions are shown on the kitchen noticeboard.
But usually you will have to buy the food in advance. So when a special day is drawing near, look
here to see which recipes are suggested, then you will be able to celebrate in style!
New Year's Day (1 January)
Igloo Cake
Snowmen
Wassail Cup
Pongal, the Hindu Harvest Festival (early January)
Ground rice payasam
St. Valentine's Day (14 February)
Icy spicy biscuits
Saucey legs
Knickerbocker glory
Shrove Tuesday or Pancake Day (47 days before Easter Day)
Pancake pie
Pancakes with orange filling
Lemonade
St. David's Day (1 March – the Patron Saint of Wales)
Welsh rarebit
Welsh cakes
Old King Cole's bowl
St. Patrick's Day (17 March – the Patron Saint of Ireland)
Irish stew
Pototo and cheese cakes
Viking ships
Here are the traditional ingredients of Irish coffee:
Cream
- rich as an Irish brogue
Coffee
- strong as a friendly hand
Sugar
- sweet as the tongue of a rogue
Irish whiskey - smooth as the wit of the land.
Mothering Sunday or Mothers' Day (3 Sundays before Easter Day in the UK, 2nd Sunday in
May in the USA and some other countries)
Mothers' Day breakfast
Almond sweets
Floating islands
Pesach (Jewish Passover) (around Easter time)
Coconut pyramids and Cinnamon balls
Easter Sunday (Very complicated date!)
Sunrise starter
Dawn surprise
Bunny biscuits
Rabbit cake
St. George's Day (23 April – the Patron Saint of England)
The Great British Breakfast
Roast Beef
16
© Anastasis Ltd 2005-2009
Yorkshire Pudding
Whit Sunday (7 Sundays after Easter Day)
Spiced kebabs
Apple burp
Fathers' Day (3rd Sunday in June in USA and elsewhere)
Scotch eggs
Egg nog
Strawberry steamed pudding with custard
Midwinter's Day (21 July on Captain Cook's calendar!)
Beefburglars
Four-in-one barbecued trout
Grandma Green salad
Sloshed coconut
Rosh Hashanah, the Jewish New Year (September)
Lekach (honey and spice cake)
Hallowe'en (31 October)
Venus swamp soup
Sea urchins
Caterpillar salad
Worm pie
Guy Fawke's Night or Bonfire Night (5 November)
Fizzing ale
Cannon balls
Gunpowder barrels
Conspirators' pudding
St. Andrew's Day (30 November – the Patron Saint of Scotland)
Porridge
Fishcakes
Scotch pancakes
Christmas Day and Boxing Day (25 & 26 December)
Uncle Arnie's luxury Christmas pudding
Marzipan fruit
Wise men's gifts
Turkey kebabs
Luxury mince squares
Eid, a Muslim Festival (the date changes every year)
Mrouziya
Ramadan, a Muslim Festival (the date changes every year)
Fig and date bread
11.19 Videos
When you look at a recipe from a Tuck Box cookery book you may see words underlined in the
instructions. If you click on the underlined words a video will be shown. The available videos are
listed in Section 13.8 “Videos”.
11.20 Recipe FAQs
FAQs are Frequently Asked Questions - questions that people often ask. But FAQs are not only
questions, they have answers as well. Perhaps they should be called FAQWAs - Frequently
Asked Question With Answers!
© Anastasis Ltd 2005-2009
17
These FAQWAs may help you when you are making a new recipe or changing an existing one or
trying to find one.
11.20.1 General
Q: How can I make a new recipe or change one that already exists?
A: Look at Section 11.2 “Creating a recipe” or Section 11.4 “Changing a recipe”.
Q: How can I enter the characters "è", "é" and "ê" (for example in crême brulée)?
A: Type "e", then type "\", "/" or "^" respectively.
11.20.2 Recipes screen
Q: Sometimes several recipes with the same name are listed on the Recipes screen, and
sometimes they are just the same! Why is this?
A: If someone copies a recipe into his personal cookery book and does not change its name then
both the original recipe and the new recipe will be listed under the same name. The reason they
are both listed is that the user might have made some changes to the recipe in his personal
cookery book, so the two recipes may be different. Captain Cook doesn't know which one he
wants to see, so Captain Cook displays both of them to allow him to choose.
11.20.3 Origins
Q: What is an "origin"?
A: A recipe origin is the source of the recipe, for example the magazine or book that you found it
in. For more information, see Origins in Section 10.17.
Q: What is the point of entering an origin?
A: In the "Find recipes" screen you can search for all the recipes from a particular origin. If you
have assigned that origin to your recipe then your recipe will be displayed in the list of recipes it
finds.
Q: How do I enter an origin?
A: In the "Recipes screen" in Edit mode the arrow button by the "Origins" box displays a dropdown list of origins already stored in your computer. Click on the one you want. If the origin you
want is not there, you can type it into the box. If you don't want to enter an origin, just leave this
box blank or click on the top, blank, entry in the drop-down box.
11.20.4 Meal types
Q: What is a "meal type"?
A: A meal type is a type of meal for which a recipe is suitable, for example "hot snack" or "party
food". A recipe may have more than one meal type assigned to it.
Q: What is the point of entering a meal type?
A: In the "Find recipes screen" you can search for all the recipes suitable for a particular meal
type. If you have assigned that meal type to your recipe then your recipe will be displayed in the
list of recipes it finds. The "Meal menus screen" also uses meal types to display suitable recipes
for your dinner menus.
Q: How do I enter a meal type?
A: In the "Recipes screen" in Edit mode click the "Meal types" button. You will then see a list of
the meal types stored in the computer and you will be able to copy the ones you want into your
recipe. The Administrator (probably your teacher) can also enter new meal types. If you are not
the Administrator and you want to enter a new meal type, ask the Administrator to do this for you.
11.20.5 Ingredients
18
© Anastasis Ltd 2005-2009
Q: How do I enter ingredients?
A: In the "Recipes screen" in Edit mode click the "Ingredients" button and follow the instructions
on the screen.
Q: Why can't I type ingredients in directly, like instructions?
A: Ingredients have to be entered in a special way so that they can be scaled for different
numbers of servings. For example, if you had a recipe for 2 people that said "5 drops almond
essence" and you then wanted to see the quantities you would need for 20 people, you wouldn't
want to read "50 drops almond essence". The programme knows how much a drop is and in this
case if you changed the number of servings to 20 it would display "4 teaspoons almond essence",
which is much better.
Q: How do I enter a food when it isn't listed in the "Food" box on the Ingredients screen?
A: Personal users can't enter new food types. If you want to enter "edible snails", for example,
ask the Administrator (usually your teacher) to enter these as a new food type, via the Menu bar
"Edit | Food types". Snails will then appear in the drop-down list in the "Food" box. Mind you
don't tread on them!
Q: How can I enter alternative foods, e.g. "12 oz cod, haddock or whiting"?
A: Enter the first food ("cod") in the "Food" box, and the rest in the "Preparation and Notes" box.
Start with a comma (", haddock or whiting") or the word "or" ("or haddock or whiting").
Q: Why do I sometimes get a message "There is something wrong with ...?"
A: There are several possible reasons:
•
the units don't match the food, e.g. "1 lb water", or "1 pumpkins"
•
imperial and metric units are mixed, e.g. "1½ litres" instead of "1.5 litres"
•
the ingredient you have entered is plain silly, e.g. "thick orange juice" or "1 large litre milk
chopped into small pieces"
If you are the Administrator you may also be asked, "Do you want to look at the food?" If you
think that what you have entered is correct, click "Yes" to look at the food and correct its
description if necessary.
Q: Why can't I enter "1 level tablespoon orange juice"?
A: Because orange juice is a liquid and you can't have a heaped tablespoon of it! Just enter "1
tablespoon orange juice." The programme checks that entries make sense, and sometimes it
gets a little over-fussy.
Q: In a salad recipe for 4 people I entered "4 small tomatoes" (one for each person) but the
programme changed it to "2 medium tomatoes". How can I stop this?
A: Enter "1 small tomato" instead of "4 small tomatoes", and type "per person" or "per serving" in
the "Preparation and Notes" box. Whenever the programme sees the word "per" it does not scale
the quantities for different numbers of servings. If you are the Administrator another way is to
enter "small tomatoes" in the food box. When the "Food types" screen pops up enter "small
tomatoes" as a special food type. The number of small tomatoes required will then be scaled as
normal for the number of servings selected.
Q: I want to enter "2 scoops ice cream", but the word "scoop" is not available for the Measures
box. What should I do if the unit of measure I want to use is not there?
A: Work out how your unit would be in a unit which is provided, e.g. 1 scoop is 50 ml or 2 fluid oz,
so enter "100 ml ice cream" or "4 fl oz ice cream" instead of "2 scoops". In the "Preparation and
Notes" box you could also add "(1 scoop for each person)". Don't put "(1 scoop per person)"
because if you use the word "per" the quantities will not be scaled.
Q: How do I enter "A pinch of salt" or "A dash of vinegar"?
A: You have to enter "1 pinch salt" or "1 dash vinegar".
Q: I am entering a new ingredient. I have chosen the word "level" from the Fractions box but it
was a mistake. How can I delete it?
A: Press the "Delete" key, or use the little arrow button at the side of it to move to the very top of
the list where you will find a blank space. Click on this blank space and the word you entered will
© Anastasis Ltd 2005-2009
19
disappear. You can do the same thing in the "Units" box, "Measures" box and "Food" box.
Q: Why are there two boxes labelled "No. of servings", one on the Ingredients screen and the
other on the Recipes screen?
A: In the box on the Ingredients screen you enter how many servings or items the ingredients you
have entered will provide. In the box on the "Recipes" screen you enter the number of servings or
items that you actually want to cook or prepare. When you change the number of servings on the
"Recipes" screen and press the "Enter" key, the quantities of ingredients displayed will change to
show what you need for this particular number of servings or items.
Q: I can't see a box for the number of servings on the Recipes screen. Where is it?
A: It is visible only when you are editing (changing) a recipe in your personal cookery book or a
book that you have created as the Administrator. If you want to change the number of servings in
a recipe that you can't edit, go to the Menu bar and select "Edit | Number of Servings". (You must
have a recipe displayed to do this.)
11.20.6 Instructions
Q: Why does the text go back to the top when I move the Instructions scroll bar and then click in
the Instructions box?
A: You have to click in the Instructions box first to "focus" it. Then use the scroll bar.
Q: How can I enter a bullet point in the recipe instructions?
A: Type "#". (It's on a key at the right-hand end of the main keyboard.)
Q: How do I enter an oven temperature?
A: Type one of the following in the "Instructions" box:
for Gas Mark or Regulo temperatures: "1/4G", "1/2G", "1G" to "9G"
for Fahrenheit temperatures: "225F" to "475F"
for Celsius or Centigrade temperatures: "120C" to "275C".
It is important to type them exactly as shown, but without the inverted commas.
Q: How can I be sure that the temperature I have entered is valid?
A: While you are still in the "Instructions" box, click the right mouse button or click in another box.
The colour of the temperature will change to blue if you have entered it correctly.
Q: When I click the "View" button, why does the temperature appear in a different scale from the
one I entered, e.g. "1/4G" turns into "225°F" instead of "Gas mark ¼"?
A: The temperature is displayed in the scale that you have chosen on the "Settings screen" .
Q: The recipe I am copying from says "a warm oven". How do I know what temperature setting
that is?
A: Look at Section 10.13 “Oven temperatures”.
11.20.7 Finding recipes
Q: When I try to find recipes on the "Find recipes" screen, why doesn't it show recipes from the
Beginners', Juniors' or Seniors' cookery books?
A: It is probably because you have entered a score in the Score box. Recipes in the Tuck Box
cookery books don't have yumminess scores, so make sure that the Score box is blank if you
want to find Tuck Box recipes. If that is not the problem, click the "Wipe out" button to start your
search again, then set one box at a time and click "Find". Then set the second box you want and
click "Find", and so on. As soon as the TuckBox recipes stop appearing in the list of recipes
found you should be able to see why. Remember that if you select "Yes please" then only recipes
with the item shown next to the "Yes please" box will be found. If you select "No thank-you" only
recipes without the item shown next to the "No thank-you" box will be found.
20
© Anastasis Ltd 2005-2009
12 Meal menus
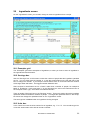
12.1 Overview
Colourful menus for special meals can be created and printed out on the "Meal menus" screen.
This is reached by clicking the "Menus" button.
Courses can be added either by typing in your own words, or by selecting a recipe. (You will not
be able to use recipes from anyone else's personal cookery book.)
A selection of borders is available, together with different styles for the separating lines between
courses and a choice of fonts and font styles.
Menus can be printed out in various formats and folded paper sizes using A4 paper.
An editable "Sample" menu is provided to help you to get started.
12.2 Creating a menu
To create a meal menu click the "Menus" button and choose "Make a new menu". Think of a
name for your new menu, follow the instructions on the screen and click "OK". You will go to the
"Meal menus" screen. Then just follow the instructions on the screen.
12.3 Viewing a menu
To view a meal menu click the "Menus" button and choose "Look at a menu". Follow the
instructions on the screen and click "OK". You will go to the Meal menus screen where you can
view the menu you have chosen.
You can view menus which you have made or which the Administrator has made. You cannot
view a menu made by another personal user.
12.4 Changing a menu
To change a meal menu click the "Menus" button and choose "Look at a menu". Follow the
instructions on the screen and click "OK". You will go to the Meal menus screen. Then just follow
the instructions on the screen. When you have finished, click "Done".
You can change menus which you have made, or menus which someone has made when logged
in as "Anyone". You cannot change a menu made by the Administrator or another personal user,
and you cannot change the name of the "Sample" menu or the courses in it.
12.5 Printing a menu
To print a menu you will need a printer connected to the computer and switched on, with A4 paper
in it. Use a colour printer if possible.
Find the menu on the "Meal menus" screen and click the "Print" button. You will be asked to
choose a format. The options are:
•
•
•
•
•
A4 portrait - this prints a large A4 menu suitable for notice boards
A5 landscape left - this prints a half size menu on the left-hand side of the sheet
A5 landscape right - this prints a half size menu on the right-hand side of the sheet
A5 landscape double - this prints a half size menu on both sides of the sheet
A6 folded - this prints a quarter size menu in the bottom right corner of the sheet so
that it can be folded up like a greetings card
12.6 Deleting a menu
You can delete any meal menu that you created, but not one that another user created. If you log
in as "Anyone" you can delete menus that were created when logged in as "Anyone". To delete a
© Anastasis Ltd 2005-2009
21
menu click the "Menus" button, choose "Throw out a menu" and follow the instructions on the
screen.
13 Library
13.1 Overview
The Library is reached by clicking the "Library" button. It contains seven items:
•
•
•
•
•
•
•
My Progress Chart
Dictionary of Food
Dictionary of Cooking
Healthy Eating Guidelines
Healthy Menus
Safety and Hygiene in the Kitchen
Videos
A Progress Chart is not available to the “Anyone” or the Administrator.
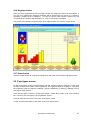
13.2 Progress Charts
Every personal user has a Progress Chart. This is a bar chart which shows how many basic
recipes he or she has completed. The basic recipes are recipes which have been selected to
include more than 60 of the most important basic cookery skills. Four have to be completed to
reach "Beginner" level, five more to reach "Junior" level, and six more to reach "Senior" level.
When a level has been reached the user can print out a personal Progress Certificate for that
level.
Individual Progress Charts can be seen by personal users on the "Progress" screen. This is
reached by clicking the "Library" button and choosing "My progress chart".
The Administrator will see not see My progress chart" but should use the Menu to select
"Edit|Progress records". Selecting this option will display a progress record of all the pupils
(personal users) who use the database. If the database is kept on the same computer as the
programme is it will show the names of everyone who uses the programme on that computer. If
the database is kept on a network server it will show the names of everyone who uses the
programme on the network.
13.3 Dictionary of Food
This is a dictionary for children which describes all the foods used in the recipes and many other
foods as well. It is reached by clicking the "Library" button.
13.4 Dictionary of Cooking
This is a dictionary for children which explains cookery words and phrases from "A la carte" to
"Wok". It is reached by clicking the "Library" button.
13.5 Healthy Eating Guidelines
This is an important booklet for children which explains the connection between food and health.
What you eat can affect:
•
•
•
•
your concentration and performance at school
your growth and development
your resistance to illness
the development of a healthy lifestyle which can continue into adulthood.
Topics covered include:
22
© Anastasis Ltd 2005-2009
•
•
•
•
•
•
•
•
a balanced diet
the nutrients in food
which foods are good for us
eating suggestions
allergies
vegetarianism
dieting
why healthy eating is important.
The booklet is reached by clicking the "Library" button.
13.6 Healthy Menus
In the Library there is a booklet called "Healthy Menus". This is full of exciting ideas for
breakfasts, packed lunches and after-school snacks. They all taste scrumptious and won't make
you put on too much weight. What more could you want?
You can also find 10 menus for complete healthy meals on the "Meal menus" screen. They are
entitled "Menu A" to "Menu J". And if you can't find what you want there, why not make up your
own healthy eating menu by going to the "Find recipes" screen and selecting the "Healthy eating"
meal type? This will show you all the healthiest Tuck Box recipes which you can put together to
make your own fighting fit formula.
The Healthy Menus booklet is reached by clicking the "Library" button.
13.7 Safety and Hygiene in the Kitchen
This is an important booklet for all young cooks, and for old ones too!
Cooking is great fun, but some things you do when you are cooking can be dangerous. Following
these simple rules in the kitchen will help to keep you safe and also anyone else who eats the
food you cook!
Topics include:
•
•
•
•
•
•
•
Before you start
Spills and breakages
Care with utensils and electrical appliances
Using the cooker
Using the microwave
Washing up
Food hygiene.
The booklet is reached by clicking the "Library" button.
13.8 Videos
When you look at a recipe from a Tuck Box cookery book you may see words underlined in the
instructions. If you click on the underlined words a video will be shown.
Here is a list of all the videos available.
•
•
•
•
•
Buttering bread
Chopping celery
Coring an apple
Creaming margarine
Crushing garlic
•
•
•
Cutting up fruit
Dicing meat
Getting ready
•
•
•
•
•
•
•
•
•
•
Grating
Kneading dough
Mashing potato
Melting chocolate
Mincemeat plait
Peeling an apple
Peeling potatoes
Preparing an onion
Preparing a sweet pepper
Preparing mushrooms
© Anastasis Ltd 2005-2009
23
•
•
•
•
•
•
•
Rolling pastry
Rubbing in
Scraping carrots
Separating an egg
Shelling an egg
Sifting
Slicing bread
•
•
•
•
•
•
•
Squeezing a lemon
Turning fried items
Using a colander
Using oven gloves
Washing hands
Whisking an egg
Zig-zag tomatoes
There is a complete set of videos in the Library, which you can reach by clicking the "Library"
button.
14 The Administrator
The Administrator is a person, usually a teacher, who has special privileges. The reason for
having an administrator is to prevent children from deleting the names of other children and their
associated data, and to prevent them from changing or deleting food types, meal types and
origins.
The Administrator has special privileges. He or she can:
•
move the database to a remote server for centralized use on a network
•
create and maintain General cookery books
•
create and maintain food types, meal types and recipe origins
•
delete personal users
The Administrator cannot have a personal cookery book when logged in as the Administrator, but
may do so by logging in as a personal user under some other name.
Initially the Administrator logs in by typing "Administrator" in the user name box on the "Welcome"
screen. For security reasons he may then change this word to some other password by selecting
"User Names | Edit" from the Menu bar. The word "Administrator" or whatever word the
Administrator changes it to will not appear in the user name box or in on-screen messages.
15 User names
15.1 Overview
Your user name (or log in name) is the name you enter when you start to use the programme.
Captain Cook uses it to find your personal cookery book, progress chart and meal menus that you
have made. The Administrator can have a user name as well as his password.
User names can be entered, edited or deleted only by the Administrator. If you are the
Administrator click "Edit | Classes and Pupils" on the Menu bar. This will take you to the "Edit
Classes and Pupils" screen where you can enter a class and put some pupils in it. Every user
name, or pupil, must be associated with the name of a class. If you want to have a user name of
your own so that you can have a personal cookery book, you must make up a class name and
enter your name as the only pupil in it!
Once your name is in the list in the "Log in name box" you can just click on your user name when
you start to use the programme.
15.2 Creating a user name
Your user name (or log in name) is the name by which Captain Cook addresses you. If you want
your own cookery book you must have a user name, but in the Schools Edition only the
Administrator can enter a user name for you. To do this, the Administrator should click "Edit |
Classes and Pupils" on the Menu bar and follow the instructions on the "Edit Classes and Pupils"
screen.
24
© Anastasis Ltd 2005-2009
15.3 Anyone
On the "Welcome" screen you can log in as "Anyone", as the Administrator (usually a teacher with
a special password), or as a personal user under your own name once this has been entered by
the Administrator. Only people logged in as personal users can have a personal cookery book.
"Anyone" can be used for demonstration purposes, or in a classroom situation where for some
reason the teacher doesn't want the children to set up personal records. Some of the personal
settings are unavailable to "Anyone".
15.4 Changing a user name
Personal users can change their own user name, either on the "Settings" screen or by selecting
"Edit | User Names | Edit" from the Menu bar, and following the instructions on the screen.
The Administrator may also change his or her log in name by selecting "Edit | User Names | Edit"
from the Menu bar.
15.5 Deleting a user name
Only personal users can be deleted, and only by the Administrator.
On the Menu bar select "Edit | User Names | Delete", and follow the instructions on the screen.
These give the options of deleting a single named user, all the personal users, or all the personal
users except for a single named one. The third option is provided so that the Administrator can
keep his or her personal cookery book and other records.
When a user name is deleted, the following associated items are deleted as well:
•
•
•
•
personal cookery book and recipes
any menus the user created
personal progress record and progress chart
search preferences on the "Find recipes" screen
Once deleted they cannot be recovered.
16 “Windows” skills
16.1 Overview
Many “Windows”™ programs, such as Microsoft Word, require similar skills such as using the
mouse, dragging and dropping, and saving work. Captain Cook’s Tuck Box uses most of the
main skills needed, in order to give you practice for using other software too.
16.2 Arrow boxes
Some boxes have buttons with arrows on them next to them. If you click an arrow button the
number or date in the box changes by one. If you click on an arrow button and keep the mouse
button down the number or date will keep changing, sometimes faster and faster. As soon as you
release the mouse button it stops changing.
To try this out, go to the “Settings” screen and try entering your birthday. You can press the
“Oops” button afterwards to undo the changes you have made.
16.3 Buttons, the Menu bar, and Menus items
You will find the most important things by clicking one of the buttons at the bottom of the screen.
To do this move the mouse until the pointer on the screen is over one the button you want, then
click the left-hand mouse button.
© Anastasis Ltd 2005-2009
25
Most computer programmes also have a grey bar at the top of the screen with words like "File"
and "Edit" on it. This is call a "Menu bar". When you click on a word on the Menu bar other
words usually appear. These are called “Menu items”. By clicking on these you should be able to
go anywhere in the programme.
Menu items which are not available for some reason will be disabled or disappear altogether. A
disabled item looks grey and doesn't do anything when you click on it.
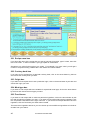
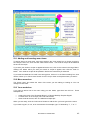
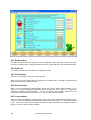
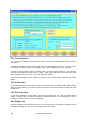
16.4 Choosing or selecting items in list boxes
To select an item in a list box, just move the mouse pointer onto it and click the left mouse button.
In some list boxes you can select more than one item at a time. There are three ways to do this.
To practise them, click the "Cookbooks" button and choose "Change a cookery book". This will
take you to the "Cookery books" screen. In the right-hand "Recipe names" box you'll see a list of
recipes which you can copy into your cookery book.
There are three different ways to select more than one item. Try them out and decide which one
you find easiest.
•
•
•
Hold the "Shift" key down (it's the key with an up arrow on it on the left of your keyboard)
and drag the mouse pointer down the recipes that you want to copy. The recipe names
will turn blue as they are selected. If you now click the "Copy to" button, they will appear
in the left-hand "Recipe names" box. By using the "Shift" key like this you can select a
set of recipes that are all together. (If you want to learn a big word, this is called
"Contiguous selection".)
Hold the "Shift" key down and click on the first and last recipe that you want to copy.
They will be selected and all the recipes in between them.
Hold the "Control" key down (it's the key marked "Ctrl" on the left of your keyboard) and
click on the individual recipes that you want to copy. The recipe names will turn blue as
they are selected. If you now click the "Copy to" button, they will appear in the left "Recipe
names" box. By using the "Control" key you can copy a set of recipes that are not all
together. (If you want to learn an even bigger word, this is called "Non-contiguous
selection".)
Practise this a few times, then click the "Oops" button to undo your changes.
16.5 Customising Captain Cook's Tuck Box
"Customising" software means making it look and behave the way you want it to.
You can customise Captain Cook's Tuck Box on the "Settings" screen. Here you can choose
colours, pictures and measurement units. You can tell Captain Cook if you want to see him and if
you want sounds or music playing, plus other things.
16.6 Disabled and enabled items
When a button or menu items looks grey and can't be clicked, it is said to be "disabled". This
happens when for some reason the button or menu item must not be used. For example, when
you first open the "Recipes" screen the "Oops" button is disabled because no changes have been
made so there are no changes to undo.
An "enabled" button or menu item is one which works when you click it. In Captain Cook’s Tuck
box enabled buttons have black writing on them and a coloured picture.
16.7 Dragging and dropping
Dragging and dropping are techniques for quickly moving items from one place on the screen to
another.
To practise dragging and dropping, click the "Cookbooks" button and choose "Change a cookery
26
© Anastasis Ltd 2005-2009
book". Click on a recipe in the right "Recipe names" box, but keep your finger down on the
mouse button. Then move the mouse pointer across the screen to the left "Recipe names" box.
This is called "dragging". Release the mouse button and the recipe will appear in the left "Recipe
names" box. This is called "dropping".
You can drag several recipes at a time if you first press the "Shift" key and drag the mouse
pointer down the list.
Try this several times, then click the "Oops" button to undo your changes.
16.8 Logging in
"Logging in" means telling a computer programme who you are. The Administrator must enter a
user name for you before you can log in as yourself.
When you start "Captain Cook's Tuck Box" the "Log in name" box is displayed. If you click the
small arrow by the box a list of names will appear. Click on your name, then click the "Go" button
and you are logged in!
If you do not have a user name, you can log in by clicking "Anyone", but if you want to have a
personal cookery book, progress chart and other features you must use your own user name.
The Administrator logs in by typing a special Administrator password.
16.9 Saving your work
You should regularly make a copy of important information on your computer and store it in a safe
place. Then if you delete something by mistake or your computer is damaged or stolen you won't
have lost the information for ever. In computer language, these copies are called "back-ups".
Captain Cook's Tuck Box stores its information in files located in a folder called "database", and it
stores back-up copies of these files in a folder called "backup". If something goes wrong, for
example if there is a power failure or the computer crashes, then next time you run the
programme it will load the files from the "backup" folder instead of the normal "database" folder.
The back-up files are updated every time you click a "Done" button or close the programme
normally.
Nevertheless, if you are running the programme on a stand-alone computer (not a network, which
normally has its own backup arrangements) it is best to make regular copies of the "database"
folder's files on a CD or on a zip disc or tape drive, especially if you are entering your own recipes
or designing menus. Then, if your computer breaks or is stolen, you won't lose all the lovely
recipes you have written.
If you installed the programme on a local PC, you should find the "database" folder within the
"Application Data" folder.
Look for "C:\Documents and Settings\All Users\Application
Data\Anastasis\CapnCook\Schools(edition)", or else the folder that you specified when you
installed the programme. If the programme was installed on a network server the "database"
folder will normally be on a similar path on the server.
16.10 Short cut keys
If you look at the word on a button, label or menu item you will see that one of its letters is
underlined. This is called the short cut key. To use a short cut key, hold down the "Alt" button at
the bottom of the keyboard and tap the short cut key letter. If the key is for a:
•
•
•
button - the button will click and do whatever it is supposed to do
label - the cursor will go into the box next to the label and you can start typing in it
menu item - the list of items will drop down for you to choose what you want to do.
© Anastasis Ltd 2005-2009
27
16.11 Tabbing
There are three ways you can select things on the screen: use the mouse, use short cut keys, or
use the “Tab” key. The Tab key is the key with a left and right arrow on it near the top left corner
of the keyboard.
Each time you tap the Tab key the cursor will move to the next box or button on the screen,
usually moving from left to right and from top to bottom. When you reach the item you want you
can either type in it if it is a box, or click it by pressing the "Enter" key on the right of the keyboard
if it is a button.
If you want the cursor to move in the other direction, hold down the Shift key (the one that makes
capital letters) while you tap the Tab key. The cursor will then move backwards, from right to left
and from bottom to top.
Of course you can do the same things with the mouse, but using the mouse button too much can
be bad for your finger. Also with practice it can be faster to use the keyboard.
If you hold the “Alt” key down while you press Tab you will go to the next programme which is
running on your computer, if another programme is running, and Captain Cook’s Tuck Box will
disappear. You can get back to it by pressing Alt + Tab again.
16.12 Moving to another programme
When Captain Cook's Tuck Box is running the "Task bar" which is usually at the bottom of the
screen is invisible. This means that you can't select another programme which is running or click
on "Start" in the usual way.
There are two ways to select another running programme without shutting down Captain Cook's
Tuck Box.
1. "Minimize" Captain Cook's Tuck Box by clicking on the small white box with a "minus" (-) sign
in it which you will see in the top right-hand corner of the screen. The Task bar will reappear and
you can click on the icon for the running programme which you want to see.
2. Use "Alt" + "Tab". To move to another running programme hold down the "Alt" key and click
the "Tab" key. This is the key on the left-hand side of the keyboard with a left and right arrow on
it. A small screen will appear showing pictures of any other programmes that are running on your
computer. While you hold down the "Alt" key and press "Tab" repeatedly each programme icon
will be highlighted in turn. When you release the "Alt" key the highlighted programme will be
displayed instead of Captain Cook's Tuck Box.
To access "Start" press the "Windows" key which is usually on the bottom row of the keyboard. If
your keyboard does not have a "Windows" key then minimize Captain Cook's Tuck Box as
described above and the "Start" button will reappear.
16.13 Editing, entering and deleting text
Editing, entering and deleting text is done in the same way as for most Windows programmes.
To enter the characters è, é and ê, type "e", then type "\", "/" or "^" respectively.
To enter a bullet-point in a recipe instruction, type "#". (It's on a key at the right-hand end of the
main keyboard.)
To enter a degree sign (°) for an oven temperature, see Section 11.19.6: Recipe FAQs:
Instructions: Q: How do I enter an oven temperature?"
17 Welcome screen
This is the first screen which appears when the programme is opened. Enter your name (or
28
© Anastasis Ltd 2005-2009
choose a special log in name) to gain access to your personal cookery book, meal menus,
progress chart and other information.
17.1 Log in name box
Click on your name, then click the "Go" button and you are logged in! The Administrator must
enter a user name for you before it can appear in the list.
If you prefer you can select "Anyone" from the list. You'll be able to see all the Tuck Box cookery
books, but you won't be able to make or look at your personal cookery book.
17.2 Arrow button
Click this button to see a list of names of the children who are using Captain Cook's Tuck Box. If
you have typed your name in earlier you will see it in the list. Click on it, then click "Go" and you
will be taken into the Kitchen.
17.3 Go button
When you have entered or clicked on your name in the Log in name box, click this button to go to
the kitchen.
17.4 Help button
Click this button for help on this screen.
For help on everything, click "Help" on the programme’s Menu bar.
17.5 Stop button
Click this button to close Captain Cook's Tuck Box.
© Anastasis Ltd 2005-2009
29
17.6 Tuck box
Click on the Tuck Box for a tasty treat!
18 Kitchen screen
The Kitchen is the screen that you see after logging in. It has a picture, a clock, a notice board
and the "My cookery book" button.
If you have moved to other screens, you can return to the Kitchen by pressing the "Go back"
button one or more times.
18.1 My cookery book picture
Click on the picture of a book to make or look at your personal cookery book.
18.2 The kitchen clock
Can you tell the time? The kitchen clock should be telling the correct time. Say what time it is,
then click on the clock to find out if you were right!
18.3 The notice board
The notice board has cookery tips, parrot jokes and messages.
message especially for you!
One day there may be a
18.4 Kitchen picture
You can change this picture on the "Settings" screen, or even hang up a picture of yourself! Try
clicking on it and see what happens.
30
© Anastasis Ltd 2005-2009
18.5 Parrot
Can you see Captain Cook the parrot? You can hide him by clicking on him with the right mouse
button.
19 Settings screen
Click the "Settings" button to go to the "Settings" screen. Here you can choose how you want the
programme to look, sound and behave. You can change the colours, choose whether you want
music to play, hang a photo of yourself on the kitchen wall, and many other things.
Each personal user can have his own settings. If you log in as "Anyone" you can also set some
items, but others won't be available.
19.1 Name box
In this box you can change the name that you use to log in when you open the programme.
19.2 Day box
Type in this box the day in the month that you were born, or use one of the arrow buttons to
change it.
19.3 Month box
Type in this box the month that you were born, or use one of the arrow buttons to change it.
19.4 Year box
Type the year that you were born in this box, or use the arrow buttons on each side to set the
© Anastasis Ltd 2005-2009
31
year. Tell Captain Cook when you were born and he will give you a nice surprise if you go into
the kitchen on your birthday.
19.5 No thanks button
Click this button if you don't want to enter your birthday. If you do enter your birthday, you will see
one or two messages on the kitchen notice board as your birthday draws near, otherwise you
won't.
19.6 Gas mark
Click this if you want oven temperatures to be shown as gas marks.
19.7 Celsius
Click this if you want oven temperatures to be shown in degrees Celsius.
19.8 Fahrenheit
Click this if you want oven temperatures to be shown in degrees Fahrenheit.
19.9 Metric
Click this if you want ingredients to be shown in metric units (grammes and litres, etc.).
19.10 Imperial
Click this if you want ingredients to be shown in imperial units (ounces and pints, etc).
19.11 Kitchens
Click on one of the kitchen pictures to choose a kitchen for the Kitchen screen.
19.12 Pictures
Click on one of the lower pictures to choose a picture to hang on the kitchen wall.
19.13 Your photo
Click the square marked “Photo” to hang a photo of yourself on the kitchen wall. You will have to
choose the photo by clicking the "Photo" button.
19.14 Popup help box
Click this to turn the popup help on or off. If it is turned on and the programme is running then a
message will appear whenever you hold the mouse cursor over a button or box to tell you what it
does.
19.15 Parrot box
Click this to turn the parrot on or off.
19.16 Sounds box
Click this to turn the sounds on or off. To have the sounds on you will need a sound system
connected to your computer and turned on.
19.17 Music box
Click this to turn the music on or off. To have the music on you will need a sound system
connected to your computer and turned on.
32
© Anastasis Ltd 2005-2009
19.18 Background button
Click this button to choose a different background colour for all the screens.
19.19 Foreground colour
Click this button to choose a different foreground colour for all the screens.
19.20 Reset button
Click this button to restore the background and foreground colours back to their original settings.
19.21 Photo button
Click this button if you want to choose a photo of yourself to hang up on the kitchen wall. You will
need a photo saved on the computer as a bitmap file (ending with the extension ".bmp"), either
scanned in or saved from a digital camera. You must also click the "Your photo" frame to tell
Captain Cook that you want him to change the picture in the kitchen.
19.22 Parrot
This is Captain Cook the parrot. You can turn him on or off on this screen by clicking the parrot
box. You can also hide him by clicking on him with the right mouse button.
20 Cookery books screen
On the "Cookery books" screen you can quickly copy recipes from other cookery books into your
personal cookery book, or delete recipes from it. You can also change the name of your cookery
book.
Personal users can change only their personal cookery book on this screen; the Administrator can
change only General cookery books.
To reach the "Cookery books" screen, click the "Cookbooks" button and choose "Change a
cookery book".
© Anastasis Ltd 2005-2009
33
20.1 Name of the book box
This box shows the name of the cookery book you are changing. You can change its name in this
box.
20.2 Choose a book box
This box shows the name of a cookery book that you can copy recipes from. If you click on the
arrow button next to it you can choose a different book.
20.3 Left recipe names box
This box shows the recipes in your cookery book. If you want to see one, click on its name here,
then click the "See recipe" button. Or click on its name with the right mouse button.
If you don't want a recipe in your cookery book, click on its name here, then click the "Rub out"
button.
20.4 Right recipe names box
This box shows the recipes that you can copy into your cookery book. The cookery book that
they come from is shown in the box above.
If you want to copy a recipe into your cookery book, click on its name here, then click the "Copy
to" button. If you prefer, click on the recipe you want to copy, but keep your finger down on the
mouse button. Then move the mouse pointer across the screen to the left recipe names box.
This is called "dragging". Release the mouse button and the recipe will appear in your cookery
book. This is called "dropping". Yet another way is to double click on the recipe that you want to
copy.
If you want to copy all the recipes in the cookery book on the right into your cookery book on the
left, click the "Copy all" button.
34
© Anastasis Ltd 2005-2009
If you want to see one of the recipes, click on its name here, then click the "See recipe" button.
Or click on its name with the right mouse button.
20.5 See recipe button
To see a recipe before you copy it into your cookery book, click on its name in the right-hand
recipe names box, then click the "See recipe" button.
If you want to look at more than one recipe, hold the Shift key down and click on the first and last
recipes that you want to see. Then click the "See recipe" button. (The "Shift" key is on the lefthand side of the keyboard. It has an up arrow on it.)
You can also use the "See recipe" button to look at recipes that are already in your cookery book.
Click on the ones you want to see in the left-hand recipe names box, then click the "See recipe"
button.
20.6 Copy to button
To copy a recipe into your cookery book, click on its name in the right-hand recipe names box,
then click the "Copy to" button.
If you want to copy more than one recipe, hold the Shift key down and click on the first and last
recipe that you want to copy. Then click the "Copy to" button. (The "Shift" key is on the left-hand
side of the keyboard. It has an up arrow on it.)
20.7 Copy all button
Click this button to copy all the recipes from the right-hand recipe names box into your cookery
book.
If you copy a recipe to your cookery book that has the same name as one you already have, a
number in square brackets will appear after the new recipe name. Look at both recipes using the
"See recipe" button. (Hold down the Shift key - it's the key with an up arrow on the left of the
keyboard - and click on both the recipes. They should both turn blue. Then click the "See recipe"
button.) If both recipes are the same, you may want to rub out the new one using the "Rub out"
button.
20.8 Rub out button
To rub out or delete a recipe from your cookery book, click on its name in the left-hand recipe
names box, then click the "Rub out" button.
If you want to delete than one recipe, hold the Shift key down and click on the first and last
recipes that you want to delete. Then click the "Rub out" button. (The "Shift" key is on the lefthand side of the keyboard. It has an up arrow on it.)
21 Recipes screen
On the "Recipes" screen you can make, look at, change or print recipes.
Personal users can only change recipes that are in their personal cookery book. The
Administrator can change recipes in any General cookery book that he has made. (You can't
change any recipes when you look at them using the "See recipe" button on the "Cookery books"
screen or the "Meal menus" screen.)
To reach the "Recipes" screen, click the "My cookery book" button in the kitchen, or click the
"Recipes" button at the bottom of the screen and choose "Look at a recipe" or "Look at all the
recipes".
© Anastasis Ltd 2005-2009
35
The picture below shows the screen when you first enter it, in View mode.
21.1 Recipe picture
The "Recipe picture" box shows a picture of the recipe, if it has one. You can add a picture to a
recipe or change its picture if the recipe is in your personal cookery book or in one you made as
the Administrator. To add or change a picture, click the "Picture" button in Edit mode and follow
the instructions.
21.2 Recipe box
The "Recipe" box shows the complete recipe apart from the ingredients, which are in the box
below it. This is visible in “View” mode only.
If you want to change a recipe in a cookery book that you have made, click the "Change" button,
and a lot of new boxes will appear. The recipe will then be in Edit mode, as shown in the picture
below.
21.3 Ingredients box
The "Ingredients" box displays the ingredients.
21.4 Cookery book name box
This shows the name of the cookery book that the selected recipe is in. Sometimes different
cookery books have recipes with the same name, so this shows you which one you are looking at.
If the Cookery book name box is red, this means that it is not a book you can change, so you
won't be able to change the selected recipe.
If you have chosen to look at all the cookery books, there will be an arrow button beside the
Cookery book name box, so that you can choose which cookery book to look at. The arrow
36
© Anastasis Ltd 2005-2009
button also appears when the Administrator is making a new recipe, so that he or she can choose
which cookery book to put the new recipe in. In this case only cookery books that the
Administrator has made will be listed.
21.5 Recipe names list box
This shows the names of all the recipes that you can look at. If you click on a recipe name, the
recipe will be displayed on the screen.
21.6 Print button (Recipes screen)
If you have a printer switched on and connected to your computer, you can click the "Print" button
to print the recipe out. Use A4 paper.
21.7 Timer button
The "Timer" button lets you set an alarm clock to tell you when a recipe is cooked.
21.8 Change button
If the "Change" button is visible and enabled, clicking it will show the recipe in "Edit” mode, which
means that you can make changes to it. If the "Change" button is disabled, this means that you
cannot change the recipe because it is not in a cookery book that you have made.
When you click the "Change" button it changes into a "View" button. Clicking the "View" button
will return the recipe to "View mode.
21.9 View button
If the "View" button is visible and enabled, clicking it will show the recipe in "View mode. This
makes the recipe easier to read, but while it is in view mode it can't be changed.
When you click the "View" button it turns into a "Change" button. Clicking the "Change" button
will return the recipe to "Edit mode.
21.10 Recipe name box
In the "Recipe name" box you can change the name of a recipe.
© Anastasis Ltd 2005-2009
37
21.11 Origin box
The origin of a recipe is where it came from. In the Origin box you can add an origin to a recipe or
change its origin.
Click the down arrow button to see a list of origins available, then click on the one you want.
If you want to add an origin that is not in the list, ask the Administrator to do this for you.
The Administrator can type a new origin name into the box, or delete a displayed origin name if it
is not in use in a recipe.
21.12 Score box
Click the arrow buttons to the left and right of the "Score" box to change a recipe's yumminess
score. You can choose one, two or three Smileys, or a Frowney. Here is what they mean:
1 Smiley = "OK"
2 Smileys = "Yummy"
3 Smileys = "Brilliant"
1 Frowney = "Yukky"
21.13 Skill box
Click the arrow buttons to the left and right of the "Skill" box to change a recipe's skill level. You
can choose one, two or three Pacmen. Here is what they mean:
1 Pacman = "Easy"
2 Pacmen = "Moderate"
3 Pacmen = "Hard"
21.14 Minutes to prepare box
In the "Minutes to prepare" box you can change the time that a recipe takes to prepare, before it
is cooked.
21.15 Minutes in total box
In the "Minutes to cook" box you can change the total time that it takes a recipe be prepared and
to cook or set.
21.16 Number of servings box
In the "Number of servings" box you can change the number of servings or items that the
quantities shown will make.
When you change the number of servings in this box and press the "Enter" key or click on another
box, the quantities of each ingredient shown will automatically change. Try 999 and see how
much food you will need!
If the recipe is not one that you can change, you can still change the number of servings by
clicking "Edit | Number of Servings" on the Menu bar.
21.17 Meal types box
The "Meal types" box shows what kinds of meal the recipe is suitable for. Meal types are useful
when you use the "Find a recipe" screen. For example you can ask to see all the recipes that are
suitable for "Party food", and every recipe which has "Party food" in its Meal types will be
displayed.
You can add or remove meal types from the recipe by clicking the "Meal types" button just below
the box.
38
© Anastasis Ltd 2005-2009
21.18 Picture button
Click the "Picture" button to choose or change the picture for a recipe. To do this you must have
the new picture already saved on your computer as a "bitmap" file. It is best if the picture is in
256 colours, 256 pixels wide by 192 pixels high, but this is not essential.
21.19 Meal types button
Click the "Meal types" button to add or remove meal types from a recipe. You will go to the "Meal
types" screen.
If you want to add a Meal type that is not in the list, ask the Administrator to do this for you.
21.20 Ingredients button
Ingredients are the foods that go into a recipe. Click the "Ingredients" button to add or remove an
ingredient or to change its quantity. You will go to the "Ingredients" screen.
21.21 Copy, cut, paste, delete & undo instructions buttons
These little buttons may help you to make changes to the Instructions. Buttons like these are
used on lots of computer programmes, so it's a good idea to learn how to use them. Ask your
teacher to show you how they work.
21.22 Instructions box
The "Instructions" box shows the instructions for a recipe. In Edit mode you can use this box to
add, change or remove instructions from the recipe that is showing. Enter Celsius, Fahrenheit or
Gas Mark oven temperatures as C, F or G: for example 180C, 200F, 4G. (Don't put a space
before the letters.) The temperatures will then automatically be converted to the temperature
scale you have chosen on the "Settings" screen. Edit mode is only available when you are
looking at a recipe in your personal cookery book.
22 Find recipes screen
On the "Find recipes" screen you can find recipes which have things you like in them, or recipes
which don't have things you don't like! For example you can find all the recipes that have
chocolate in them, or all the recipes that do not have a score of "yukky". (See Section 20
"Recipes" screen.)
You can enter information in as many boxes as you want to. For example you could look for all
recipes with chocolate that take less than 30 minutes to prepare and have a yumminess score of
"brilliant" (3 pacmen)! When you are ready, click the "Find" button and you will be able to see the
recipes that Captain Cook has found for you.
The "Find recipes" screen will find recipes only in cookery books that you can see - not in anyone
else's personal cookery book.
Recipes in the Tuck Box cookery books don't have yumminess scores, so make sure that the
Score box is blank if you want to find Tuck Box recipes.
To reach the "Find recipes" screen, click the "Recipes" button and choose "Find recipes".
© Anastasis Ltd 2005-2009
39
22.1 Recipe name box
If you know the name of the recipe that you want or just part of its name, type it in here, then click
the "Find" button. It does not matter if you type capital or small letters.
Sometimes you might find more than one recipe. For example if you type "cake" you will get a
number of recipes including "Rabbit cake" and "Potato and cheese cakes".
22.2 Cookery book box
If you want to find recipes from a particular cookery book, click on the arrow button by this box
and choose the cookery book you want.
22.3 Origin box
If you want to find recipes which have a particular origin, click on the arrow button by this box and
choose the origin you want.
22.4 Meal type box
If you want to find recipes which are suitable for a particular meal type, click on the arrow button
by this box and choose the meal type you want.
22.5 Food boxes
If you want to find recipes with or without a particular ingredient, click on the arrow button by this
box and choose the ingredient you want. If you want to find recipes that have the ingredient, click
the "Yes please" radio button to the right of the box. If you want to find recipes that don't have the
ingredient, click the "No thank-you" radio button instead.
There are three ingredient boxes so you can choose up to three different ingredients to include or
exclude from your search.
40
© Anastasis Ltd 2005-2009
22.6 Instructions word box
If you want to find recipes that have a certain word in the instructions, type it in this box. For
example, if you love grating things, type "grate". This will produce recipes that have the words
"Grate", "grate" and "grated", giving you a "grate" choice!
22.7 Preparation time box
If you want to find recipes that take less than a certain time to prepare before you cook them, type
the time in minutes in this box. If you prefer you can use the arrow buttons on the left and right of
the box to enter a number.
For example if you enter "20" and click the "Find" button you will find all the recipes that take 20
minutes or less to prepare.
If any recipes have been made without a preparation time they will not appear in the results
unless the Preparation time box is blank.
22.8 Total time box
If you want to find recipes that take less than a certain time to prepare and cook, type the time in
minutes in this box. If you prefer you can use the arrow buttons on the left and right of the box to
enter a number.
For example if you enter "30" and click the "Find" button you will find all the recipes that take 30
minutes or less to prepare and cook.
If any recipes have been made without a preparation and cooking time they will not appear in the
results unless the Total time box is blank.
22.9 Score box
If you want to find recipes with a certain score, use the arrow buttons to set the score you want.
Here is what the scores mean:
1 Smiley = "OK"
2 Smileys = "Yummy"
3 Smileys = "Brilliant"
1 Frowney = "Yukky"
If you want to find recipes with a certain score or better, choose the score you want as above,
then click the "or more" box on the right of the score box until it has a tick in it.
If any recipes have been made without a score they will not appear in the results unless the Score
box is blank.
22.10 Or more check box
Click "or more" until it has a tick in it if you want to find recipes that have a certain score or more.
You must enter the score you want in the "Score" box to the left of the "or more" check box.
If the "or more" box does not have a tick in it and there is a score in the "Score box", then only
recipes with that score will be found.
22.11 Skill level box
If you want to find recipes which require a certain level of skill, use the arrow buttons to set the
skill level you want.
The skill levels are:
© Anastasis Ltd 2005-2009
41
1 Pacman = "Easy"
2 Pacmen = "Moderate"
3 Pacmen = "Hard"
If you want to find recipes which require a certain skill level or less, choose the skill level you want
as above, then click the "or less" box on the right of the score box until it has a tick in it.
If any recipes have been made without a skill level they will not appear in the results unless the
Skill level box is blank.
22.12 Or less check box
Click "or less" until it has a tick in it if you want to find recipes that have a certain skill level or less.
You must enter the skill level you want in the "Skill level" box to the left of the "or less" check box.
If the "or less" box does not have a tick in it and there is a skill level in the "Skill level" box, then
only recipes with that skill level will be found.
22.13 Yes please (Food)
Click "Yes please" if you want to find recipes that have a certain food. You must enter the food
you want in the box to the left of the "Yes please" radio button.
22.14 No thank-you (Food)
Click "No thank-you" if you want to find recipes that do not have a certain food. You must enter
the food you don't want in the box to the left of the "No thank-you" radio button.
22.15 Yes please (Instructions)
Click "Yes please" here if you want to find recipes that have a certain word in their instructions.
You must enter the word you want in the box to the left of the "Yes please" radio button.
22.16 No thank-you (Instructions)
Click "No thank-you" here if you want to find recipes that do not have a certain word in their
instructions. You must enter the word you don't want in the box to the left of the "No thank-you"
radio button.
22.17 Find button
Click the "Find" button when you are ready to find the recipes you have chosen. A list of the
recipes found will be displayed. Click "OK" and you will go to the "Recipes" screen where you
will be able to see the recipes you were looking for. To return to the "Find recipes" screen, click
the "Go back" button.
22.18 Wipe out button
Click the “Wipe out” button to empty all the boxes and start a new search.
23 Meal menus screen
On the "Meal menus" screen you can make, look at, change, delete or print a menu for a special
meal. You can also see 10 healthy eating menus, “Menu A” to “Menu J”.
To reach the "Meal menus" screen, click the click the "Menus" button at the bottom of the screen
and choose "Look at a menu" or "Look at all the menus".
42
© Anastasis Ltd 2005-2009
23.1 Adding and inserting menu items
To add an item to a meal menu, type some words in the "Your words" box or choose a recipe in
the "Recipe name" box, then click the "Add course" button. The words or recipe will be added at
the end of the recipe.
If you want your words or recipe to appear before the end, click on the course in the large "Menumaking" box before which you want your words or recipe to appear, then click the "Push in"
button. Your words or recipe will be pushed in before the course that you selected.
If you make a mistake and it is still in the wrong place, click on it in the "Menu-making" box, then
use the "Move up" or "Move down" button to move it up or down to the place where you want it.
23.2 Menu name box
The "Menu name" box shows the name of the menu you are making or looking at. You can
change its name here.
23.3 Your words box
If you want to add a line to the menu using you own words, type them into this box. Some
examples are:
•
•
•
a title to the menu, like "Christmas Dinner" or "Mum's Birthday Surprise Supper"
a course which is not a recipe, like "Tea and biscuits"
some words at the end, like "The waitress accepts tips".
When you are ready, click the "Add course" button to add the line you have typed to the menu.
If you need to type è, é or ê, as in crème brulée for example, type "e" followed by "\", "/" or "^".
© Anastasis Ltd 2005-2009
43
23.4 Meal type box
The "Meal type" box helps you to find a suitable recipe for a course. For example, if you want the
first course to be soup or a starter, click the arrow button by this box and in the list of meal types
that appears click "Soups and Starters". If you then look in the "Recipe name" box beneath it you
will find all the recipes suitable for soups or starters.
If you want to look at all the recipes without choosing a particular meal type select the first item in
the "Meal type" box, which is "Any".
23.5 Recipe name box
Use the "Recipe name" box to choose a recipe for a course of the meal. Click the arrow button by
the box, and in the list of recipes displayed click the one you want. Then click the "Add course"
button to add it to the menu.
23.6 Menu-making box
The "Menu-making" box shows the menu's courses and separating lines as they are added to the
menu.
If you click on a line in the "Menu-making" box you can then click the "Rub out", "Move up", "Move
down" or "See recipe" button to rub it out, move it up or down in the menu, or (if it is a recipe) to
see the recipe.
23.7 Add course button
Click the "Add course" button when you have typed some words in the "Your words" box or
selected a recipe in the "Recipe name" box, and the words of recipe will be added to the end of
the menu.
23.8 Add line button
Click the "Add line" button to add a separating line to the menu. These are used to divide main
courses from one another.
When you add a separating line it appears at the end of the menu. If you want to put a separating
line higher up the menu, just add it at the end and use the "Move up" button to move it up to the
place where you want it.
23.9 Rub out button
To delete a course or separating line from a menu, first click on it in the Menu-making box, then
click the "Rub out" button.
When you do this, the "Rub out" button will change into a "Bring back" button until you do
something else. Click the "Bring back" button if you made a mistake and rubbed out the wrong
line.
23.10 Bring back button
The "Bring back" button appears when the "Rub out" button has been clicked and a line has been
deleted from the menu. If you make a mistake, click on the "Bring back" button and the line will
be restored without undoing any other changes you have made on the screen.
As soon as you do something new, the "Bring back" button changes back into a "Rub out" button.
23.11 Push in button
To insert a new course before one of the existing menu items:
•
Type the new course in the "Your words" box or choose a recipe in the "Recipe name"
box
44
© Anastasis Ltd 2005-2009
•
•
Click in the Menu-making box on the course or separating line before which you want to
insert the new item
Click the "Push in" button
Your new words or recipe will appear immediately above the course or separating line you
selected.
23.12 Move up button
To move a course or separating line further up the menu, first click on it in the Menu-making box,
then click the "Move up" button.
23.13 Move down button
To move a course or separating line further down the menu, first click on it in the Menu-making
box, then click the "Move down" button.
23.14 See recipe button
To see a recipe, first click on it in the "Recipe name" box or the "Menu-making" box, then click the
"See recipe" button.
23.15 Menu display window
The menu display window shows how the menu will appear when you print it. You can change
the style of the separating lines, the border round the edge, and the size, style and colour of the
letters, by clicking on the buttons below it.
23.16 Line button
Click the "Line" button to change the style of the separating lines in the menu. There are 10
different line styles to choose from, including stars, smileys, bells and bombs!
23.17 Border button
Click the "Border" button to change the border round the menu. There are 6 different borders to
choose from.
23.18 Font button
Click the "Font" button to change the size, style or colour of the letters used in the menu.
23.19 Print button (Meal menus)
Click the "Print" button to print out a menu. You will need to have a printer switched on and
connected to the computer, with A4 paper in it. Use a colour printer if possible.
When you click the "Print" button, a dialogue box will appear asking you to choose one of five
different ways to print the menu out. See Section 11.5 “Printing a menu”.
24 Progress screen
On the "Progress" screen you can see a record of the basic recipes that you have completed,
look at your Progress Chart and print out a Progress Certificate.
The "Progress" screen is available only to personal users. To reach it, click the "Library" button at
the bottom of the screen and choose "My Progress Chart".
The first picture below shows the "Progress" screen when you first enter it.
© Anastasis Ltd 2005-2009
45
24.1 Radio button
The radio buttons show which recipes you have completed. When you enter a date in the date
box next to a radio button, a red light flashes on and off to show that you have cooked that recipe.
24.2 Date box
The "Date" box shows the date that you completed a recipe.
24.3 Chart button
Click the "Chart" button to see your Progress Chart.
When you click on the "Chart" button it changes into a "Dates" button. Clicking on this button will
bring you back to the recipes and dates.
24.4 Senior button
When you have completed all sixteen basic recipes, the "Senior" button will be enabled. If you
click on it a Senior's Progress Certificate will be printed with your name on it, signed by
"Squawky" (Captain Cook's nickname). You will of course need a printer switched on and
connected to the computer with A4 paper in it. Use a colour printer if possible.
24.5 Junior button
When you have completed the first nine basic recipes, the "Junior" button will be enabled. If you
click on it a Junior's Progress Certificate will be printed with your name on it, signed by Captain
Cook. You will of course need a printer switched on and connected to the computer with A4
paper in it. Use a colour printer if possible.
46
© Anastasis Ltd 2005-2009
24.6 Beginner button
When you have completed the first four basic recipes, the "Beginner" button will be enabled. If
you click on it a Beginner's Progress Certificate will be printed with your name on it, signed by
"Squawky" (Captain Cook's nickname). You will of course need a printer switched on and
connected to the computer with A4 paper in it. Use a colour printer if possible.
The picture below shows a Progress Chart, which appears when you click the "Chart" button.
24.7 Dates button
Click the "Dates" button to close the Progress Chart and return to the recipes and dates screen.
25 Food types screen
On the "Food types" screen the Administrator can add, change or delete a food type. Food types
are basic foods that are used in recipe ingredients, like sugar, tomatoes or cooking oil. They may
have different words for singular ("cabbage"), plural ("cabbages") or quantity ("cabbage") forms,
and may be solid or liquid.
There are two ways to reach the "Food types" screen. Either select "Edit | Food" from the Menu
bar, or enter a new food type on the "Ingredients” screen.
Personal users do not have access to the "Food types" screen.
To find out what each button or box does, click on its picture below.
© Anastasis Ltd 2005-2009
47
25.1 Food name box
The "Food name" box shows the name of the food. You can change the spelling here, or enter a
new name.
To change the spelling of an existing food, click the arrow button by the box, then click on the
food name you want to change in the displayed list. When it appears in the box, change it.
To enter a new food name, first try to find the name you want in the list as above. If it is not there,
click on the first item in the list, which is "(Any)". Then type in the name of the new food. After
that, complete boxes "B" and "C", then click the "Done" button.
If you want to change or enter another food type, click the "Next" button instead of the "Done"
button.
25.2 Next button
If you have reached the "Food types" screen from the Menu bar, the "Next" button will be visible.
Click the "Next" button if you have changed or entered a new food and want to change or enter
another one.
25.3 Rub out button
If you have reached the "Food types" screen from the Menu bar, the "Rub out" button will be
visible. Click the "Rub out" button to delete the selected food type. If the food type is in use, a
message will tell you this and it won't be deleted.
25.4 Weight box
Click the "Weight" box until there is a tick in it if the food that you are making or changing can be
measured by weight (oz, gm, etc). This usually means it is a solid.
48
© Anastasis Ltd 2005-2009
Tick the Volume and Number boxes as well if you can also measure the food by volume or
number.
25.5 Volume box
Click the "Volume" box until there is a tick in it if the food that you are making or changing can be
measured by volume (pints, ml, etc.). This usually means it is a liquid.
Tick the Weight or Number boxes as well if you can also measure the food by weight or number.
25.6 Number box
Click the "Number" box until there is a tick in it if the food that you are making or changing can be
measured by number (1, 20 etc.). This usually means it is a solid.
Tick the Weight or Volume boxes as well if you can also measure the food by weight or volume.
25.7 800 gm box
If the "800 gm" box is visible, type in here how to spell the food when it is measured by weight.
Before you enter anything in the "800 gm" box, make sure that you have completed Box B.
25.8 500 ml box
If the "500 ml" box is visible, type in here how to spell the food when it is measured by volume.
Before you enter anything in the "500 ml" box, make sure that you have completed Box B.
25.9 1 box
If the "1" box is visible, type in here how to spell the food when there is one of it. Before you enter
anything in the "1" box, make sure that you have completed Box B.
25.10 20 box
If the "20" box is visible, type in here how to spell the food there are twenty of them. Before you
enter anything in the "20" box, make sure that you have completed Box B.
26 Meal types screen
Meal types such as "Meat and poultry", "Salads" and "Cakes" are assigned to recipes. You can
search for all the recipes suitable for a particular meal type, such as "Parties". On the "Meal
types" screen you can add meal types to a recipe or delete them from it. The Administrator can
also add, change or delete meal types from the programme's dictionary.
There are two ways to reach the "Meal types" screen. If you are changing a recipe on the
"Recipes" screen and click the "Meal types" button, the "Meal types" screen appears and allows
you to add meal types to the recipe or delete meal types from it. The Administrator can also add,
change or delete meal types from the programme's dictionary.
The second way is to select "Edit | Meal Types" from the Menu bar, but only the Administrator can
do this. He can then add, change or delete meal types from the dictionary.
The first picture below shows how the screen looks when you reach it from the "Recipes" screen.
© Anastasis Ltd 2005-2009
49
26.1 Current recipe box
In the "Current recipe" box you can see the name of the recipe that you are editing.
26.2 Recipe meal types box
In the "Recipe meal types" box on the left-hand side you can see a list of the meal types for the
current recipe. If you want to delete one of them from the recipe, click on it in this box, then click
the "Rub out" button.
26.3 Add new button
To add a new meal type to the dictionary, click the "Add new" button, type the new word in the
"Dictionary of meal types" box on the right, then click the "Done" button. If you want to add more
than one new meal type, click the "Add new" button again instead of the "Done" button.
When the "Meal types" screen is reached from the "Recipes" screen, this button is enabled only
for the Administrator. For security reasons personal users cannot add meal types to the
dictionary.
26.4 Copy to button
To add a meal type to the current recipe, click on the meal type in the "Dictionary of meal types"
box on the right, then click the "Copy to" button.
Another way to add a meal type to a recipe is to drag it from the "Dictionary of meal types" box on
the right to the "Current recipe" box on the left, then drop it there. (See Section 15.7 "Dragging
and dropping”.)
26.5 Rub out button
If you have reached the "Meal types" screen from the "Recipes" screen, you can use the "Rub
50
© Anastasis Ltd 2005-2009
out" button to remove a meal type from the current recipe. Click on it in the "Current recipe" box,
then click the "Rub out" button.
To remove a meal type from the dictionary, click on it in the "Dictionary of meal types" box, then
click the "Rub out" button. A "#" sign by the meal type means that it is used by at least one
recipe: the button will be disabled, so you will not be able to delete or change the meal type. The
button will also be disabled if you have logged in as a personal user: for security reasons only the
Administrator can delete meal types from the dictionary.
26.6 Dictionary of meal types box
The "Dictionary of meal types" box shows a list of all the meal types available.
If you have reached the "Meal types" screen from a recipe and you want to copy a meal type into
your recipe, click on its name here, then click the "Copy to" button. If you prefer, click on the
recipe you want to copy, but keep your finger down on the mouse button. Then move the mouse
pointer across the screen to the "Current recipe" box. This is called "dragging". Release the
mouse button and the meal type will appear in your recipe. This is called "dropping". An even
quicker way is just to double click on the meal type.
The next picture shows how the screen looks when the Administrator reaches it using Edit | Meal
Types.
27
Origins screen
On the "Origins" screen the Administrator can add, change or delete origins from the
programme's dictionary. The screen is reached by clicking "Edit | Origins" on the Menu bar.
(Origins can also be added or changed in the “Recipes” screen.)
© Anastasis Ltd 2005-2009
51
For security reasons personal users are not allowed to edit recipe origins.
27.1 Add new button
To add a new origin to the dictionary, click the "Add new" button, type the new word in the
"Recipe origins" box on the right, then click the "Done" button. If you want to add more than one
new origin, click the "Add new" button again instead of the "Done" button.
27.2 Rub out button
To remove an origin from the dictionary, click on it in the "Recipe origins" box, then click the "Rub
out" button. A "#" sign by the origin means that it is used by a Tuck Box recipe so it cannot be
deleted: the button will be disabled.
27.3 Recipe origins box
The "Recipe origins" box shows a list of all the recipe origins{linkID=112} available.
52
© Anastasis Ltd 2005-2009
28
Ingredients screen
On the "Ingredients" screen you can add, change or remove ingredients from a recipe.
28.1 Examples grid
The "Examples" grid shows examples of ingredients, to show you how to enter an ingredient in
the ingredients boxes beneath it.
28.2 Servings box
Use the "Servings" box on this screen to show the number of people that the ingredient quantities
are for. You can either type the number in, or use the arrow buttons on the left and right of the
box to change the number. If you keep the mouse button down on an arrow button the number
will change faster and faster. The biggest number allowed is 999.
Some recipes for small items are for a "batch" rather than a number of people, for example a
batch of 20 biscuits. In this case enter "1" in the "Servings" box, and in the "Instructions" box on
the "Recipes screen. type, "One batch will make 20 biscuits.".
There is another "Servings" box on the "Recipes" screen. That one is used to show the ingredient
quantities needed for different numbers of people. It changes the quantities shown in the recipe,
but it does not change the quantities shown on the "Ingredients" screen.
The servings box is disabled when an ingredient is being changed.
28.3 Units box
In the "Units" box enter the units number for an ingredient, e.g. "1" or "5". You can either type it in
or use the arrow button at the side to choose a number.
© Anastasis Ltd 2005-2009
53
Some ingredients don't have a units number. In this case leave the box blank. There is a blank
space at the top of the list if you want to change a number to nothing.
If you make a mistake, press the "Escape" key in the top left-hand corner of the keyboard.
28.4 Fractions box
In the "Fractions" box enter the fraction for an ingredient, e.g. "½" or "0.5". There are also word
fractions, like "level", "large" and "thin" that you can use. You can either type the fraction in or use
the arrow button at the side to choose a fraction. You will not be able to type any words that are
not in the list.
Some ingredients don't have a fraction. In this case leave the box blank. There is a blank space
at the top of the list if you want to change a fraction to nothing.
If you make a mistake, press the "Escape" key in the top left-hand corner of the keyboard.
28.5 Measures box
In the "Measures" box enter the measure for an ingredient, e.g. "gm", "roll" or "teaspoon". You
can either type the word in or use the arrow button at the side to choose a word. You will not be
able to enter any words that are not in the list.
Some ingredients don't have a measure. In this case leave the box blank. There is a blank space
at the top of the list if you want to change a measure to nothing.
If you make a mistake, press the "Escape" key in the top left-hand corner of the keyboard.
28.6 Food box
In the "Food" box enter the food type for the ingredient. You can either type the word in or use
the arrow button at the side to choose a word. You must enter something in the "Food" box.
If you are a personal user and you type in a word that is not in the list, a message will tell you that
this food type is unavailable. In this case you will have to ask the Administrator (usually your
teacher) to add the food type for you. For security reasons personal users are not allowed to add,
change or delete food types.
If you are the Administrator and you type in a word that is not in the list, the "Food types" screen
will appear and you will be able to enter the new food type there.
28.7 Preparation and Notes box
In the "Preparation and Notes" box you can enter a preparation method, like "cut into small
pieces", or add a note to the ingredient, like "fresh if possible". You can either type the words in
or use the arrow button at the side to choose some words from the list.
28.8 Ingredients grid
The "Ingredients" grid shows all the ingredients that are in the current recipe.
Click on an ingredient in the grid to change it or delete it, then click the "Change" button or the
"Rub out" button as appropriate.
28.9 Change button
To change an ingredient, first click on it in the large "Ingredients" grid, then click the "Change"
button. The ingredient will move from the grid to the ingredients boxes above it, and the
"Change" button will change into a "Put back" button. When you have made your changes, just
click the "Put back" button, and the ingredient will return to the grid.
54
© Anastasis Ltd 2005-2009
28.10 Put back button
The "Put back" button replaces the "Change" button when the "Change" button is clicked. The
"Change" button moves a selected ingredient from the "Ingredients" grid to the ingredient boxes,
and the "Put back" button returns it to the grid after the changes have been made.
28.11 Add button
To add a new ingredient to the recipe, fill in the ingredient boxes above the large "Ingredients"
grid, then click the "Add" button. The new ingredient will move from the ingredient boxes to the
last line in the grid.
If you want to put the new ingredient further up the list, use the "Push in" button instead.
28.12 Push in button
To insert a new ingredient to the recipe, fill in the ingredient boxes above the large "Ingredients"
grid, then click in the "Ingredients" grid on the ingredient above which you want the new ingredient
to go. Click the "Push in" button. The new ingredient will move from the ingredient boxes to a
place in grid immediately above the ingredient that you selected.
If you want to put the new ingredient at the foot of the list, use the "Add" button instead. In this
case there is no need to select an ingredient in the grid first.
28.13 Rub out button
To delete an ingredient, click on it in the large "Ingredients" grid, then click the "Rub out" button. If
you make a mistake, use the "Bring back" button straight away to restore it.
28.14 Bring back button
Click the "Bring back" button to restore an ingredient that you have just deleted.
28.15 Move up button
To move an ingredient up a place in the list, first choose it by clicking on it in the large
"Ingredients" grid. Then click the "Move up" button.
28.16 Move down button
To move an ingredient down a place in the list, first choose it by clicking on it in the large
"Ingredients" grid. Then click the "Move down" button.
29 Recipe timer
The "Recipe timer" is a kind of alarm which you can use to tell you when a recipe is cooked. To
display the "Recipe timer", go to the "Recipes" screen and click the "Timer" button.
To use the timer, your computer must have a sound system (loudspeakers) switched on and
connected.
© Anastasis Ltd 2005-2009
55
29.1 Cooking time box
In the "Cooking time" box enter the recipe's cooking time in minutes. (This will appear
automatically in the box, but you may want to change it for some reason.) You can either type the
time in or use the arrow buttons on each side of the box. If you hold the mouse button down on
an arrow button, the time will change faster and faster.
29.2 Time now box
The "Time now" box shows the current time.
29.3 Ready at box
When your click the "Start" button, the "Ready at" box will show the time that the food will be
cooked.
29.4 Start/Cancel/Stop button
Click the "Start" button as soon as you put the food into the oven. The time when the food will be
cooked will appear in the "Ready at" box, and the "Start" button will turn into a "Cancel" button.
Click the "Cancel" button if you want to stop the timer for some reason. When the alarm goes off
the “Cancel” button will turn into a "Stop" button. Click it to stop the alarm ringing.
29.5 Shrink/Expand button
Click the "Shrink" button to make the timer smaller. It will then say "Expand", which you can click
to make the timer big again.
29.6 Hide button
When you have set the timer, you can click the "Hide" button to make the timer disappear. You
will then be able to see the recipe again or use other programmes on your computer. When the
alarm goes off the timer will appear again.
29.7 Done button
Click the "Done" button when you have finished using the timer, and the screen will close.
30 Progress Records screen
Select Edit | Progress Records from the menu bar to go to the "Progress Records" screen. Here
you can keep a record of the basic recipes which each pupil has completed.
This menu item is enabled only when the Administrator has logged in.
56
© Anastasis Ltd 2005-2009
30.1 Class box
This box shows the name of the class under review. Click the arrow button to the right of this box
to see a list of all the classes that are in the database. Click the name of the class you want to
review. The names of the pupils in the class will appear in the "Pupil" column on the right-hand
side of the screen.
30.2 Recipe box
This box shows the name of the recipe under review. Click the arrow button to the right of this
box to see a list of all the basic recipes . Click the recipe you want to use in the current lesson. A
tick will appear beside the names of the pupils in the selected class who have already cooked this
recipe, and the date that they did it will be displayed.
30.3 Date box
This box displays a date. To change the date, click on the arrow button to its right, and click on
the date you want. The left and right arrows at the top of the calendar move forward or back one
month. Click on the red circle if you want today's date.
Use the date box when you want to record that the pupils selected have completed a recipe.
When you click the "Assign" button in the “Update” panel below, it will be recorded that they have
completed the recipe on the date you have selected.
30.4 Select all button
Click the "Select | All" button to select all the pupils in the selected class. If you then click the
"Update | Assign" button below, it will be recorded that all the pupils in the selected class
completed the recipe displayed on the date displayed. Alternatively if you then click the "Update |
Deassign" button below, it will be recorded that none of the pupils in the selected class have
completed the recipe displayed.
© Anastasis Ltd 2005-2009
57
The "Select | All" button is also useful if you want to assign or deassign the current recipe to all
except one or two names, for example when two pupils are absent from the lesson. Click "Select
| All" to select all the pupils, then keep the "Ctrl" key held down while you click on the name or
names which you do not want to operate on. This will deselect them. (See Section 15.4
“Choosing or selecting items in list boxes”.)
30.5 Select none button
Click the "Select | None" button to deselect all the pupils in the selected class. This is normally
used when you have clicked the "Select | All" button by mistake and you want to start again.
30.6 Assign button
When you have selected a class, recipe, date and pupils, click the "Update | Assign" button to
record that the selected pupils have completed the selected recipe on the date shown. This
button is disabled if no pupils have been selected.
30.7 Deassign button
Click the "Update | Deassign" button to record that the selected pupils have not completed the
selected recipe. Note that this will affect all the pupils selected who have completed the recipe,
not just the selected pupils who have completed the recipe on the date shown.
This button is normally used when you have made a mistake in assigning a recipe and you want
to start again.
30.8 Progress button
Click the “View | Progress” button to see the Progress Report for all the pupils in the selected
class. The Progress Report shows which pupils have completed which recipes, and you can print
it out if required.
When you click the “View | Progress” button after making changes, you will be asked if you want
to save the changes you have made. If you click "Yes" then any changes you have made will be
saved and displayed in the report. If you click "No" then any changes you have made will be
undone before you see the report.
30.9 Recipes button
Click the "View | Recipes" button to see all the basic recipes which feature in the Progress charts .
30.10
Recipe name box
This displays the name of the recipe selected in the Recipe box on the left.
30.11 Done column
This column in the "Progress" table shows a tick beside the name of any pupil who has completed
the selected recipe.
30.12 Pupil column
This column in the "Progress" table shows the name of the pupils in the selected class.
30.13 Date column
This column in the "Progress" table shows the date that each pupil completed the selected recipe.
If a pupil has not completed the selected recipe then the entry in the date column will be blank.
30.14 Basic recipe list
Click the link near the top to see a list of the basic recipes.
58
© Anastasis Ltd 2005-2009
31 Classes and Pupils screen
Select Edit | Classes and Pupils from the menu bar to go to the "Classes and Pupils" screen.
Here you can add, change or delete the names of classes and pupils.
This menu item is enabled only when the Administrator has logged in.
31.1 Edit class name box
To add a new class, type its name in this box, then click the button to the right which will say
"Add".
To edit an existing class name, click on it in the "Class names" box below, then click the "Edit"
button. The class name will move into this box, where you can change it as required. When it is
correct, click the button to the right which will say "Done".
31.2 Class names box
This large box on the left shows the names of the classes which have been entered in Captain
Cook's Tuck Box. When you click on one of the names, the list of pupils in the class will appear in
the "Pupil names" box on the right. You can then either edit it in the "Edit class name" box above
by clicking the "Edit" button to the right of this box, or delete it by clicking the "Rub out" button.
To choose and edit a name quickly, double click on it to move it to the "Edit class name" box
above, then change it as required.
31.3 Add class button
To add a new class to the database, type its name in the "Edit class name" box to the left of this
© Anastasis Ltd 2005-2009
59
button. The button's caption will change to "Add". When you click the button the name of the
class will move into the "Class names" box below.
31.4 Edit class button
This is the “Edit” button on the left-hand side of the screen. To edit or change the name of an
existing class, first select it by clicking on it in the "Class names" box to its left. Then click this
button to move the class name into the "Edit class name" box above where you can edit it as
required. A quicker way to edit a class name is to double click on the name, which will move it
directly into the "Edit class name" box.
31.5 Rub out class button
This is the “Rub out” button on the left-hand side of the screen. To rub out or delete the name of
an existing class, first select it by clicking on it in the "Class names" box to its left, then click this
button.
31.6 Rub out all classes button
Click this button to rub out or delete all the existing classes. Do not do this unless you are sure
that you want to: it will not be possible to restore them once they have gone.
31.7 Edit pupil name box
This is the “Edit” button on the right-hand side of the screen. To add a new pupil, type his or her
name in this box, then click the button to the right which will say "Add".
To edit an existing pupil name, click on it in the "Pupil names" box below, then click the "Edit"
button. The pupil name will move into this box, where you can change it as required. When it is
correct, click the button to the right which will say "Done".
31.8 Pupil names box
This box shows the names of the pupils in the class which you have selected in the "Class
names" box opposite.
To edit or change a name, either double click on it or click it once and click the "Edit" button to the
right of this box. It will move to the "Edit pupil names" box above, where you can change it as
required.
To delete or rub out a name, select it by clicking on it once, then click the "Rub out" button to the
right of this box.
To move a pupil into another class, drag it across to the new class shown in the "Class names"
box opposite.
To move more than one pupil at a time to a new class, either click the "Select all" button before
you drag them all across, or select a set of names by holding down either the Shift key or the Ctrl
key as you click on them with the mouse. (See Section 15.4 “Choosing or selecting items in list
boxes”.)
31.9 Add pupil button
This is the “Add” button on the right-hand side of the screen. To add a new pupil to the class
selected in the "Class names" box on the left, type his or her name in the "Edit pupil name" box to
the left of this button. The button's caption will change to "Add". When you click the button the
name of the pupil will move into the "Pupil names" box below.
31.10 Edit pupil button
This is the “Edit” button on the right-hand side of the screen. To edit or change the name of an
existing pupil, first select it by clicking on it in the "Pupil names" box to its left. Then click this
60
© Anastasis Ltd 2005-2009
button to move the pupil name into the "Edit pupil name" box above where you can edit it as
required. A quicker way to edit a pupil name is to double click on the name, which will move it
directly into the "Edit pupil name" box.
31.11 Rub out pupil button
This is the “Rub out” button on the right-hand side of the screen. To rub out or delete the name of
an existing pupil, first select it by clicking on it in the "Pupil names" box to the left, then click this
button.
31.12 Select all pupils button
If you want to delete all the pupil names in a class or drag them all into another class, first click
the "Select all" button, then the “Rub out pupil” button.
The "Select all" button is also useful if you want to delete or move all except one or two names.
Click "Select all", then keep the "Ctrl" key held down while you click on the name or names which
you do not want to operate on. This will deselect them. (See Section 15.4 “Choosing or selecting
items in list boxes”.)
32 Printer settings
32.1 Paper size
The programme assumes that your printer is set up to use A4 paper. If the default setting is not
A4 there may sometimes be problems in printing progress reports, recipes, menus and birthday
cards. To change the default paper size setting go to Start | Settings | Control Panel | Printers
and Faxes. Right-click on the printer and select "Printing preferences". Look for items such as
"Layout | Advanced | Paper/Output | Paper Size" or "Page Setup | Paper Size" where you can
change the default paper size to A4.
32.2 Graphics mode
Some printers can cause problems due to their graphics settings. Go to Start | Settings | Control
Panel | Printers and Faxes, right-click on the printer and select "Printing preferences". If some
characters print out incorrectly, look for "Advanced | Graphic | True Type Font" or something
similar and set it to "Download as Softfont". If the words are printed within a thin black rectangle
look for " Advanced | Printer Features | Graphics Mode" or something similar and set it to
"Raster".
33 Technical support
If you have a question which is not answered in the Recipe FAQs item or anywhere else in this
manual, please go to our website www.anastasis.co.uk and look at the FAQs (Frequently
Asked Questions) list there.
If you cannot find the answer in the FAQs list then e-mail your question to
[email protected]. We may not be able to answer your question immediately but
we shall do our best to answer it as soon as we can.
Captain Cook’s Tuck Box™ is produced by:
Anastasis Ltd
86A Totteridge Lane
High Wycombe
Bucks
HP13 7PN
© Anastasis Ltd 2005-2009
61