1
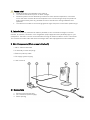
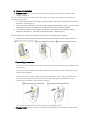
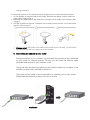
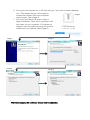
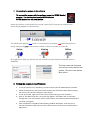
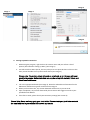
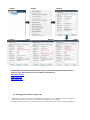
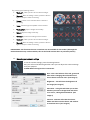
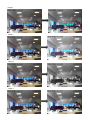
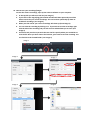
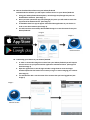
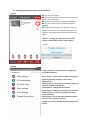
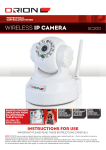
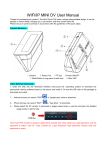
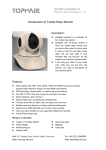
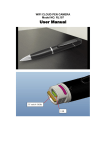
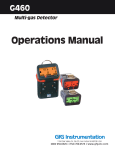
User Manual Thank you for your purchase of the Time2 MIP11 Wireless Surveillance Network camera. We recommend that you carefully read this manual before in order to use your camera See sections: 1. Preventive measures and safety instructions. 2. Intended use. 3. Main Components. 4. Camera installation. 5. Connecting the camera to your router. 6. Downloading the required software. 7. Connecting the camera to the software. 8. Setting up the camera wirelessly. 9. Setting up motion detection. 10. Managing your camera from your PC 11. Managing your camera settings 12. How to save your recordings/images 13. Downloading software for your iPhone/Android 14. Connecting the camera to your iPhone/Android 15. Managing software from your iPhone/Android 16. Frequently asked questions (FAQS) 17. Technical Specifications 1. Preventive measures and safety instructions 1.1. Notifications Warning! Do not install the product outdoors or in any place where it might become wet. Do not install the product in any place that might be exposed to extreme heat or cold. It is not permitted to open the product yourself or to have it opened, neither is it permitted to repair the product yourself or to have it repaired. This will void the warranties. Please let any maintenance be carried out by certified maintenance personnel. Only use original accessories from the manufacturer. Keep the product out of reach of children. Disconnect the device from all power sources before cleaning it. Use a clean, dry cloth to clean the product. Do not use any abrasive agents, corrosive cleaning products or any substances that contain bleach or solvents to clean the product. Remove the adapter from the power outlet during storms, lightning and whenever the product will not be used for a longer period of time. Please note! Install the product as indicated in this manual. The camera should be kept out of direct sunlight. Wireless systems can be affected by interference from wireless telephones, microwave ovens and other wireless devices that operate in the 2.4 GHz range. Keep the product at least 3 metres away from any possible sources of interference during installation and operation. The camera is not able to view through glass at night. Keep this in mind when positioning it. 2. Intended use The MIP11 is a security camera that makes it possible to view surveillance images via a local network, an Internet connection or the "Plug2View (iOS) & p2pcamviewer (Android)" App on your smartphone. The MIP11 can be connected either through an Ethernet cable or a Wi-Fi connection. The camera can make video and audio recordings and is also equipped with motion detection. 3. Main Components (What comes in the box?) 1. MIP11 Camera with base 2. 2 assembly screws and plugs 3. Ethernet (internet) cable 4. DC supply (power supply) 5. User’s manual 3.1 Connections 1. Ethernet port (Internet port) 2. DC connection (Power supply) 3. Reset opening 4. Camera Installation Please note! Ensure that the camera functions properly in the chosen location before starting installation. You can choose to place the camera on a flat surface, or to attach the camera to the location of your choice with screws. 1. To mount the camera to the stand, you will need to twist the camera to the screw on the stand. (See image 1) 2. Once you have done this, there is a screw tight plate behind to which you can screw towards the camera to tighten this in place and hold the camera straight. 3. To twist the camera on an angle or landscape, the stand has a rotating casing where the ball joint is. Twist this to loosen the ball. (See image 2) This will then let you move the camera up and down or landscape or portrait. 4. Tighten the casing where the ball joint is to hold securely in place. (See image 3) 1 2 3 Connecting the camera Connect the power adapter to the DC connection on the camera the plug into a power outlet. (See image 1) Connect one end of the Ethernet cable supplied with the product to the network port on the camera. (See image 2) Connect the other end of the Ethernet (internet) cable to the router. The green LED on the Ethernet (internet) port and on the front on the camera will light up and flash when the camera has successfully connected to a network. 1 2 You can now operate your IP Camera using your smartphone or PC. Please note! Make sure that the camera functions properly in the chosen location before starting installation. To mount the camera to a surface using the screws such as a wall, please see below: 1. On the bottom of the stand will be two holes. Remove the rubber case to make the holes clear. (See image 1) 2. Measure the distance from the holes so the camera will fit nicely to the screws. (See image 2) 3. Drill the screws into the wall. The base of the camera stand should now fit and slide into this. (See image 3) Please note! If the surface is too hard for the screws (stone/ concrete), you will need to drill holes and use the screw plugs which are included. 5. Connecting the camera to your router During the setup of your camera, you will need the camera to be connected to your router for internet access. For this you will need the internet cable provided and access to your internet router. Using the internet cable provided put the internet cable into the back of the camera (as previously advised in section 4) The other end will need to be connected to an internet port on your router. Please see demonstration below on how to do this. 6. Downloading the software Before you can start the set-up of your camera, you will require: Computer Internet access Access to your router Power supply Camera (with components) Go to www.scc21.net on your internet browser) to get the software required from an online download. Please Note: You will require a software that is able to unzip files (such as Winzip) to open the download. Winzip is software which can open files such as this download. This can be downloaded at www.winzip.com. Most computers already have this software preinstalled. PLEASE NOTE: If you select Web view, you will not have downloaded the software. This just allows you to view the camera online without downloading the program where all the set up features will not be available. When you visit www.scc21.net you will see the following: 1. You will need to choose the appropriate file to download (PC client is a version of the software which runs on windows laptops or computers) 2. It will direct you to another page which will ask you to download the file. (See image 1) 3. Click the download button for the software to start downloading. 4. Once the file has finished downloading it will automatically open/or ask you to open the download directing you to the SYSM Monitor Setup (See image 2) 5. When you have read through the SYSM setup window, click the next button. It will then ask where you wish to locate the download. (See image 3) 6. Once you have chosen this, it will then ask you if you wish to make a desktop icon. This means that you will be able to Image 1 access the software from your computer home screen. (See image 4) 7. Once you have done this press install to begin installation. Once this is complete it will then open on your computer. If this does not happen, open the software using the shortcut created on your desktop. (See image 5) Image 2 Image 3 Image 4 Image 5 After these stages, the download should now be complete. 7. Connecting the camera to the software To connect the camera with the software, open the ‘SYSM Monitor’ program. The desktop icon is called SYSM Monitor. SYSM Monitor icon will look like this: When the camera is connected to the router, open the LAN tab and the camera will automatically appear as shown below: The camera will appear blue when it is connected to a network, red whilst the camera is being viewed and grey if the camera is offline or fails to connect to a network. Online Viewing Offline By logging into WAN, the camera can be viewed using the Ethernet (internet) cable or wirelessly. The User name and Password can be found on the back of the camera. This is the one with the Blue outline. 8. Setting the camera to run Wirelessly 1. To set the camera to run wirelessly, you will need to open the SYSM Monitor software. 2. Under the LAN tab you will see the camera name, this will show as blue. When viewing the camera, this will then change to red as shown. 3. To set up the WiFi, right click on the camera name to bring up a list of options. 4. Click on ‘Set WiFi Connection’ on the list that appears. Thereafter click on start WiFi settings then ‘scan for network’, which would require your Network name and Password (as shown in image 3). 5. Upon completion. Press Ok and the following window will appear. It will ask you to remove the internet cable; this may take a few moments to connect to and will make a slight noise. Image 3 Image 1 Image 2 Image 4 9. Settings up Motion Detection 1. While using the program, right click on the camera name and you will see a list of options (like advised in setting up WiFi). (see image 1) 2. You will see Alarm Alerts (Email, this may also just as set-up Email Alerts. Click into this then you will be able to set up the motion detect (See image 2) Please note: The motion detect will send an email and up to 3 images with your specified message. Motion detection can only be set up with Hotmail, Yahoo and Gmail email addresses. 3. Fill in the appropriate details (see image 3). Please be advised the information for the SMTP Port and Data Encryption can be found in image 4. 4. When you have done this, any motion detected will be sent to you via email. 5. Upon completion, any motion detected by the IP camera will trigger an email to your specified email address. 6. If this fails to work, please check your Sensitivity settings (See section 4) Please Note: Some mail may go to your Junk folder! Please check your junk folder and add the email address to your contact list to avoid any issues. Image 1 Image 4 Image 2 Yahoo Image 3 Hotmail Gmail PLEASE NOTE: The motion detection feature will only work with Hotmail, Gmail and Yahoo accounts. If you do not have one you are able to create these at: www.hotmail.com www.gmail.com www.yahoo.com 10. Managing your camera using your PC • Start the IP Camera Tool via the "SYSM Monitor" shortcut on your desktop. The IP camera tool automatically searches for the IP camera(s) connected to your network. • Double-click the camera you want to use. In the main window the camera image will appear. By pressing the following button: "Capture": Take a picture of the camera image. "Record": Start recording a video; press the button again to stop the video recording. "Listen": Listen to the sound that the camera is recording. "Talk": Talk through the speaker of the camera. "Vertical flip": Flip the image horizontally. "Mirror": Flip the image vertically. "Settings": Control the settings of the camera. "Capture": Take a picture of the camera image. "Record": Start recording a video; press the button again to stop the video recording PLEASE NOTE: The functions that are crossed out are not available for this model. (Although the motion detection may not be available, this can be found in Alarm Alert as previously shown) 11. Managing your camera's settings To set the camera settings, press the settings button. Here you will see the following window. Here you can adjust the camera settings to fit your purpose. PLEASE NOTE: The night vision is automatic Hue – This is the balance of the red, green and blue colour. Changing this will make one of these colours stand out more. (See image 1) Brightness – This will alter the brightness of the image (See image 2) Saturation – Using this will allow you to alter whether you want to image black and white or in colour, 1 being black and white. (See image 3) Contrast - Contrast will make the colours bolder and allow certain colours and outlines to stand out more. (See image 4) Image 1 Image 2 Image 3 Image 4 12. How to save your recordings/images To save the camera recordings, open up the camera software on your computer. 1. In the top left you will see a tool bar (see image 1) 2. If you click on the magnifying glass another window will then open and you will be able to search for your recent recordings. This can be done specifically by dates or include all recordings. (see image 2) 3. When you click search your recent recordings will show up (show image 3). 4. You can view the recording by clicking on it. If you wish to save the recordings right click the title of the recording and you will see a list which allows you to save. (See image 4) 5. It will then ask you where you wish the save the file. Specify where you would like to save the file. Once you have chosen the location, press save to save the recording. You can find this in the located folder. (see image 5) Image 1 Image 2 Image 3 Image 4 Image 5 13. How to download the software on your iPhone/Android To download the software you will require internet access on your iPhone/Android. 1. Using your iPhone/Android smartphone, visit the app store/Google Play store to download the software. (See image 1). 2. Once you have opened the App store/Google play store you will need to search the app. Search for P2PCamviewer. (See image 2) 3. It should be there first app to appear. Download the application on your device in order to use the IP Camera (See image 3). 4. You will now have successfully downloaded the app in to use the camera from your iPhone/Android. Image 2 Image 1 Image 3 P2PCamviewer 14. Connecting your camera to your iPhone/Android 1. In order to view and manage the camera from your iPhone/Android you will require internet access on your phone and the application mentioned above. (The app will look like image 1) 2. Open the application to see the login window. Using the User name and Login Password (found on the back of the camera) to log in to start managing your camera. (See image 2) 3. You will then be able t see the name of the camera that you have logged into (See image 3) Image 2 Image 1 P2PCamviewer Image 3 15. Managing the camera from your iPhone/Android Image A A1. Log into your camera. A2. See all the available cameras that are connected B via your Wi-Fi connection. A3. All photos and video recordings are saved here. A4. See alarm reports when movement has been detected. A5. Find information about the software, check for updates, total capacity and available capacity on the program. You are also able to set the sound caption option. ‘Options’ – Change your log in password for the camera or add another camera. (See image 1) Image1 A1 A2 A3 A4 A5 Image B Image A Section B – Edit the camera settings from your iPhone/Android. Video settings – Edit the main settings of the image, such as the quality, resolution, frame scale, brightness etc… SD-Card settings – Choose the recording settings that are being saved the your SD card SD-Card Query – Change the SD card files Alarm Settings – Change the settings of when motion is detected (such as how many images you want, alarm sensitivity) Email Settings – Set up the motion detection (same feature as the computer software) Change access code – Change the access code on the camera. 16. Frequently asked questions (FAQS) Why is there a delay when viewing the camera on my iPhone/Android? Understandably there will be a delay as you are viewing the camera through the internet. However if you are having problems with a long lengthy delay then you will need to check the strength of your internet, on both the camera and the device you are using to view the camera. After checking all this, if your internet connection is fine then it will help to change the resolution of the camera to 174x128. If the camera speeds up then there is an issue with the internet connection. (See section 11 to change the settings) The screen colours are not satisfying The settings of the screen colour can be changed using the software. This is demonstrated in section 11 with guidance to what setting changes what. Does the camera have to be constantly connected to the router? When you are first setting up the camera, you will have to connect this to your router. However, once you have done this you are then able to set up the camera through your WiFi (See section 8) Is the camera suitable to be placed in a window? The camera is not suitable to be placed at a window as this would interfere with the night vision. The night vision will not work due to the reflective lights from the camera. Can the camera be placed outside? Unfortunately the camera is not suitable for outdoor use 17. Technical specifications General product specifications Sensor: Resolution: Viewing angle: Minimal brightness: Video compression: 1/4" Colour CMOS Sensor 640 x 480 pixels (300k pixels) 60 degrees 0.5Lux @ F2.0 MJPEG Images per second: Power source: Energy consumption: Temperature: 25fps(VGA), 30fps(QVGA) 230VAC/5VDC/2A Adapter 2,5W (Max.) -5°C ~ 55°C (23°F~131°F) Minimal system requirements: CPU: 2.0 GHZ or higher Memory: 256 MB or higher Video card: 64 MB or higher Supported OS: Windows 98/ME/2000/XP/Vista/7/8 Supported browsers: IE6.0-10.0, Firefox, Safari, Google Chrome Supported mobile OS: iOS 4.3 and higher / Android 2.1 and higher Certification: CE, FCC, RoHS, R&TTE