1
X-Monkey
Software Development Guide
X-Monkey Software Development Guide Rev -
Table of Contents
Contents
1.
Introduction ................................................................................................................................ 3
1.1
Scope of this Software Development Guide ........................................................................ 4
1.2
Limitations .......................................................................................................................... 4
1.2.1
Precautions and User Responsibility ............................................................................. 4
1.3
Programming Options ......................................................................................................... 4
1.3.1
Startup Conditions ........................................................................................................ 5
2. Setup for Software Development ................................................................................................ 6
2.1
Hardware ............................................................................................................................ 6
2.2
Power ................................................................................................................................. 6
2.3
Compiler / Integrated Development Environment (IDE) ...................................................... 6
2.4
Debugging Tools ................................................................................................................ 7
3. Software Structure...................................................................................................................... 8
3.1
Top Level Code Components ............................................................................................. 8
3.2
Common public source code .............................................................................................. 9
3.3
Platform code ................................................................................................................... 10
3.4
Proprietary helper libraries ................................................................................................ 11
4. Global Variables ....................................................................................................................... 11
5. User_Main() structure ............................................................................................................... 11
6. Common Functions .................................................................................................................. 13
7. Library Functions ...................................................................................................................... 14
8. Appendix A – Serial Port Reprogramming Example ................................................................. 17
X-Monkey Software Development Guide Rev -
Release Notes
Title
Subtitle
Type
Document number
Revision Index
Initial Release
Monkey
X-Monkey Software Guide
Manual
UM5100
Date
4/2012
Name
MR
Status / Comments
Initial release
IMPORTANT DISCLAIMERS
This document and the use of any information contained therein, is subject to the acceptance of the Ryan Mechatronics terms and
conditions. They can be downloaded from www.ryanmechatronics.com.
Ryan Mechatronics LLC makes no warranties based on the accuracy or completeness of the contents of this document and reserves the
right to make changes to specifications and product descriptions at any time without notice.
Ryan Mechatronics LLC assumes no liability for damages or otherwise due to use of the information in this document or application of any
device described in this document.
Ryan Mechatronics LLC stresses end user compliance with all applicable laws and regulations when using devices of this nature. Use by
an end user in violation of any applicable laws is automatic basis for termination of warranty, technical support and future sales.
Ryan Mechatronics LLC reserves all rights to this document and the information contained herein. Reproduction, use or disclosure to third
parties without express permission is strictly prohibited.
Copyright © 2012, Ryan Mechatronics LLC
X-Monkey Software Development Guide Rev -
1. Introduction
The Monkey platform provides a high performance basis for mechatronic system control. Originally
designed for autonomous vehicle control, the platform can also be used for advanced data logging,
industrial control, motion control or other mechatronic applications.
The X-Monkey platform is an enhanced version of prior Monkey circuit assemblies. The X-Monkey
includes:
o
Powerful base CPU - Cortex M3 (ARM7) LPC 1768 CPU
o Cortex SWD interface (tested with Rowley Crossworks)
o Hardware based serial boot loader for easy loading of new software
o
High performance U-Blox LEA-6 GPS Module
o Active on board antenna for increased sensitivity and jamming reduction
o Autosensing off board GPS antenna switch for external antenna use
o
o
o
o
o
o
o
o
o
o
o
o
o
3 axis gyro (rate sensor)
3 axis accelerometer
3 axis magnetometer
RS-485 driver on board for spare port
Barometric pressure sensor
Spare analog and digital I/O ports
Six (6) Isolated and dedicated PWM servo outputs
Four (4) input capture port connector
Micro SD Card
EEPROM for configuration settings
Flash data log for solid state data logging
Three status LED’s (red, green, blue)
Interfaces with CHIMU module for attitude estimates and sensor inputs via SPI or UART
Monkey has an excellent GPS module on board (U-Blox series) with both on board and off board
antenna capability. The off board antenna capability is important if the unit is used in conditions
where the on board antenna will be blocked by enclosures or other jamming.
Monkey has on board inertial measurement sensors, but is intended to work with the CHIMU AHRS
as a plug in module to offload attitude determination. The CHIMU includes:
3 axis rate sensors to measure angular rate
3 axis accelerometers to measure linear acceleration
3 axis magnetometer to measure magnetic flux (typically used for compass type heading
derivation)
The combination of all these capabilities with the on board ARM processing power allows a full
attitude heading reference system (AHRS) with GPS position, velocity and time updates all in one
tiny package.
Application areas include, but are not limited to:
UAVs (AUVs, UAS, etc)
Robotics
Education
X-Monkey Software Development Guide Rev - | Introduction
3
Rocket science
1.1 Scope of this Software Development Guide
This guide provides an overview of software development on the X-Monkey platform. It is not a
comprehensive guide, but is intended to help familiarize the user with the core structure on Monkey,
how you can insert your own code and develop on the platform, and provide descriptions and
examples of common functions.
1.2 Limitations
The toolset and project that is provided for Monkey was designed using Rowley Crossworks
(www.rowley.co.uk ). This compiler / IDE are based on the GCC base. It is a very good tool, and
relatively inexpensive, especially for individuals. Rowley frequency updates their toolset with the
latest core files for the X-Monkey series of processor, and we adopt the latest after testing.
1.2.1 Precautions and User Responsibility
The Monkey is an open electrical device with no case. It has no on board protection from short
circuits or accidental electrical damage. No system is fool proof, and all correct use and planning for
events in case of failure are the responsibility of the user.
Ryan Mechatronics cannot be held responsible for accidental or intentional damage caused
by this unit either directly or indirectly.
1.3 Programming Options
X-Monkey can use either SWD for detailed debugging / programming, or can be loaded with code
via a serial boot loader.
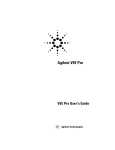
The Monkey platform is an excellent prototyping system for users that want or need the power of an
ARM Cortex core. User application code can be run on the core. However, the design makes it
easy for the on-board ARM processor to be reprogrammed by using on-board firmware upload
capability. This allows new Intel HEX formatted code to be uploaded using the serial port. A top
level view of the usage modes is shown in the following figure.
X-Monkey Software Development Guide Rev - | Introduction
4
1.3.1 Startup Conditions
The startup condition of the S2 ISP pushbutton on the Monkey dictates what mode the system
enters when reset or power is applied.
On Board ARM CPU running user code: For operation in standalone mode, user must have code
loaded and running on the processor. In this case, switch S2 is not depressed.
Reprogramming: In order to reprogram the board, switch S2 would be depressed before power is
applied. When power is applied in this state, the on board boot loader of the ARM is active.
Programming steps in this state can be found in Appendix A – Serial Port Reprogramming Example .
X-Monkey Software Development Guide Rev - | Introduction
5
2. Setup for Software Development
Presented in this section are the most common setup and method for programming and coding the
X-Monkey.
Please note - the Monkey is an open electrical device with no case. It has no on board protection
from short circuits or accidental electrical damage. No system is fool proof, and all correct use and
planning for events in case of failure are the responsibility of the user.
Ryan Mechatronics cannot be held responsible for accidental or intentional damage caused
by this unit either directly or indirectly.
2.1 Hardware
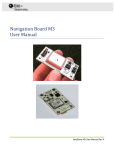
Hardware details can be found in the X-Monkey User Manual UM5000, found on our website
(www.ryanmechatronics.com). However, shown below is a standard setup for connecting to the unit
while debugging.
Figure 1. Serial Wire Debug (SWD) X-Monkey setup
2.2 Power
The X-Monkey requires 4.5 to 28V on its input power connector. Typically, we use a 5V bench
supply to provide this while debugging. 5 volts is selected so that if there is an accidental short /
touch of the power input to the rest of the board there will be limited damage. The X-Monkey CPU
pins are (in general) 5V tolerant.
Loss of power to the unit while debugging will stop the debugging of course. It may also require
disconnect / connect of the SWD tools to have your PC recognize them again.
2.3 Compiler / Integrated Development Environment (IDE)
Rowley Crossworks for ARM - This is our preferred tool for compiling code. Rowley provides a solid
compiler and IDE based on the GCC compiler base, and provides both forum and ticketed support
for users. Licenses start at $150 for personal use.
X-Monkey Software Development Guide Rev - | Setup for Software Development
6
2.4 Debugging Tools
In order to debug using the SWD connector and Rowley Crossworks, you will need a JTAG / SWD
interface and an interface cable. Rowley has a list of supported tools on their site. We use these
two options (both are required):
ARM-USB-TINY-H - This is a high speed JTAG debugger that works with the Rowley toolset, and
costs about $60. Rowley has a JTAG debugger as well, the CrossConnect Lite; it is just a little more
costly at $100.
ARM SWD Adapter - This is required for the Serial Wire Debug (SWD) format for ARM Cortex
interface. It plugs into the debugger above and comes with the cable that plugs directly into
Monkey's SWD header.
X-Monkey Software Development Guide Rev - | Setup for Software Development
7
3. Software Structure
The project code is structured to allow updates to libraries and common public code independent of
user’s specific project code.
The user only needs to provide a “user_main()” function in their code and link it appropriately.
When the X-Monkey is done booting, it will transfer control to this function and still provide access to
all functions and libraries on the unit.
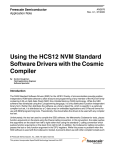
The overall project is called a solution and it contains a number of items. The solution structure is
shown below.
Figure 2. Solution Structure
The solution contains proprietary libraries, open source code and settings for the project. This
section will describe each of the following groups:
Top level project code components
Common public code
Platform code for customization
Proprietary helper libraries
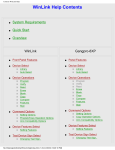
3.1 Top Level Code Components
The top level code components are highlighted in the figure below.
X-Monkey Software Development Guide Rev - | Software Structure
8
Figure 3. Top level code components
The following quick descriptions apply to these items:
main.c – This is the entry point for the C code.
o After the system is setup and initialized, main.c calls the function “User_Main()”. This
is the link to the user code located in the Platforms->UserMode.c (or similar) code.
This is how your code interfaces into the overall project.
projectconfig.h – this file contains a number of defines that affect the overall project.
o Items like RS-485 and SD card use can either be enabled or disabled in this file.
projectwarnings.c – contains warnings based on the defines in projectconfig.h to try and
prevent errors by raising warnings and errors if you choose wrong options.
systemfiles – contains startup code (assembly) specific to this processor.
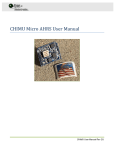
3.2 Common public source code
The common public source code (expanded) is highlighted in the figure below.
X-Monkey Software Development Guide Rev - | Software Structure
9
Figure 4. Open Source Code
3.3 Platform code
The platform folder contains files that represent specific platforms (i.e. fixed wing UAV, quadcopter,
platform stabilization, etc.).
From within Rowley, you can include and exclude different files before compiling. This allows you to
selectively choose which platform or function you are compiling for, while maintaining all the libraries
and public code.
In this manner, you are able to have different files with User_Main() entry points. When main.c
passes control to this function, your platform specific code will execute.
X-Monkey Software Development Guide Rev - | Software Structure
10
3.4 Proprietary helper libraries
The proprietary libraries are highlighted here. However, this is our internal view. Your project will
only contain the libraries themselves, which reside in the Libraries directory and have a .a
extension. The included .h files provide access to the compiled code within these libraries.
Figure 5. Libraries
4. Global Variables
One benefit (and sometimes drawback) to the X-Monkey code is the use of global variables, located
in globals.h. Using these variables makes it very easy for users to access the latest information that
is typically populated behind the scenes in interrupt service routines or thru the main state machine.
One major drawback: In CrossWorks, there is a global variable tab for inspecting global variables. If
this is selected, you will experience dramatic slowdowns during debugging as Rowley updates ALL
of these variables.
To avoid this slowdown while debugging, simply look at other watch windows and don’t use the
global watch display.
5. User_Main() structure
User_Main() is where the users code typically goes. It is a pseudo-RTOS state machine that
executes certain functions based on interval times. Full examples are provided with the software,
but an example is shown below. Some significant items are:
Task times – the task break down consists of 1 msec, 5 msec, etc. tasks. Put your required
code call into the appropriate section (i.e. don’t call it faster than it needs to, or slower).
Protected sections – if a section is called out as protected, it is important to other background
functions and should not be removed unless you know you don’t need it. This is how the
Monkey base code operates to provide sensor data and manage com protocols without user
intervention.
X-Monkey Software Development Guide Rev - | Global Variables
11
void User_Main(void)
{
//Main loop
// Note that this is the time / tasking loop. There are protected areas in this section you should leave alone.
//
// State machine for task processing by user is in user_process()
#if defined CFG_SDCARD
bLoggerOK = sd_init(); //Init SD card logger if enabled
#endif
gThruputCnts = 0;
gLED_Heartbeat = 1; //Enable heartbeat
User_Init();
//Start processing loop
while (1)
{
gThruputCnts++;
//Pseudo-tasking occurs here
if (time_1ms_flag) // 1ms (1000 Hz) tasks
{
/*---------------------------------------------------------------------*/
/* BEGIN PROTECTED -- DO NOT REMOVE -- UNIT WILL NOT OPERATE CORRECTLY */
//Handle serial port receipt
Main_SerialPort_Process(); //Handles double buffering of input from serial coms
//Parse now that the interrupts seem over (RX FIFO has been emptied)
SSP1_Parse_CHIMU();
//Parse GPS
GPS_Parse();
//Process uplinked waypoints - Event handler will indicate if there is a complete set waiting for you
Waypoint_Process();
//INS filter processing
#ifdef CFG_INSFILTER
INS_Filter_Process();
#endif
#ifdef CFG_BMP085
Baro_Process(1000); //Updates pressure sensor at a 1 second rate. Maximum update rate is about 40 msec
#endif
/* END PROTECTED ------------------------------------------------------*/
/*---------------------------------------------------------------------*/
User_Process(); //Handles user processing (like mode switches, etc)
time_1ms_flag = 0;//Clear time tick
}
if (time_5ms_flag) //5ms (200 Hz) tasks
{
//No Tasks
time_5ms_flag = 0;//Clear time tick
}
if (time_10ms_flag) //10ms (100 Hz) tasks
{
//No Tasks
X-Monkey Software Development Guide Rev - | User_Main() structure
12
time_10ms_flag = 0;//Clear time tick
}
if (time_20ms_flag) //20 ms (50Hz) tasks
{
/*---------------------------------------------------------------------*/
/* BEGIN PROTECTED -- DO NOT REMOVE -- UNIT WILL NOT OPERATE CORRECTLY */
Control_Process(); //Handle control functions (servos) at 50Hz
#ifdef CFG_USE_MONKEY_TELEMETRY
TX_Com_Process();
//Handles output messages
#endif
/* END PROTECTED ------------------------------------------------------*/
/*---------------------------------------------------------------------*/
time_20ms_flag = 0;//Clear time tick
}
if (time_100ms_flag) //100ms (10 Hz) tasks
{
/*---------------------------------------------------------------------*/
/* BEGIN PROTECTED -- DO NOT REMOVE -- UNIT WILL NOT OPERATE CORRECTLY */
ADC_Process(); // 10 Hz, start a burst ADC read. Global gADC holds result.
CHIMU_Process();
/* END PROTECTED ------------------------------------------------------*/
/*---------------------------------------------------------------------*/
//Below is for SD card logging of standard data set if card is present
//Called at 10 Hz, but only writes to disk after 10 entries
#if defined CFG_SDCARD
SD_StandardLogging(TRUE);
#endif
time_100ms_flag = 0; //Clear time tick
}
if (time_1000ms_flag) //1000ms (1 Hz) tasks
{
System_Check_CPU(); //Checks CPU load and puts it into Monkey output message as needed
time_1000ms_flag = 0; //Clear time tick
}
}//Loop back around
}
Figure 6. Sample User_Main() function
6. Common Functions
Common used functions in the open source area include (but are not limited to):
(To be documented at a later date. Functions are numerous. For now, please browse the
reference manual online to see the full set of source code available functions in the Monkey
code base.)
X-Monkey Software Development Guide Rev - | Common Functions
13
7. Library Functions
Special functions can be found in the libraries. These functions are designed in many cases to make
it easier to access special hardware functions on the X-Monkey. Libraries represent proprietary
code that you have access to, but cannot change or view the source. The libraries currently include:
UserFunctions – a collection of functions that are most commonly used.
SDCard – functions for accessing the micro SD card file system. Some of these functions
are repeated in UserFunctions for convenience.
INS – an inertial navigation system library
InertialSensors – for accessing on board MEMS sensor data (different than CHIMU access,
which is in the common source area).
GPS – handles GPS parsing and module control functions
GNC – guidance, navigation and control functions (access may be limited)
Many of the commonly used library functions are found in the UserFunctions library. A brief
description of those functions located in UserFunctions as of release 4.0 is shown in Table 1.
This is just a quick example of some of the functions. A comprehensive list of all functions,
defines and variables in the code can be found in our detailed software description. Please
note that the latest detailed software description can be found in our online software reference
manual. This manual can be found here:
http://www.ryanmechatronics.com/public_files/user_manuals/platforms/X-Monkey/XMonkeySoftwareUserGuide/html/index.html
Table 1. Current set of Functions in UserFunction Library
GPS Functions
int
GPS_SetDataRate (int rate)
Set GPS Data Rate (output rate)
void
GPS_SetFilter (unsigned char filter)
Set GPS Filter Type.
void
GPS_MessageEnable (unsigned char msgid, unsigned char
enable)
Enable / Disable GPS Messages.
void
GPS_ColdStart (void)
Coldstart software reboot of GPS.
Power Control Functions
void
Power_GPS (int poweron)
Power Management for GPS.
void
Power_CHIMU (int poweron)
Power Management for CHIMU.
void
Power_Aux3_3V (int poweron)
Power Management for Auxiliary Power.
int
Power_Sleep (void)
X-Monkey Software Development Guide Rev - | Library Functions
14
Sleep (Idle) mode control.
int
Power_DeepSleep_WDT (unsigned int minutes, unsigned int
seconds)
Deep Sleep mode control - WDT.
int
Power_DeepSleep_RTC (unsigned int minutes, unsigned int
seconds)
Deep Sleep mode control - RTC.
int
Power_BoostFromLowPower (int enabled)
Boost processing mode control.
LED Control Functions
void
Led_Control (unsigned long led, int on)
LED On/Off control for Monkey board.
void
Led_Blink (unsigned long led, int blinks)
LED Blocking Flash function for Monkey board.
GPIO Functions
int
GPIO_Configure (int channel, int direction, int pullup, int
ISRenable, int risefall)
GPIO Configure Required to set GPIO to outputs or return to
inputs.
int
GPIO_Output (int channel, int value)
GPIO Output Sets or clears an output GPIO.
int
GPIO_Value (int port, int pin)
GPIO Value Returns high/low state of any port/pin combination
Note that all port pins not configured as ADC can be queried, this
is not limited to P2.12 or P2.13)
SD Card Functions
int
SD_Mount (void)
Mount SD Card.
int
SD_FileOps (char *fileptr1, char *fileptr2, int cmd)
SD Card File Operations.
int
SD_Log_Data (char *data, int btw, unsigned int *msec, unsigned
int *fsize)
SD Card Logging Operations.
UART COM Control Functions
void
int
unsigned short
COM_BaudRate (int com, unsigned short baud)
UART baud rates.
COM_Putch (int com, int ch)
UART Putch.
COM_Space (int com)
X-Monkey Software Development Guide Rev - | Library Functions
15
UART TX Queue Space.
const char *
int
void
int
COM_Puts (int com, const char *string)
UART Puts.
COM_Write (int com, const char *buffer, unsigned short count)
UART Write.
COM_TxFlush (int com)
UART TX Flush.
COM_Getch (int com)
UART Getch.
SPECIAL System Control Functions
void
int
SYSTEM_ClockOut (int clock, int enable)
System Clock Out.
SYSTEM_RTC_Check ()
Check RTC.
X-Monkey Software Development Guide Rev - | Library Functions
16
8. Appendix A – Serial Port Reprogramming Example
Steps to load a new Hex file (firmware image) into the X-Monkey board
1)
2)
3)
4)
5)
6)
7)
8)
9)
10)
11)
12)
Download and install the latest version of FlashMagic from this site:
(http://www.flashmagictool.com/)
Power down Monkey
Remove CHIMU module (if present) from Monkey board (to be on the safe side)
Plug USB node or other USB to serial converter into Monkey
Press the S2 button on Monkey and KEEP IT HELD DOWN FOR THE NEXT STEP!
Power up Monkey (or, press the S1 button and release it)
Release the S2 button.
Run FlashMagic and reprogram
a. Open settings file (.fms), or if .fms file is not available, select settings shown below
b. Change COM port to your com port
c. Change path to .hex file to where you stored the hex file to download
d. Press the “start” button, it will flash and verify
e. If it fails, try pressing the reset button on the Monkey board and try again
f. If it still fails, try powering the unit via a USB cable so grounds are common
g. If it still fails, drop the baud rate to 57600
h. If it still fails, cycle power on the Monkey and try again
Close FlashMagic
Power board down
Put CHIMU back on (be CAREFUL ABOUT PIN ALIGNMENT!)
Power up without any buttons pressed and verify new code is running
X-Monkey Software Development Guide Rev - | Appendix A – Serial Port Reprogramming
Example
17