1
The Last Word 2.1 Reference Manual
The Last Word
Professional Word Processing
for the Atari XL/XE
Written by and Copyright © Jonathan Halliday 1999-2008
1-1
The Last Word 2.1 Reference Manual
Contents
1
INTRODUCTION ................................................................................................................................ 1-5
1.1
OVERVIEW OF THE LAST WORD ................................................................................................ 1-5
1.2
ABOUT THE MANUAL ................................................................................................................ 1-5
1.3
STARTING LW ............................................................................................................................ 1-6
1.3.1
1.4
2
3
BASIC OPERATION ..................................................................................................................... 1-7
1.4.1
THE EDIT SCREEN ............................................................................................................... 1-7
1.4.2
SAVING AND LOADING TEXT .............................................................................................. 1-7
1.4.3
BASIC CONFIGURATION ..................................................................................................... 1-8
EDITOR COMMANDS ....................................................................................................................... 2-9
2.1
CURSOR MOVEMENT ................................................................................................................ 2-9
2.2
TEXT ENTRY MODES .................................................................................................................. 2-9
2.3
INSERTING AND DELETING TEXT ............................................................................................. 2-10
2.4
MOVING AND COPYING WITH TEXT BLOCKS .......................................................................... 2-10
2.5
FINDING AND REPLACING TEXT .............................................................................................. 2-12
2.5.1
SEARCHING WITH WILDCARDS ........................................................................................ 2-12
2.5.2
SEARCH AND REPLACE MODES ........................................................................................ 2-13
ADDITIONAL EDITOR FEATURES .................................................................................................... 3-14
3.1
COUNTING WORDS ................................................................................................................. 3-14
3.2
EDITED TEXT INDICATOR ......................................................................................................... 3-14
3.3
TABULATION ........................................................................................................................... 3-14
3.3.1
4
TABULATION MODES ....................................................................................................... 3-15
3.4
PLACE MARKERS ...................................................................................................................... 3-15
3.5
POSITION IN FILE ..................................................................................................................... 3-15
3.6
EDITING MULTIPLE FILES ......................................................................................................... 3-15
DISK OPERATIONS .......................................................................................................................... 4-17
4.1
DISK OPERATIONS FROM THE EDITOR .................................................................................... 4-17
4.1.1
VIEWING FILES ................................................................................................................. 4-17
4.1.2
EXITING TO DOS ............................................................................................................... 4-17
4.2
THE LW DISK MENU ................................................................................................................ 4-17
4.2.1
5
LOADING LW FROM SPARTADOS ...................................................................................... 1-6
SUBDIRECTORY FEATURES ............................................................................................... 4-19
PRINTING WITH LW ....................................................................................................................... 5-20
5.1
PREVIEWING TEXT ................................................................................................................... 5-20
1-2
The Last Word 2.1 Reference Manual
5.2
KEEPING TRACK OF PAGINATION ............................................................................................ 5-20
5.3
EDITOR PRINT COMMANDS .................................................................................................... 5-20
5.4
EMBEDDED COMMANDS ........................................................................................................ 5-20
5.4.1
STAGE 1 COMMANDS ...................................................................................................... 5-21
5.4.2
CREATING HANGING INDENTS......................................................................................... 5-26
5.5
OTHER PRINT FEATURES ......................................................................................................... 5-26
5.5.1
5.6
6
7
CONFIGURING THE PRINT FORMATTER .................................................................................. 5-26
CONFIGURING LW FOR YOUR PRINTER ......................................................................................... 6-27
6.1
PRINTER DRIVERS .................................................................................................................... 6-27
6.2
THE PRINTER DRIVER EDITOR ................................................................................................. 6-27
6.3
CREATING A PRINTER DRIVER ................................................................................................. 6-27
THE LW MACRO LANGUAGE .......................................................................................................... 7-30
7.1
LOADING MACROS .................................................................................................................. 7-30
7.2
RUNNING MACROS ................................................................................................................. 7-30
7.3
SPECIAL MACRO COMMANDS ................................................................................................ 7-31
7.3.1
DISABLING THE SCREEN FROM MACROS......................................................................... 7-33
7.3.2
SPECIAL CHARACTERS ...................................................................................................... 7-33
7.3.3
ENTERING OTHER COMMANDS FROM MACROS ............................................................ 7-34
7.3.4
THE SPECIAL MACRO FONT.............................................................................................. 7-34
7.3.5
KEYBOARD CONVENTIONS FOR MACROS........................................................................ 7-34
7.4
8
EXAMPLE MACROS .................................................................................................................. 7-35
CONFIGURING LW .......................................................................................................................... 8-37
8.1
CONFIGURATION OPTIONS IN THE EDITOR ............................................................................ 8-37
8.2
USING THE CONFIGURATION PROGRAM ................................................................................ 8-38
8.2.1
8.3
9
INTERNATIONAL CHARACTERS ........................................................................................ 5-26
SETTING UP MULTIPLE TEXT BUFFERS ............................................................................. 8-38
CUSTOM FONTS ...................................................................................................................... 8-40
DOS PACKAGES AND LW ................................................................................................................ 9-41
9.1
MEMORY REQUIREMENTS ...................................................................................................... 9-41
9.2
ATARI DOS 2.0/2.5 .................................................................................................................. 9-41
9.3
ATARI DOS XE .......................................................................................................................... 9-42
9.4
MYDOS 4.5 .............................................................................................................................. 9-42
9.5
DISK-BASED SPARTADOS ......................................................................................................... 9-42
9.6
SPARTADOS X .......................................................................................................................... 9-43
9.6.1
THE SPARTADOS X PATH .................................................................................................. 9-43
1-3
The Last Word 2.1 Reference Manual
9.6.2
SPARTADOS X MEMORY CONFIGURATIONS .................................................................... 9-44
10 LW COMMAND SUMMARY .......................................................................................................... 10-45
10.1
EDITOR COMMANDS ......................................................................................................... 10-45
10.2
SPECIAL KEYS ..................................................................................................................... 10-47
10.3
MACRO COMMANDS......................................................................................................... 10-47
10.4
PRINT FORMATTING COMMANDS .................................................................................... 10-48
11 PROGRAMMER'S TECHNICAL NOTES ........................................................................................... 11-50
11.1
ASSEMBLY LANGUAGE ADD-INS ........................................................................................ 11-50
11.2
MEMORY USAGE ............................................................................................................... 11-50
11.3
PROGRAM DESIGN ............................................................................................................ 11-51
11.4
DEVELOPMENT AND TESTING ........................................................................................... 11-52
11.5
WHY LW CAME INTO BEING .............................................................................................. 11-52
11.6
DEVELOPMENT .................................................................................................................. 11-53
11.7
CORRESPONDENCE ............................................................................................................ 11-53
1-4
The Last Word 2.1 Reference Manual
1
INTRODUCTION
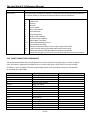
1.1 OVERVIEW OF THE LAST WORD
Welcome to THE LAST WORD, the brand new word processor for Atari XL/XE computers, and one of
the most powerful programs of its kind in the Public Domain. Although LW bears no relationship
whatsoever to other Public Domain word processors like Speedscript or TextPro, it incorporates some
of the best facilities found in these programs with those of commercial packages such as AtariWriter
Plus and The First XLEnt Word Processor. This means LW offers:
Up to 240 column editing
Editing of up to 5 files at once on a 130XE
Sophisticated keyboard macro language
Easy icon-driven operation or keyboard shortcuts
80 column print preview
Full cut and paste features
Search and replace, including reverse search
High speed operation, even with large files
On-line help system
Mini DOS-style menu
Support for DOS 2.5, MyDOS, DOS XE, SpartaDOS and SpartaDOS X
User-definable tab ruler
Customizable printer drivers
Fully configurable operation
All international characters visible on the screen
Comprehensive print formatting commands
Automatic heading levels
Indents, hyphenation and more...
Many commercial word-processors force you to use a particular DOS package, or are heavily copyprotected and impossible to transfer to another disk. LW was written to try and combine the unique
features of several established word processors into a single, commercial quality program (possibly the
last of its kind for the Atari Classic) which works with virtually any DOS or memory configuration.
1.2 ABOUT THE MANUAL
This manual assumes basic familiarity with the Atari screen editor and keyboard. Command keystrokes
are enclosed in angle brackets ("<" and ">") which should NOT be typed in. Where two or more keys
need to be pressed together, these keys are linked with the plus sign "+".
1-5
The Last Word 2.1 Reference Manual
This documentation was written using LW, and incorporates several of the advanced page layout
features of the program, such as hanging indents and external files. Studying these files will help you to
understand LW's print formatter.
1.3 STARTING LW
To load LW from the distribution disk under DOS 2.5, you just need to put the disk in the drive and
switch on the computer. Any external application cartridges should first be removed. LW will load
automatically. You can also load LW from the DOS 2.5/MyDOS menu by selecting Binary Load and
typing AUTORUN.SYS. The procedure for DOS XE is similar, but accomplished via the Machine Language
Access Menu.
If you don't want LW to load automatically when you switch the computer on, rename AUTORUN.SYS
to LW.COM. When LW loads, it looks on the drive #1 for the following files, and if it finds them, loads
them. If a file isn't found, default "built-in" values are used.
LW.CFG
Configuration file: sets up memory usage, editor settings, directory information, and
path for help files. Created with the configuration editor, LWCONFIG.COM
LW.FNT
Standard graphics 0 font which will be used in the editor and throughout the
program.
LW.PDR
Printer driver file, created with the printer driver construction program: LWPD.COM.
LW.MAC
Macro file, containing automated, user-written command sequences. If a macro is
defined for the "@" key, it will be run immediately. See section 6.
1.3.1 LOADING LW FROM SPARTADOS
If you use SpartaDOS or any other command line DOS, you will probably first want to rename
AUTORUN.SYS to LW.COM. This file can then be run from the command processor as desired.
If you use SpartaDOS or SpartaDOS X, you MUST disable internal BASIC before running LW. With
SpartaDOS, type
BASIC OFF
then
LW
If you use SpartaDOS X, load LW with the command
X LW
1-6
The Last Word 2.1 Reference Manual
An added bonus with SpartaDOS is that you can specify a file to edit on the command line after the
program name, such as:
LW LETTER.TXT
Or
X LW LETTER.TXT
LW will attempt to load LETTER.TXT automatically. If the file isn't found, LW will present you with an
empty file with the name that you typed on the command line. If you use SpartaDOS X, LW will look in
the PATH for the configuration files listed above at run time and whenever these files are loaded
during an editing session. See section 8.
1.4 BASIC OPERATION
You can begin using LW without reading this manual. If you get stuck, press the <HELP> key, then a
number 1 to 9 or 0. If you don't read the manual, however, you'll be missing out on a huge amount of
invaluable information.
1.4.1 THE EDIT SCREEN
To begin using LW, load the program as described above and take a moment to familiarize yourself
with the editing screen. You'll see a tab ruler line along the top (which scrolls horizontally if you define
a screen wider than 40 columns), below that a 20 line editing window, and, at the foot of the screen,
two lines for status information. The flashing cursor indicates the current typing position. Until you
press a key, the first line of status information will be the title and version # of the program; thereafter
it will default to the name of the file currently in memory. Until you load a file or give it a name, it will
be called UNNAMED.TXT.
Entering text in LW is easy: just type as you normally would, pressing <RETURN> only at the end of a
paragraph and letting the program wrap words at the ends of lines. Cursor keys, <DELETE/BK SP>, and
<INSERT> keys behave exactly as you would expect.
When you're ready to save your text, you can follow one of two procedures, outlined below.
1.4.2 SAVING AND LOADING TEXT
To save the text in memory to disk, press <CTRL+S> Save text. A prompt will appear with a default
filename. Either press <RETURN> to accept this name, or type a new one: the old one will disappear
automatically. After you press <RETURN>, your text will be written to disk. If an error occurs, you'll be
informed. To abort the save operation, just press <Esc>.
1-7
The Last Word 2.1 Reference Manual
If you type no extender, LW will append one of your choosing before opening the file. The default
extender and that defined in the supplied configuration file "LW.CFG" is ".TXT". You can change this,
however, or disable it altogether by using the configuration editor.
The first time you save a file, the name you give it becomes the default for subsequent saves, which
will NOT alter the default name. To load previously written text, press:
<CTRL+L> Load text
A prompt will appear with a default drive specifier. You can edit this with <DELETE> for another drive if
necessary, then type a filename and press <RETURN>.
1.4.3 BASIC CONFIGURATION
You can configure LW to suit yourself. Pressing:
<SHIFT+CTRL+Q> Save configuration
will allow you to save the configuration to disk. The file will automatically be given the default extender
CFG, and you should call the file LW.CFG if you want your new preferences to be available the next
time you boot the program.
As described above, LW normally wraps words to the next line if they don't fit as you type. You can
turn this feature off with:
<CTRL+W> Word wrap toggle
By default in LW, <RETURN> characters appear as inverse curved arrows. You can make them invisible
with:
<SHIFT+CTRL+CLR> Toggle visible returns
When words are wrapped, the screen line is padded out with "false spaces". These aren't actually part
of the text and are just a guide. If you don't want to see them, toggle the feature with:
<CTRL+B> Toggle false spaces
These are just a few of the settings saved in the configuration. For further information on configuring
LW, see section 7.
1-8
The Last Word 2.1 Reference Manual
2
EDITOR COMMANDS
LW's commands are all accessed by key combinations. Once you become familiar with LW's keystrokes,
a wealth of advanced commands becomes instantly available.
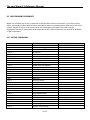
2.1 CURSOR MOVEMENT
The following commands allow rapid cursor movement around the text:
<CTRL+LEFT ARROW>
<CTRL+RIGHT ARROW>
<CTRL+UP ARROW>
<CTRL+DOWN ARROW>
<Tab>
<CTRL+A>
<CTRL+Z>
<SHIFT+LEFT ARROW>
<SHIFT+RIGHT ARROW>
<SHIFT+UP ARROW>
<SHIFT+DOWN ARROW>
<SHIFT+CTRL+UP ARROW>
<SHIFT+CTRL+DOWN>
<CTRL+H or START>
<CTRL+E>
Cursor left
Cursor right
Cursor up
Cursor down
Next tab stop (if in Over-Type Mode)
Start of line
End of line
Previous start of sentence
Start of next sentence
Previous start of paragraph
Start of next paragraph
Screen up
Screen down
Top of screen, then top of file
End of file
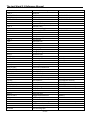
2.2 TEXT ENTRY MODES
These commands affect various setting in the editor:
<SHIFT+CTRL+INS>
Toggle insert & over-type modes. In insert mode, text after the cursor is pushed
along as you type, and closes up when you press <DELETE>. In over-type mode,
new text overwrites existing text. Notice that the operation of the <TAB> key
differs depending on which mode the editor is in.
<CAPS>
Toggle upper/lowercase.
<CTRL+CAPS>
Forced control key mode toggle. Allows entry of control codes without pressing
<CTRL+ESCAPE> first. The current case is saved when you save the configuration
(see later), and becomes the default next time you load the program.
<SHIFT+CAPS>
Uppercase lock.
<INVERSE>
Toggle inverse video on and off.
2-9
The Last Word 2.1 Reference Manual
<CTRL+ESCAPE>
Allow subsequent control key to be entered as normal text (same as pressing
<ESCAPE> in the normal Atari screen editor. Also de-selects a marked block of
text.
<SHIFT+ESCAPE>
Alternative to <CTRL+ESCAPE>.
<CTRL+W>
Turn word-wrap on and off. Saved in config file.
<SHIFT+CTRL+W>
Set screen editing width. Type the number of characters per line you want anything from 5 to 240. If the line length becomes longer than 40 characters, the
screen will become a horizontal as well as a vertical window onto your text.
Setting the editor line length to the same length as printed lines means you can
set tables out almost exactly as they will print. Saved in config file.
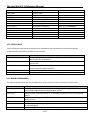
2.3 INSERTING AND DELETING TEXT
The following commands allow simple insertion and deletion of text:
<DELETE>
Delete character to left of cursor
<CTRL+INSERT>
Insert a space at the cursor
<TAB>
Insert spaces to next tab stop (if in Insert Mode)
<CTRL+DELETE>
Delete character to right of cursor
<SHIFT+DELETE>
Delete a <W>ord, <L>ine, <S>entence, or <P>aragraph. Respond to the prompt
by pressing the highlighted letter, or <ESCAPE> to cancel. Pressing <RETURN>
defaults to DELETE LINE. Deleted text will fill up the paste buffer from the
beginning. Paste the text back into the main buffer with <CTRL+P> or
<SHIFT+INSERT>.
<SHIFT+INSERT>
Insert previously deleted text
<CTRL+P>
Paste, or insert previously deleted text (same as above)
<CTRL+CLEAR>
Erase all text
<SHIFT+CLEAR>
Erase all text (same as above)
2.4 MOVING AND COPYING WITH TEXT BLOCKS
The following commands allow blocks of text to be marked, then moved, copied or deleted:
2-10
The Last Word 2.1 Reference Manual
<CTRL+M>
Mark or highlight block. Before a block can be copied, moved or deleted, it must
be marked. Use this command to define the starting point of your block.
Subsequently, as you move the cursor, the text between the marked beginning
and the cursor position will be inverted. You can also mark the end of a block, then
cursor back to the beginning. Several other block commands only work once a
block has been defined in this way. To un-mark a highlighted block of text, press
<CTRL+ESCAPE>.
<CTRL+C>
Cut block. Use this command once a block has been marked as outlined above. The
marked text will be copied from the main buffer to the paste buffer, providing the
block is not too large. Note that any text already in the paste buffer will be
overwritten. The text will then be erased from the main buffer, and block mode is
cancelled. You can paste text back with the Paste command.
<CTRL+O>
Copy block. This copies text to the paste buffer exactly like the Cut option, but the
text also remains in the main buffer, still highlighted.
<DELETE>
Delete block. This deletes a marked block without copying it to the paste buffer.
Because text deleted this way is irretrievable, you are first asked for confirmation.
Note that the block to be deleted may be of any length, regardless of paste buffer
size.
<SHIFT+CTRL+I>
Write block to a file. Supply a filename at the prompt and the block - which may be
of any length - will be written to disk. The file will have the extension "BLK" unless
you supply a different one. This option, along with the merge command, allows for
the transfer of large blocks of text between different files.
<CTRL+I>
Insert, or merge, file (icon: hypodermic syringe). This option, which is always
operative, allows a file to be inserted into the middle of the text in memory. The
filename you type will have the usual text file extender appended to it unless you
supply another. If the file you attempt to insert exceeds in size the available space,
the text will remain unchanged.
<CTRL+N>
Number of words and bytes in block
<CTRL+Y>
Lowercase block
<SHIFT+CTRL+Y>
Uppercase block
<CTRL+[>
Un-invert text in block
<CTRL+]>
Invert text in block
<CTRL+K>
Kill paste. Empties the paste buffer
2-11
The Last Word 2.1 Reference Manual
2.5 FINDING AND REPLACING TEXT
LW has extensive search features which work both forwards and backwards through the text. Searches
can be either case sensitive or insensitive. Search and replace operations can be performed either
individually or on the whole file, with or without confirmation.
<SHIFT+CTRL+F>
Define find string. This option allows you to type in the text you wish to search for
(up to 30 characters). The program will then move the cursor to the next
occurrence of the string.
<CTRL+F>
Find string. This will move the cursor to the next occurrence of the previously
defined string.
<CTRL+U>
Upwards find string. Searches backwards for the previously defined string.
<CTRL+R>
Replace string. Once a string has been "found" with <CTRL+F> or <CTRL+U>, this
command will change it to the "replace" string.
<SHIFT+CTRL+R>
Define replace string
<CTRL+G>
Global search and replace. Allows you to type a search string and a replace string,
then attempts to replace each occurrence of the search string with the replace
string. Unless the command is run from a macro, the first time the string is found,
a menu will appear, asking if you wish to "<C>hange, <I>gnore, Change <A>ll".
Press the highlighted letter of the option you want, or <ESCAPE> to cancel.
"Change" replaces the string and moves to the next occurrence. "Ignore" skips to
the next occurrence. "Change All" replaces every occurrence in the file (you can
interrupt this with the Break Key). Note that if the “Global” option has been set
with <SHIFT+CTRL+H>, search and replace will automatically replace all
occurrences of the text.
2.5.1 SEARCHING WITH WILDCARDS
In find strings, the question mark (?) will match any character, just as in DOS filenames:
"Find>TH?S?"
will match both "THESE" and "THOSE". Wildcards in replace strings leave the relevant characters in the
text unchanged, so:
"Find>(?)"
"Change to>(?.)"
will place a dot after any single, unknown parenthesized character.
2-12
The Last Word 2.1 Reference Manual
Search strings may be surrounded by spaces to ensure that only whole words are matched. In the case
of words followed by punctuation symbols, a macro to perform multiple search/replaces through the
text could be written. See macros (section 6).
2.5.2 SEARCH AND REPLACE MODES
Search and replace works in 2 modes: case-sensitive (Case on) and case insensitive (Case off: the
default). The first only matches words of the exact same case, so that "THE" would not match "the".
Case-insensitive mode ignores the case of letters during searches.
<SHIFT+CTRL+U>
Set Search and Replace Options. This allows you to set whether search operations
are case sensitive, whether they prompt for confirmation (global), and whether
wildcards are allowed or simply treated as normal text.
2-13
The Last Word 2.1 Reference Manual
3
ADDITIONAL EDITOR FEATURES
LW includes many features to aid in the editing of text, such as place markers, pagination guides, and
tabulation. The range of facilities available makes LW one of the most complete word processors for
the Atari.
3.1 COUNTING WORDS
LW's fast word count will instantly tell you how many words are in the current document.
<CTRL+N>
Will display the number of words in the document, together with the size of the
document in bytes. If you use this command while text is marked, only the words
in the block will be counted, and the number of bytes displayed will reflect the size
of the marked block.
Unlike many other word processors, LW's word count only counts actual text and not embedded
printer commands. Anything typed in reverse video is ignored by the word count. Unfortunately this
does mean that header/footer definitions and filename arguments are still counted, since these are
typed in normal video, so you will need to allow for this when counting words.
3.2 EDITED TEXT INDICATOR
If text in any LW memory bank has been changed without being saved, the word “Save” will appear in
the middle of the status line. This is to remind you to save any vulnerable work. The reminder will
vanish once your text has been saved.
3.3 TABULATION
LW's tab ruler can be set up with your own tab stops, which can then be saved with the configuration
file. These are the commands for editing the tab ruler:
<SHIFT+TAB>
Set tab at cursor position.
<CTRL+TAB>
Clear tab at cursor position.
<SHIFT+CTRL+TAB> Reset default tab stops.
<SHIFT+CTRL+E>
Erase ALL tab stops.
3-14
The Last Word 2.1 Reference Manual
3.3.1 TABULATION MODES
In insert mode, the <TAB> key will insert as many spaces as necessary to get to the next tab stop. In
over-type mode, <TAB> will just skip over existing text and on to the next tab stop.
3.4 PLACE MARKERS
LW has a system of markers which make navigating your text simplicity itself. If you're working on a
section of text which you want to leave but will need to return to later, mark it with a place marker.
<SHIFT+CTRL+S>
Set place marker at cursor position. Asks for which place marker (1-4) to set.
<SHIFT+CTRL+G>
Goto place marker. Asks for number of place marker to find. Providing the place
marker has been set, and doesn't reside in text which has been deleted, the cursor
will jump to the position of the relevant marker.
3.5 POSITION IN FILE
Sometimes you need to know exactly the exact location of the cursor in a document:
<CTRL+;>
Displays the number of bytes used by the document, together with the cursor
position, starting at 1.
3.6 EDITING MULTIPLE FILES
On expanded memory machines, LW allows you to edit several files at once. Setting up LW for your
memory configuration is explained later in Configuring LW (section 7). If LW is loaded "clean", i.e. with
no configuration file (if the file "LW.CFG" cannot be accessed when the program is run), the program is
set up for a standard, unexpanded machine with a single 15K text buffer. The default LW.CFG file
duplicates these default settings. However, if you have an expanded 800XL, 65XE or stock 130XE
computer with no RAM disk, you can replace LW.CFG with XE130.CFG. Copy XE130.CFG to your system
disk and rename it LW.CFG. The next time you run LW, you will have FIVE text banks available, each of
just over 15K in size. You can switch between these banks with:
<SHIFT+CTRL+n>
Select memory bank
where <n> is a number from 1 to 9, or 0, which denotes 10. Note that banks beyond 5 can only be
accessed when LW is configured for machines expanded to 192K and beyond (see section 7:
Configuring LW). Bank 1 (main memory) is ALWAYS the main bank, so you can see that a maximum of 9
banks of expanded RAM can be made available. Each bank has the same 15K capacity and its own set
of place markers and its own filename. You can cut and paste between banks with ease, and by
keeping all the files of a large document in separate banks and by using the include bank print
commands from the main file, you can keep track of pagination as if you were editing a single,
contiguous file.
3-15
The Last Word 2.1 Reference Manual
For maximum convenience, you will be returned to the current text bank even after <RESET>, or an exit
to DOS followed by a re-run.
Note that when configurations are loaded during an editing session with the <CTRL+Q> Load Config
command, bank information in the configuration file is ignored. It is therefore impossible to change
editing bank configurations after the program has loaded. This was done to preclude the possibility of
losing unsaved text by accidentally locking out an expanded bank.
Using SpartaDOS, the X-Cart, or a modified DOS 2.5 or MyDOS, it is possible to configure LW to share
expanded memory with one or more RAM disks. This is explained fully in section 7.
3-16
The Last Word 2.1 Reference Manual
4
DISK OPERATIONS
LW allows full manipulation of files and directories, and has support for many different DOS packages.
The mini DOS menu allows viewing, loading, deleting, renaming and copying of files at the touch of a
key. The menu displays a scrolling window onto an alphabetically sorted directory list of up to 128
filenames. Files can be viewed on screen just as they appear in the editor without being loaded into
memory.
4.1 DISK OPERATIONS FROM THE EDITOR
In addition to the <CTRL+L>oad and <CTRL+S>ave commands, the following file handling features are
available from the editor:
4.1.1 VIEWING FILES
<CTRL+J>
View file. From the editor, this allows you to enter a filename and view the file in a
scrolling window on the screen, complete with word-wrap. Pause the listing with
<CTRL+1> or by holding down one of the three console keys.
<SHIFT+CTRL+O>
Spool file. This is the same as view file, but words are not wrapped and returns are
never visible, regardless of the current editor settings. Useful for alternative help
screens, etc. from within macros.
4.1.2 EXITING TO DOS
To finish using LW and go to DOS, type:
<CTRL+X>
Exit to DOS
and respond "Y" to the prompt, first ensuring all your work has been saved. If you have MEM.SAV
active or use Disk Based SpartaDOS, you can go from DOS straight back to your text by running at
address $2800.
4.2 THE LW DISK MENU
The various facilities on the disk menu are accessed by pressing the highlighted keys on the menu at
the foot of the screen. The highlight bar is moved with the cursor keys, pressed either with or without
<CTRL>. <SHIFT+CURSOR KEYS> will send the selector bar to the start or end of the directory.
4-17
The Last Word 2.1 Reference Manual
<CTRL+D>
Disk menu. This calls the mini-DOS menu, which reads in a full disk directory and
displays up to forty entries at once on the screen.
<SHIFT+CTRL+H>
As above, but allows the user to specify the directory file mask before calling the
disk menu.
The following options are available on the menu:
<S>PEC
Set the directory search mask. Use this to narrow or expand the criteria for the
directory search.
<CTRL+L>OAD
Load the file under the selector bar.
<V>IEW
View the file under the selector bar. Same as view from the editor.
<D>EL(ETE)
Delete the file under the selector bar. If the deletion is successful, the filename is
removed from the list.
<R>EN(AME)
Asks for a new name and renames the highlighted file. The entry in the list is
changed to the new name, and correctly interprets any wildcards.
<C>OPY
Asks for the name of the new file into which you want to copy the contents of the
highlighted file. You can type a new drive number, add a subdirectory path if your
DOS supports them, and include wildcards. If you want to make a copy of the file
under the same name but on a different drive, type the drive identifier, then "*.*".
Files of any length may be copied, even those which won't fit into the LW editor.
NOTE: The copy operation utilizes the unused part of the current text bank as a
buffer. The more unused memory there is, the faster the copy operation will be, so
you will want to be in the bank with plenty of unused memory before you copy
anything. A completely full bank actually has 1 spare byte, so copy will still work
with it, albeit agonizingly slowly!
<M>KDIR
Create a new directory in the current directory, providing DOS used supports
subdirectories.
<ESC>
Exit the directory menu.
<U>NLOCK
Unlock highlighted file.
<L>OCK
Lock highlighted file.
<F>ORMAT
Format the disk.
E<X>IT
Leave the program and go to DOS.
4-18
The Last Word 2.1 Reference Manual
DRIVE <1>-<0>
Catalogue drive. 1-9 denote the corresponding drive number, and 0 denotes an
unnumbered drive ("D:"). This is important if you want to enter MyDOS
subdirectories.
S<O>rt
This option will present a menu asking whether to sort the directory by name,
extender, or none. Any other key will leave the setting, which is saved in the
configuration, unaltered. "None" will turn off the sorting function. With "Ext",
name has second priority in the sort order, and vice-versa.
4.2.1 SUBDIRECTORY FEATURES
The following options only work with DOSes which support subdirectories.
>
Catalogue the highlighted directory. Only used with Subdirectory oriented DOSes.
<
Go back up one level towards the root directory. DOS-specific, as above.
4-19
The Last Word 2.1 Reference Manual
5
PRINTING WITH LW
LW's print processor is one of the most comprehensive of any Atari word processor. Useful features
abound to make life easier when printing complex documents.
5.1 PREVIEWING TEXT
<CTRL+V>
Preview printed pages (icon: magnifying glass over lined paper). Text is sent to a
10 line, 80 column window almost exactly as it will appear when printed. Page
breaks appear as rows of dashes, and page wait is active if selected. Pause the
output with <CTRL+1> or by holding down <SELECT> or <OPTION>. Pressing
<START> at any time will skip to the next page, and <BREAK> will return you to the
editor.
5.2 KEEPING TRACK OF PAGINATION
<CTRL+?>
"Where's the cursor on the printed page?" This is an innovation also seen on
TextPro, and simply prints the page and line number of the text under the cursor.
5.3 EDITOR PRINT COMMANDS
<SHIFT+CTRL+P>
Print text. This brings up a menu of 3 choices. Pressing "P" will send text straight to
the printer. Choosing "S" previews text in exactly the same way as <CTRL+V> from
the editor. "D" allows you to type a filename and send formatted output to disk or
another device (default filename extender is "PRN"). Note that the preview screen
always becomes active when printing documents. Output can be abandoned by
pressing <BREAK>.
All the above commands will read any included files (see later) unless you comment out include
statements. This means that you can always know exactly where you are on the printed page, even in
documents made up of many different files.
5.4 EMBEDDED COMMANDS
LW has a wealth of print formatting commands which will allow you to tailor your printed output
exactly to your needs. Formatting commands follow these simple rules:
Formatting commands consist of 1 or 2 letter alphanumeric symbols, entered in reverse video,
often followed by numeric or textual arguments.
Formatting commands may be in either upper or lowercase.
Numeric arguments of formatting commands are entered in reverse video.
5-20
The Last Word 2.1 Reference Manual
String arguments (footer lines, header lines and filenames) are entered in normal video.
Stage 1 formatting commands, either singly or grouped together, must be the first things on a
line. They may be optionally terminated with a <RETURN>.
Formatting commands must not contain extraneous spaces.
Here are some examples of print formatting commands (the letters enclosed in angle brackets are
inverse):<l><2><0><RETURN>
Sets the left margin to 20.
<l><2><0><r><6><0>hello.
Sets the left margin to 20, the right to 60, then prints "hello." 20 spaces from the left of the page.
<f><c>Page <#><RETURN>Defines a running footer which prints the current page number.
5.4.1 STAGE 1 COMMANDS
The following commands, entered as inverse characters in upper or lower case, affect the size and
layout of the page. Generally, they should be the first things on a line. Where numeric arguments are
required (n), these are entered, also in reverse video, directly after the command. Several commands
may be placed together consecutively on a line. Commands may be followed by a <RETURN> (which
will NOT print).
A<n>
First page to print. <A><2> will start output at page 2. Default is 1.
B<n>
Set bottom margin, default 61. This is measured in lines from the top of the page,
and is the last line on which body text will print. With a page length of 66, a
bottom margin of 61 will print 5 blank lines at the foot of each page. Ensure you
leave enough lines to print your footer (if any), which may be up to 3 lines long. If
the footer doesn't fit, it won't print.
F<n/text>
Define running footer to be printed at the bottom of each page. <n> is an
OPTIONAL offset, in lines, from the bottom page margin, and should be typed in
inverse video immediately before the text of the footer. Actual footer text should
be in normal video, except where Stage 2 formatting commands appear (Stage 1
commands cannot appear in headers or footers), and must end with a <RETURN>.
Use the inverse <#> symbol to print the page number. A footer or header can
consist of up to 3 lines, each terminated by a return. These lines must each be
preceded by the <F> symbol and must be defined on consecutive lines. If the
footer is redefined elsewhere in the text, the lines already defined are discarded.
To get rid of a footer, just include <F><RETURN> in your text.
G<n>
Get text bank. Should be on a line on its own, followed by <RETURN>. The
contents of the text bank will be read and printed in place of the command.
5-21
The Last Word 2.1 Reference Manual
G<fspec>
Get file from disk. This command should be on a line on its own, terminated by a
<RETURN>. The contents of the file will be read and printed in place of the
command. This works very quickly, even when reading a file from disk, because a
double-buffering system is used to eliminate slow single-byte read commands.
Any formatting commands in the included files will be carried out. The advantage that this method has
over the link commands of many word processors is that the same file will be in the edit buffer after
printing. You can have a main file with include statements and using the "where's the cursor?"
command and print preview, always see the correct pagination. Note that due to memory constraints
on buffering this command is NOT nestable, i.e. an included file may NOT in turn include another,
although an included BANK may include a FILE.
H<n/text>
This defines a running header to be printed at the top of each page, and works
identically to the <f>ooter command. The optional number specifies the offset
from the top of the page, and the default value is 2.
JL
Justify text left. All text following this command will be aligned with the left
margin.
JR
Justify text right. All text following this command will be aligned with the right
margin.
JC
Justify centre. All following text will be centred on the page.
JF
Justify fully. All following text will be aligned flush with both the left and right
margins.
L<n>
Set the left margin. The default is 10. Take care not to do foolish things like making
the left margin bigger than the right, etc. The print formatted includes some error
checking, but will print garbage if you set impossible margins.
M<n>
Margin outdent by <n> chars, as in this line. This outdents the next line of text.
Subsequent lines revert to the normal margin. The line is properly lengthened to
fill the extra space. This paragraph uses a paragraph indent and a margin outdent
on the first line, creating a hanging indent. NOTE: To aid in alignment, the
outdented part of the line will be unaffected by full justification. Also, an
outdented line cannot be centred or flushed right.
N<n>
New page. The optional argument will make the command begin a new page only
if fewer than <n> lines remain on the current page.
P<n>
Page length. This is the overall length of the page, including the top and bottom
margins. Default is 66.
R<n>
Set Right margin. This is the rightmost column in which text will print. Default is
70.
5-22
The Last Word 2.1 Reference Manual
S<n>
Print style. <n> is 0-9. This sends one of 10 non-printing control sequences to the
printer. These sequences are set up in the printer driver editor and can each
consist of any codes you like, up to 7 bytes each. Handy for selecting fonts or print
styles not supported by print style directives (see later).
T<n>
Set top margin, default 5. This sets the number of blank lines which will print at
the top of each page. Leave enough lines for your running header, if you've set one
up.
V<fspec>
Verbose include file. This sends the named file to the printer regardless of its
contents. The file could be a printable bit-image, enabling you to include graphics
in your document (this won't show on the preview screen, however). If you include
a graphic, ensure you adjust the page length and bottom margin accordingly.
W<n>
Turn page wait on <1>, or off <0>. The default may be either, depending on the
configuration. Used for single sheet printing, it will pause and wait for a keystroke
at the end of each page. This also works during print preview. Press escape at the
prompt to abandon the print/preview operation. Note that the key press is NEVER
taken from a macro. This is so that page prompts won't steal subsequent macro
keystrokes and knock a macro out of step when printing is finished.
Y<n>
Line spacing, default of 1 means no blank lines between each line of text. <2> will
print in double-spacing.
Z<n>
Last page to print. Stops printing at page <n>.
><n>
Left paragraph indent. Used to indent the paragraph you're reading. All following
text up to the next <RETURN> will be indented by <n> spaces from the left margin.
<<n>
Right paragraph indent. All following text up the next <RETURN> will be indented
by <n> spaces from the right margin.
[<n>
Left header/footer margin, default 10. This works like the <l> command, but sets
the margin for the headers and footers, which don't obey the normal left margin.
The reason for this is in case the left and right margins are altered within the text.
If these alterations crossed a page boundary, headers and footers which shared
those margins might not be properly aligned.
]<n>
Right header/footer margin, default 70. As above, but for the right margin.
?<n>
Set starting page number, default is 1. To begin numbering a document with a
page number of 3, set <n> to <3>.
@<n>
Page select. <n> is the number of pages to skip during printing, and defaults to 0.
Use this command with a parameter of <1> to print only the odd pages in a
document, <2> to print every third page, etc. To print the even pages, set page
select to <1> and <a> (first page to print) to <2>. Useful for creating multi-pass
5-23
The Last Word 2.1 Reference Manual
double-column documents or pages where the headers and footers are offset for
binding purposes. You can print the odd pages with blocked right footers, then set
up blocked left footers and print the even numbered pages.
!<n>
Set heading level. <n> can range from 1-9. This prints an automatic section
heading in place of the command. You can follow the command with a space and a
line of text for a title.
Say you structured your text as follows (with your main text between these headings):
!1 TRANSPORT
!2 BUSES
!2 TRAINS
!1 AMENITIES
!2 LIBRARIES
!2 LEISURE
!3 SWIMMING
!3 OTHER SPORTS
The printout will be:
1 TRANSPORT
1.1 BUSES
1.2 TRAINS
2 AMENITIES
2.1 LIBRARIES
2.2 LEISURE
2.2.1 SWIMMING
2.2.2 OTHER SPORTS
The print formatter will work out the section headings when you print the text, so you don't need to
renumber the headings whenever you reorganize the document.
&
Reset heading levels. This character simply resets all heading levels to their initial
values of 1. Allows you to use more than one sequence of headings in a
document.5.4.2. STAGE 2 COMMANDS
The following commands can appear anywhere on a line, even in headers and footers, and affect
individual lines of text or characters. Some take parameters, but most don't. A handy way to enter
these commands which saves pressing the inverse key two times is to enter them in conjunction with
<SELECT>.
#
Print page number. Embed in header and footer lines to print the current page
number.
C
Centre line. Following text on the line is centred. This command can be used to
centre header/footer text or any individual lines. The centred line should end in a
5-24
The Last Word 2.1 Reference Manual
<RETURN>. This command need not be first character on the line - you can have
text blocked left, centred and edged right all on the same line. NOTE: This
command is NOT that same as centre justify, which works on ALL following text. If
you centre or edge right individual lines in paragraphs justified by the Stage 1
justify command, justification will suppressed on that line.
D
Toggle double strike on or off. Block any text you want printed in boldface in <d>
characters, i.e. "<d>this is bold<d>". This feature is set up by the printer driver
editor. Your printer may not support boldface, however.
E
Edge right. Forces subsequent text on the line up against the right margin. See
Centre Line.
I
Toggle italics on or off. Works like <d>.
U
Toggle underline on or off.
O<n>
Output ASCII char. This outputs the ASCII code <n>. The character is NOT counted
as a printable character, so it won't affect the formatting or word-wrap. Handy for
sending any control codes to the printer which aren't covered by the printer
driver.
X<n>
Send printable code. Works like <o>utput ASCII, but the character is counted as
printed matter by the formatter and appears on the preview screen as a question
mark. Handy for printing the international character not supported by the printer
driver.
-
Soft hyphen (dash). Insert in the middle of especially long words. When these
words won't fit onto a line during printing, the word will be broken where the soft
hyphen is embedded, and a hyphen printed at the end of the line. If the word fits
onto the line, no hyphen is printed.
_
Hard hyphen (underscore). Normal hyphens between words allow the line to be
split at that point. Use a hard hyphen instead to prevent this happening.
.
Hard space (can also be an inverse space). Use hard spaces between words to
force them to always be printed on the same line. A quick way to enter a hard
space is with <SHIFT+CTRL+SPACE>.
(
Ignore to closing brace “)”. Everything up to the next inverse closing brace is
ignored by the print processor.
;
Comment line: everything until the next Return is ignored by the print processor.
UP ARROW
Toggle superscript on or off.
DOWN ARROW
Toggle subscript on or off.
5-25
The Last Word 2.1 Reference Manual
LEFT ARROW
RIGHT ARROW
*
%
Add-in #3
Add-in #4
Add-in #5
Add-in #6
5.4.2 CREATING HANGING INDENTS
It's easy to create true hanging indents using LW's paragraph indent and margin release commands.
Say you wanted to indent the next paragraph by 15 columns, but have the first line flush with the
original left margin. Just include the line:
>15m15<RETURN>
Remember to type the line in inverse video.
5.5 OTHER PRINT FEATURES
Extraneous spaces following the end of a line not terminated by a <RETURN> are suppressed at the
beginning of the next line. This means sentences with two or more spaces following the full stop will
not leave extra spaces at the start of the next line, should the line break occur directly after the full
stop.
Missing arguments and illegal commands will produce error messages and halt printing.
5.5.1 INTERNATIONAL CHARACTERS
LW supports the Atari international character set with printed output which directly matches the
preview display. Characters with ASCII codes from 0-26, and codes 96 and 123, can be re-defined so
they send the actual codes to the printer which correspond to the foreign characters in the Atari
international character set. You can set up any characters you like, but unless they correspond to the
standard international set, they won't be represented correctly on the preview screen. This feature is
set up with the printer driver editor (see PRINTER DRIVERS).
5.6 CONFIGURING THE PRINT FORMATTER
The print formatter defaults for the following margins can be set with the configuration editor
LWCONFIG.COM:
LEFT/RIGHT MARGIN
LEFT/RIGHT HEADER/FOOTER MARGIN
TOP/BOTTOM MARGINS
HEADER/FOOTER OFFSETS
See Section 8, Configuring LW, for more information.
5-26
The Last Word 2.1 Reference Manual
6
CONFIGURING LW FOR YOUR PRINTER
You can customize LW's print styling commands to suit any kind of printer. Toggles can be set up for
italics, bold, underlining, superscript and subscript, and up to 10 further styling commands can be
defined for any purpose you can think of.
6.1 PRINTER DRIVERS
LW uses printer driver files (with the extension "PDR") to configure itself for various printers. At runtime, LW will attempt to load LW.PDR, so you can have the settings in this file available every time you
run the program. If LW.PDR can't be found, LW uses its own default printer driver, which supports no
special formatting and will send documents to the printer completely "clean". You can load printer
drivers at any time during an editing session with:
<SHIFT+CTRL+D>
Load printer driver. Just type a filename as usual - ".PDR" will be appended if you
supply no extender.
Printer driver files translate the styling commands for italics, underline, boldface, etc., as well as
international characters, into codes specific to your printer.
6.2 THE PRINTER DRIVER EDITOR
The printer driver editor (LWPD.COM) should be loaded from DOS with BASIC disabled. (NOTE: With
SpartaDOS, you can include the name of a printer driver file on the command line.) It has a simple
menu interface which allows you to select the items you want to change with a wide highlight bar, and
pick extra options from a menu at the foot of the screen by typing the highlighted letters. The options
in the left column allow you to set up on/off toggles for italics and other printer features. Each code
string can be up to 7 bytes in length. Just highlight the option with the cursor keys, press <RETURN>,
and the codes from your printer manual, separated by commas. If codes are already present, you can
edit them with a full range of cursor controls.
6.3 CREATING A PRINTER DRIVER
Let's step through creating a printer driver for an EPSON compatible STAR LC-10 printer (not that you
need to, since an EPSON driver is supplied, but it will do as an example).
First, run LWPD.COM without loading in a printer driver. You'll need your printer manual to hand.
Move the highlight bar to "Italics ON" and press <RETURN>. "Codes" will appear on the status line. This
is where you type the code sequence which switches on italics on your printer.
6-27
The Last Word 2.1 Reference Manual
In your printer manual, find the codes for "ITALICS ON". For the EPSON compatible example, the
sequence is 27, 52. Type these two numbers separated by a comma, and press <RETURN>. Italic off
would be 27,53: you enter this in the next category, directly below. All 5 pairs of ON/OFF toggles work
in just the same way. In a document, the first <i> in a file will turn italics on, the second off, the third on
again, and so on (see initialization string later).
The second column allows you to set up print styles, accessed from the LW print processor by <s><n>
(both in inverse video), where n is any digit from 0-9. You can have 10 sequences of 7 characters each,
which can set up any printer features you like. Below the second column is an entry called
"Initialization". This is a string of up to 10 codes which will be sent to the printer at the beginning of
every document. Initializing the printer is a useful precaution against toggles such as underline and
boldface getting out of step if printing is halted before these features are turned off, then
recommenced. The best thing to put in the initialization string are the codes to reset the printer,
turning off all special features like underlining or proportional spacing. See the supplied printer drivers
for examples (many Atari printers - the 1029 for one - have no print styling features, and therefore
require no initialization strings). An alternative for the EPSON driver to that supplied is 27, 64, which is
the command to reset the printer.
If you don't want an initialization string sent to the printer, delete any numbers under "Initialization"
and press <RETURN>.At the bottom of the screen, we have toggles and codes for international
characters. The STAR LC-10 manual has various character sets, selectable from software or DIP
switches. We're interested in IBM character set #2, since it contains most of the Atari international
character set in the codes 128-255. Normally these print as italicised versions of normal characters, so
you will want to select the IBM set #2 with the DIP switches. There is a main bank of 12 DIP switches on
the LC-10. To get the characters we want out of the printer, set switch 1-6 (Printer Mode) to ON
(Standard), and 1-7 to OFF (Graphics). The other switches can be set according to your preferences.
There is one character still missing from the printer's character set ("u" with an acute accent) which
has to be coaxed out by software. The country-specific character set we need for the "u" acute can't be
selected with the DIP switches, so the printer driver needs to send out the appropriate codes before
printing international characters. In the printer driver editor, under "International ON", enter 27,82,12,
and under "International OFF", enter 27,82,0. This will select the appropriate character set whenever
international characters are printed.
The bottom line of the screen allows you to enter what actual code should be sent to the printer for
each international character. Only 1 code is allowed for each letter, but remember that every character
will be preceded and followed by the on and off code sequences if they are present.
Save your printer driver (press "s") and call it LW.PDR if you want it to load automatically at run-time.
Now, if you run LW with this printer driver installed and type any international characters in your text,
they should print out correctly on your LC-10.
The procedure for most EPSON compatibles should be very similar, although, unfortunately, I haven't
had access to such equipment while writing this manual.
I personally use a Canon BJ-200ex bubble-jet printer set up in EPSON emulation mode, and the printer
driver described above works perfectly with the Canon once the DIP switches are set correctly.
6-28
The Last Word 2.1 Reference Manual
I've supplied the EPSON printer driver along with drivers for all the Atari printers. Although I don't own
an Atari printer, I was able to figure out the codes they use by making AtariWriter Plus think I had one
hooked up, then printing to disk and studying the output. Note that not all Atari printers support
features like italics and boldface. I trust these drivers work well with the actual equipment.
Some work may be required to coax international characters out of your printer. However, even if your
printer doesn't support them, there are plenty of utilities for downloading fonts to printers. Just
download a font which emulates the Atari international character set, set up a printer driver, and
you're good to go. Being able to print international characters without fuss was one of the key reasons
that LW was written in the first place. I wanted a word processor which had them visible on the screen
and didn't require special commands in the middle of a document. After years spent using print keys
and a custom reversed-out character set with TextPro, I think I've finally come up with a more
workable solution.
6-29
The Last Word 2.1 Reference Manual
7
THE LW MACRO LANGUAGE
Macros are one of the most important features of LW. Macros allow entirely new commands to be
created from the existing features of the program, and recalled at the touch of a key. The macro facility
is similar to that seen on programs like TextPro and Superscript. Like TextPro, LW has macro
commands which cannot normally be accessed from the keyboard.
Note: While the macro language is functionally similar to that of TextPro, the actual mechanics of the
LW macro processor are entirely different. The numerous functional similarities are designed to make
the transition from TextPro to LW as painless as possible.
LW macros follow exactly the same structure as TextPro macros - i.e. they are created from within the
editor and take the form:<macro key><=><macro text>where <macro key> is any single character, <=>
is an INVERSE equals sign, and <macro text> can be any combination of commands or text you want.
While LW macros look a lot like those of TextPro and offer the same facilities, the commands are
completely different and macros in LW run at a much greater speed. You can also set up null macros
from LW, which are handy when writing recursive subroutines. Note that an active macro can be
prematurely terminated with the <BREAK> key.
7.1 LOADING MACROS
Load a macro file with the command:
<SHIFT+CTRL+M>
Load macro file. Type the name of the file and press return. Macros are saved as
normal files from the editor. The macro file should not exceed 1K (1024 bytes).
This is an important consideration if you are going to convert macros from
TextPro, which has a 2K macro buffer. However, by avoiding large macro files and
opting instead for smaller, interactive macros, problems of buffer size can be easily
avoided.
7.2 RUNNING MACROS
Macros are executed in one of two ways:
Pressing <ESCAPE>, then the key the macro is attached to.
Holding down <OPTION>, then pressing the key the macro is attached to.
The <ESCAPE> activation approach allows macro activation to be captured by a keyboard buffer, if you
have one.
7-30
The Last Word 2.1 Reference Manual
<START>
Pressed on its own will run the <#> macro, should one exist. This is another
throwback to TextPro.
The "@" key macro will be run at start-up (in the LW.MAC macro file) if it exists (this feature was also
present in TextPro).
The way <ESCAPE> triggers macros is one reason <CTRL+ESCAPE> or <SHIFT+ESCAPE> is necessary to
enter control characters in the editor and input dialogues. Another reason is that I wanted to make
<ESCAPE> an abort key at all other times.
7.3 SPECIAL MACRO COMMANDS
As with TextPro, the special macro commands are entered as INVERSE <CTRL+KEY> characters, and are
only available from within macros. You type these with <CTRL+ESCAPE> followed by either <INVERSE>,
<CTRL+KEY>, then <INVERSE> again, or <SELECT+CTRL+KEY>, which is another TextPro feature which
has been emulated to make the typing of the odd inverse character less of a hassle.
<CTRL+A>
Ask for Input String. This command obtains string input from the user on the
command line. Follow the command with message, ending in <RETURN>, just as
you would with the macro print message command. This message becomes the
input prompt. Any following text appears as the default contents of the input field.
To actually get input from the user, you MUST include the <CTRL+L>ine Input
macro command as normal. The macro will then pause, allowing the text entry
until <RETURN> is pressed. The input is sent to the paste buffer and overwrites its
contents, even if a null string was entered. If the <CTRL+B>ranch Macro is used
before the Ask command, the branch will occur if the input string was EMPTY.
The input string can be pasted into the document in the same way as any normal
paste operation. It can also be inserted into a filename/search/replace input line
with the <CTRL+B> command (see below).
The Ask for Input command has virtually unlimited scope for macro development,
allowing the creation of truly interactive, professional looking applications. Just
remember that the contents of the paste buffer are lost when this command is
used.
<CTRL+B>
Branch to macro. Use this macro to create a branching condition. Follow with a
macro identifier before a LOAD MACROS command, and the program will attempt
to run this macro as soon as the new macros are loaded. Used before a FIND
command, LW will branch to the macro if the string is NOT FOUND. Used before a
GOTO MARKER/NEXT MARKER/PREVIOUS MARKER command, the branch will
occur if the marker is NOT FOUND. Used before a special macro CONFIRM (Y/N)
command <CTRL+C>, the macro will be branched to if the user responds NO. Used
before a <CTRL+A> Macro Ask for Input String, the branch will occur if the
subsequent input string is EMPTY. See the <CTRL+Z> command for more
conditional branching commands.
7-31
The Last Word 2.1 Reference Manual
<CTRL+C>
Confirm (Y/N). Follow with a message terminated with <RETURN>. LW will print
the message, followed by a question mark, then "(Y/N):". The user responds with
the appropriate key. "Y" will allow the macro to continue. "N" will terminate all
macros (even if the macro running is nested), or, if a branch macro is pending after
a <CTRL+B>ranch command, that macro will be run. NOTE: Before the introduction
of "macro conditionals" in later TextPro versions, that program's <equivalent "Y/N"
command, <SELECT+CTRL+A>sk, always attempted to run the "&" macro if "N" was
pressed. LW does NOT include this feature: use the <CTRL+B>ranch to pre-select a
macro to run if "N" is pressed.
<CTRL+J>
Macro menu. Follow with a line of text terminated with <RETURN>. The text
should be in the form of some kind of small menu. This message will be printed,
then the program will run the macro attached to the next key pressed.
<CTRL+K>
Get key. Simply waits for a key, then continues the macro.
<CTRL+L>
Accept line. In either the editor or an input dialogue, this character will pause the
macro and allow user keyboard input until <RETURN> is pressed or the macro is
stopped with <BREAK>. Note that many features of the editor, including the icon
bar, are disabled in Accept Line mode. If you run another macro whilst in accept
line mode, the current macro will be abandoned and accept line mode terminated.
NOTE: TextPro input mode always works in OVERTYPE mode - LW accept line
mode works IN WHATEVER MODE THE EDITOR IS IN AT THE TIME. Also, the colon
delimiters of TextPro are NOT supported by LW.
The Accept Input command no longer filters out cursor movement other than
left/right as did Version 1.0. Only a few commands - mostly those requiring input are now disabled during macro input mode. This change was implemented to
allow interactive macros far greater scope. A macro can now, for example, pause
while the user marks a block of text, then, when return is pressed, operate on the
defined block.
<CTRL+V>
Print message. Follow with text terminated by <RETURN>. LW will print the
message, which will clear on the next keystroke.
<CTRL+X>
Execute macro. Follow with a macro identifier. LW will attempt to execute the
macro in the form of a SUBROUTINE or PROCEDURE. This means when the
executed macro terminates, the calling or parent macro will resume from the next
instruction following the execute command. Macros calls can be nested in this way
up to a depth of 128.
<CTRL+Z>
Set toggles and test flags. Follow with one of the characters below:
U
L
I
Put the keyboard into uppercase.
Put keyboard into lowercase.
Set insert mode.
7-32
The Last Word 2.1 Reference Manual
O
1-9 or 0 (0=10)
B
H
U
Set overtype mode.
Select the appropriate text bank when multiple banks are
set up. Bank 1 is always the MAIN (unextended) bank, and
2-10 correspond to banks of extended memory.
Select the text bank the program was in when the macro
was called.
Hide the screen display.
Turn the screen on again.
These parameters should be in normal video and each setting requires a separate
<CTRL+Z>.
As well as setting flags, the <CTRL+Z> command can also test certain conditions:
M
S
C
Test for block marking.
Test if any text is already selected.
Test for file edits since the text in memory was last saved.
You would precede these tests with a macro branch command. The branch will
occur if the above conditions are FALSE.
7.3.1 DISABLING THE SCREEN FROM MACROS
You can use the:
<SELECT+CTRL+Z> set toggles command
to turn the display on and off from within a macro. Follow with an "H" to "hide" any screen updates,
and a "V" to make them visible. Nothing is actually printed to the screen when the display is disabled the display will immediately change to reflect any changes made by the macro when it is switched on
again. This is a great way to make macros run as if they were built-in commands, bypassing the
prompts that usually whizz by on the command line. Certain commands - such as print, view, spool,
disk menu and the four macro commands which display prompt information - re-enable the display
automatically.
7.3.2 SPECIAL CHARACTERS
<SPACE> or <CTRL+P> Entered in a filename dialogue will enter the device, path and name of the
current file.
<CTRL+N>
Entered in a filename dialogue will enter name of current file without device.
<CTRL+B>uffer
When pressed in ANY input dialogue (unless preceded by <CTRL+ESCAPE>),
<CTRL+B> will place the contents of the paste buffer (or as much of it as will fit)
into the input line. Using this method, if you previously captured text with the
Ask for Input command, it can be transferred into any LW command which
7-33
The Last Word 2.1 Reference Manual
requires input. Similarly, you could cut text from the document and feed it into
an LW command. Note that if the input dialogue is associated with a filing
operation, the string will appear in uppercase.
In order to make these new commands as flexible as possible, the device/path/name and path/name
variables are now accessible from ANY input dialogue. Precede them with <CTRL+ESCAPE> to type
them literally.
7.3.3 ENTERING OTHER COMMANDS FROM MACROS
While <ESCAPE> is used to start macros from the editor, from within a macro, <CTRL+X> does this job.
This means that FROM MACROS, <ESCAPE> PERFORMS ITS USUAL JOB OF PRECEDING CONTROL
CHARACTERS. If you want to enter any command code from within a macro as part of your text rather
than as a command, just precede it with an <ESCAPE> character in the macro. Many LW commands are
attached to <SHIFT+CTRL> key combinations. Obviously these have no ASCII equivalents, so how are
these commands denoted in macros? Simple - from a macro, just think <INVERSE CTRL> instead of
<SHIFT+CTRL>. So, to enter the<SHIFT+CTRL+F>ind string command from within a macro, you would
type an:<INVERSE CTRL+F>instead, or:<SELECT+CTRL+F>This is why the special macro commands use
only those characters that relate to illegal <CTRL+SHIFT> key presses.
When a macro is running, the only keys read from the keyboard are get key commands, confirm
commands, text entered during accept line mode, and characters pressed during printing when page
wait is on. The "Press a key" prompt after a file view/print operation requires a keystroke from the
active macro to clear it and return to the editor.
7.3.4 THE SPECIAL MACRO FONT
The font MACRO.FNT on the distribution disk can be loaded by typing:
<SHIFT+CTRL+N> New font, responding "O" for other, then typing MACRO <RETURN>. This font defines
all the control keys as outline characters instead of international characters in order to make editing
macros a little easier.
7.3.5 KEYBOARD CONVENTIONS FOR MACROS
Understanding how the keys in LW work may seem complex at first, so before we step through some
example macros, let's recap:
<CTRL+ESCAPE> allows you to enter control codes into the editor or into an input dialogue, as
<ESCAPE> on its own normally does in BASIC, etc. To get the escape code itself (which appears
in LW as a curved downward pointing arrow) in the text, press <CTRL+ESCAPE> then <ESCAPE>.
<CTRL+ESCAPE> pressed when text is marked will unmark the text, as will <BREAK> or any text
typed.
7-34
The Last Word 2.1 Reference Manual
The <ESCAPE> symbol in a macro duplicates <CTRL+ESCAPE> typed at the keyboard. To make a
macro put the <ESCAPE> symbol into the editor, include two consecutive <ESCAPE> symbols in
the macro.
<ESCAPE> pressed at the keyboard runs macros from the editor.
<ESCAPE> pressed outside the editor aborts the current operation.
In macros, special macro commands and <SHIFT+CTRL> commands are entered as INVERSE
<CTRL+KEY> COMMANDS.
Sorry if this seems complicated, but it seems the best solution to having macros which need to
describe <SHIFT+CTRL> keys. The best way to clarify matters is with a couple of examples. Studying the
macros supplied on the distribution disk will also help you to understand the LW macro language.
7.4 EXAMPLE MACROS
<CTRL+S> in LW brings up the save dialogue. The current filename is already there: all you have to do is
press <RETURN>. Say you want to save your file at regular intervals under the same name during an
editing session. You can automate this with a macro.
Make sure the editor is empty (press <CTRL+CLEAR>, then "y"), and load the macro editing font with
<SHIFT+CTRL+N>, <o> for "Other", then MACRO <RETURN>.
We'll put this macro on the "s" key, so that to run it you'll just type <ESCAPE> then the <s> key.
Type <s>, then <SELECT> and the equals sign - <=> - together. That means the following text is attached
to the <s> key. You should have a lower case "s" and an inverse equate on the screen. Now press
<CTRL+ESCAPE>, then <CTRL+S>. This should put an outlined "S" on the screen. We want to automate
the <RETURN> key stroke in the save dialogue, so we just press <RETURN> to complete the save
command. If the save operation is successful, it would be nice to have a message saying the file has
been saved. Type <CTRL+ESCAPE>, then <SELECT+CTRL+V>. You should have an outlined "V" on the
second screen line. Now type (WITHOUT THE QUOTES), "Document Saved", and press
<RETURN>.That's the macro finished. Save it under the name "TEST.MAC" for now, clear the editor,
and load the macro into the macro buffer with the <SHIFT+CTRL+M> load macros command. Now if
you load a text file, whenever you press <ESCAPE> then <s>, the file will be automatically saved back to
disk and "Document Saved" will appear on the message line.
Note that LW distinguishes between upper and lower case when running macros, so if you want a
macro to run regardless of what case the keyboard is in, you need to add another definition. In this
case, if you wanted uppercase <S> to run the same macro, you would add to the macro <S>,
<SELECT+EQUALS SIGN>, <CTRL+ESCAPE>, <SELECT+CTRL+X>, then a lowercase <s>. This simply makes
the uppercase <S> run the lowercase <s> macro.
ANOTHER EXAMPLE
7-35
The Last Word 2.1 Reference Manual
The above example was pretty simple: let's try something a little more complex.
LW doesn't have a command to transpose mistyped characters, but we can create this command using
a macro.
Note: this macro is included in the LW.MAC macro supplied on the distribution disk, along with macros
to transpose words and paragraphs.
We'll write the transpose adjacent characters macro first.
We'll put this macro on <ESCAPE> <CTRL+T> for transpose. To make entry of this macro easier, first
type <CTRL+CAPS> to go into "control" mode. This feature disables LW's commands, enabling you to
type control keys without preceding them with <CTRL+ESCAPE>. If you need to make corrections, type
<CTRL+CAPS> again to turn off control mode.
Now, with an empty editor as before, type <CTRL+T>.
Now type <SELECT+EQUALS SIGN>.
Type <CTRL+M>. This means we are about to mark a block.
Now type <CTRL+RIGHT ARROW>. When the macro runs, this will define the character under the
cursor as a marked block. Next, type <CTRL+C>. This is the Cut Marked Text command, and will send
that character to the paste buffer.
Now type <CTRL+RIGHT ARROW> again to move the cursor over the next character. Next, type
<CTRL+P>. This will paste the original character to the right of the character that followed it. Finally,
type <CTRL+LEFT ARROW> to move the cursor back to its original position.
We'll finish with a message for a neat effect.
Type <CTRL+V> (the "print message" command) then type "Characters Transposed", and end with
<RETURN>.
You'll now need to take the editor out of control mode by typing <CTRL+CAPS>. Save the macro, then
load it as described previously. Now when you press <ESCAPE>, then <CTRL+T>, then character under
the cursor will swapped with the one to its right, and a message to that effect will be displayed.7.5.
MACRO SUMMARY
As you can see, the scope of the macro language is governed only by your imagination. If you think of
something LW doesn't do, chances are it's possible to construct the feature you want using a macro.
And LW is fast enough to make your macros execute seamlessly, as if they were built-in features of the
program. You can have your address or other frequently used text passages attached to a macro, or
have a macro which merges in sections of text from disk at the cursor position. Check the supplied
macro files to get an idea of the diverse applications of macros.
7-36
The Last Word 2.1 Reference Manual
8
CONFIGURING LW
You can configure LW so that it always loads with the settings you prefer. You can even load different
configurations part way through an editing session. You can set up everything from screen colour to
additional banks of RAM for text.
8.1 CONFIGURATION OPTIONS IN THE EDITOR
The following commands toggle or set up various LW features, and these settings are all saved in the
configuration file. They can all be set up from the configuration program, with the exception of the tab
ruler. Not all the options in the configuration program can be altered from the editor during an editing
session: only those options which are likely to need changing once the program is up and running are
available.
<CTRL+B>
<CTRL+T>
<CTRL+W>
<CTRL+TAB>
<SHIFT+TAB>
<SHIFT+CTRL+E>
<SHIFT+CTRL+TAB>
<SHIFT+CTRL+W>
<SHIFT+CTRL+INS>
<CAPS>
Toggle false spaces
Toggle visible returns
Toggle word-wrap
Clear tab stop at current column
Set tab stop at current column
Erase all tab stops
Reset default tab stops
Set number of screen columns (5-240)
Toggle Insert/Over-type modes
Toggle Upper/Lower case
Several settings from the disk menu are also saved in the config file:
<S>pec
<1-0>
Set the directory filename mask
Set the current drive #
Use the following commands to load and save different configurations during an editing session:
<CTRL+Q>
<SHIFT+CTRL+Q>
Load config
Save config
Unless you supply your own filename extender, ".CFG" will be appended during both save and load.
One other command from the editor is:
<SHIFT+CTRL+N>
Install/Load alternative character set
The character set information isn't saved in the config file. To make a character set of your choice load
a run-time, rename it "LW.FNT" and put it on your LW work disk.
8-37
The Last Word 2.1 Reference Manual
8.2 USING THE CONFIGURATION PROGRAM
The LW configuration program (LWCONFIG.COM) should be loaded with internal BASIC disabled and no
cartridges present. This program allows you to set extra options, such as screen colours, the location of
the HELP files, and the default file extender (if any) to use for your documents when loading and saving
files in LW.
LWCONFIG.COM is very similar to the printer driver editor, and has an identical form of presentation.
SpartaDOS users can type:
LWCONFIG <filename>
at the command line to load the program with a configuration file (any file with a ".CFG" extender - you
needn't type the extender) to edit.
Once the program has loaded, a menu appears offering the whole range of LW settings for alteration.
The highlight bar is moved with the cursor keys (with or without <CTRL>), and an option selected with
<RETURN>. The current setting for the chosen option will be displayed and can then be altered. To
leave a setting unchanged, just type <ESCAPE> when it appears.
Some options are toggles - use the space bar to highlight "ON" or "OFF" and press return. Other
options require numeric arguments - type the number, and press <RETURN>.A few options - HELP
PATH, DIRECTORY MASK, EXTENDER - require string inputs.
"Extender" should be left blank if you don't want a default extender added to your document
filenames. If you do type in an extender, DO NOT TYPE THE DOT - just the extender itself, of NO MORE
THAN 3 CHARACTERS.
"Help Path" allows SpartaDOS/MyDOS/DOS XE users to specify the drive and path on which the HELP
FILES (*.HLP) will be kept. DOS 2.5 users can use this option if they want to keep help files on a drive
other than drive #1. SpartaDOS X users can use this function or put the help files in a directory included
in the DOS PATH variable. See section 9: DOS Packages and LW.
When setting up the default margins, etc., take care not to input impossible values - the program
makes no checks on the sense or otherwise of what you type in. If the print formatter outputs rubbish,
chances are there are illogical values in the configuration. Always make the top margin a lower number
than the bottom margin, the left lower than the right, etc. Note that you can set the "Wildcard"
character for the search and replace functions. Change it from "?" to something else if you think you'll
want to include a question mark as a "literal" character in a search/replace string.
8.2.1 SETTING UP MULTIPLE TEXT BUFFERS
Another of LW's most powerful features is its ability to use up to 9Æ16K banks of expanded RAM for
multiple text buffers. The program puts no restrictions on what kind of memory expansion can be
used: you're free to set up the bank switching values for whatever memory you have.
8-38
The Last Word 2.1 Reference Manual
The obvious application of this is for a standard 130XE with 4 additional edit buffers of 15871 bytes
each (LW uses 512 bytes from each bank for special storage purposes), giving a total text capacity of
79355 bytes including the main (standard RAM) bank. The files are always kept separate (unlike
AtariWriter Plus), but may be linked together when printed by using include bank commands. You can
have upwards of 10,000 words of text instantly available in memory, and by having "include bank #"
commands in the main bank (bank #1), you can keep track of pagination with the <CTRL+?> command,
or preview the whole document with <CTRL+V> without once having to access a file. However, it goes
without saying (or should), that unless you save your files regularly, a mishap with all this text on board
could be disastrous.
From the main program, banks are selected with:
<SHIFT+CTRL+n> Select bank command
where <n> is any one of the number keys. <1> always calls up the main (unexpanded) bank, while the
other 9 numbers can be set up any way you wish. From macros, these same numbers follow
the:<SELECT+CTRL+Z> Settings command
(or inverse <CTRL+Z>).
By default (loaded "clean" with no config file), LW uses no expanded RAM - it assumes you have a
stock, unmodified 800XL or 65XE. The default configuration file, "LW.CFG" on the distribution disk, also
doesn't use expanded RAM, but does include the bank values for a 130XE set up."RAM Bank Masks" on
the configuration program menu lets you type a comma separated list (up to 9 DECIMAL numbers) of
the values which will switch in the various banks you want to use. LW ignores bits 0,1 and 7 of these
numbers. The 130XE uses bits 2, 3, 4 and 5 for bank selection. The main bank is ALWAYS selected with
decimal 48, which is bits 4 and 5 set. The 130XE banked list is, in order, 0, 4, 8 and 12. These refer to
the following banked regions:
0 = $0000 - $3FFF
4 = $4000 - $7FFF
8 = $8000 - $BFFF
12 = $C000 - $FFFF
If the banked list is 0,4,8,12 and you type in 4 for # EXT Banks, that config file will set LW up for all 4
extended banks. If you type 1 in # EXT Banks, just the $0000Æ-Æ$3FFF bank will be available, on
<SHIFT+CTRL+2>. You can arrange the banks in any order you like - 12 first in the list will put $C000 $FFFF on <SHIFT+CTRL+2> - but the assignments always start on this key and work right along the
numbers.
You'll need to enter all values in decimal (sorry!). If you have a 130XE, just use the XE130.CFG file and
modify it to use as many or as few banks as you want. If you have some other set up, consult the
documentation for your RAM upgrade to see what values are required. I've left bit 6 available for
alteration, but not bit 7 (the self-test bit). Hopefully this should cope with most memory set-ups.
8-39
The Last Word 2.1 Reference Manual
See section 9: DOS Packages and LW for a discussion of how to set up LW for expanded RAM on
systems with RAM disks.
8.3 CUSTOM FONTS
Several alternative character sets (all with the extender ".FNT") are supplied on the distribution disk,
which can be loaded at any time with:<SHIFT+CTRL+N>.The MACRO.FNT font is most suited to editing
macros, since the control characters are outlined letters. The other fonts are cosmetic variations on the
standard set, and all include full international characters.
8-40
The Last Word 2.1 Reference Manual
9
DOS PACKAGES AND LW
LW works with and configures itself for all the most popular DOS packages for Atari Computers. This
includes:
Atari DOS 2.0/2.5
Atari DOS XE
MyDOS 4.5
Disk based SpartaDOS
SpartaDOS X
Even if your DOS isn't in this list, LW may well work with it, providing it follows the same basic CIO
protocols as Atari DOS.
9.1 MEMORY REQUIREMENTS
Whichever DOS you use, you must ensure that it has a MEMLO setting ($2E7,$2E8) well below $2400.
Although LW actually loads at $2800, it uses the 1K block between $2400 and $27FF for its redefined
character set. All memory from MEMLO up to $23FF is used for the paste buffer, so you can see that
the lower your DOS's MEMLO, the better. LW will not run at all if MEMLO is above $2300.
Using DOS 2.5 with normal buffers you can expect a paste buffer of about 1.5K. Other DOSes are
different, but few are more memory hungry than DOS 2.5. You can see that LW is very tightly squeezed
into RAM, but that's a necessary price to pay for keeping the whole program in conventional memory,
rather than using program overlays or space under the OS ROM. This is why LW works with so many
different DOSes. The reason LW won't run on Atari 800 is that it requires the XL's keyboard tables and
the international font.
LW also requires the cartridge memory, from $A000-$BFFF, and will switch out internal BASIC unless
the DOS used has its own system for doing so from the command line. You must also remove any
external cartridges, unless you use SpartaDOS X, which lets you switch cartridges on and off (with this
DOS, you must load LW with the "X" command).
9.2 ATARI DOS 2.0/2.5
These systems require no special handling by LW and special DOS features such as subdirectory and
command line support will be inactive. LW will disable internal BASIC automatically with this DOS. Any
other unrecognized DOS packages will be treated by LW just as if they were DOS 2.0/2.5. If you have
MEM.SAV set up, you can exit to DOS, then re-run at $2800 and be back in the same file at the same
point you left it.
9-41
The Last Word 2.1 Reference Manual
9.3 ATARI DOS XE
I have no idea how widely used this DOS is, although apart from the lack of technical information in the
DOS XE manual and the irksome user interface, I have found it to be a quite useable system on the
occasions I have tried it. LW will configure itself for this DOS, and will allow traversal of the
subdirectory tree, the creation and deletion of subdirectories. Re-run after an exit to DOS works
particularly well here, since, as with SpartaDOS, main memory is not corrupted by DOS (you should run
at address $2800). LW disables internal BASIC automatically with this DOS.
9.4 MYDOS 4.5
This DOS works well with LW. Subdirectory names are preceded by a colon on the disk menu, and
traversal of the directory tree is catered for, as well as the creation and deletion of subdirectories. To
display the contents of the active directory, don't forget to remove the drive number from the device
spec by first pressing <0> on the disk menu. If you have MEM.SAV, exit to DOS and re-run works in
exactly the same way as with DOS 2.5. Internal BASIC is disabled on loading.
I have never used MyDOS versions prior to 4.5, so I’m unsure whether LW will work correctly with
them. See the SpartaDOS section for details of how to make LW load its configuration files from a
drive/directory other than D1.
9.5 DISK-BASED SPARTADOS
SpartaDOS is easily the best DOS for use with LW, and probably with any compatible application.
SpartaDOS offers the lowest possible MEMLO settings, leaving you with more space for the paste
buffer and any resident handlers. LW can have a paste buffer of around 4K with the smallest versions
of this DOS.
SpartaDOS switches internal BASIC in and out from the command line, so LW REQUIRES that you do a
BASIC OFF
command before loading. Any other external cartridges must also be removed.
You can specify a file to edit on the command line after the program name, and LW will attempt to
load the file when it initializes. From the disk menu you can traverse the directory tree with ease
without having to type any names and you can create and delete subdirectories at will. You can set up
multiple memory banks to share with the RAM disk driver. You can exit to DOS, then re-run LW by
simply typing "RUN" with no address, and be back in the editor, in the same bank and the exact same
position in the file that you were in before you went to DOS. LW is fully compatible with the SpartaDOS
Time/Date line and keyboard buffer.
The configuration program offers you the chance to alter the help path, so you can keep your help files
on any drive/directory in the system.
9-42
The Last Word 2.1 Reference Manual
All the subdirectory DOSes, including SpartaDOS, let you put all your LW files in a subdirectory, then,
when you want to run LW, you can make the directory the default, then run the program. This also
means you can change LW's set-up by running it from within different subdirectories.
But what if you want to run LW from anywhere in the system, without worrying about which directory
you're in? Or if you want LW to look on a different drive altogether? If you want to do either of these
things, you need to run the LWPATH.COM utility, which allows you to actually change the LW.COM file
itself so that LW looks for its configuration files on whichever drive and in whatever directory you
choose. You need to tell the program where to find LW.COM, then you'll be offered the chance to
change the config path. You MUST enter the drive specifier, optional path, and "LW" (no quotes).
When running LW with SpartaDOS, you can specify command line options as follows:
LW [files] [/M[c]] [/Ppath] [/Q] [/X]
M
P
Q
X
: Disable autorun macro or run macro “c”
: Set Search Path
: Disable Splash Screen
: Load “Clean” (without any config, font, printer drivers or macros)
9.6 SPARTADOS X
LW was developed under SpartaDOS X, and takes advantage of many of its advanced features. That
includes all the facilities of disk-based SpartaDOS versions, with the exception of re-run after an exit to
DOS (memory is corrupted by SpartaDOS X). However, LW has most of the disk management functions
you could possibly need right inside the program, so an exit to DOS in the middle of an editing session
shouldn’t be necessary.
9.6.1 THE SPARTADOS X PATH
An important feature only present in SpartaDOS X is the search path. This is the environment variable
called PATH, and contains a list of all the drives/directories which should be searched when an
executable file is called up by the command processor. The PATH can also be searched by applications,
however, and LW searches the path when loading fonts, macros, printer drivers and configurations
(unless you explicitly supply paths for these files), as well as its help screens.
If you use SpartaDOS X, format a disk and create a subdirectory called “LW”. Copy all the LW files you
want – macros, help files, etc – into this directory. Now create a CONFIG.SYS file which includes the
path of the LW directory in the PATH environment variable, such as:
PATH=CAR:;A:>LW;
Now, not only can you load LW from any working directory on the system, LW will also be able to find
its configuration files. This powerful feature makes the creation of interactive macros easy, since LW
will always search the path when loading macro files.
9-43
The Last Word 2.1 Reference Manual
You may also want to set the help path using LWCONFIG.COM so that it points to your LW directory by
entering:
D1:>LW>LW.HP1
This will allow LW to look for help files without even having to search the path and will speed up the
system.
9.6.2 SPARTADOS X MEMORY CONFIGURATIONS
If you have a 130XE or other expanded RAM machine, you can achieve the largest possible paste
bugger with LW by including in your CONFIG.SYS file the line:
USE BANKED
This will tell SpartaDOS X to use the uppermost expanded RAM bank for itself and will free up main
memory for LW. This configuration can yield a paste buffer of upwards of 4K in size, even with the
SpartaDOS keyboard buffer installed.
SpartaDOS X lets you specify how many banks to use for your RAM disks. These banks are used from
the top bank down, so it’s possible to set up a DOS bank, a RAM disk, and up to 2 extended text buffers
for LW, all sharing the extra 64K of RAM in a 130XE. Of course, with RAMBO or similar expanded
machines, many more configurations are possible. Just calculate how many banks SpartaDOS X is using,
and you have the LOWEST banks left to configure for use as LW’s text buffers.
When running LW with SpartaDOS X, you can specify command line options as follows:
X LW [files] [/M[c]] [/Ppath] [/Q] [/X]
M
P
Q
X
: Disable autorun macro or run macro “c”
: Set Search Path
: Disable Splash Screen
: Load “Clean” (without any config, font, printer drivers or macros)
9-44
The Last Word 2.1 Reference Manual
10 LW COMMAND SUMMARY
Below is a complete list of every command in the LW editor and print formatter. In the first section,
editor commands are described with their equivalent macro commands (where different) in the third
column. Where no macro command is listed, the command is the same from within macros.
Remember that macro commands which duplicate <SHIFT+CTRL> keystrokes are entered as INVERSE
<CTRL> keystrokes.
10.1 EDITOR COMMANDS
COMMAND
CTRL A
CTRL B
CTRL C
CTRL D
SHIFT+CTRL D
CTRL E
SHIFT+CTRL E
CTRL F
SHIFT+CTRL F
CTRL G
SHIFT+CTRL G
CTRL H
SHIFT+CTRL H
CTRL I
SHIFT+CTRL I
CTRL J
CTRL K
CTRL L
CTRL M
SHIFT+CTRL M
CTRL N
SHIFT+CTRL N
CTRL O
SHIFT+CTRL O
CTRL P
SHIFT+CTRL P
CTRL Q
SHIFT+CTRL Q
CTRL R
FUNCTION
Start of Line
False Spaces Toggle
Cut Marked Block
Disk Menu
Load Printer Driver
End of File
Erase all Tab Stops
Find String
Select Find String
Global Search & Replace
Goto Place Marker
Home/Start of Text
Set Disk Menu file mask
Merge File
Write Block to Disk
View File
Kill Paste Buffer
Load File
Mark Text Block
Load Macros
Show Number of Words
Install/Load Font
Copy Marked Text
Spool File
Paste Text Block
Print File
Load Configuration
Save Configuration
Replace Found String
10-45
MACRO EQUIVALENT
INVERSE CTRL D
INVERSE CTRL E
INVERSE CTRL F
INVERSE CTRL G
INVERSE CTRL H
INVERSE CTRL I
INVERSE CTRL M
INVERSE CTRL N
INVERSE CTRL O
INVERSE CTRL P
INVERSE CTRL Q
The Last Word 2.1 Reference Manual
SHIFT+CTRL R
CTRL S
SHIFT+CTRL S
CTRL T
SHIFT+CTRL T
CTRL U
SHIFT+CTRL U
CTRL V
CTRL W
SHIFT+CTRL W
CTRL X
CTRL Y
SHIFT+CTRL Y
CTRL Z
CTRL CTRL =
CTRL +
CTRL *
SHIFT SHIFT =
SHIFT +
SHIFT *
SHIFT+CTRL SHIFT+CTRL =
CTRL [
CTRL ]
SHIFT+CTRL [
SHIFT+CTRL ]
TAB
CTRL TAB
SHIFT TAB
SHIFT CTRL TAB
ESCAPE
CTRL ESCAPE
CTRL ?
SHIFT+CTRL ?
CTRL ;
CTRL <
SHIFT <
SHIFT+CTRL <
CTRL >
SHIFT >
SHIFT+CTRL >
CTRL DELETE
SHIFT DELETE
RETURN
Select Replace String
Save File
Set Place Marker
Add-In #1
Add-In #2
Find String Upwards
Set Search & Replace Options
Preview Text
Word Wrap Toggle
Set Screen Width
Exit to DOS
Char/Block Lowercase
Char/Block Uppercase
End of Line
Previous Line
Next Line
Column Left
Column Right
Paragraph Left
Paragraph Right
Sentence Left
Sentence Right
Screen Up
Screen Down
Word Left
Word Right
Un-Invert marked text
Invert marked text
Next Tab Stop
Erase Tab Stop
Set Tab Stop
Reset Default Tab Stops
Run a Macro
Enter Control Character
Display Print Position
Display Program Version #
Display Cursor Position
Erase All Text
Erase All Text
Toggle Visible Returns
Insert a Space
Paste Deleted Text
Toggle Insert/Over-Type
Delete Char at Cursor
Del Word/Line/Sent/Para
End of Paragraph
10-46
INVERSE CTRL R
INVERSE CTRL S
INVERSE CTRL T
INVERSE CTRL U
INVERSE CTRL W
INVERSE CTRL Y
[NONE]
[NONE]
[NONE]
[SEE MACRO GOSUB]
[ESCAPE]
[NONE]
[SEE "SET" COMMAND]
[NONE]
[SEE "SET" COMMAND]
The Last Word 2.1 Reference Manual
CAPS
CTRL CAPS
SHIFT CAPS
INVERSE
SHIFT CTRL INV
SHIFT CTRL SPC
CTRL 1
SHIFT+CTRL 1
SHIFT+CTRL 2-0
START
SELECT+CHAR
OPTION
HELP
Toggle Upper/Lower Case
Control Lock
Uppercase Lock
Inverse/Normal Toggle
Convert Normal/Inverse
Hard Space
Pause Listing
Select Main Text Bank
Select Extended RAM Bank
Run # Macro
Enter Inverse Character
Run Macro
Help System
[SEE "SET" COMMAND]
[SEE "SET" COMMAND]
[NONE]
[NONE]
[SEE "SET" COMMAND]
[SEE "SET" COMMAND]
10.2 SPECIAL KEYS
These characters have special meanings when entered on the command line unless preceded by
<CTRL+ESCAPE> (<ESCAPE>,<ESCAPE> from macros):
KEY
SPACE or CTRL P
FUNCTION
If typed when a filename is requested, prints the device/path/name of
the current file in the editor.
If typed when a filename is requested, prints just the path/name of the
current file.
If the first key pressed during input, will clear the input line and just
leave the default device specifier.
Abandons input.
Allows entry of control characters on the input line.
CTRL N
DELETE
ESCAPE or BREAK
CTRL ESCAPE
10.3 MACRO COMMANDS
The following commands are only available from within macros and are entered in inverse video.
COMMAND
INV CTRL B
INV CTRL C
INV CTRL J
INV CTRL K
INV CTRL L
INV CTRL V
FUNCTION
Branch Macro <macro key>. Selects a macro to run after negative confirm, a
macro load, negative find string/next/goto marker.
Confirm (Y/N). Continues macro if "Y" pressed, else aborts or runs pre-selected
macro.
Macro Menu <menu text><RETURN>. Prints message and runs macro attached to
next key press.
Wait for a key from user
Accept Line Mode. Accepts keyboard input until <RETURN> is pressed. Also works
in input dialogues.
Print message <message><RETURN>.
10-47
The Last Word 2.1 Reference Manual
INV CTRL X
INV CTRL Z
Execute macro <macro key>.
Set options/test conditions <option>. Follow with one of the following characters
(in normal video) to set various options and test various conditions:
U
L
R
N
I
O
!
?
H
U
1
2-0
X
B
M
S
C
Uppercase
Lowercase
Inverse
Normal
Insert Mode
Over-Type Mode
Case Sensitive
Case Insensitive
Hide screen updates
Unhide screen updates
Select Main Text Bank
Select Extended banks 2-10
Clear Edited Text Flag
Switch to text bank editor was in when macro was called
Test for block marking (precede with branch command)
Check for selected text (precede with branch command)
Check for changes to text since last save (precede with branch command)
10.4 PRINT FORMATTING COMMANDS
These commands affect the printed document, and are entered in inverse video, in lower or upper
case. All numeric arguments should also be in inverse video (use <SELECT+KEY> to enter a single
character in inverse video). Filenames and header/footer lines should be entered as normal text,
terminated with <RETURN>.
COMMAND
A<n>
B<n>
C<line>
D
E<line>
F<line>
G<file>
G<n>
H<line>
I
J<n>
L<n>
M<n>
N<n>
O<n>
P<n>
FUNCTION
First page to print
Bottom Margin
Centre Line
Double strike Toggle
Edge Line Right
Define Running Footer
Include File
Include Text Bank
Define Running Header
Italic Toggle
Justification
Left Margin
10
Margin Outdent
New Page (conditional #)
Output Control Code
Page Length
10-48
DEFAULT VALUE
1
61
0
0
66
The Last Word 2.1 Reference Manual
R<n>
S<n>
T<n>
U
V<file>
W<n>
X<n>
Y<n>
Z<n>
><n>
<<n>
[<n>
]<n>
?<n>
#
@<n>
!<n>
&
(
_
;
.
UP ARROW
DOWN ARROW
LEFT ARROW
RIGHT ARROW
*
%
Right Margin
Print Style
Top Margin
Underline Toggle
Verbatim dump to Printer
Page Wait
Output Printing Code
Line Spacing
Last Page to Print
Left Paragraph Indent
Right Paragraph Indent
Left Head/Footer Margin
Right Head/Footer Margin
Set Starting Page Number
Insert Page Number
Skip <n> Pages During Print
Heading Level
Reset Heading Levels
Ignore to next )
Hard Hyphen
Comment line
Soft Hyphen
Hard Space
Superscript Toggle
Subscript Toggle
Add-in #3
Add-in #4
Add-in #5
Add-in #6
10-49
70
5
0
1
10
70
1
The Last Word 2.1 Reference Manual
11 PROGRAMMER'S TECHNICAL NOTES
This section first outlines LW's memory map, then goes on to discuss some of the general ideas behind
the program. Don't expect masses of indigestible information. This section isn't only for programmers.
If you're having problems running LW, you'll want to check out the section on memory usage. I'll also
be talking about various tricks that LW employs, and why it has turned out the way it has.
11.1 ASSEMBLY LANGUAGE ADD-INS
Version 2.1 of LW presents assembly language programmers with the interesting opportunity of
writing their own machine code routines to extend the functionality of the software. These small
binary routines must adhere to strict guidelines, and are loaded into the macro buffer, patching into
hooks in the main program. There are two unused editor commands and four print formatting
directives which can be hooked into user-written modules.
A toolkit for writing add-ins will be available separately from the program author, and will include a full
equate list for the program, example add-ins, and guidelines for writing your own modules.
11.2 MEMORY USAGE
The main LW.COM program is only 20K long, and nearly 2K of this code is the loading
screen/initialization segment, which is abandoned once the program has loaded. 2K of the remaining
code is taken up with font data and messages. The program loads at $2800 and extends up to $3FFF,
skips $4000-$7FFF, then occupies $8000-$ABC2. The remaining RAM region $BF00-$BFFF is used for
the macro buffer and the screen display. The $4000-$7FFF area is avoided since this is where the 130XE
switches in the extra RAM banks, and LW's text buffer resides here no matter what computer you
have.
LW also uses several other regions for data storage, including the entire upper half of page zero ($80$FF). ALL memory from $3FD to $6FF is used by LW for buffers. This area includes the OS cassette
buffer, which you're (hopefully) unlikely to need. It doesn't matter if DOS corrupts this memory if you
do an exit to DOS: LW doesn't rely on the buffers being intact if you re-run the program from DOS (at
$2800). You SHOULD ensure, however, that no resident handlers use these RAM regions, otherwise
conflicts with LW will certainly occur. For example, a type-ahead keyboard buffer which resides in Page
6 ($600-$6FF) would NOT be useable with LW.
LW uses no memory under the Operating System (hence its compatibility with most DOSes), and yet
still allows 1K for the screen display, a further 2K for the print preview screen, 1K for the macro buffer,
and over 15K for each text buffer.
One thing which has allowed LW to be crammed into such a small amount of code is the placing of
almost all the program's variables in Page Zero RAM. The entire upper half of Page Zero is used by LW.
This is made possible by the fact that unlike LW makes no calls to the OS's floating point arithmetic
routines, which require $D4-$FF for themselves. In fact, LW doesn't even make any calls to CIO for
11-50
The Last Word 2.1 Reference Manual
screen output: it uses its own custom print routine. The screen editor device is abandoned when the
program starts and only opened again upon exit to DOS. This use of page 0 instead of absolute
addresses makes LW between twenty and thirty percent smaller than it might otherwise have been. It
also means the program runs significantly faster.
There are other techniques which save on code space. LW uses many memory locations as flags, which
are only ever on or off. These flags are tested using the 6502 "BIT" instruction, which means only bit 7
needs to be set or cleared. So instead of storing 0 in the flag to clear it and 128 to set it, to clear it I use:
LSR <address>which puts a 0 in bit 7 with only 2 bytes of code.
To set it, I have used:
SEC
ROR <address>
Which is only 3 bytes (providing <address> is on page 0). The other bits in the byte are of no
significance, although occasionally more precision is required if both bits 6 and 7 of the byte are used.
Bit 6 is also tested with the "BIT" command and will be transferred to the overflow flag. Branching is
done with "BVC" and "BVS". These techniques don't really yield space savings when long strings of flags
are being cleared: it's as easy to load a 0 and store it in the flags. But when widely dispersed flag
sets/clears are necessary, the savings can soon mount up.
11.3 PROGRAM DESIGN
LW handles the text in memory in a special way in order to achieve its speed. While many word
processors hold text as a contiguously in memory, LW uses a pointer system to ensure that the free
memory in the buffer is always directly in front of the cursor. Therefore, when you type, there is no
slowdown in the editor regardless of the size of the file. The text is moved through memory as you
move the cursor through the it. When the screen refresh routine hits the location of the cursor, it
jumps over the free memory in the buffer and displays the rest of the text, which is right at the top of
the buffer.
Although LW is written in compact assembly language, it is still a modular program. No code is
duplicated and – to save space – subroutines are used instead of in-line macro code. The reduction in
code size achieved by using subroutines can be considerable.
Of course, there's always a trade-off between speed and structure. In time critical sections, the quick
and dirty approach often has to be used. But LW was easier to develop than it might have otherwise
been, because the philosophy of structure and compactness was observed right from the first line of
code, despite the fact that the program contains some extremely tight machine code.
LW is the culmination of my 10 years of experimentation with Atari programming, starting with BASIC,
then on to C, and finally to Assembler. I haven't tried the Quick language from Germany or Action by
OSS, but I honestly think that machine code is the best language to use if you need compactness and
speed. After many years flailing about with the Atari Macro Assembler, I finally wrote my own
11-51
The Last Word 2.1 Reference Manual
Assembler because I wanted one which was worked with SpartaDOS X. The result was a Macro
Assembler called MA65 and writing it was the best thing I ever did for my programming productivity.
MA65 was used to compile THE LAST WORD (more times than I care to remember), and it can
assemble the entire 130K of source code in about 8 minutes with a floppy drive and a RAM disk.
11.4 DEVELOPMENT AND TESTING
After nine years of thinking about writing a word processor, I finally began LW at the start of 1999. It
took only 3 months to get a fully working version, and a further 2 months to produce one which was
reliable. It was this test period, during which I used LW to write utility macros and the bulk of this
documentation, that highlighted bugs and design faults for later correction. During this time probably
hundreds of complete re-compilations were done. The program culminated in version 2.1 in 2000.
The fonts for LW were designed with the GLYPH font editor by Jack Prevost.
The source code was written with another of my programs, XEDIT, which is a text editor available in the
Public Domain. Its chief asset is its ability to handle files of up to 23K.
11.5 WHY LW CAME INTO BEING
For many years, the excellent word processor TextPro, in all its many incarnations, took care of all my
word processing needs. I bought AtariWriter Plus but I only ever used it to proofread TextPro
documents. I tried Mini Office 2, but the only thing I liked about it was the print preview facility. For
ease of use and versatility, I still felt that TextPro was streets ahead of them both. I'd also read about
The First XLEnt Word Processor, which offered icons and a print preview facility. I knew nothing about
the reputedly superb but unavailable Paperclip, and had only read a review of Superscript, which I felt
sure wouldn't run well with my system. What I really wished for was a program which had the facilities
and programmability of TextPro, the efficiency of AtariWriter Plus, and the presentation and print
preview of The First XLEnt WP. I also wanted an easy way to include international characters in my
documents.
You now have a copy of the resultant program. It's been a successful project from my point of view,
since I now have the word processor I always wanted on the Atari. All it lacks is a spell checker. I'll
leave it up to those users lucky enough to own Paperclip and First XLEnt to decide how well LW
compares with it.
I've tried to make LW a writer's word processor: I spend a lot of time writing short stories. Once LW is
set up, you shouldn't have to worry about the technicalities of the program or waste time working
around its limitations. If you've edited long files with other word processors, you will welcome the
speed with which LW deals with large amounts of text.
I don't make any claims that this is the perfect WP for the Atari. What it is, however, is an
amalgamation of all the best and most innovative features found on other Atari WPs, both PD and
commercial. It may be the last word processor ever written for the Atari Classic: I'm pretty certain
another of its size and complexity will not be seen. There are many commercial WPs available that
were written years ago, and TextPro - without doubt the most popular WP for the Classic these days 11-52
The Last Word 2.1 Reference Manual
is a superb program. I didn't write LW because I wanted to give the Atari world another WP: I wrote it
primarily for myself. But now that it's complete, I'm keen to share it. It is – I believe – a commercial
quality program, with the advantage of being Freeware and Open-Source.
11.6 DEVELOPMENT
There are many things about The Last Word which could be improved. Some things on the drawing
board include:
The ability to auto-detect RAM upgrades and configure text buffers accordingly
The ability to read larger files or split files across text banks
A special SpartaDOS X version of the program which uses RAM under the Operating System,
providing a 24K main text buffer
Whether any of these features see the light of day remains to be seen. Only with the advent of fast PC
based emulation and through the medium of Internet-based communities has The Last Word finally
seen the light of day. It’s still fun to see what can be done with the Atari 8, though!
11.7 CORRESPONDENCE
Any enquiries, bug reports, etc, should be addressed to me, Jonathan Halliday at [email protected].
11-53
The Last Word 2.1 Reference Manual
11-54