1
WARRANTY
All termsandconditionsspecifiedin your agreement
with AT&T
apply.
NOTICE
Whilereasonable
efforts weremade
to ensurethat the informationin this
document
wascompleteandaccurateat the time of printing, AT&T
can
assume
no responsibility for anyerrors. Changes
or correctionsto the
informationcontainedin this document
maybe incorporatedinto future
issues.
TO ORDERCOPIES OF THIS DOCUMENT
Call:
AT&TCustomer
Information Centeron 800 432-6600,
In Canada:800255-1242or
Write: AT&TCustomerInformation Center
2855North Franklin Road
P.O. Box19901
Indianapolis, IN 46219
Order: DocumentNo. AT&T555-021-758
issue 1, November
1993
For moreinformation about AT&Tdocuments,seeBusiness
Communications
SystemsPublications Catalog, 555-000-010.
HEARINGAID COMPATIBILITY
Thisvoice/dataterminalis compatible
with the inductivelycoupled
hearingaids as required by the FederalCommunications
Commission(FCC).
Preparedby
AT&TGBCSDocumentation
DevelopmentGroup
Middletown,NewJersey 07748
©1993 AT&T
All RightsReserved
Prlntedin USA
YOURRESPONSIBILITYFORYOURSYSTEM’SSECURITY
Youare responsiblefor the security of your system.AT&T
doesnot
warrantthat this productis immune
fromor will preventunauthorized
use
of common-carrier
telecommunication
servicesor facilities accessed
throughor connected
to it. AT&T
will not be responsiblefor anycharges
that result fromsuchunauthorized
use.Productadministrationto
preventunauthorized
useis your responsibility andyour system
manager
shouldreadall documents
providedwith this productto fully
understand
the featuresavailablethat mayreduceyourrisk of incurring
charges.
INTERFERENCE
WARNING
INFORMATION
- Part 15 of FCCRules
FederalCommunications
Commission
(FCC)Rulesrequire that you
notifiedof the following:
This equipment
hasbeentestedandfoundto complywith the limits for a
ClassA digital device,pursuantto Part 15 of the FCCRules.These
limits are designed
to providereasonable
protectionagainstharmful
interferencein a residentialinstallation. Thisequipment
generates,uses
andcanradiate radio frequencyenergyand, if not installed andusedin
accordance
with the instructions, maycauseharmfulinterferenceto
radio communications.
However,
there is no guarantee
that interference
will not occurin a particularinstallation. If this equipment
doescause
interferenceto radio or televisionreception,whichcanbedetermined
by
turning the equipment
off andon, the useris encouraged
to try to correct
the interferenceby oneor moreof the following measures:
1 Reorientor relocatethe receivingantenna.
2 Increasethe separationbetween
the equipment
andreceiver.
3 Connect
the equipment
into an outlet on a cimuitdifferent fromthat to
whichthe receiveris connected.
4 Consultthe dealeror an experienced
radio/TVtechnicianfor help.
Youmayfind the following bookletpreparedby the Federal
Communications
Commission
helpful: Howto Identify and Resolve
Radio-TVInterferenceProblems.
Thisbookletis availablefromthe U.S.Government
Printing Office,
Washington,D.C. 20042,Stock No. 004-000-00345-4.
Contents
Introduction
.....................................................................
Organization
of this Manual
.............................................
Conventions
Used
in this Manual
.......................................
A NoteontheTerm,system
manager
.................................
1
1
2
3
YourISDN
8520T
Voice
Terminal
.......................................
4
Voice
Feature
Descriptions
................................................
Voice
Features
...............................................................
Features
Accessed
with the DisplayandSoftkeys...............
9
9
10
Voice
Features
...............................................................
Answering
andPlacing
a Call..........................................
Conference
..................................................................
Drop
...........................................................................
Hold
...........................................................................
Message
Retrieval
......................................................
Mute
........................................................................
Redial(LastNumber
Dialed)..........................................
Speakerphone
andSpeaker
..........................................
Speaker
..................................................................
Speakerphone
.........................................................
Transfer
.....................................................................
13
13
14
14
15
15
16
16
17
17
18
19
FeaturesAccessed
with the DisplayandSoftkeys............
EnteringSoftkeyMode;Exiting to YourHome
Screen
(Using~ and~-~/t-~.Buttons)....................................
using I"Prey
1,and~ .................................
ThePadlock
Icon.........................................................
Responding
to QuitandDone
..........................................
ASoftkey
DisplayScreen
Flowchart
.................................
Setting
theClock
.........................................................
SettingtheSpeakerphone
.............................................
20
21
23
23
23
23
26
29
Adding,Editing, andDeleting a Number
andName
32
(andOptionalGroup
Name)
in theDirectory........................
AddingNumbers
andNames
Into the Directory. ........... 32
Duplicate
Entries
......................................................
36
EditingEntriesin theDirectory
....................................
38
41
Deleting
anEntryfromtheDirectory..............................
Organizing
Entriesin theDirectory
....................................
43
44
Renaming
Groups
......................................................
Moving
EntriesfromOneGroup
into Another
..................
47
Searching
for anEntryin theDirectory..............................
50
Viewinga DirectoryEntry(Editing or Deleting
theEntryandPlacing
a Call)..........................................
54
Using~
to Placea Call .............................................
57
Using
theCallLog.........................................................
59
ViewingUnanswered
IncomingCalls in the Carl Log
(When
the Carl Logis set to Unanswered
Calls Only)...... 59
Setting
theCallLog...................................................
61
SeeingIndication of NewUnanswered
IncomingCall(s)
Underthe DateandTimeon YourDisplayScreen............ 63
ViewingUnanswered
IncomingCalls in the Carl Log
(When
CarlLogis setto All Calls).................................
65
Viewing
Answered
Incoming
Calls in the Call Log............ 66
Viewing
Outgoing
Callsin theCallLog...........................
68
LockingandUnlockingDirectory Changes,
Call Log,
andAll Softkeys
.........................................................
71
Changing
or Removing
YourPassword
..............................
74
Choosing
a Home
Screen............
. .................................76
Selectinga Particular DirectoryPage
for theHome
Screen
................................................
78
Self-Test
.....................................................................
82
Choosing
theContrast
Levelfor theDisplay........................
84
Selectinga Personalized
Ring
(andAdjusting
Ringer
Volume)
.......................................
Selecting Display Messages
YouWantTo Viewand Setting
the Rateat WhichYouViewthe DisplayMessages
............
Turning
onor off Softkey
Information
Tones
........................
Setting the Number
of Names
on the DirectoryPage............
86
88
91
93
Tones
andTheirMeanings
.............................................
Voice
Terminal
Tones
...................................................
96
96
LabelingandInstalling the Designation
Card
andtheTelephone
Number
Card....................................
96
Installation
.....................................................................
98
Contents
of tl~e 8520T
Package
.......................................
98
Desktop
InstRllatien
......................................................
98
Attaching
Adjunct
Equipment
........................................
100
Removing
the Directory Cartridge from An8520T
andTransferringthe Cartridgeto Another8520TTerminal...101
Removing
the VoiceTerminalfromOperation...............
101
Removing
the VoiceTerminal
Stand...........................
101
Removing
the DIRCartridgefromthe VoiceTerminal...... 103
Reinstalling
theDesktop
Stand
....................................
104
Connecting
the 8520T
to theSystem
...........................
104
Installing the DIRCartridgein Another8520T
Terminal... 104
Technical
Description
...................................................
Physical
Dimension
andWeight
.................................
Power
Requirements
................................................
Environmental
Requirements
....................................
105
105
105
105
List of Figures
Figure
FigureTitle
Pagen(
Figure1
8520TVoice/DataTerminal(Top View)
Figure2
8520TVoice/DataTerminal(BottomView)
Figure3
The8520TDisplay, Softkeys,
andDisplayControlButtons
20
Figure4
A Flowchartof the SoftkeyDisplayScreens
24
Figure5
A Flowchartof the SoftkeyDisplayScreens
(continued)
25
Figure6
Line, Adjunct, andHandsetCordRouting
for Desktop
Installation
98
Figure7
Removing
the Voice TerminalDesktopStand
101
Figure8
Removing
(andInstalling) the D~RCartridge
102
IMPORTANTSAFETYINSTRUCTIONS
Onlythe mostcareful attention hasbeendevotedto quality standardsin
the manufacture
of your newtelephone.Safetyis a majorfactor in the
designof everyset. But, safety is YOUR
responsibilitytoo.
Pleasereadcarefully the helpful tips listed belowandonthe nextpage.
Thesesuggestions
will enableyouto takefullest advantage
of yournew
voice/dataterminal.Then,retain thesetips for later use.
When
using your telephoneequipment,the following safety precautions
shouldalwaysbe followedto reducethe risk of fire, electric shock,and
injury to persons.
¯ Readandunderstand
all instructions.
Followall warningsandinstructions marked
on the telephone.
¯ This telephonecanbe hazardous
if immersed
in water. To avoid the
possibility of electrical shock,donot usethe telephone
whileyouare
in the bathtubor shower,or whenyouare wet. If youaccidentally
dropthe telephone
into water,do not retrieve the equipment
until you
havefirst unplugged
the line cordfromthe modular
wall jack. Donot
reconnect
the telephone
until it hasdried thoroughly.
¯ Avoidusingthe telephone(other than the cordlesstype) during
electrical stormsin yourimmediate
area.Thereis a remoterisk of.
electric shockfromlightning. Urgentcalls shouldbebrief. Even
thoughprotectivemeasures
mayhavebeeninstalled to limit
electrical surgesfromenteringyour home
or business,absolute
protectionfromlightningis impossible.
¯ If yoususpecta naturalgasleak in the vicinity of the telephone,
report it immediately,
but usea telephoneawayfromthe areain
question.Thetelephone’selectrical contactscouldgeneratea tiny
spark.Whileunlikely, it is possiblethat this sparkcouldignite heaw
concentrations
of gas.
¯ Neverpushobjectsof anykind into the telephonethroughhousing
slots sincethey maytouchhazardous
voltagepoints or shodout
padsthat couldresult in a risk of electric shock.Neverspill liquid of
anykind onthe telephone.If liquid is spilled, however,
dry
immediately,
andrefer anyserviceproblems
to qualified service
personnel.
¯ Toreducethe risk of electdcshock,do not disassemble
the
telephone.Thereare no user serviceablepadsinside. Opening
or
removingcoversmayexposeyouto hazardousvoltages. Incorrect
reassembly
cancauseelectric shockwhenthe telephoneis
subsequently
used.
¯
¯
¯
¯
¯
¯
Slots andopeningsin the housingmustnot be blockedor covered.
Theopeningsshouldneverbe blockedby placing the telephoneon a
sofa, rug or othersimilar surface.Thisproductshouldneverbe
placednearor overa radiator or heat register. Thisproductshould
not beplacedin a built-in installationunlessproperventilationis
provided.
Thetelephoneshouldbe operatedonly fromthe type of power
sourceindicatedonthe markinglabel. If youare not sureof the type
of powersupplybeingused,contacta qualified serviceperson.
Donot allow anythingto rest onthe powercord. Donot locate this
productwherethe cordwill be abused
by personswalkingon it.
Donot overloadthe ACwall outlets andextensioncordsas this can
resultin risk of fire or electricshock.
Beforecleaning,disconnectall cordsfromthe telephone.Donot
useliquid cleanersor aerosolcleaners.Usea damp
cloth for
cleaning.
Disconnect
the cordsonthe telephoneandrefer servicingto qualified
servicepersonnelwhentheseconditionsexist:
¯ When
the powersupplycord or plug is damaged
or frayed.
¯ . If liquid hasbeenspilled into the product.
¯
¯
¯
¯
If the producthasbeenexposed
to rain or water.
If the telephone
doesnot operatenormallyby followingthe
operatinginstructions. Donot attemptto adjustanyother
controlssincedoingso mayresult in damage
andwill require
extensiveworkby a qualified technicianto restorethe productto
normaloperation.
If the producthasbeendroppedor the housinghasbeen
damaged.
If the productexhibitsa distinct change
in performance.
SAVE THESE INSTRUCTIONS
~
When
youseethis warningsymbolon the product,refer to the
instructionsbookletpacked
with the productfor information
before proceeding.
Introduction
’" "
TheAT&T8520Tvoice/dataterminal canbe addedto your Integrated
Services Digital Network(ISDN)commuhications
system(DEFINITY®
and5ESS
switchesonly). In orderto provideyouwith excellentquality
andreliability, AT&T
hasdesigned
this newvoice/dataterminalwith the
latest advances
in telecommunications
technology.
The8520Tvoice/dataterminaloffers 20 call appearances,
Mute,Redial,
Conference,
Drop,Transfer, Hold, andExit buttons, a Speakerphone
whichcanalso be optionedas a listen-only Speaker,a Volume
control,
andan Adjunctjack for adjunctequipment;
all that youwill needfor easy
andefficient call-handling.The7-line by 24-character
liquid crystal
display,10 softkeys(the unlabeled
keysoneither side of the display),
andfour display control buttonscanbe usedto accesssuchfeaturesas
a personalDirectory,a Call Logwhichlists the mostrecentincoming
and
outgoingcalls, the Self-Testfeature, anda personalized
ringing pattern
for the terminal.
ImportantNote: The8520Tterminal offers BOTH
voice and data
features.However,
only voicefeaturesare describedin this manual.
For a discussionof 8520Tdata features, seethe ISDN8500Series
Display TerminalADMUser’s Manual,555-021-730.
Thefollowing featureshavebeenincludedfor the
hearingandvisually impairedperson:
¯ Twosmall bars havebeenplacedon the 5 dial
padkey;
¯ Therate at whichthe display messages
appear
on your screencanbe set at Slow, Medium,
or
Fast;
¯ Confirmationanderror tones;
¯ Compatibilitywith inductivelycoupledhearing
aids.
ORGANIZATION
OF THIS MANUAL
Thismanual
is arranged
into the followingsections:
¯ Your ISDN8520TVoice Terminal- showsthe top and bottom
viewsof the 8520Tandexplainsits features.
¯ Feature
Descriptions
- lists the voicefeaturesandthe featuresthat
canbe accessed
with the softkeys,tells whateachfeature does,and
suggestshowyoumightuseit.
¯
¯
¯
¯
¯
¯
VoiceFeatures
- gives step-by-stepprocedures
on using voice
features.
FeaturesAccessed
with the DisplayandSoftkeys- describes the
softkeysandhowto usethemto accessfeaturessuchas setting up
andusinga personalDirectoryof frequentlycalled numbers
and
viewinga Call Logof incomingandoutgoingcalls.
TonesandTheirMeaninglists anddescribesthe various terminal
tones.
LabelingandInstalling the Designation
Card-explains howto
remove
andlabel the designationcard.
Installation- givesbrief step-by-step
procedures
for connecting
yourvoice/dataterminalto the system,desktopinstallation suchas
connecting
the handset
andthe line cord, and,if appropriate,
attachingadjunctequipment.
Thissectionalso includesdirectionson
removingthe DIRcartridge fromone8520Tterminal andtransferring
it to another8520T.
Technical
Descriptionprovidesinformationon the technical
aspectsof the 8520Tvoice/dataterminal.
CONVENTIONS
USEDIN THIS MANUAL
A rectangularbox containing a feature name,such as ~,
represents
anybuttonhavinga featureassigned
to it, with a
corresponding
feature name
label.
A 5-line screen,suchas
Directory
Call Log
Lock
Options
Data
Set Spkr
Set Clock
Home Screen
represents
the lowersectionof the 7-line displaythat is shown
whenyou
pressthe I-~ display control button. This sectionof the display
screenlists the featuresyoucanaccessby usingthe softkeys,the
unlabeled
buttonsoneither side of the display.
A NOTEON THE TERM,"’SYSTEMMANAGER’"
In this manual
it is often suggested
that yourefer to yoursystem
manager
for moreinformation. Thesystemmanagermayalso be called
the systemadministratoror, possibly, the telecommunications
manager.
For handyreference,usethe spacebelowto write your system
manager’sname,roomnumber,and extension.
Name__
Room
~.
Extension
3
Your ISDN 8520T Voice Terminal
Beforeyoubeginusing yourISDN8520Tvoice/dataterminal, familiarize
yourselfwith the voice/data
terminalfeatures,lights, jacks,andother
components
available to you. To help youdo this, Figures1 and2 show
youthe top andbottomviewsof the 8520Tterminal.
4
FIGURE
1 8520TVoice/DataTerminal(TopView)
5
The8520Tvoice/dataterminalcomponents
pictured in Figure1, the top
view, are describedbelowandon the next page.For your convenience,
theyarelisted alphabetically.
CallappearanceJfeature
buttonsThese20 buttonsare devotedeitherto
handlingincomingandoutgoingcalls (call appearances)
andare labeled
with the exchange
(numbers)and extensionnumberorthey can be used
as feature buttonsto accessvoicefeaturessuchas Call Forwardor
SendAll Calls; theseare labeledwith the featurename,Eachof these
20call appearance/feature
buttonshasa red light whichindicatesthe
selectedline anda greenlight whichindicatesthe statusof that line or
feature.
Conference
button For setting up conference
calls with an additional
party.
card For noting the call appearance
telephonenumber
or
extensionor feature the buttoncanaccess.
Designation
DialpadThestandard12-buttonpadfor dialing telephonenumbers
andaccessingfeatures. Theletters, "Q" and"Z," havebeenadded
to the appropriatedial padkeysfor enteringdirectorynames,
and
the "5" buttonon yourdial padhasraisedbarsfor visually-impaired
users.
DisplayA 7-line by 24-character
super-twistliquid crystal display. The
displayis dividedinto twoparts. Thetop twolines displayswitch
informationwhile the lowerfive lines showsoftkeyinformationandmenu
selections.
DisplaycontrolbuttonsThesefour buttonsare labeledMenu,Dir,
-~ Prev, andNext~.
¯ ~ is usedto access the main softkey menu.
~ allows youto quickly accessDirectoryentries in orderto placea
call.
¯ ~ and ~ can be used to help you go back and forth
throughmenu
options,to searchfor an entry in yourDirectoryand
edit Directoryentries, andto viewentriesin yourCall Log.
DropbuttonFor disconnecting
froma call or droppingthe last party
addedto a conference
call.
Exit buttonFor simultaneously
exiting a softkeyfeatureandreturningto
Normal(call-handling) Mode.Whenyou press ~, the lower part of
the display will showthe Home
Screenyouselected.
Handset
For placingandanswering
calls (often peoplecall it the
receiver).
Holdbutton
A red button,for putting a voicecall on hold.
Message
light A red light whichgoeson steadily whena message
has
beenleft for you.Seeyoursystemmanager
for instructions regarding
your local message
retrieval procedures.
Mutebutton For turning off (andthen backon again) the microphone
the handsetor the speakerphone
so the other personon the call cannot
hearyou.
Redia/buttonFor automaticallyredialing the last number
youdialed
fromthe dial pad.
$oftkeysThe10 unlabeledbuttonslocated besidethe display
correspond
to wordson the display screen.Softkeysare usedalong
with displaycontrol keysto accessor createa personalDirectoryof
frequently-callednumbers,
a Call Logof the mostrecentincomingand
outgoingcalls, andsuchfeaturesas selectinga personalized
ringing
pattern,doinga self-test of yourvoice/data
terminal,settingthe clock,
andoptimizingthe speakerphone.
For turning on andoff the speakerphone
or the
listen-onlyspeaker.
Speaker button
Telephone
number
card For noting the area codeandtelephonenumber
of yourvoice/dataterminal.
TransferbuttonFortransferringa call to anothervoiceterminal.
Volume
control button When
on a call, usedto increaseor decreasethe
receivevolumeof the handsetor speakerphone
(if on a call usingthe
speakerphone).Whenyou are not on a call, the ~ control button
is usedto increaseor decrease
the volumeof the ringer andthe tones.
Routing
channel
Adjunct
jack
Line
jack
RS232
connector
Handset Handset cord
jack routing channel
FIGURE
2 8520TVoiceTerminal(Bottom
View)
The various componentswhich appear on the bottom of the 8520T
voice/data terminal are shownin Figure 2 and listed and explained
below.
Ad]unctjack Usedfor connecting an external speakerphone,a headset
adaptor, or other adjunct equipment. The jack is labeled "ADJUNCT."
WARNING:
Donot insert the handset cord into the "ADJUNCT"
jack. It
will cause equipmentdamage.
Handset]ackUsedfor connecting the handset cord to your voice/data
terminal. The jack is labeled ~ .
Line ]ack Usedfor connectingthe line cord to your voice/data terminal.
Thejack is labeled "LINE."
Voice Feature Descriptions
Herearebrief descriptionsof the voicefeaturesandthe features
accessedwith the softkeys, including whateachonedoesandhowyou
mightwantto useit.
VOICE FEATURES
Conference
Allowsyouto addan additionalparty to a call so that you
canconducta conversationwith morethan oneparty. Useto set up
time-savingconferences,
or to spontaneously
includea party important
to a discussion.
DropDisconnects
youfroma call withoutrequiring youto hangup the
handsetor pressthe switchhook.Canalso be usedwith the Conference
feature to disconnectthe last party added.Usewhenever
youare using
the handset
andwantto continueusingit for anotheractionafter ending
a call.
HoldTemporarily
disconnects
youfroma call, holdingit until youcan
returnto it. Whilea call is onhold,youcanplaceanothercall, activate
anotherfeature,answera waitingcall, or leaveyourvoice/dataterminal
to performanothertask. Usewhenyouhavea call that youdo not wish
to drop,but for whichyouhaveto interrupt briefly to dosomething
else.
Message
Retrieval YourMessage
light goeson to let youknowa caller
hasleft a message.
Followyour system’smessage
retrieval procedures
to get your message.
MuteTurnsoff the microphone
associatedwith the handsetor the
speakerphone,
whicheveris currently active. Usewhenyouwantto
confer with someone
in the roomwith you, but youdo not wantthe other
party onthe call to hearyourconversation.
(Youarestill ableto hearthe
person
onthe call.)
Redial(Last Number
Dialed)Automaticallyredials the last number
you
dialedmanuallyfromthe dial pad,either anextensionor an outside
number.Useto savetime in redialing a busyor unanswered
number.
Speakerphone Yourvoice/dataterminal haseither
the Speaker
(listen-only) ortheSpeakerphone
(listen andtalk) functionor it mayhave
neither. Checkwith the systemmanager
to seehowyour voice/dataterminalis set.
TheSpeaker
(listen-only) featureallowsyouto placecalls or access
other voice features without lifting the handset.(Press~ .)
However,
in orderto speakto the other party, youmustusethe handset
(the speaker
mustbeoff). Usewith featureactivities that require
listening only, suchas on-hook
dialing or monitoring
calls onhold.
TheSpeakerphone
(listen andspeak)feature allows youto place and
answer
calls or accessothervoicefeatureswithoutlifting the handset.
(Press ~ .) You mayuse the softkeys on the voice/data terminal
to set or reset the speakerphone.
When
youset the built-in
speakerphone,
it performsa test of the surroundingenvironment
and
adjustsitself for optimalperformance.
Usethe built-in speakerphone
anytime youprefer hands-freecommunications,
both speakingand
listening, or for groupconference
situations.
TransferTransfersa call fromyourvoice/dataterminalto another
extension.Usewhenyour caller needsto speakfurther with someone
else.
FEATURES
ACCESSED
WITH THE DISPLAYANDSOFTKEYS
Thefollowingfeaturescanbe accessed
usingthe 10 softkeyslocatedon
bothsidesof the display.
Call LogTheCall Logis initially set to list the 20mostrecentincoming
unanswered
calls only. Anoption is providedso that youmayalso
chooseto accessthe 20 mostrecent answered
calls, andthe 20 most
recentoutgoingcalls placedfromyourvoice/dataterminal,or youmay
chooseto turn off the Call Log.Useto checkon calls that youmissed
(the unanswered
calls) andto remindyouof thosecalls that you
answered
or placedmostrecently.
Call LogIndicatorSetsyourdisplayso that youreceivean indicationat
the top of your display screenwhena newunanswered
incomingcall is
placedinto yourCall Log.
Call Progress
TheAPIdialing Call Progressfeaturespecifiesif and
whenthe speakerbecomes
active while placinga voicecall usingAPI.
ContrastChanges
the contrastlevel of yourdisplayso the letters or
numbers
are darkeror lighter againstthe background
of the screen.
DataPlacesa datacall with yourvoice/dataset andset up Data
Options.
DataIndicator Setsyour display so youreceive confirmationwhenever
anactivedatacall is in progress.
DirectoryUsed
to create,view,edit, or call a personaldirectoryof upto
144extensionsor outside numbers
andthe names
of the associated
party. OnceyourDirectoryis set up, youcandeleteentries andsearch
for entries alreadyentered.Numbers
in your Directorycanbe arranged
in alphabeticalorder, in user-definedgroups,or both. Use~ to
10
quickly dial a call. Useyour Directoryas a handyplaceto store numbers
youfrequentlycall.
Dir ButtonWhen
youpress ~-~ followed by a softkey button
associated
with that Directoryentry, a call is immediately
placedto a
telephonenumber.Thephonenumberappearson the display screenas
it is dialed.
Exit buttonExits a softkeyfeatureandreturnsthe voice/dataterminal
display to your Home
Screen.Thetop two lines againshowyouthe time
anddate andanyrelevantsysteminformation.
Home
ScreenAllowsyouto select a display Screenthat will appeareach
time you press ~. In this way, youcan quickly accessa screenthat
youuseoften.
LockAllowsyouto lock your Directory changes
so no oneelse can
add,edit, delete,or re-organize
entriesin yourDirectory;lock yourCall
Logso no oneelse canviewyourCall Logentries; lock all of the
softkeysso no oneelse canviewor change
anyof the features
accessed
by the softkeys.
Number
of Names
(ona Directory Page)Allowsyouto view either
10 names
or 9 names
+ Quit on an individual Directorypage.If you
chooseto have10 names
on the Directory screenat onetime, youcan
leavethe Directoryor cancelcalling a name
in yourDirectoryonly by
pressing ~ or ~ (rather than using Quit).
Personalized
RingAllowsyouto select yourownpersonalized
ringing,..
patternfromamong
eight availablepatterns.Useto distinguishyour
voice/dataterminal’sring fromthat of othernearbyvoiceterminals.
ScreenTheScreenfeatures include Display Rate andMessage
Type.
DisplayRateAllowsyouto set the lengthof time the display message
remainson the screen.Thereare three rates: Slow,Medium,
andFast.
Message
TypeAllowsyouto select the type of messages
youwantto
seeon the screen:either error messages
only orbotherror and
informationtimedmessages.
Self-TestPerforms
a diagnostictest of yourvoice/dataterminal
includingthe lights, ringer,buttons,anddisplay.
Noteonthe Self-Testfeature:When
youperforma self-test of the
voice/dataterminal,it clearsthe contentsof the Call Logandthe last
number
dialed fromRedial, andreturnsthe volumecontrolto the default
setting.
11
Set ClockAllowsyouto set the date andtime on your voice/data
terminaldisplay.
Set Speakerphone
When
youset the built-in speakerphone,
it performs
a test of the surrounding
environment
andadjustsitself for optimal
performance.
Tones
A confirmationtone (sequentiallow andhigh tones) is provided
to let youknowa selection hasbeenaccepted.An error beeptone (one
beep)alerts youthat youpressedaninvalid softkey.Anerror tone (one
steadylow tone) occurswhenyouhavemade
a mistakein your softkey
entries. Youmaychooseto turn the confirmationtoneandthe error
beeptone on or off. (See"TurningOnor Off SoftkeyInformationTones"
later in this manual.)
Voice Features
Theprocedures
whichfollow give shod,step-by-stepinstructionsfor
usingeachfeature. For yourconvenience,
the featuresare listed
alphabetically.Unlessotherwisenoted, the calling procedure
assumes
the handset
is off-hook.
ANSWERING
ANDPLACINGA CALL
To
answer
a call
Lift the handset.
¯ Thegreenlight (belowthe redlight) goesonsteadily at the
selectedcall appearance
button.
NOTE:
if youare not connected
immediately,
pressthe call
appearance
buttonnextto the flashinggreenlight.
Toplacea call
1 Lift the handset.
¯ Thegreen(belowthe red light) goeson steadily at the selected
call appearance
button.
NOTE:
If youwantto usea different call appearance,
pressthe
desiredcall appearance
button.
youwantto call.
2 Listenfor the dial toneanddial the number
To
end(or drop)a call
Hangup the handset or press the ~ button
NOTE:
If you usethe ~ button, youwill hear a dial tone andyour
voice/dataterminalis readyfor anothercall.
To adjust the receivevolume
of the handset,the speakerphone,
or
¯ the listen-onlyspeaker
1 Whileona call,
to raise the volume,
pressthe right half of the Volume
controlbutton
labeled
[--/~--];
to lowerthe volume,
pressthe left half of the Volume
control button
labeled[-~7-l.
13
CONFERENCE
Toaddanotherparty to a call
Whileon a call, press~ to addthe next party.
¯ Thecurrentcall is placedon hold.
¯ TheredConference
light flutters.
NOTE:
If anidle call appearance
buttonis not automatically
selected,pressoneyourself.
2 Listenfor the dial tone, anddial the number
of the nextparty.
3 Press ~ whenthe next party answers.
¯ Thered Conference
light goesoff.
¯ All parties are nowconnected.
Todropthe last party froma conference
call
1 Press ~-~.
¯ Thelast party youaddedis dropped.
DROP
To disconnect
froma call andobtaindial tone withouthanging
up
1 Press ~ .
¯ Listenfor dial tone.
NOTE:
Pressing~ will also disconnectthe last party addedto a
conference
call. Seethe procedures
for the Conference
feature in
this section.
If the far-end party hangsup before youpress~, the light next
to youroriginal call appearance
will gooff, andyouwill needto
re-selecta call appearance
buttonin orderto placeanothercall.
14
HOLD
Toput a call onholdwhile youanswer
anothercall
NOTE:
Thegreenlight is flashingbesidethe call appearance
buttonof
the incoming
call.
1 Press ~.
¯ Theredlight goesoff, andthe greenlight flutters (nextto the call
appearance
buttonof the heldcall).
2 Pressthe call appearance
button of the secondcall.
¯ Thered light goeson, andthe greenlight goesonsteadily.
¯ Youare connected
to the secondcall.
NOTE:
If youput a conference
call on hold, the other parties remain
connected
with eachother.
Toreturnto the heldcall
t Pressthe call appearance
buttonnextto the heldcall.
= Thered light goeson, andthe greenlight goeson steadily (next
to the call appearance
buttonof the previouslyheldcall).
¯ Youare connected
to the held call.
MESSAGE
RETRIEVAL
Seeyour systemmanager
for instructions regardingthe message
retrieval procedures
for yoursystem.
15
MUTE
To turn off the microphoneassociatedwith the handsetor the
speakerphone
so the other party cannot hear you
1 While on a call, press ~.
¯ Thered Mutelight goeson.
¯ Theother party cannothear your conversation,but youcanhear
the otherparty.
To turn on the microphoneassociated with the handsetor
speakerphone
again, so the other party can hear you again
Press
~
again.
1
¯ Thered Mutelight goesoff.
¯ Youcan resumeyour conversationwith the other pady.
REDIAL (LAST NUMBER
DIALED)
To automaticallyradial the last numberyoudialed manually(this
canbe an extension, outside number,or trunk/feature code)
NOTE:
The8520Tvoice/dataterminal redials numbers
consistingof up
to 37digits.
1 Lift the handset.
2 Listen for the dial tone, and press ~.
¯ Thelast number
youdialed (fromthe dial pad)is automatically
redialed.
3 Waitfor the called partyto answer.
16
SPEAKERPHONE
AND SPEAKER
NOTE:
Yourvoice/dataterminalis set for the Speaker
(listen-only) orfor
the Speakerphone
(listen andspeak)function or for neither. Checkwith
yoursystemmanager
to seehowyour voice/dataterminalis set.
Speaker
Usethe followingprocedures
if yourvoice/dataterminalis set for the
Speaker
(listen-only)feature.
Toplace/answer
a call without lifting the handset
or to usethe
speaker
with anylistening-onlyfeature
1 Press
~.
¯ The red light next to ~ and the red light next to ~
go on.
2 Placeor answer
the call or accessa selectedfeature.
If youare placinga call, dial the telephone
number.
Adjust
speaker
volume,
if
necessary.
4
¯ Toraise the volume,pressthe right half of the Volume
control
buttonlabeled
r--/x--~;
to lowerthe volume,pressthe left half of the Volume
control
button labeled~--].
5 Press ~ to hang up.
¯ Thered light next to s~-~-~, and the red light next to ~
gooff.
To activate the speakerwhile usingthe handset
1 Press
~ .
¯ The red light next to ~ and the red light next to ~
go on.
¯ Thespeakeris active, andthe handsetis turnedoff.
2 Hangup handset.
NOTE:
If youwantto speakto the other pady,youmustpick up the
handset(whichturns off the speaker).
17
Speakerphone
Usethe followingprocedures
if yourvoice/dataterminalis set for the
Speakerphone
(listen andspeak)feature.
NOTE:
If yourvoice/dataterminalis set for the Speakerphone
feature,
youcanadjust the speakerphone
to the surroundingroomacousticsto
provide optimal performance.Youmustset the speakerphone
whenyou
initially set upyourvoice/dataterminalandreset it whenyoumove
the
terminalto a different location(evenif it’s in the same
room).Usethe
directionsin "Settingthe Speakerphone"
in the sectiontitled Features
Accessed
with the Displayand Softkeys.
To place/answer
a call withoutlifting the handset
or to usethe
speakerphone
with any voice feature
1 Press
~,
2
3
4
5
¯ The red light next to ~ goes on,
Placeor answer
the call or accessa selectedfeature.
|f youare placinga call, dial the telephone
number.
Adjust the speakerphone
volumeif necessary.
¯ Toraise the volume,
pressthe right half of the Volume
control
buttonlabeled~-/%---~;
to lowerthe volume,
pressthe left half of the Volume
control
buttonlabeledI-~7-].
Press ~ to hang up.
¯ Theredlight nextto I-~p~a~:or~
goesoff.
To preventthe other party fromhearingyou
NOTE:
If youare using the handsetandthe Speakerphone
feature is not
active, the Mutefeatureturns off the microphone
associated
with the
handset(not the speakerphone).
1 Press ~.
¯ Thered light goeson andthe other party cannothearyou.
2 Press~ again to resumetalking to other party.
¯ Thered light goesoff andthe otherparty canhearyouagain.
To changefrom speakerphone
to handset
1 Lift handset
andtalk.
¯ The red light next to ~ goes off.
18
Speakerphone(continued)
To change from handset to speakerphone
1
Press
~ .
¯ The red light
next to ~ goes on.
¯ Thespeakeris active, and the handsetis turned off.
2 Hang upthe handset.
TRANSFER
To send a call to another extension
1
Press
~.
¯ Thepresent call is put on hold.
¯ Thered Transfer light flutters.
2 Listen for dial tone.
3 Dial the numberto whichthe call is to be transferred (third pady).
¯
Remainon the line and, if you so choose, announcethe call when
the third party answers.
NOTE:
If you don’t chooseto announcethe call, you must wait until
youhear ringing at the far end before completingthe transfer.
If the numberof the third party.is busyor there is no answer,press
the call appearance
buttonnext to the fluttering greenlight to
disconnectthe call to the third padyandto return to the call on hold.
4
Press Tr~.~ again.
¯ Theparty on hold is transferred to the third party.
¯ Your terminal is releasedfrom the call.
5 Hang up.
NOTE:
To prevent a transfer call from disconnecting, completethe
transfer processbefore entering into anotheraction, such as
answeringanothercall.
19
Features Accessedwith the Display
and Softkeys
Thesoftkeys are the 10 unlabeledkeys located on either side of the
display. Figure 3 showsthe softkeys in relation to the display and the
display control buttons located abovethe softkeys.
ISDN8520T
~Display
~Control
i--u Buttons
~
Softkeys
Display
FIGURE
3 The8520TDisplay,Softkeys,
andDisplayControlButtons
Youcan use the softkeys and display control buttons to accessthe
following features:
¯
Setting the clock;
¯
Settingthe speakerphone;
¯
Adding, editing, and deleting the numbersand associated names
(and optional groupnames)in the voice/data terminal Directory;
¯
Organizingyour Directory in alphabetical order or by group name,
renaminga group, and movingDirectory entries from one group into
another;
Searchingthe Directory for a particular entry, by nameor by number,
and then placing a call to the numbercurrently shownon the display
screen;
¯
¯
Viewingthe contentsof your Directory, and then editing, deleting, or
searchingfor an entry or placing a ca~ to the numbercurrentty shown
on the display screen;
¯
Using ~ to quickly place a call to a numberlocated in your
Directory;
2O
Usingthe Call Logto viewincoming
and/oroutgoingcalls;
¯ LockingandunlockinganyDirectoryChanges,
the Call Log, andall
Softkeyfunctions;
¯ Changingor removingyour password;
¯ Selectinga Home
Screen,whichyour display will return to whenever
you press ~ or press the softkey beside Home
Screen;
¯ Initiating a self-test of thevoice/data
terminal’slights, ringer,buttons,
anddisplay;
¯ Selecting
the contrastlevel for thedisplay;¯
¯ Selectinga personalized
ringing pattern;
¯ Selectingthe type of display messages
shown
on the display screen
(all messages
or only error messages)
andsetting the rate at which
the display messages
are shown;
¯ Addingconfirmationor error tonesto display messages;
¯ Setting the number
of names
on a Directorypage;
¯ ProvidingServiceInformationif the terminalis usedfor data
functions;
¯ Choosing
if andwhenthe speakerbecomes
active while placing a
voicecall usingyourPC(the Call Progress
feature).
NOTE:Use~ to accessany of these features quickly.
ENTERINGSOFTKEYMODE;EXITING TO YOURHOMESCREEN
(USING ~ AND ~ BUTTONS)
Whenever
youpress~-M~n---EE],
youwill seethe followingMainMenu
screen.(Thetop two lines showthe timeandsysteminformation;the
bottomfive lines showthe softkeymenus.)
Aug
ii,
Directory
Call Log
Lock
Options
1993
1:59
PM
Data
Set Spkr
Set Clock
Home Screen
NOTE:
Dataappears
only if yourset is configuredfor Datafeatures.
If thereareleft or right arrowsshown
towardthe top of the display,such
as in the MainMenuscreenshownon the previouspage,youcan press
~ or ~ to moveforward or back one screen. For instance,
whenthe Main Menuis displayed on the screen, you can press ~
to view the secondMainMenuscreenshownbelow.
Aug
ii,
1993
1:59
PM
Self-Test
Service Info
If you wantto go backto the first MainMenuscreen, press ~.
At the top centerof the lowerpart of the screenyouwill seethe set of
screensyouare resp.onding
to, suchas Menu.Thisscreentitle is fully
capitalizedandplac~din a box,so the title alwaysstandsout on the
screen.Onthe left andright sideof the display,besidethe softkeys,you
will seethe choicesyoucanselect. Toaccessanyof the choices,you
mustpressthe softkeybesidethat menu
choice.
For example,by usingthe first MainMenu
screen,youcanaccessthe
Directory menu
by pressingthe softkey besideDirectory. Toaccessthe
Call Log, pressthe softkeybesideCall Log.Toviewother softkey
options, pressthe softkeybesideOptions.
IMPORTANT
NOTES:
If youare at anyother non-timedscreen, pressing
~ will abandonany action and return you to the MainMenu.
If you are at the MainMenuand youpress ~, your display will
showa blank screen.
Thereare also "timed"informationscreenswhichappearfor only a few
seconds.Youdo not needto respondto thesescreens.If youpress
anyof the softkeysduringoneof thesetimedmessages,
the display
advancesto the next message.
Press~ at anytime to return to your Home
Screen.
22
When
youare enteringor editing an entry, usethe displaycontrol button
labeled ~ to movethe cursor to the next spaceor to the next input
field. Youcanalso use ~ to view the next pagein the Directory or
set of numbers
in the Call Log.Pressthe displaycontrol buttonlabeled
[-~ to movethe cursor backa screenon that level or to movethe
cursorbacka spacewhile editing.
User-~ to enteryourDirectoryin orderto quicklyplacea call.
THE PADLOCKICON
If there is a small padlockicon ( ~ ) next to oneof the menu
itemssuch
as Call Logor Edit, that functionis locked.In orderto accessthe
function, youmustenter your ownpersonal3-digit security password.
For moreinformationaboutthe Lockfeature, see"Lockingand
Unlocking
DirectoryChanges,
Call Log,andAll Softkeys"later in this
manual.
RESPONDING
TO "’QUIT" AND"" DONE’"
¯ . When
youseeQuit at the lowerrighthandcornerof the display, it
means
you havethe option of abandoning
the action you have
begun.Pressthe softkeybesideQuit if youdo notwantto respond
to the options on the screenor saveanychanges
youhavemade.
¯ . When
youseeDoneat the lowerrighthandcornerof the display, it
means
youhavealreadyenteredinformationor accessed
a feature.
Pressingthe softkeybesideDonewill confirmyour action andallow
youto moveon to the next screen.
NO’rE:In mostof the display messages
shown
in this section, Done
appears
in the right lowercorner,rather than Quit. Remember
that if
Quit is not available, you canalwayspress~ to abandon
the action
in progressandexit SoftkeyMode.
A SOFTKEYDISPLAY SCREENFLOWCHART
Review
the display screenflowchartsin Figures4 and5 beforeyou
beginusingthe soffkeyfeatures.Youmayalso wantto return to the
flowcharts
if youforgetwhata featuredoesor its relationto the Main
Menuscreens.
23
FIGURE
4 A Flowchartof the SoftkeyOlspiayScreens
24
r"
0
FIGURE
5 A Flowchartof the SoffkeyDisplayScreens(continued)
25
SETTING THE CLOCK
When
your voice/data terminal is first installed, whenit is unpluggedand
then pluggedin again, or after a poweroutage, the top two lines of the
display screenremindyou to set the clock.
TO SET
PRESS
THE
CLOCK
Set Clock.
Directory
Call Log
Set
Lock
Options
Data
Spkr
Set Clock
Home Screen
To set the clock
1
Pressthe softkey besideSet Clock.
¯ Thedisplay showsthe date andtime, suchas:
Sep
24,
[Next>
1993
i0:00
AM
MOVES
CURSOR]
Month(-)
iMonth(+)
Quit
26
Thedisplayformatfor the clockis:
MMMDD, YYYY HH:MMAM or PM
in whichMMM
= monthabbreviation, suchas "$ep"
DD= dayof the monthsuchas "2" or "24"
YYYY= year such as "1993"
HH:MM
= hour and minutessuch as "10:45"
AMor PM= morningor afternoon/evening
Dothe followingto changethe month:
¯ Usethe softkey besideMonth(-)to go backa month
(suchas from"Sep"to "Aug").
¯ Thedisplayfield whichyouare currently viewing,suchas
"Sep,"flashes.
¯ TheQuit menu
choiceat the lower right cornerchanges
to
Done.
¯ Pressthe soflkey besideMonth(+)to go forwarda month(such
as from"Sep"to "Oct").
¯ Press~ to go on to the next field.
Dothe followingto change
the otherfields on the Date/Time
screen:
NOTE."
Thedisplayfield that youare currentlyviewingflashes.
Pressthe softkeybesidethe (-) option, suchas Day(-)to go
a day(from"24" to "23"), to gobacka year, anhour,or
minute. Youcan switch between"AM"and "PM"by pressing the
softkeybeside"am"or "pm."
¯ Pressthe softkeybesidethe (+) option, suchas Day(+)to
forwarda day(from "24" to "25"), to go forwarda year, an hour
or a minute. Youcanswitch between"AM"and "PM"by
pressingthe softkeybeside"am"or "pm."
¯ Togoonto the nextfield, suchas fromthe dayfield to the year,
press
~
NOTE:
Youcanalso usethe dial padto changethe display clock.
For example,
whenthe monthis fla, shingon the screen,youcan
pressthe 8 keyto change
the monthto August,or, whenthe dateis
flashing, enter"25" fromthe dial padto select"25" as the date. Use
"A" for "AM"or "P" for "PM."
27
4 When
the correct date appearson the display, pressthe softkey
beside Done.
¯ Thedisplay confirmsyour changes.
5 Oncethe clock hasbeenset, youcannowset the speakerphone.
Goon to the next procedure,"Setting the Speakerphone."
SETTING THE SPEAKERPHONE
Whenyou set the speakerphoneon your voice/data terminal, you hear a
set of tones as the speakerphone
performsan acoustic test of the
environment. Whenthe tones stop, your speakerphonehas finished
adjusting itself for optimal performanceand is readyfor use. Youmust
set the speakerphone
whenyou initially set up your voice/data terminal,
and reset it whenyou movethe voice/data terminal to a different location
(evenif it’s in the sameroom),or after a poweroutage.
After youhaveset the clock, the followingdisplay appears(if the
speakerphone
needsto be set),
TO OPTIMIZE
THE
SPEAKERPHONE,
PRESS Begin.
Begin
Cancel
Follow these proceduresto set the speakerphone.
1 Press the softkey beside Begin to set the speakerphone.
(Press the softkey beside Cancelif you do not wantto set or reset
the speakerphone
at this time.)
NOTE:
If you press the softkey beside Cancel, the top two lines on
the display continueto indicate that the speakerneedsto be reset.
29
¯
If youpressthe softkeybesideBegin,the displayshowsthe
followingtimedscreen:
OPTIMIZING PERFORMANCE
OF THE SPEAKERPHONE.
Youwill heara set of rising tonesas the speakerphone
adjusts
itself to the surrounding
acousticalenvironment.
Thesetonesare
automatic.Nouser response
is required.
Thefollowingprocedure
is an alternate wayof usingthe softkeysto
set the speakerphone.
1 Press
I--~-;-E~.
2 Pressthe softkeybesideSet Spkr.
¯ Thedisplay shows:
TO OPTIMIZE THE
SPEAKERPHONE,
PRESS Begin.
Begin
Cancel
Pressthe softkeybesideBeginto set the speakerphone.
(Pressthe softkeybesideCancelif youdo not wantto set or reset
the speakerphone
at this time. However,
notethat the top lines of
the displayscreenwill continueto indicatethat the speakerphone
needsto be reset.)
¯
If youpressthe softkeybesideBegin,the display showsthe
followingtimedscreen:
OPTIMIZING PERFORMANCE
OF THE SPEAKERPHONE.
Youwill heara set of rising tonesas the speakerphone
adjusts
itself to the surroundingacousticalenvironment.
Thesetonesam
automatic.Nouserresponse
is required.
ADDING, EDITING, AND DELETING A NUMBERAND NAME(AND
OPTIONAL GROUPNAME) IN THE DIRECTORY
The8520Tvoice/data terminal supports up to 144 Directory entries. The
telephonenumbersentered in the Directory can be up to 24 digits, and
associatednamescanbe=upto eight characters(and/or digits) in length.
Groupnames,which are optional, can be up to six characters. Directory
entries can be changed
by editing or deleting, or, if there is a duplicate
entry, you can choosewhich one you want to keep in your Directory or
you canrenameeither of the duplicate entries.
When
you enter namesinto your Directory, the entries are automatically
alphabetizedfor you.
NOTE:
If there are frequently used namesthat you wantto place at the
front of your Directory, placea # or * as the first characterin the name
such as "#Jane" or "*Paul." Thesenameswill then appear before the
"A’s" in your Directory. (Names
beginningwith # appearfirst in the
Directory, followed by namesbeginning with *, and then names
beginningwith a number,0 through9, and then the alphabet, first upper
and then lower case.)
Adding Numbersand NamesInto the Directory
To enter/add a number, name, and optional group nameinto the
Directory
1
2
Press
~ .
Press the softkey beside Directory.
~ The display shows:
View
Organize
Search Name
Search
Phone
Add
Delete
Edit
#
Done
32
Pressthe softkey besideAdd.
NOTE:
If DirectoryChanges
are locked,youmustenter your 3-digit
password
in orderto modifyyourDirectory. Seethe informationin
"LockingandUnlockingDirectoryChanges,
Call Log, andAll
Softkeys"
later in this section.
¯ Thedisplay shows:
ENTER PHONE #:_
8-CHAR NAME:
6-CHAR GROUP:
Backspace
Pause
Quit
NOTE:The 6-CHAR
GROUP
option is displayed ONLY
IF, at
somepoint, youhavechosento organizethe Directory by group
name.
Enterthe telephonenumber
youwantto be addedto the Directory..
(Enterall the numbers
in the orderyouwoulddial them.Youcan
enterupto 24digits. A pausecountsas onedigit.)
¯ . WhenBackspace
appearson the display screen, use this
feature to go backonespaceanderasethe previousdigit.
~. You can press ~ to movethe cursor back one
letter/character
withouterasingit.
¯ , Asyouenter the telephonenumber,pressthe softkeybeside
Pauseto place a 1.5-secondpausebetweenan accesscode,
suchas "9," andthe telephonenumber.A pausewill be inserted
into the Directoryentry, anda comma
will appearon the display.
DeleteDigit appearson the display screen,usethis
~ When
featureto deletethe number
presentlyflashing.
NOTE:Hyphens,dashesand/or spacesare NOTnecessarybetween
digits. (For example,
in the Directory,the number,
555-1234,
is
enteredas "5551234,"withoutthe interveninghyphen.)
After youhaveentered10 digits, includinganypauses,the words,
"ENTER
PHONE
#:" beginto moveoff the display screenoneletter
at a time in order to accommodate
the remainder
of the telephone
number.
When
the correct phonenumber
is shownon the display andthe
cursor is after the last digit of the number,press~ to movethe
cursor to the next field, 8-CHAR
NAME:.
(To movethe cursor up a
line to a previous field, press ~ ).
¯ Thedisplay shows:
ENTER PHONE #:1566
8-CHAR NAME:_
6-CHAR GROUP:
Backspace
Quit
6 Usethe dial padkeysto enter the name
of the personwhosenumber
youhavejust added
to the Directory.
IMPORTANT:
Youmayneedto press the dial pad key morethan
onceto enter the correct character.For example,pressthe GHI
(or 4) keyonceto entera "G"; pressthe 4 keytwiceto enteran "H";
pressthe keya third timeto enteran"1." If youpressthe dial pad
keya fourth time, a "4" appears
on the screen.If youpressthe 4
keyagain,the screenwill returnto thefirst letter onthe dial padkey,
in this casea "G."
¯ Press ~ to accept the character you have entered and
move
the cursorto the nextposition.
¯ When
Backspace
appearson the display, youcan usethis
featureto go backonespaceanderasethe previousletter.
¯ You can use r-~ to movethe cursor back one
letter/character
withouterasingit.
Caseappearson the display, youcanusethis feature to
¯ When
change
the letter to upperor lowercase.
¯ When
DeleteCharacterappearson the display, youcanusethis
featureto deletethecharacter
or letter that is flashing.
NOTE."
Youcanalso usea # or a * at the beginningor endof or
within the name.
¯ Thefirst letter of the name
is automatically
capitalized,
althoughyoumaychooseto changeit to lower case(using
the softkeynext to Case).
34
¯ As you enter each letter of the name,that letter flashes on
the screenuntil youmoveon to the next letter (by pressing
¯
Quit changesto Donewhenyou have madeat least one
entry.
If 6-CHARGROUP
appears on the display, you mayalso chooseto
enter an optional group name,such as "Sales" or "Acctng." When
the correct nameis shownon the display and the cursor is after the
last character in the name, you can press ~ to movethe cursor
to the next field, 6-CHAR
GROUP:.
(To movethe cursor up a line to
a previous field, press ~ ). If you do NOTwant to enter
group namefor the personat this time, go on to Step 8.
¯ The display shows:
ENTER
8-CHAR
6-CHAR
PHONE
#: 1566
NAME:PatRober
GROUP:_
Backspace
~.
Done
SeeStep6 for directions on entering letters or digits into the
nameand using the Backspace,Case, Delete Character
functions,
and ~, and ~.
Whenthe phone number, name, and optional group nameare shown
correctly on the display screen, press the soffkey beside Done.
¯
Thedisplay confirmsyour entry.
Duplicate Entries
If you enter a duplicate namein your Directory, youwill seethe following
timed screen:
THE
NAME
KSmith
IS ALREADY
PLEASE CHOOSE
USED.
ANOTHER.
and then the display shows:
DUPLICATE NAME:
#1:9,12125551357
#2:1577
Rename#1(Old)
KSmith
Delete#1
Rename#2(New)
Quit
If you see this screen,youhaveone of the following options:
¯ Rename#1, the old nameand number
¯ Rename#2, the new nameand number
¯ Delete #1, the old nameand number
¯ Quit, thus deleting #2, the newnameand number
36
To renamethe old or newentry in a duplicate entry
1 If you chooseto renameeither #1 or #2, press the softkey beside the
appropriate option (either beside Rename#1
or beside
Rename#2)
¯ If Rename#1
is selected, the display showsthe original entry:
ENTER:
8-CHAR
6-CHAR
9,12125551357
NAME:KSmith_
GROUP:Acctng
Backspace
2
Done
Usethe directions under "Addinga Directory Entry" to insert changes
in the entry.
¯
Thedisplay confirms your entry.
To delete the old entry in a duplicateentry
1
If you chooseto delete #1, press the softkey beside Delete#I,
¯ The display shows:
OLD KSmith
HAS
BEEN DELETED.
NEW
KSmith WITH PHONE
1577
HAS BEEN SAVED.
37
#
Editing Entries in the Directory
To edit a Directory entry
PressI--~’;~ .
Press the softkey beside Directory.
¯ The display shows:
View
Organize
Add
Delete
Search
Name
Search
Phone
Edit
#
Done
Pressthe softkey besideEdit in order to edit a Directory entry.
NOTE:
If Directory Changes
are locked, you must enter your 3-digit
passwordin order to modify your Directory. Seethe information in
"Locking and UnlockingDirectory Changes,Call Log, and All
Softkeys"later in this section.
¯
Thedisplay showsthe first Directory page:
*Paul
Donna
Harvey
JDiner
Kimberly
KSmith
MarkH
~
PatRober
RobertMt
Quit
NOTE:Onceagain, rememberthe namesin the Directory are
arrangedalphabetically.
Doeither of the following, if needed:
¯
Press ~ to page forward through the namesin the
Directory.
38
¯
Press ~ to page backwardsthrough the namesin the
Directory.
Pressthe softkeybesidethe name
of the entry youwantto edit.
¯ Thedisplay showsthe Directoryentry:
~EDIT PHONE #:9,171455590
8-CHAR NAME: RobertMt
6-CHAR GROUP:Servic_
Backspace
Done
NOTE:
If the phonenumber,name,and optional groupnameare
correctandyoudo not wishto edit themat this time, pressthe
softkey besideDone.
If youwantto edit the phone
number,
do the following:
NOTE:
After youhaveentered10 digits, including anypauses,the
words,"EDITPHONE
#:" beginto moveoff the display screenone
letter at a timein orderto accommodate
the remainder
of the
telephonenumber.
¯ Pressthe softkeybesidethe line youwantto edit; in this case,
youwouldpressthe softkeybesidethe first line whichallowsyou
to edit the telephonenumber.
Press ~ or ~ to go back or forward to the digit you
wantto edit.
¯ Pressthe softkey beside Backspace
to go backonespaceand
erasethe previousnumber.
¯ Pressthe softkeybesideDeleteDigit to erasethe digit that is
flashing.
¯ Typethe newnumbers
of the phonenumber.
the telephonenumber
on the screenis correct, press
¯ When
~ to moveto the next input field, 8-CHAR
NAME:
or press
thesoftkeybesidethe third line in orderto edit the
6-CHARGROUP:
option.
7 If youwantto edit the 8-character
name,
do the following:
¯ When
youhaveedited at least oneletter of the 8-CHAR
NAME,
the display shows:
EDIT PHONE #:9,101909999
8-CHAR NAME: RobertMt
6-CHAR GROUP:Servic
Case
Delete Character
Done
NOTE:
Youmayneedto pressthe dial padkey morethan onceto
enter the correct character.For example,
pressthe GHI(or 4) key
onceto entera "G"; pressthe 4 keytwice to enter an"H"; pressthe
keya third timeto enteran"1." If youpressthe dial padkeya fourth
time, a "4" appears
on the screen.If youpressthe 4 keyagain,the
screenwill againprint a "G."
¯
¯
¯
Press ~ to accept the character you have entered and
move
the cursorto the nextposition.
When
Backspace
appearson the. display screen,usethis.
feature to movethe cursor backonespaceanderasethe
previous
letter.
If thecursoris after a character
or if thecharacter
is flashing,
press ~ to movethe cursor back one letter/character
wJlhouterasingit.
~
When
Caseappearson the display screen,usethis feature to
change
the letter to upperor lowercase.
¯ When
DeleteCharacterappearson the display screen,usethis
featureto deletethe characterthe cursoris on.
If appropriate,press~ to moveto the next input field, the
optional 6-charactergroupname.
Usethe directionsfor editing the
8-charactername
in orderto edit the groupname.
NOTE:
Theoptional groupnamecan be addedor deleted at any
time.
9 When
all categorieson the screenare correct, pressthe softkey
beside Done.
¯ Thedisplay confirmsyour changes.
4O
Deleting an Entry from the Directory
To delete an entry from the Directory
1
2
Press ~-~.
Press the softkey beside Directory.
¯ The display shows:
Add
Delete
View
Organize
Search
Search
Name
Phone
Edit
Done
#
Press the softkey beside Delete.
NOTE:If Directory Changesare locked, you must enter your
3-digit passwordin order to modify your Directory. Seethe
information in "Locking and UnlockingDirectory Changes,Call Log,
andAll Softkeys"later in this section.
¯
Thedisplay showsthe first Directory page:
*Paul
[D~L~T~
I
Donna
Harvey
JDiner
Kimberly
KSmith
MarkH
PatRober
RobertMt
Quit
Doeither of the following, if needed:
~
Press ~ to page forward through the namesin the
Directory.
Press ~ to page backwards through the names in the
Directory.
41
S
Pressthe softkey beside the nameof the entry you wantto delete.
¯ The display showsthe Directory entry:
PHONE
8-CHAR
6-CHAR
#:9,10119099998874
NAME: Donna
GROUP: Office
Delete
Quit
Pressthe soflkey besideDeleteif you wantto delete this entry.
¯ The display confirms your choice,
42
ORGANIZING
ENTRIESIN THE DIRECTORY
Theentries in yourDirectorycanbe either organized
alphabetically(by
individualentry) or by group.Thedefaultsetting is alphabeticalby
individual entry andremainsthis wayunlessyouchooseto organizethe
Directory accordingto groups.Youcanhaveanynumberof names
in a
group,andyoucanhaveup to 48 groups.
If youdo chooseto organizeyour Directoryby group,youmaylater
chooseto changethe nameof a groupor moveentries from onegroup
to another.
To organizeyourDirectoryentries by groupname
1 Press ~M-~.
2 Pressthe softkeybesideDirectory.
¯ Thedisplay shows:
IDIRECTORY
Call
I
View
Add
Organize
Delete
Search Name
Edit
Done
Search Phone #
3 Pressthe softkey besideOrganize.
NOTE:
If DirectoryChanges
are locked,youmustenter your 3-digit
password
in orderto modifyyour Directory. Seethe informationin
"LockingandUnlockingDirectoryChanges,
Call Log, andAll
Soflkeys"
later in this section.
43
Thedisplay shows:
IORGANIZEJ (ALPHA)
By Alphabet
By Group
Rename Group
Move Entries
Done
NOTE:
Thecurrent organizationof your Directory, suchas Alpha
(Alphabetical)or Group(organized
by groups),is displayedin
upperright cornerof the screen.
4 Dooneof the following:
Pressthe softkeybesideBy Alphabetif youwantyour Directory
alphabetized
by individualentry.
=,- Pressthe softkeybesideByGroupif youwantDirectoryentries
organizedby groupname.
¯ Thedisplay confirmsyourchoicein the upperright corner.
5 Pressthe softkeybesideDonewhenyouare finished selecting the
manner
in whichyour Directorywill be organized.
¯ Thedisplay returns to the mainDirectoryscreen.
RenamingGroups
To changethe nameof a Directory group
1 Press
~.
44
2
Press the softkey beside Directory.
¯ The display shows:
Call
IDIRECTORY!
View
Organize
Search
Search
3
Add
Delete
Name
Phone
Edit
Done
#
Press the softkey beside Organize.
¯ The display Shows:
[.ORGA~IZEI(ALPHA)
By Alphabet
By Group
Rename Group
Move Entries
Done
4 Press the softkey beside RenameGroup,
¯ The display showsyou a list of your Directory groups:
Acctng
Servic
Billng
Shop
Custmr
RENAME
Telecm
Transp
Office
Sales
5
If
necessary,
Quit
press ~ or ~ to view more group names.
45
Pressthe softkeybesidethe groupyouwantto rename.
¯ Quit changes
to Donein the lower right corner.
¯ Theselectedgroupchangesto reversevideo.
7 Pressthe softkeybesideDoneto confirmyour choice.
¯ Thedisplay then shows:
6
TO RENAME Acctng,
ENTER NEW NAME:_
Backspace
Quit
Enterthe newname
of the Directorygroup,suchas "Bkkepg."
NOTE:
Thenewgroup namecan be a maximum
of six characters
and/ordigits.
¯ After youhaveenteredat least onecharacteror digit, the display
shows:
TO RENAME Acctng,
ENTER NEW NAME:B
Case
Done
Delete Character
Press ~ to accept the character you have entered and
move
the cursorto the nextposition.
~ When
Backspace
appearson the display screen, use this
feature to movethe cursor backonespaceanderasethe
previous
letter.
~,- Press ~ to movethe cursor back one letter or character
withouterasingit.
46
Caseappearson the display screen,usethis feature to
~,. When
change
the letter to upperor lowerCase.
~- When
DeleteCharacterappearson the display screen,usethis
featureto deletethe characterthe cursoris on.
When
the newgroupnameappearscorrectly on the display, press
the softkeybesideDone.
¯ Thedisplay confirmsthat the newgroupname
hasreplacedthe
old one.
MovingEntries fromOneGroupinto Another
To moveentries from one Directory groupinto another group
(or move
unassigned
entries into a group)
1 Press
~.
2 Pressthe softkeybesideDirectory.
3 Pressthe softkey besideOrganize.
¯ Thedisplay shows:
I ORGA~IZE.I(ALPHA)
By Alphabet
By Group
Rename Group
Move Entries
Done
4 Pressthe softkey beside MoveEntries.
¯ Thedisplay showsthe first Directoryscreen:
47
*Paul
I SELECTI
Donna
I
Harvey
[ MOVE I PatRober
RobertMt
JDiner
KSmith
TOI
MarkH
Kimberly
Quit
Press the softkey beside those Directory entries you want to moveto
another(or to a particular) group.
¯ TheDirectory entries you select appearin reverse video.
Press ~ to"~view the next Directory screen, if appropriate,
or press I
p~vI to view the previousDirectory screen,and then
repeat Step 5.
Press the softkey beside Donewhenyou have selected all the
Directory entries you want movedto another group.
¯ The display shows:
ENTER
GROUP
WHICH ENTRIES
BE MOVED:_
NAME
TO
WILL
Quit
After youhaveenteredat least oneletter or digit, the display
changesto:
~ENTER GROUP NAME TO
WHICH ENTRIES WILL
BE HOVED:S
Delete
Case
Done
Character
48
Press ~ to accept the character you have entered and
move
the cursorto the nextposition.
When
Backspace
appearson the display screen, usethis
feature to movethe cursor backonespaceanderasethe
previous
letter.
If thecursoris after a character
or if the character
is flashing,
press ~ to movethe cursor back one letter or character
withouterasingit.
=,, When
Cassappearson the display screen,usethis feature to
change
the letter to upperor lowercase.
When
DeleteCharacterappearson the display screen, usethis
featureto deletethe character
the cursoris on.
When
youare finished enteringthe groupname
into whichyouwant
the selectedentries moved,pressthe softkeybesideDone.
¯ Thedisplay confirmsthat the selectedentries havebeenmoved
to the designated
group.
NOTE:
If the groupname
youenteredalreadyexists, the entries
youselectedare added
into that groupalongwith its previously
existingentries.
49
SEARCHINGFOR AN ENTRY IN THE DIRECTORY
Followthis procedurefor searchingyour Directory for a specific entry.
Youcan search for either a nameor a phonenumber.
To search for a name
Press
1
Pressthe softkey beside Directory,
¯ The display shows:
Call
I DIRECTORYI
View
Add
Organize
Delete
2
Search
Name
Search
Phone
Edit
Done
#
Press the softkey beside SearchName
if you want to search for a
particular namein your Directory.
¯
The display shows:
TO SEARCH ON A NAME,
ENTER 1-8 CHARS:_
Backspace
Quit
5O
Enterthe name
youwantto searchfor.
¯ After youhaveenteredat least onecharacter,the display
changes
to:
TO SEARCH ON A NAME,
,ENTER 1-8 CHARS:K
Case
Done
Delete Character
¯
Press ~ to accept the character you have entered and
move
the cursorto the nextposition.
When
Backspace
appearson the display screen, use this
feature to movethe cursor backonespaceanderasethe
previous
letter.
Press ~ To moveback one letter or character without
erasing
it.
¯ When
Caseappearson the display screen,usethis feature to
change
the letter to upperor lowercase.
DeleteCharacterappearson the display screen,usethis
¯ When
featureto deletethe characterthe cursoris on.
NOTE:
Youcando a searchon a partial name,suchas entering
"Ka" insteadof "Kathy,"andthe display will showALLnames
beginningwith "Ka." However,
the letters youenter mustcoincide
exact/y(boththe letter andthe case)with the beginning
letters of the
name
youare searchingfor.
the name
is correct, pressthe softkey besideDone.
4 When
¯ If the name
youhaveenteredis in yourDirectory,the Directory
entry that corresponds
to that name
will appearon the display
screen.
51
To searchfor a particular phonenumberincluded in your Directory
1 Press the softkey beside SearchPhons# if you want to search for a
particular phonenumberin your Directory.
¯ The display shows:
TO SEARCH
ENTER
1-24
ON PHONE
#,
DIGITS:_
Pause
Backspace
2
Quit
Enter the digits of the phonenumberyou are searchingfor.
¯ After you enter one character, the display changesto:
TO SEARCH
ENTER
1-24
ON PHONE
#,
DIGITS:713_
Pause
Done
Backspace
NOTE:Youcan do a search on a partial number, such as
entering "71" instead of "7134," and the display will showyou
ALLnumbersbeginning with "71 ." However,the digits you enter
mustcoincide with the beginningdigits of the numberyou are
searchingfor.
Press the softkey beside Backspaceto movethe cursor back
one spaceand erase the previous letter.
If the cursoris after a characteror if the characteris flashing,
press ~ to movethe cursor back one letter or character
without erasingit.
Press the softkey beside Pauseto place a 1.5-secondpause
betweenan access code, such as "9," and the telephone
number.A pausewill be inserted into the Directory entry, and a
comma
will appearon the display.
52
3 Pressthe softkeybesideDone,
¯ If the phonenumber
youhaveenteredis in yourDirectory,the
Directoryentry that corresponds
to that number
will appearonthe
displayscreen.
VIEWING A DIRECTORYENTRY(EDITING OR DELETINGTHE
ENTRY AND PLACING A CALL)
Directory entries can be viewedand changed,or you can have the
voice/data terminal automatically dial the telephonenumberyou are
presently viewing.
To view a Directoryentry (and, if desired, edit or delete the entry or
call that number)
NOTE:Youcan also use I-~ to call a numberin your directory. To do
this, use the procedures in "Using ~
to Placea Call."
1
2
Press I-~-E~.
Press the softkey beside Directory.
¯ The display shows:
Call
[DIRECTORY
i
View
Organize
3
Search
Name
Search
Phone
Add
Delete
Edit
#
Done
Press the softkey beside View.
54
¯
Thedisplay showsthe first pagein your Directory:
*Paul
[. VXEW I
KSmith
Donna
[Acting
I
Harvey
MarkH
PatRober
JDiner
RobertMt
Kimberly
Quit
Doeither of the following, if needed:
~,. Press N~h~--~]to pageforward through the namesin the
Directory.
=,- Press ~ to page backwards through the names in the
Directory.
Pressthe softkey beside the Directory entry of the nameyou wantto
view.
¯
Thedisplay showsthe Directory entry:
PHONE #:9,10119099998875
8-CHAR NAME:MarkH
6-CHAR GROUP:Acctng
Edit
Call
6
Delete
Done
Doone of the following:
To call this number,press the softkey beside Call.
¯ The voice/data terminal dials the telephone numberyou are
currently viewing on the screen.
~,- If youwantto edit the Directory entry, press the softkey beside
Edit.
~
If youwantto delete the Directory entry, press the softkey beside
Delete.
55
(If youneedhelpin editingor deletingthe Directoryentry, return
to the directionsin "Adding,Editing, andDeletinga Number
and
Name
in the Directory.")
If DirectoryChanges
are locked(the Add,Edit, Delete,and
Organizefunctions havepadlocksnext to themto remindyou
theyare locked),youmustenter your3-digit password
in orderto
modifyyour Directory. Seethe informationin "Lockingand
Unlocking
DirectoryChanges,
Call Log,andAll $oflkeys"later in
this section.
If youhavecompleted
viewingthe telephonenumber,pressthe
softkey besideDone.
USING
TOP’AC~
ACA’’
Youcanalso use~-~ to placea call to a number
in yourDirectory.
IMPORTANT
Whenyou press the softkey beside the namein the
Directoryyouwishto call, the call is placedimmediate/y.
Themenu
doesnot askyouto respond
to a screenbeforethe ca//is p/aced.
To use ~ to call a personwhosenumberappearsin your
Directory
1 Press~ to enter your Directory.
= Thedisplayshows
tl’ie first pagein yourDirectory
*Paul
~
Donna
Harvey
JDiner
Kimberly
KSmith
MarkH
PatRober
RobertMt
Quit
NOTE:
Theword,"CALL"at the center of the display screen
remindsyouthat onceyoupressthe softkey besidea namein
yourDirectory,a call is automaticallyandimmediately
placedto
that person.
Doeither of the following,if needed:
~ Press ~ to page forward through the namesin the
Directory.
Press ~ to page backwardsthrough the namesin the
Directory.
When
the nameof the personwhosenumberyou wantto call
appearson the screen,pressthe softkeybesidethat name.
57
The voice/data terminal immediatelydials the telephonenumber
of the entry you haveselected.
The display shows:
*Paul
Donna
Harvey
KSmith
~
JDiner
C Kimberly
MarkH
PatRober
RobertMt
Quit
NOTE:A handset icon appears beside the selected name,such
as "Kimberly"above,to confirmthat your call to this personis
being dialed or has been connected.
58
USINGTHE CALL LOG
Thevoice/dataterminal Call Logstores the 20 mostrecent unanswered
incomingcalls, the 20 mostrecentanswered
incomingcalls, andthe
20 mostrecentoutgoingcalls placedat the terminal.
NOTES:
If multiple calls fromthe sametelephonenumber
are received,
only the mostrecentcall fromthat number
appears
in the Call Log.
When
a 21stcall comes
in or is placed,it is added
to the top of the Call
Login the appropriate
category;thecall listed at the bottom
of the list in
that category
is deletedfromthe list.
When
yourvoice/data
terminalarrivesandis initially set up, it will have
an Unanswered
Call Log. If youwantto readjust your ownCall Log, see
the procedures
in the sub-section
titled "Settingthe Call Log."
Youmaydesignatewhetheryou wantto:
¯ Logonly incomingunanswered
calls into your Call Log
(This option is labeled Unanswered
Only on the screen);
¯ Turn off the Call Log
(This optionis labeledNoneonthe screen);
¯ Logall calls, incoming
andoutgoing,into yourCall Log
(This optionis labeledAll on the screen);
NOTE:
Incoming
Call Logwill reflect informationprovidedby the network
yourvoice/dataterminalis connected
to. If no informationappears
in
your Call Log, seeyour systemmanager.
ViewingUnanswered
IncomingCalls in the Call Log
(When
the Call Logis set to Unanswered
Calls Only)
To viewthe 20 mostrecentunanswered
calls (with Call Logset to
"Unanswered
Only")
1 Press
~.
2 Pressthe softkeybesideCall Log.
NOTE:
If the Call Logis locked,youwill needto enteryour3-digit
password
before youcanusethe Call Log. Seethe informationin
"LockingandUnlockingDirectoryChanges,
Call Log, andAll
Softkeys"
later in this section.
59
¯
Thedisplay shows:
New Calls (4)
Old Calls (12)
Done
NOTE:
Thewords,"NewCalls" or "Old Calls" appearon the
displayscreenonly if youhavenewor old calls in yourvoice/data
terminal’sCall Log.("Newcalls" are onesyouhaven’tpreviously
viewed.)Thedisplayalso tells youthe number
of newor old calls
in yourCall Log.
Pressthe softkey besideNewCalls or besideOld Calls accordingto
the unanswered
calls youwantto viewat this time.
¯ Thedisplay shows:
1-212-555-1790
Jan 31, 1994
Delete
12:30PM
More
Done
NOTE:
If the number
andthe name
of the caller cannotbe
identified, youwill seethe message,
"Phone#/Name
Unavailable"
onyourdisplayscreen.(Thename
is mostlikely aninternal call.)
If youwantto remove
this call fromyour Unanswered
Call Log,press
the softkeybesideDelete.
Arrowsonthe displayindicateif thereareothercalls to view.If you
wantto seeinformationonthe nextor previouscall in the Call Log,
press the softkey beside More or press ~ or ~.
¯ Thedisplay showsyouthe telephonenumberandnameof the
nextor previousunanswered
call in the Call Log.
6O
¯
Theword"LAST"appearson the display to remindyou whenyou
havefinishedviewingall the newunanswered
calls in the Call
Log. ("LAST"also appearswhenyouhavefinished viewingall
old unanswered
calls in the Call Log.)After youhaveviewedall
newcalls in the Call Log, youcanthen viewanyold unanswered
calls in the CallLog.
6 When
youare finished viewingunanswered
calls in the Call Log,
pressthe softkey besideDone.
NOTE:
After youhaveviewednewcalls in the Call Log, they become
old
calls. TheCall Logwill continueto holdthe 20 mostrecentunanswered
calls, includingbothnewandold calls.
Setting the Call Log
Toturnonor to turnoff, or to set the Call Log
1 Press ~ .
2 Pressthe softkeybesideOptions.
¯ Thedisplay shows:
Ring
IOPTXONSj
Tones
Call Progress
Contrast
Home Screen
Call Log
Names
Screen
Done
3 Pressthe soflkey besideCall Log.
NOTE:
If the Call Logis locked,youwill needto enteryour3-digit
password
beforeyoucanusethe Call Log. Seethe informationin
"LockingandUnlockingDirectoryChanges,
Call Log, andAll
Softkeys"
later in this section.
61
¯
Thedisplay shows:
Set up
Indicator
Done
Toset upyourCall Log(turn Call Logoff, log only unanswered
calls,
or log all calls), pressthe softkeybesideSet up.
¯ Thedisplayshows
the currentstatus of the Call Log:
SELECT TYPE OF CALLS
TO BE LOGGED IN THE
CALL LOG:UNANSWERED ONLY
None
All
Unanswered Only
Done
Dooneof the following:
~ If youdo not wantyourvoice/dataterminalto collect Call Log
information,pressthe softkeybesideNone.
NOTE:
Thedisplay remindsyouthat setting the Call Logto None
erasesall previouslyloggedcalls andrequeststhat youconfirm
yourchoiceto turn off the Call Log(Yesor No).
If youpressthe soffkeybesideYes,the Call Logis clearedand
turned off, andthe wordsCell Logare removed
fromthe Main
Menu
andthe list of possibleHome
Screens.
If youwantto haveonly unanswered
calls enteredinto the Call
Log, press the softkey besideUnanswered
Only.
NOTE:
Thedisplay remindsyouthat setting the Call Logto
Unanswered
Only erasesall answered
andoutgoingcalls
previouslyrecordedin yourCall Logandrequeststhat you
confirmyourchoiceto log only unanswered
calls (Yesor No.).
62
If youpressthe soflkeybesideYes,the Call Logis set for only
unanswered
calls.
=,. if youwantboth unanswered
andanswered
incomingcalls and
all outgoingcalls to beenteredinto yourCall Log,pressthe
softkeybesideAll.
¯ Thedisplay showsyouthe Call Logsetting youhave
selected.
If the correct Call Logsetting appears
on yourscreen,pressthe
softkey besideDone.
¯ Thedisplayconfirmsyour choice.
SeeingIndication of NewUnanswered
IncomingCall(s)
Underthe Date and Timeon Your Display Screen
Youcanset yourdisplayso youreceivean indicationat the top of the
display screenwhena newunanswered
incomingcall is placedinto your
Call Log. Thefollowing display shows,an
example.
Sep 24, 1993 i0:00 AM I
I
(2 NEW CALLS)
To set your display so you receive indication of newunanswered
incomingcalls at the top of the display
1 Press I-~.
2 Pressthe softkey besideOptions.
¯ The display shows:
Tones
Contrast
Call Log
Screen
Call Progress
Home Screen
Names
Done
63
Press the softkey beside Call Log.
NOTE:
If the Call Log is locked, youwill needto enter your 3-digit
passwordbefore you can use the Call Log. Seethe information in
"Locking and Unlockingthe Directory, Call Log, and All Softkeys"
later in this section.
¯ The display shows:
Set up
Indicator
4
Done
Press the softkey beside Indicator.
¯ The display shows:
SHOW
AN INDICATOR
WHEN
A NEW CALL ARRIVES IF
CALL LOG IS SET TO LOG
UNANSWERED
OR ALL CALLS?
Yes
No
Press the softkey beside Yes or No.
¯ If you press No, the display confirmsyour choice NOTto receive
indication whena newunanswered
incomingcall arrives; if you
press Yes, the display confirms you WILLreceive indication when
a newunanswered
call comesinto your voice/data terminal.
64
Viewing Unanswered
IncomingCalls in the Call Log
(WhenCall Logis set to All Calls)
Usethe following procedureswhenthe Call Log is set for "All Calls."
To view the 20 mostrecent unanswered
calls (whenthe Call Log is
set to "All Calls")
Press
~.
Press the softkey beside Call Log.
NOTE:
If the Call Log is locked, youwill needto enter your 3-digit
passwordbefore you can use the Call Log. Seethe information in
"Locking and UnlockingDirectory Changes,Call Log, and All
Softkeys"later in this section.
¯ The display shows:
Unanswered
Incoming (ii)
Answered Incoming (4)
Outgoing
Done
NOTE:The numberbeside "UnansweredIncoming" or beside
"AnsweredIncoming"includes both newand old calls.
Press the softkey beside Unanswered
Incoming.
¯ The display showsyou the telephone numberor extension (and
name,if it is aninternal call) suchas:
1-908-555-1234
Aug 3, 1993
12:30PM
More
Done
Delete
65
If youwantto remove
this call fromyour Unanswered
Call Log, press
the softkeybesideDelete.
5 If youwantto seeinformation
on the nextor previouscall in the Call
Log, press the softkey beside More or press ~ or ~.
= Thedisplayshowsyouthe number
(andname,if it is an internal
call) of the nextor previousunanswered
call in the Call Log.
¯ Theword"LAST"appearson the display to remindyou whenyou
havefinished viewingall the newunanswered
calls in the Call
Log. ("LAST"also appearswhenyouhavefinished viewingall
old unanswered
calls in the Call Log.) After youhaveviewedall
newcalls in the Call Log,youcanthen viewanyold unanswered
calls in the Call Log.
4
6
When
youare finished viewingeachcall, pressthe softkeybeside
Done.
ViewingAnswered
Incoming
Calls in the Call Log
To viewthe list of the 20 mostrecentanswered
calls
Press
~.
Pressthe softkeybesideCall Log.
NOTE:
If the Call Logis Docked,
youmustenteryour 3-digit password
to modifyyourCall Log. Seethe informationin "Lockingand
Unlocking
the Directory,Call Log,andAll Softkeys"
later in this
section.
¯ This display shows:
Unanswered Incoming (ii)
Answered Incoming (4)
Outgoing
Done
Incoming
to view incoming
3 Pressthe softkey beside Answered
answered
calls.
66
Thedisplay showsyouthe mostrecent answered
call:
~NSWERED
1-212-555-4321
Aug 3, 1993
11:30 AM
More
Done
Delete
NOTE:
Thenumbershownat the top left, suchas
"1-212-555-4321
," is the telephonenumber
of the answered
call.
4 If youwantto remove
this call fromyour Answered
Call Log,press
the soflkeybesideDelete.
5 If youwantto seemoreof the mostrecentcalls youhaveanswered,
press the softkey beside More or press ~ or ~.
¯ Thedisplay againshowsyouthe telephonenumberof the next or
previousincoming
call.
¯ Theword"LAST"appearson the display to remindyouwhenyou
havefinishedviewingall the answered
calls in the Call Log.
6 When
youare finished viewingeachanswered
call in the Call Log,
pressthe softkeybesideDone.
67
ViewingOutgoingCalls in the Call Log
To view the 20 mostrecent calls placed from the voice/data terminal
1
2
Press ~ .
Press the softkey beside Call Log.
¯ This display shows:
IALL CALLS]
~nanswered
Answered
Outgoing
Incoming
Incoming
(ii)
(4)
Done
Pressthe softkey beside Outgoingto view the list of calls you have
placed.
¯
Thedisplay showsone of the following screens, accordingto
whether you have entered both a nameand a numberinto the
Directory entry (it makesno difference whetheryou dialed the
numberfrom the dial pad or the Directory or used ~ ):
IOUTGOING
i
9,555-1234
Aug 3, 1993
ii:00
Save
Call
or
68
AM
More
Done
1566
Aug 3,
PatRober
1993
ii:00
Call
AM
More
Done
NOTE:The telephone numbershownhere is the numberof the
call placed from this voice/data terminal, such as 1566.The
nameof the person associatedwith that number(if one has been
enteredinto the personalizedDirectory) is shownat the right of
the telephone number.
Do
oneof the following:
If you press the softkey besideCall, the voice/data terminal
placesa call to this number.
If there is not a nameassociatedwith the number,it meansthat
this numberis not in your Directory. If you want this number
enteredinto your Directory, press the softkey beside Save. If
Directory Changes
are locked, this option requires you to enter
your 3-digit password.Then, the display shows:
:ENTER
PHONE
8-CHAR
6-CHAR
#:9,5551234
NAME:_
GROUP:
Backspace
Done
For directions on adding a nameand (optional) group nameinto
a Directory entry, see "Adding, Editing, and Deleting a Directory
Entry."
¯
After you havesavedthis numberinto the Directory, the
display screenreturns to the Call Log entry.
Youcan view other outgoing calls placed at the voice/data
terminal by pressing the softkey beside Moreor by pressing
or
¯
69
¯
The word "LAST" appearson the display to remind you when
you havefinished viewingall the newoutgoingcalls.
Whenyou are finished viewing each outgoingcall in the Call Log,
press the soffkey beside Done.
7O
LOCKINGANDUNLOCKING
DIRECTORYCHANGES,CALL LOG,
ANDALL SOFTKE¥S
The8520T
voice/dataterminalallowsyouthe optionof lockinganyor all
of thefollowing:
¯ Youcanlock all Directory Changes
so no onebut youcanadd,
edit, delete,or saveentriesin yourDirectory.
¯ Youcanlock the Call Log so no onecanview your incomingor
outgoingcalls or change
your Call Logoptions;
¯ Youmayalso chooseto lock all the Softkeysso no onecanview or
changeanyof the featuresaccessed
by the softkeys.
In orderto lock any(or all) of thesefeatures,youmustenteryourown
personal3-digit security password
youhavecreated.Asyouenter the
threedigits, a * appears
in placeof eachdigit. In this way,your
password
remainsprivate.
NOTE:
Yourpassword
remainsthe samefor all the features.
If youaccessa lockedfeatureby enteringa password,
the featurewill
automaticallyrelock whenyouexit that feature. Youmustuseyour
password
everytimeyouwantto accessthat lockedfeatureuntil you
usethe lock optionto unlockthatfeature.
To lock yourDirectoryChanges,
Call Log,or all Softkeys
1 Press~;n~-~,.
2 Pressthesoftkey besideLock.
¯ Thedisplay shows:
Lock/Unlock Items
Create Password
Done
71
3
Press softkey beside Lock/Unlock Items.
¯ The display shows:
Softkeys
Directory
Call
Changes
Log
Done
Pressthe softkey besidethe feature(s) you wantto lock.
¯
The padlock icon goes on as you press the soflkey(s), such
the samplescreen below. (The samplescreen below showsthat
Directory Changesand the Call Log are locked.)
Softkeys
~ Directory
Call
Changes
Log ~
Done
Press the softkey beside Donewhenyou are finished selecting all
the items you wantto lock.
¯ Thedisplay asks you to enter or create a 3-digit password.
Enter or create your 3-digit password.
Whenyou have entered your password, press the softkey beside
Done.
If you havecreated a password,the display requests that you, "For
Verification, Please Re-enter NewPassword." Whenyou have
completedthat task, press the softkey beside Done.
¯ Thedisplay confirms that you havelocked the feature(s) of your
choice.
72
To unlock your Directory changes
NOTE:If you have lost your password,see your system manager,
1 Press
~ ,
2 Press the softkey beside Lock.
¯
The display shows:
Lock/Unlock
Items
Change Password
Remove
Password
Done
Press softkey beside Lock/UnlockItems.
¯ The display shows:
iPRESS
1
Softkeys
TO LOCK
Directory
& UNLOCK
Call
Changes
Log ~
DQne
Pressthe softkey beside the function or feature you wantto unlock.
(The abovesamplescreen showsthe Call Log is locked.)
¯ Thepadlockicon goesoff as you press the softkey(s).
Press the softkey beside Donewhenyou are finished selecting the
items you wantto unlock.
¯ Thedisplay asks you to enter your 3-digit password.
Enter your 3-digit password.
Whenyou have entered your password, press the softkey beside
Done.
¯
Thedisplay confirms that you have unlockedthe feature of your
choice,
73
CHANGING OR REMOVING YOUR PASSWORD
To changeor removea 3-digit security password
Press ~ .
Press the softkey beside Lock.
¯ The display shows:
Lock/Unlock
Items
Change Password
Remove
Password
Done
Dothe following (according to whetheryou are changingor removing
the password):
Press the softkey beside ChangePassword.
¯ The display shows:
TO CHANGE PASSWORD,
PLEASE ENTER OLD 3-DIGIT
PASSWORD:
Quit
¯
¯
As soonas the first character is accepted,Quit in the lower
right corner changesto Done.
The display messages
ask you to enter your old password,
create a newpassword,and then to re-enter the new
password.
74
¯
Whenyou have donethis, the display confirms the new
passwordis nowactive.
If you want to removeyour 3-digit password,press the softkey
beside RemovePassword.
¯ The display shows:
TO REMOVE PASSWORD,
PLEASE ENTER 3-DIGIT
PASSWORD:
Quit
Whenyou have entered the correct password,the display
confirms the passwordis removed.and everything is
unlocked.
75
CHOOSING A HOME SCREEN
The8520Tvoice/data terminal allows you to select a display screenthat
appears each time you press ~. In this way, you can quickly access
a screenyouuse often. Yourchol" "ces are:
¯
¯
Blank-- The screen is blank.
¯
Directory Page-- A particular pagefrom your Directory is shown.
See"Selecting a Particular Directory Pagefor the HomeScreen"
later in this manualfor directions on selecting a specific Directory
page.
Directory Menu-- The Directory Menuis shown.
¯
¯
Data -- The Data menuis shown.
Call Log -- TheCall Log screen is shown.
¯
Menu-- The Main Menuis shown.
To choose your HomeScreen
1 Press
~,
2 Press the softkey beside Options.
¯ The display shows:
Ring
IOPTIONS]
Call Progress
Tones
Contrast
Call Log
Home
Names
Screen
3
Screen
Done
Press the softkey beside HomeScreen.
76
¯
The display showsa timed screen:
SELECT A SCREEN TO
RETURN TO EACH TIME
Exit
IS PRESSED.
The display then showsyour current selection for the Home
Screen:
HOME
SCREEN:BLANK
Data
Call Log
Blank
Directory
Page
Directory
Menu
Menu
Done
4
Press the soflkey beside the item you wish to be your HomeScreen.
If you choosea particular Directory Page,see the section below,
"Selecting a Particular Directory Pagefor the HomeScreen."
5
Press the soflkey beside Donewhenyou have selected the Home
Screenof your choice.
¯ The display confirms your choice.
77
Selecting a Particular Directory Page for the HomeScreen
You can choose to have your HomeScreen show a Directory page
which showsnamesbeginning with a specific letter, suchas those
entries beginningwith "K" (so that particular names
in your Directory,
such as Kimberly and KSmith, will appear on your HomeScreen) or you
maychooseto have a specific group screen as your HomeScreen.
NOTE:The HomeScreen organization does not need to be the sameas
the regular Directory organization. Changingthe organization of one
doesnot affect the organizationof the other.
To select a particular Directory Page(with namesbeginning with
specific alphabet letter) to be your HomeScreen
1
2
Press
~.
Pressthe softkey beside Options.
3
4
Pressthe softkey beside HomeScreen,
Press the softkey beside Directory Page.
5
Press the softkey beside Doneto confirm your choice.
¯ The display shows:
HOME
SCREEN FORMAT:
ALPHABETIC
Alphabetic
Group
Name
Done
Press the softkey beside Alphabetic if you want your HomeScreen
to shownamesbeginningwith a specific letter, such as Kimberlyor
RobertMt.
7
Press the softkey beside Doneto confirm your choice.
78
¯
The display shows:
ENTER
THE Ist
OF AN ENTRY
THE
HOME
CHARACTER
TO APPEAR
ON
SCREEN:_
Quit
Typethe beginningletter of the entries to be on your HomeScreen.
NOTE:Youmayneed to press the dial pad key morethan once to
enter the correct character. For example,press the GHI(or 4) key
onceto enter a "G"; press the 4 key twice to enter an "H"; press the
key a third time to enter an "1." ~f youpress the dial padkey a fourth
time, a "4" appearson the screen. If you press the 4 key again, the
screenwill return to the first letter on the dial padkey, in this casea
¯
After youhaveenteredthe initial
character, the display shows:
ENTER THE ist CHARACTER
OF AN ENTRY TO APPEAR ON
THE
HOME
SCREEN:K
Case
Done
NOTE:Press the softkey beside Caseif you want to changethe
letter to upperor lowercase.
Press the softkey beside Doneto confirm your choice.
¯
Thedisplay confirms your choice. In this example,those
Directory entry namesbeginningwith "K" will appearfirst on your
HomeScreen.
79
NOTE:
If there are no Directory entries beginningwith the letter
you have chosen, the Directory will showa page on which names
beginningwith the specific pagewouldbe located. In the above
example,if there are no "K’s" in your Directory, the Home
Screen
wouldshowa Directory pagewith "J’s" and/or "L’s" instead.
To select a group to appear as your HomeScreen
2
Press ~;~--~.
Pressthe softkey besideOptions.
3
Press the softkey beside HomeScreen.
4
Pressthe softkey besideDirectory Page.
Press the softkey beside Doneto confirm your choice.
¯ The display shows:
HOME
SCREEN FORMAT:
ALPHABETIC
Alphabetic
Group Name
Done
6
Press the softkey beside GroupNameif you want the HomeScreen
to showa particular group, such as Sales or Acctng.
7
Press the softkey beside Doneto confirm your choice.
¯ The display shows:
Accntg
I.~EC~I
Billng
[ GROOPJ
Servic
Shop
Custmr
Telecm
Office
Transp
Sales
Quit
8O
8 If necessary,press N~h~-Jor ~ to see moregroups in your
Directory.
Pressthe softkeybesidethe groupyouwantto appearon your
HomeScreen.For example,if you choosethe group named
"Transp,"thenthe first directon]pagefor that groupwill appearon
your display screen wheneveryou press ~.
10 Pressthe softkeybesideDoneto confirmyourchoice.
¯ Thedisplay confirmsyour choice.
81
SELF-TEST
To makesure your voice/data terminal is workingproperly
NOTE:The handset must be on-hook whenyou test the voice~data
terminal. Performingthe self-test terminatesanycall in progress, and
preventsyoufrom receiving calls until the test is completed.
Theself-test also clears the Call Log and the last numberdialed from
Redial, and the volumesetting is returnedto the default.
1
2
While the handset is on-hook, press ~.
Press [-~ to see the second Main Menuscreen.
¯ The display shows:
Self-Test
Service
3
Info
Press the softkey beside Self-Test.
¯ The display shows:
SELF-TEST
ENSURES THE
PHONE WORKS PROPERLY
AND
WILL CLEAR THE CALL LOG.
Begin
Cancel
82
4 Pressthe softkeybesideBeginto start the self-test. (Pressthe
softkeybesideCancelif youdo not wantto initiate a self-test of your
voice/data
terminalat this time.)
¯ When
youpress Begin, the following occurs:
-- Thedisplay remindsyou to press ~ twice if you wish to
endtheself-test.
NOTE:
If a call is in progressandthe handsetor
speakerphone
are off-hook, the display message
remindsyou
to hangup beforea self-test canbegin.
-- Terminalemitsa tone.
-- Message
light goeson.
-- Thedisplay showsyou the FeaturePackagenumberandthe
Self-Test passedmessage.
NOTE:
If theseeventsdo not occur, contactyour system
manager.
5 After youheara repeatedtone, pressanybutton on the voice/data
terminal.
¯ Terminalemitsa key click.
6 Press ~~i~, ~, ~~-~, and
¯ Lights to the left of the Mute,Speaker,Conf,andTransfer
buttonsgoon steadily.
7 Press t--hZ~ , ~-~, ~--~7~~, and ~.
¯ Lights to the left of the Mute,Speaker,Conf,andTransfer
buttons
flutter.
8 Pick up handsetandpresseachdial padkey.
¯ Message
light flutters.
¯ Handsetemits a touch tone as eachkey is pressed.
9 Hangup handset.
10 When
the self-test is completed,press~ twice.
NOTE:
If youdo notpress~ twice to end the test, the voice/data
terminalautomatically
exits the self-test after 30seconds.
CHOOSINGTHE CONTRASTLEVEL FOR THE DISPLAY
Youcan use the softkeys to set the darknessor lightness of the
voice/data terminal display.
To choosethe contrast level of the display
1
Press ~--~.
2
Press the softkey beside Options.
¯ The display shows:
Ring
I OPTIONS]
Call Progress
Tones
Contrast
Call Log
Home
Screen
Names
Screen
3
Done
Press the softkey beside Contrast.
¯ The display shows:
ADJUST CONTRAST:
LOW>>>
HIGH
Lower(-)
Higher(+)
Done
NOTE:The arrows are arranged between Low and High. There
are five possible contrast levels, andthus five possible arrows
betweenL and H.
84
4 Dooneof the following:
¯ Press the softkey beside Higher(+) or ~ to makethe
contrast darker. Eachbutton pressincreasesthe numberof
arrowsby one.
¯ Press the softkey beside Lower(-) or ~ to makethe
conlrast lighter. Eachbutton pressdecreases
the number
of
arrowsby one.
5 Pressthe softkey besideDonewhenyou are finished.
¯ Thedisplayconfirmsthat the contrastlevel hasbeenset.
85
SELECTING A PERSONALIZEDRING (AND ADJUSTINGRINGER
VOLUME)
Youcan use the softkeys to choosea personalizedringing pattern for
your voice/data terminal so you can distinguish the ringing pattern at
your voice/data terminal from others in your office, Thereare eight
different ringing patterns to choosefrom.
To select a personalizedringing pattern for your voice/data terminal
1 Press
~ .
2 Pressthe softkey beside Options.
¯ The display shows:
IRing
[.OPTIONS]
Tones
Call Progress
Contrast
Home Screen
Call Log
Names
Screen
3
Done
Press the soft[key beside Ring.
¯ The display shows:
SELECT
RING
PATTERN:
Ring(-)
Ring(+)
1
Done
86
NOTE:
Thenumber"1" in this samplescreenis the numberof
the ringingpatternyouare currentlyhearing.
PressRing(-) or Ring(+)or dial the number
fromthe dial padto
ringingpatterns1 through8.
¯ Eachof the eight ringingpatternsis playedonce.
When
youhearthe ringing pattern youwantto usefor your
voice~data
terminal, pressthe softkeybesideDone.
¯ Thedisplayconfirmsthe ringing pattern youhavechosen.
To adjustthe ring volume
(whenyouare notona call)
Toraise the volume,pressthe right half of the Volume
controlbutton
labeled ~ ;
to lowerthe volume,
pressthe left half of the Volume
controlbutton
labeledI-~7-1.
87
SELECTING DISPLAY MESSAGESYOU WANTTO VIEW AND
SETTING THE RATE AT WHICHYOU VIEW THE DISPLAY
MESSAGES
Youcan use the softkeys to select the display messages
you wish to
view (either all messages
or only error messages)
and to set the length
of time the display message
stays on the screen (Slow, Medium,or
Fast). When
you receive your voice/data terminal, the rate is set at
Medium.Youmaywant to test all three reading rates before you makea
final selection.
To select the rate at which you see the display messages
1
2
Press ~ .
Press the softkey beside Options.
¯ The display shows:
Tones
Contrast
Call Log
Call
Progress
Home
Screen
Names
Screen
3
Done
Press the softkey beside Screen.
¯ The display shows:
I TIMED MESSAGES
Display
OPTIONS
I
Rate
Messages
Done
88
4 Pressthe soflkey besideDisplayRate.
= Thedisplay showsthe current rate:
TIMED MESSAGE RATE: MED
Slow(8-11 sec)
Medium(4-7 sec)
’Fast(2-5 sec)
Done
Pressthe softkeybesideeither Slow,Medium,
or Fast, accordingto
the rate at whichyouwantthe display messages
to be shown.
¯ Thedisplay reflects the choiceyouhavemade.
When
the display screenshowsthe display message
rate you want,
pressthe softkey besideDone.
NOTE:
Besure to checkthe timing of the message
for the rate at
whichyouhaveset the messages
to be displayed.If it is too fast or
too slow, youmaymodifythe rate again.
89
To select all display messages
or only error messages
to be shown
on the display screen
Press ~-~~ .
Press the soltkey beside Options.
Press the softkey beside Screen.
Press the softkey beside Messages.
¯
The display showsthe current display message
setting:
MESSAGES TO DISPLAY:
ALL MESSAGES
IAll Messages
Errors
5
6
¯
Only
Done
Doone of the following:
~ Press the softkey beside All Messages
if you want to see all
display messages.
Press the softkey beside Errors Only if you want to see only
error messages.
Whenthe display screen showsthe type of messagesyou wish to
see, press the softkey beside Done,
Thedisplay confirms your selection.
90
TURNINGON OR OFF SOFTKEYINFORMATION
TONES
Alongwith timedconfirmationscreens,the voice/dataterminalalso
providesSoftkeyMode
confirmationtones(sequentiallow andhigh
tones).Alsoavailableareerror tones(onelowtone)to alert youif
havemadea mistakein your softkey entries. Youmaychooseto turn
thesesoftkeyinformationtonesonor off.
NOTE:
This procedureturns on or off the informationtonesassociated
with the softkeys.Theconfirmationanderror tonesassociatedwith
thosefeaturesnot usedwith the softkeysare not turnedonor off by the
procedure
describedhere.
Toturn on or off the confirmation
anderror tones
1 Press
2 Pressthe softkey besideOptions.
¯ Thedisplay shows:
~±ng
IO~TIONSl
Tones
Contrast
Call Log
Screen
3
Call Progress
Home Screen
Names
Done
Pressthe softkeybesideTones.
91
¯
Thedisplay showsthe current setting (On or Off):
INFORMATION
Off
On
4
TONES:
OFF
Done
Dooneof the following:
Press the softkey beside Off to turn off the Softkey Mode
information tones.
=,- Pressthe softkey beside Onto turn on the information tones.
¯ Thedisplay changesto reflect your choice (On or Off).
5
When
the display screenreflects your choice (On or Off), press the
softkey beside Done.
SETTING THE NUMBEROF NAMESON THE DIRECTORYPAGE
Whenyou view the namesin your Directory or use ~ to locate the
nameof someone
in your Directory whomyou want-to call, you will
initially see(up to) nine names
and the wordQuit on the last line of each
Directory page,suchas in the following screen.
*Paul
Donna
~
IAccntg
KSmith
MarkH
Harvey
PatRober
JDiner
RobertMt
Kimberly
Quit
However,you maychooseto changethis option so you can view
10 names(instead of nine) on each Directory page, such as in the
following example.(Notice that the Quit option does NOTappearin the
lowerright corner.)
Paul
Donna
IV~
KSmith
MarkH
I Accntgl
Harvey
PatRober
JDiner
RobertMt
Kimberly
SandyTa i
Your"Number
of Names"
options are these:
¯ If youchoose9+Quit, youwill see nine nameson eachDirectory
page.Youcan quit viewingmorenamesin the Directoryor decide
not to call a namein your Directory(whenyouhaveusedI-dE] ), by
pressingthe softkeybesideQuit.
93
¯
If you choose10, you will see 10 nameson each Directory page, but,
if youdecide not to view morenames
in the Directory or in order to
cancel the "CALL" screen (when you have used I-~ ), you must
press
~T I or ~.
NOTE:
This option sets the numberof names(either 9 or 10) on each
Directory page. It does not affect the maximum
numberof entries
(whichis 144) you can maintainin your Directory.
To set the numberof names(9 or 10) on an individual Directory
page
Press ~~-~ .
Press the softkey beside Options.
¯ The display shows:
!Ring
Tones
[OPTXONS]
Call Progress
Contrast
Call Log
Home
Screen
Names
Done
Screen
NOTE:
Call Progresswill not be displayed if you are not using the
Data options.
Press the softkey beside Name.
¯ The display showsthe current setting (9+Quit or 10):
DIRECTORY
PAGES
MAY HAVE
I0 NAMES EACH OR 9+Q~it.
NAMES PER PAGE: 9+Qult
9+Qult
I0
Done
94
Dooneof the following:
¯ Pressthe softkeybeside10 if youwantto view 10 names
on
eachDirectorypage.
¯ Pressthe softkey beside9+Quitif youwantto seenine names
(andQuit).
¯ Thedisplaychanges
to reflect your choice(9+Quitor 10).
When
the display screenreflects your choice,pressthe softkey
beside Done.
Tones and Their Meanings
VOICE TERMINALTONES
¯ busysignal---A low-pitchedtone repeated60 timesa minute;
indicatesthe number
dialedis in use.
¯ confirmationtone Tworising tones;indicates a feature activation
or cancellationhasbeenaccepted.
¯ dial tono A continuoustone; indicates dialing canbegin.
¯ error beep--One
beep;alerts youthat youpressedan invalid
softkey.
¯ error torte Analternating high andlow tone; indicatesa dialing
error, a denialof the servicerequested,
or a failure to dial withina
presetinterval (usually10seconds)
after lifting the handset
or dialing
the previous
digit.
¯ local error tone--Asteadylow tone; indicates youmade
a mistake
in yoursoftkeyentry.
¯ reordertone A fast busysignal; indicatesa call is blocked.
¯ self-test tonePeriodictones;indicatesthe voice/dataterminalis
continuingto perform
a self-test.
¯ speakerphons
reset tones~Arising set of tones; indicates the
speakerphone
is adjustingitself to the surrounding
roomacoustics.
Labeling and Installing the DesignationCard
and the Telephone NumberCard
Insidethe front coverof this user’smanual
are twobuttondesignation
cardson whichyoucanwrite the telephonenumber,extension,name,or
feature that eachcall appearance/feature
buttoncanaccess.These
designationcardsmatchthe call appearance/feature
buttonson the
voice/dataterminal;that is, the left column
is labeleda throughe; the
secondcolumn
is labeledf throughj: the third column
is labeled
k througho, andthe fourth columnis labeledp throught.
Belowthe perforatedbottomedgeof eachdesignationcard is a
telephonenumber
card on whichyoucan write your telephonenumber.
At the bottomof eachdesignationandtelephonenumber
card is an
additionalattachedsectionwhichwill make
it easierfor youto insert
thesecardsin a typewriteror runthe cardsthrougha laser printer.
96
To label andinstall the designation
card andtelephonenumber
card
1 Tearthe button designationcard, alongwith the telephonenumber
card andattached"tail," fromthe user’s manual
alongthe perforated
edges.(Youmaychooseto take out onecard at a time andleave
the remainingcardsin the manualfor future use, or youmaychoose
to tear out bothcardsat onetime.)
2 Labelthe button designationcard with the appropriatenumber,
extension,name,
or feature for eachcall appearance/feature
button.
Label the telephonenumbercard with your owntelephonenumber.
Youcanhandwriteor typethe informationon the cardsor run the
cardsthrougha laser printer..
3 Separatethe button designationcard andtelephonenumbercard
alongthe perforatedborder.Youmaydiscardthe attached"tail"
section.
4 Placethe buttondesignationcardunderthe plastic cardcoveron the
voice/dataterminal. Placethe telephonenumbercard underthe
telephonenumbercard coverlocated beneaththe handset.
97
Installation
CONTENTS
OF THE 8520T PACKAGE
Beforeyoubegin,make
sure youhavethe followingparts in the box:
¯ 8520Tvoice/dataterminal (with attacheddesktopstand)
¯ K-type handset
¯ 9-foot handsetcord
¯ 7-foot line cord
¯ Designation
card(s)
NOTE:
Youwill find designation
cardsat the front of this book.
¯ Cover(s)for Designation
card(s)
¯ This user’s manual
DESKTOPINSTALLATION
NOTE:
Thefollowinginstructionsdescribethe installation of the 8520T
voice/dataterminalona deskor table.
Usethe followingdirectionsto connect
the line cordandadjunctcordto
the appropriatejackson the voice/dataterminal.
1 Placethe voice~data
terminalfacedownon a flat surface.
2 Snaponeendof the 7-foot line cordinto the "LINE"jack andthe
adjunctcord (if applicable)into the "ADJUNCT"
jack onthe bottom
the voice/dataterminal. Threadeachcord throughthe routing
channel,makingsure the cord fits underthe squaretabs. See
Figure6 for the locationof the jacks. For moreinformationon
installing adjuncts,refer to the section"AttachingAdjunct
Equipment."
WARNING:
Correct cord types mustbe usedwhenconnecting
terminalsandassociatedcomponents.
Failure to usethe correct
cordand/orto properlyinsert the cordinto the jack maycause
voice/dataterminal malfunctionor equipment
damage.
3 Snaponeendof the coiled cord into the Handset
jack (markedwith
the handsetsymbol)on the bottomof the voice/dataterminal, as
shownin Figure6. Threadthe handsetcord throughthe handset
cordrouting channel.
98
WARNING:
Donot insert the handsetcord into the "ADJUNCT"
jack.
It will causeequipment
damage.
Routingchannel
for line cordand Line
adjunctcord
jack
~diunct
iack
RS232
connector
jack routing channel
FIGURE
6 Line, Adjunct, andHandset
Cord Routingfor Desktop
Installation
Turnthe voice/dataterminalright side up, with the front facingyou.
Snapthe free endof the handsetcord into the handsetandplace the
handset
in the cradle.
Snapthe free endof the line cordinto the modular
jack. Lift the
handset
andlisten for the dial tone.
99
ATTACHING ADJUNCT EQUIPMENT
If you are installing a speakerphone(models AT&T$101A, $201A,or
QUORUM®
CS201A), a headset adapter (model AT&T500A or the
507Aadapter), or other adjunct that maybe offered, follow these steps
to connectthe adjunct equipmentto your voice/data terminal.
1
Placethe voice/data terminal face downon a flat surface.
2
Snapthe adjunct cord into the "ADJUNCT"
jack until you hear a
click. SeeFigure 6 for the location of the "ADJUNCT"
jack.
Routethe adjunct cord through the channel. Refer to the "Desktop
Installation" sectionfor instructions.
Connectthe free end of the adjunct cord to your speakerphone
or
headset adapter.
3
4
NOTE:
Refer to the adjunct’s installation documentation
for its power
requirements.
100
REMOVING
THE DIRECTORY
CARTRIDGE
FROMAN 8520T AND
TRANSFERRING
THE CARTRIDGETO ANOTHER
8520T TERMINAL
The8520Tvoice options, suchas Directory names
andnumbers,display
contrast,selectedringing pattern, or displaymessage
timing, are stored
in the Directorycartridge(labeledDIR)locatedin the backof the
terminal. If necessary,an 8520Tuser caneasily remove
the DIR
cartridgefromone8520Tterminalandtransfer the cartridgeto another
8520T.In this way,all previouslyprogrammed
Directoryentries and
optionscanbe importedinto the newset. Usethe followingdirections
for removing
the DIRcartridgefroman 8520T
andinstalling the cartridge
in another8520Tterminal.
Removing
the Voice TerminalfromOperation
If the voice/dataterminalis in operation,youmustdisconnect
the line
cord andadjunct cord andRS232
cord (if necessary)beforeyoucan
remove
the DIRcartridge.SeeFigure6 for the locationof the jacks.
with the voice/data
1 Pickup the handset(youcanleaveit connected
terminal)andlay it aside.
2 Turnthe voice/dataterminalover so youcanseethe bottomof the
set. Disconnect
the line cordfromthe Linejack andthe cordof any
adjunct equipmentfrom the Adjunctjack. Disconnectthe RS232
cordfromthe rear of the set, if applicable.
Removing
the Voice TerminalStand
Beforeyoucanremovethe DIRcartridge from an 8520Tterminal, you
mustremove
the voice/dataterminal desktopstandfromthe bottomof
the voice/dataterminal. Toremove
the stand,follow thesedirections.
1 Placethe voice/dataterminalface downon a flat surface.TheBar
Codelabel on the bottomof the set shouldbe towardyou.
2 Witha flat-blade screwdriver,remove
the screwfromthe lower
centerof the desktopstand.SeeFigure7 for the location of the
screw.
3 Slowlyrotate the bottomof the desktopstandup towardthe top of
the voice/dataterminal.
4 Thencarefullylift the uppertwotabsonthe top of the standout of
the uppertab slots.
101
?
2 uppertabs
(at top of desktop
stand)
FIGURE
7 Removing
the VoiceTerminalDe~ktopStand
102
Removing
the DIR Cartridge from the VoiceTerminal
TheDIRcartridgeandROM
cartridgehousingis locatedat the upperleft
of the bottomof the voice/dataterminal. SeeFigure8 for the locationof
the cartridgehousing.(Again,the Bar Codelabel on the bottomof the
set shouldbe towardyou.)
Important:
Noticethe DIRcartridgeis installed onthe right side of the
cartridgehousing,andthe ROM
cartridgeis installed on the left side.
DO NOTREVERSETHESETWOCARTRIDGES.
1 Withthumbandforefinger, graspthe DIRcartridge, pressinginward.
onthe circular tab, andlift the cartridgefromthe righthand
sideof the
cartridgehousing.SeeFigure8 for the locationof the DIRcartridge
housing.
Z Putthe cartridgeasideso youcanlater install it in another8520T
terminal.
ROM
cartridge
housing
DIRcartridge
housing
IGURE
8 Removing
(andInstalling)
theDIRCartridge
103
Reinstallingthe DesktopStand
1 Carefullyreplacethe desktopstandby placingthe uppertwo desktop
standtabsin the voice/data
terminalslots at the top of the set.
2 Slowlylowerthe desktopstandonto the bottomof the voice/data
terminal.
3 Replace
the screwin the holefromwhichyouremoved
it.
SeeFigure 7.
Connecting
the 8520Tto the System
Next,reconnectthe cordsof the 8520Tvoice/dataterminal.
SeeFigure6 for the locationof the jacks.
1 Plugin the line cordinto the Linejack, andplugin the adjunct
equipment
cordinto the Adjunctjack, if necessary.
2 Turnthe voice/dataterminalright sideup, with the front facingyou.
the free endof the line cordinto the wall jack. Lift the handset
3 Snap
andlisten for the dial tone.
installing the DIRCartridgein Another8520TTerminal
In orderto install the DIRcartridgein another8520T
terminal,usethe
following procedure.
(In general,the procedures
for removing
andfor
installing the DIRcartridgearethe same.)
all of the cordsfromthe voice/dataterminalinto whichyou
1 Unplug
are installing the DIRcartridge. See"Removing
the VoiceTerminal
fromOperation"in this sectionof the manual.
2 Remove
the screwfrom the lowercenter of the desktopstand. See
Figure7 for the locationof the screw.Lift the desktop
standfromthe
bottomof the voice/dataterminal. See"Removing
the Voice
TerminalStand"in this sectionandrefer to Figure7.
3 Carefully,lowerthe newDIRcartridgeinto the righthandslot of the
cartridge housing.Pushdownon the cartridge until youhearand
feel it click into place.Forthe locationof the cartridgehousing,
see
Figure8.
4 Replacethe desktopstandandreplacethe screwin the hole from
whichyouremoved
it. See"Reinstalling the DesktopStand"in this
section.
Reconnect
the cords of the 852OT
terminal. See"Connecting
the
8520T
to the System"
in this section.
104
TechnicalDescription
Physical Dimension
and Weight
Thedesktop-mounted
voice~dataterminal measures
¯
¯
¯
¯
11 1/2 inches (29.1 cm) wide
10 1/4 inches(26 cm)long(fromfront to rear of set)
5 3/8 inches(13.66cm)high (with handset)
4 3/4 Ibs (2.17 kg)
PowerRequirements
The8520Tvoice/dataterminalrequiresauxiliary power.If the 8520T
replacesan already-existingterminalwhichusesauxiliary power,the
powersupplycurrently beingusedwill suffice. If a newpowersupplyis
beingorderedfor the 8520Tterminal, useeither the MSP-1
(local) Power
Supplyor the 1145ABulk PowerSupply.
EnvironmentalRequirements
The8520Tcanoperatein temperatures
rangingfrom 40 to
120degreesF (4 to 48 degrees
C) andrelative humiditiesrangingfrom
5 to 95 percent.However,
at low relative humidities(often duringwinter
months),
some
additionalprotectionagainstexcessive
static electricity
buildup maybe required, depending
on the materials(suchas nylon)
presentin carpeting,chairs with castors, andevenclothing. Commonly
availablemethods
of protectionincludeantistatic spraysfor carpeting
andantistatic matsto put underchairswith castors.
105
Index
A
Addinga group name
into theDirectory,32
Adding numbersand names
into theDirectory,32
Adjunct equipment
attaching,100
Adjunctjack
connection,98, 99, 100
description,8
location,99
Adjustingthe volume
receive,13
speaker/speakerphone,
13, 17, 18
toneringer, 87
Answered
Call Log, 66
Answering
calls, 13
B
Buttons
call appearance,
6
Conference,6
dial pad,6
displaycontrol,6
Dir, 6, 11,23
Menu,6, 21
Next>, 6, 23
<Prev,6, 23
Drop,6
Exit, 7, 11,21
Hold,7
Mute,7
Redial,7
Speaker,7
Transfer,7
Volume
control, 7
unlocking,73
viewingcalls
answered
incoming,66
outgoing,68
unanswered
incoming,59, 65
Call LogIndicator,10
Call Progress,10
Calls
answering,13
Conference,14
Drop,14
ending,13
Hold, 15
message
retrieval of, 15
Mute,16
placing
fromdial pad,13
fromDir button, 57
fromDirectorysoftkey, 54
Redial,16
speakerphone,
17
Transfer,19
Changingthe password,74
Choosinga HomeScreen, 76
Clock,12
settingthe, 26
Conference,
9, 14
Contrast,10
Contrastdisplaylevel
setting the, 84
Creatingthe password,
72, 74
D
Data,10
DataIndicator, 10
Deletinganentry in theDirectory,41
Designation
card, 6
installing,96
labeling,96
Dial pad,6
Dir button, 11,23,57
Directory,10
adding,32
calling, 54, 57
deleting,41
editing, 38
lockingDirectorychanges,
71
movingentries to anothergroup,47
numberof names
on page,11, 93
C
Call Log,10, 59
indicationof new
unanswered
calls, 63
Indicator,63
locking,71
setting, 59
all calls,63
turningonor off, 61
unanswered
calls only, 62
turningonor off, 61
I-1
organizing,43
renaminggroups,44
searching
for anentry, 50
setectinga Directorypage
to be HomeScreen,78
unlockingDirectorychanges,73
viewing,54
Directorycartridge
installing,101
removing,101
transferring,101
Display,6
contrastlevel
settingthe, 84
controlbuttons,6, 20,23
messages,22
DisplayRate,11
Done
responding
to, 23
Drop,9, 14
entering groupname,32
moving
entries to anothergroup,47
organizingDirectoryby groups,43
renaming,44
selecting a groupas Home
Screen,
H
Handset,7
Handsetiack
connection,98, 99
description,8
location,99
Ho~d,9, 15
HomeScreen,11
choosing,76
exitingto, 21
selectinga Directorypage,78
selectinga group,80
I
Informationtones
turningonor off, 91
Installing
adjunct equipment,100
designation
card, 96
Directorycartridge,101
handsetcord, 98
line cord,98
telephonenumbercard, 96
E
Editingthe Directory,38
Entering a groupname
into the Directory,32
Entering a numberand name
into the Directory,32
EnteringSoftkeyMode,21
Exit button,11,21
Exiting SoftkeyMode,22
Exiting to Home
Screen,21
L
Labeling
designationcard, 96
telephonenumbercard,96
Linejack
connection,98, 99
description,8
location,99
Lockfeature,11
padlockicon, 23, 72
Locking
Call Log,71
Directorychanges,
71
Softkeys,71
F
Featuredescriptions
display,10
softkeys,10
voice,9
Featuresaccessed
with
the displayandsoftkeys,10, 20
Flowchartof softkey
display screens,23
G
Groupnameinto Directory
adding,32
editing,38
entering,32
Groups
addinggroupname,32
editing groupname,38
M
MainMenu,21
Menu
button, 21
Message
I!ght, 7
I-2
Message
type, 11
Messages
retrieving,9, 15
settingdisplayrate of screens,88
setting typesshown,88
Moving
entries to anothergroup,47
Mute,9, 16, 18
Qu~
responding
to, 23
R
¯ Names
setting number
of, 93
Nextbutton, 23
Number
and nameinto Directory
adding,32
deleting,41
editing, 38
entering,32
Rate
setting viewingtime
of display messages,
88
Redial(Last Number
Dialed), 9,
Removing
Directorycartridge,101
password,74
Renaming
groups, 44
Ringoption
selectinga personalized
pattern,86
Ringer
adjustingthe volume,87
O
S
N
Options
Call Progress,21
displaycontrast,84
display messages,
88
displayrate, 88
HomeScreen, 76
informationtones,91
numberof names
onDirectorypage,93
ringingpattern,86
settingthe Call Log,61
Organizing
the Directory,43
OutgoingCall Log,68
P
PadlockIcon, 23
Password
changing,74
creating,72, 74
removing,74
Personalized
Ring,11
selecting,86
Placingcalls
fromdial pad,13
fromDirectory
usingDir button,57
usingthe softkeys,54
Prevbutton, 23
Screen
displayrate, 11,88
message
type, 11
messages,88
Searching
for anentry in Directory,50
Selectinga personalized
ring, 86
Self-Test,11, 82
Set Clock,12
Set Speakerphone,
12
Setup, 61
Setting
Call Log, 59
all calls,63
turningonor off, 61
unanswered
calls only, 62
clock, 26
displaycontrastlevel, 84
informationtones,91
message
display rate, 88
message
types, 88
numberof names
on Directory page,93
ringingpattern,86
speakerphone,
29
Softkeys
Call Log, 59
clock, 26
contrast,84
descriptionof, 7, 20
Directory,32
done,23
enter, 21
exit, 22
flowchart,23
HomeScreen
choosing,76
informationtones,91
locking,71
MainMenu,21
message
display rate, 88
numberof nameson
Directorypage,93
personalized
ring, 86
quit, 23
Self-Testfeature,82
speakerphone,
29
unlocking,73
Softkeysdisplay screens
flowchart,23
Speaker,9, 17
adjustingthe volume,13, 17
Speakerphone,
9, 17, 29
adjustingthe volume,13, 18
setting, 29
U
Unanswered
Call Log, 59, 65
Unlocking
Call Log,73
Directorychanges,73
Softkeys,73
V
Viewing
Call Log
answered
incoming,66
outgoing,68
unanswered
incoming,59, 65
Directoryentry,54
VoiceFeatures,13
T
Technicaldescription,105
Telephonenumbercard, 7
installing,96
labeling,96
Toneringer
adjustingthe volume,87
Tones,12
description,96
setting,91
Transfer,10, 19
Transferring
Directorycartridge,101
I-4
We’dlike youropinion.
AT&Twelcomes
your feedbackon this document.Your comments
can
be of great valuein helpingus improveour documentation.
IntegratedServiceeDigital Network
(ISDN)
8520TVoicelDateTerminalFeaturePackage
3 Uaer’a Manual
AT&T555-021-758, COMCODE
107040073,
lesue 1, November
1993
1. Pleaserate the effectivenessof this document
in the followingareas:
lEase
I Exc°’’entI Good
I Fair
of Finding Information ....
Clarity
I I .......
IC°mpleteness
I
I
I
I Poor
I
I
I
IAccuracy
I
I
I
I
Organizati°n
I
......
I ............
]--I ................. I
Appearance
I
J
I
’1
=’’
IEx"mP
I
I ................
I
1
Illustrations
Overall
Satisfaction
I
I
I
Pleasecheckthe waysyoufeel wecould improvethis document:
Improvetheovervlew/Introduction
[~ Makeit moreconcise
Improve
the table of contents [~ Addmorestep-by-stepprocedures/tutorials
Improve
the organization
[-I AddmoretroubleshootingInformation
Addmorefigures
(~ Make
It less technical
Addmoreexamples
~ Addmore/better
quick reference
aids
Addmoredetails
~ Improvethe index
Pleaseadddetails aboutyour majorconcerns.
3. Whatdid youlike mostaboutthis document?
4. Feel free to write anycomments
belowor on an attachedsheet.
If wemaycontact youconcerningyour comments,
pleasecompletethe
following:
Name:
Company/Organization:
Telephone
Number:(
)
Date:
Address:
When
youhavecompleted
this form, pleasefold, tape, andreturn to
addresson back.Thank.you.
FoldHereFirst
NO POSTAGE
NECESSARY
IF MAILED
IN THE
UNITED STATES
II
BUSINESS REPLY MAIL
FIRSTCLASSPERMIT
NO. 785 MORRISTOWN,
NJ
POSTAGE
WILL BE PAID BY ADDRESSEE
AT~T
GBCS
ProductDocumentation
Development
Group
Room4K-361
200 Laurel Avenue
Middletown,NJ 07748-9976
Reprinted
with permission
For internal
use only
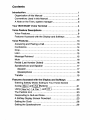


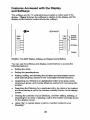
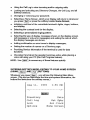

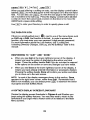
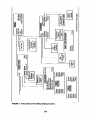
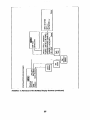


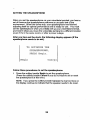
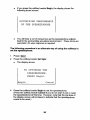
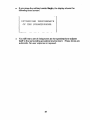
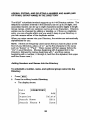

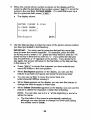
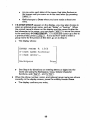
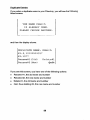


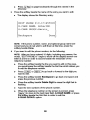


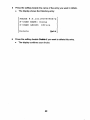
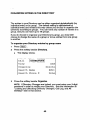
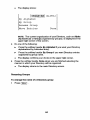

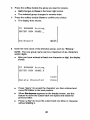


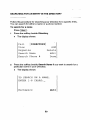


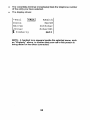
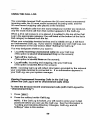
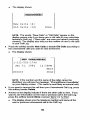


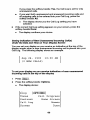


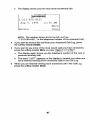

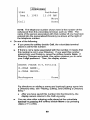

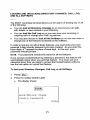

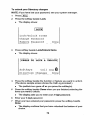

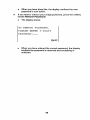


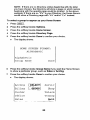

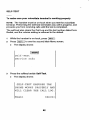
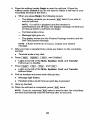
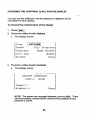


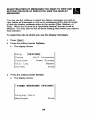
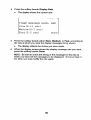
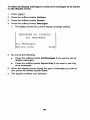
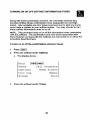

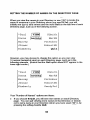


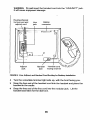


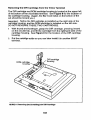


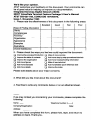


![hank yo_fo buyil_gaSamsung (}a_Te_a ]hs](http://vs1.manualzilla.com/store/data/005691502_1-2e8e29ffb67d0c8f7d0d701e3cb644b7-150x150.png)