Transcript
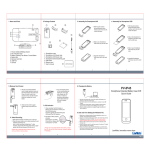
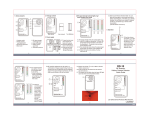
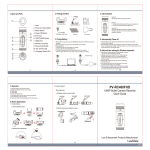
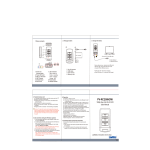
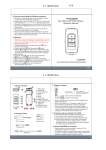
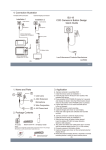
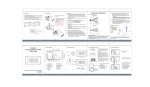
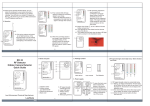
80x120mm
1. Name and Parts
3. Camera Setup Illustration
Connection with a portable DVR:
Analogue camera mainly uses to capture images.
1. Install the device as illustration shown below.
2. Insert the camera jack into A/V IN socket.
3. Press POWER-ON button on portable DVR about 3 seconds and
release the button. Note that HOLD button should not be activated
when press POWER-ON button.
4. A green light will turn on to show that DVR device is turn-on
properly. Press REC button to start recording.
5. Captured images are automatically shown on LCD display.
6. Audio and video signals are automatically collected and saved
into record folder in DVR.
1
2
3
4
5
1. CMOS Lens
2. Wire Cord Organizer
3. Microphone
4. Video System and Audio Quality Dip Switch
5. AV Jack
Connection of AV Output:
Analogue camera mainly uses to capture images and output
captured audio and video signals to an external display through AV
switching cable .
1. Install the device as illustration shown below.
2. Slide the back cover of battery holder to open the battery tray.
Insert a PP3 (9V) battery into battery tray. Switch to ON position.
3. The yellow and white color cable of switching cable are to connect
with the external television/LCD.
4. Captured images are automatically shown on the connected
LCD/Television.
5. Audio and video signals are transmitted to LCD/Television.
Noted that external LCD/Television is required to connect with an
audio and video recording device.
2. Package Content
Optional Accessories
Portable DVR- PV-500ECO
TV/LCD
Battery Pack
Switching Cable
Extension Cord
(1)
(2)
9V Battery Holder
Switching Cable
(3)
80x120mm
4. Setting Video Signal System and Audio Quality
NTSC
Video
PAL
Video
5. Connection with Wireless Equipment
CM-SG10
Spectacle Covert Camera
Quick Guide
Optional Accessories
Portable Transmitter
- TBR-1255/2455
INDOOR
Audio
Optional Accessories
Portable Receiver and DVR
- PVRC-701/PVRX-702
OUTDOOR
Audio
1. Camera can also connect with RF wireless equipment.
2. Connect AV jack to portable transmitter.
3. Connect DVR or any recording device with portable
receiver.
4. Set transmitter and receiver at the same frequency
or channel.
5. Turn on receiver’s power.
6. Captured images will be shown on receiver side.
7. Note that receiver should connect with external
LCD / TV in order to display captured images.
1. Make sure video system and audio quality
is selected before turn on the DVR.
2. On the controller panel, there are two bar switch:
a. Switch to N to change video system to NTSC.
b. Switch to P to change video system to PAL.
c. Switch to L to record in indoor environment.
d. Switch to H to record in ourdoor environment.
Law Enforcement Products Manufacturer
(4)
(5)
LawMate
V1.0