Transcript
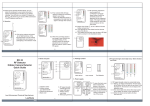
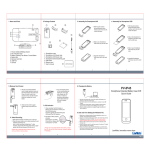
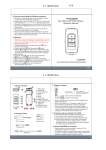
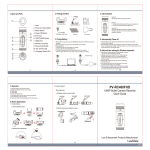
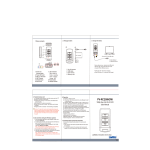
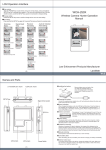
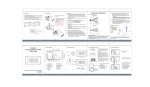
2. Package content
1. Name and parts
ANT.
8
ANT.
ANT.
7
1
Off
2
Finder Viewer
On
Off
Signal Level
Off
1
Finder Viewer
6
Blink
5
Off
4
High Sensitivity
On
Blink
Off
Signal Level
Low Sensitivity
High Sensitivity
On
3
User manual
3.1 To open the back cover,
slide it towards the
bottom of the device.
3.2 Insert the batteries as
shown in the illustration.
3.3 Close the back cover
by sliding it towards
the top of the device.
(1)
Off
Finder Viewer
Blink
On
Signal Level
Off
Low Sensitivity
High Sensitivity
Hidden Camera Finder
Radio Detector 20MHz – 6GHz
5.3 When the
surronding signal
is too strong, it
may influence
the real target
finding. In this
situation, switch
the sensitivity
adjustment to
Low and pull
back the
antenna. (WiFi is
also a RF signal)
Off
Finder Viewer
Blink
On
Signal Level
Off
Low Sensitivity
High Sensitivity
Hidden Camera Finder
Radio Detector 20MHz – 6GHz
(5)
C
4.1 RF signal strength meter ten colored light array.
4.1.1 Slide 3 to High/Low Sensitivity. The blue LED
at the bottom of the bar lights up as shown in
the illustration A. The device is on and stays
at the detection mode.
4.1.2 Ten colored light array shows the output power
of the target. (as shown in the illustration B)
4.1.3 When the device is low battery, the blue
LED turns off.
(3)
5.4 RF sensitivity adjustment can be used for a
confirmation of irregular signal finding. Switch the
sensitivity to low and apprroach to the suspected
target. If the signal strength is still strong, the view
finder can be turned on for the final check.
5.5 Switch View Finder 2 to On or Blink to find the
hidden camera lens.
5.6 Look through the view finder from the obverse
side of the device.
5.7 The hidden lens will flash when the laser LED light
spot it as shown in the illustrations below.
ANT.
8
ANT.
(2)
Off
5-1 Pull up the antenna
and switch 3 to High
Senstivity. At the time
the device is on, ten
colored LED lights
blink and it leaves 1-3
LED lighting in the
detection mode.
Finder Viewer
Blink
On
Signal Level
Off
Low Sensitivity
3
High Sensitivity
Hidden Camera Finder
Radio Detector 20MHz – 6GHz
(4)
RD-10
RF Detector
Hidden Camera Detector
Quick Guide
ANT.
6
7
Off
ANT.
B
Hidden Camera Finder
Radio Detector 20MHz – 6GHz
5. RF signal strength
colored light array
6. Laser LED lights
7. Hidden camera
view finder
8. Telescoping antenna
5.2 If ten colored LED still
keep lighting, it means
the surronding signal
is very strong.
※When the detection
activity is proceeded
at the high floor, the
siganl is stronger
than usual)
A
Two Batteries
3. Power supply
ANT.
5. Operation
Low Sensitivity
High Sensitivity
Main device
1. Vibration switch
2. Hidden camera
scan Blink/On/Off
3. Sensitivity adjustment
4. Back cover
Signal Level
Off
Hidden Camera Finder
Radio Detector 20MHz – 6GHz
Hidden Camera Finder
Radio Detector 20MHz – 6GHz
Finder Viewer
Blink
Manual
Low Sensitivity
3
4.2 Silent Covert Pocket Vibration Mode: You can
place this small gem in your pocket and when it
detects eavesdropping, it will alert you by silently
vibrating. You will know in an instant if it detects
an RF bug, cell phone bug or sends a GPS
transmission.
(The RF detector must be on)
4. RF signal strength colored light array /
Slient vibration alert mode
2
Off
Finder Viewer
Blink
Finder Viewer
Blink
On
On
Signal Level
Off
Signal Level
Off
Low Sensitivity
Low Sensitivity
High Sensitivity
High Sensitivity
Hidden Camera Finder
Radio Detector 20MHz – 6GHz
Hidden Camera Finder
Radio Detector 20MHz – 6GHz
Law Enforcement Products Manufacturer
(6)
(7)
LawMate
®
V1.2