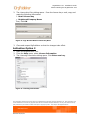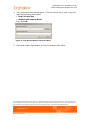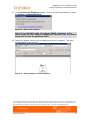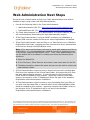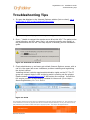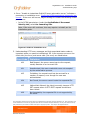
1
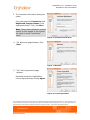
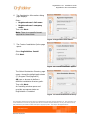
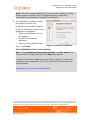
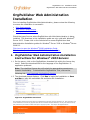
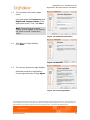
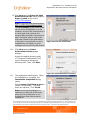
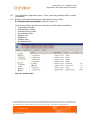
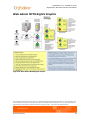
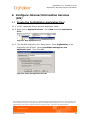
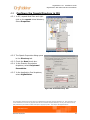
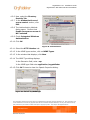
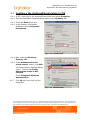
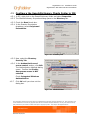
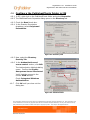
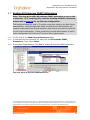
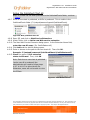
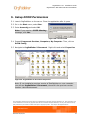
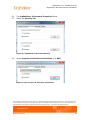
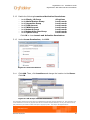
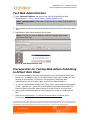
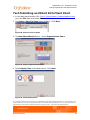
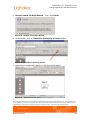
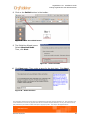
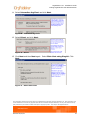
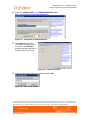
OrgPublisher 10.1 Installation Guide OrgPublisher 10.1 Installation Guide Table of Contents Table of Contents OrgPublisher Installation ............................................................................4 OrgPublisher Client vs OrgPublisher Web Administration Installation ..............4 Role Requirements for Installation ............................................................5 OrgPublisher Client Role Requirements ...................................................5 OrgPublisher with Web Admin Role Requirements.....................................5 OrgPublisher System Requirements...........................................................6 OrgPublisher Client Requirements ..........................................................6 OrgPublisher Web Admin Server Requirements ........................................6 Prerequisites for Installation ....................................................................6 About Installing the OrgPublisher Trial .........................................................7 Converting the OrgPublisher Trial to the Retail Version ................................7 OrgPublisher Client Installation ................................................................. 10 OrgPublisher Client Installation Instructions ............................................. 10 OrgPublisher Web Administration Installation .............................................. 14 1. OrgPublisher Web Administration Installation Instructions................... 14 2. Configuring Groups ....................................................................... 19 2.1 Create a Global Group on the Domain Controller .......................... 19 2.2 Create a Local Group on the Web Server..................................... 19 3. Setting NTFS Permissions .............................................................. 21 3.1 Set NTFS Permissions for the Opweb Folder................................. 21 3.2 Set NTFS Permissions for the SourceCharts Folder........................ 22 3.3 Set NTFS Permissions for the ArchivedCharts Folder ..................... 23 3.4 Set NTFS Permissions for the SearchDictionary Folder................... 23 3.5 Set NTFS Permissions for the PublishedCharts folder..................... 23 4. Configure Internet Information Services (IIS) ................................... 26 4.1 Create the OrgPublisher Application Pool..................................... 26 4.2 Configure the Opweb Directory in IIS ......................................... 27 4.3 Configure the SourceCharts Folder in IIS .................................... 29 The information contained in this document is confidential and proprietary to Aquire Solutions, Inc. This information may not be distributed or used for any purpose other than the evaluation of Aquire Solutions, nor may it be disclosed to any party without the prior written consent from Aquire. Copyright © 2001 - 2011 Aquire. All Rights Reserved. Revised 10/21/11 2 OrgPublisher 10.1 Installation Guide Table of Contents 4.4 Configure the ArchivedCharts Folder in IIS .................................. 30 4.5 Configure the SearchDictionary Charts Folder in IIS...................... 31 4.6 Configure the PublishedCharts Folder in IIS ................................. 32 4.7 Enable All Unknown ISAPI Extensions ......................................... 34 4.8 When Allow All Unknown ISAPI Extensions is Restricted ................ 35 5. Setup DCOM Permissions ............................................................... 37 Testing OrgPublisher Web Administration.................................................... 42 Prerequisites for Testing Web Administration ............................................ 42 Test Web Administration........................................................................ 43 Prerequisites for Testing Web Admin Publishing to EChart Rich Client ........... 43 Test Publishing an EChart Rich Client Chart .............................................. 44 Web Administration Next Steps ................................................................. 50 Troubleshooting Tips ............................................................................... 51 The information contained in this document is confidential and proprietary to Aquire Solutions, Inc. This information may not be distributed or used for any purpose other than the evaluation of Aquire Solutions, nor may it be disclosed to any party without the prior written consent from Aquire. Copyright © 2001 - 2011 Aquire. All Rights Reserved. Revised 10/21/11 3 OrgPublisher 10.1 Installation Guide OrgPublisher Installation OrgPublisher Installation The purpose of this document is to provide the information needed to successfully install OrgPublisher 10 on a workstation (referred to as an OrgPublisher Client installation) or to install OrgPublisher with Web Administration. If installing OrgPublisher with Web Administration, refer to the set of instructions that corresponds to the type of server where OrgPublisher will be installed. Below is a list of servers and corresponding installation guides: Windows® Server 2003 – Use the OrgPublisher Web Administration Installation directions in this guide beginning here. Windows® Server 2008 - Click here for the installation guide. Windows® Server 2008 R2 - Click here for the installation guide. OrgPublisher Client vs OrgPublisher Web Administration Installation Each OrgPublisher license covers one installation of OrgPublisher, which can be activated by either: 1) Installing OrgPublisher on a workstation (referred to as OrgPublisher Client installation) 2) Installing OrgPublisher on a server with Web Administration. With Web Administration, one OrgPublisher license allows up to 5 Chart Administrators to access the OrgPublisher Web Administration interface. To determine which option to choose, the following link explains the differences between the OrgPublisher Client and OrgPublisher Web Administration: OrgPublisher Client vs. OrgPublisher Web Administration The information contained in this document is confidential and proprietary to Aquire Solutions, Inc. This information may not be distributed or used for any purpose other than the evaluation of Aquire Solutions, nor may it be disclosed to any party without the prior written consent from Aquire. Copyright © 2001 - 2011 Aquire. All Rights Reserved. Revised 10/21/11 4 OrgPublisher 10.1 Installation Guide OrgPublisher Installation Role Requirements for Installation The type of permissions required to successfully install OrgPublisher varies depending on the chosen installation method. Please refer to the applicable role requirements below. Note: Both the OrgPublisher Client and OrgPublisher Web Administration installation options are available with the OrgPublisher Trial. OrgPublisher Client Role Requirements User must be an Administrator on the workstation where installing OrgPublisher Note: If an error displays during the OrgPublisher Client installation, this indicates the user is not an administrator on the workstation. Please contact a member of the IT department with Administrator permissions to complete the OrgPublisher Client installation. OrgPublisher with Web Admin Role Requirements User must be an Administrator on the Web Server Creating the Global Group (OPWeb_GG) on the Domain Controller must be completed by an administrator on the Domain Controller The information contained in this document is confidential and proprietary to Aquire Solutions, Inc. This information may not be distributed or used for any purpose other than the evaluation of Aquire Solutions, nor may it be disclosed to any party without the prior written consent from Aquire. Copyright © 2001 - 2011 Aquire. All Rights Reserved. Revised 10/21/11 5 OrgPublisher 10.1 Installation Guide OrgPublisher Installation OrgPublisher System Requirements OrgPublisher Client Requirements Pentium® PC compatible or greater Windows® XP, Windows® Vista™, or Windows 7 operating system 512 MB of RAM 60 MB available hard disk space Adequate storage space for charts OrgPublisher Web Admin Server Requirements Pentium® PC compatible or greater Microsoft® IIS (ISAPI enabled) web server running: Windows® XP, Windows® 2003, Windows® 2008 web server or Apache™ HTTP Server 2.0+ (running Windows operating system) Virtual directory with execute permissions for scripts and executables on the web server 60 MB available hard disk space 1 GB of RAM Note: The OrgPublisher Web Administration Server is disabled for Windows® Vista™. Prerequisites for Installation The following items will be required to ensure the installation process is successful: Valid license key information to activate OrgPublisher 10 which includes: License Key: Provided via email Registered Company Name: Company name, exactly as it appears in the license key email If upgrading from a previous version of OrgPublisher, review the OrgPublisher Upgrade Considerations Guide prior to installation. If installing OrgPublisher with Web Administration, complete the following items prior to installation: Confirm the server meets all Web Administration Server Requirements Complete the setup of the Global Group (OPWeb_GG) described in Configuring Groups. Note: The administrator on the server must have an administrator on the Domain Controller create the Global Group (OPWeb_GG group). The information contained in this document is confidential and proprietary to Aquire Solutions, Inc. This information may not be distributed or used for any purpose other than the evaluation of Aquire Solutions, nor may it be disclosed to any party without the prior written consent from Aquire. Copyright © 2001 - 2011 Aquire. All Rights Reserved. Revised 10/21/11 6 OrgPublisher 10.1 Installation Guide About Installing the OrgPublisher Trial About Installing the OrgPublisher Trial To download a trial of OrgPublisher, visit the Aquire web site link: OrgPublisher Premier Trial Download After submitting a Trial Download request to Aquire, an email with an OrgPublisher Trial product key will be sent to activate and begin the OrgPublisher Trial. The OrgPublisher Client and OrgPublisher Web Administration installation methods are available using the OrgPublisher Trial. After purchasing the retail version of OrgPublisher, a new e-mail will be sent to the registered owner containing the following license key information: New Retail License Key Registered Company Name Download Instructions The full version of OrgPublisher can be enabled by entering the new retail license key into the existing OrgPublisher Trial using the directions below. Converting the OrgPublisher Trial to the Retail Version Convert the OrgPublisher Trial to the full retail version using one of two methods described below: Activation Option 1 While the trial version is in effect, each time OrgPublisher is opened, the OrgPublisher Trial Version dialog opens: 1. Click Enter New Key. Figure 1. Enter New Key The information contained in this document is confidential and proprietary to Aquire Solutions, Inc. This information may not be distributed or used for any purpose other than the evaluation of Aquire Solutions, nor may it be disclosed to any party without the prior written consent from Aquire. Copyright © 2001 - 2011 Aquire. All Rights Reserved. Revised 10/21/11 7 OrgPublisher 10.1 Installation Guide About Installing the OrgPublisher Trial 2. The License Key Entry dialog opens. From the license key e-mail, copy and paste the following information: Retail License key Registered Company Name Then, click OK. Figure 2. Copy & Paste Retail License Key Data 3. Close and reopen OrgPublisher so that the changes take effect. Activation Option 2 1. Open the OrgPublisher Trial. 2. From the Help menu, select License Information. 3. The Licensing Information dialog opens. Click Enter new key. Figure 3. Licensing Information The information contained in this document is confidential and proprietary to Aquire Solutions, Inc. This information may not be distributed or used for any purpose other than the evaluation of Aquire Solutions, nor may it be disclosed to any party without the prior written consent from Aquire. Copyright © 2001 - 2011 Aquire. All Rights Reserved. Revised 10/21/11 8 OrgPublisher 10.1 Installation Guide About Installing the OrgPublisher Trial 4. The License Key Entry dialog opens. From the license key e-mail, copy and paste the following information: Retail License key Registered Company Name Then, click OK. Figure 4. Copy & Paste Retail License Key Data 5. Close and reopen OrgPublisher so that the changes take effect. The information contained in this document is confidential and proprietary to Aquire Solutions, Inc. This information may not be distributed or used for any purpose other than the evaluation of Aquire Solutions, nor may it be disclosed to any party without the prior written consent from Aquire. Copyright © 2001 - 2011 Aquire. All Rights Reserved. Revised 10/21/11 9 OrgPublisher 10.1 Installation Guide OrgPublisher Client Installation OrgPublisher Client Installation Prior to installing the OrgPublisher Client, please review the following information to ensure the installation is successful: Prerequisites for Installation Role Requirements System Requirements OrgPublisher Client Installation Instructions 1. From the computer where OrgPublisher will be installed, click on the OrgPublisher download link within the license key email. Select the download link for the language of the OrgPublisher 10 application preferred. Note: The retail/trial license key will unlock the appropriate connectors or Premier functionality. To download the OrgPublisher Trial, click on the following: Trial Download: OrgPublisher Premier 2. The download prompt displays. Click Run to begin the Installation or Save and Run to save the executable file and begin the Installation. Figure 5. OrgPublisher Download The information contained in this document is confidential and proprietary to Aquire Solutions, Inc. This information may not be distributed or used for any purpose other than the evaluation of Aquire Solutions, nor may it be disclosed to any party without the prior written consent from Aquire. Copyright © 2001 - 2011 Aquire. All Rights Reserved. Revised 10/21/11 10 OrgPublisher 10.1 Installation Guide OrgPublisher Client Installation 3. The Activation Information dialog box opens. Copy and paste the License key and Registered Company Name in the appropriate fields. Then, click Next. Note: These values should be entered exactly as they appear in the License key email to avoid “Invalid Key” errors. Figure 6. Activation Information 4. The Welcome! page displays. Click Next. Figure 7. Welcome 5. The License Agreement page displays. Read and accept the OrgPublisher License Agreement by clicking Agree. Figure 8. License Agreement The information contained in this document is confidential and proprietary to Aquire Solutions, Inc. This information may not be distributed or used for any purpose other than the evaluation of Aquire Solutions, nor may it be disclosed to any party without the prior written consent from Aquire. Copyright © 2001 - 2011 Aquire. All Rights Reserved. Revised 10/21/11 11 OrgPublisher 10.1 Installation Guide OrgPublisher Client Installation 6. The Registration Information dialog page displays. Enter: Registered user’s full name. Registered user’s company name Then click Next. Note: There is no specific format required for these fields. Figure 9. Registration Information 7. The Custom Installation Option page opens. Select OrgPublisher Install Click Next. Figure 10. Custom Installation Option The Select Destination Directory page opens. Accept the default path shown (C:\Program Files\OrgPub10) OR type or browse to define a different installation directory path. Then click Next. An Installing window opens and provides a progress status as OrgPublisher is installed. Figure 11. Select Destination Directory The information contained in this document is confidential and proprietary to Aquire Solutions, Inc. This information may not be distributed or used for any purpose other than the evaluation of Aquire Solutions, nor may it be disclosed to any party without the prior written consent from Aquire. Copyright © 2001 - 2011 Aquire. All Rights Reserved. Revised 10/21/11 12 OrgPublisher 10.1 Installation Guide OrgPublisher Client Installation Note: If an error message displays at this point in the installation process, please contact a member of the IT department who can login with administrative permissions to complete the installation. 8. The Installation Completed! dialog box opens to confirm that OrgPublisher successfully installed. Check or uncheck any of the options displayed on the page to: Create an OrgPublisher icon on your desktop Launch the OrgPublisher application View the Getting Started Guide Then, click Finish. Figure 12. Installation Completed! The OrgPublisher Client is now installed. Note: The OrgPublisher Getting Started Guide and User manual also can be found in the application by in the Help Menu options. To publish with ECharts, additional server setup is required. ECharts are interactive charts designed for over 5,000 records and provide advanced security options. OrgPublisher 10 EChart Server Setup Guide The information contained in this document is confidential and proprietary to Aquire Solutions, Inc. This information may not be distributed or used for any purpose other than the evaluation of Aquire Solutions, nor may it be disclosed to any party without the prior written consent from Aquire. Copyright © 2001 - 2011 Aquire. All Rights Reserved. Revised 10/21/11 13 OrgPublisher 10.1 Installation Guide OrgPublisher Web Administration Installation OrgPublisher Web Administration Installation Prior to installing OrgPublisher Web Administration, please review the following to ensure the installation is successful: Role Requirements Web Server Requirements Prerequisites for Installation Check the type of server where OrgPublisher with Web Administration is being installed. The directions in this installation guide are only valid with Windows® Server 2003. Please click on the links below to access OrgPublisher Web Administration Installation guides for Windows® Server 2008 or Windows® Server 2008 R2. Click here to open the Windows® 2008 Installation Guide. Click here to open the Windows® 2008 R2 Installation Guide. 1. OrgPublisher Web Administration Installation Instructions for Windows® 2003 Servers 1.1 On the server, click on the OrgPublisher download link within the license key email. Select the download link for the language of the OrgPublisher 10 application preferred. Note: The retail/trial license key will unlock the appropriate connectors or Premier functionality. To download the OrgPublisher Trial, click on the following link: Trial Download: OrgPublisher Premier 1.2 The download prompt displays. Click Run to begin the Installation or Save and Run to save the executable file and being the Installation. Figure 13. OrgPublisher Download The information contained in this document is confidential and proprietary to Aquire Solutions, Inc. This information may not be distributed or used for any purpose other than the evaluation of Aquire Solutions, nor may it be disclosed to any party without the prior written consent from Aquire. Copyright © 2001 - 2011 Aquire. All Rights Reserved. Revised 10/21/11 14 OrgPublisher 10.1 Installation Guide OrgPublisher Web Administration Installation 1.3 The Activation Information page opens. Copy and paste the License key and Registered Company Name in the appropriate fields. Then, click Next. Note: These should be entered exactly as they appear in the License key email to avoid “Invalid Key” errors. Figure 14. Activation Information 1.4 The Welcome! Page displays. Click Next. Figure 15. Welcome 1.5 The License Agreement page displays. Read and accept the OrgPublisher License Agreement by clicking Agree. Figure 16. License Agreement The information contained in this document is confidential and proprietary to Aquire Solutions, Inc. This information may not be distributed or used for any purpose other than the evaluation of Aquire Solutions, nor may it be disclosed to any party without the prior written consent from Aquire. Copyright © 2001 - 2011 Aquire. All Rights Reserved. Revised 10/21/11 15 OrgPublisher 10.1 Installation Guide OrgPublisher Web Administration Installation 1.6 The Registration Information screen displays. Enter: Registered user’s full name. Registered user’s company name Then click Next. Note: There is no specific format required for these fields. Figure 17. Registration Information 1.7 The Custom Installation Option dialog opens. Select OrgPublisher Custom Install, and then click Next. Figure 18. Custom Installation Option 1.8 The Select Web Administration Destination Directory dialog displays. Enter \opweb at the end of C:\inetpub\wwwroot Note: Verify the Web Administration Destination Directory Path = C:\inetpub\wwwroot\opweb If this path is not entered correctly, OrgPublisher will display an error message when launching Web Administration. Figure 19. Enter the Physical Path The information contained in this document is confidential and proprietary to Aquire Solutions, Inc. This information may not be distributed or used for any purpose other than the evaluation of Aquire Solutions, nor may it be disclosed to any party without the prior written consent from Aquire. Copyright © 2001 - 2011 Aquire. All Rights Reserved. Revised 10/21/11 16 OrgPublisher 10.1 Installation Guide OrgPublisher Web Administration Installation 1.9 Click Next and the Enter the Web Administration URL dialog displays. Enter /opweb at the end of HTTP://ServerName Note: Verify the Web Administration URL = HTTP://ServerName/opweb The ServerName is the name of the server where OrgPublisher is to be installed, and the URL entered here is a virtual path that points to the physical path entered in the previous step. If another path is used, enter that path instead of the path above. If this path is not entered correctly, OrgPublisher will display an error message when launching Web Admin. 1.10 Figure 20. Enter the Virtual Path Click Next and the Select Destination Directory page displays. Accept the default directory path (C:\Program Files\OrgPub10) OR type or Browse to change the directory path. Then, click Next. Figure 1. Figure 21. Select Destination Directory 1.11 The application install begins. When the installation is complete, the Installation Completed! dialog opens. Select Launch OrgPublisher now to create a DCOM entry. The other items are optional. Click Finish. Note: Launching OrgPublisher is required to create the DCOM entry which will be needed later in the OrgPublisher Web Administration installation. Figure 22. Installation Completed The information contained in this document is confidential and proprietary to Aquire Solutions, Inc. This information may not be distributed or used for any purpose other than the evaluation of Aquire Solutions, nor may it be disclosed to any party without the prior written consent from Aquire. Copyright © 2001 - 2011 Aquire. All Rights Reserved. Revised 10/21/11 17 OrgPublisher 10.1 Installation Guide OrgPublisher Web Administration Installation 1.12 The OrgPublisher application opens. Then, close the application after it opens successfully. 1.13 Browse to the Web Administration Destination Directory Path, C:\inetpub\wwwroot\opweb, entered in Step 1.8. The following folders and files are created in the Web Admin installation: ArchivedCharts folder PublishedCharts folder SearchDictionary folder SourceCharts folder OPAdmin.htm OPAdmin.js OPAdmin.opw Remoteserver.dll Figure 22. Opweb Folder The information contained in this document is confidential and proprietary to Aquire Solutions, Inc. This information may not be distributed or used for any purpose other than the evaluation of Aquire Solutions, nor may it be disclosed to any party without the prior written consent from Aquire. Copyright © 2001 - 2011 Aquire. All Rights Reserved. Revised 10/21/11 18 OrgPublisher 10.1 Installation Guide OrgPublisher Web Administration Installation 2. Configuring Groups The following groups are required to setup access to OrgPublisher Web Administration. 2.1 Create a Global Group on the Domain Controller Note: The OPWeb_GG group must be created by an Administrator on the Domain Controller. Create a Global Group titled OPweb_GG. 2.1-1 Add the OrgPublisher Chart Administrator Users to the global group. Figure 23. Creating OPWeb_GG on the Domain Controller. 2.2 Create a Local Group on the Web Server Note: The OPWeb_LG group must be setup by an Administrator on the Server. Setup of the OPWeb_LG group must be completed prior to moving on with the installation. Create a Local Group titled OPweb_LG. 2.2-1 Click Start -> All Programs -> Administrative Tools -> Computer Management 2.2-2 In the Computer Management dialog, expand Local Users and Groups 2.2-3 Select the Groups folder 2.2-4 In the Actions Menu, select New Group Figure 24. Creating the OPWeb_LG group The information contained in this document is confidential and proprietary to Aquire Solutions, Inc. This information may not be distributed or used for any purpose other than the evaluation of Aquire Solutions, nor may it be disclosed to any party without the prior written consent from Aquire. Copyright © 2001 - 2011 Aquire. All Rights Reserved. Revised 10/21/11 19 OrgPublisher 10.1 Installation Guide OrgPublisher Web Administration Installation 2.2-5 In the New Group dialog, enter OPWeb_LG in the Group Name field. 2.2-6 Click Add, and select the Domain Global Group (OPWeb_GG) group. Click OK when finished. 2.2-7 In the New Group dialog, select Create and the OPWeb_LG group should appear in the list of Local Groups. Figure 25. Creating the OPWeb_LG Group on the Web Server. The information contained in this document is confidential and proprietary to Aquire Solutions, Inc. This information may not be distributed or used for any purpose other than the evaluation of Aquire Solutions, nor may it be disclosed to any party without the prior written consent from Aquire. Copyright © 2001 - 2011 Aquire. All Rights Reserved. Revised 10/21/11 20 OrgPublisher 10.1 Installation Guide OrgPublisher Web Administration Installation 3. Setting NTFS Permissions NTFS Permissions must be configured to access and secure OrgPublisher Web Administration. 3.1 Set NTFS Permissions for the Opweb Folder 3.1-1 Navigate to C:\inetpub\wwwroot 3.1-2 Right-click on the opweb folder and choose Properties. Figure 26: Opweb Properties 3.1-3 Select the Security tab. 3.1-4 Click Edit and the Permissions for opweb dialog opens. 3.1-5 Click Add. Then, click Locations and change the location to the Server. Click OK. Figure 27. Opweb Security The information contained in this document is confidential and proprietary to Aquire Solutions, Inc. This information may not be distributed or used for any purpose other than the evaluation of Aquire Solutions, nor may it be disclosed to any party without the prior written consent from Aquire. Copyright © 2001 - 2011 Aquire. All Rights Reserved. Revised 10/21/11 21 OrgPublisher 10.1 Installation Guide OrgPublisher Web Administration Installation 3.1-6 In the Select Users or Groups dialog, click Advanced and in the dialog that displays, select Find Now. 3.1-7 Select the following groups from the search results and click OK: Local Administrators Group OPWeb_LG Network Service IIS_WPG (Worker Process Group) Click OK to add the groups. Figure 28. Select Users or Groups 3.1-8 Set the following NTFS permission for the Opweb folder: Local Administrators Group – Full Control OPWeb_LG – Modify Network Service – Read and Execute IIS_WPG (Worker Process Group) – Read and Execute Note: Remove the Everyone Group from the Opweb folder 3.2 Set NTFS Permissions for the SourceCharts Folder 3.2-1 Navigate to the C:\inetpub\wwwroot\opweb 3.2-2 Right-click on the SourceCharts folder and choose Properties 3.2-3 Repeat steps 3.1-1 through 3.1-8 for the SourceCharts folder. SourceCharts folder - NTFS permissions: Local Administrators Group – Full Control OPWeb_LG – Modify Network Service – Read and Execute IIS_WPG (Worker Process Group) – Read and Execute Note: Remove the Everyone Group in the Sourcecharts folder. The information contained in this document is confidential and proprietary to Aquire Solutions, Inc. This information may not be distributed or used for any purpose other than the evaluation of Aquire Solutions, nor may it be disclosed to any party without the prior written consent from Aquire. Copyright © 2001 - 2011 Aquire. All Rights Reserved. Revised 10/21/11 22 OrgPublisher 10.1 Installation Guide OrgPublisher Web Administration Installation 3.3 Set NTFS Permissions for the ArchivedCharts Folder 3.3-1 Navigate to the C:\inetpub\wwwroot\opweb 3.3-2 Right-click on the ArchivedCharts folder and choose Properties 3.3-3 Repeat steps 3.1-1 through 3.1-8 for the ArchivedCharts folder. ArchivedCharts folder - NTFS permissions: Local Administrators Group – Full Control OPWeb_LG – Modify Network Service – Read and Execute IIS_WPG (Worker Process Group) Note: Remove the Everyone Group in the ArchivedCharts folder. 3.4. Set NTFS Permissions for the SearchDictionary Folder 3.4-1 Navigate to the C:\inetpub\wwwroot\opweb 3.4-2 Right-click on the SearchDictionary folder and choose Properties 3.4-3 Repeat steps 3.1-1 through 3.1-8 for the SearchDictionary folder. SearchDictionary folder - NTFS permissions: Local Administrators Group – Full Control OPWeb_LG – Modify Network Service – Read and Execute IIS_WPG (Worker Process Group) – Read and Execute Note: Remove the Everyone Group in the SearchDictionary folder. 3.5. Set NTFS Permissions for the PublishedCharts folder 3.5-1 Navigate to the C:\inetpub\wwwroot\opweb 3.5-2 Right-click on the PublishedCharts folder and choose Properties 3.5-3 Select the Security tab. 3.5-4 Click Edit and the Permissions for PublishedCharts dialog opens. 3.5-5 Click Add. Then, click Locations and change the location to the Server. Click OK. 3.5-6 In the Select Users or Groups dialog, click Advanced and in the dialog that displays, select Find Now. 3.5-7 Select the following groups from the search results and click OK: Local Administrators Group OPWeb_LG Network Service IIS_WPG (Worker Process Group) Users Group The information contained in this document is confidential and proprietary to Aquire Solutions, Inc. This information may not be distributed or used for any purpose other than the evaluation of Aquire Solutions, nor may it be disclosed to any party without the prior written consent from Aquire. Copyright © 2001 - 2011 Aquire. All Rights Reserved. Revised 10/21/11 23 OrgPublisher 10.1 Installation Guide OrgPublisher Web Administration Installation 3.5-8 Click OK to add the groups. 3.5-9 PublishedCharts folder - NTFS permissions: Local Administrators Group – Full Control OPWeb_LG – Modify Network Service – Read and Execute IIS_WPG (Worker Process Group) – Read and Execute Users Group – Read and Execute Note: Removing the Everyone Group is not required for the PublishedCharts folder. However, edit the Everyone Group permissions and remove Write permissions if enabled. The Everyone Group should only have read and execute permissions enabled on the PublishedCharts folder. The information contained in this document is confidential and proprietary to Aquire Solutions, Inc. This information may not be distributed or used for any purpose other than the evaluation of Aquire Solutions, nor may it be disclosed to any party without the prior written consent from Aquire. Copyright © 2001 - 2011 Aquire. All Rights Reserved. Revised 10/21/11 24 OrgPublisher 10.1 Installation Guide OrgPublisher Web Administration Installation Web Admin NTFS Rights Graphic Figure 30. Web Admin NTFS Rights Graphic The information contained in this document is confidential and proprietary to Aquire Solutions, Inc. This information may not be distributed or used for any purpose other than the evaluation of Aquire Solutions, nor may it be disclosed to any party without the prior written consent from Aquire. Copyright © 2001 - 2011 Aquire. All Rights Reserved. Revised 10/21/11 25 OrgPublisher 10.1 Installation Guide OrgPublisher Web Administration Installation 4. Configure Internet Information Services (IIS) 4.1 Create the OrgPublisher Application Pool 4.1-1 In IIS, expand the Server and then Application Pools. 4.1-2 Right click on Application Pools. Go to New and select Application Pool… Figure 31. New Application Pool 4.1-3 The Add New Application Pool dialog opens. Enter OrgPublisher in the Application pool ID field. Select Use default settings for new application pool. Then Click OK. Figure 32. Enter the Application Pool ID The information contained in this document is confidential and proprietary to Aquire Solutions, Inc. This information may not be distributed or used for any purpose other than the evaluation of Aquire Solutions, nor may it be disclosed to any party without the prior written consent from Aquire. Copyright © 2001 - 2011 Aquire. All Rights Reserved. Revised 10/21/11 26 OrgPublisher 10.1 Installation Guide OrgPublisher Web Administration Installation 4.2 Configure the Opweb Directory in IIS 4.2-1 In IIS, expand Web Sites and rightclick on the opweb virtual directory. Select Properties. Figure 33. IIS ECharts Properties 4.2-2 The Opweb Properties dialog opens to the Directory tab. 4.2-3 Check the Read check box. 4.2-4 In the Execute Permissions dropdown, select Scripts and Executables. 4.2-5 In the Application Pool dropdown, select OrgPublisher. Figure 34. Virtual Directory Tab The information contained in this document is confidential and proprietary to Aquire Solutions, Inc. This information may not be distributed or used for any purpose other than the evaluation of Aquire Solutions, nor may it be disclosed to any party without the prior written consent from Aquire. Copyright © 2001 - 2011 Aquire. All Rights Reserved. Revised 10/21/11 27 OrgPublisher 10.1 Installation Guide OrgPublisher Web Administration Installation 4.2-6 Now, select the Directory Security Tab. 4.2-7 In the Authentication and access control section, click Edit. 4.2-8 The Authentication Methods dialog opens. Confirm that Enable Anonymous access is NOT selected. 4.2-9 Check Integrated Windows Authentication. 4.2-10 Click OK. Figure 35. Authentication 4.2-11 Select the HTTP Headers tab. 4.2-12 In the MIME types section, click on MIME Types. 4.2-13 In the window that displays, click New. 4.2-14 The MIME Type dialog displays. In the Extension field, enter .ocp In the MIME type field enter application/orgpublisher 4.2-15 Click OK 3 times to close the Opweb Properties dialog. Figure 36. Set the .ocp MIME type The information contained in this document is confidential and proprietary to Aquire Solutions, Inc. This information may not be distributed or used for any purpose other than the evaluation of Aquire Solutions, nor may it be disclosed to any party without the prior written consent from Aquire. Copyright © 2001 - 2011 Aquire. All Rights Reserved. Revised 10/21/11 28 OrgPublisher 10.1 Installation Guide OrgPublisher Web Administration Installation 4.3 Configure the SourceCharts Folder in IIS 4.3-1 In IIS, click to expand the opweb virtual directory. Then, right click on the SourceCharts folder and select Properties. 4.3-2 The SourceCharts Properties dialog opens to the Directory tab. 4.3-3 Check the Read check box. 4.3-4 In the Execute Permissions dropdown, select Scripts and Executables. Figure 37. Virtual Directory Tab 4.3-5 Now, select the Directory Security Tab. 4.3-6 In the Authentication and access control section, click Edit. The Authentication Methods dialog opens. Confirm that Enable Anonymous access is NOT selected. Check Integrated Windows Authentication. 4.3-7 Click OK until you close out the dialog box. Figure 38. Authentication The information contained in this document is confidential and proprietary to Aquire Solutions, Inc. This information may not be distributed or used for any purpose other than the evaluation of Aquire Solutions, nor may it be disclosed to any party without the prior written consent from Aquire. Copyright © 2001 - 2011 Aquire. All Rights Reserved. Revised 10/21/11 29 OrgPublisher 10.1 Installation Guide OrgPublisher Web Administration Installation 4.4 Configure the ArchivedCharts Folder in IIS 4.4-1 In IIS, right click on the ArchivedCharts folder and select Properties. 4.4-2 The ArchivedCharts Properties dialog opens to the Directory tab. 4.4-3 Check the Read check box. 4.4-4 In the Execute Permissions dropdown, select Scripts and Executables. Figure 39. Directory Tab 4.4-5 Now, select the Directory Security Tab. 4.4-6 In the Authentication and access control section, click Edit. The Authentication Methods dialog opens. Confirm that Enable Anonymous access is NOT selected. Check Integrated Windows Authentication. 4.4-7 Click OK until you close out the dialog box. Figure 40. Authentication The information contained in this document is confidential and proprietary to Aquire Solutions, Inc. This information may not be distributed or used for any purpose other than the evaluation of Aquire Solutions, nor may it be disclosed to any party without the prior written consent from Aquire. Copyright © 2001 - 2011 Aquire. All Rights Reserved. Revised 10/21/11 30 OrgPublisher 10.1 Installation Guide OrgPublisher Web Administration Installation 4.5 Configure the SearchDictionary Charts Folder in IIS 4.5-1 In IIS, right click on the SearchDictionary folder and select Properties. 4.5-2 The SearchDictionary Properties dialog opens to the Directory tab. 4.5-3 Check the Read check box. 4.5-4 In the Execute Permissions dropdown, select Scripts and Executables. Figure 41. Directory Tab 4.5-5 Now, select the Directory Security Tab. 4.5-6 In the Authentication and access control section, click Edit. The Authentication Methods dialog opens. Confirm that Enable Anonymous access is NOT selected. Check Integrated Windows Authentication. 4.5-7 Click OK until you close out the dialog box. Figure 42. Authentication The information contained in this document is confidential and proprietary to Aquire Solutions, Inc. This information may not be distributed or used for any purpose other than the evaluation of Aquire Solutions, nor may it be disclosed to any party without the prior written consent from Aquire. Copyright © 2001 - 2011 Aquire. All Rights Reserved. Revised 10/21/11 31 OrgPublisher 10.1 Installation Guide OrgPublisher Web Administration Installation 4.6 Configure the PublishedCharts Folder in IIS 4.6-1 In IIS, right click on the PublishedCharts folder and select Properties. 4.6-2 The PublishedCharts Properties dialog opens to the Directory tab. 4.6-3 Check the Read check box. 4.6-4 In the Execute Permissions dropdown, select Scripts and Executables. Figure 41. Directory Tab 4.6-5 Now, select the Directory Security Tab. 4.6-6 In the Authentication and access control section, click Edit. The Authentication Methods dialog opens. Confirm that Enable Anonymous Access IS selected. Verify that the account is the correct IUSR account. Check Integrated Windows Authentication. 4.6-7 Click OK until you close out the dialog box. Figure 42. Authentication The information contained in this document is confidential and proprietary to Aquire Solutions, Inc. This information may not be distributed or used for any purpose other than the evaluation of Aquire Solutions, nor may it be disclosed to any party without the prior written consent from Aquire. Copyright © 2001 - 2011 Aquire. All Rights Reserved. Revised 10/21/11 32 OrgPublisher 10.1 Installation Guide OrgPublisher Web Administration Installation 4.6-8 Select the HTTP Headers tab. 4.6-9 In the MIME types section, click on MIME Types. 4.6-10 In the window that displays, click New. 4.6-11 The MIME Type dialog displays. In the Extension field, enter .ocp In the MIME type field, enter application/orgpublisher 4.6-12 Click OK 3 times to close the PublishedCharts Properties dialog. Figure 43. Set the .ocp MIME type The information contained in this document is confidential and proprietary to Aquire Solutions, Inc. This information may not be distributed or used for any purpose other than the evaluation of Aquire Solutions, nor may it be disclosed to any party without the prior written consent from Aquire. Copyright © 2001 - 2011 Aquire. All Rights Reserved. Revised 10/21/11 33 OrgPublisher 10.1 Installation Guide OrgPublisher Web Administration Installation 4.7 Enable All Unknown ISAPI Extensions Note: This step will enable All Unknown ISAPI extensions to run on the web server. If IT security policy restricts allowing all ISAPI extensions, please refer to step 4.8 for an alternate configuration. The directions below (for step 4.7) require a one-time setup by the Web Server Administrator. Using the alternate setup, the Web Server Administrator will need to enable each chart.dll web extension each time a new chart is published by the Chart Administrator. Please contact the Domain Administrator to clarify which configuration will meet the IT Security Policy requirements. 4.7-1 4.7-2 4.7-3 In IIS, click on the Web Service Extensions folder. In the Web Service Extension list, right click on All Unknown ISAPI Extensions. Then, select Allow. A security prompt displays. Click Yes to enable all unknown ISAPI extensions. Figure 44. Allow all unknown ISAPI Extensions. The information contained in this document is confidential and proprietary to Aquire Solutions, Inc. This information may not be distributed or used for any purpose other than the evaluation of Aquire Solutions, nor may it be disclosed to any party without the prior written consent from Aquire. Copyright © 2001 - 2011 Aquire. All Rights Reserved. Revised 10/21/11 34 OrgPublisher 10.1 Installation Guide OrgPublisher Web Administration Installation 4.8 When Allow All Unknown ISAPI Extensions is Restricted Note: If step 4.7 was completed, skip this step and continue with step 5. Using the configuration below (in step 4.8), the Web Server Administrator will need to enable each chart.dll web extension when new charts are published by the Chart Administrator. The second part of this configuration cannot be completed until an EChart has been published. Please contact the Domain Administrator to clarify which configuration will meet the IT Security Policy requirements. The directions below are intended for organizations with an IT Security Policy that restricts setting All Unknown ISAPI Extensions to Allow. Initially, a remoteserver.dll web extension must be setup. Then, the Web Server administrator will need to configure a chart.dll web extension each time a new EChart is published (producing a new chart.dll). Setup the Remoteserver.dll Web Extension 4.8-1 Open IIS, and click on Web Service Extensions 4.8-2 Under Tasks, click on Add a new Web Service extension 4.8-3 The New Web Service Extension dialog opens. In the Extension Name field, Enter remoteserver.dll 4.8-4 Click Add and the Add file dialog opens. 4.8-5 Enter the path: C:\inetpub\wwwroot\opweb\remoteserver.dll 4.8-6 Check the option to Set extension status to Allowed. Then, click OK. Figure 45. Add remoteserver.dll The information contained in this document is confidential and proprietary to Aquire Solutions, Inc. This information may not be distributed or used for any purpose other than the evaluation of Aquire Solutions, nor may it be disclosed to any party without the prior written consent from Aquire. Copyright © 2001 - 2011 Aquire. All Rights Reserved. Revised 10/21/11 35 OrgPublisher 10.1 Installation Guide OrgPublisher Web Administration Installation Setup the Published Chart.dll Note: If a chart has not been published to the PublishedCharts folder, continue to Step 5. 4.8-7 When a new chart is published, a dll file is produced. This is visible in the PublishedCharts folder (C:\inetpub\wwwroot\opweb\PublishedCharts) Figure 46. New published chart dll 4.8-8 Open IIS, and click on Web Service Extensions 4.8-9 Under Tasks, click on Add a new Web service extension 4.8-10 The New Web Service Extension dialog opens. In the Extension Name field, enter the new dll name. (Ex. PacificEastern.dll) 4.8-11 Click Add and the Add file dialog opens. 4.8-12 Enter or browse to the path to the new chart dll. Then click OK. Example: C:\inetpub\wwwroot\PublishedCharts\PacificEastern.dll 4.8-13 Check the option to Set extension status to Allowed. Then, click OK. Note: Each time a new chart is published (and a new dll is produced) the administrator will need to follow steps 4.8-7 to 4.8-13 to allow the dll file. Otherwise, users will not be able to view the EChart. Figure 47. Add Web Extension The information contained in this document is confidential and proprietary to Aquire Solutions, Inc. This information may not be distributed or used for any purpose other than the evaluation of Aquire Solutions, nor may it be disclosed to any party without the prior written consent from Aquire. Copyright © 2001 - 2011 Aquire. All Rights Reserved. Revised 10/21/11 36 OrgPublisher 10.1 Installation Guide OrgPublisher Web Administration Installation 5. Setup DCOM Permissions 5.1. Launch OrgPublisher on the server. Close the application after it opens. 5.2. Go to the Start menu, select Run. 5.3. Enter dcomcnfg and select OK. Note: If you receive a CLSID Warning message, click Yes. Figure 48. Launch DCOM 5.4 Expand Component Services, Computers, My Computer. Then, click on DCOM Config 5.5 Navigate to OrgPublisher X Document. Right click and select Properties. Figure 49. OrgPublisher X Document Properties Note: If you installed a previous version of OrgPublisher on your computer, you will see OrgPublisher X Document, where X is the previous version number. Use that document. The information contained in this document is confidential and proprietary to Aquire Solutions, Inc. This information may not be distributed or used for any purpose other than the evaluation of Aquire Solutions, nor may it be disclosed to any party without the prior written consent from Aquire. Copyright © 2001 - 2011 Aquire. All Rights Reserved. Revised 10/21/11 37 OrgPublisher 10.1 Installation Guide OrgPublisher Web Administration Installation 5.6 5.7 The OrgPublisher X Document Properties Opens. Select the Security Tab. Figure 50. OrgPublisher X Document Security 5.8 Under Launch and Activation Permissions, click Edit. Figure 51. Edit Launch and Activation Permissions The information contained in this document is confidential and proprietary to Aquire Solutions, Inc. This information may not be distributed or used for any purpose other than the evaluation of Aquire Solutions, nor may it be disclosed to any party without the prior written consent from Aquire. Copyright © 2001 - 2011 Aquire. All Rights Reserved. Revised 10/21/11 38 OrgPublisher 10.1 Installation Guide OrgPublisher Web Administration Installation 5.9 Click Add. Then, click Locations and change the location to the Server. Click OK. Figure 52. Add Groups in Launch and Activation Permissions 5.10 In the Select Users or Groups dialog, click Advanced and in the dialog that displays, select Find Now. Figure 53. Select Users or Groups 5.11 Add the following groups: – Local Administrators Group – Local Interactive Group – Local IUSR Account – Local IWAM Account – Local Network Group – Local Network Services Group – Local OPweb_LG Group – Local System Group Click OK to add the groups Figure 54. Select Users or Group The information contained in this document is confidential and proprietary to Aquire Solutions, Inc. This information may not be distributed or used for any purpose other than the evaluation of Aquire Solutions, nor may it be disclosed to any party without the prior written consent from Aquire. Copyright © 2001 - 2011 Aquire. All Rights Reserved. Revised 10/21/11 39 OrgPublisher 10.1 Installation Guide OrgPublisher Web Administration Installation 5.12 Enable the following Launch and Activation Permissions: – – – – – – – – Local Local Local Local Local Local Local Local OPweb_LG Group Administrators Group Interactive Group IUSR Account IWAM Account Network Group Network Services Group System Group All options Local Launch Local Launch Local Launch Local Launch Local Launch Local Launch Local Launch Click OK to close Launch and Activation Permissions. 5.13 Under Access Permissions, click Edit. Figure 55. Access Permissions 5.14 Click Add. Then, click Locations and change the location to the Server. Click OK. Figure 56. Add Groups in Access Permissions The information contained in this document is confidential and proprietary to Aquire Solutions, Inc. This information may not be distributed or used for any purpose other than the evaluation of Aquire Solutions, nor may it be disclosed to any party without the prior written consent from Aquire. Copyright © 2001 - 2011 Aquire. All Rights Reserved. Revised 10/21/11 40 OrgPublisher 10.1 Installation Guide OrgPublisher Web Administration Installation 5.15 In the Select Users or Groups dialog, click Advanced and in the dialog that displays, select Find Now. Figure 57. Select Users or Groups 5.16 Select the following groups from the search results and click OK: o Local Administrators Group o Local Interactive Group o Local IUSR Account o Local IWAM Account o Local Network Group o Local Network Services Group o Local OPweb_LG Group o Local System Group Click OK to add the groups. Figure 58. Select Groups 5.17 Enable the following Access Permissions: o o o o o o o o Local Local Local Local Local Local Local Local OPweb_LG Group Administrators Group Interactive Group IUSR Account IWAM Account Network Group Network Services Group System Group Both options Local Access Local Access Local Access Local Access Local Access Local Access Local Access Click OK to close the Access Permissions dialog and OK to close the OrgPublisher X Document window. The Windows 2003 OrgPublisher Web Administration setup is complete. Now, proceed to test Web Administration and EChart Publishing to ensure everything is correctly configured. The information contained in this document is confidential and proprietary to Aquire Solutions, Inc. This information may not be distributed or used for any purpose other than the evaluation of Aquire Solutions, nor may it be disclosed to any party without the prior written consent from Aquire. Copyright © 2001 - 2011 Aquire. All Rights Reserved. Revised 10/21/11 41 OrgPublisher 10.1 Installation Guide Testing OrgPublisher Web Administration Testing OrgPublisher Web Administration The following tests will help determine if Web Administration is configured correctly. If the following tests are performed successfully, the OrgPublisher Web Administration installation is correctly configured. If errors display while testing, review: o NTFS permissions o IIS configurations o DCOM settings o Refer to the Troubleshooting Tips in this Installation Guide to determine if additional settings may be needed. If errors still occur after checking the configurations and reviewing the troubleshooting tips, please contact Aquire Support for further assistance. Prerequisites for Testing Web Administration It is recommended to test Web Administration on a workstation rather than the server. In addition, the Web Server Administrator may want to add their user account to the OPWeb_LG group for the purpose of accessing Web Administration with the same rights as the Chart Administrators. To open OrgPublisher Web Administration, users must have a Web Administration pluginX file, orgpub32.ocx. Users will be prompted to download the pluginX file from the Aquire Web Site when visiting the Web Administration URL for the first time. Users must be administrators on their machines in order to install pluginX files. Refer to OrgPublisher 10 PluginX Implementation Guide for more information on pluginX controls. The information contained in this document is confidential and proprietary to Aquire Solutions, Inc. This information may not be distributed or used for any purpose other than the evaluation of Aquire Solutions, nor may it be disclosed to any party without the prior written consent from Aquire. Copyright © 2001 - 2011 Aquire. All Rights Reserved. Revised 10/21/11 42 OrgPublisher 10.1 Installation Guide Testing OrgPublisher Web Administration Test Web Administration 1. Open Internet Explorer and type in the URL for OrgPublisher Web Administration: http://<servername>/opweb/Opadmin.htm Note: <servername> is the name of the server on which OrgPublisher is installed. 2. If prompted, install the Web Administration pluginX file from the Aquire Web Site. 3. OrgPublisher Web Administration should open. Note: Click OK if a prompt displays with the message that reads, No Charts Exist Yet. Figure 59. Web Administration View Prerequisites for Testing Web Admin Publishing to EChart Rich Client It is recommended to test Web Administration on a workstation rather than the server. In addition, the server administrator may want to add their user account to the OPWeb_LG group for the purpose of accessing Web Administration with the same rights as the Chart Administrators. To open an OrgPublisher Echart Rich Client Chart, users must have a pluginX viewer, orgpubx.ocx. Users will be prompted to download the pluginX file from the Aquire Web Site when clicking on a chart link for the first time. Users must be administrators on their machines in order to install pluginX files. Refer to the OrgPublisher 10 PluginX Implementation Guide for more information on pluginX controls. The information contained in this document is confidential and proprietary to Aquire Solutions, Inc. This information may not be distributed or used for any purpose other than the evaluation of Aquire Solutions, nor may it be disclosed to any party without the prior written consent from Aquire. Copyright © 2001 - 2011 Aquire. All Rights Reserved. Revised 10/21/11 43 OrgPublisher 10.1 Installation Guide Testing OrgPublisher Web Administration Test Publishing an EChart Rich Client Chart 1. In the Web Administration URL (http://<Servername>/opweb/opadmin.htm), go to the File Menu and select New 2. The Select a Chart to Open dialog displays. Click New. Figure 60. Select a Chart to Open 3. The New Chart Wizard Opens. Select Organizational Chart. Figure 61. Select Organizational Chart 4. Select Empty Chart as the data source. Click Next. Figure 62. Select Empty Chart The information contained in this document is confidential and proprietary to Aquire Solutions, Inc. This information may not be distributed or used for any purpose other than the evaluation of Aquire Solutions, nor may it be disclosed to any party without the prior written consent from Aquire. Copyright © 2001 - 2011 Aquire. All Rights Reserved. Revised 10/21/11 44 OrgPublisher 10.1 Installation Guide Testing OrgPublisher Web Administration 5. Uncheck Lauch the Style Wizard. Then, click Finish. Figure 63. Uncheck Lauch Style Wizard 6. In the toolbar, click on Insert Box Containing a Person button. Figure 64. Insert Box Containing Person 7. Drop the box containing a person in the chart white space. Figure 65. Create a one box chart The information contained in this document is confidential and proprietary to Aquire Solutions, Inc. This information may not be distributed or used for any purpose other than the evaluation of Aquire Solutions, nor may it be disclosed to any party without the prior written consent from Aquire. Copyright © 2001 - 2011 Aquire. All Rights Reserved. Revised 10/21/11 45 OrgPublisher 10.1 Installation Guide Testing OrgPublisher Web Administration 8. Click on the Publish button in the toolbar. Figure 66. Click the Publish button 9. The Publishing Wizard opens. Select Advanced Mode. Then, click Next. Figure 67. Advanced Mode 10. Click Next again. Then, enter a name for the test chart. Click Next. Figure 68. Name the Chart The information contained in this document is confidential and proprietary to Aquire Solutions, Inc. This information may not be distributed or used for any purpose other than the evaluation of Aquire Solutions, nor may it be disclosed to any party without the prior written consent from Aquire. Copyright © 2001 - 2011 Aquire. All Rights Reserved. Revised 10/21/11 46 OrgPublisher 10.1 Installation Guide Testing OrgPublisher Web Administration 11. Select Interactive Org Chart and click Next. Figure 69. Interactive Org Chart 12. Select Echart and click Next. Figure 70. EChart 13. Click Next and then Next again. Select Rich client using PluginX. Click Next. Figure 71. Echart Rich Client The information contained in this document is confidential and proprietary to Aquire Solutions, Inc. This information may not be distributed or used for any purpose other than the evaluation of Aquire Solutions, nor may it be disclosed to any party without the prior written consent from Aquire. Copyright © 2001 - 2011 Aquire. All Rights Reserved. Revised 10/21/11 47 OrgPublisher 10.1 Installation Guide Testing OrgPublisher Web Administration 14. Enter the virtual path to the PublishedCharts folder, http://Servername/opweb/PublishedCharts Figure 72. Virtual Path to PublishedCharts 15. Click Next through the remainder of the prompts and then click Finish to publish the test chart as an Echart Rich Client Chart. Figure 73. Publish the Echart 16. Enter a chart name when prompted and click OK. Figure 74. Enter a Chart Name The information contained in this document is confidential and proprietary to Aquire Solutions, Inc. This information may not be distributed or used for any purpose other than the evaluation of Aquire Solutions, nor may it be disclosed to any party without the prior written consent from Aquire. Copyright © 2001 - 2011 Aquire. All Rights Reserved. Revised 10/21/11 48 OrgPublisher 10.1 Installation Guide Testing OrgPublisher Web Administration 17. In the Echart Link Summary window, click on the URL that displays to open the Echart in Internet Explorer. Figure 75. Echart Link Summary Note: If you did NOT enable all unknown ISAPI extensions in the Server setup, you will need to configure the chart.dll (step 4.8) before being able to view the published chart. 18. Install the pluginX viewer from the Aquire web site if prompted. The chart should display in the browser. Figure 76. Echart Displays in Internet Explorer The information contained in this document is confidential and proprietary to Aquire Solutions, Inc. This information may not be distributed or used for any purpose other than the evaluation of Aquire Solutions, nor may it be disclosed to any party without the prior written consent from Aquire. Copyright © 2001 - 2011 Aquire. All Rights Reserved. Revised 10/21/11 49 OrgPublisher 10.1 Installation Guide Web Administration Next Steps Web Administration Next Steps Review the list of items below so that your Chart Administrators have what is needed to begin using charts with Web Administration: Provide the following links to the Chart Administrators: Web Administration URL (Ex. http://servername/opweb/opadmin.htm) PublishedCharts URL (Ex. http://servername/opweb/publishedcharts) If a Chart Administrators is not an administrator on his/her machine, he/she will need assistance downloading the Web Administration pluginX. If the Chart Administrator is using an ODBC connection to a database, a system DSN must be created on the server where OrgPublisher is installed. If the Chart Administrator uses text files or csv files that are not in Standard OrgPublisher field order, mapping text files must be done by an administrator on the server through the OrgPublisher client. Note: If the server administrator will need to assist with mapping text files in OrgPublisher, it is recommended that a default chart file is created one time on the server using the OrgPublisher client. Then, Chart Administrators can use the default file as the basis for creating new charts by following these directions: 1. Open the default file. 2. In the File Menu, Select Save As and create a new chart name for the file. 3. The data connection remains the same and can now be used to create new organizational charts. If Chart Administrators require access to import and overwrite existing data files from their desktop to the SourceCharts folder, this cannot be done from the Web Administration interface. A network share to the SourceCharts folder would be needed for this purpose. Approving network share folder access is the decision of the IT department and is not part of the standard OrgPublisher Web Administration installation. If Chart Administrators require access to copy formatting files (otm files) to use with new chart data files, a network share to the PublishedCharts folder would be needed for this purpose. Approving network share folder access is the decision of the IT department and is not part of the standard OrgPublisher Web Administration installation. The information contained in this document is confidential and proprietary to Aquire Solutions, Inc. This information may not be distributed or used for any purpose other than the evaluation of Aquire Solutions, nor may it be disclosed to any party without the prior written consent from Aquire. Copyright © 2001 - 2011 Aquire. All Rights Reserved. Revised 10/21/11 50 OrgPublisher 10.1 Installation Guide Troubleshooting Tips Troubleshooting Tips 1. If a grey bar displays in the Internet Explorer window (but no chart), set a MIME type of .OCP on the PublishedCharts folder. Figure 77. Grey Bar displays without .ocp MIME type 2. Error: “Unable to contact the remote server.dll at this URL.” The paths to the virtual directory and URL were, likely, not entered correctly upon install, or the permissions are not set. This may require a reinstall, per the installation guide. Figure 78. RemoteServer.dll Error 3. Chart administrator or end users get a blank Internet Explorer screen, with a red X in the upper left corner indicates a problem installing and registering the ActiveX control. Installing ActiveX controls requires administrative rights on the PC. The IT group can request Aquire’s MSI scripts to assist in pushing out the plugins. Please contact [email protected] if MSI scripts are required. Include the full version number of OrgPublisher installed on the server (Go to Help > About OrgPublisher). Ex. 10.1.3042.1 Figure 79. Red X The information contained in this document is confidential and proprietary to Aquire Solutions, Inc. This information may not be distributed or used for any purpose other than the evaluation of Aquire Solutions, nor may it be disclosed to any party without the prior written consent from Aquire. Copyright © 2001 - 2011 Aquire. All Rights Reserved. Revised 10/21/11 51 OrgPublisher 10.1 Installation Guide Troubleshooting Tips 4. Error: "Unable to instantiate OrgPub32 as an automation server" indicates a permission or installation error. Verify the DCOM permissions (dcomcnfg) are correct. If the error still occurs, adjust settings to include the following DCOM permissions: In the DCOM permissions (under the OrgPublisher X Document Identity tab), select the Launching User Note: If the error still continues, this may require a reinstall per the installation guide. Figure 80. Unable to Instantiate error 5. Understanding HTTP error messages and their associated status codes is important when you need to troubleshoot IIS. A few common errors on the client side (4xx error) and server side (5xx error) are listed below: Error Code Definition 400 Bad Request; the server cannot service the request, usually because of an incorrect URL. 401 Unauthorized; the users credentials were not accepted by the authorization process. 403 Forbidden; the request could not be serviced for a number of reasons, even though the user was authenticated. 404 Not Found; the server cannot locate the requested file. 405 Method Not Allowed; the client incorrectly issues a HTTP GET request when a HTTP POST request should have been issued. 406 Not Acceptable; the requested file is not supported by the client. The information contained in this document is confidential and proprietary to Aquire Solutions, Inc. This information may not be distributed or used for any purpose other than the evaluation of Aquire Solutions, nor may it be disclosed to any party without the prior written consent from Aquire. Copyright © 2001 - 2011 Aquire. All Rights Reserved. Revised 10/21/11 52 OrgPublisher 10.1 Installation Guide Troubleshooting Tips Error Code Definition 407 Proxy Authentication Required; the client has to authenticate with the proxy server before its request can be serviced. 410 Gone; the server no longer has the requested file. 500 Internal Server Error; indicates a typical server side error. 501 501 Not Implemented; the server does not support the HTTP method requested by the client. 502 Bad Gateway; an invalid response was received by the upstream server for which this server is a gateway. 503 Service Unavailable; the server does not support the service requested by the client. The information contained in this document is confidential and proprietary to Aquire Solutions, Inc. This information may not be distributed or used for any purpose other than the evaluation of Aquire Solutions, nor may it be disclosed to any party without the prior written consent from Aquire. Copyright © 2001 - 2011 Aquire. All Rights Reserved. Revised 10/21/11 53