1
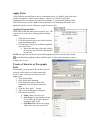
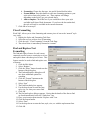
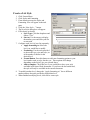
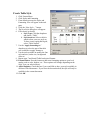
Word 2003
Working with Custom Styles
User’s Manual
University of Wisconsin Oshkosh
Information Technology
Sarah Bradway
Table of Contents
APPLY STYLES .......................................................................................................................................... 1
CREATE A CHARACTER OR PARAGRAPH STYLE.......................................................................... 1
CLEAR FORMATTING ............................................................................................................................. 2
FIND AND REPLACE TEXT FORMATTING ........................................................................................ 2
MODIFY AN EXISTING STYLE .............................................................................................................. 3
CREATE A LIST STYLE ........................................................................................................................... 4
CREATE TABLE STYLE........................................................................................................................... 5
i
Apply Styles
Using different sizes and fonts of text in a document can be very helpful, especially when
trying to emphasize a certain word or phrase. However it can also be quite time
consuming to have to change each aspect of formatting. To combat this problem, Word
2003 allows users to create a style, a kind of premade set of formatting rules that can be
applied to any piece of text with just a couple of mouse clicks.
Applying Prepared Styles
Word 2003 already has many styles set up for you. The
easiest way to access these is through the formatting
toolbar.
1. Select the text to format
2. Click the dropdown arrow next to the Style box
on the formatting toolbar
3. Click the type of style you would like applied to
your selected text
a. Notice that the name of the style reflects
the way the style will look when applied
to your text.
NOTE: the styles list can also be accessed through the task pane, click the styles button
on the formatting toolbar to show available styles. Follow same procedure as above
to apply style to text.
Create a Character or Paragraph
Style
Occasionally, you may not be able to find a style to
suit your needs in the set of styles prepared by
Word. It may work better to create your own
unique style.
1. Click Format Menu
2. Click Styles and Formatting
3. If not already present, the Styles and
Formatting view will appear in the task
pane.
4. Click the “New Style…” button.
5. The New Style dialog box will appear
6. Fill in boxes as desired
a. Name: Name your new style
b. Style Type: Use the dropdown menu
to select the type of style, character,
paragraph, table, or list
c. Style Based on: Choose an existing
style to base your new style off of.
1
d. Formatting: Choose the font type, size and if desired bold or italics.
e. Format Button: Press this button to add extra formatting options to your
style such as font color, borders, etc. These options will change
depending on the Style Type you selected above.
f. Add to template: Check this box if you would like to have your style
available in all future Word documents. If you leave the box unchecked,
the style will only be available in the current document.
7. Click OK to create style
Clear Formatting
Word 2003, allows you to clear formatting and return a piece of text to the “normal” style
very easily
1. Display the Styles and Formatting Task Pane
2. Select the text you wish to clear of formatting
3. Click the style, “Clear Formatting” from the Task Pane
4. The selected text is immediately returned to “normal.”
Find and Replace Text
Formatting
The find and replace feature of word is most
commonly used to locate a certain pieces of text
and replace them with other pieces of text. This
feature can also be used to find and replace sets
of formats.
1. Click the Edit Menu
2. Select “Replace”
3. Click the “More” button located near the
bottom of the dialog box.
4. The Find and Replace dialog box will
now show additional options for
searching.
5. Click the “Format” button near the
bottom of the dialog box.
6. Select “font.”
7. The Find Font dialog box appears
8. Use the drop downs to enter the font,
style, size, etc. that you want to find.
9. Click OK
10. The find and replace dialog reappears. Notice that the details of the font to find
are listed immediately below the “Find what:” box
11. Place your insertion point into the “Replace with:” box.
12. Click the format button.
13. Select “Font”
14. Use the drop downs to enter the font, style, size, etc. with the replacement font.
15. Click OK
2
16. The find a replace dialog box reappears. Notice that the details of the font to
replace are listed immediately below the “Find what:” box.
17. Click “Find Next” to locate the first piece of text that matches “find” criteria
18. Click Replace to change the selected piece of text to the new formats
19. Click “Replace All” to replace every found piece of text in the document with the
new formatting.
Modify an Existing Style
Once a style has been created it can easily be modified using one of the following
procedures.
Modify a Style Manually
Click the Format Menu
1. Click Styles and Formatting
2. In the Styles and Formatting Taskpane, run your mouse over the style you would
like to modify.
3. Click the dropdown arrow
4. Click “Modify”
5. Make any desired changes
6. Click OK to save changes.
Modify a Style using Example Text
1. Change any portion of text in your document to reflect the changes you want to
make to your style
2. Click the Format Menu
3. Click Styles and Formatting
4. Select the example portion of text from your document
5. In the Styles and Formatting Task pane, run your mouse over the style you would
like to modify.
6. Click the dropdown arrow
7. Click “Update to match selection”
8. Changes will be saved to the style and will update any other text using that style
3
Create a List Style
1. Click Format Menu
2. Click Styles and Formatting
3. If not already present, the Styles and
Formatting view will appear in the task
pane.
4. Click the “New Style…” button.
5. The New Style dialog box will appear
6. Fill in boxes as desired
a. Style Type: Click the dropdown and
choose “List.”
b. Start at: Use the arrows to display
the number you would like your list
to start with
7. Configure each level of your list separately.
a. Apply formatting to: Select the
level you would like to modify
c. Formatting: Use the tools provided
to choose the type, size and style, etc
of the number or bullet for the
desired level
d. Format Button: Press this button to add extra formatting options to your
level marker such as color, borders, etc. These options will change
depending on the Style Type you selected above.
e. Add to template: Check this box if you would like to have your style
available in all future Word documents. If you leave the box unchecked,
the style will only be available in the current document.
8. To modify another level, change the “Apply formatting to:” box to different
number and use the tools provided to format that level.
9. When finished modifying levels, click OK to create style
4
Create Table Style
1. Click Format Menu
2. Click Styles and Formatting
3. If not already present, the Styles and
Formatting view will appear in the task
pane.
4. Click the “New Style…” button.
5. The New Style dialog box will appear
6. Fill in boxes as desired
a. Style Type: Click the dropdown
and choose “Table”
b. Style based on: Select a table in
which to base your new style on.
To base it on a regular black grid,
select “Table Normal”
7. Use the “Apply formatting to:”
dropdown to select the part of the table
you would like to apply formats to.
8. Use the tools available to modify the font
style and size, border size, background
color etc.
9. Repeat steps 7 and 8 until Table has desired formats.
10. Format Button: Press this button to add extra formatting options to your level
marker such as color, borders, etc. These options will change depending on the
Style Type you selected above.
11. Add to template: Check this box if you would like to have your style available in
all future Word documents. If you leave the box unchecked, the style will only be
available in the current document.
12. Click OK
5