1
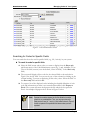
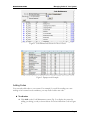
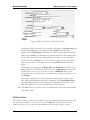
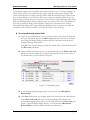
Tips for Creating a Good Coding
System
DonorPerfect Online
SofterWare, Inc.
DonorPerfect Online
December 2009
DonorPerfect Online
Introduction
Introduction
User-defined codes are extremely important in DonorPerfect Online because they help
ensure consistency in the way information is stored in the database. Moreover, this
consistency facilitates the effective use of filters and sorts, which are critical to the operation
of DonorPerfect Online.
Indeed, it would be very difficult to make any sense of the information in your database if it
lacked a high degree of consistency. Imagine, for example, what would happen if the
description that is entered into the Solicitation field in the gift record were left up to the
whim of each data entry person. It is very likely that a wide variety of terms would be used to
describe the same fund raising event. Then imagine how confusing the resulting Solicitation
Analysis report would be. It is to avoid exactly this type of confusion that DonorPerfect
Online uses codes.
A code is a pre-defined, systematic and concise way for representing information that is
repetitively used. An example of a code we all use frequently is the two digit state code that
the post office insists that we put in mailing addresses. By default DonorPerfect Online uses
the exact same set of codes in the State field found on the Main screen.
DonorPerfect Online employs user-defined codes in a wide variety of fields. For example,
there are codes to represent:
•
Each of your fund raising solicitations (e.g., Annual Appeal, Banquet, Golf
Outing, Phonathon, etc.). These codes are used in the Solicitation field (field
name = solicit_code).
•
Each of the accounts toward which donations are directed (e.g., Building Fund,
Education, Unrestricted, etc.). These codes are used in the General Ledger field
(gl_code) in the Gift and Pledge entry screens.
•
Each of the types of acknowledgment/receipt letter that need to be produced
(e.g., Standard Acknowledgement, Pledge Payment Thank-You, New Member
Thank-You, etc.) These codes are used in the Thank-You # and Thank You
Letter fields (ty_letter_no) in the Gift and Pledge entry screens, respectively.
•
Each of the many descriptors used to explain the relationship of a donor to your
organization (e.g., Board Member, Volunteer, Alumnus, etc.). These codes are
used in the Flags field (flag) in the Main screen.
•
Each of the types of gift that must be recorded (e.g., Cash, Check, In Kind Gift,
etc.). These codes are used in the Type of Gift field (gift_type) in the Gift
Screen.
•
And many many more items of information.
December 2009
Page 1
DonorPerfect Online
General Considerations
General Considerations
There are several issues that you should consider as you define codes for your system.
Plan Ahead
When establishing your system of codes, it is a good idea to try to anticipate what your
future needs may be. That would lean towards having somewhat longer codes, even when a
shorter code length would work initially. For example, if you choose a single numeric
character as your code, you will be restricted to only ten codes (i.e., 0, 1,…, 9). If
subsequently you needed to define more than ten codes, you would have to expand the code
length. However, if you initially choose a two digit numeric, you would have 100 codes to
use before needing to expand.
An additional value to having longer codes, especially those that are alphabetic, is that longer
codes can be made a bit more intelligible to the humans that interface with the system.
Finally, it is helpful if all the codes for a given field use the same number of characters. Thus,
by anticipating the number of codes you will need and the information they will have to
represent, you can plan for a code length that will satisfy those needs.
Regularly Maintain Codes
It is natural that the number of codes in your system will expand with time. This can happen,
for example, if the codes you define for solicitations that are repeated annually include
characters that identify the year of the particular solicitation, such as BQ04, BQ05, etc. for
the annual fund raising banquets in 2004, 2005, etc. After a while, the number of the entries
in the Solicitation pull-down menu can increase to the point where unnecessary delays and
possible mistakes are introduced into the data entry process.
Thus, if you are no longer using a code and don’t want it to get in the way of data entry,
make it inactive as discussed below. It is a good idea to regularly review the frequently used
codes (e.g., solicit_code, gl_code, flag, etc.) in your system to determine which ones can be
made inactive.
Indeed the code definition itself, which is also discussed below, enables you to set up a date
after which the code will be automatically set to inactive. Thus, when you are creating a new
code, if you can reasonably anticipate when that code will no longer be needed, set the
inactive date appropriately.
Note that a code that has been tagged as inactive will still appear in the donor records and in
reports, but not in the pull-down menus and other selection screens.
Managing Codes in Your System
Because the user-defined codes in your system are critical to ensuring the consistency of
your data, you’ll need to manage them over time to make sure they are up-to-date and
accurate. Managing your codes involves adding new codes and editing, inactivating or
deleting existing codes in the Code Maintenance screen as shown below in Figure 1. The
Code Maintenance screen is accessed by clicking the Settings button in the Navigation Bar
and Code Maintenance in the Settings menu.
December 2009
Page 2
Managing Codes in Your System
DonorPerfect Online
Figure 1. Code Maintenance Screen
Searching for Codes for Specific Fields
You can search for the codes used in specific fields (e.g., GL, Activity) in your system.
► To search for codes for specific fields
1. Select the field/screen whose codes you want to display from the Show only
pull-down menu of the Code Maintenance screen (Fig. 1) and, click Go. (To see
a list of all fields/screens, leave the default, “Show all fields,” in the Show only
field.)
2. The system will display all the codes for the selected field as shown below in
Figure 2 for the GL field. You can sort by any of the columns by clicking on the
column heading. To return to displaying all the codes, select “Show all fields” in
the Show only field and click Go.
3. To export a list of the displayed codes including the detailed definition of each
code and information on when it was created and modified, click Export to
Excel. The system will create the dpexport.xls file which can be opened in
Excel. An example of dpexport.xls is shown in Figure 3 below.
Note: Dpexport.xls contains columns for all of the fields that could be
present in any code definition. Thus, you may see columns for
fields, such as “mcat_hi,” “mcat_lo,” and “mailed” shown in Figure 3,
that do not pertain to the particular field whose codes you have
exported.
December 2009
Page 3
DonorPerfect Online
Managing Codes in Your System
Figure 2. Code Maintenance Screen for the GL Field
Figure 3. Dpexport.xls Example
Adding Codes
You can easily add codes to your system. For example, if you will be sending out a new
mailing or have started a new committee, you may need to add a new code.
► To add codes
1. Click Add on the Code Maintenance screen (Fig. 2) to display the screen for
adding (or editing) a code, as shown below for a new Solicitation Code in Figure
4.
December 2009
Page 4
Managing Codes in Your System
DonorPerfect Online
Figure 4. Add Code Screen for Solicitation Codes
Complete the fields as needed. If you entered a field name in the Show only field
on the Code Maintenance screen prior to clicking Add, that field will be
displayed in the Field Name field. Otherwise, select the appropriate field name.
Enter the new Code in a format that is consistent with that of the existing codes
for this field. Such consistency will facilitate more effective sorts and reports.
Set the new code as Inactive if you don’t want it to appear in selection menus
until some later time. At that point you can reset Inactive and the code will
appear.
Alternatively, you can specify the Begin Date and End Date of the date range
during which the code will be active. If don’t enter a Begin Date, the new code
will be active as soon as it is saved. If you enter an End Date while you are
creating the code, you will not have to remember to go back at a later time to set
it as Inactive.
Some codes, including those for the Solicitation field shown in Figure 4, may
have additional information that can be completed. (The Total Mailed, Goal,
and other additional fields in the definition of the Solicitation code are used to
hold information that is used in the Solicitation Analysis report.)
2. Click Save. When you return to the Code Maintenance screen the newly defined
code will be listed.
Editing Codes
The steps for editing a code are very similar to those for Adding Codes discussed above and
will not be repeated here. All you need to do is click Edit next to the code you want to
modify in Step 1 above to open the code definition screen shown in Figure 4 above.
December 2009
Page 5
DonorPerfect Online
Managing Codes in Your System
Note: If you attempt to edit a code that has already been used in a constituent record, the
system will respond with a warning. If you continue, the code will be changed in Code
Maintenance and in the existing records.
You can edit the other fields (e.g., Description, Comments, etc.) in the definition of a
code, but no warning will be given.
Inactivating Codes
You can cause a code to be Inactive by simply editing the definition for the code and setting
the Inactive check box.
As stated above, codes that are marked as inactive will not be available for selection.
However, you can override the inactive setting for all codes by selecting the Allow inactive
codes in data entry, filters, contact manager, membership and global updates
parameter on the General Parameters screen (accessed by clicking Settings in the
Navigation Bar and Parameters in the Settings menu).
Deleting Codes
Occasionally you may need to delete unused codes from your system.
Note:
You cannot delete a code that has been used in an existing constituent record. If you
attempt to do so, you will receive an error message.
► To delete a code
1. Click Delete next to the code in the Code Maintenance screen (Fig. 1) that you
want to remove.
2. The system will display a warning message.
Click OK to confirm the deletion. The system will delete the code from the Code
Maintenance screen.
Sharing Codes
The DPO code sharing function enables you to establish a set of codes that will be used by
two fields. If a new code is added to one field, a corresponding code is automatically added
to the second as well. Similarly, if you edit or delete a code, the matching codes would also
be modified or removed from the second field. Furthermore, the sharing can be set up to be
“reciprocal” so that changes made in the codes for either of the fields will appear in the code
set for the other.
December 2009
Page 6
Managing Codes in Your System
DonorPerfect Online
For example, suppose the local public radio station wanted to run a “College Challenge” in
which donors could vote for their favorite college when they made a gift or pledge. The
station would first add a College Challenge field to both the Gift and Pledge screens. Then
they would establish a set of codes for the various colleges for which the donors can vote.
Code sharing would allow them to enter those codes for the College Challenge/Gifts Screen
field in Code Maintenance and automatically cause the same set of codes to be available for
the College Challenge/Pledge Screen field. By sharing the codes between the College
Challenge/Gifts Screen and College Challenge/Pledges Screen, the station can insure the
consistency that would be needed to easily tally the results of the challenge.
► To set up code sharing between fields
1. Open the Code Maintenance screen as discussed above and select the field that
will receive the shared codes in the Show only pull-down menu. In our example,
the College Challenge/Pledges Screen will receive the shared codes from the
College Challenge/Gifts Screen.
Click Go. The system will list any codes that already exist for the field selected in
the Show only pull-down.
2. Select the field that will be the source of the shared codes in the Share code with
pull-down. In our example, the College Challenge/Gifts Screen is the source of
the shared codes, as shown below in Figure 5.
Figure 5. Code Sharing Setup
3. If you want the sharing arrangement to be reciprocal, select Reciprocal
Relationship.
4. Click Save. Henceforth, any changes made in the code list for the field selected
in the Share code with pull-down (College Challenge/Gifts Screen) will
automatically appear in the code list for the field selected in the Show only pulldown (College Challenge/Pledge Screen). If we had selected Reciprocal
Relationship the codes would be shared in both directions.
December 2009
Page 7
DonorPerfect Online
Managing Codes in Your System
Note: Certain fields are forced by the system to use the same set of codes.
For example, the codes for the Address Type/Donor Screen field will
always be the same as those for the Address Type/Addresses Screen
field. Similarly, the codes for the Country/Donor Screen field will be the
same as those for the Country/Addresses Screen.
For more information on coding refer to the “Code Maintenance” and “Appendix B –
Sample Coding” sections of the DonorPerfect Online User Manual.
December 2009
Page 8