1
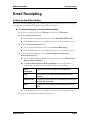
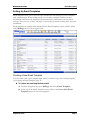
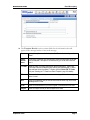
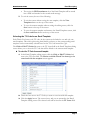
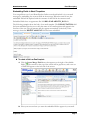
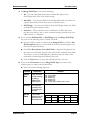
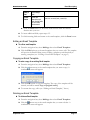
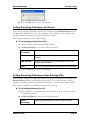
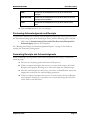
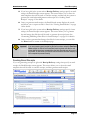
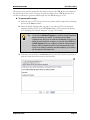
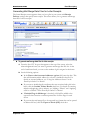
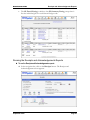
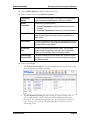
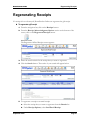
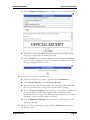
Email Receipting Guide
DonorPerfect Online
SofterWare, Inc.
DonorPerfect Online
September 2010
DonorPerfect Online
Table of Contents
Table of Contents
INTRODUCTION .................................................................................................. 3
Choosing Email and/or Letter Receipting................................................................................... 3
Workflow......................................................................................................................................... 3
Regenerating Official Receipts .................................................................................................... 3
EMAIL RECEIPTING............................................................................................ 4
Setting Up Email Receipting......................................................................................................... 4
Setting Up Email Templates ......................................................................................................... 5
Creating a New Email Template ................................................................................................. 5
Editing an Email Template ........................................................................................................ 11
Copying an Email Template ...................................................................................................... 11
Deleting an Email Template ...................................................................................................... 11
Setting Receipting Preferences for Donors.............................................................................. 12
Setting Receipting Preferences when Entering Gifts .............................................................. 12
Previewing Acknowledgments and Receipts ........................................................................... 13
Generating Receipts and Acknowledgments ........................................................................... 13
Sending Email Receipts ............................................................................................................ 15
Generating Mail Merge Data Files for Letter Receipts.............................................................. 19
Updating the Batch Number ....................................................................................................... 21
RECEIPTS AND ACKNOWLEDGMENTS REPORTS ....................................... 22
Overview ................................................................................................................................... 22
Running the Receipts and Acknowledgements Reports........................................................... 23
REGENERATING RECEIPTS ............................................................................ 27
September 2010
Page 2
DonorPerfect Online
Introduction
Introduction
Email Receipting allows you to send receipts and acknowledgments to your donors via
email. This can be done instead of regular letter-style receipts generated through mail
merges, or in combination with letter receipts.
Note: Consolidated receipting users please refer to the DonorPerfect Online User Manual or
the online help for instructions on using email receipting with consolidated receipting.
Choosing Email and/or Letter Receipting
You can select receipting options at the system, donor and gift levels.
In the Acknowledgments/Receipts parameters screen, the Default Donor Receipt
Delivery Method parameter sets whether receipts & acknowledgments will be sent via mail,
letter, email AND letter, or not at all. This is the default setting for your entire DonorPerfect
Online system.
For each donor in the system, you can choose whether you want to send their
receipts/acknowledgments via email, or letter, both, or not at all. This option can be set in
the Main Entry Screen once email receipting is activated. The donor level setting overrides
the system level setting.
Lastly, you can also select email receipting, letter receipting, both, or none when you enter a
gift. The gift level setting overrides the system and donor level settings.
Workflow
The basic workflow for email receipting is as follows:
1. Set up receipting and activate email receipting.
2. Set up email templates for your receipts and acknowledgments.
3. Set receipting preferences for donors.
4. Select receipting preferences when entering gifts.
5. Preview your acknowledgments and receipts, if desired.
6. Generate email receipts and acknowledgments.
7. Generate mail merge data files for letter receipts and acknowledgments.
8. Update the batch number.
Regenerating Official Receipts
If need be, you can regenerate an official email receipt like you would do for an official letter
receipt.
September 2010
Page 3
Email Receipting
DonorPerfect Online
Email Receipting
Setting Up Email Receipting
Before you can start entering gifts and generating receipts, you must first activate receipting
and select the system default setting for receipt delivery method.
► To activate receipting and set the default delivery method
1. From the navigation bar, select Settings and then select Parameters.
2. Click the Entry Screens link:
a. On the Entry Screen Parameters screen, check Show RECEIPT fields.
b. Click the Save button to save changes and return to the Parameters screen.
3. Click the General Parameters link:
a. On the General Parameters screen, check Activate Receipting.
b. Click the Save button to save changes and return to the Parameters screen.
4. To activate email receipting, click the Acknowledgements/Receipts,
Financial Reports link:
a. On the Financial Reports/Receipt Processing screen, check Enable Email
Receipt Delivery Method.
b. Set Default Donor Receipt Delivery Method to the receipt delivery
method that your want to be selected by default for new donors:
Do not
acknowledge
This donor will not receive receipts and acknowledgments.
Email
This donor will receive receipts and acknowledgments as email
messages.
Email and Letter
This donor will receive receipts and acknowledgments as both email
messages and printed letters.
Letter
This donor will receive receipts and acknowledgments as printed
letters.
c. Click the Save button to save changes and return to the Parameters screen.
5. Log out of DonorPerfect Online and log back in.
September 2010
Page 4
DonorPerfect Online
Email Receipting
Setting Up Email Templates
Email templates allow you to store all of the standard text and settings for your commonlyused email messages. When sending email, you can select a template, and the text and
information entered into the template will automatically be entered into your new email
message. This saves lots of time, and helps to ensure that the emails contain all the necessary
information.
Email templates are created and maintained in the Email Templates screen, which is found
in the Mailings menu of the navigation bar.
Creating a New Email Template
You can either create a new template from scratch, or make a copy of an existing template
(see Copying an Email Template, page 11).
► To create a new email template from scratch
1. From the navigation bar, select Mailings then select Email Templates.
2. At the top of the Email Templates screen, click on the Create New Email
Template button. A new screen appears:
September 2010
Page 5
Email Receipting
DonorPerfect Online
3. The Template Details section contains fields for the information that will
appear in the message headers of the email message:
Name
A short descriptive name for the template, like “Standard Acknowledgement
Email.”
Share
with all
users
If this option is checked, other DonorPerfect Online users will be able to see and
use this template. If the option is not checked, only you will be able to see and
use it.
TY Letter
Enter the Thank You Letter code that this email corresponds to. Each Thank
You Letter Code can correspond to one and only one email template. To select
the code from the list of available TY Codes, click the Click to Edit TY Codes
link (see “Selecting the TY Code for an Email Template,” page 8 for details).
CC
Enter email addresses that you want to receive a copy of this email message
when it is sent.
BCC
Enter email addresses that you want to receive a blind carbon copy of this email
message when it is sent.
From
Enter the email address that you want to appear in the From field of the email.
Subject
Enter the subject line that you want to appear in the email.
September 2010
Page 6
DonorPerfect Online
Email Receipting
4. The Message Body section is where you can enter the text that will appear in
the body of the email message. At the bottom of the screen, you can select
whether to format the body of the message as Rich HTML, which allows you
to format the text in a variety of ways using the toolbar at the top of the text
field, or as Plain Text, which has no formatting.
5. If desired, you can also embed DonorPerfect Online fields in your email
message. Embedded fields have an appearance like
%%BIO.AVAILABILITY_DAY%%. When the email is sent, the embedded
field will be replaced with the contents of that field in the current record. See
“Embedding Fields in Email Templates” on page 8 for details.
6. The Official Receipt and PDF Attachment sections are used for email
receipting. When email receipting is activated, two emails will be sent to each
donor: the standard email, and a second email consisting of the following:
•
The headings will be the same as for the first message, except that “Official
Receipt” will be appended to the Subject line.
•
The text in the Official Receipt tab of the Email Template will form the
body of the message.
September 2010
Page 7
DonorPerfect Online
•
Email Receipting
The text in the PDF Attachment tab of the Email Template will be turned
into a PDF and attached to the second email message.
7. To exit the screen, do one of the following:
•
To exit the screen without saving the new template, click the View
Templates button at the top of the screen.
•
To save the current template without exiting the editing screen, click the
Save button at the top of the screen.
•
To save the current template and return to the Email Templates screen, click
the Save and Close button at the top of the screen.
Selecting the TY Code for an Email Template
Each Thank You Letter code (TY code) in the system can be linked to one and only one
email template. This aids in processing email thank you letters, as the corresponding email
template can be automatically selected based on the TY Code entered for a gift.
The Click to Edit TY Codes link next to the TY Letter field in the Email Template editing
screen allows you to select the TY Code that will be linked to the current email template.
► To select the TY Code for an email template
1. In the Email Template editing screen, click the Click to Edit TY Codes link
next to the TY Letter field. The Choose available Thank You letter(s) to be
associated with the template screen appears.
2. Check the box next to the TY Code you want to associate with this template.
3. Click the Apply button. The screen closes, and you are returned to the Email
Template editing screen. The selected code will be listed in the TY Letter field.
September 2010
Page 8
DonorPerfect Online
Email Receipting
Embedding Fields in Email Templates
You can pull data out of your DonorPerfect Online records and include it in your email
messages by embedding one or more fields in the message. When the email is sent, the
embedded field will be replaced with the contents of that field in the current record.
Embedded fields have an appearance like %%BIO.AVAILABILITY_DAY%%.
The following example shows the body of an email template. The DP.SALUTATION field
has been embedded into the text so that the name of the email recipient will appear in the
first line of the text. The gift amount will also appear automatically in the body of the
message, where the DPGIFT.AMOUNT field has been embedded.
► To embed a field in an Email template
1. Click the Insert Merge Field button that appears to the right of the editable
The controls at the top of the screen will be grayed out, and a new set
fields.
of fields will appear on the left side of the screen:
2. Place your cursor where you want the embedded field to appear in your email.
September 2010
Page 9
Email Receipting
DonorPerfect Online
3. Set Merge Field Type to one of the following:
•
All – You can enter fields from either the Main/Bio tables, or the
Gift/Pledge tables. This is the default setting.
•
Main/Bio – You can enter fields from the Main/Bio table only. These are
typically fields from the main entry screen or the Bio screen.
•
Gift/Pledge – You can enter fields from the Gift/Pledge tables only. These
are fields from gift or pledge records.
•
Functions – These selections enter a combination of fields and text to
provide a fast and easy way to create common message elements such as an
address block, or a salutation.
4. If you selected All, Main/Bio, or Gift/Pledge from the Merge Field Type
list, carry out the following steps to embed your field:
a. Select the field you want to enter from the Merge Field list. Click the Sort
By Description option to sort the fields in the list by their descriptive text,
instead of by their field name.
b. Check Use Descriptions for Coded Fields to display the descriptions for
the codes in a coded field, instead of the actual codes contained in the fields.
For instance, if you are embedding the solicitation code, the name of the
solicitation would be displayed instead of the code.
c. Click the Insert button to insert the selected field into your text.
5. If you selected Functions from the Merge Field Type list, carry out the
following steps to embed your fields and text:
a. Select one of the following functions:
Function
Address
Block
Example
Description
Enters the full set
of fields to display
the mailing
address of the
email recipient.
##DP.TITLE## ##DP.FIRST_NAME##
##DP.LAST_NAME##
##DP.ADDRESS##
##DP.ADDRESS2##
##DP.ADDRESS3##
##DP.ADDRESS4##
##DP.CITY## ##DP.STATE## ##DP.ZIP##
Salutation Enters the Dear
[recipient] line for
the beginning of a
message.
Dear ##DP.SALUTATION##,
Split Gift
Details
^^
Enters a table
containing the split
gift fields for the
current gift record.
Prompt1
Prompt2
Prompt3
Prompt4
Prompt5
Split_Gift1_F1 Split_Gift1_F2 Split_Gift1_F3 Split_Gift1_F4 Split_Gift1_F5
Split_Gift2_F1 Split_Gift2_F2 Split_Gift2_F3 Split_Gift2_F4 Split_Gift2_F5
^^
September 2010
Page 10
Email Receipting
DonorPerfect Online
Today’s
Date
Enters today’s
date.
@@TodaysDate@@
Tribute
Details
Enters the
description and
main contact fields
for the current
tribute record.
##DPGIFT.TRIBUTE_DESCRIPTION##
##DPGIFT.TRIBUTE_MAIN_CONTACT##
b. Click the Insert button to insert the fields and text from the selected
function into your text.
6. To insert additional fields, repeat steps 2-5.
7. To finish inserting fields and return to the email template, click the Done button.
Editing an Email Template
► To edit an email template
1. From the navigation bar, select Mailings then select Email Templates.
2. Click the Edit link next to the email template that you want to edit. The template
will open in the Email Editing screen. Editing a template works identically to
creating a template (see “Creating a New Email Template” on page 5).
Copying an Email Template
► To make a copy of an existing Email template
1. From the navigation bar, select Mailings then select Email Templates.
2. Click the
button next to the email template that you want to copy. A
confirmation screen will appear:
3. Click the OK button to copy the template. The copy of the template will be
created, and will be named Copy of [original name].
4. To rename the copy, edit it (see “Editing an Email Template,” above).
Deleting an Email Template
► To delete an Email template
1. From the navigation bar, select Mailings then select Email Templates.
2. Click the
button next to the email template that you want to delete. A
confirmation screen will appear:
September 2010
Page 11
Email Receipting
DonorPerfect Online
3. Click the OK button to delete the template.
Setting Receipting Preferences for Donors
You can set receipting preferences separately for each donor. The Receipt Delivery field on
the Main Entry Screen allows you to select whether a donor will receive no receipts, email
receipts, printed letter receipts, or both email and letter receipts.
This setting overrides the system default setting.
► To set receipting preferences for a donor
1. Open the donor record in the Main Entry Screen.
2. Set Receipt Delivery to one of the following settings:
Do Not
Acknowledge
This donor will not receive receipts and acknowledgments.
Email
This donor will receive receipts and acknowledgments as email
messages.
Email and Letter
This donor will receive receipts and acknowledgments as both email
messages and printed letters.
Letter
This donor will receive receipts and acknowledgments as printed letters.
3. Click the Save button to save your changes.
Setting Receipting Preferences when Entering Gifts
You can select what kind of receipt will be sent for each gift you enter into the system. The
Receipt Delivery field on the Gift Entry Screen allows you to select whether a gift will
generate no receipts, email receipts, printed letter receipts, or both email and letter receipts.
This setting overrides the system default and donor level settings.
► To set receipting preferences for a gift
1. Enter the gift as you normally would. See “Gift Entry” in the DonorPerfect Online
User Manual for details.
2. Set Receipt Delivery to one of the following settings:
Do Not
Acknowledge
September 2010
Receipts and acknowledgments will not be generated for this gift.
Page 12
Email Receipting
DonorPerfect Online
Email
Receipts and acknowledgments for this gift will be sent as email
messages.
Email and Letter
Receipts and acknowledgments for this gift will be sent both as email
messages and printed letters.
Letter
Receipts and acknowledgments for this gift will be sent as printed
letters.
3. Click the Save button to save your changes.
Previewing Acknowledgments and Receipts
To preview the transactions for which acknowledgments and receipts will be generated, run
the Transaction Listing report from the Receipts screen, with the following option selected:
•
Make sure the Include Already Processed Gifts (Previously Receipted Or
Acknowledged) option is NOT checked.
See “Running the Receipts and Acknowledgements Reports” on page 22 for details on
running the Transaction Listing report.
Generating Receipts and Acknowledgments
When the Receipts screen generates email acknowledgements and receipts, it follows the
following steps:
1. The user sets receipting options and starts off the process.
2. If there are unprocessed gifts that were set to receive email receipts, the Email
Receipts screen appears, allowing you to select and output the email messages.
3. After the email receipts have been sent, you will see an Email Results screen that
displays the results from the email receipting operations.
4. If there are unprocessed gifts that were set to receive letters, the Letter Receipts
screen appears, allowing you to produce one or more mail merge data files that
can be used to send the letters.
September 2010
Page 13
Email Receipting
DonorPerfect Online
► To generate acknowledgements and receipts
1. From the navigation bar, click on the Receipts button. The Receipts screen
appears:
2. Set the following receipting options:
Selected
Dates
If checked, the system will select only those transactions that fall within the
starting and ending dates you specify, regardless of the batch number.
3. If you click the More Options link, you can select the following additional
options:
Current Batch
If checked, the system will only select gifts whose Batch Number is set
to 0. This is generally only true for gifts that were added to the system
after the last batch was processed.
Batch Module ID
If a batch number from the Batch 1.0 or Batch 2.0 modules is entered in
this field, receipts will only be generated for the gifts from that batch.
Include Already
Processed Gifts
This option includes gifts that have already been assigned to a batch or
assigned a receipt number from the acknowledgement processing. It is
cleared by default.
Set Selection
Filter
Check to put an optional selection filter in place. This will prevent certain
records from appearing in the report. See “Using Selection Filters” in the
DonorPerfect Online User Manual for details.
4. From the Receipt/Acknowledgment Options section at the bottom of the
screen, click the New Receipts button:
September 2010
Page 14
DonorPerfect Online
Email Receipting
5. If you have gifts in the system whose Receipt Delivery settings specify an email
receipt, the Email Receipts screen appears. This screen allows you to select the
email templates that will be used to send the receipts, and then tell the system to
generate the email acknowledgements and receipts. See “Sending Email
Receipts” on page 15 for details.
6. Once you generate email receipts, the Email Results screen displays the results
and allows you to export records to Excel. See “Viewing Email Results” on page
18 for details.
7. If you have gifts in the system whose Receipt Delivery settings specify a letter
receipt, the Letter Receipts screen appears. This screen allows you to generate
the mail merge data files that will be used to generate the receipt letters. See
“Generating Mail Merge Data Files for Letter Receipts” on page 19 for details.
8. Once you have generated mail merge data files for letter receipts, you can click
the Done button to return to the Receipts page.
Important! If you are processing email receipts for gifts that have been marked for Email and
Letter receipts, the gifts will not be assigned receipt numbers until after the mail
merge data files have been generated from the Letter Receipts page at the end of
the process. In other words, you must do both the email and the letter receipting in
full to complete the process correctly.
Sending Email Receipts
If you are generating receipts for gifts with Receipt Delivery settings that specify an email
receipt, the Email Receipts screen appears. This screen allows you to select the email
templates that will be used to send the receipts, and then generate email receipts.
September 2010
Page 15
Email Receipting
DonorPerfect Online
The receipts to be sent are grouped by the thank-you letter code (TY #) that was entered in
the gift records. There is also a category for gifts that did not have a TY # specified. You
can choose whether to generate email receipts for each TY # category or not.
► To generate email receipts
1. Select the types of TY # that you want to generate email receipts for by checking
the box in the Select column.
2. Select the Email Template that you want to use with each TY #. If an email
template specifies the TY # in its TY Letter field, it will be selected by default
(see “Creating a New Email Template” on page 5 for details).
Tip: You can click the Add New Template link to create a new email template to
use with a given thank you number. This will take you to the Email
Templates screen, where you can create the new template. Once you have
selected an email template for a category, you can also click the Edit link in
the Email Template column for a category, and edit the selected template.
Adding or editing a template will end the current receipt generation cycle.
Once you have created or edited the new email templates, you will need to
start over again at the Receipts screen.
3. If desired, you can click on the Preview link for each TY # and see a preview of
what the emails that will be sent out will look like:
September 2010
Page 16
Email Receipting
DonorPerfect Online
4. Set the following options for email receipts:
Include official
receipt (PDF)
If this option is checked, a second email will be sent out along with
the first. This message will consist of the following:
• The headings will be the same as for the first message, except
that “Official Receipt” will be appended to the Subject line.
• The text in the Official Receipt tab of the Email Template will
form the body of the message.
• The text in the PDF Attachment tab of the Email Template will be
turned into a PDF and attached to the second email message.
Note: If the Email Template you select does not
have the Official Reciept and PDF
Attachment tabs filled in, and this option is
selected, you will get an error when you try
to generate email receipts.
Primary Email
address only
If this option is selected, the primary email address for the donor will
always be used to email the receipt.
Use secondary Email
address set to
receive the following
mailing type(s)
If this option is selected, the donor’s secondary email address, if
any, will be used to email the receipt for the selected mailing types.
If the user has no secondary email address, the primary address will
be used.
5. Click the Generate Email Receipts button. A “Processing” message appears
while DonorPerfect Online processes the email messages. Once processing is
finished, the Email Results screen will appear (see next section).
September 2010
Page 17
DonorPerfect Online
Email Receipting
Viewing Email Results
The Email Results screen displays the results of your attempt to generate email receipts:
•
If the system encountered problems with sending out some or all of your email
receipts, those records will be listed on the Missing/Invalid Email tab.
•
Those receipts that were sent out successfully are listed on the Sent tab:
Once you have finished with this screen, click the Continue to Letter Receipts button to
go to the Letter Receipts screen.
Important! If you are processing email receipts for gifts that have been marked for Email and
Letter receipts, you must generate both the email receipt and the mail merge data
file for the letter receipt before the receipt number will be assigned to the gift
records. Generating just the email receipts and returning to the Receipts page will
not complete the receipting process.
September 2010
Page 18
DonorPerfect Online
Email Receipting
Generating Mail Merge Data Files for Letter Receipts
The Letter Receipts screen appears when you have gifts in your system with Receipt
Delivery settings that specify letter receipts. This screen allows you to generate mail merge
data files for those receipts.
► To generate mail merge data files for letter receipts
1. From the list of TY # types that appears at the top of the screen, select the
acknowledgement letter you want to generate mail merge data files for. At the
end of each letter listed, you can see the number of gifts assigned to that letter.
2. Set the following options:
a. In the Date to check seasonal addresses against field, enter the date. This
date will determine which address for a donor is included in the file. For
details on seasonal addresses, see “Using the Addresses Screen” in the
DonorPerfect Online User Manual.
b. If you want to include details on tributes that are associated with gifts in the
batch, click the Include Tribute Details check box. For details on entering
tributes and applying gifts to tributes, see “Adding a Tribute” and “Applying
a Gift to a Tribute” in the DonorPerfect Online User Manual.
c. If Include Flags in Mailmerge is checked, a field will be added to the
export file that contains a comma-separated list of all the flags for each
donor.
d. If you want the mail merge file to be exported in a format that can be opened
in Microsoft Excel, click the Export to Excel (CSV) check box.
September 2010
Page 19
Email Receipting
DonorPerfect Online
e. Check Include Pledge Data for Pledge Payments to include pledge data
such as pledge totals along with gift record data in the export file.
f.
From the Export Template pull-down, choose the template you want to use
for the mail merge data file. This template defines which fields will be
included in the file you export. For details on export templates, see “Export
Templates” in the DonorPerfect Online User Manual.
3. Click the Do button. The File Download page appears.
Note:
Once this action has been submitted, receipt numbers are assigned to
each gift.
4. Click the Save button, go to the location where you want to save the file, and
then click Save. The file is created, and you can now use Word to customize the
acknowledgement letters. See Appendix C in the DonorPerfect Online User Manual
for more information on mail merge functions.
5. Repeat steps 1-4 until mail merge data files have been created for all TY # types.
6. Click the Done button to finish generating letter receipts and return to the
Receipts page.
September 2010
Page 20
DonorPerfect Online
Email Receipting
Updating the Batch Number
After you’ve reviewed gifts and created acknowledgements/receipts, you need to update the
batch number. This ensures that each gift in the batch you processed is not reprocessed
again at a later time and that each gift batch has a unique number.
► To update the batch number
1. From the navigation bar, click on the Receipts button.
2. From the Receipt/Acknowledgment Options section at the bottom of the
screen, select Update Batch No.
A message appears:
3. Click Yes, Update Batch to confirm. The batch number is increased by one.
September 2010
Page 21
DonorPerfect Online
Receipts and Acknowledgments Reports
Receipts and Acknowledgments
Reports
Overview
The Receipts and Acknowledgements reports allow you to view details on the gifts entered
into the system since the last time that acknowledgements were processed. There are three
different reports available:
•
The Transaction Listing lists the gifts entered into the system since the last
acknowledgement/receipts processing.
•
The GL Summary Listing provides a listing by General Ledger code of gifts
entered into the system since the last acknowledgements/receipts processing.
The Summary listing displays the sum of all gifts for each GL code. If you use
the optional Accounting Module, it also has a line for Accounting Code.
September 2010
Page 22
DonorPerfect Online
•
Receipts and Acknowledgments Reports
The GL Detail Listing is similar to the GL Summary Listing, except that it
lists the individual gifts for each General Ledger code.
Running the Receipts and Acknowledgements Reports
► To run the Receipts and Acknowledgements reports
1. In the navigation bar, click on the Receipts button. The Receipts and
Acknowledgments screen appears.
September 2010
Page 23
Receipts and Acknowledgments Reports
DonorPerfect Online
2. Click on More Options to display additional options.
3. Enter or select the following Selection Options:
Current Batch
Number
The number of the current batch. This number counts up sequentially
as you complete and update batches. This field is not editable.
All/User
Transactions
Select one of the following options:
• Select All Transactions to display transactions from all users in
the batch.
• Select User Transactions to show only your current transactions.
Selected Dates
If checked, the system will select only those transactions that fall
within the starting and ending dates you specify, regardless of the
batch number.
Current Batch
If checked, the system will only select gifts whose Batch Number is set
to 0. This is generally only true for gifts that were added to the system
after the last batch was processed.
Set Selection
Filter
Check to put an optional selection filter in place. This will prevent
certain records from appearing in the report. See “Using Selection
Filters” in the DonorPerfect Online User Manual for details.
Include Already
Processed Gifts
This option includes gifts that have already been assigned to a batch
or assigned a receipt number from the acknowledgement processing.
It is cleared by default.
4. Select a report Type:
•
The Transaction Listing lists the gifts entered into the system since the last
acknowledgement/receipts processing.
•
The GL Summary Listing provides a listing by General Ledger code of
gifts entered into the system since the last acknowledgements/receipts
processing. The Summary listing displays the sum of all gifts for each GL
code. If you use the optional Accounting Module, it also has a line for
Accounting Code.
September 2010
Page 24
DonorPerfect Online
•
Receipts and Acknowledgments Reports
The GL Detail Listing is similar to the GL Summary Listing, except that
it lists the individual gifts for each General Ledger code.
5. Optionally, type in a Report Heading for the listing. This will appear in the title
area of the report.
6. Click one of the following buttons:
•
Screen displays the report as a regular page in DonorPerfect Online, with
the standard navigation toolbar at the top of the page.
•
Printable displays the report in a new browser window, without the
navigation toolbar. This version of the report is more suitable for printout.
•
Excel outputs the report in Microsoft Excel format. You will be prompted
to open the report directly in Excel, or save it as a file.
•
Word outputs the report in Microsoft Word format. You will be prompted
to open the report directly in Word, or save it as a file.
September 2010
Page 25
DonorPerfect Online
Receipts and Acknowledgments Reports
•
Create Acknowledgements/Receipts automatically creates a data file to be
merged into your acknowledgement letters. See “Generating an
Acknowledgement/Receipts Data File” below for details.
•
Download Accounting Data: This button is used with the DonorPerfect
Online Accounting Module. Clicking the button transfers the current batch
of accounting data to your accounting software. See “DPO Accounting
Module (Manual Download)” in the DonorPerfect Online User Manual for
details.
Note: This is a drillable report. This means that clicking on any of the blue
hyperlinked numbers will send you to another page that has an explanation
and breakdown of that figure.
September 2010
Page 26
DonorPerfect Online
Regenerating Receipts
Regenerating Receipts
If a receipt is lost or destroyed, DonorPerfect Online can regenerate the gift receipt.
► To regenerate a gift receipt
1. From the navigation bar, click on the Receipts button.
2. From the Receipt/Acknowledgment Options section at the bottom of the
screen, click on the Regenerate Receipts button.
The Regenerate Official Receipts screen appears:
3. Enter the search criteria for the receipt that you want to regenerate.
4. Click the Search button. The results of your search will appear below:
5. To regenerate a receipt as an email receipt:
a. Select the receipt that you want to regenerate from the Results list.
b. Under Receipt Options, select Send Email Receipt.
September 2010
Page 27
DonorPerfect Online
Regenerating Receipts
c. Click the Regenerate Receipt button. A preview of the receipt will appear:
d. If desired, you can enter additional text into the regenerated email receipt
message by typing it into the Include Text field.
e. Click the Send button to send the regenerated email receipt, or the Close
button to cancel sending the receipt. If you sent the receipt, you will see a
message stating that it has been sent:
6. To regenerate a receipt as a printed letter:
a. Select the receipt that you want to regenerate from the Results list.
b. Under Receipt Options, select Send Letter Receipt.
c. Set the remaining Letter Receipt options. See “Generating Mail Merge Data
Files for Letter Receipts” on page 19 for details on these options.
d. From the Export Template pull-down, choose the template you want to use
for the mail merge data file. This template defines which fields will be
included in the file you export. For details on export templates, see “Export
Templates” in the DonorPerfect Online User Manual.
e. Click the Regenerate Receipt button. You will be prompted to save the
mail merge data file.
7. When you are done regenerating receipts, click the Cancel button to return to
the Receipts screen.
September 2010
Page 28