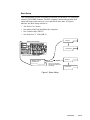
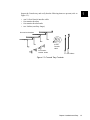
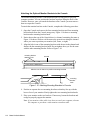
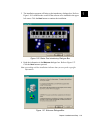
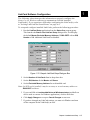
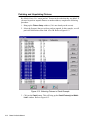
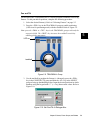
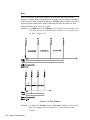
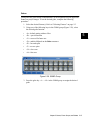
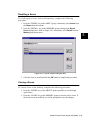
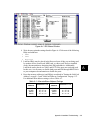
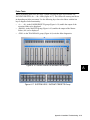
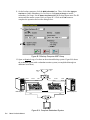
1
®
User’s Manual
®
.
P/N 60600028 Rev. A
High End Systems Inc.
2217 West Braker Lane
Austin, Texas U.S.A.
© High End Systems, Inc. 1993-97, All Rights Reserved
Information and Specifications in this document are subject to change without notice. High End Systems, Inc.
assumes no responsibility or liability for any errors or inaccuracies that may appear in this manual. The software
described in this manual is furnished under a license agreement and may be used or copied only in accordance
with the terms of the agreement.
Unlawful reproduction or distribution in any manner without the written permission of High End Systems is strictly
forbidden.
High End Systems accepts no liability for computers that do not work with the Status Cue lighting console system.
Since PC systems have BIOSs that are different from one company to another there can be absolutely no guarantee that a particular machine will work perfectly for the use of a Status Cue system.
Trademarks used in this text: Dataflash, Color Pro, Cyberlight, the High End Systems logo, High End Systems,
Intellabeam, Lightwave Research, the Lightwave Research logo, Lithopatterns, Status Cue, the Status Cue logo,
Studio Color, and Trackspot are registered trademarks of High End Systems Inc.; Golden Scan 2, Golden Scan 3,
Pin Scan, Stage Scan, Super Scan, Super Scan HPE, Super Scan Zoom, and Tiger Scan are trademarks of Clay
Paky; Nat TM 1200, Nat TM 2500, Nat MM 1200, and Nat MM 2500 are trademarks of Coemar; MAC 600, MAC
1200, PAL 1200, Roboscan Pro400, Roboscan Pro518, and Roboscan Pro1220 are trademarks of Martin Professional; Stratos is a trademark of Studio Due; AR5, VL5, VL5A, VL6, and VLM are trademarks of Vari-lite Inc., MSDOS, Windows 95 and Windows are trademarks of Microsoft Corporation; Littlite is a registered trademark of CAE
Inc.; Pentium is a registered trademark of Intel.
Other trademarks and trade names may be used in this software to refer to either the entities claiming the marks
and/or their products. High End Systems makes no claim of any proprietary interest in trademarks and trade
names other than its own.
Status Cue uses one or more of the following patents: US 4,962,687; US 5,078,039; UK 2,043,769; US 5,331,822;
US 5,402,326; UK 2292896; US D365165; US 5,430,629; US D360,404; US 5,455,748; 0475082; US 5,506,762;
M9604224.9; US 5,515,254; US D370080; UK 2.291,814; US 5,545.951; UK 2055842; UK 2,292,530; UK
2294909; UK 2292896; 1052/96; 862-1996; and US 5,580,164.
Other patents may be pending.
October 02, 1998
Status Cue User’s Manual
P/N 60600028 Rev. A
Status Cue 3-Ring Binder
P/N 90901002
Kit with Manual, Binder, and Inserts
P/N 80430047
Printed in the U.S.A.
.
Declaration of Conformity
according to ISO/IEC Guide 22 and EN45104
Manufacturer:
Lightwave Research
2209 West Braker Lane
Austin, Texas 78758
U.S.A.
Exclusive Distributor:
High End Systems, Inc.
2209 West Braker Lane
Austin, Texas 78758
U.S.A.
declares that the product
Product Name:
Status Cue Lighting Console and LinkCard
Product Number:
Status Cue
Product Options:
All
Safety:
conforms to the following Product Specifications:
EN 60950: 1992
EMC:
EN 55022 : 1987 – Class A ITE
IEC 801-2 : 1991 Level 2 (4/8 kV)
IEC 801-3 : Draft 5 / prEN 55024-3 : 1991 – 3V/m Level 2
IEC 801-4 : 1988 / prEN 55024-4 : 1992 – 0.5 kV Signal Lines Level 2
1 kV Power Lines
Supplementary Information:
The products herewith comply with the requirements of the Low Voltage Directive 72/23/EEC and the
EMC Directive 89/336/EEC.
The Status Cue Lighting Consoles were tested in a typical configuration with ISA bus LinkCards manufactured by Lightwave Research. The Status Cue Lighting Consoles were tested in a typical configuration with Austin Computer.
U.S.A., October 02, 1998
Lanny Derryberry, Compliance Engineer
IMPORTANT SAFETY INFORMATION
INSTRUCTIONS PERTAINING TO CONTINUED PROTECTION AGAINST FIRE, ELECTRIC
SHOCK, AND INJURY TO PERSONS ARE FOUND IN APPENDIX C.
READ ALL CAUTIONS AND WARNINGS PRIOR TO ASSEMBLY, MOUNTING, AND OPERATING THIS EQUIPMENT.
IMPORTANT: INFORMATIONS DE SÉCURITÉ
INSTRUCTIONS RELATIVES À UNE PROTECTION CONTINUE CONTRE L' INCENDIE, LE
CHOC ÉLECTRIQUE, ET CONTRE DES BLESSURES POSSIBLES SUR DES INDIVIDUS SE
TROUVENT DANS L'APPENDICE C.
PRIÈRE DE LIRE TOUTES LES PRÉCAUTIONS ET LES AVERTISSEMENTS AVANT D'ASSEMBLER, DE MONTER, ET DE FAIRE FONCTIONNER CET ÉQUIPEMENT.
WICHTIGE SICHERHEITSHINWEISE
DIE NACHSTEHENDEN HINWEISE BETREFFEN DEN SCHUTZ GEGEN BRAND, ELEKTRISCHEN SCHLAG, SOWIE VERLETZUNGEN. SIE BEFINDEN SICH IN APPENDIX C.
LESEN SIE ALLE WARNUNGEN SORGFÄLTIG, BEVOR SIE DAS GERÄT ZUSAMMENBAUEN, INSTALLIEREN UND BENUTZEN!
INFORMACIÓN IMPORTANTE DE SEGURIDAD
SE ENCUENTRAN EN EL APÉNDICE C LAS INSTRUCCIONES CONCERNIENTES A LA PROTECCIÓN CONTINUA CONTRA INCENDIO, CHOQUE ELÉCTRICO, Y LESIONES A PERSONAS.
POR FAVOR LEA TODAS LAS PRECAUCIÓNS Y LAS ADVERTENCIAS ANTES DE ENSAMBLAR, MONTAR Y OPERAR ESTE EQUIPO.
INFORMAZIONI IMPORTANTI DI SICUREZZA
ISTRUZIONI PERTINENTI LA PROTEZIONE CONTRO IL FUOCO, LE SCOSSE ELETTRICHE, I
DANNI ALLE PERSONE SI TROVANO NEL APPENDICE C.
LEGGERE TUTTI GLI AVVERMENTI PRIMA DI MONTARE E USARE QUESTO APPARECCHIO.
FCC Statement
This equipment has been tested and found to comply with the limits for a Class A digital device, pursuant to part 15 of the FCC rules. These limits are designed to provide reasonable protection against harmful interference when the equipment is operated in a commercial environment. This equipment
generates, uses, and can radiate radio frequency energy and, if not installed and used in accordance with
the instruction manual, may cause harmful interference to radio communications. Operation of this
equipment in a residential area is likely to cause harmful interference in which case the user will be
required to correct the interference at his own expense.
Warranty Information
Limited Warranty
Unless otherwise stated, your product is covered by a two year parts and labor limited warranty.
Dichroic filters and Lithopatterns® are not guaranteed against breakage or scratches to coating. It is the
owner's responsibility to furnish receipts or invoices for verification of purchase, date, and dealer or
distributor. If purchase date cannot be provided, date of manufacture will be used to determine warranty
period.
Returning an Item Under Warranty for Repair
It is necessary to obtain a Return Authorization Number (RA#) from your dealer/point of purchase
BEFORE any units are returned for repair. The manufacturer will make the final determination as to
whether or not the unit is covered by warranty. Lamps are covered by the lamp manufacturer's warranty.
Any Product unit or parts returned to High End Systems must be packaged in a suitable manner to
ensure the protection of such Product unit or parts, and such package shall be clearly and prominently
marked to indicate that the package contains returned Product units or parts and with a Return
Authorization (RA#) number. Accompany all returned Product units or parts with a written explanation
of the alleged problem or malfunction.
Please note: Freight Damage Claims are invalid for fixtures shipped in non-factory boxes and packing
materials.
Freight
All shipping will be paid by the purchaser. Items under warranty shall have return shipping paid by the
manufacturer only in the Continental United States. Under no circumstances will freight collect
shipments be accepted. Prepaid shipping does not include rush expediting such as airfreight. Airfreight
can be sent customer collect in the Continental United States.
REPAIR OR REPLACEMENT AS PROVIDED FOR UNDER THIS WARRANTY IS THE
EXCLUSIVE REMEDY OF THE CONSUMER. HIGH END SYSTEMS, INC. MAKES NO
WARRANTIES, EXPRESSED OR IMPLIED, WITH RESPECT TO ANY PRODUCT, AND HIGH
END SPECIFICALLY DISCLAIMS ANY WARRANTY OF MERCHANTABILITY OR FITNESS
FOR A PARTICULAR PURPOSE. HIGH END SHALL NOT BE LIABLE FOR ANY INDIRECT,
INCIDENTAL, OR CONSEQUENTIAL DAMAGE, INCLUDING LOST PROFITS, SUSTAINED
OR INCURRED IN CONNECTION WITH ANY PRODUCT OR CAUSED BY PRODUCT
DEFECTS OR THE PARTIAL OR TOTAL FAILURE OF ANY PRODUCT REGARDLESS OF THE
FORM OF ACTION, WHETHER IN CONTRACT, TORT, (INCLUDING NEGLIGENCE), STRICT
LIABILITY, OR OTHERWISE, AND WHETHER OR NOT SUCH DAMAGE WAS FORESEEN OR
UNFORESEEN.
Warranty is void if the product is misused, damaged, modified in any way, or for unauthorized repairs or
parts. This warranty gives you specific legal rights, and you may also have other rights which vary from
state to state.
Software Program License Agreement
PLEASE REVIEW THE FOLLOWING TERMS AND CONDITIONS CAREFULLY BEFORE OPENING THIS
PACKAGE. BY OPENING THIS PACKAGE, YOU INDICATE YOUR ACCEPTANCE OF SUCH TERMS AND
CONDITIONS. IN THE EVENT THAT YOU DO NOT AGREE WITH ANY OF THEM, YOU SHOULD
PROMPTLY RETURN THE PACKAGE UNOPENED. YOUR MONEY WILL BE REFUNDED.
Pursuant to this Agreement, you may: (a) use the program on a single computer; (b) copy of the program into
any computer readable or printed form for back-up or modifications purposes in support of your use of the program
on the single computer (certain programs, however, may include mechanisms to limit or inhibit copying; they are
marked "copy protected"); (c) modify the program and merge it into another program for your use on the single
computer; and (d) transfer the program and license to another party if the other party agrees to accept the terms and
conditions of this agreement.
Any portion of this program merged into another program will continue to be subject to the terms and conditions of the agreement. If you transfer the program, you must at the same time either transfer all copies whether in
printed or computer readable form to the same party or destroy any copies not transferred, including all modifications and portions of the program contained or merged into other programs. You must also reproduce and include
the copyright notice on any copy, modification, or portion merged into another program.
YOU MAY NOT USE, COPY, MODIFY, OR TRANSFER THE PROGRAM, OR ANY COPY, MODIFICATION, OR MERGED PORTION, IN WHOLE OR IN PART, EXCEPT AS EXPRESSLY PROVIDED FOR IN
THIS AGREEMENT. IF YOU TRANSFER POSSESSION OF ANY COPY, MODIFICATION, OR MERGED
PORTION OF THE PROGRAM TO ANOTHER PARTY, YOUR LICENSE IS AUTOMATICALLY TERMINATED.
Term
The license is effective until terminated. You may terminate it at any other time by destroying the program,
together with all copies, modifications, and merged portions in any form. It will also terminate upon conditions set
forth elsewhere in this Agreement or if you fail to comply with any term or condition of this Agreement. You agree
upon such termination to destroy the program together with all copies, modifications, and merged portions in any
form.
Limited Warranty and Remedies
HIGH END SYSTEMS, INC. warrants the diskette(s) on which the program is furnished, to be free from
defects in materials and workmanship under normal use for a period of one (1) year from the date of delivery to you
as evidenced by a copy of your receipt. This warranty is limited to you and is not transferable.
During the 1 year warranty period, HIGH END SYSTEMS will (1) replace any diskette not meeting the foregoing warranty and which is returned to HIGH END SYSTEMS or Authorized HIGH END SYSTEMS Dealer
(“Authorized Dealer”) with a copy of your receipt; or (2) if HIGH END SYSTEMS or the Authorized Dealer is
unable to deliver a replacement diskette that is free of defects in materials or workmanship, you may terminate this
Agreement by returning the program and your money will be refunded.
THE FOREGOING WARRANTY DOES NOT EXTEND TO ANY DISKETTE THAT HAS BEEN DAMAGED AS A RESULT OF ACCIDENT, MISUSE, ABUSE, OR AS A RESULT OF SERVICE OR MODIFICATION BY ANYONE OTHER THAN HIGH END SYSTEMS OR AN AUTHORIZED DEALER. EXCEPT AS
EXPRESSLY SET FORTH ABOVE, NO OTHER WARRANTIES, EITHER EXPRESS OR IMPLIED, ARE
MADE WITH RESPECT TO THIS PROGRAM, INCLUDING, BUT NOT LIMITED TO THE IMPLIED WARRANTIES OF MERCHANTABILITY AND FITNESS FOR A PARTICULAR PURPOSE, AND HIGH END
SYSTEMS EXPRESSLY DISCLAIMS ALL WARRANTIES NOT STATED HEREIN. YOU ASSUME THE
ENTIRE RISK AS TO THE QUALITY AND PERFORMANCE OF THE PROGRAM. SHOULD THE PROGRAM PROVE DEFECTIVE, YOU-AND NOT HIGH END SYSTEMS-OR AN AUTHORIZED DEALERASSUME THE ENTIRE COST OF NECESSARY SERVICING, REPAIR, OR CORRECTION. SOME JURISDICTIONS DO NOT ALLOW THE EXCLUSION OF IMPLIED WARRANTIES, SO THE ABOVE EXCLUSION MAY NOT APPLY TO YOU. THIS WARRANTY GIVES YOU SPECIFIC LEGAL RIGHTS, AND YOU
MAY ALSO HAVE OTHER RIGHTS WHICH VARY FROM JURISDICTION TO JURISDICTION.
HIGH END SYSTEMS does not warrant that the functions contained in the program will meet your requirements or that the operation of the program will be uninterrupted or error-free. You also assume responsibility for the
selection of the program to achieve your intended results, and for the installation, use, and results obtained from the
program.
YOUR SOLE REMEDIES AND HIGH END SYSTEMS ENTIRE LIABILITY ARE AS SET FORTH
ABOVE. IN NO EVENT WILL HIGH END SYSTEMS BE LIABLE TO YOU OR ANY OTHER PERSON FOR
ANY DAMAGES, INCLUDING ANY INCIDENTAL, OR CONSEQUENTIAL DAMAGES, EXPENSES, LOST
PROFITS, LOST SAVINGS, OR OTHER DAMAGES ARISING OUT OF THE USE OF OR INABILITY TO
USE SUCH PROGRAM.
SOME JURISDICTIONS DO NOT ALLOW THE LIMITATION OR EXCLUSION OF INCIDENTAL OR
CONSEQUENTIAL DAMAGES FOR CONSUMER PRODUCTS, SO THE ABOVE LIMITATIONS OR
EXCLUSIONS MAY NOT APPLY TO YOU.
General: Sublicenses, Assignments, Transfers
You may not sublicense, assign, or transfer the license or the program except as expressly provided in this
Agreement. Any attempt to otherwise sublicense, assign, or transfer any of the rights, duties, or obligations hereunder is null and void.
This Agreement is governed by the Laws of the State of Texas and the United States of America except for
their conflicts of law provisions. Venue of any dispute hereunder shall reside in the courts of Travis County, Texas,
U.S.A.
Governing Law
This Agreement is governed by the Laws of the State of Texas, USA.
YOU ACKNOWLEDGE THAT YOU HAVE READ THIS AGREEMENT, UNDERSTAND IT, AND
AGREE TO BE BOUND BY ITS TERMS AND CONDITIONS; YOU FURTHER AGREE THAT IT IS THE
COMPLETE AND EXCLUSIVE STATEMENT OF THE AGREEMENT BETWEEN US WHICH SUPERSEDES
ANY PROPOSAL OR PRIOR AGREEMENT, ORAL OR WRITTEN, AND ANY OTHER COMMUNICATION
BETWEEN US RELATING TO THE SUBJECT MATTER OF THIS AGREEMENT.
Status Cue
Table of Contents
Introduction .......................................................................................... I-1
About This Manual .............................................................................................. I-1
Text Style ........................................................................................................I-2
Software Variations and Updates....................................................................I-2
Caution and Warning Symbols .......................................................................I-2
Safety Instructions...........................................................................................I-2
Current Status Cue Features................................................................................. I-3
System Overview ................................................................................................. I-4
Basic Setup......................................................................................................I-5
Expanded Setup...............................................................................................I-6
Performance Only Setup .................................................................................I-7
Redundant Systems Using Status Cue ............................................................I-8
Console................................................................................................................. I-9
Application......................................................................................................... I-10
LinkCard ............................................................................................................ I-10
Minimum Personal Computer Requirements..................................................... I-11
PC Hardware .................................................................................................I-11
Video .............................................................................................................I-11
MIDI..............................................................................................................I-11
Computer Software .......................................................................................I-11
Specifications ..................................................................................................... I-12
Accessories......................................................................................................... I-12
Compliance ........................................................................................................ I-13
Chapter 1
Installation and Setup ......................................................................... 1-1
Unpack Status Cue .............................................................................................. 1-1
Save the Shipping Materials........................................................................... 1-1
Inspect the Contents ....................................................................................... 1-2
Before You Begin ............................................................................................... 1-5
Setting the LinkCard Address ........................................................................ 1-5
LinkCard(s) Installation ................................................................................. 1-7
Connecting the Master LinkCard to Computer Power Supply ...................... 1-8
Connecting Multiple LinkCards..................................................................... 1-9
Console Installation........................................................................................... 1-11
Installing Littlites ......................................................................................... 1-11
Attaching the Optional Monitor Brackets to the Console............................ 1-12
Status Cue Cabling............................................................................................ 1-14
Connect Console Cable ................................................................................ 1-14
Connect LinkCard Data Out “Y” Cable....................................................... 1-15
Connecting the Data Cables to Fixtures....................................................... 1-16
Table of Contents
TOC-1
Terminator Construction.............................................................................. 1-17
Computer Setup ................................................................................................ 1-18
Windows 3.1x Configuration....................................................................... 1-18
Installing Status Cue for Windows ................................................................... 1-22
LinkCard Software Configuration .................................................................... 1-27
Starting Status Cue for Windows...................................................................... 1-28
Chapter 2
Axiom of Operation ............................................................................. 2-1
Overview............................................................................................................. 2-1
Data Organization ............................................................................................... 2-1
LTP and Transparencies ..................................................................................... 2-1
Chapter 3
MIDI Setup ........................................................................................... 3-1
Overview............................................................................................................. 3-1
MSC Configuration.............................................................................................. 3-1
MIDI Device Configuration................................................................................ 3-2
Removing MIDI Devices.................................................................................... 3-4
Editing MIDI Devices......................................................................................... 3-4
Chapter 4
Fixture Setup ........................................................................................ 4-1
Overview............................................................................................................. 4-1
Adding Fixtures .................................................................................................. 4-2
Changing Fixture Types...................................................................................... 4-6
Moving Fixtures.................................................................................................. 4-9
Removing Fixtures............................................................................................ 4-11
Patching and Unpatching Fixtures .................................................................... 4-12
Soft-Patching Single DMX Channels ............................................................... 4-16
Eliminating Soft-Patches ............................................................................. 4-19
Changing Fixture Attributes ............................................................................. 4-21
Importing Fixture Data ..................................................................................... 4-22
Chapter 5
Scenes, Fixture Groups, and Palettes................................................. 5-1
Overview............................................................................................................. 5-1
Creating Scenes................................................................................................... 5-2
Editing................................................................................................................. 5-4
Selecting Fixtures .......................................................................................... 5-5
Dim ................................................................................................................ 5-7
Pan and Tilt .................................................................................................... 5-9
Xfade............................................................................................................ 5-10
Delay............................................................................................................ 5-12
Rate .............................................................................................................. 5-14
TOC-2
Status Cue User’s Manual
MSpeed ........................................................................................................ 5-16
Color............................................................................................................. 5-18
Color Mix ..................................................................................................... 5-19
RGB....................................................................................................... 5-19
HSI ........................................................................................................ 5-20
Gel ......................................................................................................... 5-21
Using Gel Tables and the Color Picker........................................... 5-22
Editing Gel Tables........................................................................... 5-24
Editing Gel Tables Off-Line ........................................................... 5-24
Deleting a Gel ................................................................................. 5-25
Reverting to the Default Gel Look-Up Table ................................. 5-25
Importing Gel Look-Up Tables....................................................... 5-26
Gobos ........................................................................................................... 5-27
Rotating Gobos............................................................................................. 5-28
Gate / Strobe Rate ........................................................................................ 5-30
Focus ............................................................................................................ 5-31
Zoom ............................................................................................................ 5-31
Frost, Frost Strobe, and Effect ..................................................................... 5-32
Iris ................................................................................................................ 5-33
Single Channel DMX................................................................................... 5-34
Naming a Scene................................................................................................. 5-35
Storing a Scene.................................................................................................. 5-36
Using Song Presets............................................................................................ 5-37
Copying a Scene................................................................................................ 5-37
Removing a Scene............................................................................................. 5-38
Recalling a Scene .............................................................................................. 5-39
Closing a Scene ................................................................................................. 5-39
Playback ............................................................................................................ 5-40
Live Control ................................................................................................. 5-40
Presets .......................................................................................................... 5-41
Fixture Groups .................................................................................................. 5-42
Changing Banks ........................................................................................... 5-42
Creating and Storing Fixture Groups ........................................................... 5-44
Recalling Fixture Groups ............................................................................. 5-45
Erasing Fixture Groups ................................................................................ 5-45
Palettes .............................................................................................................. 5-46
Creating and Storing Palettes ....................................................................... 5-46
Assigning Palettes to Fixtures ............................................................... 5-48
Editing Default Palette 128 .......................................................................... 5-49
Importing Palettes ........................................................................................ 5-50
Erasing Palette Data ..................................................................................... 5-53
Table of Contents
TOC-3
Chapter 6
Sequences .............................................................................................. 6-1
Overview............................................................................................................. 6-1
Creating Sequences............................................................................................. 6-2
Editing................................................................................................................. 6-4
Adding New Steps ......................................................................................... 6-4
Inserting New Steps ....................................................................................... 6-5
Naming Steps ................................................................................................. 6-6
Naming a Sequence ....................................................................................... 6-7
Editing Fixture Constructs ............................................................................. 6-7
Copying and Pasting Fixture Constructs ....................................................... 6-8
Cutting, Copying, and Pasting Steps ............................................................. 6-8
Dragging and Dropping Steps........................................................................ 6-9
Dragging and Dropping a Scene Into a Step.................................................. 6-9
Setting, Inserting, and Getting Sequences Into Presets ................................. 6-9
Deleting Steps ................................................................................................ 6-9
Storing Sequences............................................................................................. 6-10
Recalling Sequences ......................................................................................... 6-11
Closing a Sequence ........................................................................................... 6-11
Removing Sequences From Scratch Memory .................................................. 6-12
Playback............................................................................................................ 6-14
Live Control of a Static Step........................................................................ 6-14
Live Control of a Sequence Loop ................................................................ 6-15
Presets .......................................................................................................... 6-16
Chapter 7
Songs ..................................................................................................... 7-1
Overview............................................................................................................. 7-1
Setting a Preset.................................................................................................... 7-3
Inserting a Preset................................................................................................. 7-5
Getting a Preset ................................................................................................... 7-7
Erasing a Preset................................................................................................... 7-8
Configuring Preset Types ................................................................................... 7-9
Scene Transition .......................................................................................... 7-11
Button Action............................................................................................... 7-11
Fader Action ................................................................................................ 7-12
Construct Filter ............................................................................................ 7-13
Creating New Songs ......................................................................................... 7-14
Naming Songs................................................................................................... 7-16
Storing Songs .................................................................................................... 7-16
Recalling Songs ................................................................................................ 7-17
Bank Method................................................................................................ 7-17
List Method.................................................................................................. 7-18
Reordering Songs.............................................................................................. 7-19
Loading a Song Order File................................................................................ 7-20
Editing a Song Order File Off-line ................................................................... 7-21
TOC-4
Status Cue User’s Manual
Removing Songs ............................................................................................... 7-22
Playback ............................................................................................................ 7-23
Advancing Songs ......................................................................................... 7-23
Playing Back Presets .................................................................................... 7-23
Clearing Instant Preset Output ..................................................................... 7-24
Chapter 8
CueLists................................................................................................ 8-1
Overview ............................................................................................................. 8-1
Before You Begin ............................................................................................... 8-1
Creating a New CueList ...................................................................................... 8-2
Finding Your Way Around ................................................................................. 8-3
Screen Indicators ............................................................................................ 8-3
CueList Configuration......................................................................................... 8-4
Clock Source .................................................................................................. 8-4
Insertion Methods........................................................................................... 8-6
Time Options.................................................................................................. 8-6
Cue Sorting Window...................................................................................... 8-6
Output and Input Control Windows............................................................... 8-7
Inserting Cues...................................................................................................... 8-8
Blank Cue....................................................................................................... 8-8
Cutting or a Copying Scenes and Sequences Into a Cue ............................... 8-9
Placing the Active Scene or Sequence Into a Cue ......................................... 8-9
Recording the Console’s Input and Output Data ......................................... 8-10
Capturing the Active Presets in a Snapshot ................................................. 8-10
Capturing External MIDI Data..................................................................... 8-11
Storing CueLists................................................................................................ 8-12
Recalling a CueList ........................................................................................... 8-13
Editing CueLists................................................................................................ 8-14
Label............................................................................................................. 8-14
Cue Number ................................................................................................. 8-15
Renumbering CueLists................................................................................. 8-15
Cue Time...................................................................................................... 8-16
Transition Time............................................................................................ 8-17
Device .......................................................................................................... 8-18
Command and Data Fields ........................................................................... 8-19
Internal .................................................................................................. 8-19
<none> ............................................................................................ 8-20
GO ................................................................................................... 8-20
STOP ............................................................................................... 8-21
ALL OFF......................................................................................... 8-22
LOAD.............................................................................................. 8-22
GOTO FIRST.................................................................................. 8-23
GOTO LABEL................................................................................ 8-23
GOTO ZERO .................................................................................. 8-24
SNAPSHOT .................................................................................... 8-24
Table of Contents
TOC-5
GO CUE.......................................................................................... 8-25
START CLOCK ............................................................................. 8-25
STOP CLOCK ................................................................................ 8-26
START A CUELIST ...................................................................... 8-26
STOP A CUELIST ......................................................................... 8-27
START AT NUMBER ................................................................... 8-28
START AT TIME........................................................................... 8-29
OPEN CUELIST............................................................................. 8-30
CLOSE CUELIST .......................................................................... 8-30
BEEP............................................................................................... 8-31
FIRE MACRO ................................................................................ 8-31
SHUTDOWN.................................................................................. 8-32
SHUTDOWN/RESTART............................................................... 8-33
MSC ...................................................................................................... 8-34
MIDI ..................................................................................................... 8-35
SysEx .................................................................................................... 8-37
Comments .................................................................................................... 8-38
Getting a Scene or Sequence Stored as a Preset in a Cue (Get/Get) ........... 8-39
Playback............................................................................................................ 8-40
Automated Playback .................................................................................... 8-40
Overriding Automatic Playback ........................................................... 8-40
Cue Information Box ...................................................................... 8-40
Hold Function ................................................................................. 8-41
Manual Playback.......................................................................................... 8-42
Chapter 9
Shows..................................................................................................... 9-1
Overview.............................................................................................................
Creating a New Show .........................................................................................
Storing a Show....................................................................................................
Recalling a Show ................................................................................................
Archiving a Show ...............................................................................................
Unarchiving a Show............................................................................................
Deleting Show Files From the Hard-Disk Drive ................................................
Recovering a Show .............................................................................................
9-1
9-2
9-3
9-4
9-5
9-6
9-7
9-7
Chapter 10
Tips and Tricks .................................................................................. 10-1
Overview........................................................................................................... 10-1
Macros .............................................................................................................. 10-1
Creating Macros........................................................................................... 10-2
Running Macros........................................................................................... 10-4
Erasing Macros ............................................................................................ 10-4
Windows’ Positions and Sizes .......................................................................... 10-5
Storing Windows ......................................................................................... 10-5
Recalling Windows...................................................................................... 10-6
TOC-6
Status Cue User’s Manual
Identifying Fixtures ........................................................................................... 10-6
Flip Function ..................................................................................................... 10-7
Homing Fixtures................................................................................................ 10-8
Status Cue Function Modes .............................................................................. 10-8
Viewing Fixture Data During Preset Playback ................................................. 10-9
Additional Tips and Tricks at a Glance........................................................... 10-10
Appendix A
Troubleshooting and Maintenance................................................... A-1
Overview ............................................................................................................ A-1
Before You Begin .............................................................................................. A-2
Required Support Information ........................................................................... A-3
Determining Software and Code Versions.................................................... A-4
Acquiring Help................................................................................................... A-5
Solving LinkCard Not Found Errors.................................................................. A-6
Conflict Between Option Cards and Computer Components ....................... A-7
Simplify your system to test for conflicts .............................................. A-7
Determining Used IRQs and Excluded Memory Addresses.................. A-8
LinkCard Hardware Problems.......................................................................... A-10
Replacing LinkCard Fuses .......................................................................... A-11
Operational Troubleshooting ........................................................................... A-13
Console Diagnostics......................................................................................... A-16
LED Tests.................................................................................................... A-17
Key Press Tests ........................................................................................... A-18
Viewing Code Versions .............................................................................. A-19
Encoder Tests .............................................................................................. A-20
Fader Tests .................................................................................................. A-23
Trackball Tests ............................................................................................ A-24
Littlite Intensity Tests ................................................................................. A-24
Preventative Maintenance ................................................................................ A-25
Software ...................................................................................................... A-25
Protection against Viruses.................................................................... A-25
Checking and Fixing Disk Errors......................................................... A-29
Defragmenting the Hard-Disk Drive.................................................... A-32
Computer..................................................................................................... A-34
Console........................................................................................................ A-34
Table of Contents
TOC-7
Appendix B
Supplemental Information ................................................................. B-1
Overview............................................................................................................. B-1
Redundant System Installation ........................................................................... B-1
Total Redundant System ................................................................................B-1
Single Console Redundant System ................................................................B-6
Upgrading Status Cue for Windows Software.................................................... B-7
Status Cue File System ....................................................................................... B-8
Viewing the Output Stack................................................................................... B-9
Viewing MIDI Data .......................................................................................... B-10
Setting System and Show Preferences.............................................................. B-11
Adjusting Console Lights ............................................................................B-12
Setting Default Xfade and Delay Times ......................................................B-12
Setting Numeric Timeout.............................................................................B-12
Enabling CueList Confirmations .................................................................B-12
Enabling and Disabling Startup Animation .................................................B-12
Setting Fixture ID Options...........................................................................B-13
Setting Show Preferences ............................................................................B-13
Autoloading and Autostarting a CueList .....................................................B-14
Automatically Loading the Trackball at Windows Startup .............................. B-14
Uploading Devices............................................................................................ B-15
Inside the Console............................................................................................. B-17
DB-9 Pin Configuration.................................................................................... B-18
Appendix C
Special Configuration and Control of Fixtures................................ C-1
Overview............................................................................................................. C-1
Available Fixture Types...................................................................................... C-1
Lightwave Research............................................................................................ C-3
AF1000 Three Channel..................................................................................C-3
AF1000 Two Channel....................................................................................C-4
Color Pro........................................................................................................C-4
Cyberlight Running DMX .............................................................................C-4
Cyberlight CX Running DMX.......................................................................C-4
Intellabeam Running DMX ...........................................................................C-4
Studio Color ...................................................................................................C-5
Trackspot Running DMX ..............................................................................C-6
Clay Paky............................................................................................................ C-7
Golden Scan II ...............................................................................................C-7
Golden Scan III ..............................................................................................C-7
Golden Scan III Six Channel .........................................................................C-7
Golden Scan HPE ..........................................................................................C-7
Stage Scan......................................................................................................C-8
Super Scan .....................................................................................................C-8
Super Scan Zoom...........................................................................................C-8
F.A.L................................................................................................................... C-9
TOC-8
Status Cue User’s Manual
PF3013 .......................................................................................................... C-9
Coemar ............................................................................................................. C-10
NAT MM 1200 ........................................................................................... C-10
NAT MM 2500 ........................................................................................... C-10
NAT TM 1200............................................................................................. C-11
NAT TM 2500............................................................................................. C-11
Martin Professional .......................................................................................... C-12
MAC 1200................................................................................................... C-12
MAC 1200 with Vectoring.......................................................................... C-12
PAL 1200 .................................................................................................... C-13
PAL 1200 with Vectoring (MSpeed) .......................................................... C-14
PAL Disco................................................................................................... C-14
PAL Disco with Vectoring (MSpeed)......................................................... C-15
RoboScan Pro 518....................................................................................... C-15
RoboScan Pro 1220 cymr............................................................................ C-15
RoboScan Pro 1220 xr ................................................................................ C-15
Studio Due........................................................................................................ C-16
Stratos.......................................................................................................... C-16
Vari-Lite........................................................................................................... C-17
VL5 and VL5a............................................................................................. C-17
VL6 ............................................................................................................. C-18
VLM............................................................................................................ C-18
Appendix D
Glossary of Terms .............................................................................. D-1
Terms.................................................................................................................. D-1
Appendix E
Important Safety Information ........................................................... E-1
Important: Informations De Sécurité .................................................................. E-1
Wichtige Sicherheitshinweise ............................................................................. E-1
Información Importante De Seguridad................................................................ E-2
Importanti Informazioni Di Sicurezza ................................................................ E-2
Table of Contents
TOC-9
List of Figures
Basic Setup .......................................................................................................... I-5
Expanded Setup ................................................................................................... I-6
Performance Setup ............................................................................................... I-7
Redundant System ............................................................................................... I-8
Latch Locations ................................................................................................... 1-2
Opening the Console ........................................................................................... 1-2
Console Tray Contents ........................................................................................ 1-3
Identifying LinkCard Carton Items ..................................................................... 1-4
Identifying LinkCard Components ..................................................................... 1-6
LinkCard DC Power Input Connector ................................................................ 1-8
Jumper Block Expanded View ........................................................................... 1-9
Connecting LinkCard Communication Cable(s) and Terminator ..................... 1-10
Littlites Attached to Console ............................................................................ 1-11
Attaching Mounting Brackets to Console ......................................................... 1-12
Side View with Littlites and Monitor Brackets Installed ................................. 1-13
Console Cable to LinkCard ............................................................................... 1-14
Console Rear Panel ........................................................................................... 1-14
Locking the Console Cable to the Connector Posts .......................................... 1-15
Connecting Data Out “Y” Cable to LinkCard .................................................. 1-15
Connecting Data Cables from Status Cue to Fixtures ...................................... 1-17
Building 120-ohm Terminator .......................................................................... 1-17
Main Group ....................................................................................................... 1-18
Control Panel Group ......................................................................................... 1-19
Enhanced Dialogue Box ................................................................................... 1-19
Virtual Memory Dialogue Box ......................................................................... 1-20
Expanded Virtual Memory Dialogue Box ........................................................ 1-20
Change Virtual Memory Settings Dialogue Box .............................................. 1-21
Restart Windows now? Dialogue Box .............................................................. 1-21
Disk 1 Contents ................................................................................................. 1-22
Status Cue Introductory Dialogue Box ............................................................. 1-23
Welcome Dialogue Box .................................................................................... 1-23
Status Cue Registration ..................................................................................... 1-24
Software License Agreement ............................................................................ 1-24
Sample Choose Destination Directory Dialogue Box ....................................... 1-25
Sample Confirm Newly Selected Directory Dialogue Box .............................. 1-25
Choose Directory Dialogue Box (Sample) ....................................................... 1-26
Sample LinkCard Setup Dialogue Box ............................................................. 1-27
Upload New Code to LinkCard Dialogue Box ................................................. 1-28
Device Upload Status Information Box ............................................................ 1-29
Please Exit Windows and Restart Dialogue Box .............................................. 1-29
Device Upload Status-Finished! Dialogue Box ................................................ 1-30
Transparency Concept ........................................................................................ 2-2
Stack Viewer Window ........................................................................................ 2-2
CONSTRUCTS Group ....................................................................................... 2-3
MIDI Show Control Setup .................................................................................. 3-1
TOC-10
Status Cue User’s Manual
List of Figures (continued)
MIDI Devices Default Window .......................................................................... 3-3
Add New MIDI Device... Dialogue Box ............................................................. 3-3
MIDI Devices Dialogue Box .............................................................................. 3-4
Edit a MIDI Device... Dialogue Box ................................................................... 3-5
OBJECT Group ................................................................................................... 4-2
Fixture Setup Dialogue Box ................................................................................ 4-3
Add Fixture(s) Dialogue Box .............................................................................. 4-4
Special Settings Window .................................................................................... 4-4
Fixture Setup Sample Dialogue Box ................................................................... 4-5
Selecting Fixtures Example ................................................................................. 4-6
Change Fixture(s) To... Dialogue Box ................................................................ 4-7
Changed Fixture Types Example ........................................................................ 4-8
Move Fixture(s) Before Which Fixture? Dialogue Box ..................................... 4-9
Moved Fixtures Example .................................................................................. 4-10
Remove Fixture(s)? Dialogue Box .................................................................... 4-11
Selecting Fixtures to Patch Example ................................................................. 4-12
Patch Fixtures to Which Link? (LinkCard Patch) Dialogue Box ..................... 4-13
Select Starting Address (Patch) Dialogue Box ................................................. 4-13
Patched AF1000s Example ............................................................................... 4-14
Selecting Fixtures to Soft-Patch ........................................................................ 4-15
Soft-Patch to Which Channel? Dialogue Box ................................................... 4-16
Soft-Patched Channels Example ....................................................................... 4-17
Removing Soft-Patches ..................................................................................... 4-18
Change Fixture(s) To... Dialogue Box .............................................................. 4-19
Changed Soft-Patched Fixtures Example .......................................................... 4-19
Change Attributes For Selected Fixture(s) Dialogue Box ................................ 4-20
Change Attributes For Selected Fixture(s)
(single channel DMX) Dialogue Box ................................................................ 4-20
Import... Dialogue Box ...................................................................................... 4-22
Import From... Dialogue Box............................................................................. 4-23
OBJECT Group ................................................................................................... 5-2
MEMORY Group ................................................................................................ 5-3
New Scene Window ............................................................................................ 5-3
CONTROL and SELECT Groups ....................................................................... 5-5
TRACKBALL Group .......................................................................................... 5-6
DIM Wheel .......................................................................................................... 5-7
CONSTRUCTS Group ........................................................................................ 5-7
Set Dim At Dialogue Box ................................................................................... 5-8
TRACKBALL Group .......................................................................................... 5-9
Set Pan/Tilt At Dialogue Box ............................................................................. 5-9
Xfade Diagram .................................................................................................. 5-10
SCENE Group ................................................................................................... 5-11
Xfade Field ........................................................................................................ 5-11
Delay Diagram .................................................................................................. 5-12
Delay Field ........................................................................................................ 5-13
Table of Contents
TOC-11
List of Figures (continued)
Rate Diagram .................................................................................................... 5-14
SEQUENCE Group .......................................................................................... 5-15
Rate Field .......................................................................................................... 5-15
MSpeed Diagram .............................................................................................. 5-16
MSPEED Wheel ............................................................................................... 5-17
Set MSpeed At Dialogue Box ........................................................................... 5-17
COLOR Group .................................................................................................. 5-18
COLOR MIX Group .......................................................................................... 5-19
Set Color At Dialogue Box ............................................................................... 5-20
Gel Picker Dialogue Box .................................................................................. 5-22
Off-Line Color Table Editing ........................................................................... 5-24
Revert to Factory Default Dialogue Box .......................................................... 5-25
Select a Gel File To Import Into List Dialogue Box ......................................... 5-26
GOBO Group .................................................................................................... 5-27
ROTATING GOBO Group .............................................................................. 5-28
ROTATE Group ............................................................................................... 5-29
STROBE RATE Wheel .................................................................................... 5-30
FOCUS Wheel .................................................................................................. 5-31
ZOOM Wheel ................................................................................................... 5-31
EFFECT Group ................................................................................................. 5-32
IRIS Wheel ....................................................................................................... 5-33
DIM Wheel ....................................................................................................... 5-34
Set Dim At Dialogue Box ................................................................................. 5-34
Name Scene Dialogue Box ............................................................................... 5-35
Store Scene Dialogue Box ................................................................................ 5-36
Remove Scene Dialogue Box ........................................................................... 5-38
Delete Scene Confirmation Box ....................................................................... 5-38
Recall Scene Dialogue Box .............................................................................. 5-39
MASTER GROUP ............................................................................................ 5-40
Fixture and Palette Bank Indicators .................................................................. 5-42
CONTROL Group ............................................................................................ 5-42
Bank Dialogue Box ........................................................................................... 5-43
SYSTEM KEYS / INSTANT PRESETS Group .............................................. 5-43
CONTROL and SELECT Groups .................................................................... 5-44
FUNCTION Group ........................................................................................... 5-44
Store a Fixture Group Dialogue Box ................................................................ 5-45
FUNCTION Group ........................................................................................... 5-46
CONTROL Group ............................................................................................ 5-47
Store a Palette Dialogue Box ............................................................................ 5-47
Recalled Palette for Pan/Tilt and Color ............................................................ 5-48
Import From... Dialogue Box ............................................................................ 5-50
Import Example for Different Number of Fixtures .......................................... 5-51
Continue With Import? Dialogue Box .............................................................. 5-52
Import Error Dialogue Box ............................................................................... 5-52
Erase a Palette Dialogue Box ............................................................................ 5-53
TOC-12
Status Cue User’s Manual
List of Figures (continued)
OBJECT Group ................................................................................................... 6-2
MEMORY Group ................................................................................................ 6-2
New Sequence Window ...................................................................................... 6-3
CONTROL Group ............................................................................................... 6-5
Name Step Dialogue Box .................................................................................... 6-6
Name Sequence Dialogue Box ............................................................................ 6-7
Paste Selected Fixture(s) Dialogue Box .............................................................. 6-8
Store Sequence Dialogue Box ........................................................................... 6-10
Recall Scene Dialogue Box ............................................................................... 6-11
Remove Sequence Dialogue Box ...................................................................... 6-12
Delete Sequence Confirmation Box .................................................................. 6-13
SEQUENCE Group ........................................................................................... 6-15
New Song Window ............................................................................................. 7-2
SONG Group ....................................................................................................... 7-3
Set a Preset in Song Dialogue Box ..................................................................... 7-3
SYSTEM KEYS/INSTANT PRESETS Group .................................................. 7-4
FADER PRESETS Group ................................................................................... 7-4
Song Window ...................................................................................................... 7-4
Insert a Preset in Song Dialogue Box ................................................................. 7-5
Insertion Error Dialogue Box .............................................................................. 7-6
Get a Preset From Song Dialogue Box ............................................................... 7-7
CONTROL Group ............................................................................................... 7-8
Erase a Preset From Song Dialogue Box ............................................................ 7-8
SONG Group ....................................................................................................... 7-9
Preset Type Dialogue Box ................................................................................ 7-10
OBJECT Group ................................................................................................. 7-14
MEMORY Group .............................................................................................. 7-14
Save Changes Made to Song Dialogue Box ..................................................... 7-15
Store Song Dialogue Box .................................................................................. 7-15
Name Song Dialogue Box ................................................................................. 7-16
CONTROL Group ............................................................................................. 7-17
Select Song From Preset Keys Dialogue Box ................................................... 7-17
Recall Song Dialogue Box ................................................................................ 7-18
Song Order Dialogue Box ................................................................................. 7-19
Save Song Order As... Dialogue Box ................................................................ 7-20
Load Song Order From... Dialogue Box ........................................................... 7-20
Song Order Text File Example ......................................................................... 7-21
Remove Song Dialogue Box ............................................................................. 7-22
Delete Song Confirmation Dialogue Box ......................................................... 7-22
CONTROL Group ............................................................................................. 7-23
SONG Group ..................................................................................................... 7-24
OBJECT Group ................................................................................................... 8-2
MEMORY Group ................................................................................................ 8-2
New CueList Window ......................................................................................... 8-2
Sample CueList Window .................................................................................... 8-3
Table of Contents
TOC-13
List of Figures (continued)
Standard Clock .................................................................................................... 8-5
CD Clock Source ................................................................................................ 8-5
Cue Sorting Window .......................................................................................... 8-6
Output and Input Control Windows .................................................................... 8-7
CONTROL Group .............................................................................................. 8-8
Store Cue Dialogue Box ..................................................................................... 8-9
MIDI Viewer ..................................................................................................... 8-11
Store CueList Dialogue Box ............................................................................. 8-12
Recall CueList Dialogue Box ........................................................................... 8-13
Edit Cue Label Dialogue Box ........................................................................... 8-14
Edit Cue Number Dialogue Box ....................................................................... 8-15
Drag Editing ...................................................................................................... 8-16
Edit Time Dialogue Box ................................................................................... 8-16
Select MSC Command Dialogue Box .............................................................. 8-17
Edit Time Dialogue Box ................................................................................... 8-17
Select Device Dialogue Box ............................................................................. 8-18
Device, Command, and Data Fields ................................................................. 8-19
Select Internal Command Dialogue Box .......................................................... 8-19
<none> Command and Data Fields .................................................................. 8-20
GO Command Field .......................................................................................... 8-20
Select a Preset From Song Dialogue Box ......................................................... 8-20
Use the Current Song Dialogue Box ................................................................. 8-21
Go Preset ........................................................................................................... 8-21
STOP Command ............................................................................................... 8-21
Stop Preset ......................................................................................................... 8-21
ALL OFF Command ......................................................................................... 8-22
LOAD Command .............................................................................................. 8-22
Select Song Dialogue Box ................................................................................ 8-22
LOAD Song ...................................................................................................... 8-22
GOTO FIRST Command .................................................................................. 8-23
GOTO LABEL Command ................................................................................ 8-23
Cue Goto Label Dialogue Box .......................................................................... 8-23
GOTO LABEL Example .................................................................................. 8-23
GOTO ZERO Command .................................................................................. 8-24
SNAPSHOT Command .................................................................................... 8-24
GO CUE Command .......................................................................................... 8-25
GO CUE Dialogue Box .................................................................................... 8-25
GO CUE Example ............................................................................................ 8-25
START CLOCK Command .............................................................................. 8-25
STOP CLOCK Command ................................................................................ 8-26
START A CUELIST Command ....................................................................... 8-26
Select CueList Dialogue Box ............................................................................ 8-26
START A CUELIST Example ......................................................................... 8-26
STOP A CUELIST Command .......................................................................... 8-27
STOP A CUELIST Example ............................................................................ 8-27
TOC-14
Status Cue User’s Manual
List of Figures (continued)
START AT NUMBER Command .................................................................... 8-28
Start CueList At Number Dialogue Box ........................................................... 8-28
START AT NUMBER Example ...................................................................... 8-28
START AT TIME Command ........................................................................... 8-29
Start CueList at Time Dialogue Box ................................................................. 8-29
START AT TIME Example .............................................................................. 8-29
OPEN CUELIST Command ............................................................................. 8-30
OPEN CUELIST Example ................................................................................ 8-30
CLOSE CUELIST Command ........................................................................... 8-30
CLOSE CUELIST Example ............................................................................. 8-30
BEEP Command ............................................................................................... 8-31
FIRE MACRO Command ................................................................................. 8-31
Recall Macro Dialogue Box .............................................................................. 8-31
FIRE MACRO Example ................................................................................... 8-31
Shutdown Confirmation Dialogue Box ............................................................. 8-32
SHUTDOWN Command .................................................................................. 8-32
Shutdown/Restart Dialogue Box ....................................................................... 8-33
SHUTDOWN/RESTART Command ............................................................... 8-33
MSC Device Command and Data Fields .......................................................... 8-34
Select MSC Command Dialogue Box ............................................................... 8-34
MIDI Device Command and Data Fields .......................................................... 8-35
Select MIDI Command Dialogue Box .............................................................. 8-35
MIDI Command Example ................................................................................. 8-35
MIDI Data Example .......................................................................................... 8-36
SysEx Command and Data Fields ..................................................................... 8-37
Generic MIDI SysEx Hex Editor ...................................................................... 8-37
Edit Cue Comments Dialogue Box ................................................................... 8-38
SONG Group ..................................................................................................... 8-39
Cue Information Box ......................................................................................... 8-40
Hold Field .......................................................................................................... 8-41
Holding Function .............................................................................................. 8-41
OBJECT Group ................................................................................................... 9-2
MEMORY Group ................................................................................................ 9-2
Save Show As... Dialogue Box ........................................................................... 9-3
Open Show Dialogue Box ................................................................................... 9-4
Archive To Which Directory Dialogue Box ....................................................... 9-5
Unarchive Which File Dialogue Box .................................................................. 9-6
Unarchive to which directory? Dialogue Box ..................................................... 9-6
FUNCTION Group ........................................................................................... 10-2
CONTROL Group ............................................................................................. 10-2
Store a Macro Dialogue Box ............................................................................. 10-2
SYSTEM KEYS-INSTANT PRESETS Group ................................................ 10-3
Erase a Macro .................................................................................................... 10-4
OBJECT Group ................................................................................................. 10-5
MEMORY Group .............................................................................................. 10-5
Table of Contents
TOC-15
List of Figures (continued)
About Status Cue for Windows Dialogue Box (Sample) .................................. A-4
LinkCard LEDs .................................................................................................. A-6
MSD Application Screen ................................................................................... A-8
IRQ Status Window ........................................................................................... A-9
LinkCard Fuses ................................................................................................ A-12
TRACKBALL and CONTROL Group ............................................................ A-16
SELECT Group ................................................................................................ A-16
COLOR Group ................................................................................................. A-17
GOBO Group ................................................................................................... A-18
ROTATING GOBO Group ............................................................................. A-19
STROBE RATE and FOCUS Groups ............................................................. A-20
ROTATE and ZOOM Groups ......................................................................... A-20
EFFECT and IRIS Groups ............................................................................... A-21
MSPEED and DIM Groups ............................................................................. A-21
COLOR MIX Group ........................................................................................ A-22
FADER PRESETS and MASTER Groups ...................................................... A-23
SYSTEM KEYS / INSTANT PRESETS Group ............................................. A-23
CONTROL Group ........................................................................................... A-24
Microsoft Anti-Virus Application ................................................................... A-25
Options Dialogue Box ..................................................................................... A-26
Microsoft Anti-Virus Program ......................................................................... A-27
Options Setting Dialogue Box ......................................................................... A-27
Selecting the C Drive ....................................................................................... A-28
ScanDisk Dialogue Box ................................................................................... A-29
Surface Scan Options Dialogue Box ............................................................... A-30
Advanced Options Dialogue Box .................................................................... A-30
Select Drive Dialogue Box .............................................................................. A-32
Disk Defragmenter Dialogue Box ................................................................... A-32
Advanced Options Dialogue Box .................................................................... A-33
Defragmenting Drive C Dialogue Box ............................................................ A-33
Quit Disk Defragmenter Dialogue Box ........................................................... A-33
MSC Setup Window ...........................................................................................B-3
Main Computer MSC Setup ...............................................................................B-3
Backup Computer MSC Setup ............................................................................B-4
Complete Redundant System ..............................................................................B-4
Single Redundant System ...................................................................................B-6
Archive Old Show Window ................................................................................B-7
Output Stack Window .........................................................................................B-9
MIDI Viewer Sample Window .........................................................................B-10
Preferences Dialogue Box ................................................................................B-11
Status Cue LinkCard Setup Dialogue Box .......................................................B-14
Device Code Upload Dialogue Box ..................................................................B-15
Device Upload Status Information Window .....................................................B-16
Internal Storage Trays .......................................................................................B-17
DB-9 Pin Configuration ....................................................................................B-18
TOC-16
Status Cue User’s Manual
List of Figures (continued)
EFFECT Group .................................................................................................. C-3
STROBE RATE Group ...................................................................................... C-3
COLOR Group ................................................................................................... C-5
ZOOM Wheel ..................................................................................................... C-5
FOCUS Wheel ................................................................................................... C-6
GOBO Group ................................................................................................... C-10
MSPEED Group ............................................................................................... C-12
CONSTRUCTS Group ..................................................................................... C-13
ROTATING GOBO Group .............................................................................. C-13
Selecting VL5 Dim Channels ........................................................................... C-17
Table of Contents
TOC-17
List of Tables
Master LinkCard Switch Settings ....................................................................... 1-6
Slave LinkCard Switch Settings ......................................................................... 1-7
Fixture Constructs Controlled by Xfade ........................................................... 5-11
Color Mixing the Seven Basic Colors .............................................................. 5-20
Alternate Base Address Settings ........................................................................ A-9
Operational Troubleshooting ........................................................................... A-13
Status Cue Files ..................................................................................................B-8
TOC-18
Status Cue User’s Manual
Introduction
Congratulations and thanks for using the Status Cue® lighting Console from
Lightwave Research®.
About This Manual
This manual provides the means to setup and operate Status Cue. This manual
is organized in the following sections:
Introduction—introduces you to this manual and Status Cue.
Chapter 1 Installation and Setup—explains how to install the Status Cue
hardware and software.
Chapter 2 Axiom of Operation—explains the operational concepts of Status
Cue.
Chapter 3 MIDI Setup—explains how to setup MIDI Show Control and add
MIDI devices.
Chapter 4 Fixture Setup—explains how to add, configure, and patch fixtures.
Chapter 5 Scenes, Fixture Groups, and Palettes—explains how to use
Scenes, Fixture Groups, and Palettes.
Chapter 6 Sequences—explains how to use Sequences.
Chapter 7 Songs—explains how to use Songs.
Chapter 8 CueLists—explains how to use CueLists.
Chapter 9 Shows—explains how to use Shows.
Chapter 10 Tips and Tricks—provides special tips and tricks on operating
Status Cue.
Appendix A Troubleshooting and Maintenance—provides directions for
troubleshooting and maintenance of the Console and computer.
Appendix B Supplemental Information—provides information pertaining to
redundant systems, System Preferences, homing fixtures, identifying fixtures,
and additional Status Cue information.
Appendix C Special Configuration and Control of Fixtures— covers the
operation and special configuration requirements for specific fixture types.
Appendix D Glossary of Terms— terms and definitions of Status Cue related
items.
Appendix E Important Safety Information—provides safety information in
English, French, German, Spanish, Italian, and Danish.
Note: the last page of the manual is a two-page fold out picture of the Status Cue
Console provided for reference.
Introduction
Intro-1
Text Style
Throughout this manual, different types of text will be used to refer to its
corresponding item:
•
•
•
a keycap, wheel, or fader will look like: push the <ALL> button
a Windows screen item, menu, option, or field will look like: click on the OK
button
DOS items, file names, and input key strokes will look like: Type a:\ setup
Software Variations and Updates
The screen captures in this manual are from Windows 95 systems. Their
appearance differs slightly from Windows 3.1x. Due to constant software
upgrades, screen captures may have slight modifications made to them (typically
nomenclature). However, the functionality of the items will remain the same. For
the latest Status Cue User’s manual and software, periodically check our
web site at http://www.highend.com.
Caution and Warning Symbols
The following international symbols appear in margins throughout this manual to
highlight caution and warning messages:
Caution: This symbol appears adjacent to Caution messages. Ignoring
these messages could result damage to equipment or data loss.
Warning: This symbol appears adjacent to High Voltage Warning
messages. Ignoring these messages could result in serious personal injury.
Safety Instructions
•
•
•
•
•
Intro-2
Heed all caution and warning messages throughout this manual and the
documentation that accompanies your fixtures and computer.
Servicing must be conducted by the manufacturer or other qualified service
personnel.
Avoid allowing liquids in any form to come in contact with the console.
Do not place small metal objects or foreign objects (objects that were not
intended to be placed inside the console) in the console’s storage tray. Possible
damage to the console may occur during shipping voiding the warranty.
Electro Static Discharge (ESD) may permanently damage the electronic
components on the LinkCard, internal PC components, and internal system
boards. If you are working with these components, use a commercially
available wrist grounding strap to discharge static electricity. If a wrist
grounding strap is not available, touch an unpainted metal surface, such as, the
power supply case. When handling the LinkCard or other cards inside your
computer, hold the card by the edges or by the metal bracket on the end of the
card. Avoid touching the components on the card except for DIP switches and
jumpers.
Status Cue User’s Manual
Current Status Cue Features
•
•
•
•
•
•
•
•
•
•
•
•
•
•
•
•
•
•
•
•
•
•
•
•
•
•
•
•
Simultaneous control of up to 200 Cyberlight®, 272 Cyberlight CX, 1360
Color Pro® (with DMX interfaces), 1360 Dataflash® AF1000, 336
Intellabeam®, 256 Studio Color®, or 584 Trackspot® fixtures per Status Cue
system with 4 LinkCards, as well as numerous other DMX compatible fixtures
DMX fixture ‘library’
Console operates in conjunction with a 486 or Pentium® personal computer
The Status Cue application runs under Microsoft® Windows® 3.11 or
Windows 95
USITT DMX-512 and LWR control
Menu and window driven displays, editing, and program storage
Performance mode operation without Console
Memory storage is virtually unlimited depending on computer hardware
System supports 4 LinkCards
Controls up to 1024 DMX channels per LinkCard- up to 4096 channels with 4
LinkCards.
128 Palettes for all parameters
5872 Scenes consisting of Construct parameters, position information, and
timing information are used to build Songs
32 Instant Presets plus 16 Fader Presets per Song, unlimited number of Songs
128 Fixture Group Selections
32 system Macros
Supports up to 8 concurrent CueLists, each with an independent clock source
CD ROM support for triggering and using CueLists
16 control faders with flash buttons
Master dim
Gel look up tables for custom gel references
Crossfade time up to 36.4 minutes
Instant blackout function
"Human engineered" ergonomic design
Easy access to hardware for maintenance and troubleshooting
Convenient Console internal storage trays
Two Console auxiliary plug-in lamps
Supports MIDI Show Control, standard MIDI, and SMPTE through a MIDI
card
Two year warranty
Introduction
Intro-3
System Overview
Status Cue is a versatile and powerful lighting control system with the ability to
control Color Pro, Cyberlight, Cyberlight CX, Dataflash AF1000, Intellabeam, Studio Color, and Trackspot fixtures. Status Cue also offers preset fixture types for
numerous additional lighting instruments. These other fixtures enjoy the same
sophistication of control as High End products such as Cyberlight with the use of dedicated controls, palettes and other advanced features. A library of supported fixtures
from many manufacturers is supplied and is constantly expanding. The console also
features standard MIDI and MIDI Show Control protocol capabilities. The many
advantages afforded by the Status Cue system make it the obvious choice for control
of automated lighting in any professional situation.
The Status Cue Console interfaces with a Pentium or 486 microprocessor based personal computer fitted with one or more LinkCards which in turn interface with the fixtures. Status Cue for Windows runs under Microsoft Windows 3.11 or Windows 95 on
a desktop PC providing system functionality that includes menu and window driven
displays, editing, and program storage. Fixture and Console software updates are
effortlessly accomplished through the software.
Status Cue provides the designer with the controls and features associated with conventional lighting desks while offering the performance of a dedicated moving light
console. The Status Cue system is not only infinitely powerful and expandable, it is
also comfortable to learn, featuring a control architecture hierarchy that makes sense.
Status Cue has four levels of system configurations. These configurations
allow you to use the Status Cue system to control and operate fixtures in a
rehearsal or performance situation. The configurations are:
•
•
•
•
Intro-4
Basic Setup
Expanded Setup
Redundant Setup
Performance Only Setup
Status Cue User’s Manual
Basic Setup
This configuration provides everything you need to use the Status Cue system for
control of 1024 DMX channels. You have complete control and operation of all
connected fixtures and can create, view, and edit all show data. As Figure 1
indicates, the Basic Setup consists of:
•
•
•
•
The Status Cue Console
One master LinkCard (installed in the computer)
One Console cable (DB-25)
One Link Out “Y” cable (DB-9)
Fixture 1
Status Cue Console
Last Fixture
10-foot console to LinkCard cable
Fixture 1
Master LinkCard
installed in PC
4-foot "Y" Link Cable
with 2 Link Output XLR
connectors
Last Fixture
Figure 1. Basic Setup
Introduction
Intro-5
Expanded Setup
This configuration provides everything you need to use Status Cue for up to 4096
DMX channels (with four LinkCards). You have complete control and operation of
all connected fixtures and can create, view, and edit all show data. As Figure 2
indicates, the Expanded Setup consists of:
•
•
•
•
•
The Status Cue Console
Two (or more) LinkCards (master and slaves)
LinkCard communication cables (connected between adjacent LinkCards)
Console cable
Interfacing Y-cable per LinkCard
Status Cue Console
Fixture 1
Last Fixture
Fixture 1
10-foot Console to LinkCard cable
Last Fixture
Master LinkCard
installed in PC
LinkCard Comm
cable
Fixture 1
Last Fixture
Slave LinkCard
Installed in PC
Fixture 1
4-foot "Y" Link Cables
with 2 Link Output XLR
connectors
Figure 2. Expanded Setup
Intro-6
Status Cue User’s Manual
Last Fixture
Performance Only Setup
Once you fine tune the last details of your show, you can operate Status Cue
through Cue Lists or controlled through a MIDI interface. Notice in Figure 3 that
the console is not connected. This prevents tampering or other inadvertent damage
to the show. All functions are available in this configuration which needs only the
computer with one or more LinkCards, keyboard, and a mouse. As Figure 3
indicates, the Performance Only Setup consists of:
•
•
•
One or more LinkCards (master and slaves)
One LinkCard communications cable (4-inch) between adjacent LinkCards
Interfacing “Y” cables from each LinkCard to the fixtures
fixture 1
last fixture
fixture 1
last fixture
Master LinkCard
installed in PC
LinkCard Comm
cable
4-foot "Y" Link cables
with 2 Link Output XLR
connectors
fixture 1
last fixture
Slave LinkCard
installed in PC
fixture 1
last fixture
Figure 3. Performance Setup
Introduction
Intro-7
Redundant Systems Using Status Cue
Redundant Status Cue systems are highly recommended for all live performance
environments. Using redundant systems enables you to proceed with a Show when
the unimaginable might occur (computer component failure, large line spike,
spontaneous combustion of a computer, act of God, etc.). There are two redundant
system configurations:
•
•
Total Redundant System- two Consoles, two computers, identical number of
LinkCards in each system, and two MIDI Cards
Single Console Redundant System- one Console, two computers, identical
number of LinkCards in each system, and two MIDI Cards. Refer to Figure 4.
Link A
Datalink "Y" Cable
DB9M
Datalink
DB25M
Link B
XLR
XLR
DB9F
DB9F
VGA
Main System
DB9M
Datalink
DB25M
DB25M
DB25M
VGA
MIDI In
MIDI Out
Backup System
VGA
Monitor
Figure 4. Redundant System
Refer to "Redundant System Installation" on page B-1 for complete information on
setup.
Intro-8
Status Cue User’s Manual
Console
The Status Cue system provides up to 18 layers of simultaneous playback control of
connected fixtures. Sixteen of these output channels are accessed as Fader presets, and
the currently selected Instant Preset and Live Control constitute the remaining two
output channels. Each Fader Preset features a high sensitivity fader control, an indicator, and a Flash key. The fader controls may be used to playback numerous options,
such as dimming, rate control, or crossfading of Scenes stored in the Fader Presets.
Scenes and sequences may also be stored on one of the banks of 32 Instant Preset buttons ready for immediate recall. These 32 keys also give quick, easy access to Status
Cue’s powerful Palette function (preset focus), rapid Fixture Group selection and Macros. Adjacent to the Fader Presets is a Master Fader controlling overall dimming, and a
Blackout key, which enables a quick "cut to black" effect.
The Continuous Constructs control section includes a series of eight rotary wheels for
precise manipulation of parameters such as strobe rate, gobo rotation, frost, mirror
speed, focus, zoom, iris, and dimming. Three smaller rotary Construct wheels and
Construct keys form the Console’s Color Mixing section. The wheels allow exact levels of RGB (Red Green Blue) color to be created. Construct keys allowing the operator
to select either gel color or HSI (Hue Saturation Intensity) models.
The console’s Discrete Construct section includes the COLOR, GOBO, and ROTATING GOBO key groups. The COLOR group enables control of all parameters relating
to the fixed dichroic color wheels of all Lightwave Research automated luminaires and
other DMX fixtures, including single and split color selection, forward and reverse
color spins, color oscillation, and their associated variable speeds. The GOBO and
ROTATING GOBO groups are used to select static and/or rotating gobos, and control
their indexing, oscillation, and related speed parameters.
In addition to its powerful features, Status Cue is elegantly designed and stylized. The
chassis is constructed from 18 gauge cold rolled steel and is built to ensure maximum
rigidity and ruggedness. The Console also has convenient hidden storage with a compartmental tray for holding cables, floppy disks, small tools, etc.
Introduction
Intro-9
Application
The Status Cue application program was written in the C++ object oriented programming language and runs under Microsoft Windows 3.11 or Windows 95 on a
Pentium® or 486-based personal computer. The software program provides the graphical user interface to the system and communicates with the Console through the LinkCard.
Because the application program utilizes the Microsoft Windows operating system,
Status Cue is capable of supporting high resolution video monitors, MIDI, SMPTE,
external trackball, CD ROM’s, touch screens, storage systems, and a host of other
external devices. The application program features familiar menu type commands and
convenient pop-up dialogue boxes for navigation throughout the program. Fixtures
and Constructs are matrixed in a dynamic window format for constant monitoring of
system information.
Most importantly, the computer interface allows for programming to take on familiar
computer-oriented characteristics. Click and drag editing, cutting, copying, and pasting are conveniences that computer users take for granted, but are revolutionary concepts in the context of programming automated lighting. To move a Scene within a
Sequence, simply ‘click’ on the Scene and drag it to another location. In this manner, a
show can be arranged and rearranged in no time.
LinkCard
The LinkCard features a Motorola® 68331 processor with 1024 Kb RAM, 256 Kb of
Flash ROM, and 16 Kb of dual-port RAM. The LinkCard contains most of the system
intelligence and all time critical performance functions, freeing the Windows application from the burden of real time control. Each of the data link outputs can be configured independently for Lightwave Research (LWR) or DMX-512 protocols.
Each card has output connectors that interface to the Console and to the fixtures providing both necessary data and power to the Console and the LinkCard output to the
fixtures. Up to four cards each with two DMX-512 / LWR protocol outputs may be
installed in the computer to expand the system up to a total of 4096 DMX channels.
Fixture software upgrades for Cyberlight, Studio Color, and future Lightwave
Research fixtures may also be performed through these data links.
Intro-10
Status Cue User’s Manual
Minimum Personal Computer Requirements
The following subsections contain the minimum recommended computer
hardware and peripheral requirements for Status Cue. While most computers
that meet the Status Cue specification probably will work, only systems
purchased and pre-configured by High End Systems are fully supported. Due
to the differences between components, High End Systems Inc. accepts no
liability for computers that do not perform as expected.
PC Hardware
Microprocessor:
Intel® 486 DX33 or faster x86
architecture
BIOS:
American Megatrends® or Phoenix®
Memory:
16 megabytes (MB) of random access
memory (RAM) for one LinkCard and
eight MB for each additional LinkCard
Hard drive:
100 MB free
Power supply:
200 W
Bus:
Industry Standard Architecture (ISA)
one full length 16-bit slot per LinkCard
Video
Monitor:
A color video monitor that supports 1024
x 768 resolution with 256 colors and a 60
Hz refresh rate or better
Card:
A color video card that supports 1024
x 768 resolution with 256 colors and a 60
Hz refresh rate or better
MIDI
Card:
Music Quest MQX-32M
Computer Software
DOS
MS-DOS® 5.0 or greater
Windows
Microsoft Windows 3.11 (United States
version)
Note: Windows 95 is fully supported.
Introduction
Intro-11
Specifications
Status Cue Console
Height:
14 cm (5.75 in.)
Width:
104 cm (41 in.)
Depth:
71 cm (28 in.)
Weight:
26.53 Kg (58.5 lbs.)
Power Consumption:
+5 V DC (350 milliampere) for LEDs and +12
V DC (1200 milliampere) for Littlites and logic
boards
LinkCard
Size:
full size ISA card
Power Consumption:
2.25 watts
Accessories
The following items are currently available for Status Cue:
Item Description
Number
Status Cue Console
Part
22020002
Status Cue industrial rack mount 100-MHz Pentium computer,
16-MB memory, CD ROM, one LinkCard, output Y
cable, and software
90902020
Intro-12
Status Cue Desktop 100-MHz Pentium Computer, 16-MB
memory, CD ROM, one LinkCard, output Y cable, and
software
90902021
Status Cue 17-inch color monitor
22040008
LinkCard, output Y cable, and software
22040001
16-MB SIMM
90303074
Music Quest (Opcode) MQX-32M MIDI card
22040002
A/B switchbox db25 for Console
90902014
A/B switchbox db9 for data line
90902011
A/B switchbox db15 for monitor
90902015
Keal road case for Console
22070001
Keal road case for Console, table mount
22070003
Status Cue User’s Manual
Keal road case for two Status Cue rack mount
computers, 17" monitor, keyboard, and storage tray
22070002
Status Cue User’s Manual
60600028
Status Cue 3-Ring Binder
90901002
Littlite replacement bulb
55030019
Intellipower IQ800 SDI 50/60 UPS w/battery backup
(100-250v, 50/60hz)
22040004
10-foot heavy duty data cable w/ Neutrik XLRs
55050005
25-foot heavy duty data cable w/Neutrik XLRs
55050006
50-foot heavy duty data cable w/ Neutrik XLRs
55050007
100-foot heavy duty data cable w/ Neutrik XLRs
55050008
Compliance
The Status Cue system is compliant to the following standards:
•
•
•
•
•
•
EN 60950: 1992
EN 55022 : 1987 – Class A
IEC 801-2 : 1991 / prEN 55024-2 : 1992 3kV CD 8kV AD
IEC 801-3 : 1984 / prEN 55024-3 : 1991 – 3V/m
IEC 801-4 : 1988 / prEN 55024-4 : 1992 – 0.5 kV Signal Lines, 1 kV Power Lines
FCC-Class A digital device
Introduction
Intro-13
Intro-14
Status Cue User’s Manual
1
Chapter 1
Installation and Setup
In this chapter you will:
❑ unpack Status Cue (1-1)
❑ set LinkCard address (1-5)
❑ install LinkCard(s) (1-7)
❑ install the Console and accessories (1-11)
❑ connect the cables (1-14)
❑ configure the computer for Status Cue For Windows (1-18)
❑ install Status Cue For Windows (1-22)
❑ configure LinkCard(s) (1-27)
❑ start Status Cue for Windows (1-28)
Unpack Status Cue
In this section you unpack your Status Cue and verify that it arrived complete
and without any damage.
Save the Shipping Materials
Do not discard the shipping cartons and packing materials. These cartons and
packing materials are specifically designed to protect the Console and LinkCard
during transport.
If you ever need to return a product for repair or maintenance, you must return it in
its original shipping carton and packing materials. You will be billed for a new
shipping carton and new packing materials if you return your Status Cue in a nonfactory shipping carton with non-factory packing materials.
Note: before returning anything to the factory, be sure to call your High End
Systems Dealer/Distributor for a Return Authorization number. The factory
cannot accept any goods shipped without an RA number.
Chapter 1 Installation and Setup
1-1
Inspect the Contents
If any of the items in the following lists are missing or damaged you must notify
both the shipping agent and your sales agent immediately.
Computer Carton– if you have purchased a computer from High End Systems,
remove the computer from its carton. The correct number of purchased LinkCards
will be pre-installed and configured in the computer. Inspect the computer for
shipping damage.
Monitor Carton– if you have purchased a monitor from High End Systems,
remove the monitor from its carton. Inspect the monitor for shipping damage.
Console Carton – open the large carton and remove the Status Cue Console. Place
the Console on a flat surface and remove the special water resistant dust cover.
There are two latches on the Console, one on each side near the front as indicated
by Figure 1.1. Pull each latch out and twist one quarter turn.
LIGHTWAVE RESEARCH
Latches
Figure 1.1. Latch Locations
Lift the front of the Console up approximately 10° and release. The Console will
then open automatically as indicated by Figure 1.2
Figure 1.2. Opening the Console
1-2
Status Cue User’s Manual
1
Inspect the Console tray and verify that the following items are present (refer to
Figure 1.3):
•
•
•
•
one 10-foot Console interface cable
four monitor brackets
four monitor bracket knobs
two Littlites (auxiliary lamps)
four monitor brackets
10-foot
Console
cable
four monitor
bracket knobs
two Littlites
Figure 1.3. Console Tray Contents
Chapter 1 Installation and Setup
1-3
LinkCard Carton – verify the following items in the LinkCard carton (refer to
Figure 1.4):
• LinkCard
• Status Cue User’s Manual (this manual in a 3-ring binder)
• one 4-foot "Y" link cable
• one 4-inch LinkCard Communications cable
• two 120-ohm terminators (XLR style connectors)
• Status Cue for Windows Diskettes
Notes: if you purchased a Status Cue computer from High End Systems, the
LinkCard box will not contain a LinkCard, it is pre-installed in your
computer.
D2
BP22
R29
L1
GND1
LED1
CON_12
CON_10
LED2
LED3
R33
F2
R15
R19
R16
R18
C5
C4
CON_4
CON_2
F4
R26
R24
R21
F5
R25
C7
C6
T4
R22
D19
R34
D18
D16
D17
R10
CON_7
R20
DZ2
R9
R5
D12
D14
D15
D13
BP21
BP20
IC21
F3
BP18
R23
BP16
R6
R8
DZ3
R12
R27
R28
DZ4
DZ1
R7
R13
R11
BP15
BP14
D7
D6
D5
D4
D8
D11
R36
R35
D10
BP17
IC17
D9
IC12
IC13
IC20
D21
IC16
5
BP8
IC8
CON_3
D20
T2
9
BP6
IC6
IC15
IC14
F6
BP10
CON_13
BP11
CON_5
T3
CON_6
1
BP2
IC9
2
X1
+
C12
+
CON_14
+
C8
C9
1
+
2
3
13
C1
C13
LINK CARD/CYBERLIGHT
VER 2.1
3/10/94
BOB M.
CC_LNK3.FLA
25
C2
R1
R2
F8
D3
IC2
RS1
F7
BP9
IC19
C3
14
1
IC10
IC11
BP19
6
BP4
IC4
T1
1
RS2
BP1
LED6
R31
R32
R14
CON_8
IC18
IC1
LED5
LED4
R30
CON_9
CON_11
D1
R17
X2
10
1
R4
F1
D22
R3
DS_1
BP7
IC7
BP13
BP5
IC5
BP12
CON1
BP3
IC3
3
LinkCard
two terminators
Status Cue for Windows
diskettes
four-foot “Y” Data Link
Out cable
Status Cue
User’s Manual
four-inch LinkCard
Comm cable
Figure 1.4. Identifying LinkCard Carton Items
1-4
Status Cue User’s Manual
1
Before You Begin
Caution: Before you begin the installation read the following safety precautions.
1. Read all warnings, precautions, and safety instructions listed in the user
manual provided with your computer.
2. The factory ships the LinkCard in an antistatic bag. Keep the card in the
antistatic bag until ready to install the card in the computer. Also, return
the card to the antistatic bag whenever you remove it from the
computer. When handling the LinkCard try to hold the card by the
edges or by the metal bracket on the end of the card. Try not to touch
the components on the card except for the DIP switches or jumpers.
3. Follow the instructions in your computer user manual regarding the
installations of expansion cards. They should take precedence over the
general instructions provided in this chapter.
4. Turn off the power to your personal computer. If you have a Status Cue
computer from High End Systems, it is pre-installed and configured
with the appropriate number of LinkCards. Proceed with "Console
Installation" on page 1-11.
Setting the LinkCard Address
If you are not familiar with the concept of setting the base memory address or
Interrupt Request (IRQ) levels for use by computer option cards, then please refer
to Appendix A. Otherwise, continue with this subsection.
The master LinkCard is the first LinkCard installed in the computer. Any
additional LinkCards installed are slaves to the master. If you are installing slaves,
you will need to set the switches for the slave LinkCards as explained in this
subsection.
Note: the factory configures the LinkCard for a base address of C800. This address
may conflict with other option cards in your system, typically a SCSI
adapter (not recommended). If you receive a LinkCard Not Found error,
refer to "Solving LinkCard Not Found Errors" on page A-6. If you are
installing the LinkCard in a new system or a system with an IDE hard-disk
drive controller, you should be able to install the LinkCard without any
conflicts.
Chapter 1 Installation and Setup
1-5
To set the LinkCard address, complete the following procedure:
1. Remove the LinkCard from its protective antistatic bag. Place the bag on a
flat surface and place the LinkCard on top of the bag.
2. Locate the eight configuration DIP switches on the top edge of the
LinkCard as indicated in Figure 1.5.
insert this end of
card in card slot
DC power input
connector (Con 8)
Master/Slave
configuration
DIP Switches
Link Data Out
connector
(DB-9)
metal bracket
LinkCard
Comm
In/Out
connectors
Link “A” Data Out
protection fuses
(top 3 fuses)
12 34 56 7 8
card-edge
Link “B” Data Out
protection fuses
(middle 3 fuses)
Console voltage LinkCard to
protection fuses Console connector
+5 volts and
(DB-25)
+12 volts fuses
(bottom 2 fuses)
Figure 1.5. Identifying LinkCard Components
Master LinkCard – If you are installing this LinkCard as the Master
LinkCard, that is, the first LinkCard you install in the system, then set or verify
that all DIP switches are “off” or down as indicated in Table 1.1 and Figure
1.5. This is the default C800 base address.
Table 1.1: Master LinkCard Switch Settings
Master=Off
Slave=On
1-6
Status Cue User’s Manual
Base Address
Not Used
1
2
3
4
5
6
7
8
OFF
OFF
OFF
OFF
OFF
OFF
OFF
OFF
1
Slave LinkCard(s) – If you are installing a slave LinkCard, set DIP Switches
1 and 4 to “on” and all others to “off” for one slave LinkCard. For the second
and third slaves refer to Table 1.3.
Table 1.2: Slave LinkCard Switch Settings
Base Address
Not Used
Switch
1
2
3
4
5
6
7
8
Slave 1
Slave 2
Slave 3
ON
ON
ON
OFF
OFF
ON
OFF
ON
OFF
ON
OFF
OFF
OFF
OFF
OFF
OFF
OFF
OFF
OFF
OFF
OFF
OFF
OFF
OFF
LinkCard(s) Installation
1. Remove the cover of your computer as outlined in your computer’s user
manual.
2. Locate an unused full length 16-bit ISA card connector (slot). Remove the
screw that holds the metal filler bracket covering the opening to the rear panel
for the selected slot. Set the screw aside, you will need it for the LinkCard.
3. Insert the card-edge of the LinkCard firmly into a full length 16-bit expansionslot connector on the motherboard or riser board as explained in your
computer’s user manual.
4. When the LinkCard has been firmly seated in the expansion slot and the metal
bracket is aligned with the surrounding brackets, secure the LinkCard’s metal
bracket with the screw you removed in step 2.
5. Repeat this procedure for additional LinkCards.
Note: if you have more than one LinkCard, attempt to install the cards side by side
in sequential slots (for convenience of troubleshooting).
Chapter 1 Installation and Setup
1-7
Connecting the Master LinkCard to Computer Power Supply
1. Locate an unused DC power connector from the computer’s power supply.
These connectors are typically used when adding a disk drive or other
peripheral to a system.
2. Press the connector firmly onto the DC Power Input connector, marked Con 8,
on the Master LinkCard. Refer to Figure 1.5 for the location of Con 8.
Note: only the Master LinkCard requires DC Power from the computer.
Caution: Make sure that the polarity of the power supply connector mates
properly with the polarity of the DC power input connector or
permanent damage to the LinkCard may result.
Figure 1.6 shows the DC power input connector in detail.
Yellow
+12 volts
1
Black
Gnd Gnd
2
3
Red
+5 volts
4
The color coding of the wires
on the mating wiring harness from
the PC power supply are:
+12 volts = Yellow
+5 volts = Red
Gnd = Black
Con 8
Figure 1.6. LinkCard DC Power Input Connector
Note: Depending upon your computer, it is possible that there may not be enough
DC power connectors for the Master LinkCard or they may too short to
reach the Master LinkCard. In this instance, DC “Y” and extension
connectors are readily available at most computer stores.
1-8
Status Cue User’s Manual
1
Connecting Multiple LinkCards
If you have multiple LinkCards, you need to install an interfacing communications
cable between LinkCards. The factory ships all LinkCards configured as master
LinkCards.
To connect the LinkCard communications cables and terminator jumper:
1. Locate the LinkCard communications cable provided with each LinkCard.
This cable is about 4 inches long and constructed of a pair of wires, one red and
one black. Situated at both ends of the cable there is a small female jumper
block connector.
2. Locate the jumper block at the top edge of the LinkCard indicated by Figure
1.7 and Figure 1.8. There are three sets of two-pin jumpers (Con 10, Con 11,
and Con 12) and one set of four-pin jumpers (Con 9). The Con 10 through Con
12 pin jumper blocks are used for communication cable inputs or outputs. The
top jumpers of Con 9 are used to store the terminator when it is not needed and
the first set of jumpers is used to terminate the last card if you have a Console
cable that is over 100 feet.
Master Card Only– The top two pins of Con 9 should be jumpered. Refer to
Figure 1.7. This completes the installation for master only LinkCard systems.
If you have slave cards to install continue with the next paragraph, otherwise,
go to step 4.
Slave Card(s) – Move (store) the terminator jumper to the top pair of pins on
Con 9 for all cards, including the Master. Terminate the last card by moving the
jumper to the vertical pins of Con 9.
Comm
cable
inputs
or
outputs
store terminator jumper
here
terminate last card
Con Con Con
12 11 10
Con
9
Figure 1.7. Jumper Block Expanded View
Note: if you have a Console cable (DB-25) that exceeds 100 feet in length, place the
terminator on the last card horizontally across the bottom pins on Con 9.
3. Install the LinkCard Communications cables. Use the left three pairs of jumper
block pins (Con 10, Con 11, and Con 12) to connect the communications
cables. The jumper blocks are wired in parallel, therefore, any one may be used
for an input from the previous card or as output to the next card. Refer to
Figure 1.8.
Chapter 1 Installation and Setup
1-9
Begin by connecting one end of the communications cable to Con 10, Con 11,
or Con 12 on the master card. Ensure that the red wire is facing up or towards
the top edge of the card. Connect the other end of the cable to Con 10, Con 11,
or Con 12 on the first slave card. The red wire must also face the top edge of
the card.
If you install a second or third LinkCard, continue connecting communications
cables from the first slave to the second, and so on.
Jumper Block
Note: when you connect the comm cables between LinkCards
observe the order of the wire color coding. That is, red to
the top pin and black to the bottom pin on all cards.
1 2 3 4 5 6 7 8
Master
all switches off
1 2 3 4 5 6 7 8
Slave 1
switches
1 and 4 On
1 2 3 4 5 6 7 8
switches
1 and 3 On
Slave 2
Terminator
Figure 1.8. Connecting LinkCard Communication Cable(s) and Terminator
4. Replace the computer cover. Then, reconnect all peripherals. Do not turn
system power on, the Console and “Y” Data Out cables will need to be
connected first.
1-10 Status Cue User’s Manual
1
Console Installation
Use the information in the following subsections to install the Status Cue
Console and its accessories.
Installing Littlites
The Console has provisions for two Littlites which provide dimmable Console
lighting. The Littlite goosenecks allow you to position the light where desired.
To attach the two Littlites to the Console, complete the following procedure:
1. Open the Console and remove the two Littlites from the storage tray.
2. Align the three pins on the Littlites with their female receptacles on the
Console and press the Littlites into the Console. Refer to Figure 1.9. Bend the
goosenecks to position the light where needed.
LIGHTWAVE RESEARCH
press Littlites
into Console
receptacles
Figure 1.9. Littlites Attached to Console
Note: only use Tungsten Halogen Bulbs (type Q5) 12-14 volts, 330-380 ma, 5 watt
for replacements.
Refer to "Setting System and Show Preferences" on page B-11 to learn how to
adjust the Littlites lamp output.
Chapter 1 Installation and Setup 1-11
Attaching the Optional Monitor Brackets to the Console
The monitor brackets provide a convenient and space saving place to put your
computer monitor. You can position the brackets anywhere along the back of the
Console. However, once you attach the brackets to the Console you must remove
them to reopen the Console.
To attach the monitor brackets to the Console, complete the following procedure:
1. Open the Console and remove the four mounting brackets and four mounting
bracket knobs from the Console storage tray. Figure 1.10 shows a mounting
bracket and a mounting bracket knob.
2. Notice that on the rear of the Console there is a channel containing four nuts as
Figure 1.10 shows. Slide two of the nuts to the general area along the channel
where you want to position your monitor (left, center, or right).
3. Align the hole in one of the mounting brackets with the nut in the channel and
fasten with the mounting bracket knob. Do not tighten down yet. Do the same
with the other mounting bracket. Refer to Figure 1.10.
mounting bracket
attaching nuts
channel
LIGHTWAVE RESEARCH
slide the nuts in channel to position mounting brackets
mounting
bracket
knob
Figure 1.10. Attaching Mounting Brackets to Console
4. Position or separate the two mounting brackets so that they line up with the
base or feet of your monitor. Firmly tighten the two mounting bracket knobs.
5. Place your monitor on the two brackets. If necessary, loosen the brackets and
realign to properly support the monitor.
Note: if your monitor video cable is too short to reach your computer, relocate
the computer or purchase a video monitor extension cable.
1-12 Status Cue User’s Manual
Figure 1.11 shows the completed assembly of the Littlites and monitor brackets.
Littlites
monitor
brackets
Figure 1.11. Side View with Littlites and Monitor Brackets Installed
6. Repeat the proceeding steps to attach the additional brackets for an additional
monitor, notebook, etc. (if required).
Chapter 1 Installation and Setup 1-13
1
Status Cue Cabling
The following subsections show how to properly connect all cables for
operation of the Status Cue Console and attached devices.
Connect Console Cable
The Console to LinkCard cable is a 10 foot shielded cable with a “locking” right
angle DB-25 connector on the Console end and a straight DB-25 connector on the
LinkCard end. Pins 3 and 25 are not used in the cable. See Figure 1.12
.
10 feet
connect to
Master LinkCard
right angle
DB-25
(female)
connect to
Console
straight DB-25
(male)
Figure 1.12. Console Cable to LinkCard
To install the Console cable from Console to LinkCard:
1. Connect the right angle connector to the “Console LINK” connector located at
the rear of the Console (Figure 1.13) with the cable dressed towards the right
side of the Console (looking from rear). This allows cable clearance when you
open the Console. Then, slide the connector locking mechanism to the left to
secure the connector to the Console. Refer to Figure 1.14.
.
EXTERNAL
CONTROL
EXT IN 1
EXT IN 2
CONSOLE
LINK
Figure 1.13. Console Rear Panel
1-14 Status Cue User’s Manual
1
slide locking mechanism to left
to capture posts on rear panel
CONSOLE LINK connector
post
CONSOLE
LINK
locking
mechanism
slide left
Console cable connector
Figure 1.14. Locking the Console Cable to the Connector Posts
2. Connect the straight DB-25 connector to the mating receptacle on the master
LinkCard. Tighten the two thumb screws to secure the cable to the card.
Caution: The DB-25 connector on the LinkCard is the same type of connector that
is used by computer printer ports. DO NOT plug a printer into the
LinkCard DB-25 connector or printer damage could result.
Connect LinkCard Data Out “Y” Cable
A four-foot LinkCard Data Out “Y” cable and two 120-ohm terminators are
shipped with each LinkCard. One end of the cable has a DB-9 connector that
connects to the LinkCard. At each end of the “Y” split is a standard 3-pin XLR
female connector that interfaces to the fixtures.
To connect the Data Out “Y” Cable to the LinkCard:
1. Connect the DB-9 connector to the mating connector on the LinkCard. Tighten
the thumb screws to secure the connector to the card. Refer to Figure 1.15
2. Repeat this procedure for each LinkCard in the system.
PC
LinkCards
1 and 2
Data Link Out
connector
4-foot
Data Link Out
cable assembly
1A
connect cable assembly
to DB-9 connector on
LinkCard
1B
Figure 1.15. Connecting Data Out “Y” Cable to Link Card
If you are not connecting any fixtures to the system at this time, this completes the
hardware installation. For convenience, you can connect the two terminators to the
“Y” cable.
Chapter 1 Installation and Setup 1-15
Connecting the Data Cables to Fixtures
All supported Lightwave Research fixtures (running LWR protocol) can be mixed
on the same link. However, DMX devices must have their own dedicated link. You
can configure the following fixture types:
• up to 16 Cyberlights (LWR) or 25 Cyberlights (DMX) per link
• up to 34 Cyberlight CXs (DMX) per link
• up to 32 Studio Colors (DMX) per link
• up to 170 Dataflash AF1000s (3 channel DMX mode only) per link
• up to 32 Intellabeams (LWR) or 42 Intellabeams (DMX) per link
• up to 32 Trackspots (LWR) or 73 Trackspots per link (DMX)
• up to 170 Color Pros (DMX with interfaces) per link
• up to 512 DMX channels per link (1024 channels per LinkCard)
Connecting the fixtures to Status Cue requires cables with standard 3-pin XLR
connectors. Also, the last fixture in each string requires a 120-ohm terminator.
Construct the data cables using shielded, two-conductor cable with a male 3-pin
XLR connector on one end and a female 3-pin XLR connector on the other end.
Pin 1 is the Shield, Pin 2 is the Data Compliment (negative), and Pin 3 is the Data
True (positive).
You can use microphone cables if the pin connections are correct (the same as
described above). You should construct or purchase all of your cables (one cable
for each fixture) before you set up Status Cue.
The fixture Data In connector is a male (pins) XLR connector located on the rear
panel of Lightwave Research and most other fixtures. The Data Out connector is a
female XLR connector located next to the Data In connector as Figure 1.16 shows.
Note: some fixture manufacturers use 5-pin data connectors. Adapters are readily
available to convert 5-pin to 3-pin XLR connectors. Also, some
manufacturers invert pins 2 and 3 on their fixtures. It will be necessary to
rewire their fixture data connectors or make custom cables dedicated for
these fixtures.
To connect the fixtures, perform the following procedure:
1. Plug the male end (pins) of a data cable into one side of the “Y” connector
cable assembly, 1A, 1B, 2A, or 2B. Refer to Figure 1.18.
2. Then, plug the female end (sockets) of the data cable into the Data In (male)
connector of the first fixture.
3. To connect additional fixtures, connect the Data Out connection (female XLR)
of the first fixture (from step 2) to the Data In connection (male XLR) of the
second fixture. Then, continue connecting fixtures in this same manner until all
fixtures are connected.
4. Connect a 120-ohm terminator to the Data Out connector on the last fixture on
each link.
1-16 Status Cue User’s Manual
1
PC
Link Data Out
Data Out
1A
1B
Data In
2B
2A
Data
Cables
Note: the last fixture on each link must be terminated.
Figure 1.16. Connecting Data Cables from Status Cue to Fixtures
Note: if you wish to perform supported software uploads, do not place
Intellabeam, AF1000, and fixtures that are not manufactured by High End
Systems/Lightwave Research before the uploadable fixtures on the link
(place them afterwards).
Terminator Construction
Although two terminators are provided with each LinkCard, this subsection
explains how to construct your own terminator. Refer to Figure 1.18.
1. Obtain a Male XLR connector.
2. Disassemble the connector.
3. Solder a 120 ohm resistor,
minimum of 1/4 watt, between pins 2 and 3.
4. Reassemble the XLR connector.
5. Install terminator in Data Out port of fixture.
1
2
3
Figure 1.17. Building 120-ohm Terminator
Chapter 1 Installation and Setup 1-17
Computer Setup
Before installing the Status Cue for Windows software, complete the
following items:
•
Disable Plug and Play (PnP) through the computer’s BIOS (if applicable) for each
IRQ required by the LinkCard(s). Refer to the computer’s documentation for
instructions.
• Run an anti-virus utility to remove any viri that could be present on the computer.
Refer to "Protection against Viruses" on page A-25.
• Run a disk utility to check and fix disk errors. Refer to "Checking and Fixing Disk
Errors" on page A-29.
• Run a defragment utility to optimize the hard-disk drive. "Defragmenting the
Hard-Disk Drive" on page A-32.
Notes: if you have a new computer from High End Systems, it is set up correctly.
Continue with "Starting Status Cue for Windows" on page 1-28.
Windows 3.1x Configuration
For Status Cue to operate properly under the Windows 3.1x operating system,
several settings need to be modified.
Notes: To increase your computer’s speed, repeat the procedure in this subsection
with a completed Show open. Windows 95 systems do not require special
configurations.
Complete the following procedure to configure the computer:
1. Start Windows 3.1x.
2. Double click the Control Panel item in the Main group (Figure 1.18). This
brings up the Control Panel group (Figure 1.19).
Figure 1.18. Main Group
1-18 Status Cue User’s Manual
1
Figure 1.19. Control Panel Group
3. Double click the 386 Enhanced item in the Control Panel group. This
brings up the Enhanced dialogue box. Refer to Figure 1.20.
Figure 1.20. Enhanced Dialogue Box
4. Click the Virtual Memory button in the Enhanced dialogue box. This
brings up the Virtual Memory dialogue box. Refer to Figure 1.21
Chapter 1 Installation and Setup 1-19
Figure 1.21. Virtual Memory Dialogue Box
5. Click the Change>> item to expand the Virtual Memory dialogue box.
Refer to Figure 1.23
disable these options
configure these items
Figure 1.22. Expanded Virtual Memory Dialogue Box
6. Using the Type: drop-down menu, set the swapfile to Permanent. Refer to
Figure 1.22.
7. Click in the New Size: field and type in the size from in the
Recommended Size field. Refer to Figure 1.22.
1-20 Status Cue User’s Manual
Note: the recommended size will increase when Status Cue is running with an open
Show.
8. Disable (no X in the box) Use 32-Bit Disk Access and Use 32-Bit File
Access. Refer to Figure 1.22.
9. Click the OK button. This brings up the Change Virtual Memory Settings
dialogue box. Refer to Figure 1.23.
Figure 1.23. Change Virtual Memory Settings Dialogue Box
10. Click the Yes button to proceed. This brings up the Restart Windows
now? dialogue box. Refer to Figure 1.24.
Figure 1.24. Restart Windows now? Dialogue Box
11. Click the Restart Windows button to allow the changes to take effect and
complete the procedure.
Chapter 1 Installation and Setup 1-21
1
Installing Status Cue for Windows
This section explains how to properly install the Status Cue for Windows software
application. If you purchased a Status Cue computer from High End Systems, it is preinstalled with Status Cue for Windows. If you are upgrading to a new version of Status
Cue for Windows, refer to "Upgrading Status Cue for Windows Software" on page B-7
before proceeding.
Before beginning the installation, make a backup copy of the Status Cue for Windows
diskettes and use the backup diskettes for the installation. If you are unfamiliar with
this procedure, refer to your DOS or Windows documentation.
To install Status Cue for Windows follow this procedure:
1. Start Windows. If you are already running Windows, exit any application that
may be present in memory (word processing, etc.).
2. Insert Installation Diskette 1 into your 3¼-inch floppy drive.
3. Access the drive using My Computer, Windows Explorer, or File Manager.
If you are unfamiliar with this, refer to your Windows documentation or online help. Alternately, follow the instructions on Installation Diskette 1.
4. Double click on setup.exe to begin installation. Refer to Figure 1.25
(Windows 95 screen shown).
Figure 1.25. Disk 1 Contents
1-22 Status Cue User’s Manual
5. The installation program will bring up the introductory dialogue box. Refer to
Figure 1.26. It indicates the version of the software to be installed in the upper
left corner. Click the Next button to continue the installation.
Figure 1.26. Status Cue Introductory Dialogue Box
6. Read the information in the Welcome dialogue box. Refer to Figure 1.27.
Click the Next button to proceed.
Note: proceeding with the installation indicates that you accept the copyright
information.
Figure 1.27. Welcome Dialogue Box
Chapter 1 Installation and Setup 1-23
1
7. Fill in the appropriate registration information and click the Next button to
continue. Refer to Figure 1.28.
Figure 1.28. Status Cue Registration
8. Read the information in the Software License Agreement dialogue box.
Refer to Figure 1.27. Click the Yes button to proceed.
Figure 1.29. Software License Agreement
Note: proceeding with the installation indicates that you accept the software license
agreement.
1-24 Status Cue User’s Manual
9. If you wish to install Status Cue for Windows into the default directory c:\SQ#
(# is the software version), click the Next button to proceed. Refer to Figure
1.30.
Figure 1.30. Sample Choose Destination Directory Dialogue Box
If the directory does not exist (typical), the installation program will prompt
you to confirm the creation of the directory. Refer to Figure 1.31.
Figure 1.31. Sample Confirm Newly Selected Directory Dialogue Box
If you do not wish to install the software into the default directory, click the
Browse... button to bring up the Choose Directory Dialogue Box. Refer to
Figure 1.32.
Chapter 1 Installation and Setup 1-25
1
Figure 1.32. Choose Directory Dialogue Box (Sample)
10. Select the desired directory for installation or type a new directory name in the
Path: field. Click the OK button to complete the operation.
11. Insert remaining disks as prompted by the installation program. A Status Cue
program group is also created with the appropriate icons. In addition to
installing the necessary files, Status Cue is automatically placed in the
StartUp group (the next time Windows is started, it automatically launches
Status Cue for Windows).
Caution: do not rename the Status Cue icon in the StartUp group.
1-26 Status Cue User’s Manual
1
LinkCard Software Configuration
The following subsections provide information to properly configure the
Status Cue for Windows software to communicate with the installed
LinkCard(s). If you experience difficulties configuring the LinkCard(s), refer
to "Solving LinkCard Not Found Errors" on page A-6.
To setup and configure installed LinkCards, perform the following procedure:
1. Run the LinkCard Setup application from the Status Cue program group.
This launches the Status Cue LinkCard Setup dialogue box. It will display
the default Master Excluded Memory Address of C800-CBFF with an IRQ
Number of 10. Additional LinkCards are disabled.
Figure 1.33. Sample LinkCard Setup Dialogue Box
2. Set the Number of LinkCards from its drop-down box.
3. Set the IRQ Number for the Master and Slaves.
4. Set the Excluded Memory Address for each installed card.
Note: if a SCSI card is installed, it may be necessary to set each memory address at
D000-D3FF and above.
5. If you would like to Load trackball driver at Windows startup (trackball can
also be used as a mouse for Windows applications), click its check box.
6. Click Apply Changes to accept or Cancel Changes to start over.
7. If you have changed any LinkCard settings, you must exit Windows and turn
off the computer for the LinkCard(s) to reset.
Chapter 1 Installation and Setup 1-27
Starting Status Cue for Windows
In this section you will begin using the Status Cue for Windows application.
Just double-click on the Status Cue Help icon in the Status Cue group to get
started with the help. Otherwise, continue with Starting Status Cue for
Windows.
1. To start Status Cue for Windows:
2. Double-click on the Status Cue icon in the Status Cue group. You will be
prompted to upload software into the LinkCard. Refer to Figure 1.34.
Figure 1.34. Upload New Code to LinkCard Dialogue Box
Notes: If the Master LinkCard Not Found popup appears, then you do not
have a LinkCard installed in the PC or you may have address or IRQ
level conflicts with other option cards.
The most common cause is IRQ conflict with another option card. Try
selecting a different IRQ level, for example, IRQ 10. If this does not
work you may have conflict with the base memory address. Appendix A
provides additional information.
In the event that you get a General Protection Fault message from
Windows, write down the error message and contact High End Systems
technical support. Then it will be necessary to exit Windows and turn
off your computer.
3. Click Yes to begin the upload. This will bring up the Device Upload Status
information box.
1-28 Status Cue User’s Manual
1
Figure 1.35. Device Upload Status Information Box
4. If there are no errors uploading to the LinkCard, Status Cue will prompt you to
exit Windows and restart the system. Refer to Figure 1.36.
Figure 1.36. Please Exit Windows and Restart Dialogue Box
5. After the Please EXIT Windows and Restart! dialogue box is dismissed, the
Device Upload Status-Finished! dialogue box will appear. Click the OK
button to dismiss the dialogue box. Refer to Figure 1.37.
Note: at this time the Trackball will stop working and you may receive a message
indicating the LinkCard has stopped responding. This is normal after new code
has been uploaded to the LinkCard.
6. Exit Windows and restart the computer.
Chapter 1 Installation and Setup 1-29
Figure 1.37. Device Upload Status-Finished! Dialogue Box
1-30 Status Cue User’s Manual
Chapter 2
Axiom of Operation
2
In this chapter you will learn about the following topics:
❑ data organization (2-1)
❑ LTP and Transparencies (2-1)
Overview
In this chapter, you will learn how Status Cue stores data and addresses channel
priorities.
Data Organization
Status Cue data is organized and sorted by Shows. A Show is the object that is
written to disk. All data, such as Scenes, Sequences, CueLists, etc. are stored in
a Show file. Refer to "Status Cue File System" on page B-8 for complete
information.
LTP and Transparencies
The fundamental concept in the architecture of Status Cue is the use of Latest Takes
Precedence (LTP). This principle, simply stated, means that the last command or level
given is always the one that is obeyed. This is in contrast to conventional lighting desks
where usually it is the ‘Highest’ level that is obeyed- known as Highest Takes
Precedence (HTP). LTP has the further property that any Constructs or channels which
are not recorded in the ‘Latest’ Scene will remain unchanged from their previous state
(transparent). Therefore a Scene may be programmed to control only a particular
Construct, such as color or position, leaving all other Constructs unaltered. When that
Scene is activated, it will ‘layer’ over the existing state and affect only the programmed
Constructs and fixtures. The previous state of all other fixtures or Constructs will be
transparent (show through) and remain unaffected. Refer to Figure 2.1.
Chapter 2 Axiom of Operation
2-1
Figure 2.1. Transparency Concept
Transparencies allow you to create position only Scenes or color only Scenes, etc.
Entire Sequences can be built up using these layers by superimposing, for example, a
gate chase and a programmed move on top of other programming. Building up
Sequences in this manner uses the most powerful aspect of the LTP concept in that
each layer controlling the output of the board remains independent. Any layer can be
removed at any time (Preset turned off or Scene/Sequence closed), leaving underlying
layer(s) intact.
LTP mode applies to the usage of the 17 Presets (1 Instant Preset and 16 Fader
Presets) and one Live output (active Scene or Sequence on the Status Cue
desktop). The outputs that are in use are referred to as a stack. The Live output
is always on top of the stack. Multiple Scenes and Sequences may be open on
the desktop at the same time, but the Live (active/currently selected) Scene or
Sequence takes precedence (top of stack) over any other Scenes, Sequences or
active Presets. The stack is viewed by selecting the Output Stack... item from
the Window drop-down menu. Refer to Figure 2.2.
Figure 2.2. Stack Viewer Window.
2-2
Status Cue User’s Manual
Status Cue uses the following colors for Constructs in Scene and Sequence
windows and the corresponding LEDs indications in the CONSTRUCTS group
(Figure 2.3):
•
Blue- transparent values(s) that allow non-transparent (assigned) values to pass
through to the next layer. The LED in the CONSTRUCTS group will not illuminate.
•
Black- non-transparent (assigned) value(s) that passed through to the next layer.
The LED(s) in the CONSTRUCTS group will illuminate.
•
Red- the non-transparent Construct currently being edited. Underlying value(s)
are not passed through to the next layer. This value is sent to the next layer. The
corresponding LED in the CONSTRUCTS group will flash.
2
Figure 2.3. CONSTRUCTS Group
Chapter 2 Axiom of Operation
2-3
2-4
Status Cue User’s Manual
Chapter 3
MIDI Setup
3
In this chapter you will:
❑ configure MIDI Show Control (3-1)
❑ configure MIDI devices (3-2)
❑ remove MIDI devices (3-4)
❑ edit MIDI devices (3-4)
Overview
This chapter covers setup and configuration of MIDI Show Control (MSC),
and MIDI devices. Status Cue can control external MIDI devices and it can be
controlled via MIDI. If you require redundant systems use the information in
this section to setup MIDI communication. Incoming MIDI data can be viewed
for verification. At this time, if your needs do not include MIDI, skip to
“Chapter 4 Fixture Setup.”
MSC Configuration
If MSC is required, complete the following procedure to configure MSC:
1. Select MSC Setup... from the Configure drop-down menu. This brings up the
MIDI Show Control Setup dialogue box. Refer to Figure 3.1.
Figure 3.1. MIDI Show Control Setup
Chapter 3 MIDI Setup
3-1
2. Select the appropriate Status Cue Device ID (MIDI ID) by clicking in its field
and typing in the ID number. The correct setting is required for redundant
systems and for controlling Status Cue from another MIDI device.
3. Click the appropriate check boxes to turn on or off the following items:
• MIDI In- if this is the redundant backup system, if you are controlling this
Status Cue via MIDI, or if you would like for MIDI commands to be
captured in a CueList.
• MIDI Out- if this system is the master system, you are planning to output
MIDI data to external devices.
4. Select the correct driver for your MIDI card from the Device Driver drop-down
menu. If you do not have the driver installed for your MIDI card, refer to the
documentation provided with the card to install its driver.
5. Click the following boxes in the MIDI In field:
• Apply to CueLists-if you plan on using an external MIDI device for
CueLists.
• Apply to Songs- if you plan on using an external MIDI device to change
Songs and play Presets. Otherwise, select Neither if you do not have a
backup system.
6. Click the following boxes in the MIDI Out (Redundancy:) field:
• Apply to CueLists-if this is the master system and you are slaving a
redundant system to control CueLists.
• Apply to Songs- if this is the master system and you are slaving a redundant
system to control Songs.
• Neither-if you do not have a backup system.
7. Click the OK button to accept changes.
Note: for complete information on redundant systems, refer to "Redundant System
Installation" on page B-1.
MIDI Device Configuration
Status Cue can control external MIDI devices with CueLists through the following
protocols:
• Musical Instrument Digital Interface (MIDI)-standard MIDI protocol
• MIDI Show Control (MSC)-defined subset of MIDI System Exclusive for
entertainment
• System Exclusive protocol (SysEx)-protocol for any device that contains its
own exclusive information from the manufacturer or for the industry type
To configure and control external MIDI devices, complete the following
procedure:
3-2
Status Cue User’s Manual
1. Select MIDI Devices... from the Configure drop down menu. This will bring
up the MIDI Devices dialogue box. The MIDI Devices dialogue box indicates
the installed MIDI devices. Refer to Figure 3.2 for the default window.
3
Figure 3.2. MIDI Devices Default Window
2. Click the Add Device... button to install a new MIDI device.
3. Type in the name of the new device in the Device Name field. Refer to
Figure 3.3.
Figure 3.3. Add New MIDI Device... Dialogue Box
4. Select the Device Type from its drop down menu. The following options are
available:
• Show Control Protocol (MSC)
• MIDI
• System Exclusive (SysEx)
5. Set the MIDI ID by typing the appropriate number in its field.
Note: SysEx does not use MIDI ID.
6. Select the Command Format from the drop-down menu. The items are
available by device type number.
Note: SysEx and MIDI do not use Command Format.
Chapter 3 MIDI Setup
3-3
7. Click the OK button to complete the procedure.
8. Repeat the above steps to add additional devices. Refer to Figure 3.4 for a
sample dialogue box.
Figure 3.4. MIDI Devices Dialogue Box
9. Click the close tab in the upper right hand corner to exit the dialogue box.
Removing MIDI Devices
To remove a MIDI device, complete the following procedure:
1. Select MIDI Devices... from the Configure drop-down menu. This brings up the
MIDI Devices dialogue box.
2. Select a MIDI device to remove.
3. Click the Remove Device button to extract the device from the list.
Editing MIDI Devices
To edit an existing MIDI device, complete the following procedure:
1. Select MIDI Devices... from the Configure drop-down menu. This brings up the
MIDI Devices dialogue box. Refer to Figure 3.4.
2. Select the MIDI device to edit.
3. Click the Edit Device... button to change the parameters of the device. This
brings up the Edit a MIDI Device... dialogue box. Refer to Figure 3.5.
Note: you may also double click the device to begin editing.
3-4
Status Cue User’s Manual
3
Figure 3.5. Edit a MIDI Device... Dialogue Box
4. Enter the appropriate information and click the OK button to complete the
procedure.
Chapter 3 MIDI Setup
3-5
3-6
Status Cue User’s Manual
Chapter 4
Fixture Setup
In this chapter you will:
❑ add fixtures (4-2)
❑ change fixtures types (4-6)
❑ move fixtures (4-9)
❑ remove fixtures (4-11)
❑ patch and unpatch fixtures (4-12)
❑ soft-patch single DMX channels (4-16)
❑ eliminate soft-patches (4-19)
❑ change fixture attributes (4-21)
❑ import fixture data from a different show (4-22)
4
Overview
This chapter covers adding, patching, and configuring fixtures for Status Cue.
Status Cue supports both DMX and LWR protocols. Single channel DMX is
also available to program specialized items like dimmers, color scrollers, fog
machines, and hazers. Single channel DMX also provides a means to control
any USITT DMX-512 compliant device.
After fixtures are setup, refer to the following sections for additional fixture information:
•
•
•
"Identifying Fixtures" on page 10-6
"Flip Function" on page 10-7
"Homing Fixtures" on page 10-8
Chapter 4 Fixture Setup
4-1
Adding Fixtures
To add fixtures, complete the following procedure:
1. Press the <SETUP> key in the OBJECT group (Figure 4.1) to bring up the
Fixture Setup dialogue box (Figure 4.2). Alternately, select Fixtures from the
Configure drop-down menu.
Figure 4.1. OBJECT Group
4-2
Status Cue User’s Manual
4
Figure 4.2. Fixture Setup Dialogue Box
2. Click the Add button in the Fixture Setup dialogue box to bring up the Add
Fixture(s) dialogue box. Refer to Figure 4.3.
Note: fixtures are inserted above the highlighted bar.
Chapter 4 Fixture Setup
4-3
Figure 4.3. Add Fixture(s) Dialogue Box
3. The Add Fixture(s) dialogue box displays the fixture types that are currently
available. Using the mouse (trackball), select a protocol/fixture type from the
list by clicking it and type the number of fixtures in the text box.
Notes: supported preset fixture types are constantly being expanded to encompass a
large variety of manufacturers and fixture types. Contact High End Systems for
the latest software release. If you wish to only add one fixture, select it and
press the <ENTER> key to add the fixture and automatically exit the Add
Fixture(s) dialogue box.
4. If special switch settings are required for the fixture(s), Status Cue will prompt
you to make the necessary changes. If you do not wish to be reminded of the
special setting(s), click the Do not display this message again during this
session... check box. Refer to Figure 4.4.
Figure 4.4. Special Settings Window
4-4
Status Cue User’s Manual
5. If you need to insert fixtures between existing fixtures, simply select the fixture
you want placed after the new fixtures and perform the above steps. Click
Finished when all fixtures have been added. The Fixture Setup dialogue box
shows the added fixtures. Fixtures are automatically patched in the order they
are added. Figure 4.5 shows a sample Fixture Setup dialogue box.
4
Figure 4.5. Fixture Setup Sample Dialogue Box
6. If no additional patching is necessary, click the OK button to rebuild fixture
data.
Chapter 4 Fixture Setup
4-5
Changing Fixture Types
For ease and convenience of configuration, you may change fixture types.
Status Cue changes fixture types intelligently. If any programming has been
completed with the old fixture type(s), pan, tilt, and RGB values are imported
into the new fixture type. Status Cue automatically converts the values
according. To change fixture types, complete the following procedure:
1. Bring up the Fixture Setup dialogue box (if it was not already on the screen).
2. Select the fixture(s) you wish to change. For non-sequential fixtures, click the
first fixture, and then hold down <Ctrl> on the computer’s keyboard, and click
individual fixtures. For sequential fixtures, hold down the <Shift> key on the
computer’s keyboard and select the first and last fixture. Alternately, hold
down the mouse button on the console and drag to acquire a sequential range
of fixtures.
Figure 4.6. Selecting Fixtures Example
3. Click on the Change button. This will bring up the Change Fixture(s) To...
dialogue box. Refer to Figure 4.7.
4-6
Status Cue User’s Manual
4
Figure 4.7. Change Fixture(s) To... Dialogue Box
4. Click the type of fixture you wish to change to. Click on the OK button to
return to the Fixture Setup window. Refer to Figure 4.7. The Fixture Setup
window now indicates your changes. Refer to Figure 4.8 for an example.
Chapter 4 Fixture Setup
4-7
Figure 4.8. Changed Fixture Types Example
5. Click on the OK button in the Fixture Setup window return to the main Status
Cue window or proceed with the following subsections for other fixture
options.
4-8
Status Cue User’s Manual
Moving Fixtures
Fixtures are easily moved to a different order.
Notes: only the fixture numbers are reassigned when fixtures are moved. If you need to
change the address or Link, refer to "Patching and Unpatching Fixtures" on
page 4-12.
4
To move fixtures, complete the following procedure:
1. Bring up the Fixture Setup dialogue box (if it is not already on the screen).
2. Select the fixtures to move. Refer to Step 2 on 4-63..
3. Click the Move button. This brings up the Move Fixture(s) Before Which
Fixture? dialogue box. Refer to Figure 4.9.
Figure 4.9. Move Fixture(s) Before Which Fixture? Dialogue Box
4. Select the fixture insertion point. The fixture becomes highlighted. Fixture(s)
will be inserted above the insertion point. Refer to Figure 4.9
5. Click the OK button. The selected fixtures are moved above the insertion point.
Refer to Figure 4.10 for an example.
Chapter 4 Fixture Setup
4-9
Figure 4.10. Moved Fixtures Example
4-10 Status Cue User’s Manual
Removing Fixtures
In the event fixtures are removed from the rig or a mistake was made adding
fixtures, you may remove individual or a range of fixtures.
Caution: removing fixtures will cause all data and attributes to the selected fixtures to
be removed from the entire Show (Scene, Sequence, etc.).
4
To remove fixtures, perform the following steps:
1. Bring up the Fixture Setup dialogue box (if it is not already on the screen).
2. Select the fixture(s) that you wish to remove (refer to Step 2 on (4-6)).
3. Click the Remove button. You will be prompted to continue or cancel this
operation through the Remove Fixture(s)? dialogue box. Refer to Figure 4.11.
Figure 4.11. Remove Fixture(s)? Dialogue Box
4. Click on the Yes button to continue (remove fixtures) or the No button to
cancel the operation.
Chapter 4 Fixture Setup 4-11
Patching and Unpatching Fixtures
By default, Status Cue “smart patches” fixtures in the order that they are added. If
you need to patch or unpatch fixtures to another address, complete the following
procedure:
1. Bring up the Fixture Setup window (if it is not already on the screen).
2. Select the fixture(s) that you wish to patch or unpatch. In this example, we will
patch AF1000 fixtures from Link 1A to 2B. Refer to Figure 4.12.
Figure 4.12. Selecting Fixtures to Patch Example
3. Click on the Patch button. This will bring up the Patch Fixture(s) to Which
Link? window. Refer to Figure 4.13.
4-12 Status Cue User’s Manual
4
Figure 4.13. Patch Fixtures to Which Link? (LinkCard Patch) Dialogue Box
4. Click the Link you wish to patch to and click the OK button to bring up the
Select Starting Address dialogue box. Alternately, double click on the Link.
In this example, we selected Link 2a. Figure 4.13 shows a DMX Link and
Figure 4.15 shows a LWR Link. If you wish to unpatch fixtures, simply click
on the Unpatch button.
Figure 4.14. Select Starting Address Dialogue Box for DMX Links
Chapter 4 Fixture Setup 4-13
Figure 4.15. Select Starting Address Dialogue Box for LWR Links
5. In the Select Starting Address dialogue box, click on the box where you wish
the address to start at. Status Cue will automatically set the appropriate number
of channels from the selected fixtures. Refer to Figure 4.14. The following
color scheme is used:
•
•
•
blue- existing fixture(s) address(es)
green- new fixture patching address(es)
blue and green for DMX Links- overlapping addresses between existing
and new fixtures on a DMX Link
• red- overlapping addresses between existing and new fixtures on a LWR
Link
Notes: if you click on the OK button when blue and green occupy the same
address, you will unpatch the fixture(s) previously assigned to that address
and replace them with the new fixture(s).
6. Click on the OK button to complete the procedure. The Fixture Setup
dialogue box now indicates the patched AF1000 fixtures. Refer to Figure 4.16.
4-14 Status Cue User’s Manual
4
Figure 4.16. Patched AF1000s Example
Chapter 4 Fixture Setup 4-15
Soft-Patching Single DMX Channels
Status Cue allows each single DMX channel to be soft patched. This allows
multiple DMX channels to be controlled as a single fixture. To soft-patch
DMX channels, complete the following procedure:
1. Bring up the Fixture Setup dialogue box (if it was not already on the screen).
2. Select the desired DMX channel(s) in the Fixture Setup dialogue box.
Channels 1-5 are selected in Figure 4.17.
Figure 4.17. Selecting Fixtures to Soft-Patch
3. Click the Soft-Patch button. This brings up the Soft-patch to which
channel? dialogue box. Refer to Figure 4.18.
4-16 Status Cue User’s Manual
4
Figure 4.18. Soft-Patch to Which Channel? Dialogue Box
4. Click the channel that will control the soft-patched channels (To be softpatched) and click the OK button. The soft-patched channels are grouped
under the control fixture. Refer to Figure 4.19. When editing a Scene or
Sequence, use the control fixture to modify all soft-patched channels.
Chapter 4 Fixture Setup 4-17
Figure 4.19. Soft-Patched Channels Example
5. Repeat steps 1-3 as needed for additional soft-patching.
4-18 Status Cue User’s Manual
Eliminating Soft-Patches
To eliminate a soft-patch, complete the following procedure:
1. Select all fixtures to eliminate from soft-patching.
4
Figure 4.20. Removing Soft-Patches
2. Click the Change button. This brings up the Change Fixture(s) To... dialogue
box. Refer to Figure 4.21.
Chapter 4 Fixture Setup 4-19
Figure 4.21. Change Fixture(s) To... Dialogue Box
3. Select DMX-Single Channel and click the OK button. The soft-patched
fixture(s) will become single DMX channel(s) again. Refer to Figure 4.22.
Figure 4.22. Changed Soft-Patched Fixtures Example
4-20 Status Cue User’s Manual
Changing Fixture Attributes
Status Cue allows fixture attributes to be changed for ease of programming.
The following attributes can be changed on DMX or LWR protocol fixtures to
compensate for hanging positions (to correspond with trackball movement
during positioning):
•
Invert Pan- inverts pan for fixtures positioned inversely on an X axis (upside
down).
•
•
Invert Tilt- inverts tilt for fixtures positioned inversely on a Y axis. (sideways)
Swap Pan and Tilt- swaps the pan and tilt functions for fixtures positioned
inversely on X and Y axes (upside down and sideways).
The following single DMX channel attributes can be changed:
•
Dimmable- allows the channel(s) to be dimmed by any fader.
•
Xfade-able- allows the DMX channel to be crossfaded with Scenes and
Sequences.
To change fixture attributes, complete the following procedure:
1. Bring up the Fixture Setup window (if it is not already on the screen).
2. Select the fixture(s) that need to have their attributes changed.
3. Click on the Configure button to bring up the Change Attributes For
Selected Fixture(s) dialogue box. Refer to Figure 4.23 for preset fixture types
and Figure 4.24 for single channel DMX.
Figure 4.23. Change Attributes For Selected Fixture(s) Dialogue Box
Figure 4.24. Change Attributes For Selected Fixture(s)
(single channel DMX) Dialogue Box
4. Click the desired check box to change the selected item(s) attributes.
5. Click the OK button to complete this procedure and return to the Fixture
Setup window.
Chapter 4 Fixture Setup 4-21
4
Importing Fixture Data
Status Cue can import fixture data (fixture types, attributes, and patches) from
one Show to another. This feature can save time in Show preparation when the
same fixtures and rig are used. To import fixture data, complete the following
procedure:
1. Bring up the Fixture Setup dialogue box (if it is not already on the screen).
2. Click on the Import button to bring up the Import... dialogue box.
Figure 4.25. Import... Dialogue Box
3. Select one of the following options:
Add fixtures, configuration and patches- adds the fixtures,
configurations, the Link addresses, and information into the current Show
• Only replace patches of current fixtures- re-patches fixtures in the
current Show identically to the imported Show
• Only replace configuration of current fixtures- replaces existing
configurations in the current Show with the imported Show’s
configurations
4. Select the desired option and click OK.
•
5. This brings up the Import From... dialogue box. Refer to Figure 4.26.
4-22 Status Cue User’s Manual
4
Figure 4.26. Import From... Dialogue Box
6. Select the appropriate directory and Show file to import fixture data from and
click the OK button. The data will be imported into the Fixture Setup dialogue
box.
7. Click the OK button to rebuild fixture data with the imported data and return to
normal operation.
Note: after importing fixture data, you may wish to import Palettes as well. Refer to
"Importing Palettes" on page 5-50.
Chapter 4 Fixture Setup 4-23
4-24 Status Cue User’s Manual
Chapter 5
Scenes, Fixture Groups, and Palettes
In this chapter you will:
❑ create Scenes (5-2)
❑ edit Scene data (5-4)
❑ name Scenes (5-35)
❑ store Scenes (5-36)
❑ recall Scenes (5-39)
❑ close Scenes (5-39)
❑ set Scenes to Presets (5-37), (7-3)
❑ insert Presets (5-37), (7-5)
❑ get Scenes from Presets (5-37), (7-6)
❑ erase Presets (5-37), (7-7)
❑ playback Scenes (5-40)
❑ create and store Fixture Groups (5-44)
❑ recall Fixture Groups (5-45)
❑ erase Fixture Groups (5-45)
❑ create and store Palettes (5-46)
❑ import Palettes (5-50)
❑ erase Palette data (5-53)
5
Overview
This chapter covers the aspects of how to use Scenes, Fixture Groups, and
Palettes. A Scene is the most basic element (object) for using Status Cue. A Scene
is one static setting or look consisting of fixtures, their Constructs, and timing
controls. Scenes may be stored in Song Presets, played back under live control,
or stored as a Step in a Sequence (refer to "Chapter 6 Sequences").
Status Cue allows the creation of up to 5872 Scenes per Show; 128 additional
Scenes may serve as Palettes. Palettes serve as reference libraries of Scene
Constructs, extending the traditional preset focus concept to all possible
fixture Construct parameters. As the venue or stage changes, a handful of
Palettes may need updating rather than possibly hundreds or thousands of
individual Scenes.
Similar or commonly used fixtures can be grouped and recalled together to
speed up editing. Status Cue allows 128 Fixture Groups to be created.
Note: this chapter also serves as a basis for Sequence editing, as it is virtually
identical.
Chapter 5 Scenes, Fixture Groups, and Palettes
5-1
Creating Scenes
To create a new Scene, perform the following procedure:
1. Press <SCENE> in the OBJECT group, the LED will illuminate. Refer to
Figure 5.1. Alternately, you may select Scene from the Object drop-down
menu.
Figure 5.1. OBJECT Group
2. Press the <NEW> key in the MEMORY key group. Refer to Figure 5.2.
Alternately, select New from the Memory drop-down menu. A new unnamed
(NoName1) Scene window appears listing the fixtures you configured in
Fixture Setup. The new Scene window contains default transparent values
(indicated by blue). Refer to Figure 5.3.
Notes: when transparent values are present, assigned (non-transparent) values from
the last active Scene, Sequence, or Preset(s) will show through and be
outputted to the Stage Value(s). Turn off any active Preset(s) and press the
<CLEAR> key in the SEQUENCE group to clear any hanging values from
Scenes and Sequences.
5-2
Status Cue User’s Manual
5
Figure 5.2. MEMORY Group
clapboard fixture #
protocol/fixture type available Constructs
Figure 5.3. New Scene Window
3. To assist and speed up editing, you may wish to create Fixture Groups. If
Fixture Groups are desired, refer to "Fixture Groups" on page 5-42.
Notes: when a new Scene or Sequence is created, the default transparent values are
pulled (derived) from Palette 128. If you wish to change Palette 128, refer to
"Creating and Storing Palettes" on page 5-46.
Chapter 5 Scenes, Fixture Groups, and Palettes
5-3
Editing
Editing allows Constructs to be changed from their current value (color change for
example). Due to the similarity of editing the Steps of a Sequence (Scenes), Sequence
editing is included in this section. For additional information on Sequences, refer to
Chapter 6.
Complete the following procedure to edit a Scene:
1. Create or recall a Scene or Sequence to the desktop. Refer to "Creating Scenes"
on page 5-2 or "Recalling a Scene" on page 5-39.
2. Press the <SCENE> or <SEQ> key in the OBJECT group repeatedly to select
and scroll though open Scenes or Sequences.
3. Select the fixture(s) to edit (refer to "Selecting Fixtures" on page 5-5) or recall
a Fixture Group (refer to "Recalling Fixture Groups" on page 5-45).
4. Turn off Blind mode by pressing the <BLIND> key in the MEMORY group
(Figure 5.2) to view the stage output. The LED will stop blinking.
Notes: if you wish to create a Scene or Sequence without interrupting a currently
playing Scene or Sequence, enable Blind mode. Status Cue automatically turns
on Blind mode at start-up, when a new Scene or Sequence is created and while
a Get is performed. Refer to "Getting a Preset" on page 7-6 for additional
information.
5. Use the following subsections to set the desired fixture constructs:
• "Dim" on page 5-7
• "Pan and Tilt" on page 5-9
• "Xfade" on page 5-10
• "Delay" on page 5-12
• "Rate" on page 5-14 (Sequences only)
• "MSpeed" on page 5-16
• "Gate / Strobe Rate" on page 5-30
• "Gobos" on page 5-27
• "Rotating Gobos" on page 5-28
• "Iris" on page 5-33
• "Focus" on page 5-31
• "Zoom" on page 5-31
• "Frost, Frost Strobe, and Effect" on page 5-32
• "Color" on page 5-18
• "Color Mix" on page 5-19
• "Single Channel DMX" on page 5-34
Note: some fixture types require special controls. Refer to Appendix C.
5-4
Status Cue User’s Manual
Selecting Fixtures
Fixtures can be selected using the following methods:
•
The preferred method is to use the numeric keypad in the CONTROL
group with the <NOT>, <AND>, and <THRU> keys in the SELECT group
to select a range of fixtures. Refer to Figure 5.4.
Example: to select fixtures 5 through 10, 28, but not 6; you would press <5>,
<THRU>, <10>, <AND>, <28>, <NOT>, and <6>.
•
•
•
•
•
Click the fixture number in the Scene window.
Hold the mouse button and drag the mouse to select multiple fixtures.
Press the up and down keys to move to the previous or next fixture. Refer
to Figure 5.4
Press the <.> key in the CONTROL group to cycle thought the last five
fixture selections (fixture selection history). Refer to Figure 5.4.
Press the mouse key in POS (Position) mode to advance downward
through individual fixtures. Refer to Figure 5.5.
previous next
fixture fixture
5
fixture
selection
history
Figure 5.4. CONTROL and SELECT Groups
Chapter 5 Scenes, Fixture Groups, and Palettes
5-5
mouse
button
Figure 5.5. TRACKBALL Group
5-6
Status Cue User’s Manual
Dim
Dim controls the light output of fixtures. To edit Dim, complete the following
procedure:
1. Select the desired fixture(s). Refer to "Selecting Fixtures" on page 5-5.
2. Set the Dim using the <DIM> wheel (Figure 5.6). Alternately, press the
<DIM> key in the CONSTRUCTS group (Figure 5.7) and then the <AT>
key in the SELECT group (Figure 5.4) to bring up the Set Dim At dialogue
box (Figure 5.8). Enter the desired value and click the OK button to
complete the procedure.
5
Note: the <AT> key can be used for any value that uses a percentage (%).
Figure 5.6. DIM Wheel
Figure 5.7. CONSTRUCTS Group
Chapter 5 Scenes, Fixture Groups, and Palettes
5-7
Figure 5.8. Set Dim At Dialogue Box
5-8
Status Cue User’s Manual
Pan and Tilt
Pan and tilt are the X (horizontal) and Y (vertical) position coordinates for moving
fixtures. To edit pan and tilt positions, complete the following procedure:
1. Select the desired fixture(s). Refer to "Selecting Fixtures" on page 5-5.
2. Press the <POS> key in the TRACKBALL group to enable positioning
(LED is on for positioning mode) with the trackball. Refer to Figure 5.9.
Note: press the <PAN> or <TILT> keys in the TRACKBALL group to edit only the
respective fields. The <FAST> key increases the trackball’s sensitivity
enabling quicker movement.
5
LED on
trackball
Figure 5.9. TRACKBALL Group
3. Use the trackball to position the fixture(s). Alternately, press the <POS>
key in the CONSTRUCTS group and then the <AT> key in the SELECT
group to bring up the At dialogue box. Input the desired positions in whole
numbers using the keypad with a "." (<.> key) between the values. Refer to
Figure 5.10.
Figure 5.10. Set Pan/Tilt At Dialogue Box
Chapter 5 Scenes, Fixture Groups, and Palettes
5-9
Xfade
Xfade (crossfade) is the amount time that a construct takes to reach its new value.
RGB color changes, and Dim are examples of Constructs that use Xfade. Xfade
times affect all fixtures in the Scene or a Step (Scene) in a Sequence. Thus, each
Step of a Sequence can have different Xfade times.
¹Note: LWR fixtures use MSpeed.
The Scene or Sequence window displays the current Xfade value, ranging from
0.1 second to 36 minutes (2160 seconds). For example, set the Dim in Scene 1
to 100% and the Xfade in Scene 1 to 5 seconds. Then, set the Dim in Scene 2 to
50. When you advance from Scene 1 to Scene 2, the selected fixtures in Scene 1
will take 5 seconds to fade from full intensity to half intensity in Scene 2. Refer to
Figure 5.11.
Figure 5.11. Xfade Diagram
Table 5.1 provides a list of fixtures and Constructs are controlled by Xfade.
5-10 Status Cue User’s Manual
Table 5.1: Fixture Constructs Controlled by Xfade
Construct
Cyberlight
Intellabeam
Studio
Color
Dim
X
X
X
Iris
X
X
RGB
X
Frost
X
Focus
X
X (FX1)
Zoom
X
X (FX2)
Trackspot
Single
Channel
DMX
X
X
X
To edit Xfade, press the <XFADE> button in the SCENE group (Figure 5.12) and
type the desired time. To enter minutes instead of seconds, type the value followed
by ".." (two decimals). Alternately, click the up and down buttons in the Xfade
field to set the desired time (Figure 5.13).
Figure 5.12. SCENE Group
Figure 5.13. Xfade Field
Note: to set the Xfade on all steps of a Sequence simultaneously, start the Sequence
by pressing the <GO> key in the SEQUENCE group and use the above
procedure. Refer to "Playback" on page 6-14.
Chapter 5 Scenes, Fixture Groups, and Palettes 5-11
5
Delay
Scenes are used as Steps in a Sequence. Delay is the total time an individual Step
waits before moving to the next Step in the Sequence. The Scene or Sequence
window displays the current Delay value, ranging from 0.1 second to 36 minutes
(2160 seconds). Delay is affected by the Rate value (refer to "Rate" on page 514) in Sequences. Rate will override XFade and MSpeed times. Refer to Figure
5.14.
Note: if you have a static Scene that is not in a Sequence, Delay time will not be
used.
Figure 5.14. Delay Diagram
In a Step of a Sequence, if Xfade has completed its value change before Delay,
Status Cue holds the value until the duration of Delay has expired. Refer the last
Step in Figure 5.14. For this reason, you may wish to set Delay to an equal or
greater value than Xfade so it can complete its value change.
Example: if a 10 second Xfade time is set in a Step and a 5 second Delay is set, the
selected fixture will only be 50% finished with its Xfade before the
Sequence advances to the next Step.
Tip: to make circular motions with fixtures, experiment with setting Delay less than
Xfade.
5-12 Status Cue User’s Manual
Set the Delay time (if required) by pressing the <DELAY> key in the SCENE
group (Figure 5.12) and typing the desired time. Enter ".." (2 decimals) after the
value to change the value to minutes. Alternately, click the up and down buttons in
the Delay field to set the desired time (Figure 5.15).
Figure 5.15. Delay Field
Note: to set the Delay on all Steps of a Sequence simultaneously, start the
Sequence and use the above procedure. Refer to "Playback" on page 6-14 to
playback a Sequence.
Chapter 5 Scenes, Fixture Groups, and Palettes 5-13
5
Rate
Rate overall speed of the entire Sequence, thus the total time each Step of a
Sequence will play before advancing to the next Step. Rate is used as a multiplier.
You can specify rates from 0.01 x (fastest) to 127.98 x (slowest). Rates less than 1
x speed up time advancement, while greater than 1 x slow down the rate. Rate
effects the Delay value you set in a Scene.
Example 1: with Rate set to 1 x and Delay set to 2 seconds, Scenes advance every
2 seconds. Set Rate to .5 x and Scenes advance every 1 second, and so
on. Refer to Figure 5.16.
Figure 5.16. Rate Diagram
Example 1: set Xfade to 5 Seconds, Delay to 5 Seconds, and Rate to 1 x on each
Step. The resulting Steps will Xfade for 5 seconds and Delay for 5
seconds.
5-14 Status Cue User’s Manual
Example 2: set Xfade to 2 Seconds, Delay to 3 Seconds, and Rate to 2 x on each
Step. The resulting Steps will Xfade for 4 seconds and Delay for 6
seconds.
Example 3: to build a Sequence that has a 2 second delay on each Step, you can set
Rate for 1 x and Delay for 1 Second, or set Rate for 1 x and Delay for
2 Seconds. So, it is just as effective to increase or decrease the speed of
a Sequence by increasing or decreasing the Delay of each Step and
leaving Rate set for 1 x. The end result will be the same.
Set the Rate time (if required) by pressing the <RATE> key in the SEQUENCE
group (Figure 5.17) and typing the desired Rate and press the <ENTER> key.
Alternately, click the up and down buttons in the Rate field (Figure 5.18) to set the
desired time.
Figure 5.17. SEQUENCE Group
Figure 5.18. Rate Field
Chapter 5 Scenes, Fixture Groups, and Palettes 5-15
5
MSpeed
MSpeed (movement speed) is a function of time to destination. That is, all fixtures
that have the same MSpeed value move at the same time, regardless of the distance
traveled.
For example in Figure 5.19, fixture A will move 2-feet from position 1 to position
2. Fixture B will move 10-feet from position 1 to position 2. Both fixtures start and
stop at the same time, providing they are programmed with the same MSpeed
setting. The fixture(s) with the longest distance (fixture B) moves faster than the
other(s) (fixture A), but they arrive at their respective positions at the same time.
position 1
position 2
8
0
E
0
4
0
3
0
N
LITHO
V A O
I TI
20
10
e re
d
ge
s
0
6
0
7
0
cyberlight
LI GH TW AV E RES EAR CH
AU STIN, TEX AS U. S. A.
5
0
N
AU STI N, TEX AS U.S. A.
0
5
0
6
V A IO
I T
00
eg
d
re e
s
34
0
0
0
20 1
0 102
D
5
3
5
0
67
00
D
E
4
0
070
8
0
7
6
0
80
LITH
O
80
LI GH TWAV E RES EAR CH
cyberlight
0
4
0
20 3
10
B
LITHO
E
4
0
N
cyberlight
V A IO
I T
30
e 0
d
re se
g
3
2 10 1
020
0
5
0
60
7 8
0 0
N
5
0
60
A
AU STIN, TEX AS U. S.A.
0
5
0
5
A
VIA IO
T
0
4
0
e g
d
re se
3
0
0
20
10
1
20
D
E
4
0
3
0
60
70
8
0
D
0
6
0
807
LITHO
70
80
LIGH TWAV E RES EAR CH
cyberlight
LIGH TWAV E RES EAR CH
AU STIN, TEX AS U. S. A.
0
04
B
Figure 5.19. MSpeed Diagram
MSpeed settings are available on all moving Lightwave Research fixtures (and a
few other manufacturers). While this Construct typically applies to position (Pan
and Tilt), Color, Gobo, Rotating Gobo, and Effects may also be assigned to
MSpeed.
Note: MSpeed should be equal to or less than Rate. Otherwise Delay will advance
to the next Step before fixture movement has reached its programmed
destination.
5-16 Status Cue User’s Manual
To edit the MSpeed construct, complete the following procedure:
1. Select the desired fixture(s). Refer to "Selecting Fixtures" on page 5-5.
5
Figure 5.20. MSPEED Wheel
2. Using the <MSPEED> wheel set the desired value. Alternately, press the
<SPEED> key in the CONSTRUCTS group and press the <AT> key in the
SELECT group to bring up the Set MSpeed At dialogue box (Figure 5.21).
Type in the desired value and click the OK button to complete the
procedure.
Figure 5.21. Set MSpeed At Dialogue Box
Chapter 5 Scenes, Fixture Groups, and Palettes 5-17
Color
The Color construct is used to select a desired color for fixtures containing fixed
color wheels. To edit the Color construct, complete the following procedure.
1. Select the desired fixture(s). Refer to "Selecting Fixtures" on page 5-5.
2. Using the following keys in the COLOR group (Figure 5.22). Select the
desired color function(s):
•
•
•
•
•
•
•
•
<A>- whole color
<B> - half colors
<C>- special function
<D>- enables MSpeed on the Color Construct
<E>- spins the color wheel forward
<F>- spins the color wheel in reverse
<G>- slow scan
<H>- fast scan
Figure 5.22. COLOR Group
3. Press <1> - <12> in the COLOR group to assign the desired color.
5-18 Status Cue User’s Manual
Color Mix
The color mix constructs (Red, Green, Blue) are used in additive, subtractive, and
HSI color mixing systems for applicable fixtures. The color mix constructs are
accessed by three methods:
•
•
•
RGB- red, green, and blue color model
HSI- hue, saturation, intensity color model
Gel- gel lookup table and color picker
RGB
To edit color mix constructs using RGB, complete the following procedure:
1. Select the desired fixture(s). Refer to "Selecting Fixtures" on page 5-5.
2. Using the three wheels in the COLOR MIX group (Figure 5.23), mix the
desired color. Alternately, press the <RGB> key in the CONSTRUCTS
group and press the <AT> key in the SELECT group to bring up the Set
Color At dialogue box (Figure 5.24). Enter the desired values with a "."
(decimal- <.> key) between the values (Red.Green.Blue) and click the OK
button to complete the procedure.
Figure 5.23. COLOR MIX Group
Chapter 5 Scenes, Fixture Groups, and Palettes 5-19
5
Figure 5.24. Set Color At Dialogue Box
Tip: to create the seven basic colors, refer to Table 5.1.
Table 5.1: Color Mixing the Seven Basic Colors
Basic Color
Red Value
Green Value
Blue Value
White
100
100
100
Red
100
0
0
Green
0
100
0
Blue
0
0
100
Magenta
100
0
100
Yellow
100
100
0
Cyan
0
100
100
HSI
This method is reserved for future use.
5-20 Status Cue User’s Manual
Gel
Status Cue provides an easy to use gel lookup table and a custom color picker.
Gels are sorted by manufacturer or custom names. Gel tables can be moved
from system to system and are they easily edited off-line with a text editor.
Additionally, the color picker portion of the Gel Picker dialogue box provides
a visual reference of the color and instant color selection. Refer to the
following subsections to use the gel and color picker features:
•
•
•
•
•
•
"Using Gel Tables and the Color Picker" on page 5-22
"Editing Gel Tables" on page 5-24
"Editing Gel Tables Off-Line" on page 5-24
"Deleting a Gel" on page 5-25
"Reverting to the Default Gel Look-Up Table" on page 5-25
"Importing Gel Look-Up Tables" on page 5-26
Chapter 5 Scenes, Fixture Groups, and Palettes 5-21
5
Using Gel Tables and the Color Picker
To create/edit a gel table and use the color picker, complete the following
procedure:
1. To view fixture output, select the desired fixtures in an open Scene or
Sequence. Refer to "Selecting Fixtures" on page 5-5.
Note: Blind mode must be off.
2. Press the <GEL> key in the COLOR MIX group to bring up the Gel
Picker dialogue box. Refer to Figure 5.26. Alternately, select the Gel
Picker... item from the Window drop-down menu.
manufacturer
gel colors
color picker
intensity bar
current color
Figure 5.25. Gel Picker Dialogue Box
3. Type the Manufacturer name in its field. Alternately, select a default
manufacturer from the drop-down menu at the top left of the dialogue
box.
4. Click and type the Color name in its field.
5. Set the desired color by clicking in the color circle or hold down the
mouse button and drag the color picker in the color circle. The current
color will be outputted to the selected fixtures and indicated in the
current color box. Alternately, use the three wheels in the COLOR MIX
group. The currently selected color is displayed in the box below the
color circle.
5-22 Status Cue User’s Manual
Note: you can move the Intensity bar to set custom colors, but you are
removing all of the colors together at the same time. When the
intensity bar is moved to the bottom, the net color output is black (full
red, full blue, full green).
6. Click the Add button to place the manufacturer, gel name, and values
into the table.
7. Press the <ENTER> key in the CONTROL group to accept any changes
made to the table or press the <CANCEL> key to discard any changes.
Alternately, click the OK or Cancel buttons.
Tip: to quickly select a color, select the desired fixtures, press the <GEL>
key, click the desired color in the color circle, and press the
<ENTER> key.
Chapter 5 Scenes, Fixture Groups, and Palettes 5-23
5
Editing Gel Tables
To edit a gel table, complete the following procedure:
1. Select the desired fixtures in an open Scene or Sequence. Refer to
"Selecting Fixtures" on page 5-5.
1. Press the <GEL> key in the COLOR MIX group (Figure 5.23) to bring
up the Gel Picker dialogue box. Refer to Figure 5.25. Alternately, select
the Gel Picker... item from the Window drop-down menu.
2. Select the desired manufacturer from the drop-down menu.
3. Select the desired color to edit.
4. Correct the gel color using the wheels in the COLOR MIX group or use
the mouse with the color selector to choose another color with the color
picker. The picker will output the data to the selected fixtures.
5. Click the Change button to replace the values in the table.
6. Press the <ENTER> key in the CONTROL group to accept any changes
made to the table or press the <CANCEL> key to discard any changes.
Alternately, click the OK or Cancel buttons.
Editing Gel Tables Off-Line
To edit a gel table off-line, complete the following procedure:
1. Open a text editor such as Notepad.
2. Open the gel text file (gel.txt or other custom text file) located in the
current Status Cue or custom directory. The comma delimited file is in
the following order: manufacturer, color name, red value, green value,
blue value. Refer to Figure 5.26.
Figure 5.26. Off-Line Color Table Editing
3. Edit the desired value(s) and save the file to complete the procedure.
5-24 Status Cue User’s Manual
Deleting a Gel
To delete a gel, complete the following procedure:
1. Press the <GEL> key in the COLOR MIX group to bring up the Gel
Picker dialogue box. Refer to Figure 5.25. Alternately, select the Gel
Picker... item from the Window drop-down menu.
2. Select the desired manufacturer from the drop-down menu.
3. Click the desired color to remove.
4. Click the Delete button to remove the gel.
5. Press the <ENTER> key in the CONTROL group to accept any changes
made to the table or press the <CANCEL> key to discard any changes.
Alternately, click the OK or Cancel buttons.
Reverting to the Default Gel Look-Up Table
To revert back to the default (factory) gel-lookup table, complete the
following procedure:
1. Press the <GEL> key in the COLOR MIX group to bring up the Gel
Picker dialogue box. Refer to Figure 5.25. Alternately, select the Gel
Picker... item from the Window drop-down menu.
2. Click the Revert to default Gels button. This brings up the Revert to
Factory Default dialogue box.
Figure 5.27. Revert to Factory Default Dialogue Box
3. Click OK to complete the operation.
Chapter 5 Scenes, Fixture Groups, and Palettes 5-25
5
Importing Gel Look-Up Tables
To import a gel file into the gel look up table, complete the following
procedure:
1. Press the <GEL> key in the COLOR MIX group (Figure 5.23) to bring
up the Gel Picker dialogue box. Refer to Figure 5.25.
2. Click the Import button to bring up the Select a Gel File To Import
Into List dialogue box. Refer to Figure 5.28.
Figure 5.28. Select a Gel File To Import Into List Dialogue Box
3. Select the desired gel text file and click the OK button. The gels will be
inserted into the gel picker table.
5-26 Status Cue User’s Manual
Gobos
Fixed gobos are glass etched (LithoPatterns®) or metal patterns used in applicable
fixtures to project images. To set the desired gobo, complete the following
procedure:
1. Select the desired fixture(s). Refer to "Selecting Fixtures" on page 5-5.
2. Using one of the following keys in the GOBO group (Figure 5.29), select
the desired gobo function:
•
•
•
•
•
•
•
•
<A>- default setting with no effect
<B> - special function
<C>- reserved for future use
<D>- enables MSpeed on the Gobo construct
<E>- forward spins
<F>- reverse spins
<G>- slow scan
<H>- fast scan
Figure 5.29. GOBO Group
3. Press the gobo key <1> - <12> in the GOBO group to assign the desired
gobo.
Chapter 5 Scenes, Fixture Groups, and Palettes 5-27
5
Rotating Gobos
Rotating gobos are projecting patterns that can spin at various speeds. Rotating
gobos may also be indexed so the image appears in the correct visual orientation.
Note: due to variance in manufacturers’ fixtures, refer to "Appendix C Special
Configuration and Control of Fixtures" on page C-1.
To edit the RGobo construct, complete the following procedure:
1. Select the desired fixture(s).
2. Using one of the following keys in the ROTATING GOBO group (Figure
5.30), select the desired gobo function:
•
•
<A>- default setting allowing indexing
<B> - forward spins
•
•
•
<C>- reverse spins
<D>- special function
<E>- enables MSpeed on the RGobo Construct
Figure 5.30. ROTATING GOBO Group
3. Press the desired gobo key (<1>-<5>) in the ROTATING GOBO group.
4. Press any of the following keys in the ROTATE group (Figure 5.31) to use
the <ROTATE> wheel to index or spin the gobo:
•
•
•
<POS>- enables indexing of the gobo
<FWD>- enables variable forward spinning of the gobo
<REV>- enables variable reverse spinning of the gobo
Alternately, press the following keys in the ROTATING GOBO group:
• <A>- enables indexing of the gobo
• <B>- enables variable forward spinning of the gobo
• <C>- enables variable reverse spinning of the gobo
5-28 Status Cue User’s Manual
5
Figure 5.31. ROTATE Group
Chapter 5 Scenes, Fixture Groups, and Palettes 5-29
Gate / Strobe Rate
The Gate Construct sets the strobe rate on applicable fixtures. The gate can also be
opened or closed by pressing the <OPEN> or <CLOSED> keys above the
<STROBE RATE> wheel. Refer to Figure 5.32. To edit the Gate Construct,
complete the following procedure:
1. Select the desired fixture(s).
2. Press the <STROBE> button above the <STROBE RATE> wheel.
Figure 5.32. STROBE RATE Wheel
3. Set the desired rate with the <STROBE RATE> wheel.
5-30 Status Cue User’s Manual
Focus
The Focus Construct is used to control the focal length of selected fixture(s). To
edit the Focus construct, complete the following procedure:
1. Select the desired fixture(s).
2. Set Focus using the <FOCUS> wheel (Figure 5.33). Alternately, press the
<FOCUS> key in the CONSTRUCTS group and then the <AT> key in the
SELECT group to bring up the Set Current Construct At dialogue box.
Enter the desired value and click the OK button to complete the procedure.
5
Figure 5.33. FOCUS Wheel
Zoom
The Zoom Construct is used to increase or decrease a beam field or image size. To
edit the Zoom Construct, complete the following procedure.
1. Select the desired fixture(s).
2. Set Zoom using the <ZOOM> wheel (Figure 5.34). Alternately, press the
<ZOOM> key in the CONSTRUCTS group and then the <AT> key in the
SELECT group to bring up the Set Current Construct At dialogue box.
Enter the desired value and click the OK button to complete the procedure.
Figure 5.34. ZOOM Wheel
Chapter 5 Scenes, Fixture Groups, and Palettes 5-31
Frost, Frost Strobe, and Effect
The Frost, Frost Strobe, and Effect Constructs are used for frost diffusion, frost
strobing, and special effects (prisms, color correctors, etc.) on applicable fixtures.
To edit these Constructs, complete the following procedure.
1. Select the desired fixture(s).
2. Press the desired key above the <EFFECT> wheel. Refer to Figure 5.35.
Figure 5.35. EFFECT Group
Note: CC3 on older Consoles may indicate FROST instead of EFFECT.
3. Set the desired value using the <EFFECT> wheel (Figure 5.34).
Notes: Frost (percentage) can use the <AT> key to bring up the Set Construct At
dialogue box. The Frost Construct is tied to the <FROST> key in the
CONDTRUCTS group while both the <F-STB> and <EFFECT> keys and
their respective functions are tied to the <EFFECT> key in the
CONSTRUCTS group.
5-32 Status Cue User’s Manual
Iris
The Iris Construct is used to control the beam size on applicable fixtures. To edit
the Iris Construct, complete the following procedure:
1. Select the desired fixture(s). Refer to "Selecting Fixtures" on page 5-5.
2. Set the Iris using the <IRIS> wheel (Figure 5.36). Alternately, press the
<IRIS> key in the CONSTRUCTS group and then the <AT> key in the
SELECT group to bring up the Set Current Construct At dialogue box
(Figure 5.8). Enter the desired value and click the OK button to complete
the procedure.
Figure 5.36. IRIS Wheel
Chapter 5 Scenes, Fixture Groups, and Palettes 5-33
5
Single Channel DMX
To edit single channel DMX, complete the following procedure:
1. Select the desired single channel DMX devices.
2. Set the DMX value using the <DIM> wheel (Figure 5.37). Alternately, press
the <AT> key in the SELECT group to bring up the Set Dim At dialogue
box (Figure 5.38). Enter the desired value and click the OK button to
complete the procedure.
DIM
CC8
Figure 5.37. DIM Wheel
Figure 5.38. Set Dim At Dialogue Box
5-34 Status Cue User’s Manual
Naming a Scene
To name a Scene, complete the following procedure:
1. Press the <SCENE> key in the OBJECT group repeatedly to select and scroll
though open Scenes.
2. Press the <NAME> key in the MEMORY key group to bring up the Name
Scene dialogue box. Refer to Figure 5.39. Alternately, select Name from the
Memory drop-down menu.
5
Figure 5.39. Name Scene Dialogue Box
3. Type the desired name in the Name field and click OK to complete the
procedure.
Note: naming a Scene does not automatically store the Scene. Refer to "Storing a
Scene" on page 5-36.
Chapter 5 Scenes, Fixture Groups, and Palettes 5-35
Storing a Scene
Up to 5872 Scenes can be stored into each Show. When a Scene is stored, it is
placed in Scratch Memory and cannot be recalled on quick demand like a
Preset of a Song (refer to "Playback" on page 7-22). Scratch Memory is an area
of memory where Scenes and Sequences are placed until they are stored in
Presets. Scratch Scenes or Sequences are stored with their respective Show.
To store a Scene, complete the following procedure:
1. Press the <SCENE> key in the OBJECT group repeatedly to scroll between
open Scenes.
2. Press the <STORE> key in the MEMORY key group to bring up the Store
Scene dialogue box. Refer to Figure 5.40. Alternately, select Store from the
Memory drop-down menu.
Figure 5.40. Store Scene Dialogue Box
3. Type in the name for the Scene and click the OK button to complete the
procedure.
5-36 Status Cue User’s Manual
Using Song Presets
Scenes and Sequences are easily stored, retrieved, and played back through the
Instant and Fader Presets of Songs. To use a Song’s Presets, refer to the
following sections:
•
•
•
•
"Setting a Preset" on page 7-3.
"Inserting a Preset" on page 7-5.
"Getting a Preset" on page 7-6.
"Erasing a Preset" on page 7-7.
5
Copying a Scene
To make an identical copy of a Scene or Sequence, complete the following
procedure:
1. Press the <SCENE> or <SEQUENCE> key in the OBJECT group to select and
scroll though open Scenes and Sequences.
2. To copy the Scene or Sequence, hold down the <Ctrl> key and drag the
clapboard icon
(the icon will appear with a + in it) or film cam icon
(Sequences) onto the desktop.
Chapter 5 Scenes, Fixture Groups, and Palettes 5-37
Removing a Scene
To delete a Scene from scratch memory, complete the following procedure:
1. Press the <SCENE> key in the OBJECT group. Alternately, select Scene from
the Object drop-down menu.
2. Select Remove from the Memory drop-down menu to bring up the Remove
Scene dialogue box. Refer to Figure 5.41.
Figure 5.41. Remove Scene Dialogue Box
3. Click the Scene to delete (remove) and click the OK button. This will bring up
the Delete Scene confirmation box.
Figure 5.42. Delete Scene Confirmation Box
4. Click the Yes to complete the procedure.
5-38 Status Cue User’s Manual
Recalling a Scene
To recall (open) a Scene from scratch memory, complete the following
procedure:
1. Press the <SCENE> key in the OBJECT group. Alternately, select Scene from
the Object drop-down menu.
2. Press the <RECALL> key in the MEMORY group to bring up the Recall
Scene dialogue box. Refer to Figure 5.43. Alternately, select Recall from the
Memory drop-down menu.
Figure 5.43. Recall Scene Dialogue Box
3. Click the Scene to recall and click the OK button to complete the procedure.
Closing a Scene
To close a Scene on the desktop, complete the following procedure:
1. Press the <SCENE> key in the OBJECT group repeatedly to scroll though
open Scenes.
2. Press the <CLOSE> key in the MEMORY group to close the active Scene. If
the Scene has been modified, you will be prompted to save the changes.
Chapter 5 Scenes, Fixture Groups, and Palettes 5-39
5
Playback
Scenes can be played back under live control and by using Presets. Use the
following subsections to playback Scenes and Sequences. Additionally, use the
< M> fader and < BLACK> key (instant blackout) in the MASTER group to
override all Dim constructs.
Figure 5.44. MASTER GROUP
Live Control
Up to nine Scenes or Sequences may be open at any given point. But only
the active Scene will be sent to the Live output. To playback a Scene under
live control, complete the following procedure:
1. Recall the Scene(s) you wish to playback. The last Scene or Sequence
opened will take precedence over other Scenes and Sequences.
2. Turn Blind Mode off by pressing the <BLIND> key in the MEMORY
group. The LED will turn off and the Scene(s) are played through the live
channel on the Stack. Refer to "Viewing the Output Stack" on page B-9 for
additional information.
Note: if values from a previous Scene or Sequence (not in a Preset) are showing
through the transparencies, press the <CLEAR> key it the SONG group to
remove the hanging value(s).
5-40 Status Cue User’s Manual
Presets
17 Presets (16 Fader Presets and one Instant Preset) may be played at once.
Refer "Chapter 7 Songs" on page 7-1 for information on Presets. To
playback a Scene or Sequence in a Preset, complete the following
procedure:
1. Press the desired Instant Preset or Fader Preset(s) to play.
2. Adjust the Fader Preset slider(s) as required.
Note: Blind Mode does not affect Instant or Fader Presets.
Chapter 5 Scenes, Fixture Groups, and Palettes 5-41
5
Fixture Groups
Fixture Groups (groups of commonly assigned fixtures) make selecting fixtures easy.
Examples of Fixtures Groups are:
• all Cyberlights
• all Studio Colors
• all upstage fixtures
• only odd fixtures
Status Cue has the ability to store 128 Fixture Groups. Fixture Groups are stored in
four banks of 32 System Keys. Fixture Groups can be used with any Scene or
Sequence in a Show.
Changing Banks
Fixture Groups and Palettes are accessed through four Banks of 32 System keys.
The current Fixture Group and Palette Banks are indicated in the upper middle
portion of Scene and Sequence Windows below the title bar. Refer to Figure 5.45.
Figure 5.45. Fixture and Palette Bank Indicators
The following banks contain the corresponding numbers:
• Bank 1- 1–32
• Bank 2- 33–64
• Bank 3- 65–97
• Bank 4- 98–128
To change the current Bank, complete the following procedure:
1. Press the desired key in the FUNCTION group (<GROUP> or
<PALETTE>).
2. Press the <BANK> key in the CONTROL group (Figure 5.46). This brings
up the corresponding BANK dialogue box. Refer to Figure 5.47.
Figure 5.46. CONTROL Group
5-42 Status Cue User’s Manual
5
Figure 5.47. Bank Dialogue Box
3. Select the desired Bank by Pressing the keys <1>, <2>, <3>, or <4> in
SYSTEM KEYS / INSTANT PRESETS group (Figure 5.48). The key with
the current Bank will blink. Alternately, use the mouse and click the
desired Bank and then the OK button.
Figure 5.48. SYSTEM KEYS / INSTANT PRESETS Group
Chapter 5 Scenes, Fixture Groups, and Palettes 5-43
Creating and Storing Fixture Groups
To store Fixture Groups, perform the following procedure:
1. Open or create a Scene or Sequence.
2. Select the fixtures to place in a group with the numeric keys in the
CONTROL group and the keys in the SELECT group. Refer to Figure
5.49.
Figure 5.49. CONTROL and SELECT Groups
3. Press the <GROUP> key in the FUNCTION group (Figure 5.50) twice.
The LED will remain on.
Note: alternately press the <GROUP> key once to place the Console in
one-shot mode. The LED will flash.
Figure 5.50. FUNCTION Group
4. If necessary, change to a different Bank. Refer to "Changing Banks" on
page 5-42.
5. Press the <STORE> key in the CONTROL group (Figure 5.46). This will
bring up the Store a Fixture Group dialogue box (Figure 5.51).
5-44 Status Cue User’s Manual
5
Figure 5.51. Store a Fixture Group Dialogue Box
6. Press any of the 32 System Keys (Figure 5.48) to store the Fixture
Group on that key. The LEDs will illuminate to indicate if there is a
Fixture Group already stored on that key. Alternately, use the mouse to
click on the appropriate System Key in the Store a Fixture Group
dialogue box (Figure 5.51).
Recalling Fixture Groups
To recall a Fixture Group, perform the following procedure:
1. Press the <GROUP> key in the FUNCTION group.
2. Change Banks if necessary.
3. Press the appropriate key in the SYSTEM KEYS / INSTANT PRESETS
group to recall the Fixture Group.
Note: LEDs will illuminate at stored locations.
Erasing Fixture Groups
To erase a Fixture Group, complete the following procedure:
1. Press the <GROUP> key in the FUNCTION group.
2. Change Banks if necessary.
3. Press the <ERASE> key in the CONTROL Group. Refer to Figure 5.46.
4. Press the appropriate key in the SYSTEM KEYS group to delete the fixture
group.
Note: LEDs will illuminate at stored locations.
Chapter 5 Scenes, Fixture Groups, and Palettes 5-45
Palettes
Palettes are extremely useful programming tools. Status Cue provides 128
Palettes. Palettes can be thought of as “Preset Focuses” with all applicable
Constructs. Palettes allow one or more Scenes or Sequences to reference
another Scene (Palette) for commonly used Construct information. Typically,
Palettes are used for positions, but Status Cue offers the flexibility of saving
any or all Constructs to a Palette. Thus, a handful of Palettes can be edited
instead of possibly hundreds of individual Scenes and Sequences.
Examples: you can create one Palette for commonly used positions, another
Palette for colors, and another Palette for gobos. Also, when a trim
height changes, (the truss is moved up or down due to a venue
change) simply edit a few position Palettes instead of refocusing
every Scene, Sequence, and Preset in your Show.
Creating and Storing Palettes
To create a Palette, perform the following procedure:
1. Open or create a Scene.
2. Press the <PALETTE> key in the FUNCTION group.
Figure 5.52. FUNCTION Group
3. Select the fixture(s) that will use the Palettes.
4. Select a Construct (or all) to place in the Palette by pressing the desired key
or the <ALL> key in the CONSTRUCTS group. The selected Construct key
will blink to show that it is currently being edited and the values within the
Scene or Sequence window will also change to red.
Note: if the desired Construct key is not blinking, the Construct is not being
edited.
5. Change the required Construct(s) as desired.
6. If necessary, change to a different Bank.
7. Press the <STORE> key in the CONTROL group (Figure 5.53). This will
bring up the Store a Palette dialogue box. Refer to Figure 5.54.
5-46 Status Cue User’s Manual
Note: if the Store a Palette dialogue box does not come up, there are no fixtures
selected.
5
Figure 5.53. CONTROL Group
Figure 5.54. Store a Palette Dialogue Box
8. Press one of the 32 keys in the SYSTEM KEYS/INSTANT PRESETS
group (Figure 5.48) to store the Palette in a System key. Alternately,
use the mouse and click the desired key.
Chapter 5 Scenes, Fixture Groups, and Palettes 5-47
Assigning Palettes to Fixtures
To assign a Palette to a fixture or a group of fixtures in a Scene or Sequence,
complete the following procedure:
1. Open or select the desired Scene or Sequence to assign the Palettes to.
2. Press the <PALETTE> key in the FUNCTION group (Figure 5.52)
twice.
3. If necessary, change to a different Bank. Refer to "Changing Banks" on
page 5-42.
4. Select the desired fixture(s) to reference the Palette. Refer to "Selecting
Fixtures" on page 5-5.
5. Select the desired Construct(s) by pressing its key in the
CONSTRUCTS group or press <ALL> in the CONSTRUCTS group.
6. Select the desired Palette by pressing a key in the SYSTEM KEYS
group. The LED(s) will illuminate to indicate the available Palette(s)
for the fixture(s). The Construct value(s) stored in that Palette will be
placed in the open Scene or Sequence. The applicable Construct(s) will
indicate the Palette Bank and Palette number inside two brackets. Refer
to Figure 5.55 for an example of a position Palette (<1/1>) and a color
Palette (<1/11>).
Note: Palettes directly reference specific Constructs of a fixture or a
group of fixtures and can only be used with the specific fixture or
group of fixtures.
position Palette
color Palette
Figure 5.55. Recalled Palette for Pan/Tilt and Color
5-48 Status Cue User’s Manual
Editing Default Palette 128
To edit the default transparent values (light blue) that are brought up when new
Scene or Sequence is created, complete the following procedure:
1. Create a new Scene or Sequence.
2. Press the <PALETTE> key in the FUNCTION group (Figure 5.52) twice.
3. Change to Bank 4. Refer to "Changing Banks" on page 5-42.
4. Select the desired fixture(s) to change in Palette 128. Refer to "Selecting
Fixtures" on page 5-5.
5. Select the desired Construct(s) by pressing its key in the CONSTRUCTS
group or press <ALL> in the CONSTRUCTS group.
6. Make the desired changes to the Construct(s).
7. Press the <STORE> key in the CONTROL group (Figure 5.53). This
brings up the Store a Palette dialogue box (Figure 5.54).
8. Press the <32> key in the SYSTEM KEYS/INSTANT PRESETS group
(Figure 5.48). The Palette will be stored and the next time a new Scene or
Sequence is created, the new values will be present.
Note: remember that Palette information will only be stored for the selected
fixtures and Constructs. Any fixtures and Constructs that were not changed
will remain at their previous values.
Chapter 5 Scenes, Fixture Groups, and Palettes 5-49
5
Importing Palettes
Palettes may be imported from other Shows. When Palettes are imported, all 128
Palettes are placed into the current Show.
To import Palettes, complete the following procedure:
1. Select the Import Palettes... item from the File drop-down menu. This
brings up the Import from... dialogue box.
Figure 5.56. Import From... Dialogue Box
2. Select the Show to import Palettes from and click OK. Depending on
fixture configuration, one of the following events will occur:
5-50 Status Cue User’s Manual
•
identical fixtures numbers and fixture types in the two showsStatus Cue will import the Palettes one to one with the fixtures
•
some identical fixture types and/or there is a different numbers of
fixtures- Status Cue matches up each Palette with the first
corresponding fixture type it comes in numeric order. Dissimilar fixture
types and additional fixtures can not use the imported Palettes. An
example is illustrated in Figure 5.57. This configuration brings up the
Continue with Import? dialogue box (Figure 5.58). Click OK in the
Continue with Import? dialogue box to complete the procedure.
•
dissimilar fixture types- Status Cue can not import Palettes for
fixtures that are not the same. This configuration brings up an error
dialogue box (Figure 5.59). Click OK to dismiss the dialogue box.
current Show
5
Show to import Palettes from
resulting Show when the Palettes are assigned
Note: fixture 3 Trackspot does not have Palette to reference.
In the resulting Show, it will not use a Palette.
Figure 5.57. Import Example for Different Number of Fixtures
Chapter 5 Scenes, Fixture Groups, and Palettes 5-51
Figure 5.58. Continue With Import? Dialogue Box
Figure 5.59. Import Error Dialogue Box
5-52 Status Cue User’s Manual
Erasing Palette Data
Palettes are easily erased from a Show. Additionally, an individual Construct (just
a color, a gobo, etc.) can be removed from the Palette. To erase a Palette or a
Construct within a Palette, complete the following procedure:
1. Select the fixture(s) that the Palette is assigned to.
2. Press the <ALL> key in the CONSTRUCTS group to completely erase all
Palette data or press a specific Construct key to erase its data.
3. Press the <PALETTE> key twice (assigned mode).
4. Select the desired Bank if necessary.
5. Press the <ERASE> key in the CONTROL group. This brings up the Erase
a Palette dialogue box.
Figure 5.60. Erase a Palette Dialogue Box
6. Select the Palette to erase by pressing the appropriate key in the SYSTEM
KEYS group. The available Palette keys will illuminate. Alternately, use
the mouse and click the desired key.
Chapter 5 Scenes, Fixture Groups, and Palettes 5-53
5
5-54 Status Cue User’s Manual
Chapter 6
Sequences
In this chapter you will:
❑ create new Sequences (6-2)
❑ add new Steps (6-4)
❑ insert new Steps (6-5)
❑ name Sequences (6-7)
❑ name Steps (6-6)
❑ edit fixture Constructs (6-7)
❑ copy and paste fixture Constructs (6-8)
❑ cut, copy, and paste Steps (6-8)
❑ drag and drop Steps (6-9)
❑ drag and drop a Scene or Sequence into a Step (6-9)
❑ set Sequences to Presets (6-9), (7-3)
❑ insert Sequences in Presets (6-9), (7-5)
❑ get Sequences from Presets (6-9), (7-6)
❑ delete Steps (6-9)
❑ store Sequences (6-10)
❑ recall Sequences (6-11)
❑ close Sequences (6-11)
❑ remove Sequences (6-12)
❑ playback Sequences (6-14)
6
Overview
A Sequence (also known as a loop or chase) is a series of programmed Scenes
(Steps) that run continuously in a loop when played back. Sequences can be
stored as Presets, stored into cues of a CueList, or played back under live
control.
Note: several preference options are available for Sequences and Steps. Refer to
"Setting System and Show Preferences" on page B-11.
Chapter 6 Sequences
6-1
Creating Sequences
To create a new Sequence, perform the following procedure:
1. Press <SEQ> in the OBJECT group, the LED will illuminate. Refer to Figure
6.1. Alternately, you may select Sequence from the Object drop-down menu.
Figure 6.1. OBJECT Group
2. Press the <NEW> key in the MEMORY group. Refer to Figure 6.2.
Alternately, select New from the Memory drop-down menu. A new unnamed
(NoName1) Sequence window appears listing the fixtures you configured in
Fixture Setup. The new Sequence window contains default transparent values
(indicated by blue). When transparent values are present, values from other
Sequences, Scenes, or Presets will show through and be outputted. Refer to
Figure 6.3.
Note: when transparent values are present, assigned (non-transparent) values from the
last active Scene, Sequence, or Presets will show through and be outputted to
the Stage Value(s). Turn off any active Presets and press the <CLEAR> key in
the SEQUENCE group to clear any hanging values from Scenes and Sequences.
Figure 6.2. MEMORY Group
6-2
Status Cue User’s Manual
Step Step name Sequence fixture #
icon
protocol/fixture type available constructs
6
Figure 6.3. New Sequence Window
Tip: To assist and speed up editing, you may wish to create Fixture Groups. If Fixture
Groups are desired, refer to "Fixture Groups" on page 5-42.
Note: the default values used for new Scenes and Sequence are pulled from Palette
128. If you need to reset the default values refer to "Editing Default Palette 128"
on page 5-49.
Chapter 6 Sequences
6-3
Editing
Use the following subsections to edit Sequences:
•
•
•
•
•
•
•
•
"Adding New Steps" on page 6-4
"Inserting New Steps" on page 6-5
"Naming a Sequence" on page 6-7
"Naming Steps" on page 6-6
"Editing" on page 5-4
"Copying and Pasting Fixture Constructs" on page 6-8
"Cutting, Copying, and Pasting Steps" on page 6-8
"Dragging and Dropping Steps" on page 6-9
•
•
•
"Dragging and Dropping a Scene Into a Step" on page 6-9
"Setting, Inserting, and Getting Sequences Into Presets" on page 6-9
"Deleting Steps" on page 6-9
Adding New Steps
To add a new Step to a Sequence, complete the following procedure:
1. Select and scroll through the open Sequences by pressing the <SEQ> key
in the OBJECT group. Alternately, select an open Sequence from the
Window drop-down menu.
2. Press the <STEP> key in the OBJECT group (Figure 6.1).
3. Press the <NEW> key in the MEMORY group (Figure 6.4). A new Step
will be added after the last Step.
4. Repeat item 3 to add additional Steps to the Sequence.
Note: the <STEP> key will remain flashing until it is turned off by pressing the
<SEQ> key. This allows the addition of new Steps by only pressing the
<NEW> key.
6-4
Status Cue User’s Manual
Inserting New Steps
To insert a new Step in the middle of a Sequence, complete the following
procedure:
1. Select and scroll through the open Sequences by pressing the <SEQ> key
in the OBJECT group (Figure 6.1). Alternately, select an open Sequence
from the Window drop-down menu.
2. Press the <STEP> key in the OBJECT group. The LED will flash.
3. Select the insertion point by clicking on a Step.
4. Press the <INSERT> key in the CONTROL group (Figure 6.4). A new Step
will be inserted before the selected Step. Alternately, press the <Insert> key
on the keyboard.
6
Figure 6.4. CONTROL Group
Note: the <STEP> key will continue to flash until the <SEQ> key is pressed.
Chapter 6 Sequences
6-5
Naming Steps
To name a Step, complete the following procedure:
1. Click the Step to name. If you have set the Prev/Next fixture in Step
mode under Preferences you can use the up and down arrow keys in the
CONTROL group to select the desired Step.
2. Press the <STEP> key in the OBJECT group. The key will flash.
3. Press the <NAME> key in the MEMORY group to bring up the Name Step
dialogue box. Refer to Figure 6.5. Alternately, select Name from the
Memory drop-down menu.
Figure 6.5. Name Step Dialogue Box
4. Type the desired name in the Name field and click OK to complete the
procedure.
6-6
Status Cue User’s Manual
Naming a Sequence
To name a Sequence, complete the following procedure:
1. Press the <SEQ> key in the OBJECT group repeatedly to scroll through
open Sequences. Alternately, select an open Sequence from the Window
drop-down menu.
2. Press the <NAME> key in the MEMORY key group to bring up the Name
Sequence dialogue box. Refer to Figure 6.6. Alternately, select Name
from the Memory drop-down menu.
6
Figure 6.6. Name Sequence Dialogue Box
3. Type the desired name in the Name field and click OK to complete the
procedure.
Note: naming a Sequence does not store it into Scratch memory. Refer to "Storing
Sequences" on page 6-10.
Editing Fixture Constructs
To edit the fixture Constructs in a Step (Scene) of a Sequence, complete the
following procedure:
1. Use the up and down arrow keys in the CONTROL group to select the Step
to edit or click on it.
Note: you must be in Sequence mode, not Step mode.
2. Follow the procedures outlined in "Editing" on page 5-4.
Chapter 6 Sequences
6-7
Copying and Pasting Fixture Constructs
To quick copy and paste a Construct parameters from one Step to another,
complete the following procedure.
1. Select the Step to copy from (source Step).
2. Select the fixtures to copy (source fixtures). Refer to "Selecting Fixtures"
on page 5-5.
3. Press the <COPY> key in the MEMORY group.
4. Select the Step to paste the Constructs to (destination Step).
5. Press the <COPY> key in the MEMORY group. This brings up the Paste
Selected Fixture(s) dialogue box. The Steps’ names will appear in the
dialogue box. Refer to Figure 6.7.
Figure 6.7. Paste Selected Fixture(s) Dialogue Box
6. Press the <ENTER> key or the <CANCEL> key in CONTROL group.
Alternately, use the mouse and click OK or Cancel.
Cutting, Copying, and Pasting Steps
To cut, copy, or paste a Step, complete the following procedure:
1. Select the Step(s) to copy by clicking it.
2. Select either Cut or Copy from the Edit drop-down menu.
3. Select a Step to place the Step (in memory) before.
4. Select Paste from the Edit drop-down menu.
6-8
Status Cue User’s Manual
Dragging and Dropping Steps
To drag and drop a Step, complete the following procedure.
1. Click the Step to move or copy.
2. While holding the mouse button down, move the Step to the new location
within the current Sequence or another Sequence. It will be cut and pasted
above the new location. Alternately, hold the <Ctrl> down on the keyboard
and the mouse button to drag copy the Step.
Dragging and Dropping a Scene Into a Step
To drag and drop an existing Scene into a Step of a Sequence, complete the
following procedure:
6
1. Select or recall the desired Scene.
2. Using the mouse (Trackball), click the clapboard while holding down the
mouse button and drag the clapboard to a Step of a Sequence. The Scene
will be inserted as a Step in the Sequence and the Scene will be removed
from the desktop. Alternately, hold the <Ctrl> key down on the keyboard
and the mouse button to drag copy the Scene into a Step.
Setting, Inserting, and Getting Sequences Into Presets
To use Sequences with Presets of a Song, refer to the following topics:
•
•
•
•
"Setting a Preset" on page 7-3
"Inserting a Preset" on page 7-5
"Getting a Preset" on page 7-6
"Erasing a Preset" on page 7-7
Deleting Steps
To delete a Step in a Sequence, complete the following procedure:
1. Press the <SEQ> key in the OBJECT group to select and scroll through
open Sequences. Alternately, select an open Sequence from the Window
drop-down menu.
2. Press the <STEP> key in OBJECT group.
3. Click the Step to delete. If you have set the Prev/Next fixture in Step
mode under Preferences you can use the up and down arrow keys in the
CONTROL group to select the desired Step
4. Press the <DELETE> key in the CONTROL group. The Step will be
deleted. Alternately, use the <DELETE> key on the keyboard.
Chapter 6 Sequences
6-9
Storing Sequences
A virtually unlimited number of Sequences can be stored into each Show.
When a Sequence is stored, it is placed in scratch memory and cannot be
recalled on quick demand like a Preset of a Song (refer to "Playback" on page
7-22). When a Sequence is stored it is safe from accidental editing and is
easily recalled to its original settings.
To store a Sequence, complete the following procedure:
1. Press the <SEQ> key in the OBJECT group.
2. Press the <STORE> key in the MEMORY group to bring up the Store
Sequence dialogue box. Refer to Figure 6.8. Alternately, select Store from
the Memory drop-down menu.
Figure 6.8. Store Sequence Dialogue Box
3. Type in the name for the Sequence and press the <Enter> key or click the OK
button to complete the procedure.
6-10 Status Cue User’s Manual
Recalling Sequences
To recall (open) a Sequence from scratch memory, complete the following
procedure:
1. Press the <SEQ> key in the OBJECT group. Alternately, select Sequence
from the Object drop-down menu.
2. Press the <RECALL> key in the MEMORY group to bring up the Recall
Sequence dialogue box. Refer to Figure 6.9. Alternately, select Recall from
the Memory drop-down menu.
6
Figure 6.9. Recall Scene Dialogue Box
3. Using the up and down arrow keys in the CONTROL group, select the
Sequence to recall and press the <ENTER> key. Alternately, click the
Sequence to recall and click the OK button to complete the procedure.
Closing a Sequence
To close a Sequence on the desktop, complete the following procedure:
1. Press the <SEQ> key in the OBJECT group to select and scroll through open
Sequences.
2. Press the <CLOSE> key in the MEMORY group to close the active Sequence.
If the Sequence has been modified, you will be prompted to save the changes.
Chapter 6 Sequences 6-11
Removing Sequences From Scratch Memory
To remove a Sequence from scratch memory, complete the following
procedure:
1. Press the <SEQ> key in the OBJECT group. Alternately, select Sequence
from the Object drop-down menu.
2. Select Remove from the Memory drop-down menu to bring up the Remove
Sequence dialogue box. Refer to Figure 6.10.
Figure 6.10. Remove Sequence Dialogue Box
3. Click the Sequence to remove and click the OK button. This brings up the
Delete Sequence confirmation box. Refer to Figure 6.11.
6-12 Status Cue User’s Manual
Figure 6.11. Delete Sequence Confirmation Box
4. Click the Yes button to complete the procedure.
Chapter 6 Sequences 6-13
6
Playback
Sequences can be played back under live control and by using Presets. Use the
following subsections to playback Sequences.
Live Control of a Static Step
To playback a Step of a Sequence under live control, complete the following
procedure:
1. Recall the Sequence you wish to playback.
2. Using the up and down arrow keys select the desired Step to playback.
Alternately, click the desired Step.
3. Turn Blind Mode off by pressing the <BLIND> key in the MEMORY
group. The LED will turn off and the Step is played through the live output
on the Stack. Refer to "Viewing the Output Stack" on page B-9 for
additional information.
6-14 Status Cue User’s Manual
Live Control of a Sequence Loop
To playback a complete Sequence, complete the following procedure:
1. Recall the Sequence you wish to playback.
2. Press the <LOOP> key in the SEQUENCE group (Figure 6.12). This
brings up the Sequence Loop dialogue box. Refer to Figure 6.13.
6
Figure 6.12. SEQUENCE Group
Figure 6.13. Sequence Loop Dialogue Box
Chapter 6 Sequences 6-15
3. Click one of the following options in the Sequence Loop dialogue box:
•
Stop- allows the Steps to run forward one time then stops
•
Forward- allows the Steps to run from the first to the last Step then
repeats
•
Reverse- allows the Steps to run from the last to the first Step then
repeats
•
Fwd / Rev- allows the Steps to run from the first to the last Step and
then run from the last to the first Step then repeats
4. Press the <GO> key in the SEQUENCE group to run the Sequence.
5. Turn Blind Mode off by pressing the <BLIND> key in the MEMORY
group. The LED will turn off and the Sequence will be played through the
live output on the Stack. Refer to "Viewing the Output Stack" on page B-9
for additional information.
6. Press the <GO> key again to stop on a desired Step.
7. Press the <RESUME> key to resume playing the Sequence where it was
stopped or press the <GO> key again to restart the Sequence from the first
step.
Presets
17 Presets (16 Fader Presets and 1 Instant Preset) may be played at once.
To playback a Scene or Sequence under live control, complete the
following procedure:
1. Press the desired Instant Preset or Fader Preset(s) to play.
2. Adjust the Fader Preset slider(s) as required.
Note: Blind Mode does not prevent Instant or Fader Presets from outputting to the
fixtures.
6-16 Status Cue User’s Manual
Chapter 7
Songs
In this chapter you will:
❑ set Scenes and Sequences into Presets (7-3)
❑ insert Scenes and Sequences into Presets (7-5)
❑ get Scenes and Sequences from Presets (7-6)
❑ erase Presets (7-7)
❑ configure Preset types (7-8)
❑ create new Songs (7-13)
❑ name Songs (7-15)
❑ store Songs (7-15)
❑ recall Songs (7-16)
❑ reorder Songs (7-18)
❑ recall a Song order file (7-19)
❑ load a Song order file (7-19)
❑ edit a Song order file off-line (7-20)
❑ remove Songs (7-21)
❑ advance Songs (7-22)
❑ playback Presets (7-22)
❑ clear Presets (7-23)
7
Overview
A Song is a collection of 32 Instant Presets and 16 Fader Presets. The button
and faders of the 32 Instant Presets, 16 Fader Presets, and Live item are user
configurable. This allows the 17 outputs to react in designated ways to key
presses and fader movement. An unlimited number of Songs can be created for each
Show, but only one Song can be open at a time. When a new Show is created, a
new Song window ( Song - NoName1) is automatically created and placed on
the desktop. Refer to Figure 7.1
Chapter 7 Songs
7-1
Figure 7.1. New Song Window
7-2
Status Cue User’s Manual
Setting a Preset
Scenes and Sequences can easily be "set" (assigned) to a Preset of a Song for
playback on demand. To set a Preset, complete the following procedure:
1. Press the <SCENE> or <SEQUENCE> key in the OBJECT group to select
(make active) and scroll through open Scenes or Sequences.
2. Press the <SET> key in the SONG group (Figure 7.2) to bring up the Set a
preset in Song dialogue box (Figure 7.3). Alternately, select Set Preset from
the Song drop-down menu.
7
Figure 7.2. SONG Group
Figure 7.3. Set a Preset in Song Dialogue Box
Note: the Song name in the above example is "Quietly."
3. Press the desired Instant Preset (Figure 7.4) or Fader Preset (Figure 7.5) key
on the console to assign the Scene or Sequence to the preset. Its name will
Chapter 7 Songs
7-3
appear in the Preset of the Song Window (Figure 7.6). Alternately, click the
desired Preset in the Set a preset in Song dialogue box (Figure 7.3).
Figure 7.4. SYSTEM KEYS/INSTANT PRESETS Group
Figure 7.5. FADER PRESETS Group
Figure 7.6. Song Window
Note: once a Scene or Sequence is set into a Preset, it can be edited by performing a
Get. Refer to "Getting a Preset" on page 7-6.
4. Configure the Preset as necessary. Refer to "Configuring Preset Types" on page
7-8.
7-4
Status Cue User’s Manual
Inserting a Preset
After Presets are created, additional Presets can be inserted without
overwriting existing Presets. Inserting a Preset pushes existing Presets over
one number while assigning the Scene or Sequence to the selected Preset.
Additionally, it also moves the Preset Type and updates any CueList using the
Preset. To insert a Preset, complete the following procedure:
1. Press the <SCENE> or <SEQUENCE> key in the OBJECT group to select and
scroll though open Scenes and Sequences.
2. Select the Insert Preset item from the Song drop-down menu. This brings up
the Insert a Preset in Song dialogue box. Refer to Figure 7.7.
7
Figure 7.7. Insert a Preset in Song Dialogue Box
3. Press the desired Instant Preset (Figure 7.4) or Fader Preset (Figure 7.5) key
on the console to insert (set) the Scene or Sequence into. Alternately, click the
desired Preset in the Insert a preset in Song dialogue box. The Preset will be
inserted and all other Presets will be shifted over. If the Preset can not be
inserted (meaning all Presets are full) an insertion error dialogue box is
brought up. Refer to Figure 7.8.
Figure 7.8. Insertion Error Dialogue Box
Chapter 7 Songs
7-5
Getting a Preset
To edit or view a Scene or Sequence that has been set to a Preset, complete the
following procedure:
1. Press the <GET> key in the SONG group (Figure 7.2) to bring up the Get a
preset from Song dialogue box (Figure 7.9). Alternately, select Get Preset
from the Song drop-down menu.
Figure 7.9. Get a Preset From Song Dialogue Box
2. Press the desired key in the SYSTEM KEYS/INSTANT PRESETS group
(Figure 7.4) or FADER PRESET group (Figure 7.5) on the Console to get the
Scene or Sequence from the Preset. The Scene or Sequence will be opened on
the desktop. Alternately, click the desired Preset in the Get a preset from
Song dialogue box (Figure 7.9).
3. Turn off Blind mode (if required).
4. Edit or view the desired Constructs.
5. To set the Scene or Sequence back to a Preset, refer to "Setting a Preset" on
page 7-3 or press <SET> and <SET> again to assign it back to its original
Preset.
Notes: when a Set/Set is performed, the Scene or Sequence will automatically be
closed. You can also assign the Scene or Sequence to a different Preset if you do
not wish to change the original Preset.
7-6
Status Cue User’s Manual
Erasing a Preset
To erase a Preset from a Song, complete the following procedure:
1. Press the <PRESET> key in the FUNCTION group if it has not been selected.
2. Press the <ERASE> key in the CONTROL group (Figure 7.10). Alternately,
select Erase Preset from the Song drop-down menu. This will bring up the
Erase a Preset from Song dialogue box. Refer to Figure 7.11.
7
Figure 7.10. CONTROL Group
Figure 7.11. Erase a Preset From Song Dialogue Box
3. Press the desired Preset key in the SYSTEM KEYS/INSTANT PRESETS
group (Figure 7.4) or FADER PRESETS group (Figure 7.5) to erase.
Alternately, click the desired Preset in the Erase a preset from Song dialogue
box (Figure 7.11).
Chapter 7 Songs
7-7
Configuring Preset Types
Configuration types can be assigned to the individual Instant Presets, Fader
Presets, and the Live values. The configuration types dictate how an output
responds during playback. All Instant Presets use one output, so the
configuration set to one Instant Preset is the configuration used for all Instant
Presets. Configuration types are unique to each Song, so different Songs can
contain different configuration types. To configure an output, complete the
following procedure:
1. Press the < TYPE> key in the SONG group (Figure 7.12). This will bring
up the Preset Type dialogue box (Figure 7.13). Alternately, select
Change Types... from the Song drop-down menu. The dialogue box
indicates the 18 outputs and configuration parameters.
Figure 7.12. SONG Group
7-8
Status Cue User’s Manual
7
Figure 7.13. Preset Type Dialogue Box
2. Select the desired output to configure by pressing any key in the SYSTEM
KEYS/FADER PRESETS group (Figure 7.4) or a corresponding key in the
FADER PRESETS group (Figure 7.5). Alternately, use the mouse (trackball)
to select the Live channel, Instant Preset, or a Fader Preset. The selected output
is indicated by
(wedgie).
3. Select the configuration type in the Quick Select field or create a custom
configuration by selecting an available item from the following fields:
• Scene Transition (7-10)
• Button Action (7-10)
• Fader Action (7-11)
• Construct Filter (7-12)
4. Repeat steps 2 and 3 to configure additional channels.
5. Click the OK button to complete the procedure.
Chapter 7 Songs
7-9
Scene Transition
The following options are available in the Scene Transition field:
•
Xfade w/ MSpeed- allows crossfading between Scenes/Sequences and allows
MSpeed to be used.
•
•
Xfade, no MSpeed- allows crossfading between Scenes/Sequences, but it
disables and replaces the fixtures’ MSpeed Constructs. Xfade determines the
MSpeed values for all fixtures within the Preset (or Live).
Instantaneous- instantly activates the Preset and ignores Xfade and MSpeed.
Button Action
The Button Action field dictates how the buttons respond when pressed. The
following options are available in the Button Action field for the Fader Presets:
•
•
•
•
•
•
•
Latch - Add- enables the Preset key to remain on with one key press and
allows additional Preset keys to remain on.
Latch - Swap- enables the Preset key to remain on with one key press, but
turns off all other Presets.
Flash - Add- turns on a Preset when its key is held down and uses the fader’s
setting for Dim. This is indicated by FLASH in a blue box at the bottom of the
Preset in the Song Window.
Bump - turns on a Preset when its key is held down, but sets all Dim
Constructs at 100%. This is indicated by BUMP in a light blue box at the
bottom of the Preset in the Song Window.
Flash - Swap- turns on a Preset when its key is held down, uses the fader’s
setting for Dim Constructs, but turns off all other Presets. This is indicated by
FLASH in a blue box at the bottom of the Preset in the Song Window.
Step- advances one Step of the Sequence stored in the Preset when its key is
pressed. This is indicated by STEP in a white box at the bottom of the Preset in
the Song Window. This automatically selects the Fader Action to auto-latch.
The Preset is activated using the Fader and then each Step is advanced when
the Fader’s button is pressed.
Solo- reserved for future use.
7-10 Status Cue User’s Manual
Fader Action
The following options are available for the Fader Presets in the Fader Action
field:
•
Dimmer - enables fader control of the Preset’s Dim Constructs after the Preset
is activated by the button.
• Dimmer, Auto-Latch - enables fader control of the Preset’s Dim Constructs
and moving the Fader past 0% (bottom) turns the Preset on and moving the
Fader back to 0% turns it off.
Note: if the fader is accidentally bumped, the Fader level will take precedence
over the recorded, so light output could be very low.
•
Manual Xfade - enables the fader to manually Xfade Steps of a Sequence (in
the Preset). Moving the fader to 0% (bottom) starts the first Step, when the
fader reaches 100% (top) the next Step will engage. Repeat the process for
additional Steps.
Note: the Sequence proceeds to the next Step, you can not go backward.
•
Delay- overrides the Delay(s) in the Preset and allows the fader to control the
Delay of the Preset. Moving the fader up increases Delay (slows movement)
and moving the fader down decreases Delay (quickens movement).
• Rate - overrides the Rate in the Preset when the fader is first moved to a
position equal to the programmed Rate. Moving the fader up increases Rate
up to 50% and moving the fader down decreases Rate up to 50%.
• Relative Rate - overrides Rate and sets Rate according to the fader position.
When the fader is at 50%, the Sequence will run at the programmed Rate.
Moving the fader above and below 50% increases and decreases Rate.
Notes: when the Preset is turned on and Relative Rate is used, it will run at the
Fader level immediately. You must override the existing recorded Rate by
raising or lowering the fader above 50% to gain control.
Chapter 7 Songs 7-11
7
Construct Filter
The Construct Filter field allows Construct masking. The following options
are available in the Construct Filter field:
•
•
Off - does not filter any Constructs (default)
Position - allows only Pan, Tilt, and MSpeed Constructs to change in the
assigned output
• Pattern- allows only Gobo and Rotating Gobo Constructs to change in the
assigned output
• Color - allows only Color and Color Mixing Constructs to change in the
assigned output
• Image- allows only Focus and Zoom Constructs to change in the assigned
output
• Effects - allows only Frost and Effects Constructs to change in the assigned
output
• Brightness- allows only Dim, Iris, and Gate Constructs to change in the
assigned output
Example: Select a Fader Preset and set it to filter Position. Store a Scene with nontransparent (active) values for every Construct including position. Set
the Scene to the fader Preset. Press the Fader key. Only the fixture(s)
positions will change.
Note: the same effect is achieved by creating a Scene with non-transparent values
for position while leaving all other values transparent.
7-12 Status Cue User’s Manual
Creating New Songs
To create a new Song, complete the following procedure:
1. Press the <SONG> key in the OBJECT group (Figure 7.14). Alternately select
Song from the Object drop-down menu.
7
Figure 7.14. OBJECT Group
2. Press the <NEW> key in the MEMORY group (Figure 7.15). Alternately,
select New from the Memory drop-down menu. A new (unnamed) Song
window will appear on the desktop. If the current Song has been modified,
(indicated by <modified> in the Song title bar) the Save Changes Made to
Song dialogue box will appear.
Figure 7.15. MEMORY Group
Chapter 7 Songs 7-13
Figure 7.16. Save Changes Made to Song Dialogue Box
3. Click Yes to save the current Song or No to discard the changes and open a
new Song. If Yes is chosen, the Store Song dialogue box will appear. Refer to
Figure 7.17.
Caution: if you do not store your Songs, all Presets that were changed will not be
saved.
Figure 7.17. Store Song Dialogue Box
4. Type the desired name in the Song Name field and click OK to store the Song
and open a new Song.
7-14 Status Cue User’s Manual
Naming Songs
To name a Song, complete the following procedure:
1. Press the <SONG> key in the OBJECT group (Figure 7.14). Alternately select
Song from the Object drop-down menu.
2. Press the <NAME> key in the MEMORY group (Figure 7.15). This will bring
up the Name Song dialogue box. Refer to Figure 7.18. Alternately, select
Name from the Memory drop-down menu.
7
Figure 7.18. Name Song Dialogue Box
3. Type the desired name in the Name field and click OK to complete the
procedure. The name will appear in the Song tittle bar.
Storing Songs
An unlimited number of Songs can be stored into each Show. To store a Song
in a Show, complete the following procedure:
1. Press the <SONG> key in the OBJECT group (Figure 7.14). Alternately select
Song from the Object drop-down menu.
2. Press the <STORE> key in the MEMORY group (Figure 7.15). This will bring
up the Store Song dialogue box. Refer to Figure 7.17. Alternately, select
Store from the Memory drop-down menu.
3. Type the desired name in the Song Name field and click OK to complete the
procedure.
Chapter 7 Songs 7-15
Recalling Songs
Songs are quickly recalled by either of the following methods:
•
•
Bank method
List method
Bank Method
To recall a Song from a Show using the bank method, complete the
following procedure:
1. Press the <SONG> key in the OBJECT group (Figure 7.14). Alternately
select Song from the Object drop-down menu.
2. Press the <BANK> key in the CONTROL group (Figure 7.19). This will
bring up the Select Song From Preset Keys dialogue box (Figure 7.20).
Figure 7.19. CONTROL Group
Figure 7.20. Select Song From Preset Keys Dialogue Box
3. Press the desired key in the SYSTEM KEYS/INSTANT PRESETS group
(Figure 7.4) to bring up the corresponding Song. The LEDs illuminate to
indicate the location of stored Songs. Alternately, use the mouse and click
the desired Preset.
7-16 Status Cue User’s Manual
Note: for performance situations, refer to "Advancing Songs" on page 7-22.
List Method
To recall a Song from a Show using the list method, complete the following
procedure:
1. Press the <SONG> key in the OBJECT group (Figure 7.14). Alternately
select Song from the Object drop-down menu.
2. Press the <RECALL> key in the MEMORY group (Figure 7.15). This will
bring up the Recall Song dialogue box. Refer to Figure 7.21. Alternately,
select Recall from the Memory drop-down menu.
7
Figure 7.21. Recall Song Dialogue Box
3. Use the up and down arrow keys in the CONTROL group to select the
desired Song and press the <ENTER> key. Alternately, click the desired
Song and then click OK to complete the procedure.
Note: for performance situations, refer to "Advancing Songs" on page 7-22.
Chapter 7 Songs 7-17
Reordering Songs
By default, Songs are sorted in the order they were stored. Numerous Song
orders can be saved and edited off-line. To reorder Songs, complete the
following procedure:
1. Select Reorder Songs... from the Song drop-down menu. This will bring up
the Song Order dialogue box. Refer to Figure 7.22.
Figure 7.22. Song Order Dialogue Box
2. Click a Song in the Current Song Order: field. The Song will be copied into
the New Song Order Field: in the order it was selected. Continue selecting
Songs until all Songs have been copied into the New Song Order: field.
Alternately, click the Copy All button, click a song to move in the New Song
Order: field and use the up and down arrow buttons in the dialogue box to
correct the order.
3. To save the Song order as a text file (optional), click the Save button. This will
bring up Save Song Order as... dialogue box. Refer to Figure 7.23.
Alternately, click the OK button to complete the procedure.
7-18 Status Cue User’s Manual
Figure 7.23. Save Song Order As... Dialogue Box
4. Type the desired name in the File name: field, select the location to save the
file to, and click OK to complete the procedure.
Note: by default, the current Status Cue directory is used.
Loading a Song Order File
To load a saved Song order file, complete the following procedure:
1. Press the <SONG> key in the OBJECT group (Figure 7.14). Alternately select
Song from the Object drop-down menu.
2. Select Reorder Songs... from the Song drop-down menu. This will bring up
the Song Order dialogue box. Refer to Figure 7.22.
3. Click the Load button. This will bring up the Load Song Order From...
dialogue box.
Figure 7.24. Load Song Order From... Dialogue Box
4. Select the desired file and click OK to complete the procedure.
Chapter 7 Songs 7-19
7
Editing a Song Order File Off-line
To edit a Song order file off-line, complete the following procedure:
1. Open a text editor such as Notepad.
2. Open the song order text file (.txt). Refer to Figure 7.25.
Figure 7.25. Song Order Text File Example
3. Reorder the Songs and save the file to complete the procedure.
7-20 Status Cue User’s Manual
Removing Songs
To permanently remove a Song from a Show, complete the following
procedure:
1. Press the <SONG> key in the OBJECT group. Alternately, select Song item
from the Object drop-down menu.
2. Select the Remove item from the Memory drop-down menu. This will bring
up the Remove Song dialogue box. Refer to Figure 7.26.
7
Figure 7.26. Remove Song Dialogue Box
3. Select the Song to remove and click OK. This will bring up the Delete Song
confirmation dialogue box. Refer to Figure 7.27.
Figure 7.27. Delete Song Confirmation Dialogue Box
4. Click Yes to complete the procedure.
Chapter 7 Songs 7-21
Playback
Use the following subsections to advance Songs, play Presets, and clear
Instant Preset output during playback.
Advancing Songs
Songs can be instantly advanced for performance applications. Songs are advanced
in the order set in the "Reordering Songs" on page 7-18. To advance Songs,
complete the following procedure:
1. Press the <SONG> key in the OBJECT group. Alternately, select Song
from the Object drop-down menu.
2. Press the page down (double arrows pointing down) key in the CONTROL
group to advance forward through the Song list and press the page up
(double arrows pointing up) to advance backwards though the Song list.
Alternately, use the <Page Down> and <Page Up> keys on the keyboard.
Press the up arrow to move to the first Song on the list and press the down
arrow to move to the last song on the list. Refer to Figure 7.28.
advance backwards
advance forward
top of list
bottom of
list
Figure 7.28. CONTROL Group
Playing Back Presets
17 Presets (16 Fader Presets and 1 Instant Preset) may be played at once.
To playback a Scene or Sequence using the Presets, complete the following
procedure:
1. Press the desired Instant Preset or Fader Preset(s) to play.
2. Adjust the Fader Preset slider(s) as required.
Note: Blind Mode does not affect Instant or Fader Presets.
7-22 Status Cue User’s Manual
Clearing Instant Preset Output
During playback, if an Instant Preset was the last Preset to be played, it will
continue to output its value to the stage after it is turned off. To clear an Instant
Preset, press the <CLEAR> key in the SONG group. Refer to Figure 7.29.
Notes: the Instant Preset values can not be cleared if a Preset is on. Also use
<CLEAR> key to remove hanging values from Scene and Sequences.
7
Figure 7.29. SONG Group
Chapter 7 Songs 7-23
7-24 Status Cue User’s Manual
Chapter 8
CueLists
In this chapter you will:
❑ configure MIDI devices and MSC for CueLists (8-1)
❑ create CueLists (8-2)
❑ find your way around the CueList screen (8-3)
❑ configure CueLists (8-4)
❑ insert cues (8-8)
❑ store CueLists (8-12)
❑ recall CueLists (8-13)
❑ edit CueLists (8-14)
❑ playback CueLists (8-40)
8
Overview
A CueList is a series of cues (events) available for playback. CueLists allow
the user to conveniently run through an entire show by simply pressing one
button or automate an entire Show with internal or external synchronization.
Multiple devices can be simultaneously controlled with CueLists. Eight
CueLists can run simultaneously and an unlimited number of cues can be
created in each CueList.
Unlike Scenes and Sequences, CueLists reference Songs and have the ability
to accept and output MIDI data. CueLists play back the Presets that are stored
in the Songs.
Before You Begin
To start using CueLists, you may need to configure the following items:
•
MIDI devices-if you are controlling external MIDI devices (hoists with MIDI
capable controllers, special effects, etc.)
• MIDI Show Control (MSC)-for MSC or capturing of external MIDI data and
SMPTE time code
Refer to "Chapter 3 MIDI Setup" for information on configuring MIDI and
MSC.
Chapter 8 CueLists
8-1
Creating a New CueList
Complete the following procedure to create a new CueList:
1. Press <CUELIST> in the OBJECT group on the Console. Refer to Figure 8.1.
Alternately, use the mouse (trackball) to select CueList from the Object dropdown menu.
Figure 8.1. OBJECT Group
2. Press <NEW> in the MEMORY group (Figure 8.2) to open a new CueList
(Figure 8.3). Alternately, select New from the Memory drop-down menu.
Figure 8.2. MEMORY Group
Figure 8.3. New CueList Window
8-2
Status Cue User’s Manual
Finding Your Way Around
Figure 8.4 shows a sample CueList window.
cue information box
cue sorting
clock
input and output
controls
next cue icon
Figure 8.4. Sample CueList Window
8
Screen Indicators
CueLists use the following methods to visually indicate operations:
• white- not selected
• black- selected cue
• yellow- current cue playing
• blue- current cue and selected cue
•
(cue icon)- next cue (wedgie)
Chapter 8 CueLists
8-3
CueList Configuration
Before continuing with the rest of this Chapter, it is necessary to configure the
following items for each CueList. Use the following subsections to configure
CueLists:
•
•
•
•
•
"Clock Source" on page 8-4
"Insertion Methods" on page 8-6
"Time Options" on page 8-6
"Cue Sorting Window" on page 8-6
"Output and Input Control Windows" on page 8-7
Clock Source
Each CueList can have an individual clock source. Select a clock source from the
Clock Source drop-down menu in the CueList window. Alternately, from the
CueList drop-down menu located on the menu bar, select Clock Source and then
the desired pop-out item. Clock sources are based on 30 frames per second nondrop frame.
The following clock sources are available:
• No Clock- disables the clock so cues may only be advanced manually.
• Internal- uses an internal clock source. In the display (A:B:C.D) A is the hour,
B is the minutes, C is the seconds, and D is frames. Refer to Figure 8.5.
• MTC (SMPTE)- uses external MIDI time code or SMPTE time code. In the
display (A:B:C.D) A is the hour, B is the minutes, C is the seconds, and D is
frames. Additionally, play turns on and off the SMPTE input. Refer to Figure
8.5.
Note: a MIDI card must be installed.
•
CD-
uses the clock from the Status Cue computer’s CD ROM drive to
synchronize cues with an audio CD. In the display (A:B:C.D) A is the track, B
is the minutes, C is the seconds, and D is frames. Refer to Figure 8.6.
Note: a CD ROM must be installed.
•
Time of day-
•
8-4
uses the computer’s clock to reference cues. This feature
automates shows to play cues at a specific time of day. In the display
(A:B:C.D) A is the hour (military time), B is the minutes, C is the seconds, and
D is frames. Refer to Figure 8.5.
Day of Week- uses the computer’s clock to automate shows to play cues at a
specific time of day and day of week. In the display (A:B:C.D) A is the day, B
is the hour, C is the minute, and D is ignored. For the days, Sunday is 0 and
Saturday is 6. Refer to Figure 8.5.
Status Cue User’s Manual
Notes: for the Time of Day and Day of Week clock sources, verify that your clock is
set correctly by using the Date/Time item found in the Control Panel of
Windows. Unfortunately and as much as I would like to, you cannot use the
Rewind button (“History Erase Button”) with Time of Day or Day of Week
to travel back in time.
A
1
B
2 3
4
C
D
5
6
Figure 8.5. Standard Clock
•
•
•
•
•
•
1- return to zero
2- rewind
3- fast forward
4- record
5- stop
6- play
8
A
1
2 3
B
4
C
5
6
D
7
Figure 8.6. CD Clock Source
•
•
•
•
•
•
•
1- skip track backwards
2- scan backwards
3- scan forward
4- skip track forwards
5- record
6- stop
7- play
Chapter 8 CueLists
8-5
Insertion Methods
Select an Insertion Method from its drop-down menu. Alternately, from the CueList
drop-down menu located on the menu bar, select Insertion Method and then the
desired pop-out item.You may choose from the following items:
• No Insertion-will not allow any cues to be put into the list. This ensures no cues
can accidentally be placed into a finalized CueList.
• After Selection-places the next cue immediately after the selected cue. If this is
used between whole numbers, the numbering will begin in decimals between
the whole numbers.
Example: if 4 is selected and the next cue number is 5, 4.100 will be the inserted
number.
•
•
•
•
Before Selection-inserts the cue before the
selected cue.
At Beginning-inserts cues at the beginning of the CueList.
At End-inserts cues at the end of the CueList.
At Time-inserts cues at the time displayed on the clock of the CueList.
Time Options
Time options set the time a cue will play in relation to the clock. Select a Time
from its drop-down menu. Alternately, from the CueList drop-down menu
located on the menu bar, select Clock Source and then the desired pop-out
item.You may choose from the following items:
• Absolute-cues will be played according to the time on the clock.
• Relative-after a cue is played, the next cue plays when the time in the Cue
Time field elapses.
Example: if you have three cues with times of 0 seconds, 12 seconds, and 2
minutes, the first cue plays immediately, the second cue plays 12
seconds after the first cue, and the third cue plays 2 minutes after the
second cue.
Option
Cue Sorting Window
CueLists can be sorted by either time or number. Click the desired option. Refer to
Figure 8.7.
Figure 8.7. Cue Sorting Window
Note: using the Relative time option allows sorting by number only.
8-6
Status Cue User’s Manual
Output and Input Control Windows
CueLists can filter data flow through the output and input control windows. Refer
to Figure 8.8.
Figure 8.8. Output and Input Control Windows
CueLists offer the following input and output controls:
• Output MTC- enables the output of MIDI time code
• Convert MSC to Internal- converts the following MIDI Show Control
commands (Device field) to Internal commands when recording:
— MSC GO to Internal GO
— MSC STOP to Internal STOP
— MSC LOAD to Internal LOAD
— MSC ALL OFF to Internal ALL OFF
• Record MIDI- enables MIDI data to be recorded into a CueList
• Record Preset/Song- enables the recording of the following events:
— Instant Presets
— Fader Presets
— Song events
— commands from additional CueLists (Song changes, internal commands,
etc.)
Chapter 8 CueLists
8
8-7
Inserting Cues
Use the following methods to insert cue(s) into a CueList:
•
•
•
•
•
inserting a new blank cue. Refer to "Blank Cue" on page 8-8.
cutting or copying an existing Scene or Sequence into a cue. Refer to "Cutting
or a Copying Scenes and Sequences Into a Cue" on page 8-9.
placing the active Scene or Sequence into a cue. Refer to “Placing the Active
Scene or Sequence Into a Cue” on page 8-9.
recording data to the cues. Refer to "Recording the Console’s Input and Output
Data" on page 8-10.
capturing external MIDI data. Refer to "Capturing External MIDI Data" on
page 8-11.
Blank Cue
To insert a new cue into the CueList, complete the following procedure:
1. Click the desired cue to use as an insertion point. The row will highlight.
2. Press the <INSERT> button in the CONTROL group on the console. Refer
to Figure 8.9. A new blank cue will be inserted according to the insertion
method. Alternately, press the <Ins> key on the keyboard.
Figure 8.9. CONTROL Group
8-8
Status Cue User’s Manual
Cutting or a Copying Scenes and Sequences Into a Cue
To cut or copy a Scene or Sequence into a cue, complete the following procedure:
1. Open or create the Scene or Sequence to place in a cue.
2. To cut and paste the Scene into a cue, drag the clapboard icon onto the
desired cue
(the icon will appear with a – in it). To copy the Scene or
sequence, hold down the <Ctrl> key and drag the clapboard icon onto the
desired cue
(the icon will appear with a + in it). When the cue is
inserted, a Preset will be assigned to the cue.
Placing the Active Scene or Sequence Into a Cue
If a Scene or Sequence is the active window on the desktop, you can copy it as a
cue. To copy the active Scene or Sequence to a cue, complete the following
procedure:
1. Press the <CUE> button in the MEMORY group. This will bring up the
Store Cue dialogue box. Refer to Figure 8.10.
8
Figure 8.10. Store Cue Dialogue Box
2. Enter the desired data in the fields and click the OK button to complete the
procedure. The new cue will be stored as a Preset.
Note: the next cue number is automatically chosen according to the insertion
method.
Chapter 8 CueLists
8-9
Recording the Console’s Input and Output Data
To record events coming into the Console and the live channel data, complete the
following procedure:
1. Select a starting point and/or starting time by clicking the desired cue in a
CueList.
2. Press the Record button in the CueList window. The button will turn red
and the counter will begin if you are using a clock source.
Note: when the record function is used, existing cues are not erased, but they will
be played.
3. Actions on the Console (turning on or off Presets, loading Songs, etc.) will
be recorded as an individual cue at the time the action occurred.
4. Press the Stop button to stop recording.
Capturing the Active Presets in a Snapshot
The playing Presets can be captured instantly in a snapshot. To capture the Preset
output (snapshot), complete the following procedure:
1. Select a starting point by clicking the desired cue in a CueList.
2. Press the <CUE> button in the MEMORY group to capture the Console’s
output. The cue will be placed in the CueList. The Command field of the
new cue will indicate SNAPSHOT.
8-10 Status Cue User’s Manual
Capturing External MIDI Data
CueLists provide the ability to capture external MIDI data and play it back at a
later time. This data will be outputted through the MIDI card when the CueList is
played. To capture external MIDI data, complete the following procedure:
1. Configure MIDI as outlined in "Chapter 3 MIDI Configuration."
2. If you wish to view the incoming MIDI data (optional), select MIDI Viewer
from the Window drop-down menu. Refer to Figure 8.11.
8
Figure 8.11. MIDI Viewer
3. From the CueList, select a starting point (depending on insertion method)
by clicking the desired cue in the CueList.
4. Click the Record button in the CueList window.
5. Send MIDI data into the MIDI In of the MIDI card. Each MIDI command
will be recorded and assigned as an individual cue.
6. Press the Stop button to quit recording.
Chapter 8 CueLists 8-11
Storing CueLists
To store (save) a CueList, complete the following procedure:
1. Select the open CueList to store. If the CueList is not the selected item on the
desktop, select the CueList from the Window drop-down menu on the menu bar
or press the <CUELIST> button in the OBJECT group to scroll though open
CueLists.
2. Press the <STORE> key in the MEMORY group to bring up the Store CueList
dialogue box. Refer to Figure 8.12. Alternately, select Store from the Memory
drop-down menu.
Figure 8.12. Store CueList Dialogue Box
3. Type in the desired name of the CueList and click the OK button to complete
the procedure.
8-12 Status Cue User’s Manual
Recalling a CueList
To recall a CueList, complete the following procedure:
1. Press the <CUELIST> key in the OBJECT group.
2. Press the <RECALL> key in the MEMORY group to bring up the Recall a
CueList dialogue box. Alternately, select Recall from the Object drop-down
menu. Refer to Figure 8.13.
8
Figure 8.13. Recall CueList Dialogue Box
3. Using the arrow keys in CONTROL group, select the desired CueList and
press the <ENTER> key. Alternately use the mouse (trackball) and click the
OK button to complete the procedure.
Chapter 8 CueLists 8-13
Editing CueLists
Cues can be edited when a CueList is playing (live) or stopped. Use this
section to perform the desired editing.Use the following subsections to edit
CueList fields:
•
•
•
•
•
•
"Label" on page 8-14
"Cue Number" on page 8-15
"Renumbering CueLists" on page 8-15
"Cue Time" on page 8-16
"Transition Time" on page 8-17
"Device" on page 8-18
•
•
"Command and Data Fields" on page 8-19
"Comments" on page 8-38
Label
The Label field may be used to name a cue or as a reference point for another cue
(goto label). To edit the Label field, complete the following procedure:
1. Double click the Label field in the cue to edit. This brings up the Edit Cue
Label dialogue box. Refer to Figure 8.14.
Figure 8.14. Edit Cue Label Dialogue Box
2. Enter the label for the cue and click the OK button.
Note: labels are not case sensitive.
8-14 Status Cue User’s Manual
Cue Number
Cue numbers are edited in the same manner as the Label field. For added
flexibility, up to 999 cues can be inserted between whole number cues. To edit the
Cue Number field, complete the following procedure:
1. Click the cue to edit.
2. Double click the Cue Number field. This brings up the Edit Cue Number
dialogue box. Refer to Figure 8.15.
8
Figure 8.15. Edit Cue Number Dialogue Box
3. Enter the new cue number and click the OK button.
Note: you can simply enter 80 in the above example to achieve the same result.
Renumbering CueLists
At any point in time, a Cuelist can be renumbered. Renumbering may be required
if the Cue numbers are out of order. This can occur by using the Sort By Time
option. To renumber a CueList, complete the following procedure:
1. Press the <CUELIST> button in the OBJECT group to scroll through open
CueLists. Alternately, select an open CueList from the Window drop-down
menu.
2. Select the Renumber CueList item from the CueList drop-down menu. The
cues will be renumbered numerically top to bottom using whole numbers.
Chapter 8 CueLists 8-15
Cue Time
The Cue Time field supports both drag editing and standard editing. Drag editing
allows multiple cue times to be edited simultaneously.
To edit multiple cue times, complete the following procedure:
1. Using the mouse (trackball), click one or more cues to edit.
2. Click and hold (with the mouse button/hot key) the digit of time to be
edited and move the pointer up or down to change that digit’s time. The
Cue Time field(s) will change to indicate the value change. Refer to Figure
8.16.
indicates amount of time added or subtracted
Figure 8.16. Drag Editing
3. Release the mouse button to complete editing.
To edit the Cue Time field using the standard method (specific cue), complete the
following procedure:
1. Double click the Cue Time field in the cue to edit. This brings up the Edit
Time dialogue box. Refer to Figure 8.17.
Figure 8.17. Edit Time Dialogue Box
2. Enter the new cue number and click the OK button.
8-16 Status Cue User’s Manual
Transition Time
Transition times can be used with any MSC device to override other timing
entities. To edit transition times, complete the following procedure:
1. Select the MSC cue to edit.
2. Double click the Command field to bring up the Select MSC Command
dialogue box.
3. Select MSC SET and click OK. Refer to Figure 8.18.
8
Figure 8.18. Select MSC Command Dialogue Box
4. Double click the Trans Time field. This will bring up the Edit Time dialogue
box. Refer to Figure 8.19.
Figure 8.19. Edit Time Dialogue Box
5. Enter the desired time and click the OK button to complete the operation.
Chapter 8 CueLists 8-17
Device
The Device field assigns a specific MIDI device or all MIDI devices to a cue. To
assign a device, complete the following procedure:
1. Select the cue to edit.
2. Double click the Device field to bring up the Select Device dialogue box.
Refer to Figure 8.20.
Figure 8.20. Select Device Dialogue Box
Note: <Internal> is a non-MIDI Status Cue device. It is used when Status Cue is
the Master controller.
3. Select the appropriate device from the list and click the OK button to
complete the procedure.
Note: refer to "MIDI Device Configuration" on page 3-2 to add devices.
8-18 Status Cue User’s Manual
Command and Data Fields
The Command and Data fields assign Internal, MSC, MIDI, or SysEx commands
and their corresponding data string to a cue. Refer to the following subsections to
edit the fields:
• "Internal" on page 8-19
• "MSC" on page 8-34
• "SysEx" on page 8-37
Internal
Specific Internal Command and Data field options are covered in the following
pages. To edit the Command and Data fields of an Internal device complete the
following procedure:
1. Double click the Command field (Figure 8.21) in the desired cue to
bring up the Select Internal Command dialogue box. Refer to Figure
8.22. The Internal Commands are covered on pages 8-20 to 8-31.
8
Figure 8.21. Device, Command, and Data Fields
Figure 8.22. Select Internal Command Dialogue Box
2. Click the desired Internal command and click then the OK button to
complete the operation.
3. Double click the Data field to bring up its corresponding dialogue box.
4. Type the appropriate information (if necessary) in the dialogue box and
click the OK button to complete the procedure.
Chapter 8 CueLists 8-19
<none>
The <none> command disables both the Command and Data fields. Refer to
Figure 8.23.
Figure 8.23. <none> Command and Data Fields
GO
The GO command plays a Preset in the current CueList. Refer to Figure
8.24.
Figure 8.24. GO Command Field
Double clicking this Data field brings up the Select a preset from the open
Song dialogue box. Refer to Figure 8.25. If you are editing the Data field
and the Preset is from a different Song, Use the current Song dialogue box
will appear. Refer to Figure 8.26. Click the Yes button to use the current
Song or the No button to recall the previous Song.
Figure 8.25. Select a Preset From Song Dialogue Box
8-20 Status Cue User’s Manual
Figure 8.26. Use the Current Song Dialogue Box
Press the desired Preset key on the Console to assign the Preset to the cue.
Alternately, click the desired Preset on the screen. The Preset will appear in the
Data field indicating the Preset number and Song to play. Refer to Figure 8.27.
8
Figure 8.27. Go Preset
STOP
The STOP command stops a Preset in the current CueList.
Figure 8.28. STOP Command
Double clicking this Data field brings up the Select a preset from the open
dialogue box. Refer to Figure 8.25. Press the desired Preset key on the
Console to assign the Preset to the cue. The Preset will appear in the Data field
indicating the Preset number and Song to stop. Refer to Figure 8.29.
Song
Figure 8.29. Stop Preset
Chapter 8 CueLists 8-21
ALL OFF
The ALL OFF
command turns all Presets off. Refer to Figure 8.30
Figure 8.30. ALL OFF Command
LOAD
The LOAD command loads
(opens) a Song. Refer to Figure 8.31.
Figure 8.31. LOAD Command
Double clicking this Data field brings up the Select Song dialogue box. Refer
to Figure 8.32.
Figure 8.32. Select Song Dialogue Box
Select the desired Song and click the OK button to complete the operation. The
Song will appear in the Data field indicating the Song to load. Refer to Figure
8.33.
Figure 8.33. LOAD Song
8-22 Status Cue User’s Manual
GOTO FIRST
The GOTO FIRST command goes to the first cue in the current CueList.
Refer to Figure 8.34.
Figure 8.34. GOTO FIRST Command
GOTO LABEL
The GOTO LABEL command goes to the cue with a specific label. Refer to
"Label" on page 8-14. Refer to Figure 8.35.
8
Figure 8.35. GOTO LABEL Command
Double clicking this Data field brings up the Cue Goto Label dialogue box.
Refer to Figure 8.36.
Figure 8.36. Cue Goto Label Dialogue Box
Type in the label to "go to" and type in the desired loops (number of times
to repeat). Click the OK button to complete the operation. The Data field
will display the label name followed by the number of loops. Refer to
Figure 8.37
Figure 8.37. GOTO LABEL Example
Chapter 8 CueLists 8-23
GOTO ZERO
The GOTO ZERO command resets clock to zero and places the next cue
icon (wedgie) at the first cue closest to zero. Refer to Figure 8.38.
Figure 8.38. GOTO ZERO Command
SNAPSHOT
The SNAPSHOT command allows the active Presets to be captured and
placed into the cue. Refer to Figure 8.39.
Figure 8.39. SNAPSHOT Command
8-24 Status Cue User’s Manual
GO CUE
The GO CUE command plays a cue on a specified CueList. Refer to Figure
8.40.
Figure 8.40. GO CUE Command
Double clicking this Data field brings up the GO CUE dialogue box. Refer
to Figure 8.41.
8
Figure 8.41. GO CUE Dialogue Box
Select the desired CueList from the CueList: drop-down menu. Type the
appropriate cue number in the Number: field and click the OK button to
complete the operation. The Data field will indicate the name of the
CueList followed by the cue number. Refer to Figure 8.42.
Figure 8.42. GO CUE Example
START CLOCK
The START CLOCK command starts the clock of the current CueList. Refer
to Figure 8.43.
Figure 8.43. START CLOCK Command
Chapter 8 CueLists 8-25
STOP CLOCK
The STOP CLOCK command stops the clock of the current CueList. Refer
to Figure 8.44
Figure 8.44. STOP CLOCK Command
START A CUELIST
The START A CUELIST command starts the clock (plays) of a specified
CueList. Refer to Figure 8.45.
Figure 8.45. START A CUELIST Command
Double clicking this Data field brings up the Select CueList dialogue box.
Refer to Figure 8.46.
Figure 8.46. Select CueList Dialogue Box
Select the CueList to open and click OK to complete the operation. The
Data field will display the selected CueList. Refer to Figure 8.47.
Figure 8.47. START A CUELIST Example
8-26 Status Cue User’s Manual
STOP A CUELIST
The STOP A CUELIST command stops the clock (prevents it from playing)
of a specified CueList. Refer to Figure 8.48.
Figure 8.48. STOP A CUELIST Command
Double clicking this Data field brings up the Select CueList dialogue box.
Refer to Figure 8.46. Select the CueList to stop and click OK to complete
the operation. The Data field will display the selected CueList. Refer to
Figure 8.49
8
Figure 8.49. STOP A CUELIST Example
Chapter 8 CueLists 8-27
START AT NUMBER
The START AT NUMBER command starts a specified CueList at a specific
cue number. Refer to Figure 8.50.
Figure 8.50. START AT NUMBER Command
This Data field brings up the Start a CueList at Number dialogue box. Refer
to Figure 8.51.
Figure 8.51. Start CueList At Number Dialogue Box
Select the desired CueList to open from the CueList: drop-down menu.
Type the appropriate cue number in the Number: field and click OK to
complete the operation. The Data field will display the selected CueList
and cue number. Refer to Figure 8.52
Figure 8.52. START AT NUMBER Example
8-28 Status Cue User’s Manual
START AT TIME
The START AT TIME command starts a specified CueList at a specific time.
Refer to Figure 8.53.
Figure 8.53. START AT TIME Command
This Data field brings up the Start a CueList at Time dialogue box. Refer to
Figure 8.54.
8
Figure 8.54. Start CueList at Time Dialogue Box
Select the desired CueList to open from the CueList: drop-down menu.
Using the numeric keys in the CONTROL group, type the appropriate cue
time (separated by ".") in the Time: field and click OK to complete the
operation. The Data field will display the selected CueList and cue time.
Refer to Figure 8.55.
Figure 8.55. START AT TIME Example
Chapter 8 CueLists 8-29
OPEN CUELIST
The OPEN CUELIST command opens a specified CueList. Refer to Figure
8.56.
Figure 8.56. OPEN CUELIST Command
This Data field brings up the Select CueList dialogue box. Refer to Figure
8.46. Select the CueList to open and click the OK button to complete the
procedure. The Data field will display the selected CueList. Refer to Figure
8.57.
Figure 8.57. OPEN CUELIST Example
CLOSE CUELIST
The CLOSE CUELIST command closes a specified CueList. Refer to Figure
8.58.
Figure 8.58. CLOSE CUELIST Command
This Data field brings up the Select CueList dialogue box. Refer to Figure
8.46. Select the CueList to close and click the OK button to complete the
procedure. The Data field will display the selected CueList. Refer to Figure
8.59.
Figure 8.59. CLOSE CUELIST Example
8-30 Status Cue User’s Manual
BEEP
The BEEP command causes the computer’s internal speaker to beep. Refer
to Figure 8.60.
Figure 8.60. BEEP Command
FIRE MACRO
The FIRE MACRO command runs a stored macro. Refer to Figure 8.61.
8
Figure 8.61. FIRE MACRO Command
This Data field brings up the Recall Macro dialogue box. Refer to Figure
8.62.
Figure 8.62. Recall Macro Dialogue Box
Press the desired key in the SYSTEM KEYS / INSTANT PRESETS group.
The LEDs will illuminate to indicate existing Macro locations. Alternately
use the mouse and click the desired key. The Data field will indicate the
Macro.
Figure 8.63. FIRE MACRO Example
Chapter 8 CueLists 8-31
SHUTDOWN
The SHUTDOWN command shuts down the computer so it may be properly
turned off. For Window 3.x systems, this command will exit Windows to a
DOS prompt. When this command is selected, a confirmation dialogue box
will appear. Refer to Figure 8.64.
Figure 8.64. Shutdown Confirmation Dialogue Box
Click the Yes button to place this command in the CueList. Refer to Figure
8.65.
Figure 8.65. SHUTDOWN Command
The computer will shutdown when the cue runs.
8-32 Status Cue User’s Manual
SHUTDOWN/RESTART
The SHUTDOWN/RESTART command shuts down the computer so it may
be properly turned off and restarted. When this command is selected, a
confirmation dialogue box will appear.
8
Figure 8.66. Shutdown/Restart Dialogue Box
Click the Yes button to place this command in the CueList. Refer to Figure
8.67.
Figure 8.67. SHUTDOWN/RESTART Command
Chapter 8 CueLists 8-33
MSC
To edit the Command and Data fields of a MIDI Show Control (MSC) device,
complete the following procedure:
1. Double click the Command field (Figure 8.68) in the desired cue to bring
up Select MSC Command dialogue box. Refer to Figure 8.69.
Figure 8.68. MSC Device Command and Data Fields
Figure 8.69. Select MSC Command Dialogue Box
2. Click the desired MSC command and then click the OK button to
complete the operation.
3. Double click the Data field to bring up its corresponding dialogue box.
4. Type the appropriate information in the dialogue box and click the OK
button to complete the procedure.
8-34 Status Cue User’s Manual
MIDI
To edit the Command and Data fields of a MIDI device, complete the following
procedure:
1. Double click the Command field (Figure 8.70) in the desired cue to bring
up Select MIDI Command dialogue box. Refer to Figure 8.70.
Figure 8.70. MIDI Device Command and Data Fields
8
Figure 8.71. Select MIDI Command Dialogue Box
2. Click the desired MIDI command and click the OK button to complete
the operation.
3. Double click the Data field to bring up its corresponding dialogue box.
Refer to Figure 8.72 for an example.
Figure 8.72. MIDI Command Example
4. Type the appropriate information in the dialogue box and click the OK
button to complete the procedure. The Data field will indicate the
corresponding information. Refer to Figure 8.73 for an example
Chapter 8 CueLists 8-35
Figure 8.73. MIDI Data Example
8-36 Status Cue User’s Manual
SysEx
If you are editing a SysEx (system exclusive) device, complete the following
procedure:
1. Double click the Data field of the cue containing a SysEx device (Figure
8.74). SysEx devices do not use the Command field. This will bring up the
Generic MIDI SysEx Hex editor. Refer to Figure 8.75.
Figure 8.74. SysEx Command and Data Fields
8
Figure 8.75. Generic MIDI SysEx Hex Editor
2. Using the keyboard, enter the appropriate Hex (hexadecimal) values in the
editor and click the OK button to complete the procedure.
Chapter 8 CueLists 8-37
Comments
The Comments field allows up to a 200 character description to be assigned to a
cue. To edit the Comments field, complete the following procedure:
1. Select the cue to edit.
2. Double click the Comments field to bring up the Edit Cue Comments
dialogue box. Refer to Figure 8.76.
Figure 8.76. Edit Cue Comments Dialogue Box
3. Type in the desired comments and click the OK button to complete the
procedure.
8-38 Status Cue User’s Manual
Getting a Scene or Sequence Stored as a Preset in a Cue (Get/Get)
Scenes and Sequences stored as Presets in cues can be retrieved and edited on the
fly. This procedure is called Get/Get editing. All selected Presets can be retrieved,
even if they are from different Songs. To perform a Get/Get edit, complete the
following procedure:
1. Select one or more cues that contain Scenes or Sequences stored as Presets.
2. Press the <GET> key in the SONG group (Figure 8.77) twice. After the
second time <GET> is pressed, the selected Scene(s) or Sequence(s) stored
as Preset(s) are placed on the desktop for editing.
8
Figure 8.77. SONG Group
3. Perform the desired editing on the Scene(s) or Sequence(s).
4. Press <SET> twice (Set, Set) to place the Scene or Sequence back into its
respective Preset (cues).
Chapter 8 CueLists 8-39
Playback
CueLists can be played back manually, automated through internal time
sources, or externally controlled via MSC. Override control is provided
through the Cue Information box and the Hold function.
Automated Playback
For automated playback of a CueList, complete the following procedure:
1. If the desired CueList is not open, recall (open) it using the procedure
outlined in "Recalling a CueList" on page 8-13.
2. Press the play button on the clock in the CueList to start the CueList.
Notes: if your clock source other than No Clock, you must press the play button on
the CueList. If the play button is not pressed, the CueList will not start.
CueLists can be automatically loaded and started when Status Cue is
started. Refer to "Autoloading and Autostarting a CueList" on page B-14.
(The clock can run without playing (not activated with the play button)
cues.)
Overriding Automatic Playback
Automatic playback can be overridden using either the Hold function or using
the buttons in the Cue Information box. Refer to the following subsections to
override automatic playback.
Cue Information Box
The Cue Information box (Figure 8.78) indicates the current cue, the next
cue, and provides control of the cues.
A
B C
D
E
F
Figure 8.78. Cue Information Box
Refer to Figure 8.78 and the following references for the button functions
of the Cue Information box:
• A- return to first cue
• B- rewind current cue
• C- fast forward current cue
• D- goto last cue
• E- back one cue
8-40 Status Cue User’s Manual
•
F- advance one cue
Hold Function
The Hold function allows the user to hold a cue until the next cue time
comes up or advance it manually. To enable the Hold function, complete
the following procedure:
1. Double click the Hold field in the desired cue. The field will indicate
HOLD. Refer to Figure 8.79.
Figure 8.79. Hold Field
2. Start the CueList using the play button. When the list comes to a cue
that is held, HOLDING will appear in the Cue Information box below the
Cue Advance button. Refer to Figure 8.80.
8
Figure 8.80. Holding Function
3. Click the Cue Advance button or use the “go” button to advance the
held cue. You can use the <ENTER> key in the CONTROL group, the
<Enter> key on the keyboard, or the Console’s mouse button in the
position mode as a “go” button.
Notes: if the next cue’s time is reached by the clock, the holding cue will be
fired and the CueList will continue normal playback. Do not use the
<GO> key in the SEQUENCE group to attempt to playback a
CueList.
Chapter 8 CueLists 8-41
Manual Playback
CueLists can be advanced using “go” button playback and with the controls
located in the Cue Information window. To manually advance through a CueList,
complete the following procedure:
1. If the desired CueList is not open, press the <CUELIST> in the OBJECT
group and then the <RECALL> key in the MEMORY group. This will
bring up the Recall CueList dialogue box.
2. Select the CueList to recall.
3. Double click the cue to start.
4. Press the “go” button to advance though cues. You can use the <ENTER>
key in the CONTROL group, the <Enter> key on the keyboard, or the
Console’s mouse button in the position mode as a “go” button.
Notes: you may also use the buttons in the Cue Information box in the CueList
window to manipulate cue playback.
8-42 Status Cue User’s Manual
Chapter 9
Shows
In this chapter you will:
❑ create Shows (9-2)
❑ store Shows (9-3)
❑ archive Shows (9-5)
❑ unarchive Shows (9-6)
❑ delete all files pertaining to a Show simultaneously (9-7)
❑ recovering a Show (9-7)
Overview
A Show is the level at which Status Cue for Windows is saved to disk. Each
Show contains a setup of fixtures, fixture patches, Songs, Presets, Scenes,
Sequences, and CueLists. Only one Show may be opened at once, however the
number of total possible Shows is only limited by hard-disk drive size.
9
When Status Cue for Windows is started, the last used Show and the first Song
in the Song list are automatically brought up.
Note: in the Status Cue file system,.shw is not the complete Show file. Refer to
"Status Cue File System" on page B-8 for complete information.
Chapter 9 Shows
9-1
Creating a New Show
To create a new Show, complete the following procedure:
1. Press the <SHOW> key in the OBJECT group. Refer to Figure 9.1. Alternately,
select Show from the Object drop-down menu.
Figure 9.1. OBJECT Group
2. Press the <NEW> key in the MEMORY key group. Refer to Figure 9.2.
Alternately, select New from the Memory drop-down menu. A new Show will
be created.
Note: if the current Show has been modified or there are unsaved Scenes, Sequences,
Songs, or CueLists open, you will be prompted to save each item.
Figure 9.2. MEMORY Group
9-2
Status Cue User’s Manual
Storing a Show
To store a Show, complete the following procedure:
1. Press the <SHOW> key in the OBJECT group. Alternately, select Show from
the Object drop-down menu.
2. Press the <STORE> key in the MEMORY key group. If the Show has not been
previously saved, this will bring up the Save Show As... dialogue box. Refer
to Figure 9.4. Alternately, select Save from the File drop-down menu.
Note: to save a Show under a different name, select the Save As... item from the File
menu.
9
Figure 9.3. Save Show As... Dialogue Box
3. Select the desired location, type the name, and click OK to complete the
procedure. Show names must consist of eight characters with no spaces or
“reserved” characters.
Chapter 9 Shows
9-3
Recalling a Show
To recall a Show, complete the following procedure:
1. Press the <SHOW> key in the OBJECT group. Alternately, select Show from
the Object drop-down menu.
2. Press the <RECALL> key in the MEMORY key group to bring up the Open
Show dialogue box. Refer to Figure 9.4. Alternately, select Recall from the
Memory drop-down menu or simply select Open from the File drop-down
menu.
Figure 9.4. Open Show Dialogue Box
3. Select the desired Show and click OK to complete the procedure.
9-4
Status Cue User’s Manual
Archiving a Show
It is highly recommended that shows be archived (backed up) for data security
in the unlikely event of a hard-drive crash or data corruption. An Archive
provides a backup of all files used for a particular Show, and compresses them
into a single file that can be quickly unarchived (restored). An Archive makes
it easy to move Shows from one computer to another. To archive a Show,
complete the following procedure:
1. Select Archive... from the File drop-down menu. This will bring up the
Archive to which directory? dialogue box. Refer to Figure 9.5.
9
Figure 9.5. Archive To Which Directory Dialogue Box
2. Select the desired location and click the OK button to complete the procedure.
The archived file will be saved with the file extension of.asq (Archive Status
Cue).
Notes: while you can archive a show to the hard drive, it is highly recommended that a
separate archive file be stored on a floppy disk as well. Text files such as
gel.txt and Song lists are not part of the archive.
Chapter 9 Shows
9-5
Unarchiving a Show
To unarchive (restore) a Show, complete the following procedure:
1. Select Unarchive... from the File drop-down menu. This brings up the
Unarchive which file? dialogue box. Refer to Figure 9.6.
Note: if open items have not been saved, you will be prompted to save these items.
Figure 9.6. Unarchive Which File Dialogue Box
2. Select the desired location, file, and click the OK button. This brings up the
Unarchive to which directory? dialogue box.
Note: if the Show to unarchive is from a previous version (.a30, etc.), select the
Old Ver. Archives (*.a??) from the List files of type: drop-down menu.
Figure 9.7. Unarchive to which directory? Dialogue Box
3. Select the desired location to unarchive (uncompress) the file to and click the
OK button. The show will automatically open when the operation is complete.
9-6
Status Cue User’s Manual
Deleting Show Files From the Hard-Disk Drive
For data security, a Show can not be deleted from the Status Cue for Windows
application. However, a special DOS-based batch file ( .bat) is provided to
delete an entire Show and its corresponding data files from the hard-disk drive.
To delete a Show from the hard-disk drive, complete the following procedure:
1. Exit to a DOS prompt.
2. Change to the directory where the Show resides (SQ31, Show Files, etc.).
Note: the delshow.bat file must be in the same directory.
3. Type delshow xxxxx (xxxxx is the Show name without a file extension)
and press <Enter>. The Show and all of its associated files will be deleted.
Recovering a Show
Status Cue offers a special recovery feature to retrieve data that may have
become damaged. Only the next to the last saved change can be recovered.
Each time a file is saved, the previously saved file is saved in a manner in
which it may be recovered. To recover a show, complete the following
procedure:
9
1. Exit to a DOS prompt.
2. Change to the directory where the Show resides (SQ31, Show Files, etc.).
Note: the recover.bat file must be in the same directory.
3. Type recover xxxxx yyyyy (xxxxx is the show name without a file
extension and yyyyy is the new show file name) and press <Enter>. The Show
and all of its associated files will be restored.
Example: type in recover hesdemo hesdem2.
Chapter 9 Shows
9-7
9-8
Status Cue User’s Manual
Chapter 10
Tips and Tricks
In this chapter you will:
❑ create Macros (10-2)
❑ run Macros (10-4)
❑ erase Macros (10-4)
❑ store windows’ positions and sizes (10-5)
❑ recall windows’ positions and sizes (10-6)
❑ identify fixtures (10-6)
❑ flip moving yoke fixtures (10-7)
❑ home fixtures (10-8)
❑ view fixture data from active Presets (10-9)
❑ learn about the function modes (10-8)
❑ learn additional tips and tricks (10-10)
Overview
This chapter covers special tips and tricks for Status Cue operations. These
items are provided to speed programming and add convenience. The latest
information is covered on our web site at http://www.highend.com.
10
Macros
Status Cue provides 32 user-definable Macros to make programming quicker
and easier. Macros are a recorded series of key presses and/or wheel (encoder)
movements which can be replayed with a single key press, thereby allowing
the user to put Status Cue in a desired state quickly with a minimum of key
presses. Additionally, Macro 32 (if programmed) automatically runs when a
Show is opened. Complete the following sections to use Macros.
Chapter 10 Tips and Tricks 10-1
Creating Macros
To create a Macro, complete the following procedure:
1. Press the <MACRO> key in the FUNCTION group. Refer to Figure 10.1.
Figure 10.1. FUNCTION Group
Note: pressing the <MACRO> key once places the Console in one-shot mode and
pressing it twice places it in permanent mode. Refer to "Status Cue Function
Modes" on page 10-8.
2. Press the <STORE> key in the CONTROL group (Figure 10.2). This
brings up the Store a Macro dialogue box (Figure 10.3).
Figure 10.2. CONTROL Group
Figure 10.3. Store a Macro Dialogue Box
10-2 Status Cue User’s Manual
3. To allocate the location for the Macro, press the desired key in the
SYSTEM KEYS/INSTANT PRESETS group (Figure 10.4) to set the
Macro at that location. Alternately, use the mouse (trackball) and click the
desired key in the dialogue box. The LEDs illuminate to indicate
previously stored Macros. After the Macro location is determined, Status
Cue starts recording. This is indicated by the bar at the bottom of the screen
and by the System key and <STORE> key flashing.
Figure 10.4. SYSTEM KEYS-INSTANT PRESETS Group
4. Perform the required actions for the Macro.
Example: open a new Scene, select all fixtures, and set Dim at 100%.
5. To stop recording and store the Macro, press the <STORE> key in the
CONTROL group again or press the same System key pressed in step 3.
Note: you can use one Macro to trigger additional Macros.
10
Chapter 10 Tips and Tricks 10-3
Running Macros
To run a Macro, complete the following procedure:
1. Press the <MACRO> key in the FUNCTION group. Refer to Figure 10.1.
2. Press the appropriate key in the SYSTEM KEYS/INSTANT PRESETS
group (Figure 10.4). This runs the Macro.
Note: up to 8 Macros can be run at the same time.
Erasing Macros
To erase a Macro, complete the following procedure:
1. Press the <MACRO> key in the FUNCTION group. Refer to Figure 10.1.
2. Press the <ERASE> key in the CONTROL group. This brings up the Erase
a Macro dialogue box. Refer to Figure 10.5.
Figure 10.5. Erase a Macro
3. Press the desired illuminated key in the SYSTEM KEYS-INSTANT
PRESETS group (Figure 10.4) to erase the Macro. Alternately, use the
mouse (trackball) and click the desired key in the dialogue box.
10-4 Status Cue User’s Manual
Windows’ Positions and Sizes
The positions and sizes of all windows can be stored and recalled. For
example, you can place the Song window in the lower half of the screen and a
CueList in the upper half of the screen. Then save the windows. Move the
windows around and then recall positions to return to the saved positions and
sizes.
Storing Windows
To store the windows’ positions and sizes, complete the following procedure:
1. Move and resize all windows as desired.
2. Press the <WINDOW> key in the OBJECT group. Refer to Figure 10.6.
10
Figure 10.6. OBJECT Group
3. Press the <STORE> key in the MEMORY group. Refer to Figure 10.7. The
windows’ positions are stored.
Figure 10.7. MEMORY Group
Chapter 10 Tips and Tricks 10-5
Recalling Windows
To recall windows’ positions and sizes, complete the following procedure:
1. Press the <WINDOW> key in the OBJECT group. Refer to Figure 10.6.
2. Press the <RECALL> key in the MEMORY group. Refer to Figure 10.7.
The windows will move and resize to the stored settings.
Note: the specified window(s) must be open.
Identifying Fixtures
To determine the location of a fixture or a group of fixtures, Status Cue
provides a fixture identification function. Refer to "Setting Fixture ID
Options" on page B-13 to determine how fixture(s) respond to identification.
To identify (ID) fixtures, complete the following procedure:
1. Open or create a Scene or Sequence with Blind mode off.
2. Select the desired fixture(s). Refer to "Editing" on page 5-4.
3. Press and hold the <ID> key in the FIXTURE group (Figure 10.8). The
selected fixtures will respond accordingly. Alternately, press the <ID> key
twice to latch on fixture ID. Then press the key again to turn it off.
Notes: selected single channel DMX values will change back and forth from 0 to 100.
This allows instruments such as PAR cans to be identified.
Figure 10.8. FIXTURE Group
Example: use the fixture ID latch feature to create Palettes for position using
fixture groups. This allows fixture groups to be easily seen during
programming.
10-6 Status Cue User’s Manual
Flip Function
To speed programming, moving yoke fixtures can be flipped to provide an
additional range (degrees) of movement (avoiding stops). When a moving yoke
fixture, such as Studio Color is flipped, the unit pans 180° and tilts to the
opposite position of the 90° (straight down) axis and ends up pointing the same
direction. This allows more physical movement before a stop is reached. To flip a
fixture, complete the following procedure:
1. Open or create a Scene or Sequence with Blind mode off.
2. Select the desired moving yoke fixture(s). Refer to "Editing" on page 5-4.
3. Press the <FLIP> key in the FIXTURE group (Figure 10.8). The selected
fixture(s) will flip.
Notes: older Consoles may have a <PICK> key instead of a <FLIP> key. Alternately,
press the <PAN> or <TILT> keys in the TRACKBALL group to flip on the pan
or tilt.
10
Chapter 10 Tips and Tricks 10-7
Homing Fixtures
Due to physical contact or other conditions, fixtures may require homing
(recalibration). Depending on the fixture, homing resets the physical position
of pan, tilt, color, gobo, etc. To home fixtures, complete the following
procedure:
1. Press the <HOME> key in the FIXTURE group (Figure 10.8). This brings up
the Home Fixture dialogue box (Figure 10.9).
Notes: it is not necessary to have a Scene or Sequence open to home fixtures. The last
fixtures that were selected will appear in the Fixture Selection: field. When
<HOME> is pressed, group mode automatically turns on for quick group
homing.
Figure 10.9. Home Fixtures Dialogue Box
2. Using the keys in the CONTROL and SELECT group (refer to "Editing" on
page 5-4), type in the desired fixtures to home and click the OK button to
complete the procedure. The fixtures will home.
Status Cue Function Modes
Status Cue uses two modes for operation of the Function keys:
•
•
one-shot mode- pressing another key in the FUNCTION group (Figure 10.10) one
time allows one instance of the new key press before reverting back to the assigned
mode. The key’s LED will blink.
permanent mode- pressing a key in the FUNCTION group twice assigns Status
Cue to that mode. The key’s LED will illuminate.
Figure 10.10. FUNCTION Group
10-8 Status Cue User’s Manual
Viewing Fixture Data During Preset Playback
Fixture data is easily viewed while Presets (Scenes and Sequences) are
playing. To view the data, complete the following procedure:
1. Open a new Scene and leave the values transparent (blue).
Note: pressing the <ALL> key in the CONSTRUCTS group toggles the selected
fixture(s) values between transparent and “hard coded.”
2. Play the desired Presets. The data sent to the fixtures will be shown (real-time)
in the Scene’s transparent values.
10
Chapter 10 Tips and Tricks 10-9
Additional Tips and Tricks at a Glance
This section provides additional information for Status Cue.
•
•
•
•
•
•
•
•
•
Set, Set- pressing <SET> and <SET> in the SONG group after "getting" a preset,
automatically places the Scene or Sequence back to the Preset you got it (<GET>)
from and closes the window.
Auto copy on new Step - Turn this feature on in the Preference window (refer to
"Setting Show Preferences" on page B-13), then when new Steps are created in a
Sequence, they are the same as the previous Step. This feature is helpful in carrying over “hard coded” values.
All Constructs Palette - Press the <ALL> key in the CONSTRUCT group prior to
storing your Palette. This creates a Palette for all Constructs.
All, All - To remove all transparent values for fixtures in a Scene or Sequence,
press the <ALL> key in the FIXTURE group followed by the <ALL> key in the
CONSTRUCTS group. This feature toggles between transparent and non-transparent values.
Always Archive shows to a floppy disk. This way there is a backup that does not
live on the hard drive. Refer to "Archiving a Show" on page 9-5.
Minutes - To enter Xfade or Delay times in minutes, simply enter the number of
minutes followed by two ".." (decimals-<.> key).
User Definable Defaults - Palette 128 sets the default values for the Console. For
example, if a user wants to always use the Wide Angle lens with 2X mode on and
RGB set to 40/40/40, store those settings as defaults in Palette 128. Refer to "Creating and Storing Palettes" on page 5-46.
Numeric Timeout - To change the amount of time that Status Cue waits before
automatically accepting a fixture number, simply change the Numeric Timeout
setting in the Preference window. The default setting is 1.00 second. Refer to
"Setting Numeric Timeout" on page B-12.
Save all of your Show files into a dedicated directory. This way, when you upgrade
software versions, they are easily located.
10-10 Status Cue User’s Manual
Appendix A
Troubleshooting and Maintenance
In this appendix you will:
❑ fill out a technical support checklist (A-3)
❑ determine software versions (A-4)
❑ acquire help (A-5)
❑ solve LinkCard not found errors (A-6)
❑ solve LinkCard hardware problems (A-10)
❑ perform operational troubleshooting (A-13)
❑ perform Console diagnostics (A-16)
❑ perform preventative maintenance (A-25)
Overview
This appendix provides directions for troubleshooting problems that may be
preventing you from installing or operating your Status Cue properly. Before calling
for technical assistance, follow the recommended procedures in this appendix to solve
hardware and software problems.
If the procedures in this appendix do not solve your problem and you need to call for
assistance, please provide the support technician with the information outlined in the
Support Checklist provided in this appendix.
Caution: if your system is behaving erratically, back up your files to prevent loss or
damage.
Appendix A Installation Troubleshooting
A
A-1
Before You Begin
Caution: Before performing any troubleshooting procedures read the following personal and
equipment safety precautions.
1. Read all warnings, precautions, and safety instructions listed in the user manual
provided with your personal computer (PC). This includes the prevention of
damage caused by static electricity.
Static electricity can permanently damage the delicate components on the
LinkCard and other components inside your PC. To discharge static electricity
from your body touch any unpainted metal surface, such as the power supply
case. Periodically touch the metal surface to remove any accumulated static
charge. You may also use a wrist grounding strap.
2. When handling the LinkCard or other cards in your system try to hold the card
by the edges or by the metal bracket on the end of the card. Try not to touch the
components on the card except for the DIP switches or jumpers.
3. Follow the instructions in your personal computer user manual regarding the
installations of expansion cards.
4. Turn off the power to your personal computer and all connected peripherals
before installing or removing any card in your PC.
A-2
Status Cue User’s Manual
Required Support Information
Technical support can provide you with faster service if you can provide the
following information when you call:
Contact:____________________________ Date:_____________
Company:___________________________ Dealer____________
Phone #:____________________________ number of LinkCards:__
Computer: HES__ Rack-mount__ Desktop__ 486__ Pentium__
Computer S/N #_______________
Other Computer Manufacturer____________________
Status Cue Version _____ link_dll_____ Console _____Boot_____
LinkCard _____ boot_____
Console S/N #______________
Problem/Comment:
_____________________________________________________________________
_____________________________________________________________________
_____________________________________________________________________
_____________________________________________________________________
_____________________________________________________________________
_____________________________________________________________________
_____________________________________________________________________
_____________________________________________________________________
_____________________________________________________________________
A
Note: this form may be copied and faxed to your authorized dealer or High End Systems
Technical Support.
Appendix A Installation Troubleshooting
A-3
Determining Software and Code Versions
To determine the version of Status Cue for Windows, link_dll.dll, Console, and
LinkCard, complete the following procedure:
1. Start Status Cue for Windows.
2. Select the About... from the Help drop-down menu. This brings up the About
Status Cue for Windows dialogue box. Refer to Figure A.1.
Figure A.1. About Status Cue for Windows Dialogue Box (Sample)
3. Write down the current revision levels for technical support. The far left column
indicates the loaded (system) code revision levels.The far right column indicates
the current code revision levels. The two columns should match.
A-4
Status Cue User’s Manual
Acquiring Help
If can not resolve a problem with this appendix, contact your authorized High End
Systems dealer or contact High End Systems Technical Service through the following
methods:
U.S. and Canada
From 8 a.m. to 6 p.m. (U.S. Central time) Monday through
Friday:
(800) 890-8989
24-hour FAX:
(512) 834-9195
24-hour voice mail: (512) 837-3063 or (800) 890-8989
24-hour World Wide Web Site
http://www.highend.com
ftp.highend.com
Europe
Voice:
FAX:
+49 8122 9903-0
+49 8122 9903-33
Singapore
Voice:
FAX:
+65 742 8266
+65 743 9322
A
Appendix A Installation Troubleshooting
A-5
Solving LinkCard Not Found Errors
If you encounter a LinkCard Not Found ( Master LinkCard Not Found, Slave #1
LinkCard Not Found, etc.) warning window during Status Cue for Windows start up,
use the following section to resolve the problem. Generally, a problem can occur in
two areas:
• an IRQ (Interrupt Request) and/or an address conflict between option cards
• a hardware problem with the LinkCard
To determine the type of problem, complete the following procedure:
1. Turn off the computer and remove the computer case so that the LinkCard(s) are
visible. Check to ensure that the LinkCard(s) are fully seated in the ISA slots.
2. Turn on the computer and start Status Cue for Windows. Observe the LinkCard
LEDs. Refer to Figure A.2
LED 1 = +12 volts to console from power supply
(Master LinkCard only)
LED 2 = +5 volts to console from power supply
(Master LinkCard only)
LED 3 = +5 volts to LinkCard from the mother
board
LED 4 = status LED (heartbeat)
LED 5 = Link 2 Data indication
LED 6 = Link 1 Data indication
LED 3
Red
LED 4
Red
LED 2
Yellow
LED 5
Link 2
LED 1
Green
LED 6
Link 1
Figure A.2 LinkCard LEDs
3. Select from the following items to diagnose the problem:
•
•
•
•
A-6
No LEDs are on - refer to "LinkCard Hardware Problems" on page A-10.
LED 4 flashing at even rate - Normal operation.
LED 4 is flashing mostly on - There is an IRQ conflict between the LinkCard and
another system device or option card. Refer to "Conflict Between Option Cards
and Computer Components" on page A-7.
LED 4 is flashing mostly off - There is a base memory conflict between LinkCard
and another system device or option card. Refer to "Conflict Between Option
Cards and Computer Components" on page A-7.
Status Cue User’s Manual
Conflict Between Option Cards and Computer Components
Most LinkCard Not Found messages are the result of interrupt request (IRQ) or base
memory conflicts between the LinkCard and other existing options that you may already
have in your system, such as a sound card, MIDI card, or SCSI host adapter. Use the
following subsections to resolve these conflicts.
Simplify your system to test for conflicts
The easiest way to check for conflict is to temporarily remove all but the required
cards from the system. If the system works, then either the LinkCard or one of your
option cards needs to be re-addressed. Refer to the documentation that comes with
your option card(s) to re-address it or refer to "Setting the LinkCard Address" on page
1-5 and "LinkCard Software Configuration" on page 1-27 to re-address the LinkCard.
Additionally, you may have a conflict with your PnP BIOS. Refer to your computer’s
documentation to disable this feature for the IRQs used by Status Cue.
A
Appendix A Installation Troubleshooting
A-7
Determining Used IRQs and Excluded Memory Addresses
IRQs and memory addresses can be located using Microsoft Diagnostics (MSD) tools
provides detailed parameter information about the computer. For example, MSD
determines the usage of base memory addresses and IRQ levels in addition to other
system parameters. Use the following procedures to look at the current state of IRQs
and base memory addresses in computer.
Notes: MSD is only recommended for experienced computer users and can only be
used in native DOS mode (i.e. not in a DOS window).
Complete the following procedure to use MSD to determine used memory addresses
and IRQs:
1. Exit Windows to a DOS prompt (c:\).
2. Type MSD at the DOS prompt. This starts the MSD application. Refer to Figure
A.3.
Figure A.3 MSD Application Screen
Note: MSD indicates Pentium processors as 486.
3. Type Q (IRQ Status...) to view a listing of hardware components, their
address, and their IRQ. Refer to Figure A.4
A-8
Status Cue User’s Manual
Figure A.4 IRQ Status Window
4. Write down or print the settings listed in Figure A.4. Take note of the following
IRQs and addresses:
• COM2
• LPT2
• Reserved
5. LinkCard IRQs may be placed in the Reserved areas if they are not being used
by another device (sound card, MIDI card, or video card). Refer to installed
card(s) documentation to determine their IRQ and address. Additionally,
LinkCards can be placed on COM 2 and LPT2 if the ports are not being used.
In this case, it is necessary to disable both ports and PnP through BIOS. Refer
to your computers documentation to disable the ports.
6. Reset the memory address(es) and IRQ(s) as outlined in "Setting the LinkCard
Address" on page 1-5 and "LinkCard Software Configuration" on page 1-27.
For additional base address settings, refer to Table A.1.
Table A.1: Alternate Base Address Settings
Base
Address
C8000
CC000
D0000
D4000
Switches: 2 3 4
off
off
off
off
off
off
on
on
off
on
off
on
Base
Address
D8000
DC000
E0000
E4000
A
Switches: 2 3 4
on
on
on
on
off
off
on
on
off
on
off
on
Appendix A Installation Troubleshooting
A-9
LinkCard Hardware Problems
If a LinkCard hardware problem exists, complete the following procedure:
1. Remove the computer’s cover if it is not already removed.
2. Start Status Cue for Windows.
3. Observe the LinkCard’s LEDs. Refer to Figure A.2 for location information
•
•
•
•
•
LED1: +12 volts to console: When "on" this LED indicates that +12 volts is being
sent to the console through fuse F8. An "off" LED indicates that F8 may be blown.
This LED will only be on if it is the master LinkCard. The power to this LED is
supplied through the pigtail from the computer power supply.
LED2: +5 volts to console: When "on" this LED indicates that +5 volts is being
sent to the console through fuse F7. An "off" LED indicates that F7 may be blown.
This LED will only be on if it is the master LinkCard. The power to this LED is
supplied through the pigtail from the computer power supply.
LED3: +5 volts to LinkCard: When "on" this LED indicates that +5 volts is
present on the LinkCard from the computer’s mother board. An "off" LED
indicates no +5 volts power to the LinkCard.
LED4: This LED (heartbeat) indicates the status of the LinkCard by flashing at the
following rates:
• Flashing at a 1 hertz rate – Status Cue has found the LinkCard, boot code is
running, and communication is transpiring (Status Cue for Windows is not
running).
•
Latching on one time and flashing at an inverted 1 hertz rate (pulsing) –
Status Cue has found the LinkCard, but the checksums in the LinkCard do not
match the checksum in statusq.ini (Status Cue for Windows is running).
This will instigate the LinkCard upload procedures.
•
Flashing Rapidly – Status Cue has found the LinkCard and the LinkCard is
running system code (Status Cue for Windows is running). This is normal
operation.
•
Flashing mostly on – There is an IRQ conflict between the LinkCard and
another system device or option card. Refer to "Conflict Between Option Cards
and Computer Components" on page A-7.
•
Flashing mostly off – There is a base memory conflict between LinkCard and
another system device or option card. Refer to "Conflict Between Option Cards
and Computer Components" on page A-7.
LED 4 – Multiple LinkCards: it takes a few seconds per LinkCard for
synchronization to occur. Once the LinkCards are synchronized, each LED 4 will
blink in sync.
A-10 Status Cue User’s Manual
•
LED 5: Link B Data: This LED displays the status for the Link 2 data output to the
fixtures. The two states of the LED are:
• On – this is the normal state of the LED*.
•
Blinking– this is another normal state of the LED*.
*Note: this will vary from user to user and in different types of configurations. The colors
may be green, red, or a green/red mixture.
• LED 6: Link A Data: see LED 5.
4. If one or more LEDs are not on, refer to "Replacing LinkCard Fuses" on page
A-11. If no LEDs are on, exit Windows, turn off the computer, reseat the
LinkCard into another ISA slot (slot may be bad), and confirm the DIP switch
settings. If this does not work, contact technical support.
Replacing LinkCard Fuses
The LinkCard has eight fuses located along the right side of the card. Refer to Figure A.2.
Six fuses protect the two data links to the fixtures. Two fuses protect +5 and +12 volts to
the Console.
F1, .125 A, Fast Blow – this fuse protects "Link A +" data to fixtures.
F2, .125 A, Fast Blow – this fuse protects "Link A –" data to fixtures.
F3, .125 A, Fast Blow – this fuse protects "Link A GND" data to fixtures.
F4, .125 A, Fast Blow – this fuse protects "Link B +" data to fixtures.
F5, .125 A, Fast Blow – this fuse protects “Link B –" data to fixtures.
F6, .125 A, Fast Blow – this fuse protects "Link B GND" data to fixtures.
F7, 4 A, Fast Blow –
this fuse protects "+5 volts to Console."
F8, 2 A, Fast Blow –
this fuse protects "+12 volts to Console."
Appendix A Installation Troubleshooting A-11
A
Link 1
(1A)
Link 2
(1B)
F1
F1 = .125 A, Fast Blow
F2
F2 = .125 A, Fast Blow
F3
F3 = .125 A, Fast Blow
F4
F4 = .125 A, Fast Blow
F5
F5 = .125 A, Fast Blow
F6
F6 = .125 A, Fast Blow
+5 V
F7
F7 = 4 A, Fast Blow
+12 V
F8
F8 = 2 A, Fast Blow
Figure A.5 LinkCard Fuses
If LED 1 and LED 2 (master LinkCard only) are off, then +5 volts is not being supplied by
the pigtail from the computer power supply. There may be a broken wire in the power
supply connector. Try another power supply connector if available or swap the connector
with the disk or diskette drive. Verify address switch settings on LinkCard.
When multiple LinkCards are used, if an LED 4 is not in sync, check the Comm cable to
ensure that it is properly installed.
A-12 Status Cue User’s Manual
Operational Troubleshooting
To solve software and operational problems, use the following table to resolve the
problem.
Table A.1: Operational Troubleshooting
Problem
Fixtures are not responding
as programmed
All or some fixtures on a
Link do not respond
Cause
•
Solution
•
•
Transparency is in
effect
the Live channel is
overriding the output
•
•
Link is unplugged
Link fuse has blown
•
•
•
bad cable(s)
•
•
fixture is addressed
incorrectly on the
fixture side
the Link is not terminated
•
fixture is outputting
bad data on a Link
fixtures are patched
to the wrong address
•
OEM fixtures
require special data
wiring
•
•
•
•
•
•
•
•
Recall the object and remove
the Transparency
Stop playing object in the
Live channel
check the Link cabling
refer to "LinkCard Hardware
Problems" on page A-10
check and replace cables as
necessary
refer to the fixture’s user
manual to correctly address
the fixture
refer to "Connecting the Data
Cables to Fixtures" on page 116
check fixture output with a
DMX tester
refer to "Patching and
Unpatching Fixtures" on page
1-12
consult the fixture’s manaul
for the correct wiring
Appendix A Installation Troubleshooting A-13
A
Table A.1: Operational Troubleshooting
Problem
Littlite is not working correctly
Cause
Solution
•
•
bulb is burned out
lights are dimmed
•
•
•
•
•
not fully seated into
socket
LinkCard fuse is
blown
Console fuse is
blown
internal short
LinkCard LED does not
work, but card works properly
•
LED is burned out
•
refer to qualified service technician
No LEDs on LinkCard
work
•
non-standard DIP
switch settings
ISA slot is bad
•
refer to "Setting the LinkCard
Address" on page 1-5
refer to qualified service technician
keys’ dome is misaligned
foreign substance
has been spilled into
the Console
•
•
remove and realign key cap
refer to qualified service technician
•
save work, turn computer off
and on (cold boot), then Contact High End Systems service
•
•
•
Console key does not work
•
•
Clobbered Memory Error
A-14 Status Cue User’s Manual
•
•
•
•
check and replace bulb
refer to "Adjusting Console
Lights" on page B-12
reseat the Littlite
refer to "Replacing LinkCard
Fuses" on page A-11
Refer to qualified service
technician
place the Littlite into the other
receptacle and check functionality
Table A.1: Operational Troubleshooting
Problem
General Protection Fault
(GPF) at Status Cue startup
Cause
•
conflict between
•
link_dll.dll and
console.exe.
•
Each software version has its own
link_dll.dll.
This can happen if
you attempt to run
an older version of
Status Cue after a
newer version was
installed.
GPF in link_dll.dll or console.exe
Solution
•
run the most current version
of console.exe
re-install the version of software version you which to
use
write down the actions that
occurred before the message,
the error message (exact
wording), error code numbers, and Contact High End
Systems service
A
Appendix A Installation Troubleshooting A-15
Console Diagnostics
The Status Cue Console has built in diagnostics to verify the operational status of the
keys, LEDs, sliders, encoders and trackball. If a problem is diagnosed, contact your
authorized dealer or High End Systems before attempting to service the Console.
Before using Console diagnostics, check to ensure the latest Console System code is
installed in the flash ROM. Refer to "Determining Software and Code Versions" on
page A-4. If you are not using the latest code, complete the procedure outlined in
"Uploading Devices" on page B-15.
To use Console diagnostics, complete the following procedure:
1. To enter diagnostics mode, hold down the "hot key" in the TRACKBALL
group, simultaneously press the < 2>, < 5>, < 8>, and < 0> keys in the
CONTROL group, release the CONTROL group keys, and then release the
"hot key." Refer to Figure A.6 the <NOT>, <AT>, <THRU>, and <AND> LEDs in
the SELECT group will blink when the Console is in diagnostic mode. Refer to Figure
A.7
hot key
press these keys
simultaneously
Figure A.6 TRACKBALL and CONTROL Group
Figure A.7 SELECT Group
A-16 Status Cue User’s Manual
2. Hold down the "hot key, " press the key associated with the desired test or
function. The following subsections provide the keys to instigate desired tests
and functions:
• "LED Tests" on page A-17
• "Key Press Tests" on page A-18
• "Viewing Code Versions" on page A-19
• "Encoder Tests" on page A-20
• "Fader Tests" on page A-23
• "Trackball Tests" on page A-24
• "Littlite Intensity Tests" on page A-24
Note: it is not necessary to exit the current test to begin another test.
3. To reset the Console and exit diagnostics, press the <TILT>, <FAST>, and <PAN> keys
in the TRACKBALL group while holding down the hot key.
LED Tests
Use the following keys in the COLOR group (Figure A.8) with the hot key to diagnose
LED functionality:
•
•
•
•
<A> turns on all LEDs.
<B> cycles the LEDs to the left (show mode).
<C> cycles the LEDs the to the right (show mode).
<D> exits the LED test.
A
Figure A.8 COLOR Group
Appendix A Installation Troubleshooting A-17
Key Press Tests
Use the following keys in the GOBO group (Figure A.9) and the hot key to diagnose key
presses:
•
<A> invokes a key test. The keyboard is a matrix made of 16 columns and 16 rows.
When any key is pressed, the LED with the same column number will light up in row
one of the COLOR group (Figure A.8).
Example: the "GEL" key is in column one of row five. Pressing the <GEL> key will cause
the <A> LED in the COLOR group to illuminate. <A> is in row one. Not all
keys have an LED, so the keys are mapped to a row to give a visual indication of
the key presses.
•
<B> exits the key press mode.
Figure A.9 GOBO Group
A-18 Status Cue User’s Manual
Viewing Code Versions
Use the following keys in the ROTATING GOBO group (Figure A.10) with the hot key to
view the boot code, flash ROM, and 8031 EPROM code versions:
•
<A> displays the version number of the boot code in the Console’s flash ROM. The
number is displayed as three digits, x.yz. The value for x will be displayed by the
LED's <A> through <6> in the COLOR group. The value for y will be displayed in
Color LED's E through 12. And the value for z will be displayed in Gobo LED's A
through 6. The value associated with each LED is 0 through 9, reading left to right.
Note: the flash ROM and boot codes can also be read using the About box located in the
Help drop-down menu. Refer to "Determining Software and Code Versions" on
page A-4.
Example: version 2.53 would be displayed as <C> in the COLOR group, <8> the
COLOR group and <D> the GOBO group.
•
•
<B> displays the version number of the system code in the flash ROM. The number is
displayed in the same manner as explained above.
<C> displays the version number of the 8031 EPROM. The number is displayed in the
same manner as explained above.
Figure A.10 ROTATING GOBO Group
Appendix A Installation Troubleshooting A-19
A
Encoder Tests
While performing encoder tests, the encoder’s output is displayed in the ROTATING
GOBO LEDs’ <A> through <3> (Figure A.10). Press the following keys with the hot key
to diagnose encoder functionality:
•
•
•
<CLOSED> in the STROBE RATE group (Figure A.11) displays the output of the
<STROBE RATE> encoder.
<STROBE> displays output of the <FOCUS> encoder (Figure A.11)
<OPEN> exits the encoder test.
.
Figure A.11 STROBE RATE and FOCUS Groups
•
•
•
<POS> in the ROTATE group (Figure A.12) allows the output of the <GOBO RATE>
to be displayed.
<FWD> in the ROTATE group allows the output of the <ZOOM> encoder (Figure
A.12) to be displayed in the ROTATING GOBO LEDs.
<REV> exits the encoder tests.
Figure A.12 ROTATE and ZOOM Groups
A-20 Status Cue User’s Manual
•
<FROST> in the EFFECT ¹group allows the output of the <EFFECT> encoder to be
displayed.(Figure A.10).
• <F-STB> in the EFFECT group allows the output of the <IRIS> encoder to be
displayed.
• <EFFECT> exits the encoder test.
¹Note: older Consoles will have a "FROST" group instead of an "EFFECT" group.
Figure A.13 EFFECT and IRIS Groups
•
•
•
<1> in the MSPEED group (Figure A.14) enables the output of the <MSPEED>
encoder to be displayed.
<2> enables the output of the <DIM> encoder (Figure A.14) to be displayed.
<3> exits the encoder test.
Figure A.14 MSPEED and DIM Groups
Appendix A Installation Troubleshooting A-21
A
•
•
•
<RGB> in the COLOR MIX group (Figure A.15) enables the output of the
<RED HUE> encoder to be displayed.
<HSI> enables the output of the <GREEN SAT> encoder to be displayed.
<GEL> enables the output of the <BLUE INTEN> encoder to be displayed.
Figure A.15 COLOR MIX Group
A-22 Status Cue User’s Manual
Fader Tests
While performing fader tests, the fader’s output is displayed in the SYSTEM KEYS /
INSTANT PRESETS <9> - <16> LEDs (Figure A.17). The LEDs will count up and down
in depending on fader movement. Use the following keys above the faders with the hot
key to diagnose fader functionality:
•
•
•
<1> - <16> in the FADER PRESETS group (Figure A.16) enable the output of the
associated fader to be displayed.
<BLACK> in the MASTER group (Figure A.16) enables the output of the Master
Fader (<M>) to be displayed.
<POS> in the TRACKBALL group (Figure A.6) exits the fader diagnostics.
Figure A.16 FADER PRESETS and MASTER Groups
Figure A.17 SYSTEM KEYS / INSTANT PRESETS Group
Appendix A Installation Troubleshooting A-23
A
Trackball Tests
Use the following keys in the TRACKBALL group (Figure A.6) with the hot key to
diagnose trackball functionality:
•
•
•
•
<TILT> enables the horizontal output of the trackball to be displayed in the SYSTEM
KEYS / INSTANT PRESETS LEDs’ <9> - <16> (Figure A.17).
<FAST> enables the vertical output of the trackball to be displayed in the SYSTEM
KEYS / INSTANT PRESETS LEDs’ <25> - <32> (Figure A.17).
<PAN> enables a a combination of horizontal and vertical output displayed in their
corresponding LEDs.
<POS> exits the trackball diagnostics.
Littlite Intensity Tests
Use the following keys in the CONTROL group (Figure A.18) with the hot key to
diagnose Littlite functionality:
•
•
<STORE> enables the intensity of the external lamps to be modified. Preset Fader 1
controls the intensity of the left lamp and the <M> fader controls the intensity of the
right lamp. Refer to Figure A.16.
<ERASE> exits the external lamp diagnostics.
Figure A.18 CONTROL Group
A-24 Status Cue User’s Manual
Preventative Maintenance
To ensure years of trouble-free operation, Status Cue requires minor preventative
maintenance. While most preventative maintenance is hardware related, software care
also needs to be performed.
Software
To remove the possibilities of data loss and system crashes, please complete the following
sections on a regular basis:
•
•
•
Regularly archive your show to floppy diskettes. Refer to "Archiving a Show" on page
9-5.
Run virus protection software on a regular basis, such as Microsoft Anti-Virus,
Norton® Anti-Virus, McAffe®, etc. Refer to "Protection against Viruses" on page A25.
Regularly run disk utilities such as Scandisk and Defrag. Refer to "Checking and
Fixing Disk Errors" on page A-29 and "Defragmenting the Hard-Disk Drive" on page
A-32.
Protection against Viruses
Viruses are programs that can corrupt data and damage the microprocessor. Viruses are
caught by downloading files from the Internet and by installing un-scanned software.
To protect data from possible damage, virus checks should be performed on a regular
basis. Additionally, update your anti-virus software on a regular basis.
Windows 95 Systems
To run the built-in virus protection software under Windows 95, complete the
following procedure:
1. Select the MWAV item from the Programs/Applications pop-out menus. This
brings up the Microsoft Anti-Virus application. Refer to Figure A.19.
Figure A.19 Microsoft Anti-Virus Application
Appendix A Installation Troubleshooting A-25
A
2. Click the C: drive as indicated in Figure A.19. The application will read the
directories.
3. Select the Set Options... item from the Options drop-down menu. This brings up
the Options dialogue box. Refer to Figure A.20.
Figure A.20 Options Dialogue Box
4. Set the check boxes as indicated in Figure A.20 and click the OK button to accept
the changes and dismiss the dialogue box.
5. Click the Detect and Clean button. The application will find and remove any viri
in memory and on the hard-disk drive.
A-26 Status Cue User’s Manual
Windows 3.x Systems
To run the built-in DOS virus protection software for Windows 3.x systems, complete
the following procedure:
1. Exit out of Windows to the DOS prompt (c:\).
2. At the DOS prompt, enter MSAV. This starts the Microsoft Anti-Virus program.
Refer to Figure A.21
Figure A.21 Microsoft Anti-Virus Program
3. Click the Options button (Figure A.21). This brings up the Options Setting
dialogue box.
Figure A.22 Options Setting Dialogue Box
4. Set the check boxes as indicated in Figure A.22 and click the OK button to accept
the changes and dismiss the dialogue box.
Appendix A Installation Troubleshooting A-27
A
5. Click the Select new drive button (Figure A.21). The available drives will appear
below the title bar.
Figure A.23 Selecting the C Drive
6. Click the letter C (Figure A.23). The program will read the directories.
7. Click the Detect and Clean button. The program will find and remove any viruses
in memory and on the hard-disk drive.
8. After the detect and clean process has finished, click the Exit button to return to
DOS.
A-28 Status Cue User’s Manual
Checking and Fixing Disk Errors
Hard-disk drives inherently develop errors over time. Finding and repairing these
errors reduces the risk of data loss.
Caution: if your hard-disk drive contains more than 5MB of bad clusters, contact
High End Systems service or replace the drive before installing or using Status Cue for
Windows.
Windows 95
To use the ScanDisk application built in to Windows 95, complete the following
procedure:
1. With Windows 95 running, select the ScanDisk item from the Accessories/
System Tools pop-out menus. This brings up the ScanDisk dialogue box.
Refer to Figure A.24.
A
Figure A.24 ScanDisk Dialogue Box
2. Select the following items (Figure A.24):
•
(C:) drive
•
Thorough
•
Automatically fix errors
3. Click the Options... button. This brings up the Surface Scan Options dialogue
box. Refer to Figure A.25.
Appendix A Installation Troubleshooting A-29
Figure A.25 Surface Scan Options Dialogue Box
4. Select the System and data areas item and click the OK button. Refer to Figure
A.25.
5. Click the Advanced... button. This brings up the ScanDisk Advanced Options
dialogue box.
Figure A.26 Advanced Options Dialogue Box
6. Select the options indicated in Figure A.26 and click the OK button to accept the
changes and dismiss the dialogue box.
7. Click the Start button to begin the scan.
8. Fix all disk errors as prompted by the application.
A-30 Status Cue User’s Manual
Windows 3.x
To run the built-in DOS disk utility for Windows 3.x systems, complete the following
procedure:
1. Exit out of Windows to the DOS prompt (c:\).
2. At the DOS prompt, enter scandisk. This starts the Scandisk program.
3. Perform the surface scan when prompted by the program. If any bad sectors are
located (Problem Found dialogue box), select the Fix It option.
A
Appendix A Installation Troubleshooting A-31
Defragmenting the Hard-Disk Drive
Over time, hard-disk drive data becomes fragmented and needs to be optimized.
Optimizing the drive can reduce the risk of data loss and increase disk space.
Windows 95
To use the Defrag application built in to Windows 95, complete the following
procedure:
1. With Windows 95 running, select the Disk Defragmenter item from the
Accessories/System Tools pop-out menus. This brings up the Select Drive
dialogue box. Refer to Figure A.27.
Figure A.27 Select Drive Dialogue Box
2. Select the C: drive from the Which drive do you want to defragment? dropdown menu and click the OK button. This brings up the Disk Defragmenter
dialogue box. Refer to Figure A.28.
Figure A.28 Disk Defragmenter Dialogue Box
3. Click the Advanced... button. This brings up the Advanced Options dialogue
box. Refer to Figure A.29.
A-32 Status Cue User’s Manual
Figure A.29 Advanced Options Dialogue Box
4. Select the options indicated in the Advanced Options dialogue box and click the
OK button to accept the changes and dismiss the dialogue box.
5. Click the Start button to begin the defragmentation. This brings up the
Defragmenting Drive C dialogue box. Refer to Figure A.30.
A
Figure A.30 Defragmenting Drive C Dialogue Box
6. When the application finishes, the quit Disk Defragmenter dialogue box is
brought up. Click Yes to exit the application. Refer to Figure A.31.
Figure A.31 Quit Disk Defragmenter Dialogue Box
Appendix A Installation Troubleshooting A-33
Windows 3.x
To run the built-in DOS disk utility for Windows 3.x systems, complete the following
procedure:
1. Exit out of Windows to the DOS prompt (c:\).
2. At the DOS prompt, enter defrag. This starts the Defrag program.
3. Click the C: drive and then the OK button. The program will quickly analyze the
hard-disk drive.
4. Click the Optimize button to begin defragmenting the drive.
5. When the program has finished, click the Exit Defrag button to return to DOS.
Computer
Follow the instructions provided by the computer’s manufacturer to care for the system.
For industrial rack-mount systems, clean the air filter regularly and keep the system in a
protective road case.
Console
Clean your Status Cue Console on a regular basis. Dust, dirt, and smoke (cigarette and oilbased fog fluid) can accumulate and cause malfunctions. To clean the outer surfaces and
internal storage trays:
•
Wipe with a soft damp cloth or tissue, or use a small vacuum to remove the built-up
dust and dirt. Do not use a blower, as this will force dirt into keys of the desk.
• For inexorable substances (grim and serious build up), use Industrial Strength Green
409™ cleaner (sparingly) and a soft cloth.
Warnings: Do not submerse in liquid. There are no user serviceable parts inside. Servicing
should only be conducted by a qualified technician. If any liquid (soda, beer,
pizza sauce, etc.) has been spilled on or into the Status Cue Console,
contact High End Systems technical support before attempting to service
the Console.
A-34 Status Cue User’s Manual
Appendix B
Supplemental Information
This appendix provides information on:
❑ redundant system installation (B-1)
❑ upgrading software versions (B-7)
❑ Status Cue file system (B-8)
❑ output stack (B-9)
❑ MIDI viewer (B-10)
❑ setting system and Show preferences (B-11)
❑ automatically loading the trackball at Windows startup (B-14)
❑ uploading devices (B-15)
❑ inside the Console (B-17)
❑ DB-9 pin configuration (B-18)
Overview
This appendix provides relevant supplemental information on the operation of Status
Cue.
Redundant System Installation
As mentioned in the Introduction, redundant systems are highly recommended for live performance environments. This section indicates how to properly install and setup both types of
redundant systems.
B
Total Redundant System
You will need the following components for this configuration:
•
•
•
•
•
2 complete Status Cue systems- 2 PCs, identical number of LinkCards in the PCs, 2
Consoles, and their cables.
2 MIDI cards with their cables
1 MIDI cable -this is a cable with a male 5-pin DIN connector on each end. It connects
the master MIDI card to the backup MIDI card. Choose the correct length to safely
reach between the two PCs.
MIDI drivers for Windows 3.x or Windows 95- this provides the software interface
between Windows and the MIDI card. The drivers should be supplied with the MIDI
card.
1 "A/B" switch box with DB-9 connectors for each LinkCard- this provides the
mechanism to switch the Datalink from the main LinkCard to the backup LinkCard.
Note: Lightwave Research offers custom switchboxes that combine numerous
switchboxes into one convenient rack mount unit.
Appendix B Supplemental Information
B-1
•
2 DB-9 cables, with male connectors- this connects each LinkCard to the A/B switch
box. If you cannot obtain cables with male/male connectors, use cables with the same
connector on each end and use a gender changer.
Complete the following procedure to setup a total redundant system:
1. Install a MIDI card in an unused slot in each computer. Follow the installation
instructions supplied with the MIDI card. The instructions should include the MIDI
driver installation. Refer to the user manual supplied with your computer for additional
instructions on installing expansion cards.
Note: computers purchased from High End Systems come with MIDI cards and cables.
2. Connect the MIDI connectors to each MIDI card.
3. Connect the DB-9 connector on one of the Datalink "Y" cables to the Input/Output
port on the back of the A/B switch box.
4. Connect the two DB-9 cables to the switchbox. Connect one cable to the "A" port and
the other cable to the “B” port. If required, first connect the gender changers to the
switch box, then connect the cables to the gender changers. Securely tighten all
connector screws.
5. Designate one computer as "main" and the other computer system as "backup."
Connect the cable from port "A" on the switch box to the LinkCard in the master
system. Connect the cable from port "B" on the switch box to the LinkCard in the
backup system. Turn the switch box to port "A," this is the master system.
6. Connect one end of the MIDI cable to the "MIDI 1 Out" connector on the master
computer. Connect the other end to the "MIDI 1 In" connector on the backup
computer.
7. Connect one 10-foot Console cable from the LinkCard in the main system to its
Console. Do the same for the backup system.
8. Power up both systems and start up the Status Cue for Windows on both systems.
9. On both computers, select the Configure item from the menu bar in the Status Cue
main window. Then, select the MIDI Setup... item from the Configure drop-down menu.
This brings up the MSC Setup dialogue box. Refer to Figure B.1.
B-2
Status Cue User’s Manual
Figure B.1. MSC Setup Window
Note: if you do not have an available device driver, refer to the MIDI card’s user manual for
installation of the MIDI driver.
10. On the main computer, click the MIDI Out Enabled box. Then, click either For CueLists
to enable redundancy for CueLists or click For Songs to enable redundancy for Songs.
Set the Status Cue Device ID from its drop-down menu. The ID must match the backup
system. Refer to Figure B.2. Click OK to complete the operation and exit the dialogue
box.
B
Figure B.2. Main Computer MSC Setup
Appendix B Supplemental Information
B-3
11. On the backup computer, click the MIDI In Enabled box. Then, click either Apply to
CueLists to enable redundancy for CueLists or click Apply to Songs to enable
redundancy for Songs. Set the Status Cue Device ID from its drop-down menu The ID
must match the master system. Refer to Figure B.3. Click on the OK button to
complete the operation and exit the dialogue box.
Figure B.3. Backup Computer MSC Setup
12. Open an identical copy of a show on the main and backup system. Figure B.4 shows
the redundant system with a redundant monitor system (accomplished through an
additional switchbox).
Link A
Datalink "Y" Cable
Link B
XLR
XLR
DB9M
Datalink
DB25M
Main System
DB9F
DB9F
DB25F
MIDI Out
DB9M
Datalink
DB25F
DB25M
MIDI In
VGA
VGA
VGA
Figure B.4. Complete Redundant System
B-4
Status Cue User’s Manual
Backup System
13. To test the system, the backup computer should activate and deactivate INSTANT and
FADER PRESETS for Songs or follow the CueList on the main system.
14. In the event of a system failure, rotate the select knob on the A/B switch box from "A"
to "B" for each LinkCard. The backup system will continue the Show from the same
Presets(s) or Cue(s) that were running on the main system.
Note: if the monitor is also on a switchbox (Figure B.4), change it from "A" to "B" to view the
backup system.
B
Appendix B Supplemental Information
B-5
Single Console Redundant System
This configuration is almost identical to the Total Redundant System except there is not a
backup system Console. Follow the procedure for "Total Redundant System" on page B-1
with the exception of one Console. An additional DB25 A/B box with cables is required to
switch Consoles. Refer to Figure B.5.
Link A
Datalink "Y" Cable
DB9M
Datalink
DB25M
Link B
XLR
XLR
DB9F
DB9F
DB25M
DB25M
VGA
Main System
Datalink
DB9M
DB25M
VGA
MIDI In
MIDI Out
Backup System
VGA
Monitor
Figure B.5. Single Redundant System
Note: a U.P.S. (not shown) is highly recommended.
To switch systems:
In the event of a system failure, rotate the select knob on each A/B switch box from
"A" to "B." The backup system will continue the show from the last Preset(s) or Cue(s)
that was running on the main system.
Note: rotate the Console’s knob slowly from "A" to "B." This allows the Console to reset its
LEDs.
B-6
Status Cue User’s Manual
Upgrading Status Cue for Windows Software
If you are upgrading to a newer software version of Status Cue for Windows, follow
the instructions listed in "Installing Status Cue for Windows on page 1-22" to install
the software and then continue with this section.
Caution: Do not under any circumstances use an un-installer software package or the
Add/Remove Programs application in Windows 95 to remove a previous
version of Status Cue for Windows. These packages do not know the correct
Status Cue files to remove and problems will result if they are used. Refer to
"Status Cue File System" on page B-8 to learn which files can be safely deleted
from the hard-disk drive.
When upgrading to a later version of Status Cue for Windows, keep in mind that all
Show files are 100% compatible (forward compatible) with the new software version.
The first time a Show (created with a previous software version) is opened with the
new software, the system brings up a dialog box informing you the original file will
be archived and provides the file name ( filename.axx - where xx is the new version
number). Refer to Figure B.6.
B
Figure B.6. Archive Old Show Window
Take note of the Archived file name. The new show file will be stored in the same
directory where it was before.
Show files are not backwards compatible. If you wish to return to a previous version
of the software, you must reinstall the older software and unarchive the old show file.
Appendix B Supplemental Information
B-7
Status Cue File System
Status Cue files may be moved to accommodate a user’s needs. For convenience, you
may wish to create a directory dedicated to Show files, gel tables, etc. However,
the .shw is not the complete Show file. Table B.2 indicates the Status Cue file and its
purpose:
Table B.2: Status Cue Files
File
B-8
Purpose
aviview.exe
executable file that enables viewing of the startup animation
console.exe
executable file for the Status Cue for Windows application
lcsetup.exe
LinkCard Setup
linkdll.dll
Dynamic link library file that enables communication with the LinkCard
located in the windows/system directory
sqmacro.dll
Dynamic link library file to view video help examples located in the
windows/system directory
rhmplay.dll
Dynamic link library file that enables the viewing of help video examples
located in the windows/system directory
statusq.ico
Status Cue icon
statusq.ini
Status Cue initialization file located in the windows directory
stcue.hlp
Main Status Cue help file. Additional help files (.hlp) may also exist
console.s19
Uploadable Console code file
cyber.s19
Uploadable Cyberlight code file
link.s19
Uploadable LinkCard code file
studio.s19
Uploadable Studio Color code file
.avi
Video clip files
.bmp
Bitmap images
.cfg
¹Data files containing the fixture types, number of fixtures, and fixture
patches
.cue
¹Data files containing CueList information
.fxg
¹Data files containing Fixture Group information
.mac
¹Data files containing Macro information
.sc1
¹Data files containing Show information
Status Cue User’s Manual
application
Table B.2: Status Cue Files
File
Purpose
.sc2
¹Backup data files of Show information
.scn
¹Data files containing scratch Scenes
.seq
¹Data files containing scratch Sequences
.sng
¹Data files containing Song names and Preset information
.wnd
¹Data files containing window positions
¹Note: are the Show files are stored into Archived files.
Viewing the Output Stack
The output stack provides a visual means to look at the active Presets (outputs). If
there is a live output playing, it will always take priority and be on the top of the
stack.
To view the output stack, select Output Stack... from the Window drop-down menu. This
brings up the Output Stack window. Refer to Figure B.7.
B
Figure B.7. Output Stack Window
Appendix B Supplemental Information
B-9
Viewing MIDI Data
MIDI data can be viewed by its hex value or by command. To view MIDI data,
complete the following procedure:
1. Select MIDI Viewer... from the Window drop-down menu. This brings up the MIDI Viewer
window. Refer to Figure B.8.
Figure B.8. MIDI Viewer Sample Window
2. Click the appropriate check boxes to view the desired data.
3. Press the Clear Window button to clear the window.
Note: the MIDI Viewer has a 1 KB buffer. When the buffer becomes full, the Clear Window
button must be pressed to view additional MIDI data.
B-10 Status Cue User’s Manual
Setting System and Show Preferences
The System and Show preferences can be set to custom tailor Status Cue for the
individual user. System preferences are global to every Show and Show preferences
are stored and recalled with individual Shows. To set preferences, complete the
following procedure:
1. Select the Preferences... item from the File drop-down menu. This brings up the
Preferences dialogue box
B
Figure B.9. Preferences Dialogue Box
2. Use the following subsections to set the desired preference:
• "Adjusting Console Lights" on page B-12
• "Setting Default Xfade and Delay Times" on page B-12
• "Setting Numeric Timeout" on page B-12
• "Enabling CueList Confirmations" on page B-12
• "Enabling and Disabling Startup Animation" on page B-12
• "Setting Fixture ID Options" on page B-13
• "Setting Show Preferences" on page B-13
• "Autoloading and Autostarting a CueList" on page B-14
3. Click the OK button to save the Preferences and complete the procedure.
Appendix B Supplemental Information B-11
Adjusting Console Lights
To adjust Littlite brightness, use the Console Light Intensity scroll bar. To adjust the
intensity balance between the two lights, use the Balance scroll bar (the middle is equal
balance). Refer to Figure B.9.
Setting Default Xfade and Delay Times
The default Xfade and Delay times are the values that automatically appear when new
Scenes and Sequences are created. To set default times, click in the Default Xfade or the
Default Delay boxes and then type the desired times. Refer to Figure B.9.
Setting Numeric Timeout
Numeric timeout is the time between a numeric key press (in the CONTROL group) and
the time the Console automatically accepts the input (key press). This feature is used when
selecting fixtures. To set appropriate time, click in the Numeric Timeout box and enter the
desired time. Refer to Figure B.9.
Notes: Numeric Timeout can be disabled by deselecting its Enable box. When disabled, it
is necessary to press the <ENTER> key in the CONTROL group after a fixture
number is entered.
Enabling CueList Confirmations
CueList confirmations are provided to ensure cues are recorded and to close a CueList. To
enable or disable CueList confirmations, click the following check boxes (Figure B.9):
•
Beep when recording Cues- the system
speaker beeps to confirm when a new cue is
recorded
•
Prompt to close CueList-
provides a confirmation dialogue box to close a CueList
instead of instantly closing the CueList
Enabling and Disabling Startup Animation
To enable or disable the animation at Status Cue startup, click the Show Startup Animation
check box. Refer to Figure B.9.
B-12 Status Cue User’s Manual
Setting Fixture ID Options
Selected and background fixtures can be set to respond differently to a fixture ID. These
responses are set in the Fixture ID Options field. Refer to Figure B.9.
Note: refer to "Identifying Fixtures on page 10-6" to use fixture ID.
Click one of the following boxes in the Selected Fixture(s) field to set the response of
selected (identified) fixture(s):
•
•
White w/ No Iris-
fixture(s) go to 100% dim and will iris up to the largest setting
White w/ Iris- fixture(s) go to 100% dim and will iris down to the smallest size (if
applicable)
• Strobe Only- fixture(s) strobe
Click one of the following boxes in the Background Fixture(s) field to set the response of
background (not selected) fixture(s):
•
•
Gate Closed-
•
closes the gate(s)
Gate Open with Indigo- opens the gate(s) and changes the color(s) to indigo (or the
closest equivalent)
Not Affected- unchanged
Setting Show Preferences
Preferences can be set and stored for each Show (non-global). To select these preferences,
open the desired Show and click any of the following check boxes in the Show
Preferences field (Figure B.9):
•
Display MSpeed values ( 1..99 )-
displays MSpeed values in percentages instead of in
seconds
•
Auto-save when storing objects-
automatically saves the Show when a Scene,
Sequence, CueList, or Song is stored
Note: the above option is not checked, objects are stored in RAM and only saved when the
Show is saved.
•
Auto-save when setting Presets- automatically
•
•
•
•
saves the Song when a Scene or
Sequence is set in a Preset.
Resort Songs on rename- automatically sorts Songs by name instead of by the order of
when they are created (by date and time)
Auto-copy on new Step- copies the data from the previous Step into a new Step of
Sequence
New Scenes use stage values- when a new Scene or Sequence is created, the values
will be non-transparent
Prev/Next fixture in Step mode- allows the up and down arrow keys in the CONTROL
group to select fixtures while in Step or Sequence mode. When this is disabled, the up
and down arrow keys move from Step to Step.
Appendix B Supplemental Information B-13
B
Autoloading and Autostarting a CueList
A CueList can automatically be loaded and/or started when Status Cue for Windows is
started. To automatically load a CueList, open a Show and select the desired CueList from
the At startup, Auto-load CueList drop-down menu. Refer to Figure B.9. To automatically
start the selected CueList, click the Autostart the above CueList check box. The next time
the Show is opened, the CueList will automatically open and/or start.
Automatically Loading the Trackball at Windows Startup
The trackball on the Status Cue Console can be used as a mouse for normal Windows
operations. To automatically load the trackball driver when Windows starts up,
complete the following procedure:
1. Select the LinkCard Setup icon in the current Status Cue directory program group. This
brings up the Status Cue LinkCard Setup dialogue box.
Figure B.10. Status Cue LinkCard Setup Dialogue Box
2. Click the check box beside Load trackball driver at Windows startup.
3. Click the Apply Changes button to accept the changes and dismiss the dialogue box. A
line will be written into the win.ini file to enable the trackball. The changes will take
effect the next time Windows is started.
B-14 Status Cue User’s Manual
Uploading Devices
New software code is easily uploaded to devices from Status Cue. Each Status Cue
software release provides the most recent software code ( .s19 files) for the following
items:
• Console
• LinkCard
• Cyberlight
• Studio Color
• future Lightwave Research products
Note: software codes seldom change, but it is highly recommended that you use the latest
code. Contact your Authorized dealer or High End Systems.
To upload devices, complete the following procedure:
1. Remove any devices which may inhibit bi-directional communication (buffer boxes,
DMX splitters, repeaters, etc.) and check to ensure that the last fixture on each Link is
terminated.
2. Select Device upload... from the File drop-down menu. This brings up the Device Code
Upload dialogue box. Refer to Figure B.11.
B
Figure B.11. Device Code Upload Dialogue Box
3. Click the box beside the device to upload.
Appendix B Supplemental Information B-15
4. Click one of the following boxes when uploading to fixtures:
•
Upload ONLY to configured fixtures-
uploads to the selected correctly patched
fixtures on all links.
•
Upload to ALL fixtures-
uploads to all fixtures (of the selected type) connected to
all links. The fixtures do not have to be patched or addresses correctly.
Note: this feature is not available for all fixture types.
5. Click OK to begin uploading the code to the selected item. This brings up the Device
Upload Status dialogue box. Refer to Figure B.12.
Figure B.12. Device Upload Status Information Window
6. When the update has successfully completed, the Process field will indicate
Finished!. Click the OK button to complete the procedure.
Note: If any error messages are received, refer to "Operational Troubleshooting" on page A13.
B-16 Status Cue User’s Manual
Inside the Console
This section identifies and defines the purpose for the storage tray slots. On the lower
half of the Status Cue Console, there are ten storage areas in the plastic tray. Refer to
Figure B.13.
Littlites
keyboard or monitor brackets
mouse
manual
pens/bracket screws
3.5-inch disks
DO NOT
USE
Console cable
user defined
Figure B.13. Internal Storage Trays
The internal storage trays are designed to be a convenient place to store accessories.
B
Appendix B Supplemental Information B-17
DB-9 Pin Configuration
Use the following diagram (Figure B.14) for the proper pin configuration for the DB9 connector:
5
4
9
3
8
2
7
1
6
rear view
Figure B.14. DB-9 Pin Configuration
Link A:
• Pin 1 is + (red)
• Pin 2 is - (black)
• Pin 6 is ground
Link B:
•
•
•
Pin 5 is + (red)
Pin 4 is - (black)
Pin 3 is ground
B-18 Status Cue User’s Manual
Appendix C
Special Configuration and Control
of Fixtures
In this appendix you will:
❑ learn the available fixture types (C-1)
❑ configure and control the unique features for supported fixtures (C-3)
Overview
This appendix covers the operation and special configuration requirements for
specific fixture types. Due to some configurations and special features, nonstandard controls are used to access their functions. Unless noted in this
appendix the functions are tied to standard controls. Additionally, the
Constructs field of Scenes and Sequences indicate the control object in
parenthesis.
Available Fixture Types
The following fixture types are currently available for Status Cue:
Lightwave Research
• AF1000 (two or three channel)
• Color Pro
• Cyberlight (LWR and DMX)
• Cyberlight CX
• Intellabeam (LWR and DMX)
• Studio Color
• Trackspot (LWR and DMX)
Clay Paky
• Combicolor 575
• Golden Scan II
• Golden Scan III
• Golden Scan III (six channel)
• Golden Scan HPE
• Pin Scan
• Stage Scan
• Super Scan
C
Appendix C Special Configuration and Control of Fixtures
C-1
• Super Scan Zoom
• Tiger Scan
Coemar
• Nat TM 1200
• Nat TM 2500
• Nat MM 1200
• Nat TM 2500
F.A.L.
• PF3013
Martin Professional
• MAC 600 (with and without Vectoring)
• MAC 1200 (with and without Vectoring)
• PAL 1200 (with and without Vectoring)
• PAL 1200 Disco (with and without vectoring)
• RoboColor Pro 400
• RoboScan Pro 518
• RoboScan Pro 1220 cmyr
• RoboScan Pro 1220 xr
Studio Due
• Stratos
Vari*Lite®
• AR5
• VL5™ (8 and 16 bit)
• VL5A™ (8 and 16 bit)
• VL6™ (8 and 16 bit)
• VLM™
Note: the list of supported fixture types is constantly expanding. Contact High End
Systems for specialized needs.
C-2
Status Cue User’s Manual
Lightwave Research
Use this section to correctly configure and control the unique features for
Lightwave Research fixtures.
AF1000 Three Channel
Fixture settings:
• Set Personality switches 3, 4, 5 to "on" (3 channel mode).
Unique Console control:
• Duration- press the <EFFECT> key above the <EFFECT> wheel and use the
<EFFECT> wheel. Refer to Figure C.1.
Figure C.1. EFFECT Group
•
Rate- use the <STROBE RATE> wheel. Refer to Figure C.2.
C
Figure C.2. STROBE RATE Group
Note: Dim is controlled by the <DIM> wheel.
Appendix C Special Configuration and Control of Fixtures
C-3
AF1000 Two Channel
Fixture settings:
• Set Personality switches 3 and 4 to "on" (2 channel mode).
Unique Console control:
• Rate- use the <STROBE RATE> wheel.
• Dim - use the <DIM> wheel.
Color Pro
For Color Pro luminaires to function, the Color Pro DMX interface box with a 3to 5-pin XLR adapter must be used.
Unique Console setting:
• The interface must see 48 DMX channels. Even if less than 16 Color Pro
luminaires will be used, a minimum of 16 must be configured during fixture
setup.
Cyberlight Running DMX
Fixture settings:
•
Set Address switch 7 to "on" and switch 8 to "off" (Mode 2)
Cyberlight CX Running DMX
Fixture settings:
• Set Address switch 7 and 8 to "on" (Mode 3)
Intellabeam Running DMX
Fixture settings:
• Set Personality switches 5 and 6 to "on" and set switch 8 to "off" (11 channel
extended DMX).
• Set Personality switch 3 to "on" for DMX channels 1-256 or 4 to "on" for
DMX channels 257-512.
C-4
Status Cue User’s Manual
Studio Color
Unique Console control:
• Reset Functions to normal (default)-press the <A> key in the COLOR group
(Figure C.3.)
Figure C.3. COLOR Group
•
•
•
•
•
•
•
Continuous Color Function- press the <C> key in the COLOR group (Figure
C.3.) and the <EFFECT> key above the <EFFECT> wheel and use the
<EFFECT> wheel (Figure C.1.).
MSpeed on Color Functions- press the <D> key in the COLOR group (Figure
C.3.).
Color Mix Sequences- press the <E> key in the COLOR group (Figure C.3.),
press the <EFFECT> key in EFFECT group and use the <EFFECT> wheel.
Random Color Mix- press the <F> key in the COLOR group (Figure C.3.),
press the <EFFECT> key in EFFECT group and use the <EFFECT> wheel.
Quickest Path- press the <G> key in the COLOR group (Figure C.3.).
Double spinning of the color mixing wheels (2x Mode)- press the <H> key in
the COLOR group (Figure C.3.).
Wide Angle Lens Wheel (Effects Wheel 1)- use the <ZOOM> wheel. Refer to
Figure C.4.
C
Figure C.4. ZOOM Wheel
•
Frost Wheel (Effects Wheel 2)- use the <FOCUS> wheel. Refer to Figure
C.5.
Appendix C Special Configuration and Control of Fixtures
C-5
Figure C.5. FOCUS Wheel
Trackspot Running DMX
Fixture settings:
• Set fixtures for High Resolution.
• Set Personality switches 3 and 5 to "on" for addresses 1-256.
• Set Personality switches 3 and 4 to "on" for addresses 257-512.
C-6
Status Cue User’s Manual
Clay Paky
Use this section to correctly configure and control the unique features for Clay
Paky fixtures.
Golden Scan II
Unique Console control:
• Gobo Wheel- press the <FROST> key above the <EFFECT> wheel and use
the <EFFECT> wheel. Refer to Figure C.1.
Golden Scan III
Fixture setting:
• Set Optional DIL switch 4 to "on" (expanded channel format).
Unique Console control:
• Prism Wheel- press the <EFFECT> key above the <EFFECT> wheel and use
the <EFFECT> wheel. Refer to Figure C.1.
Golden Scan III Six Channel
Unique Console control:
• Color Wheel- press the <EFFECT> key above the <EFFECT> wheel and use
the <EFFECT> wheel. Refer to Figure C.1.
Golden Scan HPE
Unique Console control:
• Second Color Wheel- use the <ZOOM> wheel. Refer to Figure C.4.
• Rotating Prism Wheel- press the <EFFECT> key above the <EFFECT>
wheel and use the <EFFECT> wheel. Refer to Figure C.1.
• Frost/ Fixed Prism Wheel- press the <FROST> key above the <EFFECT>
wheel and use the <EFFECT> wheel. Refer to Figure C.1.
Appendix C Special Configuration and Control of Fixtures
C
C-7
Stage Scan
Unique Console control:
• Lamp- press the <CLOSED> key above the <STROBE RATE> wheel to turn
the lamp off and press the <OPEN> key above the <STROBE RATE> wheel to
turn the lamp on. Refer to Figure C.2.
• Rotating Prism Wheel- press the <EFFECT> key above the <EFFECT>
wheel and use the <EFFECT> wheel. Refer to Figure C.1.
• Frost/ Fixed Prism Wheel- press the <FROST> key above the <EFFECT>
wheel and use the <EFFECT> wheel. Refer to Figure C.1.
• Prism Rotation- press the <F-STB> key above the <EFFECT> wheel and use
the <EFFECT> wheel. Refer to Figure C.1.
Super Scan
Unique Console control:
• Gobo Wheel- press the <FROST> key above the <EFFECT> wheel and use
the <EFFECT> wheel. Refer to Figure C.1.
• Prism wheel- press the <EFFECT> key above the <EFFECT> wheel and use
the <EFFECT> wheel. Refer to Figure C.1.
Super Scan Zoom
Unique Console control:
• Prism Select- press the <EFFECT> key above the <EFFECT> wheel and use
the <EFFECT> wheel. Refer to Figure C.1.
• Prism Rotation- press the <F-STB> key above the <EFFECT> wheel and use
the <EFFECT> wheel. Refer to Figure C.1.
Note: these functions are tied together. Use the <EFFECT> key in the
CONSTRUCTS group to turn on and off transparencies.
C-8
Status Cue User’s Manual
F.A.L.
Use this section to correctly configure and control the unique features for
F.A.L. fixtures.
PF3013
Unique Console control:
• Gobo wheel- use the <ZOOM> wheel to control this function. Refer to Figure
C.4.
• Prism- press the <EFFECT> key above the <EFFECT> wheel and use the
<EFFECT> wheel. Figure C.1.
C
Appendix C Special Configuration and Control of Fixtures
C-9
Coemar
Use this section to correctly configure and control the unique features for
Coemar fixtures.
NAT MM 1200
Unique Console control:
• Rotating Gobo Wheel 2- use the keys in the GOBO group to select the
rotating gobo. Refer to Figure C.6.
Figure C.6. GOBO Group
•
•
•
Rotation of Rotating Gobo Wheel 2- use the <MSPEED> wheel. Refer to
Figure C.7.
Prism Selection- press the <EFFECT> key above the <EFFECT> wheel and
use the <EFFECT> wheel. The <EFFECT> key in the CONSTRUCTS group
toggles transparencies on and off. Refer to Figure C.1.
Prism Rotation- press the <F-STB> key above the <EFFECT> wheel and use
the <EFFECT> wheel. The <EFFECT> key in the CONSTRUCTS group
toggles transparencies on and off. Refer to Figure C.1.
NAT MM 2500
Unique Console control:
• Rotating Gobo Wheel 2- use the keys in the GOBO group to select the
rotating gobo. Refer to Figure C.6.
• Rotation of Rotating Gobo Wheel 2- use the <MSPEED> wheel. Refer to
Figure C.7.
• Prism Selection- press the <EFFECT> key above the <EFFECT> wheel and
use the <EFFECT> wheel. The <EFFECT> key in the CONSTRUCTS group
toggles transparencies on and off. Refer to Figure C.1.
• Prism Rotation- press the <F-STB> key above the <EFFECT> wheel and use
the <EFFECT> wheel. The <EFFECT> key in the CONSTRUCTS group
toggles transparencies on and off. Refer to Figure C.1.
C-10 Status Cue User’s Manual
NAT TM 1200
Unique Console control:
• Movement Options- press the <OPTION> key in the CONSTRUCTS group
and use the Trackball in position mode. The <POS> key in the
CONSTRUCTS group toggles transparencies on and off. Refer to Figure C.8.
• Rotating Gobo Wheel 2- use the keys in the GOBO group to select the desired
rotating gobo. Refer to Figure C.6.
• Rotation Of Rotating Gobo Wheel 2- use the <MSPEED> wheel. Refer to
Figure C.7.
• Prism Selection- press the <EFFECT> key above the <EFFECT> wheel and
use the <EFFECT> wheel. The <EFFECT> key in the CONSTRUCTS group
toggles transparencies on and off. Refer to Figure C.1.
•
•
Prism Rotation- press the <F-STB> key above the <EFFECT> wheel and use
the <EFFECT> wheel. The <EFFECT> key in the CONSTRUCTS group
toggles transparencies on and off. Refer to Figure C.1.
Color Wheel- use the <ZOOM> wheel. Refer to Figure C.4.
NAT TM 2500
Unique Console control:
• Movement Options- press the <OPTION> key in the CONSTRUCTS group
and use the Trackball in position mode. The <POS> key in the
CONSTRUCTS group toggles transparencies on and off. Refer to Figure C.8.
• Rotating Gobo Wheel 2- use the keys in the GOBO group to select the desired
rotating gobo. Refer to Figure C.6.
• Rotation Of Rotating Gobo Wheel 2- use the <MSPEED> wheel. Refer to
Figure C.7.
• Prism Selection- press the <EFFECT> key above the <EFFECT> wheel and
use the <EFFECT> wheel. The <EFFECT> key in the CONSTRUCTS group
toggles transparencies on and off. Refer to Figure C.1.
• Prism Rotation- press the <F-STB> key above the <EFFECT> wheel and use
the <EFFECT> wheel. The <EFFECT> key in the CONSTRUCTS group
toggles transparencies on and off. Refer to Figure C.1.
• Color Wheel- use the <ZOOM> wheel. Refer to Figure C.4.
C
Appendix C Special Configuration and Control of Fixtures C-11
Martin Professional
Use this section to correctly configure and control the unique features for
Martin fixtures.
Note: some fixtures require special data pin configurations. Consult the applicable
fixture manual(s).
MAC 1200
Fixture setting:
• Set the fixture to Mode 2.
Unique Console control:
• Gobo Wheel- use the <ZOOM> wheel. Refer to Figure C.4.
• Color Wheel- press the <EFFECT> key above the <EFFECT> wheel and use
the <EFFECT> wheel. Refer to Figure C.1.
MAC 1200 with Vectoring
Fixture setting:
• Set the fixture to Mode 4.
Unique Console control:
• Gobo Wheel- use the <ZOOM> wheel. Refer to Figure C.4.
• Color Wheel- press the <EFFECT> key above the <EFFECT> wheel and use
the <EFFECT> wheel. Refer to Figure C.1.
• Second MSpeed- press the <2> key above the <MSPEED> wheel and use the
<MSPEED> wheel. Refer to Figure C.7.
Figure C.7. MSPEED Group
C-12 Status Cue User’s Manual
PAL 1200
Fixture setting:
• Set the fixture to Mode 2.
Unique Console control:
• Framing- press the <OPTION> key in the CONSTRUCTS group and use the 8
wheels (<STROBE RATE> (CC1)- <DIM> (CC8)) to control each function.
Refer to Figure C.8.
Figure C.8. CONSTRUCTS Group
•
Framing rotation- exit Option Mode and press the <EFFECT> key above the
<EFFECT> wheel. Use the <EFFECT> wheel for control. Refer to Figure C.1.
Note: the framing functions are tied together. Use the <IRIS> key in the
CONSTRUCTS group to turn on and off transparencies. Refer to Figure
C.8.
•
C
Open rotating gobo- use the <E> key in the ROTATING GOBO group.
Figure C.9. ROTATING GOBO Group
Appendix C Special Configuration and Control of Fixtures C-13
PAL 1200 with Vectoring (MSpeed)
Fixture setting:
• Set the fixture to Mode 4
Unique Console control:
• Framing- press the <OPTION> key in the CONSTRUCTS group and use the 8
wheels (<STROBE RATE> (CC1)- <DIM> (CC8)) for control of the functions.
Refer to Figure C.8.
• Framing rotation- exit Option Mode and press the <EFFECT> key above the
<EFFECT> wheel and use the <EFFECT> wheel for control. Figure C.1.
Note: the framing functions are tied together. Use the <EFFECT> key in the
CONSTRUCTS group to turn on and off transparencies.
•
•
Open rotating gobo- use the <E> key in the ROTATING GOBO group.
Figure C.9.
Second MSpeed- use the <2> key above the <MSPEED> wheel and use the
<MSPEED> wheel. Refer to Figure C.7.
PAL Disco
Fixture setting:
• Set the fixture to Mode 2.
Unique Console control:
• Open position on rotating gobo wheel 1- press the <E> key in the
ROTATING GOBO group. Refer to Figure C.9.
• Second rotating gobo wheel- press the <EFFECT> key above the <EFFECT>
wheel and use the <EFFECT> wheel. Refer to Figure C.1.
• Second rotating gobo wheel rotation- press the <F-STB> key above the
<EFFECT> wheel and use the <EFFECT> wheel. Refer to Figure C.1.
C-14 Status Cue User’s Manual
PAL Disco with Vectoring (MSpeed)
Fixture setting:
• Set the fixture to Mode 4.
Unique Console control:
• Open position on rotating gobo wheel 1- press the <E> key in the
ROTATING GOBO group. Refer to Figure C.9.
• Second rotating gobo wheel- press the <EFFECT> key above the <EFFECT>
wheel and use the <EFFECT> wheel. Refer to Figure C.1.
• Second rotating gobo wheel rotation- press the <F-STB> key above the
<EFFECT> wheel and use the <EFFECT> wheel. Refer to Figure C.1.
• Second MSpeed- use the <2> key above the <MSPEED> wheel and use the
<MSPEED> wheel. Refer to Figure C.7.
RoboScan Pro 518
Unique fixture settings:
• Set jumpers for pins 4 and 5 (Mode 3)
Unique Console control:
• Color Wheel- press the <EFFECT> key above the <EFFECT> wheel and use
the <EFFECT> wheel to use the fixture’s color wheel. Refer to Figure C.1.
RoboScan Pro 1220 cymr
Unique fixture settings:
• set the fixture for Mode 2
Unique Console control:
• Color Wheel- press the <EFFECT> key above the <EFFECT> wheel and use
the <EFFECT> wheel to use the fixture’s second color wheel. Refer to Figure
C.1.
C
RoboScan Pro 1220 xr
Unique fixture settings:
• set the fixture for Mode 2
Unique Console control:
• Color Wheel- press the <EFFECT> key above the <EFFECT> wheel and use
the <EFFECT> wheel to use the fixture’s second color wheel. Refer to Figure
C.1.
Appendix C Special Configuration and Control of Fixtures C-15
Studio Due
Use this section to correctly configure and control the unique features for
Studio Due fixtures.
Stratos
Fixture settings:
• Set DIP switches 1 and 2 to "on" (12-bit mode)
Unique Console control:
• Color wheel- press the <EFFECT> key above the <EFFECT> wheel and use
the <EFFECT> wheel. Refer to Figure C.1.
• Rotating gobo wheel- press the <FROST> key above the <EFFECT> wheel
and use the <EFFECT> wheel. Refer to Figure C.1.
C-16 Status Cue User’s Manual
Vari-Lite
Use this section to correctly configure and control the certain features for VariLite fixtures.
VL5 and VL5a
VL5 and VL5a fixtures do not provide the ability for internal dimming, thus an
external dimmer is required. Status Cue allows the VL5’s Dim Construct to be
patched separately from other fixture Constructs. This is useful for patching all
Dim channels in numeric order or allowing all Dim channels to be placed on a
separate Link.
Note: VL5’s Dim and other channels must be kept on the same LinkCard, but not
necessarily on the same Link.
Example:
After adding VL5 fixtures, select the Dim channels and click the Patch button
(Figure C.10.). Then patch the Dim channels to the desired Link.
C
Figure C.10. Selecting VL5 Dim Channels
Appendix C Special Configuration and Control of Fixtures C-17
VL6
Note: the color wheel and the Gobo wheel can be Xfaded.
VLM
Unique Console control:
• Tilt spin forward- press the <EFFECT> key above the <EFFECT> wheel and
use the <EFFECT> wheel. Refer to Figure C.1.
• Tilt spin reverse- press the <FROST> key above the <EFFECT> wheel and
use the <EFFECT> wheel. Refer to Figure C.1.
C-18 Status Cue User’s Manual
Appendix D
Glossary of Terms
Terms
Additive color mixing
The creation of colors by superimposing red, green and blue light sources. The intensities of
red, green and blue light determine the resulting color. This method is commonly used in TVs
and projection TV/video devices. Additive color mixing done in this way is also called the
RGB (red-green-blue) color model.
See also “Subtractive color mixing.”
AF1000
A high powered xenon strobe manufactured by Lightwave Research.
Archive
A backup of all files used for a particular Show compressed into a single file that can be
quickly unarchived (restored). An Archive makes it easy to move shows from one computer to
another.
Autolatch (Dimmer)
Turns on the Fader Preset when the fader is moved above 0. When the fader is returned to 0,
the Preset turns off.
Bank
Memory location of the 32 System keys. Banks are used for palettes and Groups. Four Banks
are available.
D
Base memory
Or upper memory area, is the 384 Kilobytes of system memory that resides above the 640
Kilobytes of conventional memory. Base memory is addressed from 640 Kilobytes to 1
Megabyte. Extended memory begins after base memory. Option cards reserve an area of base
memory to run the device drivers for their option card and memory-resident programs.
Black Key (Blackout)
The Master fader (grand master) has an associated <BLACK> key that allows instant cut to
black.
Appendix D Glossary of Terms D-1
Blind Mode
Blind mode allows you to preview or pre-stage Scenes and Sequences live without affecting
the output. New Scenes and Sequences open in Blind mode when a Preset is on. Scenes or
Sequences retrieved with the <GET> key are opened with Blind mode enabled.
Bump (button action)
Turns on the Preset as long as the button is held down. Dim instantly goes to 100% regardless
of fader position.
See also “Flash (button action).”
CC1 to CC8
The Strobe Rate, Rotate, Effects, MSpeed, Focus, Zoom, Iris, and Dim variable controls are
alternately identified with the letters CC1 through CC8 respectively. These letters stand for
“Continuous Construct Control” which allows for generic use of these controls.
CD
Compact disc containing digital audio information.
CD ROM
Compact disc read-only memory. Disc or disc drive containing digital information. Typically
installed in computer. CueLists support audio CD ROM input.
Chase
Chase and Sequence are used interchangeably. Refer to Sequence for definition.
Color mixing
Process of creating colors using either the RGB or HSI color models.
Color Pro
A color changing luminaire manufactured by Lightwave Research.
Comm Cable
4-inch communication cable connected between LinkCards. This cable enables
synchronization and communication between multiple LinkCards.
See also “LinkCard.”
Constructs
Features of the fixture (such as Color Mixing, Gobos, Rotating Gobos, Color Wheel, Iris, Frost
and Shutter). When you create Scenes and Sequences you record the Constructs and their
parameters (values).
D-2
Status Cue User’s Manual
Construct Filters
Software filters allowing only certain Constructs or parameters to be played from a Preset.
Copy
Copy is a feature selected from the MEMORY key group to copy all the fixture Construct
parameters between fixtures. You can copy fixture Construct parameters: from one fixture to a
selected range of fixtures, from a range of fixtures to a like number of fixtures, or from many
fixtures to the range beginning with a single selected fixture. You can copy within the same
Scene or Sequence or between different Scenes and Sequences.
Note: the <COPY> key toggles between copy and paste for convenience.
Cue/CueList
A CueList is a series of cues (events) available for playback on demand. CueLists allow the
user to conveniently run through an entire show by simply pressing one button or automate an
entire show with internal or external synchronization. Multiple devices can be simultaneously
controlled with CueLists. Eight CueLists can run simultaneously and an unlimited number of
cues can be created in a CueList. Unlike Scenes and Sequences, CueLists reference songs and
have the ability to accept and output MIDI data. CueLists play back the Presets that are stored
in Songs.
Cyberlight
An automated moving mirror luminaire manufactured by Lightwave Research.
Daisy chain
The method used to connect Fixture Data Cables from the LinkCard to the fixtures. You
connect Data cables in series, from one of the LinkCard XLR connectors to the first fixture.
Then, from the output of the first fixture to the input of the second fixture, and so on.
Data
A field in the CueList screen which corresponds to information in the Command field. Digital
information typically stored on a disk or hard-disk drive or transferred through a separate line.
Data cable
Cable providing data to fixtures. Typically in a daisy chain configuration.
Appendix D Glossary of Terms D-3
D
Delay
Delay is a Construct that allows you to set the amount of time that the Sequence pauses on the
current Scene before advancing to the next Scene. Delay values range from 0.1 second to 36
minutes.
The Delay time is multiplied by the Rate Construct (in the Sequence window). When running a
Sequence, you can dynamically change the Delay (and Xfade) times, however, in this mode the
changes are global to all Scenes in the Sequence.
See also “Rate.”
See also “MSpeed (movement speed).”
Desk
A synonym for a lighting console.
DC1, DC2, DC3
These letters stand for “Discrete Construct Control” which allows for future generic use of
these key groups. The COLOR, GOBO, and ROTATING GOBO key groups are identified
with the letters DC1, DC2, and DC3 respectively.
Dialogue box
The Status Cue system displays dialogue boxes to request information about the task you are
performing or to present you with information.
Dichroic
A dichroic (meaning “two-color”) filter achieves a richly-saturated color without using any
chromophoric (pigmented) materials. In simple terms, it can achieve this effect by either
reflecting or “cancelling out” through destructive interference all but a narrow range of the
light spectrum.
Dichroic filters offer a number of advantages over traditional gel filters: since they are made of
Pyrex-like glass and absorb almost no heat themselves, they theoretically have no failure
mechanism; they transmit more light than gels; and their resultant colors are more richlysaturated than is possible with a gel.
See also “Litho”.
Diffusion
Diffusion is a special effect that causes a defined spot with a soft edge similar to a FRESNEL.
That is, the edges of the pattern go out of focus.
See also “Frost.”
D-4
Status Cue User’s Manual
Dim
Use this Construct to vary the dim (intensity) level of the selected fixture. The Scene and
Sequence windows display the percentage of dim as you vary the control from 0 (dark) to
100% (maximum brightness). Use the <DIM> control with the <XFADE> key to set the
crossfade time. When you assign a Scene or Sequence to a Fader Preset, the associated fader
controls the dim of that Scene or Sequence.
Dimmer
An electronic device which controls the amount of electricity passed to the lamp of a luminaire
thus controlling brightness.
Disks
An apparatus for storing and retrieving data.
Diskettes
Typically a 3.5 inch magnetic floppy disk used to transfer files between Personal Computers.
DMX-512 Protocol
DMX-512 is a standard method of controlling lighting fixtures and other devices (such as
lasers and hazers). Developed by the United States Institute of Theatre Technology (USITT),
DMX-512 is supported by leading entertainment industry equipment manufacturers, such as
High End Systems.
DMX 512 (D for digital, MX for multiplex and 512 is the number of channels per link) is a
reliable, efficient and well-understood method of controlling lighting devices. Its strength lies
in the ability to control a large number of different types of devices made by various vendors
on the same link using any DMX-compatible controller.
See also “LWR Protocol.”
DMX Address
The DMX-512 protocol allows a total of 512 addresses to be used on a particular link. A link is
a group of devices connected by XLR cabling. You need to assign a unique fixture number to
each luminaire you wish to respond independently to control commands. Multiple fixtures can
be assigned the same address if you wish them all to respond to control commands in the same
way.
DOS
Disk operating system. Basic operational control for computers.
Effect
Key group which controls the special effects constructs for luminaires.
Appendix D Glossary of Terms D-5
D
Excluded Memory Address
Physical areas of RAM excluded from the operating system for the LinkCard.
Fader Presets
Use the 16 Fader Presets to control the playback of Scenes and Sequences. Each of the 16
Fader Presets has its own output. Thus, you can layer the Fader Presets to build effects.
See also “Stack (Output).”
See also “Instant Presets.”
Fader Type
This feature allows the Fader Presets, Instant Presets, and Live values to react in a configurable
manner. To access this feature, press the <TYPE> key in the Song Group.
Fixture
A lighting device or luminaire. The Cyberlight, Intellabeam, and Trackspot are examples of
fixtures. Fixture and luminaire are used interchangeably.
Flip
A special function for moving yoke fixtures, such as Studio Color. The unit pans 180° and tilts
to the opposite position of the 90° (straight down) axis. This allows more physical movement
before a stop is reached. Flip observes the POS mode (pan or tilt).
Focus
Focus is a variable Construct that allows you to remotely bring the projected beam and gobo
image in and out of focus.
Frost
Frost is a variable construct effect that typically allows you to add a haze or fog effect in
increasing/decreasing densities to the projected pattern.
Function
This is the name of the STATUS CUE key group that determines the function (or usage) of the
System Keys/Instant Presets keys. That is, use the keys as <MACRO>, <PALETTE>,
<GROUP>, or <PRESET>.
Gel
Reference to a specific gel color (RGB value).
A piece of colored material placed over a PAR can or other device.
D-6
Status Cue User’s Manual
Get
Retrieval of a Scene or a Sequence from an Instant or Fader Preset. The <GET> key is located
in the SONG key group.
Gobo indexing
Gobo indexing is the process of positioning a rotating gobo in a static position anywhere
through 360 degrees in 1/4 degree increments (typically).
Group
Group is one of four functions available through the FUNCTION key group. It allows you to
store groups of fixtures that you create using the numerical keypad and the Select keys
(<NOT>, <AT>, <THRU>, and <AND>). For example, if you often select fixtures 12 THRU
24, but NOT 18 AND 19, you can assign this fixture selection to System Keys for easy recall.
To use the System Keys as group values, first press the <GROUP> key in this key group, then
press the System key containing the desired fixture group. You can store up to 128 group
selections.
See also “Bank.”
Homing
The procedure that is performed from the Status Cue system to reset each fixture, connected to
the system, to its mechanical home positions default settings. Homing fixtures typically strikes
the lamp, turns on the cooling fans, sets the Gobo and Color wheels, and Gate to their home
(default) position. The fixtures then idle with the gate closed waiting for a command from the
controller. To access this feature, press the <HOME> key in the FIXTURE Group. If you
Home while playing a Preset, the Homed fixtures rejoin the stage values upon completion of
Homing.
Hue, Saturation, and Intensity (HSI)
HSI is a model for mixing colors. Use this color model to choose colors based on saturation
and intensity.
Hue- the color attribute that distinguish one color from another.
Saturation- the percentage or amount of gray in a color. Increasing saturation lowers the
amount of gray in the color, and decreasing saturation increases the amount of gray in the
color.
Intensity (or brightness)- the difference in the light intensity transmitted through a color
(independent of hue and saturation).
HTP
Highest Takes Precedence. Used primarily for dimmer packs and some Lighting desks where
the highest dim constructs take precedence over lower dim constructs.
Appendix D Glossary of Terms D-7
D
ID
Identification of one or more fixtures. To access this feature, press the <ID> key in the
FIXTURE Group.
Indexing
The process of turning or rotating a gobo into the desired viewing position.
Instant Presets
Instant Presets provide you with a mechanism to instantly playback Scenes and Sequences that
were previously assigned as an Instant Preset. You can play one Instant Preset at a time. There
are 32 Instant Presets available per Song.
See also “Fader Presets.”
See also “Stack (Output).”
Intellabeam
An automated moving mirror luminaire manufactured by Lightwave Research.
Internal Commands
Commands used for CueLists in Status Cue for Windows. Internal commands are only related
to the operation of Status Cue.
IRQ - Interrupt Request
When an option (device) needs to be serviced by the computer it sends out an interrupt request
on its assigned level to get the computer’s attention. The computer then responds with an
interrupt service routine. The computer services the interrupts in order of priority. That is, a
higher priority interrupt is serviced before a lower priority. Interrupts are organized into a
multi-level priority scheme, but generally, the lower the IRQ number the higher the priority.
The timer, keyboard, serial ports, disk controllers, printer port, mouse, LinkCard, and so on, all
use interrupts.
Iris (aperture)
Iris is a continuous Construct. The iris is a device with a variable circular opening that controls
the beam diameter projected from the selected fixture in a similar fashion that a camera's iris
controls the amount of light entering the camera.
Latch (button action)
Allows a Preset to remain on when its key is pressed. Selecting Latch - Add in the <TYPE>
menu allows multiple keys to remain on at the same time. Selecting Latch - Swap allows only
the selected Preset to remain on.
D-8
Status Cue User’s Manual
Link
Physical output from a LinkCard to fixtures. A Link may be configured for either LWR or
DMX protocol.
LinkCard
The LinkCard is a full length PC card that plugs into an unused ISA slot in your computer. The
LinkCard contains most of the Status Cue system intelligence and supports fixtures through
two output Links. The Master LinkCard has two output connectors that interface to the
Console and to the fixtures. The LinkCard interface connector (DB-25) to the Console contains
all Console to LinkCard bi-directional signals and also provides power to the Console. The
other connector (DB-9) provides the LinkCard data output to the fixtures through a four foot
“Y” Data Link cable. Up to four LinkCards can be installed into any given Status Cue system.
Litho
A litho has a pattern etched on it (some lithos are also textured), as the name “LithoPatterns”
suggests. All LithoPatterns are designed and manufactured at the High End Systems dichroic
lab in Austin, Texas. There are currently a large number of available lithos, including
LithoPatterns, Art Glass, Psy-Dye and Special Effects.
A dichroic process is used to color all lithos.
See also “Dichroic”.
Littlites
Dimmable lights provided with the Status Cue Console.
Live control
Live control allows you to override the currently playing Preset. You can select fixtures and
Constructs and override the currently active Preset by opening a new Scene or Sequence
window. For example, you may want to select a fixture to use as a follow spot or grab several
fixtures and change their colors to blue. Live control stays active until you either close the
Scene or Sequence or toggle on <BLIND> mode.
D
See also “Blind mode.”
See also “Stack (Output).”
Loop
Key in the SEQUENCE Group which allows you to configure how a sequence runs.
Luminaire
See “Fixture.”
Appendix D Glossary of Terms D-9
LWR Protocol
The native control protocol for Cyberlight, Intellabeam, and Trackspot. LWR protocol offers
all the features of DMX-512 plus a checksum for data verification.
Macro
A macro is a recording of key presses that you assign (store) to one of the 32 System Keys.
You then play back the macro by pressing the appropriate System Key. Macros save time by
allowing you to perform redundant operations with a single key stroke. You can store up to 32
macros.
Master fader/dim
The Master fader or dim (grand master) provides live master dim control over all connected
fixtures. Slide the <M> fader all the way down for black, and full up for maximum brightness.
The Master fader has an associated <BLACK> key that allows you to perform a quick cut to
black.
See also “Black key (blackout).”
Master LinkCard
Primary LinkCard in the Status Cue System that connects to the Console and to Link 1A and
1B.
Memory
Use this key group to select the action you want to perform with the object selected from the
OBJECT key group.
Menus
The Status Cue for Windows program provides menus that contain commands and tools for
creating and playing programs. Menus are contained in a menu bar across the top of the screen.
For example, the Status Cue main window displays: File, Edit, Object, Memory, Song,
Configure, Window, and Help menus. Menus follow the normal Windows conventions.
MIDI
MIDI (Musical Instrument Digital Interface) is the communication protocol for many
microprocessor-based musical instruments. Lighting devices often use the MIDI Show Control
feature for Master/Slave or submaster operation. Status Cue supports MIDI Show Control
(MSC).
MIDI Show Control (MSC)
A control protocol (language) that allows a variety of different types of devices to be
controlled from a central source, such as a lighting console. Status Cue allows you to set up
CueLists that play back pages or Presets on any MSC controller connected to it.
D-10 Status Cue User’s Manual
MIDI Time Code (MTC)
A timing protocol that allows synchronization between MIDI devices.
See also “SMPTE.”
MSpeed (movement speed)
This Construct defines whether the fixture's pan/tilt, colors or gobos (static and rotating)
change at mirror movement speed (MSpeed) or at full speed. The speed settings determine
how long it takes for the selected fixtures to reach their programmed position in the Scene or
Sequence. You assign MSpeed to the Color, Gobo, or Rotating Gobo Construct by selecting the
Speed key located in the respective Construct key group. The Speed key is used with the
<MSPEED> wheel to set the MSpeed value. The fixture then profiles MSpeed.
Speed is a function of time to destination. That is, all fixtures that have the same speed value
move together, regardless of the distance traveled. For example, if one fixture is only moving
one foot and another is moving ten feet, they start and stop at the same time, providing they are
programmed with the same speed setting. The fixture with the longest distance to travel moves
faster than the other, but they arrive at their respective positions at the same time.
See also “Delay.”
Monitor
Video display terminal for a computer system.
Mouse
The mouse is the most common type of pointing device used on personal computers. Another
common pointing device is the trackball which is used on Status Cue. These devices allow you
to move the pointer (or cursor) around the screen, create drawings, select menu items, and so
on.
See also “Trackball.”
Numeric Timeout
Configurable amount of time Status Cue waits for a second or third key press in the
CONTROL key group before making a fixture selection with the keys in the CONSOLE
Group.
Object Group
The name of the key group where you begin performing an activity, such as, creating or editing
a Scene, Sequence, Song, and so on. For example, to create a Scene you first press the
<SCENE> key. Then, you press the key in the MEMORY key group that specifies what you
want to do with the object. For example, press the <NEW> key to create a new Scene. As an
analogy you can think of Object as the noun and Memory as the verb.
Appendix D Glossary of Terms D-11
D
Palette
A Palette is a reserved area where you store a Construct that you want to later use as a
reference in other Scenes or Sequences. Think of a Palette as a “Reference Library” with
applicable constructs. This is convenient when you change venues, you only need to change
the Palette to update your Scenes. Position Memories is a common use for Palettes. You can
create a Palette for any Construct in the CONSTRUCTS key group. Status Cue supports 128
Palettes.
Note: Palette 128 is the defaults palette and is user-definable.
See also “Position memory.”
Patch
Assigning a fixture or a range of fixtures to a specific address on a Link.
PAR (Cans)
Parabolic Aluminized Reflector: a light fixture containing a PAR lamp as the illumination
source. PAR cans may have a single color filter, generally of the polymer gel type. Motorized
gel scrollers or color wheels are commonly fitted to PAR cans to enable remote color changes.
Numbers such as 64, 56, 38, 36 etc. are used to specify the size of the reflector in 1/8 inch
pitches across the reflector; the larger the number, the larger the fixture.
Parameters
The values assigned to Constructs. For example, selecting a parameter (value) of 100 for the
dim Construct causes the fixture to project a beam of maximum brightness.
Position memory - synonym for “Position Palette”
Position memory is a time saving feature that allows one or more Scenes to reference another
Scene for pan and tilt information. Thus, many Scenes can reference or use the pan and tilt
information from a single Scene. When the reference Scene is altered, all Scenes that refer to it
reflect the change in position.
See also “Palette.”
Preset Focus
Same as Position memory.
Presets
A Preset is a recording of Scenes or Sequences that you assign to a Preset number. You then
select the Preset number to immediately recall or playback the recorded Preset. Presets store all
the Constructs, position, and timing information for the selected fixtures in the Presets.
See also “Instant Presets.”
See also “Fader Presets.”
D-12 Status Cue User’s Manual
Prism
Prism is a special effect that multiplies the projected pattern. Typically, luminaires use a four
multiplying prism.
Programming
The inputting and recording of fixture values to achieve a desired design or theme.
Rate (Sequences)
Rate allows you to regulate the time of advancing Scenes within a Sequence. You scale the
advance Rate in percentages by first selecting the Rate field in the Sequence window, then
setting the Rate value with the up/down arrows in the Rate field. You can specify Rates from
.01 (fastest) to 127.99 (slowest). A value of 1.00 is times 1, 2.00 is times 2,.50 is times 1/2, and
so on. Rates less than 1.00 speed up the advancing Rate, while greater than 100 slow down the
Rate. You can also type in the Rate value by first pressing the <RATE> key in the Sequence
key group, then type in the value and press the <ENTER> key.
See also “Delay.”
RGB
RGB (Red, Green, and Blue) is a color model that you can use in the Status Cue system to mix
colors. RGB is a color additive model. That is, when you mix 100 percent of red, green, and
blue, the resultant color is white (additive), and mixing 0 percent of the three colors the
resultant color is black. Fixtures often use the subtractive CMY (Cyan, Magenta, and Yellow)
color model because 0 percent mix of the three colors yield white. Thus, in a fixture with the
color flags removed from the light path produces white. Status Cue converts the RGB colors to
CMY for use with fixtures.
Rotate
Rotate consists of three Construct keys and the <ROTATE> wheel. Use Rotate to set the gobo
rotational speed and direction (forward/reverse) for the gobo that you select from the
ROTATING GOBO group parameter keys. You also set the static or index position of the
selected gobo through 360 degrees in one degree increments.
D
See also “Rotating gobos.”
See also “Gobo indexing.”
Rotating gobos
Rotating gobos allow you to continuously rotate any available gobos during projection in a
forward or reverse direction. You can rotate the gobos in various rotation speeds as defined by
the <ROTATE> wheel.
See also “Gobo indexing.”
Appendix D Glossary of Terms D-13
Scene
One static setting or look consisting of selected fixtures, their Constructs, and timing. A Scene
can be as simple as a single fixture, in plain white light or as complicated as multiple fixtures
with different colors, effects, and rotating gobos. Status Cue allows the creation of 5872
Scenes per Show; 128 additional Scenes may serve as Palettes
See also “Palettes.”
Scratch memory
Scratch memory can be considered a list of Scenes and Sequences that you store into and recall
from to build your Show. To store to Scratch memory, press an OBJECT key and then press
<STORE> in the MEMORY group to access these individual object lists. Storing to Scratch
stores the object within the Show file permanently. Scratch memory is not the same as <SET>
to a Preset. Objects stored in Scratch memory must be recalled to be used.
Sequence
A Sequence (chase) is a series of programmed Scenes (Steps) that can run continuously in a
loop when played back. You store Sequences in a Song as Presets or playback under live
control.
See also “Song.”
Serial Data Distributor
A device used to re-time and regenerate the DMX 512 signal in order to extend data cable runs.
A serial data distributor is required when the end-to-end cable span (the total length of all
cables) on any link exceeds 500 ft. (152 m).
See also “Link.”
Set
The recording of a Scene or a Sequence into an Instant or Fader Preset.
See also “Get.”
Show
A Show is the highest level activity on the Status Cue system and is the level at which you save
the program to disk. For example, to store only a fixture and its Constructs to disk, you save it
as a Show.
Slave LinkCard
A LinkCard installed in a Status Cue system other than the Master LinkCard. Up to 3 slaves
may be installed in one system.
See also “Master LinkCard.”
See also “LinkCard.”
D-14 Status Cue User’s Manual
SMPTE
Society of Motion Picture and Television Engineers (SMPTE) began work to develop a
standardized synchronization method for the new medium. The resulting ’SMPTE time code’ is
simply the recording of time information, in hours, minutes, seconds and frames, as a digitally
encoded signal on one of the tracks of a multi-track audio or video tape. There are a number of
frame rates in use today:
24 used in motion-picture film
25 EBU standard (European Television)
29.97 NTSC color videotape standard
30 NTSC monochrome standard (audio) (used by Status Cue)
SMPTE Time code can be recorded to an audio track (Longitude Time Code, or LTC) or it can
be recorded as part of the video signal (Vertical Interleave Time Code, or VITC). Either way,
the time code ’word’ is the same.
Snapshot
A Cue type that will replay a stored combination of the Instant and Fader Presets.
Soft Patching
Configuring multiple single DMX channels to be controlled as a single fixture.
Solo (button action)
Cancels any other active Preset outputs until the Solo type Preset is released.
Song
A Song is a collection of 32 Instant Presets and 16 Fader Presets. You can create an unlimited
number of Songs within a Show file.
See also “Presets.”
D
Stack (Output)
The Output Stack provides a visual indication on the main window of the Instant and Fader
Presets that are active as well as live control status. The Stack also provides a convenient way
to keep track of the ordering of Fader Presets, that is, the Fader Preset layers.
See also “Live control.”
See also “Blind mode.”
Stage Value
This is the data that the LinkCard actually outputs to the fixtures. Stage data is helpful in live
editing when you want to view the current Construct parameters.
Appendix D Glossary of Terms D-15
Starting Address
First Address on any given link. Point at which a fixture address begins.
Status Cue
A versatile lighting control system manufactured by Lightwave Research.
Step
This is the left most column in the Sequence window. It displays a sequential reference number
of the Scenes contained in the Sequence.
Strobe Rate
Use Strobe rate to control the operation of the gate and strobe effects. Strobe is accessed from
the STROBE Construct key and adjusted using the <STROBE RATE> wheel.
Studio Color
An automated moving yoke wash luminaire manufactured by Lightwave Research.
SYSEX
System exclusive protocol. A subset of MIDI.
System Keys
These keys provide you with the mechanism to playback Presets, Macros, Palettes, or Group
key assignments that you previously recorded (stored). You play one System Key at time.
See also “Macro.”
See also “Palette.”
See also “Group.”
See also “Instant Presets.”
Terminator
A terminator is a resistor inside an XLR connector. It is used to prevent the analog signal from
continuously “echoing” up and down the data link. A terminator must be used on the last
device in every Link. For Lightwave Research luminaires, a 120-ohm terminator is required.
D-16 Status Cue User’s Manual
Trackball
The trackball functions as a trackball for the Status Cue control panel and as a standard mouse
control for the PC. If you have a mouse connected to the PC, then you can use either or both as
the mouse control. The trackball is primarily used to position fixtures for programming or for
live control. Use your fingers and rotate the trackball in the tilt direction, pan direction, or any
combination of tilt and pan. “POS” must be illuminated (on) to access position mode for the
trackball.
Trackspot
An automated compact moving mirror luminaire manufactured by Lightwave Research.
Trackspot has 10 colors,10 Gobos, Dim, and Strobe.
Transparency
Transparency is an important concept that demonstrates the interaction between the 18
possible composite outputs to the fixtures. Transparent values are the computer’s default
values for all constructs of a fixture(s). When you open a new Scene or Sequence, you see
them displayed as Light Blue. When you adjust a construct, you are assigning that value to that
construct within that Scene/Sequence; you are making it non-transparent. This is the basic
principle of transparency. As an analogy, think of five overhead transparencies stacked for
projection on a screen.
See also “HTP.”
See also “Preset.”
Transition - (Time)
Timing entities in a CueList used to override the times of MSC devices.
Unarchive
Restoration of a Show to hard drive/computer from floppy disk or from within the hard drive.
Xfade
A timing entity that allows you to set the crossfade time between variable (continuous)
Constructs as the Scene advances from the previous Scene to the current Scene. Xfade and
Delay are Scene wide timing entities, that is, the crossfade and delay time affects all the
fixtures in a Scene. When previewing a Sequence in the editing mode, you can dynamically
change the Xfade and Delay times. However, in this mode the changes are global to all Scenes
in the Sequence. Xfade is the transition time to reach new values, where Delay is the amount of
time each Step will playback or pause on each Step (in a Sequence).
See also “Delay.”
See also “Constructs.”
Appendix D Glossary of Terms D-17
D
XLR Cable/Connectors
This is the type of cables and connectors used to interface (or daisy chain) the fixtures to the
LinkCards. Most Lightwave Research XLR connectors have three pins:
Pin 1 = shield
Pin 2 = negative
Pin 3 = positive
Zoom
Zoom is a continuous construct. Zoom is a motorized mechanism which allows you to
effectively alter the beam size while maintaining focus.
D-18 Status Cue User’s Manual
Appendix E
Important Safety Information
WARNING: FOR CONTINUED PROTECTION AGAINST ELECTRIC
SHOCK.
1. Refer servicing to qualified service personnel. No user serviceable parts inside.
2. Do not expose to rain or moisture.
3. The Status Cue console and LinkCards must be used with a computer having
SELV (safety extra-low voltage) DC supply to the LinkCard.
Important: Informations De Sécurité
MISE EN GARDE: POUR UNE PROTECTION PERMANENTE
CONTRE LES CHOCS ÉLECTRIQUES.
1. L'utilisateur ne peut pas accéder aux pièces à l'intérieur de cet appareil. Seul du
personnel qualifié est habilité à réparer cet appareil.
2. Ne pas exposer l'appareil à la pluie ou l'humidité.
3. La console Status Cue et les LinkCards doivent être utilisées avec un
ordinateur doté d'une alimentation à courant continu SELV reliée à la
LinkCard.
Wichtige Sicherheitshinweise
WARNUNG: ZUM SCHUTZ GEGEN GEFÄHRLICHE
KÖRPERSTRÖME.
E
1. Das Gerät enthält keine wartungsfähigen Teile. Service sollte stets nur von
Fachpersonal durchgeführt werden.
2. Vor Feuchtigkeit und Nässe schützen.
3. Die Status Cue Konsole und die LinkCards dürfen nur mit einem Computer
benutzt werden, der eine SELV Gleichstromversorgung für die LinkCard
aufweist.
Appendix E Important Safety Information
E-1
Información Importante De Seguridad
ADVERTENCIA: PARA LA PROTECCIÓN CONTINUA CONTRA
ELECTROCUCIONES.
1. El interior de la unidad no contiene repuestos que puedan ser reparados por el
usuario. Solicite el servicio de reparación de personal califícado.
2. No exponga la unidad a la lluvia o a la humedad.
3. La consola Status Cue y las LinkCards deben usare con una computadora que
tiene una fuerza de corriente continua SELV conectada al LinkCard.
Importanti Informazioni Di Sicurezza
AVVERTENZA: PER PREVENIRE LE SCOSSE ELETTRICHE.
1. L'utente non deve riparare nessuna parte dentro l'unita'. Per qualsiasi
riparazione rivolgersi al personale specializzato.
2. Questa apparecchiatura non deve essere esposta ne alla piogga ne all' umidita'.
3. La console Status Cue e la scheda LinkCards devono essere usate con un
computer che alimenta la LinkCard tramite il dispositivo di alimentazione di
sicurezza a corrente continua a bassissima tensione SELV .
E-2
Status Cue User’s Manual