1
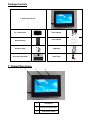
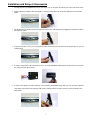
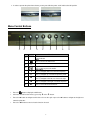
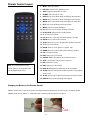
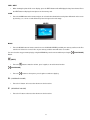
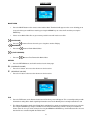
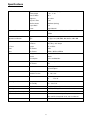
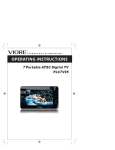
7” Digital Photo Frame
Item Number: 62903108
User Manual
* Important Notice: Please read this manual carefully
All brand names and trademarks are the property of their respective owners
FCC Norm
FCC
This equipment has been tested and complies with limits for Class B digital devices pursuant to
Part 15 of Federal Communications Commission (FCC) rules.
FCC Compliance Statement
These limits are designed to provide reasonable protection against frequency interference in
residential installations. This equipment generates, and radiates radio frequency energy, and if
not installed properly or used in accordance with the instructions, may cause harmful
interference to radio communication. However, there is no guarantee that interference will not
occur in television reception, which can be determined by turning the equipment on and off.
Interference may be corrected by one or more of the following measures:
Reorient or relocate the receiving antenna
Increase the separation between the equipment and the receiver
Plug the equipment into an outlet on a circuit different from that to which the receiver is
connected.
CAUTION!
The Federal Communications Commission warns the user that changes or modifications to the unit not
expressly approved by the party responsible for compliance could void the user’s authority to operate the
equipment.
2
Contents
Precautions...................................................................................................................................... 4
Overview .......................................................................................................................................... 5
Quick Start Guide ............................................................................................................................ 5
Attaching the Easel Stand to the Digital Photo Frame ................................................................. 6
Package Contents ........................................................................................................................... 7
7” Digital Photo Frame.................................................................................................................... 7
Installation and Setup of Accessories ........................................................................................8-9
Menu Control Buttons..................................................................................................................... 9
Remote Control Layout................................................................................................................. 10
On Screen Display (OSD) Setup Menu ................................................................................... 11-13
Operating your Digital Photo Frame with the Remote Control.............................................14-16
Specifications ................................................................................................................................ 17
Troubleshooting ............................................................................................................................ 18
Maintenance................................................................................................................................... 19
Service Procedure ......................................................................................................................... 20
Warranty ......................................................................................................................................... 21
3
Precautions
1. Read all of these instructions and save this manual for later use.
2. Follow all warnings and instructions on the product.
3. Do not insert sharp objects or spill liquid into the digital photo frame through the cabinet slots; this
may cause accidental fire, electric shock or failure.
4. Unplug the unit when not in use for an extended period of time.
5. Unplug the unit from power outlet before cleaning.
6. Do not attempt to service this product yourself, as opening or removing the cover may expose
you to potential electric shock. Only a qualified technician should service this product.
7. Do not apply pressure to the screen, the LCD screen is very delicate.
8. Keep the digital photo frame away from extreme heat, cold or humid places.
9. Do not place directly under sunlight, dusty surroundings or near equipment which may
generate strong magnetic fields.
10. Do not place any object on the power cord.
4
Overview
•
The 7” Digital Photo Frame enables you to view digital photos from different types of memory
cards simply and quickly. There’s no need to use a computer or a printer. You can enjoy your
photos anytime and anywhere. It’s very convenient and quick.
•
The Slide Show Mode is a convenient method to display all of your pictures in one continuous
mode. It allows you to choose several pre-programmed transitions from slide to slide.
•
Most functions on this Digital Photo Frame can be controlled by the Remote Control device
included.
•
The Digital Photo Frame does not require a direct connection to a computer. The built-in card
reader and the bonus 8 in 1 card reader can read a wide assortment of the most popular memory
cards.
•
The Digital Photo Frame can also be connected to a TV and pictures can be viewed on the TV
screen.
•
Videos and short movies stored on the memory cards in MPEG4 format can also be played back
on the unit as well as audio and MP3 music programs stored on the memory cards.
•
The Digital Photo frame supports MS, SD, MMC memory cards via the built-in card reader and by
using the optional 8 in 1 card reader connected through the USB port you can also download from
the following memory card types: CF(Type 1&2), SD, MMC, MS, MS Pro, SM and MD.
Quick Start Guide
1. Plug the DC power adapter cable into the DC + 12V input and plug the AC end of the adapter into
a normal AC outlet .
2. Insert your compact flash memory card SD, MMC or MS card found in your digital camera into
the appropriate card slot on the side of the Digital Photo Frame.
3. In order to view pictures stored on CF(Type 1 & 2), MS Pro, SM or MD memory cards you can
connect the optional card reader to the photo frame with the USB cable included and then insert
the memory card for viewing on the photo frame.
4. Turn the On/Off switch to the On position, the Digital Photo Frame will initialize and display your
media.
5
Attaching the Easel Stand to the Digital Photo Frame
1. Clear a flat clean area to set your photo frame down upon in order to attach the easel stand to the back of the frame.
Make sure there are no sharp objects in the area that can make contact with the LCD screen of the photo frame that
may cause damage to the screen.
2. Align the easel stand to the back of the photo frame so that the mounting hole lines up correctly. Locate the securing
screw packed with the photo frame unit and insert it through the easel and tighten the knob to securely hold the easel
stand to the photo frame.
3. You may set the Digital Photo Frame in a vertical or horizontal position as shown below.
Horizontal Position
Vertical Position
6
Package Contents
7” Digital Photo Frame
8 in 1 Card Reader
Power Adapter
User’s Manual
Remote Control
Earphone Cable
USB Cable
Easel Stand with Knob
Audio Cable
7” Digital Photo Frame
LCD Screen
Remote Control Receiver
Clear Acrylic Frame
7
Installation and Setup of Accessories
1.
Carefully position your Digital Photo Frame so that you can see all of the connection ports on the side of the frame.
2.
Plug the DC power adapter cable into the DC + 12V input and plug the AC end of the adapter into a normal AC
outlet.
3.
The photo frame has built-in speakers but you may listen to the audio program by plugging in the Earphone cable to
the Earphone outlet.
4.
To view your pictures on TV you can plug the AV cable into the AV port and connect to the proper input on your TV
or DVD player.
5.
In order to view pictures, video and listen to music: insert the SD, MMC or MS memory cards into the correct slot on
the side panel of the photo frame.
6.
In order to view pictures stored on CF(Type 1 & 2), MS Pro, SM or MD memory cards you can connect the optional
card reader to the photo frame with the USB cable included and then insert the memory card for viewing on the
photo frame.
8
7. In order to operate the photo frame viewer you may now slide the power on/off switch to the ON position.
Menu Control Buttons
No.
Symbol
O
R
OK
Function
LED
Power Indicator
Menu
Press to access the main menu.
Return
Play/Pause
Press to play or pause the media.
Down/Next
Press to navigate down or to view the next photo.
Up/Previous
Press to navigate up or to view the previous photo.
Left/Style
Press to navigate to the left or to choose the style.
Right/Rotate 90°
Press to navigate to the right or to rotate the photo.
Enter
Press to select the desired function.
•
Press the “
•
Select the desired function menu, by pressing “ ” or the “ ” button.
•
Press the “ ” button to navigate to the left or to choose the style or press the “ ” button to navigate to the right or to
” button to display the OSD menu.
rotate the photo 90°.
•
Press the “OK“ button to enter/select the function selected.
9
Remote Control Layout
1. MUTE: Mutes the volume.
2. RETURN: Returns to the OSD main menu.
3. STOP: Stops the selected file or action.
4. POWER: Turns the unit on or off.
5. PHOTO: Goes to the Photo Setup and displays the photo files.
6. MUSIC: Goes to the Music Setup and displays the music files.
7. MOVIE: Goes to the Movie Setup and displays the movie files.
8. FILE: Goes to the file library and shows all files.
9. MENU: Goes to the main OSD Menu.
10. UP: Moves the cursor up when making a selection.
11. PLAY/PAUSE: Play/pause the media program.
12. V+: Increases the volume.
13. Left: Moves the cursor to the left when making a selection.
14. ENTER: Access the function selected.
15. Right: Moves the cursor to the right when making a selection.
16. V-: Decreases the volume.
17. ZOOM: Zooms in on the picture x 4 (photos only).
18. DOWN: Moves the selector down when making a selection.
19. FW: Forwards the movie.
20. PREV: Goes to the previous file.
21. ROTATE: Rotates the photo in 90° clockwise intervals.
22. STEP: Synchronizes play of picture and music.
23. RW: Rewinds the movie.
Note: The working distance for the
24. NEXT: Advances to the next file.
remote control is up to 9.84 feet away
25. DISPLAY: Display the file information of selected picture.
from the Digital Photo Frame.
26. SLOW: Adjusts the interval time between pictures as they appear
on the screen.
27. STYLE: Selects how the picture will change from frame to frame.
28. REPEAT: Plays the file repeatedly until stopped.
Changing the Battery in the Remote Control
Hold the remote control, squeeze the button to the right, and pull the battery tray out. Then re-place the battery (model
CR2025) inside the tray with the “+” polarity facing up, and then push the tray back to its place.
FPO
10
On Screen Display (OSD) Setup Menu
Setup Menu page
Setup mode selected
Current Setup mode
1. Turn on the Digital Photo Frame and press the “MENU” button on the remote or “L” on the Digital Photo Frame to
display the OSD menu.
2. Select the desired function menu, by pressing “
” or the “
” button and press “ENTER” or “OK”.
PHOTO SETUP
Photo Setup:
Allows you to select
how the photos will
be displayed on the
screen.
Transition Mode:
Allows you to
select how fast the
viewer will change
from picture to
picture.
Thumbnail Digest:
Allows you to turn the
thumbnail viewer On
or Off.
Orientation:
Allows you to select
if the picture will
appear in horizontal
or vertical mode.
Digest Style:
Allows you to
select how many
thumbnails will
appear on the
screen.
MUSIC SETUP
Music Setup:
Allows you to
select how your
music files will
play.
Repeat Mode:
Allows you to select
if the music file(s)
selected will play
repeatedly or one
time only.
11
MOVIE SETUP
Movie Setup:
Allows you to
select how your
movie files will
play.
Repeat Mode:
Allows you to select
if the movie file(s)
selected will play
repeatedly or one
time only.
Digest Style:
Allows you to
select how many
movie thumbnails
will appear on the
screen.
SLIDESHOW SETUP
Slideshow Setup:
Allows you to select
how the photos will
be displayed on the
screen.
Slideshow Mode:
Allows you to select
if you will run the
slideshow or have it
run automatically.
Folder Repeat:
Allows you to
select if the slide
show you created
will repeat upon
completion.
Interval Time:
Allows you to select
the time duration
between photos in
the slide show.
Transition:
You can select
how the photos
will change from
one frame to the
next.
Auto Start:
Allows you to select
if the slideshow will
begin automatically
upon inserting the
memory card.
12
PREFERENCES SETUP
Preferences
Setup:
Allows you to
select your
preferences on
the screen.
TV Type:
When sending the
A/V signal to a TV
you must select
the matching TV
tuner system.
TV Display:
When sending
the A/V signal to a
TV you must
select the screen
format.
Video Output:
When sending the
A/V signal to a TV
you must select
the TV input type
connection.
OSD Lang:
You may select
the screen menu
to appear in
English or
Chinese
languages.
OSD Message:
Allows you to turn
on or off all On
Screen Display
Messages.
Setup Values:
Resets the photo
frame to the
factory set
standards and
deletes your
settings.
13
Operating your Digital Photo Frame with the Remote Control
Note: The following menu will only appear on the screen as long as the memory card contains MP3 and/or MPEG files.
PHOTO
PHOTO
•
Press the PHOTO button on the remote control to access the Thumbnail Preview of the pictures you have saved on
the memory card. On the following screen it will display the small Thumbnail Digest of your pictures allowing you to
select one of them by moving the cursor over the picture using the ARROW KEYS on your remote. Once you have
selected a photo, press the ENTER key and you will now see the picture fill the photo frame. This will also activate the
Slide Show feature of your Digital Photo Frame as the unit will now advance from one picture to the next starting with
the picture you selected to review all the photos on your memory card.
DISPLAY
•
Press DISPLAY, it will show you the file name and size, resolution and date the picture was taken for each individual
picture on the memory card.
STOP
•
Press the STOP button to stop the slideshow presentation. Press ENTER to re-start the presentation.
ZOOM
•
While the picture is on the screen, press the ZOOM button and you can enlarge the picture up to 4 times. Press the
ZOOM button once, the picture will be enlarged 2 times larger than the original; press the ZOOM button a second time
and it will enlarge the picture 3 times the original size; press the ZOOM button a third time and it will enlarge the
picture 4 times the original size; press the ZOOM button one more time and the photo will return to it’s original size.
RETURN
•
Press the RETURN button, and it will take you back to the original Thumbnail Digest or “Home” page which will show
you the 4 selection choices; Photo, Music, Video and File which you may select with the ARROW keys and then press
ENTER to resume your viewing.
STYLE
•
Press the STYLE button to choose a Transition Style where you can select how the transition will look as the picture
frame changes from frame to frame. There are 14 styles you can choose from: dissolve from left to right, right to left,
top to bottom, bottom to top, and 10 other choices that will be listed for you on the viewing screen.
STEP
•
Press the STEP button to synchronize and start the desired picture and music that is stored on the memory card.
Press STEP again to stop the music from playing.
ROTATE
•
Press the ROTATE button on the remote to rotate the picture on the screen in a clockwise direction and the picture will
rotate in 90° intervals for a full 360 rotation with each press of the ROTATE button.
14
PREV / NEXT
•
When viewing the photo in full screen display, press the PREV button and it will display the last picture viewed. Press
the NEXT button to display the next picture on the memory card.
SLOW
•
Press the SLOW button on the remote and you can select the time duration that each picture will remain on the screen
by choosing 1, 3, 5 or 10 seconds before the picture changes to the next image.
MUSIC
MUSIC
•
Press the MUSIC button of remote control to access the MUSIC LIBRARY provided your memory card has music files
stored on it. If there are no music files on your memory card this menu will not be accessible.
You can select the song you want to play by using the ARROW keys on the remote and then pressing the
Button.
(MUTE)
•
Press the
button to mute the volume, press it again, to cancel the mute function.
(PLAY/PAUSE)
•
V+
Press the
button to select pause, press it again to continue to playing.
(INCREASE VOLUME)
•
V-
Press the V+ button: to increase the volume one level at a time.
(DECREASE VOLUME)
•
Press the V- button: to decrease the volume one level at a time.
15
(PLAY/PAUSE)
MOVIE/VIDEO
MOVIE/VIDEO
•
Press the MOVIE button on the remote control and the Movie Thumbnails will appear on the screen allowing you to
choose the video you would like to watch by pressing the ARROW keys to select the file and then pressing the
ENTER key.
•
If there are no Movie/Video files on your memory card this menu will not be accessible.
(PLAY/PAUSE)
•
Press the
button to Pause the movie, press it again to continue Playing.
(BACKWARD)
•
Press the
button to Rewind Movie/Video.
(FAST FORWARD)
•
Press the
button to Fast Forward the Movie/Video.
RETURN
•
V+
Press the RETURN button, and it will come back to the home page.
(INCREASE VOLUME)
•
V-
Press the V+ button: to increase the volume one level at a time.
(DECREASE VOLUME)
•
Press the V- button: to decrease the volume one level at a time.
FILE
FILE
•
Press the FILE button on the Remote Control and a File Library screen will appear. This screen will provide you with
information showing all the details regarding information stored on the Memory Card currently installed in the unit.
•
This Library will show the details of the Photo, Music and Movie files stored on your Memory Card once you select the
File using the ARROW keys and press ENTER. For the Photo and Movie files it will also show you a Thumbnail
Picture of the file once you select it from the list using the ARROW and ENTER keys. It will indicate the file size and
date the file was created along with the Folder name.
16
Specifications
LCD Panel
Supported Formats
Type
7.0” TFT LCD Display
Viewing Angle
H: 80° , V: 70°
Contrast Ratio
250 : 1
Brightness
300 cd/m2
Response Time
16 ms
Max Resolution
1440X234 (Analog)
Aspect Ratio
16: 9
Frame
Acrylic Material
Type
JPEG, AVI (motion – JPEG), MP3, MPEG1, MPEG2,
MPEG4
Built-in Card Reader
Type
SD, MMC, MS memory card
Optional Card Reader
Type
CF (Type 1 & 2) SD, MMC, MS, MS Pro, SM & MD
Media
Output
1 Vp-p
Functions
Video Play – A/V Output
TV Tuner
System
PAL or NTSC
Photo
File Format
JPEG
Video
File Format
MPEG1, MPEG2, MPEG4
Power
Voltage
100-240V DC 12V
Current
800mA
Consumption
Active < 9.6Watt Max
Output
2W Stereo Speakers
File Format
MP3
Audio
Slideshow
With background MP3 music
Repeat Playback
Pictures
User Interface
Operating Condition
Dimensions
File Format
JPEG
Rotation Function
90°, 180°, 270°
LED Indicator
Active
- Green
Off
- Turn off
Temperature
0°C~45°C
Air Humidity
20% ~ 80% R.H.
Physical
9.5” (W) 7” (H) 3.5” (D) With Easel Stand
Net Weight
2.54 lbs (including remote control and reader)
Regulation (Certifications)
FCC
Accessories
Remote Control, UL Adaptor, Earphone cable, USB
cable and Easel Stand with knob, and User Manual.
Others
8 in 1 Memory Card Reader included.
17
Troubleshooting (FAQ)
1. Q: What type of file formats does the DPF support?
A: It supports JPEG, AVI (motion – JPEG), MP3, MPEG1, MPEG2, MPEG4.
2. Q: Why are some of my photos not able to be displayed on the viewer?
A: Most digital cameras take and save the photos in a JPEG format which allows the digital photo frame to
display the photos. However, some images (for example web page images, scanned images, or RAW
format photos taken by special cameras) may not be supported.
3. Q: There is no picture on the screen?
A: The flash card may not be installed properly.
Verify the power adapter is connected properly to the power outlet and DC port on the frame.
Verify the power On/Off switch is turned to the On position.
4. Q: Why is it screen displaying “NO MEDIA DETECTED” on the screen?
A: Make sure the flash card is installed properly on the flash card reader.
Check the USB cable connection. If it is bent or damaged, the signal may be affected.
Turn off the Digital Photo Frame and reinsert the memory card properly.
Turn on the Digital Photo Frame and press the “MENU” button on the remote or “ ” button to display the
OSD menu. Select the desired function, by pressing the “ ” or the “ ” button and press “ENTER” or
“OK”.
5. Q: Why is the digital photo frame not playing the AVI files in my card?
A: Most likely the AVI format is not supported, there are many AVI formats. The Digital Photo Frame
supports AVI format in MOTION JPEG format.
18
Maintenance
To clean your digital photo frame, please refer to the instructions below:
NOTE: To prevent electrical shock, do not open the Digital Photo Frame casing. Leave repair of the frame
to qualified personnel, please see the tech support information in the warranty.
1. Unplug the power
Unplug the Digital Photo Frame power adapter from the AC socket before cleaning the monitor.
2. Check the cover
Check to see if the frame and accessories are damaged, broken, or strained. If so, please consult the warranty
card for Tech Support information.
3. Clean
Never spray or pour any liquid directly onto the screen or frame.
Avoid allowing any water or liquid from
entering the Digital Photo Frame or accessories.
4. Cleaner
Use water or non-ammonia/non-alcohol based glass cleaner. Do not use harsh or abrasive cleaners such as
ketene (such as acetone), ethanol, toluene, acetic acid, methane, chloride, or other detergents to clean the
monitor, these chemicals can damage the LCD screen of the frame.
5. Screen
To clean your LCD screen or case, use water or a mild cleaner, as listed above. Moisten a soft, clean cloth or if
possible, use a special screen cleaner sheet or a solution suitable for static electricity application. Using any
cleaner other than water or a mild cleaner may damage your digital photo frame and will not be covered under the
warranty.
6. Storage of Unit
If the Digital Photo Frame is not in use for a long time, please unplug it and store it in its original box in order to
avoid any damage.
7. Disclaimer
Any damage resulting from use of any cleaner that is not mentioned above is not covered under the terms of the
warranty on this product.
19
Service Procedure
For technical support after the first 14 days of purchase, please call the toll free number below to obtain
service. A customer service representative will assist you and provide a return authorization number (RA
number) if needed allowing you to ship your product to the service center.
DO NOT RETURN THIS PRODUCT TO THE STORE. PLEASE CONTACT THE TOLL FREE
NUMBER LISTED BELOW
Please have the following information available when you call the service center:
Your Name and Address
Date of Purchase
Model Number
Serial Number
Store Name and Address
Store Location Number
Type of problem with the unit
After receipt of the RA number:
Send the complete unit, including power cord and adapter in the original carton to the address below.
Include a copy of the original receipt for proof of purchase (within 90 days).
Write the RA number on the outside of the package. Packages without RA numbers will not be
accepted.
The LCD monitor is fragile. Use extreme care when handling and packaging the unit.
The purchaser is responsible for any shipping charges to the repair facility and assumes all risk.
The service center will repair or replace the unit and send it back to the purchaser within 10 working
days from receipt of the unit.
To contact the service facility, please call 508-435-4830 or 800-639-3803. The address for this facility is:
Four Star Group
26840 Fargo Ave. Suite C
Bedford Heights, OH 44146
Email Support: [email protected]
20
Warranty
90 Days Limited Warranty
This product is warranted to be free from defects in material and workmanship for a period of 90 days.
Warranty obligations are limited to replacement or repair of defective parts and components, at the option
of the manufacturer. The warranty of this product is null and void if the product is subjected to negligence,
abuse, modification, misuse, accident or if the customer uses the product for a function it was not
intended for. This warranty is only valid for the original purchaser of this product and will not be honored
if the product is resold.
The manufacturer will not be liable for incidental or consequential damages caused by the use of this
product. The manufacture will not be liable for any costs such as lost profits or revenues, cost of
temporary replacements, loss of data, loss of equipment or use of equipment or any claims by third
parties.
After 14 days from purchasing the product, please call the phone number mentioned below to obtain
service. DO NOT RETURN THIS PRODUCT TO THE STORE. A customer representative will give you a
return authorization (RA number) allowing you to ship the product to the service center. The purchaser
must have a copy of the original receipt for proof of purchase within 90 days. The purchaser of this
product is responsible for any shipping charges to the repair facility. The manufacturer service center will
repair or replace the unit in question and send it back to the purchaser within 10 working days of receipt
of the unit.
In order to contact the service facility, please call 508-435-4830 or 800-639-3803.
The address for this facility is:
Four Star Group
26840 Fargo Ave.
Unit C
Bedford Heights, OH 44146
E-mail Support: [email protected]
21