1
Windspeed WS1
Page 6
Set up of the Anemometer together
with the ALGE Photofinish OPTIc
When using the operating unit outside, it is not allowed to use the charger.
Charge the internal batteries during the night before the event.
☞ Set up the photofinish OPTIc (see OPTIc manual):
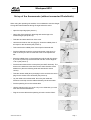
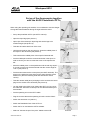
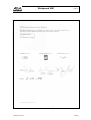
☞ Open the tripod legs (see picture 1).
☞ Open clips of the telescopic tripod leg and set the legs to its
maximal length (see picture 2).
Picture 1
☞ Take the wind tube careful out of the case.
☞ Hold the wind tube on the carrying grip. Screw the middle piece of
the tripod on the wind tube (see picture 3).
☞ Take care that the middle piece of the tripod is fastened well.
☞ Put the middle piece with the screwed wind tube in the tripod. In
order to do this you have to rotate the screw of the tripod to the
left.
Picture 2
☞ Move the middle piece on the tripod down until the red ring stops it.
If you set it up this way the anemometer has the correct height of
1.22 m (see picture 4).
☞ Put the anemometer at the correct place (see IAAF rule book). The
arrow on the wind tube must show into the same direction as the
athletes run (then the following wind and heat wind is shown
correct).
Picture 3
☞ Take the remote cable (60 m) and plug it at the end with the corner
plug into the socket of the wind tube (see picture 5).
☞ Lay the cable to the timing room (where the OPTIc is). Do not lay
the cable taut. Someone could trip over the cable and destroy the
anemometer.
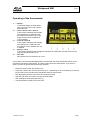
☞ Put the operating unit on the OPTIc table.
☞ Plug the remote cable at the operating unit at the socket ”Wind”.
Picture 4
☞ Switch the anemomer on (switch 1)
☞ Switch the Distribution Box of the OPTIc on.
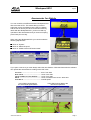
☞ Switch the PC on and start the OPTIc software.
☞ Select at ”Choose the sport” the point ”Athletic with ALGE
Version:E-99-09-12
Picture 5
Page 6