1
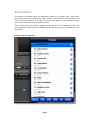
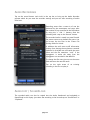
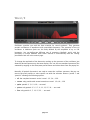
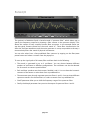
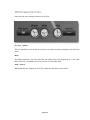
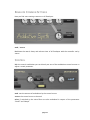
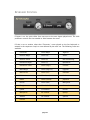
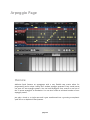
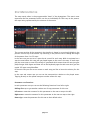
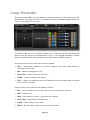
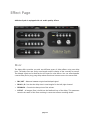
Addictive Synth
VirSyn Software Synthesizer
2nd Edition
Introduction....................................................................................4
Welcome to Addictive Synth........................................................................................4
Features......................................................................................................................5
Basics..............................................................................................7
Top bar.......................................................................................................................7
Interfaces....................................................................................................................8
Keyboard Bar..............................................................................................................8
Keyboard....................................................................................................................8
Sound Presets.............................................................................................................9
Arpeggio Presets.......................................................................................................11
Audio Recordings......................................................................................................12
Audiocopy / SoundCloud...........................................................................................12
Wave Page.....................................................................................13
Overview...................................................................................................................13
Wave I/II...................................................................................................................14
Filter I/II...................................................................................................................16
Sound Parameter.......................................................................................................17
Control Page.................................................................................19
Overview...................................................................................................................19
LFO...........................................................................................................................20
LFO Common Settings...............................................................................................23
Envelope...................................................................................................................24
Envelope Common Settings.......................................................................................25
Control.....................................................................................................................25
Keyboard Control......................................................................................................26
Arpeggio Page...............................................................................28
page 2
Overview...................................................................................................................28
Global Settings..........................................................................................................29
Step Matrix Editor.....................................................................................................31
Loop Recorder...............................................................................32
Effect Page....................................................................................33
Delay.........................................................................................................................33
Modulation Effect......................................................................................................34
Reverb......................................................................................................................36
Appendix......................................................................................37
Troubleshooting.......................................................................................................37
page 3
Introduction
WELCOME TO ADDICTIVE SYNTH
It was never so easy to create beautiful sounds and driving loops. The unique dynamic
wavetable + noise synthesis allows you to explore an unprecedented wide range of sonic
territory. From acid loops, crystal clear percussions, realistic human choirs to complex
musical soundscapes nothing seems impossible with only a handful parameters to tweak.
Together with the intelligent randomizer for both sounds and arpeggios you will loose
any sense of time and space while exploring unknown sonic territories.
Right from the beginning you'll understand why it's named Addictive.
With the Apple iPad Camera Connection Kit you can use a CoreMIDI compatible MIDI
Keyboard to control Addictive Synth.
For updated informations
mobil.virsyn.com.
about
Addictive
page 4
Synth
please
visit
our
website
at
FEATURES
Dynamic wavetable synthesizer
•
Six dynamic wavetable oscillators per voice, up to 48 total.
•
Continuous morphing between two oscillator sets.
•
Realtime editing of up to 128 partials (overtones).
•
Realtime editing of filter structure to create arbitrary body resonances.
•
Spectral noise generator with dynamic filter structure.
•
Extensive modulation possibilities using up to 4 LFOs and 4 Envelopes.
•
Control matrix allows real time control using the X/Y touch pad, the tilt sensors of the
iPad and MIDI Controllers. •
Four track loop recorder with unlimited overdubbing.
•
Monophonic or polyphonic with 8 voices.
•
160 factory presets, unlimited user presets can be shared. •
Up to three effects concurrently usable selected from: equalizer, phaser, flanger,
chorus and stereo/cross delay.
•
Hi end reverberation unit.
Live
•
Play melodies live with the onscreen keyboard. Drag fingers for slides and vibrato. •
With the Apple iPad Camera Connection Kit you can use a CoreMIDI compatible MIDI
Keyboard to control Addictive Synth.
•
Line 6 MIDI Mobilizer compatible.
•
Velocity sensitive keyboard.
•
Select from dozens of scales and play them with scale optimized keyboard layout.
page 5
Full featured programmable Arpeggiator
•
Uses programmable sequences with up to 32 steps. •
Can trigger single notes and chords.
•
Unique randomizer generates Arpeggios with 100% usability.
•
32 Arpeggios included, unlimited user arpeggios possible.
•
For each step you can program tie, accent, transposition and note order
Global
•
Export loops as audio and midi files.
•
Audio pasteboard for exchange with other Apps
•
Exchange user presets with File Sharing in iTunes.
•
Support for virtual MIDI input connections.
•
Support for Korg's Wireless Sync-Start Technology (WIST).
•
Publish loops and recordings online with the SoundCloud audio platform.
•
Exchange user presets with File Sharing in iTunes.
page 6
Basics
The user interface of Addictive Synth is quite simple and is divided into five different main
screens:
•
Wave page for basic sound adjustment
•
Control page for modulation routing
•
Arpeggiator
•
Loop recorder
•
Effects
TOP BAR
Functions from left to right:
•
Switch to WAVE page for basic sound adjustment.
•
Switch to CONTROL page for modulation routing
•
Switch to ARP page for Arpeggiator settings
•
Switch to LOOP page
•
Switch to EFFECT page
•
VirSyn Logo opens About box ( and can be used as MIDI Panic button )
•
MIDI sets receiving channel used in virtual MIDI environment.
•
WIST synchronize clock to Korg WIST compatible Apps.
•
BKGD Audio enables background audio
•
Audio Recording - opens audio recorder page
•
Tempo/Metronome setting - opens Tempo/Metronome page*
•
Question mark - open help overlay for current page.
*Note that you can enter the tempo also with the “Tempo” knob in the Arpeggiator module
on the wave and arpeggio page.
page 7
INTERFACES
•
MIDI - Sets the MIDI channel Addictive is listening for MIDI Notes coming from an
external Keyboard or from another App connected via virtual MIDI.
•
WIST - Tap here to synchronize the arpeggiator operation and the tempo to a KORG/
WIST compatible App.
•
BKGD AUDIO - If set Addictive doesn’t stop working if running in the background.
This let you for example have a sequencer App in the foreground and Addictive
working in the background.
KEYBOARD BAR
•
Preset Selection field - Selects and manages sound presets. Use arrow keys for
browsing. Tap in the middle of the field opens preset manager.
•
Arpeggio Selection field - Selects and manages arpeggio presets. Use arrow keys for
browsing. Tap in the middle of the field opens preset manager.
•
V - Switch on to use tapping force as velocity information.
•
Q - If Key Quantize is set: swiping over the keys is constrained to exact tuning
(Glissando), otherwise pitch bends continuously (Glide).
•
Keyboard range - Tap to select keyboard range, double tap to size the keyboard.
KEYBOARD
Addictive can be played by either the on-screen keyboard or a CoreMIDI compatible
Hardware controller keyboard. You can also use the MIDI Mobilizer Interface of Line6 for
controlling Addictive from an external keyboard.
The on-screen keyboard seems to miss a pitch bender / modulation wheel but this
functions are there in a more touch screen compatible way:
•
Pitch bending is done with moving the fingers left/right. ( if “Q” is not set )
•
Modulation wheel is simulated by moving fingers up/down.
page 8
SOUND PRESETS
The presets in Addictive Synth are organized in banks of 32 presets each. These banks
are saved as files with the extension “.bnk” and they can be directly accessed within the
iTunes File Sharing section of the App. This is the place where you can manage to share
preset banks with other users of Addictive Synth.
Tap on the preset field to open a popup window with a list of all available presets. For
quick zapping through the list of available presets use the left/right arrow buttons in the
preset field.
Popup window for presets:
page 9
Functions in Preset popup:
•
Right arrow: (re-)name preset.
•
Save as: save preset in another preset location.
•
Save: saves the current preset.
•
Copy: copies current preset to the clipboard
•
Paste: paste clipboard to current preset.
•
Init: current preset will be set to initial state.
•
Refresh: refresh list after you’ve copied a new bank to the iTunes file sharing folder.
The first four banks with 32 presets each are already filled with factory sounds. The banks
“Init a” and “Init b” are there for your own creations. If you need more, just make copies of
“Init a.bnk”, rename them to your taste and put them into the iTunes file sharing folder.
page 10
ARPEGGIO PRESETS
Touch on the “Arpeggio” field to open a popup window listing all preset arpeggios. The
first entry is always the arpeggio in the current sound preset since every preset can
contain it’s own arpeggio. “Arp from preset” is the arpeggio pattern saved inside the
current sound preset.
Arpeggio preset popup:
Functions in Arpeggio preset popup:
•
right arrow: window opens where you can name the pattern and specifiy the number
of bars used for this pattern.
•
Save: saves current arpeggio under new name.
page 11
AUDIO RECORDINGS
Tap on the record button (red circle) in the top bar to bring up the Audio Recorder
popover which let you enter the recorder settings and you can start recording of audio
from here:
Recording starts after a count-in of one bar
indicated by the metronome and stops after
the number of bars specified in the field above
by using the “+” and “-“ buttons. Start the
recording with a tap on the “Record” button.
The recorded audio is saved in a wave file with
the preset name set as default file name. You
can access the the files in the iTunes File
sharing folder for iVoxel.
In addition the midi note on/off information
coming from playing the onscreen or external
keyboard is recorded into a file with the same
name and the file extension “.mid”. If the
arpeggiator is active the notes from the
arpeggiator are recorded in the MIDI file.
To change the file name just tap on the name
field and enter the new file name.
Tap on the right arrow of
recording in the list to replay it.
an
existing
AUDIOCOPY / SOUNDCLOUD
The recorded audio can also be copied into the Audio Pasteboard and uploaded to
SoundCloud in this Popup. Just select the recording in the list and tap on “SoundCloud” or
“Clipboard”.
page 12
Wave Page
OVERVIEW
The dynamic wavetable synthesis algorithm on which Addictive Synth is based provides a
very efficient way to create very complex sound sources far beyond the capabilities of
traditional analog synthesis.
Up to six independent oscillators are the basis of this method. It’s therefore ideally suited
for generating ultra fat or chorus like sounds. By strongly detuning the six oscillators you
can generate inharmonic sounds well-suited for simulating cymbals or bell like sounds.
The waveform of the oscillators can be defined freely by specifying up to 128 partials.
With its 128 pole dynamic resonance filter the base sound of the oscillators will be filtered
in a way that is comparable to the filtering of a resonant body of physical instruments.
The Morph function let you smoothly blend between two different resonant bodies with
two different basic waveforms. The filter frequencies of all formants can be shifted
towards lower frequencies with the cutoff and balance parameters.
These outputs of the six oscillators and the noise generator can be spread over the stereo
panorama to achieve a space effect.
The spectral noise generator is working in parallel to the six oscillators above. They share
the same dynamic resonance filter and the possibility to morph between two different
filter structures. The Noise generator has a dedicated volume envelope on the Control
page.
page 13
WAVE I/II
Oscillators provides you with the base material for sound synthesis. They generate
periodic oscillations of waveforms with controllable frequency. The spectrum of the six
oscillators in Addictive Synth can be freely defined by the amplitude of up to 128
harmonics. You can define two different sets of spectrums labelled I and II with the
possibility to morph between them either manual or automatically with the routing
possibilities laid out in the control page.
To change the amplitude of the harmonics making up the spectrum of the oscillators just
draw the desired spectrum on the wave display. You can also use standard spectrums like
sawtooth by tapping on the filter/wave preset button and select them from the popup list.
Normally all partials (harmonics) are used to create the oscillator spectrum. But you can
restrict the used partials to some specific set with the selection buttons “partial I” and
“partial II” allowing the following options:
•
all: the complete harmonic series is used : 1,2,3,4,...,128
•
octave: only partials with octave intervals are used: 1,2,4,8,...,128
•
quint: partials 2, 3, 6, 9, 18,... are used
•
prime: only partials 2, 3, 5, 7, 9, 11, 13, 17, 19, ... are used
•
five: only partials 2, 7, 12, 17, 22, ... are used
page 14
With the button on the right side you can select different configurations of the battery of
six oscillators:
•
6 Osc - 6 oscs with same pitch
•
6 Osc 1:2 - 3 oscs with base pitch, 3 oscs in suboctave
•
6 Osc 1:2:3 - 3 * 2 oscs tuned in ratio 1:2:3
•
6 Osc 1:2:3:4:5:6 - 6 oscs tuned in ratio 1:2:3:4:5:6 (subharmonic)
•
4 Osc 1:2 - 2 * 2 oscs tuned in ratio 1:2
•
3 Osc - 3 oscs with same pitch
•
2 Osc - 2 oscs with same pitch
•
2 Osc 1:2 - 2 * 1 osc tuned in ratio 1:2
•
1 Osc - 1 oscillator
page 15
FILTER I/II
The synthesis of Addicitve Synth is based around a “spectrum filter”, which allows you to
specify the frequency response by drawing a filter contour in the spectrum display. This
allows the creation of very complex formant filter structures. In the example above you
see the typical formant structure of the vocal sound “A”. These filter characteristics can
affect the oscillator waveforms and the noise generator in a way comparable to the way a
resonant body filters the sound of physical instruments.
You can also select from a few predefined filter contours by tapping on the filter/wave
preset button and select a contour from the popup list.
To sum up the signal path of this wave/filter oscillator bank is the following:
•
The sound is generated by up to 6 oscillators. You can choose between different
numbers of oscillators in different configurations. The oscillators can also be detuned
for fat sounds or extreme special effects.
•
Each oscillator produces two basic waves, labelled I and II. You can draw the harmonic
structure of the waves or select them from a predefined list.
•
The two waves pass through separate spectrum filters (I and II). You can draw different
spectrum contours for the two filters, or select a contour from a predefined list.
•
Cutoff parameter allow you to shift the frequency range of the spectrum filter.
•
Finally, the Morph parameter lets you mix the output of spectrum filters I and II.
page 16
SOUND PARAMETER
Right below the wave/filter window you’ll find a series of knobs which allow you to adjust
all sound parameter:
pitch
Master tuning in the range of +/- 24 half tones and +/- 50 cent for fine tuning.
detune
With this parameter you can set the detuning of the 6 independent oscillators of the
multi. Small values lead to complex, chorus like sounds. With increasing values the sound
becomes more and more inharmonic.
cutoff/balance
The cutoff parameter allow you to shift the frequency range of the filter.
This makes it easy to create unique sounding filter sweeps. The more this knob is closed,
the more the spectrum is shifted to the left and the sound gets darker similar to the
behavior of a traditional filter. If you have more than 2 oscillators running you can specify
a different cutoff for a part of the oscillators with the use of the balance parameter. If it’s
set to zero the cutoff of all oscillators is identical, otherwise the difference is stronger
with rising the balance.
morph I-II
You can morph between two parameter sets for wave and filter. If morph is set to 0 % only
Filter I / Wave I is used for the final sound. With rising value of morph the sound
transforms into the one specified by Filter II / Wave II.
Tip: the morph includes the partial structure set with partial I/partial II. If partial I is set to
“all” and partial II is set to “prime” you can morph between a harmonic sound to an
inharmonic one.
width
Define the stereo width of the oscillator set and the noise generator. Please note that this
parameter has no effect if only one oscillator is used.
drive
Adjusts the amount of distortion.
level
Basic level of the output of the oscillator bank.
master
The master output level. The output is protected by a limiter device which makes sure
that the audio output of the iPad doesn’t get saturated.
Tip:
Double tap on any parameter knob to set the parameter to its default value.
page 17
NOISE PARAMETER
The spectral noise generator allows for an unprecedented range of spectral variability and
dynamics. This is due to the possibility to use the two filter banks with their base
parameters “Cutoff” and “Morph”:
cutoff
The cutoff parameter allow you to shift the frequency range of the filter. It works the
same way as described for the oscillator banks. You can set it to a different value than for
the oscillators.
morph I-II
You can morph between two parameter sets for the noise filter. If morph is set to 0 % only
Filter I is used for the final sound. With rising value of morph the sound transforms into
the one specified by Filter II.
level
Basic level of the output of the noise generator. Use this to balance the noise spectra and
the output of the oscillator bank.
page 18
Control Page
OVERVIEW
The control page gives your sound movement and expressive character. The sound
generated on the wave page would be very boring – it would have a steady amplitude and
the sound character wouldn’t change over the duration of a note. On the Control page
you basically connect modulation sources like envelopes, LFOs and the realtime controller
to sound parameter. Due to the simplicity of Addictive’s synthesis method it’s sufficient
to control the four basic sound parameters Level, Noise level, Cutoff, Pitch and Morph
which are represented by the four horizontal control rows shown below. In each row you
can set the modulation sources you want to take influence on one of this basic
parameters and with which amount.
The Noise parameters “Cutoff” and “Morph” are controlled with the same modulations as
for the oscillator bank. But you can turn the noise modulations off for each category.
page 19
LFO
On the leftmost column you have access to the LFO parameter.
Each of the four LFOs is in effect a bank of 8 LFOs, one for each voice.
This module provides you with a Low Frequency Oscillator useful for periodic and random
sound parameter modulations. The LFO can produce five different modulation waveforms.
wave:
select from one of the following waveforms:
Sine wave
Ramp up
Ramp down
Square wave
Pulse wave
Random
mode:
poly - each note of a chord gets an independent lfo.
sync - the LFO rate is synced to the tempo set in the arpeggiator module.
global – all LFOs for the 8 voices are in sync and act as one.
rate: sets the speed of modulation from 0.01 Hz -100.0 Hz. Values over 20Hz are in the
audible audio spectrum which can cause raunchy and cool-sounding sideband overtones
when modulating pitch, cutoff or amplitude.
noise: if switched on the noise filters are also modulated in respect of the parameters
“Cutoff” and “Morph”
mod: sets the maximum amount of modulation of the sound parameter. The effective
amount depends on the control source selected.
page 20
source: the control source makes the modulation amount (mod) described above
dependent of the setting of one of the following control sources:
------ : no control source, modulation amount as set by “mod”
pad x : modulation amount is modified by X movement of X/Y Pad control
pad y : modulation amount is modified by Y movement of X/Y Pad control
tilt x : modulation amount is modified by tilting the iPad in X direction.
tilt y : modulation amount is modified by tilting the iPad in Y direction.
velo: modulation amount is modified by the key velocity.
key:
modulation amount depends on note value.
With an external MIDI Controller you can also use the following MIDI controllers:
[01] Modulation Wheel
[02] Breath Controller
[04] Foot Controller
[05] Portamento Time
[06] Data Entry
[07] Channel Volume
[08] Balance
[10] Pan
[11] Expression
[12] Effect Control 1
[13] Effect Control 2
[16] General Purpose 1
[17] General Purpose 2
[18] General Purpose 3
[19] General Purpose 4
PLease note that you can simulate the Modulation wheel controller with the on screen
keyboard by up/down movements of your fingers.
page 21
Example:
If you want to add vibrato to your sound and you want to control the strength of the
vibrato with the modulation wheel of your keyboard the following settings are needed:
In the 3rd row ( this is the one to modulate pitch ) set the lfo waveform to “sine” and the
rate to a value around 6 Hz.
Set the “mod” parameter of the LFO to 5 %
Set “[01] Modulation Wheel” as control source.
page 22
LFO COMMON SETTINGS
Here you find some settings common to all LFOs:
key sync / phase
The LFO waveform starts at the same point as set with the phase parameter with each key
press.
delay
The delay parameter sets the time that will elapse after the beginning of a new note
before the LFO’s amplitude rises from zero to it’s maximum level.
mod / source
Modulates the rate (frequency) of all LFOs with the controller set by source.
page 23
ENVELOPE
With the envelope generator you can control the sound parameter at any point
duration from key press to key release.
in its
attack: Sets the time the envelope needs to reach the maximum level. The curvature is
logarithmic, that means from start the signal builds up quickly and rising slower when
approaching the max level.
decay: Sets the time the envelope needs to reach the sustain level after the attack phase
has ended. The curvature is exponential, that means from start the signal decays quickly
and falling slower when approaching the sustain level. The decay time has no effect if the
sustain level is at maximum.
sustain: Sets the sustain level the envelope will stay until release.
release: Sets the time the envelope needs to die out after the key is released. The
curvature is exponential, that means from start the signal decays quickly and falling
slower when approaching zero.
mod: sets the maximum amount of modulation of the sound parameter. The effective
amount depends on the control source selected.
source: the control source makes the modulation amount (mod) described above
dependent of the setting of a control source.
noise: if switched on the noise filters are also modulated in respect of the parameters
“Cutoff” and “Morph”
Please note:
Sometimes extremely short attack or release settings can cause clicks, so be aware of this
(this is never an issue with 'real' analog synths, because analog circuitry isn't that fast).
page 24
ENVELOPE COMMON SETTINGS
Here you find some settings common to all Envelopes:
mod / source
Modulates the attack, decay and release times of all Envelopes with the controller set by
source.
CONTROL
With the control modulation you can directly use one of the modulation control sources to
adjust a sound parameter.
mod: sets the amount of modulation by the control source.
source: the control source to be used.
noise: if switched on the noise filters are also modulated in respect of the parameters
“Cutoff” and “Morph”
page 25
KEYBOARD CONTROL
If legato is on, the pitch slides from one note to the next legato played note. The slide
parameter controls the time needed to slide between the notes.
If Scale is set to another value than 'Chromatic', notes played on the live keyboard or
entered in the sequencer 'snap' to notes allowed by the scale set. The following scales are
available:
Chromatic
Chord Major
Algerian
Diatonic Major
Chord (m)
Arabic
Diatonic minor
Chord (6)
Bali Island Pelog
Pentatonic Major
Chord (7)
Byzanthine
Pentatonic minor
Chord (maj7)
Chinese
Blues Major
Chord (maj7+5)
Egyptian
Blues minor
Chord (m7)
Hawaiian
Whole-tone
Chord (sus4)
Hindu
Ionian
Chord (7sus4)
Japanese
Dorian
Chord (dim)
Mongolian
Phrygian
Chord (dim7)
Oriental
Lydian
3rd Interval
Persian
Mixolydian
4th Interval
Ryukyu
Aeolian
5th Interval
Spanish
Locrian
page 26
The base note transposes all live played/sequenced notes if set to another value than 'C'.
With “voice” you can set Addictive to either polyphonic with a maximum of 8 voices or to
monophonic.
The bend range sets the amount of pitch variation using the modulation wheel of an
external MIDI keyboard.
page 27
Arpeggio Page
OVERVIEW
Addictive Synth features an arpeggiator with a very flexible step matrix editor for
programming and a unique “rolling dice” random arpeggio generator. Every sound preset
can store it’s own arpeggio pattern. You can build arpeggios from scratch or use one of
the 32 preset arpeggios as foundation. You can also create an unlimited number of user
arpeggio presets.
Just play a chord or a single note and it gets transformed into a grooving monophonic
synth line or a rhythmical chord pattern.
page 28
GLOBAL SETTINGS
Tap on the arpeggio button to start/stop the arpeggio.
The mode parameter determines the way the pressed keys are sequenced. Available
modes are: Up/Down/Alternate/Random/Incl/Excl.
The trigger parameter controls the way pressed notes and chords are handled:
standard – all currently pressed notes are used for the arpeggio.
hold – the last pressed notes are taken and the arpeggio continues even after you lift of
all notes.
key sync – like “standard, but the arpeggio restarts at step 1 with every new press of
some notes.
The clock parameter sets the basic step length.
The Tempo can be set in bpm (40-300) with the tempo knob. To enter a tempo value by
tapping a rhythm tap on the tempo display in the top bar of the main window.
With Shuffle every other step in the arpeggio is moved forward or backward in timing.
The fix parameter is a performance function and if on the global settings of the arpeggio
don’t change on sound or arpeggio preset selection. This is useful if you want to use
different arpeggios for one sound or different sounds for one arpeggio with the same
settings.
Note that if fix is on the selection of another preset doesn’t
arpeggio, the currently active arpeggio stays as it is.
page 29
load the presets own
Some more parameter are available on the right side of the Arpeggio page:
With the “rolling dice” you can get another randomly generated arpeggio with each tap on
the dice and be surprised how useful they can be !
The gate parameter controls the length of each note relative to the step time.
With the accent row in the step matrix you can boost the velocity for selective steps. The
velocity used for accented steps can be set with the accent knob shown above.
If “key velo” is set the arpeggiator uses a constant velocity set with the “velocity” knob
above for all steps which are not accented. Otherwise the arpeggiator uses the velocity
with which the notes were pressed.
page 30
STEP MATRIX EDITOR
The step matrix editor is the programmable “heart” of the Arpeggiator. The matrix rows
represents the five parameters which can be set individually for each step in the pattern,
the steps being represented by the columns of the matrix.
The current position of the arpeggio in the timeline is shown by a running highlight in the
position row on top of the matrix. Tap and drag in the position row to change the length
of the pattern from 1 to 32 steps.
In the next row you can set or reset the tie control for each step. With tie activated on a
step the note before this step will get played legato to the note in the step. If both steps
play the same note no note off message is generated which means that the note just gets
played longer. With legato and slew set on the keyboard page the tied notes also gets the
typical 303 type note glide effect.
In the next row you can set an accent on each step you like to boost the velocity for this
step.
In the note and octave row you can set the transposition relative to the played notes.
Tapping directly on the yellow transpose marker mutes this step.
Parameter row functions
In each parameter row you can set the following functions from left to right:
Rolling dice: tap to get another random set of step parameter for this row.
Left arrow: rotate the contents for this parameter in the row on step to the left.
Right arrow: rotate the contents for this parameter in the row one step to the right.
Reset sign: reset the parameter for this row to their default value.
page 31
Loop Recorder
The loop recorder offers you the capability to play and record up to four tracks on the fly.
Playback and recordings are done in an endless loop with a predefined length which you
can set in the range of 1 to 16 bars.
To record a track just tap on the “Rec” button of one of the four tracks. Recording starts
with the first key pressed on the keyboard if “play” is not engaged. Recording is always
done in “overdub” mode: each recording mixes with already recorded material.
In the first line you have control over all tracks together:
•
PLAY - starts/stops playback of all tracks. Playback also starts automatically on
recording the first track.
•
ARP - switches arpeggiator on/off
•
Level slider - master volume for all tracks
•
CLEAR - clears the content of all tracks
•
COPY - copies the complete track to the clipboard for use in another App or to paste
in in a track for a submix.
Each of the four tracks have the the following controls:
•
REC - starts recording for this track. Only one track can record at one time.
•
MUTE - silence track.
•
SOLO - solo function for track - only this track is played.
•
Level slider - individual level for this track.
•
CLEAR - clears content for this track
•
PASTE - fills track with current content of audio clipboard.
page 32
Effect Page
Addictive Synth is equipped with six studio quality effects.
DELAY
The delay effect provides you with two different types of delay effects using two delay
lines. The delay times are set by note lengths and are relative to the currently set tempo.
The delayed signal can be feed back to the input for echo effects. You can select between
a stereo delay and a ping-pong delay where the echoes bounces across the stereo field.
•
DRY/WET - Balances between original and delayed signal.
•
DELAY L/R- Sets the the delay time in note lengths for the left/right channel.
•
FEEDBACK - Controls the decay time of the echoes.
•
CUTOFF - A lowpass filter is build into the feedback loop of the delay. This parameter
controls the cutoff of this filter resulting in successive echoes sounding darker.
page 33
MODULATION EFFECT
For the modulation effect you can choose between three different effect types.
Chorus
Use the chorus effect to fatten the voice and give it more width in the stereo panorama.
•
DRY/WET - Balances between original and delayed signal.
•
DEPTH - This parameter controls the depth of the delay modulation.
•
FEEDBACK - Sets the feedback amount for the delay lines of the chorus to further
increase the chorus effect.
•
DELAY - The mean delay time of the chorus. Set this to 10-20ms for typical chorus
effect.
•
SPREAD - Use this to decrease the periodicity of the modulation .
•
RATE - The modulation rate of the effect.
Flanger
The Flanger is composed of two independent delay lines with feedback for the left and the
right channel respectively. The delay time of both delays is modulated by one LFO with
adjustable frequency. For typical flanging effects the delay time should be below 5
milliseconds.
•
DRY/WET - Balances between original and delayed signal.
•
DEPTH - This parameter controls the depth of the delay modulation.
•
FEEDBACK - Sets the feedback amount for the delay lines of the chorus to further
increase the chorus effect.
•
DELAY - The mean delay time of the chorus. Set this to 10-20ms for typical chorus
effect.
•
RATE - The modulation rate of the effect.
page 34
Phaser
The Phaser is built of an 8-pole allpass filter, which gives you a very short and frequency
dependent delay time. This delay time is modulated by an LFO.
•
DRY/WET - Balances between original and delayed signal.
•
DEPTH - This parameter controls the depth of the delay modulation.
•
FEEDBACK - Sets the feedback amount for the delay lines of the chorus to further
increase the chorus effect.
•
DELAY - The mean delay time of the chorus. Set this to 10-20ms for typical chorus
effect.
•
RATE - The modulation rate of the effect.
page 35
REVERB
The reverb unit in Addictive Synth is a stripped down version of our hi-end reverb
REFLECT which is famous for his natural and smooth sound.
You can use the reverb effect in two ways: for each preset you can have your own reverb
settings within each preset. Switch on “global” if you prefer to set the reverb the same for
all presets.
•
DELAY - Sets the amount of time that elapses between the direct sound and the
reverberation tail. This time correlates with the perceived size of the simulated room.
The adjustable range is from 0 ms to 300 ms.
•
REVERB TIME - The time the reverb takes to die away by 60dB after the end of the
initial sound. This parameter correlates with the perceived size of the simulated room.
The adjustable range is from 50 ms to 100 seconds.
•
ROOM SIZE - The room size parameter sets the average distance between the
reflecting walls.
•
DIFFUSION - The Diffusion parameter controls the echo density of the resulting
reverberant sound. The adjustable range is from 0% to 100%. A higher value
corresponds to a higher echo density which is in most cases more natural sounding.
•
ABSORPTION - The Absorption parameter simulates the surface and air absorption of
high frequencies. The adjustable range is from 0% to 100% . Due to absorption the
reverberation time is shorter for high frequencies than for low frequencies. With
higher absorption high frequencies will decay much faster.
•
STEREO - Adjusts the stereo image width of the reverberation tail.
•
DRY/WET - Balance between the dry and reverberant part of the output signal.
page 36
Appendix
TROUBLESHOOTING
Fresh installation
Sometimes Apps having problems after first installation or update. Please try the
following:
•
trash the app
•
boot your device. (most important !)
•
repurchase again from the AppStore ( you don’t have to pay again, they know that you
already have )
•
sometimes another reboot can be helpful.
•
This removes usually problems of this kind and has only be done once.
CoreMIDI problems
There is no special setting in IVoxel to make it work. On default iVoxel listens to all MIDI
channels for input. Check the channel setting with the button “MIDI” on the Control Page.
This should be set to “Omni” to allow input from all channels.
Sometimes it may help if you reboot the device and try it again.
Please make also sure that your keyboard is compatible to CoreMIDI, you can
find a list of compatible MIDI Keyboards here:
http://iosmidi.com/devices/
Report crash logs
If the App suddenly quits during working a crash log is generated helping us identifying
the problem.
Please send us this crash log for further analysis.
Here you can find an excellent article on how to access crash log files:
http://aplus.rs/apple/how-to-find-crash-logs-for-iphone-applications-on-mac-vista-and-xp/
page 37