1
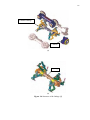
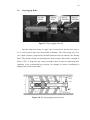
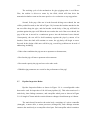
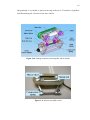
FULLY AUTONOMOUS PIPELINE CLEANING ROBOT SAFUAN NAIM BIN MOHAMAD UNIVERSITI TEKNOLOGI MALAYSIA “I hereby declare that I have read this thesis and in my opinion this thesis is sufficient in terms of scope and quality for the award of the degree of Bachelor of Engineering(Electric - Mechatronic )” Signature : ............................................................ Name of Supervisor : Prof. Dr. Shamsudin bin Hj Mohd Amin Date : 2nd JULY 2012 FULLY AUTONOMOUS PIPELINE CLEANING ROBOT SAFUAN NAIM BIN MOHAMAD A thesis submitted in partial fulfillment of the requirements for the award of the degree of Bachelor of Engineering (Electrical - Mechatronics) Faculty of Electrical Engineering Universiti Teknologi Malaysia JULY 2012 DECLARATION “I declare that this thesis entitled “Fully Autonomous Pipeline Cleaning Robot”, is the result of my own research except as cited in the references. The thesis has not been accepted for any degree and is not concurrently submitted in candidature of any other degree.” Signature : ………………………………….. Name : SAFUAN NAIM BIN MOHAMAD Date : 2nd JULY 2012 ii Specially to my beloved parents, siblings and friends for their eternal support, encouragement and inspiration throughout my journey of education. iii ACKNOWLEDGEMENT I would like to give my sincere appreciation to my supervisor, Prof. Dr. Shamsudin bin Hj Mohd Amin for encouragement, advices and guidance that have led to the success of this project. I would also like to take this opportunity to express my deepest grateful appreciation to my family member who always gives fully moral support and advice for me. The support from family members makes me more confident in doing this project. My fellow friends should also be recognized for their continual support and encouragement. My sincere appreciation also extends to all course mate and others who have provided assistance at various occasions. Their views and tips are useful indeed. I am also indebted to Universiti Teknologi Malaysia (UTM) particularly Faculty of Electrical Engineering (FKE) for their assistance in carrying out my project and provided accommodations to fulfill the objectives of this project. iv ABSTRACT Fully Autonomous Pipeline Cleaning Robot is used to clean the mud or dirt inside the pipe. The autonomous pipe cleaning robot has four tracks to make a smooth mobility inside the pipe. The track was attached with foldable linkage. The foldable linkages give the ability to the robot to move horizontally or vertically inside the pipe. The compress and track design was combined together to maximize the efficiency of the robot. Furthermore, the track wheel will give more friction between robot and the pipe. Thus it can prevent the robot from slipping or spinning inside the pipe. The wire brushes are an effective way to remove the mud inside the pipe. This gives the idea of combining the robot technology with the wire brushes cleaning technology. The brushes are attached behind the robot. The brushes will rotate to clean the mud .The cleaning process will start if the sensors detect the mud. If the sensors do not detect the mud, the cleaning process will not happen. By using this method the life span of battery can last longer due to power saving. The dsPIC30F4011 is used as the microcontroller for the robot to control the movement of the robot. The sensor used in this project is infra red sensor. Infra red sensor is used to detect the obstacle in front of the robot. If there are any obstacles the robot will reverse automatically until the robot come up from the pipe. v ABSTRAK Robot Pencuci Paip secara automatik digunakan untuk mencuci lumut atau kotoran di dalam paip. Robot ini mempunyai empat trek untuk memudahkan robot bergerak di dalam paip. Trek-trek ini disokong oleh sambungan yang boleh dimampatkan. Sambungan yang boleh dimampatkan membolehkan robot ini bergerak secara melintang dan menegak di dalam paip. Sambungan yang boleh dimampatkan dan trek dapat menambahkan keberkesanan robot. Selain itu, tayar trek juga dapat menambahkan daya geseran di antara robot dan dinding paip. Oleh itu, robot dapat mengelak daripada tergelincir atau berpusing di dalam paip. Berus wayar adalah cara yang paling berkesan untuk menanggalkan lumut atau kotoran di dalam paip. Ini telah memberi idea untuk mengabungkan robot teknologi dengan teknologi pencucian paip menggunakan berus wayar. Berus wayar terletak di belakang robot. Berus ini akan berputar untuk mencuci lumut. Proses mencuci akan bermula jika penderia mengesan sebarang kotoran atau lumut. Jika penderia tidak mengesan sebarang kotoran, proses mencuci tidak akan berlaku. DsPIC30F4011 digunakan sebagai pengawal untuk mengawal pergerakan robot ini. Penderia yang digunakan di dalam projek ini adalah penderia infra merah. Penderia ini digunakan untuk mengesan sebarang halangan yang berada di hadapan robot. Jika terdapat halangan, robot akan mengundur secara automatic sehingga keluar daripada paip. vi TABLE OF CONTENTS CHAPTER TITLE PAGE TITLE PAGE DECLARATION 1 2 DEDICATION ii ACKNOWLEDGMENT iii ABSTRACT iv ABSTRAK v TABLE OF CONTENTS vi LIST OF FIGURES ix LIST OF TABLES xii LIST OF SYMBOLS AND ABBREVIATION xiii LIST OF APPENDICES xiv INTRODUCTION 1 1.1 Background 1 1.2 Problem Statement 3 1.3 Objectives 3 1.4 Scope of the Project 3 1.5 Thesis Layout 4 LITERATURE REVIEW 5 2.1 Introduction 5 2.2 OH’s Pipe Cleaning Robot (OPC) 5 vii 2.3 Pipeline Water Cleaning Robot 7 2.4 Wire Rope and Chain Scraper 8 2.5 Multifunctional Robot for In-pipe Inspection 9 ( MRINSPECT) IV 3 4 2.6 Pipe Pigging Robot 12 2.7 Pipeline Inspection Robot 13 2.8 Pipeline Jet Cleaning Robot 16 2.9 Non Autonomous Robots 16 2.10 Semi Autonomous Robots 17 2.11 Fully Autonomous Robots 18 METHODOLOGY 19 3.1 Overview 19 3.2 Project Workflow 20 3.3 Project Plan 20 MECHANICAL AND ELECTRONIC DESIGN 22 4.1 Mechanical Design 22 4.2 Fully Autonomous Pipeline Cleaning Robot 24 Design 4.3 Fully Autonomous Pipeline Cleaning Robot 27 Platform 4.3.1 Caterpillar Track 27 4.3.2 Body and Foldable Linkage 28 4.3.3 Foldable Cleaning Mechanism 29 4.3.4 Fully Autonomous Pipeline Cleaning 29 Robot 4.4 Electronic Design 32 4.4.1 Main Board Circuit 32 4.4.2 Voltage Regulator 34 4.4.3 Motor Driver Circuit 35 4.4.4 Dspic30f4011 Microcontroller Unit (MCU) 36 4.4.5 Infra Red Sensor 38 viii 4.5 5 4.4.6 UIC00B USB ICSP PIC programmer 40 4.4.7 Micro Metal Gear Motor 41 4.4.8 Power Supply 42 Software Design 43 4.5.1 44 Program Download RESULT AND ANALYSIS 46 5.1 46 The Movement of the Pipeline Water Cleaning Robot 5.2 Robot Ability 48 5.2.1 48 Ability to Move Horizontally and Vertically 5.2.2 6 Ability to Clean the Mud 50 DISCUSSION AND CONCLUSION 53 6.1 Discussion 53 6.2 Suggestion and Future Development 54 6.3 Conclusion 54 REFERENCES Appendix A 56 58-59 ix LIST OF FIGURES FIGURE NO. TITLE PAGE 1.1 The pipe with mud 2 1.2 The pipe without scale 2 2.1 OH’s Pipe Cleaning Robot (OPC) 6 2.2 The structure of pipeline water cleaning robot 7 2.3 The position of the wheel 8 2.4 The chain scraper 9 2.5 Photo of MRINSPECT IV 10 2.6 (a) (b) Structure of the linkage 11 2.7 Pipe pigging robot 12 2.8 The pipe pigging robot structure 12 2.9 Pipeline inspection robot 14 2.10 Linkage structure and caterpillar wheel module 15 2.11 Silicon caterpillar wheel 15 2.12 Pipeline Jet Cleaning Robot 16 2.13 Examples of non autonomous robots; RAUSCH 17 Electronics USA LLC 2.14 Example of semi automatic robot, PIPAT 17 2.15 Examples of fully autonomous robots 18 3.1 Project flow 21 4.1 Classification of in pipe robot 22 4.1(a) Pig type 22 4.1(b) Caterpillar type 22 4.1(c) Wall-press type 22 4.1(d) Wheel type 23 x 4.1(e) Screw type 23 4.1(f) Inchworm type 23 4.1(g) Walking type. 23 4.2 The initial robot design using CAD drawing 24 4.3(a) Side view of the robot 25 4.3(b) Front view of the robot 25 4.3(c) Back view of the robot 26 4.3(d) Cleaning mechanism 26 4.4 The caterpillar track 27 4.5 The body and foldable linkage 28 4.6 Foldable cleaning mechanism with brushes 29 4.7 Isometric view of the final version of the Fully 30 Autonomous Pipeline Cleaning Robot 4.8 Side view of the final version of the Fully Autonomous 30 Pipeline Cleaning Robot 4.9 Front view of the final version of the Fully Autonomous 31 Pipeline Cleaning Robot 4.10 Back view of the final version of the Fully Autonomous 31 Pipeline Cleaning Robot 4.11 Block diagram for circuit connection 32 4.12 Main board circuit 33 4.13 Motor driver circuit 33 4.14(a) Schematic circuit for voltage regulator 5V 34 4.14(b) Schematic circuit for voltage regulator 6V 34 4.15 Schematic diagram for the motor driver circuit using 35 L293D 4.16 dsPIC30f4011 pin notation 36 4.17 The schematic diagram PIC microcontroller circuit 38 4.18(a) Transmitter and receiver of infra red sensor 38 4.18(b) Variable resistor for infra red sensor 39 4.18(c) Comparator LM324 39 4.19 Principle of the comparator 39 4.20 UIC00B USB ICSP PIC programmer 40 xi 4.21 Micro Metal Gear motor with the dimension 41 4.22 The lithium-polymer battery 42 4.23 Process of writing software 43 4.24 Writing program by using MPLAB IDE 44 4.25 The structure of PICkit 2 programmer 45 4.26 The program is successful load to MCU 45 5.1 Algorithm of Fully Autonomous Pipeline Cleaning Robot 47 movement 5.2 Pipeline with 6 inch in diameter 48 5.3(a) Robot entering the pipe 49 5.3(b) Robot move horizontally inside the pipe 49 5.3(c) Robot move vertically inside the pipe 50 5.4 The wire brushes 51 5.5 The foldable cleaning mechanism 51 5.6 The foldable cleaning mechanism attached at the back of 52 the robot xii LIST OF TABLES TABLE TITLE 4.1 The specification of the metal gear motors when running at 6V PAGE 42 xiii LIST OF SYMBOLS AND ABBREVIATIONS MPa - Mega Pascal DC - Direct Current USB - Universal Serial Bus UTM - Universiti Teknologi Malaysia Kg - kilogram LED - Light Emit Diode PIC - Programmable Interface Controller CCD - charge-coupled device xiv LIST OF APPENDICES APPENDIX A TITLE PAGE Gantt Chart First Semester 2011/2012 58 Gantt Chart Second Semester 2011/2012 59 1 CHAPTER 1 INTRODUCTION 1.1 Background The pipeline water system cleaning is very important in order to maintain the efficiency of the pipeline. The continuous used of pipeline water system can cause mud or scale inside the pipe. The mud or scale can reduce the efficiency of water flow and damage the pipe. The mud also can reduce the diameter of the pipe and change the water flow rate as shown in the Figure 1.1. In several applications such as water cooling system the flow of the water is very important to determine the water needed. The mud can cause the error in the flow meter reading. So, the pipe must be clean as possible as shown in Figure 1.2. The traditional cleaning methods such as manual cleaning, chemical cleaning and mechanical cleaning cannot meet the need of cleaning the pipe well. The manual cleaning is the method that used in the industry nowadays. The pipe was cleaned by using man power to scrub the pipe with the wire brush. The wire brush was attached on the tip of the long rod and the worker will scrub the pipe until it cleaned. This 2 method is really tiring and time consuming. Furthermore, this method can clean the pipe with limited distance and can only clean on straight pipe. High pressure water jet is one of the cleaning methods. The advantages of using high pressure water jet is low cost, high cleaning efficiency and reliable. However, to work in such high pressure is very dangerous. Figure 1.1 The pipe with mud Figure 1.2 The pipe without scale 3 1.2 Proble m statement The problem statements for this project are: 1. The robot is not widely used to clean the pipeline water system in our industry. 2. The mud inside the pipe can reduce the efficiency of the water flow. 3. The conventional method is very difficult and tiring. 1.3 Objectives There are three objectives in this project. The objectives are: 1. To build a fully autonomous pipeline cleaning robot. 2. To design a robot that can move horizontally and vertically inside the pipe. 3. To construct a robot that can minimize the mud and scale inside the pipe. 1.4 Scope of the project The reason of scoping the project work to a boundary is to ensure the project will be done in a systematic manner and prevent overlapping of work occurs. This project focuses on cleaning the inner of the pipeline water system. For this project, there are a few limitations. The limitations are: 1. The diameter of the pipe is about 150mm or 6 inch. 2. The pipe not contains water during cleaning process. 3. The mud is not hard mud. 4. Only a section of the pipe will be used and it must be on the ground. 4 1.5 Thesis Layout This thesis is organized in six chapters. Detailed explanation abo ut each of the chapter contained in this thesis is as follows: Chapter 1 gives the overview of the project about pipeline cleaning methods. Besides, the objective of research, problem statement, scope of project and thesis structure also present in this chapter. Chapter 2 will focus on literature review on many projects that have been built before this by different authors around the world. The literature review is useful in giving the insight ideas for the Fully Autonomous Pipeline Water Cleaning Robot project undertaken. Chapter 3 presents the research methodology and also the Gantt chart for the following work of project. Chapter 4 describes the mechanical and electronic design and interface circuit used in this project. The microcontroller circuit and other related circuits such as DC motor will be discussed. The robot control programming process starting from flowchart, writing program and downloading it into the microcontroller via USB programmer will also been presented. Chapter 5 discusses on the result, findings and the assessment of the robot. The robot will be analyzed to measure its effectiveness and to ensure the objectives successfully achieved. Throughout the analysis stage, strengths and weaknesses of the robot were identified. Chapter 6 presents the conclusion of the whole project and recommendation for future work. 5 CHAPTER 2 LITERATURE REVIEW 2.1 Introduction Literature review is a study from previous people about the similar work to his or her. It is very important for the researcher to know the problem and how other people solve the problem. Different people come with many way of solution or method. It also gives researcher knowledge about the current technology and tool to use in designing something. Therefore, this chapter will give information about the previous pipe cleaning robot and it structure. 2.2 OH’s Pipe Cleaning Robot (OPC) Figure 2.1 shows the OPCR move in the pipe. This robot was made by Young Hoon Oh from University of Florida, a student from Department of Electrical and Computer Engineering [1]. The role of OPCR (OH’s Pipe-Cleaning Robot) is simple. It automatically finds the obstacle, runs back, changes the pitch of the wheel and cleans it. When it does not find any more obstacles, then change the pitch to the run mode again and run until the end of the pipe. When the robot reaches the end of the pipe, its work is done- that means it stops. The sensors are used for finding the obstacles and sensing the end of the pipe. The test was successful and all the 6 problems are solved. The robot only can move in a straight pipeline. It will scrub the scale with the blade that attach to the body. The motion of the robot is helical. Scrubber Servo Wheel Figure 2.1 OH’s Pipe Cleaning Robot (OPC) [1] OPCR specification: 1. Head Unit - Diameter: 5.544 inches - Height: 2.25 inches 2. Driving Unit - Individual Strut Length (Including wheel housing, angle control motor): 3.475 inches - Diameter: 5.544 inches - Height: 3.4 inches 7 2.3 Pipeline Wate r Cleaning Robot The pipeline water cleaning robot was made by Muhammad Hafiz Bin Makhtar @ Mokhtar from Universiti Teknologi Malaysia (UTM) [2]. The robot use high pressure water jet and a span to clean the pipe. Figure 2.2 shows the isometric view of the robot. The robot was controlled by using two push buttons. One push button will give signal to the robot to move forward and another push button to move backward. The movement of the robot was manually control by a user. The metal gear motor was used to move the robot. Water jet Sponge Figure 2.2 The structure of pipeline water cleaning robot [2] The body is in triangle shape as shown in Figure 2.3. There are three links 120 degree from each other acts as a suspension to press the pipe. The suspension will make sure the robot body maintain at center of the pipe. Two of the wheel is attach with metal gear motor to move the robot. 8 Wheel Figure 2.3 The position of the wheel [2] 2.4 Wire Rope and Chain Scraper The Chain scraper head is a highly effective multi-purpose tool designed for easy use and maintenance under rugged work conditions. Figure 2.4 shows the structure of scraper. The Rotating Chain Scraper can be adapted to a wide range of pipe diameters by simply adjusting the skid and selecting the respective chain length [3]. For extra heavy deposits, chains with welded manganese steel plates and roller chain attachments are available for the larger chain cutters. Due to their high cleaning effect, rotating chains generate considerable mechanical forces, roller chains are not recommended in clay pipes. Any pipe made from steel, cast iron or plastic will accept these forces without risk of damage. When working in clay pipes a Cable Loop attachment is available for pipes 8-16 inches diameter. Clay pipes have a tendency to be brittle due to damage from roots, external 9 forces and offsets. The cable loop attachment offers a softer cleaning effect when operating under these conditions. However, this Chain Scraper is handled manually. Figure 2.4 The chain scraper [3] 2.5 Multifunctional Robot for In-pipe Inspection (MRINSPECT) IV As depicted in Figures 2.5 and 2.6, MRINSPECT IV largely consists of three parts, called body frame, driving module, and CCD assembly [4]. Three driving modules are attached at the distal ends of foldable legs of the body frame and they are located circumferentially 120 degrees apart from each other. The CCD assembly is mounted in the front side of the body frame. The radial dimension of the robot is changeable from 85 to 109 mm, while the axial one is 150 10 mm constant. Also, the robot can exert 9.8 N of traction force and 0.15 m/s of speed in maximum just with 0.7 Kg of its own weight. As illustrated in Figure 2.6, the body frame is a skeletal linkage mechanism the other components such as driving modules and CCD assembly are attached to. It is composed of two sets of slider–crank mechanisms in the front and rear side of the robot, respectively, where each set consists of three slider–crank mechanisms located equidistantly along the circumferential direction. Couplers of slider–crank mechanisms in the front and the rear side of the robot are connected each other with driving modules .Radial motions of wheels are synchronized with a ring like slider and its axial motion is limited with a stopper in the central shaft. The front wheels and the rear ones, called front wheel set and rear wheel set are allowed to move radials in an asymmetric fashion as three driving modules are attached at the ends of the legs on the body frame Figure 2.5 Photo of MRINSPECT IV [4] 11 Foldable linkage Camera (a) Spring (b) Figure 2.6 Structure of the linkage [4] 12 2.6 Pipe Pigging Robot Figure 2.7 Pipe pigging robot [5] Pipeline inspection robots or “pigs” have been used for the last 100 years or so, to work in pipes that were inaccessible to humans. The earliest pigs were of a very simple structure, propelled by the differential pressure provided by the flowing fluid. They mainly carried out cleaning work using scrapers and brushes, example in Figure 2.7[5]. A long time ago, many researchers have worked on endowing more capability to the conventional pig concept, for example, to make it intelligent by adding sensors and control units. Figure 2.8 The pipe pigging robot structure 13 The working cycle of the mechanism for pipe pigging robot is as follows. First, the turbine is driven to rotate by the fluid, which will then drive the transmission shaft to rotate at the same speed or via a reduction or step-up gearbox. Second, if the peg of the nut is in the forward driving screw thread, the nut will be pushed forward (to the left in Figure 2.8), because the brushes attached to the nut can slide along the pipe, and the brushes on the body of the pig will hold its position against the pipe wall. When the nut reaches the end of the screw thread, the peg of the nut is moved in a continuous groove into the backward screw thread. Consequently, the nut will be held stationary against the pipe by means of its brushes. Since the shaft will continue to rotate, the pig body will begin to move forward. In the design of this new self-drive pig, several key problems are in need of addressing, including: • Under what conditions the pig can move upstream or downstream; • How fast the pig will move upstream or downstream • How much capacity the pig can have to do other work • Which design parameters are crucial to the performance of the pig? 2.7 Pipeline Inspection Robot Pipeline Inspection Robot as shown in Figure 2.9 is a reconfigurable robot that can be used for inspection of 80-100 mm pipelines [6]. This robot consists of a main body, three linkage structures, and caterpillar wheel parts as shown in Figure 2.10. It length is 70mm and the exterior diameter changes from 80mm up to 100mm. The main board, located at the main body, consisting of a micro controller (Atmega8), a motor drive, a sensor processor (Atmega128), and a linkage structure connects the main body to a caterpillar wheel part. Each caterpillar wheel contains a 14 micro DC motor. The body is constructed as a triangular shape, which is adequate to support the three linkage structures. For each chain, two four-bar linkage structures similar to scissors are connected to the hinge joints grounded at the main body as show on Figure 2.10. And the hinges are connected by a spring-shaft. The deflection of the spring allows foldable characteristic of the linkage structure when the caterpillar wheel contacts the rough surface of the pipeline. Silicon wheel Figure 2.9 Pipeline inspection robot [6] A micro DC motor equipped with an encoder is enclosed inside the caterpillar wheel parts, and its length is 10 mm. The function of the encoder is for measuring the moving distance of the robot. The robot mechanism consists of three pairs of caterpillar. They are operated by micro DC motor. Figure 2.9 shows that the two robot modules are connected by a spring so that a smooth steering can be achieved at T-branches or elbows. Each sub-chain is designed so that it is foldable to fit into the size of pipeline. The caterpillar wheel of Figure 2.11 is made of two gears and a wrapping silicon belt. The function of the silicon is for adhering to the wall since it has a very large friction coefficient. The arrangement for each caterpillar wheel module is 120 degrees apart. Therefore, the robot is able to hold the surface of the pipeline firmly while moving on the surface of the pipeline very smoothly. Due to each caterpillar is controlled 15 independently, it is possible to perform steering at elbows or T-branches of pipelines by differentiating the velocities of the three wheels. Figure 2.10 Linkage structure and caterpillar wheel module Figure 2.11 Silicon caterpillar wheel 16 2.8 Pipeline Jet Cleaning Robot Stone-age Company had built the Pipeline Jet Cleaning Robot as shown in Figure 2.12 [7]. This pipeline cleaning robot is driven by track and used high water pressure jet as the cleaning method. However, the robot face some problem which is it cannot suit the pipe diameters well, and lateral alignment is bad. As a result, this affects cleaning process. To overcome the problem with the medium-small pipeline, the intelligent cleaning equipment which has small and weight moving carrier with high efficiency and multi- functional walking mechanism is propped by researcher. Water jet Figure 2.12 Pipeline Jet Cleaning Robot [7] 2.9 Non Autonomous Robots A non-autonomous robot usually just acts as a medium to the human operator to check the subjected area, where the operator cannot reach. The human operator remotely operates the robot, and the control signals for the robot are usually sent through a tethered cable. The human controller determines the conditions of the subjected pipeline by examining the output from the sensor data, which are usually the pictures from the camera attached to the robot. 17 Figure 2.13 Examples of non autonomous robots; RAUSCH Electronics USA LLC 2.10 Semi Autonomous Robots In semi autonomic robots the assessment of the pipeline is not completely left to the human operator. The Robot often includes modules, which will enable the robot to perform actions, which are usually pre-programmed onto the robotic modules. But still the controls to start these operations have to be issued by the human operator. So this makes the robot a semi autonomic. Some of the robots, which show the semi autonomic functionality, are “PIPAT” [8], [9] developed for quantitative and automatic assessme nt of the sewage condition. Figure 2.14 Example of semi automatic robot, PIPAT 18 2.11 Fully Autonomous Robots Fully autonomic robots are one such field where the research and development when compared to the other robots is comparatively fewer than the research being done in other types of robots. A Fully autonomic robot usually carries all the required modules that are required for it to assess and process the condition of the pipeline. Only a few of the fully autonomic robots have been developed for pipeline inspection, “KURT” [10] and “MAKRO” are two such robot platforms for pipeline inspection that are designed for fully autonomic navigation in more or less cleaned pipelines with diameters ranging from 300 mm to 600 mm, and under dry weather conditions. KURT is able to navigate to ground level pipe junctions, was designed for inspecting pipelines assisted by maps uploaded into the robot. MAKRO consists of six segments connected by five motor driven active joints, these components enable it to simultaneously climb a step and turn in the pipeline junctions. MAKRO was designed to establish that robots can navigate themselves autonomously inside sewer pipelines. Figure 2.15 Examples of fully autonomous robots 19 CHAPTER 3 METHODOLOGY 3.1 Overvie w The project is start by collecting information related to the water pipeline cleaning robot or the robot that move inside the pipe. Some research from previous pipeline cleaning robot has been done to get more information related to the topic. The research about pipeline inspection robot also gives the additional information in designing the robot. The idea and concept are important to make sure the robot is suitable for it application and can working properly in the pipe. The research also include in finding the best cleaning method and robot body design to make sure the robot is good enough to clean the dirt or mud in the inner surface of the pipe. After that, the design of the robot and the design of complete circuit will be produce. The hardware and circuit design is important in order to choose suitable material and electronic components for the robot. To achieve this task, the study of the mechanical design and circuit design is important to make sure the design is suitable for the robot. 20 After completing the mechanical and electronic design, the real robot will be constructed. Then the programming can be developing in order to achieve the objective of this project. During the overall process, continuously improvement and troubleshooting must be done to make sure the structure of the robot or electronic part working properly. 3.2 Project workflow This project involved the hardware, electronic and the software part. So, to accomplish this project, the workflow of the project is shown in Figure 3.1 has been done. The workflow make the process of this project goes smoothly and knows the state of priority task that need to be done first. Roughly, this project will begin with the hardware part which is the robot design and construction. Then, the electronic parts that control the robot will be design. Last but not least, the software part which is programming will be program in the robot to give instruction to the robot. 3.3 Project plan Same as any other project, the plan is needed to make the project run smoothly and systematic. Failure to plan the project can cause a lot of trouble and waste of time. One year timeline were given to finish the project. A Gantt chart will help us to manage the progress of the project. A Gantt chart is a plan that will be use to execute the scope of our project within a week. The Gantt chart of FYP1 and FYP2 is available in Appendix B. 21 Start Decide the FYP project, objectives and scope of the project Make research from the previous in pipe robot design Design the mechanism by using CAD drawing Mechanism and circuit design Material and electronic selection Build the hardware part NO Test the mechanism YES Build the electronic part NO Test and troubleshooting the circuit YES Combination between the hardware and electronic part Software integration YES Test and improving the robot Finish Figure 3.1 Project flow NO 22 CHAPTER 4 MECHANICAL AND ELECTRONIC DESIGN 4.1 Mechanical Design The main objective in this chapter is to find the suitable design for the robot, the material and approach to construct the robot structure. The robot structure was build to achieve the target which is to move vertically and horizontally inside the pipe. There are many type of in pipe robot design. The design is shown in Figure 4.1. The selection of design is very important in order to fulfill the requirement of the robot. (a) (b) (c) 23 (d) (e) (f) (g) Figure 4.1 Classification of in pipe robot. (a) Pig type. (b) Caterpillar type. (c) Wall-press type (d) Wheel type. (e) Screw type. (f) Inchworm type (g) Walking type. [11] After studied the related references, the combination between caterpillar type and wall press type was choose to design the robot. The robot has four caterpillar tracks and each of them will be supported by the foldable lingkage. The Fully Autonomous Pipeline Cleaning Robot was built based on several mechanical components. There are body, foldable linkage, caterpillar track, and foldable cleaning mechanism. For the body, most of it is built from acrylic sheet. This is because the acrylic is easy to cut and rustproof. Furthermore, the lightweight of acrylic play important role to ensure the robot can climb vertically. 24 4.2 Fully Autonomous Pipeline Cleaning Robot Design Before the actual robot is built, the CAD drawing is used to design the robot. By using Solid Work, the initial design of the robot was design as shown in Figure 4.2. From the design, the actual size of the robot can be determined. Caterpillar Track Cleaning Mechanism Body Figure 4.2 The initial robot design using CAD drawing Figure 4.3 shows the final whole design of Fully Autonomous Pipeline Cleaning Robot from front view, back view, and side view and also the length and width of the robot in each of different view 25 4.5 inch 6.5 inch (a) Side view of the robot 2.5 inch (b) Front view of the robot 26 (c) Back view of the robot Rotating Part Wire Brushes (d) Cleaning mechanism Figure 4.3 Different view of the robot Driving part 27 4.3 Fully Autonomous Pipeline Cleaning Robot Platform All commercial sewer pipe robots are capable of moving in straight pipes but not in any kinds of bended or branched pipes. Most of those robots are not capable to travel in vertical pipeline network. However, mobility in vertical pipelines is one of biggest challenge for an in pipe robot, because most of pipelines in general houses and buildings consist of very complicated network, including vertical as well as horizontal pipelines. In the mechanical model of pipe cleaning robot, wall-press type is considered for vertical mobility and caterpillar type is combined with the former for increasing the gripping force. After the design complete, the real robot was constructed. The body of the robot is constructed as a rectangular shape. By using this shape, it can support four linkage structures on each one of the surface. . 4.3.1 Caterpillar Track Caterpillar track Motor Figure 4.4 The caterpillar track 28 The caterpillar track can give more friction between the robot and the wall of the pipe. The robot was implemented with four caterpillar tracks each 1 inch wide and 5.5 inch long as shown in Figure 4.4. For giving more torque to make sure the robot run smoothly, high torque motor was used. The motor can give torque about 1.8 kg/cm. 4.3.2 Body and Foldable Linkage Foldable linkage Figure 4.5 The body and foldable linkage Along with caterpillar tracks, the foldable linkage is use to support the track. The foldable linkage is a factor to make sure the robot can move vertically. This links are responsible in giving the required gripping force to the robot. The springs give the ability for the linkage to contract and expend. The foldable linkage is attached with the body of the robot. The linkage is about 90 degree with each other. Using fo ur caterpillar track also make the robot more stable and avoid the robot from slipping due to the mud inside the pipe. 29 4.3.3 Foldable Cleaning Mechanism Brushes Figure 4.6 Foldable cleaning mechanism with brushes The foldable cleaning mechanism is attached at the back of the robot. The advantage of using the foldable cleaning mechanism is it can vary accordingly with the size of pipe. The cleaning mechanism consists of three fingers and at the tip of each finger has wire brush. Wire brush is very effective way to clean the mud inside the pipe. The cleaning mechanism is drive by a motor. The cleaning mechanism will be rotated during the cleaning process. 4.3.4 Fully Autonomous Pipeline Cleaning Robot Figure 4.7 shows the overall outlook of the final version of the Fully Autonomous Pipeline Cleaning Robot. The final structure is constructed based on the continuous modification and improvement. 30 Front sensor Figure 4.7 Isometric view of the final version of the Fully Autonomous Pipeline Cleaning Robot Figure 4.8 Side view of the final version of the Fully Autonomous Pipeline Cleaning Robot 31 Figure 4.9 Front view of the final version of the Fully Autonomous Pipeline Cleaning Robot Figure 4.10 Back view of the final version of the Fully Autonomous Pipeline Cleaning Robot 32 4.4 Electronic Design The electronic circuit is designed to control all the actuator, sensor and motor to the main microcontroller of the robot. The circuit is soldered on a donut board. The connections are made using wrapping wires and soldering. The circuit was divided into three parts which are the main board, the sensor circuit and the driver circuit to control the motor. The main board and the sensor circuit were designed on the same board. The driver circuit is designed on the other board. Both of the board will be stack together. The board must be small to make sure it fix inside the body of the robot. The space for circuit board is very limited. Figure 4.11 shows the block diagram for summarizes the connection between the main electronic components of Pipeline Water Cleaning Robot. IR Sensor Voltage regulator 5V dsPIC30F4011 Microcontroller Motor driver L293D Micro metal gear motor Voltage regulator 6V Figure 4.11 Block diagram for circuit connection 4.4.1 Main Board Circuit The main board circuit, as shown in Figure 4.12, is where the microcontroller, voltage regulator circuit, and USB Burner were located. I have decided to use dsPIC30F4011 microcontroller as the main controller to control the hardware performance. The USB Burner is used to load the program to the 33 microcontroller. In order to make the loading process easier, a connection will be made in the main board. Comparator Voltage regulator 5V dsPIC30F4011 Microcontroller USB burner Figure 4.12 Main board circuit Motor Driver Figure 4.13 Motor driver circuit Voltage regulator 6V 34 4.4.2 Voltage Regulator For this project, two voltage regulators are needed to give constant supply to the circuit. The first voltage regulator will provide 5V constant power supply for the dsPIC30F4011 microcontroller to operate. The LM7805 was used to convert 12V power supply to constant 5V. The microcontroller is very sensitive and only can operate within 5±0.1 V. Below or above this values, the dsPIC30F4011 microcontroller may end up burn or not operate. Second voltage regulator, LM7806 will provide constant 6V power supply for the motor. As shown in Figure 4.14 the schematic for two voltage regulators is the same but the regulator value used is different. A few functions of components that were used in the voltage regulator circuit are: The 1N4001 diode is used to protect the voltage regulator when power supply is connected in wrong polarity. Capacitors are used to minimize noise to produce more stable and constant output voltage. The LED serves as an indicator of the 5V and 6V outputs. (a) (b) Figure 4.14 Schematic circuit for voltage regulator 35 4.4.3 Motor Driver Circuit Motor driver is used to control the direction of the motor. It also can control the speed of the motor by controlling the pulse width modulation (PWM). In this project, the L293D motor driver is used to drive DC motor. Figure 4.15 shows the schematic diagram for the motor driver circuit. One motor driver can control two motors. The robot used five DC motor to move and to drive cleaning mechanism. So, three motor drivers is needed to operate the DC motor 5V 6V Figure 4.15 Schematic diagram for the motor driver circuit using L293D 36 4.4.4 Dspic30f4011 Microcontroller Unit (MCU) Figure 4.16 dsPIC30f4011 pin notation [12] High-Performance Modified RISC CPU: Modified Harvard architecture C compiler optimized instruction set architecture 84 base instructions with flexible addressing modes 24-bit wide instructions, 16-bit wide data path 16 x 16-bit working register array Up to 30 MIPs operation: - DC to 40 MHz external clock input - 4 MHz-10 MHz oscillators input with PLL active (4x, 8x, 16x) Peripheral and External interrupt sources 8 user selectable priority levels for each interrupt 4 processor exceptions and software traps Primary and Alternate interrupt Vector Tables Peripheral Features: High current sink/source I/O pins: 25 mA/25 mA Optionally pair up 16-bit timers into 32-bit timer modules I2C™ module supports Multi-Master/Slave mode and 7-bit/10-bit addressing Trigger for synchronized A/D conversions 37 Special Microcontroller Features: Enhanced Flash program memory: -10,000 erase/write cycle (min.) for industrial temperature range, 100K (typical) Data EEPROM memory: -100,000 erase/write cycle (min.) for industrial temperature range, 1M (typical) Self-reprogrammable under software control Power-on Reset (POR), Power-up Timer (PWRT) and Oscillator Start-up Timer (OST) Programmable code protection In-Circuit Serial Programming™ (ICSP™) Programmable Brown-out Detection and Reset generation Selectable Power Management modes - Sleep, Idle and Alternate Clock modes The MCU main circuit consists of crystal and 5 volts supply from voltage regulator. Crystal is connected to the OSC1 (pin 13) and OSC2 (pin 14) pins to establish oscillation. Figure 4.17 shows the schematic diagram PIC microcontroller circuit. Pins 11, 21, 32, and 40 are connected direct to 5 volts voltage regulator and pins 12, 20, 31, and 39 are grounded. The configuration of crystal is shown in the Figure 4.15. VDD is 5 volts regulated voltage from voltage regulator circuit. A 15 MHz crystal is choose as the oscillator to ensure the execution time of each instruction is fast enough. By referring to dsPIC30F4011 datasheet, it is necessary to connect 15- 33picoFarad ceramic capacitors to increase the stability of the oscillator. 38 Figure 4.17 The schematic diagram PIC microcontroller circuit 4.4.5 Infra Red Sensor Infra red sensor is used to detect the obstacle in front of the robot. Figure 4.18 shows the schematic of infra red sensor. It consists of transmitter and emitter. The transmitter will send the light. If there are any obstacle or object the light will deflected back and the emitter will receive the light. The comparator LM324 is used to compare between the input from the emitter and variable resistor. Figure 4.19 show the principle of the comparator. Then the output from comparator will be send to the microcontroller. (a) Transmitter and receiver of infra red sensor 39 (b) Variable resistor for infra red sensor (c) Comparator LM324 Figure 4.18 Schematic circuits for infra red circuit Figure 4.19 Principle of the comparator 40 4.4.6 UIC00B USB ICSP PIC programme r UIC00B USB ICSP PIC programmer is designed to program popular Flash PIC MCU which includes most of the PIC family. Besides 8 bits, it can also program 16 bits and 32 bits PIC MCU. On board ICSPTM (In Circuit Serial Programming) connector offers flexible methods to load program, UART Tool and Logic Tool. It supports on board programming which eliminate the frustration of plug- in and plugout of PIC MCU. This also allow user to quickly program and debug the source code while the target PIC is on the development board. Since USB port is commonly available and widely used on Laptop and Desktop PC, UIC00B is designed to be plug with USB connection [13]. This programmer obtained its power directly from USB connection, thus no external power supply is required, making it a truly portable programmer. This programmer is ideal for field and general usage. UIC00B offers reliable, high speed programming and free windows interface software. UIC00B USB ICSP PIC programmer, as shown in Figure 4.20, is used to transfer the programming from computer into the PIC microcontroller. There are used certain pin at microcontroller for the connection to USB programmer circuit. Pin RF2, RF3, Vpp , Vdd and Vss are the pins that are used at the microcontroller for the connection. Figure 4.20 UIC00B USB ICSP PIC programmer 41 4.4.7 Micro Metal Gear Motor Micro Metal Gear motor as shown in Figure 4.21 was used as an actuator to move the forward, backward and driving the cleaning mechanism. For this robot, two type of gear ratio is needed. The first ratio is 289:1 Micro Metal Gear motor is used to move the robot. Second ratio is 150:1 Micro Metal Gear motor is used to drive the cleaning mechanism. To be able to move, the robot needs very high torque motor because of the weight of the robot. As for cleaning part, it need high speed motor to rotate and clean the mud. Table 4.1 shows the specification of the metal gear motors when running at 6V [14]. Figure 4.21 Micro Metal Gear motor with the dimension 42 Table 4.1 The specification of the metal gear motors when running at 6V 4.4.8 Powe r Supply The power supply part is the most critical unit in an electronic project. Two rechargeable LiPo, Lithium Polymer 7.4V, 1000mAh, batteries is used to supply power to the Pipeline Water Cleaning Robot. The LiPo battery is quite small, light and has longer life. Figure 4.22 shows the lithium-polymer battery. This battery was connected to the voltage regulator to supply 5V to the microcontroller. Another battery is connected to the motor driver to support the motor. It is very important to used different battery for main board and motor driver because the motor required a lot of current in order to move. Figure 4.22 The lithium-polymer battery 43 4.5 Software Design Basic process of writing software for the Fully Autonomous Pipeline Cleaning Robot is showed in Figure 4.23 below. Start Desire robot movement Writing program NO Compile the program YES NO Download to the microcontroller Test the robot movement YES Finish Figure 4.23 Process of writing software 44 4.5.1 Program Download By using MPLAB software the .hex file was created as shown in Figure 4.24. Then the hex file will upload into the microcontroller using PICkit 2 programmer. Figure 4.25 show the structure of PICkit 2 programmer. First, the UIC00B USB ICSP PIC programmer must be connected with USB port of the computer. Then the socket from UIC00B USB ICSP PIC programmer need to connected with microcontroller. After all the setup done, the PICkit will detect if there any microcontroller available or not. If the microcontroller is available, the type of microcontroller will be display in device configuration window in Figure 4.25 The .hex file needs to be import first to the PICkit programmer. Then, the .hex file was burnt into the PIC, as shown in the Figure 4.26. Now, the PIC microcontroller is ready to be used. Figure 4.24 Writing program by using MPLAB IDE 45 Figure 4.25 The structure of PICkit 2 programmer Figure 4.26 The program is successful load to MCU 46 CHAPTER 5 RESULT AND ANALYSIS 5.1 The Movement of the Pipeline Water Cleaning Robot The first step in the analysis process is to identify the functionality of the Fully Autonomous Pipeline Cleaning Robot. Analysis conducted based on the objectives of the project which are to build a fully autonomous pipe cleaning robot, to design a robot that can move horizontally and vertically in the pipeline, to construct a robot that can minimize the mud inside the pipe. As a result, Figure 5.1 shown algorithm of Fully Autonomous Pipeline Cleaning Robot movement. Once the start button is push, the robot will start moving inside the pipe. The robot is fully autonomous because it will make it own decision. The sensor is used to send the feedback to the microcontroller and execute the desire instruction. 47 Start Switch ON the robot Robot move forward (Normal speed) NO Mud detected? YES Cleaning process (Moderate speed) Obstacle detected? YES NO Reverse (Normal speed) Finish Figure 5.1 Algorithm of Fully Autonomous Pipeline Cleaning Robot movement 48 5.2 Robot Ability Once the robot characteristics have been identified, the next step is to analyst and to identify the strengths and weaknesses of robot. From the experiments conducted, robot was able to move in horizontal and vertical motion. The robot also can detect any obstacle in front of it. Beside, the robot can clean the mud by using the wire brushes attach at the back of the robot. 5.2.1 Ability to Move Horizontally and Ve rtically In this project, the pipe size is constant. The diameter of the pipe must be at least 6 inch as shown in Figure 5.2. The Fully Autonomous Pipeline Cleaning Robot was able to move horizontally and vertically inside the pipeline as shown in Figure 5.3. The specifications of the pipe must be as follows for the robot to move smoothly. Figure 5.2 Pipeline with 6 inch in diameter 49 (a) Robot entering the pipe (b) Robot move horizontally inside the pipe 50 (c) Robot move vertically inside the pipe Figure 5.3 The movement of Fully Autonomous Pipeline Cleaning Robot in the pipeline The springs give the ability for the robot to grip with the wall of pipe. The robot can move vertically without slip or fall down. 5.2.2 Ability to Clean the Mud The robot has ability to clean the mud or dirt inside the pipe. The cleaning process was done by using the wire brush in Figure 5.4. Wire brush is effective method to remove the mud. The cleaning mechanism shown in Figure 5.5 is attach at the back of the robot will rotate to clean the mud. The cleaning mechanism used springs to automatically vary the position of the wire brush accordingly to the size of pipe. 51 Figure 5.4 The wire brushes Figure 5.5 The foldable cleaning mechanism 52 Figure 5.6 The foldable cleaning mechanism attached at the back of the robot 53 CHAPTER 6 DISCUSSION AND CONCLUSION 6.1 Discussion Based on the achievement and respond from the lecturer and students, the Fully Autonomous Pipeline Cleaning Robot project is seen most likely successful in achieving its scope and objectives as discussed in chapter one. The earlier constrains that existed such as choosing the best material to develop the robot structure had been finalized by using the acrylic sheet, due to its light weight, flexible material, and looked solid. The material is also easy to shape, drill and cut into pieces. At the beginning of the project, there are many cleaning method need to consider such as high pressure water jet, pigging and wire brush. The high pressure water jet is not very suitable because it use high pressure to operate. Working in high pressure is very dangerous. Furthermore the wire to supply the water will minimize the distance that can be travel by the robot. Finally, the decision to use the wire brushes was decided. It is because the wire brushes can remove the mud effectively. Besides, it also low cost and easy to maintenance. Working with mud also has other problem. The mud is wet and can cause damage to the electronic part inside the body of the robot. In order to avoid this problem, silicon is used to seal the robot completely and make the robot water proof. 54 6.2 Suggestion and Future Development There is still a lot of space for improvement and enhancement for this Fully Autonomous Pipeline Cleaning Robot project. This robot covers a very large area which needed creativity, talent and dynamic mentality to fully optimize the technology, knowledge and inspiration of the nature. The design of the robot can be improve to allow the robot can move in different size of pipe. To make this happen, the circuits of the robot need to be small as possible. The small circuits allow the designer to design smaller body for the robot. Another technology that can be added is vision system. The vision system such as water proof camera can be the eye of the robot to send the vision to the main controller. So, the robot can monitor if there are any defect on the pipe wall. 6.3 Conclusion For the short summarized, this thesis discusses about the pipeline cleaning robot that actuated using five micro DC motors. This project is implemented using dsPIC130F4011 which was programmed using the C Language and a motor driver L293D as a mean to move those motors. Besides, the infra red sensor is used to detect the obstacle in front of the robot. As a conclusion, all objectives for this project were ma naged to achieve. The objectives are: 1 To build a fully autonomous pipeline cleaning robot. 2 To design a robot that can move horizontally and vertically inside the pipe. 3 To construct a robot that can minimize the mud and scale inside the pipe. 55 This project is successfully designed, implemented and tested. The main function for this project was achieved. Everything that we learned was applied in this final year project. Students can improve the skills to make mechanical and electronic designs that very useful after graduate and in working life after that. For the next robot development, it is hoped that this robot can be reconstructed with some modification to improve the abilities and to provide benefits in future also be able to be marketed or commercialized. 56 REFERENCES [1] Young Hoon OH (2002). OH’s Pipe Cleaning Robot. University of Florida. [2] Muhammad Hafiz Bin Makhtar @ Mokhtar(2010). Pipeline Water Cleaning Robot. Banchelor Degree. Universiti Teknologi Malaysia, Skudai. [3] ENZ USA INC. enz golden jet® Catalogue 2009, Aurora (IL): Trade brochure 2009. [4] Se-gon Roh and Hyouk Ryeol Choi. Diffential- Drive In-Pipe Robot for Moving Inside Urban Gas Pipeline. IEEE Transaction on Robotics. 2005. 21 (1): 1-17 [5] Zheng Hu and Ernest Appleton(2005). Dynamic Characteristics of a Novel Self-Drive Pipeline Pig. IEEE Transactions on Robotics, VOL. 21, NO. 5 [6] Young-Sik Kwon, Hoon Lim, Eui-Jung Jung, Byung-Ju Yi. Design and Motion Planning of a Two-Moduled Indoor Pipeline Inspection Robot. 2008 IEEE International Conference on Robotics and Automation. May 19-23, 2008. Pasadena, CA, USA: IEEE. 2008. 3998-4004 [7] Ding Feng, Chaobin Huang, Kui Zhou, Peng Wang, Jin Liu & Shouyong Li. Crucial Technology Research on Pipeline Jet Cleaning Robot. In: C. Xiong. ed. ICIRA 2008, Part II, LNAI 5315. London: Springer-Verlag. 1137-1144;2008 [8] Kirkham R, Kearney P, Rogers K, Mashford J. 2000. PIRAT - A System for Quantitative Sewer Pipe Assessment. In: International Journal of Robotics Research. 19(11): 1033-1053. [9] Implementation of PIRAT - http://www.csiro.au/solutions/pswg.html [10] Hertzberg, J.; Kirchner, F., “Landmark-based autonomous navigation in sewerage pipes”, Advanced Mobile Robot, 1996., Proceedings of the First Euromicro Workshop on 9-11 Oct. 1996 Page(s):68 – 73 57 [11] Bioinspiration and Robotics: Walking and Climbing Robots, Book edited by: Maki K. Habib, ISBN 978-3-902613-15-8, pp. 544, I-Tech, Vienna, Austria, EU, September 2007 [12] Retrieved on February 17, 2012. http://www.microchip.com/wwwproducts/Devices.aspx [13] Cytron Technology[2010]. User Manual UIC00B USB ICSP PIC PROGRAMMER .[Brochure]. Cytron Technologies Sdn. Bhd 58 APPENDICES APPENDIX-A Gantt chart First Semester 2011/2012 59 Gantt chart Second Semester 2011/2012