1
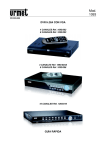
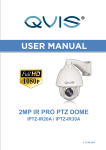
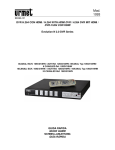
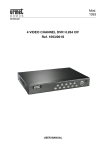
Mod.
1093
DS1093-100
DVR H.264 CON HDMI / H.264 WITH HDMI DVR / H.264 DVR MIT HDMI /
DVR H.264 CON HDMI
Evolution 2.0 DVR Series
4CANALI SCH. 1093/004H / 4CH Ref. 1093/004H / 4KANAL Typ 1093/004H/
4 CANALES Ref. 1093/004H
8CANALI SCH. 1093/008H / 8CH Ref. 1093/008H / 8KANAL Typ 1093/008H/
8 CANALES Ref. 1093/008H
16CANALI SCH. 1093/016H / 16CH Ref. 1093/016H / 16KANAL Typ 1093/016H
16 CANALES Ref. 1093/016H
8CANALI SCH. 1093/018H / 8CH Ref. 1093/018H / 8KANAL Typ 1093/018H/
8 CANALES Ref. 1093/018H
16CANALI SCH. 1093/019H / 16CH Ref. 1093/019H / 16KANAL Typ 1093/019H
16 CANALES Ref. 1093/019H
GUIDA RAPIDA
QUICK GUIDE
SCHNELLANLEITUNG
GUÍA RÁPIDA
ENGLISH
TABLE OF CONTENTS
1
General Information ............................................................................................................................. 24
1.1
Product description ............................................................................................................... 24
1.1.1
1.2
1.2.1
1.3
2.2
Ref. 1093/004H-008H-016H DVR Front Panel............................................................................................ 27
Ref. 1093/018H-019H DVR Front Panel ..................................................................................................... 28
Rear Panel ............................................................................................................................ 29
2.2.1
2.2.2
2.2.3
2.2.4
5
Power ......................................................................................................................................................... 26
Safety precautions ...................................................................................................................................... 26
Installation precautions ............................................................................................................................... 26
Cleaning the device .................................................................................................................................... 26
Hard disk .................................................................................................................................................... 26
Image recording .......................................................................................................................................... 26
Privacy and copyright.................................................................................................................................. 26
Descriptions of the Parts ..................................................................................................................... 27
2.1
Front Panel ........................................................................................................................... 27
2.1.1
2.1.2
3
4
Contents of the box ..................................................................................................................................... 25
Warnings .............................................................................................................................. 26
1.3.1
1.3.2
1.3.3
1.3.4
1.3.5
1.3.6
1.3.7
2
General features ......................................................................................................................................... 24
Opening the box ................................................................................................................... 25
Ref. 1093/004H-008H-016H DVR Back Panel ............................................................................................ 29
Ref. 1093/018H DVR Back Panel ............................................................................................................... 30
Ref. 1093/019H DVR Back Panel ............................................................................................................... 31
RS485/Sensor/Alarm port functions ............................................................................................................ 31
2.3
Remote Controller ................................................................................................................ 32
2.4
Remote Controller Ref. 1093/019H ...................................................................................... 33
2.5
Mouse Operation .................................................................................................................. 34
Device Basic Startup ............................................................................................................................ 35
Basic Configuration ............................................................................................................................. 35
4.1
Monitor Selection .................................................................................................................. 35
4.2
Language and Date/Time Settings ....................................................................................... 35
4.3
Video Output Control ............................................................................................................ 36
4.4
Recording Parameters.......................................................................................................... 36
Advanced Configurations .................................................................................................................... 37
5.1
Hard Disk Configuration ....................................................................................................... 37
5.2
Firmware Upgrade and Default Settings .............................................................................. 37
5.3
Network Configuration .......................................................................................................... 38
5.4
Login Device in Web Interface ............................................................................................. 38
5.5
iUVS Software Mobile........................................................................................................... 41
DS1093-100
23
1
GENERAL INFORMATION
Dear Customer,
Thank you for having purchased this Urmet product.
This document describes how to install and use the URMET Evolution 2.0 DVR Series ref. 1093/004H – ref. 1093/008H –
ref. 1093/016H - ref. 1093/018H - ref. 1093/019H
Read this quick guide which contains information for correct, safe use carefully.
Keep this quick guide at hand so that you can refer to it when needed.
NOTE
For more detailed information about the devices, refer to the full instruction manual inside the CD provided with the
product.
1.1
PRODUCT DESCRIPTION
The URMET S.p.A. product is a digital video recorder capable of recording from several cameras to internal hard disk.
1.1.1
GENERAL FEATURES
Triplex mode (recording, play and network transmission at the same time)
H. 264 video compression, with WD1, WHD1 e WCIF resolutions
Windows Graphical interface; embedded real-time Linux 2.6 Operation System
Recording in 960H Resolution
Multiple or single recording
HDMI/ VGA Output
User friendly Menu
Multiple operation modes (Preview, record, playback, backup, network surveillance and mobile phone
monitoring)
Main Stream and Sub Stream network transmission
ADPCM audio compression
Remote control (via browser and via client Software CMS)
Remote control through mobile
Supports Zoom in/out and sequence function
Alarm management
Multiple alarm recording
Web Data Encryption
Alarm notification through email
Auto-maintenance mode
PTZ controls via RS-485
Backup on USB 2.0 in front Panel (flash drive or hard disk)
Rear USB 2.0 ports for back-up, upgrade and mouse operation
Remote Control
Multilanguage OSD
PDA software Mobile for the following Platforms: Symbian 3th and 5th Edition, Windows Mobile, iOS, Android,
Blackberry
Watermark
Syncronous Playback 4ch. for DVR 4 ch. Models, 8ch. for DVR 8 ch. Models, and16 ch. For DVR 16 ch. Models
IMPORTANT NOTE
Contact an authorised Service Centre for increasing the recording capacity of devices.
DS1093-100
24
1.2
OPENING THE BOX
Check that the packing and the contents are not visibly damaged. Contact the retailer immediately if parts are either
missing or damaged. Do not attempt to use the device in this case. Send the product back in its original packing if it is
damaged.
1.2.1
CONTENTS OF THE BOX
DVR
Power unit
•
INPUT
⇒
100-240 Vac 50/60Hz 1.5 A max.
•
OUTPUT ⇒
12Vdc 2A for Ref. 1093/004H – Ref. 1093/008H – Ref. 1093/0016H
⇒
12Vdc 5A for Ref. 1093/018H and Ref. 1093/019H
Quick Guide
CD-ROM containing software and user manuals
Mouse
IR remote control, (included 2 batteries size AAA)
Audio cable (Only for Ref.1093/019H)
Shuko plug (Only for Ref.1093/018H and Ref. 1093/019H)
Italian plug (Only for Ref.1093/018H and Ref. 1093/019H)
Cross LAN cable cat. 5
IMPORTANT NOTE
Accessories may be changed without prior notice.
DS1093-100
25
1.3
WARNINGS
1.3.1
1.3.2
1.3.3
1.3.4
1.3.5
1.3.6
1.3.7
POWER
Only use the power unit provided to power the device. Check mains rating before plugging the power unit in.
Do not pull the cable to unplug the device.
Switch the device off before unplugging power unit. This operation must not be performed when the DVR is
recording, playing or from the configuration menu. Stop recordings and playback in progress before
disconnecting power from the device to prevent damaging the hard disk beyond repair.
SAFETY PRECAUTIONS
Keep the device away from rain and humidity to prevent risk of fire and electrocution. Do not introduce material
(solid or liquid) inside. If this should accidentally occur, disconnect the device from the mains and have it
inspected by qualified personnel.
Never open the device. In all cases, contact a qualified personnel or authorised service centre for repairs.
Keep the device away from children, to prevent accidental damage.
Do not touch the device with wet hands to prevent electrical shock or mechanical damage.
Do not use the device if it should fall or the external casing is damaged. Risk of electrocution if the device is
used in such conditions. Contact the retailer or authorised installer.
INSTALLATION PRECAUTIONS
To prevent overheating the device, arrange it in a position allowing the flow of air through the slots in the casing.
Ensure at least 5 cm of free space when installing inside a rack. For the same reason, do not install sources of
heat, such as radiators or hot air ducts. Keep away from direct sunlight. Do not install in areas subject to
excessive dust, mechanical vibrations or shocks.
Do not arrange this device on an unstable surface, such as a tottering or slanted table. The device could fall
causing injury or mechanical failures.
Do not install the device in a place where it could be exposed to humidity or water. Do not direct a jet of water
onto the device: risk of fire, electrocution or mechanical failure.
Stop using the device if water or other material should penetrate inside: risk of fire and electrocution. Contact
the retailer or authorised installer.
Do not place heavy or heat generating objects on top of the device: this could damage the casing and/or
increase internal temperature causing faults.
Do not cover the device with a cloth while it is running to prevent deforming the external casing and overheating
the internal parts: risk of fire, electrocution and mechanical failure.
Keep magnets and magnetised objects away from the device to prevent faults.
Do not use the device in presence of smoke, vapour, humidity, dust or intense vibrations.
Wait for a while before operating a device immediately after transporting it from a cold place to a warm place
and vice versa. Wait on average for three hours: this will allow the device to adapt to the new ambient
(temperature, humidity, etc.).
CLEANING THE DEVICE
Rub delicately with a dry cloth to remove dust and dirt.
Dip the cloth in neutral detergent if dirt cannot be eliminated with a dry cloth alone.
Do not use volatile liquids (such a petrol, alcohol, solvents, etc.) or chemically treated clothes to clean the
device to prevent deformation, deterioration or scratches to the paint finish.
HARD DISK
The hard disk installed in this device is sensitive to shocks, differences in temperature and vibrations.
Disrespect of these precautions can compromise correct operation of the device and loss of data stored on the
hard disk.
If repairs are required, it is advisable to backup all important data before taking the device to the service centre.
URMET S.p.A. is not liable for loss of stored data.
IMAGE RECORDING
This device was designed to record images, not as a burglar alarm. URMET S.p.A. cannot be held liable for loss
or damage following theft sustained by the user.
Make a test recording before using the device to make sure that is working correctly. Please note that URMET
S.p.A. is not liable for loss of stored data consequent to loss or damage caused by incorrect observation
installation, use, improper use or malfunctioning of the device.
This device contains precision electronic components. Protect the device from shocks to ensure correct
recording of images.
PRIVACY AND COPYRIGHT
The 1093/004H – 1093/008H – 1093/016H – 1093/018H – 1093/019H digital video recorder is a device for
CCTV systems. Recording of images is subject to the laws in force in your country. Recording of images
protected by copyright is forbidden.
Product users shall be responsible for checking and respecting all local rules and regulations concerning
monitoring and recording video signals. The manufacturing SHALL NOT BE LIABLE for use of this product not
in compliance with the laws in force.
DS1093-100
26
2
2.1
2.1.1
DESCRIPTIONS OF THE PARTS
FRONT PANEL
REF. 1093/004H-008H-016H DVR FRONT PANEL
4
8
20
Item
5
6
10
9
Key title
or
Indicator
7
13
15 16 17
19
12
11
Remark
18
2
1
3
Function & Description
If the “Green” indicator is on the system is getting power
normally.
1
Power Indicator
2
IR Receiver
3
HDD Indicator
4
Search Video File
5
Disable Audio
MUTE
Disable Audio
Channel select:
CH- CH+
CH CH +
CH select key
7
ALL
ALL
Monitor in QUAD/nineth/ sixteenth Mode
8
PLAY
9
PAUSE
10
By frame
11
STOP
Stop playing or stop manual record
12
REC
●
Press the button to start manual record.
13
PTZ
PTZ
14
MENU
15
Left Key / Rew
Enter into Main menu, exit or stop playing / Move to left; Rewind
function; decrease PTZ rotation speed and parameter value /
Selection Monitor BNC and HDMI or VGA.
16
Up key
Move up
17
Right Key / Fast
Forward
select [Enter] / [Edit] operation / Right key, F. Forward key;
18
Down key
Move down
19
ENTER
Select [Enter] / [Edit] operation
20
USB Port
Connect to USB2.0 port
6
DS1093-100
PWR
14
Receives IR signal from Remote Controller
HDD
SEARCH
When the “Red” indicator flashes it means the hard drive is
being read or written to.
Search Video File
Enter into Pop-up Menu; Play record file.
Pause / play frame by frame manually
Play frame by frame
MENU/ESC
Enter into PTZ Mode
Enter into Main menu, exit or stop playing
increase PTZ rotation speed and Parameter value.
27
2.1.2
REF. 1093/018H-019H DVR FRONT PANEL
11
12
17
Item
Type
1
13
14
9 10 6
15
Key title
/Indicator
Marks
HDD indicator
HDD
Power indicator
PWR
Indicator
2
3
4
5
IR
Receiver
Complex
Key
5
16
4
8
7
2
3
Function
When the “Red” indicator flashes it means
the hard drive is being read or written to.
If the “Green” indicator is on the system is
getting power normally.
Receives IR signal from Remote Control
Menu
MENU/ESC
Enter into main menu / Exit
Open or close audio input
Mute
Move up
6
UP
7
RIGHT
/
DOWN
9
LEFT
/
Move left / RWD
10
ENTER
PTZ
Enter into PTZ control, select [Enter] /
[Edit] operation
8
Direction
Key
Move right / FWD
Move down
1.
11
12
13
14
15
Channel
Select &
numeric
input
Play
Control
Single Channel
and numeric key
Play
Play/Pause
Stop
Manual record
16
Multi Display
17
USB Port
DS1093-100
Numeric key
0,1-9 and CH
key CH1~9
●
28
Number 1~9 stand for numeric 1~9
and CH 1~9.
2. CH11-CH16 select method: press
firstly numeric key 1 and then other
numeric key. For example CH16
select firstly press 1, and then press
6.
3. Holding press key 0 for three seconds
may convert current output device
Convert to play status
Convert to play/ pause status
Stop playing and stop manual record
Press the button to start manual record.
Live display Quad mode, 9-split and 16split mode
Connect to USB2.0 port
1
2.2
2.2.1
REAR PANEL
REF. 1093/004H-008H-016H DVR BACK PANEL
2
1
7
4
3
6
2
1
8
11
3
6
4
Item
DS1093-100
10
11
5
9
10
7
3
12
8
2
1
5
7
4
9
6
12
8
11
5
9
10
12
Physical port
Connection method
1
Video input
Connect CH1-4 for DVR Ref. 1093/004H, CH1-8 for DVR
Re. 1093/008H, CH 1-16 for DVR Ref. 1093/016H (Virtual)
video input device (BNC interface)
2
Video output
Connect monitor output (BNC interface)
3
Audio Input
4CH audio input (RCA interface);
4
Audio Output
Audio output (RCA interface);
5
USB Port
Connect USB mouse
6
HDMI Port
Connect to HDMI monitor
7
VGA Port
Connect to VGA monitor, such as PC monitor
8
PIN RS485/ Sensor Alarms
RS485/Sensor/Alarm interface (see pin outs below)
9
IR-EXT
For IR ext Remote Control (for future use)
10
Power Port
Connect power supply - DC12V 2A
11
Ethernet Port
Connect LAN, Ethernet (RJ45 interface)
12
Power Switch
Turn Power on and off
29
2.2.2
REF. 1093/018H DVR BACK PANEL
2
4
Item
DS1093-100
1
5
8
7
3
9
12
6
10
11
13
Physical port
Connection method
1
Video input
CH1-8 video input device (BNC interface)
2
Video output
Connect monitor output(BNC interface)
3
Audio Input
CH1-CH4 audio input (RCA interface);
4
Audio Input
CH5-CH8 audio input (RCA interface);
5
Audio Output
Audio output (RCA interface);
6
USB Port
Connect USB mouse
7
HDMI Port
Connect to HDMI monitor
8
VGA Port
Connect to VGA monitor, such as PC monitor
9
PIN RS485/ Sensor Alarms
RS485/Sensor/Alarm interface (see pin outs below)
10
IR-EXT
For IR ext Remote Control (for future use)
11
Power Port
Connect power supply - DC12V 5A
12
Ethernet Port
Connect LAN, Ethernet (RJ45 interface)
13
Power Switch
Turn Power on and off
30
2.2.3
REF. 1093/019H DVR BACK PANEL
Item
2.2.4
Physical port
Connection method
1
Video input
Connect CH1-16 video input (BNC interface)
2
Video output
(UP) Main video output; (Down) Spot output (BNC interface)
3
Audio input
Connect CH1-4 audio signal input (BNC interface)
4
Audio output
5
Audio input
Connect audio signal output, including spot main audio output and sequence
audio output (BNC interface)
Connect (CH5~CH16) Audio input
6
Ethernet Port
Connect LAN, Ethernet (RJ45 interface)
7
Power Switch
Turn Power on and off
8
HDMI
HDMI Output
9
VGA Port
Connect to VGA monitor, such as PC monitor
10
USB Port
Connect USB mouse
11
RS-485/Sensor/Alarm
RS485/Sensor/Alarm interface (see pin outs below)
12
Power Port
Connect power supply - DC12V 5A
RS485/SENSOR/ALARM PORT FUNCTIONS
Alarm input: Connect [-] port of your sensor to G (GND) pin, and [+] port to channel input according to the alarm device
you purchased.
Alarm output: Connect to the two ports marked with “out”
PTZ Port: Connect your camera to RS-485A and RS485B accordingly.
DS1093-100
31
2.3
REMOTE CONTROLLER
Item
1
2
3
4
5
6
7
8
Key title
1-8
9、
、0
ALL
Menu
▲
▼
◄/
SEL
9
10
11
12
13
14
15
16
DS1093-100
●
■
Audio
Mute
32
Key function
Channel select 1-8; Numeric key
Numeric key; Clicking numeric “0” allow you switch
to GUI (Graphical user Interface) function
Multiple display mode
Enter into Main menu/Exit
Up arrow key, Volume adjust
Down arrow key, Volume adjust
Left/Down key,
Decrease/increase parameter value of control bar
Select key/Edit key;
Confirm the selected operation.
Rewind key
Enter into record search menu;
Play key
Forward key
Record key
Pause/Sequence key
Stop manual record; stop playing
Testing
Mute on/off
2.4
REMOTE CONTROLLER REF. 1093/019H
Key Title
REC
SEARCH
2×
×2
Enter into Quad display
3×
×3
Enter into 9-split display
4×
×4
Enter into 16-split display
AUTO
0~9
DISPLAY
MODE
Enter into dwell time display
Channel select; numeric key
Multiple CH display (Quad, 9-split, 16-split and full
screen display)
▲
Up direction key
▼
Down direction key
Left/right direction key; also decrease/increase
parameter value of control bar.
select [Enter] / [Edit] operation
Enter into/exit Main menu
PIP display mode
Mute key
◄/
ENTER
Menu/ESC
PIP
MUTE
FWD
Forward(x2、x4、x8)
REW
Rewind(x2、x4、x8)
PLAY
STOP
PAUSE/
FRAME
SLOW
Z+
ZF+
FI+
IPTZ
LOCK
DS1093-100
Key Function
Press the button to enter into manual record.
Press the button to enter into record search menu
33
Enter into record search, play record event
Stop play / manual play
Pause / play frame by frame
(1/2、1/4、1/8)Slow play
Zoom out video area
Zoom in video area
Extend focus
Extend focus
Increase PTZ brightness
Decrease PTZ brightness
Allow you set preset bit and control PTZ.
Lock system
2.5
MOUSE OPERATION
Except using buttons of front panel or remote controller, you also can use mouse to perform system operation.
TYPE
Click left key of
Mouse
Click right key of
Mouse
Double-click
Left
key of Mouse
Moving Mouse
Sliding Mouse
DS1093-100
Function
In menu lock mode, Enter into pop-up menu and clicking any sub menu to pop up Login window; on menu unlock mode, enter into pop-up menu, and then clicking left key to
enter into any sub menu directly.
After entering into main menu, clicking left key could enter into any sub menu; On
[Detailed file] menu mode, clicking left key could playback one recording file.
Change the status of check box and motion detection area.
Clicking combo box to access pull-down menu; Click left key to stop dwell time display
when dwell time display is activated.
By clicking left key you can adjust Color control bar and volume control bar.
Clicking combo box to access pull-down menu
By clicking left key you can select values in edit boxes or pull-down menu and supports
Chinese word input, special symbol, numeric and character input, use instead of
[Enter] or [Backspace
]
In live display mode, clicking right key will display pop-up menu.
In Main menu or sub menu mode, clicking right key will exit current menu.
In live display or playback mode, double-clicking left key will maximize the screen.
Select menu item
On motion mode, sliding mouse will select motion area; On [Color set] menu mode,
sliding mouse will adjust color control bar and volume control bar.
34
3
DEVICE BASIC STARTUP
For a quick startup of the device, follow the procedure below:
Connect the desired analog cameras to BNC input channels.
Connect the mouse to the USB port.
Connect the HDMI/ VGA output to the respective HDMI/ VGA monitor and/or connect the BNC “Video Out” output
to the respective monitor in order to display the analog cameras previously connected.
Connect the network cable to LAN port, if needed.
Power the device on, inserting the power supply connector into the plug and set the switch to position 1 (if
requested).
NOTE
For further details, see the instructions manual in the CD provided with the product.
4
BASIC CONFIGURATION
4.1
MONITOR SELECTION
This Function allows to control the OSD Menu, switching BNC video Output and HDMI/VGA Video Output.
It is possible to switch the OSD Menu on video Output by DVR Front Panel:
Press and Hold “” REWIND Button (i.e. the Selection Button in right position of DVR Front Panel) for DVR
Models Ref. 1093/004H, Ref. 1093/008H and Ref. 1093/016H. Release the button after audible warning.
Press and Hold ”0” Button (Numeric Button on DVR Front Panel) for DVR Models Ref. 1093/018H and Ref.
1093/019H. Release the button after audible warning.
It is also possible to switch the OSD Menu on video Output by Remote Control (i.e. Selecting 0 Button), or select by
mouse the icon
from pop-up Menu (i.e. last icon on the right bottom of pop-up Menu displayed in the screen).
Wait till that the mouse pointer is displayed on Monitor.
4.2
LANGUAGE AND DATE/TIME SETTINGS
To set language and date/time, follow the procedure below:
On the DVR, select [Main MenuSystem] and choose the language for the DVR.
Change date, time and format, setting the current date/time. It is also possible to set the daylight-saving time, by
selecting the button [Set DST].
Save the configurations, exit from the DVR menu and reboot the device, if required.
DS1093-100
35
4.3
VIDEO OUTPUT CONTROL
On the DVR, select [Main Menu Monitor Output] to definitively set the menu control, by selecting the desired video
output.
The option [Video Out Control] includes the following items:
•
•
•
HDMI: used to load the menu control configurations at DVR startup on HDMI/ VGA video output.
VOUT: used to load the menu control configurations at DVR startup on MAIN BNC video output.
AUTO: used to automatically load the menu control configurations at DVR startup on HDMI/ VGA or MAIN BNC
video output, according to the video output connected and to the monitor used.
NOTE:
It is suggested to select the output [HDMI/ VGA] or [VOUT] according to the monitor.
The option [AUTO] is suggested when both HDMI/ VGA and BNC monitors are connected and the user wants
to be able to switch the menu control on the video output.
To save the changes, select the button [APPLICA], exit from the menu and reboot the device in order to make
changes active.
4.4
RECORDING PARAMETERS
Select [Main Menu Record] to access the menu [Record]. The following functions are available:
4.
5.
6.
The menu [Schedule] allows to set recording options: 24 hours or Normal, on Motion/Alarm; recording time
tables can be customized. It is also possible to program both recording options, Normal/Alarm within the same
time tables.
The item [File Size] in the menu [Rec Parameters] defines the maximum length of the recorded files (15min,
30min, 45min, 60 min).
After configurations in the Recording menu have been completed, save these changes and check that, after
exiting from the device menu, the icon “R” is displayed for each channel in LIVE mode; this icon indicates that
the device is recording according to configurations.
DS1093-100
36
5
ADVANCED CONFIGURATIONS
5.1
HARD DISK CONFIGURATION
Select [Main Menu Device] and start with the Hard Disk configuration, according to the user’s needings, checking the
following options:
5.2
OVERWRITE: If selecting “AUTO”, when the Hard Disk is full, the system will automatically overwrite the oldest
records, so it is possible to define how many days the records will remain in the hard disk. If selecting “OFF”,
when the Hard Disk is full, the recording will stop.
It is also possible to define how many days to keep the records of all the device channels. Select a value among
the available options.
FORMAT HD: This option is used to format the Hard Disk; files can’t be stored in the HD if this has not been
formatted. Select the Hard Diskthe button [Format HD] to start formatting; the system will ask: “All HD data will
be deleted, do you confirm?”; after pressing “OK”, the system will display: “Format in progress…” and “Format
complete”, then the system will automatically reboot. In case of fault, if the device doesn’t work at the first
installation, it could be useful to format the Hard Disk.
UNUSED FREE SPACE: it is the space available on the Hard Disk.
TOTAL SPACE: it is the total Hard Disk space.
REMAINING TIME: According to current video quality levels and frame rate, the system will show an evaluation
of the remaining recording time.
FIRMWARE UPGRADE AND DEFAULT SETTINGS
Select [Main Menu System Info ] for checking the DVR Firmware Version. If the Firmware Version is old, it is
possible to upgrade the device system software (firmware). Follow the procedure below:
Insert a USB flash drive into the PC and copy on the key the folder “dvrupgrade”, used to upgrade.
Insert the USB flash drive into the USB port (front or back) of the DVR.
On the DVR, select [Main Menu Advanced] and then [Update].
Wait until firmware upgrade and device reboot have been completed.
On the DVR, select [Main Menu Advanced] and then [Load Default]. A new screen will be displayed: select all
the items and click on [Apply], the device will be reset to factory defaults.
Exit from the OSD menu and wait for the device reboot, if needed.
IMPORTANT NOTES:
It is strongly recommended to Backup the record files stored in the Hard Disk before Upgrade Firmware
Version. After Backup Process, the files shall be played using the Player Software present in the current
Firmware Release
After Uploading Default Settings please set again the Basic Configurations (i.e. Video Out Control,
Language, Date/Time and Record Parameters, etc.)
DS1093-100
37
5.3
NETWORK CONFIGURATION
Select [Main MenuNetwork] to access network configuration. To configure the device for the local network, follow the
procedure below.
Select the desired network [Static], [DHCP] and [PPPoE].
For [Static] type, assign an IP address to the device, and check that [Client Port], such as 9000, and [Http Port],
such as 80 and [Mobile Port] as 18600 have been assigned. Please refer to picture below.
For [DHCP] type it is possible to set the Mobile Port, Client Port and HTTP Port as above and the network will
automatically assign a dynamic IP address, that can randomly change.
Save the changes by clicking on the button [Apply] and exit from the DVR OSD menu.
Reboot the device, as required, and wait until this operation has been completed.
NOTE:
For further details about the Network configuration Menu and Mobile and Internet Configuration Menu, see the
respective sections on the user manual, available in the CD provided with the product.
5.4
LOGIN DEVICE IN WEB INTERFACE
The instructions below describe how to access and configure the device web pages via LAN and Internet Explorer:
o
o
DS1093-100
Launch Internet Explorer and enter in the address bar the DVR IP address and the DVR HTTP
port, as http://IP Address:HTTP Port. If the DVR HTTP port is 80, enter only the DVR IP address,
as http://IP Address
If the installation of an ActiveX component is required, check that this operation is performed
as follows:
Double click on the icon
to open the browser Internet Explorer.
The following screen will appear (or the default first page):
Select from the menu of the Internet Explorer window the item “Tools → Internet options”
38
The window “Properties” will appear. Select “Security”.
Select “Trusted sites”.
Click on “Custom Level” and make sure that the protection level is set to “Low”. If the
protection level is not set, set it to Low and click on “Re-set” as shown in the figure. Select OK
to confirm.
DS1093-100
Click on the item “Sites”.
39
The following screen will appear. Add the device IP address (for example:
http://192.168.36.40) in the field “Add Web Site to the Zone”.
Click on the button “Add”.
NOTE
Don’t select the item “Require server (https:) verification for all sites in this zone”.
o
o
o
DS1093-100
Select “Exit” to close the window
Confirm by clicking on “Apply” and “OK”.
Close Internet Explorer.
Launch Internet Explorer and enter in the address bar the IP address and HTTP port of the DVR,
for example http://IP Address:Web Port/
After installing Active X, the following screen will appear; enter user name, password and Client
port, select the language and the Stream type. At the first access, enter admin as user name and
leave the password field empty. The first access is valid if default parameters have been kept and
the password is disabled in the DVR user menu. Otherwise, if the password has been enabled,
enter the password for administrator and/or user.
After setting the previous parameters (user name, password, client port, language, stream type),
select the button [Login] to access the device web interface.
40
5.5
IUVS SOFTWARE MOBILE
URMET iUVS is a mobile phone CCTV application developed for iOS and Android Platform. It's compatible with the URMET
H.264 New Dynamic & Video Smart and Evolution 2.0 DVR Series for Firmware V3.1 or upper version.
Features
Here follow the main features of the application:
•
•
•
•
•
•
Live audio/video streaming of up to 4 channels
Remote Search and Playback
Local Playback
PTZ function
Snapshot and Video capture
Multiple devices supported
Getting Start
•
•
•
Download and install the iUVS App from Apple Store or Android Market.
Connect your device to the internet using 3G or WiFi.
Launch application you will brought to iUVS main menu
Add and delete device
Device manager allow you add or delete device, and also modify device properties. Tab "Device Manager" on Main Menu to
open this interface as below
To add a new device, click "Add" button at the top right, then you can input the device name, address(IP or domain name), port,
user name and password etc. The Channels property can be retrieved form device.
NOTE: It is needed to set the Data Port (i.e. 9000) for iUVS Software Mobile correct working. If the user sets the Mobile
Port, iUVS Software Mobile cannot work for any reason.
To delete a device from list, swipe the device name you want to delete, then tap the delete button next to the device name.
DS1093-100
41
Live video monitor
Tab Live Monitor on Main Menu will bring up Live interface, which provides stream video, record, snapshot and PTZ, etc.
1. Open a device
Tab
to open device list as below, then select one of devices in the list, will open all channels of it automatically.
2. Open a channel
Tab Cross button on one of the view window will enter channel list window, then select one channel to open on the previous
window. Live preview about selected channel will be played.
NOTE:
About Software Mobile installation details for Symbian, Windows and BlackBerry Platforms, see the respective
sections on the user manual, available in the CD provided with the product.
For further details about the iUVS Software Mobile, see the respective sections on the user manual, available in the
CD provided with the product.
DS1093-100
42
DS1093-100
URMET S.p.A.
10154 TORINO (ITALY)
VIA BOLOGNA 188/C
Telef.
DS1093-100+39 011.24.00.000 (RIC.AUT.)
Fax
+39 011.24.00.300 - 323
84
Area tecnica
servizio clienti +39 011.23.39.810
http://www.urmet.com
e-mail: [email protected]
MADE IN CINA