1
Shopping cart software
v. 2.0
User Manual
Copyright © 2004-2010 CS-Cart.com
Copyright © 2004-2010 CS-Cart.com
Table of contents
1. Welcome to CS-Cart shopping cart software . . . . . . . . 5
2. Introducing CS-Cart . . . . . . . . . . . . . . . . . . . . . . . . . . . 6
2.1 What Is CS-Cart? . . . . . . . . . . . . . . . . . . . . . . . . . . 6
2.2 Features . . . . . . . . . . . . . . . . . . . . . . . . . . . . . . . . 7
3. Installation . . . . . . . . . . . . . . . . . . . . . . . . . . . . . . .
3.1 Requirements . . . . . . . . . . . . . . . . . . . . . . . . . .
3.2 Installing CS-Cart . . . . . . . . . . . . . . . . . . . . . . .
3.2.1 License Agreement . . . . . . . . . . . . . . . . . .
3.2.2 Checking Requirements. . . . . . . . . . . . . . .
3.2.3 Host And Database Settings . . . . . . . . . . .
3.2.4 Installing Database. . . . . . . . . . . . . . . . . .
3.2.5 Shop Outlook Settings . . . . . . . . . . . . . . .
3.2.6 Installing Skins . . . . . . . . . . . . . . . . . . . .
3.2.7 Summary . . . . . . . . . . . . . . . . . . . . . . . .
.
.
.
.
.
.
.
.
.
.
. 11
. 11
. 12
. 14
. 15
. 16
. 18
. 19
. 20
. 21
4. CS-Cart Architecture . . . . . . . . . . . . . . . . . . . . . . . .
4.1 Interfaces . . . . . . . . . . . . . . . . . . . . . . . . . . . .
4.1.1 Storefront interface . . . . . . . . . . . . . . . . .
4.1.2 Administration interface . . . . . . . . . . . . . .
.
.
.
.
. 22
. 22
. 22
. 23
5. Administration panel . . . . . . . . . . . . . . . . . . . . . . . .
5.1 Authentication . . . . . . . . . . . . . . . . . . . . . . . . .
5.2 Orders. . . . . . . . . . . . . . . . . . . . . . . . . . . . . . .
5.2.1 View orders . . . . . . . . . . . . . . . . . . . . . . .
5.2.2 Sales reports . . . . . . . . . . . . . . . . . . . . . .
5.2.3 Order statuses . . . . . . . . . . . . . . . . . . . . .
5.2.4 Shipments . . . . . . . . . . . . . . . . . . . . . . . .
5.2.5 Gift certificates . . . . . . . . . . . . . . . . . . . .
5.2.6 Return requests . . . . . . . . . . . . . . . . . . . .
5.2.7Recurring plans . . . . . . . . . . . . . . . . . . . .
5.2.8View subscriptions . . . . . . . . . . . . . . . . . .
5.2.9Subscription events . . . . . . . . . . . . . . . . .
5.3 Catalog . . . . . . . . . . . . . . . . . . . . . . . . . . . . . .
5.3.1 Categories . . . . . . . . . . . . . . . . . . . . . . . .
5.3.1.1 Bulk category addition. . . . . . . . . .
5.3.2 Products . . . . . . . . . . . . . . . . . . . . . . . . .
.
.
.
.
.
.
.
.
.
.
.
.
.
.
.
.
. 25
. 25
. 26
. 26
. 40
. 48
. 52
. 54
. 60
. 67
. 70
. 73
. 75
. 75
. 84
. 85
Last Revised: Jan 5.10
Page
1 of 409
Copyright © 2004-2010 CS-Cart.com
5.3.2.1 Global update. . . . . .
5.3.2.2 Bulk product addition
5.3.3 Product features. . . . . . . . . .
5.3.4 Product filters . . . . . . . . . . .
5.3.5 Global options . . . . . . . . . . .
5.3.6 Promotions . . . . . . . . . . . . .
5.3.7 Configurator . . . . . . . . . . . .
5.3.8 Reward points . . . . . . . . . . .
5.4 Users . . . . . . . . . . . . . . . . . . . . .
5.4.1 Users . . . . . . . . . . . . . . . . .
5.4.2 Administrators . . . . . . . . . . .
5.4.3 Customers. . . . . . . . . . . . . .
5.4.4 Affiliates . . . . . . . . . . . . . . .
5.4.5 Suppliers. . . . . . . . . . . . . . .
5.4.6 Profile fields. . . . . . . . . . . . .
5.4.7 User carts . . . . . . . . . . . . . .
5.4.8 User groups . . . . . . . . . . . . .
5.4.9 Events . . . . . . . . . . . . . . . .
5.5 Shippings/taxes . . . . . . . . . . . . . .
5.5.1 Shipping methods . . . . . . . .
5.5.2 Taxes . . . . . . . . . . . . . . . . .
5.5.3 States . . . . . . . . . . . . . . . . .
5.5.4 Countries . . . . . . . . . . . . . .
5.5.5 Locations. . . . . . . . . . . . . . .
5.5.6 Localizations . . . . . . . . . . . .
5.6 Administration . . . . . . . . . . . . . . .
5.6.1 Settings . . . . . . . . . . . . . . .
5.6.1.1 Appearance . . . . . . .
5.6.1.2 Company . . . . . . . . .
5.6.1.3 Dynamic HTML . . . . .
5.6.1.4 E-mails . . . . . . . . . .
5.6.1.5 General . . . . . . . . . .
5.6.1.6 Google base . . . . . . .
5.6.1.7 Image verification . . .
5.6.1.8 Logging . . . . . . . . . .
5.6.1.9 Reports . . . . . . . . . .
5.6.1.10 Shipping settings . .
5.6.1.11 Sitemap . . . . . . . . .
5.6.1.12 Thumbnails . . . . . .
Last Revised: Jan 5.10
.
.
.
.
.
.
.
.
.
.
.
.
.
.
.
.
.
.
.
.
.
.
.
.
.
.
.
.
.
.
.
.
.
.
.
.
.
.
.
.
.
.
.
.
.
.
.
.
.
.
.
.
.
.
.
.
.
.
.
.
.
.
.
.
.
.
.
.
.
.
.
.
.
.
.
.
.
.
.
.
.
.
.
.
.
.
.
.
.
.
.
.
.
.
.
.
.
.
.
.
.
.
.
.
.
.
.
.
.
.
.
.
.
.
.
.
.
.
.
.
.
.
.
.
.
.
.
.
.
.
.
.
.
.
.
.
.
.
.
.
.
.
.
.
.
.
.
.
.
.
.
.
.
.
.
.
.
.
.
.
.
.
.
.
.
.
.
.
.
.
.
.
.
.
.
.
.
.
.
.
.
.
.
.
.
.
.
.
.
.
.
.
.
.
.
.
.
.
.
.
.
.
.
.
.
.
.
.
.
.
.
.
.
.
.
.
.
.
.
.
.
.
.
.
.
.
.
.
.
.
.
.
.
.
.
.
.
.
.
.
.
.
.
.
.
.
.
.
.
.
.
.
.
.
.
.
.
.
.
.
.
.
.
.
.
.
.
.
.
.
.
.
.
.
.
.
.
.
.
.
.
.
.
.
.
.
.
.
.
.
.
.
.
.
.
.
.
.
.
.
.
.
.
.
.
.
.
.
.
.
.
.
.
.
.
.
.
.
.
.
.
.
.
.
.
.
.
.
.
.
.
.
.
.
.
.
.
.
.
.
.
.
.
.
.
.
.
.
.
.
.
.
.
.
.
.
.
.
.
.
.
.
.
.
.
.
.
.
.
.
.
.
.
.
.
.
.
.
.
.
.
.
.
.
.
.
.
.
.
.
Page
.
.
.
.
.
.
.
.
.
.
.
.
.
.
.
.
.
.
.
.
.
.
.
.
.
.
.
.
.
.
.
.
.
.
.
.
.
.
.
121
123
124
127
130
134
140
147
149
149
152
153
156
157
158
160
161
165
172
172
178
181
183
184
190
194
194
195
198
200
200
202
209
210
213
214
215
229
229
2 of 409
Copyright © 2004-2010 CS-Cart.com
5.6.2 Addons . . . . . . . . . .
5.6.3 Payment methods . .
5.6.4 Database. . . . . . . . .
5.6.5 Credit cards . . . . . . .
5.6.6 Titles . . . . . . . . . . .
5.6.7 Currencies . . . . . . . .
5.6.8 Import data . . . . . . .
5.6.9 Export data . . . . . . .
5.6.10 Logs . . . . . . . . . . .
5.6.11 Upgrade center. . . .
5.6.12 Statistics . . . . . . . .
5.6.13 Webmail . . . . . . . .
5.6.14 Store access . . . . .
5.6.15 Data feeds . . . . . . .
5.7 Design. . . . . . . . . . . . . . .
5.7.1 Site layout. . . . . . . .
5.7.2 Logos . . . . . . . . . . .
5.7.3 Design mode . . . . . .
5.7.4 Blocks. . . . . . . . . . .
5.7.5 Appearance settings .
5.7.6 Quick links . . . . . . .
5.7.7 Top menu . . . . . . . .
5.7.8 Site map . . . . . . . . .
5.7.9 Template editor . . . .
5.7.10 Skin selector . . . . .
5.8 Content . . . . . . . . . . . . . .
5.8.1 Pages . . . . . . . . . . .
5.8.1.1 Pages . . . . .
5.8.1.2 Links . . . . . .
5.8.1.3 Forms . . . . .
5.8.1.4 Polls . . . . . .
5.8.2 Languages. . . . . . . .
5.8.3 Tags . . . . . . . . . . . .
5.8.4 Site News . . . . . . . .
5.8.5 Newsletters . . . . . . .
5.8.6 Mailing lists . . . . . . .
5.8.7 Subscribers . . . . . . .
5.8.8 Store locator . . . . . .
5.8.9 SEO rules . . . . . . . .
Last Revised: Jan 5.10
.
.
.
.
.
.
.
.
.
.
.
.
.
.
.
.
.
.
.
.
.
.
.
.
.
.
.
.
.
.
.
.
.
.
.
.
.
.
.
.
.
.
.
.
.
.
.
.
.
.
.
.
.
.
.
.
.
.
.
.
.
.
.
.
.
.
.
.
.
.
.
.
.
.
.
.
.
.
.
.
.
.
.
.
.
.
.
.
.
.
.
.
.
.
.
.
.
.
.
.
.
.
.
.
.
.
.
.
.
.
.
.
.
.
.
.
.
.
.
.
.
.
.
.
.
.
.
.
.
.
.
.
.
.
.
.
.
.
.
.
.
.
.
.
.
.
.
.
.
.
.
.
.
.
.
.
.
.
.
.
.
.
.
.
.
.
.
.
.
.
.
.
.
.
.
.
.
.
.
.
.
.
.
.
.
.
.
.
.
.
.
.
.
.
.
.
.
.
.
.
.
.
.
.
.
.
.
.
.
.
.
.
.
.
.
.
.
.
.
.
.
.
.
.
.
.
.
.
.
.
.
.
.
.
.
.
.
.
.
.
.
.
.
.
.
.
.
.
.
.
.
.
.
.
.
.
.
.
.
.
.
.
.
.
.
.
.
.
.
.
.
.
.
.
.
.
.
.
.
.
.
.
.
.
.
.
.
.
.
.
.
.
.
.
.
.
.
.
.
.
.
.
.
.
.
.
.
.
.
.
.
.
.
.
.
.
.
.
.
.
.
.
.
.
.
.
.
.
.
.
.
.
.
.
.
.
.
.
.
.
.
.
.
.
.
.
.
.
.
.
.
.
.
.
.
.
.
.
.
.
.
.
.
.
.
.
.
.
.
.
.
.
.
.
.
.
.
.
.
.
.
.
.
.
.
.
.
.
.
.
.
.
.
.
.
.
.
.
.
.
.
.
.
.
.
.
.
.
.
.
.
.
.
.
.
.
.
.
.
.
.
.
.
.
.
.
.
.
.
.
.
.
.
.
.
.
.
.
.
.
.
.
.
.
.
.
.
.
.
.
.
.
.
.
.
.
.
.
.
.
.
.
.
.
.
.
.
.
.
.
.
.
.
.
.
.
.
.
.
.
.
.
.
.
.
.
.
.
.
.
.
.
.
.
.
.
.
.
.
.
.
.
.
.
.
.
.
.
.
.
.
.
.
.
.
.
.
.
.
.
.
.
.
.
.
.
.
.
.
.
.
.
.
.
.
.
.
.
.
.
.
.
.
.
.
.
.
.
.
.
.
.
.
.
.
.
.
.
.
.
.
.
.
.
.
.
.
.
.
.
.
.
.
.
.
.
.
.
.
.
.
.
.
.
.
.
.
.
.
.
.
.
.
.
.
.
.
.
.
.
.
.
.
.
.
.
.
.
.
.
.
.
.
.
.
.
.
.
.
.
.
.
.
.
Page
.
.
.
.
.
.
.
.
.
.
.
.
.
.
.
.
.
.
.
.
.
.
.
.
.
.
.
.
.
.
.
.
.
.
.
.
.
.
.
232
261
263
268
269
271
272
279
281
283
287
295
297
302
307
308
309
310
311
314
314
316
319
321
323
325
325
325
332
334
339
344
347
349
352
356
358
360
363
3 of 409
Copyright © 2004-2010 CS-Cart.com
5.8.10 Banners. . . . . . . . . . . . . . . . . . . . . . . . .
5.8.11 Comments and reviews . . . . . . . . . . . . . .
5.9 Affiliate . . . . . . . . . . . . . . . . . . . . . . . . . . . . . .
5.9.1 Product groups. . . . . . . . . . . . . . . . . . . . .
5.9.2 Banners . . . . . . . . . . . . . . . . . . . . . . . . .
5.9.3 Plans . . . . . . . . . . . . . . . . . . . . . . . . . . .
5.9.4 Affiliates . . . . . . . . . . . . . . . . . . . . . . . . .
5.9.5 Approve commissions . . . . . . . . . . . . . . . .
5.9.6 Pay affiliates . . . . . . . . . . . . . . . . . . . . . .
5.9.7 Payouts . . . . . . . . . . . . . . . . . . . . . . . . . .
5.9.8 Accounting History . . . . . . . . . . . . . . . . . .
FAQ . . . . . . . . . . . . . . . . . . . . . . . . . . . . . . . . . . . . . . . .
Last Revised: Jan 5.10
Page
. 365
. 365
. 369
. 369
. 373
. 379
. 385
. 387
. 391
. 392
. 395
. 396
4 of 409
Copyright © 2004-2010 CS-Cart.com
1. Welcome to CS-Cart shopping cart software
The CS-Cart shopping cart software is designed to help you build a robust online
store. This software can satisfy both a professional user, interested in up-to-date and
advanced functionality, and a novice for whom the simplicity is the main factor.
Moreover, our slogan Buy easy, sell easier speaks for itself. You just go to our
site, buy the software, build your store and start trading.
Although CS-Cart shopping cart software is designed to be intuitively simple to use,
this tutorial is offered to make learning to use it even simpler and quicker. The manual
will guide you step-by-step through installation, setup and use of the shopping cart
software.
Thank you for using CS-Cart software.
Last Revised: Jan 5.10
Page
5 of 409
Copyright © 2004-2010 CS-Cart.com
2. Introducing CS-Cart
2.1 What Is CS-Cart?
CS-Cart is powerful shopping cart software built using industry
standard PHP and MySQL. Optimized programming code makes it
possible to build stores that can easily handle over 10,000
products. CS-Cart also uses the PHP Smarty template engine that
makes it very simple to change the look-and-feel of the store in the
minimum amount of time, and with advanced catalog management
tools your store can be maintained with the least amount of effort.
CS-Cart is your best choice if you are:
• looking for quality PHP shopping cart software to start an online business;
• a site owner wishing to integrate a shopping cart with your existing web site;
• a web developer searching for a professional low-cost PHP shopping cart;
• an ISP or web hosting company that wants to offer a shopping cart solution as a part
of your services;
• looking for a good PHP/MySQL platform to create a dynamic website with some
specific functionality.
The CS-Cart software includes:
• complete source code;
• one domain lifetime license;
• 1 month of free technical support or 40 support credits with the first license and 20
credits with each additional one.*
*CS-Cart licenses purchased from authorized resellers come with 20 support
credits.
Last Revised: Jan 5.10
Page
6 of 409
Copyright © 2004-2010 CS-Cart.com
2.2 Features
General:
• Complete ready-to-use store package
• Web-based installation wizard & store configuration
• Intuitive administration panel
• Built-in professional design templates
• Bulk uploading of categories, products and images
• Full import and export of product/user/order/language databases in CSV format
• No programming knowledge required for installation and setting up
• Free 1-month technical support or 40 support credits
Localization
• Translated into 8 languages (some translations are partial)
• Easy addition of new languages
• Configurable currency symbols
• Configurable measurement units
• Configurable list of countries/states/provinces
• Ability to switch date and time formats
• Ability to create unlimited number of localizations
Search Engine Optimization:
• Search Engine Friendly URLs
• Custom meta keywords and description for product, category and content pages
• Generation of HTML catalog of static product and category pages
• Site map generation
• Breadcrumb trail
Design & Layout:
• 100% template driven storefront and admin panel
• Easy integration to match current design
• Fully customizable design & layout
• Extensive usage of AJAX technologies, minimizing screen refreshes
• Category/product thumbnails and detailed images
• One-page checkout
• Design blocks
• Visual template editor
• Visual language variables editor
• Catalog page
• Mini-cart presence on all pages
Last Revised: Jan 5.10
Page
7 of 409
Copyright © 2004-2010 CS-Cart.com
• Addition of custom content pages via administration interface
• Built-in template editor
• Changing storefront and admin logos via administration interface
• Debug console: displays a tree of templates for all pages
Product Catalog features:
• Unlimited number of products/categories
• Product cloning
• Unlimited category nesting
• Bulk product/category management
• Ability to assign products to multiple categories
• Featured products list and cross selling
• Digital delivery system
• Configurable products
• Quantity discounts
• Discount coupons
• Membership based access to every category/product
Product Details:
• Unlimited product options w/optional surcharges
• Various display types for product options
• HTML enriched product descriptions
• Related products list
• Customers also bought list
• Unlimited product images
• Product large image pop-up
Marketing & Promotional Tools:
• Affiliate program
• E-mail/postal gift certificates
• RMA (Return Merchandise Authorization)
• Featured/Related products, cross selling
• Ability to set up variety of promotions
• Product reviews and ratings
• Gift Registry wish list
• One-page checkout
• Bestsellers
• 'Send to friend' feature
• Reward points addon
• Product filters
• Ability to add tags
Last Revised: Jan 5.10
Page
8 of 409
Copyright © 2004-2010 CS-Cart.com
• Polls
Merchandising/Inventory:
• Full product stock control
• Low-stock notifications
• Wholesale trade
• Ability to set minimal order amount
• 'List Price' and 'Our Price' options
• Enabling/disabling product inventory control
• Extended import/export of product database
Shipping & Tax:
• UPS, FedEx, USPS, DHL, Australia Post & Canada Post real-time calculations
• Intershipper real-time calculator
• Customizable shipping surcharges
• Unlimited custom delivery methods
• Unlimited custom-defined locations
• Shipping restriction by location
• Free shipping option
• Drop shipping
• Flexible shipping customization (based on the number of items, weight or order
amount)
• Customers can choose delivery methods
• Customizable tax calculation
• Product-specific taxes
• 'Tax exempt' feature
Payment Gateways & Methods:
• Full list of offline payment methods: checks, purchase orders, phone orders and
others
• Real-time credit card processing: 50+ integrated payment systems
• Ability to create new payment methods
Web-based administration panel:
• Easy and quick addition of multiple items (products, categories, static pages, etc)
• File browser and template editor use AJAX technologies
• Ability to configure every aspect of e-commerce site in realtime
• Integrated database backup/restore tool
• Flexible organization of webshop informational part
• Unlimited number of admin accounts
• Multiple levels of administrative access
• Ability to act on behalf of other users
Last Revised: Jan 5.10
Page
9 of 409
Copyright © 2004-2010 CS-Cart.com
• Ability to collect statistical data
• IP-based access restrictions
• Integrated webmail system
• SMS notifications
Customer Care:
• Integrated configurable store search
• Search filters
• Password reminder for customers
• Customers can view order history
• User groups and special pricing
• Membership based access to the informational part of the store
• 'Continue shopping' and 'Clear cart' buttons
• Printable invoices
• 'Wish list' feature
• 'Feature comparison' option
• Customer can edit product options directly in the cart
Security:
• Full HTTPS/SSL support
• Secure HTTPS/SSL administrative access
• Secure HTTPS/SSL checkout, login and customer profile pages
• Customer passwords are MD5 encrypted in database
• Password-protected administrative access.
Repeat Customer Accommodation:
• Cart content is stored in database;
• Each customer can have unlimited number of profiles;
• Registered customers can edit their account details at any time;
• Registered customers can view their order history.
CS-Cart is highly customizable. If your business has some specific feature
requirements our engineers would be happy to help you customize your store so that it
will satisfy all of your business needs.
Last Revised: Jan 5.10
Page
10 of 409
Copyright © 2004-2010 CS-Cart.com
3. Installation
3.1 Requirements
1. PHP version 5.1 or above. PHP configuration should include the following options
(all these values are default):
• disabled safe_mode;
• enabled file_uploads.
2.
MySQL database version 4.1 or above.
3.
PHP CURL is required for operation of several payment gateways and systems
(such as PayPal, Authorize.NET, Google Checkout, etc) and real-time shipping services
(FedEx, UPS, DHL/Airborne).
CS-Cart runs on:
Windows
Linux
FreeBSD
RedHat
CS-Cart runs on most server configurations, ranging from dedicated servers to
shared servers that utilize different PHP configurations.
NOTE: If your web server has mod_security enabled, you may see the "403
Forbidden" or "Not Acceptable" error messages after submitting forms that contain the
words "curl", "perl", "file(", etc. It is recommended to disable the mod_security module
or reconfigure it in the way these words are not forbidden.
Last Revised: Jan 5.10
Page
11 of 409
Copyright © 2004-2010 CS-Cart.com
3.2 Installing CS-Cart
The instructions below are about CS-Cart installation on a hosting server accessible
on the Internet. If you would like to make a CS-Cart installation on your local computer
(desktop), please download the "How to install CS-Cart on a local computer" manual on
the "File area" page in our Customer Help Desk (http://helpdesk.cs-cart.com) and skip
chapter 3.2 in this manual.
Briefly, CS-Cart installation includes the following steps:
1) extracting the software distribution package and uploading the files to a web
server;
2) setting file access permissions;
3) creating a MySQL database;
4) running the Installation Wizard.
The first step is to uncompress the CS-Cart distribution package (the
'cscart_vX.X.X.tgz' or 'cscart_vX.X.X.zip' file) anywhere under your web server
directory.
On a WINDOWS-based server, you can do it with any TAR- or ZIP-compatible
archive software.
On a UNIX-based server with terminal access to it, please run one of the following
commands depending on the package file format:
tar -xzvf cscart_vX.X.X.tgz
or
unzip cscart_vX.X.X.zip
Most versions of control panel have the so-called file manager that allows to
unpack a TGZ or ZIP archive by one click.
If none of the ways listed above works for you, you should uncompress the
distribution package on your local computer using any TAR- or ZIP-compatible archive
software, e.g. WinRAR (http://www.rarlab.com/rar/wrar370.exe), and upload all the
files to your server by FTP.
The next step is setting file access permissions.
On a UNIX-based server with terminal access to it, run the following commands one
by one:
chmod 666 config.local.php
chmod -R 777 catalog
chmod -R 777 images
chmod -R 777 skins
Last Revised: Jan 5.10
Page
12 of 409
Copyright © 2004-2010 CS-Cart.com
chmod -R 777 var
If you do not have terminal access to your server, you can change file access
permissions using an FTP client. Most of them have the "Change permissions" or
"Change mode" functions. With the help of the function you are to set the permissions
for the 'config.php' file and the directories listed above. The 'chmod 666 config.php'
command means that you must set 666 permissions (in other words, read, write and
execute permissions for the file user, group and other) for the 'config.php' file. Other
commands (e.g. 'chmod -R 777 catalog') mean that you must set the same 777
permissions for the directory, its subdirectories and all the files under these directories.
Please refer to your FTP client documentation for more detailed instructions on setting
file permissions.
In order to set the same file access permissions on a WINDOWS-based server, you
may need to give full permissions for the files and directories to the user with the
IUSER_ComputerName account.
Then create a MySQL database (you may need to create a MySQL user before that)
in your website control panel.
Remember the MySQL name, host, user name and password to use them at the
next installation step.
The last major installation step is running the CS-Cart Installation Wizard. In your
browser go to the following URL:
http://www.my_site.com/install/
(replace "my_site.com" with your site's URL).
Now you should follow the Installation Wizard. The installation progress is shown in
the Installation steps box on the left.
Installation steps
Last Revised: Jan 5.10
Page
13 of 409
Copyright © 2004-2010 CS-Cart.com
3.2.1 License Agreement
Please read the license agreement. If you accept its statements, select the I accept
CS-Cart Software Agreement check box and click on the Next button.
License agreement
If you launch the installation wizard again, you will be asked to enter the
authentication code and choose whether it will be a new installation or only skins will
be reinstalled. The authentication code will be displayed at the final step of the first
installation.
Last Revised: Jan 5.10
Page
14 of 409
Copyright © 2004-2010 CS-Cart.com
3.2.2 Checking Requirements
This phase checks your PHP and MySQL configuration, and checks for PHP CURL
support on your server. If all tests are passed, you should click the Next button.
Otherwise, contact your server administrator.
Checking requirements
Last Revised: Jan 5.10
Page
15 of 409
Copyright © 2004-2010 CS-Cart.com
3.2.3 Host And Database Settings
Now the Installation Wizard needs to know some details about your web server.
Host and database settings
You should fill in the following fields:
• Server host name
This is a name of the website on which you are installing CS-Cart, for instance
www.my_site.com. There should be entered only a domain without HTTP:// prefix or a
directory path following the domain.
• Server host directory
If you install CS-Cart in a subdirectory on your website (and all the CS-Cart files are
already under this subdirectory), for instance, the shop should be accessible via URL
http://www.my_site.com/shop, the value of this field should be /shop (it is required
NOT to have the '/' sign at the end of the path). If your CS-Cart installation is in the
Last Revised: Jan 5.10
Page
16 of 409
Copyright © 2004-2010 CS-Cart.com
web root directory (so your online store will be accessible via URL http://
www.my_site.com), the field is required to be empty.
• Secure server host name
This is an URL of your secure server (the domain should be entered according to the
same rules as for the "Server host name" field above). If you do not know the URL of
your secure server, enter here the same value you entered into the "Server host name"
field above, as they are the same usually.
• Secure server host directory
Enter the subdirectory of your secure server (if CS-Cart is not in the web root
directory) according to the same rules as for the "Server host directory" field above.
Although the Wizard fills in the fields above automatically, it may detect the
server host names and directories incorrectly on some server configurations. Please
check by yourself whether the values are correct.
• MySQL server host
Usually it is named ‘localhost’, but in order to be certain, refer to the Databases
page in your website control panel or contact your hosting provider.
• MySQL database name
• MySQL user
• MySQL password
• Secret key to encrypt orders data
In order to conform to the "Protect Cardholder Data" point of PCI Data Security
standards CS-Cart uses BlowFish algorithm to encode credit card information. Enter a
sequence of symbols (letters, digits, etc.) into this field, it will be used as a key for the
encryption algorithm.
• Administrator e-mail
Enter a real e-mail into the field. The default administrator e-mail, company e-mails
(of Order, Support, etc. departments) and contact form recipient's email will be
changed to the value of this field.
• License number
Enter your license number to connect the store to our upgrade server. If the license
number is entered, in the admin panel you will see what updates are currently
available to you.
• Additional languages
Select additional language packs you wish to install.
• Install demo data
Tick off this check box to install demo products, orders, discounts, news and
banners.
Last Revised: Jan 5.10
Page
17 of 409
Copyright © 2004-2010 CS-Cart.com
3.2.4 Installing Database
Database installation starts if all previous conditions are met. You will be notified if
database installation was successful.
Installing database
Last Revised: Jan 5.10
Page
18 of 409
Copyright © 2004-2010 CS-Cart.com
3.2.5 Shop Outlook Settings
Select the skin you wish to install. A screenshot will be displayed for each selection.
Shop outlook settings
Last Revised: Jan 5.10
Page
19 of 409
Copyright © 2004-2010 CS-Cart.com
3.2.6 Installing Skins
Please have a bit of patience while the Installation Wizard is installing template files
on your server. You will be notified when the skin is installed successfully.
Installing skins
Last Revised: Jan 5.10
Page
20 of 409
Copyright © 2004-2010 CS-Cart.com
3.2.7 Summary
Congratulations. Your CS-Cart shopping cart software is installed. You will see a
summary page which informs you about special features.
Summary
After the installation process, do the following:
• Rename or password protect the install directory (for security reasons).
• Change the password in the administrator account. You can do this in the
administration panel using the ‘Administrators’ link in the ‘Users’ box.
Use the following links for access:
• http://www.my_site.com/index.php - storefront;
• http://www.my_site.com/admin.php - administration panel.
The default administrator login and password are as follows:
• username: admin;
• password: admin.
Last Revised: Jan 5.10
Page
21 of 409
Copyright © 2004-2010 CS-Cart.com
4. CS-Cart Architecture
4.1 Interfaces
The CS-Cart shopping cart software has different interfaces for the storefront and
administration panel.
4.1.1 Storefront interface
Storefront interface
The layout can vary greatly depending on the addons or information blocks enabled.
More information about the addons and blocks can be found in the chapters Addons
(Administration->Addons) and Blocks (Design->Blocks).
You can change the store outlook and locations of the elements listed above by
yourself, or make use of our design integration service (for more information please
visit http://www.cs-cart.com).
Last Revised: Jan 5.10
Page
22 of 409
Copyright © 2004-2010 CS-Cart.com
4.1.2 Administration interface
The administration panel is where you control and configure the shop by setting up
options, processing orders, managing inventory and users. The structure of the admin
panel can be conditionally divided into 3 parts: the top menu, the main content area
and the bottom panel.
Administration interface
The top menu
The top menu is a set of tabs, each of which represents a certain aspect of store
operation. The tabs are Orders, Catalog, Users, Shipping/taxes, Administration,
Design, Content and Affiliate. Click on a tab and you will see the administration
sections of this tab.
The main content area
The main content area is displayed in the center. All actions are performed in this
area, from setting system options to controlling affiliate payouts.
Last Revised: Jan 5.10
Page
23 of 409
Copyright © 2004-2010 CS-Cart.com
The bottom panel
The bottom panel contains a search section and the Last viewed items section.
The search section allows to perform a quick search in product name, product code,
store content and also search for order IDs or users.
The Last viewed items feature dynamically keeps track of the last 10 items
viewed and edited by you and allows to visit them by a single click. Moreover, it shows
you not only links to the desired items but also images related to them:
-
is displayed after editing any product data;
-
is displayed after editing any order data;
-
is displayed after editing other data.
So, you can quickly and easily return to any edited product, order or setting by
clicking the Last viewed items link in the bottom right corner of the page.
Note: if you do not need to go back to the edited products, orders or settings, you
can click on the clean up history link (after clicking on Last viewed items) and
remove all the links listed there.
Also there is a built-in notification system that displays notifications in the right top
corner. And a quick menu, displayed on all pages in the top right corner, enables you
to quickly access any store section and perform a necessary action. The quick menu is
fully customizable, so you can create your own set of frequently used actions.
To add a link to the quick menu you should do the following:
- click on Quick menu to open it;
- click on add link in the desired section of the quick menu;
- enter a link name in the Name field and a link itself in the Link field in the opened
window and click on the
button. The link will be added to the quick menu.
You can change the store outlook and locations of the elements listed above by
yourself, or make use of our design integration service (for more information please
visit http://www.cs-cart.com).
Last Revised: Jan 5.10
Page
24 of 409
Copyright © 2004-2010 CS-Cart.com
5. Administration panel
5.1 Authentication
When logging in, you will be presented with an authentication parameters form in
which you must enter your user information.
Authentication
After entering the appropriate information, click on
.
If you have forgotten your password, use Forgot password? link to have your new
password sent to you by e-mail.
If you want to modify your user profile go to the ‘All users’ chapter.
To log out, click on the Log out button at the top.
Last Revised: Jan 5.10
Page
25 of 409
Copyright © 2004-2010 CS-Cart.com
5.2 Orders
The CS-Cart software includes an overall order management system that features
automatic e-mails to customers and merchants. The administrator can manage shop
orders by making use of the sections of the ‘Orders’ tab.
‘Orders’ box
5.2.1 View orders
Using this link will display the ‘Orders’ page in the main content area.
Orders
Last Revised: Jan 5.10
Page
26 of 409
Copyright © 2004-2010 CS-Cart.com
The ‘Orders’ page contains the ‘Search’ pattern which allows you to search for
orders by the following parameters:
- Customer - customer’s name;
- E-mail - customer’s e-mail;
- Total ($) - order total (set the range of the order total);
If you want to make the search results more precise, click on Advanced search
option. The search form will be expanded and you will be able to search by the
following options:
- Tax exempt - whether the user who placed the order is tax exempt or not;
- Order status - check the necessary status;
- Period - set a date range or select among the specified periods;
• All
• This day - the current day;
• This week - the current week;
• This month - the current month;
• This year - the current year;
• Yesterday;
• Previous week;
• Previous month;
• Previous year;
• Last 24 hours;
• Last 7 days;
• Last 30 days;
- Order ID - identification number of the order;
- Shipping - the search results will include orders for which the checked shipping
methods were used;
- New orders - tick off to search for orders that have not been viewed yet;
- Gift certificate code - here you can enter a gift certificate code and specify whether
the gift certificate is purchased or used;
- Also advanced search allows to specify a product or products of the order. Click on
the + Add link and choose the necessary product or products;
- Customer files - if enabled, the search results will contain orders with the
customized product(s) (namely, products for which customers loaded their own files,
e.g. images).
Moreover, the system allows to create different search patterns and save them for
future use. Just set the search options, type the name of the pattern in the Save this
search as: input field and click on the
button. Once the search pattern is
saved, it is displayed in the dropdown list box at the top.
Last Revised: Jan 5.10
Page
27 of 409
Copyright © 2004-2010 CS-Cart.com
After filling in any of the search fields click on
to display the search results.
The ‘Orders’ page contains a list of all orders placed in the shop. The following
information is given for each order:
- Select column - here you can select the necessary order(s);
- ID – order identification number;
If you wish, you can change the initial value from which order identification
numbers will count by using the following path: Administration->Settings>General->Initial order ID value.
- Status – order status (the processing stage of this order);
- Customer – full name of the customer who placed this order;
- E-mail - e-mail address of the customer;
- Date - order registration date;
- Total – order total amount.
You can change the number of orders shown on a page by using this path:
Administration->Settings->Appearance>Orders per page.
The ‘Status’ field has the following values:
- Open – an order that has been placed but not yet processed;
- Completed – an already processed order (a seller got money and sent product to a
customer);
- Backordered – a backordered order (the order cannot be processed as the ordered
item is not in stock at the moment);
- Failed – a failed order;
- Declined – an order which was declined by a seller;
- Cancelled – an order which was cancelled by a customer;
- Processed – a processed order (seller got money, but product is not sent yet);
- Decreasing status - the status when the number of products in stock decreases;
- Increasing status - the status when the number of products in stock increases;
To change the order status:
- choose a new status value in the ‘Status’ field.
To delete an order:
- place a check mark in the Select column of the order you want to delete;
Last Revised: Jan 5.10
Page
28 of 409
Copyright © 2004-2010 CS-Cart.com
- click on the Choose action link and choose Delete selected.
or
- use the
link and click on Delete.
To edit the order use the
link and click on Edit. You will be taken to the
page where you can edit the order beginning from the order products to the payment
method.
To print several invoices at the same time:
- place check marks in the Select column of the orders you want to print invoices
for;
- click on
.
To print several invoices in PDF format:
- place check marks in the Select column of the orders you want to print invoices
for;
- click on the Choose action link and choose Bulk print (PDF)
To remove a credit card information from the database:
- place a check mark in the Select column of the necessary order;
- click on the Choose action link and choose Remove CC info.
To export the selected order(s) to Quickbooks click on the Choose action link
and choose Export to Quickbooks.
To export the selected order(s) click on the Choose action link and choose
Export selected.
To look up order details:
- click on either the ID link or
order’ page).
link to display the order detail page (‘Viewing
All order details are given in the following tabs: General, Addons, Promotions.
The tab General contains information about fraud risk (it is displayed, if the Anti
Fraud addon was enabled when the order was placed), billing address, shipping
address, payment information (payment method that was used when placing the
order), products information - a list of ordered products with all necessary information
(price, quantity, tax, subtotal, product options, etc.), and information about the order
total amount, shipping cost and taxed amount.
Last Revised: Jan 5.10
Page
29 of 409
Copyright © 2004-2010 CS-Cart.com
To enter notes about the order:
- enter text into the ‘Staff only notes’ field;
- click on
.
To notify the customer of the changes, enable the Notify customer option
before saving the changes to the database.
To notify the administrator of the changes, enable the Notify orders
department option before saving the changes to the database.
If the customer left some notes regarding the order, they are shown in the
Customer notes field.
If the Allow to create shipments option is enabled in Administration>Settings->General, you can divide the order into multiple shipments on the
‘Viewing order’ page.
To create a shipment:
- click on +New shipment;
- choose the products that will be included in the shipment;
- specify quantity of the product(s);
- in the Options section you can specify Shipping method, Tracking number,
Carrier, Comments for the shipment;
- if the option Send shipment notification to customer is enabled, the customer
who placed the order will be notified of the created shipment.
- after the necessary fields are filled in, click on
.
To view the already created shipment(s), click on the View shipments link. You
will be taken to the Shipments page (Orders->Shipments).
If a product is assigned to a shipment, it is marked as shipped on the Viewing
order page.
Last Revised: Jan 5.10
Page
30 of 409
Copyright © 2004-2010 CS-Cart.com
New shipment
In the Addons tab you see the addon that can be enabled for orders. This addon is
given here if it is enabled in Administration->Addons. For orders this is Comments
and reviews.
By setting the Communication field to Enabled you enable the addon for this
particular order, namely enable communication about the order. The Communication
tab appears, in which you can add comments on the order. The added comments will
be available for the customer who placed this order.
To notify the customer of the changes, enable the Notify customer option
before saving the changes to the database.
To notify the administrator of the changes, enable the Notify orders
department option before saving the changes to the database.
Last Revised: Jan 5.10
Page
31 of 409
Copyright © 2004-2010 CS-Cart.com
In case the order meets some promotion conditions, the promotion is displayed in
the Promotion tab.
Add order
Under some conditions it is desirable for a store administrator to have the ability to
create order manually, for instance if a customer places an order by phone. CS-Cart
has a feature that allows you to create orders via the administration area.
Click on the
create a new order.
button and you will be taken to the page where you can
To add an order the store administrator will need to pass 4 steps:
- select products that need to be included in the order (‘Products’);
- enter customer information (‘Customer details’);
- select shipping and payment methods (a discount coupon can be applied and
calculated tax and shipping rates can be defined manually) (‘Totals’);
- enter payment details and order notes (‘Summary’).
At the first step you will need to select products that will be ordered.
Using the
link you can select the necessary products. CS-Cart provides
two types of search: basic and advanced search.
Last Revised: Jan 5.10
Page
32 of 409
Copyright © 2004-2010 CS-Cart.com
Search for products
Basic search options are:
- Find results with:
Available options:
• Any of these words - search for any entered word;
• All of these words - search for all entered words in any order;
• The exact phrase - search for the exact entered phrase.
- Price ($);
Specify a price range in which the search will be performed.
- Search in category;
This field allows you to define the location of the product(s) you are looking for. For
example, to search for orders in all categories, choose the item ‘-All categories-’ in this
select box or select categories/subcategories in which the search will be done.
Advanced search options allow you to specify additional advanced search
criteria:
- Search in;
• Product name;
Last Revised: Jan 5.10
Page
33 of 409
Copyright © 2004-2010 CS-Cart.com
• Full description;
• Short description;
• Keywords;
• Subcategories.
- Search by product code - you search by a unique product code;
- Tag - search by the product tag;
- Configurable - select whether the product is configurable or not;
- Sales amount - specify an interval for the sold items;
- Shipping freight($) - specify a shipping freight range;
- Weight(lbs) - specify a weight range;
- Quantity - specify a quantity range;
- Free shipping - whether free shipping is selected for the product;
- Status - specify product status;
- Popularity - specify a range of popularity rating.
After filling in any of the search fields, click on
After that a list of products is displayed.
to start the search process.
The following information is given for each product:
- Product name - name of the product and product options if any;
- Price - product price;
- Quantity - number of products.
To add the product(s) to cart:
- enter the necessary value into the ‘Quantity’ field;
- click on
.
Now the selected products are included in the list of ordered products. This list is
represented as a table with the following columns:
- Select column - you can select the necessary product(s);
- Product - product name;
- Price - product price;
- Discount - product discount;
- Quantity - number of products.
By ticking off the check box before the price, discount, etc. you are able to define
your own values. Otherwise values will be taken from the database.
Last Revised: Jan 5.10
Page
34 of 409
Copyright © 2004-2010 CS-Cart.com
List of products
If you change the value of any field click on
.
To delete a product from the list:
- tick off the check box opposite the entry you want to delete;
- click on Delete selected.
Click on the Proceed to the next step button to go to the next step.
At the second step you should enter customer information (contact information,
billing address, shipping address).
If the billing address is not the same as the shipping address click on ‘Ship to
different address’ and enter the necessary address. If the check box is ticked off, you
can specify a different shipping address.
The fields marked with * are mandatory. You cannot proceed to the next step
without entering the necessary information in these fields.
Last Revised: Jan 5.10
Page
35 of 409
Copyright © 2004-2010 CS-Cart.com
Customer information
Last Revised: Jan 5.10
Page
36 of 409
Copyright © 2004-2010 CS-Cart.com
After the fields are filled in click on
to save the information.
If the customer is registered you can use the Choose User link to enter his/her
information automatically. You can search for the user by name, company, e-mail,
username, user group, tax exempt, address, city, zip/postal code, state/province,
country, tag, ordered products. When any of the fields is filled in click on
.
User(s) information is displayed. The following information is given:
- Select column;
- ID - user unique identification number;
- Username - unique name identifying the user;
- E-mail - user e-mail address;
- Name - full name of the user;
- Registered - date and time of registration;
- Type - whether the user is a customer or affiliate;
- Active - shows whether the user is active or not.
Choose user
To enter user information into the necessary fields:
- tick off the radio button of the user;
Last Revised: Jan 5.10
Page
37 of 409
Copyright © 2004-2010 CS-Cart.com
- click on
button.
Now that all the fields are filled in click on the Proceed to the next step button to
turn to the third step.
The following elements are included in the ‘Totals’ form:
First product information is displayed:
- Product - product name and its options;
- Price - product price;
- Quantity - number of products;
- Points - number of points the user gets on his account for this product (if the
Reward points addon is enabled and set up);
- Discount - product discount amount;
- Tax - product tax;
- Subtotal - subtotal for the product.
Then follows order information:
- Subtotal - order subtotal;
- Including discount - discount amount;
- Points - points which are added to the user’s account (if any);
- Including taxes - tax amount;
- Custom shipping method;
- Discount;
- Total cost;
- the ‘Discount coupon code’ select box - you can apply the coupon(s) to the
order;
- the ‘Gift certificate code’ input field - enter the gift certificate code to apply it to
the order;
- the ‘Shipping method’ select box;
- the ‘Payment method’ select box - here you choose a payment method;
- the ‘Affiliate code’ input field.
If you change the value of any field click on
.
Click on the Proceed to the next step button to proceed to the fourth step.
Last Revised: Jan 5.10
Page
38 of 409
Copyright © 2004-2010 CS-Cart.com
Checkout
Now you are on the ‘Summary’ page. The order and customer information is
displayed on the page:
- Billing address;
- Shipping address;
- Payment method;
- Shipping method;
‘Payment method’ and ‘Shipping method’ have the [Change] link. By using it
you can return to the third step.
- Payment details - details peculiar to the payment method should be entered in
this section. For instance, if payment method is credit card, in the Payment details
section the following data must be entered: card (Visa, Visa Electron, etc.), card
number, cardholder’s name, expiration date. Also some notes can be added to the
order here.
To add the order to the list of orders click on
.
To start the order processing click on the
Last Revised: Jan 5.10
button.
Page
39 of 409
Copyright © 2004-2010 CS-Cart.com
5.2.2 Sales reports
Using this feature you have the ability to make quantitative and qualitative analyses
of the existing orders and their components (purchased products, used payment
methods, customers, etc.). The reports will help you to study the market and to
increase in sales. On the ‘Sales reports’ page you can view reports which help you to
make the analysis of your sales.
The ‘Reports’ section contains 5 reports which are already defined by default. They
are listed in the right hand menu.
They are:
- Order Reports;
- Top 10 Customers;
- Top 10 Categories;
- Top 10 Products;
- Payment Methods.
Each report page contains the search section and report charts.
The search section enables you to select a date range for all charts. Here you can
either set a custom date range or choose one of the specified options.
Date range
Let's consider the ‘Top 10 Products’ report. It contains 4 charts:
- Top 10 Products - Items Sold;
- Top 10 Products - Cost;
- Top 10 Products - Cost(monthly);
Last Revised: Jan 5.10
Page
40 of 409
Copyright © 2004-2010 CS-Cart.com
- Top 10 Products - Items Sold(monthly).
The specified date range affects all charts in the current report section.
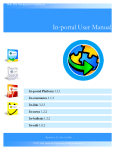
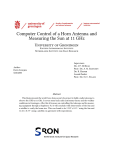
Top 10 Products - Items Sold
Top 10 Products - Items Sold is a chart represented as a graphic pie where
object to analyze is products, value to display is the number of products, date range is
not set (all data are analyzed), and where values are selected by the number of items.
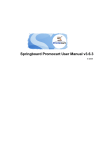
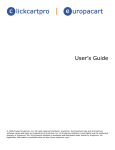
Top 10 Products - Cost is a bar chart where object to analyze is categories, value
to display is product costs, time interval - total, date range is not set (all data are
analyzed), and where values are selected by the number of items.
Last Revised: Jan 5.10
Page
41 of 409
Copyright © 2004-2010 CS-Cart.com
Top 10 Products - Cost
Top 10 Products - Cost (monthly)
‘Top 10 Products - Cost (monthly)’ is a chart represented as a table where
object to analyze is products, value to display is product costs, time interval - total,
date range is not set (all data are analyzed), and where values are selected by total
cost.
Last Revised: Jan 5.10
Page
42 of 409
Copyright © 2004-2010 CS-Cart.com
‘Top 10 Products - Items Sold (monthly)’ is a chart represented as a table
where object to analyze is products, value to display is the number of products, time
interval - month, date range is not set (all data are analyzed), and where values are
selected by the number of items.
Top 10 Products - Items Sold (monthly)
If you want to edit reports, click on the manage reports link right under the page
title. You will be taken to the page with a list of the defined reports. You will see the
following data:
- Select column - select the necessary item;
- Position - ordinal number;
- Name - name of the report;
- Status - status of the report (whether it is enabled or disabled).
Reports
Last Revised: Jan 5.10
Page
43 of 409
Copyright © 2004-2010 CS-Cart.com
If you edit the value of any field, click on
to save the changes.
To delete a report from the list:
- tick off the check box opposite the entry you want to delete;
- click on Delete selected.
To create a new report click on the
button.
Let's consider a report and its components by the example of ‘Top 10 Products’.
To edit the ‘Top 10 Products’ report click on the
page is opened. It contains:
link. The ‘Editing report’
- Name - name of the report;
- Position - ordinal number;
- Status - whether the report is active or disabled;
- the ‘Charts’ section.
The ‘Charts’ section gives the following information:
- Select column;
- Position - ordinal number;
- Name - name of the chart;
- Type - type of chart representation (table, bar, pie, pie 3D);
- Value to display - what is figured in the chart (order totals, the number of orders,
discounts and coupons, taxes, shipping costs, product costs, the number of products).
If you edit the value of any field, click on
to save the changes.
To delete a chart from the list:
- tick off the check box opposite the entry you want to delete;
- click on Delete selected.
To add a new chart click on the
button.
The ‘Top 10 Products’ report consists of 4 charts:
- ‘Top 10 Products - Items Sold’;
- ‘Top 10 Products - Cost’;
- ‘Top 10 Products - Cost(monthly)’;
Last Revised: Jan 5.10
Page
44 of 409
Copyright © 2004-2010 CS-Cart.com
- ‘Top 10 Products - Items Sold(monthly)’.
Edit report
If you want to edit the chart click on the
link. You will be taken to the page with
the following tabs: General, Orders, Statuses of orders, Payment methods, Locations,
Users, Categories, Products. In the General tab you define the chart parameters, while
options of the other tabs allow to set chart conditions and thereby restrict the chart
data.
The General tab contains:
- Name - name of the chart;
- Position - ordinal number of the chart;
- Type - type of chart representation (table, bar, pie, pie 3D);
- Object to analyze - an object that is analyzed with the chart;
- Value to display - it is what is figured in the chart (parameters according to which
analysis is fulfilled);
- Time interval - periods that are analyzed (day, week, month, year);
If chart type is a pie or a pie 3D the ‘Time interval’ field is hidden.
- Date range - period of time over which analysis is carried out;
- Limit - max number of chart components;
Last Revised: Jan 5.10
Page
45 of 409
Copyright © 2004-2010 CS-Cart.com
The value of the ‘Limit’ field cannot exceed 25 if chart type is not ‘Table’.
- Select values by - parameter by which values are selected. It should correspond
with the values to display (e.g. Products costs - Total cost or Number of products number of items).
The General tab
If you edit the value of some fields, click on
to save the changes.
Options of the tabs Orders, Status, Payment methods, Locations, Users, Categories,
Products help you set the conditions of the chart. In other words, you can select only
e.g. orders that have been paid by credit card and/or orders that have been placed by
certain customers, etc. If no conditions are defined, all existing orders are taken into
account.
The note with all defined chart conditions is displayed at the top of the page and
above the chart while it is being viewed.
Last Revised: Jan 5.10
Page
46 of 409
Copyright © 2004-2010 CS-Cart.com
Using ‘Orders’ you can select certain orders that will be analyzed. Click on +Add
orders and specify the necessary order(s) in the pop-up section.
Orders
To delete an order from the list:
- click on delete of the entry you want to delete.
‘Statuses of orders’
This is where you can set up the statuses of the orders you want to analyze:
whether it is backordered, completed, declined, failed, cancelled, open, processed.
Tick off the check box of the status(es) and click on
.
The ‘Payment methods’ tab contains a list of all defined payment methods:
- Select column;
- Payment - payment method;
- Processor - payment gateway defined for the payment method;
- User group - ‘All’ is set up by default.
If you place or remove a check mark, click on
to save the changes.
With the help of the ‘Locations’ tab you can select the destination(s).
Choose the destination, tick off its check box and click on
. This means that
orders that have been placed by customers from the selected destination zone(s) will
be selected as chart conditions.
Last Revised: Jan 5.10
Page
47 of 409
Copyright © 2004-2010 CS-Cart.com
To make an analysis of orders placed by certain users select them in the ‘Users’
section. Click on +Add users and specify the necessary users in the pop-up section.
To delete a user:
- click on delete mark of the entry you want to delete.
The ‘Categories’
subcategories.
section
enables
you
to
choose
among
categories
and
Click on the
link and specify the necessary categories in the pop-up
section. The selection of categories means that the orders with the products from the
chosen categories will be selected as chart conditions.
Using the ‘Products’ section you can select certain products for analyzing.
To add the product to the list of defined products use the
link.
The selection of products means that orders that have the chosen products will be
selected as chart conditions.
To cancel all chart conditions click on the clear conditions link at the top.
To view the charts of the report, click on the view report link.
5.2.3 Order statuses
This feature allows you to define new and change the existing order statuses
according to your needs.
Last Revised: Jan 5.10
Page
48 of 409
Copyright © 2004-2010 CS-Cart.com
Order statuses
7 order statuses are available by default. They cannot be deleted.
To delete a status click on the delete link of the status you want to delete.
If you want to edit the existing order status click on the
link. The pop-up
section will appear and you will be able to edit the following parameters:
- Name - name of the order status;
- Status - letter symbol of the order status;
- E-mail subject - the subject of the e-mail which is sent to customers automatically
and which notifies them of the processing stage of the orders;
- E-mail header - the header of the e-mail which is sent to customers automatically
and which notifies them of the processing stage of the orders;
This field also contains tools for text editing. If you want to use them, click on
.
Last Revised: Jan 5.10
Page
49 of 409
Copyright © 2004-2010 CS-Cart.com
- Notify customer - tick off if you want to inform customers that the status of their
order has changed to this one;
- Notify orders department - tick off if you want to inform the store administrator
that the status of the order has changed to this one;
- Inventory - the value of this field shows whether this order decreases or increases
the product quantity;
- Remove CC info - if ticked off, the credit card information is removed from the
database;
- Pay order again - if ticked off, a customer can pay for the order again in case the
previous attempt failed;
- Allow return registration - if enabled, customers can register return of products
(functionality of the RMA addon) in the storefront for the orders with this status;
- Notify supplier - tick off if you want to inform suppliers that the status of the order
has changed to this one;
- Change gift certificate status to - choose the status a gift certificate will have, if
the order acquires this particular order status.
If you make any changes, click on the
button to save them in the
database.
Last Revised: Jan 5.10
Page
50 of 409
Copyright © 2004-2010 CS-Cart.com
Order statuses
Some statuses are already defined, but you can add your own statuses using the
button.
To delete a status (default statuses cannot be deleted) click on the delete link of
the status you want to delete.
Last Revised: Jan 5.10
Page
51 of 409
Copyright © 2004-2010 CS-Cart.com
5.2.4 Shipments
The shipment functionality gives you the ability to ship an order (products of the
order) in different batches and on different periods. Such batches will be treated as
separate shipments of one order. For example, in stock items can be shipped
immediately after the order is placed. Any backordered items in the order can be
shipped separately at a later date.
Shipments are created in the Shipping information section on the Viewing
order page.
It is necessary to enable the option Allow to create shipments in
Administration->Settings->General to allow the administrator to create
shipments.
A list of created shipments is given on the page Shipments. If there is a great
number of shipments in your store, you can use the search section to limit the search
results. You can search by customers who placed the order and order IDs.
To make the search results more precise, click on Advanced search option. The
search form will be expanded and you will be able to search by the following
parameters:
• Shipment day - the date when the shipment was created;
• Order date - the date when the order was placed;
• Shipped products - products assigned to the shipments.
Moreover, the system allows to create different search patterns and save them for
future use. Just set the search options, type the name of the pattern in the Save this
search as: input field and click on the
button. Once the search pattern is
saved, it is displayed in the dropdown list box at the top (near the page title
Shipments).
The following information is provided for each shipment:
- Select column;
- Shipment ID - identification number of the shipment;
- Order ID - identification number of the order for which the shipment is created;
- Shipment date - date when the shipment was created;
- Order date - date when the order was placed;
- Customer - customer who placed the order and to whom products are shipped.
Last Revised: Jan 5.10
Page
52 of 409
Copyright © 2004-2010 CS-Cart.com
Shipments
To delete a shipment, click on the
shipment.
and delete links of the necessary
To delete several shipments at once, tick off the necessary shipments and click
on Delete selected.
To print a packing slip of the shipment, click on more and packing slip.
To print several packing slips at once, select the necessary shipments and click
on
.
To view shipment details, click on view.
The information on the shipping carrier, shipping and billing addresses, customer's
e-mail, telephone number and IP address, products and their quantity is given on the
shipment details page. Also here are given comments on the shipment (if any).
Last Revised: Jan 5.10
Page
53 of 409
Copyright © 2004-2010 CS-Cart.com
Shipment details
5.2.5 Gift certificates
Gift certificate is the best solution for the customers who don't know what to buy
as a present. Customers just buy a gift certificate and specify its parameters. It is the
administrator who sends it to the recipient via e-mail or via postal mail. Customers
have the ability to add a message to the certificate (it may be various greetings,
wishes, etc.). Along with a gift certificate customers can also present any product(s) of
the store. These products are added to the certificate as free products.
Gift certificates can be created both by administrators in the administration panel
and customers in the storefront.
Gift certificates are very convenient in use. In order to pay for the order with a gift
certificate a customer enters its code on the checkout page and specifies the amount
he wants to spend. If the certificate amount is not enough to pay for the order, the
Last Revised: Jan 5.10
Page
54 of 409
Copyright © 2004-2010 CS-Cart.com
customer can apply the certificate and pay the rest amount using a credit card or some
other payment method. Another advantage of the certificate is that it has no period of
validity.
Following the Gift certificates link you open the page where all the existing gift
certificates are displayed. This link is displayed only if the Gift certificates check box
is enabled in Administration->Addons.
Gift certificates
If you have a large number of gift certificates the search section will help you to find
the necessary one or several certificates that meet some conditions.
- From – the name of the person who sent/gave this certificate;
- To – the name of the person the gift certificate is going to;
- E-mail – e-mail of the gift certificate recipient;
To make the search results more accurate use advanced search options:
- Gift certificate code – code that is assigned to a certificate, internal code of the
certificate which is used in the database and generated automatically;
Gift certificate status - the processing stage of the certificate (Pending, Active,
Used, Cancelled);
- Period – specify the period within which the certificate was created;
When all or some of the following search conditions are specified click on
to display the search results.
Moreover, the system allows to create different search patterns and save them for
future use. Just set the search options, type the name of the pattern in the Save this
Last Revised: Jan 5.10
Page
55 of 409
Copyright © 2004-2010 CS-Cart.com
search as: input field and click on the
button. Once the search pattern is
saved, it is displayed in the dropdown list box at the top.
Then follows a list of all gift certificates:
- Select column;
- Code – internal code of the certificate which is used in the database and generated
automatically;
- From – the name of the person the gift certificate is coming from;
- To – the name of the person the gift certificate is going to;
- Type – method of dispatch of the certificate (via e-mail or via postal mail);
- Date – date and time of the certificate creation;
- Current amount – cash value of the certificate at the present moment;
- Status – the processing stage of the certificate.
On this page you can also change the certificate status or delete some unnecessary
certificates.
You can change the certificate status by selecting the necessary one in the Status
column.
If you want to delete some certificates, tick off the necessary certificates and click
. Also you can delete a certificate by clicking on the delete link.
on
To add a new certificate:
- click on the
- fill in the form and click on
button;
.
By clicking on the Code and Date links you are redirected to the Editing certificate
page which contains two tabs: Detailed information and History.
The Detailed information tab presents all main information about the certificate
and have the following fields:
- Gift certificate code – internal code of the certificate which is used in the database
and generated automatically;
- Status – the processing stage of the certificate;
- To – the name of the person the gift certificate is going to (the recipient of the gift
certificate);
Last Revised: Jan 5.10
Page
56 of 409
Copyright © 2004-2010 CS-Cart.com
- From – the name of the person the gift certificate is coming from (the sender of
the certificate);
- Message – a message that will be displayed on the gift certificate;
This field also contains tools for text editing. If you want to use them, click on
.
- Amount – cash value of the certificate. Here you can choose among the given
variants or set the amount by yourself;
- E-mail – recipient's e-mail address. You can enter the address only if the 'Send
via e-mail' option is enabled. If it is so it means that you select the e-mail gift
certificate and it will be sent via e-mail.
If the option 'Send via postal mail' is enabled the following fields should be filled
in: Address, Address(line 2), City, Country, State/province, Zip/Postal code, Phone. It
means that you select the postal certificate which needs to be printed and sent to the
delivery address.
Last Revised: Jan 5.10
Page
57 of 409
Copyright © 2004-2010 CS-Cart.com
Last Revised: Jan 5.10
Page
58 of 409
Copyright © 2004-2010 CS-Cart.com
Also products can be included in the certificate. Click on the
button
and using the pop-up section select the products you want to add to the certificate and
click on the Add products button.
If you want to notify the customer of the changes in the certificate, put a tick
mark in the ‘Notify customer’ check box. But note that it can be ticked only for a
single action.
By clicking on Preview you will see the card that will be sent to the recipient.
All information necessary for checking the certificate balance is in the ‘History’ tab.
The tab contains five columns:
- Date – date and time of certificate creation;
- Username - unique name identifying the user;
- Name – full name of the gift certificate user;
- Balance – the initial amount on the certificate account and the products attached
to the certificate as free products.
- Debit balance – the certificate amount left after the purchases.
History
To the right of the Gift certificates page you can see the link Gift certificate
statuses. By clicking on this link you open the page where you can create statuses for
gift certificates.
Last Revised: Jan 5.10
Page
59 of 409
Copyright © 2004-2010 CS-Cart.com
Gift certificate statuses
You can create certificate statuses as you create order statuses.
For more information about Order statuses see Orders->Order statuses.
5.2.6 Return requests
This add-on allows to return products which customers are not entirely satisfied
with. Customers can register the return following the 'Orders' link in the 'My account'
side box. Following the 'Registration of the return' link customers see which
products of the order can be returned. Moreover, there they can specify the reason for
the return, provide their comments and other related information. But note that
customers can return only those products which are defined as returnable by the
administrator and only within a specified period of time.
The Return requests link is displayed in the side box if the RMA addon is enabled
in Administration->Addons.
Last Revised: Jan 5.10
Page
60 of 409
Copyright © 2004-2010 CS-Cart.com
Return requests
The 'Return request' page is represented as a list of customer requests for return
of goods.
For the convenience of the administrator the 'Search' section is displayed at the
top. It allows to find the necessary return request without any difficulty. Moreover the
search can be performed by the following parameters: name of the customer who
registered the return; customer's e-mail; number of returned products (quantity).
By clicking on the Advanced search options link you expand the search criteria
form and will be able to search by return identification number (Return ID); action that
should be applied (e.g. refund or replacement); return status; period in which the
return was registered. Here you can also set a limit on the search results with such
parameters as order status (status of the order for which the return request was
made), order ID or products of the order.
The system also allows to create different search patterns and save them for future
use. Just set the search options, type the name of the pattern in the Save this search
as: input field and click on the
button. Once the search pattern is saved, it is
displayed in the dropdown list box at the top.
Last Revised: Jan 5.10
Page
61 of 409
Copyright © 2004-2010 CS-Cart.com
Search section
Then follows a list of all existing return requests:
- Select column;
- ID – return request identification number;
- Status – the current status of the request;
- Customer – the full name of the customer;
- Date – date and time when the request was submitted;
- Action - action chosen during return registration (e.g. refund, replacement);
- Order ID – identification number of the related order, click on this link to open the
page of the related order;
- Quantity – number of products a customer wants to return.
To delete a return request:
- tick off the necessary request;
- click on Delete selected;
or
click on the delete link of the request.
Last Revised: Jan 5.10
Page
62 of 409
Copyright © 2004-2010 CS-Cart.com
To print packing slips of several requests at once:
- place check marks in the Select column of the requests you want to print;
- click on
.
Click on ID or Date links to view the return information. The page Return info
contains the following information:
- Return – return request number (number assinged to the return in the database);
- Date – date and time the request was submitted;
- Action - action chosen by the customer;
- Status – the current status of the return request;
- Gift certificate – the code of gift certificate and its amount, this gift certificate is
created by the administrator and granted to the customer who submitted the request.
This field is displayed only if the administrator has created the certificate for the
customer.
Then follows two tabs: Return products information and Declined products
information.
There are the same columns in these two tabs:
- Select column;
- Product – product name and options of the product if there are any;
- Price – product price;
- Quantity – number of products;
- Reason – reason for the return.
At first all the products that the customer wants to return are displayed in the
'Return products information' tab. Here the administrator can decline some or all
products by ticking off the corresponding check boxes and clicking on the DECLINE
PRODUCTS button. The declined products will be shown in the 'Declined products
information' tab and the products that were not declined will be left in the first tab.
Furthermore, if the administrator for one reason or another cannot apply the action
required by the customer (for example, cannot replace the required item), he can
create a gift certificate for this customer instead. In order to do this the administrator
should tick off the necessary products and click on Create gift certificate. The code
certificate will be displayed above the tabs and its amount will directly depend on the
number and the price of the products the administrator checked. So the gift certificate
amount is calculated in the following way: the price of the checked product multiplied
by the quantity of this product, if several products were checked this action is
performed for all products and then the results are added.
If the customer provided some additional information related to the return request
it is displayed in the Comments section.
Last Revised: Jan 5.10
Page
63 of 409
Copyright © 2004-2010 CS-Cart.com
By clicking on the Customer information link you will see detailed customer
information.
Return info
If you make some changes and want to notify the customer of them tick off the
Notify customer check box and click on
Last Revised: Jan 5.10
.
Page
64 of 409
Copyright © 2004-2010 CS-Cart.com
To calculate the order again taking into account the return request:
- check the 'Recalculate order' radio button;
- click on
.
If you do not want to recalculate the order, check the Do not recalculate order
radio button.
Following the RMA reasons link on the right you go to the page where you can
define the reasons which customers specify when they register the return.
The following information is represented on the page:
- Select column;
- Position – ordinal number;
- Reason – name of the reason;
- Status – status of the reason (Active or Disabled).
If you make changes, click on
to save them to the database.
To add a new reason, click on the
pop-up section.
section and fill in the form in the
To delete a reason click on the delete link.
To delete several reasons at a time:
- tick off the necessary reasons;
- click on Delete selected.
Last Revised: Jan 5.10
Page
65 of 409
Copyright © 2004-2010 CS-Cart.com
RMA reasons
By clicking on the RMA actions link you open the page where you can edit the
actions that are applied to the products customers want to return. For example, it can
be a refund or replacement of the item. Customers will be able to choose among the
given variants in the storefront.
Following the RMA request statuses link you go to the page where you can
specify the return request statuses. The way you can do this is similar to the way you
set order statuses.
For more information about statuses see Orders->Order statuses.
Last Revised: Jan 5.10
Page
66 of 409
Copyright © 2004-2010 CS-Cart.com
5.2.7 Recurring plans
Recurring billing is an addon intended for selling and tracking the subscriptionbased products (e.g. membership fees, subscription services, hosting plans, etc.). With
the help of this addon you are able to bill customers on a regular basis.
To set the billing process, it is necessary to create a recurring plan and assign
products to it. A wide range of options allows to make the process more flexible and
sell subscription-based products or services on various terms and conditions, namely
define initial product prices, billing frequency and time period. Recurring plans can be
applied to any number of products, and each individual product can also be associated
with several subscription plans.
A list of existing recurring plans is given on the Recurring plans page. The
following parameters are given for each plan:
- Select column - here you can select the necessary plan;
- Title - name of the recurring plan;
- Recurring period - how often the payment should be made (annually/quarterly/
monthly/weekly/by period);
- Status - status of the plan (Active, Disabled).
Recurring plans
To delete a product:
- place a check mark in the Select column of the plan you want to delete;
- click on the Delete selected button.
or:
- use the delete link of the necessary entry.
To edit a recurring plan:
- click on the
Last Revised: Jan 5.10
link of the necessary entry.
Page
67 of 409
Copyright © 2004-2010 CS-Cart.com
Editing recurring plan
- Title - name of the recurring plan;
- Recurring period - how often the payment should be made (annually/quarterly/
monthly/weekly/by period);
- Pay day - day of the payment;
Last Revised: Jan 5.10
Page
68 of 409
Copyright © 2004-2010 CS-Cart.com
The value of this field depends on the selected recurring period. If Recurring
period is set to Annually, Quarterly or Monthly, you can select any day in the first
month of the period. If Recurring period is set to Weekly, you can select any day of
the week (from Sunday to Saturday). In case Recurring period is set to By period,
the field Recurring period value (days) appears on the page. In this field you
specify the recurring period in days (e.g. 15) and in the field Pay day - the day when
the payment should be made (e.g. 5).
- Recurring price - specify prices of the products that are bought under this
recurring plan. You can set the original price or give a discount;
• original - original price of the product;
• to percentage of the original price - the original price will be reduced to the
specified percentage;
• by percentage of the original price - the original price will be reduced by the
specified percentage;
• to fixed amount - the original price will be reduced to a fixed amount;
• by fixed amount - the original price will be reduced by a fixed amount;
- Recurring duration (months) - subscription period in months;
- Recurring start price - product price in the initial period;
- Recurring start duration - duration of the initial period (days or months);
- Recurring note - here you can leave a note for the recurring plan that will be
displayed in the storefront;
- Status - status of the plan (Active, Disabled);
- Allow customers to set up duration - tick off to allow customers to set up the
subscription period by themselves;
- Allow customers to unsubscribe - tick off to allow customers to unsubscribe from
the recurring plan.
In the Products tab you can assign products to the plan.
Last Revised: Jan 5.10
Page
69 of 409
Copyright © 2004-2010 CS-Cart.com
Recurring plans - Products
5.2.8 View subscriptions
Here is given a list of all subscriptions to products.
- Select column;
- ID - identification number of the subscription;
- Order ID - identification number of the order;
- Customer - full name of the customer;
- E-mail - e-mail of the customer;
- Date - date of the subscription;
- Recurring price - amount of the periodical payment;
- Last paid - date of the last payout;
- Status - status of the subscription (Active, Disabled, Unsubscribed, Completed).
When changing the status of the subscription, a notification is sent to a customer by
default. If you do not want to notify a customer, remove a tick mark from the Notify
customer check box.
Last Revised: Jan 5.10
Page
70 of 409
Copyright © 2004-2010 CS-Cart.com
Subscriptions
To view a subscription conditions click on the
button. You will see the Viewing
subscription page where the following parameters are listed:
- Creation date - date of the subscription creation;
- Status - status of the subscription;
- Recurring plan - ID of the recurring plan for this subscription;
- Order - ID of the order placed under this subscription;
- End date - end date of the subscription;
- Last paid - date of the last payment;
- Recurring period - how often the payment should be made (annually/quarterly/
monthly/weekly/by period);
- Customer - full name and e-mail of the customer;
- Payment method - payment method used when paying for the order.
Shipping information
- Method - shipping method;
- Tracking number - a carrier's unique tracking identifier for a package (it is used to
trace the order as it travels to its destination).
- Carrier - package delivery company (e.g. FedEx, DHL, UPS, etc.).
If you make changes on the page and want to send a notification to a customer, tick
off the Notify customer checkbox.
To save the changes click on
Last Revised: Jan 5.10
. To cancel the changes click on
Page
.
71 of 409
Copyright © 2004-2010 CS-Cart.com
Viewing subscription
In the tab Products you see the product or products of the subscription.
Last Revised: Jan 5.10
Page
72 of 409
Copyright © 2004-2010 CS-Cart.com
Viewing subscription - Products
Viewing subscription - Paid
The orders relating to the subscription are given in the Orders tab.
Also here is given a total amount paid under this subscription.
5.2.9 Subscription events
Once a subscription is created, the further placing of orders and sending of
notifications should be carried out manually. All the information on the current events
is displayed on the page Subscription events.
Last Revised: Jan 5.10
Page
73 of 409
Copyright © 2004-2010 CS-Cart.com
Subscription events
All the events are grouped into four sections. The corresponding subscriptions and
the related orders are given in each section.
- Attempt to pay the failed order - orders that failed for some reasons. Here you
notify customers that they can make an attempt to pay the failed order again. Note:
the number of such attempts and time interval between them are defined in the
Recurring billing addon settings (Administration->Addon->Recurring billing>General).
- Charge subscription - orders that have to be paid on the same day. You remind
customers that it’s time to pay for the subscription.
- Notification of manual paying - orders that have to be paid manually. Here you
notify customers that their orders cannot be processed automatically and that it should
be done manually. Note: the content of the notification and the period during which
the notification is sent are defined in the Recurring billing addon settings
(Administration->Addon->Recurring billing->Notification).
- Notification of future payment - orders that will have to be paid in the furure.
Note: the content of the notification and the period during which the notification is
sent are defined in the Recurring billing addon settings (Administration->Addon>Recurring billing->Notification).
Last Revised: Jan 5.10
Page
74 of 409
Copyright © 2004-2010 CS-Cart.com
To send a notification:
- to check an item and click on the process link of this item.
To process several items at a time:
- check the necessary items;
- click on the Process selected events button.
5.3 Catalog
You can manage the categories and products sold in your shop using the
administration sections of the Catalog tab.
Catalog
5.3.1 Categories
You can manage your store categories and products using this menu item.
Store categories are managed by using the ‘Categories’ page, which contains a list
of all categories of the store:
Last Revised: Jan 5.10
Page
75 of 409
Copyright © 2004-2010 CS-Cart.com
List of product categories
- Select column - you can select the necessary category;
- Position – ordinal number of the category in the category tree;
- Name – category name (if a + sign is displayed before the category, that means it
has subcategories. Click on the sign to show all subcategories);
- Products – number of products in the category ;
- Status – status of the category (Active - the category is available in the storefront,
Disabled - the category is not available in the storefront, or Hidden - the category is
not displayed in the storefront but can be accessed by customers by following the
direct link).
To enter the category position number:
- enter the desired number in the ‘Position’ field;
- click on
Last Revised: Jan 5.10
.
Page
76 of 409
Copyright © 2004-2010 CS-Cart.com
For example, in the figure above, entering 12 for the ‘Children’s Book’ category and
11 for the ‘Computers & Internet’ category will change the order of these categories in
the storefront: the ‘Computers & Internet’ category will be displayed first.
By default, if there are no numbers in the ‘Position’ field, categories will be
ordered alphabetically.
To delete a category, either:
- use the delete link in the category row;
or:
- place a check mark in the Select column of the category you want to delete;
- click on the Choose action link and choose Delete selected.
Be careful when deleting a category, its subcategories and products will also be
deleted automatically.
To edit a category click on the category name (link) and edit the following
parameters:
- Location - whether it is a root level category or not. If not, choose its parent
category;
- Name - name of the category;
- Images;
Images are defined as pairs: Thumbnail and Popup larger image. You can download
an image from a local computer or a server, or enter a direct link to the image. Also
you can specify an alternative text;
- Description - description of the category that is displayed in the storefront right
after the category name;
This field also contains tools for text editing. If you want to use them, click on
.
- Page title - you can define any title that will be displayed in the browser when
viewing the category page in the storefront.
- META description – a specific Meta Tag description field for this category;
- META keywords – a specific Meta Tag keywords field for this category;
- User groups – user groups for which the category is available, i.e. the users
signed up for the selected groups have access to this category;
You can define user groups in the chapter Users->User groups.
Last Revised: Jan 5.10
Page
77 of 409
Copyright © 2004-2010 CS-Cart.com
If you tick off the ‘Apply to all subcategories’ check box the selected user group will
be applied to all subcategories of this root category.
- Position – ordinal number of the category in the storefront;
- Created date - this is the date that the category information has been added to
the database;
- Status – whether the category is active, hidden or disabled;
- Localization - select localization(s) for which the category will be available.
The ‘Localization’ field is displayed only if at least one item is defined in
Shipping/taxes->Localizations.
Remember that by enabling the category for the localization you do not enable
products of this category.
After entering the desired parameters, click on
to save the changes to
the database.
You can skip entering any parameter except Location, Name and Status.
Last Revised: Jan 5.10
Page
78 of 409
Copyright © 2004-2010 CS-Cart.com
Editing category
Last Revised: Jan 5.10
Page
79 of 409
Copyright © 2004-2010 CS-Cart.com
In the ‘Blocks’ tab the lists with the ‘Categories’ content are represented. To
enable the necessary list, tick off the ‘Enable for this page’ check box.
Items of the block are displayed in the Listed items section. If the block is filled
manually, follow the
link and choose necessary categories in the pop-up
section and add them to the Listed items section.
To find more information about Blocks see Design->Blocks.
Blocks
In the Addons tab you see addons that can be enabled for categories. Such addons
are given here if they are enabled in Administration->Addons.
For categories such addons are Age verification, Comments and reviews.
The Age verification addon allows to define an age limit for a category. The
following fields can be filled in:
- Age verification - tick off to enable age verification for the category;
- Age limit - set the minimum age for access to the category;
- Warning message - the message that is displayed during age verification.
Communication about the category, category rating or both can be enabled in the
Comments and reviews section.
If you make any changes click on
Last Revised: Jan 5.10
. To cancel the changes click on
Page
80 of 409
.
Copyright © 2004-2010 CS-Cart.com
Addons
In the Layout tab you can select how the products of the category will be
displayed.
- Use custom layouts - enable this option to be able to specify a layout for the
category;
- Product columns - specify whether the products will be displayed in one column or
two columns, etc. Note that this option is used only for the Grid layout, but you can
also use it in your own custom layouts.
- Available layouts - tick off available layouts for this category;
- Default category layout - set the default layout for this category.
If you make any changes click on
Last Revised: Jan 5.10
. To cancel the changes use
Page
.
81 of 409
Copyright © 2004-2010 CS-Cart.com
Category layout
In the ‘Reward points’ tab you specify the number of points customers will get for
buying any product of this category.
Override global point value for all products in this category – if the check box
is ticked off the values defined for the user groups below will prevail over those which
are specified globally (on the 'Reward points' page).
- User group – list of all user groups of the store and options Guest and Registered
for those who are not assigned to any user group;
- Amount – the number of reward points you set for a user group (can be edited
only if Override global point value for all products in this category is checked);
- Amount type - specify whether the set amount will be an absolute value (points)
or percentage (%). When Amount type is set to Percent (%), the reward points are
calculated in the following way: the product price is divided into 100, and the result is
multiplied by the number set in the Amount field.
If you make some changes click on
Click on the
Last Revised: Jan 5.10
to save them to the database.
link to undo the changes.
Page
82 of 409
Copyright © 2004-2010 CS-Cart.com
Reward points
There is a list of all reviews about the category in the Reviews tab. The tab is
displayed only if communication on the category is enabled, namely the Reviews field
(in the General tab) is set to Communication, Rating or All.
To change the parameters of several categories:
- place a check mark in the Select columns of the categories you want to change;
- click on the Choose action link and choose Edit selected;
This will open the ‘Select fields to edit’ form, in which you select parameters to
modify. ‘Select field to edit’ is represented as a group of check boxes. It allows you
to choose the fields you wish to change in the ‘Update categories’ form.
Last Revised: Jan 5.10
Page
83 of 409
Copyright © 2004-2010 CS-Cart.com
Select fields to edit
To add a new category:
- click on
category’ page.
and fill in all the necessary parameters on the ‘New
5.3.1.1 Bulk category addition
To add several categories at once follow the Bulk category addition link under
the page title. The Add categories form will open. Here you can add several new
categories at a time using a single form.
Last Revised: Jan 5.10
Page
84 of 409
Copyright © 2004-2010 CS-Cart.com
Bulk category addition
To add a new category, click on
.
The number of categories that can be added in this form will depend on the
parameters of your server. We do not recommend bulk addition of more than 100
categories at a time.
To add a new category identical to an existing one ("clone" the category),
click on
.
To delete a category, click on
.
After entering the parameters, click on
to add a group of categories.
5.3.2 Products
You can manage products using the ‘Products’ form, which contains the following
sections:
- Search for products;
- a list of all products.
The ‘Products’ page contains the ‘Search’ pattern which allows you to search for
orders by the following parameters:
Last Revised: Jan 5.10
Page
85 of 409
Copyright © 2004-2010 CS-Cart.com
- Find results with - enter search words and select whether any of the entered
words, all of the words or the exact phrase will be searched for;
- Price - set a price range;
- Search in category - set in what category the search will be performed (All
categories is set by default);
If you want to make the search results more precise click on Advanced search
option. The search form will be expanded and you will be able to search by the
following options:
Search for products
- Search in;
You may have the system search for products which contain the specified pattern
(text) within any of the following product parameters:
• Product name;
• Full description;
• Short description;
• Keywords;
• Subcategories.
- Search by product features;
Last Revised: Jan 5.10
Page
86 of 409
Copyright © 2004-2010 CS-Cart.com
- Search by product code - you can use this field to locate a product by entering its
unique product ID;
- Configurable - set Yes if the product you search for is configurable;
- Sales amount - specify an interval for the sold items;
- Shipping freight ($) - define a range for the shipping freight;
- Weight (lbs) - define a range for the product weight;
- Quantity - product quantity in stock (define a quantity range);
- Free shipping - whether the product is shipped for free;
- Status - status of the product (Active - the product is available for customers,
Disabled - the product cannot be accessed by customers; Hidden - the product can be
accessed by customers only by following the direct link).
After you have entered the desired information, click on
process.
to start the search
Also the system allows to create different search patterns and save them for future
use. Just set the search options, type the name of the pattern in the Save this search
as: input field and click on the
button. Once the search pattern is saved, it is
displayed in the dropdown list box at the top.
A successful search will display a list of the products matching all of your search
criteria.
Last Revised: Jan 5.10
Page
87 of 409
Copyright © 2004-2010 CS-Cart.com
List of all products
The list of all products is represented in the following way:
- Select column - selects the product;
- Code – internal product code;
- Name – name of the product;
- Price – product price;
- List price – manufacturer's suggested retail price (it is used to show that your
price is lower);
- Quantity – number of products in storage;
- Status – status of the product (Active - the product is available for customers,
Disabled - the product cannot be accessed by customers; Hidden - the product can be
accessed by customers only by following the direct link).
You can define the number of products displayed per page in the chapter
Administration->Settings->Appearance>Products per page.
To change product parameters (‘Code’, ‘Price’, ‘List price’):
- enter the new values of the parameters;
Last Revised: Jan 5.10
Page
88 of 409
Copyright © 2004-2010 CS-Cart.com
- click on
.
To look up product details:
- click on the product name link.
To delete a product:
- place a check mark in the Select column of the product you want to delete;
- click on the Choose action link at the bottom and choose Delete selected.
or:
- use the delete link in the product row.
To change the number of products in storage:
If no options are defined in the product,
- simply type the needed value into the ‘Quantity’ field.
Otherwise,
- click on
in the ‘Quantity’ field to open the ‘Inventory’ form, on which you will
be able to set the quantity for each type of the product.
To edit a product:
- click on the name of the product.
This will open the ‘Editing product’ form, in which you will be able to change
product parameters. All parameters are grouped into a number of sections:
Information, Pricing/inventory, SEO/Meta data, Availability, Extra.
Last Revised: Jan 5.10
Page
89 of 409
Copyright © 2004-2010 CS-Cart.com
Editing product
- Name - product name;
- Main category - choose in what category the product will be displayed;
- Price – product price in your store;
Last Revised: Jan 5.10
Page
90 of 409
Copyright © 2004-2010 CS-Cart.com
The currency of price is displayed in round brackets after the field name - for
example, ‘Price ($)’ or ‘Price (€)’.
- Full description - full description of the product with no length limit which is shown
in the Description tab on the product details page in the storefront;
If you do not enter any text in the ‘Short description’ field, the first 300
characters of the ‘Full description’ field will be used as a short product description.
This field also contains tools for text editing. If you want to use them, click on
.
- Status - status of the product (Active - the product is available for customers in
the storefront, Hidden - the product can be accessed by customer only by following the
direct link, Disabled - the product cannot be accessed by customers);
- Images;
Images are defined in pairs: Thumbnail and Popup larger image.
To select an image on a local computer or a server use Local or Server links. To
type the URL of the file click on the URL link. Also you can define an alternative text
both for Thumbnail and Popup larger image.
You can only choose images with ’*.jpg’, ’*.gif’ and ’*.png’ extensions.
The maximum total image size will depend on the parameters of your server.
Generally it is 2 Mb. In order to be certain, contact your server administrator.
Last Revised: Jan 5.10
Page
91 of 409
Copyright © 2004-2010 CS-Cart.com
Editing product
- Product code - identifying code of the product;
- List price – market price of the product;
Price currency is displayed in round brackets after the field name. For example, ‘List
price ($)’ or ‘List price (€)’.
- In stock - number of products in storage;
If you wish to continue selling products even when there are none in stock, see
the chapter Administration->Settings->General->Allow negative amount in
inventory).
Last Revised: Jan 5.10
Page
92 of 409
Copyright © 2004-2010 CS-Cart.com
Be sure that stock control is enabled (see the chapter Administration>Settings->General->Enable inventory tracking) so that the quantity is
automatically updated.
- Zero price action - here you specify the behavior of the store if value of the ‘Price’
field is zero. You can both allow the addition of the product to cart and ban it, or you
can let a customer set the price.
- Inventory - set the way how to track inventory for the product;
The available choices are:
• track with options - tracking for the product with options;
The ‘track with options’ choice is displayed only if a product has at least one
option.
If the ‘track with options’ choice is selected then
button appears instead
of input field next to ‘In stock’ on the ‘Update products’ page and in the
‘Quantity’ column on the ‘Manage products’ page. Click on
button and you
are redirected to the ‘Inventory’ page. For more information about the ‘Inventory’
page see the description of the ‘Product options’ tab.
• track without options - tracking for the product itself (without options);
• do not track - disable tracking for this product.
- Minimum order quantity - the minimum product quantity that can be added to
cart;
- Maximum order quantity - the maximum product quantity that can be added to
cart;
- Quantity step - step of product quantity (if Quantity step is set to 2, then only 2,
4, 6, 8, 10, etc. items can be added to cart);
- List quantity count - number of items in the quantity list;
- Weight;
The unit of weight is displayed in round brackets near the field name - for example,
‘Weight (lbs)’ or ‘Weight (kg)’.
You can define the unit of weight in the chapter Administration->Settings>General->Weight symbol.
Last Revised: Jan 5.10
Page
93 of 409
Copyright © 2004-2010 CS-Cart.com
By default, the unit of weight is pound (lbs).
- Free shipping - tick off to enable free shipping for this product;
- Shipping freight - handling fee for each unit of this product i.e. the value of the
shipping cost for this particular product. It is added to the cost calculated at checkout;
- Taxes - allows to choose the applicable taxes on the product;
You can add or configure taxes in Shipping/Taxes->Taxes.
Editing product
- Page title - title of the page displayed in the browser window when viewing the
product in the storefront;
- META description – specific Meta Tag description field for this product;
- META keywords – specific Meta Tag keywords field for this product;
- Search words - specify the words by which the product can be easily found in the
storefront;
Last Revised: Jan 5.10
Page
94 of 409
Copyright © 2004-2010 CS-Cart.com
Editing product
- User groups - user groups that have access to this product;
You can add or configure taxes in Shipping/Taxes->Taxes.
- Created date - the date when the product information has been added to the
database;
- Avail since - date starting from which the product becomes available for
customers;
- Buy in advance - if ticked off, customers can buy the product in advance even if it
is not available at the moment (i.e. Avail since is set to a later date);
Last Revised: Jan 5.10
Page
95 of 409
Copyright © 2004-2010 CS-Cart.com
Editing product
- Feature comparison - tick off if you want that customers can add the product to a
comparison list;
To be able to view the feature comparison list in the customer storefront it is
necessary that a block with the content Feature comparison is defined on the Blocks
page (Design->Blocks).
- Downloadable - tick off this check box if the product is electronically distributed. If
this option is enabled, additional check boxes will also appear:
• Enable shipping for downloadable product - tick off this check box if there is a
component in the electronically distributed product which requires shipping (such
as a manual book for a software product);
• Time-unlimited download - tick off to allow unlimited download of the product;
You can define the period of time during which this product can be downloaded
by the customer in Administration->Settings->General->Download key TTL.
Last Revised: Jan 5.10
Page
96 of 409
Copyright © 2004-2010 CS-Cart.com
- Localization - select localization(s) for which the product will be available;
The ‘Localization’ field is displayed only if at least one localization is defined in
Shipping/taxes->Localizations.
- Short description – product description (with no length limit) which is displayed on
the product list page in the storefront;
If you do not enter any text in the ‘Short description’ field, the first 300
characters of the ‘Full description’ field will be used as a short product description.
This field also contains tools for text editing. If you want to use them, click on
.
- Popularity - product popularity rating (integer) based on number of views in the
storefront, number of additions to cart and number of purchases. The popularity rating
is calculated automatically by the system, but the administator can also set this option
to any value. Sorting of products in the storefront can be based on this rating.
If you change any parameters, click on the
To cancel the changes click on the
button.
link.
Also additional data can be specified using the tabs:
Images;
Secondary categories;
Options;
Qty discounts;
Files;
Blocks;
Addons;
Features;
Tags;
Attachments;
Required products
Reward points.
If the corresponding parameters are set in the Addons tab, the following additional
tabs will also appear:
Reviews;
Last Revised: Jan 5.10
Page
97 of 409
Copyright © 2004-2010 CS-Cart.com
Configuration (if the ‘Configurable’ check box is enabled).
The ‘Images’ tab contains only the ‘Additional images’ section for choosing
additional images of the product. All additional images will be displayed underneath the
main thumbnail on the product detail page of the storefront.
You can download an image from a local computer or a server, or enter a direct link
to the image. Also you can specify an alternative text.
You can only choose images with ’*.jpg’, ’*.gif’ and ’*.png’ extensions.
The maximum total image size will depend on parameters of your server.
Generally it is 2 Mb. In order to be certain, contact your server administrator.
To add a new pair of images, click on
.
To add an image pair identical to an existing one ("clone" an existing image
pair), click on
.
Clone function is only enabled for images located on the server.
To delete a pair of images, click on
last one.)
Last Revised: Jan 5.10
. (You can delete all the rows except the
Page
98 of 409
Copyright © 2004-2010 CS-Cart.com
Images
In the ‘Secondary categories’ tab you can specify other categories and
subcategories to which the product belongs and where it will be displayed.
Secondary categories
Last Revised: Jan 5.10
Page
99 of 409
Copyright © 2004-2010 CS-Cart.com
Each product has its own typical options which can be defined using the ‘Product
options’ tab. These options will be displayed in the storefront as product parameters.
Product options
The list of product options is given in the following way:
- Name - name of the option;
- Status - status of the option (Active - available in the storefront, Disabled - option
is not displayed in the storefront);
To add an option:
- click on the
button and specify an option in the pop-up section.
To apply a global option to the product use the
button.
The ‘Add global options’ button is displayed only if at least one global option is
defined on the ’Global options’ page.
If you want the added product options to reflect the changes made for global
product ones, you will need to add them as a link. To do this tick off ‘Apply as link’
check box before the applying process. You won’t be able to edit the linked product
options on the ‘Editing products’ pages then.
To delete an option:
- click on the delete link of the entry you want to delete.
Last Revised: Jan 5.10
Page
100 of 409
Copyright © 2004-2010 CS-Cart.com
To edit an option:
- click on the
link of the necessary entry.
You will be able to edit the following parameters:
- Name - name of the option;
- Position - ordinal number of the option in the list;
- Inventory - if enabled the option is taken into account when forming the product
inventory and it is displayed on the Inventory page of the product;
- Type - select the display type of the option (Selectbox, Radiogroup, Checkbox,
Text, Textarea, File);
- Description - description of the option that is available in the storefront. Next to
the option the symbol (?) will be displayed, by clicking on it customers will see the
specified description;
- Comment - insert a comment that will be displayed below the option in the
storefront.
Product options
Last Revised: Jan 5.10
Page
101 of 409
Copyright © 2004-2010 CS-Cart.com
If you add an option of text or textarea type, you can specify additional parameters
for it, namely:
- RegExp - enter a regular expression that will validate the value entered by a
customer. For example, if the field is set to ^[a-zA-Z]{3}[0-9]{2,3}$, then the
customer will have to enter 3 letters and 2 or 3 figures;
- Required - if ticked off, the option will be mandatory to fill in;
- Inner hint - a notice that is displayed in grey in the field and that gives a hint
about what to enter;
- Incorrect filling message - the message that is displayed in case of incorrect filling
of the field. This may occur when a certain regular expression is set for the option. For
example, if RegExp is set to ^[a-zA-Z]{3}[0-9]{2,3}$, in this field you can enter the
following: Please, enter 3 letters and 2 or 3 figures (e.g. abc123). So if the customer
enters an incorrect value, s/he will see the specified notification. This can be used to
check a telephone number, postal code, date, etc.
If the option type is file, it means that a file can be uploaded by a customer for this
product. It is especially useful for customizable products like T-shirts, mugs or
postcards, where a customer can use his own graphic image.
For option of the file type, you can specify the following additional parameters:
- Required - if enable, it is mandatory to upload a file;
- Allowed extension - leave this field empty to allow uploading of all file types or
input allowed extensions separated by comma (e.g. jpg,bmp,gif,pdf);
- Max uploading file size - leave this field empty to allow uploading of files of any
size or limit the file size ("100" is equal to 100 Kb);
- Multiupload - if enabled, customers can upload several files.
The ‘Variants’ tab allows to define option variants.
Variants are not available for Text, Textarea and File types.
Last Revised: Jan 5.10
Page
102 of 409
Copyright © 2004-2010 CS-Cart.com
Editing option
The information is given in the following way:
- Position - ordinal number of the option in the list;
- Name - name of the option variant (e.g. option ‘size’ may have such variants as
small, medium, large, X large, etc.). Note that a variant name consisting of more than
20 characters may change the website display in some cases;
- Modifier/Type - positive or negative value that affects the product price if the
option variant is selected/absolute($) or percent(%) type of modifier;
- Weight modifier/Type - positive or negative value that affects the product weight
if the option variant is selected/absolute(lbs) or percent(%) type of modifier;
- Status - status of the option (Active or Disabled).
Click on the Extra link to display additional parameters:
- Icon - icon of the option. You can download the icon from a local computer, a
server or type a direct link to the image. Here you can also define an alternative text
for the icon;
- Earned point modifier/Type - positive or negative value that affects the number of
points earned for the product if the option variant is selected/absolute(points) or
percent(%) type of modifier (this option is available only if the Reward points addon
is enabled in Administration->Addons).
Last Revised: Jan 5.10
Page
103 of 409
Copyright © 2004-2010 CS-Cart.com
If you edit the value of any field, click on
to save the changes.
To add a new row with empty fields to the section, click on
.
To add a new row with identical values to an existing one ("clone" section),
click on
.
To delete a row, click on
. (You can delete all the rows except the last one.)
When buying a product the customer chooses the necessary combination of product
parameters. For example, M, L, XL sizes and white, black, red, green colors are
available for a T-shirt. The customer chooses among these option variants a white Tshirt in size L. But the white T-shirt in size L isn’t in stock. In order to ban this
combination in the storefront you can define certain exceptions using the
link in the ‘Product options’ section.
Click on the
of exceptions.
link to open the ‘Exception’ page. The page contains a list
To add a new exception click on
specify a combination.
and in the pop-up section
Exceptions
Exception combination is a combination of product variants which isn’t available for
customers in the storefront.
You can choose not to display exceptions in the storefront or show a warning when
a customer selects the exception (Administration>-Settings->General).
Last Revised: Jan 5.10
Page
104 of 409
Copyright © 2004-2010 CS-Cart.com
New combination
In exception combination each option can have ‘disregard’ or ‘disable’ values.
‘Disregard’ means that the option does not affect the exception combination. For
instance, if size option has ‘Disregard’ value and color option is defined as 'BLACK', in
customer area the 'BLACK' variant will be disabled only, and all sizes will be available
for other color variants.
‘Disable’ means that the option will be disabled if other exception conditions are
met. For example, if size option has ‘Disabled’ value and color option is specified as
'BLACK', in customer front-end size option will be disabled if 'BLACK' is selected.
If you click on the
link you are taken to the ‘Inventory’ page. If
you click on the rebuild combinations link, all available combinations will be displayed
on the page:
- Select column;
- Combination - combination of product options and its code;
- Images - product thumbnail and popup larger image.
You can choose both ‘Additional option thumbnail’ and ‘Popup larger image’. You
can download an image from a local computer or a server, or enter a direct link to the
image. Also you can specify an alternative text.
If you modify any option affecting the variant combinations they are normally
updated automatically. However, if you discover that the variant combinations have
not been updated, click on the rebuild combinations link to apply the changes.
Last Revised: Jan 5.10
Page
105 of 409
Copyright © 2004-2010 CS-Cart.com
If you edit the value of any field, click on
to save the changes.
To delete a combination from the list:
- click on the delete link of the plan.
To delete several combinations at a time:
- tick off the check boxes opposite the entries you want to delete;
- click on Delete selected.
To add a new combination to the list use the
button.
- select option variants;
- click on
.
Quantity discounts
CS-Cart shopping cart software includes the possibility of wholesale trade. You can
define quantity discounts (wholesale prices) for a product using the ‘Qty discounts’
tab.
Quantity discounts
The list of quantity discounts is represented as follows:
Last Revised: Jan 5.10
Page
106 of 409
Copyright © 2004-2010 CS-Cart.com
- Quantity – the minimum number of products to which the current quantity
discount is applied;
- Price - the wholesale price of the product;
- User group – the type of a user group that can view this discount;
You can define user account types in the chapter Users->User groups.
To delete a wholesale price:
- click on the
sign of the price you want to delete.
You can add a new wholesale price using the
To add a new row, click on
button.
.
To add a new row with values identical to an existing one ("clone" a
wholesale price), click on
.
To delete a row, click on
. (You can delete all the rows except the last one)
In case of electronically distributed products, the Files tab allows you to load files
that will be downloaded by customers.
Names of the files and their statuses (Active or Disabled) are given in the list.
To delete a file:
- click on the delete link of the entry you want to delete.
To edit a file:
- click on the
Last Revised: Jan 5.10
link of the entry you want to edit.
Page
107 of 409
Copyright © 2004-2010 CS-Cart.com
To add a new file to the list click on the
following parameters:
button and define the
- Name - name of the file;
- Position - position of the file in the list;
- File - load the file;
You can download a file from a local computer or a server, or enter a direct link to
the image.
- Preview - load a preview file that can be downloaded by customers from the
product details page in the storefront (in the Files tab);
- Activation mode - set when the purchased product can be downloaded
(Immediately - immediately after the purchase; After full payment - when the order
has the statuses Processed or Completed; Manually - manually by the
administrator);
- Max downloads - maximum number of downloads available;
- License agreement - text of the license agreement;
- Agreement required - define whether it will be required to accept the license
agreement at checkout or not;
- Readme - this text will be in the Readme file of the product;
The fields License agreement and Readme contain tools for text editing. If you
want to use them, click on
To add a new entry , click on
.
.
To add a new entry with file links identical to an existing one ("clone" a link),
click on
.
To delete an entry, click on
. (You can delete all the rows except the last one.)
In the Blocks tab you see all blocks defined for a product details page in Design>Blocks->Products.
On the page you have the ability to add blocks that will be displayed only on the
details page of this particular product.
To learn how to add blocks refer to the chapter Blocks (Design->Blocks).
Last Revised: Jan 5.10
Page
108 of 409
Copyright © 2004-2010 CS-Cart.com
Order of the blocks in the Product details page tabs section can be changed by
using the drag and drop feature. So the positions on these tabs can be set for each
product individually.
Blocks
In the Addons tab you see addons that can be enabled for this particular product.
Such addons are given here if they are enabled in Administration->Addons.
Last Revised: Jan 5.10
Page
109 of 409
Copyright © 2004-2010 CS-Cart.com
For products such addons are Product configurator, RMA, Age verification,
Comments and reviews.
If the Configurable check box is ticked off in the Product configurator section, it
means that the product is configurable (consists of several components) and the
Configuration tab is displayed.
In the RMA section you can define whether the product can be returned
(‘Returnable’ is enabled) or not and specify the period during which it can be
returned.
In the Bestselling section you can see the number of sold items. The section is
displayed only if the Bestsellers addon is enabled in Administration->Addons.
The Age verification addon allows to define an age limit for a product. The
following fields can be filled in:
- Age verification - tick off to enable age verification for the product;
- Age limit - set the minimum age for access to the product;
- Warning message - the message that is displayed during age verification.
Communication about the product, product rating or both can be enabled in the
Comments and reviews section.
If you make any changes click on
Last Revised: Jan 5.10
. To cancel the changes click on
Page
110 of 409
.
Copyright © 2004-2010 CS-Cart.com
Addons
Last Revised: Jan 5.10
Page
111 of 409
Copyright © 2004-2010 CS-Cart.com
Use the Product features tab to enter data concerning additional product fields
that you have previously defined.
You can add product feature in the chapter Catalog -> Product features.
Products features
The Buy together feature allows to create combinations of products and apply
discounts to such combinations. So if the specified products are bought together,
customers are provided with a discount. Such combinations and possible discounts are
presented in the Buy together tab on the product details page in the storefront. And
customers can easily decide whether to take advantage of the given opportunity or not.
To enable this feature, you need to enable the Buy together addon in
Administration->Addons.
In the "Buy together" tab you see a list of created combinations. The name of the
combination and its status (Active or Disabled) are given in the list.
To add a combination:
- click on the Add combination button.
To delete a combination:
- click on the delete link of the entry you want to delete.
Last Revised: Jan 5.10
Page
112 of 409
Copyright © 2004-2010 CS-Cart.com
Buy together
To edit a combination click on the edit link and the Editing combination pop-up
window will open. There you will see two tabs: General and Products.
In the General tab you can edit the following parameters:
- Name - name of the combination;
- Decsription - description of the combination that will be displayed in the
storefront;
- Available from - starting this date the combination becomes available;
- Available till - the last day when the combination is available;
- Display in promotions - if ticked off, the combination will be displayed in the
Promotions tab;
- Status - Active or Disabled.
Last Revised: Jan 5.10
Page
113 of 409
Copyright © 2004-2010 CS-Cart.com
Editing combination - General
In the Products tab you will see the products that form the combination. The
following information is given for each product of the combination:
- Name - name of the product;
- Quantity - quantity of the product;
- Price - regular price set for this product;
- Discount - discount on the product if it is bought in this combination;
• by fixed amount - the original price will be reduced by a fixed amount;
• to fixed amount - the original price will be reduced to a fixed amount;
• by percentage of the original price - the original price will be reduced by the
specified percentage;
• to percentage of the original price - the original price will be reduced to the
specified percentage;
- Value - value of the discount;
- Discounted price - price with the applied discount.
Last Revised: Jan 5.10
Page
114 of 409
Copyright © 2004-2010 CS-Cart.com
Editing combination - Products
Below are given Total cost (total cost without discounts) and Price for all (total
cost with discounts).
Also you can use the Share discount option and grant a discount on the whole
combination. If you enter some value (e.g. 50) into this and click on Apply, the
discount will be distributed among all the products of the combination depending on
their regular price.
Note: if you change any parameter, remember to click on Recalculate.
To save the changes, click on the
button. To cancel the changes, click on
cancel.
Use +Add products to add products to the combination and delete to delete the
necessary product from the combination.
Last Revised: Jan 5.10
Page
115 of 409
Copyright © 2004-2010 CS-Cart.com
In the ‘Tags’ tab you can set tags for this product. The tags specified here are
displayed in the ‘Tag cloud’ side box in the storefront.
Tags
- Popular tags – tags that have already been added for the product;
- My tags – tags that have been added by you;
Also here you can add new tags for the product, just type the necessary value into
the input field and click on
.
For more information about product tags see Content->Tags.
The ‘Configuration’ tab appears if the ‘Configurable’ check box is ticked off in the
Addons tab and this means that this product is configurable and therefore can consist
of some components. The customers have the ability to choose these components in
the storefront. Moreover, customers will not select components that are incompatible
with each other, when they choose the first component, the following unsuitable
variants are disabled.
Here you can select product groups which the product can consist of. The page
contains two sections:
- Add product group;
- Product groups.
In the drop down select box of the ‘Add product group’ section you choose
products group for the product.
To apply a product group:
- select a product group in the check box;
- click on the
Last Revised: Jan 5.10
button to add the group.
Page
116 of 409
Copyright © 2004-2010 CS-Cart.com
The Product groups section contains the following columns:
- Select column;
- Position - ordinal number of the group in the storefront;
- Step - which step this product group is assigned to;
- Group name - the name of the group;
- Default configuration products - products that constitute the product group;
- Required - if the check box is enabled then when a customer composes a product
in the storefront he/she is required to buy something from this product group.
In this section you can specify the product(s) that will be represented as
Recommended in the storefront. To do this you need to select the product(s) and
click on the
button.
If you make any changes click on
to save the changes.
To delete a product group:
- tick off the necessary group;
- click on Delete selected.
For more information about configurable products see Catalog->Product
configurator.
In the ‘Attachments’ tab you see a list of the attachments to the product. The
name of the attachment and its status (Active or Disabled) are given in the list:
Attachments
Last Revised: Jan 5.10
Page
117 of 409
Copyright © 2004-2010 CS-Cart.com
To delete an attachment:
- click on
mark of the entry you want to delete
To edit an attachment click on the
following parameters:
link and you will be able to edit the
- Name - name of the attachment;
- Position - ordinal number;
- File - attach files from your local computer, from a server or type the URL to
directly link to the file.
- User groups - select user groups for which the attachment will be available.
The Required products tab
Required products are related products that are necessary to buy in addition to the
main one.
To add required products click on the link
the pop-up section and add them to the list.
, select necessary products in
Required products
In the ‘Reward points’ tab the administrator can specify the price of the product in
points and customers can earn for buying the product.
- Allow payment by points – tick off to allow a customer to pay for the product by
points;
- Override global PER – if this option is enabled it means that price in points
specified for this particular product overrides global point exchange rate (set up in
Reward points settings) and the value defined in the 'Price in points' field below will
be displayed in the storefront;
- Price in points – the product price in points.
Last Revised: Jan 5.10
Page
118 of 409
Copyright © 2004-2010 CS-Cart.com
In the ‘Points earned per product’ section the administrator defines the number
of points customers get for buying this product.
Override global/category point value for this product – if this check box is
ticked off the values defined for the user groups below will prevail over those which are
specified globally (on the 'Reward points' page) and for the category (on the category
detail page).
- User group – list of all user groups in the store and options Guest and Registered
for those who are not signed for any user group;
- Amount – number of points you set for the user group;
- Amount type - specify whether the set amount will be an absolute value (points)
or percentage (%). When Amount type is set to Percent (%), the reward points are
calculated in the following way: the product price is divided into 100, and the result is
multiplied by the number set in the Amount field.
Reward points
If you make some changes, click on
Last Revised: Jan 5.10
to save them to the database.
Page
119 of 409
Copyright © 2004-2010 CS-Cart.com
If the ‘Comments and reviews’ option is enabled in the ‘Addons’ tab, you can
create a post on the product by using the ‘Reviews’ tab.
To add a post click on the
button, enter your name, your message,
define the rating of the product and click on
If you make any changes click on
.
to save them to the database.
If you want to delete a review, put a tick mark in the check box in the top right
corner and click on Delete selected.
Reviews
To change the parameters of several products:
- place check marks in the Select columns of the products you want to change;
- click on the Choose action link and choose Edit selected.
This will open the ‘Select fields to edit’ section, which is represented as a group of
check boxes. This section allows you choose the fields you will change using the
‘Update products’ section.
Last Revised: Jan 5.10
Page
120 of 409
Copyright © 2004-2010 CS-Cart.com
Select fields to edit
To clone a product:
- place a check mark in the check box of the product you want to clone;
- click on the Choose action link and choose Clone selected.
To add a new product:
- click on the Add product button;
- enter the necessary information on the New product page.
5.3.2.1 Global update
Also, the Global update option is available for products (to open the Global
update page click on the global update link on the Products page). Global update
allows you to update some product parameters for several products at once. Namely,
you can decrease or increase a price value, list price value, in stock value, price in
points value for the selected products as well as regenerate thumbnails.
Last Revised: Jan 5.10
Page
121 of 409
Copyright © 2004-2010 CS-Cart.com
If a positive value is entered, the current value will be increased. In case of a
negative value, the current value will be decreased.
- Price – the value on which the current price will be changed (can be a fixed
amount ($) or percentage (%));
- List price – the value on which the current list price will be changed (can be a fixed
amount ($) or percentage (%));
- In stock – the value on which the current stock value will be changed;
- Price in points – the value on which the current price in points will be changed
(can be a fixed number of points (points) or percentage (%));
- Regenerate thumbnails – tick off to regenerate product thumbnails.
To select products that will be updated, click on the Add products link in the
Products section and choose the necessary products.
Last Revised: Jan 5.10
Page
122 of 409
Copyright © 2004-2010 CS-Cart.com
Global update
After the necessary values are entered, click on the
button to apply the
changes to the selected products.
5.3.2.2 Bulk product addition
This option allows you to add several products at the same time using a single form
(to open the Bulk product addition form click on the bulk product addition link on the
Products pages).
Last Revised: Jan 5.10
Page
123 of 409
Copyright © 2004-2010 CS-Cart.com
Bulk product addition
To add a new row with empty fields to the section, click on
.
The number of products that can be added with a single operation will depend on
the parameters of your server. We do not recommend addition of more than 100
products at a time.
To add a new row with values identical to an existing one ("clone" a product),
click on
.
To delete a row, click on
. (You can delete all the rows except the last one.)
After entering the desired information, click on
to add new products.
5.3.3 Product features
You can add additional non-standard fields to the product information using the
‘Product features’ form.
A list of all non-standard product fields is represented on the page. Name and
status are given for each product feature. Moreover, features can be grouped for
convenience of the administrator, thus the administrator can change the settings for
the whole group at once but not for every single feature.
Last Revised: Jan 5.10
Page
124 of 409
Copyright © 2004-2010 CS-Cart.com
Product features
You can define the number of product features displayed per page in chapter
Administration->Settings->Appearance>Elements per page.
To delete a product feature or a group:
- click on delete of the entry you want to delete.
To edit a product feature click on the
following parameters:
link and you will be able to change the
- Name - name of the feature;
- Position - position of the feature in the list (ordinal number);
- Description - product feature description. If a description is given in this field, a ?
sign is displayed on the product details page in the storefront (in the Features tab). If
a customer clicks on ?, s/he will see the provided description in a pop-up window;
- Type - field type;
You can choose from the following types: ‘Check box’ (select box, multiple check
boxes), ‘Select box’ (select box, number, extended) or ‘Others’ (text, number, date).
Last Revised: Jan 5.10
Page
125 of 409
Copyright © 2004-2010 CS-Cart.com
If you select the extended type, you will be able to define some additional fields for the
variants of the feature (image, description, page title, URL, META description, META
keywords).
- Group - choose whether the feature belongs to some features group or not. If a
feature is assigned to a group, the options Product, Catalog pages can be set only for
the whole group but not a separate feature.
- Product - tick off to display the feature on a product page;
- Catalog pages - tick off to display the feature on catalog pages (pages with a list
of products);
- Prefix - an affix that precedes the feature value;
- Suffix - an affix that follows the feature value;
If you make any changes click on the
button to save the changes to the
database.
The alternative values of the additional fields can be changed in the tab ‘Variants’.
If you edit the existing variants, remember to click on the
button to save the
changes.
Editing product feature
Last Revised: Jan 5.10
Page
126 of 409
Copyright © 2004-2010 CS-Cart.com
To add a new variant, click on
.
To add a new variant with values identical to an existing feature ("clone" a
product feature), click on
.
To delete an entry, click on
. (You can delete all the rows except the last one.)
When editing a feature the tab ‘Categories’ is displayed only if it doesn’t belong to
any group. In the tab you can set the categories (namely products of these categories)
for which this feature can be defined. If the product feature belongs to some group,
then such categories are specified when editing the group.
To add a new feature click on the
pop-up section and click on
.
To add a new group click on the
up section and click on
button, fill in the form in the
button, fill in the form in the pop-
.
5.3.4 Product filters
The Product filters feature lets customers quickly find products with the exact
attributes they are seeking, as they can simply filter out the product features they
don't want. You can add as many filters as you like but, independent of their number,
filters will efficiently work together. For example, when a customer chooses some
specific value (e.g. price range from $50 to $100), the other filters will display the
products of that selected value only. Moreover, you can choose on which category
pages and what filters should be shown.
If you want Product filters to be displayed in the storefront, it is necessary that
a block with the content Product filters is defined on the Blocks page (Design>Blocks).
Last Revised: Jan 5.10
Page
127 of 409
Copyright © 2004-2010 CS-Cart.com
Product filters
On the page is given a list of all product filters defined in the store. Names of
product filters and their statuses (Active or Disabled) are given in the list.
To delete a filter click on delete of the entry you want to delete.
To edit the filter click on the
link.
To add a filter click on the
button. In the appeared ‘Add new filter’
pop-up section you will see two tabs: General and Categories.
Last Revised: Jan 5.10
Page
128 of 409
Copyright © 2004-2010 CS-Cart.com
Add new filter
In the tab General you can define the following parameters:
- Name – name of the filter;
- Position – ordinal number;
- Show on home page - tick off to display this filter on the home page;
- Filter by – entity by which products are filtered. Here you select among Product
fields (price, in stock, free shipping) and Product features of select box and multiple
check box types defined in the store.
In the tab Categories you define categories for which the filter will be displayed in
the storefront. Add necessary categories by following the
link.
If the filter presupposes the existence of some value intervals, the tab Ranges is
displayed. In the tab you define ranges of the filter:
- Position - ordinal number;
- Name – name of the range that is displayed in the storefront;
- From - To – the range itself (e.g. 0 - 50 for the price filter)
This form supports bulk addition.
To add a new row with empty fields to the section, click on
Last Revised: Jan 5.10
.
Page
129 of 409
Copyright © 2004-2010 CS-Cart.com
To add a new row with values identical to an existing one ("clone" row) click
on
.
To delete a row, click on
. (You can delete all the rows except the last one.)
5.3.5 Global options
If some products of your store have the same set of options, you have the ability to
set up global product options on this page. Then you can easily copy a global option to
some products.
Global options
A list of global options is given on the ‘Global options’ page. The name and status
(Active or Disabled) are specified for each global option.
To delete a global option:
- click on delete of the entry you want to delete.
To add a global option use the
To edit a global option click on the
following parameters:
button.
link and you will be able to change the
- Name - name of the global option;
- Position - position in the list of options (ordinal number);
- Inventory - if enabled the option is taken into account when forming the product
inventory and it is displayed on the Inventory page of the product;
- Type - a view of this option in the storefront (select box, radio group, check box,
text input field, text area);
Last Revised: Jan 5.10
Page
130 of 409
Copyright © 2004-2010 CS-Cart.com
- Description - description of an option that is available in the storefront. (?) will be
displayed next to the option, by clicking on it customers will see the specified
description.
Editing option
In the ‘Variants’ tab you can edit variants of global options:
- Position - ordinal number of the variant;
- Variant name - name of the option variant (e.g. option ‘size’ may have such
variants as small, medium, large, X large, etc.) Note that a variant name consisting of
more than 20 characters may change the website display in some cases;
- Modifier/Type - positive or negative value that affects the product price if the
option variant is selected/absolute ($) or percent (%) type of modifier;
- Weight modifier/Type - positive or negative value that affects the product weight
if the option variant is selected/absolute (lbs) or percent (%) type of modifier;
- Status - status of the option (Active or Disabled).
Click on the Extra link to display additional parameters:
Last Revised: Jan 5.10
Page
131 of 409
Copyright © 2004-2010 CS-Cart.com
- Icon - icon of the option. You can download the icon from a local computer, a
server or type a direct link to the image. Here you can also define an alternative text
for the icon;
- Earned point modifier/Type - positive or negative value that affects the number of
points earned for the product if the option variant is selected/absolute(points) or
percent(%) type of modifier (this option is available only if the Reward points addon
is enabled in Administration->Addons).
Size
If you edit the value of some fields, click on
to save the changes.
To add a new row with empty fields to the section, click on
.
To add a new row with identical values to an existing one ("clone" section),
click on
.
To delete a row, click on
. (You can delete all the rows except the last one.)
Global product options can be applied to products in two ways:
Last Revised: Jan 5.10
Page
132 of 409
Copyright © 2004-2010 CS-Cart.com
1. By using global options application form;
Global options application form
To choose the products to which the option should be applied click on the Apply to
products link.
The form with the following sections is open:
- a list of products;
- Select options - choose a necessary option.
First you define products to which global options will be applied. Follow the
link and select products in the pop-up section. In this section products
can be searched for by several parameters. More information about the search
parameters can be found in the chapter Products.
To select global option(s) which should be applied to product(s) use the
‘Select options’ section.
To apply the selected global options to the products, click on the
link.
The options will be copied to the ‘Product options’ sections of the products. If
needed you could edit the copied options of some products. If you want the added
product options to reflect the changes made for global product ones, you will need to
add them as a link. To do this tick off the ‘Apply as link’ check box before the applying
process. You won’t be able to edit the linked product options on the ‘Editing products’
pages then.
2. In the ‘Product options’ tab on the ‘Editing product’ page.
Last Revised: Jan 5.10
Page
133 of 409
Copyright © 2004-2010 CS-Cart.com
Click on the ‘Add global options’ button in the tab, select a global option in the
‘Global options’ select box in the pop-up section and click on
to add the
global option with all its variants to the list of the product options.
If you wish the global option to be added as a link (once added the option will reflect
the changes that can be made for the global option, but you cannot edit it and its
variants), tick off the ‘Apply as link’ check box and click on
.
5.3.6 Promotions
Promotions is one more promotion tool which allows to offer various privileges for
your customers. On the page you define certain conditions and if customers meet them
they get special reward which is also defined by you.
Promotions can be of two types: Cart promotions and Catalog promotions. Cart
promotions are different product discounts, while Catalog promotions allow to define
not only discounts on products and orders, but also grant coupons, free shipping and
free products.
Manage promotions
The page contains a complete list of promotions of your store. The following
information is given for each item of the list:
- Select column - here you can select the necessary promotion;
Last Revised: Jan 5.10
Page
134 of 409
Copyright © 2004-2010 CS-Cart.com
- Name - name of the promotion;
- Priority - specify the order in which promotions will be applied by assigning ordinal
numbers to them: 1, 2, 3, etc. (if the same priority is set for two promotions, they are
applied in the order they are selected from the database);
- Zone - field of application (whether it is a cart promotion or a catalog promotion);
- Status - status of the promotion (Active - promotion is available for customers,
Disabled - promotion is not available for customers; Hidden - promotion is not shown in
the storefront).
If you make any changes click on the
database.
button to save the changes in the
To delete a promotion:
- click on the delete link of the promotion.
To delete several promotions at a time:
- tick off check boxes opposite the entries you want to delete;
- click on Delete selected.
To edit a promotion click on the
link of the necessary promotion. The Editing
promotion page will open. It contains three tabs General, Conditions, Bonuses.
In the tab General you can edit the following parameters:
- Name – name of the promotion;
- Detailed description – description of the promotion that is displayed for customers
in the storefront (if the detailed description is not given, a short description is used
instead);
- Short description – description that is displayed on the order info page (the My
account side box->Orders->Order info);
These fields also contains tools for text editing. If you want to use them, click on
.
- Date from – date starting from which the promotion is available;
- Date through – starting from this data the promotion is not available;
- Priority – order of application of the promotions (if the same priority is set for two
promotions, they are applied in the order they are selected from the database);
- Stop other rules – tick off to stop other promotions (if any) from being applied;
- Status – status of the promotion (Active, Hidden or Disabled).
Last Revised: Jan 5.10
Page
135 of 409
Copyright © 2004-2010 CS-Cart.com
Editing promotion
In the tab Conditions you define conditions that have to be met to get bonuses.
You are able to set whether all conditions are to be met or any of them. And the ability
to add not only conditions but also groups of conditions greatly improves the flexibility
of the promotion system.
Moreover, the software allows to set conditions that do not have to be met to get a
bonus. So here you create the formula according to which the promotion will be
Last Revised: Jan 5.10
Page
136 of 409
Copyright © 2004-2010 CS-Cart.com
applied. If customers meet the conditions, they will enjoy all the existing privileges (i.e.
all available bonuses will be applied).
NOTE: Cart and catalog promotions have different options in the Conditions and
Bonuses tabs.
Promotion conditions
To add a new condition click on the
conditions given in the list, set its value and click on the
button, select from the
button.
Conditions for catalog promotions can be set in relation to product prices,
categories, products, users, product features and user groups.
- Product price – choose whether the product price has to be equal/not equal to,
less than or equal to, greater than or equal to, less than, greater than the amount
specified by you;
- Categories – specify categories products of which have to be bought or on the
contrary don't have to be bought to get a promotion;
- Products – specify products that have to be bought or don't have to be bought to
get a promotion;
- Users – specify users who can get the bonus;
- Product feature - specify product features;
- User group – specify user groups that can get the bonus;
- Points on user account - specify the number of points on a user account.
Last Revised: Jan 5.10
Page
137 of 409
Copyright © 2004-2010 CS-Cart.com
Each condition can be deleted by clicking on
mark.
Bonuses
In the Bonuses tab you define bonuses that will be applied.
The only bonus that can be set for a catalog promotion is a discount on a product.
This discount can be set in 4 different ways and the price of the product can be
reduced:
- to some percentage of the original price;
- by some percentage of the original price;
- to some fixed amount;
- by some fixed amount.
Conditions for cart promotions can be set in relation to:
- Product price – choose whether the product price has to be equal/not equal to,
less than or equal to, greater than or equal to, less than, greater than the amount
specified by you;
- Categories – specify categories products of which have to be bought or on the
contrary don't have to be bought to get a promotion;
- Products – specify products that have to be bought or don't have to be bought to
get a promotion;
- Users – specify users who can get the bonus;
- Product feature - specify a product feature;
- User group – specify user groups for which the bonus is available;
Last Revised: Jan 5.10
Page
138 of 409
Copyright © 2004-2010 CS-Cart.com
- Customer country – specify the country the customer have to or don't have to be
from;
- Customer state – specify customer state code;
- Customer zip/postal code – specify the zip/postal code of a customer;
- Order total – specify order total;
- Total products in the cart – specify what number of products has to be in the cart;
- Total products weight in the cart – specify the total weight of products in the cart;
- Payment method – specify the payment method that has to or doesn't have to be
used;
- Coupon code - specify a complete coupon code;
- Number of usages - specify number of times for coupon use by a certain
customer;
- Once per user - select if a coupon is to be used only once by a certain user;
- Automatically generated coupon codes - you can adjust the system in the way it
will automatically generate a coupon code and send it to a customer. To do this you
need to:
1) create cart promotion A, set the condition Automatically generated coupon codes
for it and define any bonuses you like.
2) create cart promotion B with any conditions; set for it the bonus Give coupon,
where you select promotion A.
So if a customer gets promotion B, then a coupon code is automatically generated
for promotion A and sent to the customer. Later on the customer will be able to use
promotion A by applying this coupon.
- Points on user account - specify the number of points on a user account.
Bonuses for cart promotions can be the following:
- Order discount – give a discount on the order;
- Discount on products – give a discount on the chosen products;
- Discount on all products in categories – give a discount on all products of the
chosen categories;
- Give user group – grant a user group to the customer;
- Give coupon – grant a coupon to the customer;
- Free shipping – grant a free shipping;
- Free products – give free products;
- Gift certificate - give a gift certificate;
- Give points - add points on a user account.
If you change anything click on
to save the changes to the database.
If you do not want to save the changes click on
Last Revised: Jan 5.10
.
Page
139 of 409
Copyright © 2004-2010 CS-Cart.com
5.3.7 Configurator
Configurator is a module that allows you to create and sell compound products or
systems that can consist of many interchangeable or optional components (like
computer systems, home cinemas, etc). It is also intended for creating sets of products
(for example, suits, accessories sets, etc). The customer can define by himself/herself
what components the "complex" product should consist of. The feature ensures that
the product will be in working condition when assembled: it enables you to define
specifications and requirements for each component, to avoid incompatibility between
the components within one configurable product (for example, AMD motherboard is
compatible with Athlon processors but incompatible with Intel Pentium).
The Configurator link is displayed among the Catalog administration sections only
if the Product configurator is enabled in Administration->Addons.
The page contains three tabs:
- Steps;
- Product groups;
- Compatibility classes.
Product configurator/Steps
The ‘Steps’ tab is intended for defining stages necessary to configure the product.
The stages are represented as tabs in the front-end.
Last Revised: Jan 5.10
Page
140 of 409
Copyright © 2004-2010 CS-Cart.com
The ‘Steps’ tab is represented as a table with the following columns:
- Select column - here you can select the necessary step;
- Position - ordinal number of the step;
- Name - name of the step;
- Status - status of the step (Active or Disabled).
For example, if you want to buy a computer the following sections: ‘Required
products’ and ‘Periphery components’ can be specified.
If you make any changes (for example, change the name of the step or position)
click on
.
To delete a step from the list:
- click on the delete link of the step.
To delete several steps at a time:
- tick off the check boxes opposite the entries you want to delete;
- click on Delete selected.
To add a new step use the
button.
The ‘Product groups’ tab consists of the following columns:
- Select column - select the necessary product group;
- Name - name of the group;
- Step - the step to which the group is assigned;
- Display type - select whether the group will be displayed as a check box, select
box, radio group;
- Status - status of the product group (Active - available in the storefront, Disabled
- unavailable in the storefront).
Last Revised: Jan 5.10
Page
141 of 409
Copyright © 2004-2010 CS-Cart.com
Product groups
If you make any changes (for example, change the name of a group or disable/
enable a group) click on
.
To delete a group from the list:
- tick off the check box opposite the entry you want to delete;
- click on Delete selected.
To add a new group use the
button.
Groups are components constituting the product. For a computer it can be
monitors, motherboards, memories, printers, etc. Each group can be related to a
certain step. For instance, printer is an optional product and is related to the
‘Periphery components’ step, while motherboard is one of the most important
computer components, so it is related to the ‘Required products’ step.
If you click on the
Last Revised: Jan 5.10
link, you are redirected to the ‘Editing group’ page.
Page
142 of 409
Copyright © 2004-2010 CS-Cart.com
Editing group
Last Revised: Jan 5.10
Page
143 of 409
Copyright © 2004-2010 CS-Cart.com
The page contains two tabs:
- General;
- Products.
In the ‘General’ tab you see the fields:
- Name - name of the group;
- Images - thumbnail image and popup larger image of the group;
- Full description - description of the group;
- Step - step to which the group is related;
- Display type - select whether the group will be represented as a check box, select
box, radio group;
- Status - status of the group (Active or Disabled).
If you make any changes click on
to save them in the database.
The other section ‘Products’ is represented as a list of products assigned to the
group.
Editing group
The ‘Compatibility classes’ tab is represented as a table consisting of the
following columns:
- Select column - select the necessary class;
- Name - name of the class;
- Group - the group to which the class is assigned;
- Status - status of the class (Active or Disabled).
Last Revised: Jan 5.10
Page
144 of 409
Copyright © 2004-2010 CS-Cart.com
Compatibility classes
If you make any changes (for example, change the name of a class or disable/
enable a class) click on
.
To delete a class from the list:
- tick off the check box opposite the entry you want to delete;
- click on Delete selected.
In the ‘Compatibility classes’ tab you define the compatibility of product
components.
Click on the
link and you are redirected to the ‘Editing class’ page with two
tabs General and Products.
Last Revised: Jan 5.10
Page
145 of 409
Copyright © 2004-2010 CS-Cart.com
Editing class
In the General tab given the following information:
- Name - name of the class;
- Group - to which group this class belongs;
- Compatible classes - select other classes the products of which are compatible
with the products of this class (For example, the products of class ‘Intel Processors’ are
compatible with the products of class ‘Intel Motherboard’.);
- Status - status of the class (Active or Disabled).
In the tab ‘Products’ you select the products of this class.
The ‘Configurator’ feature can be removed from the top menu. You can do this
in Administration->Addons.
To add a new configurable product click on the add configurable product link
under the page title and you are redirected to the ‘New product’ page where after
filling in the necessary fields you create a new product.
Also you are allowed to see all configurable products clicking on the show all
configurable products link in the right hand menu. After that you are redirected to the
‘Products’ page where only configurable products are displayed.
Last Revised: Jan 5.10
Page
146 of 409
Copyright © 2004-2010 CS-Cart.com
5.3.8 Reward points
If you want to reward your clients for purchasing in your store you can do this using
the 'Reward points' section. If customers buy products they get some bonus points
on a special account. Saving up some number of points on the account, the customers
will have an opportunity to buy something and pay for it by points. If the product price
(in points) is too high and they do not have enough points on your account you will be
able to apply any number of points and the price will be reduced, a new product price
will be calculated automatically.
Moreover, you can set different reward programs for different customers because
there are three ways of setting reward points. Reward points can be assigned to a
particular user group, a category and a product itself. If the customer is assigned to
the user group for which reward points were defined, he can get points by buying
products in the store. If reward points are defined for a category, customers can earn
points by purchasing any product of this category. And of course if the customer buys a
product for which reward points are defined, all these points are credited to the
customer account.
Note: It is necessary that payment by points should be allowed for a product so
that customers can apply their points. Administrator allows such a payment on product
detail page in the Reward points tab.
Reward points
On the ‘Reward points’ page you can assign reward points to user groups and set
their amount:
- User group – name of the user group of the store and options Guest and
Registered for those who are not signed for any user group;
Last Revised: Jan 5.10
Page
147 of 409
Copyright © 2004-2010 CS-Cart.com
- Amount – number of reward points you set for the user group;
- Amount type – Absolute (points) or Percent (%) type of charging system. For
example, if you set the 'Amount' option for all user groups to 50 and 'Amount type' to
Absolute (points), the customer will get 50 points. But if the 'Amount type' is Percent
(%), the points are calculated in the following way: the product price is divided into
100, and the result is multiplied by the number set in the Amount field.
If you make some changes click on
Last Revised: Jan 5.10
to save them to the database.
Page
148 of 409
Copyright © 2004-2010 CS-Cart.com
5.4 Users
The CS-Cart shopping cart software allows you to manage all user profiles with the
administration sections of the ‘Users’ tab.
‘Users’
There are four user types:
- Customers can access only the storefront. This permits them to buy products and
make reviews.
- Administrators can access both the storefront and the administration panel.
Through the administration panel they can manage and configure the store.
- Affiliates can log in to the storefront under their accounts and keep track of
information concerning commission charges.
- Suppliers provide the store with goods.
5.4.1 Users
This menu item allows you to view all user accounts.
List of all user accounts
Last Revised: Jan 5.10
Page
149 of 409
Copyright © 2004-2010 CS-Cart.com
This section can help you to search for accounts by the following parameters:
- Name;
- Company;
- E-mail;
To make the search results more accurate use Advanced search options.
- Login;
- User group;
- Tax exempt;
- Address;
- State/province;
- City;
- Country;
- Zip/postal code;
- Ordered products.
Moreover, the system allows to create different search patterns and save them for
future use. Just set the search options, type the name of the pattern in the Save this
search as: input field and click on the
button. Once the search pattern is saved,
it is displayed in the dropdown list box near the page title.
A list of all registered users is represented as a table consisting of the following
columns:
- Select column – selects the user;
- ID – the user’s ID number;
- Username – the name that the user must give when logging in;
- Name – full name of the user;
- Registered – date and time of registration;
- Type – type of a user account (administrator, customer, affiliate);
- Status – status of the user’s account (whether the account is active or disabled).
By clicking on
you will see four options: View all orders, Act on behalf of
Delete and Points. By following the first one you can view all orders placed by this
particular customer, while following the second one you are taken to the storefront and
already logged in under the customer’s name. By clicking on the Points link you are
taken to the Reward points log page of the customer.
To delete a user account:
- place a check mark in the Select column of the account you want to delete;
Last Revised: Jan 5.10
Page
150 of 409
Copyright © 2004-2010 CS-Cart.com
- click on Delete selected.
To edit a user profile, click on the link in the ‘Username’ or ‘Name’ columns of the
user account.
To add a new user account, click on the
page will open. There you can fill in the following fields:
button. The New profile
The ‘User account info’ section:
- Username *;
- Password *;
- Confirm password *;
- Status *;
- Account type *;
- Tax exempt;
- Language.
The ‘Contact information’ section:
- First name *;
- Last name *;
- E-mail *;
- Phone *.
The ‘Billing address’ section:
- First name *;
- Last name *;
- Address *;
- Address, line 2 ;
- City *;
- Country *;
- State/province *;
- Zip/postal code *.
If the shipping address is not the same as the billing address, place a tick mark in
the ‘Ship to different address’ check box and you will be able to specify a different
shipping address.
The fields marked with * are mandatory. You cannot add a new account without
entering the necessary information in these fields.
Last Revised: Jan 5.10
Page
151 of 409
Copyright © 2004-2010 CS-Cart.com
If you wish, you can configure the profile fields, as explained in the chapter
Users->Profile fields..
After entering the desired data, click on
to add a new user account.
The Addons tab can be shown on this page. It is displayed if the Age verification
addon is enabled in Administration->Addons.
If you make any changes click on
. To cancel the changes click on
.
After a user account is created, the User groups tab is displayed on the Editing
profile page. A list of user groups defined in the store is given in this tab. Here you can
set the status of each user group for this particular user.
The statuses are:
- Active - user is signed up for this user group;
- Pending - user made a request for this user group and is waiting for approval;
- Available - user group is available for the user and s/he can sign up for it in the
storefront;
- Declined - the user’s request for the user group was declined.
If you want to inform a user of any changes, leave the ‘Notify user’ check box
enabled.
The CS-Cart shopping cart software includes the possibility of creating multiple
profiles for the same user. For example, a user can have one profile for home delivery,
and another for office delivery.
You can enable or disable the option to allow multiple profiles, as explained in
the chapter Administration->Settings->General->Allow user to create
multiple profiles (shipping and billing addresses) for one account.
5.4.2 Administrators
This menu item allows you to display a list of all administrator accounts.
Last Revised: Jan 5.10
Page
152 of 409
Copyright © 2004-2010 CS-Cart.com
List of administrator accounts
The list of administrators is represented as follows:
- Select column – selects the user;
- ID – the administrator’s identification number;
- Username – the name that the administrator must enter when logging in;
- Name – full name of the administrator;
- Registered – date and time of registration;
- Type – type of user account (Administrator);
- Status – status of the account (Active or Disabled).
You can define the number of user accounts displayed per page, as explained in
the chapter Administration->Settings->Appearance>Elements per page.
To delete an administrator account:
- place a check mark in the Select column of the account you want to delete;
- click on Delete selected.
To edit an administrator profile, click on the link in the ‘Username’ or ‘Name’
columns of the administrator account.
To add a new administrator account, click on the
button.
5.4.3 Customers
This menu item allows you to display a list of customer accounts.
Last Revised: Jan 5.10
Page
153 of 409
Copyright © 2004-2010 CS-Cart.com
List of customer accounts
The list of registered customers is represented as a table consisting of the following
columns:
- Select column – selects the user;
- ID – the customer’s identification number;
- Username – name that the customer must enter when logging in;
- Name – full name of the customer;
- Registered – date and time of registration;
- Type – type of user account;
- Points - number of points on the customer’s account;
- Active – this field allows you to enable or disable the customer’s account.
You can define the number of user accounts displayed per page, as explained in
the chapter Administration->Settings->Appearance>Elements per page.
To delete a customer account:
- place a check mark in the Select column of the account you want to delete;
- click on Delete selected.
To edit a customer profile, click on the link in the ‘Username’ or ‘Name’ columns
of the customer account.
To add a new customer account, click on
information on the New profile page.
and fill in the necessary
By clicking on
you will see the following links: View all orders, Act on behalf
of, Delete and Points. By following the first one you can view all orders placed by this
particular customer, while following the second one you are taken to the storefront and
already logged in under the customer’s name. By clicking on the Delete link you will
delete this particular customer. And by clicking on the Points link you are taken to the
Last Revised: Jan 5.10
Page
154 of 409
Copyright © 2004-2010 CS-Cart.com
Reward points log page of the customer. On this page the administrator can deduct
or add points to a user’s account.
Reward points log
The information is given in a table with four columns:
- Select column;
- Date – date and time when the points were added/subtracted;
- Points – the number of points added/subtracted;
- Reason – the reason for addition/subtraction of points.
Here you see two buttons Cleanup log and Delete selected. If you want to delete
all logs at a time, click on the Cleanup log button, but if you want to delete only some
logs put a tick mark opposite the logs you want to delete and click on the Delete
selected button.
You can add or deduct points using the 'Add/subtract points' button. First you
should choose the action (addition or subtraction of points), then specify the number of
points and also if you wish you can write the reason for points addition or subtraction.
Moreover, if you do not want to inform a user of the change to the account remove a
tick mark from the 'Notify customer' check box.
Last Revised: Jan 5.10
Page
155 of 409
Copyright © 2004-2010 CS-Cart.com
Click on
to apply the changes.
5.4.4 Affiliates
On this page you can both manage (edit, delete, add) and control all affiliate
accounts of the store.
List of affiliate accounts
A list of registered affiliates is represented as a table consisting of the following
columns:
- Select column – select the necessary affiliate;
- ID – the affiliate’s identification number;
- Username – the name that the customer must enter when logging in;
- Name – full name of the customer;
- Registered – registration date;
- Type – type of a user account (Affiliate);
- Status – status of the account (Active or Disabled)
You can define the number of user accounts displayed per page, as explained in
the chapter Administration->Settings->Appearance>Elements per page.
To delete an affiliate account:
- place a check mark in the Select column of the account you want to delete;
- click on Delete selected.
Last Revised: Jan 5.10
Page
156 of 409
Copyright © 2004-2010 CS-Cart.com
To edit an affiliate profile, click on the link in either the ‘Username’ or ‘Name’
columns of the customer account.
To add a new affiliate account, click on
information on the New profile page.
and fill in the necessary
5.4.5 Suppliers
The Suppliers add-on allows the store owner to sell products which he does not
have in stock. The owner has several suppliers whose products are sold in the store.
When a customer buys supplier's products, the supplier receives the notification where
it is specified what products should be delivered and to what address. So not the store
owner but the supplier ships the products to the customer. The store owner just
arranges for the goods to be delivered directly to the customer. And correspondingly
the shipping cost is calculated on the basis of the supplier's address.
In order to set this add-on the administrator needs to:
- create a supplier account,
- specify products of this supplier (on product detail page select the supplier),
- specify shipping methods for the supplier (in the 'Shipping method properties'
section select the supplier).
The Suppliers link is displayed in the side box only if the Suppliers addon is
enabled in the Administration->Addons.
On the page you can manage (edit, delete, add) and control all supplier accounts of
the store.
A list of registered affiliates is represented as a table consisting of the following
columns:
- Select column;
- ID – the supplier’s identifiation number;
- E-mail - e-mail of the supplier;
- Username - the name that a supplier must enter when logging in;
- Name – full name of the supplier;
- Registered – date and time of registration;
- Type – type of a user account (Supplier);
- Status – status of the supplier’s account (Active or Disabled).
By following the View supplier products link you will see a page with all products
of the supplier.
Last Revised: Jan 5.10
Page
157 of 409
Copyright © 2004-2010 CS-Cart.com
Supplier
To delete a supplier account:
- place a check mark in the Select column of the account you want to delete;
- click on Delete selected.
To edit a supplier profile, click on the link in either the ‘E-mail’ or ‘Username’
columns of the account.
To add a new supplier account, click on
information on the New profile page.
and fill in the necessary
5.4.6 Profile fields
On this page you can edit all profile fields and add new ones. You have the ability to
make the fields mandatory or optional. The ‘Profile fields’ form is represented as a
table with the following columns:
- Select column;
- Position - ordinal number of the field;
- Description - field name;
- Type - field type;
The ‘Title’, ‘State/province’, ‘Country’ profile fields are represented as select boxes
in the storefront. And so in the ‘Type’ column of these fields there are links to the
pages where you can edit the variants for these check boxes.
- Profile (show/required);
- Checkout (show/required);
- Supplier (show/required);
- Affiliate (show/required).
Last Revised: Jan 5.10
Page
158 of 409
Copyright © 2004-2010 CS-Cart.com
Profile fields
Since many customers may have no interest in constant registration, the program
has a separate set of fields for the user registration profile and the customer profile
used in the checkout process. In each case, there are two options: ‘show’ and
‘required’: selecting ‘show’ will place the item on the form, and selecting ‘required’ will
cause the software to check whether the user has entered data in the field or not. (A
required field will be marked with ‘*’.)
Last Revised: Jan 5.10
Page
159 of 409
Copyright © 2004-2010 CS-Cart.com
To add a new profile field use the
button. You should enter the
number of the field in the ‘Position’ column, the field name in the ‘Description’ column.
Then select the type of display in the ‘Type’ option. You can select among the following
types: check box, date, input field, radio group, select box, text area. In the ‘Section’
field you choose whether this field will be represented in the ‘Contact information’
section of the profile or in the ‘Billing address’ and the ‘Shipping address’ sections.
In the ‘Profile’, ‘Checkout’, ‘Supplier’ and ‘Affiliate’ columns specify the field status in
the corresponding profiles, i.e. whether this field will be optional or mandatory.
When the fields are filled in click on
to add the new field to the profile.
5.4.7 User carts
If registered customers add products to cart but by some reason do not buy them,
their cart content is saved to the database and is displayed on the 'User cart' page in
the administration panel. When the customers come to the store again, the products
are automatically added to the cart.
This information helps administrator to see what products are popular among
customers or guess what products may be bestsellers in the near future.
The page contains two sections:
- the search section;
- a list of all user carts.
The following information is given in the second section:
- Customer – full name of the customer;
- Cart content – number of products added to the cart;
- Wish list content – products which were added to the wish list.
Last Revised: Jan 5.10
Page
160 of 409
Copyright © 2004-2010 CS-Cart.com
User carts
To display the cart content details or wish list details click on the plus sign next to
the customer's name. The name, quantity and price will be shown for each product in
the cart.
5.4.8 User groups
If you wish, you may define different groups of customers. This feature in the CSCart shopping cart software allows you to provide some of your customers with access
to special features:
- special categories;
- different wholesale prices;
- different shipping methods;
Last Revised: Jan 5.10
Page
161 of 409
Copyright © 2004-2010 CS-Cart.com
- different payment methods.
You can restrict access to these features using their ‘User groups’ fields, as
explained in the corresponding chapters.
User groups
The page contains a list of existing user groups.
The list of user groups is represented as a table consisting of the following columns:
- Select column – selects the user group;
- User group – name of the user group;
- Type - type of the user group (Administrator, Customer);
- Status – status of the user group (Active, Disabled, Hidden).
To delete a user group:
- click on the delete link of the user group.
To delete several user groups at a time:
- tick off the check boxes opposite the entries you want to delete;
- click on Delete selected.
Customers can sign up for user groups in the storefront. All customers’ requests for
user groups can be seen by clicking on the user group requests link.
Last Revised: Jan 5.10
Page
162 of 409
Copyright © 2004-2010 CS-Cart.com
User group request
On the page User group requests you can see the full name of the customer, who
made a request, and the user group the customer wants to sign for. Also here you can
change the status of the request.
To inform a customer of the changes, tick off the Notify customer check box.
To approve requests:
- tick off the check boxes opposite the requests you want to approve;
- click on the Approve selected button.
To decline requests:
- tick off the check boxes opposite the requests you want to decline;
- click on Decline selected.
If you define the type of the user group as ‘Administrator’, there appears the
privileges link. Click on it to display the ‘Privileges’ section.
You have the ability to open or close various parts of the administration area for
different user groups. For example, you can create a user group which has access only
to catalog or orders, etc.
Last Revised: Jan 5.10
Page
163 of 409
Copyright © 2004-2010 CS-Cart.com
----------------------------------------break----------------------------------------------
Privileges
In the ‘Privileges’ section you define the actions available for the administrator to
execute. Select the necessary items, tick off their check boxes and click on
.
To add a new user group, click on the ‘Add user group’ button, enter the
necessary information in the pop-up section and click on
. Now the new
user group is added.
When creating a user group you can also define recurring plans for it. For more
information on recurring plans, read the chapter Orders->Recurring plans.
Last Revised: Jan 5.10
Page
164 of 409
Copyright © 2004-2010 CS-Cart.com
5.4.9 Events
This feature is intended for providing additional opportunities for customers and
promoting your online sales.
Gift Registry addon allows to notify your friends of some special occasions (events)
in your life (for example, weddings, birthdays, holidays, etc.). You can attach the link
to the product(s) you want to receive as present(s) to the notification. And your friends
can easily find them. Customers as well as administrator can create such events in the
storefront. If the customers subscribe their friends to this or that occasion then the
event participants are notified of it by e-mail. The message sent to the event
participants contains links to the products that are wanted as gifts.
The Events link is displayed in the side box only if Gift Registry is enabled in
Administration->Addons.
To display the Events side box in the customer storefront it is necessary that a
block with the content Events is defined on the Blocks page (Design->Blocks).
Events
Last Revised: Jan 5.10
Page
165 of 409
Copyright © 2004-2010 CS-Cart.com
The ‘Events’ form contains:
- the search section;
- a list of the events.
You can search for the necessary event by the following parameters:
- Title - the descriptive name of the event;
- Owner - name of the event author;
- Subscriber - event participant to whom the notification of the event can be sent.
To make the search results more accurate click on Advanced search options and
you will be able to search by the following parameters:
- Status - whether the event has already occurred (Finished), it is in progress (In
progress) or it is being awaited (Awaiting).
- Type - shows whether the event is public (available to all customers) or private
(available only to the owner and users included in participant list of this event) or
whether the event is disabled (not accessible to customers);
- Period - period of validity (choose among the specified periods or set a date
range).
After any of the fields is filled in, click on
.
The list of existing events is represented as a table consisting of the following
columns:
- Select column;
- Title - the descriptive name of the event;
- Start date - the first day of the event;
- End date - the last day of the event;
- Status - the processing stage of the event;
- Type - shows whether the event is available to all customers (public) or it is a
restricted event and available only to the owner and participants (private) or whether
the event is not accessible to customers (disabled).
To delete an event:
- click on the delete link of the event.
To delete several events at a time:
- tick off the check boxes opposite the entries you want to delete;
- click on
Last Revised: Jan 5.10
.
Page
166 of 409
Copyright © 2004-2010 CS-Cart.com
Click on the link in the ‘Title’ column and you are redirected to the page with the
detailed information about the event.
The tab ‘General’ contains the following fields:
- Title - the descriptive name of the event;
- Your name - name of the event author;
- E-mail - e-mail of the event author;
- Start date - the first day of the event;
- End date - the last day of the event;
- Type - select whether the event is public, private or disabled (it is not shown in
the front-end).
- Invitees - invitee’s name and e-mail;
- Guestbook - if the option is enabled then you can create posts about the event in
the ‘Guestbook’ tab.
Last Revised: Jan 5.10
Page
167 of 409
Copyright © 2004-2010 CS-Cart.com
Events
Three more tabs are displayed on the page: Products, Notifications, Guestbook.
The Guestbook tab is displayed only if the option Guestbook in the General tab
is set to Enabled.
Last Revised: Jan 5.10
Page
168 of 409
Copyright © 2004-2010 CS-Cart.com
In the ‘Products’ tab the products specified for the event are displayed.
Products
In order to add new products to the list click on the
link. In the pop-up
section choose necessary products, specify their quantity and click on Add products
button.
In the ‘Notifications’ tab a list of all invitees of the event is displayed. If you tick
off the check boxes of invitees and click on
they
receive the event notification with two links (View event details, Unsubscribe). If
the first one is clicked the invitees are referred to the customer storefront to the page
with event details. If the subscribers click on the ‘Unsubscribe’ link they are
redirected to the storefront with the note that they have been successfully
unsubscribed.
In the ‘Guestbook’ tab you can create posts about the events. In the post you can
describe the event , evaluate it, etc.
Last Revised: Jan 5.10
Page
169 of 409
Copyright © 2004-2010 CS-Cart.com
Guestbook
To add a new event click on the
click on the
button. After filling in the fields
button to add the event.
If the existing fields of the form don’t satisfy all your requirements you can add
specific fields. You can do it by using the custom event fields link at the top.
Additional fields are presented on the page in the following way:
- Select column;
- Position - ordinal number of the field;
- Description - name of the field;
- Type - select whether the new field will be represented as a select box, date, radio
group, check box, input field, text area;
- Required - tick off the check box if you want this field to be mandatory to fill in;
- Status - status of the field (Active or Disabled).
Last Revised: Jan 5.10
Page
170 of 409
Copyright © 2004-2010 CS-Cart.com
Field Editor
To add a new field use the
Last Revised: Jan 5.10
button.
Page
171 of 409
Copyright © 2004-2010 CS-Cart.com
5.5 Shippings/taxes
You can manage shipping methods and taxes using the ‘Shippings/taxes’ box.
Locations are needed for defining shipping destinations and tax rates. You can
select the destinations (countries, and the states contained within them) which appear
in the appropriate fields in the storefront. If you wish, you can also edit the program
predefined information on individual countries and states.
Destinations and the corresponding country and state information are managed
using the ‘Shipping/taxes’ box as well.
‘Shipping/Taxes’
5.5.1 Shipping methods
The CS-Cart shopping cart software allows you to define custom shipping methods
on the ‘Shipping methods’ option.
Shipping methods
Last Revised: Jan 5.10
Page
172 of 409
Copyright © 2004-2010 CS-Cart.com
This page contains a list of defined shipping methods. This list is represented as a
table consisting of the following columns:
- Select column;
- Position - position of the shipping method in the list (ordinal number);
- Name – name of the shipping method;
- Delivery time – delivery time (text field);
- Weight limit (lbs) - maximum weight possible for this shipping method;
- User groups - user groups which can use this shipping method;
- Status – status of the shipping method (Active or Disabled).
To delete a shipping method:
- click on the delete link of the step.
To delete several shipping methods at a time:
- tick off the check boxes opposite the entries you want to delete;
- click on Delete selected.
To add a new shipping method, use the ‘Add shipping method’ button.
To edit shipping method parameters, use the
link in its row to display the
‘Editing shipping method’ page. The page contains two tabs: General and Shipping
charges.
In the ‘General’ tab is given the following parameters:
- Name - name of the shipping method;
- Icon - icon of the shipping method (download an image from a local computer or a
server, or enter a direct link to the image). Also you can specify an alternative text for
the image;
Icons downloaded for shipping methods are displayed in a special block. To
display the icons in the storefront, remember to create a block where Block content
set to Shipping methods. To learn more about blocks refer to Design->Blocks.
Last Revised: Jan 5.10
Page
173 of 409
Copyright © 2004-2010 CS-Cart.com
Shipping method properties
Last Revised: Jan 5.10
Page
174 of 409
Copyright © 2004-2010 CS-Cart.com
- Delivery time – delivery time (text field);
- Weight limit (lbs);
- Rate calculation - manual or realtime;
- Shipping service - a list of realtime shipping services available in the store. The
options displayed in this drop-down select box depend on the shipping processors
enabled in the tab Main on the page Administration->Settings->Shipping settings (the
list is active only when realtime rate calculation is selected);
- Taxes - tax that is applied to this shipping method;
- Suppliers - select suppliers that will use this shipping method (the field is
displayed only if the Supplier addon is enabled and at least one supplier is defined
Users->Suppliers);
- User groups - select user groups for which this shipping method will be available;
- Localization - select for which localization this shipping method will be available
(the field is displayed only if at least one localization is defined Shipping/taxes>Localizations);
- Status - status of the shipping method (Active or Disabled).
There are 2 ways to calculate the shipping cost:
1. The shipping cost is based on the manually defined destination.
- select the ‘Manual’ option for ‘Rate calculation’ property;
- click on
.
- in the ‘Shipping charges’ tab select the destination you wish to set the rate and
enter the desired data.
2. The shipping cost is calculated by realtime shipping calculator.
- select the ‘Realtime’ option for the ‘Rate calculation’ property;
- select the shipping service you wish (the active services (which are enabled in
Administration->Settings->Shipping settings section) are colored).
- click on
.
- select additional fees to the calculated cost in the ‘Shipping charges’ tab.
- click on
.
The CS-Cart shopping cart software includes an option for automatic calculation of
shipping costs based on the following factors:
- product cost;
- product weight;
- product quantity.
Last Revised: Jan 5.10
Page
175 of 409
Copyright © 2004-2010 CS-Cart.com
Shipping rates
You can configure these parameters using the ‘Shipping charges’ dialog box,
which contains the following sections:
- Cost dependences;
- Weight dependences;
- Item dependences.
Last Revised: Jan 5.10
Page
176 of 409
Copyright © 2004-2010 CS-Cart.com
The dialog box also contains the ‘Show rates for location’ section. Here you select a
location for which you will specify shipping charges.
You can define locations by following the instructions in the chapter
Shipping/Taxes->Locations.
The ‘Cost dependences’ section is used if you wish the shipping cost to depend on
a product cost.
A list of existing dependences is represented as a table consisting of the following
columns:
- Select column – select the dependence;
- Product cost - the minimum product cost to which the shipping cost defined in the
‘Rate value’ column is applied;
- Rate value – the shipping cost;
- Type – the rate value type, either absolute or percent.
(For example, a rate of $5 would be represented by entering 5 for the rate value
and absolute for the type; a rate of 5% of the product cost would be represented by
entering 5 for the rate value but percent for the type.)
The ‘Weight dependences’ section is used if you wish the shipping cost to depend
on the product weight.
A list of existing dependences is represented as a table consisting of the following
columns:
- Select column – select the dependence;
- Products weight - the minimum product weight to which the shipping cost defined
in the ‘Rate value’ column is applied;
- Rate value – the shipping cost;
- Type – the rate value type, either absolute or percent;
(For example, a rate of $5 would be represented by entering 5 for the rate value
and absolute for the type; a rate of 5% of the product cost would be represented by
entering 5 for the rate value but percent for the type.)
- Per lbs – if ticked off the value defined in ‘Rate value’ will be added per each lbs.
The ‘Item dependences’ section is used if you wish the shipping cost to depend on
the quantity ordered. It includes the following elements:
- a list of defined dependences;
- Add new rate value(s).
The list of existing dependences is represented as a table consisting of the following
columns:
- Select column – select the dependence;
- Product quantity - the minimum quantity to which the shipping cost defined in the
‘Rate value’ column is applied;
Last Revised: Jan 5.10
Page
177 of 409
Copyright © 2004-2010 CS-Cart.com
- Rate value – the shipping cost;
- Type – the rate value type, either absolute or percent;
(For example, a rate of $5 would be represented by entering 5 for the rate value
and absolute for the type; a rate of 5% of the product cost would be represented by
entering 5 for the rate value but percent for the type.)
- Per item – if ticked off the value defined in ‘Rate value’ will be added per each
additional item.
To add a new dependence, use the ‘Add cost dependences’, ‘Add weight
dependences’ or ‘Add item dependences’ buttons.
After entering all of the desired information, click on
to add the new
dependence(s).
To delete a dependence:
- click on the delete link of the dependence.
To delete several entries at a time:
- tick off the check boxes opposite the entries you want to delete;
- click on Delete selected.
5.5.2 Taxes
The CS-Cart shopping cart software allows taxes to be calculated automatically.
This can be configured using the ‘Manage taxes’ form presenting the following
parameters:
Manage taxes
- Select column – select the tax;
- Tax name;
- Reg. number – registration number for this tax in your store;
Last Revised: Jan 5.10
Page
178 of 409
Copyright © 2004-2010 CS-Cart.com
- Priority – order in which taxes should be imposed (if more than one tax is applied)
- Rates depend on – this field specifies whether the tax rate depends on the
shipping or billing address (for orders in which these are different);
- Price includes tax – place a check mark in this column if the product price listed in
the catalog includes this tax already;
- Status – status of the tax (Active or Disabled).
To apply taxes to all products:
- place check marks in the Select boxes of all the taxes that you want to apply;
- click on Choose action and select Apply selected taxes to all products.
Also the taxes can be applied to each product individually on the ‘Add new
product’ page (if you are adding a product) or on the ‘Update products’ page of
already existing product.
To unset taxes from all products:
- place check marks in the Select boxes of the taxes;
- click on Choose action and select Unset selected taxes from all products.
To add a new tax, use the
and tax rates click on
button. After defining general parameters
.
To delete a tax:
- click on the delete link of the tax.
To edit a tax, use the
link in its row to display the following pair of tabs:
- General;
- Tax rates.
Last Revised: Jan 5.10
Page
179 of 409
Copyright © 2004-2010 CS-Cart.com
Tax properties
To edit a tax rate use the ‘Tax rates’ tab:
- choose a location in the ‘Location’ column.
If you wish, you can define additional locations as explained in the chapter
Shipping/Taxes->Locations.
- choose the tax value type in the ‘Type’ column: ‘Absolute’ of ‘Percent’ (from
product cost);
- enter the tax value in the ‘Rate value’ column;
- click on
.
To cancel the changes click on the cancel link.
Last Revised: Jan 5.10
Page
180 of 409
Copyright © 2004-2010 CS-Cart.com
Tax rates
5.5.3 States
The form produced by clicking on the ‘States’ link contains the following sections:
- the ‘Select country’ field;
- a list of states.
The list of states is represented as a table consisting of the following columns:
- Select column – select the state;
- Code – code assigned to the state;
- State/Province – name of the state/province;
- Status – status of the state (Active - available (e.g. in the registration form in the
storefront), Disabled - is not available in the storefront).
Last Revised: Jan 5.10
Page
181 of 409
Copyright © 2004-2010 CS-Cart.com
Manage state
To edit state parameters:
- enter the desired information in the appropriate fields;
- click on
.
To add a new state, use the ‘Add state’ button. After entering all of the desired
information in the pop-up form, click on
to add the new state.
To delete a state from the list:
- click on the delete link of the state.
Last Revised: Jan 5.10
Page
182 of 409
Copyright © 2004-2010 CS-Cart.com
To delete several states at a time:
- tick off the check boxes opposite the entries you want to delete;
- click on Delete selected.
5.5.4 Countries
The form produced by clicking on the ‘Manage countries’ link contains the
following columns:
- Code - 2-digit code assigned to the country;
- Code A3 - 3-digit official code representing the name of the country in accordance
with ISO;
- Code N3 - numeric code of the country;
- Country - name of the country;
- Region - part of the world where the country is situated;
- Status - status of the country (Active - available (e.g. in the registration form in
the storefront), Disabled - unavailable in the storefront).
Last Revised: Jan 5.10
Page
183 of 409
Copyright © 2004-2010 CS-Cart.com
Manage countries
You can specify the number of countries displayed per page, as explained in the
chapter Administration->Settings->Appearance (Elements per page).
5.5.5 Locations
The dialog box produced by clicking on the ‘Locations’ link contains a list of defined
locations.
The list of defined locations is represented as a table consisting of the following
columns:
- Select column – select the location;
- Name - name of the location;
Last Revised: Jan 5.10
Page
184 of 409
Copyright © 2004-2010 CS-Cart.com
- Status – status of the location (Active - the location is enabled and products can
be shipped to this location, Disabled - if the location is disabled, products cannot be
shipped to this location).
Locations
To edit location parameters (name, status):
- define the desired parameters;
- click on
.
To add a new location, use the ‘Add location’ section. When all parameters of
the new location are defined, click on
to add the new location.
To delete a location:
- click on the delete link of the location.
To delete several locations at a time:
- tick off the check boxes opposite the entries you want to delete;
- click on Delete selected.
To edit location parameters, click on the
link.
This will open the location parameters form, which contains the following sections:
- General;
- Countries;
Last Revised: Jan 5.10
Page
185 of 409
Copyright © 2004-2010 CS-Cart.com
- States;
- Zip/Postal code;
- City;
- Addresses.
You can specify the countries that you wish to list as possible locations by using the
‘Countries’ section, which consists of two fields:
- the right-hand field is a list of all defined countries;
If you wish, you can edit a country’s information, as explained in the chapter
Shipping/taxes->Countries.
- the left-hand field is a list of the countries that you have selected as locations.
To choose a country as a location:
- choose the country in the right-hand field;.
To select multiple specifications, press and hold the Ctrl or Shift key.
- click on
.
The selected country will be transferred from the right-hand field to the left-hand
field.
To delete a country from the location list:
- choose a country or countries that you want to delete in the left-hand field;
- click on
.
The selected countries will be transferred from the left-hand field to the right-hand
field.
Last Revised: Jan 5.10
Page
186 of 409
Copyright © 2004-2010 CS-Cart.com
Countries
You can specify the states that you wish to list as possible locations by using the
‘States’ section, which consists of two fields.
- the right-hand field is a list of all defined states;
If you wish, you can edit a state information, as explained in the chapter
Shipping/taxes->States.
- the left-hand field is a list of the states that you have selected as locations.
To choose a state as a location:
- choose a state or states in the right-hand field;
To select multiple states, press and hold the Ctrl or Shift key.
- click on
.
The selected states will be transferred from the right-hand field to the left-hand
field.
To delete a state from the location list:
- choose a state or states that you want to delete in the left-hand field;
- click on
.
The selected states will be transferred from the left-hand field to the right-hand
field.
Last Revised: Jan 5.10
Page
187 of 409
Copyright © 2004-2010 CS-Cart.com
States
You can also add locations by zip code using the ‘Zip/Postal code’ section. You are
allowed to use wildcards in this field: ? = any single character, * = any number of
characters.
For example:
- ’98?78’ corresponds to ‘98178’, ‘98278’, ‘98378’, ‘98478’, ‘98578’, ‘98678’,
‘98778’, ‘98878’, ‘98978’, ‘98078’;
- ‘12*’ corresponds to ‘12345’ ‘12876’ ‘12098’ etc.
If you need to input several separate zip code entries, you must enter them in
separate rows.
For example, to enter ‘12345’, ‘65327’ and ‘94432’ you should do the following:
- enter ‘12345’;
- press ‘Enter’;
- enter ‘65327’;
- press ‘Enter’;
- enter ‘94432’;
- press ‘Enter’.
Last Revised: Jan 5.10
Page
188 of 409
Copyright © 2004-2010 CS-Cart.com
Zip/Postal codes
You can add a city as a location by using the ‘City’ section. It is permitted to use
wildcards in this field: ? = any single character, * = any number of characters.
For example:
- ’New Y*’ corresponds to: ‘New York’, ‘New Yark’ etc;
- ‘L?s*’ corresponds to ‘Las Vegas’, ‘Los Angeles’ etc.
If you need to put several separate cities, you must enter them in separate rows.
For example, for entering ‘Boston’, ‘Chicago’, ‘Atlanta’ you should do the
following:
- enter ‘Boston’;
- press ‘Enter’;
- enter ‘Chicago’;
- press ‘Enter’;
- enter ‘Atlanta’;
- enter ‘Enter’.
Cities
You can add location addresses by using the ‘Addresses’ section. It is permitted to
use wildcards in this field: ? = any single character, * = any number of characters.
Last Revised: Jan 5.10
Page
189 of 409
Copyright © 2004-2010 CS-Cart.com
For example:
- ’* street’ corresponds to: ‘1st street’, ‘102nd street’ etc;
If you need to put several values you must enter them in separate rows.
For example, to enter ‘Oak street’, ‘Poplar street’ and ‘Elm street’ you should do
the following:
- enter ‘Oak street’;
- press ‘Enter’;
- enter ‘Poplar street’;
- press ‘Enter’;
- enter ‘Elm street’;
- press ‘Enter’.
Addresses
After entering all of the desired location information, click on
.
5.5.6 Localizations
Localization is a means of adapting the software to regional differences. Using the
feature you can adapt the store for a specific region with its currency, language and
measures of weight.
You create a certain localization (e.g. Europe); define a specific measure of weight
(e.g. kg) if necessary; then select countries that will constitute the localization, select
currency (e.g. Euro) and language for this localization. Click on the Save button and
the localization will be created. Also on the corresponding pages you can define what
categories, products, store locations, shipping methods, credit cards and locations will
be defined for this localization.
When a customer registers or signs in, the system identifies whether the country
specified in his/her profile fits any localization. If yes, the parameters will be displayed
according to the settings of the localization.
Last Revised: Jan 5.10
Page
190 of 409
Copyright © 2004-2010 CS-Cart.com
Do remember to define products and categories for the localization, otherwise no
products will be displayed for customers of this localization in the storefront.
On the page is given a list of all defined localizations. Names of the locations and
their statuses are shown on the page.
Localizations
To delete a localization from the list:
- click on the delete link of the entry you want to delete.
To add a localization use the
button.
To edit a localization click on the
link and you will see the Editing
localization page with two tabs General and Items.
In the tab General you can edit the following parameters:
- Name - name of the localization;
- Default - tick off to use the default weight settings for this localization;
- Use custom weight settings - tick off to use custom weight settings;
- Weight symbol - enter a weight symbol for this localization;
- Grams in the unit of weight defined by the weight symbol - enter the number of
grams in the weight unit defined above.
Last Revised: Jan 5.10
Page
191 of 409
Copyright © 2004-2010 CS-Cart.com
If you make any changes click on the
database. To cancel the changes click on the
button to save them in the
link.
Editing localization
In the tab Items you select what countries constitute the localization, what
currencies and languages will be used for this localization.
Here you see three sections (Countries, Currencies, Languages), each with two
fields (left-hand field and right-hand field). All available items are shown in the righthand fields, while selected items are shown in the left-hand fields. So to select items to
a localization, you need to transfer them from the right-hand field to the left-hand
field.
To choose a country (currency, language) for a localization:
- choose a country (currency, language) in the right-hand field;
- click on
.
The selected countries (currencies, languages) will be transferred from the right-hand
field to the left-hand field.
To delete a country (currency, language) from a localization:
Last Revised: Jan 5.10
Page
192 of 409
Copyright © 2004-2010 CS-Cart.com
- choose a country (currency, language) that you want to delete in the left-hand
field;
- click on
.
The selected countries (currencies, languages) will be transferred from the lefthand field to the right-hand field.
Also, using the signs
Last Revised: Jan 5.10
you can change the order of the selected items.
Page
193 of 409
Copyright © 2004-2010 CS-Cart.com
5.6 Administration
The ‘Administration’ section contains a number of options for managing your
store.
Administration
5.6.1 Settings
‘Settings’ consists of a number of sections, which are all displayed on the right of
the page:
Settings
Last Revised: Jan 5.10
Page
194 of 409
Copyright © 2004-2010 CS-Cart.com
5.6.1.1 Appearance
This option allows you to adjust the appearance of the storefront and the admin
panel:
- Administrator settings – the admin panel parameters;
You can change the following parameters:
- Administrator area default language - the language in which all variables are
displayed.
- Orders per page - the number of orders which are displayed per page as described
in the ‘Order’ chapter;
- Products per page - the number of products which are displayed per page as
described in the ‘Catalog’ chapter;
- CMS pages per page - the number of content pages which are displayed per page
as described in the ‘CMS’ chapter;
- Elements per page - the number of items which are displayed per page as
described in the remaining chapters;
Administration area settings
- Customer settings – storefront parameters.
This section includes the following parameters:
- Customer area default language - language in which all variables are displayed in
the storefront;
- Orders per page - number of orders displayed per page;
- Products per page - number of products displayed per page;
- Thumbnail width on product list page(leave empty to use original size);
- Elements per page - number of items displayed per page;
- Number of columns in the product list - specify how the products will be displayed
on the products list pages (in 1 column, 2 columns, etc.). This option is applicable to
the Grid product list layout;
Last Revised: Jan 5.10
Page
195 of 409
Copyright © 2004-2010 CS-Cart.com
- Notice displaying time (to turn off the autohide function enter 0) - specify how
long (in seconds) a notification is displayed after a customer adds a product to cart, to
wishlist, to compare list;
- Product list default sorting - specify how the products on the products list pages
will be arranged (Default, Name - by name in alphabetical order, Price - in ascending
order of price (lowest to highest), Popularity - by popularity rating (highest to lowest),
Bestselling - by the number of sold items (highest to lowest);
- Estimate taxes using default address on cart/checkout pages - if this check box is
enabled and a customer hasn’t entered any information about himself, the taxes will be
counted on the basis of the default address and displayed on the cart and checkout
pages;
- Display prices with taxes on category/product pages - tick it off so that product
subtotal and total (displayed on the category and product pages) will include the taxes;
- Display prices with taxes on cart/checkout pages - tick it off so that product
subtotal and total (displayed on the cart and checkout pages) will include the taxes;
- Display In stock as a field - if disabled, just the notification In stock is displayed
in the storefront. If the option is enabled, customers will see how many items are in
stock.
- Display product tabs as a list - if enabled, product tabs are displayed as a list (one
by one) on the product details page in the storefront;
- Default templates for products list - list of available templates for products list
display in the storefront. By default there are three templates, but you can easily add
your own one. To do it, you need to place your template in the directory skins/basic/
customer/views/categories/custom_templates and make it available by ticking off in
this section;
- Product list default layout - the layout that will be used by default for all categories
except the categories that have their own layouts defined;
- Use the selected layout for current category or search page only - if the option is
enabled and you enter a category and change the layout from default to another type,
the selected layout will be used only for this category. But if the option is disabled, the
selected layout type will be applied to all subsequent categories.
Last Revised: Jan 5.10
Page
196 of 409
Copyright © 2004-2010 CS-Cart.com
Customer storefront settings
‘Common settings’ – set up the settings concerning date and time formats in the
store.
This section contains the following parameters:
- Date format;
- Time format;
Last Revised: Jan 5.10
Page
197 of 409
Copyright © 2004-2010 CS-Cart.com
- Time zone;
- Calendar date format;
- Calendar week starts from.
Common settings
After entering all desired information, click on
.
5.6.1.2 Company
This option allows you to add information about your company that will be used in
e-mails. You can enter the following parameters:
- Company name;
- Company address;
- Company city;
- Company country;
- Company state;
- Company zip code;
- Company phone;
- Company phone 2;
- Company fax;
- Company website;
- Year when the store started its operation;
- User department e-mail address;
- Site administrator e-mail address;
- Order department e-mail address;
- Help/Support department e-mail address;
- Reply-To newsletter e-mail address.
Last Revised: Jan 5.10
Page
198 of 409
Copyright © 2004-2010 CS-Cart.com
Company
When all the desired information is entered, click on
Last Revised: Jan 5.10
.
Page
199 of 409
Copyright © 2004-2010 CS-Cart.com
5.6.1.3 Dynamic HTML
Javascript has the capability to dynamically alter a Web page by generating new
HTML elements to be displayed. It allows to update a part of the page without its full
reloading which increases usability.
You can enable Javascript pagination in the customer and administration areas. As
for customer area
and
buttons can be Javascript-based
(when such a button is clicked, the content of "Cart" (~"Compare products"~) side box
will be updated accordingly and the corresponding message will be displayed for the
customer without the whole page reloading).
Dynamic HTML pages
If any changes are made then click on
.
5.6.1.4 E-mails
You can configure the following e-mail parameters using this option:
- Method of sending e-mails;
The CS-Cart shopping cart software includes three choices of sending e-mails: ‘via
php mail function’, ‘via SMTP server’, ‘via sendmail program’.
Last Revised: Jan 5.10
Page
200 of 409
Copyright © 2004-2010 CS-Cart.com
If you are using an SMTP server, you will need to enter the appropriate values for
the following parameters into the ‘SMTP server settings’ section:
- SMTP host;
- SMTP username;
- SMTP password;
- Use SMTP authentication - tick off the check box to enable SMTP authentication.
If you are using a sendmail program, you will need to enter the appropriate path
into the ‘Sendmail settings’ section:
- Path to sendmail program.
By default this path is ‘/usr/sbin/sendmail’. Otherwise, contact your sever
administrator.
E-mails
Last Revised: Jan 5.10
Page
201 of 409
Copyright © 2004-2010 CS-Cart.com
5.6.1.5 General
This option lets you specify a variety of general store characteristics. Using this
section you can manage the following settings:
Using this section you can manage the following settings:
- Enable secure connection at checkout (SSL certificate is required to be installed on
your server) - if this option is enabled, CS-Cart works through HTTPS at checkout in
the front-end of your CS-Cart. Please make sure SSL certificate is installed on your
server before enabling this setting.
- Enable secure connection in the administration panel (SSL certificate is required to
be installed on your server) - if this option is enabled, CS-Cart works through HTTPS in
administrator area of your CS-Cart. Please make sure SSL certificate is installed on
your server before enabling this setting.
- Enable secure connection for authentication, profile and orders pages (SSL
certificate is required to be installed on your server) - if this option is enabled, CS-Cart
works through HTTPS on login and register/update profile pages in the front-end of
your CS-Cart. Please make sure SSL certificate is installed on your server before
enabling this setting.
- Template debugging console - this enables the Smarty debug console, which may
help you in customizing your store design (a javascript console window pops up and
gives you the names of all included templates and assigned variables for the current
page). Note that Smarty debug console is displayed for you in the storefront only when
you are logged in under the administrator account.
Last Revised: Jan 5.10
Page
202 of 409
Copyright © 2004-2010 CS-Cart.com
Smarty Debug Console
- Alternative currency display format - select 'Show prices in selected currency only'
if you want product prices to be displayed for your customers only in the selected
currency in the front-end. If 'Show prices in default and selected currencies' is selected
and a customer selects alternative currency in Currencies select box in the front-end,
product prices will be displayed both in base currency and in the selected currency(in
parentheses).
- Weight symbol - enter the symbol of the preferred unit of weight (e.g. lb, kg,
etc.).
- Grams in the unit of weight defined by the weight symbol - the number of grams
in the selected unit of weight.
- Access key to temporarily closed store - this field can be used if you wish to close
the store temporarily. For example, if you enter the word 'givemetheway' in this field
and click on Close store at the bottom of any page in the admin panel, your store will
Last Revised: Jan 5.10
Page
203 of 409
Copyright © 2004-2010 CS-Cart.com
be closed, but you can still access it by entering the following link: 'http://
www.your_company.com/index.php?store_access_key=givemetheway'. To open the
store again, simply click on the Open store link (it is not necessary to remove the
word from the "Access key to temporarily closed store" field).
Please note that when the store is temporarily closed most real-time payment
systems (e.g. PayPal) do not work.
- Initial order ID value - enter order ID (integer number) that will be given to the
next order placed in your store. The number cannot be less than maximum order ID
existing in the store;
- Allow to create shipments - tick off to allow the administrator to ship the order in
different batches.
General
‘Default location’ contains the following items:
- Default address- customer’s address by default. This address will be used in case
of an unregistered customer.
Last Revised: Jan 5.10
Page
204 of 409
Copyright © 2004-2010 CS-Cart.com
- Default zipcode - customer's zip code by default. This zip code will be used in case
of an unregistered customer.
- Default city - customer's city by default. This city will be used in case of an
unregistered customer.
- Default country - customer's country by default. The ‘Country’ select box on
Register account page and on Customer information one at checkout will be predefined
to the value of this field.
- Default state - customer's state by default. The ‘States’ select box on Register
account page and on Customer information one at checkout will be predefined to the
value of this field.
- Default phone - customer's phone by default. This phone will be used in the case
of an unregistered customer.
Default location
‘Catalog’ contains the following elements:
- Enable inventory tracking - if this option is enabled, the system will automatically
update the quantity of product in the inventory when an order is placed;
- Allow negative amount in inventory - this option allows you to continue selling a
product even if the amount in inventory is zero;
- Download key TTL(for electronically distributed products), hours - you can define
the period of time allowed for a customer to perform the actual download of purchased
downloadable product.
- Low stock notification threshold - if the number of products in inventory is less
than this threshold, store administrator will get a notification about it by e-mail.
- Show products from subcategories of the selected category - if the check box is
ticked off, products from subcategories will be displayed on the page of the main
category.
- Display modifiers for product options - when the check box is enabled then if a
product variant has a modifier, it is displayed in the storefront.
Last Revised: Jan 5.10
Page
205 of 409
Copyright © 2004-2010 CS-Cart.com
- Exception style - define the behavior of product option exceptions (Hide exception
- exceptions will not be displayed in the storefront, Show warning on exception - if the
exception is chosen, a notification is displayed).
- Show out of stock products - when ticked off then even products that are not in
stock are displayed in the storefront. When the check box is disabled out of stock
products data are stored in the database but they are not displayed in the storefront.
Catalog
In the ‘Promotions’ section you can edit the following parameters:
- Allow customers to use single discount coupon only - if this option is enabled
customers can use only one discount coupon;
- If discount coupon is used, don’t apply other discounts - if the option is enabled
then when customers use a coupon other discounts applied to the product are nullified.
Promotions
Last Revised: Jan 5.10
Page
206 of 409
Copyright © 2004-2010 CS-Cart.com
The ‘Users/cart’ section consists of the following elements:
- Allow users to create multiple profiles ( shipping and billing addresses) for one
account - a user can have multiple profiles. For example, he could have a profile for
personal orders, another for office use and another for ordering for friends and family.
- Allow customers to store credit card data in profile - tick off to allow customers to
add their credit card data (card number, cardholder’s name, expiration date) on the
profile page.
- Minimum order amount - the minimum amount of money that is needed for
placing an order;
- Allow shopping for unlogged customers - customers can add products to the cart
without need of being logged in.
- Disable anonymous checkout - if the check box is ticked off, customers can place
orders without need of being registered in the store before the purchase.
- Redirect customer to the cart contents page if non-AJAX addition to a cart is used
- if this option is enabled and AJAX addition to cart is disabled, the customer will
automatically be taken to the cart contents page after adding the product to cart.
- Allow customer to sign up for user group - if this check box is enabled, customers
can sign up for user groups in the storefront.
- Administrator must activate new user accounts - if the check box is ticked off,
newly created customer accounts are inactive until the store administrator activates
them manually.
- User e-mail is used as login - tick off the check box in order to use e-mail instead
of username for logging in (both for the storefront and administration panel).
- Ask customers to agree with terms & conditions during checkout - if the check box
is ticked off, customers will be asked to accept terms and conditions at the checkout;
- Allow customers to pay order again if transaction was declined - when it is ticked
off, customers can attempt to make the transaction once again if the previous one
failed.
- One page checkout - tick off to display all checkout steps on one page in the
storefront.
- If all the customer data is filled in, then show the following step at one-page
checkout - select which step (Payment method or Shipping method) will be displayed
after all the customer data is filled in.
- Estimate shipping cost on cart page - if this check box is enabled, the form for
estimating shipping cost is displayed on the cart page in the customer storefront.
Last Revised: Jan 5.10
Page
207 of 409
Copyright © 2004-2010 CS-Cart.com
Users/cart
Proxy server for outgoing connections
Here you define the settings for outgoing connections.
- Proxy host - name of your proxy host (e.g. www.proxyname.com);
- Proxy port - enter your proxy port (e.g. 8080);
- Proxy user - proxy username;
- Proxy password.
Last Revised: Jan 5.10
Page
208 of 409
Copyright © 2004-2010 CS-Cart.com
Proxy settings
Search options
- Search also in - tick off the corresponding options to make a search in Pages, Site
news.
Search options
To save the changes in the database click on
5.6.1.6 Google base
CS-Cart has the ability to export your product catalog in Google format and upload
it to its server automatically. CS-Cart can upload the exported catalog to Google server
only if PHP is configured with '--enable-ftp' key on your server. In order to check
whether this option is enabled on your server, open the ‘PHP information’ page or
contact your hosting provider.
Last Revised: Jan 5.10
Page
209 of 409
Copyright © 2004-2010 CS-Cart.com
Google base
The ‘Google base’ section consists of the following fields:
- Google host - uploads.google.com by default;
- Google login - your Google account login;
- Google password - your Google account password;
If you edit the value of some fields, click on
to save the changes.
5.6.1.7 Image verification
Image verification is added to prevent spam from automated systems. Use it in
order to make sure the one who completes the form on your site is human. For this
feature the following parameters can be specified:
- Image width – the width of the verification image;
- Image height – the height of the verification image;
- String length – the number of characters in the image;
- Number of grid lines – specify the number of lines in grid;
- Grid color (hexadecimal code) – define the color of the grid in the image,
- Minimal font size – specify the minimum font size used in the image;
- Maximal font size – specify the maximum font size used in the image;
- String type – choose whether the string will contain only digits, only letters or
both: digits and letters;
- Character shadows – tick off to display character shadows;
Last Revised: Jan 5.10
Page
210 of 409
Copyright © 2004-2010 CS-Cart.com
- Color – tick off to display color characters in the image;
- Path to background image (relative to CS-Cart root directory) – type here the path
to the background image;
- Do not use verification if user is logged in – tick off to disable the verification for
logged in users;
- Do not use verification after first valid answer – tick off to disable the verification
after the first valid answer.
In the 'Use for' section select the forms which the image verification will be applied
to. You can select among the following forms: Login form, Register form, Custom
forms, Send to friend form, Comments and reviews forms, Checkout (user information)
form.
To apply the verification:
- tick the necessary forms;
- click on
Last Revised: Jan 5.10
.
Page
211 of 409
Copyright © 2004-2010 CS-Cart.com
Image verification
Last Revised: Jan 5.10
Page
212 of 409
Copyright © 2004-2010 CS-Cart.com
5.6.1.8 Logging
This feature allows you to enable or disable various types of logging in order to save
information about some changes, errors or events if necessary.
The log data can grow large so it is advisable to delete the log information
periodically. The log files are stored in the 'var/log' directory of your CS-Cart
installation.
Log files can be created in relation to categories, database, news, orders, products,
requests and users.
- Requests – HTTPS requests can be logged;
- Users – logs can be created when a new user is created or the existing one is
updated or deleted, also user's sessions and failed logins can be logged;
- Products – logs can be created when a new product is added or the existing one is
updated or deleted, also logs can be created when the number of products is low;
- Orders – logs can be created when a new order is created or the existing one is
updated, changed or deleted;
- Database – logs can be created when the database is optimized, backed up or
restored, also database errors can be logged;
- News – logs can be created when news is created, deleted or updated;
- Categories – logs can be created when a new category is created or the existing
one is updated or deleted.
To enable the desired logging, just tick off the corresponding option and click on the
Save button.
Last Revised: Jan 5.10
Page
213 of 409
Copyright © 2004-2010 CS-Cart.com
Logging
If you place or remove a check mark, click on
to save the changes.
5.6.1.9 Reports
The ‘Reports’ page allows to choose the format of time intervals displayed in report
charts. You can edit format of ‘Day’, ‘Week’, ‘Month’, ‘Year’.
Last Revised: Jan 5.10
Page
214 of 409
Copyright © 2004-2010 CS-Cart.com
Reports
If you change the value of some fields, click on
to save the changes in the
database.
5.6.1.10 Shipping settings
This option allows you to configure real-time shipping methods (with their
associated shipping charges).
‘Main’ – this tab allows you to enable any of the following real-time shipping
processors:
- Enable Intershipper(overrides other shipping processors);
- Enable FedEx;
- Enable UPS;
- Enable USPS;
- Enable DHL;
- Enable Australia Post;
- Enable Canada Post;
- Enable Swiss Post.
Last Revised: Jan 5.10
Page
215 of 409
Copyright © 2004-2010 CS-Cart.com
Also you can disable shipping in your store by ticking off the ‘Disable shipping’
option.
Main
Last Revised: Jan 5.10
Page
216 of 409
Copyright © 2004-2010 CS-Cart.com
Australia Post parameters tab
The ‘Australia Post’ parameters tab contains the following fields:
- Package width (cm);
- Package height (cm);
- Package length (cm).
The ‘Canada Post’ tab contains the following parameters:
- Merchant ID;
- Package length;
- Package width;
- Package height.
Last Revised: Jan 5.10
Page
217 of 409
Copyright © 2004-2010 CS-Cart.com
Canada post
The ‘DHL’ parameters tab contains the following fields:
Last Revised: Jan 5.10
Page
218 of 409
Copyright © 2004-2010 CS-Cart.com
DHL parameters tab
- System ID;
- Password;
Last Revised: Jan 5.10
Page
219 of 409
Copyright © 2004-2010 CS-Cart.com
- Account number;
- Shipping key;
- Shipping key (international);
- Test mode;
- Package length;
- Package width;
- Package height;
- Shipment type;
- Additional protection;
- Ship hazardous materials;
- Use COD (cash on delivery) payment;
- COD payment method;
- COD surcharge.
‘FedEx’ – The FedEx parameters tab contains the following fields;
- ‘Account number’;
- ‘Meter number’;
- ‘Test mode’;
- ‘Package type’;
- ‘Drop Off Type’;
- ‘Height (inches)’;
- ‘Width (inches)’;
- ‘Length (inches)’.
Last Revised: Jan 5.10
Page
220 of 409
Copyright © 2004-2010 CS-Cart.com
FedEx parameters tab
The ‘Retrieve meter number’ section is used for obtaining the meter number.
Last Revised: Jan 5.10
Page
221 of 409
Copyright © 2004-2010 CS-Cart.com
Retrieve meter number
‘Intershipper’ –the Intershipper parameters tab contains the following fields;
- ‘Password’;
- ‘Username’;
- ‘Type of delivery’;
- ‘Shipping method’;
- ‘Length’;
- ‘Width’;
- ‘Height’;
- ‘Dimensional unit’;
- ‘Nature of Shipment Contents’;
- ‘Package type’;
- ‘Package CODValue in cents’;
- ‘Package InsuredValue in cents’.
Last Revised: Jan 5.10
Page
222 of 409
Copyright © 2004-2010 CS-Cart.com
Intershipper parameters tab
‘Swiss Post’ –the Swiss parameters tab contains the following fields;
International settings
- Additional insurance for URGENT goods (up to CHF 3000);
- Registered mail;
- Acknowledgement of delivery (for registered mail only);
- Personal delivery (for registered mail only);
- Cash on delivery (for registered mail only);
- Additional insurance (up to CHF 3000);
Last Revised: Jan 5.10
Page
223 of 409
Copyright © 2004-2010 CS-Cart.com
- Bulky goods;
- Cash on delivery (ECONOMY only);
- Manual processing;
Private customer settings
- Manual handling;
- Fragile;
- Signature;
- Assurance;
- Personal;
- Cash on delivery (COD).
Last Revised: Jan 5.10
Page
224 of 409
Copyright © 2004-2010 CS-Cart.com
Swiss Post parameters tab
‘UPS’ – The UPS parameters tab contains the following fields;
- UPS Rates Access Key;
Last Revised: Jan 5.10
Page
225 of 409
Copyright © 2004-2010 CS-Cart.com
- Username;
- Password;
- Test mode;
- Pickup type;
- Package type;
- Width;
- Height;
- Length.
UPS parameters tab
‘USPS’ – USPS parameters tab contains the following fields;
The ‘General info’ section:
- User ID;
- Test mode;
The ‘International U.S.P.S.’ section:
Last Revised: Jan 5.10
Page
226 of 409
Copyright © 2004-2010 CS-Cart.com
- Type of Mail;
The ‘Domestic U.S.P.S.’ section:
- Package Size(length+girth, inches);
- Machinable;
- Container(Priority Mail);
- Container(Express);
- Priority Mail (Size:Large) Width;
- Priority Mail (Size:Large) Length;
- Priority Mail (Size:Large) Height.
Specify the last three settings for Priority Mail only if Package Size is set to Large.
Last Revised: Jan 5.10
Page
227 of 409
Copyright © 2004-2010 CS-Cart.com
USPS parameters tab
Last Revised: Jan 5.10
Page
228 of 409
Copyright © 2004-2010 CS-Cart.com
5.6.1.11 Sitemap
The ‘Sitemap’ option includes the following parameters for configuring the
appearance of the storefront sitemap:
- Show the ‘Categories’ section - tick off to display categories in the site map (all
categories will be shown with their subcategories);
- Show only root level categories links in the ‘Categories’ section - tick off to display
only root level categories;
- Show the ‘Site info’ section - tick off to display the Information section, namely
links to all information pages (pages, links, forms, polls) of the store.
Sitemap
After making the desired changes, click on
.
5.6.1.12 Thumbnails
The ‘Thumbnails’ option allows you to create thumbnails from detailed images
automatically and to configure them in the storefront. This option contains the
following elements:
- Create thumbnails from detailed images automatically;
- Resize original thumbnail;
- Product thumbnail width;
- Product thumbnail height;
- Category thumbnail width;
- Category thumbnail height;
- Thumbnail background color;
- Thumbnail format;
- JPEG format quality(0-100).
Last Revised: Jan 5.10
Page
229 of 409
Copyright © 2004-2010 CS-Cart.com
Thumbnails
If you edit the value of some fields click on
to save the changes in the
database.
5.6.1.13 Upgrade center
Here you adjust the settings of the Upgrade center of CS-Cart. Read more about
Upgrade center in the chapter Administration->Upgrade center.
Last Revised: Jan 5.10
Page
230 of 409
Copyright © 2004-2010 CS-Cart.com
Upgrade center settings
- License number - number of your CS-Cart license;
- Updates server - the server where updates are downloaded (by default it is http:/
/helpdesk.cs-cart.com);
FTP server options
- Hostname - hostname of your FTP server;
- Username - your username;
- Password - your password;
- Directory - directory on the FTP server where CS-Cart is located.
FTP server options are required to be adjusted only if you do not have
permissions to update files.
Last Revised: Jan 5.10
Page
231 of 409
Copyright © 2004-2010 CS-Cart.com
5.6.2 Addons
Addon is a self-contained component of the program, which can easily be connected
or disconnected from it without affecting other options. A list of all CS-Cart add-ons is
given on the page:
- Access restrictions;
- Affiliate;
- Age verification;
- Anti Fraud;
- Attachments;
- Banners management;
- Bestsellers;
- Buy together;
- Comments and reviews;
- Customers also bought;
- Data feeds - allows administrators to create any number of product data formats
for export;
- Form builder;
- Gift certificates;
- Gift Registry;
- Google Analytics;
- Google Sitemap - generates the XML site map, which makes website indexing
easier for Google (and other search engines). A site map allows search robots to define
the location of website pages, the time of their last update and its frequency in order to
index the website more effectively;
- Hot deals block - allows to add a block (Design->Blocks) with the settings Name:
ANY, Block content: Products, Filling: ANY, Position: Central, Appearance type: Hot
deals, Wrapper: NONE. Using the block customers will be able to scroll the products
displayed in this block, switch to different pages and filter products by categories;
- My changes - the addon is intended to apply changes to the store. All the changes
must be located in the ...\addons\my_changes directory. The fact that your changes
will be applied as a separate addon considerably simplifies the upgrade process. Such
changes are to be performed through hooks. To read more about hooks and CS-Cart
functionality, refer to docs.cs-cart.com;
- News & e-mails;
- Order barcode;
- Polls;
- Price list;
- Product configurator;
- Quickbooks;
- Required products;
- Reward points;
- RMA;
Last Revised: Jan 5.10
Page
232 of 409
Copyright © 2004-2010 CS-Cart.com
- Send the page link to a friend;
- SEO (requires Apache + mod_rewrite installed);
- SMS notifications;
- Statistics;
- Store locator;
- Suppliers;
- Tags;
- Webmail;
- Wish List.
You can enable or disable any of the addons by changing its status. Also every
addon can be uninstalled by following the Uninstall link.
When you uninstall the addon, all the addon data is deleted from the database.
Last Revised: Jan 5.10
Page
233 of 409
Copyright © 2004-2010 CS-Cart.com
--------------------------------------------------------------------------------------
Addons
Some of the listed addons have additional settings that need adjusting. Click on the
corresponding
link and you will be able to set parameters in the pop-up section.
With the help of ‘Addons’ you can also manage some settings.
Last Revised: Jan 5.10
Page
234 of 409
Copyright © 2004-2010 CS-Cart.com
Access restrictions
In the ‘Access restrictions’ tab you can set some parameters of the 'Access
restrictions' addon for the administration area and the customer area.
- Login to the admin area from specified IPs only – if it is ticked off, only IP
addresses listed in the 'Admin area' tab on the 'Access restrictions' page will have
access to the administration area (Note: when the option is enabled, your IP
address is added to the list automatically and, on the contrary, the IP address
is removed from the list when the option is disabled);
Last Revised: Jan 5.10
Page
235 of 409
Copyright © 2004-2010 CS-Cart.com
- Block IP after a number of unsuccessful attempts – if this option is enabled the
administrator's IP address will be blocked after a number of unsuccessful login
attempts (Note: the number of possible attempts should be specified below
and the attempts have to be made within the period set in the 'Time between
unsuccessful login attempts (seconds)' field);
- Number of unsuccessful attempts – the number of failed attempts after which the
user's IP address will be blocked;
- Time between unsuccessful login attempts (seconds) – specify the period within
which attempts have to be made;
- Time for which the IP should be blocked (hours) – specify the period for which the
IP address will be blocked.
When the administrator's IP is blocked, it is added to the list of banned IP addresses
in the 'Admin area' tab on the 'Access restrictions' page. The status of the
restriction will be Active. If the status will be changed to Disabled, the IP address will
be banned only for the period specified in the add-on settings, but if you tick it off the
time limitations will not be taken into account.
Using the settings for customer area you can block access to it in the same way.
If you change anything click on
to save the changes to the database.
To cancel the changes click on the cancel link.
The following settings can be adjusted for the Affiliate addon:
- Show affiliate code at front-end - tick off if you want affiliate code to be shown at
the front-end. Thus customers can tell affiliate code if they, for example, make orders
by phone;
- Payment period - you decide whether affiliate commissions are paid out weekly,
biweekly or monthly;
- Number of last periods - here you specify the number of last payments displayed
on the ‘Affiliate’ page;
- Automatic approval of affiliate commissions - if the option is enabled then
administrator does not need to approve commissions, they get status ‘Approved’
automatically.
The ‘Text banner’ section contains the following fields:
- Outline color - define the color of the banner outline;
- Title text color - define the color of the banner title;
- Text color - define the color of the banner text;
- Text background color - define the color of the banner background.
Last Revised: Jan 5.10
Page
236 of 409
Copyright © 2004-2010 CS-Cart.com
A 6-digit (hexadecimal) number used in HTML and other computing applications
to represent colors should be entered in each field.
Affiliate
In the ‘Discount Coupons’ section you can edit the following parameters:
Last Revised: Jan 5.10
Page
237 of 409
Copyright © 2004-2010 CS-Cart.com
- Affiliate ID is used as coupon prefix - tick off to add affiliate ID at the beginning of
the coupon code;
- Delimiter between prefix and coupon-code - enter the character that will be a
delimiter between prefix and coupon code.
The Anti Fraud addon makes it possible to protect the store from false orders. The
module is supported by Maxmind Anti-fraud service. Through its comprehensive fraud
screening system, merchants can accurately detect and automatically flag attempted
fraud from card-not-present transactions. You need to have a valid Maxmind account in
order to use this addon in CS-Cart. To obtain a license key, you would need to
purchase credits. If you already have an account, the license key may be obtained
from the my license key web page.
Anti Fraud
Here are some parameters that you need to set.
- Maxmind license key - your license key obtained from MaxMind;
- Safe distance(km) - allowed distance from customer’s IP address to his/her billing
address in kilometers (large distance = higher risk, it affects risk factor);
- Max order total - if order amount exceeds the defined max value it affects risk
factor;
Last Revised: Jan 5.10
Page
238 of 409
Copyright © 2004-2010 CS-Cart.com
Maximum risk factor(1...10) - set the number from 1 to 10 (2.5 is recommended).
If the risk factor exceeds this number then the order is hold for review and it will have
Open status even if the transaction is processed by payment gateway or system. Store
administrator will need to decide whether the order is fraudulent or not and then set
the order status to Failed or process it manually.
If you make the changes click on
to save them in the database.
Using the ‘Comments and reviews’ options you can manage discussions of
Products, Categories, Orders, News, Gift registry, Topics, Pages, Testimonials.
Last Revised: Jan 5.10
Page
239 of 409
Copyright © 2004-2010 CS-Cart.com
---------------------------------------break-----------------------------------------
Comments and reviews
Each theme of the discussion (Products, Categories, Orders, News, Gift registry,
Topics, Pages, Testimonials) has its own set of parameters that can be changed. These
parameters are:
- Posts per pages - the number of posts displayed on one page;
- Administrator must approve posts submitted by - you select whether the
administrator must approve posts submitted by any customer, only anonymous
customers or no approval is needed at all.
- Only one post from one IP is allowed - you enable this option if you want that only
one post can be sent from one IP.
- Send notifications to this E-mail - here you enter an e-mail address to which the
notification of a post will be sent;
- Allow customer to initiate discussion - if it is enabled, customers can start
discussion.
There is also a specific setting: Number of entries in the ‘Testimonial’ box.
To save the changes in the database click on
.
The Data feeds addon allows administrators to create any number of product data
formats for export (using various data field sets). This allows to work with shopping
directories (like Google Product Search, Shopzilla, Shopping.com, etc.) and adjust the
field configuration (in case of a format change) accordingly through the easy to use
interface.
Last Revised: Jan 5.10
Page
240 of 409
Copyright © 2004-2010 CS-Cart.com
However, the main idea here is allowing to either upload a resulting export file to
FTP server, save it on a web server or simply download it (like in a regular export).
Moreover, it is possible to create CRON tasks for individual feeds in order to generate
and upload them via FTP on a regular basis (for example, daily or weekly).
In order to set data feeds you need to enter your cron password.
Data feeds
To save the changes in the database click on
on
. To cancel the changes click
.
Last Revised: Jan 5.10
Page
241 of 409
Copyright © 2004-2010 CS-Cart.com
Gift Certificate
You can define the following parameters of the Gift Certificates addon:
- Minimal amount – here you define the minimal gift certificate amount possible in
the store;
- Maximal amount – define the maximal certificate amount possible in the store;
- Amount step – step of the specified interval. If Amount step is set to 50, Minimal
amount is set to $100 and Maximal amount to $1000, the defined amounts will be
displayed in the following way: $100, $150, $200, $250, ...., $950, $1000.
Note: It will be much more convenient if the above settings are specified.
- GC Code prefix – here you define the prefix of your store certificates, this is just
for the convenience of the administrator and for sake of illustration;
- Gift certificates per page – the number of gift certificates displayed per page;
- Allow to use free products – if this check box is disabled free products cannot be
attached to a certificate;
- Allow to redeem shipping cost with gift certificate - if the check box is enabled
customers can use gift certificates to pay the shipping.
Last Revised: Jan 5.10
Page
242 of 409
Copyright © 2004-2010 CS-Cart.com
Using the ‘Gift Registry’ section you can modify some parameters of the event. For
example, you can allow only registered customers to create events and define the
number of items in the ‘Events’ side box in the front-end.
Gift Registry
Click on
to save the changes to the database if you made any.
Google Analytics is an advanced analytics tool which can automatically record your
transactions.
- Tracking code – enter the Google Analytics tracking code (NOTE: the Google
analytics tracking code is the value of the _uacct variable in the Google Tracking
Code.)
- Track e-commerce transactions – tick off to enable tracking of transactions.
Last Revised: Jan 5.10
Page
243 of 409
Copyright © 2004-2010 CS-Cart.com
Google Analytics
If you change anything click on
to save the changes to the database.
To learn more about Google Analytics visit http://www.google.com/analytics
Google Sitemap module generates the XML site map, which makes website indexing
easier for Google (and other search engines). A site map allows search robots to define
the location of website pages, the time of their last update and its frequency in order to
index the website more effectively. This is especially important for big stores with a
large number of pages.
- Include in sitemap - tick off to include in sitemap;
- Update frequency - set how often data will be updated;
- Priority - set the priority of the data.
These options can be set up for the following entries: Homepage settings, Products
settings, Categories settings, Pages settings, News settings, Extended feature pages
settings.
Last Revised: Jan 5.10
Page
244 of 409
Copyright © 2004-2010 CS-Cart.com
Google Sitemap
The following settings can be adjusted for the ‘News & emails’ addon:
Last Revised: Jan 5.10
Page
245 of 409
Copyright © 2004-2010 CS-Cart.com
News & emails
Click on
to save the changes to the database.
You are provided with ability to add a barcode to your invoices. A barcode is a
machine-readable representation of information in a visual format. Barcodes stored
data in the widths and spacings of printed parallel lines. Barcodes on the invoices will
contain information about the orders.
Using the ‘Order Barcode’ tab you can edit parameters of your barcode and
consequently change its view. The tab contains three sections:
Last Revised: Jan 5.10
Page
246 of 409
Copyright © 2004-2010 CS-Cart.com
- Image - barcode view;
- Configs - here you can define barcode parameters and choose its type;
- Specification - additional information about barcode types.
In the ‘Configs’ section you can define the parameters in the following fields:
- Type - choose barcode type;
- Output - choose barcode output;
- Text - enable or disable the text under barcode;
- Height,px - define barcode height;
- Width,px - define barcode width;
- Resolution - choose resolution;
- Text Font - choose text font;
- Barcode prefix - an affix that precedes the barcode number.
If you make any changes click on
Last Revised: Jan 5.10
.
Page
247 of 409
Copyright © 2004-2010 CS-Cart.com
Order barcode
Last Revised: Jan 5.10
Page
248 of 409
Copyright © 2004-2010 CS-Cart.com
The Polls addon is designed to carry out surveys and polls. Here you define two
parameters for this addon.
- Votes on page – the number of votes on a page;
- Answers on page – the number of answers on a page.
Polls
The Price list add-on allows to generate the product catalog in PDF and XLS (Excel)
formats.
In the section Table layout you can select what fields the price list will contain.
Using the horizontal arrows you can move items from the Available fields section to the
Selected fields one and vice versa. And to move the fields inside the Selected fields
section use the vertical arrows.
Also you can select the parameter by which products in the price list will be sorted
in the Sort by drop down field.
- Group by category - if enabled, products in the price list will be grouped by
category.
- Include product options - if enabled, the price list will contain product options.
To generate the price list in XLS and PDF formats use the links given in the XLS
layout and PDF layout sections respectively.
Last Revised: Jan 5.10
Page
249 of 409
Copyright © 2004-2010 CS-Cart.com
Price list options
It is not necessary for you to understand double-entry book-keeping or standard
accounting procedures in order to run your business. QuickBooks software will help
you if you have no formal accounting training. QuickBooks is used to track expenses,
prepare and send invoices, prepare financial statements, track inventory and many
other tasks. Here are some parameters of a file exported to Quickbooks that you can
set up.
Last Revised: Jan 5.10
Page
250 of 409
Copyright © 2004-2010 CS-Cart.com
Quickbooks
Recurring billing
- Initial status for new recurring orders - choose the order status that will be given
to an order (recurring order) after it is placed;
- Number of attempts after order failed - number of attempts to process the order
after it got the Failed status;
Last Revised: Jan 5.10
Page
251 of 409
Copyright © 2004-2010 CS-Cart.com
- Next attempt if order failed - number of days after which the next attempt to
process the order may be made.
Recurring billing - General
In the Orders tab you can specify E-mail subject and E-mail header for default
order statuses. The values entered here override standard values (defined in Orders>Order statuses) for subscription-based products.
In the Notification tab you can set the notifications of manual paying, of future
paying and of subscription changing.
- Notification duration (days) - period during which the notification will be sent to
subscribers each day.
For example, 3 days is set for Notification of manual paying. So if the automatic
payment failed, the notification of the necessity to pay manually will be sent three days
in a row.
If 3 days is set for Notification of future paying, the notifications will be sent
starting three days prior to the date of payment.
- E-mail subject - subject of the e-mail notification;
- E-mail header - header of the e-mail notification;
Last Revised: Jan 5.10
Page
252 of 409
Copyright © 2004-2010 CS-Cart.com
In the tab ‘Reward points’ you can set the following parameters of the Reward
points addon:
Last Revised: Jan 5.10
Page
253 of 409
Copyright © 2004-2010 CS-Cart.com
Reward points
- Points Exchange Rate (PER – the number of points equal to 1 conventional unit) –
this exchange rate specifies how much one currency is worth in terms of points;
- 'Price in points' is calculated automatically on PER basis – if ticked off then price in
points directly depends on points exchange rate. For example, if the Point Exchange
Rate is 10 and product price is $50, the price in points will be 500 (50*10=500);
- 'Price in points' is recalculated taking into account discounts – tick off to enable;
- 'Points' is recalculated taking into account discounts - tick off to enable;
Last Revised: Jan 5.10
Page
254 of 409
Copyright © 2004-2010 CS-Cart.com
- If the product and the product category do not have defined reward points but the
higher level category has such reward points, extract data from it – for example, a
customer buys a product which is located in the Children's book subcategory and
reward points are defined neither for the product nor for the subcategory, but reward
points of the Book category (a higher level category) are set to 10 points, therefore
these 10 points will be added to the account;
- If several reward points can be applied, set – if such a situation occurs that
different numbers of points can be added you can choose either Minimal or Maximal;
- Log lines per page – the number of log lines on the 'Reward points log' page. If the
number of logs is larger than set in this field, they will be displayed on several pages.
If you make any changes click on
to save the changes to the database.
RMA
- Display product return period - if the check box is ticked off the product return
period will be displayed in the storefront;
- Do not take weekends into account when calculating product return period - if
ticked off then Saturdays and Sundays will not be included in the return period.
If you make any changes click on
Last Revised: Jan 5.10
to save the changes to the database.
Page
255 of 409
Copyright © 2004-2010 CS-Cart.com
SEO settings
SEO (requires Apache + mod_rewrite installed)
This module (Search Engine Optimization) is aimed at those who cares for
promotion of their sites in search engines such as Google. Such systems sense static
pages much more easily than dynamic that is why the module automatically turns
dynamic page URLs into static ones. The dynamic page URLs of the following objects
will be turn into static ones - product, category, CMS (site info).
SEO is also concerned with advancing the goals of a website by improving the
number and position of its search results for a wide variety of relevant keywords.
Enable the module in order to optimize the site.
- Product/page SEF URL format - choose the URL type of the product static pages;
- Category SEF URL format - choose the URL type of the static pages for categories;
- Use single URL for all languages - if enabled, URL of the base language will be
used for all the other languages (for backward compatibility with old systems);
- Show language in the URL - tick off if you want to display the language code in the
URL. The language code will follow host name and directory name;
Last Revised: Jan 5.10
Page
256 of 409
Copyright © 2004-2010 CS-Cart.com
- Act as HTML catalog - tick off to generate an HTML version of the catalog.
The SMS notifications addon gives you the capability to receive sms notifications
about the state of things in your store. The addon works based on mobile messaging
provider Clickatell. Its online SMS gateway platform will allow you to keep constant and
accurate track of what goes on in your store.
Here are the parameters needed to be set:
- Phone number – phone number at which all sms notifications will be sent;
Clickatell settings (the authentication details required when connecting to the
Clickatell gateway to send a message)
- Username – username registered for the Clickatell's account;
- API ID – unique API ID assigned during registration;
- Password – Clickatell's password;
Send SMS if
- New order has been placed – tick off and sms notifications will be sent if a new
order is placed;
- New customer has been registered – tick off and sms notifications will be sent if a
new customer is registered;
- Product quantity is less than zero – tick off and sms notifications will be sent if a
product is out of stock;
- Only send when order total amount more than – set the minimum amount of an
order that you will be notified of;
- Only send for this shipping methods – sms notifications are sent only when the
selected shipping methods are chosen for orders.
SMS content
- Add payment info – tick off and payment info will be included in the sms
notification;
- Add customers e-mail – tick off and customer's e-mail address will be included in
the sms notification.
Last Revised: Jan 5.10
Page
257 of 409
Copyright © 2004-2010 CS-Cart.com
SMS notifications
If you edit any parameter, click on the
database.
Last Revised: Jan 5.10
button to save the changes in the
Page
258 of 409
Copyright © 2004-2010 CS-Cart.com
Statistics
- Define unique clients by - Cookie or IP address.
If you set it to Cookie, then you get more precise data because each user is saved
in memory by some browser parameters. And when it is set to IP address, then several
users with one IP address can be saved in memory as one.
Click on
if you change the value of the setting.
Store locator
Last Revised: Jan 5.10
Page
259 of 409
Copyright © 2004-2010 CS-Cart.com
- Google key (http://code.google.com/apis/maps/signup.html) – Google Maps API
key. To get a Maps API key you must have a Google Account, and your API key will be
connected to your Google Account.
Suppliers
The Suppliers addon allows vendors to sell products which they do not have in
stock.
- Display product supplier company - if ticked off then the supplier of product will be
displayed in the storefront;
- Multiple shipping method selectboxes - if it is ticked off then the select box with all
possible shipping methods is displayed for every supplier.
If you change the settings click on
.
In the Tags tab you can enable/disable the ability to assign tags to products and
content pages.
- Tags for products – if enabled, there is the ability to assign tags to products;
- Tags for pages – if enabled, there is the ability to assign tags to pages.
Last Revised: Jan 5.10
Page
260 of 409
Copyright © 2004-2010 CS-Cart.com
Tags
If you make any changes, click on the
button.
5.6.3 Payment methods
The ‘Payment methods’ page allows you to customize completely the payment
system of your store, allows to modify or ban the existing methods and create your
own ones.
This page contains a list of payment methods. Names and statuses of the payment
methods are given in the list.
Last Revised: Jan 5.10
Page
261 of 409
Copyright © 2004-2010 CS-Cart.com
Payment methods
To delete a payment method:
- click on delete the entry you want to delete.
To add a new payment method use the
section fill in the necessary fields and click on Create.
To edit a payment method click on the
following parameters:
button. In the pop-up
link of the method and edit the
- Name - name of the payment method;
- Position - define position of the method in the list (ordinal number);
Last Revised: Jan 5.10
Page
262 of 409
Copyright © 2004-2010 CS-Cart.com
- Processor - here you choose whether the process of payment is online or offline.
When you select a payment processor in the select box, the 'Configure' tab appears.
Click on the tab to set up the payment method with your payment gateway/system
account.
- Template - template which displays supplementary fields (text input boxes) in the
storefront.
- User groups - user groups for which this payment method is available;
You can define user groups using the instructions in the chapter Users->User
groups.
- Description - enter additional information that will be displayed next to the
payment method in the storefront;
- Surcharge - define an additional fee for the payment method. The fee can be
specified as a percentage of the order total amount(%) or a flat rate($). If both rates
are defined then the percentage is applied first and only after that the absolute value is
added.
- Status - status of the payment method (Active - available in the storefront,
Disabled - unavailable in the storefront);
- Icon - icon of the payment method. You can download the icon from a local
computer, a server or type a direct link to the image. You can also define an alternative
text for the icon.
Icons downloaded for payment methods are displayed in a special block. To
display the icons in the storefront, remember to create a block where Block content
set to Payment methods. To learn more about blocks refer to Design->Blocks.
If you edit the value of some fields, click on
to save the changes.
5.6.4 Database
The CS-Cart shopping cart software includes a tool allowing you to make backup
copies of the database, or to restore the database from a backup copy. It is
recommended that you back up your database periodically using the ‘Database’
section, which contains the following tabs:
- ‘Backup’;
- ‘Restore’;
- ‘Maintenance’.
Last Revised: Jan 5.10
Page
263 of 409
Copyright © 2004-2010 CS-Cart.com
Backup
The ‘Backup’ tab includes the following elements:
- Select tables – list of the database tables you have chosen to back up.
To select multiple entries, press and hold the Ctrl or Shift key.
- Backup database schema – should be normally enabled, to specify that the
database backup file will include the table structure;
- Backup database data – should be normally enabled, to specify that the database
backup file will include the actual table data;
Last Revised: Jan 5.10
Page
264 of 409
Copyright © 2004-2010 CS-Cart.com
- Compress backup file – if this option is enabled, the database backup file will be
compressed in a .tar achieve to save space;
- Backup file name – the desired filename.
After entering all parameters, click on
to backup the database.
Your database backup file will be located in the 'database/backup' directory
within the CS-Cart directory. By default, it will be: ‘shop/database/backup/’.
Restore
The ‘Restore’ tab is used for managing the database backup files, and restoring the
database if necessary. It contains:
- the file upload section;
- a list of database backup files.
Last Revised: Jan 5.10
Page
265 of 409
Copyright © 2004-2010 CS-Cart.com
To upload the database backup file to the server:
- select a file or enter URL;
- click on
.
The file will be uploaded to the ‘your_shop/database/backup/’ directory on your
server (where your_shop is the name of the directory used for your shop).
The list of backup files is represented as a table consisting of the following columns:
- Select column;
- Type – the file type (.sql or .tgz);
- Filename – name of the backup file;
- Filesize – size of the backup file.
To restore the database from a backup file in the event of a problem:
- place a check mark in the Select box for the file you want to use;
- click on
.
To delete a backup file:
- tick off the file you want to delete;
- click on Delete selected.
To load file from server to your local computer:
- use the link in the ‘Filename’ field of the desired file.
The ‘Maintenance’ tab contains information about the size of the database
(‘Current database size’ field).
To optimize the database click on
.
You can use this procedure periodically to reclaim the unused space and to
defragment the file.
Last Revised: Jan 5.10
Page
266 of 409
Copyright © 2004-2010 CS-Cart.com
Maintenance
At the top you will see two links: Logs, PHP information. Using the PHP information
link you can view the PHP details. After clicking on the Logs link you will be taken to the
‘Logs’ page where you can keep record of some kinds of actions in your CS-Cart, such
as update of a user, creation of a new order, etc.
For more information see the chapter Administration->Logs.
The log files are stored in the file system. If you want to find some log files you can
do it using the ‘Logs’ page. For example, if a product was deleted from the database
by someone else (e.g. by another administrator) you can search for the registration of
this deletion using the ‘Logs’ feature. A log file of such type keeps information on
deletion date and on a doer of the action.
You can define what type of action will be logged by CS-Cart in the ‘Logging’
section of the ‘Settings’ page.
If there exists no log file of the fulfilled action, please check whether logging of
this type of action is enabled in the ‘Logging’ section of the ‘Settings’ page.
Last Revised: Jan 5.10
Page
267 of 409
Copyright © 2004-2010 CS-Cart.com
5.6.5 Credit cards
The ‘Credit cards’ feature allows you to specify the types of credit cards that you
accept.
On the page a list of all credit cards defined in your store is displayed. Names and
statuses (Active or Disabled) of credit cards are given in the list.
Credit cards
To delete a credit card type from the list:
- click on delete of the entry you want to delete.
To add a new credit card to the list use the
necessary fields in the pop-up section and click on
Last Revised: Jan 5.10
button, fill in the
.
Page
268 of 409
Copyright © 2004-2010 CS-Cart.com
To edit a credit card click on the
following parameters:
link of the necessary entry and edit the
- Card name – name of the credit card;
- Position – position of the credit card in the list (ordinal number);
- Card code - code assigned to the card;
- Icon - icon of the credit card. You can download the icon from a local computer, a
server or type a direct link to the image. You can also define an alternative text for the
icon;
- CVV2 - place a check mark in this field if you require customers to enter their
‘Card Verification Value’;
- Start date - place a check mark in this field if you require customers to enter their
credit card start date;
- Issue number - place a check mark in this field if you require customers to enter
their credit card issue number;
- Localization - select a localization for which this credit card can be used.
If you change some parameters (‘Card code’, ‘Card name’, ‘CVV2’, ‘Start date’,
‘Issue number’) click on
to save the changes in the database.
5.6.6 Titles
The ‘Titles’ form allows you to define titles that are traditional in your country.
Titles
Last Revised: Jan 5.10
Page
269 of 409
Copyright © 2004-2010 CS-Cart.com
The form contains a list of the titles defined in the store. Titles themselves and their
statuses are given in the list.
To delete a title from the list:
- click on delete of the title you want to delete.
To add a new title, use the
necessary parameters and click on
button. In the pop-up section enter the
.
To edit a title click on the corresponding edit link and you will be able to edit the
following parameters:
The list of titles is represented as a table consisting of the following columns:
- Title – the title itself;
- Position – ordinal number of the title in drop-down box in the storefront;
- ID – the ID you wish to assign to the title.
If you change some parameters click on
to save the changes in the
database.
To enter the title position number:
- enter the number into the ‘Position’ field;
- click on
.
For example, if you enter 1 for ‘Ms.’ and 2 for ‘Mr.’ in the example shown in the
figure, the order of the titles will change in the storefront: ‘Ms.’ will be displayed first.
By default, if there are no numbers in the ‘Position’ field, titles will be listed in
alphabetical order.
Last Revised: Jan 5.10
Page
270 of 409
Copyright © 2004-2010 CS-Cart.com
5.6.7 Currencies
This page is aimed at those who wish to allow visitors to view product prices in
different currencies. On the page you can add new currencies for the store or modify
the defined ones.
When you enter product prices it is assumed they are in primary currency.
Currencies
A list of the currencies defined in the store is given on the page. All the data is
is represented in a table consisting of the following columns:
- Select column - select the necessary currency;
- Base - you can choose only one base currency for the store;
- Code - unique currency code;
- Name - descriptive name for the currency (US dollar, Euro, etc.);
- Rate - it allows to define exchange rate between base currency and other
currencies. It is more convenient to take the base currency as 1 and calculate the
others correspondingly to the base one. Let’s consider the example in the picture
above, US Dollar is the base currency and the Rate value of other currencies shows
how many dollars are equivalent to 1 euro and 1 pound. So, we see that 1.280 dollars
are in one euro and 1.880 dollars are in a pound.
- Sign - generally accepted symbol of the currency;
- After sum - if this check box is ticked off the symbol of the currency is shown after
its value, otherwise it is displayed before;
- Ths sign - select thousand separator that will be displayed in the storefront;
- Dec sign - select decimal separator that will be displayed in the storefront;
- Decimals - the number of digits after the decimal sign;
- Status - status of the currency (Active - the currency is available for customers in
the storefront, Disabled - the currency is not available for customers in the storefront).
Last Revised: Jan 5.10
Page
271 of 409
Copyright © 2004-2010 CS-Cart.com
If you change any parameters, click on
to save the changes in the
database.
To delete a currency:
- put a tick mark in ‘Select column’ of the currency you want to delete;
- click on Delete selected.
A new currency can be added with the help of the
button. Click on
it, enter the necessary data in the pop-up section and click on the
button.
If you use a payment gateway to process credit cards and it supports different
currencies, you can define the currency only in respective section on the ‘Payment
method’ page. The list of defined currencies does not affect the currency in which
the payment will be accepted.
5.6.8 Import data
If you wish, you can import data into your CS-Cart store using ‘.csv’ files (files in
which the entries are separated by appropriate delimiters such as commas). This
procedure makes administration easier by allowing you to use information created with
other software. This feature gives the ability to import language variables, order items,
orders, images, products, wholesale prices, users.
There are four links (Orders, Products, Translations, Users) on the right.
Each link directs to the corresponding tab(s). All tabs are represented in a similar
way, first there is a list of the fields that the import file can contain and then the
'Import options' section follows. The options of this section are related to the import
process:
- Language - choose a language in which the data will be imported;
Last Revised: Jan 5.10
Page
272 of 409
Copyright © 2004-2010 CS-Cart.com
- CSV delimiter - specify whether the data in the CSV file is separated by commas,
semicolons, or tabs;
- Select file - choose a file by either clicking on Browse and using the ‘Choose file’
window or typing in the file URL;
- Images directory - the directory where images are located, it will be used if the
image file is specified without a path;
- Category delimiter - delimiter of the category path;
- Files directory - the directory where downloadable files are located, it will be used
if the files are specified without a path;
Last Revised: Jan 5.10
Page
273 of 409
Copyright © 2004-2010 CS-Cart.com
Product import
Last Revised: Jan 5.10
Page
274 of 409
Copyright © 2004-2010 CS-Cart.com
The Translations link directs to the Language variables tab where you can
import language variables to your store. The fields of this tab are:
- Name - name of the variable;
- Value - variable value(content);
- Language - two-digit language code (e.g. EN).
All three fields are mandatory.
There is the tab 'States' on the same page. Here you can import information about
the states. Your import file is required to contain the following fields:
- State - name of the state (e.g. New York);
- Code - state code according to ISO standards (e.g. NY);
- Country code - country code according to ISO standards (e.g. US).
Following the Orders link on the right you are taken to the page with two tabs:
Order items and Orders.
In the 'Order items' tab the following fields are represented:
- Order ID - order identification number (number);
- Item ID – special product ID in the order (to avoid conflict if we buy, for example,
two products with different options) (number);
- Product ID – product identification number (number);
- Product code – code of the product;
- Price – product price (number);
- Quantity – number of order items (number);
- Extra - additional information in internal format.
In the 'Orders' tab the following fields are represented:
- Order ID – order identification number (number);
- E-mail - user’s e-mail;
- User ID – ID of the user (number);
- Total – order total amount (number);
- Subtotal – subtotal amount (number);
- Discount – discount (number);
- Payment surcharge – charges for the payment (number);
- Shipping cost – (number);
- Date – date (when the order was placed) given in the format month/day/year (12/
25/2005);
- Status – order status (C - Completed, O - Open, etc... All statuses are displayed
on the Order statuses page);
- Notes – notes of the customer (text);
- Payment ID – payment method ID (number);
Last Revised: Jan 5.10
Page
275 of 409
Copyright © 2004-2010 CS-Cart.com
- IP address – IP address of the customer (e.g. 192.168.0.3);
- Details – notes of the administrator (text);
- Payment information – encoded information about the payment;
- Taxes – tax information in internal format;
- Coupons – coupon information in internal format;
- Shipping – shipping information in internal format;
- Title – title of the customer (Mr, Mrs, etc);
- First name – user's first name;
- Last name – user's last name;
- Company – the name of the company;
- Fax – fax number;
- Phone - company phone;
- Web site – web site of the company;
- Tax exempt – whether the tax is imposed on the customer or not (Y – tax is not
imposed, N – tax is imposed);
- Language - two-digit language code (e.g. EN);
- Billing: title – user’s title (Mr, Ms, etc.);
- Billing: first name - user’s first name (text);
- Billing: last name - user’s last name (text);
- Billing: address - user’ s address (text);
- Billing: address (line 2) - user’s address (text);
- Billing: city;
- Billing: state;
- Billing: country - two-letter country code (e.g. US) (it can be found in the first
column on the ‘Manage countries’ page);
- Billing: zipcode – (numbers);
- Shipping: title;
- Shipping: first name;
- Shipping: last name;
- Shipping: address;
- Shipping: address (line 2);
- Shipping: city;
- Shipping: state;
- Shipping: country - two-letter country code (e.g. US) (it can be found in the first
column on the ‘Manage countries’ page);
- Shipping: zipcode - (numbers);
- Extra fields - additional fields in the format - {Field: value, Field2: value, Field3:
value}.
Last Revised: Jan 5.10
Page
276 of 409
Copyright © 2004-2010 CS-Cart.com
By clicking on the Products link on the right you will open the page with three
tabs: Images, Products, Qty discounts.
Images:
- Product code;
- Pair type – type of the pair (M - main, A - additional). The main pair of images is
added in the ‘Detailed information’ tab, and additional pair is added in the ‘Images’
tab in the admin panel and displayed in the ‘Images’ tab on the product details page
in the storefront.
- Thumbnail – path to the image;
- Detailed image - path to the detailed image;
Products:
- Product code;
- Category – path to the main category (a///b///c);
- List price – product market price (in 0.00 format);
- Price - product price (in 0.00 format);
- Status - (A - active, D - disabled, H – hidden);
- Quantity – quantity in stock (number);
- Weight - product weight in the unit of weight defined in the CS-Cart admin panel
(it is lbs by default in CS-Cart);
- Min quantity;
- Shipping freight – shipping cost (number);
- Date added – date (when the product was added) in the format month/day/year
(12/25/2005);
- Downloadable – whether the product can be downloaded (Y or N);
- Files - full path to the file of the downloadable product. Also, only the file name
can be specified if you fill in the Files directory field in the Import options section.
Several files must be delimited by comma (file1.pdf, file2.jpg);
- Ship downloadable – whether to calculate the shipping for a downloadable product
(Y or N);
- Inventory tracking - inventory tracking option (d - disable tracking, b - tracking
with product options, o - tracking without product options);
- Free shipping - whether the product is shipped for free or not (Y or N);
- Feature comparison - whether you can add this product to the compare list or not
(Y or N);
- Zero price action - zero price action option (R means ‘Do not allow to add the
product to cart’, P - ‘Allow to add the product to cart’, A - ‘Ask customer to enter the
price’);
- Thumbnail - path to the product image;
- Detailed image - path to the detailed image;
- Product name – product name (text);
Last Revised: Jan 5.10
Page
277 of 409
Copyright © 2004-2010 CS-Cart.com
- Description – product description (text);
- Short description – product short description (text);
- Meta keywords - the product META-keywords (text);
- Meta description - the product META-description (text);
- Search words;
- Page title - the name of the page displayed in the browser (text);
- Taxes – list of taxes separated by commas (e.g. VAT, California Sales Tax);
- Features - click on the Notes link to view the information about how to import
product features;
- Options - click on the Notes link to view the information about how to import
product options;
e);
- Secondary categories – additional categories separated by semicolon (b///c; d///
- Supplier - name of the supplier (name entered in the field ‘Company’ during
registration);
- Pay by points – ability to pay for the product with points (Y or N);
- Override points – whether to recalculate the points for the product (Y or N) or not.
If not, then the points specified for the category or global points are taken.
- Override exchange rate - (Y or N).
Qty discounts:
- Product code - the product code (number);
- Price - wholesale price (number);
- Lower limit - lower quantity limit (number); for example, from 1 item - $5, from 5
items - $4, from 10 items - $3;
- User group - name of the user group (e.g. Bronze).
Click on the Users link on the right and you will see the fields that can be imported
for users.
Users:
- E-mail – user's e-mail;
- Login - user's login;
- User type – user type (A - administrator, C - customer, P - affiliate, S – supplier);
- Active – whether the user is active (Y or N);
- User group ID – (number);
- Password - password encoded with md5;
- Title – user’s title (Mr, Ms);
- First name – user's first name;
- Last name – user's last name;
- Company – name of the company;
Last Revised: Jan 5.10
Page
278 of 409
Copyright © 2004-2010 CS-Cart.com
- Fax – fax number;
- Phone - user’s phone;
- Web site;
- Tax exempt – whether the tax is imposed on the customer or not (Y – tax is not
imposed, N – tax is imposed);
- Registration date - date (when the user registered) in the format month/day/year
(12/25/2005);
- Language – two-letter language code (EN);
- Billing: title
- Billing: first name
- Billing: last name
- Billing: address
- Billing: address (line 2)
- Billing: city
- Billing: state
- Billing: country - two-letter country code (e.g. US) (it can be found in the first
column on the ‘Manage countries’ page);
- Billing: zipcode
- Shipping: title
- Shipping: first name
- Shipping: last name
- Shipping: address
- Shipping: address (line 2)
- Shipping: city
- Shipping: state
- Shipping: country - two-letter country code (e.g. US) (it can be found in the first
column on the ‘Manage countries’ page);
- Shipping: zipcode
- Extra fields - additional fields in the format - {Field: value, Field2: value, Field3:
value}.
5.6.9 Export data
The CS-Cart shopping cart software also includes the ability to export the catalog as
a ‘.csv’ file, using the ‘Export data’ page. There are four links on the right of the page:
Last Revised: Jan 5.10
Page
279 of 409
Copyright © 2004-2010 CS-Cart.com
The links direct to the pages with a tab or tabs. Each tab consists of two sections:
General (the section where you specify the fields the export file will contain) and
Export options.
In the Export options you specify the parameters for exporting process. All the
possible parameters are:
- Language - choose a language in which the data will be exported;
- Product type - choose what sort of product it is (brushes, briefcases, etc.);
- Condition - indicates the condition of the products you are selling (new, used,
refurbished); used only for export to Google Base;
- Category delimiter - enter the delimiter, that is used when specifying the main
category of the product (e.g. "Computers///Desktops");
- Images directory - directory where images are located. It will be used if image file
is specified without a path; this must be an absolute path;
- Files directory - directory where product files are located. It will be used if "File"
field data is specified without a path; this must be an absolute path;
- CSV delimiter - specify whether the data in the CSV file is separated by commas,
semicolons, or tabs;
- Output - choose where the file will be saved (Direct download - on your server,
Screen - on the screen, Server - directly on the Google server);
- Filename - name of the exported file;
- Export discounts - if the check box is ticked off the products are exported together
with the discounts.
But not all of these parameters are used in each tab.
In the top section you select the fields that the exported file will consist of. You can
do this using two fields: Exported fields and Available fields.
To find more information about the fields see Administration->Import data.
Moreover, it is possible to save several variants of exported fields. In order to do
this, choose the fields you want to export, type the name of this layout and click on
Save layout as button.
Last Revised: Jan 5.10
Page
280 of 409
Copyright © 2004-2010 CS-Cart.com
5.6.10 Logs
Here is given a list of all logs of the store. First on the page goes the search section
using which you can limit the search results. You can set a certain period of time and
logs created during this period will be displayed for you. You can choose any of the
given periods or define the search period by yourself.
Moreover, for more detailed search results you can click on Advanced search
options and set the following parameters:
- User - doer of the action;
- Type/Action - specify in relation to what the log was created (orders, users,
products, categories, database, requests, news)
Also the system allows to create different search patterns and save them for future
use. Just set the search options, type the name of the pattern in the Save this search
as: input field and click on the
button. Once the search pattern is saved, it is
displayed in the dropdown list box at the top.
Last Revised: Jan 5.10
Page
281 of 409
Copyright © 2004-2010 CS-Cart.com
Logs
The following information is given in the list of logs:
- Time – date and time when when the log is created
- User – user who performed the action registered in the log
- Type – what action was performed and what it is related to (categories, database,
news, orders, products, requests or users)
- Content – content of the log.
There is an ability to go directly to the needed page. Just enter the number of the
page in the ‘Go to page:’ field and click on
To delete all the logs click on the
mark.
link.
Using the php information link you can view the PHP details. After clicking on the db
backup/restore link you will be taken to the Database page.
Last Revised: Jan 5.10
Page
282 of 409
Copyright © 2004-2010 CS-Cart.com
5.6.11 Upgrade center
Upgrade Center allows you to upgrade the installed CS-Cart up to the latest version
via the web-interface. Upgrade Center will automatically receive information about all
available updates from our server and display a notification for the administrator.
Installation of the updates is carried out on the Upgrade Center page. If access
permissions do not allow to update some files, the system will prompt to enter FTP
access details (they are not passed to our server).
All the original files, replaced during the upgrade, are saved in the folder var/
upgrade/UPGRADE_NAME. Also it is possible to cancel the changes one by one and
return to previous versions.
Let's consider the process in more detail. You will be asked to enter License number
on the Upgrade Center page, if you haven't done this when installing the software. Also
note that upgrade center settings must be adjusted on the page Administration>Settings->Upgrade center.
Enter your license number and click on the
button.
Upgrade center
Once the license number is entered, you will see an upgrade package or packages
available for you at the moment. There will be given all the necessary information:
upgrade version, release date, filesize, package contents (files included in the package)
and a list of bugfixes and improvements.
To start the installation click on the Install button.
Last Revised: Jan 5.10
Page
283 of 409
Copyright © 2004-2010 CS-Cart.com
Upgrade center - Packages
First your store will be checked for the modified files. When it is checked, you will
see the following notification if there are no modified files.
Last Revised: Jan 5.10
Page
284 of 409
Copyright © 2004-2010 CS-Cart.com
Upgrade center - Check
In case there are some modifications, the system provides a list of files containing
these modifications.
Upgrade center - Check
When your current version is checked, you will see the following notification. Click
on Continue to proceed with the upgrade.
Then you will be given the information about the backed up files and batabase
tables. Click on the Continue button.
Last Revised: Jan 5.10
Page
285 of 409
Copyright © 2004-2010 CS-Cart.com
Upgrade center - Backup
When the upgrade is performed, you will see a notification about it.
Upgrade center - Summary
Here on the Summary page you will see two links Revert and Upgrade center. By
clicking on the Revert link you will revert to the previous version. If you click on the
Upgrade center link, you be taken to the Upgrade center page.
In case the previous version contained some code modifications, you can view the
difference by clicking on the changes link in the Installed upgrades section on the
Upgrade center page. If the modifications are not critical, just click on mark as
resolved. But if these modifications are required, edit the corresponding file(s)
manually and apply your changes.
Last Revised: Jan 5.10
Page
286 of 409
Copyright © 2004-2010 CS-Cart.com
Upgrade center - Modified files
5.6.12 Statistics
A wide range of statistics covering different aspects of store operation is collected
by the software and available for the administrator. This makes it considerably easier
to analyze both overall efficiency of the store and efficiency of separate features.
There are eight links on the right of the page: General, System, Geography,
Referrers, Pages, Audience, Products, Banners. Each of them leads to the
corresponding statistical data.
General statistics provide basic user activity information, namely the total
number of visits to the store. The following information is given there:
- Date – month, day and year;
Last Revised: Jan 5.10
Page
287 of 409
Copyright © 2004-2010 CS-Cart.com
- Total – total number of visits on this day (the value is a sum of values in the two
following columns);
- Robots – number of visits by automatic systems (search bots, etc);
- Visitors – number of visitors;
- Visitor hosts – number of IP addresses from which the visitors came.
Clicking on the number in the Visitors column you open the ‘Visitors log’ page
where you can view the detailed information about every visit: date and time, the
number of pages that were viewed, IP address or Proxy (if any) of the visitor, operating
system and browser the visitor used, his screen resolution, language, country. To get
some more information click on
and you see the entry page, the current page,
the referrer and user-agent.
General statistics
System statistics contain information about operating systems, browsers and
their resolutions.
Last Revised: Jan 5.10
Page
288 of 409
Copyright © 2004-2010 CS-Cart.com
System statistics
The 'Operating systems' tab shows names of operating systems, number of visits
from each system and number of visits as a percentage of total visits.
The 'Browsers' tab contains names of the browsers which were used by visitors,
browser versions, number of visits from each browser and number of visits in
percentage terms.
The 'Resolutions' tab presents information about resolutions of the browsers. Next
to each resolution the number of visitors who use this size is displayed. Also
percentage value is provided together with the numerical one.
Geography statistics detail information about countries, cities, languages and IP
addresses.
Last Revised: Jan 5.10
Page
289 of 409
Copyright © 2004-2010 CS-Cart.com
Geography statistics
In the 'Languages' tab the languages used by people who visit the store are
presented. In the tab, there are displayed the names of the languages, number of
people using them and the percentage equivalent.
In the 'IP addresses' tab all IP addresses of the customers who entered the store
are displayed. But sometimes it is not just an IP address but a proxy server address.
Also you can see the number of visits from each IP address and the percentage value.
In the 'Countries' tab you see the countries from which the visitors came, the
number of visitors from each country and their percentage value.
Referrer statistics are represented by six tabs: By domain, By search engine,
Search words, Came from, Came to, All.
Referrer statistics
The 'By domain' tab gives information about the domains from which the
customers came, the number of visits from each domain and its percentage equivalent.
Last Revised: Jan 5.10
Page
290 of 409
Copyright © 2004-2010 CS-Cart.com
The 'By search engine' tab provides a list of all search engines which were used by
visitors who came to the store, the number of visitors referred by each engine and the
number of visitors in percentage terms.
In the 'Search words' tab a list of all words or phrases which were entered in
search engines is given. The number of queries and percentage ratio are displayed for
every variant.
'Came from' displays the search engines and the queries by which customers were
referred, the number of referrals and the percentage equivalent.
'Came to' shows the pages which customers were referred to, the number of
referrals to each page and the percentage equivalent.
In the 'All' tab you can view all URLs from which the visitors came to the store, the
number of visits from each of them and the number of visits in percentage terms. If it
is a search system, in addition to the URL the phrase entered into a search engine is
shown.
Page statistics show page popularity among users. All information is given in four
tabs: Titles by visits, Entry points, Exit points, Pages by visits.
Page statistics
In the 'Titles by visits' tab you see titles of the pages, the number of visits to the
page or pages with this title (Note that several pages can have the same title) and the
percentage ratio of visits.
Last Revised: Jan 5.10
Page
291 of 409
Copyright © 2004-2010 CS-Cart.com
The 'Entry points' tab gives information about the first pages of sessions. The
name and the title of the page, the number of visitors who started their sessions with
this page and the number of visitors in percentage terms are displayed there.
The 'Exit points' tab provides information about the last pages of sessions. There is
shown the name and the title of the page, the number of visitors whose sessions ended
on the page and its percentage equivalent.
In the tab 'Pages by visits' you see names of the pages and their titles displayed
by browsers, the number of visits to each page and the percentage ratio between the
pages.
Audience statistics gives various information about the visitors of the store.
Audience statistics
'Site attendance' illustrates the number of visits at a certain hour of the day. Total
is the total number of visits to the store.
In 'Visit time' you see the number of visits lasting less than 1 minute, from 1 to 2
minutes, from 2 to 5 minutes, etc. and the percentage value for each time period.
Average duration means the average duration of a visit.
In the 'Repeat/New visits' tab all visitors of your store are divided into two
groups. The first group is Old visitors, the visitors who were in the store more than
once. The second one is New visitors, those who entered the store only once. The
number of visitors and its percentage equivalent are displayed for both groups.
In the 'Page load speed' tab page load speeds are displayed. Also there is given
the number of times the pages with this load speed were opened by visitors. Look at
the picture below, the statistical data shows that pages with load speed from 2 to 3
seconds were opened twice, a page with load speed from 3 to 4 seconds was opened
only once and pages with load speed from 5 to 10 seconds were opened twice. The
value +3 displays that pages with load speed up to 4 seconds were opened three
times, the value +5 shows that pages with load speed up to 10 seconds were opened 5
times.
Last Revised: Jan 5.10
Page
292 of 409
Copyright © 2004-2010 CS-Cart.com
By clicking on the link View pages you can view all the pages with a certain load
speed.
'Total pages viewed per visitor' shows the percentage of visitors who viewed 1
page, 2 pages, 3 pages, 6-10 pages, etc.
Products statistics give information about the words by which customers usually
search products in your store. All information is represented in a table with the
following columns:
- Search conditions - words by which the search was performed;
- Date - date when the search was performed;
- Visitors - number of visitors who searched by this word;
- Found products - number of products that were found by this query.
Products statistics
Banners statistics give information about the banners of the store, namely how
many times banners were viewed and clicked on.
All information is represented in a table with the following columns:
- Banner - name of the banner;
- Clicks - how many time this banner was clicked on;
- Views - how many time this banner was viewed;
- Conversion - percentage ratio of number of clicks to number of views;
When clicking on the details link a pop up section will appear where the number of
clicks and views are broken down into days.
Last Revised: Jan 5.10
Page
293 of 409
Copyright © 2004-2010 CS-Cart.com
Banners statistics
All statistical data regarding System, Geography, Referrers, Pages,
Audience can be presented in different ways: as a Table, Graphic bar, Graphic pie.
Also it is possible to limit the statistical data displayed on the page by using the
Search section. You can define the time period for which the search results will be
displayed. You can choose any of the given periods or define the search period by
yourself. Moreover, for more detailed search results you can click on Advanced
search options and set the following parameters:
- Limit - limit the number of entries that will be displayed;
- Search phrase - specify a search phrase;
- Referrer URL - specify a referrer URL;
- URL - specify URL of the page;
- Page title - specify a page title;
- IP address - specify an IP address;
- User-Agent - specify a user-agent;
- Browser name - specify a browser name;
- Browser version - specify a browser version;
- Operating system - specify an operating system;
- Language - specify a language;
- Country - specify a country;
- Exclude - if selected, all the parameters specified above will be excluded from the
search results.
Last Revised: Jan 5.10
Page
294 of 409
Copyright © 2004-2010 CS-Cart.com
Also the system allows to create different search patterns and save them for future
use. Just set the search options, type the name of the pattern in the Save this search
as: input field and click the
button. Once the search pattern is saved, it is
displayed in the dropdown list box at the top.
5.6.13 Webmail
Internet commerce always involves a great number of emails and notifications of
different kind. And it appears to be not very convenient to use a separate third party
webmail application to handle all the mail. That is why we implemented MailBee
Webmail and now provide a built-in email application with an advanced set of
functions.
With CS-Cart's webmail, you can read e-mails in a safe way, reply, forward,
compose new e-mails in plain-text or HTML mode, attach multiple files to e-mails,
manage e-mails using folders, schedule your time, manage your contacts, and do
much more in flexible and completely customizable environment.
Login information
To start managing your mail you need to log in first. Standard and Advanced login is
possible. The following fields are to be filled in:
- Email – the address others will reply to when they are responding to your mail;
- Login – your login;
- Password – your password;
- Incoming Mail – the incoming mail server (protocols POP3 and IMAP can be used
to connect to the server);
- SMTP Server – the outgoing mail server;
- Use SMTP authentication – tick off to enable SMTP authentication (automatic
checking of outgoing mail)
- Sign me automatically.
Last Revised: Jan 5.10
Page
295 of 409
Copyright © 2004-2010 CS-Cart.com
After you are logged in, you'll be taken to the page with the list of all incoming
messages. Here you can create new messages, reply to the incoming messages, mark
messages as read/unread or flag them, etc.
Webmail
CS-Cart's webmail allows you to have an address book. You can add your contacts
and import them from other e-mail clients in CSV format. So following the Contacts
link in the top menu bar you go to the page with all your contacts. Here you are able to
organize the contacts in groups and edit both groups and contacts.
Our webmail enables you to schedule your life and business. The settings allow to
choose the most suitable form of calendar (day, week, month), create a multitude of
calendars and use different colors for them.
You are given the ability to change settings for all aspects of the webmail operation.
You can change common settings like date and time format, language, etc. and
settings of email accounts, contacts and calendars as well. All these settings can be
found by following the Settings link in the right top corner.
From the webmail you can easily return to the CS-Cart admin panel and there is no
need to logout. So you do not have to log in every time you return to the webmail
page.
Last Revised: Jan 5.10
Page
296 of 409
Copyright © 2004-2010 CS-Cart.com
For more information on the MailBee WebMail application go to their official site
http://www.afterlogic.com.
5.6.14 Store access
The 'Access restrictions' add-on is an advanced security tool for limiting (which
limits) the access to the store. The access can be restricted in many ways: you have
the ability to ban access to the store or to the administration area for particular IP
addresses, ban registration (or login) for certain domains or e-mail addresses and
payment by some credit cards. This considerably improves your store security and
reduces the possibility of hacking.
The Store access administration section is displayed if the Access restrictions
addon is enabled in Administration->Addons.
The page is represented as a set of tabs: IP, Domain, E-mail, Credit card,
Admin area.
Access restriction
In the ‘IP’ tab you specify IP addresses that do not have access to the store at all.
Last Revised: Jan 5.10
Page
297 of 409
Copyright © 2004-2010 CS-Cart.com
The IP tab has the following columns:
- Select column - select the necessary IP;
- IPs – IP address or a range of addresses;
- Reason – the reason for the access restriction, it is displayed when someone with
this IP address tries to enter the store;
- Created – date and time the IP address was added;
- Status – status of the restriction (Active or Disabled).
To add new IP addresses, use the
button.
After entering all of the desired information, click on
to add the new IP.
Also here you can ban access for several IP addresses with successive numbers.
It is possible to ban access for all IP addresses in the defined interval. To do this
you just need to enter the starting number (e.g. 192.169.0.40) in the 'IP From' field
and the last number (e.g. 192.169.0.49) in 'IP To' and the access to the store will be
automatically blocked for any IP address from this interval. But if you want to define
only one IP address, you can enter it either in the 'IP From' field or the 'IP To' field or in
both columns simultaneously.
In the Domain tab the administrator has the ability to ban access for all IP
addresses which are identified by a certain domain name.
The Domain tab has the following columns:
- Select column;
- Domain – name of the domain;
- Reason – the reason for the access restriction, it is displayed when someone from
this domain tries to register or login;
- Created – date and time the domain name was added;
- Status – status of the restriction (Active or Disabled).
Last Revised: Jan 5.10
Page
298 of 409
Copyright © 2004-2010 CS-Cart.com
Domain
Use the
button to add new domains to the list.
E-mail restrictions are defined in the 'E-mail' tab. The customers with the e-mail
addresses specified in the tab cannot register in the store.
- Select column;
- E-mail – e-mail address;
- Reason – the reason for the access restriction, it is displayed when someone uses
this e-mail to register;
- Created – date and time the e-mail address was added;
- Status – status of the restriction (Active or Disabled).
Last Revised: Jan 5.10
Page
299 of 409
Copyright © 2004-2010 CS-Cart.com
E-mail
NOTE: Here can be defined not only a particular e-mail address but also a domain
name. Specifying a domain name you ban access for all e-mails of this domain.
To add new e-mail addresses to the restriction list use the
button.
Credit cards that cannot be used in order to make a payment are defined in the
'Credit card' tab.
- Select column;
- Credit card number – 16-digit card number;
- Reason – the reason for the access restriction, it is displayed when someone tries
to use this credit card to pay for the order;
- Created – date and time the credit card number was added;
- Status – status of the restriction (Active or Disabled).
To add new credit cards to the list use the ‘Add’ section.
Last Revised: Jan 5.10
Page
300 of 409
Copyright © 2004-2010 CS-Cart.com
Credit card
In the 'Admin area' tab you can ban access to the admin panel for some IP
addresses. In order to do this you just need to add the necessary IP to the list of
banned IP addresses.
- Select column;
- IPs – IP addresses;
- Reason – the reason for the access restriction, it is displayed when someone with
this IP address tries to enter the admin panel;
- Created – date and time the IP address was added;
- Status – status of the restriction (Active or Disabled).
Last Revised: Jan 5.10
Page
301 of 409
Copyright © 2004-2010 CS-Cart.com
Admin area
To add new IPs use the
button:
- type the necessary data;
- click on
.
5.6.15 Data feeds
The Data feeds addon allows administrators to create any number of product data
formats for export. So you have the ability to export files to various shopping
directories like Google Product Search, Shopzilla, Shopping.com, etc. Also you can
define a different set of products for each file and adjust the field configuration in the
way you want.
Data feeds can be added only if the Data Feeds addon is enabled in
Administration->Addons.
Last Revised: Jan 5.10
Page
302 of 409
Copyright © 2004-2010 CS-Cart.com
A list of created product data formats is given on the Data feeds page.
- Select column;
- Name – name of the feed;
- Export by cron – select where to upload the file when the cron script starts the
export (Server or FTP);
- Status – status of the feed (Active or Disabled).
Data feeds
If you click on the
link, you can perform three actions:
- Download - download the file to a local computer;
- Export to server - save the file to the server where the shopping cart is installed;
- Upload to FTP server - to upload the file to some other server.
To delete a data feed:
- place a check mark in the Select column of the data feed you want to delete;
- click on Delete selected.
If you make any changes, don’t forget to save the changes to the database by
clicking on the
button.
To add a new data feed:
- click on the Add data feed button and specify the necessary settings.
To edit a data feed:
- click on the
button of the data feed you want to change and the Editing data
feed page will be open.
Last Revised: Jan 5.10
Page
303 of 409
Copyright © 2004-2010 CS-Cart.com
Data feed - editing
- Data feed name - name of the data feed;
- Filename - name of the file to export;
- Language - language in which the data will be imported;
- Category delimiter - delimiter of the category path;
- Images directory - the directory where images are located, it will be used if the
image file is specified without a path;
- Files directory - the directory where downloadable file is located, it will be used if
the file is specified without a path;
- CSV delimiter - specify whether the data in the CSV file is separated by commas,
semicolons, or tabs;
- Status - status of the data feed (Active or Disabled).
Last Revised: Jan 5.10
Page
304 of 409
Copyright © 2004-2010 CS-Cart.com
Data feed - editing
Also an export file can be uploaded to FTP server, can be saved on a web server or
downloaded like in a regular export. Moreover, it is possible to create CRON tasks for
individual feeds in order to generate and upload them via FTP on a regular basis (for
example, daily or weekly).
- Server directory - specify the directory where the file will be exported to;
- FTP server - specify the FTP server to which the file should be uploaded;
- FTP username - specify the FTP username;
- FTP password - specify the FTP password;
- Export by cron to - select where to upload the file when the cron script starts the
export (to the server (where the shopping cart is installed) or to the FTP server).
If you make any changes, click on the
button. To cancel the changes use
the cancel link.
In the Exported items tab you can define items to export. Here you can select
categories or just certain products.
Last Revised: Jan 5.10
Page
305 of 409
Copyright © 2004-2010 CS-Cart.com
To delete an item:
- click on the delete link of the item you want to delete.
Editing data feed - exported items
In the tab Fields mapping you can define what fields will be in the export file, their
position and their names.
A list of defined fields is represented as a table consisting of the following columns:
- Position - ordinal number of the field in the export file;
- Field name - name of the field that will be shown in the export file;
- Field type - select what information will be displayed in the field (all product
characteristics are given in this drop down field);
Last Revised: Jan 5.10
Page
306 of 409
Copyright © 2004-2010 CS-Cart.com
- Active - status of the field (if it is active, the field will be displayed in the export
file).
Editing data feed - fields mapping
To add a new row to the section, click on
.
To add a new row with identical values to an existing one ("clone" link), click
on
.
To delete a row, click on
.
5.7 Design
You can manage the appearance of your store using the ‘Design’ tab.
‘Design’
Last Revised: Jan 5.10
Page
307 of 409
Copyright © 2004-2010 CS-Cart.com
5.7.1 Site layout
On this page you see two tabs: General, Testimonials.
The General tab contains four fields and one drop down select box:
- Page title;
- In this section you can edit the text to be displayed on the store home
page - enter the text that will be displayed on the home page in the storefront.
This field also contains tools for text editing. If you want to use them, click on
.
- META description - specific META TAG description for this page;
- META keywords - specific META TAG keywords for this page;
- Testimonials - here you disable or enable communication about the first page, if
it is enabled the Testimonials tab appears.
In the Testimonials tab the administrator can give a good reference to the store
and his testimonial will be displayed on the Home page in the storefront.
If you want to display the Testimonials side box in the customer storefront, it is
necessary that a block with the content Testimonials is defined on the Blocks page
(Design->Blocks).
Last Revised: Jan 5.10
Page
308 of 409
Copyright © 2004-2010 CS-Cart.com
Site layout
5.7.2 Logos
Following the Logos link you go to the page where a logo image can be chosen for
the customer area, for invoices, gift certificates, the admin panel and the sign in box.
To select a file from a local computer or a server use the Local or Server links
respectively. Also you can type the URL of the file by using the link URL.
Last Revised: Jan 5.10
Page
309 of 409
Copyright © 2004-2010 CS-Cart.com
5.7.3 Design mode
Design mode is a feature specially developed to make it much easier for store
owners to change its outlook and language variables. Design mode includes two
separate modes: the Translation mode, allowing to edit language variables, and the
Customization mode, allowing to edit templates of the storefront. Editing has
become not only easier but also quicker, as now, if you want to change some language
variables of the storefront, you do not need to search them in the admin panel first. All
you need to do is to enable the translation mode and edit the necessary language
variables directly in the storefront.
Design mode
Enable translation mode – enable translation mode by clicking on this button.
In the translation mode all language variables are highlighted green. When pointing
the mouse at the necessary variable, the image
appears in the top left corner of the
highlighted area. After clicking on the image, a pop up box is displayed. There you can
edit the language variable and save your changes.
After clicking the Enable translation mode button there appears the View
storefront in translation mode link, by following which you open the storefront in
the translation mode.
To switch off the translation mode click on the Disable translation mode button.
Enable customization mode – enable customization mode by clicking on this
button.
The customization mode allows you to edit templates responsible for the user
interface. Follow the View storefront in customization mode link and you will open
the storefront in the customization mode. You will see
images. When pointing the
mouse at any image, some area of the interface will turn green and the template(s)
responsible for this area will be displayed. By clicking on the name of the template you
will open a template editor and will be able to change its code.
To edit a template you should be familiar with Smarty, a web template system
written in PHP. Also general rules of CS-Cart architecture given at docs.cs-cart.com
should be taken into account while editing a template.
Last Revised: Jan 5.10
Page
310 of 409
Copyright © 2004-2010 CS-Cart.com
Template editor
To switch off the customization mode click on the Disable customization mode
button.
5.7.4 Blocks
Using this feature you can change the layout of the store pages. It allows to
manage their contents by editing the existing information blocks (side boxes, central
boxes) or creating new ones.
Using the Blocks feature you can display additional information boxes on various
pages of the customer area and it isn’t necessary to modify templates to do this. Using
this tool you can create such lists as Featured products or Related products and
display them on different pages of the store.
The blocks can be defined for Products, Categories, Pages, Home Page, Cart,
Checkout, News pages or all pages at once. Each page is divided into 5 parts for
convenience: left, central, right, top and bottom. Blocks can be added to any of these 5
parts. Also you can easily change the location of any block by using the drag-and-drop
feature. Just click on the necessary block and drag it to a different location.
On the Blocks page you see the tabs All pages, Products, Categories, Pages,
Home Page, Cart, Checkout, News.
Last Revised: Jan 5.10
Page
311 of 409
Copyright © 2004-2010 CS-Cart.com
Let’s consider the All pages tab. Here are displayed the blocks that are displayed
on all pages of the store.
All the blocks are collapsed. The mode of the blocks (collapsed/extended) is saved
after the page reload. Block position is saved with AJAX.
To edit a block click on the
displayed pop-up section.
link and change necessary parameters in the
To delete a block click on the
mark of the block you want to delete. Blocks
displayed on all pages can be deleted only in the tab All pages.
Also the status of each block can be changed. If the status is Disabled, the block is
not displayed in the customer front-end.
Last Revised: Jan 5.10
Page
312 of 409
Copyright © 2004-2010 CS-Cart.com
Blocks
To add a new block click on the
options:
button and set up the following
- Name – name of the block;
- Block content – whether it will be a standard side box (filling and appearance are
already defined by the program) or a list of some objects;
Standard side boxes are to be added on the Blocks page to be displayed in the
customer front-end.
Last Revised: Jan 5.10
Page
313 of 409
Copyright © 2004-2010 CS-Cart.com
- Filling – filling of the list. Options among which you can choose depend on what
you set in the Block content field. For example, if Block content is set to Products,
you will be able to choose among the following:
• Manually - you add the items to the list manually;
• Newest - the newest products of the store will be displayed in the list;
• Recently viewed - products recently viewed by customers will be displayed in
the list;
• Bestsellers - bestsellers of the store will be displayed in the list;
• Rating - products with the highest ratings will be displayed in the list.
- Position – define where on the page the block will be displayed (on the left, on the
right, in the center, at the top or at the bottom).
- Appearance type – define how it will be displayed: Text links, Multicolumns, Links
thumb, Sidebox first item, Small items, Without image, Scroller, Scroller2. The types
among which you can choose depend on the settings listed above.
- Wrapper - choose a design template for the block wrapper (four options are
given).
5.7.5 Appearance settings
See the chapter Administration->Settings->Appearance
5.7.6 Quick links
Quick links are the links displayed in the top right corner in the storefront by
following which the customer can quickly go to some important pages in the store.
A list of these links is given on the page. If you change the link status to disabled,
To delete a quick link click on the
To add a quick link use the
Last Revised: Jan 5.10
mark.
button.
Page
314 of 409
Copyright © 2004-2010 CS-Cart.com
Quick links
To edit a quick link click on the
to edit three parameters:
button. In the appeared section you are able
- Link text - link name, displayed in the storefront;
- Position - position of the link;
- URL - link to the page in the store where customers should be taken.
Last Revised: Jan 5.10
Page
315 of 409
Copyright © 2004-2010 CS-Cart.com
Editing item
5.7.7 Top menu
Here you can create and manage tabs of the storefront top menu.
Top menu
Last Revised: Jan 5.10
Page
316 of 409
Copyright © 2004-2010 CS-Cart.com
The page contains a list of tabs constituting the storefront top menu. Names of the
links and their statuses (Active or Disabled) are given in the list.
To delete an item:
- click on delete of the item you want to delete.
To add a new item to the list, use the ‘Add item’ button. In the pop-up section
enter the necessary parameters and click on
To edit item parameters click on the
following parameters:
.
link and you will be able to change the
- Parent item - choose whether it will be a root level menu or it will be assigned to
some menu;
- Link text – name of the tab;
- Position – ordinal number of the tab in the storefront;
- URL – URL of the page to which the tab redirects;
- Activate menu tab for - specify an item or items for which the menu tab will be
activated;
- Generate submenu - here you can generate a submenu containing pages or
categories. The submenu can contain only one page/category or all pages/categories at
once.
- Popup direction - choose on which side the popup will be displayed (right or left).
Last Revised: Jan 5.10
Page
317 of 409
Copyright © 2004-2010 CS-Cart.com
Editing top menu
If you make any changes, don’t forget to save the changes to the database by
clicking on the
button.
To specify the link ordinal number:
- enter the desired number in the ‘Position’ field;
- click on
Last Revised: Jan 5.10
.
Page
318 of 409
Copyright © 2004-2010 CS-Cart.com
For example, entering 1 for ‘Contact us’ and 2 for ‘About us’ in the example in the
figure will change the order of the links in the storefront: the ‘Contact us’ link will be
displayed first.
By default, if there are no numbers in the ‘Position’ field, links will be displayed in
alphabetical order.
5.7.8 Site map
This page allows you to define sections with links to your store to be displayed on
the ‘Site Map’ page in the storefront. The ‘Site Map’ page contains a list of all site
map items.
Manage site map
The list of defined sections is represented as a table consisting of the following
columns:
- Select column;
- Position - ordinal number of the section;
- Section name;
- Status - status of the section (Active - available in the storefront, Disabled - not
available in the storefront).
To add a new section use the ‘Add site map section’ button. After all the
necessary parameters are entered, click on the Create button to add a new section.
Each section can have the additional references which are displayed below the
section name on the ‘Site Map’ page in the storefront. To display a list of these
Last Revised: Jan 5.10
Page
319 of 409
Copyright © 2004-2010 CS-Cart.com
references click on the
columns:
link of the section. You will see a table with the following
- Select column;
- Position - position in the list (ordinal number);
- Name - name of the link;
- URL - URL to some page of the store;
Section links
If you change the value of any field, click on
to save your changes in the
database.
To delete a link from the list:
- click on delete of the link.
To delete several links at a time:
- tick off the check boxes opposite the entries you want to delete;
- click on Delete selected.
To add a new section link use the
enter the necessary parameters and click on
button. In the pop-up section
.
To add a new row with empty fields to the section, click on
Last Revised: Jan 5.10
.
Page
320 of 409
Copyright © 2004-2010 CS-Cart.com
To add a new row with identical values to an existing one ("clone" link), click
on
.
To delete a row, click on
. (You can delete all the rows except the last one.)
5.7.9 Template editor
The ‘Template editor’ page is aimed at those who wish to edit skin templates
directly in their browser. You can completely change look and feel of your store by
using built-in template editor. For instance, the template editor can be used to modify
the design of the category pages in the way that cannot be achieved using the basic
menu items.
The template editor is JavaScript-based, so JavaScript must be enabled in your
browser.
Template editor
There are the following elements on the page:
Last Revised: Jan 5.10
Page
321 of 409
Copyright © 2004-2010 CS-Cart.com
- the ‘Current path’ field;
- the ‘Show active skins only’ check box;
- Legend (a list of skin directories);
- the ‘Create file’ button;
- the ‘Create folder’ button;
- the ‘Upload file’ button.
As soon as the page is open, the content of the 'skins' directory will be displayed.
To indicate which directory you should enter to edit the look and feel of customer or
administration areas, some directory icons are marked with different colors.
- The skin directory with operational customer and e-mail templates has a green
icon.
- The skin directory with operational administrator templates has a pink icon.
- The skin directory with operational administrator, customer and e-mail templates
has a green and pink icon.
By default, the ‘Show active skins only’ check box is ticked off, so only directories
with active operational customer and administrator templates are displayed.
Click on directory icon or double click on the directory name to open a list of its
subdirectories (since the editor is JavaScript-based, only the list of subdirectories will
be reloaded and not the whole page). Click on directory name to display a section
containing the following list of available operations for the directory:
- Delete. Click on Delete link to delete the directory.
- Rename. Click on Rename link to rename the directory. You will need to enter a
new filename into the pop-up window and click on 'Ok' button.
- Restore from the repository. Click on Restore from the repository link to
restore all subdirectories and templates of this directory from backup (the backup copy
of skin templates is stored in 'skins_repository' directory).
- Change permissions. Click on Change permissions link to set permissions for
the directory. You will need to tick off 'r' check box to set read permissions, 'w' one to
set write permissions and 'x' one to set execute permissions for the directory owner,
the owner group and all users.
Last Revised: Jan 5.10
Page
322 of 409
Copyright © 2004-2010 CS-Cart.com
Change permissions
Template icons are marked according to template type - template file, image file,
CSS file, JavaScript file, etc.
Click on file icon or double click on the filename to open a pop-up window with the
content of the file. In this window you can edit the content of the file.
Click on
Click on the
button to save the changes in the file system.
link to cancel the changes and close the window.
Click on filename to display a section with a list of available operations for the file.
The list includes the operations you can apply to the directory (delete, rename,
restore from the repository, change permissions) and two additional ones:
- Edit. Click on Edit link to open the pop-up window with the content of the file.
- Download. Click on Download link to download the file to your local computer.
By using the ‘Create file’ and ‘Create directory’ forms you can create new files
and directories in the current one. Also you can upload files from your local computer,
the shop server or Internet to the current directory by using the ‘Upload file’ form.
5.7.10 Skin selector
This page allows you to change the skin of the customer storefront and the
administration panel according to your preferences. You are provided with a certain
number of appearance variations which can meet any of your needs.
Last Revised: Jan 5.10
Page
323 of 409
Copyright © 2004-2010 CS-Cart.com
The ‘Skin selector’ page contains the following elements:
- Skin for customer area;
- Templates directory;
- Skin for administration area;
- Templates directory.
If you want to change the customer storefront appearance:
- choose the necessary skin for the customer area in the ‘Skin for customer area’
select box. The skin preview image is displayed below.
- click on
.
If the selected skin wasn't loaded before, it will be copied from the directory of skin
repository and the process will be viewed on the screen. The template location of the
selected skin is represented in the ‘Templates directory’ field.
If you want to change the skin for the administration area, repeat the steps
mentioned above with the ‘Skin for administration area’ field.
Also you can modify the look and feel of the installed skin by yourself using CS-Cart
‘Template editor’.
Last Revised: Jan 5.10
Page
324 of 409
Copyright © 2004-2010 CS-Cart.com
5.8 Content
The content management system is another powerful feature of the CS-Cart
shopping cart software. Using this feature, you can create your own information topics,
such as help pages or your company history. The topics will be listed automatically in
the ‘Site info’ box of your storefront. Also, the system includes tools allowing
registered and unregistered users to subscribe to your shop (or company) news.
This feature is managed using the administration sections of the ‘Content’ tab.
Content
5.8.1 Pages
Here you can create additional pages that will be displayed in the Information side
box in the storefront. These pages can be of four types: text pages, forms, polls and
links.
Pages of all types are given on this page. You can display only one type of pages by
using the corresponding links pages, links, polls, forms.
First goes the search pattern.
Basic search options are:
- Find results with:
Available options:
• Any of these words - search for any entered word;
• All of these words - search for all entered words in any order;
• The exact phrase - search for the exact entered phrase.
- Type (pages, links, forms, polls);
- Parent page - choose a parent page.
You can manage content pages using the ‘Pages’ form. Here is given a list of all
text pages displayed in the storefront.
Advanced search options allow you to specify additional advanced search
criteria:
- Search in (page name, description, subpages)
- Tag (search by tags of pages)
- Status (search by status; whether Active, Hidden or Disabled)
Also, the system allows to create different search patterns and save them for future
use. Just set the search options, type the name of the pattern in the Save this search
Last Revised: Jan 5.10
Page
325 of 409
Copyright © 2004-2010 CS-Cart.com
as: input field and click on the
button. Once the search pattern is saved, it is
displayed in the dropdown list box next at the top.
Pages
The list of pages is represented at a table with the following columns:
- Select column – selects the page;
- Position – ordinal number of the page in the storefront;
- Name – name of the page (it is also specified whether it is a form, text page, poll
or link);
- Status – status of the page (Active - the page is available for customers, Disabled
- the page cannot be accessed by customers; Hidden - the page can be accessed by
customers only by following the direct link).
You can define the number of content pages displayed at a time, as explained in
the chapter Administration->Settings->Appearance>CMS pages per page
(admin).
To specify the page ordinal number:
- enter number into the ‘Position’ field;
- click on
Last Revised: Jan 5.10
.
Page
326 of 409
Copyright © 2004-2010 CS-Cart.com
For example, entering 1 for ‘Contact us’ and 2 for ‘About our company’ will change
the order of the pages in the ‘Information’ side box in the storefront: the ‘Contact us’
form will be listed first.
By default, if there are no numbers in the ‘Position’ field, the pages will be listed
in alphabetical order.
To delete a page (text page, link, form, poll), either:
- place a check mark in the Select column of the page you want to delete;
- click on Delete selected.
or:
- use the delete link in the page’s row.
To edit a page (text page, link, form, poll) click on its name and you will be
taken to the page where you can edit all its parameters.
To add a page, link, form, poll:
- click on the corresponding button;
•
•
•
•
- and set the necessary parameters.
Polls can be added only if the Polls addon is enabled in Administration>Addons.
Let’s consider each page type separately.
5.8.1.1 Pages
Pages are content pages where you can post various information such as your
company information, privacy policy, affiliate program terms and conditions, etc.
Last Revised: Jan 5.10
Page
327 of 409
Copyright © 2004-2010 CS-Cart.com
Editing page
Last Revised: Jan 5.10
Page
328 of 409
Copyright © 2004-2010 CS-Cart.com
All the parameters are grouped into three sections: Information, SEO/Meta data,
Availability.
Information
- Parent page – choose whether it is a root level page or a subpage;
- Name – name of the page;
- Description – text displayed on the page in the storefront;
This field also contains tools for text editing. If you want to use them, click on
.
- Status – status of the link (Active, Hidden or Disabled).
SEO/Meta data
- Page title - you can define any title that will be displayed in the browser when
viewing the page in the storefront;
- META description - a specific Meta Tag description for this page;
- META keywords - specific Meta Tag keywords for this page.
Availability
- User groups - user groups for which the page is available, i.e. the users signed up
for the selected groups have access to this page;
- Created date – date of the page creation;
- Use available period – if ticked off, the page will be available only during the time
specified;
- Available from – the first day when the page is available;
- Available till – the last day when the page is available.
The only required parameters are ‘Name’ and ‘Status’. You can leave any other
fields blank if you wish so.
After the necessary parameters are changed/added, click on the
save the changes to the database.
button to
There is the ability to preview the created page by following the URL in the Preview
box on the right.
Last Revised: Jan 5.10
Page
329 of 409
Copyright © 2004-2010 CS-Cart.com
The ‘Blocks’ tab is also displayed in the Editing page form. The blocks that were
created in the Pages tab in Design->Blocks are represented there. To enable the
necessary block, tick off the ‘Enable for this page’ check box.
Items of the block are displayed in the Listed items section. If the block is filled
manually, follow the +Add products (categories, polls, etc.) link, choose necessary
items in the pop-up section and add them to the Listed items section.
To find more information about Blocks see Design->Blocks.
In the Addons tab you see the addons that can be enabled for pages. This addon is
given here if it is enabled in Administration->Addons. For pages such addons are
Comments and reviews and SEO.
SEO names are defined for pages automatically. A standard SEO name is the name
of the page with spaces replaced by hyphens. SEO names can be changed according to
your wish and, what is more, a separate SEO name can be defined for each language of
the store.
Last Revised: Jan 5.10
Page
330 of 409
Copyright © 2004-2010 CS-Cart.com
Communication about the page, page rating or both can be enabled in the
Comments and reviews section.
If you make any changes click on
. To cancel the changes click on
.
Addons
In the ‘Tags’ tab you can set tags for this page. The tags specified here are
displayed in the ‘Tag cloud’ side box in the storefront.
- Popular tags – tags that have already been added for the page;
- My tags – tags that have been added by you;
Also here you can add new tags for the page, just type the necessary value into the
input field and click on
.
Note that the tab Tags is displayed here only if the setting Tags for pages is
enabled in Administration->Addons.
Last Revised: Jan 5.10
Page
331 of 409
Copyright © 2004-2010 CS-Cart.com
Tags
If any type of communication is enabled in the Addons tab, the Comments tab
appears on the page. The comments regarding the page and/or page ratings are shown
in this tab. Here you can view comments posted by store administrators as well as
customers.
Comments
Last Revised: Jan 5.10
Page
332 of 409
Copyright © 2004-2010 CS-Cart.com
5.8.1.2 Links
By clicking on the link name you go to the page Editing link. Here you will be able
to edit the link parameters. All the parameters are grouped into two sections:
Information and Availability.
Information
- Parent page – choose whether it is a root level page or a subpage;
- Name – name of the link;
- Page URL – link to the page in the storefront;
- Open in new window – tick off to open the link in a new window;
- Status – status of the link (Active, Hidden or Disabled);
Editing link
Last Revised: Jan 5.10
Page
333 of 409
Copyright © 2004-2010 CS-Cart.com
Availability
- User groups - user groups for which the page is available;
- Created date – date of the page creation;
- Use available period – if ticked off, the link will be active only during the time
specified below;
- Available from – the first day when the link is active;
- Available till – the last day when the link is active.
The fields marked with * are mandatory for filling in.
The tabs ‘Blocks’ and ‘Tags’ are also displayed in the Editing link form. Their
contents are the same as for the text pages.
5.8.1.3 Forms
The system allows you to add various types of contact forms that will be displayed
in the storefront. With the help of ‘Forms’ you can edit the contact forms even if you
have no idea of HTML code.
The form parameters are grouped into three sections: Information, SEO/Meta data,
Availability.
Information
- Parent page – choose whether it is a root level page or a subpage;
- Name – name of the form;
- Description – form description that is displayed in the storefront;
This field also contains tools for text editing. If you want to use them, click on
.
- Status – status of the form (Active, Hidden or Disabled).
SEO/Meta data
- Page title - you can define any title that will be displayed in the browser when
viewing the page in the storefront;
- META description - a specific Meta Tag description for this form;
- META keywords - specific Meta Tag keywords for this form.
Availability
- User groups - user groups for which the form is available;
Last Revised: Jan 5.10
Page
334 of 409
Copyright © 2004-2010 CS-Cart.com
- Created date – date of creation;
- Use available period – if ticked off, the form will be available only during the time
specified below;
- Available from – the first day when the form is available;
- Available till – the last day when the form is available.
To preview the form follow the link in the Preview box on the right.
Last Revised: Jan 5.10
Page
335 of 409
Copyright © 2004-2010 CS-Cart.com
Editing form
Last Revised: Jan 5.10
Page
336 of 409
Copyright © 2004-2010 CS-Cart.com
The contents of the tabs Blocks, Addons and Tags are the same as for the text
pages.
In the tab ‘Form builder’ you create the form itself and add the fields of the form:
- Form submit text – text displayed after submitting the form;
This field also contains tools for text editing. If you want to use them, click on
.
- E-mail to – e-mail to which the form will be sent;
- Form is secure (SSL) – tick off to make the form transfer secure;
Then follows the section with a list of defined fields of the form:
- Position – define position of the field in the form (ordinal number);
- Name - name of the field;
- Type – display type of the field;
All display types are divided into Base and Special. Base types include check box,
header (title), input field, multiple check boxes, multiple select box, radio group, select
box, separator (separating line), text area. Special forms include date (represented as
month, day, year select boxes), e-mail (only valid e-mails can be entered), number
(only digits can be entered), phone, countries list, states list, file (represented as a
form allowing to attach a file from local computer or from the Internet to the message).
If the display type presupposes some variants to select from, the Description field
will be displayed below for such variants. You will be able to add as many variants as
you want by using the plus mark.
- Required – tick off if the field is mandatory to fill in;
- Status – status of the field (Active or Disabled).
Last Revised: Jan 5.10
Page
337 of 409
Copyright © 2004-2010 CS-Cart.com
Form builder
To delete a row, click on
Last Revised: Jan 5.10
. (You can delete all the entries except the last one.)
Page
338 of 409
Copyright © 2004-2010 CS-Cart.com
If you make any changes click on the
on the
button. To cancel the changes click
button.
5.8.1.4 Polls
With the Polls addon you can create surveys and polls and place them on your
website. This will allow you to get answers to the questions that matter to you and your
customers to express themselves.
The following tabs are displayed for a poll: General, Blocks, Addons, Poll, Questions,
Poll statistics.
The Blocks tab is displayed only if the Blocks addon is enabled in
Administration->Blocks.
The following parameters of the poll are given in the General tab.
Information
- Parent page – choose whether it is a root level page or a subpage;
- Name – name of the form;
- Description – form description that is displayed in the storefront;
The field also contains tools for text editing. If you want to use them, click on
.
- Status – status of the form (Active, Hidden or Disabled).
SEO/Meta data
- Page title - you can define any title that will be displayed in the browser when
viewing the page in the storefront;
- META description - a specific Meta Tag description for this poll;
- META keywords - specific Meta Tag keywords for this poll.
Availability
- User groups - user groups for which the poll is available;
- Created date – date of the poll creation;
- Use available period – if ticked off, the form will be available only during the time
specified below;
Last Revised: Jan 5.10
Page
339 of 409
Copyright © 2004-2010 CS-Cart.com
- Available from – the first day when the form is available;
- Available till – the last day when the form is available.
The contents of the Blocks, Addons and Tags tabs are the same as for the text
pages.
In the Poll tab you can edit the following parameters:
- Allow respondents to see the poll results – tick off to allow respondents to see the
poll results;
- Poll header – enter the header of the poll;
- Poll footer – enter the footer of the poll;
- Poll message – message displayed in the storefront after poll is completed.
Poll
A question or questions of a particular poll are given in the Questions tab.
Last Revised: Jan 5.10
Page
340 of 409
Copyright © 2004-2010 CS-Cart.com
Questions
To delete a question:
- click on delete of the question you want to delete.
To edit a question use the
link.
To add a question click on the
button. The New question pop-up
section will open. It contains two tabs General and Answers.
Editing question
Last Revised: Jan 5.10
Page
341 of 409
Copyright © 2004-2010 CS-Cart.com
General:
- Question text – the question itself;
- Position – position of the question in the list;
- Type – define whether customers will have to give a textual answer, select only a
single option, one or more options when answering the question;
- Required – the question will be mandatory (displayed with an asterisk) in the
storefront;
Editing question
In the tab Answers a list of all possible answers to the question is given:
- Position - position of the answer in a list (ordinal number);
- Answer text – answer to the question;
- Text box – if ticked off, additional text box is displayed for the answer in the
storefront.
In you make any changes click on the
changes click on the
button. To cancel the performed
link.
The form allows bulk addition of answers.
To add a new row with empty fields to the section, click on
Last Revised: Jan 5.10
.
Page
342 of 409
Copyright © 2004-2010 CS-Cart.com
To add a new row with identical values to an existing one ("clone" link), click
on
.
To delete a row, click on
. (You can delete all the entries except the last one.)
The poll statistical data is given in the Poll statistics tab.
Poll statistics
In the section Summary the following data is given:
- Total number of poll forms submitted - the number of poll forms submitted in the
storefront;
- Number of poll forms fully completed - the number of fully completed poll forms;
- First poll form submitted - date and time when the first form was submitted;
- Last poll form submitted - date and time when the last form was submitted.
The values of Total number of poll forms submitted and Number of poll forms
fully completed are links. By clicking on them you will open a pop-up section with the
following information:
- Date - date and time the form was submitted;
- User - name of the user who submitted the form;
Last Revised: Jan 5.10
Page
343 of 409
Copyright © 2004-2010 CS-Cart.com
- IP - IP address of the user who submitted the form;
- Completed - whether the form was fully completed.
To remove information about a poll click on
mark of the poll you want to delete.
Each customer will be able to complete a poll only once. This is tracked by IP
addresses.
The questions of the poll, all answers to these questions and percentage ratio of the
answers are shown in the Statistics by questions tab.
The View answers link is displayed after the answer if it presupposes customer’s
comments. Click on the link and you will be able to view comments given by the
customer and date and time they were posted.
5.8.2 Languages
The CS-Cart software includes the ability for users to translate text labels into their
own languages. It could be achieved by assigning values to the language variables.
Specifying the available languages could be done by using the ‘Languages’ form.
This form contains two tabs:
- Translations;
- Languages.
Last Revised: Jan 5.10
Page
344 of 409
Copyright © 2004-2010 CS-Cart.com
Translations
A list of language variables is presented in the Translations tab. The data is given
in a table with the following columns:
- Select column – selects the language variable;
- Variable – name of the language variable (it is used in .tpl files);
- Value – value of the language variable (value that is displayed in the
administration panel and customer area).
You can change the number of language variables displayed per page as
explained in the chapter Administration->Settings->Appearance>Elements
per page.
There is an ability to go directly to the desired page. Just enter the number of the
page in the ‘Go to page:’ field and click on the
mark.
To set language variables:
- select the description language in the dropdown box in the top left corner (the
dropdown box is displayed only if two or more languages are defined in the store);
- set the language variables in the corresponding ‘Value’ fields;
- click on
.
To search for language variables using the search section:
Last Revised: Jan 5.10
Page
345 of 409
Copyright © 2004-2010 CS-Cart.com
- enter the name of language variable in the ‘Search for pattern’ field;
- click on
.
To delete a language variable:
- place a check mark in the Select box for the language variable you want to delete;
- click on Delete selected.
You can add a new language variable using the ‘Add language variable’
button. In the pop-up section enter the name of a language variable and its value and
click on the
button.
This section supports bulk addition.
To add a new row with empty fields to the section, click on
.
To add a new row with values identical to an existing one ("clone" row) click
on
.
To delete a row, click on
. (You can delete all the rows except the last one.)
Languages
In the ‘Languages’ tab a list of all defined languages is given. The list is
represented as a table with the following columns:
- Select column;
- Language code - two-letter code assigned to the language;
- Name - name of the language;
- Status - status of the language (Active - available in the storefront, Disabled unavailable in the storefront).
To modify the values of the listed parameters (language name, status):
Last Revised: Jan 5.10
Page
346 of 409
Copyright © 2004-2010 CS-Cart.com
- set the desired values in the appropriate fields.
- click on
.
If you do not need the English language to be displayed in the drop-down menu,
be sure that there is at least one other language in a language list except English
before you change the status of the English language to ‘Disabled’.
To add a new language use the
button:
- enter the desired information in the ‘Add language’ pop-up section;
- click on
.
To delete a language:
- place a check mark in the Select box for the language you want to delete;
- click on Delete selected.
You cannot delete the English language.
There is the link translate privileges under the page title. Following this link you will
be able to translate the privileges (access privileges of the administrators).
5.8.3 Tags
The Tags addon allows you to give products or categories different 'tags'. These
tags are like free-form keywords or labels that you add to an item make it easier to
find it later. Tags help to group items that have something in common.
All the tags, defined by the store administrator, are displayed alphabetically in the
Tag cloud side box of the storefront and are links to the products or pages they are
assigned to.
To display Tag cloud side box in the customer storefront it is necessary that a
block with the content Tag cloud is defined on the Blocks page (Design->Blocks).
Last Revised: Jan 5.10
Page
347 of 409
Copyright © 2004-2010 CS-Cart.com
Customers also can create their own tags for the store products and pages, that will
be shown in a separate box My tag cloud. Besides, next to the tag customers will see
the number indicating the number of items to which the tag is assigned.
To display My tag cloud side box in the customer storefront it is necessary that
a block with the content My tag cloud is defined on the Blocks page (Design>Blocks).
Tags
Here is given a complete list of tags created in the store both by customers and
administrators. The list is represented as a table with the following columns:
- Select column;
- Tag – name of the tag;
- Popularity - number of items (products and pages) to which the tag is assigned;
- Users - number of users who added this tag;
- Products - number of products to which the tag is assigned;
- Pages - number of pages to which the tag is assigned;
Last Revised: Jan 5.10
Page
348 of 409
Copyright © 2004-2010 CS-Cart.com
- Status – status of the tag (approved/disapproved/pending). The tags added by
the administrator get the status Approved automatically.
You can use the search section to display tags only of the necessary status
(Approved, Disapproved or Pending).
If you make some changes click on the
button.
To delete a tag:
- check the necessary tag;
- click on the Choose action link and select Delete selected;
or
- use the delete link of the tag.
To disapprove a tag:
- check the necessary tag;
- click on the Choose action link and select Disapprove selected.
To approve a tag:
- check the necessary tag;
- click on the Choose action link and select Approve selected.
5.8.4 Site News
In this section you can set up site news which will be shown in the ‘Site news’ box
in the storefront.
You can disable the ‘Site news’ option by changing the status of the ‘News and
e-mails’ addon to Disabled (Administration->Addons->News and e-mails).
The news are managed using the ‘News’ dialog box, which contains a list of all
added news.
The list of all added news is represented as a table consisting of the following
columns:
- Select column;
- Date - date the news was added;
Last Revised: Jan 5.10
Page
349 of 409
Copyright © 2004-2010 CS-Cart.com
- News - the news header;
- Separate page - if it is ticked off then the news will be displayed on a separate
page;
- Status - status of the site news (Active - available in the storefront, Disabled unavailable in the storefront).
Site news
To delete a news item:
- click on the delete link of the item.
To delete several news items:
- tick off the check boxes opposite the entries you want to delete;
- click on Delete selected.
To add a news item, use the
where you should fill in the following fields:
button, a pop-up section will appear
- Name - the news header;
You cannot add news without entering the header.
- Description - text of the news article that is displayed on the Site news page in
the storefront;
This field also contains tools for text editing. If you want to use them, click on
.
Last Revised: Jan 5.10
Page
350 of 409
Copyright © 2004-2010 CS-Cart.com
- Date - date the news item was added;
- Show on separate page - put a tick mark if you want the news to be displayed on
a separate page;
- Comments - here you can enable discussion about the news. You can allow
communication, rating or both rating and communication;
- Status - status of the news (Active or Disabled).
When you have entered the desired data into the appropriate fields, click on
to add the news.
SEO names are automatically defined for news in the Addons tab. A standard SEO
name is the name of the news with spaces replaced by hyphens. SEO names can be
changed according to your wish and, what is more, a separate SEO name can be
defined for each language of the store.
The SEO addon must be enabled in Administration->Addons to be able to
define SEO names.
Once the news item is added, there appears the ‘Blocks’ tab. The blocks that were
created in the News tab in Design->Blocks are represented there. To enable the
necessary block, tick off the ‘Enable for this page’ check box.
Items of the block are displayed in the Listed items section. If the block is filled
manually, follow the +Add ... link, choose necessary items in the pop-up section and
add them to the Listed items section.
To edit the parameters of a news item, use the
link in its row:
- enter the desired information into the appropriate fields;
- click on
Last Revised: Jan 5.10
.
Page
351 of 409
Copyright © 2004-2010 CS-Cart.com
Editing news
5.8.5 Newsletters
Using this menu item you can send newsletters to different users. For example, you
can send site news to news subscribers.
You can disable the ‘Newsletters’ option by disabling the ‘News and e-mails’
addon using the path Administration->Addons->News & e-mails.
Last Revised: Jan 5.10
Page
352 of 409
Copyright © 2004-2010 CS-Cart.com
If you want customers to be able to sign up for the store newsletters, it is
necessary that a block with the content Mailing lists is defined on the Blocks page
(Design->Blocks).
You can manage newsletters using the ‘Newsletters’ form.
Newsletters
The form contains a list of all newsletters. The list is represented as a table
consisting of the following columns:
- Select column - selects newsletter;
- Subject - subject of the newsletter;
- Date - date and time when the newsletter was sent.
To delete a newsletter:
- click on the delete link of the newsletter.
To delete several newsletters at a time:
- tick off the check boxes opposite the entries you want to delete;
- click on Delete selected.
To edit a newsletter use the
necessary parameters.
Last Revised: Jan 5.10
link and in the pop-up section change the
Page
353 of 409
Copyright © 2004-2010 CS-Cart.com
To add a newsletter, use the
fill in the following fields:
button and in the pop-up section
- Subject - subject of the newsletter;
You cannot add a newsletter without entering its subject.
- Random subjects (one per line) - define several subjects and then subject for each
e-mail will be randomly picked from this list;
- Plain text body - message in clear-text readable form;
- HTML body - newsletter body in HTML format;
This field also contains tools for text editing. If you want to use them, click on
.
The following variables can be used in the HTML body:
%UNSUBSCRIBE_LINK
%SUBSCRIBER_EMAIL
%COMPANY_NAME
%COMPANY_ADDRESS
%COMPANY_PHONE.
They will be automatically changed to the values defined in the settings.
- Template - load one of the existing newsletter templates if necessary;
- Campaign - select a campaign to which this newsletter is applied;
- Status - Active or Disabled;
- Mailing lists - choose a mailing list for the newsletter (the subscribers of the
chosen mailing list will receive the newsletter);
- Users - add subscribers from the list of store users by following the link +Add
subscribers from users;
- Send to test e-mail - enter an e-mail and do a test mailing by clicking on the
button.
To save the newsletter and its settings, click on the
button.
To save the newsletter settings and send it to the specified e-mail addresses,
click on the
button.
To cancel the changes click on the
Last Revised: Jan 5.10
link.
Page
354 of 409
Copyright © 2004-2010 CS-Cart.com
On the Newsletters page you can create newsletter templates (pattern that can be
used in your future newsletters), campaigns for newsletters and autoresponders.
To add a newsletter template open the Newsletter templates page by clicking
on the Templates link on the right of the page and use the
button.
To add an autoresponder open the Newsletter autoresponders page by
clicking on the Autoresponders link on the right of the page and use the
button. The created autoresponders can be assigned to mailing
lists. For more details refer to the Mailing lists chapter.
Click on the Campaigns link on the right of the page and you are taken to the page
with a list of all campaigns carried on in your store.
This feature can considerably simplify managing store newsletters as any newsletter
can be assigned to a campaign. So this makes it easy to keep track of all the
newsletters.
Also, on the Campaigns page you will be able to view the campaign statistics
(newsletters of the campaign and the number of clicks on the links in the newsletters).
Last Revised: Jan 5.10
Page
355 of 409
Copyright © 2004-2010 CS-Cart.com
Campaigns
The name of the campaign and its status are presented on the page.
To delete a campaign tick it off and click on the
To add a new campaign use the
button.
To save the changes in the database click on the
To cancel the changes click on the
button.
button.
link.
By following the Campaign statistics link you go to the page where the newsletters
assigned to the campaign are listed. Also there you will see the number of clicks made
by customers on the links of these newsletters.
5.8.6 Mailing lists
Mailing list is a register of names and addresses to which advertising matter of the
store is sent by electronic mail.
The ‘Mailing lists’ feature allows you to build mailing lists for your store. It gives
the ability to group your store subscribers.
On the page you see all the existing mailing lists, the number of subscribers who is
signed for them and their statuses.
Last Revised: Jan 5.10
Page
356 of 409
Copyright © 2004-2010 CS-Cart.com
Mailing lists
To edit a mailing list, click on the
to edit:
link. You will see the following parameters
- Name – name of the mailing list;
- From name – name of the sender (e.g. company name);
- From email – e-mail of the sender;
- Reply to – e-mail to which replies are sent;
- Confirmation e-mail – choose an autoresponder for this mailing list (e.g. it can be
sent to confirm subscriptions or unsubscriptions, etc.)
Learn how to create autoresponders in the chapter Content->Newsletters.
- Show at checkout – tick off to display subscription to the mailing at checkout;
- Show on registration – tick off to display subscription to the mailing during
registration;
- Show in the "Mailing lists" box – tick off to display subscription to the mailing in a
separate side box in the storefront;
- Subscribers – following the Add subscribers link, you will be taken to the
Subscribers page, where you will be able to add a subscriber or sign up someone from
the store users;
- Status – status of the mailing list (Active, Hidden or Disabled).
Last Revised: Jan 5.10
Page
357 of 409
Copyright © 2004-2010 CS-Cart.com
Editing mailing list
To delete a mailing list click on
mark.
To add a new mailing list click on the
button.
5.8.7 Subscribers
Any registered or unregistered users of your shop can subscribe to the news by
entering their e-mail in the appropriate field of the ‘Mailing lists’ box in the storefront.
Last Revised: Jan 5.10
Page
358 of 409
Copyright © 2004-2010 CS-Cart.com
Subscribers
On this page a complete list of subscribers is given. The subscribers are listed in the
order they were added to the list. Their e-mail addresses are given and then follows
the information about the number of mailing lists they are signed up for.
You can disable the ‘Subscribers’ option by changing the status of the ‘News and
e-mails’ addon to Disabled (Administration->Addons->News & e-mails).
To edit the subscriber information, click on the
link.
- E-mail – e-mail address of the subscriber;
- Registered – date and time when the subscriber was signed up for the mailing list
Mailing lists:
- Mailing list – name of the mailing list;
- Format – format of the letter (plain text or HTML);
- Language – language in which letters are sent;
You can create newsletters using different languages. So a subscriber will receive
newsletters written in his native language. For more information see the chapter
Content->Newsletters.
- Subscribed – if ticked off, then the subscriber is signed up for the mailing list;
Last Revised: Jan 5.10
Page
359 of 409
Copyright © 2004-2010 CS-Cart.com
- Confirmed – if ticked off, then the subscriber is approved by the store
administrator.
Editing subscriber
To delete a subscriber:
- click on
mark of the subscriber you want to delete.
To add a new subscriber, use the
button.
To add a new subscriber from the list of the store users, follow the link Add
subscribers from users.
5.8.8 Store locator
This feature allows you to indicate all your store locations on a Google map. This
map will be available for your customers and they will be able to choose the point of
sale that is e.g. the nearest to their places.
Last Revised: Jan 5.10
Page
360 of 409
Copyright © 2004-2010 CS-Cart.com
To display the Store locator side box in the customer storefront it is necessary
that a block with the content Store locator is defined on the Blocks page (Design>Blocks).
Store locator
To be able to do this first you need to get a Google Map account and a Maps API
key. Enter your Google key in the settings of the Store locator addon
(Administration->Addons) and set coordinates of the points of sale on this page.
A list of all created store locations is presented on the page. Names of locations and
their statuses (Active or Disabled) are given in the list.
To delete a store location click on
mark of the entry you want to delete.
To edit a store location click on the
link. In the appeared pop-up section you
will be able to edit the following parameters:
- Name – name of the store location;
- Position – ordinal number in the list;
- Description – description of the store location;
- Country – country where the store is located;
- City – city in which the store is located;
Last Revised: Jan 5.10
Page
361 of 409
Copyright © 2004-2010 CS-Cart.com
- Coordinates (lat x long) – set coordinates (latitude and longitude of the location).
You can click on the
button and set the coordinates on the Google map;
- Localization - select localization(s) for which the store location will be displayed.
The ‘Localization’ field is displayed only if at least one item is defined in
Shipping/taxes->Localizations.
Editing store location
Last Revised: Jan 5.10
Page
362 of 409
Copyright © 2004-2010 CS-Cart.com
To add a new store location click on the
necessary fields in the pop-up section Add store locations.
button and fill in the
5.8.9 SEO rules
This is one more feature allowing to make your store URLs more friendly for search
engines, namely simplify URLs and make them shorter. Moreover, with the provided
multi-language support, your shopping cart will be indexed by web crawlers in different
languages.
Here you can change URLs for different pages of the store. Just define which URL
should be edited and enter a new value for it. For instance, events.search can be
replaced
with
events
in
the
URL
http://www.domain.com/
index.php?dispatch=events.search. Such replacements are called SEO rules.
Some SEO rules are already listed on the page. Their new names are generated
automatically by replacing dots and underscores with hyphens (for example,
profiles.add is replaced with profiles-add).
The following information is given on the page:
- Select column;
- Replace for - part of the URL that will indicate a replacement (e.g. auth.login_form
for the URL http://www.domain.com/index.php?dispatch=auth.login_form);
- Name - the value to which the standard URL will be changed. (e.g. login for
auth.login_form).
To delete an entry from the table, click on delete of the entry you want to
delete.
To delete several entries at once:
- tick off several entries;
- click on Delete selected.
To add a new entry, click on the Add new button, specify the necessary values in
the pop-up window and click on
Last Revised: Jan 5.10
.
Page
363 of 409
Copyright © 2004-2010 CS-Cart.com
SEO rules
If your CS-Cart based store uses several languages, SEO rules can be defined for
each language individually. You just need to select the necessary language under the
name of the page (above the search section) and specify new values for their URLs.
By default, URL values will be formed in the following way: the values defined for
the base language followed by a hyphen and a language code (two-letter code
specified for the language in the admin panel).
Last Revised: Jan 5.10
Page
364 of 409
Copyright © 2004-2010 CS-Cart.com
5.8.10 Banners
Here is given a list of banners that can be displayed in the store. The list is
represented as a table with the following columns:
- Select column;
- Banner – name of the banner;
- Type – type of the banner (Graphic banner or Text banner);
- Status – status of the banner (Active - the banner is displayed in the storefront,
Disabled - the banner is not available in the storefront; Hidden - the banner can be
accessed by customers only by the direct link).
Follow the link banners statistics to view statistical data on how many times
banners were viewed and clicked on.
To delete a banner:
- place a check mark in the Select column of the banner you want to delete;
- click on Delete selected.
To add a new banner use the
button, enter the necessary
parameters in the pop-up section and click on
Click on the
.
link to edit the following banner parameters:
- Name – name of the banner;
- Type – whether it is a graphic banner or a text banner;
- Image – banner image;
You can download the image from your local computer, from your server or type
the URL to the image. Here you can also define an alternative text for the image.
- Open in a new window – if ticked off, the banner link will open in a new window;
- URL – URL to which the banner will redirect;
- Created date – date of banner creation;
- Status – status of the banner.
To save the changes click on
button. To cancel the changes click on the
link.
5.8.11 Comments and reviews
Here you can view all the existing posts on products, categories, orders, news, gift
registry, topics, pages, etc. and find the necessary one by using the search pattern.
The Comments and reviews link is displayed in the side box if the Comments
and reviews addon is enabled in Administration->Addons.
Last Revised: Jan 5.10
Page
365 of 409
Copyright © 2004-2010 CS-Cart.com
Search section
In the search pattern you can search for the posts by author of the message, the
message text, type of discussion (whether it is rating, communication or both rating
and communication), rating.
To make the search results more accurate click on Advanced search options. You
will be able to specify IP address of the author, the period of search (choose any of the
defined periods or define the period by yourself) and specify whether the post is
approved or not.
Also you can specify the way the search results will be displayed. Using the ‘Sort
by’ option you can choose among 4 parameters (Author, Approved, Date, IP address)
by which the results will be sorted and specify the way of sorting (ascending or
descending). For example, if you choose ‘Author’ and ‘desc.’, the search results will be
sorted by author in descending order, i.e. in alphabetical order.
Moreover, the system allows to create different search patterns and save them for
future use. Just set the search options, type the name of the pattern in the Save this
search as: input field and click on the
button. Once the search pattern is saved,
it is displayed in the dropdown list box at the top.
Last Revised: Jan 5.10
Page
366 of 409
Copyright © 2004-2010 CS-Cart.com
Comments and reviews
The page is represented as a set of tabs: Product reviews, Category reviews, Page
comments, Order communication, Testimonials, Gift Registry guestbook, New
comments. The names of tabs correspond to the content. For example, in the ‘Product
reviews’ tab all reviews about products are displayed.
Let’s see the Product reviews tab. The following information is given for each
review:
- Author - author of the review;
- IP address - author's Internet Protocol address;
- Product - product about which the review was posted;
- Review - review about the product (if it is presupposed by the type of
communication);
- Rating - rating of the product (if it is presupposed by the type of communication);
- Date - date and time of creation;
- The ‘Delete’ check box;
- The ‘Approve’ or ‘Disapprove’ check box - what check box is displayed depends on
the current status of the review.
If you make any changes click on
Last Revised: Jan 5.10
.
Page
367 of 409
Copyright © 2004-2010 CS-Cart.com
To delete a post from the list:
- tick off the ‘Delete’ check box of the entry you want to delete;
- click on Delete selected.
The ‘Comments and reviews’ feature can be removed from the ‘Content’ tab.
You can do this in Administration->Addons.
Last Revised: Jan 5.10
Page
368 of 409
Copyright © 2004-2010 CS-Cart.com
5.9 Affiliate
The Affiliate addon is a built-in tool that provides the ability to promote your online
store with no other software required. All you need to do is to place promotional
banners with links to your store on your affiliates’ sites. When customers click on the
banner they are redirected to your store. CS-Cart automatically identifies the site
which referred the customers and calculates the commissions for the affiliate if
afterwards the customers buy some products. Commissions can be set as a percentage
from the sales or a flat rate. The Affiliate addon allows you to create the 2nd, 3rd and
'n' tier commissions to reward your affiliates.
In an effort to advertise the store you can use text and graphical banners that can
be attached not only to the store itself but also to a particular product, category, URL.
Furthermore, this module gives you the ability to create banners displaying a single
product or a set of products (they will be displaying one by one in a random way).
The use of the Affiliate addon presupposes the existence of a new user type affiliate. Affiliates can register by themselves on the affiliate’s authentication page.
Every affiliate will have own Affiliate plan where you specify the commission rate,
define the minimum amount of payment and the period during which the affiliate gains
profit from the customer, etc. Thus you can set up the most favorable conditions for
the most valuable affiliates.
‘Affiliate’
5.9.1 Product groups
On this page you can create the so-called ‘Product groups’ consisting of different
products, categories and URLs to which text and graphic banners can be attached later
on.
There are three tabs on ‘Product groups’ page:
- Group for categories;
- Group for products;
- URL.
Last Revised: Jan 5.10
Page
369 of 409
Copyright © 2004-2010 CS-Cart.com
Group for categories
In the ‘Group for categories’ tab you see the following columns:
- Select column;
- Name - name of the group;
- Categories - URLs to the categories that constitute the group;
- Status - status of the group (Active or Disabled).
Click on
if you make any changes.
To delete a group:
- click on the delete link of the group.
To delete several groups at a time:
- tick off check boxes opposite the entries you want to delete;
- click on Delete selected.
Using the section ‘Add group for categories’ you can add a new group for
categories. First you need to give the name of the group, then select categories for it
and click on the
button.
To edit the parameters of the existing group click on the
link.
In the ‘Group for products’ tab there are the following columns:
Last Revised: Jan 5.10
Page
370 of 409
Copyright © 2004-2010 CS-Cart.com
- Select column;
- Name - name of the group;
- Products - URLs to the products that constitute a group;
- Status - status of the group.
Click on
if you make any changes.
To delete a group for products:
- click on the delete link of the group.
To delete several groups at a time:
- tick off check boxes opposite the entries you want to delete;
- click on Delete selected.
Using the section ‘Add group for products’ you can add a new group for products.
First you need to give the name of the group and define its status, then click on +Add
products. The Add products pop-up section will appear on the screen. Select
products for the group there and add them to the group.
To edit the parameters of the existing group click on the
link.
Group for products
Last Revised: Jan 5.10
Page
371 of 409
Copyright © 2004-2010 CS-Cart.com
In the ‘URL’ tab there are the following columns:
- Select column;
- Name - name of the group;
- URL - URL address;
- Status - status of the group (Active or Disabled).
Click on
if you make any changes.
To delete a URL:
- click on the delete link of the URL.
To delete several URLs at a time:
- tick off check boxes opposite the entries you want to delete;
- click on Delete selected.
Using the ‘Add url group’ section you can add a new URL. First you need to enter
into the corresponding fields the name of the group and URL and then click on
.
URL
To edit the parameters of the existing group click on the
Last Revised: Jan 5.10
link.
Page
372 of 409
Copyright © 2004-2010 CS-Cart.com
5.9.2 Banners
On the ‘Banners’ page you can create different kinds of banners: text banners,
graphic banners and product banners. The links to the corresponding sections are on
the right of the page.
By clicking on Banners you are redirected to the ‘Text banners’ page where you
can create text banners that will be located on the affiliates’ sites. Through these text
banners new customers will be referred to the store.
There are four tabs on the ‘Text banners’ page. They are:
- Product groups;
- Categories;
- Products;
- URL.
Text banners
In the ‘Product groups’ tab there are the following columns:
- Select column;
- Title - banner title;
- Show title - tick off if you want the title to be displayed;
- Width - banner width (pixels);
- Height - banner height (pixels);
If no value is defined in the ‘Width’ and ‘Height’ fields the banner sizes will
depend on its content.
Last Revised: Jan 5.10
Page
373 of 409
Copyright © 2004-2010 CS-Cart.com
- Product groups - product group to which this banner is assigned;
- New window - put a tick if you want the link to be opened in a new window;
- Status - status of the banner (Active or Disabled).
If you make any changes click on
to save them to the database.
To delete a text banner:
- click on the delete link of the banner.
To delete several banners at a time:
- tick off check boxes opposite the entries you want to delete;
- click on Delete selected.
If you want to edit the banner click on the
‘Update banner’ page.
link and you are redirected to the
To create a new banner use the
button. In the pop-up section you
should fill in the following fields: title, show title, width, height, content (text of the
banner), open in a new window, show URL, status, product group.
Only four fields (title, content, status and product group) are mandatory for
filling in, the others are optional.
After all the necessary fields are filled in click on
button.
The rest of the tabs contain almost the same columns and fields with small
variations. In all tabs exists a difference in the column following the ‘Height’ column. In
the ‘Categories’ tab it is the ‘Categories’ column, in the ‘Products’ tab it is the
‘Products’ column, and for the ‘URL’ it is the ‘URL’ column. To what the banner will be
assigned is defined in these columns. And in the ‘New banner’ sections tabs have the
corresponding differences.
By clicking on the Graphic banners link on the right you are redirected to the
‘Graphic banners’ page where you can create graphic banners and assign them to
different product groups, categories, products, URLs. On the page you see four tabs:
‘Product groups’, ‘Categories’, ‘Products’, ‘URL’.
Last Revised: Jan 5.10
Page
374 of 409
Copyright © 2004-2010 CS-Cart.com
The ‘Categories’ tab contains the following columns:
- Select column;
- Title - banner title;
- Categories - categories to which the banner is assigned;
- New window - tick off if you want the link to be displayed in a new window;
- Status - status of the graphic banner.
Graphic banners
If you make any changes click on
to save them in the database.
To delete a graphic banner:
- click on the delete link of the banner.
To delete several banners at a time:
- tick off check boxes opposite the entries you want to delete;
- click on Delete selected.
To edit the parameters of the banner click on
To add a new banner use the
following fields:
.
button. Here you should fill in the
- Title - banner name;
- Description - description of the banner;
- Image - the banner image;
Last Revised: Jan 5.10
Page
375 of 409
Copyright © 2004-2010 CS-Cart.com
To select an image on a local computer or a server use Local or Server links. To
type the URL of the file click on the URL link.
- Open in a new window - tick off if you want the link to be opened in a new
window;
- Status - status of a banner (Active or Disabled);
In the Categories section choose to what category(-ies) the banner will be
assigned. To do this use the
link.
New banner
Last Revised: Jan 5.10
Page
376 of 409
Copyright © 2004-2010 CS-Cart.com
The rest of the tabs contain almost the same columns and fields with small
variations. In all tabs exists a difference in the column following the ‘Title’ column. In
the ‘Product groups’ tab it is the ‘Product groups’ column, in the 'Products’ tab it is
the ‘Products’ column, and for the ‘URL’ it is the ‘URL’ column. To what the banner will
be assigned is defined in these columns. And correspondingly there exist similar
differences in the ‘New banner’ sections of all tabs.
Using the Product banners link you open the ‘Product banners’ page where you
can modify the banners that use information about databased products. Product
banner is a banner which can include the product image, product name, product
description. The products in this banner are displayed in a random order.
The ‘Product banners’ form contains a list of the defined banners:
Product banners
- Select column;
- Title - name of the banner;
- Width - banner width (pixels);
- Height - banner height (pixels);
- New window - tick off in order for the link to be opened in a new window;
- Add to cart - tick off if you want the customer to be redirected to the ‘Cart
content’ page;
- Status - status of the banner (Active or Disabled).
Click on
if you make some changes.
To delete a product banner:
- click on the delete link of the banner.
Last Revised: Jan 5.10
Page
377 of 409
Copyright © 2004-2010 CS-Cart.com
To delete several banners at a time:
- tick off check boxes opposite the entries you want to delete;
- click on Delete selected.
Each banner has the
link, click on it and you are redirected to the ‘Editing
banner’ page where you can edit the banner.
You can edit the following fields:
- Title - banner title;
- Width(pixels) - banner title;
- Height(pixels) - banner height;
- Image - place the image at the top or at the bottom of the banner or disable the
image;
- Product name - place the product name at the top or at the bottom of the banner
or disable the name;
- Short description - place short description at the top or at the bottom or disable it;
- Align - here you can align the image left, right or center in the banner;
- Show border - tick off to display the borders of the banner;
- Add to cart - if this check box is enabled a customer is redirected to the store with
the product already added to cart;
- Open in new window - put a tick if you want the link to be opened in a new
window;
- Status - status of the banner (Active - available, Disabled - unavailable).
If you make any changes click on
.
When you add a new product banner using the
button, fill in all the
fields defining what product information will be displayed in the banner, how it will be
aligned, etc.
At any moment you can view what the banner will look like by using the ‘Preview’
link. In the appeared section you will see the Refresh banner link, by clicking on
which you will refresh the banner and it will display another product.
After you click on the
Last Revised: Jan 5.10
button, the banner will be created.
Page
378 of 409
Copyright © 2004-2010 CS-Cart.com
5.9.3 Plans
The ‘Affiliate’ addon allows to create different advertising plans for different
affiliates. In each plan you define its own commission rates for different actions, also
you are provided with the ability to define commissions for products, categories,
coupons and multi tier affiliates. Thus you can set up the most favorable conditions for
the most profitable affiliates.
Affiliate plans
The ‘Plans’ page contains a list of all affiliate plans. The following data is displayed
for each plan:
- Select column;
- Name - name of the plan;
- Affiliates - the number of affiliates with this plan;
- Status - status of the plan (Active or Disabled).
Click on
if you make any changes.
To delete a plan:
- click on the delete link of the plan.
To delete several plans at a time:
- tick off check boxes opposite the entries you want to delete;
- click on Delete selected.
To add a new affiliate plan use the
Last Revised: Jan 5.10
button.
Page
379 of 409
Copyright © 2004-2010 CS-Cart.com
Editing plan
Click on the
link to edit the plan. You will be redirected to the ‘Editing plan’
page with the tabs General, Products, Categories, Coupons, Multi tier affiliates.
In the tab General you can edit the following parameters:
- Name - name of the affiliate plan;
- Description - plan description;
- Life span of customer cookie (days) - if the value of this option is defined then it is
not necessary for the customers to make purchases or register on their first visit of the
store for the affiliate to receive a commission. The information about the affiliate will be
kept within the number of days specified;
Last Revised: Jan 5.10
Page
380 of 409
Copyright © 2004-2010 CS-Cart.com
It can be done if cookies are enabled in the customers’ browsers.
- Initial incentive balance ($) - if you want to set an incentive payment for the
affiliate enter the sum here;
- Minimum commission payment ($) - minimum amount paid to the affiliate, you
cannot pay out commission until it is the amount defined here;
- Commission calculation based on product price - if enabled then the commissions
for the affiliate who has redirected the customer are calculated according to the
product price. The commissions for other affiliates will be charged from the product
price according to the rates specified in the ‘Multi tier affiliates’ tab;
- Show orders - tick off to make the order number to be the link to the ‘Order info’
page;
- Coupon commission should override all the others - put a tick if you want a
coupon commission to cancel other commissions.
- Status - status of the plan.
In the section ‘Commission rates’ you can specify commission charges that the
affiliates will get for:
- Show banner - demonstration of the banner;
- Click - a click on a banner;
- Payout sales - a purchase made by the customer who came from the affiliate’s
site;
- New customer - a registered customer;
- New affiliate - a new affiliate of the store.
All commissions can be defined as a percentage from the sales (Percent(%)) or a
flat rate (Absolute($)).
Last Revised: Jan 5.10
Page
381 of 409
Copyright © 2004-2010 CS-Cart.com
Commission rates
If you make any changes click on
.
The percentage of sales can be specified for each product, category, coupon and
multi tier affiliates using the forms in the following tabs:
- Products;
- Categories;
- Coupons;
- Multi tier affiliates.
Click on the ‘Products’ tab to define the products from which the affiliate will get
commissions. Here by using the +Add products link you create a list of products and
define sales commissions for them.
Last Revised: Jan 5.10
Page
382 of 409
Copyright © 2004-2010 CS-Cart.com
Products
In the ‘Categories’ tab you select the categories and subcategories and define the
sales commissions for each of them.
Categories
Notice that if you define sales commissions for a root category these
commissions are not applied to its subcategories.
In the Coupons tab you define commissions for coupon usage. After clicking on the
link + Add coupon(s) you select a coupon in the list of all existing coupons, define the
commission rate and click on the
button. After that the affiliates will
be able to distribute coupon codes among their customers.
Last Revised: Jan 5.10
Page
383 of 409
Copyright © 2004-2010 CS-Cart.com
Coupons
In the ‘Multi tier affiliates’ tab you define the percentage rates of commissions for
affiliates of different tiers. Let’s consider the following examples: the affiliate has multi
tier affiliate system (1st, 2nd, 3rd tier affiliates). The following commissions are
defined for three levels:
Level 1 - 5%
Level 2 - 2.5%
Level 3 - 1%.
If the income from the 1st tier affiliate is $100 then the affiliate gets 5% of $100,
that is $5.
If the income from the 2nd tier affiliate is $100 then he gets 2.5% of $100, that is
$2.5 and the 1st tier affiliate gets 5% of $100, that is $5.
If the income from the 3rd tier affiliate is $100 then he gets 1% of $100, i.e. $1, the
2nd tier affiliate gets 2.5% of $100 and the 1st tier affiliate gets 5% of $100.
So the profit the affiliate receives depends on its level.
Last Revised: Jan 5.10
Page
384 of 409
Copyright © 2004-2010 CS-Cart.com
Multi tier affiliates
To add new levels with defined commission rates use the
link.
If several types of commissions are applied to the product only one is charged.
For example, if product and category commissions are set only product commission
is charged. In case when neither product nor category commissions are applied then
the commission is calculated according to the rate specified in the section
‘Commission rates’ for the ‘Sale’ action.
5.9.4 Affiliates
On the ‘Approve affiliates’ page you can view all your affiliates’ accounts and
approve or decline new accounts. The page contains two sections:
- Search;
- a list of all affiliate accounts.
With the search form you can search for the affiliates’ accounts by name, company,
e-mail. By clicking on Advanced search options you will expand the search form and
will be able to specify additional parameters: username, address, city, zip/postal code,
country, state/province, status of the affiliate, affiliate plan.
Last Revised: Jan 5.10
Page
385 of 409
Copyright © 2004-2010 CS-Cart.com
Affiliates
The list of all affiliate accounts is represented as a table with the following columns:
- Select column;
- ID - affiliate identification number;
- Username - a unique name identifying the user;
- Name - full name of the user;
- Registered - date and time of registration;
- Status - whether the affiliate is already approved, awaiting approval or declined;
- Plan - name of the plan.
If you make any changes click on
.
To approve/decline an affiliate:
- put a tick mark for the necessary affiliate or affiliates;
- click on the Choose action link and choose Approve selected or Decline
selected.
If you click on the link in the ‘ID’, ‘Username’ or ‘Name’ columns you are redirected
to the ‘Affiliate’ page with personal information, affiliate information and information
about commissions of last periods. Here you can use the Change links and change the
status and plan of the affiliate.
Last Revised: Jan 5.10
Page
386 of 409
Copyright © 2004-2010 CS-Cart.com
Viewing affiliate
5.9.5 Approve commissions
On the page you can view the statistics of all actions for which commissions are
charged. For instance, you can find out the number of clicks on banners during a
certain period of time, the average amount paid out for them, and a lot more.
Moreover, here you can get to know who of all your affiliates was the most efficient in
promoting your store and approve or delete the commissions.
Last Revised: Jan 5.10
Page
387 of 409
Copyright © 2004-2010 CS-Cart.com
Search
Using the ‘Search’ section you can:
- search for the commissions of a particular affiliate;
- choose Plan to view commissions charged according to this plan only;
- in the ‘Amount’ field set the minimum and maximum amount of commissions to
limit the search process.
To make the search results more accurate click on Advanced search options and
you will be able to search by the following parameters:
- Period - choose any of the defined periods or set your own one;
- Action - action for which the commissions are charged;
- Show zero actions - field allows to select the commissions that are not equal to 0
or, on the contrary, only those that are equal to 0;
- Status - status of the commissions.
Moreover, the system allows to create different search patterns and save them for
future use. Just set the search options, type the name of the pattern in the Save this
search as: input field and click on the
button. Once the search pattern is
saved, it is displayed in the dropdown list box at the top.
Last Revised: Jan 5.10
Page
388 of 409
Copyright © 2004-2010 CS-Cart.com
General statistics
To display the summary statistics below the search pattern click on the General
statistics. In the first column all actions for which the affiliates get money are
displayed. They are show banner, click, payout sales, new customer, new affiliate, use
coupon, initial balance. Then follows the columns:
- Count - contains the number of commissions for each action;
- Sum - the amount of all commissions for each action;
- Avg - the average value of the commission for each action;
- Affiliates - number of affiliates who get the commissions;
At the bottom of each column the total value is displayed.
Percentage of banner clicks and banner shows - shows the percentage of clicks on
all banners displayed (if 20 banners were displayed and only one was clicked on then
5% is shown).
Percentage of sales and banner clicks - shows how often the customers make the
purchases in comparison with clicks on banners (the number of clicks is taken as
100%).
Last Revised: Jan 5.10
Page
389 of 409
Copyright © 2004-2010 CS-Cart.com
For approval, disapproval or deletion of the commissions tick off the necessary
commissions and click on Choose action and choose the corresponding button.
Columns of the table:
- Action - action for which the commissions are charged;
- Date - date and time of commission charge;
- Cost - the amount charged;
- Customer - customer's IP address (customer’s full name is displayed if s/he
registered in the store);
- Affiliate - the affiliate to whom the commissions are charged;
- Banner - banner that was displayed or through which the customer came and
fulfilled the action;
- Additional data - here the information about orders, products, coupons, URL is
displayed;
- Status - the processing stage of the commissions charged.
If the commissions charged for one and the same action but for different
affiliates are displayed on the same page, then such commissions are combined
(grouped) for illustration purposes.
Last Revised: Jan 5.10
Page
390 of 409
Copyright © 2004-2010 CS-Cart.com
5.9.6 Pay affiliates
All the affiliates waiting for payment are displayed on this page. Here you can
process their payments.
The page consists of two sections;
- Search form;
- a list of all affiliates
Pay affiliates
You can restrict the search results using the following options:
- Payment amount;
- Payments with minimum release level only;
- Due payments only (1 week).
The list is represented as a table consisting of the following columns:
- Select column;
- Username - a unique name identifying the user;
- Affiliate - full name of the affiliate;
- Amount of approved actions - commission amount that was approved but not yet
paid out;
- Amount of actions awaiting approval - commission amount that was not approved
yet;
- Date of last payment - date of last payment to this affiliate.
To process a payment:
Last Revised: Jan 5.10
Page
391 of 409
Copyright © 2004-2010 CS-Cart.com
- tick off the entry(-ries) you want to process;
- click on
.
After processing, the information about the payment(s) is displayed on the
Payouts page.
5.9.7 Payouts
Here you can view all the commissions charged to the affiliates. The page contains
two sections:
- Search form;
- a list of all payouts.
Payouts
In the search form you can search for the commission by affiliate, by status (open,
successful) and by amount.
If you want to make the search results more precise click on Advanced search
option. The search form will be expanded and you will be able to search by the period.
Set a date range or select among the specified periods.
Last Revised: Jan 5.10
Page
392 of 409
Copyright © 2004-2010 CS-Cart.com
Also, the system allows to create different search patterns and save them for future
use. Just set the search options, type the name of the pattern in the Save this search
as: input field and click on the
button. Once the search pattern is saved, it is
displayed in the dropdown list box next to the page title.
After any of the fields is filled in click on
to display the search results.
The list of all payouts is represented as a table with the following fields:
- Select column;
- Affiliate - full name of the user;
- Amount - commission amount;
- Date - date and time of payment;
- Status - whether the payment is already effected (successful) or still open.
If you make any changes click on
button.
To delete a payout from the list:
- tick off the check box opposite the entry you want to delete;
- click on Delete selected.
Click on
Last Revised: Jan 5.10
to open the ‘Payout’ page of the affiliate.
Page
393 of 409
Copyright © 2004-2010 CS-Cart.com
Payout
At the top of the page the following information is represented:
- Affiliate - name of the affiliate;
- E-Mail - e-mail of the affiliate;
- Date range;
- Amount - the amount paid to the affiliate.
Then follows a list of all actions represented as a table with the following columns:
- Action - type of action for which the commissions are charged;
- Date - date and time of payment;
- Cost - amount charged;
- Customer (IP address) - the customer’s IP address;
- Banner - banner that was displayed or through which the customer came and
fulfilled the action;
- Additional data - here the information about orders, products, coupons, URL is
displayed;
- Status - the processing stage of the commissions (approved, awaiting approval,
paid-up, approved and paid-up).
Last Revised: Jan 5.10
Page
394 of 409
Copyright © 2004-2010 CS-Cart.com
5.9.8 Accounting History
Here the summary statistics of all paid out commissions are displayed. The data are
represented as a table with the following columns:
- Username - unique name identifying the user;
- Affiliate - full name of the affiliate;
- Account balance - commission amount that was approved but not yet paid out;
- Last payout - amount of last payout;
- AVG payout - average amount that was paid out;
- Total payouts - total amount paid out to the affiliate. In the column a blue line is
displayed next to the largest total payout. The other lines are painted in such a way
that they show the correlation to the largest payout.
Accounting history
To view the history of the affiliate click on
‘Payouts’ page.
. You are redirected to the
For more information see the chapter Payouts.
Last Revised: Jan 5.10
Page
395 of 409
Copyright © 2004-2010 CS-Cart.com
FAQ
What operating system is preferable for CS-Cart installation - Windows
or Unix-like (Linux, FreeBSD, RedHat)?
Although CS-Cart works well on Windows and Unix-like operating systems (Linux,
FreeBSD, RedHat), we strongly recommend installing CS-Cart on Linux, FreeBSD or
RedHat ones. The main reasons for our recommendation are stable work of CS-Cart on
a Unix-like operating system (it is more secure and allows more flexible control of file
and directory permissions, etc.) and other performance advantages.
I have downloaded the CS-Cart distribution package (the
"cscart_vX.X.X.tgz" or "cscart_vX.X.X.zip" file) on the "File area" page in
the Customer Help Desk. How can I extract it?
The CS-Cart distribution package is available in .TGZ and .ZIP formats. There are
the following possible methods to unpack the distribution package:
Directly on your server:
1. Copy the downloaded CS-Cart distribution package to the web directory of your
server via FTP.
2. Unpack it there through your website control panel (most versions of control panels
have the built-in file manager that allows to unpack archives by one click).
or
Use one of the following commands to extract the distribution package on a UNIXbased server with terminal access to it.
If you downloaded the distribution package in the TGZ format use the following
command:
tar -xzvf cscart_vX.X.X.tgz
If you downloaded the distribution package in the ZIP format use the following
command:
unzip cscart_vX.X.X.zip
On your local computer:
Copy the CS-Cart distribution package to your local computer. Extract the package by
using any TAR- or ZIP-compatible software software, e.g. WinRAR archiver (download
it here: http://www.rarlab.com/rar/wrar36b8.exe), on your local computer and upload
Last Revised: Jan.5.10
Page
396 of 409
Copyright © 2004-2010 CS-Cart.com
all the files to the web directory of your server via FTP.
I have unpacked the CS-Cart distribution package and uploaded all the
files to my server but when I try to access index.php or the "install"
directory I get a 500 server error. What is the problem?
The problem may be caused by the incorrect permissions for your files and
directories. Some webservers do not allow to execute PHP scripts with permissions
higher than 755 or 644. Change the permissions for your files and directories to 755 in
order to solve this issue.
On a Unix-based server with terminal access to it you can change the permissions
using the following command:
chmod 755 index.php (set the 755 permissions for all CS-Cart scripts (at least, for
index.php and admin.php located in the CS-Cart root directory and index.php located
in the "install" directory)).
If you do not have terminal access to your server, you can change file access
permissions using an FTP client. Most of them have the "Change permissions" or
"Change mode" functions. With the help of these functions you are able to set the
necessary permissions. The chmod 755 index.php command means that you must set
755 permissions (in other words, read, write and execute permissions for the file user
and read and write ones for the user group and other). Refer to your FTP client
documentation for more detailed instructions on setting file permissions.
In order to set the same file access permissions on a WINDOWS-based server, you
may need to give readable permissions for the files and directories to the user with the
IUSER_ComputerName account.
Another possible reason for Internal Server Error is that some directives of the CSCart .htaccess file are not supported by your web server. Try to rename the .htaccess
file located in the root directory of your CS-Cart installation to something else. If CSCart pages are displayed properly after that, contact your server administrator, provide
him with the content of the CS-Cart .htaccess file and ask him to let you know what
directives are not supported on your server.
When we install the CS-Cart software, what exactly should be filled in
the "Server host name" and "Server host directory" fields at the Installation
Wizard?
It is required to enter the name of the website and the directory on it (if
applicable) on which you are installing CS-Cart. For instance, if your online store should
be accessible via URL http://www.my_site.com/shop, then value of the "Server host
Last Revised: Jan.5.10
Page
397 of 409
Copyright © 2004-2010 CS-Cart.com
name" field must be www.my_site.com (without HTTP:// prefix) and value of the
"Server host directory" one must be /shop (it is required NOT to have the '/' sign at the
end of the path).
These fields are filled in automatically according to the URL of the Installation Wizard
script.
We need to put an extra protection to our administration side and want
to put admin.php into another directory. How can we do it?
Due to inner CS-Cart structure, it is impossible to move the "admin.php" file to
another directory and keep the CS-Cart installation operational. But there is an ability
to rename the "admin.php" file to something more complex. Once the file is renamed
you must make a change in the "config.local.php" file to support the new name you
gave to the "admin.php" file. Change the following line in the "config.local.php" file
located in the CS-Cart root directory:
$config['admin_index'] = 'admin.php';
to
$config['admin_index'] = 'admin8765.php';
where 'admin8765.php' is the name given to the 'admin.php' file.
Also you can enable the "Enable secure connection in administrator area" setting on
the "Settings" page (the link to this page is in the "Administration" tab) in the admin
panel of your CS-Cart (before that make sure your webserver supports a secure
connection) and restrict access to your panel using the "Access restrictions" addon.
How can I close my store for public?
In order to close your CS-Cart for public, log in to your CS-Cart administration
panel, open the "Administration" tab and click on the "Settings" link. Enter some value
in the "Key of access to temporarily closed store" field and click on the "Save" button.
Then click on the "Close store" link in the bottom right corner of the administration
panel. The store will be closed for public, but you will be able to enter the store by
using the special URL. For example, if your CS-Cart installation is here: http://
www.my_site.com/ and you entered "secret" in the field, you will need to use this URL:
http://www.my_site.com/index.php?store_access_key=secret
Last Revised: Jan.5.10
Page
398 of 409
Copyright © 2004-2010 CS-Cart.com
How can I change the page title ("CS-Cart. Powerful PHP shopping cart
software") to our company one?
In order to change the standard CS-Cart page title, log in to your CS-Cart admin
panel, open the "Design" tab and click on the "Site layout" link. You can edit the page
title under the "Page title" section. Click on the "Save" button to save the changes.
Can you tell me step by step how to change company name and logo on
the invoice?
In order to change the standard CS-Cart logos to your own ones, log in to your
administrator panel, open the "Design" tab and click on the "Logos" link. Upload your
logo images and click on the "Save" button to save the changes.
In order to change the company name open the "Administration" tab and click on the
"Settings" link. Click on the "Company" link on the right and edit the value of the
"Company name" field on the page. Click on the "Save" button to save the changes.
Is it possible to edit the 'Powered by CS-Cart - shopping cart software'
link at the footer?
In order to change the "Powered by CS-Cart - Shopping Cart Software" link at the
bottom of your site you should modify the "bottom.tpl" file located in the "skins/
[CUSTOMER_SKIN]/customer" directory of your CS-Cart installation. Find the following
part of code (the code may vary a bit depending on the skin):
<p class="bottom-copyright class">{$lang.copyright} ©
{if
$smarty.const.TIME|date_format:"%Y"
!=
$settings.Company.company_start_year}{$settings.Company.company_start_year}{/if}{$smarty.const.TIME|date_format:"%Y"}
{$settings.Company.company_name}. {$lang.powered_by} <a href="http://
www.cs-cart.com"
target="_blank"
class="underlined">{$lang.cscart_shopping_cart}</a>
</p>
and replace "http://www.cs-cart.com" with your link. Save the file.
Also you should change the "cscart_shopping_cart" language variable which describes
the link text. You are able to edit the language variables under the "Translations" tab
on the "Languages" page (the link to this page is in the "Content" tab) in your
Last Revised: Jan.5.10
Page
399 of 409
Copyright © 2004-2010 CS-Cart.com
administration area. Enter "cscart_shopping_cart" (without quotes) into the "Search for
pattern" input field and click on the "Search" button on the page. Edit the language
variable, which includes this text and click on the "Save" button at the bottom to save
the changes.
How can I change the meta tags for the website?
They can be edited on the "Site layout" page (the link to this page is in the
"Design" tab) in the admin panel of your CS-Cart installation.
Also there is an ability to define META description and keywords for each category,
product, CMS topic and CMS page. There are the "META description" and "META
keywords" fields on the page on which you add/update category, product, etc.
How can I add more featured products to the CS-Cart home page?
Log in to the administration panel, open the "Design" tab and click on the "Blocks"
link. Open the "Home page" tab on this page. You will see the "Featured products"
block there. In order to add products to this block click on the "Add products" link.
Is it possible to add options (e.g. size) to each individual product?
In order to add an option to the product click on the "Products" link in the
"Catalog" tab in your administration area. Click on a product name link and open the
"Options" tab. Click on the Add option button. In the opened "New option" window you
should fill in the "Name" (e.g. Size) and select the type of the new option in the "Type"
select box. There are the following types of options available:
- select box;
- radio group;
- check box;
- text;
- text area;
If the option type is "select box" or "radio group", then open the "Variants" section in
the same opened window. Fill in the "Name" input field (e.g. large), in the "Modifier"
input field next to it set the price that will be added (if this option is selected) to the
product price. To add more variants click on the "Add empty item" icon next to this
Last Revised: Jan.5.10
Page
400 of 409
Copyright © 2004-2010 CS-Cart.com
row. As soon as all variants are filled in you should click on the "Create" button at the
bottom.
The added product option will be displayed on the product list and product details
pages in the storefront.
How can I create a downloadable product in CS-Cart?
Log in to the CS-Cart admin panel, open the "Catalog" tab, then click on the
"Products" link. Click on a product name in the list or add a new product. The "Editing
product" page will be open. In order to make a product downloadable, select the
"Downloadable" check box. Select the "Enable shipping for downloadable products"
check box if it is required to display a shipping method for the product. Select the
"Time-unlimited download" check box if you would like to make the product timeunlimited downloaded. Click on the "Save" button. Open the "Files" tab and click on the
"Add file" button to upload your file(s) and choose downloading settings. The uploaded
files are stored in the file system (under the "var/downloads" directory of the CS-Cart
installation).
The "Download" link will be displayed on the order details page after placing the order
with a downloadable product. The link redirects to the page with the uploaded file
name. After the activation of download the uploaded file name becomes a link by
clicking on which a customer can download the file. A customer will receive an email
with the link to the purchased file after the activation of download as well.
Also, there is the "Download key TTL (for electronically distributed products), hours"
setting on the "Settings" page in the admin panel. It defines the time interval in hours
within which the customer can download the file(s) after the purchase. This period can
be prolonged for a certain order on the order details page. This setting does not affect
a product if the "Time-unlimited download" check box is enabled for it.
How to set up CS-Cart with PayPal payment system?
In order to set up your CS-Cart with PayPal Website Payments Standard log in to
the admin panel of your CS-Cart, open the "Administration" tab and click on the
"Payment methods" link. Click on the "Add payment" button. Enter your new payment
method name in the "Name" text input field, select "PayPal" in the "Processor" dropdown select box, enter the desired description and surcharges into the appropriate
input fields, upload an image if needed. Open the "Configure" tab in the same window
in order to view the PayPal settings section. Fill in the following fields:
"Account" - your PayPal account login;
Last Revised: Jan.5.10
Page
401 of 409
Copyright © 2004-2010 CS-Cart.com
"Name of the item" - the value of the "Pay for" field, displayed on the PayPal web page
for your customers;
"Currency" - the currency in your PayPal account. If it does not match the base
currency in your CS-Cart settings, please contact CS-Cart support team;
"Test/Live mode" - select "Live". In order to use the "Test" mode you need to get
additional accounts at PayPal Sandbox;
"Order prefix" - any prefix you want invoice IDs to have on PayPal site (optional field)
(for instance, mycart).
Click on the "Create" button to save the changes.
In order to use PayPal as a payment method on your site, there must be PHP's Curl
support on your server (you are able to read more about it on the http://www.php.net/
curl). Check whether there is PHP's CURL support installed on your server.
How can I set up CS-Cart with AuthorizeNet.Aim payment gateway?
Log in to your admin panel, open the "Administration" tab and click on the
"Payment methods" link. Click on the "Add payment" button. Enter your new payment
method name in the "Name" text input field, select "AuthorizeNet.Aim" in the
"Processor" drop-down select box, enter the desired description and surcharges into
the appropriate input fields, upload an image if needed.
Open the "Configure" tab in the same window in order to view the AuthorizeNet.Aim
settings section. Fill in the following fields:
"Login" - your AuthorizeNet login;
"Transaction key" - transaction key that you can get on the AuthorizeNet web site;
"Currency" - select your currency;
"MD5 hash value" - MD5 hash value that you can get on the AuthorizeNet web site;
"Test/Live mode" - set it to "Test" while testing the credit card processing through this
payment gateway;
"Transaction type" - select a transaction type. If you use the "Authorize only" type,
AuthorizeNet.Aim only checks your credit card data and does not make any payment.
If you use the Authorize and capture type, AuthorizeNet.Aim checks all information and
makes a payment. So for real payments you should use the second type of transaction;
"Order prefix" - any prefix you want orders to have (optional field).
Click on the "Create" button to save the changes.
Last Revised: Jan.5.10
Page
402 of 409
Copyright © 2004-2010 CS-Cart.com
How can I set up CS-Cart with 2Checkout payment gateway?
Log in to your administration area, open the "Administration" tab and click on the
"Payment methods" link. Click on the "Add payment" button. Enter your new payment
method name in the "Name" text input field, select "2checkout" in the "Processor"
drop-down select box, enter the desired description and surcharges into the
appropriate input fields, upload an image if needed. Open the "Configure" tab in the
same window in order to view the 2Checkout settings section. First of all, follow the
directions given at the top of the page.
Then fill in the following fields:
"Account number" - your 2Checkout account number;
"Secret word" - type your Secret word that you have set at the previous step;
"Test/Live mode" - set it to "Test" while testing the credit card processing through this
payment gateway.
Click on the "Create" button to save the changes.
How to set up CS-Cart with UPS?
1) Log in to your administration panel, open the "Administration" tab and click on
the "Settings" link. Click on the "Shipping settings" link on the right. Disable the
"Disable shipping" and "Enable Intershipper" check boxes (if they are selected), select
the "Enable UPS" check box and click on the "Save" button at the bottom to save the
changes.
Open the "UPS" tab to set up its settings. Fill your UPS credentials in the "UPS Rates
Access Key", "Username" and "Passwords" fields. For testing purposes select the "Daily
pickup" value in the "Pickup type", the "Package" value in "Package type" and enter 10
in each "Width", "Height" and "Length" fields. Click on the "Save" button to save the
changes.
In order to get UPS Rates Access Key go to this page:
https://www.ups.com/e_comm_access/
laServ?CURRENT_PAGE=INTRO&OPTION=ACCESS_LICENSE&loc=en_US
Click on the "Get XML Access Key" link and follow the instructions on the further
pages.
NOTE: In order to use UPS real-time shipping calculations, there must be PHP's Curl
support on your server.
Last Revised: Jan.5.10
Page
403 of 409
Copyright © 2004-2010 CS-Cart.com
2) Open the "Shipping/taxes" tab and click on the "Shipping methods" link. There is
the "UPS 3day Select" shipping method defined by default in standard CS-Cart (if the
default CS-Cart configuration has not been changed yet). Select "Active" for this
shipping method in the select box in the "Status" column. Click on the "Edit" button
next to the shipping method. Select "Realtime" in the "Rate calculation" field and "UPS
USA: 3 Day Select" in the "Shipping service" field. Click on the "Save" button to save
the changes.
Enter the desired value into the "Weight (lbs)" input field and click on the "Test" link
next to the "Shipping service" field to make a test calculation of shipping charges.
Also under the "Shipping charges" tab you are able to define shipping charges which
will be added to ones returned by real-time shipping service if it is needed.
How to set up CS-Cart with FedEx?
1) Log in to your administration panel, open the "Administration" tab and click on
the "Settings" link. Click on the "Shipping settings" link on the right. Disable the
"Disable shipping" and "Enable Intershipper" check boxes (if they are selected), select
the "Enable FedEx" check box and click on the "Save" button at the bottom to save the
changes.
Open the "Fedex" tab to set up its settings. Fill your FedEx credentials in the "Account
number" and "Meter number" fields. For testing purposes select the "Other packaging"
value in "Package type", the "Regular pickup" value in "Drop Off Type" and enter 10 in
each "Width", "Height" and "Length" fields. Click on the "Save" button to save the
changes.
If you do not have your own FedEx meter number, you can get it on the same page:
fill data in all the fields under the "Retrieve meter number" section (if your address is in
the USA, the value of the "Country" field must be US, not USA), select the "Tick off to
get meter number" check box, make sure you have entered your FedEx account
number and click on the "Save" button at the bottom. If you fill in all the fields
properly, your own FedEx meter number will be retrieved from FedEx server and the
"Meter number" field will be filled in automatically.
NOTE: In order to use FedEx real-time shipping calculations, there must be PHP Curl
support on your server.
2) Open the "Shipping/taxes" tab and click on the "Shipping methods" link. There is
the "FedEx 2nd day" shipping method on the page (if the default CS-Cart configuration
has not been changed yet). Click on the "Edit" button next to the shipping method.
Last Revised: Jan.5.10
Page
404 of 409
Copyright © 2004-2010 CS-Cart.com
Select "Realtime" in the "Rate calculation" field and "FedEx 2nd day" in the "Shipping
service" field. Click on the "Save" button to save the changes.
Enter the desired value into the "Weight (lbs)" input field and click on the "Test" link
next to the "Shipping service" field to make a test calculation of shipping charges. Use
real recipient and sender addresses for testing as FedEx uses address verification
system. Sender address = company address, that you are able to edit on the
"Company" page of the "Settings" section in your administration panel.
Recipient address = customer shipping address. In case of testing shipping charges in
the administration panel the address defined under the "Default location" section on
the "General" page of the "Settings" section is used as a customer address.
Also under the "Shipping charges" tab you are able to define shipping charges which
will be added to ones returned by real-time shipping service if it is needed.
I need to charge tax 8.25% in California, USA. How can I set it up?
First of all, it is required to have the desired location zone added to the list of
locations in the CS-Cart administration area. Log in to the admin area and click on the
"Locations" link in the "Shipping/taxes" tab. Click on the "Add location" button on the
right. On the opened page enter the desired name for your new location in the "Name"
input field (for example a location zone "CA"). Select "United States" in the "Countries"
section on the right side and click on the <- button to move it to the left box. Select
"United States: California" in the "States" section on the right side and click on the <button to move it to the left box. Leave other fields blank on the left and click on the
"Save" button at the bottom of the page to save the changes.
Then open the "Manage taxes" page (the "Taxes" link to this page is in the "Shipping/
taxes" tab). Add a new tax by clicking on the "Add tax" button or edit the existing one
by clicking on the "edit" link. The "Editing tax" page will be open. On that page:
a) Make sure "Shipping address" is selected in the "Rates depend on" select box.
b) Select if the tax rate will be included to the product price or not in the "Price
includes tax" option.
b) Under the "Tax rates" tab enter 8.25 into the "Rate value" input field and select
"Percent(%)" in the "Type" select box for the "CA" location. You are able to define tax
rates for other existing locations as well. Then click on the "Save" button to save the
changes.
In CS-Cart taxes can be applied only to product prices and shipping charges, not to
subtotal.
a) There is the "Taxes" option on each "Editing product" page in the admin area. If
some taxes are selected in the option, they will be applied to the product at checkout.
If you need to apply the defined sale tax to all existing products in the store, open the
Last Revised: Jan.5.10
Page
405 of 409
Copyright © 2004-2010 CS-Cart.com
"Manage taxes" page, select the check box next to the name of this tax, click on the
"Choose action" link and select "Apply selected taxes to all products".
Please note: when you add a new product, it will not have any applied taxes by
default.
b) In order to apply the tax to a charge of any existing shipping method, open the
"Shipping/taxes" tab, click on the "Shipping methods" link, choose the desired shipping
method and click on its "edit" link. There is the "Taxes" option on the page. If a tax is
selected in the option, it will be applied to the shipping charge at checkout.
Is it possible to offer customers a quantity discount?
Yes, it is. There is the "Qty discounts" tab on the "Editing product" page in the
admin panel. In that tab enter the minimum quantity of products to which the
wholesale price will be applied and the wholesale price of a product into the "Quantity"
and the "Price($)" input fields, respectively. If you need to add more than one price
click on the "Add empty item" icon in the same line and enter a new quantity and a
wholesale price. After that click on the "Save" button to save the changes.
Also a variety of discounts and coupons can be created on the "Promotions" page.
How can I offer a discount to a customer if he buys two special products
together?
In order to do it you need to set up a specific promotion. Log in to your
administration panel, open the "Catalog" tab and click on the "Promotions" link. Click
on the "Add cart promotion" button on the right. Fill information in the "General"
section. Then open the "Conditions" tab and click on the "Add condition" button. Select
"Products" in the opened select box, then select "in" in the opened select box. Click on
the "+ Add products" link, find and select the first product for which such discount will
be applied, click on the "Add products and close" button. Click on the "Add condition"
button and add the same condition for the second product. Open the "Bonuses" tab and
click on the "Add bonus" button. Select "Order discount" in the opened select box,
select the desired option in the second opened select box and enter the desired value
into the opened input box. Click on the "Save" button.
How to replace or remove the "Build your PC" photo?
Last Revised: Jan.5.10
Page
406 of 409
Copyright © 2004-2010 CS-Cart.com
This picture is a graphic banner, that is added to the page for demo purposes. It
can be removed or replaced on the "Banners" page in the administration area (the link
to this page is in the "Content" tab).
How to enable reviews for all products at once?
Log in to your admin area and click on the "Products" link under the "Catalog" tab.
Select "100" in the "Items per page" option (to open this option click on the number
link near "Total items"). Select all products by clicking on the check box near the
"CODE" title at the top of the product list. After that click on the "Choose action" link
and select the "Edit selected" option. Click on the "Unselect all" link in the opened
window. Select the "Reviews" check box in this section and click on the "Modify
selected" button. Click on the "Apply values to all selected products" link. A new small
section will be displayed. Select the "Reviews" check box and select "Communication"
("Rating" or "All") in the select box near to it. Then click on the "Apply" button. The
selected value will be applied to all the products. Repeat the same actions for the other
products if they are left.
As my server is in the USA and my company is in Australia, is there a
way to set the date and time to be Australian Time/Date?
This can be done on the "Appearance settings" page in the CS-Cart administrator
area (the link to this page is located in the "Design" tab). The time zone can be
changed under the "Common settings" section. Click on the "Save" button to save the
changes.
Please note that this change will affect only future dates that are saved in the
database (time of placed orders, time of user's registration, etc).
Is there a way where I can download all my products at once in some
format?
CS-Cart has the ability to export your product catalog in CSV format. To export
your catalog in CSV file log in to the CS-Cart administration area, open the
"Administration" tab and click on the "Export data" link. Click on the "Products" tab. Set
up the export parameters and export the product data to a CSV file.
Last Revised: Jan.5.10
Page
407 of 409
Copyright © 2004-2010 CS-Cart.com
I want to increase my store performance, how can I do this?
Follow these directions:
- Delete (not disable, but delete) the languages that you do not use for your site. This
can be done on the "Languages" page in your admin panel (the link to this page is in
the "Content" tab). After that it is required to optimize database to reclaim the unused
space and defragment the datafile. Open the "Database" page in the admin panel (the
link to the page is under the "Administration" tab). Open the "Maintenance" section on
the page. Remember the current database size and click on the "Optimize database"
button. The database size will be decreased if possible.
- Disable JavaScript pop-up menu. Open the "Design" tab and click on the "Blocks"
link. Click on the "edit" link in the "Categories" block (it is in the left column by
default). There is the "Filling" setting in the opened pop up window. Now it is set to
"EMenu". Try the "Plain" and "Dynamic" options, they do not use JavaScript to display
categories, that will reduce page loading time.
- Use HTML catalog. The aim of HTML catalog is to decrease page loading time and
make the site more friendly for search engines. It is a very useful feature in CS-Cart it allows generating static version of the product catalog, that will be accessible at
"http://www.my_site.com/catalog". When a visitor types "http://www.my_site.com" in
his browser and clicks on categories, product links, he will see the HTML catalog pages
(notice URLs of the pages). When he clicks on the "Checkout" link, logs in, etc., he will
be transferred to the so-called dynamic pages (they are generated by PHP - notice
URLs of such pages). Please note: the generated HTML catalog does not reflect the
changes that may be made to dynamic pages. Say, if the text on the home page is
changed and the changes can be viewed at "http://www.my_site.com/index.php", the
"http://www.my_site.com/catalog/index.html" page will not display the changes. In
other words, if you add/delete/modify categories, products, etc., you should go to
settings page of the SEO addon (the "edit" link near the "SEO" addon on the "Addons"
page) and click on the "clean up" link to update static HTML pages.
How can I have SEF (Search Engine Friendly) URLs?
Open the "Administration" tab and click on the "Addons" link in the CS-Cart
administration area. Enable the "SEO (requires Apache + mod_rewrite installed)"
addon (change its status to "Active" in the select box on the right). Please note that
SEO uses the "mod_rewrite" Apache module and the module must be installed on the
server.
Last Revised: Jan.5.10
Page
408 of 409
Copyright © 2004-2010 CS-Cart.com
How can I transfer my CS-Cart installation to a new server?
Follow these directions:
1) Make a clean installation of the same(!) version of CS-Cart on a new server;
2) Copy the "config.local.php" file of this new CS-Cart to your local computer (or
rename it to avoid its overwriting during the next step);
3) Make a backup copy of the store database on the "Database" page in the
administration area of the web site from which you wish to move CS-Cart installation
(the link to the "Database" page is in the "Administration" tab);
4) Copy all the CS-Cart files to the new server overwriting the clean installation.
5) Copy the "config.local.php" file of the clean installation back to the server.
6) Log in to the administration area of CS-Cart installed on the new server (it still has
the default login and password admin/admin) and restore the database backup file
(you created at step 3) on the "Restore" tab of the "Database" page.
As a result you will have the same copy of CS-Cart on the new server.
Last Revised: Jan.5.10
Page
409 of 409