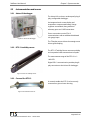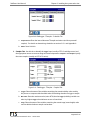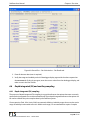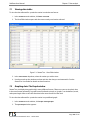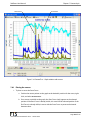
1
Extreme environments. Extreme ruggedness. Extremely simple. SedEvent User Manual Event-Triggered Automatic Grab Sampling System 1.800.548.4264 www.ftshydrology.com 700-SedEvent User Manual, Rev. 2.0, 18 December 2014 SedEvent User Manual Table of Figures Table of Contents Table of Figures ..................................................................................................................................... v Part I Overview................................................................................................................ 1 Chapter 1 Introduction ................................................................................................................... 2 1.1 What is the SedEvent turbidity threshold sampling system? ........................................................................... 3 1.2 Who this manual is for ...................................................................................................................................................... 4 1.3 Finding what you need in the manual ....................................................................................................................... 4 1.4 Water quality and Total Maximum Daily Loads (TMDL) ...................................................................................... 4 1.5 The benefits of automated data collection .............................................................................................................. 5 1.6 Turbidity threshold sampling and how it works .................................................................................................... 6 1.7 Suspended sediment monitoring flowchart ........................................................................................................... 7 Chapter 2 System overview ............................................................................................................ 8 2.1 Parts of the system ............................................................................................................................................................ 9 2.2 Instrumentation and sensors .......................................................................................................................................10 2.3 Laboratory analysis ..........................................................................................................................................................15 2.4 Turbidity threshold sampling algorithm overview .............................................................................................15 2.5 StreamTrac software .......................................................................................................................................................16 Part II Details .................................................................................................................. 17 Chapter 3 Preparing for the field ................................................................................................. 18 3.1 Receiving your system ...................................................................................................................................................19 3.2 Verifying system function in the laboratory ..........................................................................................................19 3.3 Optional computer and software ..............................................................................................................................25 3.4 Checklists and forms .......................................................................................................................................................25 Chapter 4 Site selection and deployment hardware .................................................................. 31 4.1 Introduction .......................................................................................................................................................................32 4.2 Site selection ......................................................................................................................................................................32 4.3 Turbidity sensor and water sampling deployment hardware ........................................................................32 4.4 Stage sensor deployment .............................................................................................................................................38 4.5 Stream gauging, flow measurement, and stage-discharge rating ...............................................................40 Chapter 5 Installing the system at the site .................................................................................. 42 5.1 Arrival at the site ...............................................................................................................................................................44 5.2 Unpacking ...........................................................................................................................................................................44 5.3 Streamside enclosure .....................................................................................................................................................44 5.4 Datalogger ..........................................................................................................................................................................46 5.5 Telemetry ............................................................................................................................................................................47 5.6 ISCO auto-sampler ...........................................................................................................................................................48 5.7 Turbidity sensor ................................................................................................................................................................51 5.8 Stage sensor .......................................................................................................................................................................51 5.9 Rain gauge ..........................................................................................................................................................................51 5.10 Power system .....................................................................................................................................................................53 Page ii SedEvent User Manual 5.11 5.12 5.13 5.14 5.15 5.16 5.17 Table of Figures Using the datalogger interface .................................................................................................................................. 57 Verifying basic system operation .............................................................................................................................. 58 Get a Start Visit Report from the datalogger......................................................................................................... 62 Configuring the ISCO auto-sampler ......................................................................................................................... 64 Configuring the datalogger ......................................................................................................................................... 64 Verifying system operation .......................................................................................................................................... 83 Get an End Visit Report from the datalogger........................................................................................................ 88 Chapter 6 Site visits ...................................................................................................................... 90 6.1 Maintenance and storm visits ..................................................................................................................................... 91 6.2 Get a Start Visit Report from the datalogger......................................................................................................... 91 6.3 Site observations.............................................................................................................................................................. 93 6.4 Create a Site Visit in StreamTrac ................................................................................................................................ 94 6.5 Changing sample bottles (ISCO 6712) ..................................................................................................................... 95 6.6 Depth integrated (DI) and auxiliary sampling ...................................................................................................... 99 6.7 Collecting data on a memory stick .........................................................................................................................103 6.8 Sensor maintenance .....................................................................................................................................................106 6.9 Get an End Visit Report from the datalogger......................................................................................................108 6.10 Add notes and documents to StreamTrac Site Visit.........................................................................................108 6.11 Uploading data from the datalogger into StreamTrac ...................................................................................110 Chapter 7 Data analysis .............................................................................................................. 111 7.1 Viewing data tables ......................................................................................................................................................113 7.2 Graphing data: The Graph window ........................................................................................................................113 7.3 Turning graph elements on and off .......................................................................................................................116 7.4 Zooming, scrolling, and panning ............................................................................................................................119 7.5 Station Notes ...................................................................................................................................................................121 7.6 Defining intervals with cursors .................................................................................................................................123 7.7 Data correction tools ....................................................................................................................................................125 7.8 Incorporating laboratory analysis ...........................................................................................................................127 7.9 Determining turbidity—SSC lab result relationships ......................................................................................128 Chapter 8 Troubleshooting ........................................................................................................ 133 8.1 Problem: Pumping sampler bottle volumes too low (empty) or too high ..............................................134 8.2 Problem: Pumping sampler over-sprays or water in base of sampler ......................................................135 Part III Appendices ........................................................................................................ 136 Appendix A Selecting sensor interval and offset values ............................................................. 137 A.1 Activity schedules in the datalogger .....................................................................................................................138 A.2 Coordinating schedules ..............................................................................................................................................138 A.3 Sensor commands and scheduling ........................................................................................................................139 A.4 Pulling it all together – two common configurations .....................................................................................140 Appendix B Setting turbidity thresholds ..................................................................................... 141 B.1 Turbidity threshold sampling logic ........................................................................................................................142 B.2 Guidelines for setting thresholds ............................................................................................................................142 B.3 Using the USFS threshold calculator applet........................................................................................................143 Appendix C Determining optimum solar panel tilt angle ........................................................... 149 Appendix D ISCO sampler programming guidelines ................................................................... 150 Page iii SedEvent User Manual D.1 D.2 Table of Figures ISCO 6712 ......................................................................................................................................................................... 151 ISCO 3700 ......................................................................................................................................................................... 157 Appendix E Troubleshooting DTS-12 wiper ................................................................................. 163 Appendix F Notes from the field ................................................................................................... 165 F.1 ISCO Pumping Samplers............................................................................................................................................. 166 Part IV References, Glossary......................................................................................... 167 Page iv SedEvent User Manual Table of Figures Table of Figures Figure 1-1: Typical SedEvent streamside monitoring package .................................................................................... 3 Figure 1-2: Suspended sediment monitoring flowchart ................................................................................................ 7 Figure 2-1: Parts of the system ................................................................................................................................................. 9 Figure 2-2: Axiom H2 datalogger ......................................................................................................................................... 10 Figure 2-3: DTS-12 turbidity sensor ..................................................................................................................................... 10 Figure 2-4: Carousel for DTS-12 ............................................................................................................................................ 10 Figure 2-5: SDI-SPT-5-CS pressure sensor ......................................................................................................................... 11 Figure 2-6: SDI-AM Analog Module - SDI-12 converter................................................................................................ 11 Figure 2-7: ISCO 6712 water sampler.................................................................................................................................. 12 Figure 2-8: ISCO controller cable .......................................................................................................................................... 12 Figure 2-9: Battery ..................................................................................................................................................................... 13 Figure 2-10: Solar panel ........................................................................................................................................................... 13 Figure 2-11: FTS tipping bucket rain gauge ..................................................................................................................... 14 Figure 2-12: SedEvent station enclosure ........................................................................................................................... 14 Figure 3-1: Block diagram of SedEvent system. .............................................................................................................. 21 Figure 3-2: Laboratory set-up of SedEvent system. ....................................................................................................... 22 Figure 3-3: Front panel connections on Axiom H2 datalogger. ................................................................................ 23 Figure 4-1: Empty carousel ..................................................................................................................................................... 33 Figure 4-2: Carousel with DTS-12 inserted ....................................................................................................................... 33 Figure 4-3: Carousel with DTS-12 in pipe housing......................................................................................................... 34 Figure 4-4: Two vertical pipe housing deployments of carousels............................................................................ 34 Figure 4-5: Cable mounted booms...................................................................................................................................... 35 Figure 4-6: Bridge mounted booms .................................................................................................................................... 35 Figure 4-7: Secondary boom with adjustable height and float ............................................................................... 36 Figure 4-8: Bottom anchored design with float ............................................................................................................. 36 Figure 4-9: Boom with counterweight in area of high water velocity .................................................................... 37 Figure 4-10: Boom deployment for optimum laminar flow ....................................................................................... 37 Figure 4-11: Streamside monitoring installation with conduit protecting cables ............................................. 38 Figure 4-12: Current-meter discharge measurement in a stream cross-section (diagram courtesy U.S. Geological Service, Olson & Norris, 2005). ........................................................................................................................ 41 Figure 5-1: Diagram of empty streamside enclosure.................................................................................................... 44 Figure 5-2: Diagram of streamside enclosure with equipment installed .............................................................. 45 Figure 5-3: Example streamside enclosure mounting .................................................................................................. 46 Figure 5-4: Eon GOES antenna .............................................................................................................................................. 47 Figure 5-5: GPS Antenna ......................................................................................................................................................... 47 Figure 5-6: ISCO auto-sampler in the SedEvent enclosure. ........................................................................................ 48 Figure 5-7: ISCO 6712 pump connections ........................................................................................................................ 49 Page v SedEvent User Manual Table of Figures Figure 5-8: ISCO 6712 back panel ........................................................................................................................................ 50 Figure 5-9: RG-T tipping bucket rain gauge ..................................................................................................................... 52 Figure 5-10: Battery Connection .......................................................................................................................................... 54 Figure 5-11: Typical solar panel installation ..................................................................................................................... 55 Figure 5-12: Datalogger – Home screen............................................................................................................................ 57 Figure 5-13: Datalogger – “Please input station name” screen................................................................................ 58 Figure 5-14: Datalogger – Battery Sensor icon ............................................................................................................... 59 Figure 5-15: Datalogger – Battery Sensor Setup screen .............................................................................................. 59 Figure 5-16: Datalogger - Battery Sensor screen ........................................................................................................... 59 Figure 5-17: Datalogger - Data Status screen .................................................................................................................. 60 Figure 5-18: Datalogger - Data Table screen ................................................................................................................... 60 Figure 5-19: Datalogger – Solar Panel Sensor screen ................................................................................................... 61 Figure 5-20: Datalogger – Service screen ......................................................................................................................... 62 Figure 5-21: Datalogger – Set Date Time screen ............................................................................................................ 62 Figure 5-22: Datalogger - Start Visit Report screen ...................................................................................................... 63 Figure 5-23: Datalogger – Save Report screen ................................................................................................................ 63 Figure 5-24: Datalogger – SDI Sensor Mapping screen ............................................................................................... 65 Figure 5-25: Datalogger – SDI Detect window................................................................................................................ 65 Figure 5-26: Datalogger – SDI Sensor Mapping screen with new sensors............................................................ 66 Figure 5-27: Datalogger – Stage Sensor Setup screen – Sensor tab ....................................................................... 67 Figure 5-28: Datalogger - Pressure Transducer Setup – Stage tab .......................................................................... 67 Figure 5-29: Datalogger - Pressure Transducer Setup- - Temperature Tab ........................................................ 68 Figure 5-30: Datalogger - Pressure Transducer Setup– Conversion tab .............................................................. 69 Figure 5-31: Datalogger - SDI Sensor Setup –DTS 12 ................................................................................................... 69 Figure 5-32: Datalogger - DTS-12 SDI Command Setup screen............................................................................... 70 Figure 5-33: Datalogger - SDI Field Setup screen - TurbMeanNw........................................................................... 70 Figure 5-34: Datalogger - SDI Sensor Mapping – ISCO cable ................................................................................... 71 Figure 5-35: Datalogger – SDI Sensor Setup screen, configured for an ISCO controller.................................. 71 Figure 5-36: Datalogger – Processes screen .................................................................................................................... 72 Figure 5-37: Datalogger – TSampler viewing screen .................................................................................................... 72 Figure 5-38: Datalogger – Please Select Process Type screen ................................................................................... 73 Figure 5-39: Datalogger – TSampler editing screen – Process Tab ......................................................................... 73 Figure 5-40: Datalogger - TSampler – Schedule Tab .................................................................................................... 74 Figure 5-41: Datalogger - TSampler – Sampler Tab ..................................................................................................... 74 Figure 5-42: Datalogger – TSampler Thresholds screen .............................................................................................. 75 Figure 5-43: Datalogger – Advanced TSampler Setup screen ................................................................................... 76 Figure 5-44: Datalogger – Processes screen with TSampler process ...................................................................... 76 Figure 5-45: Datalogger – Stage Sensor screen .............................................................................................................. 77 Figure 5-46: Datalogger – Enter Staff Gauge Value screen......................................................................................... 77 Page vi SedEvent User Manual Table of Figures Figure 5-47: Datalogger - Confirm stage Settings dialog ........................................................................................... 78 Figure 5-48: Datalogger – Stage Polled Values screen ................................................................................................. 78 Figure 5-49: Datalogger - Stage Offset Tool – Setting Stage Offset ....................................................................... 79 Figure 5-50: Datalogger - Stop polling.............................................................................................................................. 79 Figure 5-51: Datalogger - Telemetry screen .................................................................................................................... 80 Figure 5-52: Datalogger – Telemetry Status screen ...................................................................................................... 80 Figure 5-53: Datalogger – Telemetry A Setup screen (viewing mode) .................................................................. 81 Figure 5-54: Datalogger - Telemetry A - Self-Timed Tab ........................................................................................... 82 Figure 5-55: Datalogger - Telemetry A - Power Parameters Tab ............................................................................ 83 Figure 5-56: Datalogger - Telemetry A - GPS Tab .......................................................................................................... 83 Figure 5-57: Datalogger - Example sensor screen - Stage Sensor .......................................................................... 84 Figure 5-58: Datalogger - Sensor not responding dialog ............................................................................................ 84 Figure 5-59: Datalogger – Data Status screen ................................................................................................................. 85 Figure 5-60: Datalogger – Data Table screen................................................................................................................... 85 Figure 5-61: Datalogger – Serial Number screen ........................................................................................................... 86 Figure 5-62: Datalogger - Serial Number Update Screen ........................................................................................... 87 Figure 5-63: Datalogger - TSampler screen ..................................................................................................................... 87 Figure 5-64: Datalogger - TSampler – Auxiliary Sampling window ......................................................................... 88 Figure 5-65: Datalogger - Visit Report screen in End Visit mode ............................................................................. 89 Figure 5-66: Datalogger - Save Report screen ................................................................................................................ 89 Figure 6-1: Datalogger – Service screen ............................................................................................................................ 91 Figure 6-2: Datalogger - Visit Report screen in Start Visit mode ............................................................................... 92 Figure 6-3: Datalogger - Visit Report - Save Report screen ......................................................................................... 92 Figure 6-4: Datalogger - Typical staff plate...................................................................................................................... 93 Figure 6-5: Datalogger – Current Conditions screen .................................................................................................... 93 Figure 6-6: StreamTrac – Issue New Site Visit window ................................................................................................ 95 Figure 6-7: StreamTrac – Site Visit window – Carousel-Bottle Mapping tab ........................................................ 97 Figure 6-8: StreamTrac – Site Visit window – Site Details tab .................................................................................... 99 Figure 6-9: Datalogger – Processes screen ..................................................................................................................... 100 Figure 6-10: Datalogger – TSampler screen ................................................................................................................... 100 Figure 6-11: Datalogger – Depth Integrated Sampling window ............................................................................ 101 Figure 6-12: StreamTrac – Site Visit window – Calibration Samples tab.............................................................. 102 Figure 6-13: Datalogger – Data Status screen ............................................................................................................... 104 Figure 6-14: Datalogger – Download Data screen- showing drop down Date Range menu ...................... 104 Figure 6-15: Datalogger – Download Data screen- Select Variables screen...................................................... 105 Figure 6-16: Datalogger – CSV Exporting window ...................................................................................................... 105 Figure 6-17: Datalogger – Download Data Complete window ............................................................................... 106 Figure 6-18: Datalogger directory hierarchy on USB memory stick ...................................................................... 106 Figure 6-19: StreamTrac – Example erratic turbidity data due to sensor fouling ............................................. 107 Page vii SedEvent User Manual Table of Figures Figure 6-20: Datalogger memory stick folder hierarchy ............................................................................................ 108 Figure 6-21: StreamTrac – Notes/Attachments tab ..................................................................................................... 109 Figure 7-1: StreamTrac – View/Edit window .................................................................................................................. 113 Figure 7-2: StreamTrac – Open Graph window ............................................................................................................ 114 Figure 7-3: StreamTrac – Example Graph window ...................................................................................................... 115 Figure 7-4: StreamTrac – Parts of the Graph window ................................................................................................. 116 Figure 7-5: StreamTrac – Graph with minimal details turned on ........................................................................... 117 Figure 7-6: StreamTrac – Graph window – View control ........................................................................................... 117 Figure 7-7: StreamTrac – Graph window with Storm Event interval displayed ................................................ 118 Figure 7-8: StreamTrac – Modify Station Note window ............................................................................................. 122 Figure 7-9: StreamTrac – Confirm delete Note window ............................................................................................ 123 Figure 7-10: StreamTrac – Graph window with cursors ............................................................................................. 124 Figure 7-11: StreamTrac – Data Correction context menu ....................................................................................... 126 Figure 7-12: StreamTrac – Site Visits window ................................................................................................................ 127 Figure 7-13: StreamTrac – Site Visit window – Carousel-Bottle Mapping tab ................................................... 128 Figure 7-14: StreamTrac – Regression and Calculation window – Method tab ................................................ 129 Figure 7-15: StreamTrac – Event Summary window ................................................................................................... 131 Figure 7-16: StreamTrac – Confirm delete Storm Event window ........................................................................... 132 Figure 8-1: USFS Turbidity Threshold Calculator web page ..................................................................................... 144 Figure 8-2: Sun Microsystems Java 2 download page................................................................................................ 145 Figure 8-3: Correctly parked DTS-12 wiper .................................................................................................................... 164 Figure 8-4: Incorrectly parked DTS-12 wiper positions– .......................................................................................... 164 Page viii Extreme environments. Extreme ruggedness. Extremely simple. Part I Overview This part of the document provides an overview of the SedEvent system’s purpose, value, components, and set-up. Details for lab testing, shipping, installing, field testing, regular use, and troubleshooting are given in Part II . Page 1 of 170 700-SedEvent User Manual Rev 2 – 18 Dec 2014 Extreme environments. Extreme ruggedness. Extremely simple. Chapter 1 Introduction This chapter discusses criteria important in selecting a site for a monitoring station and in selecting the equipment to be installed at the site. Chapter contents 1.1 1.2 1.3 1.4 1.5 1.6 1.7 What is the SedEvent turbidity threshold sampling system? ........................................................................... 3 Who this manual is for ...................................................................................................................................................... 4 Finding what you need in the manual ....................................................................................................................... 4 Water quality and Total Maximum Daily Loads (TMDL) ...................................................................................... 4 The benefits of automated data collection .............................................................................................................. 5 Turbidity threshold sampling and how it works .................................................................................................... 6 Suspended sediment monitoring flowchart ........................................................................................................... 7 Page 2 of 170 700-SedEvent User Manual Rev 2 – 18 Dec 2014 SedEvent User Manual 1.1 Chapter 1 Introduction What is the SedEvent turbidity threshold sampling system? SedEvent is an intelligent, automated grab sampling for monitoring suspended sediment loads in water. It implements the turbidity threshold sampling (TTS) protocol originated by Rand Eads and Jack Lewis (1996) in a reliable and simple to operate system. A rugged streamside package integrates a datalogger with embedded TTS logic, turbidity and stage sensors, a pump sampler, power system, and telemetry. Back home, data is uploaded, managed, and analyzed using FTS StreamTrac software. A laptop computer is not needed for field operations. All system functions and configurations can be managed directly through the Axiom H2 datalogger’s touch screen, and all data can be downloaded onto a USB memory stick plugged directly into the Axiom H2 front panel. A computer loaded with the FTS StreamTrac software is useful for everything from tracking bottle changes to visualizing large amounts of data. This computer can be brought into the field if desired, or left in the lab if that is more convenient. While suspended sediment concentration (SSC) cannot be directly measured accurately or reliably, turbidity measurement has been shown to be an excellent surrogate for SSC. Turbidity is caused by suspended particulate matter, including clays and silts, organic and inorganic chemicals, microorganisms and algae, causing cloudiness in water, and can be measured accurately by the DTS-12 turbidity sensor. Figure 1-1: Typical SedEvent streamside monitoring package Page 3 of 170 700-SedEvent User Manual Rev 2 – 18 Dec 2014 SedEvent User Manual Chapter 1 Introduction SedEvent is also a general-purpose, event-driven water quality sampling and monitoring system. It’s a flexible, highly customizable system for performing regular, automated water quality (WQ) measurements based on any number of parameters and trigger conditions: turbidity, time, stage (water level), temperature, pH, dissolved oxygen (DO), equal flow, conductivity, and more. Trigger events can be based on any sensor or combination of sensors, not just stage (water height), and water samples and a wide range of sensor probes can collect data on any number of water quality measures. Water quality indicators obtained from laboratory analysis can be regressed against sensor readings from the field to develop and validate surrogates (typically turbidity, but in principle any measurable parameter) for many difficult-to-monitor WQ parameters, enabling continuous monitoring for important WQ indicators. 1.2 Who this manual is for This manual is written mainly for technicians who will be working directly with the SedEvent system hardware and software. It contains details on how to set up, operate, and troubleshoot the system, both in the laboratory and in the field. The first part of this manual can be useful to supervisors, data managers, and others who would benefit from a general knowledge of the system and its parts without needing to know a lot of details. 1.3 Finding what you need in the manual The manual is carefully organized to make finding the information you need as easy as possible. The front table of contents provides a general index to the material. Each chapter also has a detailed table of contents. The manual is divided into parts, separating the manual into an overview and details. Part I presents an overview of the system. Parts II and III present the details. The details are organized sequentially, starting with receiving and testing your system in the laboratory. Further chapters describe field set-up, site visits, and troubleshooting throughout its working life. Part IV contains references and a glossary of abbreviations and terms specific to the SedEvent system. If you have any suggestions on how to improve this manual, please do not hesitate to contact FTS at [email protected] . 1.4 Water quality and Total Maximum Daily Loads (TMDL) Water is one of our most precious natural resources and is often taken for granted until threatened by problems of quantity and quality. Excessive suspended sediment in streams and rivers is a significant pollutant that is receiving increasing attention as growing land use and development pressures make their impact on our environment. Page 4 of 170 700-SedEvent User Manual Rev 2 – 18 Dec 2014 SedEvent User Manual Chapter 1 Introduction Often, traditional techniques for studying suspended sediment revolve around intensive, time consuming and potentially dangerous manual sampling programs, that while valuable, are most often limited both spatially and temporally. In an effort to manage and mitigate the environmental impact of suspended sediment the US Clean Water Act introduced Total Maximum Daily Loads (TMDL). TMDLs are calculations of the maximum amount of suspended sediment (among concentrations of other contaminants) that a given body of water can contain while still complying with regulatory water quality standards. These water quality standards are typically set by States, Territories, and Tribes at levels consistent with the uses for each body of water. The authority will consider various uses such as drinking water supply, recreation, aquatic habitat, and the scientific criteria needed to support that use. Sediment TMDL is the sum of the allowable sediment loads from all contributing point and non-point sources, and typically includes a safety margin that accounts for seasonal variations in water quality. By complying with these regulatory requirements the role of spatial and temporal data collection becomes of paramount importance. While Suspended Sediment Concentration (SSC) cannot be directly measured with any high degree of reliability, measured turbidity has been shown to be an excellent surrogate. 1.5 The benefits of automated data collection The ability to collect meaningful information about suspended sediment transport and water discharge is dependent on the timing and frequency of data collection during events or storms. All river systems, particularly smaller watersheds that respond very quickly to rainfall, benefit from automated data collection. In rain-dominated regions most suspended sediment is transported during a small number of events. While it is possible to rely solely on manual measurements, important storm flows are usually infrequent and difficult to predict. When they do occur, trained personnel may not be available to collect the required information. Infrequent, systematic manual sampling will not provide adequate information to make credible suspended sediment load estimates under these conditions. Currently there is no reliable method to directly measure suspended sediment concentration in the field. Typically, water discharge is not a good predictor of sediment concentration in rivers and streams where bulk sediment content is transported as fine loads. The reason is that the delivery methods of the sediment from hill slopes, roads, and landslides are highly variable and discharge alone cannot account for this variability. For rivers that transport mostly sand, the water discharge and concentration may be more closely coupled if transport depends mainly on stream power to mobilize in-channel sources that are not easily flushed from the system. Page 5 of 170 700-SedEvent User Manual Rev 2 – 18 Dec 2014 SedEvent User Manual Chapter 1 Introduction In streams transporting fine sediment a sampling scheme that employs a parameter such as turbidity, which is well correlated to suspended sediment concentrations, can be expected to improve sampling efficiency and load estimation. Turbidity threshold sampling collects physical samples that are distributed over a range of rising and falling turbidities (Lewis & Eads, 1996). The resulting set of samples can be used to accurately determine suspended sediment loads by establishing a relationship between sediment concentration determined in the laboratory from field samples and turbidity measured in the field for any sampled period and applying it to the continuous turbidity data. 1.6 Turbidity threshold sampling and how it works Turbidity is an optical measure of the number, size, shape, and color of particles in suspension. The optical properties of sediment, mainly size and shape, have a significant influence on measured turbidities. For instance, sand particles return a much lower turbidity signal for a given concentration than silt and clay particles of the same concentration. The FTS-manufactured DTS-12 is an optical turbidity probe offering excellent long-term stability and reliable self-cleaning design. It can be deployed long-term with a minimum of maintenance, and returns continuous, high-quality data in a wide range of environmental conditions. Turbidity threshold sampling (TTS) utilizes turbidity thresholds, turbidity levels at which physical samples should be collected. To maximize the relevance of samples, turbidity thresholds are distributed with variable intervals across the entire range of expected rising and falling turbidities associated with turbidity events. Turbidity thresholds are selected by taking into consideration the maximum expected turbidity value for a stream, the range of the DTS-12 (nominally 0-1600 NTU), and the number of desired physical samples based on event signatures. Using the method of Rand Eads (1995) a square root scale is used to distribute the thresholds, in order to provide an adequate pairing of turbidity and suspended sediment concentrations to produce reliable regression curves. For the smallest storms three or four samples are adequate, while large events may require 5 to 15 samples. Different sets of thresholds are used when turbidity is rising and falling, with more thresholds required during the more prolonged falling period. By reconfiguring the turbidity-triggered sampler process (TSampler) in the datalogger, a user can fine-tune the distribution of thresholds to maximize sampling efficiency. A set of rules, in addition to the predefined turbidity thresholds, aids in reducing sampling during short duration turbidity spikes and ensures that a “start-up” sample is collected at the beginning of an event. Rules also help define reversals in turbidity. The turbidity-triggered sampler process (TSampler) permits continued sampling when turbidity levels exceed the sensor range as well as allowing the collection of non-threshold manually triggered samples that are paired with depth-integrated manual samples. Page 6 of 170 700-SedEvent User Manual Rev 2 – 18 Dec 2014 SedEvent User Manual Chapter 1 Introduction Closely spaced turbidity measurements resolve natural trends in sediment transport, such as spikes superimposed on a storm turbidigraph that often indicate landslides or stream-bank failures. In the case of nested watersheds, the timing and magnitude of these sediment pulses may provide additional information about cumulative effects, or dilution downstream. Authenticity of these turbidity spikes is confirmed when physical samples taken during the spikes have higher concentrations than surrounding samples. 1.7 Suspended sediment monitoring flowchart Set study objectives Select site(s) Select and configure monitoring equipment Assemble and build deployment hardware Install equipment and hardware at the site STATION MAINTENANCE SITE VISITS General site observations Download data Plot data Check equipment Change bottles Read staff plate Record site visit form STORM SITE VISITS LABORATORY ANALYSIS STREAMTRAC DATA REDUCTION Plot raw data Data grading id problems Correct problems - notes Laboratory SSC data entry Determine SSC Stage / discharge rating Append data to annual file Depth-integrated sampling Discharge measurements Read staff plate Change bottles STREAMTRAC PRODUCTS SSC storm & annual load estimates Storm flows Output data, graphs, statistics Publications / reports Figure 1-2: Suspended sediment monitoring flowchart Page 7 of 170 700-SedEvent User Manual Rev 2 – 18 Dec 2014 SedEvent User Manual Chapter 2 Chapter 2 System overview System overview This chapter gives an overview of SedEvent system, with a brief discussion of each component and its capabilities. Chapter contents 2.1 2.2 2.3 2.4 2.5 Parts of the system ............................................................................................................................................................ 9 Instrumentation and sensors .......................................................................................................................................10 2.2.1 Axiom H2 datalogger 2.2.2 DTS-12 turbidity sensor 2.2.3 Carousel for DTS-12 2.2.4 Stage (water depth) pressure sensor 2.2.5 SDI-AM Analog Module – SDI-12 converter 2.2.6 ISCO 6712 water sampler 2.2.7 Power system 2.2.8 RG-T tipping bucket rain gauge 2.2.9 Telemetry options 2.2.10 SedEvent station enclosure Laboratory analysis ..........................................................................................................................................................15 Turbidity threshold sampling algorithm overview .............................................................................................15 StreamTrac software .......................................................................................................................................................16 Page 8 of 170 700-SedEvent User Manual Rev 2 – 18 Dec 2014 SedEvent User Manual 2.1 Chapter 2 System overview Parts of the system Figure 2-1: Parts of the system Page 9 of 170 700-SedEvent User Manual Rev 2 – 18 Dec 2014 SedEvent User Manual 2.2 Chapter 2 System overview Instrumentation and sensors 2.2.1 Axiom H2 datalogger The Axiom H2 is a robust, weatherproof, plug & play, configurable datalogger. An integrated touch screen display and temperature compensated battery charge regulator are standard, along with dual telemetry ports and 3 USB connections. Figure 2-2: Axiom H2 datalogger Sensor connections are via SDI-12 communications with an additional dedicated rain gauge input. The TSampler process drives the strategic event driven grab sampling. 2.2.2 DTS-12 turbidity sensor The DTS-12 Turbidity Sensor measures turbidity and suspended solid concentrations in liquids. The measurement range of the DTS-12 is 0 – 1600 NTU. Digital SDI-12 communication provides plug & play connection to the Axiom H2 datalogger. Figure 2-3: DTS-12 turbidity sensor 2.2.3 Carousel for DTS-12 A carousel enables the DTS-12 to be securely mounted in a pipe or boom housing. Figure 2-4: Carousel for DTS-12 Page 10 of 170 700-SedEvent User Manual Rev 2 – 18 Dec 2014 SedEvent User Manual Chapter 2 System overview 2.2.4 Stage (water depth) pressure sensor The SDI-SPT-5-CS pressure transducer measures the head, or water pressure, at the sensor and is mounted below the lowest expected water stage. Digital SDI-12 communication provides plug & play connection to the Axiom H2 datalogger. Figure 2-5: SDI-SPT-5-CS pressure sensor 2.2.5 SDI-AM Analog Module – SDI-12 converter The SDI-AM is an analog-to-digital converter that enables up to 4 analog sensor devices to be connected through an SDI-12 port on the Axiom H2 datalogger. It includes two switch power ports for triggering power to devices. SedEvent Systems that include analog sensors (for example, a temperature probe or analog water level probe) will make use of this module. Figure 2-6: SDI-AM Analog Module - SDI-12 converter Page 11 of 170 700-SedEvent User Manual Rev 2 – 18 Dec 2014 SedEvent User Manual Chapter 2 System overview 2.2.6 ISCO 6712 water sampler The intake tubing runs from the sampler’s pump to a position co-located with the turbidity probe on the instrumentation boom. The ISCO sampler is capable of collecting 24 samples under control of the datalogger’s sampling program. During site visits, bottles containing samples are removed for laboratory analysis and replacements are installed. Figure 2-8: ISCO controller cable Figure 2-7: ISCO 6712 water sampler The ISCO 6712 auto-sampler collects water grab samples for laboratory analysis. It is triggered by the Axiom H2 datalogger. The datalogger controls the ISCO auto-sampler through an SDI-12 controller integrated into the cable that connects the two. Page 12 of 170 700-SedEvent User Manual Rev 2 – 18 Dec 2014 SedEvent User Manual Chapter 2 System overview 2.2.7 Power system Figure 2-9: Battery One or more heavy-duty, deep-discharge sealed batteries provide 12-V power to the SedEvent system’s instrumentation and sensors. An optional solar panel recharges the batteries, under control of the Axiom H2 datalogger, which manages all power functions for the system. Conveniently, the system monitors the solar voltage and current produced by the solar panel for routine diagnostics. Figure 2-10: Solar panel A 20W solar panel is recommended for systems that do not incorporate remote site telemetry and contain the basic sensor set. FTS will provide recommendations on the size and configuration of the power system when remote telemetry is used and an increased sensor set is added. Page 13 of 170 700-SedEvent User Manual Rev 2 – 18 Dec 2014 SedEvent User Manual Chapter 2 System overview 2.2.8 RG-T tipping bucket rain gauge The RG-T precision Tipping Bucket Rain Gauge incorporates jewelled bearings and is accurate to 0.01 inches of water per tip. It maintains calibration for long periods. Connection to the Axiom H2 datalogger is via the dedicated RAIN input. Figure 2-11: FTS tipping bucket rain gauge 2.2.9 Telemetry options The Axiom H2 datalogger can be configured internally with the industry-leading FTS G5 GOES transmitter for relaying data via satellite. All that is necessary externally are GOES and GPS antennas. The Axiom H2 datalogger can also transmit data using any of several external telemetry devices, including: External GOES transmitter GlobalStar satellite modem Cellular (GSM or CDMA) modem RMX VHF radio modem TM-Ultra landline phone modem Direct connection Ubicom 2.2.10 SedEvent station enclosure The custom designed station enclosure provides a convenient protected on-site workstation for carrying out routine site visits. It provides shelter from the rain and secure protection for the monitoring equipment. For the ISCO sampler, the enclosure comes with a slide-out shelf on heavy-duty, full-extension slides and a lid lifting device that provides easy access to sample bottles. A convenient work table and bottle staging area is also included. Figure 2-12: SedEvent station enclosure Page 14 of 170 700-SedEvent User Manual Rev 2 – 18 Dec 2014 SedEvent User Manual 2.3 Chapter 2 System overview Laboratory analysis Laboratory analysis of samples collected in the field can determine the suspended sediment concentration (SSC) from the known volume of water. The sample volume is measured and then the sediment is filtered out, dried and weighed. The weight of the sediment by volume provides the SSC at the time the sample was collected. Comparing these SSC samples to the measured turbidity when the samples were taken establishes the SSC—turbidity relationship for a series of points in time. Combining numerous samples at different turbidities during an event allows a sediment rating curve to be established (best fit curve through the results). This rating can then be applied to the rest of the continuous turbidity measurements to estimate continuous SSCs. By combining SSC with the measured stream flow, its total sediment load over time can be estimated accurately. 2.4 Turbidity threshold sampling algorithm overview The turbidity threshold sampling (TTS) algorithm was developed based on Rand Eads’ sampling logic (Lewis & Eads, 1996). The algorithm is embedded in the FTS Axiom H2 datalogger, which controls the instrumentation in the monitoring package. Typical input for configuring the algorithm includes information on expected stage and turbidity ranges. Sampling is typically set at 10-minute intervals, which is ideal for small flashy watersheds. Longer 15-minute intervals may be used for larger basins. At the beginning of each measurement interval, the DTS-12 turbidity probe wipes its optical surface and collects 100 turbidity measurements in 5 seconds. These data are then processed by the probe to output minimum, maximum, mean, median, variance and BES (best easy systematic estimator) statistics (see DTS-12 Manual for details). The median significantly reduces noisy data typically associated with entrained debris. Maximum, mean and BES tend to be noisier and less useful as turbidity estimators. FTS therefore recommends that median turbidity be used as the program trigger for sampling. Also reported by the DTS-12 turbidity sensor is the water temperature, currently accurate to within 0.2 degrees Celsius. The program next collects a mean stage value from the stage sensor. Mean stage is then compared against the minimum operating stage to determine if the turbidity probe and auto sampler intake are adequately submerged (i.e. stage is above "baseflow") to allow sampling. If the program logic determines that a sample is required, based on the turbidity thresholds discussed above, it triggers the ISCO water sampler to collect one sample. Typically the sample volume is 350 ml. Following a sample, the algorithm records the time and slot number associated with the triggered sample. Bottle mapping capabilities within the datalogger algorithm and in the StreamTrac data analysis software automatically index and link individual triggers with bottle identifiers and the subsequent suspended sediment concentration determinations in the laboratory. This mapping enables easy and powerful analysis in StreamTrac to determine regression curves for estimating event sediment loads from turbidity measurements. Additional logic can prevent turbidity sensor wiping in temperatures below 0.5 degrees Celsius. This prevents damage to the wiper in freezing conditions. Repeat cycles are also monitored to minimize repeat samples. Page 15 of 170 700-SedEvent User Manual Rev 2 – 18 Dec 2014 SedEvent User Manual Chapter 2 System overview Other hydrometric instruments, such as tipping bucket rain gauge or other meteorological sensors can be connected to the Axiom H2 datalogger to provide additional information. All data is recorded in the datalogger memory. 2.5 StreamTrac software FTS StreamTrac is a software application for collecting, managing, editing, analyzing, and processing data from SedEvent stations. In this manual, we give only an overview of most software functions, referring the reader to the StreamTrac Help for details. Creating Site Visit records in StreamTrac enhances sample bottle management and ensures that each sample and its laboratory analysis are dynamically linked with the data in time series for later analysis. The following are requirements for any computer on which StreamTrac will be installed and used: 1. Computer running Windows 2000, XP, Windows Vista, Windows 7 or Windows 8 operating systems. 2. 1 gigabytes RAM minimum. 3. 1024 x 768 capable video display minimum. 4. 20 gigabytes of hard disk space available 5. SQL Server 2000, SQL server 2005, 2008, 2008 r2 or 2012 if SQL option is used 6. SQL server and users must be on LAN. SQL servers on internet WAN is not recommended as speed may be an issue. 7. High speed Internet connection if IP modems are used. Page 16 of 170 700-SedEvent User Manual Rev 2 – 18 Dec 2014 SedEvent User Manual Part II Chapter 2 System overview Details The chapters in this part of the manual present detailed information about how to set up, test, install, use, and troubleshoot the SedEvent system. Page 17 of 170 700-SedEvent User Manual Rev 2 – 18 Dec 2014 SedEvent User Manual Chapter 3 Chapter 3 Preparing for the field Preparing for the field Thorough preparation can mean the difference between a frustrating, unsuccessful, timeconsuming field installation and one that goes smoothly. FTS strongly recommends that you perform all the checks and preparatory activities described in this chapter before the system and technicians head out into the field. Chapter contents 3.1 3.2 3.3 3.4 Receiving your system ...................................................................................................................................................19 3.1.1 Receiving and unpacking Verifying system function in the laboratory ..........................................................................................................19 3.2.1 Required parts and equipment 3.2.2 Setting up the system 3.2.3 Laboratory test procedure Optional computer and software ..............................................................................................................................25 Checklists and forms .......................................................................................................................................................25 3.4.1 Example pre-departure activity checklist 3.4.2 Example toolkit checklist 3.4.3 Example pre-departure information recording form 3.4.4 Example on-site activity checklist Page 18 of 170 700-SedEvent User Manual Rev 2 – 18 Dec 2014 SedEvent User Manual 3.1 Chapter 3 Preparing for the field Receiving your system 3.1.1 Receiving and unpacking Upon receipt of your complete SedEvent station equipment please verify that all parts below are accounted for and inform FTS if any expected equipment is missing or has been damaged during shipping. A typical SedEvent equipment package consists of: 1. Axiom H2 datalogger 2. H2 – battery power cable with integrated battery temp sensor 3. ISCO 6712 auto-sampler 4. ISCO power cable 5. ISCO interface cable 6. SDI-12 stage sensor – bubblers, pressure sensors, or float gauges 7. DTS-12 turbidity sensor and cable 8. One or two 100AH deep cycle batteries 9. Solar panel with connector cable and mounting brackets 10. RG-T tipping bucket rain gauge with connector and cable 11. PC to datalogger USB cable (not required, but may be ordered if desired) 12. Laboratory test kit (StableCal mix, black bucket and ISCO tubing) 13. SedEvent system enclosure 14. StreamTrac software 3.2 Verifying system function in the laboratory IMPORTANT: FTS strongly recommends that you assemble the complete system in a controlled laboratory environment prior to deployment in the field. This will allow you to configure the system and gain operational experience using simulated turbidity events, site visit forms and a pump sample handling scheme prior to field installation. An efficient bottle labeling and swapping scheme should be developed and practiced. System set up and troubleshooting should be learned in the lab. The following sections describe exactly how to do this. 3.2.1 Required parts and equipment 1. Opaque container in which to deploy the DTS-12 turbidity sensor and test solution. 2. StableCal or sediment sample used to mix an approximate 400-600 NTU solution. (An approximate solution is all that is needed; accuracy is not important in preparing it.) Page 19 of 170 700-SedEvent User Manual Rev 2 – 18 Dec 2014 SedEvent User Manual Chapter 3 Preparing for the field 3. Means for suspending the DTS-12 turbidity sensor so that it does not rest on the bottom of the test reservoir. A spring clamp that can clamp the DTS-12’s cable to a table edge or framework can work well. 4. A separate container of water in which to deploy the stage sensor to a minimum depth of 0.6 ft. and set up a recirculation loop for the ISCO auto-sampler. A 5-gallon bucket works well. 3.2.2 Setting up the system IMPORTANT: Connect all system components together first prior to connecting battery power to the datalogger. The following two figures provide logical and physical views of the laboratory setup. Page 20 of 170 700-SedEvent User Manual Rev 2 – 18 Dec 2014 SedEvent User Manual Chapter 3 Preparing for the field Figure 3-1: Block diagram of SedEvent system. Page 21 of 170 700-SedEvent User Manual Rev 2 – 18 Dec 2014 SedEvent User Manual Auto-sampler recirculation loop Chapter 3 Preparing for the field ISCO 6712 auto-sampler ISCO controller (integrated into cable) FTS tipping bucket rain gauge Sampling reservoir Axiom H2 datalogger Stage sensor (cable) DTS-12 turbidity sensor Lab power supply (alternative to battery) “Black bucket” for turbidity calibration Figure 3-2: Laboratory set-up of SedEvent system. Notes: 1. Orange ringed SDI-12 connectors on the Axiom H2 datalogger are all equivalent and are not sensor specific. They will work with any SDI-12 compliant sensor wired with a compatible connector. 2. A spare battery cable fuse is included should you accidentally connect the power cable to the wrong battery polarity. Doing so will not damage the datalogger but will blow the fuse. To set up the SedEvent system in the laboratory (refer to Figure 3-2): 1. Arrange the required system components for convenient access. Placing the datalogger and the turbidity calibration equipment on a bench or table usually makes the work easier. Page 22 of 170 700-SedEvent User Manual Rev 2 – 18 Dec 2014 SedEvent User Manual Chapter 3 Preparing for the field 2. Place the calibration container in a location where the DTS-12 sensor can be suspended in the container. 3. Suspend the DTS-12 turbidity sensor in the calibration container so that its sensor end is completely submerged but does not touch the bottom of the container. 4. Connect the DTS-12 sensor to an SDI port (orange rings)on the datalogger using its cable (see Figure 3-3) Figure 3-3: Front panel connections on Axiom H2 datalogger. 5. Connect the FTS tipping rain gauge to the datalogger using the supplied cable. The rain gauge can only be connected to the blue-ringed RAIN connector on the datalogger. 6. Fill the sampling reservoir with tap water and place it near the ISCO auto-sampler. 7. Place the stage sensor in the sampling reservoir and connect it to the datalogger using its cable. The stage sensor can be connected to any orange-ringed (SDI-12) connector on the datalogger. 8. Connect the ISCO auto-sampler to the datalogger using the supplied: a. Plug the 6-pin end of the ISCO controller cable (on the end nearest to the controller package on the cable) into the Flow Meter b. connector on the ISCO back panel Plug the orange-marked end of the ISCO controller cable into one of the orange-ringed connectors marked SDI A/B/C/D on the front of the datalogger. 9. Set up a recirculation loop for ISCO auto-sampler. This avoids having to fill and empty sample bottles while testing. Disconnect the auto-sampler inlet after the pump and add a short length of tubing, supplied in the FTS laboratory test kit, to return the water to your intake reservoir. 10. Ensure that the intake line is submerged and that the return line is above the water level. 11. Clamping both lines in place will help to avoid spills. Page 23 of 170 700-SedEvent User Manual Rev 2 – 18 Dec 2014 SedEvent User Manual Chapter 3 Preparing for the field 12. Connect the datalogger and auto-sampler power cable leads to the battery. 13. Configure the ISCO auto-sampler according to the instructions in section Appendix D. Start the auto-sampler’s program running. 14. At power-up the DTS-12 sensor should wipe once as an indication of a positive connection. 15. Verify and configure the datalogger according to the instructions in sections 5.12 (Verifying basic system operation) and 5.15 (Configuring the datalogger). 3.2.3 Laboratory test procedure For simulated turbidity events make a 400-600 NTU solution using StablCal® (4000 NTU, Bottle/500mL Call Hach @ 800-227-4224 for your local supplier). A sediment slurry can also be used as this will settle out with time and provide a range of triggers similar to StableCal. Only an approximate turbidity NTU value is required for these tests. 1. Fill the test reservoir with the 400-600 NTU StableCal solution or sediment sample. 2. Immerse the DTS-12 sensor in the test reservoir, ensuring that its sensor end does not touch the bottom of the reservoir. 3. The StableCal solution (sediment sample) will settle over a few hours and the turbidity will fall thus providing simulated events that will trigger a series of event samples associated with the turbidity thresholds set up in the TSampler process. You should verify this process by listening for the (loud!) activation of the auto-sampler pump several times over the course of a few hours. 4. Remix the solution by stirring it. Allow it to settle, possibly remixing again before it settles completely. This simulates multiple events with turbidity reversals that allow the system to be fully tested. Once you have verified that the system seems to be working on a physical level and the datalogger has collected some data, conduct a simulated site visit: 1. Insert a USB memory stick into a USB port on the front panel of the datalogger. 2. Get a Start Visit Report from the datalogger. (Briefly, Home > Service > Visit Report > Start Visit > OK. For detailed instructions, see section 6.2). 3. Trigger an auxiliary sample. Briefly, Home > Processing > TSampler > Aux Sample. For detailed instructions, see section 6.6.2). 4. Collect data from the datalogger in CSV format. (Briefly, Home > Data > Download > OK > OK. For detailed instructions, see section 6.7). 5. Get an End Visit Report from the datalogger. (Briefly, Home > Service > Visit Report > End Visit > OK. For detailed instructions, see section 6.9). 6. Remove the USB memory stick and plug it into a computer. 7. If you wish to examine the downloaded data manually: a. Go to the folder \H2 Data Logger\<Station Name>\Data on the memory stick. b. Open the file named <Station Name>-<Timestamp>.csv (e.g., CranstonCreek-10-8-01-13-45.csv.) Page 24 of 170 700-SedEvent User Manual Rev 2 – 18 Dec 2014 SedEvent User Manual Chapter 3 Preparing for the field 8. If you wish to examine the data using StreamTrac: a. Set up a station. (See StreamTrac Help.) b. Import the data file into the station. c. View the station data using the graph facility. 3.3 Optional computer and software The Axiom H2 datalogger does not require a computer for any field operations. All functions can be controlled from the H2’s front panel touchscreen, and data of all kinds can be downloaded directly into a USB memory stick plugged into one of its front panel USB ports. This means that you need not carry a laptop out to remote sites, but need only record your observations and essential data in a regular paper notebook for transcription onto a computer system later. For certain monitoring applications and/or sites where access is easy, you may wish to carry a laptop computer loaded with the FTS StreamTrac software. With this equipment, you can record information (e.g., bottle IDs during bottle changes) directly into the laptop without the need to transcribe it from handwritten notes, and you can examine the collected data using the sophisticated graphing capabilities in StreamTrac. 3.4 Checklists and forms To ensure a smooth site installation, you should prepare the following checklists and information forms before you go into the field. Examples of each checklist or form are given in the following sections. Page 25 of 170 700-SedEvent User Manual Rev 2 – 18 Dec 2014 SedEvent User Manual Chapter 3 Preparing for the field 3.4.1 Example pre-departure activity checklist Check received SedEvent system for shipping damage and for presence of all correct parts Contact FTS if you suspect or are unsure if a software upgrade is required for a particular device (e.g., datalogger, sensor) Perform laboratory tests of SedEvent system Enter serial numbers of other equipment (sensors, etc.) in datalogger’s serial number table Pack SedEvent system Pack laptop with StreamTrac software and USB-datalogger cable Pack other equipment Pack materials for building/installing enclosure mount Pack materials for installing solar panel Pack materials for installing GOES antenna / other telemetry antenna Pack toolkit (see checklist) Arrange for standby personnel to check/verify telemetry transmissions while you are onsite Check weather forecast for site date(s) Page 26 of 170 700-SedEvent User Manual Rev 2 – 18 Dec 2014 SedEvent User Manual Chapter 3 Preparing for the field 3.4.2 Example toolkit checklist User guides and manuals SedEvent User Guide Axiom H2 Datalogger User Guide Sensor user manuals (e.g. DTS-12, stage sensor) For equipment inside enclosure 3/8” socket driver or wrench (for ISCO mounting brackets, equipment ground connectors) 10 mm socket driver or wrench (for battery terminals) small crescent wrench #2 Phillips head screwdriver #3 Phillips head screwdriver #2 slot head screwdriver For building/installing enclosure mount 7/16” combination wrench (for enclosure mounting bolts) For installing solar panel For installing GOES antenna Page 27 of 170 700-SedEvent User Manual Rev 2 – 18 Dec 2014 SedEvent User Manual Chapter 3 Preparing for the field 3.4.3 Example pre-departure information recording form Site information Magnetic declination at site (if using a Yagi antenna) _______________________________ Latitude at site ______________________________________________________________ Solar panel tilt angle = [lat x 0.9] + 30 deg ________________________________________ GOES information GOES NESID ________________________________________________________________ GOES channel number _______________________________________________________ GOES satellite East / West (circle one) GOES transmit interval _______________________________________________________ GOES transmit offset _________________________________________________________ Equipment model numbers (MN), serial numbers (SN), and software versions (SWV) Datalogger MN _________________________________________________________________ SN __________________________________________________________________ SWV _________________________________________________________________ Stage sensor MN _________________________________________________________________ SN __________________________________________________________________ SWV _________________________________________________________________ Turbidity sensor MN _________________________________________________________________ SN __________________________________________________________________ SWV _________________________________________________________________ Rain gauge MN _________________________________________________________________ SN __________________________________________________________________ SWV _________________________________________________________________ ISCO auto sampler MN _________________________________________________________________ SN __________________________________________________________________ Page 28 of 170 700-SedEvent User Manual Rev 2 – 18 Dec 2014 SedEvent User Manual Chapter 3 Preparing for the field SWV ________________________________________________________________ External telemetry device Manufacturer ________________________________________________________ MN ________________________________________________________________ SN _________________________________________________________________ SWV _______________________________________________________________ Page 29 of 170 700-SedEvent User Manual Rev 2 – 18 Dec 2014 SedEvent User Manual Chapter 3 Preparing for the field 3.4.4 Example on-site activity checklist Arrival Check site for safety hazards and mark or eliminate them Check equipment for damage sustained in transport Installation Build/install enclosure mount Install enclosure on mount Install equipment in enclosure – DO NOT connect battery power leads yet Install solar panel Install GOES antenna Install stage sensor Install rain gauge (optional) Install monitoring boom System testing Confirm the datalogger’s configuration and operation. When possible, attach a full suite of sensors and telemetry devices and then call/monitor the datalogger through the attached telemetry (i.e. monitor a few GOES transmissions to confirm operation) Departure Record site visit information in site book Pack up tools Pack up remaining materials and equipment Lock up enclosure Page 30 of 170 700-SedEvent User Manual Rev 2 – 18 Dec 2014 SedEvent User Manual Chapter 4 Chapter 4 Site selection and deployment hardware Site selection and deployment hardware This chapter discusses criteria important in selecting a site for a monitoring station and in selecting the equipment to be installed at the site. Chapter contents 4.1 4.2 4.3 4.4 4.5 Introduction ....................................................................................................................................................................... 32 Site selection ..................................................................................................................................................................... 32 Turbidity sensor and water sampling deployment hardware ....................................................................... 32 4.3.1 Carousels 4.3.2 Booms 4.3.3 In-stream deployment considerations 4.3.4 Protection against physical damage Stage sensor deployment ............................................................................................................................................ 38 4.4.1 Initial considerations 4.4.2 Types of stage sensing devices 4.4.2.1 Noncontact stage sensor 4.4.2.2 Shaft encoder with a float and counterweight 4.4.2.3 Submersible pressure transducer 4.4.2.4 Non-submersible pressure transducer (bubbler) 4.4.2.5 Summary 4.4.3 Location considerations Stream gauging, flow measurement, and stage-discharge rating............................................................... 40 4.5.1 Discharge 4.5.2 Stream gauging 4.5.3 Stage-discharge relationships Page 31 of 170 700-SedEvent User Manual Rev 2 – 18 Dec 2014 SedEvent User Manual 4.1 Chapter 4 Site selection and deployment hardware Introduction This chapter briefly covers some essential considerations in selecting a site and equipment and in installing that equipment. The scope of this manual does not allow for a full discussion of this subject. For that, we strongly recommend that you consult Lewis and Eads’ (2008) comprehensive report “Implementation Guide for Turbidity Threshold Sampling: Principles, Procedures, and Analysis,” available online (see References). 4.2 Site selection The selection of a site for a monitoring station must take into account several different factors: Equipment survival. Conditions at the site can damage or destroy equipment. These conditions include cold (freezing), storms and floods, wildlife, and humans. Freezing problems are often avoided by removing vulnerable equipment for the season, since water sampling cannot take place in such conditions in any case. The other threats can be dealt with by a combination of careful siting and damage-resistant components (such as conduit for housing cables and tubing). Stream flow and turbulence. Automated monitoring systems cannot adjust their measurement and sampling locations to account for changes in stream flow. The measurement and sampling probe needs to be located in a well-mixed location that is characteristic of the overall flow in the stream. Pools can be convenient but they are often wider than the body of the stream and cause sediment to drop out. Conversely, a steeply pitched streambed leads to high velocities and cavitation in the water, which can interfere with accurate turbidity readings. Stability of site. To maintain consistent measurement conditions, a stable site is required. Soft banks or streambeds can experience major changes in conformation – and therefore in flow, turbulence, and sediment carrying – over the course of a season. Access for field crews. The site ideally allows field crews to perform site visits with a relative minimum of travel time, and with convenient and risk-free working conditions. Auto-sampler constraints. The site must allow the auto-sampler’s sampling tube to be run to the stream with no dips. Dips in the tubing do not permit water to be purged completely between samples, resulting in contamination between samples. For a much more detailed discussion of site selection criteria, see Lewis and Eads (2008), pages 10-30. Further useful information can be found on the Redwood Sciences Lab website at http://www.fs.fed.us/psw/topics/water/tts/ (downloaded 12 Dec 2014). 4.3 Turbidity sensor and water sampling deployment hardware The DTS-12 turbidity sensor is typically deployed in one of two ways: on what is termed a boom or in a carousel. In most cases, the tube used to draw water samples is attached to the same boom, both for convenience and to ensure a consistent relationship between the water measured by the turbidity sensor and that sampled by the auto-sampler. Page 32 of 170 700-SedEvent User Manual Rev 2 – 18 Dec 2014 SedEvent User Manual Chapter 4 Site selection and deployment hardware 4.3.1 Carousels A carousel is a device, typically constructed of aluminum, for mounting the DTS-12 inside a housing that holds it in the water. The housing may be a fixed pipe or it may be the immersion end of a boom (for details on booms, see next section) Figure 4-1 below shows a typical carousel for use in a pipe housing. A small diameter conduit is attached to use as a “handle” to position the carousel in the end of the housing, both longitudinally (pushing and pulling) and rotationally. The conduit allows the carousel and sensor to be removed for maintenance and replaced easily during inspection and maintenance (eliminating the temptation to pull on the sensor cable!). Small-diameter conduit Carousel Figure 4-1: Empty carousel Figure 4-2 shows a DTS-12 in place in the carousel. Figure 4-2: Carousel with DTS-12 inserted Figure 4-3 shows a carousel mounted in a pipe housing to be used in a vertical mounting. Page 33 of 170 700-SedEvent User Manual Rev 2 – 18 Dec 2014 SedEvent User Manual Chapter 4 Site selection and deployment hardware Figure 4-3: Carousel with DTS-12 in pipe housing Figure 4-4 below shows examples of vertically deployed pipe housings. The housing on the left has perforations to reduce drag and to provide the DTS-12 sensor with good water flow if it is completely enclosed in the pipe housing. Figure 4-4: Two vertical pipe housing deployments of carousels Page 34 of 170 700-SedEvent User Manual Rev 2 – 18 Dec 2014 SedEvent User Manual Chapter 4 Site selection and deployment hardware 4.3.2 Booms A boom allows you to precisely and safely position a DTS-12 in a well-mixed laminar flow location that can be adjusted for water level and, in most cases, can be easily retrieved for maintenance. Overall the most successful deployment systems have used boom designs with articulating arms that swing up and over downstream moving debris. Most are overhead designs with booms hung from cables (Figure 4-5), a bridge (Figure 4-6), or a secondary boom arm with adjustable height (Error! Reference ource not found.7). Detail of boom to left Figure 4-5: Cable mounted booms Figure 4-6: Bridge mounted booms Page 35 of 170 700-SedEvent User Manual Rev 2 – 18 Dec 2014 SedEvent User Manual Chapter 4 Site selection and deployment hardware Figure 4-7: Secondary boom with adjustable height and float In locations where you want to minimize footprint and discourage vandalism, a bottom anchored design can work well (Error! Reference source not found.8). Figure 4-8: Bottom anchored design with float Floats are sometimes used to automatically adjust the probe’s level in the water column as stage rises and falls (see Error! Reference source not found.7 and 4-8)). A bank, cable, or bridge-mounted retrievable boom is desirable for most installations. The boom is located to position the turbidity probe and sampler intake at a well-mixed position in the stream with minimal turbulence during high flows. Increasing water velocity and depth pushes the vertical boom arm downstream, raising the turbidity sensor higher in the water column. A counterweight prevents the boom from planing on the surface (see Figure 4-9). The depth of the turbidity probe can be adjusted as needed to position the probe above the zone of bed-load transport and below the water surface. Page 36 of 170 700-SedEvent User Manual Rev 2 – 18 Dec 2014 SedEvent User Manual Chapter 4 Site selection and deployment hardware Figure 4-9: Boom with counterweight in area of high water velocity 4.3.3 In-stream deployment considerations The DTS-12 turbidity sensor should be deployed in a well-mixed, laminar (non-turbulent) flow area of the stream. The best installations include deployment hardware that has been streamlined to promote laminar flow around the sensor optics. This provides the optimum combination of representative water volumes for measurement with the least amount of noise introduced by turbulent, cavitated water. In general, if you have bubbles within the viewing volume of a turbidity sensor it will introduce undesirable but recognizable high frequency noise. This is one reason why the DTS-12 has a smaller (tennis ball size) viewing volume (relative to widely used backscatter sensors with larger volumes) so that it can be deployed more easily into a turbulence free location in small streams. The DTS-12’s smaller cross section and angular face geometry ease longitudinal deployment from streamlined booms to promote laminar flow around the sensor’s optics during peak flow. By contrast, larger multi-parameter sondes tend to have crowded sensor geometries that are particularly susceptible to high frequency bubble noise in higher velocity flows. In Figure 4-1010 the DTS-12 is mounted pointing slightly toward the streambed at approximately 15 degrees from horizontal with the sensor face aimed downstream. This deployment method has proven to be very effective and routinely returns high quality data. Figure 4-10: Boom deployment for optimum laminar flow If you are seeing high frequency bubble noise in your data as a result of cavitation, you need to reposition your sensor or redesign your installation hardware. When searching for a deployment location, watch for high turbulence on the downstream side of obstructions such as dams, bridge ramparts, spillways and in steep boulder laden streams. The downstream side of a large pool is often a Page 37 of 170 700-SedEvent User Manual Rev 2 – 18 Dec 2014 SedEvent User Manual Chapter 4 Site selection and deployment hardware good, well mixed location free of bubbles. Deployment is sometimes a trial and error process as you typically deploy in lower stage and later observe storm or high flood conditions. 4.3.4 Protection against physical damage Cables and tubing can be damaged by wildlife and humans. Using conduit to carry vulnerable cables and tubing can often prevent such damage. The figure below shows a typical installation with conduit running from the equipment enclosure to the stream. The SedEvent enclosure comes equipped with standard 2-inch pipe elbows attached to each cable port for attaching conduit. Protective conduit Enclosure Figure 4-11: Streamside monitoring installation with conduit protecting cables 4.4 Stage sensor deployment 4.4.1 Initial considerations First, determine if a stream gauging site already exists nearby. If the data can be accessed and accurately related in time with your sensor readings, your installation will not need a stage sensor. Depending on the type of pre-existing stream gauge, it is possible that it can yield much more accurate estimates of flow (volume) than your contemplated stage sensor installation, which in turn will yield more accurate estimates of total sediment load if that is part of your monitoring program objectives. Second, the conditions at your site will determine the most suitable stage sensor for your application. Section 4.4.2 below discusses the various types of stage sensor and where they are most useful. Page 38 of 170 700-SedEvent User Manual Rev 2 – 18 Dec 2014 SedEvent User Manual Chapter 4 Site selection and deployment hardware 4.4.2 Types of stage sensing devices The information in this section is adapted, with thanks, from Lewis and Eads (2008). There are four general categories of stage sensing devices: noncontact, float and counterweight, submersible pressure transducer, and non-submersible pressure transducer (bubbler). 4.4.2.1 Noncontact stage sensor Noncontact sensors work by broadcasting ultrasound or radio waves perpendicular to the water’s surface and converting the bidirectional travel time to a distance. (Ultrasonic sensors compensate for changes in sound speed due to variations in ambient air temperature.) The sensor is mounted in a fixed location over the stream channel, often on a bridge, and above the highest expected maximum stage. Increasing the height of the sensor and rough water surface conditions reduce the stage precision. Noncontact sensors are used in channels with highly mobile beds that undergo frequent scour and fill, and where other methods are not reliable. The accuracy of this type of sensor may not be adequate for some applications. 4.4.2.2 Shaft encoder with a float and counterweight A rotational shaft encoder connected to a float and counterweight mounted inside a stilling well can produce accurate stage readings, provided the intakes remain free from sediment and the float tape or beaded line does not slip on the shaft’s pulley. Such an encoder produces values with a precision of about 0.01 ft (0.3 cm). 4.4.2.3 Submersible pressure transducer Submersible pressure transducers can be mounted in a length of pipe and secured at right angles to the flow below the lowest stage of interest. They operate by sensing changes in the water pressure. The sensor depth rating should be slightly larger than that for the maximum expected stage at the gage location. Differential pressure transducers have a tube inside the cable that is vented to the atmosphere to compensate for changes in barometric pressure. The vent tube must terminate in a dry atmosphere to prevent failure due to condensation forming in the vent tube. The pressure transducer is connected to a data logger, and its output can be adjusted by changing the offset in the data logger program to agree with the current staff plate reading. A stage averaging routine in the data logger program can electronically dampen wave oscillations from the stream, thereby eliminating the need for a stilling well. 4.4.2.4 Non-submersible pressure transducer (bubbler) Bubblers are pressure-sensing devices that detect pressure changes at the orifice of a small tube mounted in the stream. The pressure sensor and other hardware are located in the gage shelter. More specifically, modern bubblers use a small battery-powered compressor to supply the necessary air pressure to maintain a constant bubble rate at the terminus of the orifice tube. As the stage in the river rises, more air pressure is required from the compressor to maintain a constant bubble rate to overcome the increased water pressure. The pressure changes are measured by a transducer that is connected to the orifice line. Unlike the submersible pressure transducer that can be lost in high flows or damaged by debris, the orifice tube and protective conduit are inexpensive and easy to replace. Bubblers are normally used on larger rivers because they can measure water depths of 30 m or more. Page 39 of 170 700-SedEvent User Manual Rev 2 – 18 Dec 2014 SedEvent User Manual Chapter 4 Site selection and deployment hardware 4.4.2.5 Summary Sensor type Requirements Advantages Disadvantages Most suitable for Noncontact (ultrasonic, radar) Stable overhead platform (e.g., bridge) Resistance to damage from stream conditions Lower accuracy Channels with highly mobile beds that undergo frequent scour and fill Shaft encoder Stilling well High accuracy Complexity and expense of installation Applications requiring very high accuracy Pressure transducer Stable submerged mount (e.g., post) Simple installation, lower cost, reasonable accuracy (with proper calibration) Can be lost or damaged in high flows or by debris Most applications in small to moderate sized streams and rivers Bubbler Stable submerged mount Exposed equipment (bubbler tube and protective conduit) is inexpensive and easy to replace; reasonable accuracy Complexity and expense of installation Larger rivers FTS usually recommends a pressure transducer stage sensor for its combination of simplicity, flexible installation, and low cost. Some site conditions may indicate a different choice. 4.4.3 Location considerations The specific location of a stage sensor is in part determined by its type (see section 4.4.2 above). In general, a stage sensor should be located where it is least likely to be damaged by local conditions and where the stream bed and banks are stable, so that the relationship between stage measurements and flow (rating) remains relatively stable and reliable over long periods. 4.5 Stream gauging, flow measurement, and stage-discharge rating One common and important objective of stream monitoring is to estimate the total sediment transport in the stream. Estimates of discharge (or flow; see Glossary) are necessary to calculate total sediment loads. Discharge is impractical to measure directly, but it can be estimated from stage (water depth). The relationship between stage and discharge is called the stage-discharge rating (or rating curve). This section discusses briefly the principles and methods used to estimate discharge. A more detailed discussion can be found in Olson and Norris (2005). 4.5.1 Discharge There are several approaches to measuring discharge. The most accurate methods involve directing the stream through a hard-surfaced channel of known, fixed conformation. In this case, stage (water depth) Page 40 of 170 700-SedEvent User Manual Rev 2 – 18 Dec 2014 SedEvent User Manual Chapter 4 Site selection and deployment hardware in the channel is directly related to flow and this relationship is stable over time, save when the channel is blocked by debris or is damaged. Comparably accurate measurements can be obtained when the stream flows through naturally durable and stable confinements such as channels in rock. Less accuracy is achievable in conditions where the stream confinement is soft and subject to frequent scouring and erosion by both normal and extreme flow events (e.g., storms), or where debris piles up and creates radical changes in hydraulic conditions in the measurement area. 4.5.2 Stream gauging In all cases, some form of stream gauging is necessary to estimate the relationship between stage and discharge. Two forms of stream gauging are commonly performed: current metering and acoustic Doppler current profiling. Both methods use a device (current meter, acoustic Doppler current profiler) to measure the flow rate (discharge) in subsections distributed across a cross-section of the stream. The discharge in a subsection is equal to its area times the average velocity in the subsection. The discharge in the entire cross-section is the sum of the discharge in all subsections. See the figure below. Figure 4-12: Current-meter discharge measurement in a stream cross-section (diagram courtesy U.S. Geological Service, Olson & Norris, 2005). 4.5.3 Stage-discharge relationships Stage-discharge relations are developed by measuring the discharge (see above) at a range of stages (water depths). To ensure the accuracy of the calculated stage-discharge relation, measurements must include extremely high and low stages and flows, and a substantial number of measurements at all stages and flows must be made. These relations must be regularly re-evaluated against up-to-date discharge data because stream channels often change due to erosion or debris. Page 41 of 170 700-SedEvent User Manual Rev 2 – 18 Dec 2014 SedEvent User Manual Chapter 5 Chapter 5 Installing the system at the site Installing the system at the site Chapter contents 5.1 5.2 5.3 Arrival at the site ...............................................................................................................................................................44 Unpacking ...........................................................................................................................................................................44 Streamside enclosure .....................................................................................................................................................44 5.3.1 Mounting 5.3.2 Grounding 5.4 Datalogger ..........................................................................................................................................................................46 5.4.1 Mounting and grounding 5.5 Telemetry ............................................................................................................................................................................47 5.5.1 Internal GOES transmitter 5.5.1.1 Eon Goes Antenna 5.5.1.2 GPS antenna placement and connection 5.5.2 External telemetry device 5.5.2.1 Mounting 5.5.2.2 Data connection 5.6 ISCO auto-sampler ...........................................................................................................................................................48 5.6.1 Mounting 5.6.2 Suction hose 5.6.3 Data connection 5.7 Turbidity sensor ................................................................................................................................................................51 5.7.1 Mounting 5.7.2 Connection 5.8 Stage sensor .......................................................................................................................................................................51 5.8.1 Mounting 5.8.2 Data connection 5.9 Rain gauge ..........................................................................................................................................................................51 5.9.1 Location considerations 5.9.2 Mounting 5.9.3 Data connection 5.10 Power system .....................................................................................................................................................................53 5.10.1 Battery 5.10.1.1 Mounting Page 42 of 170 700-SedEvent User Manual Rev 2 – 18 Dec 2014 SedEvent User Manual Chapter 5 Installing the system at the site 5.10.1.2 Connection Solar panel 5.10.2.1 Mounting 5.10.2.2 Connection 5.10.3 Datalogger safe power-on and power-off sequences 5.10.3.1 Safe power-on sequence 5.10.3.2 Safe power -off sequence Using the datalogger interface .................................................................................................................................. 57 5.11.1 Datalogger Home screen 5.11.2 Entering alphanumeric field values Verifying basic system operation .............................................................................................................................. 58 5.12.1 Check power system 5.12.2 Verify datalogger date and time Get a Start Visit Report from the datalogger ........................................................................................................ 62 Configuring the ISCO auto-sampler ......................................................................................................................... 64 Configuring the datalogger ........................................................................................................................................ 64 5.15.1 Selecting intervals and offsets 5.15.2 Detecting sensors 5.15.3 Configuring a Pressure Transducer stage sensor 5.15.4 Configuring a DTS-12 turbidity sensor 5.15.5 Configuring the ISCO controller (cable) 5.15.6 Configuring the threshold sampling (TSampler) process 5.15.7 Setting stage offset 5.15.8 Configuring telemetry Verifying system operation ......................................................................................................................................... 83 5.16.1 Observe sensor readings 5.16.2 Test the Sensor If you suspect there is an issue with a sensor, it may be incorrectly mapped or not properly seated. 5.16.3 Verify data is being logged 5.16.4 Verify telemetry devices 5.16.4.1 GOES 5.16.4.2 On-demand modems 5.16.5 Check serial numbers in datalogger 5.16.6 Manually trigger samples 5.10.2 5.11 5.12 5.13 5.14 5.15 5.16 Page 43 of 170 700-SedEvent User Manual Rev 2 – 18 Dec 2014 SedEvent User Manual 5.1 Chapter 5 Installing the system at the site Arrival at the site 1. Once at the site, ensure the site is safe – check hazards and deal with them appropriately. 2. If this is an existing site, survey the equipment for any damage, malfunctions or incorrect sensor or antenna orientations. 3. Record your findings. 5.2 Unpacking 1. Check for transport damage when unpacking the equipment. 2. As you unpack the items, check them off against the shipping manifesto. 3. Certain items require a little extra care in handling: Datalogger. Though the datalogger’s display is waterproof, care should be taken to avoid contact with sharp objects which could damage the touchscreen. Also, do not leave the display exposed in full sun for long periods of time as this may damage the display. A good practice is to keep the datalogger in its shipping package until you are ready to install the datalogger in the enclosure. DTS-12 turbidity sensor. Avoid letting the sensor end of the device collide with the ground or hard objects. 5.3 Streamside enclosure latch for autosampler lift bracket equipment mounting plate auto-sampler lift bracket right-hand opening left-hand opening auto-sampler shelf laptop shelf Figure 5-1: Diagram of empty streamside enclosure Page 44 of 170 700-SedEvent User Manual Rev 2 – 18 Dec 2014 SedEvent User Manual Chapter 5 Installing the system at the site SDI-AM analog device – SDI interface Axiom H2 datalogger ISCO autosampler Batteries Figure 5-2: Diagram of streamside enclosure with equipment installed 5.3.1 Mounting 1. Mount the streamside enclosure securely on a sturdy, well-anchored, level platform at a comfortable working height. The enclosure should be located so that the sampling tube has a run to the stream with the fewest, and least sharp, bends in it. Ideally, enclosure placement allows a constant, gentle slope to the stream. 5.3.2 Grounding 1. Connect the enclosure’s ground lug (located on the outside at the back of the enclosure) should be connected to the nearest ground or radial connection. The enclosure’s ground cable should always be run as low as possible and be free of any kinks or sharp bends (refer to your local code requirements). Page 45 of 170 700-SedEvent User Manual Rev 2 – 18 Dec 2014 SedEvent User Manual Chapter 5 Installing the system at the site Figure 5-3: Example streamside enclosure mounting 5.4 Datalogger Lightning protection. The Axiom H2 datalogger has built-in lightning protection circuitry. This protection can be aided by the connection from the datalogger chassis to a single point ground. A ground stud on the datalogger accepts one of the green grounding wires from the mounting plate. All FTS Forest Technology Systems sensors used shielded cable. If the datalogger chassis is well grounded, the sensor cables are shielded as well. Sensor and telemetry connections. The datalogger is watertight, even without connectors attached. Device connectors (sensors and telemetry) are circular metal shell, bayonet, military style connectors which are uniquely keyed and colour coded to minimize erroneous connections. When connecting devices to the datalogger, ensure that the connectors are dry and free of debris so that no water or dirt gets trapped between the connectors. 5.4.1 Mounting and grounding 1. Decide the positioning of the datalogger and the other equipment being installed, then position the datalogger over the appropriate keyhole slots in the equipment mounting plate and slide it down into place (see Figure 5-1, Figure 5-2). Page 46 of 170 700-SedEvent User Manual Rev 2 – 18 Dec 2014 SedEvent User Manual Chapter 5 Installing the system at the site 2. Connect one of the green grounding wires attached to the mounting plate to the ground stud on the datalogger. 5.5 Telemetry The Axiom H2 datalogger can be configured with an internal GOES transmitter. Alternatively, an external modem or an external GOES transmitter can be used. 5.5.1 Internal GOES transmitter IMPORTANT: The GOES transmitter cannot operate without regular GPS fixes. Therefore the GPS antenna placement and connection is essential for GOES telemetry to function. 5.5.1.1 Eon Goes Antenna The Eon GOES antenna is normally situated on top of the enclosure. Attach it securely and pass the antenna cable through the opening. Thread the antenna cable onto the black-ringed connector marked “GOES” on the front of the datalogger. Figure 5-4: Eon GOES antenna 5.5.1.2 GPS antenna placement and connection 1. Place the GPS antenna where it has a reasonable view of the sky. Often the top of the enclosure has sufficient exposure. Attach the antenna securely in its location. 2. Pass the antenna cable through the opening in the right side of the enclosure and thread it onto the black-ringed connector labeled “GPS” on the front of the datalogger. Figure 5-5: GPS Antenna Page 47 of 170 700-SedEvent User Manual Rev 2 – 18 Dec 2014 SedEvent User Manual Chapter 5 Installing the system at the site 5.5.2 External telemetry device 5.5.2.1 Mounting All external telemetry devices are packaged by FTS in a waterproof case with standard mounting hardware compatible with the mounting plate in the enclosure. 1. Position the telemetry case over the appropriate keyhole slots in the equipment mounting plate and slide it down into place (see Figure 5-1, Figure 5-2). 5.5.2.2 Data connection 1. Plug the connector on the telemetry device cable into the green-ringed connector labeled TELEMETRY on the front of the datalogger. 5.6 ISCO auto-sampler 5.6.1 Mounting Figure 5-6: ISCO auto-sampler in the SedEvent enclosure. To mount the ISCO auto-sampler: 1. Latch the lifting frame above the auto-sampler shelf in the raised position by lifting it up and hooking its handle over the latch hook attached to the ceiling of the enclosure box (see Figure 5-1). Page 48 of 170 700-SedEvent User Manual Rev 2 – 18 Dec 2014 SedEvent User Manual Chapter 5 Installing the system at the site 2. Pull the auto-sampler shelf out to its full extension. 3. Place the auto-sampler on the shelf with the auto-sampler’s control panel facing outward (toward the operator). 4. Hook the supplied mounting brackets through the handles on each side of the lower part of the auto-sampler. The hook should face outward, away from the auto-sampler. 5. Place the slotted holes in the base of the mounting brackets over the threaded studs on the shelf. Fasten the bracket down with the supplied cap nuts. 6. Slide the mounting shelf fully into the enclosure. 7. Lower the lifting frame until the hooks on each side of it are level with the handles in the upper part of the auto-sampler. Hook the sampler handles through the lifting hooks. This may take a little effort. 5.6.2 Suction hose Pump Controller Intake hose Output hose (to distributor fitting on top housing) Figure 5-7: ISCO 6712 pump connections To attach the suction hose to the auto-sampler: 1. Insert the supplied hose coupling into one end of the suction hose. 2. Feed the coupling end of the suction hose through the pipe elbow on the left side of the enclosure. 3. Slip a pipe clamp over the intake hose on the auto-sampler (see Figure 5-7). Page 49 of 170 700-SedEvent User Manual Rev 2 – 18 Dec 2014 SedEvent User Manual Chapter 5 Installing the system at the site 4. Insert the coupling on the end of the suction hose into the sampler intake hose. Ensure it is well seated and secure it with the pipe clamp. 5. Route the suction hose to the streamside location where the sampling boom is to be located. Ideally the hose has only a few, and very gentle, bends in it and has a gradual and uniform slope between stream and sampling enclosure. 5.6.3 Data connection To connect the auto-sampler to the datalogger: 1. Plug the 6-pin end of the ISCO controller cable (see Figure 2-8; this end is nearest to the controller package on the cable) into the Flow Meter connector on the ISCO back panel (see figure below). Battery connector Flow meter connector Figure 5-8: ISCO 6712 back panel 2. Plug the orange-marked end of the ISCO controller cable into one of the orange-ringed connectors marked SDI A/B/C/D on the front of the datalogger. SDI-12 connections are interchangeable and will work with any SDI-12 compliant sensor wired with a compatible connector. 3. Route the cable and coil and secure any excess cable length so that it does not impede access to the auto-sampler or other equipment in the enclosure. Page 50 of 170 700-SedEvent User Manual Rev 2 – 18 Dec 2014 SedEvent User Manual 5.7 Chapter 5 Installing the system at the site Turbidity sensor 5.7.1 Mounting Attach the turbidity sensor to the sampler deployment hardware (boom, pipe, or other device). For details, see section 4.3. 5.7.2 Connection To connect the turbidity sensor to the datalogger: 1. Feed the end of the turbidity sensor cable through the pipe elbow mounted on the right side of the enclosure. 2. Plug the cable connector into one of the orange-ringed connectors marked SDI A/B/C/D on the front of the datalogger. SDI-12 connections are interchangeable and will work with any SDI-12 compliant sensor wired with a compatible connector. 5.8 Stage sensor 5.8.1 Mounting Attach the stage sensor to the stage sensor mounting hardware. For details, see section 4.4. 5.8.2 Data connection 1. Feed the end of the turbidity sensor cable through the opening on the right side of the enclosure. 2. Plug the cable connector into one of the orange-ringed connectors marked SDI A/B/C/D on the front of the datalogger. SDI-12 connections are interchangeable and will work with any SDI-12 compliant sensor wired with a compatible connector. 5.9 Rain gauge 5.9.1 Location considerations Fundamentally, the rain gauge needs to be located where it is not shielded from rainfall by obstructions, nor yet exposed to excessive wind which will loft rain away from the collector. Many agencies have detailed guidelines for siting a rain gauge; if your agency does, follow those guidelines. The National Weather Service (NWS) of the U.S. National Oceanographic and Atmospheric Administration (NOAA) says: The exposure of a rain gauge is very important for obtaining accurate measurements. Gauges should not be located close to isolated obstructions such as trees and buildings, which may deflect precipitation due to erratic turbulence. To avoid wind and resulting turbulence problems, do not locate gauges in wide-open spaces or on elevated sites, such as the tops of buildings. The best site for a gauge is one in which it is protected in all directions, such as in an opening in a grove of trees. The height of the protection should not exceed twice its distance from the gauge. As a Page 51 of 170 700-SedEvent User Manual Rev 2 – 18 Dec 2014 SedEvent User Manual Chapter 5 Installing the system at the site general rule, the windier the gauge location is, the greater the precipitation error will be. (http://www.nws.noaa.gov/om/coop/standard.htm, downloaded 12 Dec 2014) 5.9.2 Mounting The FTS RG-T tipping bucket rain gauge is supplied with a mounting plate which can be fastened to any desired surface and which enables the rain gauge to mounted and leveled easily and accurately. Rain gauge cylinder Rain gauge mounting arm Cylinder retaining clips (one on each side) Mounting bracket support arm Rain gauge base plate Mounting bracket base plate Data cable Figure 5-9: RG-T tipping bucket rain gauge To mount the rain gauge: 1. Attach the rain gauge mounting bracket to a suitable surface or object. 2. Attach the body of the rain gauge to the mounting bracket by inserting round tenon on the end of the rain gauge mounting arm into one of the two holes at the end of the mounting bracket support arm, as shown in Figure 5-9. The rain gauge base plate should be roughly level. 3. Adjust the cam clamp on the mounting bracket support arm so that when its handle is fully depressed it very firmly clamps the rain gauge mounting arm. 4. Slightly release the cam clamp on the mounting bracket support arm so that it provides enough friction to hold the rain gauge mounting bracket in place but does not immobilize it. 5. Loosen the locking clamp on the rain gauge mounting arm just enough that the vertical adjustment screw can move the base plate up and down as it is turned. You are aiming for the “sweet spot” where the vertical adjustment works smoothly, and where tightening the locking clamp fully does not disturb the alignment of the rain gauge base plate. Page 52 of 170 700-SedEvent User Manual Rev 2 – 18 Dec 2014 SedEvent User Manual Chapter 5 Installing the system at the site 6. Release the two spring loaded clips located at the bottom end of the cylinder, and remove the cylinder from the rain gauge base plate. 7. Using the “bull’s eye” level located on the base plate, adjust the base plate in a horizontal plane so that the leveling bubble moves to the mid-line of the bull’s eye. (Here you are centering it on one axis only. In the next steps you will centre it in the other axis so that the bubble is dead centre on the circle.) 8. Tighten the cam clamp on the mounting bracket support arm. 9. Adjust the vertical adjustment screw the rain gauge mounting arm to bring the base plate leveling bubble into the centre of the bull’s-eye. 10. Tighten the locking screw on the rain gauge mounting arm. This may disturb the bubble slightly in either axis. 11. Repeat steps 4-10 as necessary to achieve a perfect centering of the leveling bubble in the bull’s-eye. 12. Remove the rubber band used to keep the tipper locked during shipment. Rainfall readings will not occur if this step is forgotten. 13. Ensure that the rain gauge funnel and filter is free from any packing material or sticky labels. 14. Replace the cylinder on the base plate of the rain gauge, and close the spring latches. 15. Lay the rain gauge data cable toward the enclosure. 5.9.3 Data connection To connect the rain gauge to the datalogger: 1. Feed the end of the rain gauge sensor cable through the opening on the right side of the enclosure. 2. Plug the cable connector into the blue-ringed connector labelled RAIN on the front of the datalogger. 5.10 Power system The SedEvent system is powered by one or more heavy-duty, sealed deep-cycle batteries. A solar panel recharges the batteries. Both solar panel and batteries connect directly to the datalogger, which has a power management system that regulates the charging of the batteries. 5.10.1 Battery 5.10.1.1 Mounting 1. Place the battery(ies) on the floor of the enclosure beneath the laptop shelf on the right-hand side of the enclosure. If possible, avoid blocking the drainage holes towards the rear right of the enclosure. Page 53 of 170 700-SedEvent User Manual Rev 2 – 18 Dec 2014 SedEvent User Manual Chapter 5 Installing the system at the site 5.10.1.2 Connection IMPORTANT: The battery cable’s ring terminals should always be connected to the battery before the battery cable is connected to the datalogger. IMPORTANT: The battery cable fuse will blow if the battery connections are reversed. This will not harm the datalogger, but the fuse must be replaced. IMPORTANT: To ensure proper power-up, the battery should always be connected to the datalogger before connecting the solar panel. To connect the battery power: 1. Connect the battery cable to the battery by bolting each of the cable ring terminals to the appropriate battery terminal. The ring terminal with the red wire and the fuse holder goes to the positive (+) side of the battery. The ring terminal with the black and white wires goes to the (-) side of the battery. See Figure 5-10: Battery Connection. Contact FTS to discuss cabling considerations for the parallel connection of batteries if multiple batteries are required at the site. 2. Mount the temperature sensor between the two battery posts on the top surface of the battery using foam tape or duct seal putty. 3. Route the cable around behind the shelf above the battery, and plug the cable’s military connector into the black-ringed connector labelled BATTERY on the datalogger. The datalogger backlight should illuminate and the datalogger will start up. (The datalogger requires about 90 seconds to start.) 4. If the backlight does not come on and the datalogger does not start, then disconnect the battery power connector from the datalogger front panel and check the battery cable fuse and connections. Figure 5-10: Battery Connection Page 54 of 170 700-SedEvent User Manual Rev 2 – 18 Dec 2014 SedEvent User Manual Chapter 5 Installing the system at the site 5.10.2 Solar panel 5.10.2.1 Mounting Figure 5-11: Typical solar panel installation 1. Mount the solar panel facing due south (due north in the southern hemisphere). Ideally, the solar panel is located where there are no obstructions between it and all points on the southern half of the horizon. An unobstructed southern exposure may be difficult to find at some sites. In this case, try to place the solar panel where it will receive the most unobstructed light at local noon, for as long a period either side of noon as possible. Sun at noon is much brighter than sun Page 55 of 170 700-SedEvent User Manual Rev 2 – 18 Dec 2014 SedEvent User Manual Chapter 5 Installing the system at the site late or early in the day, so it is worth sacrificing a few hours of exposure near the ends of the day for fuller exposure near noon. 2. Tilt the solar panel to the optimum angle above horizontal and secure it. See Appendix C for how to determine the optimum tilt angle. 5.10.2.2 Connection IMPORTANT: To ensure proper power-up, a charged battery should always be connected to the datalogger before connecting the solar panel. To connect the solar panel: 1. Once the battery is connected and the datalogger has started, feed the cable from the solar panel through the opening on the right side of the enclosure and plug its connector into the black-ringed connector labeled SOLAR PANEL. 2. Note the battery voltage on the Home screen of the datalogger interface. 3. Verify solar panel operation using the datalogger interface: a. Touch Sensors. The Sensors screen appears. b. Touch Solar Panel. The Solar Panel Sensor screen appears. c. Examine the solar panel voltage (typically labeled VSolar) and current (ISolar) values. 4. Expected solar panel current and voltage depend on the amount of sunlight available and the state of the battery: If the battery is somewhat discharged, indicated by a lower battery voltage (below 12 V; recall you checked it in step 2), then the recharging system will draw as much current as possible from the solar panel, perhaps 1 A. If the battery is fully charged, indicated by a higher battery voltage (about 12.5 V), then the recharging system will draw only a nominal current, about 0.1 A. When a low current (ISolar) is being drawn, solar panel voltage (VSolar) is expected to be high (up to 24 V in extremely sunny conditions; in moderately sunny conditions about 14-20 V). When a heavy current is being drawn, solar panel voltage is expected to be lower (down to 12 V, which is the minimum required to charge the battery). 5. If you see unexpected solar panel voltage and current values, check the solar panel’s solar exposure and check the cable connections between the solar panel and the datalogger. 5.10.3 Datalogger safe power-on and power-off sequences IMPORTANT: To prevent potential problems due to intermittent power, follow the safe power-on and power-off sequences. In normal operation, the battery connected to the datalogger’s front panel BATTERY input powers the datalogger. However, it is possible to power the datalogger from the datalogger’s front panel SOLAR PANEL input. This practice is not advisable as power from the solar panel is intermittent. Because the datalogger has two inputs which can power the datalogger, there is a proper procedure for power cycling the datalogger to ensure proper start-up and shut down. Page 56 of 170 700-SedEvent User Manual Rev 2 – 18 Dec 2014 SedEvent User Manual Chapter 5 Installing the system at the site 5.10.3.1 Safe power-on sequence The safe power on sequence for the datalogger is: 1. Ensure the battery cable is properly connected to the battery. 2. Connect the battery cable to the datalogger’s battery input. 3. Connect the solar panel cable to the datalogger’s solar panel input. 5.10.3.2 Safe power -off sequence The safe power off sequence for the datalogger is: 1. Disconnect the solar panel cable from the datalogger’s solar panel input. 2. Disconnect the battery cable from the datalogger’s battery input. 3. If power cycling the datalogger, wait a minimum of 5 seconds before reconnecting the datalogger’s battery input. 5.11 Using the datalogger interface In the remainder of this chapter, you will be working with the Axiom H2 datalogger’s touch-screen interface. It’s worth going over a few basics before proceeding to specific verification procedures. 5.11.1 Datalogger Home screen Figure 5-12 shows the Home screen of the datalogger. All datalogger functions are reached starting from the Home screen. Model Datalogger time Function icons Status indicators Figure 5-12: Datalogger – Home screen NOTE: This manual will explain important set-up and verification procedures performed with the datalogger. It does not provide full details on every screen; however, for more details, refer to the Axiom Configuration Reference. Page 57 of 170 700-SedEvent User Manual Rev 2 – 18 Dec 2014 SedEvent User Manual Chapter 5 Installing the system at the site 5.11.2 Entering alphanumeric field values Many fields in the datalogger are alphanumeric. To set or change such a field: 1. Touch on the Edit icon (if there is one) then the field you wish to edit. Some fields can be edited directly if there is no Edit icon by simply touching the field value. 2. The Please input <item> screen appears (Please input station name is shown in this example). Figure 5-13: Datalogger – “Please input station name” screen 3. Use the keyboard controls to edit the name. 4. Touch OK to save the changes. 5.12 Verifying basic system operation 5.12.1 Check power system On the datalogger Home screen (see Figure 5-12): 1. On the datalogger Home page, touch Sensors. 2. The Sensors screen opens. The battery icon should appear. If not, you must add it. Touch the Add icon to open the Select Sensor Type screen. Touch on the battery icon. Sensors screen with Battery icon Select Sensor Type to select Battery icon Page 58 of 170 700-SedEvent User Manual Rev 2 – 18 Dec 2014 SedEvent User Manual Chapter 5 Installing the system at the site Figure 5-14: Datalogger – Battery Sensor icon 3. Touch Battery. The Battery Sensor screen opens. Select Figure 5-15: Datalogger – Battery Sensor Setup screen 4. Selecting Sensors>Battery will display the Battery Sensor screen with details. Figure 5-16: Datalogger - Battery Sensor screen 5. If battery voltage (VBatt) is less than 11.5 V and your primary focus is to collect data regardless of sampling (battery voltage can also be viewed using the status Indicators on the Home page): a. disconnect the ISCO auto-sampler’s power then change either the solar panel or the battery at the earliest opportunity; b. once the power system is corrected, reconnect the ISCO auto-sampler; and c. determine if the system has been triggering a lot of samples. i. On the datalogger Home screen, touch Data. ii. The Data Status screen appears). Page 59 of 170 700-SedEvent User Manual Rev 2 – 18 Dec 2014 SedEvent User Manual Chapter 5 Installing the system at the site Figure 5-17: Datalogger - Data Status screen iii. Touch Table . iv. The Data Table screen appears. Figure 5-18: Datalogger - Data Table screen v. Adjust the table view using the left/right arrows until the column labeled Slot Num is in view. vi. Scroll through the data looking for increments in the value of Slot Num. Each increment represents a sample taken. If there are many increments (samples taken) in a relatively short amount of time, this may be drawing down the battery. It is possible that sampling thresholds or other parameters may need adjusting to reduce the number of samples taken (or it may be that this has just been a highly eventful period). vii. Alternatively, you can examine the Slot Num value using the Graph feature from the Data Status screen. See the Axiom Datalogger Configuration Reference for details. d. determine whether the solar panel is working: Page 60 of 170 700-SedEvent User Manual Rev 2 – 18 Dec 2014 SedEvent User Manual Chapter 5 Installing the system at the site i. On the datalogger Home screen, touch Sensors. ii. The Sensors screen appears. iii. Touch Solar Panel. iv. The Solar Panel Sensor screen appears. Figure 5-19: Datalogger – Solar Panel Sensor screen v. The solar panel cannot charge the battery if its voltage is less than 12 V. The current being drawn is dependent upon the available voltage from the solar panel and the demand from the power management system to recharge the battery, but it should be substantial if the battery voltage is low. Low solar panel voltage or current indicates that the solar panel is not able to deliver enough energy under current conditions. vi. If the solar panel cannot deliver sufficient energy then you may need to increase its output, either with better orientation or positioning of the solar panel, or with a larger capacity solar panel. The Axiom H2 can manage power usage up to 100 watts (about 8 A of current at the nominal operating voltage of 12 V). e. If the solar panel is delivering sufficient energy, then the battery itself may be failing. Try recharging it and check to see if it will hold and deliver that charge. 5.12.2 Verify datalogger date and time On the datalogger Home screen, touch Service. 1. The Service screen opens. Page 61 of 170 700-SedEvent User Manual Rev 2 – 18 Dec 2014 SedEvent User Manual Chapter 5 Installing the system at the site Figure 5-20: Datalogger – Service screen 2. Touch Set Date/Time. The Set Date Time screen opens. Figure 5-21: Datalogger – Set Date Time screen 3. Verify that the correct date and time are shown. 4. If they are incorrect, enter the correct values using the controls on the screen. 5. Touch OK to close the Set Date Time screen. 5.13 Get a Start Visit Report from the datalogger 1. Insert a memory stick into a USB HOST port on the front panel of the datalogger. 2. On the datalogger Home page, touch Service>Visit Report. 3. The Visit Report screen appears in Start Visit mode (indicated by the Start Visit button (see figure below). Page 62 of 170 700-SedEvent User Manual Rev 2 – 18 Dec 2014 SedEvent User Manual Chapter 5 Installing the system at the site Figure 5-22: Datalogger - Start Visit Report screen If the Visit Report screen appears in End Visit mode (indicated by the End Visit button in place of the Start Visit button: a. Touch End Visit. b. The Save Report screen appears. Touch OK. c. The End Visit Report is written to the USB memory stick and the Visit Report screen appears in Start Visit mode (indicated by the Start Visit button 4. Enter or modify Technician identification (e.g., initials or name) and Trip #. 5. Touch Start Visit. 6. The Save Report screen appears. Touch OK. Figure 5-23: Datalogger – Save Report screen 7. The Visit Report screen reappears in End Visit mode (End Visit button is displayed). You will return to this screen later to save the End Visit Report for a record of configuration changes and troubleshooting (if required). Page 63 of 170 700-SedEvent User Manual Rev 2 – 18 Dec 2014 SedEvent User Manual Chapter 5 Installing the system at the site 8. Touch Home. 5.14 Configuring the ISCO auto-sampler See Appendix D. 5.15 Configuring the datalogger Once the system has been physically installed and connected, it needs to be configured for the specific use it is to serve. Refer to the Axiom Datalogger Configuration Reference for more detailed explanations. 5.15.1 Selecting intervals and offsets Each sensor is activated by the datalogger on a regular schedule particular to that sensor. The TSampler (threshold sampling) process, data logging, and telemetry message building are also performed on regular schedules. These schedules are determined by two parameters associated with each sensor, process, or activity: interval and offset. The Interval is in hh:mm:ss format and specifies how often the specified command is sent to the sensor. The Offset is also in hh:mm:ss format and specifies how long after midnight the first command is sent to the sensor. The specified Offset must be less than the specified Interval. IMPORTANT ! Interval and Offset specify the time the command to the SDI sensor is initiated. When configuring the sensor, the user must consider the sensor’s measurement response time so that the data returned from the sensor is available to the datalogger prior to the desired log, process, or transmission time. If you are uncertain about how to select these values, please see the Axiom Datalogger Configuration Reference and Appendix D for an extended discussion. Field experience has shown that an interval of 10 to 15 minutes works well. Data is taken often enough to ensure good coverage of even short events, and the data buffers in the datalogger can easily handle this data rate without overflowing between transmissions. A safe offset for most sensors is 10 seconds prior to the sensor interval. For example, with a sensor interval of 10 minutes, the sensor offset would be 9 min, 50 sec. Other considerations may make it convenient to make the offset -1 minute. 5.15.2 Detecting sensors Most sensors connected to the datalogger can be automatically detected and have important configuration data collected from them for your convenience. The following procedure describes how to configure sensors using device detection: 1. From the Home screen press the SDI-12 icon. 2. SDI Sensor Mapping screen appears with defined sensor displayed. If there are no sensors defined it will be blank. Page 64 of 170 700-SedEvent User Manual Rev 2 – 18 Dec 2014 SedEvent User Manual Chapter 5 Installing the system at the site Figure 5-24: Datalogger – SDI Sensor Mapping screen 3. Touch Detect . 4. SDI Detect window opens. Figure 5-25: Datalogger – SDI Detect window 5. Ensure that Include alpha in search is unchecked. The detection process takes longer if the check box is enabled since the datalogger must now also search for sensors at the non-numeric addresses (addresses a to z and A to Z). The Include alpha in search check box should only be checked if you suspect you have an SDI sensor with a non-numeric address (i.e. an address that isn’t 0 to 9). 6. Touch OK. 7. The datalogger polls all SDI-12 ports looking for connected devices. This may take several minutes. 8. SDI Detect window closes and SDI Sensor Mapping screen is filled with information about each sensor the datalogger detected. Page 65 of 170 700-SedEvent User Manual Rev 2 – 18 Dec 2014 SedEvent User Manual Chapter 5 Installing the system at the site Figure 5-26: Datalogger – SDI Sensor Mapping screen with new sensors a. Newly detected devices are highlighted in red. b. Columns labeled Defined on the left side of the screen show information defined (known) in the datalogger. c. Columns labeled Detected on the right side of the screen show information collected from the detected devices. d. Defined Addr should be the same as those in the Detected Addr (detailed in later configuration steps). e. Detected Vendor/Serial shows identifying information collected from the device. i. A knowledgeable reader can determine the type of device by examining this information. ii. A less knowledgeable reader can use the Detected Port value to trace the cable from the datalogger port labeled with that value (e.g., B for port labeled SDI B) to the device. 9. For each new sensor detected, configure it according to the instructions in the appropriate section below depending on the sensor type. 5.15.3 Configuring a Pressure Transducer stage sensor 1. On the SDI Sensor Mapping screen (see Figure 5-26), touch and hold on NEW for the pressure transducer (Campbell SCI-CS pressure transducer in the example). Because there is a sensor extension for that SDI sensor (SDI-PT), the Setup screen will automatically be displayed. 2. The Pressure Transducer Setup screen is displayed. Page 66 of 170 700-SedEvent User Manual Rev 2 – 18 Dec 2014 SedEvent User Manual Chapter 5 Installing the system at the site Figure 5-27: Datalogger – Stage Sensor Setup screen – Sensor tab 3. Enter or modify values for the fields on the Sensor tab. a. Sensor. Name for the sensor. The default name is Stage. Change if desired. b. Addr. Address of the sensor on the SDI-12 bus. Enter the detected (or otherwise known) value, if you have it. Otherwise enter any value not already in use by another sensor (an error message will be displayed if you enter an already-used value); this value can be corrected later. c. Active. Makes sensor active (checked) or inactive (blank). Ensure this control is checked. 4. Enter or modify values for the fields in the Stage tab. Figure 5-28: Datalogger - Pressure Transducer Setup – Stage tab a. Stage. Variable name for the stage value, i.e., water depth, returned by the sensor. b. Units. Units of measure for stage (depth). c. Precision. Meaningful digits after decimal place in value returned by sensor. d. Cmd. Command sequence used to query sensor. Do not change without specific knowledge of the sensor’s capabilities. Page 67 of 170 700-SedEvent User Manual Rev 2 – 18 Dec 2014 SedEvent User Manual Chapter 5 Installing the system at the site e. Field#. Field number in which stage value is returned in sensor’s response to a query. Do not change without specific knowledge of the sensor’s capabilities. f. Interval. Time period between queries issued by datalogger to sensor. See discussions in section 5.15.1 and Appendix A on selecting Interval and Offset values. g. Offset. Time after beginning of query interval at which query is actually sent. See discussions in section 5.15.1 and Appendix A on selecting Interval and Offset values. h. Number of Samples and Sample Period control burst averaging. They are enabled only when Burst Avg is selected. i. Burst Avg activates the burst averaging feature for stage values. A burst average is formed at each measurement event by collecting the specified number of samples at intervals specified by Sample Period, and taking the average. 5. Enter or modify values for the fields in the Temp tab Figure 5-29: Datalogger - Pressure Transducer Setup- - Temperature Tab a. Temp Name. Variable name for the temperature value. b. Units. Select C (Celsius) or F (Fahrenheit c. Precision. Meaningful digits after decimal place in value returned by sensor. 6. Enter or modify values for the fields in the Conversion tab. This tab sets up the equation used to convert measured water pressure to estimated water depth. This is the value given to the variable defined on the Stage tab. a. Reset resets the parameters on this screen to their default values. Page 68 of 170 700-SedEvent User Manual Rev 2 – 18 Dec 2014 SedEvent User Manual Chapter 5 Installing the system at the site Figure 5-30: Datalogger - Pressure Transducer Setup– Conversion tab 7. Touch OK. 5.15.4 Configuring a DTS-12 turbidity sensor 1. On the SDI Sensor Mapping screen (see Figure 5-26), touch the NEW button (red background) associated with the turbidity sensor (the “FTS-----DTS-12” in the Vendor/Serial column.) 2. The SDI Sensor Setup screen appears, pre-configured for a DTS-12 turbidity sensor. Figure 5-31: Datalogger - SDI Sensor Setup –DTS 12 3. Verify the value in Address. 4. Configure the command(s). For details on choosing the appropriate configurations for these commands, see discussions in section 5.15.1 and Appendix A. The simplest case is detailed below: a. Touch M1. b. The SDI Command Setup screen appears. Page 69 of 170 700-SedEvent User Manual Rev 2 – 18 Dec 2014 SedEvent User Manual Chapter 5 Installing the system at the site . Figure 5-32: Datalogger - DTS-12 SDI Command Setup screen c. Enter Interval and Offset as required. d. Selecting each field name will display the SDI Field Setup screen Figure 5-33: Datalogger - SDI Field Setup screen - TurbMeanNw e. Modify the fields if desired. Repeat for M2. Touch OK. f. The SDI Sensor Mapping screen reappears. Touch Back. 5.15.5 Configuring the ISCO controller (cable) The datalogger will come preconfigured with a TTS template. When the ISCO cable is mapped, the datalogger will recognize it and the ISCO Sensor screen will be displayed. 1. On the SDI Sensor Mapping screen (see Figure 5-26), touch the NEW button (red background) associated with the ISCO controller (“FTS-----ISI” in the Vendor/Serial column). Page 70 of 170 700-SedEvent User Manual Rev 2 – 18 Dec 2014 SedEvent User Manual Chapter 5 Installing the system at the site Figure 5-34: Datalogger - SDI Sensor Mapping – ISCO cable 2. The ISCO Sensor screen appears, pre-configured for an ISCO controller. LSU (Last Slot Used) will display the number of the last bottle used. Figure 5-35: Datalogger – SDI Sensor Setup screen, configured for an ISCO controller For information on configuring the auto-sampler, see Appendix D. 5.15.6 Configuring the threshold sampling (TSampler) process Threshold sampling is a process for the automatic collection of water samples. Water samples are taken as certain conditions of the specified Trigger are met. Select Home>Processes. More than one Threshold Sampling Process can be generated by providing each data point with a unique identifier. This is particularly useful in storm water applications. To configure the threshold sampling process in the datalogger: 1. On the datalogger Home screen, touch Processing. Page 71 of 170 700-SedEvent User Manual Rev 2 – 18 Dec 2014 SedEvent User Manual Chapter 5 Installing the system at the site 2. The Processes screen appears. Figure 5-36: Datalogger – Processes screen 3. If the Processing screen contains an icon labeled TSampler: a. Touch TSampler. b. If the process has already been configured, the TSampler viewing screen appears. Figure 5-37: Datalogger – TSampler viewing screen i. Touch Setup. ii. The TSampler screen appears (see Figure 5-39). Select the Setup cog and continue at step 5. 4. If no TSampler icon exists yet: a. Touch Add Process (plus sign). b. The Please Select Process Type screen appears. Page 72 of 170 700-SedEvent User Manual Rev 2 – 18 Dec 2014 SedEvent User Manual Chapter 5 Installing the system at the site Figure 5-38: Datalogger – Please Select Process Type screen c. Scroll through and touch the Threshold icon. 5. The TSampler editing screen appears. 6. Process Tab: Use this feature to input the Process name (default name TSampler), the Slot (default name TS_slot), the sample code (default name TS_smp_code), and the Threshold Cold (default name TS_Thr_code). Figure 5-39: Datalogger – TSampler editing screen – Process Tab 7. Schedule Tab: Enter the Sample Interval (how often the threshold process is run) and Offset. Page 73 of 170 700-SedEvent User Manual Rev 2 – 18 Dec 2014 SedEvent User Manual Chapter 5 Installing the system at the site Figure 5-40: Datalogger - TSampler – Schedule Tab a. Sample Interval. Enter the interval between TSampler activations (and thus potential samples). For details on determining schedules see section 5.15.1 and Appendix A. b. Offset. Set to 00:00:00. 8. Sampler Tab: Use this tab to identify the Trigger input (usually a DTS-12 turbidity sensor) and the appropriate sensors to measure stage and water temperature. Sampler 1 and Sampler 2 specify the water samplers (usually an ISCO 6712 series). Figure 5-41: Datalogger - TSampler – Sampler Tab a. Trigger. Select the name of the variable containing the sensed turbidity value used by the process to compare with threshold values for deciding whether to trigger a sample. b. Max Value. Enter the maximum value (units: NTU) that the Trigger (turbidity) variable can take. Any higher Trigger value indicates an error of some kind. c. Stage. Select the name of the variable containing the sensed stage (water height) value used to decide whether a sample can be taken. Page 74 of 170 700-SedEvent User Manual Rev 2 – 18 Dec 2014 SedEvent User Manual Chapter 5 Installing the system at the site d. Min Stage. Enter the minimum stage height at which a sample should be taken. Stages lower than this prevent a sample being triggered. e. Temperature. Select the name of the variable containing the sensed water temperature. f. Sampler 1. Select the name of the first (or only) device that takes water samples. This is an ISCO auto-sampler and usually bears a name like “ISCO1”. g. Sampler 2. Select the name of the second device (if used) that takes water samples. This is an ISCO auto-sampler and usually bears a name like “ISCO2”. If there is no second sampler, leave this field blank. 9. Thresholds Tab: Samples can be triggered by rising or falling values. Default settings are shown below. These settings can be modified (see section 8.3B.2 for information on selecting threshold values). Figure 5-42: Datalogger – TSampler Thresholds screen a. Change a Value: To change a value, select the field you want to change and type in the desired value when the keyboard screen is displayed. Select OK. The changed value will be displayed and automatically ordered in the ascending scale. b. Add a Value. To add a value, select the Add icon from the desired column and type in the desired value when the keyboard screen is displayed. Select OK. The changed value will be displayed and automatically ordered in the ascending scale. c. Delete a Value: To delete a value, select the Delete icon beside the value you wish to delete. You will be prompted to confirm the deletion. Select OK. 10. Advanced Tab: The Advanced tab on the TSampler screen displays the advanced settings used for the Trigger sensor. These settings outline the hysteresis for the thresholds as well as the minimum interval settings. Default settings are shown below and can be modified in accordance with specific configuration plans. Page 75 of 170 700-SedEvent User Manual Rev 2 – 18 Dec 2014 SedEvent User Manual Chapter 5 Installing the system at the site Figure 5-43: Datalogger – Advanced TSampler Setup screen 11. Touch OK. 12. The Processes screen reappears, now showing a process named TSampler. Figure 5-44: Datalogger – Processes screen with TSampler process 5.15.7 Setting stage offset The stage sensor returns a stage (depth) value that varies depending on its placement in the stream. The stage offset is added to this sensor value so that it accords with the staff plate reading. To set the stage offset: 1. From the datalogger Home screen, touch Sensors>Stage (or SDI-PT) as is relevant for your configuration. 2. The Stage Sensor screen appears. Page 76 of 170 700-SedEvent User Manual Rev 2 – 18 Dec 2014 SedEvent User Manual Chapter 5 Installing the system at the site Figure 5-45: Datalogger – Stage Sensor screen a. Select Set Stage. The Enter Staff Gauge Value screen appears. Figure 5-46: Datalogger – Enter Staff Gauge Value screen b. Enter the current value read off the staff plate. Touch OK. c. A confirmation dialog will appear reflecting the new offset value to be applied against stage sensor readings, calculated from the entered staff plate value and the most recently sampled staff sensor value. Page 77 of 170 700-SedEvent User Manual Rev 2 – 18 Dec 2014 SedEvent User Manual Chapter 5 Installing the system at the site Figure 5-47: Datalogger - Confirm stage Settings dialog 3. If the staff plate is located at a distance, to facilitate setting stage offset accurately, the polling option enables you to take a reading at the staff plate at a specific time and return to the datalogger and pick up the stage sensor reading corresponding to that specific time. To do this, you will need a time piece that can be accurately synchronized to the datalogger’s time. a. From the Stage Sensor screen select Polled then Set Stage. Figure 5-48: Datalogger – Stage Polled Values screen b. The Stage Offset Tool screen is displayed. Enter the desired Interval and Timeout times, Interval being the polling interval and Timeout being the period of time over which polling will take place. The Poll Sample Size refers to how many readings will be averaged per interval. Page 78 of 170 700-SedEvent User Manual Rev 2 – 18 Dec 2014 SedEvent User Manual Chapter 5 Installing the system at the site Figure 5-49: Datalogger - Stage Offset Tool – Setting Stage Offset c. Set the Interval to a reasonably short period of time (5 seconds is common). d. Synchronize your watch with the time shown in the upper right corner of the display. Touch Start. e. The datalogger polls the stage sensor at the selected interval and records the time and value in the table Polled Stage Values table. f. Go to the staff plate and take a reading, noting the exact time you take the reading. g. Return to the datalogger and touch Stop. Figure 5-50: Datalogger - Stop polling h. Find the reading in the table that is closest in time to your staff plate reading, and touch to select it. i. Touch Select. The Enter Staff Gauge Value screen appears. j. Enter the value read off the staff plate. Touch OK. The confirmation dialog will appear. Page 79 of 170 700-SedEvent User Manual Rev 2 – 18 Dec 2014 SedEvent User Manual Chapter 5 Installing the system at the site k. The Stage Sensor screen reappears with the updated Stage Offset value. l. Deselect the Polled check box. 5.15.8 Configuring telemetry 1. On the datalogger Home screen, touch Telemetry. 2. The Telemetry screen appears. Figure 5-51: Datalogger - Telemetry screen 3. Touch the Status. The Telemetry A G5 Status screen appears. Figure 5-52: Datalogger – Telemetry Status screen 4. Select the Setup cog. The Telemetry A G5-CS1 (or CS-2) Setup screen appears in viewing mode. Select Edit to input the fields. Page 80 of 170 700-SedEvent User Manual Rev 2 – 18 Dec 2014 SedEvent User Manual Chapter 5 Installing the system at the site Figure 5-53: Datalogger – Telemetry A Setup screen (viewing mode) 5. Transmitter Tab: a. NESID: assigned from the United States National Oceanic and Atmospheric Administration (NOAA); b. Satellite: the assigned GOES satellite (East for odd # channels and West for even # channels) c. Transmit Power levels: for CS-1 levels are 37.5 or 40.5 dBm; for CS-2 the levels can be from 26-38.5 dBm. d. Clear: When in edit mode, a Clear button will appear on the bottom of the screen. Pressing the button will set all G5 parameters back to the default settings. This includes the message format. If you press Clear, a warning screen will be displayed and you will be prompted if you wish to continue e. Random: If transmitting in either Time Ordered or Pseudo Binary message formats, transmit parameters for GOES random transmissions can be configured by pressing the Random button on the bottom of the screen. Details of setting up random transmissions are found in the Axiom G5 Telemetry Reference. 6. Self-Timed Tab: This screen displays message format and transmit parameter details. Transmit parameters are provided by the NOAA. Page 81 of 170 700-SedEvent User Manual Rev 2 – 18 Dec 2014 SedEvent User Manual Chapter 5 Installing the system at the site Figure 5-54: Datalogger - Telemetry A - Self-Timed Tab a. Transmit Parameters: Input the assigned Channel, Window, Bit Rate, Interval, and First Tx; b. Format: Use the drop down menu to select the format of the transmitted message. c. Set Message: This is used to configure the contents of the message. This button is disabled in edit mode, but enabled otherwise. See the Axiom G5 Telemetry Reference for a detailed explanation on using the Set Message feature with the different Message Formats. d. Self-Timed: the Self-Timed checkbox must remain selected when using BLM or WSC message format. If using Time Ordered or Pseudo Binary format then the Self-Timed checkbox can be deselected if only Random transmissions are desired. e. Enable Tx: The Enable Transmission box must be selected to transmit via GOES. The user can disable GOES transmissions by deselecting the Enable Transmission checkbox. If the transmission is disabled, all functions in the datalogger occur in normal preparation for a GOES transmission; however, no data is transmitted f. Message Centering: The recommended choice. If checked, the G5 transmits its data in the middle of its transmission window instead of at the start of the transmission time. This reduces interference from adjacent users. g. Send “no data” If Buffer Empty: If checked, the G5 transmits a message meaning “no data available” instead of not transmitting at all. Recommended to reduce uncertainty about meaning of absent transmissions which could occur due to various system failures. 7. Power Parameters Tab: The data points defined on the Pwr Params tab appear as internal sensors in the datalogger. Forward Power, Reflected Power, SWR (Standing Wave Ratio), and Power Supply During Tx are parameters updated by the G5 transmitter after each GOES transmission. Page 82 of 170 700-SedEvent User Manual Rev 2 – 18 Dec 2014 SedEvent User Manual Chapter 5 Installing the system at the site Figure 5-55: Datalogger - Telemetry A - Power Parameters Tab 8. GPS Tab: Use this if GPS fixing intervals more frequent than the normal once every 24 hours are required. Particularly useful in drift calculations. Select Edit. a. Select the Enable GPS Fix Interval check box then enter the desired fix interval. Figure 5-56: Datalogger - Telemetry A - GPS Tab 5.16 Verifying system operation Once all of the equipment has been mounted and connected, perform the following checks to verify the correct operation of the system. 5.16.1 Observe sensor readings 1. On the datalogger Home screen, touch Sensors. 2. For each sensor icon mapped to a sensor port, a. Touch the sensor icon. b. The sensor’s particular screen opens. Page 83 of 170 700-SedEvent User Manual Rev 2 – 18 Dec 2014 SedEvent User Manual Chapter 5 Installing the system at the site Figure 5-57: Datalogger - Example sensor screen - Stage Sensor c. Check the displayed sensor values and note whether they are “reasonable” for the conditions observed. Note that some sensors display raw (unconverted) values that may seem incorrect. d. Touch Back. The Sensors screen reappears. Continue for all attached sensors 5.16.2 Test the Sensor If you suspect there is an issue with a sensor, it may be incorrectly mapped or not properly seated. 1. Touch Home>Sensors. 2. Select the desired sensor icon. Open the Sensor Setup screen (press on the Setup cog) 3. Select the test button. Figure 5-58: Datalogger - Sensor not responding dialog If the sensor is not responding, a dialog box will appear. Check the mapping and the connections then test again. Page 84 of 170 700-SedEvent User Manual Rev 2 – 18 Dec 2014 SedEvent User Manual Chapter 5 Installing the system at the site 5.16.3 Verify data is being logged 1. On the datalogger Home screen, touch Data. 2. The Data Status screen opens. Figure 5-59: Datalogger – Data Status screen 3. Touch Table to display the Data Table screen. Figure 5-60: Datalogger – Data Table screen 4. Verify that the data table holds records containing the expected data fields. 5. Use the Jump buttons to move to a desired date and time. 6. Touch Home. 5.16.4 Verify telemetry devices 5.16.4.1 GOES If your system has a GOES telemetry system: Page 85 of 170 700-SedEvent User Manual Rev 2 – 18 Dec 2014 SedEvent User Manual Chapter 5 Installing the system at the site 1. Wait for your system to make its first transmission. 2. Contact either FTS (1-800-548-4264) or your home office and have someone verify that the transmission was received with adequate signal strength and without errors in the transmission. 3. If there are problems, contact FTS (1-800-548-4264) for troubleshooting. 5.16.4.2 On-demand modems If your system has an on-demand modem (GlobalStar satellite modem, phone modem): 1. Call your head office and request a test call to your station. A test call may consist of collecting current conditions or collecting recent data. 2. If there are problems, contact FTS (1-800-548-4264) for troubleshooting. 5.16.5 Check serial numbers in datalogger Note: A visit report has been saved to your USB memory stick so that you have a record of the serial numbers of the equipment currently installed at the site (assuming someone earlier populated the serial number table in the datalogger). 1. On the datalogger Home screen, touch Service> Serial # Table 2. The Serial Number screen appears. Figure 5-61: Datalogger – Serial Number screen 3. The table should show all beige backgrounds for device names in the Device column, and show the serial numbers in the Serial Number column. 4. If one or more serial numbers are missing (red background) or are incorrect based on your records, then you must input a serial number: a. In the Device column, touch the name of the device with a missing serial number. b. The Serial Number Update screen appears. Page 86 of 170 700-SedEvent User Manual Rev 2 – 18 Dec 2014 SedEvent User Manual Chapter 5 Installing the system at the site Figure 5-62: Datalogger - Serial Number Update Screen c. Enter or modify Serial Number. You may do this in two ways: i. Manually: Touch the Serial Number field and enter or modify serial number. ii. Auto-Detect: Touch the Auto Detect button and the device serial number is automatically entered in the Serial Number field. d. Touch OK. 5.16.6 Manually trigger samples 1. On the datalogger Home screen, touch Processing>TSampler> Aux. Sample Figure 5-63: Datalogger - TSampler screen 2. The Auxiliary Sampling window appears and the ISCO controller commands the ISCO autosampler to draw a sample. Page 87 of 170 700-SedEvent User Manual Rev 2 – 18 Dec 2014 SedEvent User Manual Chapter 5 Installing the system at the site Figure 5-64: Datalogger - TSampler – Auxiliary Sampling window 3. If you do not observe the auto-sampler cycling within 5 seconds, there is a problem. Troubleshooting tips, in order of complexity: a. Check that the ISCO auto-sampler has power and is turned on. b. Check that the ISCO controller cable (see section 2.2.6) is properly connected to both the datalogger and the ISCO auto-sampler (see section 5.6.3). c. Check that the ISCO auto-sampler has its own dedicated port (i.e., is not shared with other devices). Certain other devices have a long response latency and can cause a delay if connected to the same port as the auto-sampler. d. Check that the ISCO auto-sampler is configured properly (see Appendix D). 4. If an error occurs during sampling: a. A message window appears to notify you. b. Touch OK to dismiss the message. c. Address the problem identified in the message (e.g., samplers full). d. Return to step 5. 5. To manually cancel the auxiliary (sample): a. Touch Cancel. b. A message window appears to acknowledge the cancellation. c. Touch OK to dismiss the message. 6. When the sample has been taken, failed, or cancelled, the Auxiliary Sampling window closes. 5.17 Get an End Visit Report from the datalogger 1. Ensure the memory stick is inserted in the USB HOST port on the datalogger front panel. 2. On the datalogger Home page, touch Service> Visit Report 3. The Visit Report screen appears in End Visit mode (indicated by the End Visit button). Page 88 of 170 700-SedEvent User Manual Rev 2 – 18 Dec 2014 SedEvent User Manual Chapter 5 Installing the system at the site Figure 5-65: Datalogger - Visit Report screen in End Visit mode 4. Touch End Visit. The Save Report screen appears. Use the scroll bar to review the information and select OK. Figure 5-66: Datalogger - Save Report screen 5. It may take a few minutes to save the report. A dialog box will appear once the report has been successfully saved. 6. Remove the USB memory stick from the datalogger front panel. Page 89 of 170 700-SedEvent User Manual Rev 2 – 18 Dec 2014 SedEvent User Manual Chapter 6 Chapter 6 Site visits Site visits This chapter details procedures that should be performed during a site visit. Chapter contents 6.1 6.2 6.3 6.4 6.5 Maintenance and storm visits .....................................................................................................................................91 Get a Start Visit Report from the datalogger .........................................................................................................91 Site observations ..............................................................................................................................................................93 Create a Site Visit in StreamTrac .................................................................................................................................94 Changing sample bottles (ISCO 6712) .....................................................................................................................95 6.5.1 Recording site details 6.6 Depth integrated (DI) and auxiliary sampling ......................................................................................................99 6.6.1 Depth integrated (DI) sampling 6.6.2 Auxiliary (AUX) sampling 6.7 Collecting data on a memory stick ......................................................................................................................... 103 6.8 Sensor maintenance .................................................................................................................................................... 106 6.9 Get an End Visit Report from the datalogger ..................................................................................................... 108 6.10 Add notes and documents to StreamTrac Site Visit ........................................................................................ 108 6.11 Uploading data from the datalogger into StreamTrac ................................................................................... 110 Page 90 of 170 700-SedEvent User Manual Rev 2 – 18 Dec 2014 SedEvent User Manual 6.1 Chapter 6 Site visits Maintenance and storm visits Site visits are motivated by two concerns: maintenance and storm observations. Maintenance site visits are performed regularly or based on information about the equipment’s condition (e.g., number of empty sample bottles left). A maintenance visit typically includes downloading data, changing bottles, and general equipment inspection and maintenance. Storm site visits are performed in order to observe and sample conditions during a storm. A storm visit typically includes manually triggered sampling, stage measurement (from the staff plate), and may also include cross-sectional measurements to develop stage-discharge ratings for more extreme events. Storm visits largely involve activities that are not directly related to SedEvent system equipment, and so we do not offer any further instruction on them. Maintenance visits, on the other hand, address precisely the monitoring goals met by the SedEvent system and the equipment in it. This remainder of this section gives instructions for a typical maintenance visit. 6.2 Get a Start Visit Report from the datalogger At the beginning of every site visit, you should record a Start Visit report from the datalogger onto a USB memory stick. This records all current conditions before you perform any maintenance activities. (At the end of every visit, you should collect an End Visit report to document changes made.) 1. Insert a USB memory stick into a USB HOST port on the front panel of the datalogger. 2. On the datalogger Home page, touch Service. 3. The Service screen appears. Figure 6-1: Datalogger – Service screen 4. Touch Visit Report. The Visit Report screen should appear in Start Visit mode (indicated by the Start Visit button. Page 91 of 170 700-SedEvent User Manual Rev 2 – 18 Dec 2014 SedEvent User Manual Chapter 6 Site visits Figure 6-2: Datalogger - Visit Report screen in Start Visit mode If the Visit Report screen appears in End Visit mode (indicated by the End Visit button in place of the Start Visit buttonError! Reference source not found.: a. Touch End Visit. The Save Report screen appears. b. Touch OK. c. The End Visit Report is written to the USB memory stick and the Visit Report screen appears in Start Visit mode (indicated by the Start Visit button. 5. Enter or modify Technician identification (e.g., initials or name) and Trip #. 6. Touch Start Visit. The Save Report screen appears. Figure 6-3: Datalogger - Visit Report - Save Report screen 7. Touch OK. 8. The report is written to the USB memory stick, and the Visit Report screen reappears in End Visit modeError! Reference source not found.. 9. Touch Home. Page 92 of 170 700-SedEvent User Manual Rev 2 – 18 Dec 2014 SedEvent User Manual 6.3 Chapter 6 Site visits Site observations 1. In a field book note the presence of sediment and/or debris that is in the channel or obstructing the turbidity probe (to be cleared later) 2. Read the staff plate (but only record within 5 minutes of a datalogger measurement). Figure 6-4: Datalogger - Typical staff plate 3. View current conditions from datalogger display and record turbidity, stage, and slot number in notebook: a. On the datalogger Home screen, touch Current Conditions. b. The Current Conditions screen appears displaying the last readings from user selected variables. Figure 6-5: Datalogger – Current Conditions screen Page 93 of 170 700-SedEvent User Manual Rev 2 – 18 Dec 2014 SedEvent User Manual Chapter 6 Site visits c. If the Current Condition screen does not display the variables you require (e.g., HG, TurbMedWw, Slot), touch Setup to modify this display. For details, consult the Axiom Configurations Reference. d. Touch Home. 4. If the turbidity value appears to be anomalous, examine the turbidity sensor. Ensure that it is properly positioned in the flow, not surrounded by debris, and that its window is clean and its wiper undamaged and functioning properly (see Appendix E). 5. If the stage value appears to be anomalous, recalibrate against the staff plate (see section 5.15.7). 6. Record the current bottle number on the ISCO auto-sampler display. (Press dark.) if display is BOTTLE 14 AFTER 1 PULSES 7. Compare Slot number from datalogger Current Condition screen and Bottle number from ISCO display. Verify that Slot + 1 = Bottle. Notes: a. On the datalogger, Slot indicates the number of bottles already filled; Slot + 1 is the bottle number to be filled next. b. On the ISCO, Bottle indicates the bottle number to be filled next. c. When the datalogger and ISCO are operating correctly, Slot + 1 = Bottle. 8. If the Slot and Bottle numbers are not consistent (see previous step): a. Stop the ISCO program. b. Replace all filled sample bottles with empties (see section 6.5). c. Restart the ISCO program. d. Be skeptical about the relationship of the slot/bottle numbers recorded in the datalogger to the other data collected for the filled sample bottles you removed. 9. Wait at least two minutes after the most recent measurement by the datalogger. 10. Check the sample bottles. If sample volumes are too high or too low, go to Troubleshooting. 6.4 Create a Site Visit in StreamTrac The next steps of the site visit activities call for a site visit report to be created and filled out on the laptop. 1. Connect the serial cable between the laptop and the Axiom H2 datalogger 2. On the laptop, start the StreamTrac software. 3. The StreamTrac main window opens. Page 94 of 170 700-SedEvent User Manual Rev 2 – 18 Dec 2014 SedEvent User Manual Chapter 6 Site visits 4. Click Site Visits > Issue New Site Visit. 5. The Issue New Site Visit window opens. Figure 6-6: StreamTrac – Issue New Site Visit window 6. Select the station name from the drop-down window and click OK. The Issue New Site Visit window closes. 7. If the Hydro Year for the current date has not been defined, StreamTrac gives you the option to define it at this point. We recommend doing so. After defining the HY, the site visit process continues. 8. The Site Visit window opens at the Carousel-Bottle Mapping tab. 6.5 Changing sample bottles1 (ISCO 6712) Decide whether to change the auto-sampler bottles based on the following guidelines: 1. 12 or more samples have been collected, or 2. it is expected that the bottles will be exhausted before the next site visit because of expected storms, or 3. you are experiencing equipment problems. To change sample bottles: 1. Ensure that replacement bottles are a. available in sufficient number (the auto sampler displays the Bottle number; subtract 1 from this number to determine the number of replacement bottles), and b. labelled according to your laboratory’s requirements for unique identification of samples. 2. Pause the ISCO auto-sampler’s program: a. On the keypad press 1. . The ISCO enters Manual Paused mode and its display shows: 1 For more complex operations, such as taking manual samples or purging the lines before you recommence sampling, refer to the ISCO 6712 Installation and Operation Guide. Page 95 of 170 700-SedEvent User Manual Rev 2 – 18 Dec 2014 SedEvent User Manual Chapter 6 Site visits STOP PROGRAM RESUME PROGRAM VIEW DATA GRAB SAMPLE b. Press c. Press until Stop Program is highlighted to stop the program. 3. Undo the latches holding the ISCO auto-sampler top down to the auto-sampler base. 4. Lift the auto-sampler top using the lift bracket built into the enclosure, and latch the lift bracket in the raised position. 5. Pull the base of the auto-sampler out on the shelf until it is fully extended. 6. Note which bottles are full and need replacement. 7. In StreamTrac, in the Site Visit window, select the Carousel-Bottle Mapping tab. Page 96 of 170 700-SedEvent User Manual Rev 2 – 18 Dec 2014 SedEvent User Manual Chapter 6 Site visits Figure 6-7: StreamTrac – Site Visit window – Carousel-Bottle Mapping tab 8. On the Carousel-Bottle Mapping tab, a. Select (checkmark) Use Slot/Bottle Mapping. b. Enter the bottle batch code and the technician’s name in the provided fields. c. Enter the replacement bottle numbers in the carousel bottle mapping fields. 9. Tightly cap the bottles containing samples before removing them. 10. Place the labelled replacement bottles in the correct slots and check their positioning a second time. 11. On the Carousel-Bottle Mapping tab, set the Swap Bottle Date and Time field after the bottles have been replaced. 12. Restart the program and reset the ISCO auto-sampler to bottle position 1: a. Press until RUN is selected and press . Page 97 of 170 700-SedEvent User Manual Rev 2 – 18 Dec 2014 SedEvent User Manual Chapter 6 Site visits b. Enter Start Bottle # (typically 1) and press 13. Place the removed sample bottles on a level surface and mark the sample volume level on each one. 14. In StreamTrac, in the Site Visit window, select the Notes/Attachments tab. 15. Transfer notes from the field book to the Note field. 16. Attach any relevant documents or photos using the Attach button. Further attachments can be added later by calling up this Site Visit and returning to this tab. 6.5.1 Recording site details 1. In StreamTrac, in the Site Visit window, click the Site Details tab. Page 98 of 170 700-SedEvent User Manual Rev 2 – 18 Dec 2014 SedEvent User Manual Chapter 6 Site visits Figure 6-8: StreamTrac – Site Visit window – Site Details tab 2. Enter all relevant data (none is required). 3. Verify that stage and turbidity on the H2 datalogger display agree with the values reported on the Site Details tab. If they do not agree, enter the correct values from the datalogger display, and make a note in the Site Visit file. 6.6 Depth integrated (DI) and auxiliary sampling 6.6.1 Depth integrated (DI) sampling The purpose of depth integrated (DI) sampling is to provide reference data points that more accurately represent the integrated cross-stream sediment load. These depth-integrated reference data points can be used to calibrate the point samples taken by the SedEvent system. Current practice (Eads, 2006; Lewis, 2006) recommends defining 6 turbidity ranges that cover the entire range of turbidity encountered at the site. Within each range, it is recommended to acquire 3 sample Page 99 of 170 700-SedEvent User Manual Rev 2 – 18 Dec 2014 SedEvent User Manual Chapter 6 Site visits pairs (pumped point sample, depth-integrated sample) in each season (i.e., 3 pairs per turbidity range, distributed across the hydro year). To collect a depth-integrated sample: 1. Prepare to collect a depth-integrated sample. You will probably need one person to operate the SedEvent system and one person to manipulate the sampler in the stream. For equipment and methods see, for example, Edwards and Glysson (1999). 2. Immediately after you have collected the depth integrated sample from the stream, collect a paired DI sample with the auto-sampler. 3. On the datalogger Home screen, touch Processes The Processes screen opens. Figure 6-9: Datalogger – Processes screen 4. Touch TSampler. The TSampler screen opens. Figure 6-10: Datalogger – TSampler screen Page 100 of 170 700-SedEvent User Manual Rev 2 – 18 Dec 2014 SedEvent User Manual Chapter 6 Site visits 5. Touch DI Sample. 6. The Depth Integrated Sampling window appears and the ISCO controller commands the ISCO autosampler to draw a sample. Within 5 seconds you should observe the auto-sampler cycling. If it does not, troubleshoot according to instructions in section 5.16.6. The resulting sample will be distinctly identified in the data log as a depth-integrated sample (sample_code = 2; see section B.3.8). Figure 6-11: Datalogger – Depth Integrated Sampling window 7. If an error occurs during sampling: a. A message window appears to notify you. b. Touch OK to dismiss the message. c. Correct the problem and retrigger the sample. 8. To manually cancel the depth-integrated sample: a. Touch Cancel. b. A message window appears to acknowledge the cancellation. c. Touch OK to dismiss the message. 9. When the sample has been taken, failed, or cancelled, the Depth Integrated Sampling window closes. To record a depth-integrated sample in StreamTrac (either in the field or in the lab from field notes): 1. In StreamTrac, in the Site Visit window, click Calibration Samples tab. Page 101 of 170 700-SedEvent User Manual Rev 2 – 18 Dec 2014 SedEvent User Manual Chapter 6 Site visits Figure 6-12: StreamTrac – Site Visit window – Calibration Samples tab 2. On the StreamTrac Site Visit form, Calibration Samples tab, record the following information: a. Enter the turbidity ranges if they are not already filled in. b. Enter the date, time, and bottle number of the sample collected manually using a depth-integrating sampler from the stream. c. Enter the date, time, and bottle number of the depth-integrated sample you initiated from the data logger. 3. Click Save. 6.6.2 Auxiliary (AUX) sampling The purpose of auxiliary sampling is to collect additional samples of interest (during a storm event, for example) that are not automatically collected under the turbidity threshold sampling algorithm. Guidelines for deciding if an auxiliary (AUX) sample is required: Page 102 of 170 700-SedEvent User Manual Rev 2 – 18 Dec 2014 SedEvent User Manual Chapter 6 Site visits 1. Examine the ISCO auto-sampler bottles for size of samples, the record of stage heights, and the record of recent samples. 2. Use the following criteria to decide whether to trigger an auxiliary sample: a. The auto-ampler sample volumes are inadequate, or b. The stage is receding towards the minimum stage and there are less than 4 samples from the current storm event, or c. No sample has been taken during the previous two weeks (only at perennial streams where an annual load is of interest) To collect an auxiliary sample: 1. On the datalogger Home screen, touch Processes. The Processes screen opens. 2. Touch TSampler. The TSampler screen opens. 3. Touch Aux. Sample. 4. The Auxiliary Sampling window appears and the ISCO controller commands the ISCO autosampler to draw a sample. Within 5 seconds you should observe the auto-sampler cycling. If it does not, troubleshoot according to instructions in section 5.16.6. 5. If an error occurs during sampling: a. A message window appears to notify you. b. Touch OK to dismiss the message. 6. To manually cancel the auxiliary (sample): a. Touch Cancel. b. A message window appears to acknowledge the cancellation. c. Touch OK to dismiss the message. 7. When the sample has been taken, failed, or cancelled, the Auxiliary Sampling window closes. 6.7 Collecting data on a memory stick The Axiom H2 datalogger can download data directly to a USB memory stick, eliminating the need for a laptop computer on site. To collect current conditions or logged data from the datalogger: 1. On the datalogger Home screen, touch Data. 2. The Data Status screen appears. Page 103 of 170 700-SedEvent User Manual Rev 2 – 18 Dec 2014 SedEvent User Manual Chapter 6 Site visits Download Figure 6-13: Datalogger – Data Status screen 3. Touch Download. The Download Data screen appears. Figure 6-14: Datalogger – Download Data screen- showing drop down Date Range menu 4. Select the time period to collect data from in the Date Range drop-down. If you choose Custom, the From and To controls for date and time control the time period (and not for any other choice in the drop-down). 5. Select the Output Format of the file to be downloaded (CSV, Binary, or CSV-SHEF). For details and an explanation of the different format types, see the Axiom H2 Datalogger Configuration Reference. The following example will use CSV. 6. Select which variables to download. Touch the Select Variables button. Use the arrows to move variables between the two columns. The double arrows will move the entire list. Page 104 of 170 700-SedEvent User Manual Rev 2 – 18 Dec 2014 SedEvent User Manual Chapter 6 Site visits Figure 6-15: Datalogger – Download Data screen- Select Variables screen 7. Touch OK to return to the Download Data screen. 8. Select or de-select the Include Units Line and Replace blank fields with -99999 in accordance with your preferences. 9. Press the Download button. The CSV (or Binary) Exporting window appears. Figure 6-16: Datalogger – CSV Exporting window 10. When data exporting is complete, the CSV/Binary Exporting window closes and the Download Data Complete window appears. Page 105 of 170 700-SedEvent User Manual Rev 2 – 18 Dec 2014 SedEvent User Manual Chapter 6 Site visits Figure 6-17: Datalogger – Download Data Complete window 11. Touch OK. The Download Data Complete window closes. 12. On the USB memory stick you will find the following folder hierarchy. Figure 6-18: Datalogger directory hierarchy on USB memory stick 13. In the H2 Datalogger Data subdirectory, the downloaded data has been written to a file named <Station Name>-<Timestamp>.<Type>, where a. <Station Name> is the station name configured under Home > Station Set-up > Site tab > Station field, b. <Timestamp> is the date and time the data was downloaded, in the format yyyy-mm-ddhh-mm, c. <Type> is either csv if you downloaded data in CSV format or bin if you downloaded in binary format. 6.8 Sensor maintenance FTS recommends routine field sensor inspections and validations as part of your QA/QC protocol. The frequency required varies depending on your site conditions and whether you have access to your data by telemetry. Figure 6-19 exhibits some erratic turbidity data from a debris fouled sensor on the falling limb of the December 28th turbidity graph. Notice that once the debris was removed on December 29th Page 106 of 170 700-SedEvent User Manual Rev 2 – 18 Dec 2014 SedEvent User Manual Chapter 6 Site visits the data returned to normal. One advantage of having data via telemetry is that you only visit a site when needed. Maintenance requirements can be optimized thereby resulting in higher quality data. Erratic turbidity data Figure 6-19: StreamTrac – Example erratic turbidity data due to sensor fouling If you do not have remote access to your data, FTS recommends more frequent visits in the first few seasons to ensure your deployment is not being fouled by debris. With experience and time you can reduce your site visit frequency if you are not having debris fouling issues. FTS also recommends site inspections after any large runoff events as these may mobilize organic debris and bed load that may cause fouling. Here are general recommendations for routine sensor maintenance: 1. Service the section of the stream where measurements are being taken: a. Remove branches and debris. b. Read and record the staff plate after clearing the measurement section of the stream. 2. Service the turbidity probe and sampling boom between measurement intervals: a. Remove any debris from the housing and the leading edge of the sampling boom. b. Remove sediment from inside housing by rapidly pushing the boom up and down stream. Page 107 of 170 700-SedEvent User Manual Rev 2 – 18 Dec 2014 SedEvent User Manual Chapter 6 Site visits c. Adjust the boom height, if necessary, but use caution since there is a tendency to overcorrect the height resulting in a setting that is too high or too low. Most sites do not require adjustment. 3. During non-storm visits, clean the sensor optics if necessary. 4. If a sensor’s optical face exhibits fouling or is damaged (e.g. scratched from being buried in bed load), measurements should be carried out before and after cleaning and/or resurfacing. The difference between these measurements can be used for data corrections at a later date using StreamTrac™. For details see the DTS-12 FAQ (frequently asked questions) pamphlet. 5. The DTS-12 wiper design is robust, requires minimal maintenance, and has proved effective over long periods of time. However, it can be damaged in some conditions. For more details, see 8.3Appendix E in this document and the DTS-12 User Manual. 6.9 Get an End Visit Report from the datalogger 1. Ensure the memory stick is inserted in the USB HOST port on the datalogger front panel. 2. On the datalogger Home page, touch Service>Visit Report. 3. Touch End Visit. 4. The Save Report screen appears. Touch OK. It will take a few moments for the file to be saved. 5. A dialog box will appear once the report is successfully saved. Touch OK. The Visit Report screen reappears in Start Visit mode. 6. Touch Home. 7. Remove the USB memory stick from the datalogger front panel. 6.10 Add notes and documents to StreamTrac Site Visit 1. Remove the USB memory stick from the front panel of the datalogger and plug it into the field laptop. 2. On the memory stick, you will find a hierarchy of folders like that shown in the diagram below. Figure 6-20: Datalogger memory stick folder hierarchy 3. Copy all new files and folders in this hierarchy to the hard drive in the field laptop. 4. Download all photographs taken at this site to the hard drive in the field laptop. Page 108 of 170 700-SedEvent User Manual Rev 2 – 18 Dec 2014 SedEvent User Manual Chapter 6 Site visits 5. In StreamTrac, on the Site Visit window, click the Notes/Attachments tab. Figure 6-21: StreamTrac – Notes/Attachments tab 6. For the Start Site Visit and End Site Visit (copied from datalogger), each field photo of value, and any other documents or files of value, attach it to the Site Visit: a. On the Notes/Attachments tab, click Attach. b. The Browse Files window opens. c. Browse to the location on the laptop hard drive of the file in question. d. Select the file. e. Click Open. f. A link to the selected file is added to the Site Visit, and the link is displayed in the Attachments list. Page 109 of 170 700-SedEvent User Manual Rev 2 – 18 Dec 2014 SedEvent User Manual Chapter 6 Site visits Note: Only a link to the file is added. No files are copied, changed, or removed by adding or deleting a link on the Attachments/Notes tab. If you delete or move the linked file on the hard drive, its Attachments/Notes link becomes invalid. 7. Transcribe any relevant notes from your field books into the Notes textbox on the Notes/Attachments tab. 8. Click Save. 6.11 Uploading data from the datalogger into StreamTrac Data can be collected from the data logger and uploaded to StreamTrac in two different ways, via telemetry or from a USB memory stick. A full discussion of how to use StreamTrac is outside the scope of this manual, but here we give an outline of the process. For details on various elements of this outline, see the StreamTrac Help. 1. In StreamTrac, set up a station into which you will load the data. (Stations > Station Setup > New Station.) 2. To collect data via telemetry (GSNet [GOES satellite via internet], radio modem, phone modem, direct connect) : a. Set up an appropriate communications protocol in the station definition. ( Stations > Station Setup > Communications tab > Add/Modify Communication Method.) b. Optionally, set up a station data collection schedule. (Stations > Station Setup > Schedule tab.) c. Optionally, set up group(s) for your stations to do group calling. ( Stations > Group Setup.) d. Optionally, manually call a station or group. (Data > Collect Data & Telemetry Calls.) 3. To collect data from a USB memory stick: a. If you collected data in binary format (.bin), run the data converter program to convert it to a CSV file (.csv). b. Import the data. (Data > Import > CSV & Text.) Page 110 of 170 700-SedEvent User Manual Rev 2 – 18 Dec 2014 SedEvent User Manual Chapter 7 Chapter 7 Data analysis Data analysis This chapter briefly reviews procedures for analyzing the data collected from the SedEvent system using the FTS StreamTrac™ software. For more complete details on using StreamTrac, see the StreamTrac Help. Chapter contents 7.1 7.2 7.3 7.4 7.5 7.6 7.7 Viewing data tables ...................................................................................................................................................... 113 Graphing data: The Graph window ........................................................................................................................ 113 7.2.1 Parts of the Graph window Turning graph elements on and off ....................................................................................................................... 116 Zooming, scrolling, and panning ............................................................................................................................ 119 7.4.1 Reverting to the default zoom 7.4.2 Zooming using a bounding box 7.4.2.1 Toggling Y-axis bounding-box zooming on or off 7.4.2.2 Zooming in using a bounding box 7.4.2.3 Zooming out using a bounding box 7.4.2.4 Undoing a bounding-box zoom 7.4.3 Zooming using the vertical-axis zoom controls 7.4.4 Scrolling and panning 7.4.4.1 Toggling Y-axis scrolling on or off 7.4.4.2 Scrolling (X axis only) 7.4.4.3 Panning Station Notes ................................................................................................................................................................... 121 7.5.1 Adding a new Station Note 7.5.2 Editing a Station Note 7.5.3 Deleting a Station Note Defining intervals with cursors ................................................................................................................................ 123 7.6.1 Placing the cursors 7.6.2 Removing the cursors Data correction tools ................................................................................................................................................... 125 Page 111 of 170 700-SedEvent User Manual Rev 2 – 18 Dec 2014 SedEvent User Manual 7.8 7.9 Chapter 7 Data analysis Incorporating laboratory analysis ........................................................................................................................... 127 Determining turbidity—SSC lab result relationships...................................................................................... 128 Page 112 of 170 700-SedEvent User Manual Rev 2 – 18 Dec 2014 SedEvent User Manual 7.1 Chapter 7 Data analysis Viewing data tables To view the data collected for a particular station in a tabular text format: 1. In the StreamTrac main window, click Data > View/Edit. 2. The View/Edit window opens with the most recently used station selected. Figure 7-1: StreamTrac – View/Edit window 3. In the Select Station dropdown, select the station you wish to view. 4. Use the controls on the window to select and view the data you are interested in. See the StreamTrac User Guide for details on these functions. 7.2 Graphing data: The Graph window StreamTrac can display data graphically in many different formats. Often users want to view their data in the same format repeatedly, so graph formats (referred to simply as “graphs”) can be defined, saved, and opened again later to view the same data in the same format at a later time. To view the data collected for a particular station in a predefined graph: 1. In the StreamTrac main window, click Graph > Existing Graphs. 2. The Open Graph window appears. Page 113 of 170 700-SedEvent User Manual Rev 2 – 18 Dec 2014 SedEvent User Manual Chapter 7 Data analysis Figure 7-2: StreamTrac – Open Graph window 3. Use the controls in the top half of the window to browse the available graphs. For details on these controls, see the StreamTrac User Guide. 4. In the bottom half of the window, click on the graph you wish to view. 5. Click Open. 6. The Open Graph window closes and the selected graph opens in a new window. Page 114 of 170 700-SedEvent User Manual Rev 2 – 18 Dec 2014 SedEvent User Manual Chapter 7 Data analysis Figure 7-3: StreamTrac – Example Graph window 7. Use the controls on the Graph window to adjust the view of the data as described in the sections below. For more details on this window and its controls, see the StreamTrac User Guide. 7.2.1 Parts of the Graph window The Graph window contains many controls that enable the user to choose what is displayed and how it is displayed. The figure below identifies the main parts of the graph window. Page 115 of 170 700-SedEvent User Manual Rev 2 – 18 Dec 2014 SedEvent User Manual Chapter 7 Data analysis upper control bar Y-axis graph trace or curve graph canvas Y-axis zoom controls X-axis graph legend QS control bar X-axis scroll bar load calculation bar Figure 7-4: StreamTrac – Parts of the Graph window 7.3 Turning graph elements on and off The most stripped-down view of a graph is shown in Figure 7-4 below. Page 116 of 170 700-SedEvent User Manual Rev 2 – 18 Dec 2014 SedEvent User Manual Chapter 7 Data analysis Figure 7-5: StreamTrac – Graph with minimal details turned on To toggle on or off elements of a graph: 1. In the upper control bar of the graph window, click the drop-down arrow beside View. 2. The View control appears (see Figure 7-6). Figure 7-6: StreamTrac – Graph window – View control 3. Click on an item above the separator line to turn it on or off. (A checkmark beside an item indicates that it is on.) 4. The View control closes and the graph is updated to reflect your choice. Graph elements available to view are: Page 117 of 170 700-SedEvent User Manual Rev 2 – 18 Dec 2014 SedEvent User Manual Chapter 7 Data analysis 1. Station Notes: Station Notes are text notes added by users. The Note can be set to be displayed either as the Note icon or as the entire Note text, e.g., . a. To view the full Station Note text, hover over the icon. b. For information on adding Station Notes, see section 7.5. 2. Align Vertical Axes: Causes zeroes of each axis to be aligned vertically on graph. See StreamTrac Help for details. 3. Storm Events: Storm Events are markers added by users to delineate a time interval in the data when a storm event is believed to have occurred. Storm Events are indicated by the icon .A Storm Event icon is positioned at the beginning date and time of the storm event time interval. a. To view a summary of the information about a Storm Event, hover over the icon. b. To toggle on or off a display of the interval defined for the Storm Event, click on the icon. (See figure below.) Figure 7-7: StreamTrac – Graph window with Storm Event interval displayed c. To view or edit details about the Storm Event, right-click on the icon and select View/Modify. d. For information on adding Storm Events, see section 7.9.1. 4. Site Visits: Site Visits are records added by field crews when performing a site visit. A Site Visit is indicated by an icon positioned on the graph according to the date and time of the visit. Page 118 of 170 700-SedEvent User Manual Rev 2 – 18 Dec 2014 SedEvent User Manual Chapter 7 Data analysis a. To view a short description of the Site Visit record, hover over the icon. b. To view or edit details of the Site Visit, right-click on the icon and select View/Modify. c. For information on adding Site Visits, see Chapter 6. 5. Bottle Numbers: Bottle Numbers indicate a water sample taken. Bottle Numbers are generated automatically from information stored in the sampling records by the datalogger. A Bottle Number is indicated by an icon containing the bottle number (e.g. ). A Bottle Number icon is positioned according to the date and time of the sample. 6. Raw Edits: If you correct (edit) data in the graph, both your original (raw) data and the corrected (edited) data are stored in the database. When this option is selected, areas of the graph that have been edited are shown in a different colour. 7. Staff Plate: A staff plate observation is part of the record added by field crews when performing a site visit. A Staff Plate value is indicated by an icon positioned on the Stage curve of the graph at the date and time of the site visit. a. To view a short description of the staff plate record, hover over the icon. b. To view or edit details of the Site Visit, right-click on the icon and select View/Modify. c. For information on adding Site Visits, see Chapter 6. 7.4 Zooming, scrolling, and panning Zooming in and out on a graph essentially means adjusting the visible range of the X and Y axes. To see a small area of the graph in detail, either X or Y axes (or both) are limited to a small range. To see the entire graph, X and Y axes are set to the range limits of the data. In StreamTrac, you can zoom separately on the X (time) and Y (measurement value) axes. The X (time) axis can be adjusted to any interval within the data range. The Y (measurement) intervals can be adjusted separately on the left-hand and right-hand Y axes. A graph that is zoomed in to show detail can be scrolled to show other parts of the graph at the same zoom level. 7.4.1 Reverting to the default zoom Before zooming in or out, it is useful to know how to get back to the default zoom on a graph. 1. To revert to the default zoom, in which the full range of X and Y values are displayed, click the View All XY icon in the upper control bar of the graph window (see Figure 7-4). 2. To revert only the X-axis zoom to the default, in which the full range of X values (only) is displayed, click the View All X icon in the upper control bar of the graph window (see Figure 7-4). Page 119 of 170 700-SedEvent User Manual Rev 2 – 18 Dec 2014 SedEvent User Manual Chapter 7 Data analysis 7.4.2 Zooming using a bounding box Zoom level can be controlled by drawing a bounding box on the graph with the mouse cursor. When a bounding box is drawn, the graph display zooms in or out to display the selected area. The box can control either X-axis zoom only or both X- and Y-axis zoom. 7.4.2.1 Toggling Y-axis bounding-box zooming on or off In some cases, it is most convenient to be able to zoom only on the X axis; in others, it is preferable to be able to zoom on both X and Y axes. To control Y-axis zooming: 1. In the upper control bar of the graph window (see Figure 7-4), click the drop-down arrow beside View. 2. The View control appears (see Figure 7-6). 3. Click Allow Vertical Zooming to toggle Y-axis zooming to the other state. 7.4.2.2 Zooming in using a bounding box 1. Draw a bounding box on the graph: a. Position the cursor at a point in the main graph display corresponding to the beginning of the X (time) interval and to one end of the Y (measurement) interval you wish to zoom in on. b. Press and hold the left mouse button and drag the cursor to the end of the X (time) interval and the other end of the Y (measurement) interval you wish to zoom in on. c. The window displays a rectangle stretching from the beginning cursor position to the current position. d. Release the left mouse button. 2. The displayed X (time) interval for the graph is changed to the X interval selected by your mouse selection. If Allow Vertical Zooming is selected (see section 7.4.2.1 above), the displayed Y (measurement) interval for the graph is changed to the Y interval selected by your mouse selection. The graph is redrawn. 7.4.2.3 Zooming out using a bounding box 1. Press the Shift or Alt key and draw a bounding box on the graph (see previous section). 2. The displayed X (time) interval for the graph is changed so that the current full X-axis value range fits within the X axis range of the bounding box. If Allow Vertical Zooming is selected (see section 7.4.2.1 above), the displayed Y (measurement) interval for the graph is changed in the same way. The graph is redrawn. 7.4.2.4 Undoing a bounding-box zoom To change to the previous zoom level on the X (time) axis: 1. Click on the Undo Last Zoom icon 7-4). in the upper control bar of the graph window (see Figure Page 120 of 170 700-SedEvent User Manual Rev 2 – 18 Dec 2014 SedEvent User Manual Chapter 7 Data analysis 2. The displayed X (time) and Y (measurement) intervals for the graph are changed to the previously displayed intervals and the graph is redrawn. 3. Click Undo Last Zoom again to zoom out to a still earlier zoom level. 7.4.3 Zooming using the vertical-axis zoom controls To zoom in or out on a Y (measurement value) axis: 1. To zoom in, click on the Zoom In icon next to the desired axis. 2. To zoom out, click on the Zoom Out icon next to the desired axis. 3. To zoom out to the full data range on a Y axis, click on the Reset Axis Zoom icon desired axis. next to the 7.4.4 Scrolling and panning These two terms are almost synonyms, and both refer to a way to shift what part of the graph data is displayed in a zoomed view. Panning shifts the graph area by allowing the user to drag the graph across the window as if the mouse pointer were “sticky.” Zooming accomplishes the same thing by using conventional scroll bars at the edges of the graph window. From here on, when we say “scroll,” we also mean “pan.” 7.4.4.1 Toggling Y-axis scrolling on or off In some cases, it is most convenient to be able to scroll only on the X axis; in others, it is preferable to be able to scroll on both X and Y axes. To control Y-axis scrolling: 1. In the upper control bar of the graph window (see Figure 7-4), click the drop-down arrow beside View. 2. The View control appears (see Figure 7-6). 3. Click Allow Vertical Scrolling to toggle Y-axis scrolling to the other state. 7.4.4.2 Scrolling (X axis only) To scroll the data in the X axis, use the scroll bar below the main graph area (see Figure 7-4). The Y axis can only be scrolled by panning. 7.4.4.3 Panning To pan the data in both X and Y axes, position the mouse cursor in any clear area of the graph canvas, right-click, and drag left or right, up or down. The graph moves as if attached to the cursor. 7.5 Station Notes 7.5.1 Adding a new Station Note To add a new Station Note to a graph: 1. Position the mouse cursor over an empty area on the graph canvas at the date and time you wish to add the Note. Page 121 of 170 700-SedEvent User Manual Rev 2 – 18 Dec 2014 SedEvent User Manual Chapter 7 Data analysis 2. Right-click and select Add Note. 3. The Modify Station Note window opens (see Figure 7-8). Figure 7-8: StreamTrac – Modify Station Note window 4. Enter the text of the note in the textbox at the top of the window. 5. Adjust note date and time (on the graph; not the current date and time) as desired. 6. If you wish to display the note text on the graph rather than a small Note icon, check Show Full Note on Graph. Note text is displayed on a single line, so only short notes should be shown. 7. Select the Vertical Position if you wish. 8. Click OK. 9. The Modify Station Note window closes. 7.5.2 Editing a Station Note To edit an existing Station Note: 1. Position the mouse cursor over a Note icon. 2. Right-click and select View/Modify. 3. The Modify Station Note window opens (see Figure 7-8). 4. Modify the Note details as required. 5. Click OK. 6. The Modify Station Note window closes. Page 122 of 170 700-SedEvent User Manual Rev 2 – 18 Dec 2014 SedEvent User Manual Chapter 7 Data analysis 7.5.3 Deleting a Station Note To delete an existing Station Note: 1. Position the mouse cursor over a Note icon. 2. Right-click and select Delete. 3. The Confirm window opens. Figure 7-9: StreamTrac – Confirm delete Note window 4. Click Yes to delete the Note. Click No or Cancel to keep it. 5. If you clicked Yes, the Note is deleted and its icon is removed from the graph. 7.6 Defining intervals with cursors Two vertical (X-value) cursors, called the Start Cursor and the End Cursor, can be placed on the graph. These cursors are used to define Storm Events and perform data-editing functions. Figure 7-10 below shows the cursors placed to bracket a likely storm event in the data. The Start Cursor is displayed as a dotted green vertical line; the End Cursor as a dotted red vertical line. Page 123 of 170 700-SedEvent User Manual Rev 2 – 18 Dec 2014 SedEvent User Manual Chapter 7 Data analysis Start Cursor End Cursor Figure 7-10: StreamTrac – Graph window with cursors 7.6.1 Placing the cursors 1. To place or move the Start Cursor: a. Position the mouse pointer on the graph at the desired X-position for the cursor, rightclick, and select Set Start Cursor. b. If no cursors are visible on the graph, the Start Cursor (only) appears at the selected position. If the Start Cursor is already visible, it is moved to the selected position. If the End Cursor is already visible, it moves with the Start Cursor to preserve the interval between them. Page 124 of 170 700-SedEvent User Manual Rev 2 – 18 Dec 2014 SedEvent User Manual Chapter 7 Data analysis 2. To place or move the End Cursor: a. Position the mouse pointer on the graph at the desired X-position for the cursor, rightclick, and select Set End Cursor. b. If no cursors are visible on the graph, the End Cursor (only) appears at the selected position. If the End Cursor is already visible, it is moved to the selected position, without affecting the Start Cursor (if it is visible). 3. To move either Start or End Cursor by dragging: a. Position the mouse pointer over the cursor. b. The pointer changes to . c. Left-click and drag the cursors to a new position. d. Start and End Cursors move independently of each other. 7.6.2 Removing the cursors To remove the cursors from view, click on a Storm Event marker remove the extent display. 7.7 to display its extent. Click again to Data correction tools StreamTrac provides several different tools for correcting (editing) data in a graph. These functions are briefly outlined below. For details, see the StreamTrac Help under “Time Series Graph Editing.” Notes: 1. Most of these functions operate on a range of data defined by the Start Cursor and End Cursor (see section 7.5). 2. Data correction tools are accessed by right-clicking on the trace (graph line) to be modified and choosing from the context menu that appears (see figure below). Page 125 of 170 700-SedEvent User Manual Rev 2 – 18 Dec 2014 SedEvent User Manual Chapter 7 Data analysis Figure 7-11: StreamTrac – Data Correction context menu Summary of tools: 1. Add Storm Event. See section 7.9.1. 2. Copy Range. Copies the selected range of data to the data clipboard. 3. Paste-Fit Range. Pastes the data in the data clipboard into the selected range. If the range is a different length than the data on the clipboard, subsample or interpolate to fit. 4. Delete Range. Removes the data in the selected range from the graph. 5. Segment Interpolation. Does a linear interpolation or fills with a constant value between two points (whose X-values are defined by the range) on the graph. Usually used to fill in missing segments of data. 6. Auto Interpolation. Fills multiple gaps in the selected range with linearly interpolated values. Minimum and maximum size of gap can be specified to control what data is modified. 7. Constant Bias Shift. Adds a constant value to the data in the selected range, or replaces the data with a constant value. 8. Variable-Shift (Drift Corr.). Moves the data in the selected range along one or more pivot points. This function is useful in correcting sensor drifts due to fouling. 9. Reconstruct. Create data values in the selected range by using another field (graph) as a surrogate to estimate values, based on segments of data when both fields were present and a relationship between them can be determined. 10. Graphical Point Editing. Allows the user to drag individual data points in anywhere the Y-direction. Page 126 of 170 700-SedEvent User Manual Rev 2 – 18 Dec 2014 SedEvent User Manual Chapter 7 Data analysis 11. Mathematical Editing. Fills a range of data using a user-defined mathematical formula. A formula can use another field within the current record set to calculate values. 12. Restore Original Data. Discards all changes to the data in the selected range and replaces it with the original (raw) data stored in the database. 7.8 Incorporating laboratory analysis After samples have been sent to the laboratory and the SSC (suspended sediment concentration) for each has been determined, the SSC values can be entered in StreamTrac to permit regressions (relating turbidity and SSC) to be performed and applied to the data. To enter SSC values: 1. In StreamTrac, open the Site Visit corresponding to samples for which you have lab values: a. Select Site Visit > View All Site Visits. b. The Site Visits window opens. Figure 7-12: StreamTrac – Site Visits window c. Use the filtering and search tools to locate the Site Visit corresponding to samples for which you have lab values. d. Double-click on that Site Visit. Page 127 of 170 700-SedEvent User Manual Rev 2 – 18 Dec 2014 SedEvent User Manual Chapter 7 Data analysis e. The Site Visit window opens. 2. Select the Carousel-Bottle Mapping tab. Figure 7-13: StreamTrac – Site Visit window – Carousel-Bottle Mapping tab 3. In the SSC column, enter the SSC lab values corresponding to the unique bottle numbers recorded in the Bottle No column. 4. Click Save. 7.9 Determining turbidity—SSC lab result relationships Once SSC lab results have been entered into StreamTrac (see section 7.8), you can perform regressions to determine relationships between turbidity and SSC. These relationships can be applied to data that do not have corresponding samples in order to estimate SSC and related parameters (e.g., total sediment load). A regression that defines a relationship between turbidity measurements and SSC lab values is captured in a Storm Event. A Storm Event both marks a time interval and encompasses a calculated regression Page 128 of 170 700-SedEvent User Manual Rev 2 – 18 Dec 2014 SedEvent User Manual Chapter 7 Data analysis curve relating two sets of data over that interval, typically SSC (suspended sediment count, from lab analysis) and turbidity (from streamside monitoring data). A data set can have many different storm events, each with its own independent regression curve for estimating sediment load when no water samples are available and for estimating total sediment load over the interval. 7.9.1 Adding a new Storm Event To add a new Storm Event to a graph: 1. Position the cursors to bracket the storm event (see section 7.5). 2. Position the mouse cursor over a curve on the graph or over a curve label in the graph legend area (see Figure 7-4). 3. Right-click and select Add Storm Event. 4. The Regression and Calculation window opens. 5. Select the Method tab. Figure 7-14: StreamTrac – Regression and Calculation window – Method tab 6. For a typical SSC-Turbidity regression: Page 129 of 170 700-SedEvent User Manual Rev 2 – 18 Dec 2014 SedEvent User Manual Chapter 7 Data analysis a. Under Curve Settings – Y Axis, select SSC. b. Under Curve Settings – X Axis, select Turbidity. c. Under Curve Settings – Regression Model, select a regression method. Least Squares is a common choice. d. The area in the right-hand part of the tab is filled with a graph of the data in the selected interval, a regression curve, a title giving information about the regression curve, and some optional informational elements in the graph. A typical example is shown in the figure below. 7. Click Save. 8. You may leave the window open (to make later changes) or close it now. 9. To see the Storm Event marker in the Graph window, click the Update Data In Range from Database icon . 10. The graph is reloaded and the new display shows a Storm Event marker at the beginning of its interval. 7.9.2 Viewing a list of existing Storm Events 1. Right-click anywhere in a clear area of the graph canvas. 2. Select Event Summary. 3. The Event Summary window opens, displaying a list of all Storm Events defined in the graph. Page 130 of 170 700-SedEvent User Manual Rev 2 – 18 Dec 2014 SedEvent User Manual Chapter 7 Data analysis Figure 7-15: StreamTrac – Event Summary window 4. Control which Storm Events are displayed using the controls at the top of the window. 5. Examine a description each Storm Event in the central list. 6. Select a specific Storm Event in the list to open or delete by clicking anywhere on it. a. To open the selected event for editing, click Open or double-click on the event in the list (see section 7.9.2 for details about editing). b. To delete the selected event, click Delete. 7. To print a summary of the events currently shown in the list, click Print. 8. To close the window, click Close. 7.9.3 Editing a Storm Event For an alternative method of opening a Storm Event for editing, see section 7.9.2. To edit an existing Storm Event: 1. Position the mouse cursor over a Storm Event marker . 2. Right-click and select View/Modify. 3. The Regression and Calculation window opens with the information for the selected Storm Event. 4. Modify the information as desired. Page 131 of 170 700-SedEvent User Manual Rev 2 – 18 Dec 2014 SedEvent User Manual Chapter 7 Data analysis 5. Click Save. 6. You may leave the window open (to make later changes) or close it now. 7.9.4 Deleting a Storm Event For an alternative method of deleting a Storm Event, see section 7.9.2. To delete an existing Storm Event: 1. Position the mouse cursor over a Storm Event marker . 2. Right-click and select Delete. 3. The Confirm window opens. Figure 7-16: StreamTrac – Confirm delete Storm Event window 4. Click Yes to delete the Storm Event. Click No or Cancel to keep it. 5. If you clicked Yes, the Storm Event is deleted and its icon is removed from the graph. Page 132 of 170 700-SedEvent User Manual Rev 2 – 18 Dec 2014 SedEvent User Manual Chapter 8 Chapter 8 Troubleshooting Troubleshooting Chapter contents 8.1 8.2 8.3 Problem: Displayed stage is not correct within acceptable limits..............................................................134 Problem: Pumping sampler bottle volumes too low (empty) or too high ..............................................134 Problem: Pumping sampler over-sprays or water in base of sampler ......................................................135 Page 133 of 170 700-SedEvent User Manual Rev 2 – 18 Dec 2014 SedEvent User Manual 8.1 Chapter 8 Troubleshooting Problem: Displayed stage is not correct within acceptable limits NOTE: During the first storm flow of the season, the electronic (sensor) stage is frequently incorrect and the transducer index (stg_off) needs to be adjusted. If a stage error is noted after an initial seasonal adjustment has been done, additional troubleshooting should be done. To adjust the transducer index (stg_off) in the Monitor window: 1. Calculate offset correction = staff plate – electronic stage 2. Add offset correction to the current value of stg_off. 3. Wait for the next wake-up and confirm that the electronic stage agrees with your current observer stages. 4. Check the previous field forms and station status sheet to determine if changes were made to the stg_off. The offset may have been set incorrectly or reverted to a previous value. 5. Verify that the pressure transducer is secured. If you suspect it has moved, re-secure the transducer and reset offset (return to step 1). 6. Inspect the transducer cable for damage. 7. If the stage plot indicates drifting or erratic stage over time suspect a failing pressure transducer. Replace the pressure transducer. 8. If the stage error occurs after a high sediment event, check for debris and flush the intake if clogged. Note action, extent of obstruction, and post-cleaning stage in Site Visit notes. 8.2 Problem: Pumping sampler bottle volumes too low (empty) or too high Volumes may be low when pumping sampler intake is marginally submerged. Avoid calibrating sampler at stages very near to the station minimum stage. Ideal sample volume is 1/3 of bottle capacity (~330ml). Minimum is 1” depth in bottle. To troubleshoot: 1. Check the pumping sampler controller for proper settings. 2. Inspect for cracked and leaking pumping sampler bottles. 3. Check intake tubing for leaks or kinks. Make sure connections are tight. 4. Check inside pumping sampler pump housing for worn pump tubing. 5. Inspect pumping sampler intake for obstruction (if stage permits). 6. Overflowing bottles may indicate a failure of the “liquid detector” or excess air bubbles in the intake line caused by turbulent stream conditions or an air leak where the intake tubing joins the pump tubing (always use stainless steel hose clamps). 7. Enter the configuration mode and select the following: 8. Disable “Liquid detector” Page 134 of 170 700-SedEvent User Manual Rev 2 – 18 Dec 2014 SedEvent User Manual Chapter 8 Troubleshooting 9. Calibrate sample volume. 8.3 Problem: Pumping sampler over-sprays or water in base of sampler 1. Adjust distribution tube-end to extend 1/16" beyond the distributor arm. 2. Inspect distributor arm for loose connections, binding, or twisted tube. 3. Check for cracked and leaking bottles. 4. Overflowing bottles in a pumping sampler 3700 may indicate a failure of the “liquid detector”. 5. Enter the configuration mode and select the following: 6. Disable “Liquid detector” 7. Calibrate sample volume. Page 135 of 170 700-SedEvent User Manual Rev 2 – 18 Dec 2014 SedEvent User Manual Part III Chapter 8 Troubleshooting Appendices Page 136 of 170 700-SedEvent User Manual Rev 2 – 18 Dec 2014 SedEvent User Guide Appendix A Appendix A Selecting sensor interval and offset values Selecting sensor interval and offset values Chapter contents A.1 A.2 A.3 A.4 Activity schedules in the datalogger .....................................................................................................................138 Coordinating schedules ..............................................................................................................................................138 Sensor commands and scheduling ........................................................................................................................139 A.3.1 DTS-12 command scheduling A.3.2 ISCO command scheduling Pulling it all together – two common configurations .....................................................................................140 A.4.1 Example 1: TSampler in control of all sampling , DTS-12 wiping at each sample interval A.4.2 Example 2: Turbidity-triggered and daily sampling , DTS-12 wiping hourly Page 137 of 170 700-SedEvent User Manual Rev 2 – 18 Dec 2014 SedEvent User Guide A.1 Appendix A Selecting sensor interval and offset values Activity schedules in the datalogger Each sensor is activated (sent a command, usually a query) by the datalogger on a regular schedule particular to that sensor. The TSampler (threshold sampling), data logging, and telemetry message building processes are also performed on regular schedules. These schedules are determined by two parameters associated with each sensor, process, or activity: Interval and Offset. Interval is the time between each activation. For example, a 10 minute interval indicates that a sensor (or TSampler) is activated every 10 minutes. Interval alone cannot determine the actual time of each activation. For example, activations at 00:00, 00:10, 00:20, 00:30, etc. are all at 10-minute intervals. So are activations at 00:09, 00:19, 00:29, 00:39, etc. An additional piece of data is needed to determine precisely when each activation occurs, which is the offset time for activations. Activations occur at each time Ta, where Ta = 00:00 + N × Interval + Offset, for N = 1, 2, 3, … It’s worth noting that all activation times Ta are referenced to midnight (00:00). Though it is not strictly necessary, we also require 0 ≤ Interval < Offset, that is, Offset must be a nonnegative value less than Interval. Because of this, we can think of offsets as “wrapping around” the interval. Practically this means that if we want something to occur X minutes before the interval is up, we set the offset to Interval – X. A.2 Coordinating schedules When doing turbidity threshold sampling (TTS), it’s important to coordinate all these schedules for optimum data quality and system performance. Poor choices of interval and offset can lead to sampling based on data many minutes behind current conditions, reducing the relevance and coordination between measurements and samples. Typically, schedules are coordinated by picking the TSampler (sampling) interval and offset first. A common TSampler interval is 10 minutes, and we recommend the TSampler offset be set to 0 (zero) to simplify other calculations. Some sensors (e.g., the DTS-12 turbidity sensor) have a significant delay between request and response, and this delay varies between sensor models. It is important, therefore, to set sensor interval and offset values so that a recent sensor value is available for TSampler. Continuing our TSampler example, we might therefore set the DTS-12 turbidity sensor interval to 10 minutes (matching the TSampler interval) and it’s offset to 9 minutes (equivalent to 1 minute early) to allow for the relatively long response delay in a DTS-12. This would ensure that the TSampler process uses turbidity readings that are at most 1 minute old to decide whether to trigger a sample. To coordinate stage readings with these schedules, we also set the stage sensor for a 10 minute interval with a 9 minute offset, aligning the stage value (which returns almost instantly) with the turbidity value. Similar considerations apply to data logging schedules and data transmission message schedules. Note that it is entirely possible to query sensors much more often than the sampler process requires, and to query different sensors at different intervals. Although the datalogger allows you to select Page 138 of 170 700-SedEvent User Manual Rev 2 – 18 Dec 2014 SedEvent User Guide Appendix A Selecting sensor interval and offset values interval and offset without constraints, it is far simpler to pick a base period (e.g., 10 minutes) and then use submultiples (e.g., 1, 2, and 5 minutes) of it as intervals for various activities than it is to try to understand the interactions of activities that occur at entirely independent intervals with complex timing relationships (e.g., TSampler every 10 min, turbidity every 3 min, stage every 7 min – where the same timing relationship would only recur every 210 minutes). A.3 Sensor commands and scheduling A sensor can have several commands it responds to. Each command for a sensor has a separate schedule (interval and offset) in the datalogger. This leads to further considerations in scheduling. A.3.1 DTS-12 command scheduling The DTS-12 turbidity sensor accepts commands M1 (measure without pre-wipe), M2 (measure with prewipe), and M8 (wipe only). The datalogger automatically pre-configures with the M1 and M2 commands when it detects a DTS-12. Commonly, only the M2 (measure with pre-wipe) command is scheduled, for example with interval 10 min and offset 9 min (= -1 min). Pre-wiping consumes considerable power, but often this is not an issue. If power consumption is an issue, then M1 (measure without pre-wipe) can be configured to take measurements at frequent intervals (e.g., every 10 minutes), and M8 configured to wipe at much less frequent intervals (e.g., once per hour). It is important to set the offsets so that the commands do not collide; in this example, one wishes to avoid sending an M1 and an M8 to the sensor at the same time. If the M1 is configured with interval 00:10:00 (10 min) and offset 00:09:00 (9 min = -1 min), then M8 could be configured with interval 01:00:00 (1 hour) and offset 00:58:00 (58 min = -2 min). The wipe will then occur 1 minute before the measurement that occurs on the hour. A.3.2 ISCO command scheduling The ISCO controller (integrated into the ISCO cable; see section 2.2.6) accepts commands M (take a sample) and M2 (return last slot used). Where only turbidity triggered sampling is being done, the situation is simpler. The TSampler process is entirely in charge of triggering (which means sending the ISCO an M command) and a typical setup is interval 10 min, offset 0 min. End of story. In some situations, a daily sample is required in addition to the turbidity-based samples triggered by TSampler. In this case, an additional, daily M (sample) command must be configured in an independent process. As with the turbidity sensor, we want to avoid collisions, this time between an M command triggered by TSampler and an M command sent on the daily schedule. Assuming the usual TSampler configuration (interval 10 min, offset 0 min), we might decide to take a sample at a time 5 minutes before the 10 minute TSampler interval, thus avoiding its potential sample at -1 minute. Sampling at 10:05 am every day would accomplish this (as would any time ending in 5); this is configured as interval 24:00:00 and offset 10:05:00. (This example demonstrates how having simple relationships between intervals is helpful. In this case, the 10 minute TSampler interval and the daily (24 hour) sample interval are easy to relate.) Page 139 of 170 700-SedEvent User Manual Rev 2 – 18 Dec 2014 SedEvent User Guide Appendix A Selecting sensor interval and offset values Just to complicate things, when the TSampler process is not exclusively in charge of triggering samples, it cannot keep accurate track of the number of samples (bottles) that have been taken. (It only updates the slot number when it triggers a sample; in between times it may not have the accurate value.) To enable the user to know the true number of bottles used, we must configure an M2 (return last slot used) command, which will make this value available for logging. Since a sample could in principle be taken every 10 minutes, we must do this at least every 10 minutes. And, as always, we want to avoid collisions, with both TSampler and daily M commands. An offset of 2 minutes (= -8 min) would accomplish this, and so the configuration for the ISCO M2 command is interval 00:10:00, offset 00:02:00. A.4 Pulling it all together – two common configurations In the above sections, we have worked through the elements for two common configurations. Here we pull all the considerations together in short form where you can see how the various schedules relate to each other. A.4.1 Example 1: TSampler in control of all sampling, DTS-12 wiping at each sample interval Process/Sensor Command Interval Offset TSampler - 00:10:00 00:00:00 ISCO controller (M) - - DTS-12 M2 00:10:00 00:09:00 Measure with pre-wipe, every 10 min, -1 minute offset Stage sensor M 00:10:00 00:09:00 Returns stage (water level) A.4.2 Remarks Commands issued by TSampler, not by ISCO command configuration Example 2: Turbidity-triggered and daily sampling, DTS-12 wiping hourly Process/Sensor Command Interval Offset Remarks TSampler - 00:10:00 00:00:00 ISCO controller (M) - - ISCO controller M 24:00:00 10:05:00 Daily sample at 10:05 am ISCO controller M2 00:10:00 00:01:00 Returns last slot used; publish in variable available for data logging DTS-12 M1 00:10:00 00:09:00 Measure without pre-wipe every 10 min, -1 minute offset DTS-12 M8 01:00:00 00:58:00 Wipe 2 minutes before the hour Stage sensor M 00:10:00 00:09:00 Returns stage (water level) Commands for turbidity-triggered samples issued by TSampler, not by ISCO command configuration Note: The user must set up a logging function to store the daily sample and the last sample used value. Page 140 of 170 700-SedEvent User Manual Rev 2 – 18 Dec 2014 SedEvent User Manual Appendix B Chapter 8 Troubleshooting Setting turbidity thresholds Chapter contents B.1 B.2 B.3 Turbidity threshold sampling logic ........................................................................................................................142 Guidelines for setting thresholds ............................................................................................................................142 B.2.1 General considerations B.2.2 TTS default sampling threshold values Using the USFS threshold calculator applet........................................................................................................143 B.3.1 Installing the Java 2 JRE plug-in B.3.2 Calculating and using turbidity thresholds B.3.3 Rising thresholds B.3.4 Falling thresholds B.3.5 Example B.3.6 Slot number vs. bottle number B.3.7 Turbidity threshold sampling programming conditions B.3.8 TTS variable definitions Page 141 of 170 700-SedEvent User Manual Rev 2 – 18 Dec 2014 SedEvent User Guide B.1 Appendix B Setting turbidity thresholds Turbidity threshold sampling logic For an introduction to the TTS algorithm, see section 2.4 Note: The DTS-12 is a digital turbidity probe with its own microprocessor. It returns several statistics to the datalogger. In the datalogger, the TSampler process retains the water temp in degrees C, and the median, Max, and Variance NTU values. The datalogger performs a measurement cycle on a regular interval, typically 10 minutes (e.g. 10:00, 10:10, 10:20). At each measurement interval: 1. Stage is sensed via the digital pressure transducer with its own microprocessor. Stage is typically reported in feet (or other user selectable units) by the onboard processors. 2. The program may trigger a pumped sample if the threshold sampling criteria (stage and turbidity) are satisfied or an AUX or DI sample flag is set by the field crew. If the pumping sampler is going to sample, it will do so approximately 50 seconds after the measurement interval, 3. The data record (date, time, slot number, threshold code, sample code, stage, median turbidity, Max turbidity, Variance, water temperature, and sometimes rainfall are written to memory. 4. The datalogger goes to low power mode until the next 10-minute wake-up or a user interrupt. B.2 B.2.1 Guidelines for setting thresholds General considerations The turbidity-triggered sampling process (TSampler) in the datalogger is pre-set with a default series of rising and falling turbidity thresholds (see section below). These are a good place to start if you are new to this type of monitoring and are not sure what turbidity ranges you are likely to observe. As you gain experience with monitoring and the conditions at your particular sites, you can fine-tune your thresholds as described in later subsections. The following guidelines are designed to collect a few samples in small storms, and more, but not too many, in large storms. “Few” and “too many” are subjective terms and it is up to each investigator to define their desired range of sample abundance by setting the number of thresholds. The guidelines are based on simulations with data from Caspar Creek (Lewis, 1996) and seven winters of experience suggesting that they meet stated objectives (i.e., accurately and economically to estimate suspended sediment loads for, on average, the 6 largest storm events each year). However, with different environments or different objectives, these guidelines may not be optimal. For example, if one had a special interest in sampling the first few (likely small) events of the wet season, then an extra threshold or two might be temporarily added near the low end of each threshold scale. If relatively more emphasis is to be placed on low flows in general, then the square root scale might be replaced with a logarithmic scale. However, any alteration that places more emphasis on low turbidity conditions will result in more samples (and higher costs), unless the number of thresholds is reduced at the same time. Page 142 of 170 700-SedEvent User Manual Rev 2 – 18 Dec 2014 SedEvent User Guide B.2.2 Appendix B Setting turbidity thresholds TTS default sampling threshold values Default thresholds are listed below. The number of rising or falling thresholds and the threshold values may vary depending on site condition. Rising Thresholds Falling Thresholds 20 1900 77 1698 170 1507 300 1328 467 1160 670 1004 910 858 1187 724 1500 602 1850 491 9999 overflow 391 302 225 159 105 62 30 B.3 Using the USFS threshold calculator applet The U.S. Forest Service TTS web page has a turbidity threshold calculator that can be used with any web browser. It can be found at http://www.fs.fed.us/psw/topics/water/tts/software/ThresholdCalc.html. (Caution: Before you can use this web page, you must install the Java 2 JRE plug-in. See next section for instructions.) Page 143 of 170 700-SedEvent User Manual Rev 2 – 18 Dec 2014 SedEvent User Guide Appendix B Setting turbidity thresholds Figure 8-1: USFS Turbidity Threshold Calculator web page B.3.1 Installing the Java 2 JRE plug-in To use the calculator, you will need the Java 2 JRE plug-in from Sun Microsystems. To get the plug-in: 1. Go to the Sun Microsystems Java 2 Dowload page at http://java.sun.com/javase/downloads/index.jsp (see 2. Figure 8-2). Page 144 of 170 700-SedEvent User Manual Rev 2 – 18 Dec 2014 SedEvent User Guide Appendix B Setting turbidity thresholds Figure 8-2: Sun Microsystems Java 2 download page. 5. Click Download JRE (circled in 6. Figure 8-2). 7. Follow the instructions on the website. B.3.2 Calculating and using turbidity thresholds This information is copied from the U.S. Forest Service web page http://www.fs.fed.us/psw/topics/water/tts/software/setting_thresholds.html. In the USFS turbidity threshold calculator: 1. Using the Sensor Maximum slider, set the maximum NTU reading that your sensor can record. This value can be determined by calibration and may not be the same as the nominal range given by the manufacturer. The manufacturer should be able to provide the necessary calibration information, however. 2. Set N, L, and U on the Rising Threshold sliders, based on the criteria described below in section B.3.3 Rising thresholds. 3. Set N, L, and U on the Falling Threshold sliders, based on the criteria described below in section B.3.4 Falling thresholds. Page 145 of 170 700-SedEvent User Manual Rev 2 – 18 Dec 2014 SedEvent User Guide B.3.3 Appendix B Setting turbidity thresholds Rising thresholds 1. Determine the lowest non-zero threshold, L. This should be a value that is above typical interstorm turbidity values. In small streams it should also be a value that is expected to occur only after the stage rises enough to submerge both the turbidity sensor and the pumping sampler intake. 2. Determine the highest threshold, U, within the range of your turbidity sensor. 3. Determine the number of thresholds, N, between L and U (including both L and U). 4. Use the threshold calculator applet, or manually calculate thresholds as follows. 5. Compute d = (U0.5–L0.5)/(N-1) 6. The thresholds between L and U are (L0.5+d)2, (L0.5+2d)2, … , (L0.5+(N-2)d)2 7. Because of the way the algorithm is written, additional thresholds are needed at 0 and above the sensor measurement range, e.g. 9999. 8. The complete set of rising thresholds to be assigned is: 0, L, (L0.5+d)2, (L0.5+2d)2, … , (L0.5+(N-2)d)2, U, 9999 B.3.4 Falling thresholds The procedure is similar to that for rising thresholds, except (1) guidelines for determining L, U, and N are slightly different, (2) no threshold is needed above the sensor’s range, and (3) thresholds are assigned in descending order in the Campbell TTS (turbidity threshold sampling) program. 1. L should be a value that is at or above typical inter-storm turbidity values. In small streams it should be a value that is expected to occur before the stage falls enough to expose either the turbidity sensor or the pumping sampler intake. It is best to choose a different L for falling turbidity than for rising turbidity. Otherwise it is likely that, in a small storm event where only the lowest rising and falling thresholds are exceeded, only two samples would be collected, both at nearly the same turbidity. 2. N should be higher than that chosen for rising thresholds. 3. N and U can be altered in a trial-and-error fashion to minimize redundancy between rising and falling thresholds. However, because samples are not taken precisely at the threshold turbidity, but occur only when the threshold has been passed for two intervals, the risk of re-sampling the same turbidity is not all that great a concern. Samples are least likely to occur precisely at thresholds in rising turbidity conditions and at high turbidity levels in general, that is, when turbidity tends to change most rapidly. 4. The complete set of falling thresholds to be assigned is: U, (L0.5+(N-2)d)2, …, (L0.5+2d)2, (L0.5+d)2, L, 0 B.3.5 Example Sensor range 0-1000 Page 146 of 170 700-SedEvent User Manual Rev 2 – 18 Dec 2014 SedEvent User Guide Appendix B Setting turbidity thresholds Rising (L=15, U=900, N=10): Thresholds: 0, 15, 46, 94, 158, 240, 338, 453, 585, 734, 900, 9999 Falling (L=20, U=950, N=17): Thresholds: 950, 851, 758, 670, 587, 510, 439, 372, 311, 256, 206, 161, 122, 89, 60, 37, 20, 0 B.3.6 Slot number vs. bottle number In the SedEvent system, sample bottles are identified in two ways. Within the ISCO auto-sampler, each bottle is placed in a “slot” in the bottle carousel, and each slot has a number (from 1 to 24) that identifies it. Since bottles are constantly changed in and out of the sampler for laboratory analysis, the slot number is not sufficient to identify a bottle uniquely. “Bottle number” refers to a unique numerical identifier for a sample bottle, independent of which slot it might occupy in the auto-sampler. For data analysis, it is important to know what slot number corresponded to what unique bottle number when the sample was taken. This permits laboratory analysis data to be correlated with other data recorded by the system. In StreamTrac, the Site Visit form contains a mapping of slot numbers to bottle numbers (and lab data values), which must be updated by field personnel when they perform a site visit. This assures accurate bottle mapping and time stamps. For details, see section 5.17. B.3.7 Turbidity threshold sampling programming conditions Baseflow: This condition occurs when the stage is less than the minimum stage (min_stg). Minimum stage is defined as the lowest stage where both the pumping sampler intake and turbidity probe are submerged and functional. No threshold sampling takes place in this mode. thr_code = 0 Rising turbidity: Turbidity Mode automatically becomes Rising at first interval above baseflow. If turbidity is also above the first threshold and no rising thresholds have been sampled in the past 3 hours, a start-up sample is collected. For subsequent rising turbidity mode samples, current turbidity must equal or exceed the next rising threshold for 2 intervals. thr_code = 1 Turbidity reversal: Turbidity Mode switches between Rising and Falling. The turbidity must change direction for at least 2 intervals, AND drop 10% from the prior peak or rise 20% from the prior trough, but at least 5 NTUs in either case. A sample is collected if a threshold has been crossed since the previous peak or trough. Falling turbidity: A falling turbidity mode sample is collected when the current turbidity drops below the next falling threshold for 2 intervals. thr_code = 2 Repeat samples: When conditions for a threshold or reversal sample are otherwise met, a sample will not be collected if the threshold that was crossed has already been sampled in the past 8 (rep_wait) intervals. Overflow: Turbidity probe output exceeds the datalogger’s millivolt limit setting (mv_limit) when an OBS-3 is connected or the turbidity probe’s NTU limit (ntu_limit when a DTS-12 is connected. In this mode, two (lim_skip) intervals will be skipped between each sampled interval. Unknown: Turbidity trend not yet defined after a cold start. thr_code = 3 Page 147 of 170 700-SedEvent User Manual Rev 2 – 18 Dec 2014 SedEvent User Guide B.3.8 Appendix B Setting turbidity thresholds TTS variable definitions Variable name Value Meaning Threshold code (thr_code) 0 Baseflow 1 Rising turbidity 2 Falling turbidity 3 Unknown turbidity, not yet defined as rising or falling 0 No sample collected 1 Threshold sample 2 Depth-integrated sample (DI) 3 Auxiliary sample (AUX) 4 Start-up sample 5 Overflow sample, turbidity above maximum; samples every third interval Sampling code (smp_code) Page 148 of 170 700-SedEvent User Manual Rev 2 – 18 Dec 2014 SedEvent User Manual Appendix C Chapter 8 Troubleshooting Determining optimum solar panel tilt angle To capture the most energy, the solar panel should point in the direction that receives the most sun. This direction must account for hemisphere, latitude, seasonality, and obstructions. In the northern hemisphere, the sun traverses the southern sky and the solar panel should face south; in the southern hemisphere, the sun is in the north. The rest of this discussion will assume the northern hemisphere; in the southern hemisphere, all is the same, exchanging “south” for “north.” Latitude and seasonality determine the nominal tilt of the solar panel from the horizontal. The sun’s azimuth (angle above horizontal) varies between local latitude minus 15 degrees in winter to local latitude plus 15 degrees in summer. Most solar panel installations are not likely to be adjusted throughout the year (let alone during the day to track the sun’s changing azimuth), so a fixed tilt angle is needed. A fixed tilt should maximize the energy collected over the day. Since considerably less solar energy is available in winter, and since typically more energy is available in summer than is required, the fixed tilt should optimize the summer-winter balance. The most common optimizing formula is: tilt angle = (latitude 0.9) + 30 The table below gives tilt angles calculated from this formula for selected latitudes: Latitude Tilt angle Latitude Tilt angle 25 52.5 50 75 30 57 55 79.5 35 61.5 60 84 40 66 65 88.5 45 70.5 Page 149 of 170 700-SedEvent User Manual Rev 2 – 18 Dec 2014 SedEvent User Guide Appendix D Appendix D ISCO sampler programming guidelines ISCO sampler programming guidelines This appendix outlines programming and configuration of the ISCO auto-samplers appropriate for their application in the SedEvent system. These instructions are not comprehensive. Before using these instructions, please familiarize yourself with the ISCO manual and use it to supplement the programming information included here. Chapter contents D.1 D.2 ISCO 6712 ......................................................................................................................................................................... 151 D.1.1 Overview D.1.2 Option A – Standard programming D.1.3 Option B – Extended programming ISCO 3700 ......................................................................................................................................................................... 157 D.2.1 Programming D.2.2 Configuration Page 150 of 170 700-SedEvent User Manual Rev 2 – 18 Dec 2014 SedEvent User Guide D.1 ISCO 6712 D.1.1 Overview Appendix D ISCO sampler programming guidelines Follow the manual steps for setting the date and time (OTHER FUNCTIONS > MAINTENANCE > SET CLOCK). These instructions assume you are using the 24 bottle configuration. Note: The ISCO 6712 has a superior pump and is the preferred ISCO model for turbidity threshold sampling. D.1.2 Option A – Standard programming Standard programming is best suited to installations where the suction line length is relatively short and the suction head is low. With the auto-sampler turned on select the following from the main menu. 1. Enter 6712.1 to enter Standard Programming mode. 2. A series of informational screens appears, then … 3. Options screen appears. RUN PROGRAM VIEW REPORT OTHER FUNCTIONS a. Select PROGRAM. 4. Site Description screen appears. SITE DESCRIPTION: “FACTORY736” CHANGE? YES NO a. Select YES. b. Enter site description. c. Select DONE. 5. Number Of Bottles screen appears. NUMBER OF BOTTLES 1 2 4 8 12 24 a. Select 24 (use the 24 bottle configuration only). 6. Bottle Volume screen appears Page 151 of 170 700-SedEvent User Manual Rev 2 – 18 Dec 2014 SedEvent User Guide Appendix D ISCO sampler programming guidelines BOTTLE VOLUME IS 1000 ml (300-30000) a. Enter 1000 (ml). 7. Suction Line Length screen appears. SUCTION LINE LENGTH IS 10 ft (3-99) a. Enter based on line length at site or bench test. b. Display briefly shows a “Please wait” display. 8. Pacing screen appears. TIME PACED FLOW PACED a. Select FLOW PACED. 9. Flow Between Sample Events screen appears. FLOW BETWEEN SAMPLE EVENTS 3 PULSES (1-9999) a. Enter 1 (pulses). 10. Sample Distribution screen appears. SEQUENTIAL BOTTLES/SAMPLE SAMPLES/BOTTLE a. Select SEQUENTIAL. 11. Run Continuously? screen appears. RUN CONTINUOUSLY? YES NO a. Select NO. 12. Sample Volume screen appears. Page 152 of 170 700-SedEvent User Manual Rev 2 – 18 Dec 2014 SedEvent User Guide Appendix D ISCO sampler programming guidelines VOLUME: 200 ml SAMPLES a. Select VOLUME. SAMPLE VOLUME: 200 ml (0-10000) b. Enter 350 (ml). 13. Start Options screen appears. NO DELAY TO START DELAYED START CLOCK TIME WAIT FOR PHONE CALL a. Select NO DELAY TO START. b. Maximum Run Time screen appears. MAXIMUM RUN TIME 0 HOURS c. Enter 0. 14. Programming Complete screen appears. PROGRAMMING COMPLETE RUN THIS PROGRAM NOW? YES NO a. Select YES if you are ready to run system immediately. b. Select NO if you want to run the program later from the main menu. 15. When the program begins running (immediately or later), the display shows: BOTTLE 1 AFTER 1 PULSES a. Each time a stream sample is triggered by the datalogger as a result of turbidity thresholds, the bottle number will increase by one. Note the ISCO display always indicates which bottle number it is positioned to fill when its program is running. D.1.3 Option B – Extended programming This is best suited to installations where the suction line length is longer and the suction head is higher. With the auto-sampler turned on select the following from the main menu. Page 153 of 170 700-SedEvent User Manual Rev 2 – 18 Dec 2014 SedEvent User Guide Appendix D ISCO sampler programming guidelines 1. Enter 6712.2 to enable Extended Programming mode. 2. A series of informational screens appears, then … 3. Options screen appears: RUN “EXTENDED 1” PROGRAM VIEW REPORT OTHER FUNCTIONS 4. Select PROGRAM. 5. Program Name and Site Description screen appears: PROGRAM NAME: “EXTENDED 1” SITE DESCRIPTION: “FACTORY736” a. Select PROGRAM NAME. SELECT NEW PROGRAM CHANGE PROGRAM NAME b. Select CHANGE PROGRAM NAME. c. Change the program name as desired, e.g., “TTS-1”. (For details, consult the ISCO 6712 Installation and Operation Guide.) d. Select SITE DESCRIPTION. e. Change the side description to the site station ID that is (or will be) used to identify the site in StreamTrac. f. Select (next screen). 6. Units screen appears: UNITS SELECTED: LENGTH: ft a. Select UNITS SELECTED: LENGTH: b. Select units in feet (ft) c. Select (next screen). 1 MINUTE DATA INTERVAL 7. Data Interval not used. Select (next screen). 8. Sampling Configuration screen appears: Page 154 of 170 700-SedEvent User Manual Rev 2 – 18 Dec 2014 SedEvent User Guide Appendix D ISCO sampler programming guidelines 24, 1000 ml BTLS 3 ft SUCTION LINE AUTO SUCTION HEAD 0 RINSES, 0 RETRIES a. Select BTLS (bottle configuration). b. Enter 24, 1000 ml BTLS. c. Select SUCTION LINE d. Enter the length of the suction line at your site in ft. e. Select SUCTION HEAD. f. Select AUTO SUCTION HEAD or enter known suction head in ft. (Experiment for best samples and compare to DI samples). g. Select RINSES, RETRIES. h. Enter 1 RINSES and 0 RETRIES. i. Select (next screen). 9. N-Part Program screen appears. ONE-PART PROGRAM a. Ensure ONE-PART PROGRAM is selected. b. Select (next screen). 10. Pacing screen appears: PACING: FLOW, EVERY 1 PULSES NO SAMPLE AT START a. If screen does not read as above: i. Select PACING:. ii. Select FLOW PACED. iii. Enter 1 PULSES. iv. Select NO SAMPLE AT START. b. Select (next screen). DISTRIBUTION: SEQUENTIAL RUN CONTINUOUSLY c. Select DISTRIBUTION: Page 155 of 170 700-SedEvent User Manual Rev 2 – 18 Dec 2014 SedEvent User Guide Appendix D ISCO sampler programming guidelines 1 BOTTLES PER SAMPLE EVENT (1-24) d. Enter 1. SWITCH BOTTLES ON: NUMBER OF SAMPLES TIME e. Select NUMBER OF SAMPLES. SWITCH BOTTLES EVERY 1 SAMPLES (1-50) f. Enter 1. RUN CONTINUOUSLY? YES NO g. Select NO. h. Select (next screen). 11. Sample Volume screen appears. VOLUME: 200 ml SAMPLES a. Select VOLUME. SAMPLE VOLUME: 200 ml (0-10000) b. Enter 350 (ml). 12. Skip remaining Enable fields: Select (next screen) until … 13. Start Delay screen appears. NO DELAY TO START a. Select NO DELAY TO START (or whatever option presents itself here). b. Start Options screen appears. Page 156 of 170 700-SedEvent User Manual Rev 2 – 18 Dec 2014 SedEvent User Guide Appendix D ISCO sampler programming guidelines NO DELAY TO START DELAYED START CLOCK TIME WAIT FOR PHONE CALL c. Select NO DELAY TO START. d. Maximum Run Time screen appears. MAXIMUM RUN TIME 0 HOURS e. Enter 0. f. Select (next screen). 14. Programming Complete screen appears. PROGRAMMING COMPLETE RUN THIS PROGRAM NOW? YES NO a. Select YES if you are ready to run system immediately. b. Select NO if you want to run the program later from the main menu. 15. When the program begins running (immediately or later), the display shows: BOTTLE 1 AFTER 1 PULSES a. Each time a stream sample is triggered by the datalogger as a result of turbidity thresholds, the bottle number will increase by one. Note the ISCO display always indicates which bottle number it is positioned to fill when its program is running. D.2 D.2.1 ISCO 3700 Programming 1. In standby mode, press ENTER/PROGRAM key. 1. Standby screen appears briefly, then the Program/Configure screen. [PROGRAM, CONFIGURE] SAMPLER 2. Select PROGRAM. 3. Pacing screen appears. [TIME, FLOW] PACED SAMPLING 4. Select FLOW. Page 157 of 170 700-SedEvent User Manual Rev 2 – 18 Dec 2014 SedEvent User Guide Appendix D ISCO sampler programming guidelines SAMPLE EVERY xxxx PULSES (1 - 9999) 5. Enter 1 (pulse). 6. Sample Multiplexing screen appears. MULTIPLEX SAMPLES? [YES, NO] 7. Select NO to perform sequential sampling. 8. Sample Volumes screen appears. SAMPLE VOLUMES OF xxx ml (10-1000) 9. Enter 350 (ml). 10. Suction Head screen appears. SUCTION HEAD OF xx FEET (1 - MAX) 11. Enter 14 (ft). 90 ENTER START TIME? [YES, NO] 12. Select NO to begin the sampling routine according to the delay entered in the Start Time Delay screen during configuration (see next section). Programming complete. D.2.2 Configuration 13. In standby mode, press ENTER/PROGRAM key. 14. Standby screen appears briefly, then the Program/Configure screen. [PROGRAM, CONFIGURE] SAMPLER 15. Select CONFIGURE. 16. Set Clock screen appears. Set clock if necessary. 17. Sampler Type screen appears. [PORTABLE, REFRIG.] SAMPLER 18. Select PORTABLE. 19. Bottles screen appears. Page 158 of 170 700-SedEvent User Manual Rev 2 – 18 Dec 2014 SedEvent User Guide Appendix D ISCO sampler programming guidelines [1, 4, 12, 24] BOTTLES 20. Select 24. 21. Bottle Volume screen appears. BOTTLE VOLUME IS 1000 ml 22. Enter 1000. 23. Suction Line ID screen appears. SUCTION LINE ID IS [1/4, 3/8] INCH 24. Select 3/8. 25. Suction Line Type screen appears. SUCTION LINE IS [VINYL, TEFLON] 26. Select VINYL. 27. Suction Line Length screen appears. SUCTION LINE LENGTH IS xx FEET (3 - 99) 28. Enter 32 (ft). 29. Liquid Detector Enable screen appears. [ENABLE, DISABLE] LIQUID DETECTOR 30. Select ENABLE. 31. Rinse Cycles screen appears. x RINSE CYCLES (0 - 3) 32. Enter 0. 33. Enter Head Manually? screen appears. ENTER HEAD MANUALLY? [YES, NO] 34. Select YES. 35. Sample Retry screen appears. Page 159 of 170 700-SedEvent User Manual Rev 2 – 18 Dec 2014 SedEvent User Guide Appendix D ISCO sampler programming guidelines RETRY UP TO x TIMES WHEN SAMPLING (0 - 3) 36. Enter 0. 37. Programming Mode screen appears. [BASIC, EXTENDED] PROGRAMMING MODE 38. Select BASIC. 39. Calibrate Sampler screen appears. [ENABLE, DISABLE] CALIBRATE SAMPLER 40. Select DISABLE. 41. Start Time Delay screen appears. xxxx MINUTE DELAY TO START (0 - 9999) 42. Enter 0. 43. Master/Slave Mode screen appears. MASTER/SLAVE MODE? [YES, NO] 44. Select NO. 45. Sample Upon Disable? screen appears. SAMPLE UPON DISABLE? [YES, NO] 46. Select NO. 47. Sample Upon Enable? screen appears. SAMPLE UPON ENABLE? [YES, NO] 48. Select YES. 49. Reset Sample Interval? screen appears. RESET SAMPLE INTERVAL? [YES, NO] 50. Select YES. 51. Event Mark Type screen appears. Page 160 of 170 700-SedEvent User Manual Rev 2 – 18 Dec 2014 SedEvent User Guide Appendix D ISCO sampler programming guidelines [CONTINUOUS SIGNAL, PULSE] 52. Select PULSE to send a 3 second event mark signal. 53. Event Mark Pulse Timing screen appears. AT THE BEGINNING OF [PURGE, FWD PUMPING] 54. Select FWD PUMPING. 55. Purge Pre-Sample Counts screen appears. xxx PRE-SAMPLE COUNTS (0 - 9999) 56. Enter the number of pre-sample pump counts needed to purge the suction line. 57. Purge Post-Sample Counts screen appears. xxx POST-SAMPLE COUNTS (0 - 9999) 58. Enter the number of post-sample pump counts needed to purge the suction line. 59. Tubing Life Warning Count screen appears. nnnnn PUMP COUNTS, WARNING AT xxxxx 60. Enter 500000. 61. Tubing Life Reset Counter screen appears. RESET PUMP COUNTER? [YES, NO] 62. If you have changed the pump tube, select YES to reset the pump counter to zero. Otherwise, select NO to leave the counter unchanged. 63. Pump Counts To Warning screen appears. 500000 PUMP COUNTS TO WARNING 64. Enter 500000. 65. Program Lock screen appears. [ENABLE, DISABLE] PROGRAM LOCK 66. Select DISABLE. 67. Sampler ID screen appears. Page 161 of 170 700-SedEvent User Manual Rev 2 – 18 Dec 2014 SedEvent User Guide Appendix D ISCO sampler programming guidelines SAMPLER ID NUMBER IS xxxxxxxxxx 68. Enter 01. 69. Run Diagnostics Test Distributor screen appears. TEST DISTRIBUTOR? [YES, NO] 70. Select YES. 71. Run Diagnostics Re-Initialize screen appears. RE-INITIALIZE? [YES, NO] 72. Select NO. 73. Sampler exits configuration sequence and goes to standby 74. Press the Start Sampling Key 75. Start Sampling screen appears. START SAMPLING AT BOTTLE xx (1 - 24) 76. Enter 1. 77. Bottle Status screen appears. BOTTLE 1 AFTER 1 PULSES 78. ISCO waits for pulse from datalogger. Page 162 of 170 700-SedEvent User Manual Rev 2 – 18 Dec 2014 SedEvent User Guide Appendix E Appendix F – Notes from the Field Troubleshooting DTS-12 wiper Page 163 of 170 700-SedEvent User Manual Rev 2 – 18 Dec 2014 SedEvent User Guide Appendix E Troubleshooting DTS-12 wiper 1. Figure 8-3 shows the correctly parked wiper position that can vary by ± 5°. Notice that the wiper arm projects past the circumference of the optical face. This is an important consideration with respect to protective housing design. Any sensor carousel must allow for this range of wiper motion. Figure 8-3: Correctly parked DTS-12 wiper 2. Error! Reference source not found.4 below shows an incorrectly parked wiper position ndicative of either a power termination mid-wipe (no wiper failure, check the power from your datalogger) or a failure in the wiper reference system. The wiper should slightly overshoot the cleaning groove to clean the debris from the edge of the blade. If the wiper reference system fails, as indicated by variable and incorrect parked positions, the probe must be returned to FTS for repair. 3. Error! Reference source not found. below shows another incorrect wiper position indicative of failure in the wiper reference system. In this case the wiper has overshot the proper parked position. A normal wipe command cycles the blade bi-directionally once between the two grooves. It should not wipe this far during normal operation. Power termination mid-wipe Failure in wiper reference system Figure 8-4: Incorrectly parked DTS-12 wiper positions– Page 164 of 170 700-SedEvent User Manual Rev 2 – 18 Dec 2014 SedEvent User Guide Appendix F Appendix F – Notes from the Field Notes from the field Chapter contents F.1 ISCO Pumping Samplers .............................................................................................................................................166 F.1.1 Pump tubing replacement F.1.2 Sampler intake mounting in Montana Flumes F.1.3 Recommended intake line diameter Page 165 of 170 700-SedEvent User Manual Rev 2 – 18 Dec 2014 SedEvent User Guide F.1 F.1.1 Appendix F Notes from the field ISCO Pumping Samplers Pump tubing replacement From Liz Keppeler, Ft. Bragg ([email protected]) Increasingly, we have been experiencing ISCO sample volume problems with our 3-year old 3700 ISCO samplers (mostly overfilled samples on an intermittent basis). In years past, when the tubing life counter has reached the 500,000 warning we have inspected the pump tubing and reset the counter if no problems were evident. More recently, we have increased the warning counter to 600,000 if no obvious problems were observed when the pump tubing was inspected. In hindsight, this is not a good idea. We will now replace the pump tubing automatically when the 500,000 warning is reached. ISCO factory testing found that the pump tubing splits between 600,000 and 1,000,000 revolutions. In addition, it is important to check the rollers for silicone buildup and to verify that the rubber liners are snug. As the pump tube wears, it also becomes less flexible (does not rebound to the original shape/volume) and the sample volume can be reduced if the liquid level detector is disabled (volume is based on pump revolutions). F.1.2 Sampler intake mounting in Montana Flumes From Liz Keppeler, Ft. Bragg ([email protected]) Another problem affecting sample volumes is the position of the ISCO intake mounted in the flume. When the intake is only marginally submerged, the ISCO pumps an air/water mix which impairs the ability of the liquid detector to detect the correct volume. The positioning of the ISCO intake in the fiberglass flumes at Caspar Cr. is not securely fixed and the more the nozzle protrudes from the flume the more likely it is to pump air at low stages. We are installing a clamp on the backside of the intake, under the flume, to keep it in position. In the future, new installations should be equipped with a secure clamping mechanism, under the flume, to hold the intake in position and flume installers should allow access to the back of the flume for intake maintenance. F.1.3 Recommended intake line diameter From Rand Eads, Redwood Sciences Lab ([email protected]) It is important to use 3/8" id intake tubing (not 1/4") in order for the liquid level detector to work correctly with the 6712 samplers. Apparently, the transition from 1/4" intake to the 3/8" pump tubing (near the liquid level detector) causes air bubbles to form. This usually results in the bottles overfilling because the detector cannot deliver the correct volume when air bubbles are present. We have verified this problem at two sites and now only use 3/8" intake. The reasoning for using 1/4" intake in the past was to increase the line velocity and improve sampling efficiency. Ideally, the sample velocity in the intake line would be the same as the stream velocity (isokinetic condition) to prevent enriching or starving the sample SSC. Isokinetic conditions are usually not present during sampling because the stream velocity varies with stage, as does the line velocity as the head (stage) rises and falls. In almost all sampling conditions, the sampler intake velocity is less than the stream velocity, and the problem is exacerbated with increased intake length and larger pump lifts. These field observations lead to the idea of reducing the intake diameter to increase the line velocity The newer ISCO 6712 pump speed is faster than previous sampler models and it now appears that the 3/8" intake produces adequate line velocities for moderate line lengths and lifts with this model (this is based on field observations, not on laboratory testing). For sites pushing the maximum pump lift and line length it might be advisable to use 1/4" intake and disable the liquid level detector. Page 166 of 170 700-SedEvent User Manual Rev 2 – 18 Dec 2014 SedEvent User Guide Part IV Part IV – References, Glossary References, Glossary Page 167 of 170 700-SedEvent User Manual Rev 2 – 18 Dec 2014 SedEvent User Guide Part IV – References, Glossary References Eads, Rand. 2006. Personal communication. Discussion on using depth-integrated samples to calibrate grab samples for turbidity threshold sampling systems. Eads, Rand, and Jack Lewis. 2002. Continuous turbidity monitoring in streams of northwestern California. In: Turbidity and other sediment surrogates workshop (ed. by G.D. Glysson & J.R. Gray). 30 April - 02 May 2002, Reno, Nevada. 3 p. (Available online at: http://water.usgs.gov/osw/techniques/TSS/eads.pdf; downloaded 07 Jul 2010.) Edwards, Thomas K. and G. Douglas Glysson. 1999. Field Methods for Measurement of Fluvial Sediment. U.S. Geological Survey, Techniques of Water-Resources Investigations, Book 3, Chapter C2. (Available online at: http://pubs.usgs.gov/twri/twri3-c2/html/pdf.html; downloaded 07 Aug 2010.) Lewis, Jack. 1996. Turbidity-controlled suspended sediment sampling for runoff-event load estimation. Water Resources Research 32(7): 2299-2310. (Available online at: http://www.fs.fed.us/psw/publications/lewis/Lewis96.pdf; downloaded 07 Jul 2010.) Lewis, Jack. 2002. Estimation of suspended sediment flux in streams using continuous turbidity and flow data coupled with laboratory concentrations. In: Turbidity and other sediment surrogates workshop (ed. by G.D. Glysson & J.R. Gray). 30 April - 02 May 2002, Reno, Nevada. 3 p. (Available online at: http://water.usgs.gov/osw/techniques/TSS/LewisTSS.pdf; downloaded 07 Jul 2010.) Lewis, Jack. 2003. Turbidity-controlled sampling for suspended sediment load estimation. In: Bogen, J. Tharan Fergus and Des Walling (eds.), Erosion and Sediment Transport Measurement in Rivers: Technological and Methodological Advances (Proc. Oslo Workshop, 19-20 June 2002). IAHS Publ. 283: 13-20. M (Available online at: http://www.fs.fed.us/psw/publications/lewis/lewis_redbook03.pdf; downloaded 07 Jul 2010.) Lewis, Jack. 2006. Personal communication. Discussion on using depth-integrated samples to calibrate grab samples for turbidity threshold sampling systems. Lewis, Jack, and Rand Eads. 1996. Turbidity-controlled suspended sediment sampling. Watershed Management Council Newsletter 6(4): 1&4-5. (Available online at: http://www.watershed.org/?q=node/221; downloaded 21 Jul 2010.) Lewis, Jack, and Rand Eads. 1998. Automatic real-time control of suspended sediment based upon high frequency in situ measurements of nephelometric turbidity. In: Gray, John, and Larry Schmidt (Organizers). Proceedings of the Federal Interagency Workshop on Sediment Technology for the 21st Century, February 17-20, 1998, St. Petersburg, FL. (Available online at: http://www.fs.fed.us/psw/publications/lewis/lewis.html; downloaded 07 Jul 2010.) Lewis, Jack, and Rand Eads. 2001. Turbidity threshold sampling for suspended sediment load estimation. In: Proceedings, 7th Federal Interagency Sedimentation Conference, 25-29 Mar 2001, Reno, Nevada. [1824 KB] (Available online at: http://www.fs.fed.us/psw/publications/lewis/LewisTTS.pdf; downloaded 07 Jul 2010.) Lewis, Jack, and Rand Eads. 2008. Implementation guide for turbidity threshold sampling: principles, procedures, and analysis. Gen. Tech. Rep. PSW-GTR-212. Arcata, CA: U.S. Department of Agriculture, Forest Service, Pacific Southwest Research Station. Unofficial pre-publication layout. (Available online at: http://www.fs.fed.us/psw/topics/water/tts/TTS_GTR_prepub.pdf; downloaded 07 Jul 2010.) Olson, Scott A., and J. Michael Norris. 2005. U.S. Geological Survey Streamgaging … from the National Streamflow Information Program. U.S. Geological Survey Fact Sheet 2005-3131. (Available online at: http://pubs.usgs.gov/fs/2005/3131/; downloaded 07 Jul 2010.) Page 168 of 170 700-SedEvent User Manual Rev 2 – 18 Dec 2014 Glossary and Abbreviations Axiom H2 FTS manufactured Hydrology Datalogger boom A structure used to deploy sensors in the water, usually hanging from a cable, beam, or other overhead structure like a bridge. Because it can pivot and ride over waterborne debris, a boom can operate without fouling. A boom is often simple to set up and maintain. carousel A structure used to deploy a DTS-12 sensor in the water. A carousel holds the DTS-12 in the radial centre of a perforated and/or open-ended pipe that is immersed in the water, typically mounted vertically on a solid structure such as a bridge abutment. The carousel and pipe protect the DTS-12 while allowing full immersion in water. DI Depth-integrated (sample) discharge The volume of water moving down a stream per unit of time. Common U.S. and imperial measures are cubic feet per second (ft3/s) or gallons per day (gal/d). Common metric measures are litres per second (l/s) or cubic metres per second (m3/s). DTS-12 FTS manufactured Digital Turbidity Sensor flow see discharge SDI, SDI-12 Serial Data Interface at 1200 baud. See http://www.sdi-12.org/ . SSC Suspended Sediment Concentration SSM Suspended Sediment Monitoring TMDL Total Maximum Daily Load TTS Turbidity Threshold Sampling Page 169 of 170 700-SedEvent User Manual Rev 2 – 18 Dec 2014 SedEvent User Guide Revision History Revision Date 1 2010 – Aug - 6 2 2014 – Dec 18 Description Comments Updated with DL ver 3.1.5.9 screenshots and functions Page 170 of 170 700-SedEvent User Manual Rev 2 – 18 Dec 2014