1
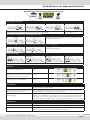
TGarage Door Operator
TM 50
TM 80
INSTALLATION AND
PROGRAMMING INSTRUCTIONS
TM50/80 MO911/1V0 SKRW433 SKR433-1
ENGLISH
Content
Quick Reference for experienced Installers
���������������������3
Registering and deleting Remote Devices ���������������������������������16
Information and Remarks
Regulations and Usage
Remote Control
��������������������������������������������������4
Directives and Regulations
Use of the operators
Garage Doors
The installers declaration of conformity
Older Garage Doors
Instruction for the users
Safety Advises for the Installation
����������������������������������5
Starting the Registry
Registering a Device
HomeLink™
Erasing Remote Devices
General Remarks
���������������������������������������������������������������������17
Useable Batteries
Changing the transmitters‘ battery
Changing the wall push-buttons‘ battery
Synchronisation of the Rolling Code
Technical Information
Installation
Conditions for Installation ����������������������������������������������6
Technical Data
�������������������������������������������������������������������������18
Wiring Diagram �����������������������������������������������������������������������18
Minimum Headroom
Door Hight
Door Arm Extension
Dimensions
Pre-Mounting ����������������������������������������������������������������6
Installation ���������������������������������������������������������������������7
Installation
Internal Wiring
External connections
Devices for adjustments
Others
Troubleshooting �����������������������������������������������������������������������19
Error Messages
Messages by blinking integrated lighting
Additional messages from the LED „Diag“ only
If... then...
Adjusting the Limit Blocks ����������������������������������������������8
The Emergency Release
�������������������������������������������������9
When the garage door is the only entrance
When there is a second entrance to the garage
Declarations
EC-Declaration of Conformity ��������������������������������������������������20
Printed Circuit Board: Adjustments and Connectors
Control Elements ���������������������������������������������������������10
Connectors ������������������������������������������������������������������11
Push Button
Photo Cell / Hatch Door Contact
Printed Circuit Board: Adjustments and Connectors
Standard Programming ������������������������������������������������12
Programming Forces and Running Distance
Choosing the type of door
Programming Remote Components
Free Programming �������������������������������������������������������13
Setting the speeds
Setting the opening speed
Changing the length of Soft Stop
Automatic Closing �������������������������������������������������������14
Setting the time
Pre-Warning by internal lighting
Connecting a Photo-Cell
Performance of Control Devices
Avoiding automatic closing temporarily
Further Safety Advice for Automatic Closing
Adjusting the Lighting Duration �����������������������������������15
Page 2
Installation Instructions TM50/TM80 - MO911/1V0
Quick Reference for experienced Installers
Adjusting the Door Type
Tilting Door
Sectionaldoor
Canopy Type Doors
After changing the DIP-switch settings the operator MUST run through a learning cycle: keep the
LEARN button pressed for 3 seconds, release it and press it again shortly�
Free Programming
For free programming, pls�
refer to page 13�
Increased Force shortly before reaching Closed Position
Increased Force
Standard
Changing the DIP-switch settings must be confirmed by shortly
pressing the LEARN button�
Pre-Warning Light (always active when using automatic closing, pls� refer to page 14 )
ON
Off
Changing the DIP-switch settings must be confirmed by shortly
pressing the LEARN button�
Automatic Closing
None
after 30 sec�
after 90 sec�
after 120 sec�
Changing the DIP-switch settings must be confirmed by shortly pressing the LEARN button�
Connectors
Push Button (potential free)
Photo Cell and Hatch Door, 8�2 kOhm,
A+B
Remove resistor and connect it to the photo cell
by putting it in line with one impulse wire
C+D
24V AC Output, max� 200mAmp�
24 V
Programming
Running Length and Forces
Keep the LEARN button pressed for 3 seconds, release it (the operators‘ light is now
blinking) and press it again shortly
Remote Components (Transmitters, Digi
Pad, Remote Wall Push Button)
Keep the LEARN button pressed for 3 seconds, release it (the operators‘ light is now
blinking) and press the desired hand transmitter button
Changing the Duration of the
Internal Lighting
Keep the LEARN button pressed for 6 seconds, release it once the green LED starts
glowing� Press LEARN button once again shortly -> the green LED starts blinking� Each
blink stands for 10 seconds of light duration� Once the desired duration is reached,
press the LEARN button again shortly (e�g� after 6 blinks for a duration of 60 seconds)�
LED-Indicators
Vp (yellow)
On when 230V supply is o�k�
TEST/FUNK (green)
On whilst an impuls is received from remote devices or a connected push-button (A+B)
8k2/Diag (red)
On when an error from a connected safety device is received (connectors C+D) or
blinks in intervalls to indicate error messages (refer to page 19)
Installation Instructions TM50/TM80 - MO911/1V0
Page 3
Information and Remarks
Regulations and Usage
It is within legal regulation and without restriction, to use a
Seip door operator with any garage door that has been approved for use with other certified door operators!
Directives and Regulations
The TM garage door operator comply to the latest European directives and regulations� The declaration of conformity is enclosed at
the end of these instructions�
Use of the operators
The operators were designed for the use with up-and-over doors
(tilting and canopy-type) and sectional doors�
All garage doors need to be maintained before automation� The
door must be easily opened and closed by hand� A garage door
must not be automated unless it is easy to open and close manually�
Garage Doors
In January 2001 the European regulations EN12604 and EN12605
became compulsory for garage doors� Before installing an automatic door operator it must be assured that the garage doors
applies to these regulations (the information can be obtained from
the manufacturers‘ declaration of confirmity)� A Seip door operator may be installed to any door that complies to the regulations�
Should a garage door not be compliant then please refer to the
chapter „older garage doors“�
The installers declaration of conformity
No matter whether a door operator was delivered together with a
garage door or seperately, the installer must issue a declaration of
conformity for the complete installation�
With this declaration the installer assures, that the installation
was made according to the instructions given by the manufacturers (e�g� the installation instructions of the garage door and the
operator)� This declaration can only be issued by the installer and
may not be issued from the manufacturer!
If both components comply to the directives and the installation
was made as to the manufacturers instructions the whole installation will normally be CE-compliant�
Page 4
Older Garage Doors
When automating an older garage-door the TS-series will still
comply to the regulations - through the automatic force setting
the requested values for forces and reversion will be according to
the regulations�
But it needs to be taken in consideration that most older garage
doors do not meet the regulations EN 12604 and EN 12605 especially regarding security features� They might still have sharp
edges bearing the danger of severe injuries - for example sectional
doors might not have a finger protection between the sections�
Unfortunately the entire regulations do not mention how to
handle the automation of such an older garage door - the danger
basically is not the automation but the construction of the door�
Therefore we strongly recommend to
- check the garage door for sharp edges bearing danger when the
door is moving; take any necessary action to avoid the dangers
and make the door safer
- check the doors‘ springs and readjust them if necessary
- grease or oil the pivotal points and rollers of the garage door
- check that the door may be easily used by hand
If, however, the dangers cannot be avoided we recommend to use
the automatic pre-warning function of the operator� The operators‘ lighting will then be blinking for approx� 5 sec� before every
movement of the garage door� People inside the garage will be
warned before the opening and can step back from the garage
door in time�
Instruction for the users
Please instruct the users as follows:
- Use of the hand transmitter
- Use of the emergency release in case of a power failure
- Hand over the separate „User Manual“ to the customer
- Inform the user about the Security Advises in the User Manual
Installation Instructions TM50/TM80 - MO911/1V0
Information and Remarks
Safety Advises for the Installation
Important Safety Instructions for Installation
WARNING: INCORRECT INSTALLATION CAN LEAD TO SEVERE
INJURY
Follow all Installation Instructions.
- Read page 3 of this instruction carefully before the installation
- Before installing the drive, remove unnecessary ropes from the
existing installation
- Maintain the garage door according to the advises on page 3
and to the door manufacturer’s manual
- If possible, install the drive at a height of at least 2,10 m and the
manual release at a height less than 1,80 m
- Locate the push-button within sight of the door but away from
moving parts and at a minimum height of 1,50 m
- Fix the label warning against entrapment next to the pushbutton
- The label fixed to the manual release may not be removed
- After installation, ensure that the mechanism is properly adjusted
and that the drive reverses when the door contacts a 40 mm high
object placed on the floor�
Installation Instructions TM50/TM80 - MO911/1V0
Page 5
Installation
Conditions for Installation
Minimum Headroom
A minimum distance of 35mm between the garage door and the ceiling is required�
>35mm
Door Hight
No optionals are required for doors up to 2,250mm hight�
Between 2,250mm und 2,500mm: a lintel-sided extension for the rail might be
required� The operator will be set back by approx� 300mm in order to use the full
running length up to the front pulley (2,500mm max�)
Higher than 2,500mm: The C-rail must be extended� Extensions are available at
500mm and 1,000mm; the operator can be extended by 1,500mm in total� The
maximum door hight is 4,000mm
Door Arm Extension
Should the minimum space between the garage door and the ceiling be smaller than 35mm then a door arm extension is
needed� For an extension you can use a metal beam from any DIY-market� The beam should not be shorter than the door‘s
height�
Dimensions
3.150 mm
800 mm
360 mm
2.500 mm max.
30 mm
78 mm
35 mm
Pre-Mounting
Be aware not to twist the chain - rather slide the rail parts on the
floor than lift them�
The overall rail consists of three parts at 1m and two junction parts
which will keep the rails together�
1
1� The empty piece of rail must be joined to the rail which is fixed
to the motor head� Run the junction-part over the joint till stop�
2� The junction-part in front shall prolude for approx� 1cm
3� Slide the last piece of rail, which carries the pulley in front, from
above into the proluding junction-part and press it down (the
chain will be tensioned)� Slide the junction-part over rail till stop�
2
4� Turn around the operator and tighten the grub-screws in the
junction-parts in order to keep them in place�
The operator is now fully pre-mounted for installation�
The chain is factory pre-tensioned� Do not change the chain
tension.
ATTENTION: Before using the operator the limit-blocks must
be set up and the operator must be put in programming
mode. Otherwise the operator will produce an error message!
Page 6
3
Installation Instructions TM50/TM80 - MO911/1V0
Installation
Installation
The front fixing angle can be mounted either at the lintel or at the
ceiling�
1
1. Meassure the middle of your garage door and make a mark on
the lintel and the top of your door (1)�
2. Fix the front fixing angle in the middle either at the lintel or at
the ceiling (lintel recommended) (1)�
2
3
3. Attach the C-rail to the front fixing angle (2)� Put a carton piece
under the motor head unit to avoid damages�
4. To fit the motor head to the ceiling it is recommend to use a
ladder (4)� When the operator is laying on the ladder you can
open the garage-door� Adjust the C-rail according to the mark you
made in the middle of the garage-door�
Fit the operator to the ceiling when you have made sure the C-rail
is running straight to the front� Use the supplied bracket to fix the
C-rail to the ceiling (3)�
5. Now fit the door arm to the garage door (5)� Take care that the
angle between the operator and the door arm does not exceed a
max� of 45° (it may be lower)�
4
6. The limit-blocks must be tightened and the programming
must be started before running the operator (page 8)!
The garage doors‘ locks must be removed before running
the operators - otherwise damages on the garage door or
operator might occure!
For additional security our locking set can be obtained as an
optional extra�
5
6
Installation Instructions TM50/TM80 - MO911/1V0
Page 7
Installation
Adjusting the Limit Blocks
These adjustments must be made before the programming
of the forces and the running-length.
Starting the programming procedure without correctly adjusted blocks may lead to damages on the garage door and
the operator!
Vorgehensweise:
1
1� The operator is mounted and the door-arm is fixed to the garage-door� The trolley is locked to the chain and stands somewhere
between the two blocks� If, however, trolley and chain need to be
moved you may do this using the TEST/RUN button�
2� Release the trolley (Pic� 1) and manually close the garage door�
3� The block for the closing direction is now right in front of the
trolley (Pic� 2)� If not, the block must be moved until it touches the
trolley�
4� Tighten the blocks‘ screw to keep it in place� Take care not to
tighten it too strongly - the c-rail should not be bended�
2
5� Now the garage door needs to be opened manually� The trolley
will lock into the chain - you have to release it once again to fully
open the garage door� (Pic� 1)�
6� The block for the opening direction is now right in front of the
trolley (Pic� 3)� If not, the block must be moved until it touches the
trolley�
7� Tighten the blocks‘ screw to keep it in place� Take care not to
tighten it too strongly - the c-rail should not be bended�
8. The trolley now needs to be locked back to the chain!
After that the programming procedure may be started (page 12
onwards)�
Page 8
3
Installation Instructions TM50/TM80 - MO911/1V0
Installation
The Emergency Release
In case of a power failure the garage door can be opened by
hand� Therefore the operator first needs to be released�
When the garage door is the only entrance
It is necessary to connect the emergency release to the door‘s
handle (pic� 1) otherwise the garage cannot be accessed in a
power failure situation�
1
Procede as follows:
1. Find out in which direction the door handle moves when opening the door�
2. Drill a hole in that side of the door handle which turns downwards�
3. Thread the cable through the hole and fix it with the enclosed
metal-clamps� Be carefull not to put a high tension on the emergency release cable - the operator then might release from the
garage-door during a normal opening cycle�
2
4. Check the function of the emergency release together with a
second person� Stay inside the garage and close the door with
the operator� Let the second person open the door manually with
the door keys� If this works, the emergency-release is mounted
properly�
Do not leave the garage and close the garage-door with the
operator before you have tested the emergency-release!
When there is a second entrance to the garage
You can use the supplied handle for the emergency release (pic�
2)�
Thread the emergency release cable through the handle�
Fix the metal clamps to the cable where the handle shall be
placed�
Shorten the cable below the metal clamps - the handle is now being held by the clamps�
In case of a power failure the user can now open the garage
door by releasing the operator with the handle for the emergency
release�
Installation Instructions TM50/TM80 - MO911/1V0
Page 9
Printed Circuit Board: Adjustments and Connectors
Control Elements
DIP
HF-Modul
B A D C 24V
TEST/
RUN
LERN/
LEARN
TEST/RUN Button (black)
Standard Function
Run the operator: Pressing the button runs or stops the operator� The function depends on the
entire status of the operator, following the sequence OPEN-STOP-CLOSE etc�
Function when Automatic Closing is active
Opening command: Pressing the button gives an opening command� When the garage door is
open then presing the button will extend the opening time� When pressing the button during the
closing procedure, then the operator will stop and open the door again�
Programming Functions
Adjusting the limit blocks: In programming mode the operator can be run by keeping the TESTbutton pressed� When the button is released, then the operator will stop - when pressing the
button again then the operator will run into the opposite direction�
Reducing the running speeds: When setting the opening and closing speed in „free programming“ mode then each press of the TEST-button will reduce the running speed by one level�
LERN/LEARN Button (red)
Standard Function
Starting the programming mode: The button must be kept pressed for approx� 3 seconds and
then must be released; the operators‘ light starts blinking and the operator is in programming
mode� Using the TEST-button the operator can be run to adjust the limit switches�
Starting the learning cycles: Once the operator is in programming mode, a short press on the
LEARN-button will start the learning cycles for the running length and the force-measurements�
DIP-Switch Confirmation
Changing the settings of DIP-switches 3 to 6: Once the DIP-switch setting is changed, it must be
confirmed by shortly pressing the LEARN-button�
Changing the settings of DIP-switches 1 and 2: Keep the LERN-button pressed for approx� 3
seconds until the integrated lighting starts blinking� Release the LERN-button and press it once
again shortly to start the learning cycles� When set to „free programming“, then pls� refer to
page 13�
Programming Functions
Adjusting the time for the integrated lighting: The LERN-button must be pressed for approx� 6
seconds until the green LED starts blinking; then release the button� Pressing the button again,
will confirm the the new time for the integrated lighting�
Increasing the running speeds: When setting the opening and closing speed in „free programming“ mode then each press of the TEST-button will increase the running speed by one level�
Combined Functions of TEST and LERN Button
Change speed settings
when DIP-switches were
set to „free programming“
The LERN-button must be kept pressed� In addition the TEST-button must be kept pressed� After
approx� 3 seconds the operators lighting starts blinking and the red LED starts blinking in a
sequence� Both buttons must now be released� The operator is now in the mode to adjust the
closing and opening speed, pls� refer to page 13�
DIP-Switches
1+2
Standard: 1 OFF, 2 ON
Adjusting the type of garage door: It may be chosen either sectional door (standard adjustment),
tilting door, short running door (e�g� Canopy type doors) and free programming�
3
Standard: OFF
Additional force shortly before closed position: When using mechanical locking systems a higher
force might be necessary in order to ensure a proper locking� Setting the switch to ON increases
the force before reaching the closed position�
4
Standard: OFF
Pre-warning: When set to ON, the operators‘ lighting will blink for approx� 4 seconds before
every opening or closing�
When automatic closing is activated: When set to OFF, the operators‘ lighting will blink for 6 seconds before closing the door� When set to ON, it will be blinking before openings and closings�
5+6
Standard: OFF
Automatic closing: The time until the door will be closed can be set to 30, 90 or 120 seconds� For
programming pls� refer to page 14�
Page 10
Installation Instructions TM50/TM80 - MO911/1V0
Printed Circuit Board: Adjustments and Connectors
Connectors
DIP
HF-Modul
B A D C 24V
LERN/
LEARN
TEST/
RUN
Push Button
A+B
Connector for a wired wall push button
Standard function
Pressing the push button will give a command to the operator� Whether this is an opening,
closing or stop command depends on the entire status of the operator�
Function when using
the automatic closing
feature
Pressing the push button:
will give an opening command when the door is closed
will be ineffective when the operator is running into opening direction
will extend the time the door is kept open when the door is in open position already
will give an opening command when the operator is running into closing direction
To avoid the automatic closing occassionally, a standard wall switch may be connected� Whilst
it is switched on, the push button connector will be blocked and the operator cannot close the
door unless the wall switch is set to off position� It may be connected parallel together with a
wall push button�
Photo Cell / Hatch Door Contact
C+D
Connector for the impulse wires of a photo cell or a hatch door contact� The 8�2kOhm resistor
is used to survey the wire� It must be removed from C+D and must be connected to the safety
device as shown below�
If both, a photo cell and a hatch door contact, must be used, then both items must be connected
in one line�
Photo Cell:
24 V
24V
24V
24 V
D
C
8,2 kW
N.C.
Hatch Door Contact:
8,2 kW
C
D
Standard function
Openings: If the device detects an obstacle within approx� 2 seconds after running from closed
position, then the operator will stop (e�g� hatch door is open)� After these 2 seconds the connector is not being checked anymore for the rest of the opening run�
Closings: The connector will be checked during the whole closing proceedure� Once an obstacle
is detected, the operator will reverse to fully open�
Function when using
the automatic closing
feature
Openings: pls� refer above to „Standard function“
Closings: The connector will be checked during the whole closing proceedure� Once an obstacle
is detected, the operator will reverse to fully open� The adjusted time for automatic closing will
start running� If the obstacle will be removed after the automatic closing time has elapsed, then
the closing procedure will start immediately�
24V AC Output (200mAmp max.)
24V
24V a/c (max� 200mAmp) power supply for external components (for example photo cells or
remote receivers)
Installation Instructions TM50/TM80 - MO911/1V0
Page 11
Printed Circuit Board: Adjustments and Connectors
Standard Programming
Programming the Forces and Running Distance
Choosing the type of door
The standard pre-setting is „Sectional Door“; if this shall be used, then proceede with step 2�
For other types of doors the DIP-switches 1 and 2 must be adjusted accordingly�
1
Sectional Door
Tilting Door
Short Running Door
When the DIP-switch settings are changed, the red LED starts blinking in intervalls; proceede
as described below�
Free Programming
Pls� refer to chapter „Free
Programming“, Page 13�
Keep the red LEARN-button pressed for approx� 3 seconds�
Release the button once the red LED and the operators‘ lighting start blinking�
2
Press the LEARN-button once again shortly�
3
4
The operator now starts with the learning cycles (force measurement and running distance):
- it hits the OPENING limit block
- it closes slowly until it reaches CLOSED-position
- it opens fast until it reaches OPEN-position
- it closes fast until it reaches CLOSED-position
The operators‘ light keeps blinking for a little while after the operator stops running� Once
the operators‘ light stops blinking the programming has been successful�
Programming Remote Components
Keep the red LEARN-button pressed for approx� 3 seconds�
Release the button once the red LED and the operators‘ lighting start blinking�
1
2
Page 12
Press the button on the remote component which is intended for use with the operator for approx� 1 second� The operators‘ light stops blinking and the component was programmed successfully�
Steps 1 and 2 must be repeated for each remote component�
For more information on remote components pls� refer to page 16�
Installation Instructions TM50/TM80 - MO911/1V0
Printed Circuit Board: Adjustments and Connectors
Free Programming
!
ATTENTION: Changing the running-speeds might result in non-conformant force values dependant on the door
type and the doors‘ weight. To ensure the installation is within legal regulations a force testing as to directive
EN13241-1 must be made.
Free Programming
1
2
Opening and closing speeds can be set manually when running the free programming
mode� The length of the soft-stop in closing direction may also be set manually� When
running the free programming for the first time all speeds are set to maximum�
After changing the DIP-switch settings the red LED will start blinking in intervalls (2 blinks
- break - 2 blinks) - proceede with step 2�
Setting the speeds
Press the LEARN-button followed by the TEST-button and keep
both pressed for approx� 3 seconds� Release the buttons once
the red LED starts blinking�
The red LED will blink for up to 8 times followed by a break�
The mode for programming the speeds is active�
Setting the closing speed
The number of blinks of the red LED indicates the entire speed
setting:
8 blinks = maximum speed
1x blink = minimum speed
3
4
5
6
7
By means of the black TEST-button the speed can be reduced;
each press reduces the speed by one step� Wait for the break
after the blinks and then start counting to evaluate the entire
speed setting�
By means of the red LEARN-button the speed can be increased�
Confirm the selected speed
Press the LEARN-button followed by the TEST-button; keep
both pressed for approx� 1 second and release them�
You are automatically in the mode for setting the opening
speed�
The program is now in the mode to set the opening speed�
Setting the opening speed
After completing step 4 the red LED is blinking up to 8 times followed by break� Setting the opening speed is made the
same way as described in step 3 and 4�
After confirming the selected opening speed the LED and the operators‘ lighting will be blinking regularily, the speeds have
been set successfully�
Starting the learning cycles
Shortly press the LEARN-button� The operator will first run in
opening direction and hit the upper limit block� If you wish
to keep the standard soft-stop in closing direction, no further
action is required� Wait until the operator has completed the
learning cycles (the door will then remain in closed position and
the operators‘ lighting will stop blinking)� The programming
then is completed�
Changing the length of Soft Stop
Once the learning cycles have started and the upper limit block was hit, the operator will run in closing direction� During
this first run in closing direction the soft stop may be altered: press the red LEARN-button and keep it pressed� The operator
will increase speed� Release the LEARN-button where you want the soft stop to start in later operation� The speed will be
reduced and the new soft stop setting will be safed� Wait until the operator has completed the learning cycles, then the
programming is completed�
Installation Instructions TM50/TM80 - MO911/1V0
Page 13
Programming
Automatic Closing
!
WHEN USING THE AUTOMATIC CLOSING FEATURE A PHOTO-CELL MUST BE CONNECTED. A PHOTO-CELL IS A
NON-CONTACT SAFETY DEVICE AND WILL AVOID IN MOST CASES THAT USERS, CARS OR OTHER OBSTACLES
WILL BE HIT BY THE CLOSING GARAGE DOOR!
The closing procedure will be started automatically after the pre-set time; the door might be unattended at that time� Without a photo-cell the operator will only reverse when hitting an obstacle� Especially moving cars may cause severe damages
on both, car and garage door!
1
Setting the time
Automatic closing is disabled by factory presetting� Setting the time after which the automatic closing shall start enables the
feature� DIP-switches 5+6 must be used for the time setting:
disabled
after 30 seconds
after 90 seconds
after 120 seconds
After changing the DIP-switch settings the red LED will start blinking in intervalls� Shortly press the red LEARN-button to
confirm the new settings; the LED stops blinking and the automatic closing is now active�
2
Pre-Warning by internal lighting
When automatic closing is active the operator will allways pre-warn the users by a blinking internal lighting� The operator
will start closing the door after 6 seconds of pre-warning� By means of DIP-switch no� 4 the pre-warning can additionally be
enabled before openings:
Pre-warning before closings
Pre-warning before openings and closings
External warning lights may connected together with the integrated operators lighting using the connectors 5+6 (230V,
160 Watts max�)� The operators housing must be removed in order to access the connectors� Cabling and connections of
230V components may only be done my authorised professionals.
3
Connecting a Photo-Cell
As a non-contact safety device a photo-cell must be connect
when using the automatic closing feature�
When the door is open and an obstacle is detected by the
photo-cell then the operator will not start the automatic
closing procedure�
When an obstacle is detected during the closing procedure
then the operator will reverse to fully open and it will restart
the count-down for automatic closing� It will then start the
closing procedure again�
24 V
24V
24V
24 V
D
C
8,2 kW
N.C.
4
Performance of Control Devices
When the automatic closing is active all incoming commands during the opening cycle will be ignored - the operator will
keep running until to fully open position�
Interrupting the opening procedure will only be possible by:
- Force detection (e�g� obstacle)
- Detection by Photo-Cell/Hatch Door connector for approx� 2 seconds after starting the opening procedure
When the door is in fully open position incoming commands will restart the count-down for the automatic closing, e�g� the
time will be extended�
5
Avoiding automatic closing temporarily
If the user would occassionally like to prevent the door from automatically closing, then an ordinary wall switch can be
connected to the push-button connectors A+B� The operator will remain blocked as long as the wall switch is switched on;
when switching it off the operator will close the door automatically again� A wall switch may be connected alongside a wall
push-button�
Page 14
Installation Instructions TM50/TM80 - MO911/1V0
Programming
Automatic Closing
!
Further Safety Advice for Automatic Closing
Once the user gets into the car, he might not recognize the operators‘ integrated blinking light before the automatic closing
starts� This may be down to light conditions or the cars‘ roof� Therefore it is strongly recommended to install an external
warning-light which is visible from inside the car�
This is similar for users approaching the garage; dependant on light conditions the blinking integrated lighting might not be
recognized in time� Therefore a further warning-light should be installed outside the garage in order to maximize the safety
in use�
Adjusting the Lighting Duration
i
The integrated lighting will be switched on with every incoming command� The adjusted time will run from the moment the
command was received�
Factory pre-set the light will stay on for 3 minutes� This time may be changed in steps of 10 seconds up to a total of
10 minutes�
To change the time proceede as follows:
Keep the red LEARN-button pressed for 6 seconds�
Release the button once the green LED comes on�
1
Press the red LEARN-button once again shortly�
The green LED now starts blinking: each blink stands for 10
seconds of lighting duration�
2
3
6 blinks = 1 minute
12 blinks = 2 minutes
18 blinks = 3 minutes
24 blinks = 4 minutes
30 blinks = 5 minutes
����
100 blinks = 10 minutes
Press the red LEARN-button shortly once the require time is reached� The green LED stops blinking and the new
duration for the integrated lighting has been stored�
Installation Instructions TM50/TM80 - MO911/1V0
Page 15
Remote Control
Registering and deleting Remote Devices
i
1
In order to use a remote device it must first be registered with the operator� A total of 10 remote devices may be registered
with one operator, the registration must be made seperately for each device�
If the total of 10 devices is exceeded, the last registered device will be overwritten by the new one�
It is not possible to register more than one button of the same hand transmitter with the operator�
Starting the Registry
Keep the red LEARN-button pressed for 3 seconds� Release it once the red LED and the operators‘ lighting start blinking�
The operator now is in programming mode and awaits the signal from a remote device�
2
Registering a Device
Press the button that shall be used for controlling the operator for approx� 1 sec�
The red LED and the operators‘ lighting stop blinking - the device was programmed successfully� Pressing the devices‘ button again will run the operator�
Repeat steps 1 and 2 for any further device�
HomeLink™
Integrated car remotes usually use the HomeLink™ system by Johnson Controls� Systems from version 6 or higher are compatible with the operator�
First the hand transmitter must be copied into the HomeLink™ module (closer information on your specific system can be
found on the internet: www�eurohomelink�com)�
The programmed HomeLink™ button will turn to a new Seip-compatible remote device� It therefore must be registered
with the operator just like any other remote device� Proceede as described in steps 1 + 2�
Erasing Remote Devices
The receivers‘ memory can be erased completely; it is not possible to delete single devices� To erase the receivers‘ memory
keep the red LEARN-button pressed for 10 seconds:
After 3 seconds the red LED and the operators‘ lighting will start to blink; after 10 seconds the red LED will come on permanently, release the LEARN-button then� The memory now is empty�
Page 16
Installation Instructions TM50/TM80 - MO911/1V0
Remote Control
General Remarks
!
Useable Batteries
Eine Batterie des Typs A23, 23A, 23L, EL12, VR 22 oder MN 21; Versorgungsspannung: 12V
Verbrauchte Batterien müssen nach den nationalen Bestimmungen entsorgt werden!
Changing the transmitters‘ battery
Open the transmitter
Take off lid
Change battery
Changing the wall push-buttons‘ battery
Change battery
12V
i
A23S
Open the wall push-button
Range
The TM operator is equipped with a high quality remote control set as a standard!
However, the remote control is the part of the operator which might be influenced by circumstances in the surroundings
of the garage� With our standard remote control you might reach a range of more than 100 meters�
The range is influenced by:
- old batteries: if you should experience a problem with the range, please change the batteries first� The lower the batteries run the lower the range will be�
- Building materials of the garage: In a garage made of concrete and steel you might reach a lower range than in an ordinary garage build of stone� The more steel was used for the walls the shorter the range of your remote-control�
Remote-control activity in the area: Radio and television transmitters close to your garage might reduce the range�
Older baby-phones and other household remote equipment: Some equipment like remote head-phones and baby-phone
might prodecure strong disturbant signals which could reduce the range of other remote devices�
It is extreemely unlikely that the range will drop to an unacceptable distance� If, however, problems should occure we will
like to be helpful�
Synchronisation of the Rolling Code
With each command given by a remote device a new code for the next command is created; this new code will be agreed
with the receiver� If a device is subsequently used for approx� 30 times out of reach of the receiver, then it will not be
accepted by anymore - the latest code is unknown to the receiver� The device must first be registered with the operator
again in order to use it (refer to page 16)�
Installation Instructions TM50/TM80 - MO911/1V0
Page 17
Technical Information
Technical Data
TM 50
TM 80
Nominal Pulling Force
50 kg
80 kg
Net Running Length
2,500 mm
Peak Pulling Force
60 kg
90 kg
Max� Running Length extended
4,000 mm
Overall Length
3,150 mm
Force-Setting for Operation
automatic
Motor
24V DC, low-noise
TM 50
TM 80
Height Motor Head
80 mm
Max� Running Speed
18 cm/sec�
14 cm/sec�
Length Motor Head
360 mm
Speed in Soft Mode
8 cm/sec�
8 cm/sec�
Width Motor Head
180 mm
Minimum Space above the door
35 mm
Time for 2,10m opening
11,5 sec�
16 sec�
Lighting
230V AC, max� 40W
Weight including packaging
Lighting Durance (adjustable)
10 sec� to 10 minutes
Noise Emissions
Duty Cycle
50%
Stand By Power Consumption
2�0 watts
Power Supply
≤ 60 dB(A)
Programmable Remotes
10 max�
Max� number of cars/garage
1
3
Subject to technical alterations!
190-250V AC
Transformer
18 kg
230V AC, 24V AC
Pre-Warning Light
adjustable
Automatic closing
adjustable
Maintenance: The operator is maintenance free! Do not
grease or oil the chain!
Wiring Diagram
Internal Wiring
1
Blue, mains supply, 230V
2
Brown, mains supply, 230V
3
Black, transformer, 230V
4
Black, transformer, 230V
5
Brown, Lighting, 230V
6
Blue, Lighting, 230V
7
White, transformer, 24V
8
White, transformer, 24V
9 MOTOR
Connector for the plug from the motor
PE
Earthing from P�C�B� to base plate
Earthing of
the mains
supply
The earthing of the mains supply (green/yellow)
is connected to the base plate with a screw (the
screw is marked with a earthing symbol)
External connections
A+B
Floating connector for push-button, key-switch
and the impulse cables of an external receiver
C+D
Floating connector with a 8,2kOhm resistor for
impulse cables from a photo-cell receiver
24V
24V AC for a photo cell transmitter when a
self test before every movement of the door is
required
Devices for adjustments
Button
„Test/Run“
Runs the operator - OPEN-STOP-CLOSE
Button
„Lern/Learn“
For automatic force setting and registration
of hand transmitters
Jumper
“FORCE/PRESSURE”
Setting of lower or higher force
Others
HF-Modul/Receiver Plug for receiver module, 433 MHz
Card
FUSE
Page 18
Fuse T1,6A 250V
Installation Instructions TM50/TM80 - MO911/1V0
Technical Information
Troubleshooting
Error Messages
The operator will show error messages either by a blinking operators‘ lighting or the red LED�
Messages by blinking integrated lighting
8 blinks
2 blinks
No impulses from the motors‘ hall-sensor� Possible reasons:
damaged hall-sensor, loose contact on the motor plug or damaged motor�
DIP-switch message: the DIP-switch setting was changed� Either
press LEARN-button to confirm the change or start the learning
cycles (page 12)�
3 blinks
The end position could not be reached, the operator switched
off at time limit� Possible reason: motor damage or other mechanical problem�
5 blinks
Loss off data in the micro processor - try to start the learning
cycles (page 12)� If this does not work the electronics must be
exchanged�
6 blinks
9 blinks
Amplifier for motor control is defective, the electronics must be
exchanged�
Additional messages from the LED „Diag“ only
4 blinks
An error occured when testing the photo-cell connector� Either
the 8�2kOhm resistor is defective or the photo-cell/hatch-door
produced an error�
EEPROM error: The electronics must be exchanged
7 blinks
Relais damage - the electronics must be exchanged�
If... then...
The operator does neither react on the transmitter nor on the pushbutton
Power failure? Disconnect and connect the operator� Is the door stuck
because of snow and ice? Check the lines and the connections of the
push-button switch� Is there water in the push-button switch or in the key
operated switch? Disconnect alle external components and try running the
operator via the TEST/RUN button�
The light doesn’t work
Replace the bulb (230 V, max� 40 Watt)
The operator reacts on the transmitter but not on the push-button
switch
Check the line of the push-button switch� Does the push-button switch
work, when the remote receiver is disconnected? If so, the remote transmitter or receiver might be defective�
The motor is buzzing but the door doesn’t move
The door is jamming�
The operator reacts on the push-button but not on the transmitter
Check the battery of the transmitter� Try registering the transmitter with
the operator (page 16)�
The operator neither reacts on the push-button nor on the
transmitter
Disconnect the receiver or remove the transmitter battery� Use your pushbutton switch only� If this solves the problem, your transmitter may be
defective� Disconnect the push-button switch and use your transmitter
only� If this solves the problem, the push-button switch or the line of the
push-button switch may be defective�
The operator isn’t running smooth
Unlock the carriage of the opener� Move the door manually and make sure
that the door is well balanced (must come to a stop at each position)�
The spring tension is too high or there is even a spring fracture�
The operator works, but the door doesn’t move
The carriage is unlocked� If you want to lock it, open the door, but not
completely, and let the opener run� The carriage locks in automatically�
The operator doesn’t work due to a power failure
Unlock the carriage with the help of the emergency release and open
the door manually� (If you have a garage where you can only enter from
outside: Unlock the door with the key and turn the door-handle, then your
opener will be unlocked� If you have a garage where you can also enter
from inside: pull at the Bowden cable hanging from the carriage�)
The door doesn’t close completely and opens again
Is the door jamming while closing? Unlock the carriage manually (make
the door running well)� Lubricate and oil the pivotal points of the door�
Run through the automatic learning cycle once again (page12)�
Installation Instructions TM50/TM80 - MO911/1V0
Page 19
Declarations
Document No� AN-02122011
Dokument Nr. AN-02122011
EC-Declaration of Conformity
As to European Directives
Low Voltage Directive 2006/95/EC
Electro Magnetic Compatibility 2004/108/EC
im Sinne der EG-Richtlinien
Niederspannungsrichtlinie 2006/95/EC
Elektromagnetische Verträglichkeit 2004/108/EC
in accordance with the Radio and Telecommunications Terminal Equipment Act (FTEG) and Directive 1999/5/EC (R&TTE
Directive)
Gemäß dem Gesetz über Funkanlagen und Telekommunikationsendeinrichtungen (FTEG) und der Richtlinie 1999/5/EG (R&TTE)
We,We hereby declare, that the following products comply to the
mentioned EC-regulations�
Wir erklären hiermit, daß die nachfolgenden genannten Produkte
den unten angegebenen EG-Richtlinien entsprechen.
We,We hereby declare, that the following products comply to the
mentioned EC-regulations�
Wir erklären hiermit, daß die nachfolgenden genannten Produkte
den unten angegebenen EG-Richtlinien entsprechen.
Type of Product /
Produktart
Garage Door Operator / Torantrieb
Product Name / Modell
TM 50 / TM 80
Approved according to 2006/95/EC and 2004/108/EC / Geprüft nach 2006/95/EC
und 2004/108/EC
Referring EC-regulations: / Angewandte harmonisierte Normen:
Electromagnetic
Compatibility /
Elektromagnetische
Verträglichkeit
EN 61000-3-2
Limits for harmonic current emissions /
Grenzwerte für Oberschwingströme
EN 61000-3-3
Limitation of voltage changes, voltage fluctuations
and flicker in publik low-voltage supply systems /
Grenzwerte für Spannungsschwankungen und Flicker
EN 61000-6-3
Emission standard for residential, commercial and
light-industrial environments /
Störaussendung für Wohnbereich, Geschäfts- und
Gewerbereiche sowie Kleinbetriebe
EN 61000-6-2
Generic standards - Immunity for industrial environments
Fachgrundnorm - Störfestigkeit - Industriebereich
Low-Voltage
Directive /
Niederspannungsrichtlinie
EN 60335-2
Particular requirements for drives for vertically moving
garage doors for residential use /
Anforderungen für Antriebe von Garagentoren mit
Senkrechtbewegung zur Verwendung im Wohnbereich
EN 60335-1
Safety of household and similar electrical appliances /
Sicherheit elektrischer Geräte für den Hausgebrauch
Safety in Use /
Nutzungssicherheit
EN 12453
Safety in use of power operated doors, requirements /
Nutzungssicherheit kraftbetätigter Tore, Anforderungen
EN 12445
Safety in use of power operated doors, Test methods /
Nutzungssicherheit kraftbetätigter Tore, Prüfverfahren
Forces
Betriebskräfte
EN 13241-1
Applied for testings for Up-and-Over Doors and
Sectionaldoors up to 5m wide and 2,50m high as to
06�02�2012
Prüfungen beantragt für Kipp- und Sektionaltore bis
zu 5m Breite und 2,50m Höhe
Stand 06.02.2012
SKR 433-1
Code B43A023004-1
Hand Transmitter as remote control for garage door operators
Handsender als Fernbedienung für Garagentorantriebe
(Short Range Device/Funkgerät geringer Reichweite (SRD))
and / und
SKR1W433
Code B443A623001
Wall Transmitter as remote control for garage door operators
Wandsender als Fernbedienung für Garagentorantriebe
(Short Range Device(Funkgerät geringer Reichweite (SRD))
comply with the essential requirements of §3 and the other relevant provisions of the
FTEG (Article 3 of the R&TTE Directive), when used for its intended purpose�
bei bestimmungsgemäßer Verwendung den grundlegenden Anforderungen des
§3 und den übrigen einschlägigen Bestimmungen des FTEG (Artikel 3 der R&TTE)
entsprechen.
§3(1)1, (Article 3(1)a)) does not refer to this type of product�
§3(1)1, Artikel 3(1)a) bezieht sich nicht auf diesen Produkttyp, es gibt hierzu keine
Norm
Protection requirement concerning electromagnetic compatibility §3(1)(2), (Article
3(1)(b))
Schutzanforderungen in Bezug auf die elektromagnetische Verträglichkeit §3(1)2,
Artikel 3(1)b))
EN 300 220-1 V2.1.1
EN 300 220-2 V2.1.2
EN 301 489-1 V1.6.1
EN 301 489-3 V1.4.1
EN 60950-1:2006
EMV / EMC Directive 2006/95/EC;2004/108/EC; 99/5/EC
Myke Seip, Walzbachtal-Jöhlingen, 06�02�2012
06
Grombacher Straße 83
75045 Walzbachtal-Jöhlingen
Germany
www�seip�com
Page 20
Installation Instructions TM50/TM80 - MO911/1V0