1
1
Switching between WLAN and 10/100 BASE-T Ethernet
At the Discovery, the most frequently used Ethernet parameters (e.g. IP addresses, gateway
address, subnet mask, etc) can be configured by using the buttons on the Discovery terminal
itself. So without a remote utility or a Telnet session etc, but simply by applying the Service
Screens.
Any 802.11b/g settings require a remote utility (see next chapters), simply because it's too timeconsuming to enter these by using just 4 buttons. However, in order to get access to these
settings, a wired connection through normal 10/100 Base-T Ethernet should be established first.
This means that the internal WLAN module has to be configured to use this interface.
By using the service screens, this can be established (see 1.14).
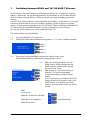
The service screens can be entered by:
1.1
1.2
Pressing button #4 for 5 seconds and
Entering the authorisation code by pressing buttons 1, 2, 3, and 4 (=default sequence)
Button 1
Button 2
Button 3
Button 4
1.3
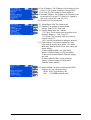
Once in the Configuration Mode, you reach the Service Screen to set
the WLAN parameters by subsequently pressing buttons 3 and 1.
1.4
1.5
When now selecting button #3, the unit’s
WLAN Settings will be retrieved from the
WLAN converter module, before going to
the next Service Screen.
When leaving this menu (after entering it
following 1.4), you will be prompted
to store these settings into the Ethernet
module.
If yes, the Discovery will compare the RS-232
settings of both the Discovery as well as the
WLAN module. If not identical, you will be
asked to synchronise them (which you always
should).
Note:
You can use:
Button #1 to select the next field:
Button #2/3 to in/decrease:
(auto-accelerating)
Button #4 go back:
Interface Manual Scantech SG-20 Discovery WLAN Rel 1.1
4