1
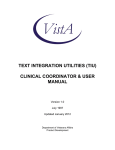
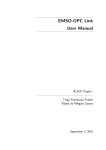
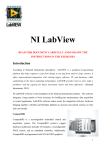
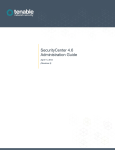
Inside
Training Manual
CMI Proprietary
CMI Proprietary
Table of Contents
Logging On To Sevocity................................................................................................. 1
Desktop ........................................................................................................................... 1
Overview ..................................................................................................................... 1
Active Charts .............................................................................................................. 2
Scheduler..................................................................................................................... 2
Messages ..................................................................................................................... 3
Main ............................................................................................................................ 4
Tools ........................................................................................................................... 4
Reports ........................................................................................................................ 4
Help ............................................................................................................................. 4
Chart ................................................................................................................................ 4
Chart Summary ........................................................................................................... 5
Demographics ............................................................................................................. 5
Referrals ...................................................................................................................... 5
Past Encounters ........................................................................................................... 6
Imported Documents ................................................................................................... 6
Medications/Assessments ........................................................................................... 6
Flowsheets/Labs .......................................................................................................... 6
Health Guidelines........................................................................................................ 7
Immunizations............................................................................................................. 7
Create Letter................................................................................................................ 7
Export Chart ................................................................................................................ 7
Close Record ............................................................................................................... 8
Encounter ........................................................................................................................ 9
Templates .................................................................................................................... 9
Note Display ............................................................................................................... 9
HPI ............................................................................................................................ 10
Past History ............................................................................................................... 10
Allergies/Meds Hx .................................................................................................... 10
Pediatric .................................................................................................................... 10
ROS ........................................................................................................................... 10
Vitals ......................................................................................................................... 11
Flowsheets/Labs ........................................................................................................ 11
Physical Exam ........................................................................................................... 11
Studies ....................................................................................................................... 12
Assessment ................................................................................................................ 12
Medications ............................................................................................................... 12
Orders/Procedures/Referrals ..................................................................................... 13
Immunizations........................................................................................................... 13
Plan/Disposition ........................................................................................................ 14
Carbon Copy ............................................................................................................. 14
Coding ....................................................................................................................... 14
Attachments .................................................................................................................. 15
Finalizing an Encounter ................................................................................................ 15
CMI Proprietary
Print ........................................................................................................................... 15
Set Date ..................................................................................................................... 16
Change Location ....................................................................................................... 16
Template ................................................................................................................... 16
Audit Trail ................................................................................................................. 16
Main .............................................................................................................................. 16
Tools ............................................................................................................................. 17
Preferences ................................................................................................................ 17
Image/File Import ..................................................................................................... 17
Blank Note Encounter ............................................................................................... 18
Patient Handouts ....................................................................................................... 18
Reports .......................................................................................................................... 18
Demographics Report ............................................................................................... 18
Help ............................................................................................................................... 18
Encounter Types ........................................................................................................... 19
Blank Note ................................................................................................................ 19
Historical ................................................................................................................... 19
Procedure .................................................................................................................. 19
Telephone .................................................................................................................. 19
CMI Proprietary
Training Manual
Logging On To Sevocity
Double-click the Sevocity icon to launch Sevocity. The logon screen will appear.
1. Type your User Name in the User Name field or click the Keyboard button and use
the on-screen keyboard (click Done after entering text).
2. Type your password in the Password field or click the Keyboard button and use the
on-screen keyboard (click Done after entering text).
3. Click OK.
4. Sevocity will ‘Check for user presence’, meaning that we will look for the same
user being logged in on another machine.
5. If the Select Clinic dialogue box appears, select the desired clinic from the drop-down
list and click OK.
Desktop
Overview
The Patient List area displays the patients scheduled for the listed provider for the day.
From this area, users can search for patients, open charts, and print schedules.
Sevocity 5.0
Training Manual
1
•
•
•
To search for a provider’s scheduled patients; select a provider from the For
drop-down list of all providers that have schedules in your clinic. Sevocity will
display that provider’s scheduled patients for the day shown.
If more than one date is scheduled for that provider, select a date from the second
drop-down list. Click Refresh if needed to refresh the screen.
To let the back office know that a patient is ready to be seen, click on the patients
name from the patient list, click Create Task, select the Subject , enter a Task if
necessary, choose the person that you want to assign the task to and click save.
Active Charts
All charts that have been pulled and are being worked in will be displayed in this area. If
a patient has a chart open with an encounter that has not been finalized, the name of the
patient will be shown in blue. A blue chart cannot be returned to the virtual chart area
until the open encounter has been finalized.
To open a chart from this area either double-click on the name of the patient or select the
patient’s name and click Open. Users can print the names of the patients shown in this
area, pull and create charts, or return charts.
• Return: Select the name of the patient and click Return.
• Pull: Click Pull/Create Chart and the Patient Search box will open. In the search
mode users can perform a partial, exact, or phonetic search for a patient as well as
search for active, inactive, and deceased patients. To begin a patient search enter
the patient’s name or account number and click Search. Once the patient is found,
you can click Pull to pull it to your active charts area, or click Pull + Open to
begin working on it immediately.
• Create: Click Pull/Create Chart and enter information in all available fields
then click Create Chart. The New Patient box will open. You must enter
information in the fields marked with a blue asterisk. Once this information is
entered, click Create Chart and a popup box will confirm that the chart has been
created.
Scheduler
To schedule a patient, first select a provider from the User drop-down list, then either
select a date from the drop-down list or add a new date by clicking Add Date and
entering a date in the New Date field.
To add a patient to the date’s schedule, click Add and use the Patient Search box to find
the patient. Once you have selected the patient, enter the time of visit in the Time field,
and either select or enter a reason for visit in the Reason for Visit field or click Add
from Favorites and select a common reason from the list. Click Save to save this
appointment or Save and Add Another to schedule another appointment on this same
day.
You can also change, remove, and arrange patient appointments in this area. Click Save
to save the schedule once patients are added.
Sevocity 5.0
Training Manual
2
Task/Messages
The routing feature in Sevocity displays a message in this area, allowing providers to
view encounter labs and messages, whether attached to a chart or not, and take necessary
action such as discarding individual or multiple messages. Users can also get messages at
any time by clicking on the yellow envelope in the upper right corner of the screen.
Messages may be created outside of an encounter and routed to users by clicking Create,
choosing the recipient of the message in the Route area, entering a Subject and Message
and clicking Send. Messages may also be replied to by clicking Reply and entering a
Message. The user that sent the message will be the default recipient of the reply.
To create a Task, click on Create, select the patient, add a subject by selecting from a
pick list of favorites or by adding text in the subject field, add a task description if
necessary and click Assign/Save
To View a Task that was sent to you or that you have assigned to a user select the task by
highlighting it and click View. To Accept or Complete a task, click on the task and then
click Accept. Once this is done, a Blue Thumbtack will be displayed next to the task.
Once you have marked the task completed, a Blue Checkmark will be displayed next to
the task.
If you assigned a task to another user, you will see a Gray Thumbtack next to the task in
your inbox once the user has marked it accepted. You will see a Gray Checkmark once
the other user has completed the task.
To open the chart of the patient the task is regarding click Open Chart.
Lab Interface
The Clinic Inbox in the messages tab is used to route lab results to providers in clinics
that have a lab interface. To send a lab result to a provider, click the lab message, click
View, and Verify the patient information in the Patient area is the same as the patient
information in the lab message, click Route and choose a recipient for the lab result. You
may choose to add a message by typing in the text field or by clicking Add From
Favorites to use your message favorites list. Click OK to route this lab message.
• To sign off on a lab message, the provider will click the lab message, click View,
click the Sign checkbox, click the Add Note checkbox to add a note by typing in
the text field or by clicking Add From Favorites to use your note favorites list.
Signed labs may also be routed by clicking Route and choose a recipient for the
lab result. You may choose to add a message by typing in the text field or by
clicking Add From Favorites to use your message favorites list. Click OK to
route this lab message.
• Once the lab message has been signed, it is stored to the patients chart. Notes may
be added to the lab message by clicking on the lab message or by going to the
Scanned/ E-Labs or Imported Documents tabs, click on the message and click
Add Note. A note may be added by typing in the text field or by clicking Add
From Favorites to use your note favorites list. The lab note may also be routed
by clicking Route and choose a recipient for the lab result. You may choose to
Sevocity 5.0
Training Manual
3
•
add a message by typing in the text field or by clicking Add From Favorites to
use your message favorites list. Click OK to route this lab message.
Routed lab messages will have a green checkmark beside them to denote that they
have been routed. Users may click on the checkmark to view the routing
information.
Main
Users can log off, switch clinics, or exit Sevocity from this menu.
Tools
The Preferences tools allow users to customize Sevocity to fit their documentation
patterns. Administration tools let you import images, use blank note encounter options,
and create patient handouts.
Reports
Users can generate reports on demographics from this menu.
Help
Users will find the Sevocity online Help documentation, User Manual, most recent
Release Notes, and information About Sevocity, which includes the toll free and local
numbers to reach the Sevocity Support line, in this menu.
Chart
Now that you have selected a patient, you will see the name, age, DOB, gender, account
number, allergies, and last visit date at all times The information displayed below the
Open Encounter button row is determined by clicking one of the buttons on the left side
of the screen. Each button opens a different section of the chart.
Sevocity 5.0
Training Manual
4
Chart Summary
The Chart Summary section displays the patient’s current medications, assessments,
allergies, vitals, and medical, surgical, family, and social histories.
Demographics
The Chart Demographics section contains the Patient Information, Insurance information,
Emergency Contacts, and Professional Contacts sub-sections, which can be updated.
After you have chosen the appropriate sub-section, click Update to enter information.
• Patient Info: This area allows a picture of the patient, religion, language, marital
status, and guardian./spouse information to be added to the chart.
• Insurance: This area allows you to enter both primary and secondary insurance
information.
• Emergency Contacts: This area allows you to enter up to two contacts.
• Professional Contacts: This area allows you to add contacts from either the user
or clinics contact lists, or to customize a professional contact.
Referrals
•
To add a referral to a patients chart, click Add, Referral Request will be the
default choice, enter the patient’s referral information from drop down lists or
favorites lists and click Add. The Authorization Status/Results may also be
entered at this time by clicking this tab and entering the authorization and/or
Sevocity 5.0
Training Manual
5
•
•
•
result information and click Add. When an appointment date is entered in the
Authorization Status/Results tab, a message will be sent to the provider that
requested the referral reminding them of the appointment date for the patient.
For a referral that is requested in an encounter, the Authorization Status/Results
may be entered by clicking on the referral, click Update, entering the
authorization and/or result information and click Save.
Clicking on Show History will reveal the audit trail for this referral.
Referrals may be printed or routed to other users.
Past Encounters
All non-image encounters are displayed in this section along with the date of the
encounter, clinic location, provider who finalized the encounter, an encounter summary,
and the encounter category. The list can be filtered by category and users can view, print,
amend, and cosign encounters.
Imported Documents
All image encounters are displayed in this section along with the date of the encounter,
clinic location, provider who finalized the encounter, an encounter summary, and the
encounter category, and can be filtered by category. You can view, print, amend, and
cosign encounters.
Medications/Assessments
Users can view all the patient’s current medications and assessments in this section.
Historic medications are viewed by clicking View Historic and selecting the mode as
indication or medication and selecting a time frame.
Historic Assessments are viewed by clicking the assessment status and selecting a time
frame.
Click on the medication or the assessment to view additional information regarding the
prescription and assessment.
Flowsheets/Labs
Users can enter flowsheet and lab data in this section. Click Add New Flowsheet, select
the desired flowsheet from the left column, and click Add. To enter data in a flowsheet
select the desired flowsheet tab and click Add Column. To view data that has been
entered in the past, select the time frame the flowsheet data was entered from the dropdown list, and then click Retrieve/Refresh Data. When viewing or adding flowsheet
information, users can delete or change information by clicking the appropriate buttons.
Note: If data is entered at the chart level, it can only be deleted or changed from the chart level.
Data entered at the encounter level has to be changed by amending that encounter.
Labs that are imported into Sevocity through an interface or the image import tab are
located under the Flowsheets/Labs tab under the Scanned/ E-Labs sub tab. Lab interface
results are available for graphing and can be viewed in a table format by clicking
Table/Graph.
Sevocity 5.0
Training Manual
6
Health Guidelines
Age and gender-specific guidelines are available when users click Review in this section.
To reveal guideline summary information, simply select a guideline.
To add a custom Health Guideline to the patients chart, click on Custom and select the
guideline from the dropdown list of favorites. Users are able to modify the information
regarding population, intervention and timing for this patient specific guideline. The
Reason for the modification will need to be added to this modified guideline before it is
saved.
To change or modify a Health Guideline, click the guideline and click Change. The
Reason for the modification will need to be added to this modified guideline before it is
saved.
A Health Guideline can be overridden for a specified time frame by clicking on the
guideline and entering the time frame and reason for override.
Immunizations
In this section users can view child or adult immunizations that have been entered in the
immunization section of an encounter. To print records for a patient or the patient’s chart,
select the radio button for either Child or Adult immunizations and click Print. Mark the
box for Print for Chart or Print for Patient and click Print Preview, Print, or Cancel.
(The Print for Chart option displays the serum and administration information.)
In children’s charts, the button for this section is marked Immunizations/Growth Charts.
When the Growth Charts section is displayed, any chart can be opened and printed. Select
the radio button for the appropriate age range and click on the chart type.
Pending Orders
Each user will have a list of pending orders specific to the orders that were entered by the
user and have not been marked completed. This list may be printed out, users may click
on the order to view further information regarding that order in the field above the list.
Create Letter
To create a letter, click Create Letter and begin writing the letter in the blank window.
Click Insert to insert specific data from the patient’s record. You may also choose a letter
template from the Letter Template drop-down list then click Process and select the
information requested by the dialogue boxes as required by the letter template. Text in
the letter may be italicized, bold, underlined and displayed in red, blue or black color.
Letters are displayed in the bottom section of the letters tab for further editing. Letters
may be printed, and saved to the chart.
Export Chart
Click Export Chart to export a patient’s chart and save it to a particular location in the
computer. Export all or user specific documentation by choosing the user and time frame.
To select specific encounters for export, click on the Select items for disclosure
checkbox. Patient demographics may also be excluded from this export.
Sevocity 5.0
Training Manual
7
Close Record
Click Close Record to close a patient’s record from the chart level.
View Open Encounters
To view an encounter that has not been finalized, click View Open Encounter and the
user will be able to view the open encounter up to the last time it was saved.
Sevocity 5.0
Training Manual
8
Encounter
To open a new encounter from the Desktop > Chart screen (the chart level), click New
Encounter, select the desired encounter type and location, and click OK. For 1997 E&M
coding the encounter type is Exam. For 1995 E&M, coding the encounter type is Multisystem.
Templates
To add an encounter using a template, click Template and select a category folder or
template type from the list on the left then select a template from the list on the right..
Click Apply to apply the template or click Preview to view the template before applying
it.
Note Display
In this section, you can view the date of the encounter and any contributing authors. All
encounters will also display the patient’s current medications and allergies.
Sevocity 5.0
Training Manual
9
HPI
This section displays referral contacts, nurses’ notes, chief complaints, and structured or
narrative HPI. To add the referring provider’s name, click Add/Change Referral and
choose the desired name from either the Patient Contacts, User Contacts, or Clinic
Contacts lists.
• To enter the name of the last person who referred the patient, click Insert Last.
• To enter nursing notes, click Enter Nursing Note and enter text into the narrative
field provided.
• To add chief complaints, click Add HPI, choose a Category if applicable, then
select a Chief Complaint from the drop-down list. Chief complaints may be
changed or deleted and can be customized. After a chief complaint is selected,
you may enter a narrative or structured HPI. Click Last to view the last HPI
entered for the patient, then click Apply to apply that complaint again.
Past History
Medical, Ob, Surgical, Family, and Social histories are documented in this section To
review history that has been entered previously, click View History. After reviewing the
history, be sure to check off the appropriate Areas Reviewed for E&M coding calculation
purposes.
Allergies/Meds Hx
Document allergies, reactions, and onset dates in this section. To enter a current
medication, click Add and choose the medication from the drop-down list, or search the
master list of medications. When entering medication information, an indication can be
linked to the medication. Click Leaflet to print out a medication leaflet.
Pediatric
Document Pediatric information in this section. Check off symptoms from left to right in
the Structured area and enter text in the narrative field in the Notes area if necessary.
ROS
Document the review of systems in this area. Check off a category on the left and mark
the green check box to document “denies of,” or check the red check box to document
“complains of.” Use the narrative field if desired or prompted.
A quick tip: If a full review of systems has been performed with negative findings, mark the
check box for “all systems are negative unless otherwise specified”.
To apply the last ROS documented, click Last then select all or check off the system you
would like to apply to your current note.
Sevocity 5.0
Training Manual
10
Vitals
Click Add/Retake vitals to enter vital signs. To backdate a vital sign, click on the
calendar and choose the date the vital was taken. A text field is available next to every
vital sign so a note can be entered. To change or delete a vital sign, select the vital and
click Change or Delete. To retake a vital, select the vital and click Add/Retake Vitals.
• Body Mass Index, Body Surface Area, and Last Vitals Taken are always
available.
• To view or print an aggregate of all vitals taken for a patient, click Past Vitals to
open the Past Vitals sub-section.
• To view or print the height, weight, and BMI growth charts, click the appropriate
button.
• To view or print graphs for other vitals, click Graph Vitals, select a time frame
from the drop-down list, select one or all vitals to graph, click Display, and
choose a print option.
Flowsheets/Labs
Users can enter flowsheet and lab data in this section. Click Add New Flowsheet, select
the desired flowsheet from the left column, and click Add. To enter data in a flowsheet
select the desired flowsheet tab and click Add Column. To view data that has been
entered in the past, select the time frame the flowsheet data was entered from the dropdown list, and then click Retrieve/Refresh Data. When viewing or adding flowsheet
information, users can delete or change information by clicking the appropriate buttons.
Click Include In Note to pull flowsheet information into an encounter.
Labs that are imported into Sevocity through an interface or the image import tab are
located under the Flowsheets/Labs tab under the Scanned/ E-Labs sub tab. Lab interface
results are available for graphing and can be viewed in a table format by clicking
Table/Graph.
Physical Exam
To add physical exam information, mark the check box next to an organ or system. To
use physical exam information entered in the last encounter, click Last, and either mark
Select All or mark the body relevant areas or systems. Click Apply..
• To apply normal levels to a physical exam, mark the desired body area or system
and click Apply Normal.
• To add an image to an encounter, click Images then Add.
• To draw a new image or draw on a background image, click Draw then either
draw the new image in the window , use the drop-down list to select the
background image, or click the “…” button to browse the computer files for the
background image..
Note: For 1997 E&M coding you can choose the type of physical exam from the drop-down list.
Sevocity 5.0
Training Manual
11
Studies
You can customize the studies section to fit your needs. Either mark the desired options
in the Structured sub-section or use the Notes sub-section text field. To apply the studies
documentation from the last encounter click Last.
Assessment
To enter Assessments, click Add and either select an assessment from the list, or search
the master list. You can use the drop-down list to filter the list shown by category To
search, click Search Master List, enter either the assessment name in the text field or the
ICD-9 code in the code field, and click Search. Select the desired assessment.
From this section you can save an assessment to your favorites list or give it a new
description. You can also search the full list of assessments, create an uncoded
assessment, and enter severity, progression, and notes using the drop-down lists
available.
• To assess for chronicity, progression and severity choose from the drop down list
of options in each area.
• Assessments may also be removed, resolved or changed by selecting the
assessment and choosing the appropriate button. Resolved assessments are
marked by a black X, removed assessments with a red X. When you click
Change, the options are progression, severity. A note field is made available for
you to enter text.
Medications
To enter medications, click Add and select the medications from the Name drop-down
list, or click Search Master List to search for and select one. When entering medication
information, an indication can be linked to the medication.
• To enter prescription information, use the drop-down list in the Add Medication
window to select the appropriate choice. Sample documentation is also available
and the patient’s allergies and weight in lb/kg are displayed at all times.
• To remove, discontinue (D/C), or change a medication, select the medication and
click the relevant button. Removed medications are marked with a red X, D/Cd
medications with a black X.
• The Refill button allows you to document refill information on the selected
medication. The Transmit/Print Rx button allows you to electronically transmit
or print a prescription for the chosen medication.
• Prescribing a medication will send users an automatic alert about drug/drug and
drug /allergy interactions. To Transmit/Print and medication that interacts, users
will be required to override the interaction.
• A medication that is ready to be refilled or has been prescribed in the past will
have a Green RX before the medication name, medications that are ready for the
Transmit/Print function will have a Blue Rx before the medication name.
• An hourglass is found on the end of a medication, upon clicking this the transmit
information will be displayed.
Sevocity 5.0
Training Manual
12
Orders/Procedures/Referrals
To enter orders, click Add and either select an order from the shown list of favorites, or
search one of the master lists. You can use the Category: drop-down list to filter the
favorites list by category. To search one of the master lists, click either Search CPT
Master List or Search HCPCS Master List and either enter the name of the order in the
Text field or enter the CPT/HCPCS code in the Code field. Press Search and select the
order. Once selected, an order can be saved to your favorites list or given a new
description from this screen. You can also search the full list of orders or create an
uncoded order.
Orders reminders, modifiers, notes, indications, ordering provider and status of the order
can be entered by using the drop-down lists available in the Add Order screen.
The following can be performed from the Orders section:
• To delete an order, select the order and click Delete.
• To change the modifier, note, indication, ordering provider and status of the order
select the order and click Change.
• To print, select the order, click Print, enter a location if desired, then click Print
or Print Preview.
• To assign a task or route an order to a recipient, select the order and click Assign
Task/Route, select a task from the dropdown list of favorites or by adding text.
Select the name of who you would like to assign or route the task to.
• If an order is pending the Orders/Procedure tab will have a Green Flag attached
to it.
To add a referral to a patients chart, click Add, Referral Request will be the default
choice, enter the patients referral information from drop down lists or favorites lists and
click Add. Clicking on Show History will reveal the audit trail for this referral
To enter a procedure, click the Procedure sub-section. Document a signed consent form
by clicking the appropriate check box. Select the desired procedure name from the
Procedure Name drop-down list. Click Custom to enter a custom procedure name.
Narrative fields are available to enter a summary, findings, and an impression of the
procedure. Click Template to choose a template to pre-fill your note.
Immunizations
To enter child or adult immunizations, the patient age group will be defaulted in the sub
tabs.
• To enter adult immunization information, select the immunization, click Add, and
fill in the appropriate fields. Current or historic information may be entered.
• For historic immunizations, click the Historic check box in the Add
Immunization window and enter the date the immunization was given in the
Date field.
• If an immunization dose is not given, select a reason from the Dose Not Given
list.
Sevocity 5.0
Training Manual
13
•
•
•
•
•
•
The CDC schedule will be displayed on child immunizations. Click the button for
the desired immunization and fill in the appropriate fields. Current or historic
information may be entered.
• For historic immunizations, click the Historic check box in the Add
Immunization window and enter the date the immunization was given in the
Date field.
• If an immunization dose is not given, select a reason from the Dose Not Given
list, when doses are not given the button is displayed red. When doses are
given, the immunization button is yellow and the date will be displayed.
Immunizations that remain to be given are gray in color.
To edit the information for an immunization added in the current encounter, select
the immunization and make the necessary changes. To remove an immunization
entered in a past encounter, select the immunization and click Remove. To
remove an immunization given in the current encounter, select the immunization
and click Delete.
Immunization records may be printed for the chart or for patients, but only the
records for the chart contain the dose administration information.
Use the Immunization Up To Date check box to note when all indicated
immunizations are up-to-date in an encounter.
Click View to get a quick glance of all immunizations that have been
administered.
Click VIS to preview or print a vaccination information sheet outside of entering
an immunization.
Plan/Disposition
A narrative field is available for you to write a plan note. To enter disposition, patient
instruction information, and patient handouts, select the appropriate information from the
drop-down lists or click Custom to enter custom information. To change or delete
displayed information, simply select a plan, disposition, or instruction and click Change
or Delete.
Carbon Copy
Patient contacts and clinic contacts may be entered in this section by selecting them from
the drop-down lists. To enter a contact not in a list, click Custom Contact and enter the
appropriate information. The name of the referring provider from the HPI section of the
encounter will be carried forward to this section automatically, but it may be changed or
deleted. Just select the name of the provider and click the desired button. A narrative
Notes field is available for miscellaneous CC information.
Coding
This section must be completed in order to finalize an exam encounter. Mark the
Uncoded check box if no E&M code is necessary. Select a visit type from the Visit Type
drop-down list.
• To code the visit according to the amount of time spent with the patient, check the
Counseling and/or Coordination of Care check box, enter the amount of time
Sevocity 5.0
Training Manual
14
•
spent with the patient, and press Enter on your keyboard. An E&M code will be
provided and a modifier may be added.
To document the visit using History, Exam, and Medical Decision Making, you
will first need to choose between a brief or extended HPI. Coding tools have been
added to assist in this and other areas of the coding section. Click the ? button for
definitions of each option.
• If using 1997 guidelines, the exam area will be completed for you. If using the
1995 guidelines users will be asked to document whether a detailed exam was
completed.
• The Medical Decision Making area has three coding tools to help with
documenting your efforts.
• Once these areas are complete an E&M code is suggested by Sevocity. If a
provider chooses a higher code, the advisor screen will define the items
entailed in this code. Modifier, Secondary Code, Preventive Code, Adjunct
Code and Prolonged Services information may be entered using the dropdown lists. Attachments
Attachments
Users can import attachments into the encounter by clicking Add and choosing the
attachment to open.
Finalizing an Encounter
After opening the Note Display section to review your encounter, click Done, mark the
Finalize check box, and click Finalize.
• To route an unfinalized encounter, click Done, mark the Route check box, choose
the name of the person to route the encounter to from the To list, select the
Priority and Subject, and click Save and Route.
• To route a finalized encounter, mark both the Finalize and Route check boxes
and follow the steps for routing an encounter.
Note: Encounters cannot be finalized without an E&M code.
•
•
•
To create a template from an encounter, click Done and mark the Create new
template from new encounter data check box.
To co-sign a note, click Done, mark the Finalize check box and then mark the
Cosign check box. The co-sign statement will appear and the note can be
finalized or routed from this point.
To create a letter, click Done, mark the Finalize and Create Letter check boxes,
and click Finalize. Once the encounter is finalized, Sevocity will take you to the
letter tool.
Print
To print an encounter note at any time, click Print.
Sevocity 5.0
Training Manual
15
Set Date
To change the date of an encounter, click Set Date and enter a date.
Change Location
To change the location of an encounter, for example, if your organization has more than
one clinic, click Change Location and select a new location from the drop-down list.
Template
If a template has been customized to pre-fill a note, click Template and choose the
appropriate template from the list.
Note: once a template is applied, it cannot be removed**
Audit Trail
Select the Show Audit Trail check box in the Note Display section to view the detailed
audit trail documentation for each health team member.
Main
Users can log off, switch clinics, or exit Sevocity through this menu.
Sevocity 5.0
Training Manual
16
Tools
User preferences, administration functions, image/file import, blank note encounter, and
patient handout tools are located on this menu.
Preferences
Sevocity has clinic-specific and user-specific preferences, which are applied based on the
type of user access. The Preferences Tool is used to customize Sevocity to meet your
clinic documentation needs.
• User preferences allow each user to customize their Sevocity experience.
• Clinic preferences can only be set by administrative-level users. These allow
administrators to set up the clinic, flowsheets, contact list, vital alert parameters,
and clinic-wide form data, and to copy images to other users.
Note: See the customization handbook for further instructions on how to customize.
Image/File Import
To import images or files (scans) or files into Sevocity, select Tools > Image/File
Import. Click Add to open the Attachment Selection screen, browse and select the
image, and click Open. Click Select, search for a patient and click OK. Choose an
encounter type from the drop-down list. (This is a category assigned in the Past
Encounters section.) Choose the provider from the drop-down list, enter the clinical date
Sevocity 5.0
Training Manual
17
and time, click Add from Favorites List and select a summary, and click Store to
Chart.
To send images to another user for signature or to store to chart, select a user to route to
from the To dropdown list, select a Priority, enter a subject, and click Send Message.
To sign the image encounter click Sign. An image can be routed to another user can be
done from this area. The Reset Same Patient tab resets all fields but the patient name
remains. To import images or files to another patient, click Reset All and follow these
steps again.
Note: Images must be smaller than 300 Kb.
Blank Note Encounter
To create a note while an encounter is open, use the Blank Note Encounter tool. Select
Tools > Blank Note Encounter. Click Select to search for and select a patient, enter the
clinical date, select a location, enter a summary, and enter the narrative note. Click
Finalize to complete the encounter note or click Finalize and Route and follow the
required steps to finalize another encounter. Templates may also be used for a blank note
encounter by clicking Template, choosing the template, and clicking Apply.
Patient Handouts
To print a handout for the patient, select Tools > Patient Handouts. Select a handout
from the Summary list, review it in the Detail field and make changes if desired. Click
Print or Print Preview then click OK.
Reports
The Demographics report is found under this menu.
Demographics Report
To create a Demographics report, select Reports > Demographics. Select a gender, enter
Age From, enter Age To, choose years or months, and click Create Report or Export.
Create Report will open the report in .pdf format. Export creates a comma delimited
(Excel) file.
Help
The PDF User Guide, User Manual, Release Notes, Speed Test and information about
Sevocity (phone numbers and email address) are found under this menu.
Sevocity 5.0
Training Manual
18
Encounter Types
Blank Note
The Blank Note encounter has a Note section for narrative encounter entry, a Summary
section to identify the encounters contents, and Immunization and Note Display sections.
Historical
The Historical encounter contains the following sections; Note Display, Past History,
Allergies/Meds Hx, Assessments, and Immunization.
Procedure
The Procedure encounter contains the following sections; Note Display, HPI,
Allergies/Meds Hx, Vitals, Procedures, Studies, Assessments, Medications,
Orders/Referrals, Plan/Disposition, and Carbon Copy.
Telephone
The Telephone encounter contains the following sections; Note Display, HPI, Past
History, Allergies/Meds Hx, Pediatric, Review of Systems, Vitals, Studies, Assessment,
Medications, Orders, Immunizations, Plan/Disposition, Carbon Copy, and Coding. The
Sevocity clinic administrator may disable these sections.
Sevocity 5.0
Training Manual
19
Index
Chart ...................................................... 4
Chart Summary ................................. 5
Close Record ..................................... 8
Create Letter...................................... 7
Demographics ................................... 5
Export Chart ...................................... 7
Flowsheets/Labs ................................ 6
Health Guidelines.............................. 7
Immunizations................................... 7
Imported Documents ......................... 6
Medications/Assessments ................. 6
Past Encounters ................................. 6
Desktop ................................................. 1
Active Charts .................................... 2
Help ................................................... 4
Main .................................................. 4
Messages ........................................... 3
Overview ........................................... 1
Reports .............................................. 4
Scheduler........................................... 2
Tools ................................................. 4
Encounter .............................................. 9
Allergies/Meds Hx .......................... 10
Assessment ...................................... 12
Attachments .................................... 15
Carbon Copy ................................... 14
Coding ............................................. 14
Flowsheets/Labs .............................. 11
HPI .................................................. 10
Immunizations................................. 13
Medications ..................................... 12
Note Display ..................................... 9
Orders/Procedures ........................... 13
Past History ..................................... 10
Pediatric .......................................... 10
Physical Exam ................................. 11
Plan/Disposition .............................. 14
ROS ................................................. 10
Studies ............................................. 12
Templates .......................................... 9
Vitals ............................................... 11
Encounter Types ................................. 19
Blank Note ...................................... 19
Historical ......................................... 19
Procedure ........................................ 19
Telephone ........................................ 19
Finalizing an Encounter ...................... 15
Audit Trail ....................................... 16
Change Location ............................. 16
Print ................................................. 15
Set Date ........................................... 16
Template ......................................... 16
Help ..................................................... 18
Logging On to Sevocity ........................ 1
Main .................................................... 16
Reports ................................................ 18
Demographic ................................... 18
Tools ................................................... 17
Blank Note Encounter ..................... 18
Image Import ................................... 17
Patient Handouts ............................. 18
Preferences ...................................... 17