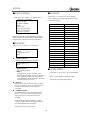
1
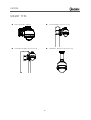
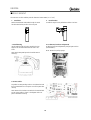
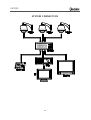
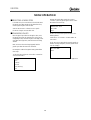
XSD27ZIR Day/Night 550/600 TVL IR Speed Dome Camera with 27x Optical Zoom, 50 Metres IR Night Vision & Power Supply USER MANUAL Please read this manual before you install or start using the XSD27ZIR Speed Dome XSD27ZIR CONTENTS FEATURES····································································· 3 CAMERA PARAMETERS··············································· 19 DECLARATION ······························································ 4 White Balance················································· 19 Precaution ························································ 4 BLC Mode······················································· 19 Warnings ·························································· 4 PAN/TILT PARAMETERS··············································· 20 INSTALLATION PREPARATION······································· 5 Auto Stop Time ··············································· 20 Tool List···························································· 5 Speed Amplify················································· 20 Cables ······························································ 5 Proportional P/T ·············································· 20 Dip Switch Setting············································· 5 Set North ························································ 20 MOUNT TYPE································································ 6 AUTO RUNNING ························································· 21 INSTALLATION GUIDE ··················································· 7 Preset ····························································· 21 Wall Mount······················································· 7 Tour································································ 21 Corner Mount ··················································· 8 Cruise ····························································· 22 Pole Mount····················································· 10 Pattern ··························································· 22 Pendent Mount ··············································· 11 Zone ······························································· 23 SYSTEM CONNECTION················································ 13 Park Time ······················································· 23 OPERATION INSTRUCTION ·········································· 14 Park Action ····················································· 23 Preheating Screen ··········································· 14 Boot-up Screen ··············································· 14 APPENDIX I: DIP SWITCH SETTING ······························ 24 Access Main Menu·········································· 14 Dip Switch Position ········································· 24 MENU OPERATION ····················································· 15 Protocol and Baud Rate Setting ······················· 24 Selecting Items················································ 15 Reset Button ··················································· 24 Changing Items··············································· 15 LEDs ······························································· 24 Editing Titles ··················································· 15 Dome Address Setting····································· 25 SYSTEM MENU ··························································· 16 Address Setting Chart ····································· 26 System Menu Options ····································· 16 Resistor Jumper Setting ··································· 29 Site info ·························································· 16 APPENDIX II: WIRE DIAMETER & Display Setup ·················································· 16 TRANSMISSION CHART ·············································· 30 Boot-up Screen ··············································· 17 APPENDIX III: RS485 BUS BASIC KNOWLEDGE ············ 31 Password ························································ 17 APPENDIX IV: TROUBLE SHOOTING····························· 32 Set Default······················································ 17 APPENDIX V: LIGHTNING & SURGE PROTECTION ········ 33 System Reboot ················································ 17 APPENDIX VI: WARRANTY ············································ 34 LENS PARAMETERS····················································· 18 Joystick AF/AI·················································· 18 AF Resume Time ············································· 18 AI Resume Time ·············································· 18 Day/Night ······················································· 18 2 XSD27ZIR FEATURES Product Features Day/Night Camera with 18x SRLEDs for an IR Multiple RS485 protocols range of 60m On-Screen Display can be customized to suit user Offers High Resolution 550/600 TVL images OSD Menu for Programmable Functions Sleek design for professional applications Variable Cruise Speed 0.1-150°/sec Cable Managed Bracket for external wall mounting Variable Pan/Tilt Speed Features System Preheat for use in low Vertical Tilt Unobstructed 0° to -90° temperature environments Auto Running Memory Against Power Outage Programmable Multi-protocol Features Auto Running for when the system is idle 360° continuous Pan, 180°Tilt “Auto Flip” On-Screen display for compass and tilt angle, 220 presets, ±0.1° preset accuracy 300°/s Pan/Tilt Preset Speed Designed for external wall mounting as supplied Can record up to 4 tours, each with up to 27 Pole Mount, Pendant Ceiling Mount and Corner System and environment temperature & fan status presets points Mount brackets also available Supports up to 4 patterns, 4 cruises, 8 titled zones which can be set to specific requirements Password Protection Power 24V AC Input Power Built in surge protection Limited lighting protection Power Consumption: 10VA (Heater OFF), 45VA (Heater ON) Fuse: 1.25A Operating Temperature Model Absolute Max Sustained Max Absolute Min Sustained Min XSD27ZIR 140°F (60°C) 122°F (50°C) -60°F (-51°C) -50°F (-45°C) Note: 1. Assume no wind chill factor 2. Prevents icing at sustained minimum of -50°F (-45°C) 3. De-ices 0.1 inch (2.5 mm) within 3 hours after power-up 3 XSD27ZIR TECHNICAL SPECIFICATIONS Image Sensor Image Resolution 1/4” Super HAD 550/600 TVL Lens Zoom Zoom Speed Angle of View 3.9 to 105.3mm 27x 3.9 to 6.3 seconds 1° to 60° Sync system Min. Illumination S/N Ratio Iris Internal/external 0 Lux with IR on >48db Auto/Manual White Balance Gain AE Control BLC Auto/Manual Auto Auto/Manual On/Off Privacy Mask Focusing system Video Output No Auto/Manual BNC Output DECLARATION This equipment generates, uses, and can radiate radio frequency energy and, if not installed and used in accordance with the instruction manual, may cause harmful interference to radio communications. Operation of this equipment in a residential area is likely to cause harmful interference in which case the user will be required to correct the interference at the user’s own expense. PRECAUTIONS: ♦ ♦ ♦ ♦ ♦ ♦ Only qualified and experienced person can carry out the installation. In many countries and areas licensed personnel is required Always take safety codes into consideration during installation. Use reliable tools only, poor quality tools may cause damage to both human and property Check the strength of all item onsite that are related to installation in advance. It is recommended that the stand of dome be 8 times stronger than the weight of the dome and its accessories. Keep all the original dome package materials in case of future repacking and transportation. Choose and install speed dome according to environment requirement (Refer to the Product Features). This product conforms to IP66 standard as specified in “Housing Protection Classification (IP code)”. WARNINGS: ♦ ♦ ♦ ♦ ♦ ♦ ♦ Avoid installing this speed dome in hazardous places where inflammable or explosive materials are stored or used. Indoor dome is not designed for outdoor environment. This speed dome runs on 24V AC. Connect to power only after completing installation. Disassemble can only be carried out by qualified personnel. Use soft towel to clean the down cover when necessary. Avoid using caustic detergent. Avoid aiming camera to strong light. 4 XSD27ZIR INSTALLATION PREPARATION TOOL LIST: Following tools may be needed for the installation: 1. 2. 3. 4. 5. 6. 7. Screws and nuts Philips screw driver Standard screw driver Wire scissors Ladder Drill Saw. CABLING: 8. 9. Video Coaxial Cable 75Ω impedance, 10. Solid copper wire, 11. 95% braided copper shield. Check the max transmission distance referring to the chart below. Cable Type Distance RG 59/U 750ft(229m) RG 6/U 1,000ft(305m) RG 16/U 1,5000ft(457m) 12. RS485 Cable 13. 0.56mm (24AWG) twisted pair wire DIP SWITCH SETTING See Appendix I: 14. 15. 16. 17. Protocol and Baud rate Dome address Video cable type Resistor jumper 5 XSD27ZIR MOUNT TYPE W A L L M O U N T (supplied) P O L E M O U N T (optional accessory) C O R N E R M O U N T (optional accessory) P E N D A N T M O U N T (optional accessory) 6 XSD27ZIR INSTALLATION GUIDE ■ WALL MOUNT Check to make sure the wall surface is firm and does not flake off. The wall must be able to withstand 8 times weight of the dome and its fixtures. . 1. Mark mounting position 2. Install bracket. Use bracket to mark the mounting position on wall Feed all cables through the hole of bracket, and fix the bracket on the wall 3. Install housing 4. Set dome ID, baud rate and protocol Feed the cables through the hole on top of the housing. Align the dome casing to the bracket and fix with 2 M5 screws as shown. Set dome ID, bard rate and protocol by configuring DIP switches (see APPENDIX I). NOTE: Remove the packing sponges NOTE: Apply water-proof tape to the thread when mounting externally 5. Connect cables. Plug cables into corresponding sockets on circuit board. Reinstall the circuit board and turn on the power. Turn off the power after checking. NOTE: Names of the interfaces are marked on the terminal block or PCB. Connect cables as shown in the diagram. Make sure power is off before connecting. 7 XSD27ZIR 6. Install black liner and Pan/Tilt Module 7. Install down cover Unscrew the two M4 screw on down cover ring. Push up the down cover into the housing and then fasten down cover with two M4 screws. NOTE: Apply lube to the O-ring for external mounting ■CORNER MOUNT Check carefully to make sure the wall is firm and does not peel off. It is required that the wall can withstand 8 times weight of the dome set. 1. Mark the fastener positions. 2. Install base. Use the corner mount base as the template to mark the mounting positions on wall. Feed the Power/RS485 Video cables through the hole of corner mount base and use M8 nuts to fasten corner base on the mounting surface. NOTE: Put cables through the wall of aside the corner base 3. Install bracket. 4. Install housing Put cables through the cavity of bracket and fasten bracket on base Feed the cables through the hole on top of the housing. Align the dome casing to the bracket and fix with 2 M5 screws as shown. NOTE: Apply water-proof tape to the thread in the case of outdoor dome 8 XSD27ZIR 5. Set dome ID, baud rate and protocol Set dome ID, bard rate and protocol by configuring DIP switches (see APPENDIX I ). NOTE: Remove the packing sponges 6. Connect cables. Plug cables into corresponding sockets on circuit board. Reinstall the circuit board and turn on the power. Turn off the power after checking. NOTE: Names of the interfaces are marked on the terminal block or PCB. Connect cables as shown in the diagram. Make sure power is off before connecting. 7. Install black liner and Pan/Tilt Module 8. Install down cover Unscrew the two M4 screw on down cover ring. Push up the down cover into the housing and then fasten down cover with two M4 screws. NOTE: Apply lube to the O-ring for external mounting 9 XSD27ZIR ■POLE MOUNT The Pole mount can be installed on pole with diameter of 130 to150mm ( 5.12” to 6”) 1. Install base. 2. Install bracket. Feed the Power/RS485/ Video cables through the central hole of the bracket base, and then fix it to the pole Put cables through the cavity of bracket and fasten it on base. 3. Install housing 4. Set dome ID, baud rate and protocol Conduct cables through the hole on top of the housing. Align the fast connector to bracket and fix with 2 M5 screws. Set dome ID, bard rate and protocol by configuring DIP switches (see APPENDIX I ). NOTE: Remove the packing sponges NOTE: Apply water-proof tape to the thread for external mounting 5. Connect cables. Plug cables into corresponding sockets on circuit board. Reinstall the circuit board and turn on the power. Turn off the power after checking. NOTE: Names of the interfaces are marked on the terminal block or PCB. Connect cables as shown in the diagram. Make sure power is off before connecting. 10 XSD27ZIR 6. Install black liner and Pan/Tilt Module 7. Install down cover Unscrew the two M4 screw on down cover ring. Push up the down cover into the housing and then fasten down cover with two M4 screws. NOTE: Apply lube to the O-ring for external mounting ■PENDENT MOUNT For low ceiling installations, dome can be mounted directly into the base flange. 1. Mark the mounting position. 2. Install base. Use the bracket base to mark the fastener positions on ceiling. Feed the cabling through the central hole of the bracket base, and then fix it on ceiling. NOTE: Put silica gel along the top of bracket base for external mounting 3. Install suspender. 4. Install housing. Feed the cabling through the cavity of suspender, and then turn the threaded pipe head into the bracket base and fasten the connection with a M5 screw. Feed cables through the top hole of the housing, and then turn the housing thread pipe head into suspender and fasten the connection with two M5 screws NOTE: Apply waterproof tape to the thread and put silica gel to the suspender for external mounting. NOTE: Apply waterproof tape to the thread for external moutning. If installation height is not high enough, mount housing directly into the base. 11 XSD27ZIR 5. Set dome ID, baud rate and protocol Set dome ID, bard rate and protocol by configuring DIP switches (see APPENDIX I). NOTE: Remove the packing sponges 6. Connect cables. Plug cables into corresponding sockets on circuit board. Reinstall the circuit board and turn on the power. Turn off the power after checking. NOTE: Names of the interfaces are marked on terminal block or PCB. Connect cables as picture shows. Make sure power is off before connecting 7. Install black liner and Pan/Tilt Module 8. Install down cover. Unscrew the two M4 screws on down cover ring. Push up the down cover into the housing and then fasten down cover with two M4 screws. NOTE: Apply the lube to the O-ring in the case of outdoor dome 12 XSD27ZIR SYSTEM CONNECTION 13 XSD27ZIR OPERATION INSTRUCTIONS The Speed Dome can be controlled through combination of hot keys on a keyboard controller. It can also be controlled through the OSD menu. The OSD menu can be activated by preset #95 call or double calling preset 1 (call twice within 5 seconds). Preset calling can be done through a keyboard controller or any other device (e.g. a computer) that can send commands to the speed dome. OSD menu operations are specified as follow: ■PREHEATING SCREEN When power on the dome and system temperature is under -15C/5F,following screen shows up: <Baud Rate> Dome control baud rate Outer Temp: -030C/-022F System Temp: -020C/-004F Fan Speed: 6480rpm System Under -15C/5F System Heating Up Please Wait… <Camera ID> The dome ID address set by dip switch or keyboard. (See APPENDX I) <Camera S/N> Camera serial number. The system will heat up until the system temperature is above -15C/5F. System starts to boot up after heating up finishes. < Outer Temp > Environment temperature XXC/XXF C: ° Celsius; F: ° Fahrenheit < System Tem > System inner temperature < Fan Speed > The rotating speed of the fan. Speed dome model number When power on or restart the dome, the boot up information will display on screen and then the dome will begin self-testing. “System booting up…” will show on the screen until “boot-up success” shows up. The whole boot up process lasts about 40 seconds. This screen display disappears once the dome receives any effective command. ■ACCESSING MAIN MENU Display the dome’s main menu on your monitor by calling preset 95 or calling preset 1 twice within 5 seconds. Note: For third party keyboard controllers please read user manuals as command to a preset may not be the same among different manufacturers. : Ernitec : 4800BPS : 001 : 8888888888 : ------------: 8.01 :022C/071F :027C/080F Booting Up… … <Version> Hardware and software version Protocol : Ernitec Baud Rate : 4800BPS Camera ID : 001 Camera S/N : 8888888888 Model : ------------Version : 8.01 Outer Temp :022C/071F System Tem:027C/080F Bootup Success ■BOOT-UP SCREEN Protocol Baud Rate Camera ID Camera S/N Model Version Outer Temp System Tem <Model> <Protocol> Dome control protocol. 14 In case password protection is in effect, input the correct 6-bit password to enter the OSD menu. (Default password is 123456). To enter password, move the joystick up or down to select number (0-9), move the joystick left or right to choose password the digits. If the input password is wrong, the password input window will disappear. The OSD menu will close automatically after 1 minute without any operation. All the settings will be saved automatically to protect against power outage. XSD27ZIR MENU OPERATION 2. Move the joystick down to point the cursor to <Camera >, move the joystick right to select it. Select BLC MODE in the same way ■SELECTING A MENU ITEM In the main menu, the cursor flashes on the left side. Move the joystick up or down to point to the desired item. Then, move the joystick right to select the item. White Blance: Auto BLC Mode Back Select an item to enter its sub menu or run a specific function or change its value or edit its title. ■CHANGING VALUES NOTE: In this manual menu paths are written in the following format: Move the joystick up or down to change the value, move the joystick left to save the setting and exit. In the case of multiple digits value, move left or right to select digits, move up or down to change value, move left to save the setting and exit. <Main Menu> <Camera > <BLC Mode> <BLC Level> 3. The <BLC Level> option blinks. Move the joystick up or down to change the option, move the joystick left to save the changing. Note: To increase the value changing speed, hold the joystick up or down for more than 10 seconds. BLC Level: 000 Back For example: In order to change BLC LEVEL, please follow these steps: 1. Call preset 95 or call preset 1 twice within 5 seconds to access the Main Menu. When finished, select <Back> to return to upper menu. System Lens Camera Pan/Tilt Auto Running Exit 15 XSD27ZIR SYSTEM MENU move joystick up or down to select desired ID number. Move the joystick left to save the settings. ■SYSTEM MENU OPTIONS <Main Menu> <System > Site Info Display Setup Bootup Screen Password Set Default System Reboot Back <Name> refers to the title of the dome. Assign a dome name to remember which dome it is. <Site Info> Dome ID, name, broadcast address. <Display Setup> Screen display <Bootup Screen> Display boot-up information <Password> Change password <Set Default> Restore factory default settings <Reboot System> Reboot dome system Select BACK to return to upper menu. ■DISPLAY SETUP <Main Menu> <System > <Display Setup> Site Name: On Preset Title: On Cruise Title: On Pattern Name: On Orientation: On Zone Name: On Cross Curser: On/Off Back ■SITE INFO The on screen display can be customized using this menu. <Main Menu> <System > <Site Info> Site ID: 007 Name: Is Bond Broadcast Add: 255 Back <Site ID> Shows the current dome’s ID. Each dome has its unique ID. ID ranges from 001 to 254. NOTE: <Site ID> can be set by menu only when DIP switch is set to ‘programmable ID’. Move the cursor to <Site ID> and then move the joystick right to enter dome ID setting, sub-menu as follow. Site S/N :8888899999 Input S/N:0000000000 Back Move the cursor to <Input S/N> then move the joystick right, input the serial number according to the <Site S/N>, and then move the joystick left to exit setting. Go to <Back>, and move joystick right to exit. Finally, 16 <Broadcast Add> Used to set the broadcast ID number. The ID functions the same as dome’s site ID, default setting is 255. The dome responds to commands sent to either ID. Refer to <Changing Values> to learn how to set the broadcast address) SYSTEM INFO includes following settings. <Name> <Site Name> Choose to display the site name <Preset Title> Choose to display cruise title when the dome is in cruise mode <Cruise Title> Choose to display preset title when calling preset <Pattern Name> Choose to display pattern title when the dome is replaying pattern sequences <Orientation> Choose to display the current lens pointing direction <Zone Name> Choose to display the current zone title Select BACK to return to upper menu. XSD27ZIR ■ BOOT-UP SCREEN ■SET DEFAUT <Main Menu> <System Info> <Set Default> <Main Menu> <System > <Bootup Screen> Select <Set Default> to restore factory default settings. List of Default Settings: Camera S/N : 8888888888 Camera ID : 001 Baud Rate : 9600bps Model : ………… Version : 8.01 Outer Temp :022C/071F System Tem:027C/080F Call Preset 1 To Back Item Zoom Speed AI/AF Resume Mode AF Resume Time AF Resume Time Iris ALC Iris PlC Day/Night all display config Frame Limit Shutter Exposure White Balance BLC Level Speed Amplify Proportional P/T Pswd Protection Park Time Park Action Arm/Disarm Reset Delay Bootup screen displays summary information of the dome. Values are fixed in this sub-menu. Refer to “Bootup Screen” to check the item. Call preset 1 to return to upper menu. ■ PASSWORD <Main menu> <System > <Password> Input Password:****** Confirm :****** PSWD Protection: On Back <Input Password> Move the joystick right to enter submenu. Old Password:****** Back • < Old Password > Enter the old password. • < Back > If old password is correct, cursor goes back behind <Input Password>, so that new password can be inputted. If old Password is not correct, cursor goes back to <Input Password>. Password cannot be changed in this case. Default Value High Both 005 005 084 016 Auto Off 1/25 Off Off Auto 000 Off On Off Off Off Disarm 004 ■SYSTEM REBOOT <Main Menu> <System > <System Reboot> Select <System Reboot> to reboot the dome. Settings will not change after restarting. <Confirm> When and only when the new password is entered, can the user get to this menu. If the password is not the same as entered the first time, it remains unchanged. < PSWD Protection> Password protection can be switched on and off. When it is <On> user need to enter password to access main menu or save preset through the keyboard. NOTE: The dome’s default password is 123456. Contact the supplier for the master password if the password is forgotten after changing it. Select BACK to return to upper menu 17 XSD27ZIR LENS PARAMETERS MENU ■ AI RESUME TIME ■ LEN MENU OPTIONS <Main Menu> <Lens> <Main Menu> <Lens> <AI Resume Time> Joystick AF/AI : Both AF Resume Time: Off AI Resume Time : Off Day/Night : Auto Back Light goes through the iris and reaches the CCD to form an image. A larger iris lets more light go through and the image will be brighter. The Iris can be controlled automatically or manually. For manual operation detail, please refer to keyboard or matrix manual. [Off] Never restore auto iris after switch to manual. [001-255] The dome will start Auto Iris this number of seconds after user manually adjusts the iris ■ JOYSTICK AF/AI ■ DAY/NIGHT <Main Menu> <Lens> <Joystick AF/AI> <Main Menu> <Lens> <Day/Night> Set automatic restore mode. When the joystick moves, the selected function will be triggered. Set the dome color/mono-chrome switching mode. Color mode is suitable to work in daytime because it needs higher illumination. Light sensitivity of mono mode is much higher. It is suitable to work at night without illumination but the video is black and white. Options are: [Both] Joystick movement triggers both auto focus and auto iris (default). [Focus] Joystick movement triggers auto focus only. [Iris] Joystick movement triggers auto iris only. [None] Joystick movement triggers none of the functions. <Auto> The dome will automatically change modes according to the environment illumination. (Default setting) <Night> The dome will always be in monochrome mode. ■ AF RESUME TIME <Main Menu> <Lens> <AF Resume time> NOTE: Iris ALC, Iris PLC, Day/Night works only for limited model of camera module. Please check specification. System defaults to Auto Focus mode, which automatically adjusts the focus to get the clear image. Focus can also be manually controlled by keyboard or matrix. For manual operation details, please refer to keyboard or matrix operation manual. This item sets the time to restore auto focus after focus is manually changed. The default setting is 005. [Off] Never restore auto focus after switch to manual. [001-255] The dome will start auto focus this number of seconds after user manually adjusts the focus. NOTE: The camera may not be able to auto focus in the following circumstances: Target is not in the center of image. Near and far targets in the same picture cannot be both clear. Target is a strong light object. Such as spotlight etc. Target is behind the glass with water drop or dust. Target moves too fast. Large area target such as wall. Target is too dark or vague. <Joystick AF/AI> is set None or <Joystick AF/AI> is set [Iris], and Auto Focus is set to [off]. 18 XSD27ZIR CAMERA PARAMETERS MENU ■ CAMERA MENU OPTIONS ■ BLC MODE <Main Menu> <Camera> <Main Menu> <Camera> <BLC Mode> White Balance: Auto BLC Mode Back R Gain (000-255), Adjusts RED color depth. B Gain (000-255), Adjusts BLUE color depth. If the backlight is bright, the objects in the center of the picture may appear dark. The dome can auto adjust the brightness of the whole image according to the brightness of center point. Thus backlight compensation can increase the brightness of the objects in the center of the picture. ■ WHITE BALANCE <Main Menu> <Camera> <White Balance> White balance is normally compensated for by the automatic white balance gain control. In some lighting conditions, user may want to manually adjust the red and blue settings for optimal viewing. If the backlight is too dark, the object on the center of the picture may appear dark. So, backlight compensation can decrease the brightness of the object. The setting options are: [Auto] Auto White Balance (default setting). [Manual] Manually set the red and blue values. Move the joystick right to enter the manual setting. The following window will appear. Select BLC MODE and the editing menu will pop up. [000] Disables backlight compensation function. [001-255] Choose a different backlight compensation level. The greater the value means more backlight compensation will be set. WB-R : 000 WB-B : 000 Back BLC Level: 000 Back [R Gain (000-255)] Adjusts RED color depth [B Gain (000-255)] Adjust BLUE color depth 19 XSD27ZIR PAN/TILT PARAMETERS ■ PROPORTIONAL P/T ■ PAN TILT MENU OPTIONS <Main Menu> <Pan/Tilt> <Main Menu> <Pan/Tilt> <Proportional P/T> The dome moves at a speed of certain degree per second. Objects on screen move much faster in wide scope than in tele-scope. Even too faster in some case. This function decreases the dome movement speed while zooming in. Auto Stop Time : Off Speed Amplify : Off Proportional P/T: Off Set North Back [On] Enable (default setting) [Off] Disables this function ■ SET NORTH ■ AUTO STOP TIME <Main Menu> <Pan/Tilt> < Set North > <Main Menu> <Pan/Tilt> <Auto Stop Time> User can set orientation on screen by using joystick to position north. For some particular protocols, the dome will not stop moving even there is no operation on joystick. This menu item sets the time after which the dome receives last control command. [Back] Select to go back to the main menu. NOTE: It is recommended that the camera is set to geographic north. [Off] Disables this function (default setting) [001~255] The time (unit : 50ms) after which the speed dome will stop moving without receiving any commands. ■ SPEED AMPLIFY <Main Menu> <Pan/Tilt> <Speed Amplify> Some protocols’ controlling speed is much lower, set [Speed Amplify] to accelerate the speed dome’s movement. Options are as below: [Off] Disable this function (default setting) [01× ~ 32×] x Times greater than the original speed 20 XSD27ZIR AUTO RUNNING ■ AUTO RUNNING MENU OPTIONS Call Preset 1 To Confirm………. <Main Menu> <Auto Running> Move the camera to the desired position and zoom to a suitable level, call preset 1 to save the current preset. Preset Tour Pattern Cruise Zone Park Time: Off Park Action: Off Back <Remove Current> Select this to delete the preset with the number and title displayed above. <Back> Select to go back to the upper menu. ■ TOUR ■ PRESET <Main Menu> <Auto Running> <Tour> Tour Number : 001 Dwell: 001 Edit Test Run Back <Main Menu> <Auto Running> <Preset> Preset Number : 001 Title: PRE1 Set Current Test Current Test Next Remove Current Back A ‘tour’ is a sequence of presets. When running a tour the camera moves from preset to preset and will dwell for a specific time for each preset. It is useful if you need to repeat switching among a number of presets. E.g. A shopping mall has several entrances. A tour can automatically loop the position of each entrance. ‘Preset’ is the point that user save for frequent use. A ‘preset’ saves both direction and zoom parameter, the camera will quickly and precisely go and zoom to a specific point if a ‘preset’ is called. E.g. If you often want to watch the door, you can set the point of door as a ‘preset’, then you can quickly monitor the door simply by calling the ‘preset’. NOTE: 4 tours can be set in the system. Each tour can contain up to 27 presets. The dwell time for each preset is independent. <Tour Number> Displays the current tour number. Values can be set to 001~004. NOTE: 220 presets can be set. <Preset No> Displays the current preset number. The value ranges from 001 to 220. Move the joystick up or down to select desired number. <Dwell> Sets the default dwell time in seconds for each preset. Values can range from 0~99 seconds. <Title> To set the current preset title. Move the joystick right to enter <Title>, then move joystick right to desired bit and move the joystick up or down to select the letters you require. For example, DEFAULT DWELL: 001, all presets’ dwell time is set as 1 second, but user can still set independent dwell times for each preset in the <Edit> menu. NOTE: You can input a maximum of 16 letters. If you are not familiar with the editing, please refer to ‘Operating Instructions’. <Setting> Select this item to set the preset position and zoom. The following menu will pop up when <Set Current> is selected: 21 XSD27ZIR <Edit> Edit presets and corresponding dwell times in a tour as follows: NOTE: If the speed dome has been zoomed in and <Cruise> is selected, the camera will keep that zoom throughout the camera’s movement. The speed dome has a maximum of 4 cruise lines. Preset-Dwell 001-001 002-004 003-002 004-001 000-001 000-001 000-001 000-001 000-001 000-001 000-001 000-001 000-001 000-001 000-001 000-001 000-001 000-001 000-001 000-001 000-001 000-001 000-001 000-001 000-001 000-001 000-001 <Cruise Number> Displays the current auto scan number. The value can be set to 001~004. Move the joystick right, then up or down to select values. <Left Position> Select to set the position of site A. The following menu will pop up. Save And Back Cancel And Back The format for the information is displayed as: Preset number-Dwell time Call Preset 1 To Confirm… For example 003-02 means go to preset 003 and dwell for 2 seconds. Move joystick left or right to select editing item. Move up or down to change the value. Move the camera to the desired position and call preset 1 to save. In the above example the tour starts from preset 1 dwells for 1 second, then goes to preset 2 dwell for 5 seconds, then preset 3 for 2 seconds and finally preset 4 for 1 second. <Right Position> Select to set the position of site B. Set it in the same way as <Left Position>. <Save and Back> Save the tour and exit <Cancel and Back> Quit without saving <Cruise Speed> Select to set the scanning speed (camera movement speed). Values can be set ranging from 001 to 255, the greater number represents the higher speed. Move joystick right to select, up or down to change the value. NOTE: When a preset dwell time is set 0, system will skip that preset. System will consider preset 0 as the end of a tour. <Run> Start the current auto scan (001~004) NOTE: No delete function applied to tour, edit it again to replace the previous data. <Back> Select to go back to the upper menu. <Test> Select to run the current tour once. Use this function to check the tour. ■ PATTERN <Main Menu> <Auto Running> <Pattern> <Run> Select to run the current tour continuously. The system will loop the tour. Pattern Number: Record Test Run Back <Back> Select to go Back to the upper menu. ■ CRUISE 001 Pattern is a replay of recorded irregular pan/tilt/zoom movements. It is useful when repeating variable speed movement of the pan/tilt/zoom. <Main Menu> <Auto Running> <Cruise> Cruise Number : 001 Left Position Right Position Default Speed: 001 Run Back Note: There can be as many as 4 patterns recorded, each no more than 3 minutes. <Pattern Number> Displays the pattern number, value options are 001~ 004. The dome camera can pan from one left point to right point and then pan back. NOTE: Camera pans only. 22 XSD27ZIR <Record> Select to Record a pattern. The following menu will pop up. Call Preset 1 To Confirm… Move to the desired point and call preset 1 to confirm. Call Preset 1 To Confirm… X/100 <Pan Speed> Select to set the pan speed (camera movement speed). Values can range from 001 to 255, the greater number represents the higher speed. Move the joystick right to select, then up or down to change value. The user can operate the dome with pan/tilt/zoom movements as needed. The system will record the pattern ofRecord…….. movement. To end recording user can call preset 1 to confirm and save the recording. <Run> Select to start scanning the current zone set. <Test> Select to Test the recorded pattern <Back> Select to go back to the upper level menu <Run> Select to run the Pattern until another command is received ■ PARK TIME <Main Menu> <Auto Running> <Park Time> <Back> Select to go back to the upper level menu This function lets the system automatically run an assigned function after a specific period of idle time. For example: if the dome is running a tour and an operator breaks the tour to do other work, the dome can automatically carry on the tour within a period of time after the operator stops the break. ■ ZONE <Main Menu> <Auto Running> <Zone> Zone Number: 001 Title: 000000000000000 Left Limit Right Limit Remove Current Pan Speed:001 Run Back Park time is a period of idle time without any operation. [Off]: Disable this function. [001~255]: Auto runs the <Park Action> after this number of seconds of idle time. ■ PARK ACTION <Main Menu> <Auto Running> <Park Action> A zone is an area between two points. The user can set a zone and scan it automatically. Park action refers to the function that system will automatically run when ‘park time’ is up. <Zone> is similar to <Cruise> except that the user can assign a title for a ZONE. Whenever the camera moves into the zone, the title will display on the screen to alert the operator. [Off] Disable this function [Pre 001~220] Call preset 001~220 [Scan 001~004] Run auto scan 001~004 [Tour 001~004] Run tour 001~004 [Pat 001~004] Run pattern 001~004 NOTE: Camera scans horizontally only. User can set up to 8 zones. <Zone Number> Displays current zone number. Values can range from 001~008. Move the joystick right then up or down to select desired value. Preset Tour Pattern Cruise Zone Park Time: 010 Park Action: Pat 001 Back <Title> Select to set the zone title. <Left Limit> / <Right Limit> Set the position of the first and second point. The following menu will pop up: In this example, the system will run Preset 8 after 38 seconds of ‘idle’ time. 23 XSD27ZIR APPENDIX I: DIP SWITCH SETTINGS This is the guide for setting protocol, baud rate, dome address, video cable type and resistor jumper. DIP Switch position The corresponding Dip Switch positions are shown below: Switch Num ber Protocol 1 2 3 4 5 6 ERNITEC YAAN ON ALEC PELCO_PD ON ON ON PELCO_C VCL ON ON MOLYNX VICON ON ON ON ON ON ON DIAMOND KALATEL ON ON HUNDA Protocol and Baud Rate setting LILIN PELCO_PDC 〓 1 2400 4800 9600 19200 〓 2 ON ON UNIVISIONV2 ON ON ON ON ON ON ON ON ON ON UNIVISIONV1* Default setting is 4800 bps. Baud Rate ON SANTACHI SW1 is for protocol and baud rate settings. Bits 1~6 of SW1 are for protocol setting and bits 7~8 are for baud rate setting as shown in the chart below Switch Digits 〓 〓 〓 〓 3 4 5 6 ON ON ON ON ON AD* ADT 〓 7 〓 8 PANASONIC OFF OFF PHILIPS* ON OFF Reserved4 OFF ON ON ON Reserved5 Reserved6 Reserved7 Reset Button Reserved8 This button is for resetting the dome after changing the dipswitch setting. The new setting works only after reboot finishes. Reserved9 LEDs Reserved12 Reserved10 Reserved11 Reserved13 The flashing Green light means the control commands have reached the dome. The Red light is on when effective command is received. Reserved14 Reserved 15 This Speed Dome supports multi-protocol. The settings are shown in the chart opposite. 24 ON ON ON ON X X ON X X X ON 7 8 XSD27ZIR Dome Address Setting The control commands contain target dome’s ID. The dome only reacts to the command sent to its own address or broadcast address. Each dome should be assigned an address. Four kinds of IDs are applicable for domes: 1. Hard ID: Hard ID is set via DIP SW2 cannot be changed from OSD menu. Hard ID ranges from 1 to 254. 2. Programmable ID: Set all 8bits of SW2 to ON to activate soft address. Input 10-bit camera SN number, and then set dome ID by controller (The dome SN number can be found on the side of the camera or on the package and user manual). 3. Broadcast ID: The Broadcast ID is programmable. When the broadcast ID is available, all domes connected to the control bus will react to the command. The default broadcast ID is 255. 4. SW2 ID: SW2 is for Dome ID setting. The setting is strictly according to binary system. If you are not familiar with binary system please look up the address setting chart (shown on the next page). 25 XSD27ZIR 4. Address setting chart ID B1 1 2 3 4 5 6 7 8 9 10 11 12 13 14 15 16 17 18 19 20 21 22 23 24 25 26 27 28 29 30 31 32 33 34 35 36 37 38 39 40 41 42 43 44 45 46 47 48 49 50 51 ON Soft Add ON B2 ON ON ON ON ON ON ON ON ON ON ON ON ON ON ON ON ON ON ON ON ON ON ON ON ON ON ON ON ON ON ON ON ON ON ON ON ON ON ON ON ON ON ON ON ON ON ON ON ON ON ON ON ON ON ON ON ON ON ON ON ON ON ON ON ON ON ON ON ON ON ON ON ON ON ON ON ON ON ON ON ON ON ON ON B7 B8 ID 52 53 54 55 56 57 58 59 60 61 62 63 64 65 66 67 68 69 70 71 72 73 74 75 76 77 78 79 80 81 82 83 84 85 86 87 88 89 90 91 92 93 94 95 96 97 98 99 100 101 102 ON ON ON ON ON ON ON ON ON ON ON ON ON ON ON ON ON ON B6 ON ON ON ON ON ON ON ON ON ON B5 ON ON ON ON ON ON B4 ON ON ON ON B3 ON ON ON ON ON ON ON ON ON ON ON ON ON ON ON ON ON ON ON ON ON ON ON Soft Add ON 26 B1 B2 B3 ON ON ON ON ON ON ON ON ON ON ON ON ON ON ON ON ON ON ON ON B4 B5 B6 ON ON ON ON ON ON ON ON ON ON ON ON ON ON ON ON ON ON ON ON ON ON ON ON ON ON ON ON ON ON ON ON ON ON ON ON ON ON ON ON ON ON ON ON ON ON ON ON ON ON ON ON ON ON ON ON ON ON ON ON ON ON ON ON ON ON ON ON ON ON ON ON ON ON ON ON ON ON ON ON ON ON ON ON ON ON ON ON ON ON ON ON ON ON ON ON ON ON ON ON ON ON ON ON ON ON ON ON ON ON ON ON ON ON ON ON ON ON ON ON ON ON ON ON ON ON ON ON ON ON ON ON ON ON ON ON ON ON ON ON ON ON ON ON ON ON ON ON ON ON ON ON ON ON ON ON ON ON ON ON ON ON ON ON ON ON ON ON ON ON ON ON ON ON B7 B8 ON XSD27ZIR ID B1 B2 B3 103 104 105 106 107 108 109 110 111 112 113 114 115 116 117 118 119 120 121 122 123 124 125 126 127 128 129 130 131 132 133 134 135 136 137 138 139 140 141 142 143 144 145 146 147 148 149 150 151 152 153 154 ON ON ON Soft Add ON ON ON ON ON ON ON ON ON ON ON ON B4 ON ON ON ON ON ON ON ON ON ON ON ON ON ON ON ON ON ON ON ON ON ON B6 B7 ON ON ON ON ON ON ON ON ON ON ON ON ON ON ON ON ON ON ON ON ON ON ON ON ON ON ON ON ON ON ON ON ON ON ON ON ON ON ON ON ON ON ON ON ON ON ON ON ON ON ON ON ON ON ON ON ON ON ON ON ON ON ON ON ON ON ON ON ON ON ON ON ON ON ON ON B5 ON ON ON ON ON ON ON ON ON ON ON ON ON ON ON ON ON ON ON ON ON ON ON ON ON ON ON ON ON ON ON ON ON ON ON ON ON ON ON ON ON ON ON ON ON ON ON ON ON ON ON ON ON ON ON ON ON ON ON ON ON ON ON ON ON ON ON ON ON ON ON ON ON ON ON ON ON ON ON ON ON ON ON ON ON ON ON ON ON ON ON ON ON ON ON ON ON ON ON ON B8 ON ON ID B1 B2 155 156 157 158 159 160 161 162 163 164 165 166 167 168 169 170 171 172 173 174 175 176 177 178 179 180 181 182 183 184 185 186 187 188 189 190 191 192 193 194 195 196 197 198 199 200 201 202 203 204 205 206 ON ON Soft Add ON 27 ON ON ON ON B3 B4 B5 ON ON ON ON ON ON ON ON ON ON ON ON ON ON ON ON ON ON ON ON ON ON ON ON ON ON ON ON ON ON ON ON ON ON ON ON ON ON ON ON ON ON ON ON ON ON ON ON ON ON ON ON ON ON ON ON ON ON ON ON ON ON ON ON ON ON ON ON ON ON ON ON ON ON ON ON ON ON ON ON ON ON ON ON ON ON ON ON ON ON ON ON ON ON B6 ON ON ON ON ON ON ON ON ON ON ON ON ON ON ON ON ON ON ON ON ON ON ON ON ON ON ON ON ON ON ON B8 ON ON ON ON ON ON ON ON ON ON ON ON ON ON ON ON ON ON ON ON ON ON ON ON ON ON ON ON ON ON ON ON ON ON ON ON ON ON ON ON ON ON ON ON ON ON ON ON ON ON ON ON ON ON ON ON ON ON ON ON ON ON ON ON ON ON ON ON ON ON ON ON ON ON ON ON ON ON ON ON ON ON ON ON ON ON ON ON ON ON ON ON ON ON ON ON ON ON ON ON ON ON ON B7 ON XSD27ZIR ID B1 B2 B3 B4 207 208 209 210 211 212 213 214 215 216 217 218 219 220 221 222 223 224 225 226 227 228 229 230 ON ON ON ON Soft Add ON ON ON ON ON ON ON ON ON ON ON ON ON ON ON ON ON ON ON ON ON ON ON ON ON ON ON ON ON ON ON ON B5 ON ON ON ON ON ON ON ON ON ON ON B7 B8 ID B1 B2 B3 ON ON ON ON ON ON ON ON ON ON ON ON ON ON ON ON ON ON ON ON ON ON ON ON 231 232 233 234 235 236 237 238 239 240 241 242 243 244 245 246 247 248 249 250 251 252 253 254 ON ON ON ON ON ON ON ON ON ON ON ON ON ON ON ON ON ON ON ON ON ON ON ON ON ON ON ON ON ON ON ON ON ON ON ON ON Soft Add ON ON ON ON ON ON ON ON ON ON ON ON ON ON ON ON ON ON B6 ON 28 B5 B6 B7 B8 ON ON ON ON ON ON ON ON ON ON ON ON ON ON ON ON ON ON ON ON ON ON ON ON ON ON ON ON ON ON ON ON ON ON ON ON ON ON ON ON ON ON ON ON ON ON ON ON ON ON ON ON ON ON ON ON ON ON ON ON ON ON ON ON ON ON ON ON ON ON ON ON ON ON ON ON ON ON ON ON ON ON ON ON ON ON ON ON ON ON ON ON ON ON ON ON ON ON ON ON ON ON ON ON ON ON ON ON ON ON ON ON ON ON ON ON ON B4 ON ON ON ON ON ON ON ON ON ON ON ON ON ON ON ON ON ON ON ON ON ON ON ON ON ON XSD27ZIR Resistor Jumper Setting When choosing the first and second pins in JP02, the 120-Ohm termination resistor is connected. RS485 bus needs two 120-Ohm resistors at both ends. Set the 120-Ohm resistors of the two devices (keyboard or dome) at the farthest distance on RS485 bus. The default setting is OFF. When choosing the second and third pins in JP02, the termination resistor is unconnected. 29 XSD27ZIR APPENDIX II: WIRE DIAMETER & TRANSMISSION CHART The transmission distances listed below are the farthest ones recommended for each given wire diameter when the 24V AC voltage loss ratio is below 10% (for equipment powered by AC, the maximum voltage loss ratio allowed is 10%). For example, a set of equipment with nominal power as 80VA, installed 35 feet (10m) away from transformer, needs a wire with a minimum diameter of 0.8000mm. Minimum Diameter of Wire (mm) Nominal Power (VA) 0.8000 1.000 1.250 2.000 10 283 ft / 86 m 451 ft / 137 m 716 ft / 218 m 1811 ft / 551 m 20 141 ft / 42 m 225 ft / 68 m 358 ft / 109 m 905 ft / 275 m 30 94 ft / 28 m 150 ft / 45 m 238 ft / 72 m 603 ft / 183 m 40 70 ft / 21 m 112 ft / 34 m 179 ft / 54 m 452 ft / 137 m 50 56 ft / 17 m 90 ft / 27 m 143 ft / 43 m 362 ft / 110 m 60 47 ft / 14 m 75 ft / 22 m 119 ft / 36 m 301 ft / 91 m 70 40 ft / 12 m 64 ft / 19 m 102 ft / 31 m 258 ft / 78 m 80 35 ft / 10 m 56 ft / 17 m 89 ft / 27 m 226 ft / 68 m 90 31 ft / 9 m 50 ft / 15 m 79 ft / 24 m 201 ft / 61 m 100 28 ft / 8 m 45 ft / 13 m 71 ft / 21 m 181 ft / 55 m 110 25 ft / 7 m 41 ft / 12 m 65 ft / 19 m 164 ft / 49 m 120 23 ft / 7 m 37 ft / 11 m 59 ft / 17 m 150 ft / 45 m 130 21 ft / 6 m 34 ft / 10 m 55 ft / 16 m 139 ft / 42 m 140 20 ft / 6 m 32 ft / 9 m 51 ft / 15 m 129 ft / 39 m 150 18 ft / 5 m 30 ft / 9 m 47 ft / 14 m 120 ft / 36 m 160 17 ft / 5 m 28 ft / 8 m 44 ft / 13 m 113 ft / 34 m 170 16 ft / 4 m 26 ft / 7 m 42 ft / 12 m 106 ft / 32 m 180 15 ft / 4 m 25 ft / 7 m 39 ft / 11 m 100 ft / 30 m 190 14 ft / 4 m 23 ft / 7 m 37 ft / 11 m 95 ft / 28 m 200 14 ft / 4 m 22 ft / 6 m 35 ft / 10 m 90 ft / 27 m 30 XSD27ZIR APPENDIX III RS485 BUS BASIC KNOWLEDGE 1 4 Basic Property Best Practice RS485 Bus is specified by RS485 standards. It is of half-duplex data transmission cables with characteristic impedance as 120. The maximum load capacity is 32 effective loads (including main controller and controlled equipment). In some circumstances a star configuration connection is required. The termination resistors must be connected to the two equipment that are farthest away from each other, such as equipment 1# and 15# in the following diagram. 2 Transmission Distance For 0.56mm (24AWG) twisted pair wires as data transmission cable, the maximum theoretical transmitting distances are as follows: As the star configuration is not in conformity with the requirements of RS485 standards, problems such as signal reflections, lower anti-interference performance arise when the cables are long in the connection. The reliability of control signals is decreased with the phenomena that the dome does not respond to or just responds at intervals to the controller, or does continuous operation without stop (refer to following picture). Baud Rate Max。 Transmit Distance 2400BPS 1200m 4800BPS 1000m 9600BPS 800m With thinner cables, installation of the dome in an environment with strong electromagnetic interference, or a large number of equipment connected to the RS485 Bus, the maximum transmitting distance will be decreased. 3 Connection and termination resistor 3-1 The RS485 standards require a daisy-chain connection between the equipment. There must be termination resistors with 120-Ohm impedance at both ends of the connection (refer to following pictures). 5 RS485 Troubleshooting Trouble Please refer to following picture for simple connection. ‘D’ should not exceed 7 metres. 31 Possible Cause Solution 1. The address and baud rate settings of dome and the controller do not Dome can do match. 2. The + and - connection self-testing but cannot be of RS485 cable is incorrect. controlled. 3. Wiring is not fully connected. 4. There is break in the RS485 cable. 1. Change the address and baud rate of controller or dome. 2. Correct the connection. 3. Make sure the connections are fully connected. 4. Try using a new (or shorter length of) RS485 cable 1. The RS485 cable is not fully connected. 2. The wire on the RS485 The dome cable is broken. can be 3. The dome is very far controlled but away from controller. the operation is not smooth 4. There are too many domes connected in the system. 1. Secure the connection. 2. Replace RS485 cable. 3. Add termination resistors to the system. 4. Install RS485 distributor. XSD27ZIR APPENDIX IV TROUBLE SHOOTING Problem Cause Solution No movements, no video after power on Red LED on circuit board is off: Check the power connection and outlet make sure they are working properly. There is no AC power connected to the PCB Board. There is a power outage or problem of the transformer. Check power supply and transformer to see is they are working properly. Check all power related cable. Camera module is not correctly connected. Output Voltage of transformer is too low. Examine the power on the dome side making sure it is above 16V. The power board is not working. Self-test is ok but dome cannot be controlled Wrong dip switch setting; Control cable reversely connected or disconnected Set the dip switch correctly according to operation manual. Check the control cable, making sure it is correctly and firmly connected. Fan speed under 1000 rpm Fan not firmly connected Connect fan correctly. If speed is still under 1000 rpm, please contact dealer to replace the fan. Blurred picture Dome in manual focus mode or bubble is stained Set focus to auto mode. Clear the bubble. 32 XSD27ZIR APPENDIX V: LIGHTNING & SURGE PROTECTION The product features TVS lightning proof technology to prevent from damage by lightning strike below 1500W and impulse signals such as surge. It is necessary to abide by the following precautions to ensure electrical safety based on practical circumstances: 1. Keep the communication cables at least 50 meters away from high voltage equipment or cables. 2. Install outdoor cable laying-out under eaves as possible as you can. 3. In open areas, shield cables in a steel tube and conduct a single point ground to the tube. Using trolley wire is forbidden in such circumstances. 4. In areas with high risk of strong thunderstorm or in high faradic areas (such as high voltage transformer substation), extra strong lightning proof equipment must be installed. 5. Take the building’s lightning proof requirements into account when surveying the lightning proof levels and the grounding of outdoor equipment and cable. Install in accordance with the national and industrial standards. 6. The system must be grounded with equal potentials. The earth ground connection must satisfy the anti-interference and electrical safety requirements and must not short-circuit with high voltage electricity. When the system is grounded separately, the resistance of down conductor should be + 4-Ohms. 33 XSD27ZIR APPENDIX VI WARRANTY TECHNICAL SUPPORT: For Technical Support for any Xvision product please contact your local distributor. LIMITED WARRANTY: This product is supplied with a 1 Year warranty. The Warranty excludes products that have been misused, (including accidental damage) and damage caused by normal wear and tear. In the unlikely event that you encounter a problem with this product, it should be returned to the place of purchase. 34 XSD27ZIR 35 XSD27ZIR Manufactured exclusively for Xvision - www.x-vision.co.uk UK/Europe Xvision Group (UK) Unit 2, Valley Point, Beddington Farm Road, Croydon Surrey CR0 4WP Email: [email protected] Middle East Burjuman Tower, 18th Floor PO Box 121828 Dubai 43659 United Arab Emirates Email: [email protected] Far East Kyoung Am Building 157-27 Samsung-dong Kangnam-ku 135 090 Seoul Korea Email: [email protected] North America 100 Park Avenue New York City, New York 10017 United States Email: [email protected] 36