1
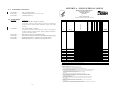
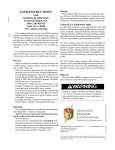
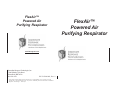
FlexAir™
Powered Air
Purifying Respirator
www.imresponse.com
Immediate Response Technologies, Inc.
7100 Holladay-Tyler Road
Glenn Dale, MD 20769
800-598-9711
P/N C-85090-001, Rev. 9
This manual could contain technical inaccuracies or typographical errors. Updates are made
periodically to the information herein. If you have comments please forward them to Immediate
Response Technologies . Thank you.
FlexAir™
Powered Air
Purifying Respirator
TABLE OF CONTENTS
1.0
2.0
3.0
4.0
5.0
This product shall not be used until the end user reads and understands
the user instruction or instruction manual which is supplied with, and is a
critical component of, each Immediate Response Technologies system. If
the end user has questions concerning the safe operation of this product,
please consult the local supervisor or safety program administrator. If the
user instruction or instruction manual is not supplied to the end user, a
copy can be obtained by calling Immediate Response Technologies: 301352-8800 (in Maryland) or 800-598-9711 (toll-free in the continental U.S.A.)
Use of Immediate Response Technologies equipment, other than in
compliance with the supplied user instructions, or instruction manual, or
use by personnel who are unqualified, or untrained, is dangerous, and the
user may be exposed or serious bodily injury or death.
This respirator cannot not be used in oxygen-deficient (less than 19.5%
oxygen) atmospheres. This respirator cannot be used in atmospheres that
are Immediately Dangerous to Life or Health (IDLH). If the end user has
questions concerning the safe operation of this product, please consult
the local supervisor or safety program administrator.
DuPontTM Tychem® QC and Tychem ® SL are registered trademarks of E.I. DuPont de
Nemours and Company
5.1
5.2
5.3
6.0
6.1
6.2
6.3
7.0
8.0
9.0
10.0
10.1
10.2
Page
GENERAL ............................................................................................... 1
CONTENTS ............................................................................................ 1
LIMITATIONS OF USE .......................................................................... 1
TECHNICAL INFORMATION ............................................................... 2
BEFORE USING THE FLEXAIR™ ......................................................... 3
- Installing the Waist Belts ..................................................................... 3
- Charging the Battery ............................................................................ 3
- Airflow Test .......................................................................................... 4
- Installing the Filtration Media .............................................................. 4
- Airflow Test (Filtration Media Installed) .............................................. 6
USING THE FLEXAIR™ SYSTEM ......................................................... 6
- Donning the FlexAir™ Blower ............................................................. 6
IN USE FLOW TEST .............................................................................. 8
AFTER USE ............................................................................................ 9
- Doffing theFlexAir™Blower ................................................................. 9
MAINTENANCE AND STORAGE ....................................................... 10
CLEANING THE RESPIRATOR ........................................................... 10
CHARGING THE BATTERY ................................................................. 11
STORING THE RESPIRATOR .............................................................. 11
DISPOSAL OF FILTRATION MEDIA AND BATTERIES .................... 12
SERVICE ............................................................................................... 12
CONSTRUCTION ................................................................................. 13
ACCESSORIES AND FILTER MEDIA ................................................. 13
ACCESSORIES ..................................................................................... 13
FILTER MEDIA .................................................................................... 14
APPENDICES
APPENDIX A-------NIOSH APPROVAL LABELS.................................................... .15
© 01/10 by Immediate Response Technologies, Glenn Dale, Maryland. All rights reserved.
1.0
GENERAL
• The user must be properly fitted to the
respirator head cover before use.
The Immediate Response Technologies
FlexAir™ respirator is a blower-assisted airpurifying respirator referred to as a Powered
Air-Purifying Respirator or a PAPR.
• The Blower, with filtration media installed, must be tested with the Airflow
Indicator, both prior to use, and at prescribed intervals during use to monitor
battery life and Cartridge or Filter efficiency.
The filtering system consists of a waistmounted battery-driven Blower Assembly
that can be configured with three (3) gas/
particulate removing cartridges or two (2)
high efficiency (HE) particulate filters. The
Blower Assembly contains an electric motor
driving an air blower. The Blower Assembly
includes an on-board rechargeable 7.4-volt
(nominal) Lithium-ion Battery (7 to 8 hour
run time) and integral charging connection.
A single-speed “on-off” switch is located
on the top front of the Blower Assembly, with
integral Low- Flow and Low- Battery alarms.
There are three (3) female threaded inlets on
the Blower Assembly for the attachment of
the filtration media (sold separately). A blanking plug is used to block one filter port when
using the two HE Filters. The user of the respirator breathes ambient air after the air has
passed through the filtration media. The Cartridges includes a sorbent bed of impregnated activated carbon to trap and/or neutralize various gases/vapors, and a mechanical filter to trap airborne particles. The
HE Filter comprises only a mechanical filter
medium to protect against airborne particles.
The Immediate Response Technologies
FlexAir™ can only be used with Immediate
Response Technologies head covers (see the
NIOSH aproval label for specific part numbers and limitations).
2.0
CONTENTS
The Immediate Response Technologies
FlexAir™ filtering system can be shipped with
the components listed below. Inspect the
contents for shipping damage and ensure all
components are present.
• Immediate Response Technologies
FlexAir™ Blower Assembly w/On-board
Battery
• Loose-fitting Head Cover
• Breathing Tube Assembly
• Waist Belt
• Li-ION Battery Charger
• Filtration media
• Blanking Plug
• Airflow Indicator
• Instruction Manuals (with NIOSH information)
The Blower Assembly assists breathing
by drawing air through the filtration media
and delivering the purified air through a hose
assembly that is attached to the headcover.
An Airflow Indicator, Immediate Response
Technologies P/N S-30112-001, is used to
check for minimum airflow and is provided
with the FlexAir™ filtering system. To maintain respiratory protection,
3.0
LIMITATIONS OF USE
As specified on the appropriate NIOSH
Approval Label supplied with the Blower
Assembly system, Cartridges, Filters and in
Appendix A of this manual.
1
• The FlexAir™ respirator may not be
taken into or used in atmospheres containing flammable or explosive gases, vapors, or dusts when the concentration
of such contaminants is near or above
the lower flammable limit (LFL).
This powered air-purifying device is only
for use in specific atmospheres and under certain conditions. Follow these instructions carefully. Failure to do so
could result in injury or death.
• Do not use the FlexAir™ respirator for
fire fighting, in oxygen-deficient atmospheres, or for protection against airborne contaminants which the selected
cartridge does not protect against.
• The end user must read and fully understand this instruction manual prior to
use.
• The end user of the respirator must
have received training in the use of the
respirator including, but not limited to,
pre-use check, donning, use, doffing (removal), and after-use care of the respirator.
• Airflow: the FlexAir™ blower provides
a constant filtered airflow at a minimum
of 170 lpm to the applicable head cover
when used with Immediate Response
Technologies filtration media and a
charged battery.
NOTE: during initial system startup,
the alarms will sound momentarily. If
the alarms fail to cease sounding, do
not use the FlexAir™ Blower until the
fault is found and corrected. If the
fault cannot be determined, remove the
FlexAir™ blower from service and contact Immediate Response Technologies
for repair.
• The FlexAir™ blower may be configured
with three (3) Gas/Particulate Cartridges
or two (2) HE Filters and one (1) Blanking Plug. The Blanking Plug (available
in black or gray) is used to manage air
flow when the blower is used with the
less restrictive HE Filters.
• Battery: on-board rechargeable 7.4 volt
(nominal) Lithium-ION (7 to 8-hour run
time). NOTE: Run times will vary depending on combination of headpiece and filtration media used. Contamination levels and filter loading will also effect run
time.
• The FlexAir™ blower has a “soft” start
feature. When the switch is depressed
to the “ON” position, it will take approximately 5 seconds for blower activation.
During this period the alarm will “pulse”
(i.e. beep) to confirm blower activation.
• Weight: Blower Assembly, with Belt
Assembly, Battery and three Cartridges:
approximately 4.3 lbs.
4.0.
The failure to choose a respirator
equipped with a cartridge and/or filter
suitable for the contaminant(s) in the atmosphere or likely to be released in the
atmosphere may result in the respirator
providing little or no protection against
the contaminated atmosphere, leading
to serious bodily injury or death.
• During use of this respirator, the atmosphere must be monitored for the level
of contamination and provide for the
withdrawal of the using personnel in the
event that the contamination level increases to immediately dangerous to life
and health (IDLH) levels.
• This respirator must be properly inspected before use, properly decontaminated, if necessary, after use, properly
cleaned and maintained after use, and
properly stored between uses.
2
• Low-airflow alarm: the FlexAir™ incorporates an audible “continuous” alarm
that activates when the system air flow
falls to a level where the end user MUST
leave the contaminated environment immediately, and decontaminate if necessary. If continued system use and reentry is required, the cause of the low
flow alarm must be determined (for example, clogged filtration media, obstructed hose), corrected, and the system checked for proper operation.
TECHNICAL INFORMATION
• Low-battery alarm: the FlexAir™ incorporates an audible “pulsing” alarm that
activates when the system battery voltage is approaching a low level and the
end user MUST leave the contaminated
environment immediately and decontaminate if necessary. Charge the
onboard battery before reusing the system.
5.0
• Perform all required pre-use inspections,
checking the condition and intactness
of all components.
- Installing the Waist Belts
1) Note the lacing path of the belt
through the male buckle and remove the male buckle and keeper
loop from the end of the belt.
2) Thread the belt through the slot on
the blower side and out through the
adjacent slot on the blower back
plate; across the back of the blower; and
then down through the slot on the back
plate and out the side slot. Center the
blower on the belt.
3) Replace the keeper loop and lace
the male buckle back onto the belt.
- Charging the Battery
• The FlexAir™ Blower has an on-board
battery that must be charged before initial use and after each use.
• Use only the approved Immediate Response Technologies Lithium-Ion
charger to charge the FlexAir™ blower.
BEFORE USING THE FLEXAIR™
Failure to use the approved charger and/
or follow the proper charging procedure
could damage equipment or lead to serious bodily injury.
• See “Instructions for Use” of the respective Head Cover.
• Use only those NIOSH-approved Immediate Response Technologies
Cartidges, Filters and Head Covers listed
on the NIOSH approval labels (see Appendix A). Use three Cartridges or two
HE Filters and a Blanking Plug.
• The battery should be charged in dustfree area at a temperature between 32°F
and 104°F. Do not cover the charger
during charging to prevent overheating
of the charger.
3
• The charging jack is located on the bottom of the blower unit. Align the barrel
of the charging plug with the charging
jack and insert until the plug is fully engaged in the jack.
• Plug the charger AC power cord into a
regulated outlet. Refer to the charger
instructions for explanation of the
charger indicator lights and for addtional
charging information.
4)
Position the Blower Assembly in an
upright position so the Airflow Indicator is vertical on top of the
Blower Assembly.
5)
Briefly turn on the Blower to verify
operation. The alarm will “pulse” (i.e.
beep) to confirm blower activation.
NOTE: during initial system startup, the
alarms will sound momentarily. If the alarms
fail to cease sounding, do not use the
FlexAir™Blower until the fault is found
and corrected. If the fault cannot be determined, remove the FlexAir™from service
and contact Immediate Response Technologies for repair.
• Ensure the blower is turned “OFF” during charging. If the blower switch is
“ON” the blower will begin to operate
after the charger is plugged into the AC
outlet. This will not damage the blower.
Charging time will be greatly increased
if the blower is operating. Depress the
switch to turn the blower “OFF” if it
comes on during charging.
6)
• When charging is complete, unplug the
AC power cord from the regulated AC
outlet and then remove the charger plug
from the blower charging jack.
7)
- Airflow Test
Test the operation of the Blower Assembly with the Airflow Indicator as follows:
1)
2)
3)
Response Technologies Gas/Particulate Cartridges or two HE Filters and one Blanking Plug. These
are the only Filtration Media which
may be used with the FlexAir™ respirator (Refer to the NIOSH Approval Labels). Three (3) new Gas/
Particulate Cartridges or two (2) new
HE Filters must be installed before
each use. The Cartridges and Filters are one-time use only and must
be disposed of after use (See Disposal of Filtration Media and Batteries Section of this Instruction).
The blanking plug is reusable and
should be retained for repeated use.
Inspect the Airflow Indicator to
verify that the O-ring is present and
in good condition. The black float
shall move freely within the column.
Supporting the Blower Assembly on
a horizontal surface so that the Airflow Indicator is approximately vertical, observe theAirflow Indicator
reading. With the Blower Assembly running and no Cartridges or
Filters installed, the black float will
go to the top of the Indicator.
Turn the FlexAir™ Blower off, remove the Airflow Indicator, and reinstall the seal plugs in the outlet
and the Cartridge/Filter mounting
ports until you are ready to use the
respirator.
After successful completion of the air
flow test, attach the Breathing Tube Assembly of the NIOSH-approved head cover to
the Blower Assembly as described in the “Instructions for Use” of the respective head
cover.
Remove the seal plugs from the outlet and Cartridge/Filter mounting
ports of the Blower Assembly. DO
NOT DISCARD THE SEAL PLUGS.
- Installing the Filtration Media
Insert the Airflow Indicator into the
Blower Assembly air outlet. Push
the Airflow Indicator into the air
outlet until it contacts the shoulder.
Install Cartridges or Filters as follows:
NOTE: The FlexAir™ respirator utilizes
three NIOSH-approved Immediate
4
1)
Remove the four (4) seal plugs from
the Blower cartridge/filter ports and
outlet. Retain these plugs for future
use.
2)
Inspect the gaskets in each of the
cartridge/filter ports. If any gasket
is damaged or missing, replace with
Immediate Response Technologies
P/N S-60026-001. Do not use a
FlexAir™ Blower with any of the
gaskets damaged or missing.
3)
• Start threading the plug by hand in a
clockwise direction. Tighten the plug
with a coin (or similar blunt object) by
inserting the coin in the depression in
the plug and turning clockwise until
hand tight.
Do not Use the Blanking Plug with the
Gas/Particulate Cartridges. Only use
the Blanking Plug with two HE Filters.
Using the Blanking Plug with two Gas/
Particulate Cartridges will result in a system configuration that may not provide
appropriate air flow for loose-fitting head
covers. Always use Three Gas/Particulate Cartridges. Failure to obey this warning may result in reduced system performance leading to serious personal injury or death.
4)
If using Gas/Particulate Cartridges,
skip to step 4. If using HE Filters
install the Blanking Plug as follows:
Remove three Gas/Particulate Cartridges or two HE Filters from the
packaging. Cartridges and Filters
are considered to have been put in
service when they are removed from
their packaging. Cartridges and Filters are intended for one time use
only.
Verify the packaging is intact, the expiration date has not been passed, and
the Cartridge or Filter housing is not
damaged. Using damaged Cartridges or
Filters may result in serious bodily injury or death.
• Install the Blanking Plug in the center
filter port (located on the bottom of the
blower).
Do not overtighten the Blanking Plug.
Overtightening may distort the gasket
resulting in leakage that may expose the
wearer to substances which can cause
serious personal injury or death.
5)
5
Install three Gas/Particulate Cartridges or two HE Filters to the
Blower Assembly by threading into
the cartridge/filter ports until hand
tight.
battery, the black float should rise
nearly to the top of the Airflow Indicator.
Do not overtighten Cartridges or Filters. Overtightening may distort the
gasket resulting in leakage that may expose the wearer to substances which can
cause serious personal injury or death.
5)
Turn the Blower Assembly off and
remove the Airflow Indicator.
The FlexAir™ respirator is now ready for
use. The user must follow the donning procedures before actual use of the respirator.
5)
- Airflow Test (Filtration Media Installed)
5.1 USING THE FLEXAIR™ SYSTEM
Using the Airflow Indicator, test operation of unit with Cartridges or Filters in place,
as follows:
- Donning the FlexAir™ Blower
Don the Blower Assembly as follows:
Failure to verify adequate air flow from
the Blower Assembly may result in reduced performance of the unit, leading
to serious personal injury or death.
1)
Inspect the Airflow Indicator
to verify that the O-ring is present
and in good condition. The black
float shall move freely within column.
2)
Insert the Airflow Indicator into the
Blower Assembly air outlet. Push
the Airflow Indicator into the air outlet until it contacts the shoulder.
3)
Turn on the Blower Assembly.
4)
Supporting the Blower Assembly on
a horizontal surface so that the Airflow Indicator is approximately vertical, observe the reading on the Airflow Indicator. Acceptable performance shall be indicated by the position of the black float being above
the 6 CFM line marked on the outside of the column. (With fresh Cartridges or Filters and a fully charged
NOTE: during initial system startup, the
alarms will sound momentarily. If the alarms
fail to cease sounding, do not use the
FlexAir™ Blower until the fault is found
and corrected. If thefault cannot be determined, remove the FlexAir™from service
and contact Immediate Response Technologies for repair.
Donning, doffing, and obtaining and
checking for a proper head cover fit must
be done in an area know to be free of
contaminants. The respirator user must
have practiced this procedure before attempting to use the respirator for respiratory protection. Failure to do so may
result in serious bodily injury or death.
1)
2)
3)
4)
6
Examine the Breathing Tube Assembly to verify that it is properly connected to the Blower Assembly.
Examine the Filtration Media to
verify that they are properly installed to the Blower Assembly.
If using the HE Filters, ensure the
Blanking Plug is properly installed
in the Blower Assembly.
Failure to properly adjust the position
of the Blower Assembly to allow free
movement of the Head Cover and the
Breathing Tube may result in the head
cover being disturbed when the head is
turned, thus reducing the protection offered by the respirator.
After initial startup alarms have
ceased, cover two cartridge or filter
inlets with the palms of the hands.
The low flow alarm will activate.
This test will familiarize the end user
with the alarm tone. If this alarm
does not sound, remove the unit
from service until the fault is located
and corrected in accordance with
the note directly above.
6)
Depress the switch to turn the
blower off.
7)
Don the Waist Belt with the Blower
Assembly such that the FlexAir™
Blower outlet is located at the top,
with the unit centered on the back.
Fasten the buckle and adjust the
Waist Belt.
Positioning the Blower Assembly such
that the Breathing Tube is excessively
loose or excessively tight may result in
the head cover being pulled from the
user’s face, exposing the user to the hazardous atmosphere the respirator was
intended to protect against, and could
result in serious bodily injury or death.
The FlexAir™ respirator must be properly prepared for use and properly donned in
an area known to be free of contamination
before it can be used.
Before entry into a contaminated area,
the maximum safe duration of use must be
estimated. The maximum safe duration of use
depends primarily on:
• The amount and type of contamination
in the air and the capacity of the Cartridge to absorb or neutralize that contaminant.
• The amount of airborne particles (dust)
in the atmosphere.
• The charge contained in the Battery.
• The physiological limits of the respirator user.
The donning instructions for the head
covers are given in the respective sections
of their “Instructions for Use.”
Additional protective clothing and
protective head wear if used, must be arranged so that it does not interfere with the
fit of the head cover or restrict the airflow to
the Cartridges or Filters.
The maximum expected Cartridge or Filter life shall be predetermined based on a
determination of the amount of contaminant
in the atmosphere, the capacity of the Cartridges or Filters and the expected air flow
through the Cartridges or Filters.
Depress the switch to activate the
blower and perform an airflow check
to confirm that the Battery is charged
and the Blower Assembly is working.
7
An average airflow of approximately two cubic feet per minute (2 CFM) will flow through
each of three Cartridges during prolonged
use. An average air flow of approximately
three cubic feet per minute (3 CFM) will flow
through each of two HE Filters during prolonged use. In determining maximum time of
use in a contaminated area, consideration
must be given to any physiological limitations of the user.
filters, obstructed hose), corrected, and the
system checked for proper operation.
During use, it is possible for the low-air
flow alarm to sound intermittantly when the
backpressure in the head cover is increased.
This can be the result of the head cover being bumped, depressed from the outside, or
a particular head/body movement. This is a
momentary signal. However, should the alarm
fail to stop, the end user MUST leave the
contaminated area immediately.
After four (4) hours of use, the user
MUST leave the contaminated area, decontaminate if required, and check the system
airflow with the Airflow Indicator (See IN USE
FLOW TEST, Section 5.2, of this instruction).
Thereafter, the airflow must be checked at
least every two (2) hours of use to monitor
battery life and filter efficiency.
If, during use,
• either the low-battery or low-airflow
alarm annunciates; or
The FlexAir™ Blower features low-airflow and low-battery voltage audible alarms
that sound whenever a low-airflow or lowbattery voltage fault condition is encountered. Under either fault condition, with the
alarm sounding, the end user SHALL IMMEDIATELY RELOCATE to an uncontaminated
area, following proper decontamination procedures, and the system is to be evaluated to
ascertain the fault condition.
• the air flow from the FlexAir™ Blower
should noticeably decrease or stop completely, or if inhalation should become
difficult; or
• the airborne contaminant is detected
by odor, taste, eye irritation, or if any
discomfort is felt during respirator use;
or
• the blower housing should become hot
to touch,
The audible “pulsing” low-battery voltage alarm activates when the system battery
voltage is approaching a low level and the
user MUST leave the contamnated
envirnoment immediately and decontaminate
if necessary. Charge the onboard battery before reusing the system.
• IMMEDIATELY LEAVE THE CONTAMINATED AREA. Decontaminate if
required, and check the respirator. Failure to do so can lead to serious bodily
injury or death.
to be useful in removing airborne contaminants, or after continued use has exceeded
the recommended time period, the following
airflow test must be performed on the respirator before reentry to the contaminated area:
5)
NOTE: If the original Cartridges or Filters
are retained for re-entry, care must be taken
not to exceed the total time of estimated useful life of the Cartridge or Filter versus the
concentration of the particular contaminant
it is being used to protect against.
1) The user must leave the area requiring respiratory protection and be in
an area free from contaminants.
2) The user must be decontaminated, if
required, at least to the extent that
the Breathing Tube can be disconnected from the Blower Assembly.
5.3
3) The Airflow Indicator must be installed as described in these Instructions and the Blower Assembly airflow measured. [See Section
5.0 Airflow Test (Filtration Media
Installed)]
4)
RETURN TO
SERVICE
RESEAT CARTRIDGES OR
FILTERS & CHECK
AIRFLOW
DOES
BLACK
FLOAT RISE
ABOVE
AIRFLOW
INDICATOR
LINE?
AFTER USE
The Doffing process shall be performed
only in a non-hazardous environment.
Failure to do so may result in serious
bodily injury or death.
Exit the area requiring respiratory protection and proceed to decontamination, if
necessary.
The blower must be operating and
Cartridges or Filters must be installed. If the black float does not
rise completely above the 6 cfm line
on Airflow Indicator, DO NOT USE
THE RESPIRATOR. Proceed as
shown in the branching logic tree.
BLACK FLOAT DOES NOT
RISE ABOVE LINE ON
AIRFLOW INDICATOR
After obtaining an acceptable flow
test, the user can re-enter the contaminated area.
When conditions are safe to remove and
handle the respirator
• Depress the switch to turn the blower
“OFF” .
• Doff the head cover. The doffing instructions for head covers are given in the
respective sections of their “Instructions for Use.”
YES
- Doffing the FlexAir™ Blower
Doff the Blower Assembly as follows:
YES
NO
The audible “continuous” alarm activates when the system air flow falls to a level
where the end user MUST leave the contaminated envirnoment immediately, decontaminate if necessary. If continued system use
and re-entry is required, the cause of the low
flow alarm must be determined (ie, clogged
5.2 IN USE FLOW TEST
If, at any time, the respirator user leaves
the contaminated area because of an alarm
condition, decreased air flow from the Blower
Assembly, a difficulty inhaling, the expiration of time the Cartridge or Filter is expected
8
CHARGE BATTERY &
RECHECK AIRFLOW
DOES
BLACK
FLOAT RISE
ABOVE
AIRFLOW
INDICATOR
LINE?
Disengage the belt buckle by squeezing
the top and bottom tabs of the buckle assembly toward the center of the buckle.
NO
REMOVE
FROM
SERVICE
9
6.1
Unthread and remove the Cartridges or
Filters. Cartridges or Filters are intended for
one use only and must be disposed of on
termination of use. Do not dispose of Cartridges or Filters as ordinary trash. See DISPOSAL OF FILTRATION MEDIAAND BATTERIES section of this instruction.
CLEANINGTHE RESPIRATOR
The respirator shall be cleaned/disinfected/decontaminated in accordance with
local safety protocols.
Clean the respirator after each use as
follows:
After termination of use and decontamination of exterior of the respirator, if necessary, the respirator must be cleaned and inspected and the onboard battery charged.
See CLEANING THE RESPIRATOR and
CHARGING THE BATTERY sections of this
instruction.
1)
Inspect the equipment for worn or
aging rubber parts, worn or frayed
webbing, or damaged components.
2)
Disconnect the Breathing Tube
from the Blower Assembly. Instructions for cleaning the head cover
are given in the respective sections
of the head cover User Instructions.
The FlexAir™ Respirator must be
cleaned, inspected, and prepared for the next
use.
3)
6.0
MAINTENANCE AND STORAGE
Failure to properly clean and inspect the
head cover, breathing tube, waist belt
and Blower Assembly may result in the
respirator providing little or no protection and may expose the user to substances which can cause personal injury or death.
Respirators must be cleaned, disinfected, and inspected after each use. After
such cleaning and inspection, the respirator
must be stored in a clean, dry area away from
direct sunlight, and reinspected during preparation for use before it is used again.
Carefully clean the Blower Assembly and Waist Belt Assembly by
wiping with a warm water solution
(110°F. maxi-mum) containing a mild
detergent. The green caps can be
installed in the cartridge/filter
mounting ports and air outlet to prevent liquids from entering the blower
during cleaning. DO NOT IMMERSE THE BLOWER ASSEMBLY. A soft cloth may be used for
scrubbing extremely dirty areas.
Clean the breathing tube connection and cartridge mounts for dirt
that could prevent an airtight seal.
Rinse thoroughly by wiping with
clean water.
NOTE: If accidental immersion of the
Blower Assembly occurs, the
Blower Assembly must be allowed
to air dry thoroughly and then be
tested with the Airflow Indicator to
verify that the motor was not damaged. Ensure the charging jack is
completely dry before charging the
battery.
The used Cartridges or Filters must be
removed from the respirator and disposed of
as directed in the DISPOSAL OF FILTRATION MEDIA AND BATTERIES section of
this instruction.
10
6.2
4)
Examine all hardware to verify
proper condition of threads, couplings and adapters.
5)
Examine to verify all gaskets and
seals are present and in good
condition.
6)
Examine the Blower Assembly for
damage or cracks. Verify that there
are no loose objects rattling inside
the Blower Assembly.
7)
Verify that unit is working properly
before storage by checking the airflow as instructed in the BEFORE
USE section of this instruction.
8)
Correct any deficiencies immediately, or tag the respirator as in need
of repair and remove from service.
6.3
STORING THE RESPIRATOR
Store the Immediate Response Technologies FlexAir™, as follows:
• On the Blower Assembly, replace the
green caps in the three Cartridge/Filter
mounting ports and in the air outlet on
the top of the unit for storage.
Store the blower with onboard battery
away from direct sunlight, heat and
moisture to prevent damage
• Store the Blower away from sunlight,
heat or moisture (at room temperature
and 50% relative humidity for best results)
CHARGING THE BATTERY
• The On-board rechargeable Li-ION Battery may require periodic charging during storage. For long term storage it is
best to store the blower with batteries at
a low charge level (~30% capacity). The
battery should be charged about 10%
every 6 months if not used for long periods. Follow the instructions included in
this manual and those supplied with the
Immediate Response Technologies Battery Charger.
Ensure the charging jack is completely
dry before charging the battery to avoid
electric shock.
The on-board rechargeable Li-ION Battery is charged in accordance with Section
5.0, CHARGING THE BATTERY of this instruction and the charging instructions supplied with the Immediate Response Technologies Battery Charger.
• The Cartridges and Filters have an extended storage life if stored unopened,
out of direct sunlight and in a dry environment. Note the expiration date. Use
as soon as possible after removing from
The on-board rechargeable Li-ION Battery
can ONLY be charged using the Immediate
Response Technologies Battery Charger, P/
N S-20106-001. When the batteries have
reached their useful service life the entire
blower assembly should be disposed of.
Read the DISPOSAL OF FILTRATION MEDIA AND BATTERIES section of this instruction.
• Keep this instruction booklet with the
complete respirator.its packaging.
11
7.0
8.0
DISPOSAL OF FILTRATION
MEDIA AND BATTERIES
SERVICE
The Immediate Response Technologies
FlexAir™ Respirator has no user-serviceable
parts except as instructed in this manual. Any
operational problems should be referred to
Immediate Response Technologies.
Cartridges and Filters:
Remove used Cartridges and Filters and
dispose of properly.
• Handle the Cartridges and Filters with
care. Cartridges and Filters may contain
the contaminant that was in the atmosphere while the Cartridges or Filters
were being used and must be handled
as a contaminated or potentially contaminated object.
9.0
CONSTRUCTION
Part Number
Standard System Description
N-60179-001
Includes: M-60176-BLK FlexAir™ Blower Assembly w/Onboard
Battery (Black); S-30019-001 Web Belt Assembly; S-30112-001
Airflow Indicator; User Manual
N-60180-001
Includes: M-60176-WHT FlexAir™ Blower Assembly w/Onboard
Battery (White); S-30019-001 Web Belt Assembly; S-30112-001
Airflow Indicator; User Manual
N-60181-001
Includes: M-60176-GRN FlexAir™ Blower Assembly w/Onboard
Battery (Green); S-30019-001 Web Belt Assembly; S-30112-001
Airflow Indicator; User Manual
* Add Breathing Tube, Head Cover, Charger and Filter Media for complete NIOSH-Approved System.
Part Number
• Disposal of the Cartridges and Filters
must be in accordance with state and
local environmental regulations.
Breathing Tube Assemblies
S-30111-001 ................ Breathing Tube Assembly, for Loose-Fitting Head Covers (Black)
S-30128-001 ................ Breathing Tube Assembly, for Loose-Fitting Head Covers (White)
S-45177-001 ................ Breathing Tube Cover, Tychem® SL
Batteries:
Part Number
Head Cover
S-40078-W01 ................ Loose-Fitting Visor w/Drawstring, Tychem® QC, White
S-40078-B01 ................. Loose-Fitting Visor w/Drawstring, Tychem® QC, Blue
When the batteries have reached their useful service life the entire blower assembly
should be disposed of.
S-40084-W01 .............. Loose-Fitting Hood w/Cape, Universal, Tychem® QC, White
S-40084-B01 ............... Loose-Fitting Hood w/Cape, Universal, Tychem® QC, Blue
S-40085-001 ................ Loose-Fitting Hood w/Cape, Universal, Tychem® SL, White
S-40059-001 ................ Loose-Fitting Visor Head Cover, Regular, Tychem® QC, White
S-40065-001 ................ Loose-Fitting Visor Head Cover, Regular, Tychem® QC, Blue
S-40067-001 ................ Loose-Fitting Visor Head Cover, Regular, Tychem® QC, Yellow
S-40060-001 ................ Loose-Fitting Visor Head Cover, Large, Tychem® QC, White
S-40066-001 ................ Loose-Fitting Visor Head Cover, Large, Tychem® QC, Blue
S-40068-001 ................ Loose-Fitting Visor Head Cover, Large, Tychem® QC, Yellow
S-40083-001 ................ Butyl Hood Assembly (w/Integral Breathing Tube)
• Dispose in accordance with state and
local environmental regulations and in
accordance with the material safety
data sheet (MSDS) for the Li-ION Battery (to obtain an MSDS, please contact Immediate Response Technologies.).
• Battery recycling is encouraged. For
information on recycling through the
Rechargeable Battery Recycling Corporation, call 1-800-8-BATTERY, or
visit their website at www.rbrc.org.
• DO NOT INCINERATE or subject the
battery cells to temperatures in excess
of 212°F. Such treatment can vaporize
the liquid electolyte, causing cell rupture. Incineration could result in cadmium emission release.
Part Number
Battery Charger
S-20106-001 ................ Battery Charger, Li-ION, w/Barrel Plug
10.0 ACCESSORIES & FILTER MEDIA
10.1 ACCESSORIES
S-30112-001 ................ Airflow Indicator - 4 to 6 CFM
S-60026-003 ................ Filter Gasket (Pack of 3)
S-10022-001 ................ Breathing Tube Assembly Gasket
S-30019-001 ................ Web Belt Assembly - 60” Lg.
S-30021-001 ................ Decon. Belt Assembly - 70” Lg.
S-30142-001 ................ Chin Strap, Butyl Hood
S-30141-001 ................ Chin Strap, Loose-Fitting Hood w/Cape
12
13
APPENDIX A - NIOSH APPROVAL LABELS
10.1 ACCESSORIES - CONTINUED
IMMEDIATE RESPONSE TECHNOLOGIES, INC.
7100 HOLLADAY-TYLER ROAD
GLENN DALE, MD 20769
(800) 598-9711
S-45126-001 ................ IRT Carry/Storage Bag
S-10079-001 ................ Molded Carrying Case 19” x 14” x 7-1/8”
S-70018-001 ................ Cartridge Snap Cap
FlexAirTM Respirator Family
These respirators are approved only in the following configurations:
10.2 FILTER MEDIA
Part Number
RESPIRATOR COMPONENTS
Component
X
23C-2484
HE/AM/CD/CL/FM/HC/HF/HS/MA/
OV/SD
X
X
X
X
X
X
21C-0841
HE
X
X
X
X
X
X
23C-2497
HE/AM/CD/CL/FM/HC/HF/HS/MA/
OV/SD
X
X
X
X
Cartridge Snap Cap
Breathing Tube Cover, Tychem® SL
S-70018
S-45177
X
X
X
X
X
X
X
X
X
X
X
X
X
X
X
X
X
X
X
X
X
X
X
X
X
X
X
X
X
X
X
X
X
X
X
X
X
X
X
X
X
X
X
X
X
X
2. Cautions and Limitations
A - Not for use in atmospheres containing less than 19.5% oxygen
B - Not for use in atmospheres immediately dangerous to life or health.
C - Do not exceed maximum use concentrations established by regulatory standards.
F - Do not use powered air-purifying respirators if airflow is less than four cfm (115 lpm) for tight fitting facepieces or
six cfm (170 lpm) for hoods and/or helmets.
H - Follow established cartridge and canister change schedules or observe ESLI to ensure that cartridges
and canisters are replaced before breakthrough occurs.
I - Contains electrical parts that may cause an ignition in flammable or explosive
atmospheres.
J - Failure to properly use and maintain this product could result in injury or death.
L - Follow the manufacturer's User's Instructions for changing cartridges, canisters and/or filters.
M - All approved respirators shall be selected, fitted, used and maintained in accordance with MSHA,
OSHA and other applicable regulations.
N - Never substitute, modify, add, or omit parts. Use only exact replacement parts in the configuration as
specified by the manufacturer.
O - Refer to User's Instructions, and/or maintenance manuals for information on use and maintenance of
these respirators.
P - NIOSH does not evaluate respirators for use as surgical masks.
S - Special or critical User's Instructions and/or specific use limitations apply. Refer to User's Instructions
before donning.
LL- This respirator contains filter or cartridge components that are not approved for all protections in all configurations.
Check the specific row on the NIOSH approval label to ensure proper use.
BREATHING TUBE COVER
Chin Strap, Loose-Fitting Hood w/ Cape
S-30141
X
X
HE-High Efficiency Particulate Air Filter for powered, air-purifying respirators
ACCESSORY - SPLASH COVER
ALTERNATE FILTER PORT PLUG
Blanking Plug, Black
Chin Strap, Butyl Hood
X
X
AM - Ammonia CD - Chlorine Dioxide CL - Chlorine FM - Formaldehyde HC - Hydrogen Chloride
HF - Hydrogen Fluoride HS - Hydrogen Sulfide MA - Methylamine OV - Organic Vapor SD - Sulfur Dioxide
15
S-30142
X
S-45115
X
X
X
1. Protection
14
ACCESSORY - CHIN STRAP
ALTERNATE BELT
AIRFLOW INDICATOR
ALTERNATE BREATHING TUBE
ASSEMBLY
BLOWER UNIT
X
Blanking Plug, Gray
X
S-10048
X
Airflow Indicator - 4 to 6 CFM
X
Belt Assy. - Decon., 70" Long x 2" Wide
X
Belt Assembly - 60" Long
X
S-30112
HE
X
S-30021
21C-0840
X
S-30019
X
X
FlexAirTM Blower Assembly w/Onboard Battery
HE
X
Breathing Tube Assy., White - Loose Fitting Head Cover
Loose-Fitting Visor Head Cover (Large, Yellow)
S-40068
21C-0839
X
Breathing Tube Assy. - Loose Fitting Head Cover
Loose-Fitting Visor Head Cover (Large, Blue)
S-40066
X
X
S-30128
Loose-Fitting Visor Head Cover (Large)
S-40060
HE/AM/CD/CL/FM/HC/HF/HS/MA/
OV/SD
X
S-30111
Loose-Fitting Visor Head Cover (Regular, Yellow)
23C-2458
X
X
M-60176-XXX
Loose-Fitting Visor Head Cover (Regular, Blue)
S-40067
X
X
Filter - HE2
Loose-Fitting Visor Head Cover (Regular)
S-40065
X
X
HE Filter w/Nuisance Odor Relief
Loose-Fitting Hood w/Cape, Universal
S-40059
X
X
IRT M96 Cartridge
Butyl Hood Assembly (w/Integral Breathing Tube)
S-40084
X
X
S-70021
Loose-Fitting Visor w/Drawstring, QC-HL
S-40083
X
HE
S-70020
Loose-Fitting Visor w/Drawstring, QC-CS
S-40079
HE/AM/CD/CL/FM/HC/HS/MA/OV/
SD
21C-0809
GME Multi-Gas HE Cartridge
Loose-Fitting Visor w/Drawstring, PP-HL
23C-2341
Loose-Fitting Hood w/Cape, Universal, Tychem® SL
Loose-Fitting Visor w/Drawstring, PP-CS
S-40078
S-70013-001 ................ HE2 Filter (2 req’d plus one blanking plug)
S-70021-001 ................ HE Filter w/Nuisance Odor Relief (2 req’d plus one blanking plug)
S-45115-001 ................ Blanking Plug, Black (1 required for use with HE Filters)
S-10048-001 ................ Blanking Plug, Gray (1 required for use with HE Filters)
S-40080
PROTECTION
S-70013
1
TC-
S-40081
(Particulate, Ammonia, Chlorine Dioxide, Chlorine, Formaldehyde,
Hydrogen Chloride, Hydrogen Fluoride, Hydrogen Sulfide, Methylamine,
Organic Vapor, Sulfur Dioxide)
S-40085
S-70020-001 ................ IRT M96 Cartridge (3 required)
10072237
ALTERNATE FACEPIECE
(Particulate, Ammonia, Chlorine Dioxide, Chlorine, Formaldehyde,
Hydrogen Chloride, Hydrogen Sulfide, Methylamine, Organic Vapor, Sulfur
Dioxide)
ALTERNATE FILTER/CARTRIDGE
10072237 ..................... GME Multi-Gas HE Cartridge (3 required)
X
X
X
ABCFIJLMNOP
X
ABCFHIJLMNOPLL
X
ABCFIJLMNOPS
ABCFIJLMNOP
X
X
2
LIMITATIONS
ABCFHIJLMNOP
X
X
CAUTIONS AND
ABCFHIJLMNOPLL
X
ABCFIJLMNOPS
X
X
X
ABCFHIJLMNOPLL