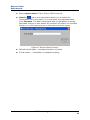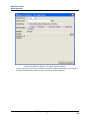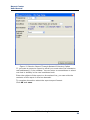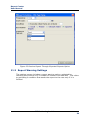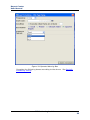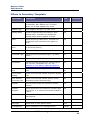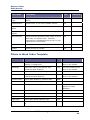
1
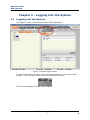
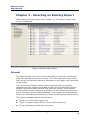
Report Center User Manual Copyright © 2008 RiT Technologies. All rights reserved. No part of this book shall be reproduced, stored in a retrieval system, or transmitted by any means, electronic, mechanical, photocopying, recording or otherwise, without written permission from RiT Technologies. No patent liability is assumed with respect to the use of the information contained herein. Although every precaution has been taken in the preparation of this book, RiT Technologies assume no responsibility for errors or omissions. Neither is any liability assumed for damages resulting from the use of the information contained herein. RiT Technologies Ltd. i Report Center User Manual Trademarks All terms mentioned in this book that are known to be trademarks or service marks have been appropriately capitalized. RiT Technologies cannot attest to the accuracy of this information. Use of a term in this book should not be regarded as affecting the validity of any trademark or service mark. The following are propriety trademarks of RiT Technologies and may not be used or reproduced without the permission of RiT Technologies: PatchView for the EnterpriseTM PatchViewTM PVMaxTM P-LETTM PV360 Dashboard SiteProTM SMART Cabling SystemTM SMARTenTM SMART CLASSixTM SMART GigaTM TM Exclusive Remedies The remedies provided herein are the Buyer's sole and exclusive remedies. RiT Technologies shall not be liable for any direct, indirect, special, incidental or consequential damages, including but not limited to, lost profits. In no event shall RiT's liability exceed the purchase price of the RiT product. Assistance For any assistance contact your nearest RiT Sales and Service Office, or your local dealer. For further information on technical support and seminars please visit out web site or email us. Web Site: http://www.rittech.com/ RiT Technologies Ltd. ii Report Center User Manual Contents CHAPTER 1 - INTRODUCTION....................................................................................................................... 5 CHAPTER 2 - LOGGING INTO THE SYSTEM ............................................................................................. 6 2.1 2.2 LOGGING INTO THE SYSTEM .................................................................................................................... 6 ERROR REPORT........................................................................................................................................ 7 CHAPTER 3 - SELECTING AN EXISTING REPORT .................................................................................. 8 GENERAL............................................................................................................................................................. 8 3.2 SELECT DIRECTORY ................................................................................................................................ 9 3.3 SEARCH AND ACTIVATE REPORT ........................................................................................................... 10 3.4 EXIT THE SYSTEM .................................................................................................................................. 10 CHAPTER 4 - EDIT AND GENERATE EXISTING REPORT SETTINGS .............................................. 11 4.1 EDIT REPORT SETTINGS ......................................................................................................................... 11 4.2 REPORT DESIGN .................................................................................................................................... 11 4.2.1 Report Fields ................................................................................................................................ 12 4.3 CREATING AND EDITING TEXT OBJECT ................................................................................................. 13 4.4 ADDING AND EDITING SUMMATION FIELDS .......................................................................................... 14 4.5 GRAPHIC DESIGN................................................................................................................................... 15 4.5.1 Functions ...................................................................................................................................... 15 4.6 USING FILTERS ...................................................................................................................................... 17 4.7 GENERATING THE REPORT AND ADVANCED PROPERTIES ...................................................................... 20 CHAPTER 5 - VIEW AND NAVIGATE REPORT DATA ........................................................................... 21 CHAPTER 6 - SAVE REPORT ........................................................................................................................ 23 6.1 6.2 CREATE NEW USER REPORT FROM EXISTING SYSTEM/USER REPORT ................................................... 23 SAVE UPDATED SETTINGS TO EXISTING USER REPORT ......................................................................... 23 CHAPTER 7 - DELETE REPORT................................................................................................................... 25 CHAPTER 8 - EXPORT REPORT DATA ...................................................................................................... 26 CHAPTER 9 - PRINT REPORT ...................................................................................................................... 27 CHAPTER 10 - E-MAIL REPORT .................................................................................................................. 28 CHAPTER 11 - PERIODIC REPORT SCHEDULING AND ACTIVATING WARNINGS..................... 29 11.1 11.2 PERIODIC SCHEDULING SETTING ......................................................................................................... 30 REPORT WARNING SETTINGS ............................................................................................................... 34 CHAPTER 12 - MAPPED FIELDS .................................................................................................................. 36 INVENTORY TEMPLATE ..................................................................................................................................... 36 DEVICES ............................................................................................................................................................ 36 Adapters........................................................................................................................................................ 38 Ports ............................................................................................................................................................. 39 Connectivity Zone ......................................................................................................................................... 39 Links ............................................................................................................................................................. 40 WORK ORDER TEMPLATE.................................................................................................................................. 40 CHAPTER 13 - FILTERS ................................................................................................................................. 42 ABOUT FILTERS ................................................................................................................................................. 42 FILTER TYPES .................................................................................................................................................... 42 BASIC FILTER SKILLS ........................................................................................................................................ 42 FILTERS IN INVENTORY TEMPLATE ................................................................................................................... 43 FILTERS IN WORK ORDER TEMPLATE ................................................................................................................ 44 CHAPTER 14 – TROUBLESHOOTING......................................................................................................... 45 RiT Technologies Ltd. iii Report Center User Manual USER PRIVILEGES ERROR .................................................................................................................................. 45 APPENDIX B: LINK STATUS, APPLICABLE OPTIONS .......................................................................... 46 DEFINITION ....................................................................................................................................................... 46 TABLE OF FIGURES ....................................................................................................................................... 48 RiT Technologies Ltd. iv Report Center User Manual Chapter 1 - Introduction The Report-Center is a report portal and Internet business intelligence center for enterprises, that provides a central access point for all reports, queries and documents from any information systems within the enterprise. It offers a wide variety of production, analysis and information distribution options for enterprise employees, clients and suppliers. Major services provided by the Report-Center Report, query and document input wizard for Web distribution. Organizational report tree manager by subjects. Individual and group user permission management. Advanced information filtering properties. Saves personalized reports by filtering and saving existing reports. Exports report data to various file formats (Excel, Word, PDF etc.) Sends reports by e-mail Periodic scheduling of report sending and receiving. Report load and queue management Fast print from Report Center server directly to enterprise printer Quick scrolling among report pages using caching mechanism Presents additional plates – different types of documents, links to others etc. RiT Technologies Ltd. 5 Report Center User Manual Chapter 2 - Logging into the System 2.1 Logging into the System The Report Center is accessed via the PV4E application. Figure 1 system login screen To access the Report Center, click the Reports button on the main PV4E toolbar. From the drop-down menu select Report Center: The following Reports Center screen opens. RiT Technologies Ltd. 6 Report Center User Manual Figure 2 Report Center Main Screen 2.2 Error Report If you receive a failure/error message warning of a particular failure in the system, contact your PV4E system administrator or a RiT representative. RiT Technologies Ltd. 7 Report Center User Manual Chapter 3 - Selecting an Existing Report After logging into the system (see Chapter 2), the Report Center main screen is displayed: Figure 3 System Main Screen General The Report Center has a list of users permitted to enter the system and each user belongs to one user list only. The user name and name of the user group to which they belong is displayed on the upper right hand side of the screen. The main screen displays system reports generated by the system manager and user reports generated by the user who can filter existing system reports and save them as new personal reports. Every Report Center system report belongs to a directory on the enterprise report tree and is filed there by the system manager. User reports are automatically filed in the Personal Reports directory under the My Reports sub-directory. The system manager defines the following: Structure of enterprise report tree Types of system reports filed in every specific directory Types of directories each user may view RiT Technologies Ltd. 8 Report Center User Manual Types of system reports each user is permitted to view After you log into the system the main screen only displays the system reports you are permitted to view as well as all previously defined user reports. 3.2 Select Directory On the right-hand side of the screen is a hierarchic tree of report directories. Click the directory name to display the reports files in this directory on the main screen as well as open the list of sub-directories within the present directory. Click the relevant directory icon to open and close the list of related sub-directories. To search for a particular report, select the directory in which it is filed. If you do not know the name of the directory, click the directory named All Reports (this is how Report Center opens after automatically logging into the system) to display a list of all reports in all directories. The first sub-directory of the All Reports directory is called My Reports. Figure 4 My Reports directory Each user has their own My Reports directory that contains all their personal reports and monitors all activities carried out by the user on their reports, divided into the following sub-directories: Personal Reports – lists all user reports generated by user Exported reports – lists all export activities of reports made by the user or ordered by a user into a variety of file formats, including report number, name, export date and file format. You can download any file previously exported. The system manager can determine a maximum number of exported reports that each user can save. Scheduled Reports – lists all scheduling of repots previously defined by each user, including report number, name, scheduling date, scheduling frequency, last action taken and next action date. Scheduling date and addressees may be updated by clicking the Report Name field. Reports for Mobile – a detail of all reports saved as reports for viewing from a Cellular phone with the purpose of viewing them from the cellular phone. RiT Technologies Ltd. 9 Report Center User Manual 3.3 Search and Activate Report After selecting a directory, all reports linked to it are displayed on a table in the center of the screen. Table columns include the following information fields for each report: Information item type – information items in the report table may include the following types: - System report – report created by system manager ( - User report – personal report generated by user ( - File/other – link to another file or site ( ) ) ) Report number – system reports are numbered by the system manager. Report name – determined by report generator Report description – determined by report generator - Click the name of any column in the report table to sort the table in ascending/ descending order according to the column. - A toolbar is located above the report table enabling additional search options: Skip columns – a combined box on the left of the toolbar shows the number of columns in the table and enables skipping from one column to the other ( ). Filter – click the filter button ( ) to perform a search for a report according to a specific value in one of the table columns (report number/ name/ description). After you have located the required report, click on the name (highlighted in blue) to access. 3.4 Exit the System Click the door icon ( ) on the upper right hand corner of the main screen and all other screens to exit the system and return to the system login screen. RiT Technologies Ltd. 10 Report Center User Manual Chapter 4 - Edit And Generate Existing Report Settings After selecting a particular report on the Report Center (see Chapter 3), the report settings screen is displayed: Figure 5 Report Settings Screen 4.1 Edit Report Settings The report settings screen is divided into six major parts: 1. Report details – report number, report description, report name and ownership fields. The values of these fields are set when the report is generated and cannot be modified. 2. Headers – all headings on the generated report: header, main heading and two lower headings. These fields can be updated before generating the report. 3. Sort fields – list of fields that determine the order of report record sorting. 4. Report Design – the Dynamic Reports Center allows styling of the report – detailed in-depth in the Report Styling section. 5. Filters – list of fields that filter the original report population. These fields can be updated before generating the report. 6. Generate report and perform advanced actions – using the toolbar. Fields that cannot be modified are set on a grey background. Mandatory fields where you must enter a value are set on a yellow background. 4.2 Report Design It is recommended that you use the inventory or Work Order template to design a report. The report's initial settings are defined by the system administrator. Entering the design screen is possible only for a report that is defined as editable. RiT Technologies Ltd. 11 Report Center User Manual You can perform the following actions in the Report Design screen: Add new fields. Edit existing fields. Create complex functions. Edit and add notes. Change field location. Add vertical and horizontal lines. Add summaries to existing fields. After clicking the Report Styling tool bar, the Dynamic Reports screen is displayed: Figure 6 Dynamic Field Input The Report Styling screen presents the report's structure and is divided into three main parts: 1. The Tool Bar – appears in the upper part of the screen. Shows all the tools available to the user in order to perform styling actions on the report. 2. The Areas Tool Bar – appears in the left part of the screen. Displays the sections in the report, such as: groups, data fields, data lines, etc. 3. Data Display Area – this area displays the fields, calculation fields and the summaries displayed in the report. 4.2.1 Report Fields In the Field Design screen, there appears a details line and a groups line. The Details Line – Presents the data in the report at the record level as it appears in the database. RiT Technologies Ltd. 12 Report Center User Manual The Groups Line – Presents a collection of data at the group field level. For example in a Customer Invoice Summary Report there is no importance in viewing the comprise data for every invoice, but rather it is important to view the summary of invoices for each customer, and therefore a new group for the Customer field, presents a field summarizing all the invoices. The report shows a line presenting the sum of the invoices issued for each customer. a pop-up window opens in the right-hand side of If you click the icon the data area. This window displays all of the fields available to be included in the report, and is comprised of two columns. Mapped Field – displays the database fields. For more information about Mapped Fields, see Chapter 12 – Mapped Fields. Formula Field – displays the calculation fields written by the person who created the report at the time of its creation. Each new calculation field that is written in the Dynamic Reports screen is displayed in this column. The fields presented in the field list can be integrated into the report in the following ways: Adding a field to a report - In order to add a new field to a report from the list of fields available, click on the desired field using the left mouse button, and drag the field, while holding the mouse button, to the relevant location within the data area. Following the release of the mouse button, the field will be placed in the desired position. Changing field location - Click the desired field using the left mouse button, and drag the field, while holding the mouse button, to the relevant location within the data area. Upon releasing the mouse button, the field will be placed in the desired position. Changing field width - Point to the relevant field using the mouse. click the Shift button on the keyboard, and while holding the shift key down, drag the field to the left or right, to widen or narrow, accordingly. Creating a new group - Click the desired field using the left mouse button and drag, while holding, to the Details line in the Areas toolbar located in the left-hand side of the screen. After releasing the mouse button, a new group will be created in the report. 4.3 Creating and Editing Text Object Creating new Text Objects – Type the desired wording in the Text Object writing window. After typing the desired wording, click the icon and drag it to the desired location within the data area. When the mouse button is released, the Text Object will be placed in the desired location. Editing existing Text Objects – In order to edit a Text Object, make sure that the Text Object is focused. Click the Text Object using the left mouse button until its border is displayed as a dotted blue line. The content of the Text Object appears in the Text Object writing window. RiT Technologies Ltd. 13 Report Center User Manual The Text Object is now focused, and it is possible to perform one of the following editing actions: - Enables you to select font type for the Text Object. - Enables you to set the font size. If the font is made significantly larger, it is important to remember to increase the size of the text box in the data area accordingly. - Enables you to accentuate the font in the Text Object . - Enables you to italicize the font in the Text Object. - Enables you to underline the font in the Text Object. - Enables you to justify the wording to the right, the left or to the center, by clicking the appropriate icon. Changing the wording – Retype the wording in the Text Object writing window. 4.4 Adding and Editing Summation Fields The Dynamic Reports Field contains a list of built-in arithmetic functions that enable fast and easy summation of each numerical field. The list of built-in arithmetic fields contains the following functions: SUM – adds up all of the values displayed in a selected field. COUNT – counts all of the values displayed in a selected field. AVG – calculates the average of all the values displayed in a selected field. MIN – displays the minimal value out of all the values displayed in a selected field. Adding a summation field is performed according to the following steps: 1. In order to create a calculation field, drag the numeric field from the list of fields appearing on the right-hand side of the screen to the relevant place within the data area. For example, if the reference is to a calculation field for a group, the field must be placed in the bottom line of the group footer. 2. Click on the field using the left mouse button, so that it becomes bold. 3. Click the arrow adjacent to the summary window and select one of the functions appearing in the display list. The focused field will become a calculation field and is displayed, including the sum of all the column values according to the group to which it has been located. Important: The calculation field displays a numerical calculation as per its location within the report. - allows you to set the date and number fields within the report. RiT Technologies Ltd. 14 Report Center User Manual 4.5 Graphic Design – allows you to add a horizontal or vertical line. In order to add a line, click the appropriate icon and drag it to the data area while holding down the left mouse button. After releasing the button, the line will be displayed where chosen in the data area. Extending or widening a line – point to the line with the mouse pointer, hold down the Shift key, and while holding down the left mouse button, drag the line to the right or down, accordingly. In order to shorten or narrow a line – perform the same action, but the direction of the drag will now be to the left or up, accordingly. 4.5.1 Functions The Dynamic Reports Center allows you to edit existing functions or to create new ones. To view the editing window, click the icon . See the following screen: Figure 7 Function Creation Screen The formula screen consists of three main parts: 1. The toolbar – located in the upper part of the screen and displays the tools available to you when handling the function (see arrow number 1 – Fig 8). 2. The functions toolbar – located in the left-hand side of the screen and shows a file tree that includes all of the functions available to you in order to write the function (see arrow number 2 - Fig 8). 3. The editing area – located in the center of the screen and is used to write the function code (see arrow number 3 - Fig 8). RiT Technologies Ltd. 15 Report Center User Manual Figure 8 Function Creation Screen To Edit an existing function – click the arrow in the formula menu in the toolbar (see arrow number 4 - Fig 8), and select the relevant function from the list of functions that appears. This list includes all the functions existing in the report. After selecting the function, the function code is displayed in the editing area. Create a new function – make sure that the formula window displays NEW (default setting). Type the name of the new function in the Name window. Now turn to the editing area and enter the code for the function. When entering the function editing window, the following actions can be taken: Allows erasing existing functions Performs a syntax check for the function code entered, and displays a notice Saves the function Saves the function and closes the function editing window The functions tree is organized by topics and is constructed in a hierarchal fashion. The tree is comprised of six primary folders, with each primary folder containing within it sub-folders grouping their relevant functions. For example, all functions for performing mathematical operations are in the folder titled Math. These are used for the following operations: Abs – a function acting on a number and returning the number only as a positive value. Ath – a function that acts on a number and returns only the inverse tangent of the number in radians. RiT Technologies Ltd. 16 Report Center User Manual The function tree displays the function name as well as the type of variables, appearing in parentheses next to the function name, on which the function acts. For example: DateTime acts on two values, the first is the date, and the second is time, and this function is displayed in the functions tree as: DateTime (date, time). In order to add a function to the editing area, click the desired function using the left mouse button, the function name appears in the editing area according to the fashion in which it operates. In order to add a field to the editing area, point to the field name and drag it to the editing area. A short explanation is available that explains the manner of operation for each function. To view these explanations, point to the function name, and click the left mouse button. 4.6 Using Filters Filter fields may be of a number of types: Text – enables you to input an entire string of characters for precise or close search. Numeric field – enables you to input digits only Date/time – enables you to select relevant date/time using a calendar Integrated box – enables you to select a single value List of values – enables you to select single value of several values from the list The system manager can define each of the filter field in the following manner: Single value – this filter may only be used once Several values – this filter may be used without limit with different values Value range- several value ranges may be selected to filter a particular field by defining the lower and upper level in each value range Additional filter fields can be added by clicking the right of the relevant filter). icon (to the Furthermore, filter fields can be cancelled and erased using the (right of the relevant filter) icon To input a text value, type the relevant words/characters in the text box. A filter field with four options is located to the left of the text box. 1. Begins with: only a record beginning with the words/characters entered into the text box are included in the report results. 2. Ends in: only a record ending with the words/characters entered into the text box are included in the report results. RiT Technologies Ltd. 17 Report Center User Manual 3. Every record that includes the words/characters entered into the text box are included in the report results. 4. Equal to: records identical to the words/characters entered into the text box are included in the report results. To enter a date/time type value, click the calendar icon to the left of the filter field ( ) or the filter field itself. A calendar window opens that enables you to select a date and time. Figure 9 Calendar Filter After a date is selected, the calendar closes and the date and time values appear in the filter field. To enter a value/several values from a list, click the list icon left of ) or the filter field itself. A window with a list appears the filter field ( from which values can be selected. RiT Technologies Ltd. 18 Report Center User Manual Figure 10 Filter Screen With List Of Values If only one value is selected from the list, a notification message appears at the top of the table. If not, an unlimited number of values may be selected. To select a value from the list, highlight the checkbox right of the relevant record. After selecting the values, click select. The window closes and the selected values appears on the filter field. A toolbar with additional search options is located above the value table. Skip pages – on the left of the toolbar is a combined box that enables you to viewi the number of pages in the table and moving from page to page (every page displays a maximum of 15 values determined by the system manager). Filter- clickes the filter value to search for a specific value in one of the table columns. To delete Filter values, click the eraser icon at the left of the filter field ). ( RiT Technologies Ltd. 19 Report Center User Manual Report sorting fields – if the system manager defined sorting fields in the report settings screen, another item can be added, displaying the sorting fields determined and the required sorting order – ascending or descending. click the plus sign "+" at the right of the field to select the field again. A different sorting order may be selected for each field. Figure 11 Report Sorting Fields 4.7 Generating the Report and Advanced Properties After report updates are updated (saving is not mandatory), it can be generated. To generate, click the magnifying glass icon on the toolbar ( ) At the head of the page is a toolbar with the following advanced options (from right to left): Generate report Save as – creates a new user report from an existing report Save – saves updated settings to existing user report Export report data – to Excel, Word, PDF format etc. (according to the properties of the customer's Crystal version) E-mails report Schedules report Print report Chapters 6 to 12 provide a detailed description of the advanced options. RiT Technologies Ltd. 20 Report Center User Manual Chapter 5 - View and Navigate Report Data After a report is produced by Report Center, the following report screen is displayed: Figure 12 Report Screen The report screen is divided into three major parts: 1. Report settings – report headers, report generator's name and filters selected for report. 2. Report data – the body of the report. 3. Navigate through report data and perform advanced actions – using the toolbar. At the top of the report is the report generator name as well as filter values selected for each of the highlighted fields. A toolbar at the top of the page presents the following options (from right to left): Report page numbering Skip report pages – next page, previous page, first page, last page Distance from display – enlarge/diminish report display Print report RiT Technologies Ltd. 21 Report Center User Manual Export report data to Excel, Word, PDF format etc. Search ( ) opens a window that enables you to search for information within the report. You must enter the requested data. Click find next. The data is presented and is highlighted in orange. Repeated clicking on this button will continue the search for the data further on in the report and so on until the end of the report. Figure 13 Report Search Screen Refresh report data – renewed production of report E-mail report – immediate or scheduled mailing RiT Technologies Ltd. 22 Report Center User Manual Chapter 6 - Save Report After selecting a particular report from Report Center, the following report settings screen is displayed. Figure 14 Report Settings Screen The toolbar on the report settings screen provides two options for saving the reports: 1. Save as – creates a new user report from an existing report 2. Save – saves updated settings to existing user report 6.1 Create New User Report from Existing System/User Report New personal reports may be created from existing system/user reports. After selecting a particular report, you can update report headers and filter values. To permanently save these settings in a new user report, you must click save as ( ) on the toolbar. The system prompts you to feed the report description field again, as follows. Figure 15 Save As screen If the new report was saved successfully, the new user report is added to the system and the message report save succeeded appears. The new user report may be accessed in the My Reports sub-directory within the Personal Reports directory. 6.2 Save Updated Settings to Existing User Report Updated settings may only be saved to user-type existing reports. System report settings may not be updated. RiT Technologies Ltd. 23 Report Center User Manual After selecting a particular user report, you can update report headers and filter values. To permanently save these settings in a new user report, you ) on the toolbar. If the update is successful, the must click save ( system displays the message report save succeeded. If you update the system report settings and attempt to save them, the system provides the option to save a new user report with these settings. The system displays the Save As screen and prompts you to input the new Report Description field. If the new user report was saved successfully, the new user report is added to the system and the message report save succeeded appears. RiT Technologies Ltd. 24 Report Center User Manual Chapter 7 - Delete Report After logging into the system (Chapter 2), the following main Report Center screen is displayed: Figure 16 Main System Screen A list of the selected reports in the present directory are displayed in the center of the screen. To delete a report, mark the checkbox to the left. ) After checking the reports to be deleted, click the Delete Report icon ( on the toolbar. The system prompts you for final approval for this request and then deletes the requested reports. Note, only user reports in My Reports directory can be deleted. System reports cannot be deleted. RiT Technologies Ltd. 25 Report Center User Manual Chapter 8 - Export Report Data Report data can be exported to various file formats using the toolbar at the top of the Report Settings screen and the report screen. The exportable formats are determined by the properties of the Crystal version used by the customer. Popular current formats include: Excel, Word, RTF, PDF, HTML. After you click the icon for a particular format, the system immediately begins the exporting process. The resulting file may be viewed in the selected format or downloaded into the Exported Reports sub-directory within My Reports directory. RiT Technologies Ltd. 26 Report Center User Manual Chapter 9 - Print Report To print the report, click the Print icon on the toolbar at the top of the Report Settings screen and the report screen. The print screen is displayed. After selecting the Enterprise Printer option, Report Center performs a quick print on the enterprise printer (recommended for enterprise users printing a large number of pages). If Local Print is selected, the user's computer prints the report on a printer directly connected to it. RiT Technologies Ltd. 27 Report Center User Manual Chapter 10 - E-mail Report IMPORTANT NOTE! When sending a report via email, the sender’s email account details must be defined in the PV4E software. A report can be emailed by clicking the email Report icon ( ) on the toolbar at the top of the Report Settings screen and the report screen. The email report screen is displayed below. Figure 17 E-mail Report Screen At the top of the screen, the email addresses can be selected from a list that includes all users in the Report Center. Email addresses may also be entered manually and added to the list of addressees by clicking the add button. The requested file format can then be selected from the Export to Format field. RiT Technologies Ltd. 28 Report Center User Manual Chapter 11 - Periodic Report Scheduling and Activating Warnings Reports can be periodically scheduled and warnings can be set by clicking the scheduling and warning icon ( Report Details screen. ) on the toolbar at the top of the Figure 18 Report Details Screen Click the schedule and warning icon to open a window where you can define periodic scheduling or warnings. RiT Technologies Ltd. 29 Report Center User Manual Figure 19 Setting Design Window 11.1 Periodic Scheduling Setting Warning frequency – determines the frequency in which the report is sent Operation begin date – this box contains a calendar to which the user may set the relevant date and precise time for the report arrival Operation conditions – If you check this box, you will be required to enter a number to schedule the report. The number of records must be equal or greater than the requested number. Destination – You can select the way that the form is delivered. For example, through a network directory, by e-mail, printer or Exported Reports directory. If you select the printer option, the enterprise printer name must be approved and listed as an option. The entire report or selected pages can be printed. To finish, click OK. RiT Technologies Ltd. 30 Report Center User Manual Figure 20 Receive Report Through Printer Option If you want to receive the report through a network directory, the type of format and directory path for the report must be selected. RiT Technologies Ltd. 31 Report Center User Manual Figure 21 Receive Report Through Network Directory Option If you want to export a report by email you must enter the relevant email addresse(s) in the window. You can enter a new address or select one that is already in the user's address book. Enter the subject of the report on the subect line, you can write the contents of the report in the box beneath. To complete the action select the report export format. Click OK and save. RiT Technologies Ltd. 32 Report Center User Manual Figure 22 Receive Report By E-Mail Option If you select the exported reports option you must select the report export format. RiT Technologies Ltd. 33 Report Center User Manual Figure 23 Receive Report Through Exported Reports Option 11.2 Report Warning Settings The settings screen includes a report warning option, activated by checking the perform only if number of records is at least box . This refers to activating a condition that sends the report to the user only if it is fulfilled. RiT Technologies Ltd. 34 Report Center User Manual Figure 24 Operate Warning Box Complete the following boxes according to the above. See Periodic scheduling setting. RiT Technologies Ltd. 35 Report Center User Manual Chapter 12 - Mapped Fields Mapped fields are PV4E database fields that are mapped into the reporting module to allow you to create reports. There are two main report templates in the report center: ■ Inventory template – allows you to create a report on every item and link stored in the PV4E database. ■ Work Order template – allows you to create report for Work Orders created in PV4E. Each template includes its own mapped fields which correlate to the PV4E database fields. Inventory Template The inventory template contains several logical databases. Each database has its own fields as follows: ■ Devices – every item stored in PV4E. ■ Adapters – any type of adapter that can be installed in a Terminal Equipment such as NIC, SCSI, etc. ■ Ports – any port in PV4E, such as switch port, panel from and back port, outlet ports, etc. ■ Connectivity Zone – connectivity zones as defined in PV4E. Connectivity Zones are a group of panels which are used by the automated provisioning module ■ Links – any part of link between switch, panel, outlet, etc. Note: Link information is updated periodically. When executing a report it displays link information updated since last update was performed. You can however initiate an update manually. Devices Filed Name Description Type Can be Filtered Catalog Name The catalog name of devices String Yes Class The Class to which devices belong in the catalog String Yes CPU The CPU speed of the terminal equipment Float No Description Description of the device, taken from the String No RiT Technologies Ltd. 36 Report Center User Manual Filed Name Description Type Can be Filtered ‘Notes’ field in the device properties window Device Name The name of the device String Yes Functional Type The functional type to which the device belongs. Functional type is a list of options, such as: panel, outlet, switch, master, etc. String Yes Location Location of the device String Yes Location Category The Location category of the device location. Using this field you can filter devices by their location, for example: generate a report only for devices that are located in a rack, switch, city, etc. String Yes Monitor The type of monitor that is connected to the terminal equipment Network Equipment Type The network equipment type name. For switch this field display either module or chassis String No No. of Slots The number of available slots in the device. This field displays the number of modules for a switch. And displays the number of slots for adapters for fields. Integer No PV Supported Managed or non-managed panels. Yes/No Yes PVMax Parent Name The name of the parent device to which a PVMax device is connected in a PVMax topology tree. string Yes integer No string Yes string No String No Available only for PVMax devices PVMax Parent Port The port number to which the device is connected to in the parent device. Available only for PVMax devices PVMax Parent Type The type of the PVMax parent device to which a device is connected in a PVMax topology tree. Applicable types can be Expander, Master, etc. Available only for PVMax devices PVMax Serial The serial number of the PVMax device. RiT Technologies Ltd. 37 Report Center User Manual Filed Name Description Number Available only for PVMax devices PVMax Software The software information of the PVMax device. Type Can be Filtered string Yes string Yes String Yes Float No Available only for PVMax devices PVMax Status PVMax device status. Available only for PVMax devices Rack Indicator Name When the device is a rack, this field contains the name of the rack indicator that is associated with it RAM The amount of RAM in the terminal equipment Reserved (RACK) This field relates to a RACK and indicates if the RACK space is free or reserved for a server/etc. Yes/No (may be null) Yes Serial No. The serial number of the device String No Size (U) The size of the device in U units Float No Vendor The name of the vendor String Yes Vendor URL Vendor’s website String No Adapters Filed Name Description Type Can be Filtered Adapter Name The name of the adapter String Yes Adapter Ports Number The number of ports in the adapter Integer No Adapter Slot The slot number in the device where the adapter is installed Integer No Adapter Type The type of the adapter, adapter can String be: NIC, Modem, SCSI, etc. Yes RiT Technologies Ltd. 38 Report Center User Manual Ports Filed Name Description Type Can be Filtered Connector The type of the connector String No IP Address The IP Address of the port. This is relevant if the port belongs to terminal equipment, such as a station with NIC installed on the port, IP phone, etc. String Yes Link status Whether this port is part of full link. See Appendix A: Link Status, applicable options String Yes MAC Address The MAC Address of the port. This is relevant if the port belongs to terminal equipment, such as station with NIC installed on that port, IP phone, etc. String Yes Port ID The name of the port in the inventory String Yes Port Index The index of the port in the device Integer No Port Name The name of the port in the catalog String No Port Type The type of the port. Whether Back or Front. String Yes Subnet The subnet of the port. This is relevant if the port belongs to terminal equipment, such as station with NIC installed on that port, IP phone, etc. String Yes Subnet Mask The subnet mask of the port. This is relevant in case the port belongs to terminal equipment, such as station with NIC installed on that port, IP phone, etc. String No Connectivity Zone Field Name Conn. Zone Desc. Connectivity Zone Description The description of the Connectivity Zone which is used by the automated provisioning module The name of the Connectivity Zone which is used by the automated provisioning module Type String Can be Filtered No String Yes RiT Technologies Ltd. 39 Report Center User Manual Links Field Name Description Type Can be Filtered Link ID The internal DB ID of the link. All the ports that belong to this link should have the same link ID value. String No Link Order The order in which items appear in a link Integer No Link Update Time The last time that the link information was updated. Date time Yes Work Order Template Filed Name Description Type Can be Filtered Assigned To The user that needs to perform the task String Yes Closed By The name of the user that closed the Work Order String Yes Closed Date The date that the Work Order was closed Date time Yes Created By The name of the user that created the Work Order String Yes Creation Date The date that the Work Order was created Date time Yes Description A description of the Work Order String No Due date The due date of the Work Order Date time Yes ID The ID of the Work Order String Yes Location A The first location of the task String Yes Location B The second location of the task String Yes Priority The priority of the Work Order Integer Yes Status The status of the Work Order String Yes Task Description The description of the task. The description is a text describing briefly the task that needs to be performed. String No Date time Yes Task Due date The task’s due date RiT Technologies Ltd. 40 Report Center User Manual Filed Name Description Type Can be Filtered Task Number The task number Integer Yes Task Status The status of the task String Yes Task Type The type of the task String Yes RiT Technologies Ltd. 41 Report Center User Manual Chapter 13 - Filters About Filters Filters allow you to control which type of information is displayed in a report. You can set filters to display only relevant information in your report. There are two main report templates in the report center: ■ Inventory template – allows you to create reports that include every item and link stored in the PV4E database. ■ Work Order template – allows you to create reports for Work Orders in PV4E. Each template includes its own filters. Filter Types There are several types of filters: ■ Text – allows you to filter by entering free text. Using the ‘contains’ dropdown allows filtering by any part of the field text: ‘start with’, ‘end with’, ‘contains’, ‘equal to’. ■ List – filters of this type include a list of options to choose from. The list can include information taken from the database, such as ‘Catalog name’ or it can include a predefined list, such as ‘port type’. ■ Boolean filter –Yes/No ■ Date – allows you to filter by choosing date, range of dates or use predefined date filters such as: yesterday, current month, last month, Etc. Basic Filter Skills Use the following when working with filters: Icon Used when… Choosing from a list Adding a filter item Removing a filter item Clearing the filter selection Copying date to next field RiT Technologies Ltd. 42 Report Center User Manual Filters in Inventory Template Filter Name Description Type Adapter Name There are several types of adapters in PV4E, for example: NIC, Modem, etc. This filter allows you to filter adapters by name. Text Adapter Type Filter adapters by type, e.g. NIC, KVM… Text Catalog Name Filters for specific items according to their catalog name. This filter list contains all catalog names as they appear in PV4E. List Class Filters devices by class name. This filter list contains all class names as they appear in PV4E. List Connectivity Zone Filters devices, links… by the connectivity zone to which they belong Text Device Name Filters device by name. Text Functional Type Filters devices by functional type, e.g. Panel, Switch… List IP Address Filters devices by IP address or any part of it. Text Link Status Filters ports that are part of a certain type of link: full link, incomplete link, etc. see Appendix A: Link Status, Applicable Options List Link Update Time Filters for links according to their last update time Date or list Link Contain Catalog Filters only links that contain a specific catalog item List Links Contain Functional type Filters only links that contain specific items according to their functional type List Location Filter for items which are located in certain location List Location Category Filters items which are located in certain types of locations, e.g. search for all items located in a Rack. List MAC Address Filters terminal equipment from a full or partial MAC address Text Port ID Filters ports by ID Text Port Type Filters back or front panel’s ports Text PV Supported Filters managed or non managed items Yes/No Comments RiT Technologies Ltd. 43 Report Center User Manual Filter Name Description Type PVMAX Parent Type Filters PVMax devices by their parent PVMax device List PVMAX Status Filters active or non active PVMax devices List Rack Indicator Name Filters Rack Indicator device by name. Text Reserved (RACK) Filters for new, reserved or free Rack spaces Yes/No Show Devices Filters terminal equipment that is part of a link ‘with links’ or ‘without links’. Terminal Equipment is considered part of a link if it has a port which is connected. List Subnet Filters devices by network subnet Text Vendor Filters devices by vendor List Comments Filters in Work Order Template Filter Name Description Type Comments Assigned to Filters the name of the person the Work Order(s) is assigned to List The list includes all the users in the system Closed By Filters the name of the person who closed the Work Order(s) List The list includes all the users in the system Closed Date Filters Work Orders by closing date Date Created By Filters the name of the person who created the Work Order(s) List Creation Date Filters Work Orders by creation date Date Due Date Filters Work Orders by due date Date Priority Filters Work Orders by priority List Status Filters Work Orders by status List Task number Filters Work Order tasks by number Text Task Status Filters Work Order tasks by status List Task Type Filters Work Order tasks by type List WO ID Filters Work Orders by any part of its ID Text The list includes all the users in the system List of priorities as appears in PV4E database. RiT Technologies Ltd. 44 Report Center User Manual Chapter 14 – Troubleshooting User Privileges Error If you receive the following error message when granting user privileges to access the Report Center, it could be due to the setup being run from the CD/DVD. To correct, copy the contents of the installation disk to your hard drive and run the setup again, RiT Technologies Ltd. 45 Report Center User Manual Appendix B: Link Status, Applicable Options Definition “Full Link” – set of links between outlet and a switch port, including all panels in between. “Extension port” – extension port is a port on an IP Telephone device that enables connecting another PC to the network. Applicable options for link status are: ■ Full Link with Terminal Equipment • ■ Full Link without Terminal Equipment and free Extension port • ■ Example: a switch port that is connected to a panel and to an outlet but nothing is connected to the outlet. Full Link with Terminal Equipment and free Extension port • ■ Example: a switch that is connected to a panel and to an outlet with an IP Telephone device connected to the outlet. Full Link without Terminal Equipment • ■ Example: a PC that is connected to an outlet and to a panel and to a switch. For future use Terminal Equipment without a full link • Example: a PC that is connected to outlet and to a panel but is not connected to a switch. RiT Technologies Ltd. 46 Report Center User Manual ■ ■ Incomplete full link without Terminal Equipment • Example: patch cord connected between two panels but not connected to a switch and no pc connected to the outlet. • Example: patch cord connected between two panels but not connected to a switch and not to an outlet. Incomplete full link Without Terminal Equipment and free Extension port • Example: Example: IP Telephone device connected to an outlet and to a panel but not to a switch Example: Example: IP Telephone device connected to an outlet and to a panel. ■ Incomplete full link With Terminal Equipment and free Extension port • For future use. RiT Technologies Ltd. 47 Report Center User Manual Table of Figures FIGURE 1 SYSTEM LOGIN SCREEN ................................................................................................................ 6 FIGURE 2 REPORT CENTER MAIN SCREEN .................................................................................................. 7 FIGURE 3 SYSTEM MAIN SCREEN .................................................................................................................. 8 FIGURE 4 MY REPORTS DIRECTORY ............................................................................................................. 9 FIGURE 5 REPORT SETTINGS SCREEN......................................................................................................... 11 FIGURE 6 DYNAMIC FIELD INPUT................................................................................................................ 12 FIGURE 7 FUNCTION CREATION SCREEN .................................................................................................. 15 FIGURE 8 FUNCTION CREATION SCREEN .................................................................................................. 16 FIGURE 9 CALENDAR FILTER........................................................................................................................ 18 FIGURE 10 FILTER SCREEN WITH LIST OF VALUES................................................................................. 19 FIGURE 11 REPORT SORTING FIELDS.......................................................................................................... 20 FIGURE 12 REPORT SCREEN .......................................................................................................................... 21 FIGURE 13 REPORT SEARCH SCREEN.......................................................................................................... 22 FIGURE 14 REPORT SETTINGS SCREEN....................................................................................................... 23 FIGURE 15 SAVE AS SCREEN ......................................................................................................................... 23 FIGURE 16 MAIN SYSTEM SCREEN .............................................................................................................. 25 FIGURE 17 E-MAIL REPORT SCREEN ........................................................................................................... 28 FIGURE 18 REPORT DETAILS SCREEN......................................................................................................... 29 FIGURE 19 SETTING DESIGN WINDOW ....................................................................................................... 30 FIGURE 20 RECEIVE REPORT THROUGH PRINTER OPTION ................................................................... 31 FIGURE 21 RECEIVE REPORT THROUGH NETWORK DIRECTORY OPTION ........................................ 32 FIGURE 22 RECEIVE REPORT BY E-MAIL OPTION.................................................................................... 33 FIGURE 23 RECEIVE REPORT THROUGH EXPORTED REPORTS OPTION............................................. 34 FIGURE 24 OPERATE WARNING BOX .......................................................................................................... 35 RiT Technologies Ltd. 48