1
N-31 Series
Network Manual
Thank you for your purchase of the PLUS Network board.
Please read this N-31 Series Network Manual carefully before use
to take full advantage of the functions of this product. Also read the
separate User’s Manual as appropriate. After you have finished reading the manuals, please keep them for future reference.
Introduction
This manual is for the network board (model name: N-31S/N-31W/N-314), providing how to use this product
on a network.
For using the network board, refer to the separate “N-31 Series User’s Manual”.
• Via wired LAN you can:
• view images stored on the network board via a network. (multiple save location setting information can be
registered)
• store images on an FTP server via a network. (multiple save location setting information can be registered)
• print out scanned images to a FTP supported network printer.
• use the IC card to store images on a specific folder on an FTP server
Cautions on using networks
About the network connection environment
• The required operating environment is subject to change without notice. Also, PLUS does not guarantee all operations.
• Even if all required operating environment conditions are met, it may happen that operations do not work properly or that
some problems arise. Depending on the communications status, displays may be delayed and communication errors may
occur.
Disclaimer
• PLUS will accept no responsibility whatsoever for any consequences of problems of communication impediments in connected devices due to the network functions.
• PLUS will accept no responsibility whatsoever for impediments incidental to usage of or the inability to use the network functions (loss of business profits, losses due to interruption of activities, etc.).
• PLUS will accept no responsibility whatsoever for malfunctions due to combinations with connected devices or the software
used, nor for damages arising from hang-up, etc.
Trademarks and copyrights
• Microsoft and Windows are registered trademarks or trademarks in the United States and other countries of the Microsoft Corporation.
• Adobe and Adobe Acrobat Reader are trademarks of Adobe Systems Incorporated.
• Safari, Apple, Mac OS and Macintosh are trademarks or registered trademark of Apple Computer, Inc., of the United States.
• Mifare is a registered trademark of NXP Semiconductors.
• The copyright of CyaSSL belongs to wolfSSL Inc.
The trademarks of the various companies and the product trademarks, even when not written down, will be given due respect.
Product names and company names appearing in this manual are registered trademarks or trademarks of the respective companies.
(1) The contents of this manual may not be reprinted in part or whole without permission.
(2) The contents of this manual are subject to change without notice.
(3) Great care has been taken in the creation of this manual; however, should any questionable points, errors, or omissions be
apparent, please contact us.
(4) Notwithstanding Section (3), this company will not be responsible for any claims of loss or profit or other matters deemed to
be the result of using this unit.
(5) Since printer connected with the network board is based on the use as a peripheral device for the PLUS network board, we
do not warrant direct connection with a computer.
(6) Manuals with incorrect collating or missing pages will be replaced.
E-2
Table of Contents
Introduction................................................................E-2
Setting before using a network.................................E-4
Simple Network Settings (via USB)............................ E-4
Making Detailed Settings (via LAN)............................ E-6
Basic Setting Operations..................................... E-7
CB Setup........................................................... E-9
Network Setting — Board/Printer Setting.......... E-11
Network Setting — Save Setting....................... E-13
Network Setting — SSL Setting........................ E-14
Administrator Menu — User Setting.................. E-15
Administrator Menu — Security Setting............ E-16
Administrator Menu — Disk management
Setting............................................................ E-17
Header/Footer.................................................. E-18
CB Information................................................. E-18
Writing Save Location Setting Information to IC
Card................................................................ E-19
Export and Importing Save Location Setting
Information...................................................... E-19
Resetting the Network Settings......................... E-20
Creating and Registering Headers and Footers... E-21
Using the Network board Connected to a Network.E-22
Saving scanned images on the network board or
FTP server............................................................. E-22
Printing out to a Network Printer............................. E-24
Transferring image files to/deleting them from the
computer............................................................... E-25
When the folder for saving is set to “Board”....... E-25
Deleting image files from the network board...... E-27
Using the Printer Server for PLUS Copyboard.........E-28
What is Printer Server for PLUS Copyboard?............ E-28
Operating Requirements......................................... E-28
Installation of the Software......................................E-29
Check Prior to Installation....................................... E-29
Installation of the Printer Server for PLUS
Copyboard............................................................. E-29
Cautions On Installation.................................... E-29
Uninstallation of the Printer Server for PLUS
Copyboard............................................................. E-30
Meaning of the Terms Used in this Manual
• Main unit (or set): This refers to the network board.
• USB memory: refers to USB flash memory.
• USB memory storage: means the saving of sheet surface data using MEMORY (i.e., the USB port) of the operation panel.
• Memory for computer storage: indicates a temporary saving location of the image that has been read.
• “copy”: Both “print” and “USB memory saving” mean to “copy.”
• “Sheet surface”: refer to the drawing portion.
• “Scroll” or “move”: indicates feeding of the sheet
• Memory for network storage: Memory used for network storage.
• Network: The communications network on which devices are interconnected in net fashion for communication (exchange of
data) between the devices. For this network board, the “network” indicates the LAN below.
• LAN (Local Area Network): A closed communications network for communicating within a restricted area, such as within a company.
• FTP (File Transfer Protocol): The protocol (communications rules) used when transferring files on a TCP/IP network.
E-3
Setting before using a network
Simple Network Settings (via USB)
Upon purchase (by default), the network board’s IP address and subnet mask are not yet set. When first connecting
the network board to a network to use it, use the simple network settings to set the network board’s IP address on
the network following the procedure below.
Notice
• When making network settings, following the instructions of the network administrator.
• It is not possible to format the computer storage memory from the computer.
• Do not press operation buttons on the network board while the computer storage memory is being accessed from the computer. Doing so will result in increased time for response between the computer and network board, and operations may not
be possible.
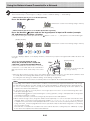
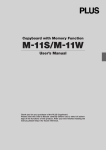
Turn on the network board’s power and connect the network board’s computer USB port for
(type B) to the computer using a USB cable.
• The standard driver is installed automatically and the network board is recognized by the computer as a removable
device.
USB cable included
with network board
To USB port on computer
(type A)
To network board’s computer USB
port (type B)
Open “My Computer”, and in this open the network board (removable device).
1 Double-click the “My Computer” (or “Computer”) icon to open.
2 Double-click the network board (display refers to model name) to open the network board’s computer storage memory.
• To check that the network board is operating as a device, right-click “My Computer” (or “Computer”) to display the
menu, then check that “PLUS Copyboard USB Device” is displayed as the disk drive name at “Management” →
“Device Manager” for Windows 7.
Use a program on the computer (Notepad, etc.) to open the “setting.ini” file in the “setup”
folder.
1 Double-click the “setup” folder to open it.
2 Open the “setting.ini” file (text format) located in this folder using Notepad or another program on the computer and
directly overwrite the contents of the settings file.
• The only characters that can be input are numbers and periods.
Do not insert any spaces. If so, the file will be identified as corrupt when the network board is started and the settings will be reset to the defaults.
E-4
Setting before using a network
Contents upon purchase and when network settings are reset
Version:04.00.00.05.00.00.00.52 . ....... Displays the firmware version of the network board
MAC Address ...................................... Displays the MAC address of the network board
Terminal Name ..................................... Displays the terminal name of the network board
-----------------------------------------------------------------------------------------------------------------------DHCP=off ............................................ Input the DHCP
IP Address= ......................................... Input the IP address.
Subnet Mask= ..................................... Input the subnet mask.
Default Gateway= ................................ Input the default gateway if necessary.
Item
Item name
Setting
Firmware version
Version
Cannot be changed
MAC address
MAC Address
Cannot be changed
Terminal name
Terminal Name
Cannot be changed
DHCP
DHCP
Off: Manual
On: Auto
On
IP address
IP Address
Any value
Blank
Subnet mask
Subnet Mask
Any value
Blank
Default gateway
Default Gateway
Any value
Blank
Example of setting
(To manually assign an IP address)
DHCP=off
IP Address=192.168.11.120
Subnet Mask=255.255.255.0
Default Gateway=192.168.11.1
Default
(To automatically assign an IP address)
DHCP=on
IP Address=
Subnet Mask=
Default Gateway=
Save the “setting.ini” settings file, overwriting the
previous file.
Save to location: “ setup” folder on network board (removable
disk)
File name: setting.ini
• We recommend making a note of changed settings for future
reference.
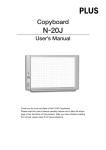
Check the connection.
1 Connect one end of the LAN cable to the LAN port of the lower
side of the network board and connect the other end of the
LAN cable to a network device such as a router and a switching hub.
2 Launch a web browser (ex.: Internet Explorer) on a computer
connected to network.
3 In the address field, input the IP address that was set or the
terminal name of the network board, and then press the [Enter]
key.
When the network board has been correctly connected to network, the user authentication screen appears.
• No password is set upon purchase.
Input “admin” in alphanumeric characters in the User Name
field and click [OK].
continued on next page
E-5
Setting before using a network
If the network board’s top screen does not open
• Have you made a mistake inputting the IP address that was set?
• Is the network board’s LAN terminal properly connected to a LAN port on the network?
• When using a proxy server, add the network board’s IP address to the “Exceptions” in the proxy’s settings to set so
that the proxy is not used.
If DHCP is set to [Off] (default setting upon purchase), the problem may be caused by the following:
• Is the IP address that was set being used by another device?
• If multiple units of this network board are connected, are they connected to the network with the same IP address?
• Is the IP address that was set within the automatic acquisition range of the DHCP of the router, etc.?
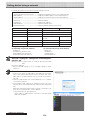
Making Detailed Settings (via LAN)
Use this procedure to make the network board device settings (“CB Setup”), network settings, etc., with the network board connected to a local area network (hereafter referred to as “LAN” or “the network”) using a computer’s web browser.
Access authority is required to make the detailed settings. There are two levels of authority – “administrator authority” and “file list
browsing authority”. The selectable menu items (some setting items) are restricted accordingly. To register the administrator, see
“Administrator Menu — User Setting” on page E-15 and to register the user, see “Network Setting — Save Setting” on page E-13.
Table of Menu Items and Access Authority Levels
Menu Item
Some Setting Items
Administrator Authority
File List Browsing Authority
•
—
Board/Printer Setting
•
—
Save Setting
•
—
Preview and Download
•
•
Delete
•
—*
User Setting
•
—
Security Setting
•
—
Disk management Setting
•
—
Header/Footer
•
—
CB Information
•
—
CB Setup
Network Setting
Board File List
Administrator Menu
• mark: Accessible : — mark: Not accessible
* When the “Delete User Image Data” security setting is set to “Valid”, deleting is possible with file list browsing authority.
Notice
• When connecting the network board to the network, be sure to consult the network administrator before making the settings.
Note
• Depending on the network being used, the display speed and button response may be slow and operations may not be
performed. If this happens, consult your network administrator. Also, the network board may not respond if buttons are
operated successively. In this case, wait awhile then operate again. If there is no response after a while, turn off the network
board’s power, then turn the power back on.
• If the top screen does not display with a web browser, press the [Ctrl] + [F5] keys to refresh the web browser’s screen.
• The network board uses JavaScript and cookies. Set the web browser so that these functions will operate.
• The network board performs automatic page reading (redirecting). Set the web browser so that this function will operate.
• With SSL enabled on HTTP, a security certificate warning is displayed when this website is accessed by the Web browser.
In this case, select “Continue to this website (not recommended)” to continue your operation.
E-6
Setting before using a network
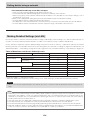
Basic Setting Operations
Here we explain how to display and close the settings screens, using the Internet Explorer web browser as an example.
Preparations:
1.Use a LAN cable to connect the network board’s LAN terminal to the LAN port on the switching hub.
2.Turn on the network board’s power.
Launch the web browser on the computer connected to the network.
“Page cannot be displayed” may in some cases appear, but simply continue to the next step.
Input the network board’s IP address.
In the web browser’s URL field, input the IP address that was set,
and then press the [Enter] key. Entry must be in alphanumeric
characters. When the network board has been correctly connected to network, the user authentication screen appears.
Input the User Name and Password, and then click [OK].
• No password is set upon purchase. Input “admin” in alphanumeric characters in the User Name field and click [OK].
Note
• The user name and password are case sensitive. Be sure
to input them properly.
• The account is locked after three incorrect password
attempts. To unlock, unplug the power cord from the
power outlet then plug it back in.
Connecting the network board to the network upon purchase
Upon purchase, the network board’s IP address and subnet mask
are not yet set. Be sure to check the section “Simple Network
Settings (via USB)” (see page E-4) and set the IP address, etc.
From the menu, click the desired setting item.
The page you required is displayed.
See the description on each appropriate page.
• CB Setup (page E-9)
• Network Setting
Board/Printer Setting (page E-11)
Save Setting (page E-13)
SSL Setting (page E-14)
• Board File List (page E-25)
• Administrator Menu
User Setting (page E-15)
Security Setting (page E-16)
Disk Management Setting (page E-17)
• Header/Footer (page E-18)
• CB Information (page E-18)
E-7
Setting before using a network
Make the changes or settings.
The screen at the right is an example of what may be displayed,
here showing the “CB Setup” page.
Selecting and inputting
Radio buttons
One of the selection items can be selected. When
switches to .
is clicked, it
Input boxes
When a box is clicked, the arrow cursor switches to the “ | ” character input cursor. Input characters in the same way as you would
on a computer.
• The characters that can be input are restricted according to the
item’s type of setting. (See page E-13, E-14, E-15)
Browse and Upload buttons
See “Header/Footer”. (Page E-18)
Setup button
When clicked, the settings/changes are sent to the network
board, overwriting previous settings.
Once overwriting is completed, the “CB Setup” page switches to
the “Setup is completed” character display.
• If the IP address in the network settings, etc., has been
changed, the network board reboots. (See page E-11.)
After making settings or changes, be sure to click the
“Setup” button to overwrite the previous settings on the
network board.
Close the web browser.
Click the web browser’s close button ([X]) to close it.
E-8
Setting before using a network
CB Setup
This is the page where the network board’s various functions are set and changed. The settings are the same as on “Table of
Function Numbers and Settings” in the section on making the settings operating the network board’s buttons.
Copyboard Setting Item
Setting/Description
Default
Paper size
Select the printing paper size.
Letter/A4
(North America/Other)
Aspect Ratio Setting
Select the aspect ratio for printing.
Match to printing paper
size
Time Date Stamp
Set the network board’s date and time.
Input as follows:
Year: 4 digits, Month: 2 digits (Ex.: 03 for March), Day: 2 digits (Ex.: 06
for the 6th),
Hours: 2 digits in 24-hour mode (Ex.: 14 for 2 pm, 06 for 6 am),
Minutes: 2 digits (Ex.: 00 for 0 minutes)
• Do not insert spaces. If the date and time setting values are incorrect,
an error message is displayed.
Get Current Time:
When the “Get Current Time” button is clicked, the display switches to
the computer’s current time. This eliminates the need to make the current date and time setting.
Time Day Stamp Format
Select the format in which the date and time are displayed.
Example:
YYYY/M/D
2014/1/23 01:23
DD-MMM-YYYY 23-Jan-2014 01:23
MMM-DD-YYYY Jan-23-2014 01:23
MMM-DD-YYYY/
DD-MMM-YYYY
(North America/Other)
Color Printing
Color printing can be set to Valid or Invalid.
Valid
Resolution
Select the resolution at which scanned images are saved.
Standard
Graphics File Format
Select the format in which scanned images are saved.
PNG
Header/Footer
Set whether or not to output the header/footer information registered on Disable (Off)
the network board.
Erase Reminder
Set the erase reminder function.
Disable
E-9
Setting before using a network
Copyboard Setting Item
Setting/Description
Password Validity Period
• This sets the time for which the password. The password is issued or 15 minutes
shown when the Show password button on the smartphone application (MTG Pocket (Note 1)), at which time the password is displayed on
the display window on the copyboard’s control panel.
• When set to “One Key Entry Only”, only one command is only accepted once after the password is issued. To perform remote control
again, issue a new password by pressing the Show password button.
Default
Setup
When the [Setup] button is clicked, the above settings/changes are sent
to the network board, overwriting previous settings.
Once overwriting is completed, the “CB Setup” page switches to the
“Setup is completed” character display.
(Note 1) MTG Pocket is an app for smartphone, which allows you to remotely operate the copyboard from your smartphone and
import images of writing on the board. The “MTG Pocket” operating instructions can be viewed from the application’s help file and
on the following PLUS website: http://www.plus-vision.com/en/product/mtg_pocket/
E-10
Setting before using a network
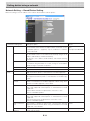
Network Setting — Board/Printer Setting
Make the settings for the IP address of the network board and the network printer..
Board/Printer Setting Item
Setting/Description
Board
Terminal Name
Input the Terminal Name of the network board on the network.
Model name - last 6
• The terminal name must be 15 alpha numeric characters or less. digits
Available symbol is “- (Hyphen)” only. A combination of numbers (Example: N31-ABCDEF)
cannot be used.
DHCP
Select to assign an IP address automatically or manually.
On
On: The DHCP server on the network automatically assigns an IP
address, Subnet Mask, and Default Gateway.
Off: Assigns an IP address, Subnet Mask, and Default Gateway
manually.
IP Address
Assign the IP address of the network board manually. If connecting Blank
to a network using the DHCP of a router, change to an IP address
outside of range of automatic acquisition.
Subnet Mask
Set the Subnet Mask of the network board manually.
Blank
Default Gateway
Set the Default Gateway of the network board manually.
Blank
Printer IP Address
Set IP address which is displayed in the Network setting field of FTP Blank
supported network printer or “PrinterServer for PLUS Copyboard”.
Printer Port
Set port number which is displayed in the Network setting field of Blank
FTP supported network printer or “PrinterServer for PLUS Copyboard”.
Graphics File
Format
Set graphic format in which image is sent to FTP supported network PDF
printer or “PrinterServer for PLUS Copyboard”. When using “PrinterServer for PLUS Copyboard”, select JPEG.
User Name
This is a user name which was registered in the Network setting Blank
field of FTP supported network printer or “PrinterServer for PLUS
Copyboard”.
The User Name must be 32 alphanumeric characters or less.
See List of Available Symbols.
Password
This is the password which was registered in the Network setting Blank
field of FTP supported network printer or “PrinterServer for PLUS
Copyboard”
The Password must be 32 alphanumeric characters or less.
See List of Available Symbols
SSL Communication
Select Enable or Disable for SSL in FTP communication with FTP Disable
supported network printer. When using “PrinterServer for PLUS
Copyboard”, select Disable.
Connection
Method
Select Implicit or Explicit for FTPS communication with FTP sup- Implicit
ported network printer.
Network
Printer
Default
E-11
Setting before using a network
Board/Printer Setting Item
Setting/Description
Setup
• When Board is set or changed
When the [Setup] button is clicked, the above settings/changes
are sent to the network board, overwriting previous settings.
Once overwriting is completed, the display switches to the “Setup
is completed. Rebooting. Wait for a while.” character display. During rebooting, the network board’s display window LEDs flash in
circular motion. Wait until they turn off. After rebooting, the web
browser will not be updated automatically.
• When Network Printer is set or changed
When the Network Printer is set or changed, “Setup is completed” is displayed. Rebooting will not be done.
Default
E-12
—
Setting before using a network
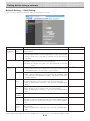
Network Setting — Save Setting
Set the location in which the network board’s scanned images are saved.
Save Setting Item
Setting/Description
Default
Save Loca- Plural Regis- Set Plural Registration to either Disable or Enable for Save Location Set- Disable
tion ID Infor- tration
ting Information.
mation
ID Number
Select an ID number.
00
• Use the Network button and the keypad panel to input an ID number.
Doing so allows you to store data on a specific save location that was
registered.
Folder for saving
Set the folder in which the network board’s scanned images are saved. Board
Board: The images are saved on the network board.
FTP Server: The images are saved in the specified folder on the FTP
server.
File List User User Name
Setting
Set the user name.
Admin (Note 1)
• The User Name must be 14 alphanumeric characters or less. See List
of Available Symbols. The user name is case sensitive.
FTP Setting
Password
Set a password.
None
• Input a password between 8 and 14 characters by combining upper
case and lower case alphabets, numbers, and symbols. See List of
Available Symbols.
FTP User
Name
This is the user name registered on the FTP server. This is required for Blank
the network board to log in to the FTP server and save image files.
• Input 32 alphanumeric characters or less. See List of Available Symbols.
FTP Password
This is the password registered on the FTP server. This is required for the Blank
network board to log in to the FTP server and save image files.
• Input 32 alphanumeric characters or less. See List of Available Symbols.
FTP Server
IP Address
Input the FTP server’s IP address.
FTP Server
Port
This is the FTP server’s standard control port number.
21
Normally use with this number. If the FTP server’s port number has been
changed, change this following the instructions of the network administrator.
FTP Save
Directory
Name
Input the name of the subfolder in the FTP server folder in which image Blank
files are saved.
• Input 200 alphanumeric characters or less. See List of Available Symbols.
Blank
(Note 1) When Plural Registration is set to Enable, the user name is “user” + ID number (example: user00).
E-13
Setting before using a network
Save Setting Item
Setting/Description
Default
FTP Setting
SSL Communication
Select Enable or Disable for SSL in FTP communication.
Disable
Connection
Method
Select Implicit or Explicit for FTPS connection method.
Implicit
Setup
When the [Setup] button is clicked, the above settings/changes are sent
to the network board, overwriting previous settings.
—
Delete (Note 1)
Deletes the current visible save location setting information.
—
IC Card Writing (Note 2)
Writes the current visible save location setting information to the IC card.
—
Save Location Setting
Information
Download
Downloads all the save location setting information registered in CSV
format.
—
Reference
Select a file of save location setting information stored on the computer
(CSV format).
—
Upload
Register a file of save location setting information that was read to the
network board.
—
(Note 3)
(Note 1)
• When this is done, image data stored on the network board are deleted. (For save folder on the network board)
(Note 2)
• For writing to IC card, see “Writing Save Location Setting Information to IC Card” on page E-19.
• Only when Folder for Saving is set to FTP Server, IC card writing is possible.
(Note 3)
• For exporting and importing of save location setting information, see “Export and Importing Save Location Setting Information”
on page E-19.
• Only when Plural Registration is set to Enable, exporting/importing and deleting are possible.
List of Available Symbols
Symbols available for User Name, Password and
FTP Save Directory Name
Symbols available only for User Name and Password
!
#
$
%
(
)
+
-
.
/
=
@
[
\
]
^
_
`
{
}
~
:
?
*
|
Network Setting — SSL Setting
SSL Setting Item
Setting/Description
Default
HTTP Setting
Select Enable or Disable for SSL in HTTP communication.
Disable
Setup
SSL Communication
When the [Setup] button is clicked, the above settings/changes are sent
to the network board, overwriting previous settings.
E-14
—
;
Setting before using a network
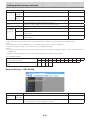
Administrator Menu — User Setting
Set the user name and password required for administrator verification and the number required for resetting the network settings.
User Setting Item
Setting/Description
Administrator Setting
Admin User
name
Set the administrator’s user name.
admin
• Admin User Name must be 14 alphanumeric characters or less. See
List of Available Symbols. The admin user name is case sensitive.
Admin
Password
Set the administrator’s password.
None
• Input a password between 8 and 14 characters by combining upper
case and lower case alphabets, numbers, and symbols. See List of
Available Symbols.
Password
Validity
Set the validity date for Admin Password and File List User Setting Pass- Off
word. To use days, select the radio button for day and input days.
Network
Reset No.
This is the number used for resetting the network settings. (See page
E-20)
Note:
Be sure to make a note of your network reset number in case you
should forget it. This number is required to reset the network settings.
—
When the [Setup] button is clicked, the above settings/changes are sent
to the network board, overwriting previous settings.
Once overwriting is completed, the “User Setting” page switches to the
“Setup is completed.” character display.
—
Other settings
Setup
Default
Caution
• Copy down the user settings in case you should forget them.
Admin User name
Admin Password
Network Reset No.
□□□□□□□□□ □ □ □ □ □
□□□□□□□□□ □ □ □ □ □
□□
E-15
Setting before using a network
Administrator Menu — Security Setting
These security settings can be made to restrict access to setting items.
Security Setting Item
Setting/Description
USB Memory
Set whether or not to enable or disable saving on USB memory devices. Valid
Default
PC connection (USB)
Set whether or not to enable or disable saving in a computer storage Valid
memory.
Network Storage
Set whether or not to enable or disable transfer of image files to network Valid
storage (folder for saving: “Board” or “FTP Server”) to a computer or FTP
server.
Notice:
• When set to “Invalid”, the network storage memory is formatted.
Transfer important image files to a computer before setting this.
Delete User Image Data
Set whether to enable or disable the file list “Delete” function with file list Valid
browsing authority.
When set to “Invalid”, the image files stored on the network board cannot be deleted.
Automatic file erase on
board
Deletes files stored on the network board at the preset time.
Off
Off: Not delete files automatically.
After Download: The files stored on the network board are deleted after
they are downloaded.
File Erase Timer: Select days and time from the pull down list. The files
stored on the network board are deleted at the specified time. (Files are deleted even if they are not downloaded.)
Setup
When the [Setup] button is clicked, the above settings/changes are sent
to the network board, overwriting previous settings.
Once overwriting is completed, the “Security Setting” page switches to
the “Setup is completed.” character display.
E-16
—
Setting before using a network
Administrator Menu — Disk management Setting
The amount of disk space used can be checked, the disk can be checked and the disk can be formatted here.
Disk Management Setting
Item
Setting/Description
Default
Disk Usage
This displays the amount of network storage memory used (in percentage).
—
Disk Check
When the [Disk Check] button is clicked, checking of the network storage memory starts. When checking is completed, the results of the
check are displayed.
If a warning is displayed, format the disk.
—
Disk Format
When the [Disk Format] button is clicked, the disk is formatted.
Notice:
• Transfer important image files to a computer before formatting. All
data (including Header/Footer image) stored on the disk are deleted.
—
E-17
Setting before using a network
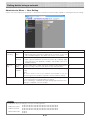
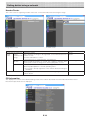
Header/Footer
This is the screen for registering headers and footers on the network board and checking the image.
Image Select screen
Preview screen
Image Select/Preview Item Setting/Description
Image
Select
Default
Select
Select whether the image to be registered on the network board is a Header
Header/Footer header or footer.
Image
Click the radio buttons to select.
• For instructions on creating images, see page E-21.
Browse
When the [Browse] button is clicked, the computer’s “Browse Files”
screen opens. Select the image, then click the [OK] button to set it.
—
Upload
This uploads the selected header or footer image to the network board.
When the [Upload] button is clicked, uploading starts.
• If an image is already registered on the network board, that image is
overwritten.
—
This displays a preview of the header or footer image registered on the
network board.
—
Preview
CB Information
This displays the contents of the detailed settings made on the network board and the network board’s firmware version.
Note that the passwords are not displayed.
E-18
Setting before using a network
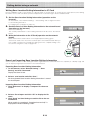
Writing Save Location Setting Information to IC Card
Use the supplied IC Card to store images on a specific folder on an FTP server. To use this function, write Save Location Setting
Information such as FTP save directory name and password of scanned image to the IC Card beforehand.
1. Set the Save Location Setting Information (operation on the
browser).
On the browser, select “Network Setting” – “Save Setting” and set register the Save
Location Setting Information.
For setting items, see page E-13 and E-14.
2. Send the Save Location Setting Information to the network board
(operation on the browser)
Click “IC Card Writing”.
The currently viewed Save Location Setting Information will be sent to the network
board.
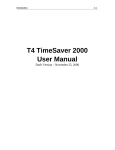
3. Write the information to the IC Card (operation on the network
board).
Blip!
Make sure that the IC Card indicator on the keypad panel is flashing green.
Touch the IC Card on the “Touch the card here” part of the network board. After you
hear a “blip” sound, the IC Card indicator lights green. This completes writing to the
IC Card. For using the IC card, see page E-23.
Export and Importing Save Location Setting Information
You can export the Save Location Setting Information registered on the network board to the computer (as a backup copy) and
you can import (re-register) the information to the network board.
Exporting Save Location Setting Information
1. On the browser, select “Network Setting” – “Save
Setting” and click “Download”.
Display the Save As box.
2. Select a save location and click “Save”.
All the registered Save Location Setting Information is stored
on the computer.
Importing Save Location Setting Information
1. Click “Reference” to display a computer file reference
screen.
2. Select a file to import and click “OK” to display the file
name.
3. Click “Send” on Save Setting to send the file to the network board.
When sending is completed, “Completed successfully” is
displayed on the Save Setting screen.
E-19
Setting before using a network
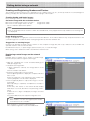
Resetting the Network Settings
Operate the buttons on the network board to reset the network settings to their defaults.
Setting items that are reset: Admin User name, Admin Password, User Name, Password, IP Address, Subnet Mask, Default
Gateway, Folder for saving, FTP User Name, FTP Password, FTP Server IP Address, FTP Server Port,
FTP Save Directory Name, Password Validity, Terminal Name, DHCP, Printer IP Address, Printer Port,
Organization Code, FTP Print Setting, Plural Registration, ID Number, SSL Communication (FTP Setting), Connection Method (FTP Setting), SSL Communication (HTTP Setting)
Notice
• Once reset, the network settings cannot be restored.
1. While pressing the ON/Standby
button.
button, press the Network
The network board switches to the network settings reset mode and “00” flashes on
the display window.
2. Press the Network Print
(Increase) or On Board Print
(Decrease) button to display the network reset number.
• The network reset number can be viewed when [Administrator Menu] → [User Setting] is selected with administrator authority.
The display switches as follows each time the Network Print (Increase) button is
pressed: 01 → 02 → …… → 99 → 00 → 01
The display switches as follows each time the On Board Print (Decrease) button is
pressed: 99 → 98 → …… → 01 → 00 → 99
3. Press the Save
button to enter.
To cancel, press the ON/Standby
button.
When the reset number matches, “LA” flashes for 5 seconds on the display window,
then the network board’s network settings are overwritten with the default values and
the network board automatically reboots.
If “LE” flashes for 5 seconds then stops flashing, remaining lit, the reset number is
wrong.
• Press the ON/Standby
button to cancel, then start over from step 1.
E-20
Setting before using a network
Creating and Registering Headers and Footers
The header/footer function allows you to superimpose your company name, logo, etc., at the top or bottom of scanned images for
printing or display. The date and time are printed at the top right of the header.
Creating header and footer images
Use your image software to create a JPEG file.
Create the image with the resolutions below.
Max. size for header images: 1248 × 110 dots *
Max. size for footer images: 1248 × 40 dots
* This is sometimes expressed as “pixels”.
Image format: JPEG
Image format: JPEG
Note
• Even for image data whose resolution is within the allowable limits, it may happen that the top and bottom of the image are
not displayed.
Image display position
Images are displayed at roughly the center in the horizontal direction. In the vertical direction they are positioned next to the
scanned image area. Consider this when creating images with less than the maximum size.
Suggestions on creating images
Scan the logo data with an image scanner, save this on the computer as image data, then crop or reduce its size to fit within the
specified resolution and save this new data.
Use Windows Paint, etc., to paste images, input characters, etc., to create the image.
When saving, save in JPEG format with a size within the maximum size.
Registering created images on the network
board
Example: Here we explain how to register a header image.
Use the same procedure to register footer images.
1.Open the “Header/Footer” screen at Detailed Settings (via
LAN). (See page E-18.)
2.Header/Footer Image Select
• When a preview is selected, click “Image Select” on the
submenu.
Click the “Header” radio button.
3.Select the header image you have created.
Click the [Browse] button to display the computer’s “Browse
Files” screen.
Select the image file to be registered as the header, then
click the [OK] button. The file name is displayed.
4.Click the [Upload] button to upload the image to the network board.
When uploading is completed, “Completed successfully” is
displayed.
At this time, “HF” flashes on the network board’s display
window (for 5 seconds, after which it stops flashing, remaining lit).
If “Data size is too large” is displayed, the image cannot be
registered.
Close the web browser, then adjust the image file’s size.
Note
• When headers or footers are registered, the header/
footer function is set to “Enable”.
Click “Preview” to check the registered image.
This completes registration. Close the web browser.
E-21
Using the Network board Connected to a Network
When connecting to the network the first time
(1) Make the settings of the IP address, etc., required for connecting the network board to the network. See “Simple Network
Settings (via USB)” (page E-4).
(2) Use a commercially available LAN cable (10Base-T or 100Base-TX straight cable) to connect the network board’s LAN terminal to the LAN port on a hub, etc.
(3) Make the network board’s network settings or FTP server settings from a web browser. (See “Making Detailed Settings (via
LAN)” on page E-6.)
If you plan to store image files on an FTP server, create the folder for storing the files on the FTP server. Ask your network
administrator for instructions on settings and creating the folder.
Notice
• Be sure to transfer important image files stored on the network board itself to a computer (data backup). If the network
board should for some reason malfunction, depending on the malfunction the stored data may be lost or become impossible to transfer. Note that PLUS will accept no responsibility whatsoever for loss of data, etc.
• The network board will not operate properly if the firewall is activated.
The following explanation assumes that the LAN cable has been connected and the various network settings
have been completed.
Saving scanned images on the network board or FTP server
Preparations :
Check that the power plug is connected to a wall power outlet.
Press the ON/Standby
button to turn on the power.
Note
• When turning on the power after the power plug has been connected or
the power has been turned off (set to the standby mode), wait about 5
seconds or more before pressing the ON/Standby button.
• When the ON/Standby button is pressed and the power turns on, the display window’s LEDs light.
Press the Scroll/Stop
be stored.
or
button to display the screen to
The procedure for displaying the sheet surface to be save is the same as for the
printing operation.
Refer to “Printing” on the separate “N-31 Series User’s Manual”
Note
• When saving, the visible image (one screen’s worth) is saved on the network board or FTP server.
• When “Board” (network storage memory) is selected as the save to location, approximately 100 image files can be saved.
• It may not be possible to save the edges of the sheet surface. Refer to
“Effective Reading Size” on the separate “N-31 Series User’s Manual”.
E-22
Using the Network board Connected to a Network
Save scanned images.
There are three ways to store images according to content of “Network Setting” — “Save Setting”.
• When Plural Registration is set to Disable (Default)
Press the Network
button
LEDs flash in circular motion during saving in memory
[Display window]
• When Plural Registration is set to Enable (ID number registered)
Press the Network
button and use the keypad panel to input an ID number (example:
23), and then press the Enter
button.
If you input the wrong ID number, press the Escape
button to return to “- -“, and input the correct ID number again.
[Display window]
LEDs flash in circular motion during saving in memory
If “L2 (error display)” appears on the display windows, it means that you input an unregistered ID number. Go back and
start gain.
[Display window]
• For use of IC card (written IC card)
Blip!
Touch the IC Card on the “Touch the
card here” part of the network board.
If the IC Card indicator flashes red for 3 seconds,
a read error occurs. Wait until the IC Card indicator
light red, and touch the IC Card slowly on the center
part.
LEDs flash in circular motion during saving in memory
• When the above network storage is done, the reading operation is performed for a one-sheet portion (while the sheet
is scrolled) and the read image data will be stored on a specific folder on an FTP server.
For setting the save setting, see “Network Setting – Save Setting” on page E-13.
• One or more screens can be saved consecutively. Refer to the separate “N-31 Series User’s Manual”.
Note
• Depending on the network communications conditions, some time may be required for identification and storage.
• If “E8” flashes (for about 5 seconds), “Invalid” is set at “Security Setting” → “Network Storage”. (See page E-16.)
• If “L1” to “L5” flashes (for about 5 seconds), this indicates that the network settings are incorrect. (Refer to the
separate “N-31 Series User’s Manual”.)
• If “FL” flashes (for about 5 seconds), there is not enough space in the save to location. Delete image files to provide space. (See pages E-27.)
• If the ON/Standby
button is pressed during the scanning operation, saving is interrupted and the image data
scanned up to that point is saved.
To move the sheet surface, wait until scrolling stops, then press the Scroll/Stop button.
• When network storage is done, image files will be saved sequentially on a save location (file name indicates date
and time). When consecutive storing is performed, numbers “-1” or “-2” (“-1”, “-2”, “-3” or “-4” on model N-314)
is added to the end of the file name. (Example: When two screens are stored consecutively 20110123_ 0123531.png, 20110123_ 012353-2.png) When file format is specified to PDF, the files will be merged into one file during
the consecutive storage.
Date and time of saved file are recorded in time of the network board. For setting time, See “CB Setup” on page
E-9 or refer to the separate “N-31 Series User’s Manual”.
E-23
Using the Network board Connected to a Network
When not using the network board, press the ON/Standby
(standby mode).
button to turn off the power
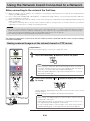
Printing out to a Network Printer
Prepare a sheet surface you want to print out and press the Network Print button.
Perform the reading operation for a one-sheet portion (while the sheet is scrolled) and the image is output to the network printer
connected to a network.
• The thumbnails and consecutive printing which is possible on the printer connected to the network board is also possible on the
network printer. For selecting, refer to the separate “N-31 Series User’s Manual”.
Note
• To print out to the printer connected to a network, select Network Setting — Board/Printer Setting and set FTP setting
beforehand.
• Printers compatible with the network board are FTP supported printers
E-24
Using the Network board Connected to a Network
Transferring image files to/deleting them from the computer
Image files stored in the folder for saving (“Board” or “FTP Server”) can be transferred to your own computer.
The operation differs according to the setting for where scanned images are stored. (See “Network Setting —
Save Setting” on page E-13.)
The image files are saved in JPEG, PNG (default) or PDF format, according to the image format setting. (See
“CB Setup” on pages E-9.)
The information below must be input to transfer the files.
If you do not know this information, ask your company’s network administrator.
Log in to the folder for saving (meaning connect to the communications path): IP address of the network board or FTP server
Verification screen:
If the folder for saving is set to “Board” … User name and password registered at “User Setting”.
If the folder for saving is set to “FTP Server” … User name and password registered on the FTP server
When the folder for saving is set to “Board”
The scanned images are saved on the network board. These images are downloaded (transferred) onto the computer connected
on the network. Downloading is possible even when the network board is in the standby mode (but not if the network board’s
power is not connected to a power outlet).
Launch the web browser on the computer and log
into the network board.
Input the IP address or the terminal name of the network board
and press the [Enter] key. Entry must be in alphanumeric.
• Upon shipment from the factory and when set to the defaults,
the network board’s IP address has not been set, so logging in
is not possible.
The verification screen opens.
• No password is set upon purchase.
For the user name, input “admin”, then click the [OK] button.
When Plural Registration is set to Enable, enter “user” + ID
number (example: user00).
• When a user password is set, input the user name (case sensitive) and password (case sensitive), then click the [OK] button.
When the password is correct, the authentication screen will be
closed and the Folder List will be displayed.
• If the password is out of validity, a message of expiration of
your password appears. Contact your administrator.
Note
• We recommend setting a user name and password to prevent unwanted persons from logging in. (See “Administrator Menu — User Setting” on page E-13, E-15.)
E-25
Using the Network board Connected to a Network
Click the desired date.
• Image files are managed in groups by date (the date the
scanned image files were saved). Because of this, display the
date list.
• Check that “Download” is selected for the [Download/Delete]
selection button.
When “▾” is clicked, a pull-down list is displayed. Click [Download].
[Download/Delete] selection button
From the file list, select the image to be transferred to the computer.
When the radio button
view image is displayed.
is clicked, it is checked
and a pre-
Download the image onto the computer.
(1) Click the [Download] button.
(2) The computer’s “Save as …” screen appears.
(3) Select the folder for saving, then click the [Save] button.
Downloading starts.
To download other files, click “Return to the folder List” to
return to the file list, then repeat from step 2.
(“Return to the folder List”)
[Download] button
Close the web browser.
Click the web browser’s close button ([X]) to close it.
E-26
Using the Network board Connected to a Network
Deleting image files from the network board
Notice
• When “Invalid” is set at “Delete User Image Data” in “Security Setting”, files cannot be deleted. This can be changed to
“Valid” with the administrator’s authority. (See page E-16.)
Perform steps 1, 2 and 3 on page E-25, E-26 to
display the file list screen.
Select [Delete].
[Download/Delete] selection button
When “▾” on the [Download/Delete] selection button is clicked, a
pull-down list is displayed. Click [Delete].
When [Delete] is selected, the radio buttons switch to checkboxes •.
Select the image file to be deleted.
To select and delete individual files:
Click the checkbox for the image file to be deleted to check it.
To delete all files:
Click the [Select All] button. All the checkboxes are checked. If
there are several files you do not want to delete, uncheck the
checkboxes for those files.
To uncheck the checkboxes for all the files, click [Cancel Select
All] to uncheck all the checkboxes.
Note
• Images are previewed when their file name is clicked.
• Check the scanned images using their preview images
before deleting them.
[Cancel Select All] button
[Select All] button
Delete the file(s).
Be sure to transfer important image files to a computer before
deleting them (data backup). Once deleted, the files cannot be
retrieved.
When the [Delete] button is clicked, the image files whose checkboxes are checked are deleted.
• When “Invalid” is set at “Delete User Image Data” in “Security Setting”, the message “No delete authority” is displayed,
indicating that the files cannot be deleted. (See “Administrator
Menu — Security Setting” on page E-16.)
E-27
Using the Printer Server for PLUS Copyboard
What is Printer Server for PLUS Copyboard?
The Printer Server for PLUS Copyboard can receive an image read on the network board, and output to a printer connected to the
PC with this software installed.
This software is resident software.
* In this manual, Printer Server for PLUS Copyboard may be referred to as “this software” or “the software”.
Notice
• This software is not a file server.
• This software is not to provide a printer driver. It is necessary to install a printer driver separately.
• Output to a printer is referring to output to a printer spool. Actual printing operation depends on the PC and the printer, or
the connection status of the PC and the printer.
Operating Requirements
Supported OS:
Supported PC:
CPU:
Memory capacity:
Available HD capacity:
Interface:
Windows 7 (32 bit/64 bit)
Windows 8 (32 bit/64 bit)
.NET Framework 4.0 Client Profile or later
IBM PC/AT compatible machine that the above OS can operate
Core 2 or higher processor
2 GB or more
40 MB or more (excluding the image save region)
1000Base-T/100Base-TX/10Base-T
Notice
• Not all the operations are guaranteed with the above operating environment.
• Macintosh is not supported.
E-28
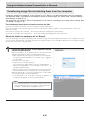
Installation of the Software
When “Installation of Software” on the included CD-ROM’s menu is clicked, the “Printer Server for PLUS Copyboard” is installed.
Check Prior to Installation
1.Check whether your personal computer meets requirements of the operating environment.
2.At the time of installation, install with a Computer Administrator rights (account).
3.Close all other applications that are running.
Installation of the Printer Server for PLUS Copyboard
Cautions On Installation
• When the included CD-ROM is first installed on a computer, the message below may appear:
If so, be sure to select [Install], and install “Microsoft® .NET Framework 4.0”.
If [Cancel] is selected, the programs may not be properly installed.
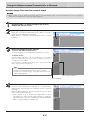
Insert the supplied CD-ROM into the CD-ROM
drive of the personal computer.
The menu screen will be displayed automatically.
If the menu screen is not displayed automatically, double click
CD-ROM icon and then “autorun.exe”.
Click “Installation of Software”.
The installer will start.
E-29
Installation of the Software
Follow the instructions of the installer and start
the installation.
Click “Finish”.
The “Installer Information Dialog Box” will be displayed.
Click “Finish”.
Uninstallation of the Printer Server for PLUS Copyboard
Selecting [Start] → [Control Panel] will display the Control Panel screen.
Double click “Add or Remove Programs or Applications” (this will differ depending on the
OS) to display the “Add or Remove Programs Properties” screen.
Select Printer Server for PLUS Copyboard among the list displayed and click [Change /
Remove] to display the Add or Remove wizard screen.
Selecting the [Remove] radio button of the wizard and clicking [Next] will start the uninstallation.
Note
• Each time the uninstaller is started, the User Account Control dialog box is displayed. Select “Continue” and continue with
the uninstallation.
E-30
E-31
26-4695-14A