1
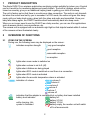
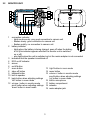
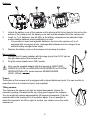
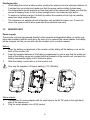
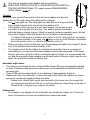
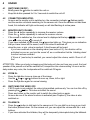
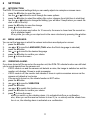
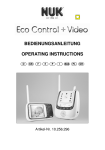
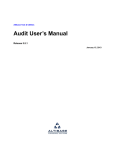
USER MANUAL
DVM-70
1
PRODUCT DESCRIPTION
The Alecto DVM-70 is a wireless audio/video monitoring system suitable for indoor use. A typical
use for it would be for monitoring babies and small children. The built-in lullabies, which can be
turned on remotely, give you an additional helping hand in getting your child off to sleep.
The unit is factory-set so that there is a continuous video connection. The audio is only transmitted when the sound level set by you is exceeded. In ECO mode, the entire unit goes into sleep
mode until your baby starts crying, when both the video and audio are transmitted. Once your
baby falls asleep again, the DVM-70 switches itself automatically back into sleep mode.
When you no longer need to use the DVM-70 as a baby monitor, you can use it for applications
such as access control, room surveillance, etc.
The camera unit is equipped with an automatic night light so that objects located within 2 metres
of the camera unit are illuminated clearly.
2
OVERVIEW OF FUNCTIONS
2.1
ICONS ON THE SCREEN:
During use, the following icons may be displayed on the screen:
indicates reception strength:
very good reception
good reception
reasonable reception
no reception
lights when zoom mode is switched on
lights when volume is set to 0 (off)
lights when lullabies are being played
lights when ECO mode is switched on and there is a connection
lights when ECO mode is activated
lights when the acoustic temperature alarm is activated
indication of volume
volume 5
volume 4
volume 3
volume 2
volume 1
volume off
indication that the adapter is connected but no battery has been installed
battery level indicator:
battery full
battery 2/3 full
while charging, this
battery 1/3 full
symbol is animated
battery empty, the monitor unit will switch
off in a few moments
2
2.2
MONITOR UNIT:
18
16
MIC
1
15
2
13
3
11
14
12
4
5
6
7
8
9
10
17
1
6VDC / 800mA
connection indicator:
- lights continuously: very good connection to camera unit
- flashes slowly: good connection to camera unit
19
- flashes quickly: no connection to camera unit
2 battery indicator
- lights when the battery is being charged, goes off when the battery
is full (this indicator appears whether the monitor unit is switched
on or off)
- also lights when the unit is switched on but the mains adapter is not connected
3 indication that the speaker is switched off
4 ECO on/off indicator
5 screen
6 on/off button
7 zoom button
13 ‘right’ button in zoom mode
8 video off button
14 menu button
9 talkback button
15 volume + button in monitor mode
10 built-in speaker
scroll button when adjusting settings
11 back button when adjusting settings
‘up’ button in zoom mode
‘left’ button in zoom mode
16 built-in microphone
12 volume - button in monitor mode
17 battery compartment
scroll button when adjusting settings 18 antenna
‘down’ button in zoom mode
19 mains adapter jack
3
2.3
CAMERA UNIT:
1
2
3
13
4
12
5
6VDC / 800mA
6
1
2
3
4
5
6
7
8
9
10
11
7
8
9
10 11
temperature sensor
light sensor (for night light)
Infrared LEDs (for night vision)
built-in microphone
on/off indicator
on/off button
volume - button
built-in speaker
start/stop button for lullabies
volume + button
‘next lullaby’ button
3
INSTALLATION
3.1
CAMERA UNIT:
14
15
16
17
12 power indication:
- lights steadily when the mains adapter is
connected (whether or not batteries have
been inserted)
- off when the camera unit is powered by
batteries only
- flashes when the batteries are low (please
note: unit will now switch off quite quickly)
13 camera
14 mains adapter jack
15 screw connection for tripod
16 battery compartment
17 antenna
Power supply:
The camera unit can be powered either with the supplied mains adapter or by 4 x 1.5 V AA batteries. If you regularly use the camera unit away from home, insert the batteries, but plug in the
mains adapter when you are at home. As soon as you disconnect the adapter, the unit switches
to battery power. If you only use the camera unit at home, there is no need to insert any batteries.
4
Batteries:
1.
2.
3.
Unlock the battery cover of the camera unit by placing a flat, blunt object in the slot on the
bottom of the camera unit; the battery cover can now be released from the camera unit.
Insert 4 x 1.5 V batteries, size AA (R6), in the battery compartment as indicated. Highquality alkaline batteries should preferably be used.
it is possible to insert rechargeable batteries, but since the camera unit is not
equipped with a charging device, rechargeable batteries must be charged in an
external battery charger when empty
Replace the battery cover on the camera unit and snap it in place.
Mains adapter:
1.
Connect the 6V mains adapter with the large plug to the 6V DC jack on
the right-hand side of the camera unit.
2.
Plug the mains adapter into a 230V socket.
Only use the supplied adapter with the large plug, MOSO MSPC0800IC6.0-5W-DE or HONR ADS-5Q-06 06005GPG or TEN PAO
INTERNATIONAL LTD, model nummer S006MV0600080.
)
(6VDC, 800mA,
6VDC / 800mA
Tripod:
The bottom of the camera unit is equipped with a tripod attachment point. You can use this to
screw the unit on to a stand or tripod. (not supplied)
Tilting camera:
The camera in the camera unit can be angled downwards. Unlock the
camera by pulling it forwards at the top, using your fingernail for example.
You can angle the camera approximately 45 degrees downwards. Push the
camera back in the housing to fix it in position again. It is not possible to
rotate the camera to the left or right; to do that, you need to move the entire
camera unit.
5
Positioning tips
•
When using the unit as a baby monitor: position the camera unit at a minimum distance of
2 metres from your baby and make sure that the power cable is safely tucked away.
•
The temperature sensor projects out from the back of the camera unit. Make sure that the
sensor is hanging freely, is not in direct sunlight and is not heated by light bulbs.
•
To ensure an optimum range, it is best to position the camera unit as high as possible,
away from large metal surfaces.
•
The camera is not waterproof and is therefore only suitable for indoor use. If used outdoors, the camera unit must be protected from moisture and sand.
3.2
MONITOR UNIT:
Power supply:
The monitor unit may be powered directly by the supplied rechargeable battery or via the supplied mains adapter with the small plug. As soon as you connect the mains adapter, the battery
will be charged, so that you can also use the monitor unit in a mobile manner.
Battery:
1.
Open the battery compartment of the monitor unit by sliding off the battery cover on the
back of the monitor unit.
2.
Insert the supplied batteries in the battery compartment in such a way that the metal contacts of the battery come into contact with the terminals of the monitor unit, and push the
battery downwards slightly until it clicks into place.
3.
Slide the battery cover back on to the monitor unit.
Only use the supplied Li-Polymer battery (3.7V, 950mAh).
Mains adapter:
1.
Connect the 6V mains adapter with the small plug to the 6V DC jack on the right-hand
side of the camera unit.
2.
Plug the mains adapter into a 230V socket.
6
Only use the supplied mains adapter with the small plug,
MOSO MSP-C0800IC6.0-5W-DE or HONR ADS-5Q-06 06005GPG or
TEN PAO INTERNATIONAL LTD, model nummer S006MV0600080.
(6VDC, 800mA,
)
6VDC / 800mA
Charging:
As soon as you connect the monitor unit to the mains adapter and plug the
adapter into a 230V wall socket, the battery will be charged.
•
The
lamp lights up. This lamp lights up when and for as long as the battery is being charged, and turns off when the battery is full.
•
If the monitor unit is turned on and you have images, you will see the battery status in the top right of the screen. This battery symbol is animated
while the battery is being charged. When the symbol remains completely green, the battery is fully charged. When this symbol is red, the battery is almost empty.
if, instead of the symbol of a battery, the symbol of a 230 V plug lights up, the battery
has not been inserted; in this case, the
lamp is only an on/off indicator: illuminated
when the monitor unit is on, off when the monitor unit is off
•
Before using the unit for the first time, you should charge the battery for at least 15 hours,
even if the indicator shows that the battery is full.
•
The charging circuit for the battery is controlled electronically; there is no danger of
overloading, so you can leave the mains adapter continuously connected. In the event
that you will not be using the unit for an extended period of time, it is recommended that
you should remove the mains adapter from the wall socket. When you start using the unit
again, be sure to first charge the battery well.
Automatic night vision:
• The camera unit includes 8 built-in infrared LEDs; these LEDs are automatically switched
on when it becomes dark around the camera unit, and automatically switched off when it
becomes light.
• These LEDs can illuminate objects up to a distance of approximately 2 metres.
• Please note that in the darkness, i.e. when the night vision LEDs are switched on, the image on the monitor will appear in black and white.
Please note: Infrared light cannot be perceived by the human eye; this means that
you cannot see that these LEDs are on with the naked eye. Depending on the type of
infrared LED, a red glow may, however, be visible.
Outdoor use:
•
The monitor is not waterproof and is therefore only suitable for indoor use. If used outdoors, this monitor unit must be protected from moisture and sand.
7
4
USAGE
4.1
•
•
SWITCHING ON/OFF:
Briefly press the button to switch the unit on.
Keep this button pressed for 2 to 3 seconds to switch the unit off.
4.2
•
CONNECTION INDICATOR:
As soon as the monitor unit is switched on, the connection indicator
flashes rapidly
and the monitor unit starts searching for the camera unit. Once the camera unit has been
found, this indicator will light continuously or will start flashing at a slow pace.
4.3
•
•
•
MONITOR UNIT VOLUME:
Press the VOL button repeatedly to increase the receiver volume.
Press the VOL button repeatedly to reduce the receiver volume.
If the screen is switched on, the volume level is displayed at the top:
= max volume,
= min volume,
= sound off
If you have switched off the sound, the lamp also lights up. This gives you an indication
that you have turned off the sound, even if the video is switched off.
when the max. or min. value is reached, 3 short beeps will be heard
if you have switched on the vibrating alarm (see section 6.3), the vibration will be
activated as soon as you turn the sound off, as a confirmation that the ‘vibrating alarm’
function has been enabled
if ‘Zoom in’ (see below) is enabled, you cannot adjust the volume; switch ‘Zoom in’ off
first
•
•
ATTENTION: When your baby is sleeping and the baby-unit does not hear any sound, the loudspeaker of the parents-unit will be switched off, irrespective the volume setting. As soon as the
baby makes any noise, the loudspeaker will be switched ON again.
4.4
•
•
•
ZOOM IN:
Press the button to see a close-up of the image.
Use the or or or buttons to move up, down, left or right.
Press the button again for normal viewing.
4.5
•
SWITCHING THE VIDEO OFF:
If ECO mode is not enabled, the video is transmitted continuously. You can turn this off by
pressing the
button. This does not affect the sound.
Press any button on the monitor unit to switch the video back on again.
As soon as one of the alarm functions is activated (see Chapter 6), the video is also
switched on.
•
•
4.6
•
•
TALKBACK:
Press the
button to talk back to the camera unit. You can talk for as long as you hold
the button pressed down. On the camera unit, you can adjust the volume with the + and buttons.
If you have activated the lullabies, they will be temporarily interrupted during the talkback.
8
4.7
•
•
•
•
•
RECEPTION INDICATOR / OUT OF RANGE MESSAGE:
In the upper left-hand corner of the image on the monitor unit, there is an indication of the
strength of the signal being received from the camera unit.
: very good reception, : standard good reception, : reasonable reception
In all cases, the audio and video quality is shown with the same level.
As soon as the signal strength is insufficient to receive audio and video (only lights up),
the warning ‘NO LINK’ appears in the image. After a few seconds the screen goes black,
and the range light starts flashing rapidly.
If any button on the monitor unit is pressed, the screen lights up with the message ‘Waiting
for connection...’. After approximately 10 seconds, the screen goes black again.
As soon as the monitor unit and the camera unit are back in range of each other, the image lights up continuously.
the same happens if the camera unit is switched off with the on/off button or if the batteries become empty in the case of mobile use
4.8 LULLABIES:
You can play lullabies from the camera unit. You can start and stop these lullabies both directly
on the camera unit and via the monitor unit.
Camera unit:
•
Press the
button to start the lullabies.
•
Lullaby 1 is played repeatedly for 15 minutes.
•
Press the
button to select a different lullaby.
•
Adjust the volume by pressing the + and - buttons.
•
The lullaby stops playing automatically after 15 minutes, or you can stop it before that
time by pressing the
button.
it is not possible to enter a setting on the camera unit to play all the songs, the selected song is played repeatedly for 15 minutes
Monitor unit:
1.
press the M button to open the menu
2.
scroll with or to the ‘LULLABY’ option
3.
press the M button
4.
use or to select the desired lullaby or select ‘All’ to play all the songs one after another
5.
press the M button
6.
use or to select the option ‘Play’
7.
press the M button, the lullaby starts playing
8.
repeat the above instructions, but in step 6 select the option ‘Stop’ to stop the lullaby playing
if one lullaby is selected, it is played repeatedly for 15 minutes
if ‘All’ is selected, all the lullabies are played one after another; this lasts around 3
minutes in total, after which the playback ends
if ECO mode is enabled, first press the
button in order to switch the lullabies on or
off from the monitor unit
9
5
ECO MODE
5.1 OPERATION:
If ECO mode is disabled, there is a continuous connection between the camera unit and the
monitor unit, and you have continuous video. The audio is only transmitted if the sound level
you set under ‘Sensitivity’ is exceeded.
If you enable ECO Mode, both the camera unit and the monitor unit go into sleep mode, and
there is NO connection. As soon as the camera unit detects a sound that exceeds the set sensitivity level, the camera unit is switched on and establishes a connection with the monitor unit.
Both video and audio are now transmitted. A few seconds after the sound near the camera unit
stops, the message ‘Eco Mode activated’ appears and the system returns to sleep mode. The
screen now goes black again.
Please note that once the set goes into sleep mode, the connection indicator light flashes rapidly to indicate that there is no connection. In this case, this is not a warning, but a confirmation
that the system is in the idle state.
5.2
1.
2.
3.
4.
5.
6.
SWITCHING ECO MODE ON/OFF:
press the M button
use or to scroll to ECO MODE
press the M button
use or to switch this function on or off
press the M button to confirm your choice
press to close the menu
as soon as you switch ECO mode on, the
lights up
5.3 FORCED VIEWING:
To force the system to allow you to view the room (or, for example, to check the proper functioning of the set), you can switch the camera unit on from the monitor unit:
1.
press the
button
2.
the message ‘Eco Mode activated’ appears on screen
3.
press the
button again to activate the camera unit
4.
after around 10 seconds the camera unit switches itself off again
5.4 OUT OF RANGE INDICATION WITH ECO MODE ON:
When the units are in sleep mode, the ‘No link’ message in the display is disabled (the connection indicator light does, however, flash rapidly). If the connection is abruptly cut off at times
when there is a connection, the ‘No link’ message appears in the display and, if set, you will
hear the range alarm.
10
6
SETTINGS
6.1 INTRODUCTION:
The DVM-70 has several settings that you can easily adjust via a simple on-screen menu.
1.
press the M button to open the menu
2.
use the or buttons to scroll through the menu options
3.
press the M button to select the setting (the colour changes from light blue to dark blue)
4.
use the or buttons to change the setting (you will hear 2 beeps when you reach the
start or end of the list)
5.
press the M button to save the change
6.
press to close the menu
if you do not press any button for 10 seconds, the menu is closed and the normal image is displayed again.
At any time, you can go one step back in the menu structure by pressing the button.
6.2 MENU LANGUAGE:
You can set the language in which the various instructions are displayed on screen:
1.
press the M button
2.
use or to scroll to LANGUAGE (TAAL when the Dutch language is selected)
3.
press the M button
4.
use or to scroll to the desired language
5.
press the M button to confirm your choice
6.
press to close the menu
6.3 VIBRATING ALARM:
If you have turned off the sound on the monitor unit, the DVM-70's vibrate function can still alert
you to sound signals from the camera unit:
•
if ECO mode is on and the camera unit detects a noise, the image is switched on and the
monitor unit vibrates 3 times in quick succession
•
if ECO mode is off, the monitor unit vibrates 3 times in quick succession as soon as the
camera unit detects a loud noise
•
if the sound is turned on, the vibrate function is NOT active
1.
press the M button
2.
use or to scroll to VIBRATION
3.
press the M button
4.
use or to switch this function on or off
5.
press the M button to confirm your choice
6.
press to close the menu
when you switch on the vibrating alarm, it is activated briefly as a confirmation
also, when you set the receiver volume to level 0 (i.e. no sound) and the vibrate function is on, the vibrating alarm is activated as a confirmation
11
6.4 SENSITIVITY:
You can set the sensitivity with which the camera unit's microphone picks up the sounds and
transmits them to the monitor unit:
1.
press the M button
2.
use or to scroll to SENSITIVITY
3.
press the M button
4.
use or to scroll to the desired sensitivity
Level 1: activated by loud sounds ..... Level 5: activated by quiet sounds
you need to determine the ideal level for your situation by trial and error
5.
press the M button to confirm your choice
6.
press to close the menu
ATTENTION: When your baby is sleeping and the baby-unit does not hear any sound, the
loudspeaker of the parents-unit will be switched off, irrespective the sensitivity setting. As soon
as the baby makes any noise, the loudspeaker will be switched ON again.
6.5 LOW BATTERY / OUT OF RANGE ALARM TONE:
You can set up an alert tone as a warning that the batteries in the camera unit are low or that
the connection between the camera unit and the monitor unit has been lost.
1.
press the M button
2.
use or to scroll to ALERT TONE
3.
press the M button
4.
use or to select the low battery alarm or the connection alarm
5.
press the M button
6.
use or to switch the relevant alarm on or off
7.
press the M button to confirm your choice
8.
press twice to close the menu
the alarm tones sound even if the volume has been set to 0 (no sound)
if ECO Mode is on, the out of range alarm is not active
the alarm tones sound once, and a warning appears on screen repeatedly; you cannot
disable this visual warning
6.6 BRIGHTNESS:
You can set the brightness of the image as follows:
1.
press the M button
2.
use or to scroll to BRIGHTNESS
3.
press the M button
4.
use or to set the desired brightness
5.
press the M button to confirm your choice
6.
press to close the menu
a low brightness consumes less power; for mobile use, it is therefore advisable to set
a low brightness so the battery lasts as long as possible
12
6.7 TEMPERATURE:
At the top of the image the temperature is diplayed of the temperature in the room in which the
camera unit is located. This display can be set to degrees Celsius or degrees Fahrenheit. You
can also set an upper and lower limit, so that an alarm tone sounds whenever one of those
limits is exceeded.
1.
press the M button
2.
use or to scroll to TEMPERATURE
3.
press the M button
4.
use or to select between ‘Format’, ‘Minimum’, ‘Maximum’ and ‘Alert’
5.
press the M button
6.
with ‘Format’
use or to set ‘Celsius’ or ‘Fahrenheit’
with ‘Minimum’
use or to set the lower limit
with ‘Maximum’
use or to set the upper limit
with ‘Alarm’
use or to switch the alarm on or off
7.
8.
press the M button to confirm your choice
press twice to close the menu
appears at the top of the screen
when the temperature alarm is switched on,
the alarm tones sound even if the volume has been set to 0 (no sound)
the alarm tones sound once, and a warning appears on screen repeatedly; please
note: you cannot disable this visual warning
please note that the temperature displayed is only an indication
13
7
POSSIBLE MESSAGES ON SCREEN
The following messages may be displayed on screen during use, either accompanied by warning tones or not:
No link:
The connection between the camera unit and the monitor unit has been lost. This may
be caused by the distance between the units being too great, by the camera unit being
switched off or by the camera unit being deactivated as a result of empty batteries.
Battery low:
The battery in the monitor unit is almost empty. The monitor unit will switch off shortly
after this warning is displayed. Connect the mains adapter straightaway to charge the battery.
Battery low at baby unit:
The batteries in the camera unit are empty. The camera unit will switch off shortly after
this warning is displayed. Replace the batteries immediately or connect the mains adapter.
Temperature too high:
The temperature in the room in which the camera unit is set up is higher than the limit you
set. Take the necessary measures or set a different limit.
Temperature too low:
The temperature in the room in which the camera unit is set up is lower than the limit you
set. Take the necessary measures or set a different limit.
Eco Mode activated:
This message appears just before the system goes into sleep mode. There is now no
longer a connection between the units. The system is only reactivated when the camera
unit detects a sound.
14
8
TIPS AND WARNINGS
8.1
•
•
•
GENERAL:
Read the manual carefully and follow all the instructions.
Never place or use the camera or the monitor in a wet or damp room or environment.
Make sure that heat can be adequately dissipated; never cover the monitor unit, the
camera unit and/or the mains adapter(s) or place them immediately next to a source of
heat.
Use only the supplied mains adapter(s); connecting another type of adapter may damage
the electronic equipment.
Make sure that the adapter cables cannot be damaged and that they cannot cause
tripping or falling.
Never disassemble the monitor unit, the camera unit and/or the mains adapter(s); this
may only be done by qualified personnel.
•
•
•
8.2
•
•
•
8.3
•
•
INSTALLATION:
The mains adapter should only be connected or disconnected when it has been
unplugged from the wall socket.
Do not install the DVM-70 during a thunderstorm.
Do not touch uninsulated adapter cables unless the adapters have been disconnected
from the mains power supply.
FREE FROM INTERFERENCE:
This Digital Video Monitoring System is digitally encoded. You should therefore never
receive a signal from other equipment, nor will the signal from your camera unit appear
on, for example, your neighbours' monitor.
If the camera or monitor are located in close proximity to electromagnetic fields, this may
cause some disturbance to the signal (audio or video). In this case, try a different location
for the camera or the monitor or, if possible, remove the source of the interference.
8.4
•
EAVESDROPPING/INTERCEPTION:
It is virtually impossible to eavesdrop on/intercept these Digital Video Monitor signals. Not
only would one need to be in range of the video monitor, very expensive equipment would
also be required.
8.5
•
MAINTENANCE:
Clean the video monitor with a damp cloth only; do not use chemical cleaning products.
Before cleaning, make sure that the mains adapters are disconnected.
8.6
•
EXPANSION:
The DVM-70 system does not allow multiple camera units to be connected to a single
monitor unit, or for the image from a single camera unit to be displayed on multiple monitor units. It is, however, possible to use multiple complete DVM-70 sets side by side at the
same time.
15
8.7
•
•
•
TROUBLESHOOTING:
In the event that the monitor does not display the camera image and/or the sound is not
being received, check:
- are the monitor and the camera switched on? (monitor unit battery charged up, camera
unit batteries full?)
- is the monitor within the range of the camera?
- has the camera been deactivated on account of silence? (in ECO mode video and
audio are only transmitted when the camera unit detects a sound)
button?
- has the image on the monitor unit been turned off with the
- is the volume on the monitor set to 0 (off)?
If all these things are in order, disconnect the mains adapters from the wall socket,
remove the batteries from the camera unit and the battery from the monitor unit, wait for
around a minute and then put everything back. Switch the monitor and the camera on.
If you are still not receiving any images or sound, please contact the Alecto service department on telephone number +31 (0) 73 6411 355.
8.8
•
RANGE:
The range of the video monitor is up to 300 metres in the open and 50 metres indoors;
the range is dependent on local circumstances. If the units move out of range of each
other, the image first freezes for a few seconds (no motion), followed after a few seconds
by the message ‘No link’, after which the screen goes black.
8.9
•
DELAYS IN VIDEO AND AUDIO:
The camera unit sends the video and audio to the monitor unit in digital blocks. The monitor unit recreates a recognisable image and a comprehensible sound from these signals.
This may mean that there is a short delay between the movement or sound taking place
and seeing/hearing it on the monitor unit.
In addition, the video and the audio on the monitor unit may not be exactly in sync with
each other.
•
8.10 ENVIRONMENT AND DISPOSAL:
•
The packaging of this video monitor may be recycled as used paper. We
recommend, however, that you should retain this packaging so that the equipment
can be adequately packed when it is being transported.
LI-POLYMER
•
Defective or dead batteries should be taken to your local depot for small chemical waste
or to the special battery collection points. Never dispose of batteries in your
household waste.
•
If you are replacing the video monitor, hand in your old equipment to your supplier;
they will ensure that it is recycled in an environmentally-friendly manner.
9
DECLARATION OF CONFORMITY
The Alecto DVM-70 complies with the essential requirements and
provisions as described in European Directive 1999/5/EC. The declaration
of conformity is available on the website www.alecto.info. Usage is allowed in
all countries of the EU. In France, Italy, Russia and Ukraine only indoor use is allowed.
16
10
SPECIFICATIONS
Range:
up to 50m indoors
up to 300 metres outdoors
Power supply monitor unit:
3.7V Lithium Polymer battery (included), made by BYD
6VDC 800mA mains adapter
(included), 2.35mm plug
model: MOSO MSP-C0800IC6.0-5W-DE
or HONR ADS-5Q-06 06005GPG
or TEN PAO INTERNATIONAL LTD, S006MV0600080.
Power supply camera unit:
4 x 1.5 V AA battery (not included)
6VDC 800mA mains adapter
(included), 5.5mm plug
model: MOSO MSP-C0800IC6.0-5W-DE
or HONR ADS-5Q-06 06005GPG
or TEN PAO INTERNATIONAL LTD, S006MV0600080.
Frequency:
2.4GHz, digital frequency hopping (FHSS) / 52 channels
Display
2.8" colour LCD display
QVGA 320*240 pixels
up to 25 frames/sec, Dynamic Frame Rate
Charging time for monitor unit battery: < 6 hours * (whether the monitor unit is switched on or
off)
Battery life for monitor unit battery:
> 8 hours * (brightness set to low)
> 5 hours * (brightness set to high)
Battery life for camera unit with alkaline batteries: > 5 hours *
Temperature sensor range:
11°C - 30°C
Accuracy:
± 2°C (at 25°C)
*: these times are approximate and are dependent on usage and on the condition and quality of
the batteries.
11
WARRANTY
The Alecto DVM-70 comes with 24 months warranty from the date of purchase. During this
period we guarantee that any defects caused by errors in materials or construction will be
repaired free of charge. This at the importer's discretion.
WHAT TO DO: If you notice a defect, first consult the manual. If the manual gives you no
definitive answer, consult the supplier of this video monitor or the Alecto service department on
telephone number +31 (0) 73 6411 355.
THE WARRANTY IS VOID: In the event of improper usage, incorrect connections, leaking
and/or incorrectly installed batteries, use of non-original parts or accessories, negligence and
defects caused by moisture, fire, flood, lightning strikes or natural disasters. In the event of
unauthorised modifications and/or repairs by third parties. In the event of incorrect transportation
of the equipment without appropriate packaging or if the equipment is not accompanied by this
warranty card and the receipt of purchase.
Connection cables, plugs and batteries are not covered by the warranty. Any further liability, in
particular for any consequential damages, is excluded.
17
12
TABLE OF CONTENTS
1
PRODUCT DESCRIPTION ............................................................................................. 2
2
2.1
2.2
2.3
OVERVIEW OF FUNCTIONS
ICONS ON THE SCREEN ............................................................................................. 2
MONITOR UNIT ..............................................................................................................3
CAMERA UNIT ............................................................................................................... 4
3
3.1
3.2
INSTALLATION
CAMERA UNIT ................................................................................................................ 4
MONITOR UNIT ..............................................................................................................6
4
4.1
4.2
4.3
4.4
4.5
4.6
4.7
4.8
USAGE
SWITCHING ON/OFF ..................................................................................................... 8
CONNECTION INDICATOR ............................................................................................ 8
MONITOR UNIT VOLUME .............................................................................................. 8
ZOOM IN ......................................................................................................................... 8
SWITCHING THE VIDEO OFF ....................................................................................... 8
TALKBACK ...................................................................................................................... 8
RECEPTION INDICATOR / OUT OF RANGE MESSAGE .............................................. 9
LULLABIES ..................................................................................................................... 9
5
5.1
5.2
5.3
5.4
ECO MODE
OPERATION .................................................................................................................10
SWITCHING ECO MODE ON/OFF............................................................................... 10
FORCED VIEWING....................................................................................................... 10
OUT OF RANGE INDICATION WITH ECO MODE ON ................................................ 10
6
6.1
6.2
6.3
6.4
6.5
6.6
6.7
SETTINGS
INTRODUCTION ........................................................................................................... 11
MENU LANGUAGE ....................................................................................................... 11
VIBRATING ALARM ...................................................................................................... 11
SENSITIVITY ................................................................................................................ 12
LOW BATTERY / OUT OF RANGE ALARM TONE....................................................... 12
BRIGHTNESS ............................................................................................................... 12
TEMPERATURE ........................................................................................................... 13
7
POSSIBLE MESSAGES ON SCREEN ........................................................................ 14
8
8.1
8.2
8.3
8.4
TIPS AND WARNINGS
GENERAL ..................................................................................................................... 15
INSTALLATION ............................................................................................................. 15
FREE FROM INTERFERENCE .................................................................................... 15
EAVESDROPPING/INTERCEPTION............................................................................ 15
18
8.5
8.6
8.7
8.8
8.9
8.10
MAINTENANCE ............................................................................................................ 15
EXPANSION.................................................................................................................. 15
TROUBLESHOOTING .................................................................................................. 16
RANGE.......................................................................................................................... 16
DELAYS IN VIDEO AND AUDIO ................................................................................... 16
ENVIRONMENT AND DISPOSAL................................................................................. 16
9
DECLARATION OF CONFORMITY ............................................................................. 16
10
SPECIFICATIONS ........................................................................................................ 17
11
WARRANTY.................................................................................................................. 17
12
TABLE OF CONTENTS ................................................................................................ 18
19
Service
Help
Aziëlaan 12
‘s-Hertogenbosch
WWW.HESDO-SERVICE.NL
[email protected]
+31 (0) 73 6411 355
ver1.3