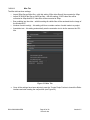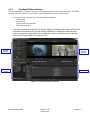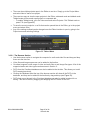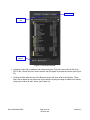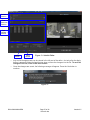
1
CineAsset Digital Cinema Mastering Software User Manual Version 2.5 The English version of this document is the only legally binding version. Translated versions are not legally binding and are for convenience only. DCA.OM.000488.DRM Page 1 of 82 Doremi Labs Version 2.5 Table of Contents 1 Introduction....................................................................................................................................... 4 1.1 System Requirements................................................................................................................ 5 1.2 Software Version ........................................................................................................................ 6 1.3 Contact Information.................................................................................................................... 6 1.4 Database Notice......................................................................................................................... 6 2 CineAsset Set Up.............................................................................................................................. 7 2.1 Installation.................................................................................................................................. 7 2.2 USB Dongle................................................................................................................................ 7 2.3 USB Dongle and DCP Encryption...............................................................................................7 2.4 Tool Bar Icon Description............................................................................................................ 8 2.5 Database and Drop-In Folders Set Up........................................................................................9 3 Using CineAsset............................................................................................................................. 12 3.1 CineAsset GUI.......................................................................................................................... 13 3.2 CineAsset Editor....................................................................................................................... 31 3.3 CinePlayer................................................................................................................................ 59 3.4 CineAsset Render Nodes......................................................................................................... 63 3.5 CineInspect............................................................................................................................... 67 4 Command Line Tools..................................................................................................................... 71 4.1 CineAssetSchedule DCP Generation........................................................................................71 4.2 CinePlayer................................................................................................................................ 72 4.3 CineAssetSchedule KDM Generation.......................................................................................73 4.4 CineInspect............................................................................................................................... 77 5 Doremi CineExport (Mac Only)......................................................................................................79 6 CineAsset Supported File Formats and Codec's.........................................................................80 6.1 Supported Codec’s................................................................................................................... 80 6.2 Supported Containers............................................................................................................... 80 6.3 Supported Image Format.......................................................................................................... 80 6.4 Supported Audio Format........................................................................................................... 80 7 Acronyms........................................................................................................................................ 81 8 Document Revision History........................................................................................................... 82 DCA.OM.000488.DRM Page 2 of 82 Doremi Labs Version 2.5 Software License Agreement The software license agreement can be found at the following location: http://www.doremilabs.com/support/cinema-support/cinema-warranties/ DCA.OM.000488.DRM Page 3 of 82 Doremi Labs Version 2.5 1 Introduction Doremi’s CineAsset Software Suite is a software based digital cinema mastering solution that converts popular video and image files to encrypted or unencrypted DCP files that can be played back on digital cinema servers. CineAsset encodes the audio and video files then wraps them into an MXF container enabling these files to be ingested and played back on the DCP-2000, DCP-2K4, DC-Post and other digital cinema servers. You can now convert, transfer, and playback 2D or 3D video clips such as local advertising, promotions, regional announcements or special interest content, and even full length features with the CineAsset solution. The CineAsset Editor is used to create the 2D or 3D compositions from audio/video files (QuickTime, MXF, AVI, WMV, etc.) or image sequences (TIFF, JPEG, BMP, TARGA, etc.) apply filters such as Color conversion and add encryption. CineAsset Editor seamlessly passes the composition to CineAsset Schedule, which handles the conversion and encryption and places the DCP in the database. Once the DCP is in the database, the CineAsset GUI is used to generate KDMs, if the content is encrypted, and transfer the DCPs to a server. CineAsset now includes a DCP Player application called CinePlayer. CinePlayer can be used to QC encrypted and unencrypted DCPs. DCPs in the CineAsset database can be sent to CinePlayer for playback with the click of a button. CinePlayer can also playback encrypted and unencrypted DCPs generated by anyone as well as any video file type supported by CineAsset. Moreover, for Mac users, CineAsset includes Doremi CineExport. Doremi CineExport is a software plug-in for Apple’s Compressor application and allows the creation of Digital Cinema Packages (DCP) from Final Cut Pro sequences and other common video files. DCA.OM.000488.DRM Page 4 of 82 Doremi Labs Version 2.5 1.1 System Requirements CineAsset software works on Windows and Mac OS X operating systems. 1.1.1 Windows: o OS: XP, Vista, Windows 7, and Windows 8.1. o RAM: 4GB minimum – 8GB recommended o Intel Core 2 Duo minimum, Core i7 quad-core recommended o Graphics adapter with minimum 512MB dedicated memory (Intel integrated graphics not recommended) MAC: o OS: 10.6.X and above. o RAM: 4GB minimum – 8GB recommended o Intel Core 2 Duo minimum, Core i7 quad-core recommended o Graphics adapter with minimum 512MB dedicated memory (Intel integrated graphics not recommended) CinePlayer Requirements When using CinePlayer for real time playback of 2K, 24fps DCP's with color conversion, the following minimum configuration is recommended: CPU(s) with minimum 12 threads (12 physical cores or 6 cores with HT Technology) 8GB RAM Graphics adapter with minimum 1GB dedicated memory Fast local storage dedicated to DCP content (7200 RPM SATA III HDD or SSD) Real time playback of any high frame rate, 3D or 4K DCP’s, cannot be guaranteed. DCA.OM.000488.DRM Page 5 of 82 Doremi Labs Version 2.5 1.2 Software Version The current software version that this manual pertains to is 7.0.x and above. 1.3 Contact Information If in need of help or assistance, please contact Doremi Labs Technical Services: USA 24/7 Technical Services line: + 1-866-484-4004 Technical Services Email: [email protected] Europe 24/7 Technical Services line: + 33 (0) 492-952-847 Technical Services Link: http://support.doremitechno.org/ticketing Japan Technical Services line: + 044-966-4855 Technical Services Email: [email protected] Australia ~ China ~ India ~ Indonesia ~ Korea ~ Malaysia ~ New Zealand ~ Philippines ~ Singapore ~ Taiwan ~ Thailand Technical Services Email: [email protected] 1.4 Database Notice ******************************************************************************************************************** The database structure for this version of CineAsset has changed and is not backwards compatible with version 6.3.8 or lower. When the software loads for the first time, we suggest that you create a new database instead of using an existing one. ******************************************************************************************************************** DCA.OM.000488.DRM Page 6 of 82 Doremi Labs Version 2.5 2 CineAsset Set Up 2.1 Installation Install the application by double-clicking on the CineAsset.exe icon. It is recommended to reboot after the installation is complete. For Mac users, the Doremi CineExport Compressor plug-in must be installed separately and in addition to the CineAsset application. To install Doremi CineExport, double-click on the CineExport 1.2.x.dmg file to mount the disk image. Then, double-click on the CineExport 1.2.x.pkg file and follow the onscreen instructions to install the plug-in. Note: For Windows users, Quicktime Player needs to be installed prior to beginning the installation process. 2.2 USB Dongle A licensed CineAsset USB dongle is required to wrap files longer than 15 seconds and without an embedded Doremi logo as shown below (see Figure 1): Embedded Doremi Logo Figure 1: Embedded Doremi Logo To obtain a USB dongle contact [email protected]. 2.3 USB Dongle and DCP Encryption CineAsset Unregistered and Pro versions can be used to encrypt content and generate KDMs for the encrypted content. CineAsset Standard version does not support encryption. The certificates and private keys used by CineAsset Unregistered version are not unique to each installation. This means KDMs can be generated by any CineAsset installation for any content that has been encrypted with an Unregistered version. CineAsset Pro version uses a unique private key that is stored on the Pro dongle. This means KDMs can only be generated for content that has been encrypted with a Pro dongle, if that same dongle is present. To obtain a Pro dongle or to upgrade an existing Pro dongle, contact [email protected]. DCA.OM.000488.DRM Page 7 of 82 Doremi Labs Version 2.5 2.4 Tool Bar Icon Description CineAsset runs as a service indicated by an icon in the right section of the tool bar on the PC desktop (see Figure 2). For Mac OS X platform, the icon will be located in the upper-right corner of the screen (see Figure 3). CineAsset Icon Figure 2: CineAsset Icon on Windows PC Desktop CineAsset Icon Figure 3: CineAsset Icon on Mac OS X Platform The Tool bar icon color indicates the current status. ◦ GREEN circle indicates status is good (see Figure 2). ◦ AMBER circle appears when processing tasks. ◦ RED circle will appear in the event of a failure. To exit the CineAsset application, right-click on the tool bar icon and select “Quit CineAsset”. DCA.OM.000488.DRM Page 8 of 82 Doremi Labs Version 2.5 2.5 Database and Drop-In Folders Set Up 2.5.1 Database Folder When running CineAsset software for the first time, it will automatically create a database folder. The database folder will be found at the following location: ~/Doremi CineAsset/Default_DCinema. The database (DB) folder created inside this folder will hold all the content that is encoded and wrapped using CineAsset. The database location can be configured to the internal drive, a USB or Firewire drive, or on a networked drive. Databases stored on Network drives can be shared between different CineAsset installations on the same network. 2.5.1.1 Changing the Database Folder • To change the database folder, go to the “Database” menu of the CineAsset GUI (Graphical User Interface) and click on “Change Location,” which opens the “Database” window (see Figure 4). ◦ In the “Database” window, click on the “Change” button to open an explorer window and browse for the new database folder (see Figure 4). Change Button OK Button Apply Button Figure 4: Database Window DCA.OM.000488.DRM Page 9 of 82 Doremi Labs Version 2.5 • • • Select the desired database folder and click on the “Select Folder” button in the explorer window. You will then be back to the “Database” window (see Figure 4). Click the "Apply" button then "Ok" button to finalize the database change (see Figure 4). The database folder can also be changed by clicking the “Change...” button at the top of the CineAsset GUI's Database tab (see Figure 5). Clicking the “Change...” button will open the “Database” window. Then follow the steps above to change the database folder location. Change Button Figure 5: Change Button on Database Tab 2.5.2 Drop-In Folders When media is placed into a drop-in folder, it will be automatically imported to the CineAsset database. For each drop-in folder, you can define different encoding profiles and each drop-In folder can either be used with Video Files or Image Sequences. To create a new drop-In folder: ◦ From the “File” menu, select “Drop-in folder Manager...” or press F2. ◦ In the drop-in folder manager window, click on the "New..." button to add a drop-in folder (see Figure 6). ◦ Select either “Video Files” or “Picture Folders” for the selected drop-in folder (see Figure 6). Selecting video files allows video files such as .mov to be add to the drop-in folder; selecting picture folders allows a folder containing an image sequence to be added to the drop-in folder. ◦ Click the “...” button next to the “Source” text box and select a folder to be used (see Figure 6) as the “Drop-In” folder. ◦ Click the “...” button next to the Destination and choose a destination for the encoded DCP (see Figure 6). If this setting is unchanged, the DCP will be added to the CineAsset Database. ◦ Choose a profile using the “Profile” drop-down box to define the encoding parameters for media added to the drop-in folder (see Figure 6). ◦ When finished, click the “Close” button (see Figure 6). DCA.OM.000488.DRM Page 10 of 82 Doremi Labs Version 2.5 Drop-in Folder Tabs Settings Manager Button New Button Figure 6: Drop-In Folder Manager Window DCA.OM.000488.DRM Page 11 of 82 Doremi Labs Version 2.5 3 Using CineAsset CineAsset is a software suite that consists of four applications: o CineAsset GUI o CineAsset Editor o CineInspect o CinePlayer The individual applications can be accessed from the CineAsset folder in the start menu or by right-clicking on the CineAsset icon in the task bar and selecting “Show App Launcher” (see Figure 7). Figure 7: CineAsset Task Bar Menu From the App Launcher, choose the desired application to start (see Figure 8). Figure 8: App Launcher DCA.OM.000488.DRM Page 12 of 82 Doremi Labs Version 2.5 3.1 CineAsset GUI The CineAsset Graphical User Interface (GUI) is shown in Figure 9 below. This GUI contains three separate function tabs: Device tab: used to manage the Doremi devices. Clip database tab: used to manage the CineAsset database and transfer DCPs. Tasks tab: displays the tasks list and their associated log information. Device Status Device Manager CPL / KDM Manager Figure 9: CineAsset Device Tab DCA.OM.000488.DRM Page 13 of 82 Doremi Labs Version 2.5 3.1.1 Device Tab The Device tab contains three different sections: “Device manager,” “Device status,” and “CPL/KDM Manager” (see Figure 9). 3.1.1.1 Device Manager The "Device Manager" can be used to manage Doremi networked devices and to organize them by creating groups. To create a new group: ◦ Click the “New Group...” button in the bottom left corner of the device tab (see Figure 12). ◦ In the “Devices group” pop-up window, type the name for the new group (see Figure 10). ◦ Click “OK” and the new group will be created and displayed in the Device manager (see Figure 10). Figure 10: “New group” Dialog Box • To add a new device: ◦ Click the “New Device...” button in the bottom left corner of the device tab. ◦ In the “Device properties” pop-up window, type the name and the IP address for the new Device. ◦ Select which group the new device will be added to from the Group drop down-box (see Figure 11). ◦ Click “OK” and the device will be added to the selected group and displayed in the Device Manager (see Figure 12). Figure 11: “New device” Dialog Box DCA.OM.000488.DRM Page 14 of 82 Doremi Labs Version 2.5 To edit an existing Device or Group, select it in the device manager and press the “Properties” button (see Figure 12). To remove an existing Device or Group, select it in the Device Manager and press the “Remove” button (see Figure 12). New Device Device Status New Group Button New Device Button Properties Button CPL / KDM Manager Remove Button Retrieve Certificates Button Retrieve Certificates by FTP Button Figure 12: Devices Added to the Group 3.1.1.2 Retrieving Certificates CineAsset can generate encrypted DCPs and also create KDMs for any DCP encrypted by CineAsset. To Generate a KDM for a specific server, the certificates from that server need to be used. Certificates can be retrieved from any server in the device manager by selecting the server and pressing the “Retrieve certificates...” button (see Figure 12). Certificates for any Doremi server can also be retrieved from the Doremi Service Public FTP site by pressing the “Retrieve certificates by ftp...” button. ◦ Pressing the “Retrieve certificates by ftp...” button will launch the Retrieval Properties window (see Figure 13). ◦ Select a destination folder for the certificates by pressing the “Browse” button and selecting a folder (see Figure 13). ◦ Type the serial number into the “Serial Number” field and press “Add SN”. ◦ Click the “Retrieve” button and the certificates will be downloaded from the FTP site and saved to the selected destination folder (see Figure 13). DCA.OM.000488.DRM Page 15 of 82 Doremi Labs Version 2.5 Figure 13: Retrieval Properties window The CineAsset application also has its own certificates that can be used to generate KDMs for a specific CineAsset installation. This allows content encrypted elsewhere to be viewed with the CineAsset DCP player. ◦ To retrieve the CineAsset certificates, go to the “File” menu and select “Export CineAsset's certificates” (see Figure 14). Figure 14: Export CineAsset Certificates 3.1.1.3 Device Status The “Device status” section displays the current status of the selected device as shown in (see Figure 15). It also provides transport control buttons. Note: The Transport Control feature only works when using the DCP-2000, DCP-2K4, IMB/ShowVault, IMS1000 or DC-Post Doremi products. DCA.OM.000488.DRM Page 16 of 82 Doremi Labs Version 2.5 Title of Loaded Clip Locate Field Playback Mode Figure 15: Device Status Window • • To locate to a specific timecode location, click the “Locate...” text and the “Locate time code” window will appear (see Figure 16). Type in the desired timecode location and press Locate. The playback behavior of the playlist can be adjusted using the Playback Mode drop-down box (see Figure 15). The selections include the following: ◦ Loop ◦ Play then Rewind ◦ Play then Eject Figure 16: Locate Window 3.1.1.4 CPL Manager The CPL Manager is used to manage the DCPs on the connected devices, create playlists, and load playlists for playback (see Figure 12). The CPL manager consists of two sections: Clip List and Show Playlist. The Clip List shows all the available clips on the selected device. ◦ To delete a clip, select the clip title in the clip list and press Delete. ◦ Use the Update button to update the clip list after ingesting new content. Playlists are used to playback the content that is on the connected servers. The Show Playlist section contains two tabs: ◦ Editor tab – used to create a new playlist and edit existing playlists ◦ Existing Show Playlist tab – used to load and manage existing playlists. To load an existing playlist: ◦ Click the Existing Show Playlist tab ◦ Select an existing playlist from the list ◦ Press the Load button DCA.OM.000488.DRM Page 17 of 82 Doremi Labs Version 2.5 Figure 17: “CPL Manager – Existing show Playlist” Tab To create a new playlist: ◦ Click the Editor tab. ◦ Select the desired clip in the Clip List and press the “Add to Show Playlist” button (see Figure 18). One or multiple clips can be added to the Show Playlist. ◦ Press the Load button to load the current playlist for playback. ◦ To save the current playlist, press the Save button (see Figure 18). Type a name for the playlist in the pop-up window and press OK. ◦ To remove a clip from the current playlist, highlight the clip in the show playlist and press the remove button. ◦ Use the “Move Up” and “Move Down” buttons to re-arrange the order of clips in the playlist. Clip List of Attached Server Save button Figure 18: “CPL Manager – Clip List and Playlist Editor” DCA.OM.000488.DRM Page 18 of 82 Doremi Labs Version 2.5 3.1.1.5 KDM Manager The KDM manager is used to delete, upload or download KDMs from Doremi Servers connected to CineAsset. To manage KDMs on a connected Doremi server, select the server in the Device tab and press the KDM manager tab (see Figure 19). Upload Button Update Button 3.1.2 Delete Button Download Button Figure 19: KDM Manager Tab To delete a KDM from the server, select the KDM and press the Delete button (see Figure 19). To download a KDM for the server to your computer, select the KDM and press the Download button (Figure 18). Then select a destination and press “Select Folder.” To Upload a KDM from your computer to the server, press the “Upload” button (see Figure 19). Select the KDM and press Open. After uploading a KDM to the server, press the “Update” button to refresh the KDM list (see Figure 19). Database Tab The Database tab shows a list of all the DCPs in the CineAsset database accompanied by their properties (e.g., Codec, Duration, Resolution and frame rate). The database tab can be used to transfer a DCP from the CineAsset database to a server connected to CineAsset over the network. The database tab is also used to create KDMs for encrypted DCPs and to manage the assets in the CineAsset database. To delete a DCP from the CineAsset database and from the computer, select the DCP in the database tab and press the Remove button (see Figure 21). To export a DCP from the CineAsset database, select the DCP in the database tab and press the Export button (see Figure 20 and Figure 21). To import an existing DCP to the database, select the “Add existing DCP…” button and browse to the folder that contains the package to be imported. DCA.OM.000488.DRM Page 19 of 82 Doremi Labs Version 2.5 Figure 20: Export Window Lock Icon for Encrypted DCP CinePlayer Button Show in Explorer / Finder Button CineInspect Button Properties Button Send To Button Remove Button Generate KDM Button Export Button DCA.OM.000488.DRM Figure 21: Database Tab Page 20 of 82 Doremi Labs Add Existing DCP... Button Editor Button Version 2.5 To view the properties of a DCP in the CineAsset database: ◦ Select the DCP and press the “Properties” button (see Figure 21). The properties window will appear showing the properties of the DCP and allow some parameters to be changed (see Figure 22). ◦ Press the Reel # tab to view the properties of the specific reels (see Figure 22). ◦ Press the “Location...” button to open an explorer window with the DCP files (see Figure 22). ◦ Press the “CinePlayer...” button to open the selected DCP with CinePlayer (see Figure 22). Location Button CinePlayer Button Figure 22: DCP Properties Window To open an Explorer (Windows) or Finder (Mac) window showing where the DCP is stored on the computer, select the DCP in the database tab and press the Show in Explorer / Finder button (see Figure 21). 3.1.2.1 Transferring to a Device DCPs in the CineAsset database can be transferred to networked devices by selecting the DCPs in the Database tab and pressing the “Send to...” button (see Figure 21). There are two ways to transfer DCPs from the CineAsset database to networked servers, either by choosing an FTP location or by selecting a destination device. DCA.OM.000488.DRM Page 21 of 82 Doremi Labs Version 2.5 3.1.2.1.1 • Selecting a Destination Device To transfer a DCP to a device using CineAsset Transfer: ◦ Select the DCP to transfer in the Database tab and press the “Send to...” button (see Figure 21). ◦ Select the CPL in the left side of “Select destination device(s)” window (see Figure 23Figure 23). ◦ If the content is encrypted, pressing the “Add KDM” button will allow you to select a KDM to send to the device along with the CPL (see Figure 23). ◦ Select the server to send the CPL to in the right side of the “Select destination device(s)” window (see Figure 23). ◦ Press “Ok” and the CPL will be transferred to the the device. The status of the transfer can be observed under the Tasks tab. ◦ The transfer can also be scheduled for a later time using the “Schedule transfer” Check box and Date/Time drop-down menu (see Figure 23). Selected CPL Selected Server Schedule Transfer Add KDM Button Figure 23: Select Destination Devices Window DCA.OM.000488.DRM Page 22 of 82 Doremi Labs Version 2.5 3.1.2.1.2 • Choosing an FTP Location To transfer a DCP over FTP: ◦ Select the DCP to transfer in the Database window and press the “Send to...” button (see Figure 21). ◦ Select the DCP in the left side of “Select destination device(s)” window (see Figure 23). ◦ If the content is encrypted, pressing the “Add KDM” button will allow you to select a KDM to send to the device along with the DCP (see Figure 23). ◦ Click the “Ftp” tab at the top of the Select destination devices window (see Figure 24). ◦ Enter the Address, Login, and password for the FTP site. ◦ Enter the destination directory on the FTP server to place the DCP. ◦ Press “Ok” to transfer the DCP to the FTP server. Figure 24: FTP Transfer DCA.OM.000488.DRM Page 23 of 82 Doremi Labs Version 2.5 3.1.2.1.3 Generating KDMs CineAsset has the ability to Generate KDMs for content that has been encrypted by CineAsset. This section describes how to generate a KDM for an encrypted DCP in the CineAsset database. DCPs that are encrypted are shown with a green lock icon in the Database tab (see Figure 21). To generate a KDM for an encrypted DCP: ◦ Select the DCP in the Database tab and press the “Generate KDM...” button (see Figure 21), and the KDM Generate Options window will appear (see Figure 25). Note: The Generate KDM button will only be active when an encrypted DCP is selected. Otherwise, the button will be grayed out. • • • Select the start and end date for the KDM using the “Start of Validity” and “End of Validity” drop-down boxes (see Figure 25). Select the appropriate time zone using the “Time Zone” drop-down box. Choose the package standard using the “Standard” drop-down box. Validity Start and End Dates Time Zone Drop Down Standards Drop Down Figure 25: KDM Generate Options Settings Tab DCA.OM.000488.DRM Page 24 of 82 Doremi Labs Version 2.5 • • • • • Go to the Certificate Manager tab of the KDM Generate Options window and select “Add Servers” to add a server's certificate to the list (see Figure 26). Browse to and select the appropriate certificate .pem file. After pressing Open, the server will appear in the Servers list. Click the check-box to select the newly added server (see Figure 26). Press the Generate button to generate the KDM for that server (see Figure 26). The KDM will be generated and will be accessible in the KDM Manager. Selected Server Check Box Add Servers Button Generate Button Figure 26: KDM Generate Options: Servers Tab DCA.OM.000488.DRM Page 25 of 82 Doremi Labs Version 2.5 3.1.3 Tasks Tab The Tasks tab displays the status of any tasks executed by CineAsset, such as transferring a DCP to a device or creating a DCP. The progress of the task is shown as well as the log information. • The color of the task circle indicates the state of the task: ◦ Green Circle – Task completed successfully ◦ Amber Circle – Task is processing ◦ Blue Circle – Task is pending ◦ Red Circle – Task has failed ◦ Red X through white circle – Task was canceled Failed Task Completed Task Processing Task Canceled Task Pending Task Figure 27: Tasks Tab To view the log file for a specific task, select the task and press the Show Log button. To Cancel a pending or running task, select the task and press the Cancel button. To restart a task, select the task and press the Restart button. Pressing the “Send to editor” button will open the selected task in the Editor where it can be edited and generated again. To remove a task, select the task and press Remove. DCA.OM.000488.DRM Page 26 of 82 Doremi Labs Version 2.5 3.1.4 Certificate & KDM Manager 3.1.4.1 Certificate Manager The certificate manager allows you to add certificates to CineAsset as well as view the certificates and their associated properties. Certificates added to the certificate manager can then be accessed from the Generate KDM Options window when generating KDMs. To open the certificate manager, go to the KDM/Certificate Manger Menu and select “Certificate Manager...” (see Figure 28). Figure 28: Opening the Certificate Manager Server / Projector Tab Properties Button Add Server Button DCA.OM.000488.DRM Figure 29: Certificate Manager Page 27 of 82 Doremi Labs Remove Cert Button Version 2.5 The Certificate Manager has two tabs, the Server tab and the Projector tab (see Figure 29). Use the server tab to manage certificates for Digital Cinema servers and the Projector tab to manage the certificates of projectors. To add a certificate: ◦ Press the “Add Server” button. ◦ Select the .pem certificate file and press open. To remove a Certificate: ◦ Select the certificate in the Certificate Manager. ◦ Press the “Remove Cert” button. To view the properties of a Certificate: ◦ Select the certificate in the Certificate Manager. ◦ Press the Properties button. ◦ The Properties window will appear (see Figure 30). Cert Name Field Apply Button Close Button Figure 30: Certificate Manager Properties Window To rename a certificate: ◦ Open the certificate's properties window. ◦ Type a new name for the certificate in the “Cert Name” filed (see Figure 30). ◦ Press “Apply”. ◦ Press “Close”. 3.1.4.2 KDM Manager The KDM manager allows you to view the KDMs generated by CineAsset as well as their associated properties. The KDM manager can also be used to send KDMs to attached servers or over the network via FTP. DCA.OM.000488.DRM Page 28 of 82 Doremi Labs Version 2.5 KDM List Remove KDM Button Location Button Properties Button Send KDM Button Figure 31: KDM Manager To open the KDM Manager, go to the “KDM/Certificate Manager” menu and select “KDM Manager...” (see Figure 32). Figure 32: Opening the KDM Manager To view the properties of a KDM: ◦ Select the KDM in the List of KDMs. ◦ Press the Properties Button (see Figure 31). The properties window will appear (see Figure 33). DCA.OM.000488.DRM Page 29 of 82 Doremi Labs Version 2.5 KDM Name Field Apply Button Figure 33: KDM Properties Window The properties window can be used to view the properties of the KDM and also to change the name of the KDM. To change the KDMs name: ◦ Type a new name for the KDM in the “KDM Name” field (see Figure 33). ◦ Press the “Apply” button. To remove a KDM, select the KDM in the List of KDMs and press the “Remove KDM” button (see Figure 31). To send a KDM to an attached device or over the network via FTP, select the KDM in the List of KDMs and press the “Send KDM” button (see Figure 31). This will launch the “Select Destination devices” window. DCA.OM.000488.DRM Page 30 of 82 Doremi Labs Version 2.5 3.2 CineAsset Editor The CineAsset Editor is used to create DCPs. The DCP creating process is done in three stages. First, define the settings for the DCP using the settings window. Second, create the composition using the CineAsset Editor interface. And third, press the Generate button handing the encoding back to CineAsset schedule and monitor the progress using CineAsset GUI. • The Editor can be launched in one of three ways: ◦ In the start menu, click on “CineAsset Editor” under the Doremi Labs CineAsset folder. ◦ With CineAsset Schedule running, right-click on the task bar icon and select “Show App Launcher…” (Figure 33). From the App launcher, select CineAsset Editor. ◦ Click on “Editor (Import)...” on the Database tab of the CineAsset GUI (see Figure 35). Figure 34: Launch Editor from the Task Bar Figure 35: Launch Editor from the CineAsset GUI After launching the CineAsset Editor, the Settings window will appear. The Settings window is used to define the settings for the DCP, such as the bitrate, package standard, and frame rate. DCA.OM.000488.DRM Page 31 of 82 Doremi Labs Version 2.5 Name Field and Save Button Existing Settings Section Settings Section Set as Default Button Create Project Button Figure 36: Project Settings Window 3.2.1 Settings Window The Project settings window is made up of two sections: Existing Settings and Settings (see Figure 36). 3.2.1.1 Existing Settings The Existing Settings section contains saved “profiles” or settings configurations. The profiles can be set as default, so every time the Editor is launched, the default settings configuration is automatically loaded. • • To set a profile as default (see Figure 36): ◦ Select the profile in the Existing Settings section. ◦ Press the “Set as default” button. ◦ The default profile will be indicated by a star icon. To save the current settings configuration to a profile: ◦ Type a name for the profile in the Name field at the top of the Settings section. ◦ Press the Save button. ◦ The new profile will appear in the “Existing Settings” section. DCA.OM.000488.DRM Page 32 of 82 Doremi Labs Version 2.5 3.2.1.2 Settings Section The Settings section is used to define the specific settings for the DCP. The settings section consists of 7 tabs: Codec, Mxf, Stereoscopic, Scaling, Image Sequence, Default Filters and Misc (see Figure 36). Any settings that are set initially using the Settings window can be changed later from the CineAsset Editor interface. 3.2.1.2.1 Codec Tab The Codec tab is used to set the video compression type and settings used such as bitrate. The available compression types are JPEG2000, MPEG2, H264 and VC1. Note: CineAsset does not include a VC1 encoder. To use the VC1 codec, the source file must also be VC1. The “Rule” options allow you to control the encoding process. “Encode if necessary” will only re-encode source files that do not match the project settings, “Encode all files” tells CineAsset to re-encode any source file regardless of the project settings and “Encode all files except IOnly (mpeg only)” tells CineAsset to only re-encode long GOP MPEG files. The Rule allows you to force re-encode JP2K source files. For JPEG2000, the maximum bitrate is 250Mb/s for frame rates at and below 30. For frame rates above 30, 500Mb/s is the maximum bitrate. For MPEG2, encoding the maximum bitrate is 80Mb/s. Figure 37: Codec Tab - JPEG2000 DCA.OM.000488.DRM Page 33 of 82 Doremi Labs Version 2.5 Figure 38: Codec Tab – MPEG2 DCA.OM.000488.DRM Page 34 of 82 Doremi Labs Version 2.5 3.2.1.2.2 Mxf Tab The Mxf tab is used to set the package Standard, audio configuration, and encryption. To encrypt the DCP, click the “Encrypt content” check-box (see Figure 39). The package standard can be set to either SMPTE or Interop. The package category can be set using the “Category” drop-down box. The available selections are Feature, Test, Trailer, Teaser, Rating, Advertisement, Short, Transitional, PSA, and Policy. The Audio configuration down-box is used to set the audio track assignments for the DCP. Hovering over the configuration will show the audio track labels. Encrypt Content Check Box Figure 39: Mxf Tab DCA.OM.000488.DRM Page 35 of 82 Doremi Labs Version 2.5 3.2.1.2.3 Stereoscopic Tab To generate 3D DCPs, use the Stereoscopic tab and check the “Generate stereoscopic content” check-box. Stereoscopic Check Box Figure 40: Stereoscopic Tab DCA.OM.000488.DRM Page 36 of 82 Doremi Labs Version 2.5 3.2.1.2.4 Scaling Tab The Scaling tab is used to set the scaling parameters for the composition. The available scaling modes are Aspect (scale and maintain the aspect ratio), Fit Horizontally, Fit Vertically, and Fill & Canvas (adds a border around the image). The force Resolution drop-down box is used to force the video into a specific video format. The scaling can also be adjusted later using the Editor interface. Figure 41: Scaling Tab DCA.OM.000488.DRM Page 37 of 82 Doremi Labs Version 2.5 3.2.1.2.5 Image Sequence Tab The Image Sequence tab is used to set the frame rate that will be applied when adding Image Sequences to the timeline. CineAsset supports High Frame Rates, standard frame rates, and archive frame rates. The available settings are 16, 18.18, 20, 21.82, 23.98, 24, 25, 29.97, 30, 47.95, 48, 50, 59.94, 60, 72, 95.90, 96, 100, 119.88, and 120. Figure 42: Image Sequence Tab DCA.OM.000488.DRM Page 38 of 82 Doremi Labs Version 2.5 3.2.1.2.6 Default Filters Tab The Default Filters tab can be used to apply filters to the composition when creating the project. Filters can also be added to the composition using the Editor Interface. • The available filters that can be set as default are Color Conversion, Overlay, Burn and Lead/Trail. Figure 43: Default Filters Tab 3.2.1.3 Color Conversion The color conversion filter is the most commonly used filter and often should be set as default when using JPEG2000 Image compression. To enable color conversion, check the Color conversion check-box in the Default filters tab (see Figure 43). Choose Conversion type (RGB to XYZ, XYZ to RGB or P3 to XYZ). Once color conversion is checked, there are 3 options (see Figure 44). o Use default LUT – use the CineAsset default RGB to XYZ' LUT. DCA.OM.000488.DRM Page 39 of 82 Doremi Labs Version 2.5 Note: CineAsset uses a Gamma 2.2 defined by the ITU-R BT.709-5 specification. If the user wants to use a mathematical 2.22, then he should use the custom input LUT option (see Figure 44). o o o o Use Custom input LUT - This option will allow the color conversion to be edited manually using slides to adjust the gamma curves or by using a .csv LUT file. Offset - Adjust the image brightness. Gamma - Set the input de-gamma. exp. If the input is Rec709, which uses an encoding gamma of 0.45, the correct setting would be 2.22 (1/0.45). Gain - Adjust the image contrast. Figure 44: Use Custom LUT Note: Custom LUT files accepted must be 12 or 16 bits with size equal to 512, 1024, 2048, 4096, 8192, 16394, 32768, or 65536. • Use 3D LUT – this option will allow the use of a .3dl LUT file. Use Custom Input LUT Figure 45: Color Conversion Filter Options DCA.OM.000488.DRM Page 40 of 82 Doremi Labs Version 2.5 To load a custom LUT .csv file: ◦ ◦ ◦ ◦ Click the “Use custom input LUT” radio button (see Figure 45). Scroll down below the graph and click the “Use LUT file” radio button. Use the drop-down box to select either 16bits or 12 bits LUT. Click the folder button to browse for and select the custom LUT .csv file. Use LUT Button Drop Down Box Figure 46: Using a LUT File DCA.OM.000488.DRM Page 41 of 82 Doremi Labs Version 2.5 3.2.1.4 Overlay The Overlay filter is used to overlay a PNG image file on the video. This feature is useful for overlaying a company logo during the playback of the DCP. Only PNG image files can be used with the overlay filter. To enable the logo overlay filter, check the “Overlay” check-box in the default filters tab. To add an Overlay image: ◦ Click the picture icon to browse and select the PNG image file. ◦ If necessary, use the Width and Height settings to change the size of the image. ◦ Use the “Top pos X” and “Top pos Y” settings to adjust where the overlay will be displayed. 0 for both will position the image in the upper-right corner. Figure 47: Overlay Filter Settings DCA.OM.000488.DRM Page 42 of 82 Doremi Labs Version 2.5 3.2.1.5 Burn Filter The Burn filter will “burn” a counter with the frame number on to each frame of the DCP. To enable the Burn filter, check the “Burn” check-box in the default filters tab. The font and position of the frame numbers can be adjust using the “burn” filter settings. Figure 48: Burn Filter Settings DCA.OM.000488.DRM Page 43 of 82 Doremi Labs Version 2.5 3.2.1.6 Lead/Trail The Lead/Trail filter is used to add blank frames or custom user frames to the beginning, end, or both of the composition. To enable the Lead/Trail filter, check the “Lead/Trail” check-box in the default filters tab. Use the Mode drop-down box to choose between adding Black Frame and a custom user frame. Figure 49: Lead/Trail Filter Settings DCA.OM.000488.DRM Page 44 of 82 Doremi Labs Version 2.5 3.2.1.6.1 Misc Tab The Misc tab has three settings. • Import 25fps files as 24fps files – with this setting, 25fps video files will be converted to 24fps. • Import 23.98/29.97fps files as 24/30 fps files – with this setting, 23.976 video files will be converted to 24fps and 29.97 video files will be converted to 30fps. • Burn subtitles into the video – with this setting all subtitle files will be rendered into the image of the finished DCP. • Number of audio track(s) – this setting will force a certain number of audio tracks to a project. • Annotation text – this setting automatically sets the annotation text to be the same as the CPL title. Figure 50: Misc Tab Once all the settings have been adjusted, press the “Create Project” button to launch the Editor interface and start creating the composition (see Figure 36). DCA.OM.000488.DRM Page 45 of 82 Doremi Labs Version 2.5 3.2.2 CineAsset Editor Interface The CineAsset Editor interface is used to create the composition and preview the output. The Editor interface takes the familiar form of a Non Linear Editor and functions in a similar way. There are 4 main sections of the CineAsset Editor interface: ◦ The Browser ◦ The Timeline ◦ The Source/Preview section ◦ The General section The basic workflow for creating DCPs with the editor is to drag and drop audio and video files and folders from the browser onto the timeline; add filters as necessary from the browser section; preview the output with the Source/Preview section; and then press the Generate button in the General section to create the DCP. General Section Source / Preview Section Browser Section Timeline Figure 51: CineAsset Editor Interface DCA.OM.000488.DRM Page 46 of 82 Doremi Labs Version 2.5 There can be multiple projects open in the Editor at one time. Simply go to the Project Menu and select New to start a new project. There are two ways to view the open projects in the Editor: windowed mode and tabbed mode. Tabbed mode will have each open project on a separate tab. ◦ To enable Tabbed mode, go to the View menu and select Projects. Click Tabbed mode or press F10 (see Figure 52). To save the current project to a .ca file that can be opened later in the Editor, go to the project menu and select Save. Any of the settings outlined can be changed once the Editor interface is open by going to the Project menu and selecting Settings. Figure 52: Tabbed Mode 3.2.2.1 The Browser Section Use the browser section to navigate the computer for audio and video files and drag and drop them onto the time line. Video files and Image sequences can be added to the timeline. CineAsset supports a wide range of video and audio files as well image files types. A list of the supported audio and video types can been seen in Section 6 . DCPs from the CineAsset database can also be added to the timeline. This allows you to edit DCPs created previously. Clicking the Database tab at the top of the browser section will show all the DCPs in the database, and they can be added to the timeline by drag and drop (see Figure 53). DCP's that are not already in the CineAsset database can also be added to project for reediting. This can be done by dragging and dropping the DCP folder or the CPL. DCA.OM.000488.DRM Page 47 of 82 Doremi Labs Version 2.5 Filters Tab Database Tab Preview Button Figure 53: Browser Section Selecting a video file or database item and pressing the “Preview” button will load the file or DCP in the “Source/Preview” section where it can be played to preview the content (see Figure 53). Clicking the filter tab at the top of the Browser section will show a list of all the filters. These filters can be added to the current reel on the timeline by drag and drop or added to all reels by clicking the “Add to all reels” button (see Figure 54). DCA.OM.000488.DRM Page 48 of 82 Doremi Labs Version 2.5 Figure 54: Browser Section – Filters Tab In addition to the filters, there is also an Audio Delay filter. The audio delay filter can be added to all the audio tracks and can delay the audio by frames. DCA.OM.000488.DRM Page 49 of 82 Doremi Labs Version 2.5 3.2.2.2 The Timeline The timeline is where the composition is constructed; files are added to the timeline from the browser. The timeline shows the video and audio for the selected Reel. To add a reel, click the “Add reel” button. To navigate between reels, click the Reel tabs at the top of the timeline. Reel Tabs Add Reel Button Remove Buttons Move Buttons Figure 55: The Timeline Video files and Image Sequences can be added to the Video Tracks. Audio files are added to their corresponding audio tracks. The mouse can be used to drag it to a different track or the “Move Up” and “Move down” buttons can be used. Subtitle or caption xml files are added to the subtitle or caption tracks. Both text and PNG subtitles are supported. To remove a file from the timeline and current reel, select the track and press the “Remove” button. The “Remove All” button is used to clear the current Reel. Figure 56: Stereoscopic Timeline When creating stereoscopic DCPs, the Timeline will have two Video tracks (see Figure 56). The left eye file or image sequence is added to Video track 0, and the right eye file or image sequence is added to Video track 1. DCA.OM.000488.DRM Page 50 of 82 Doremi Labs Version 2.5 3.2.2.3 The Source/Preview Section The Source section is used to preview video files or image sequences before adding them to the timeline. The preview section is used to view what the video will look like after any filters are applied. Figure 57: Source/Preview There are two ways to view the Source and Preview windows in the Editor: windowed mode and tabbed mode. Tabbed mode will have the Source window and Preview window on separate tabs. ◦ To enable Tabbed mode, go to the View menu and select Display Source and Preview Window in Tabbed Mode. Alternately, you can press F2 (see Figure 52). To preview a file before adding it to the timeline: ◦ Select the file in the Browser and click the “Preview” button (see Figure 53). ◦ Click the Source tab in the Source/Preview section. ◦ Press Play. To preview the output of the Editor: ◦ Select the Preview tab. ◦ Press Play. Note: The Preview section will only play the current reel. DCA.OM.000488.DRM Page 51 of 82 Doremi Labs Version 2.5 3.2.2.4 The General Section To name the DCP: • Type a name for the DCP in the text box (see Figure 58). • The built-in Digital Cinema Naming Convention (DCNC) tool can also be used to assist with naming the DCP in compliance with DCNC version 9. To use the DCNC naming convention tool, click the “Edit with DCNC…” button. Clicking this button will open the DCNC tool (see Figure 59). • Type the desired title for your DCP in the Film Title field and select the desired parameters using the drop-down menus. When the title is DCNC compliant, the clip title will change colors to reflect the selected parameters. If the clip title is not DCNC compliant, then the title will be shown in white letters. • Press the Ok button when finished. Title Text Box Figure 58: General Section DCA.OM.000488.DRM Page 52 of 82 Doremi Labs Version 2.5 Figure 59: DCNC Naming Tool To change the Category of the DCP, use the Category drop-down box (see Figure 58). The Audio configuration can be changed using the Audio Config. drop-down box (see Figure 58). After all the files have been added to the timeline and the content has been verified with the Output section, press the “Generate” button in the General section to start creating the DCP (see Figure 58). After pressing the Generate button, the CineAsset GUI will open and the status can be monitored in the task tab. 3.2.2.5 Creating Supplemental Packages CineAsset can create supplemental packages for DCPs that are in the CineAsset Database. • To create a supplemental package: ◦ Start the CineAsset Editor and create a project with the same settings as the DCP you are creating a supplemental package for (e.g. codec, etc.). Note: If the source DCP has color conversion, DO NOT add the color conversion filter to the supplemental project. Doing so will result in color conversion being applied twice. • In the Editor Browser section click the Database tab (see Figure 61). DCA.OM.000488.DRM Page 53 of 82 Doremi Labs Version 2.5 Database Tab Figure 61: Browser Database Tab • Add the source DCP to the timeline by drag and drop. • Remove the assets from the timeline that you want to replace (such as audio tracks), or add assets (such as subtitles) to the timeline that you want to add to the DCP. • Once the supplemental package has been configured properly, press the Generate button in the General section of the Editor. • On the Generation window press the Okay button. • The Project Supplemental Package window will appear (see Figure 62). Make sure any items in the window are checked and press Ok. Figure 62: Project Supplemental Package Window DCA.OM.000488.DRM Page 54 of 82 Doremi Labs Version 2.5 • Once the package is created, it will be visible in the database with shortcut arrows, indicating it is a supplemental package (see Figure 63). Shortcut Arrow Figure 63: Supplemental Package in Database 3.2.2.6 Working with Distribution KDM's In some cases, it may be necessary to work with encrypted DCP's created by external production facilities. A content owner may issue a Distribution KDM (DKDM) for CineAsset based on the public certificate for the CineAsset security dongle. CineAsset supports importing these encrypted DCP's and DKDM's in order to create different versions of the content or to create additional KDM’s. To work with an encrypted DCP from a third party mastering facility, follow these steps: • Export and send the CineAsset certificates to the content owner so they can issue a DKDM for the CineAsset dongle in use. • Using the CineAsset Editor, create a project with settings that match the DCP to be used. • • If encryption is enabled in the project settings, the DCP will be imported to the CineAsset database as encrypted and new KDM’s can be created with CineAsset. • If encryption is not enabled in the project settings, the DCP will be saved in the CineAsset database as an un-encrypted DCP. Import the DCP to the project timeline. • • When prompted, supply the location of the DKDM. Create a name for the DCP and select Generate. • The DCP will be imported to the CineAsset database. Once the DCP is in the CineAsset Database, new KDM’s can be made for it as needed. New versions of the DCP can also be created by importing the DCP into a new project. DCA.OM.000488.DRM Page 55 of 82 Doremi Labs Version 2.5 3.2.3 Subtitle Editor The Subtitle Editor allows the user to modify the subtitle attributes for any DCP. • Once the file is loaded, press on the Edit Subtitle button (see Figure 64). Edit Subtitle Figure 63: Subtitle Editor • The Subtitle Editor will appear (see Figure 64). • The Subtitle section will list the text attributes: ◦ UUID ◦ Title ◦ Format ◦ Reel Number ◦ Language ◦ Edit Rate • The Font section will list the font attributes. Here, users can change the font of each subtitle. • The Spot Number section will list the spot numbers available for edit. Clicking on each spot number expands it to show the text and font. • From here the user can change the entire text file by using the Global Settings features. Or, the user can click on the individual spot numbers and change each to whichever setting is preferable. DCA.OM.000488.DRM Page 56 of 82 Doremi Labs Version 2.5 Subtitle Section Font Resource Section Spot Number Section Apply Button Done Button Figure 63: Subtitle Editor • Any and all changes made can be viewed in the left part of the editor – but only after the Apply button is pressed. Hitting the Apply button does not save the changes into the file. To save the changes in the file, click on the Done button. • Once the changes are saved, the following message will appear. Press the Yes button to continue. Figure 63: DCA.OM.000488.DRM Page 57 of 82 Doremi Labs Version 2.5 3.2.4 • • • Changing the Text Attributes To change the text attributes, click on the arrow next desired spot number to expand the spot Then select the text of the spot. From here, the user will be able to change the string, horizontal and vertical align. The user will also be able to change the text and font itself. ◦ To change the text, go to the String field and add/delete any words necessary. ◦ To align the text, go to the H-Align and V-Align fields. ◦ To change the time the subtitle appears in the clip, go to the Time In/Time Out Offset field. Time In/Time Out Offset Button String Field Done Button Figure 63: • Make sure to click on the Done button to save all work. • To undo all work done, click on the Reset button. • To close the Subtitle Editor, click on the Close button. DCA.OM.000488.DRM Page 58 of 82 Doremi Labs Version 2.5 3.3 CinePlayer CinePlayer is a software based media player used to review Digital Cinema Packages (DCP) without the need for a digital cinema server. CinePlayer can playback any DCP, not just those created by Doremi Mastering products. Both encrypted and un-encrypted DCPs are supported. In addition to playing DCPs, CinePlayer can also playback many popular video file types. For a list of codecs and file types supported by CinePlayer, see Section 6 . Launching CinePlayer: ◦ In the start menu, click on “CinePlayer” under the “Doremi Labs, CinePlayer” folder. Quality Button Playback Information Playback Framerate Adjustment VU Meters Color Conversion Button Figure 64: CinePlayer JP2K Layer Drop Down To open a DCP or file in CinePlayer, you can simply drag and drop a file or folder onto the player. In addition to drag and drop files or folders, files can be opened by: ◦ Going to the “File” menu and selecting “Open Media ...” ◦ To open a DCP in the player, click the DCP radio button. ◦ Then click the “...” button to browse for the parent folder of a DCP. ◦ Then press OK to open the DCP for playback. ◦ If the DCP is encrypted, you will be prompted to locate the KDM file. ◦ Press the “...” button to browse for the KDM file and then press Ok to load it. DCA.OM.000488.DRM Page 59 of 82 Doremi Labs Version 2.5 Figure 65: Select KDM Window DCP Radio Button Browse Button Multimedia Radio Button Separate Files Radio Button Figure 66: Open Media Window To open a video file for playback: ◦ Click the “Multimedia file” radio button. ◦ Click the “...” button to browse for a multimedia file. ◦ Press the OK button to open the file for playback. To open individual audio and Video files for playback: ◦ Click the “Separated audio/video files” radio button. ◦ Click the “...” buttons to browse for audio and video files. ◦ Press the OK button to open the files for playback. Once the DCP is open, XYZ' to RGB color conversion can be added by pressing the color conversion button and selecting “XYZ'/YCxCz to RGB” (see Figure 64). CinePlayer supports the multiple resolution layers of JPEG2000 encoded DCPs. ◦ To select a different Layer, use the JP2K Layer drop down box (see Figure 64). The playback frame rate of the loaded file can be adjusted prior to playing the file. ◦ To change the playback frame rate, enter the desired frame rate with the playback framerate adjustment and press enter (see Figure 64). When playing back a 3D DCP, Side by Side mode can be initiated by (see Figure 67): ◦ Go to the Video menu ◦ Select 3D view ◦ Select Side by Side DCA.OM.000488.DRM Page 60 of 82 Doremi Labs Version 2.5 Figure 67: Side by Side 3D view 3.3.1 For use with slower computers, CinePlayer includes a “Quality” setting. The “Quality” setting saves processing power by reducing the rendering quality. The “Quality” selection is from 10 (the best) to 1 (the least). The default setting is 5. To change the Quality setting, use the quality button (see Figure 64). CinePlayer HD-SDI Output Support CinePlayer version 6.4 and later supports certain Blackmagic Design DeckLink series cards for HDSDI output. Specific performance depends on the host computer and full quality real-time playback is not guaranteed using these output cards. 3.3.1.1 Tested Configurations CinePlayer currently supports and has been tested with DeckLink HD Extreme 3D+ and DeckLink 4K Extreme PCIe models. Some sample configurations are listed below. • • Windows 7 – 6 core (Xeon X650 2.67Ghz) – 24gig RAM – Nvidia Quadro 2000 D (1GB RAM) – DeckLink 4K Extreme – SSD for media ◦ This configuration is capable of playing 2D, 2K at 24fps with color conversion enabled to HD-SDI output without dropping frames (standard computer monitor output disabled). Mac Pro – 12 Core (dual 2.4 GHz Xeon) – 12GB RAM – Radeon HD5770 (1GB RAM) DeckLink 4K Extreme – 2x SATA drives (RAID 0) for media ◦ This configuration is capable of playing 2D, 1080P at 24fps with color conversion enabled to HD-SDI without dropping frames (standard computer monitor output disabled). 3.3.1.2 Using HD-SDI Output When a supported card is seen by CinePlayer, it will be shown under the “Device” menu. • To enable output through the HD-SDI card, simply select the desired card in the “Device” menu. (See Figure 68). DCA.OM.000488.DRM Page 61 of 82 Doremi Labs Version 2.5 Figure 68: Side by Side 3D view • • 3.3.2 In order to maximize performance, CinePlayer gives three playback options: ◦ Only play to the HD-SDI output ◦ Only play to the standard computer monitor ◦ Play to both the standard computer monitor and the HD-SDI output To disable playback to the standard computer monitor for improved performance, go to the “Device” menu and un-check “Enable local preview” (see Figure 68). CinePlayer Options There are four main user preferences that can be used to change the way CinePlayer behaves. • To adjust the default behavior of CinePlayer, go to the File menu and select Options. The Options window will appear (see Figure 69). Figure 69: CinePlayer Options Window DCA.OM.000488.DRM Page 62 of 82 Doremi Labs Version 2.5 • CinePlayer can be set to drop frames in the attempt to play the file in real time. • Select “Drop frame allowed” to enable this. When un-checked, CinePlayer will play every frame available. In this case, if system performance is low, the playback could be slower than real-time. CinePlayer can be configured to not automatically detect the DeckLink I/O card. • • • • • When the DeckLink I/O card is not being used, un-check "Auto detect DeckLink card". This will improve performance when playing a file directly to the computer monitor. • Select the "Auto detect DeckLink card" option when the DeckLink I/O card will be used. CinePlayer can also be set to run a validation check on each DCP that is loaded. • Select “Enable dcp validation check” to turn on this feature. • When selected, the validation options will appear. See Section 3.5.2.2 for more details on the CineInspect validation options. • When un-checked, CinePlayer will not run a validation check each time a DCP is loaded for playback. By default, CinePlayer is configured to use the graphic adapters GPU when performing color conversion. If there is an issue with playback when color conversion is enabled, GPU support can be disabled. For example, Mac OS X 10.6 does not support the use of GPU for color conversion in CinePlayer. • To disable GPU color conversion, uncheck "Use GPU for color conversion". 3.4 CineAsset Render Nodes CineAsset 6.2.x and later includes support for distributed rendering using render nodes. A render node is a computer running a special version of the CineAsset engine that requires no user interaction. The master computer is the workstation with the full version of CineAsset installed and protected with the hardware dongle. The master dongle contains the number of render nodes purchased by the customer and available for use. There is no protection on the render node installations. In other words, the render nodes could be installed on multiple computers on the network. When the master CineAsset application is running, it will search for render nodes on the network. As an example, if the CineAsset dongle is licensed for five render nodes, it will use up to five render nodes it finds on the network when it is processing tasks. DCA.OM.000488.DRM Page 63 of 82 Doremi Labs Version 2.5 3.4.1 3.4.2 Requirements for Using Render Nodes with CineAsset The CineAsset dongle must include licensing for at least one render node. ◦ Additional render node licenses can be added at any time by contacting [email protected]. The render nodes must be installed on the same platform as the master copy of CineAsset. ◦ For example, if CineAsset is running on a Windows workstation, the render node(s) must also be installed on a computer running Windows. Likewise, if the master CineAsset workstation is running Mac OS, the render nodes must be installed on Mac workstations. The network infrastructure must be capable of sustaining the throughput required for distributed rendering. ◦ Insufficient network bandwidth may actually slow down rendering processes. Using CineAsset with Render Nodes Since CineAsset is designed to automatically search for render nodes on the network, there is no configuration required to set up distributed rendering with CineAsset. Simply install the render nodes on workstations that share the same network as the CineAsset master workstation and start processing a job. For users who have content (image sequence only) stored on a fast network attached storage device (NAS), it is recommended to access the content by FTP using CineAsset Editor’s FTP Explorer. Accessing data by FTP is much faster than using the default sharing mode (file explorer). ◦ The file access method can be changed by clicking on the “Explorer” or “FTP Explorer” label in the upper left corner of the CineAsset Editor window and selecting the correct one to use. Figure 70: CineAsset File Access Mode DCA.OM.000488.DRM Page 64 of 82 Doremi Labs Version 2.5 When the CineAsset render node is running, the application icon will be displayed in the task bar or menu bar. CineAsset Icon Figure 71: Window Task Bar CineAsset Icon Figure 72: Apple Menu Bar Right clicking on the icon will produce options to see the about menu or quit the application. The Windows version will also allow you to show or hide the console window. Figure 73: Windows Task Bar Figure 74: Apple Menu Bar DCA.OM.000488.DRM Page 65 of 82 Doremi Labs Version 2.5 When CineAsset is processing a job, the task information window will show the IP address(es) of the servers that are being used as render nodes. Figure 75: Render Node Task Information The console window on the render node workstation will also display information about the job that is being processed. Figure 76: Render Node Job Information DCA.OM.000488.DRM Page 66 of 82 Doremi Labs Version 2.5 3.5 CineInspect CineInspect is a new tool included with CineAsset and CinePlayer 6.4 or later. CineInspect is used to validate DCP files according to a number of tests designed to verify the DCP’s integrity. CineInspect allows the user to choose from various validation levels to inspect unencrypted or encrypted DCP’s created by anyone. It then output’s a set of log messages specifying the tests performed and the results obtained from the inspection (Pass, Fail or Warning). CineInspect can also be run from the command line to accommodate automated workflows. 3.5.1 CineInspect Integration CineInspect can be launched or used in several different ways. From the start menu, CineInspect can be launched by clicking on “CineInspect” under the Doremi Labs, CineAsset folder. With CineAsset Schedule running, right-clicking on the task bar icon and selecting “Show App Launcher” will also give the option of loading CineInspect. From the application launcher, choose “CineInspect”. From a command line interface, CineInspect can be executed with various different options. For Command line options and usages, see Section 4.4 . From within the CineAsset GUI: o CineInspect can be run from the File menu of CineAsset. o Any DCP in the database can be sent straight to CineInspect by right clicking on the database item and selecting “Send to CineInspect”. o The validation settings of CineInspect can be altered from the File->Settings menu of CineAsset. From within CinePlayer: o CineInspect can be run from the File menu of CinePlayer. o The Validation check can run automatically on any DCP folder dropped or opened into CinePlayer (this can be enabled or disabled from the File > Options menu of CinePlayer). From within CineAsset Editor: o User has the option to run the validation automatically on any DCP loaded into the editor (can be enabled or disabled from the File > Options menu of CineAsset Editor). o User has the option to run the validation check at the end of a DCP creation process (can be enabled or disabled from the DCP Generation dialog of CineAsset Editor). When launched, the main CineInspect window will appear. The CineInspect window is used to select the desired settings and display the results of the inspection. DCA.OM.000488.DRM Page 67 of 82 Doremi Labs Version 2.5 Figure 77: CineInspect DCA.OM.000488.DRM Page 68 of 82 Doremi Labs Version 2.5 3.5.2 CineInspect Interface The CineInspect interface is made up of 3 sections: Validation Tool, Validation Options, and Validation Output. 3.5.2.1 Validation Tool Under the Validation Tool, there is a Browse button that allows the user to navigate to the desired DCP to be tested. A DCP folder can also be dragged and dropped onto the Validation Tool to be loaded for inspection. 3.5.2.2 Validation Options The Validation Options section allows the user to select what level of validation they wish to perform on a given DCP. CineInspect splits the validation inspection into various levels. Each step, starting with step 1, validates the minimal required tests to verify the validity of the DCP. As the selected levels increase, the previous level will automatically be chosen as it is required to perform more in-depth tests. This leaves step 4 to be the most time consuming test to validate and the most efficient in determining the integrity of the chosen DCP. File Validation (Step 1) o Verifies if the chosen DCP has all the files required to make a valid DCP and verifies that the files have not been tampered with (size verification). Schema’s Validation (Step 2) o Verifies all the .xml files in the chosen DCP to validate against their corresponding schemas, according to the standard of the DCP (SMPTE or Interop). Signature Encryption Validation (Step 3) o Verifies the integrity of the signatures present in the xml files Compliance Validation (Step 4) o DCI spec Runs a number of tests specified in the DCI spec, to verify that the chosen DCP follows such standardization. Valid only for SMPTE packages. o Standard spec Runs a number of tests to verify that the chosen DCP follows the spec of the standard of the DCP (either SMPTE or Interop). DCA.OM.000488.DRM Page 69 of 82 Doremi Labs Version 2.5 3.5.2.3 Validation Output The Validation Output displays a detailed set of log messages specifying the tests performed and the results obtained from the inspection. The messages are categorized as Pass, Fail or Warning. It also shows a summary of the total number of tests that passed, tests that failed or tests that show warnings. Pass indicates the tested aspect of the DCP is within specification. Fail indicates the tested aspect of the DCP is not within specification and will likely cause problems with other DCP software or digital cinema players. Warning indicates the tested aspect of the DCP is not within specification but is not likely to cause problems with other DCP software or digital cinema players. The log information can also be exported as a text file. The log is automatically named according to the current date and content title text of the CPL. Alternately, a manual name can be entered for the exported file. The “Send to CinePlayer” button can be used to open the DCP in CinePlayer for visual review. DCA.OM.000488.DRM Page 70 of 82 Doremi Labs Version 2.5 4 Command Line Tools CineAsset and CinePlayer can also be used from the command line to generate and playback DCPs. This section explains the command line syntax for CineAssset and CinePlayer. 4.1 CineAssetSchedule DCP Generation The application that handles the processing of inputs and wrapping of DCPs is called CineAssetSchedule. CineAssetSchedule is located in “C:\Program Files\DoremiLabs\CineAsset”. 4.1.1 Syntax CineAssetSchedule.exe <command> [-i input1 [input options] input2 [input options]...] -settings settings_file_name title [destination] 4.1.1.1 Command The available commands include: 1. help: Shows the command line usage. 2. dcp: Create a dcp 4.1.1.2 Input Options The available input options include: 1. -audio_only: Import only the audio tracks 2. -video_only: Import only the video tracks 4.1.1.3 Settings The path to a settings file to use for creating the DCP. Settings files can be generated using CineAsst. If no settings file is specified, then the CineAsset default settings are used. 4.1.1.4 Title The title to use for the DCP. 4.1.1.5 Destination The path to where the DCP is to be created such as the Desktop or C Drive. If no destination is specified, the DCP will be created in the active CineAsset database. 4.1.2 1. Examples CineAssetSchedule.exe dcp -i G:\audio.wav G:\video.m2v -settings G:\jp2k_settings.pro dcp_example1 G:\ Example 1 will create a one reel DCP using “audio.wav” and “video.m2v”. The settings specified in the jp2k_settings.pro file will be used when creating the DCP. The DCP will be named “dcp_example1” and saved to the root directory of the G drive. 2. CineAssetSchedule.exe dcp -i G:\video1.ts -settings G:\jp2k_settings.pro dcp_example2 G:\ DCA.OM.000488.DRM Page 71 of 82 Doremi Labs Version 2.5 Example 2 creates a one reel DCP from video1.ts using the settings specified in the jp2k_settings.pro file. The DCP will be named dcp_example2 and saved to the root directory of the G drive. 3. CineAssetSchedule.exe dcp -i G:\video1.ts -video_only G:\video2.ts -audio_only -settings G:\jp2k_settings.pro dcp_example3 G:\ Example 3 creates a one reel DCP using the video track from video1.ts and the audio track from video2.ts. The settings specified in jp2k_settings.pro file will be used when creating the DCP, which will be named dcp_example3 and saved to the root directory of the G drive. 4. CineAssetSchedule.exe dcp -i G:\reel1.wav G:\reel1.m2v -i G:\reel2.wav g:\reel2.m2v -settings jp2k_settings.pro dcp_example4 G:\ Example 4 creates a 2 reel dcp, reel one made from the reel1.wav and reel2.m2v files and reel 2 made from the reel2.wav and reel2.m2v files. The settings specified in jp2k_settings.pro file will be used when creating the DCP, which will be named dcp_example4 and saved to the root directory of the G drive. 4.2 CinePlayer CinePlayer can also be used from the command line. CinePlayer.exe is installed in C:\Program Files\DoremiLabs\CineAsset. 4.2.1 Syntax CinePlayer.exe [input file 1] [input file 2] {-fullscreen} 4.2.1.1 Input files The maximum number if input files is two. If two input files are specified, only the audio track will be taken from “input file 1” and only the video track will be taken from “input file 2”. An input file can be a video or audio file of any format supported by CineAsset. An input file can also be a folder containing DCP files or a folder containing an Image Sequence. 4.2.1.2 Fullscreen When the full-screen switch is present, CinePlayer will open in full-screen mode. 4.2.2 1. Examples CinePlayer.exe G:\audio.wav G:\video.ts -fullscreen Example 1 will open audio.wav and video.ts in for playback in CinePlayer. The application will open in full-screen mode. 2. CinePlayer.exe G:\Example_DCP\ -fullscreen In example 2, “Example_DCP” is a folder containing DCP files. This example will open the DCP from folder “Example_DCP” for playback in full-screen mode. DCA.OM.000488.DRM Page 72 of 82 Doremi Labs Version 2.5 4.3 CineAssetSchedule KDM Generation 4.3.1 Syntax CineAssetSchedule.exe <command> [-i sourcce_dir] [-s server1_location -s server2_location ...] [-p projector1_location -p projector2_location ...] [-std standard] [-cert smpte_optional_cert] [-f filename_label] [-a annotation_text] [-sv start_validity] [-ev end_validity] [-vid video_watermark] [-aud audio_watermark] [-d destination_dir] 4.3.2 4.3.3 Commands KDM: Create a KDM help: Show usage Options -d: KDM location. If not available then the KDM by default is created in the database -i: Input source directory for the DCP for which to generate a KDM for -s: Server certificate location. Multiple entry of servers allowed -p: Projector certificate location (Optional). Multiple entry of projectors allowed -std: standard of the KDM to be created, either 'Interop' or 'Smpte' (Optional). If no standard is present then the KDM will default to Interop standard -cert: Valid only if KDM standard is set to SMPTE (Optional). Could be 'cs' or 'cssm' -f: Filename Label (Optional) -a: Annotation Text (Optional) -sv: Start of KDM validity (Optional). Format should be in the form of MMddyyyy-hhmmss. If -sv is not available, then the current date and time will be used -ev: End of KDM validity (Optional). Format should be in the form of MMddyyyy-hhmmss. If -ev is not available, then the end of validity will be set to the start validity + 1 months -vid: Forensic watermarking for Picture (Optional). Could be 'True' or 'False'. If not present, then by default is set to True -aud: Forensic watermarking for Audio (Optional). Could be 'True' or 'False'. If not present, then by default is set to True only if the KDM standard is set to SMPTE otherwise False -t: This sets the time zone the input start and end periods are relative to. ie -t "+5:00". Defaults to "+0:00" -uuid: Set the UUID of the created KDM. Default is to generate a unique UUID. -b: Batch kdm creation using a user defined xml file. When this option is used the other options must not be used. Example: CineAssetSchedule kdm -b kdm1.xml -b kdm2.xml -b kdm3.xml Note: Make sure when entering a location to include it in "" so spaces will be accounted for. DCA.OM.000488.DRM Page 73 of 82 Doremi Labs Version 2.5 4.3.4 Examples 1. CineAssetSchedule.exe kdm -i "C:\Users\george\Doremi CineAsset\Default_DCinema\DB\Jp2k_Interop_Encrypted-0c9cc3e6-c54e-45a4-ab77dd6983fba9a8" -s "C:\Users\george\Doremi CineAsset\Certs\DB\CineAsset— 1209372349\cert_interop_ME_CS_SM.pem" 2. CineAssetSchedule.exe kdm -i "C:\Users\george\Doremi CineAsset\Default_DCinema\DB\Jp2k_Interop_Encrypted-0c9cc3e6-c54e-45a4-ab77dd6983fba9a8" -s "C:\Users\george\Doremi CineAsset\Certs\DB\CineAsset-1209372349\cert_interop_ME_CS_SM.pem" -s "C:\Users\george\Doremi CineAsset\Certs\DB\CineAsset-3085594947\cert_smpte_CS.pem" -std Smpte -sv 07202013030310 DCA.OM.000488.DRM Page 74 of 82 Doremi Labs Version 2.5 4.3.5 Examples of Batch KDM Creation in XML Format 4.3.5.1 KDM Example <?xml version="1.0" encoding="UTF-8"?> <ASSET_MANAGER_TASK> <UUID>ecf12c01-cf1d-44ea-a8af-042567b8dd81</UUID> <ISSUE_DATE>2014/09/10 14:19:04</ISSUE_DATE> <TASK_ISSUER>Doremi120410</TASK_ISSUER> <TASK_CREATOR>CineAsset Version 6.9.4</TASK_CREATOR> <EXTRA_STATUS>Idle</EXTRA_STATUS> <PRIORITY>Normal</PRIORITY> <TYPE>Generate KDM</TYPE> <KDM_STANDARD>1</KDM_STANDARD> <KDM_TIMEZONE>+00:00</KDM_TIMEZONE> <KDM_LABEL>kdm1_commandLine_attempt_1</KDM_LABEL> <KDM_START_VALIDITY>9/09/2014 14:18:51</KDM_START_VALIDITY> <KDM_END_VALIDITY>10/10/2014 14:18:51</KDM_END_VALIDITY> <KDM_PICTURE_WATERMARK>1</KDM_PICTURE_WATERMARK> <KDM_AUDIO_WATERMARK>16</KDM_AUDIO_WATERMARK> <KDM_SRV_NAME>CineAsset-165344668</KDM_SRV_NAME> <KDM_SMPTE_CERT_SELECTION>0</KDM_SMPTE_CERT_SELECTION> <KDM_DIR_LOCATION>C:/Users/aslade/Doremi CineAsset/Kdms/DB</KDM_DIR_LOCATION> <DKDM_DIR_LOCATION></DKDM_DIR_LOCATION> <CPL_DIR_LOCATION>V:\CA_DB\DB\CMD_TEST-985f29cb-a894-4f30-a6b7c89f2f265c4b</CPL_DIR_LOCATION> <DKDM_NAME></DKDM_NAME> <KDM_ANNOTATION_LABEL>kdm1_commandLine_attempt_1</KDM_ANNOTATION_LABEL> <KDM_CRT_NAME>cert_smpte_CS_SM.pem</KDM_CRT_NAME> <KDM_CRT_LOCATION>C:\Users\aslade\Doremi CineAsset\Certs\DB\CineAsset148214703</KDM_CRT_LOCATION> <DESTINATION_FOLDER_FILENAME>C:/Users/aslade/Desktop</DESTINATION_FOLDER_FILENA ME> <DESTINATION_IS_DB_FOLDER>0</DESTINATION_IS_DB_FOLDER> </ASSET_MANAGER_TASK> DCA.OM.000488.DRM Page 75 of 82 Doremi Labs Version 2.5 4.3.5.2 KDM Example <?xml version="1.0" encoding="UTF-8"?> <ASSET_MANAGER_TASK> <UUID>a9158cff-cb7f-48c5-bcea-ec85f80f8b8d</UUID> <ISSUE_DATE>2014/09/10 14:19:12</ISSUE_DATE> <TASK_ISSUER>Doremi120410</TASK_ISSUER> <TASK_CREATOR>CineAsset Version 6.9.4</TASK_CREATOR> <EXTRA_STATUS>Idle</EXTRA_STATUS> <PRIORITY>Normal</PRIORITY> <TYPE>Generate KDM</TYPE> <KDM_STANDARD>1</KDM_STANDARD> <KDM_TIMEZONE>+00:00</KDM_TIMEZONE> <KDM_LABEL>kdm2_commandLine</KDM_LABEL> <KDM_START_VALIDITY>10/09/2014 14:19:06</KDM_START_VALIDITY> <KDM_END_VALIDITY>10/10/2014 14:19:06</KDM_END_VALIDITY> <KDM_PICTURE_WATERMARK>1</KDM_PICTURE_WATERMARK> <KDM_AUDIO_WATERMARK>16</KDM_AUDIO_WATERMARK> <KDM_SRV_NAME>CineAsset-165344668</KDM_SRV_NAME> <KDM_SMPTE_CERT_SELECTION>0</KDM_SMPTE_CERT_SELECTION> <KDM_DIR_LOCATION>C:/Users/george/Doremi CineAsset/Kdms/DB</KDM_DIR_LOCATION> <DKDM_DIR_LOCATION></DKDM_DIR_LOCATION> <CPL_DIR_LOCATION>C:/Users/george/Doremi CineAsset/Default_DCinema/DB/InteropEnc3064debe4a-39a4-4cc2-8d8e-188213ab5a98</CPL_DIR_LOCATION> <CPL_NAME>CPL_4fff3d85-5eae-464b-850e-022bba94368a.xml</CPL_NAME> <DKDM_NAME></DKDM_NAME> <KDM_ANNOTATION_LABEL>kdm2_commandLine</KDM_ANNOTATION_LABEL> <KDM_CRT_NAME>cert_smpte_CS.pem</KDM_CRT_NAME> <KDM_CRT_LOCATION>C:/Users/george/Doremi CineAsset/Certs/DB/CineAsset165344668</KDM_CRT_LOCATION> <DESTINATION_FOLDER_FILENAME>C:/Users/george/Doremi CineAsset/Kdms/DB/InteropEnc3064debe4a-39a4-4cc2-8d8e-188213ab5a98</DESTINATION_FOLDER_FILENAME> <DESTINATION_IS_DB_FOLDER>0</DESTINATION_IS_DB_FOLDER> </ASSET_MANAGER_TASK> DCA.OM.000488.DRM Page 76 of 82 Doremi Labs Version 2.5 4.4 CineInspect 4.4.1 Syntax CineInspect.exe <command> [dcpFolderDir] [validation_level] start [outputfile] 4.4.2 4.4.3 Commands -show: Show the validation tool. -hide: Hide the validation tool. Options dcpFolderDir: o Is the destination folder of the DCP that you want to inspect validation_level o 1=File Validation o 2=Schema's Validation o 3=Signature Encryption Validation o 4=Compliance with DCI spec Validation o 5=Compliance with Standard (SMPTE or Interop) spec Validation Start o is optional and is only valid when command == show o If not present, then show the gui and do not start the validation o If present, then show the gui and start validation automatically Outputfile o Is optional and is only valid when command == hide. It is the destination path file name. o If not present, then hide the gui and output the log to the standard output window o If present, then hide the gui and output the log to the specified output file Note: Make sure when entering a location to include it in "" so spaces will be counted for. DCA.OM.000488.DRM Page 77 of 82 Doremi Labs Version 2.5 4.4.4 1. 2. 3. 4. 5. 6. Examples CineInspect.exe -show G:/Mpeg2_Interop_UnEncrypted 3 CineInspect.exe -show G:/Mpeg2_Interop_UnEncrypted 3 start CineInspect.exe -hide G:/Mpeg2_Interop_UnEncrypted 45 CineInspect.exe -hide G:/Mpeg2_Interop_UnEncrypted 5 G:/temp/test_log CineInspect.exe -hide G:/Mpeg2_Interop_UnEncrypted 5 G:/temp/test_log.txt CineInspect.exe -hide G:/Mpeg2_Interop_UnEncrypted 5 G:/temp/test_log.xml Example 1 will show the Inspection Validation GUI and will set the DCP path to G:/Mpeg2_Interop_UnEncrypted and the validation level to Signature Encryption Validation. Example 2 will show the Inspection Validation GUI and will set the DCP path to G:/Mpeg2_Interop_UnEncrypted and the validation level to Signature Encryption Validation and will start the validation process automatically. Example 3 will hide the Inspection Validation GUI and will automatically set the DCP path to G:/Mpeg2_Interop_UnEncrypted and the validation level to Compliance with std spec Validation and will start the validation process automatically and output the log to the standard output. Example 4 will hide the Inspection Validation GUI and will automatically set the DCP path to G:/Mpeg2_Interop_UnEncrypted and the validation level to Compliance with std spec Validation and will start the validation process automatically and output the log to the test_log (if no extension is given the output file format is automatically considered to be a .txt file format). Example 5 will hide the Inspection Validation GUI and will automatically set the DCP path to G:/Mpeg2_Interop_UnEncrypted and the validation level to Compliance with std spec Validation and will start the validation process automatically and output the log to the test_log.txt (this will output to .txt file format). Example 6 will hide the Inspection Validation GUI and will automatically set the DCP path to G:/Mpeg2_Interop_UnEncrypted and the validation level to Compliance with std spec Validation and will start the validation process automatically and output the log to the test_log.xml (this will output to .xml file format). DCA.OM.000488.DRM Page 78 of 82 Doremi Labs Version 2.5 5 Doremi CineExport (Mac Only) Starting with CineAsset software version 6.2.x, an Apple Compressor plug-in has been created for Mac users. The plug-in allows users to export Final Cut Pro sequences or other common video files as digital cinema packages through Compressor. Doremi CineExport is available for Mac OS X 10.6 and above. Doremi CineExport can be installed along with the CineAsset application. For more information on using Doremi CineExport, please reference the “Doremi CineExport User Manual.” This manual can be found on the local machine under /Macintosh HD/Applications/Doremi Labs/Compressor Plugin/. DCA.OM.000488.DRM Page 79 of 82 Doremi Labs Version 2.5 6 CineAsset Supported File Formats and Codec's This section provides a list of file formats supported by the CineAsset application. 6.1 Supported Codec’s ProRes-422 DnxHD® YUV Uncompressed 8-10 bits DIVX®, XVID®, MPEG4 AVC/H-264 VC-1 MPEG1, MPEG2, Matrox MPEG2 DVCPRO HD, DVCPRO 25/100 Photo JPEG, MJPEG-A&B DV And many more... 6.2 Supported Containers AVI MOV MXF MPG TS EVO WMV M2TS And many more... 6.3 Supported Image Format BMP TIFF TARGA JPG DPX And many more... 6.4 Supported Audio Format WAV AAC AIFF PCM And many more... DCA.OM.000488.DRM Page 80 of 82 Doremi Labs Version 2.5 7 Acronyms Term Definition DCP Digital Cinema Package DCNC Digital Cinema Naming Convention FCP Final Cut Pro JPEG Joint Photographic Experts Group JP2K JPEG2000 MPEG Moving Pictures Experts Group UUID Universally Unique Identifier WAV Waveform Audio File Format DCA.OM.000488.DRM Page 81 of 82 Doremi Labs Version 2.5 8 Document Revision History Date Version 09/25/2008 1.0 First version. 01/29/2009 1.1 All sections revised. 12/15/2009 1.2 All sections revised. 12/13/2010 1.3 All sections revised. Final Cut Pro section added for the new software update. All images updated to reflect the current software version. 01/13/2011 1.4 New modifications made for software version 5.0.x. New pictures added. 06/22/2011 1.5 New DCNC image and information added. 08/04/2011 1.6 Warranty link redirected to new website. 10/06/2011 1.7 Section 4 modified. 03/15/2012 1.8 Section 3.3.1.1 modified. New Doremi logo added. 06/13/2012 1.9 All sections modified. 07/19/2012 2.0 Sections 4 and 5 modified. 10/30/2012 2.1 All sections modified. 12/17/2012 2.2 Section 3.3 modified to include new CinePlayer software. Section 3.4 edited. 11/19/2013 2.3 Sections 1 and 3 updated. Created new Section 3.2.2.6. 12/16/2013 2.4 Updated Section 3.3.2. 10/20/2014 2.5 Added section for Subtitle Editor. Minor updates as well for software version 7. DCA.OM.000488.DRM Description Page 82 of 82 Doremi Labs Version 2.5