1
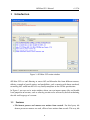
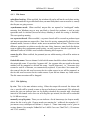
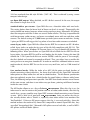
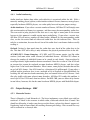
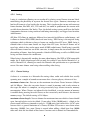
AVI-Mux GUI - Manual
v1.17.8
September 12, 2008
Alexander Noé
[email protected]
Contents
1 Introduction
1.1 Features . . . . . . . . . . . . . . . . . . . . . . . . . . . . . . . . . . . . . .
1.2 What AVI-Mux GUI is not . . . . . . . . . . . . . . . . . . . . . . . . . . . .
1.3 Why the name AVI-Mux GUI? . . . . . . . . . . . . . . . . . . . . . . . . . .
3
3
4
5
2 Getting started
2.1 Requirements . . . . . . . . . . . . . . . . . . . . . . . . . . . . . . . . . . .
2.2 Installation . . . . . . . . . . . . . . . . . . . . . . . . . . . . . . . . . . . .
2.3 Quickstart . . . . . . . . . . . . . . . . . . . . . . . . . . . . . . . . . . . . .
5
5
5
6
3 The Main Window
3.1 Source Files and Source Streams . . . . . . .
3.1.1 File type identification . . . . . . . . .
3.1.2 Importing .AAC files . . . . . . . . . .
3.1.3 Adding stream sources . . . . . . . . .
3.1.4 File order . . . . . . . . . . . . . . . .
3.1.5 Stream order . . . . . . . . . . . . . .
3.1.6 Extracing Streams . . . . . . . . . . .
3.1.7 Default Streams . . . . . . . . . . . . .
3.1.8 Delays . . . . . . . . . . . . . . . . . .
3.1.9 Stream Names . . . . . . . . . . . . .
3.1.10 Language Codes . . . . . . . . . . . .
3.2 Settings and Commands in the main window
4 Settings
4.1 General Input Settings . . . .
4.2 Format Specific Input Settings
4.2.1 Mode 2 - Form 2 files .
4.2.2 MP3 . . . . . . . . . .
4.2.3 AVI . . . . . . . . . . .
4.2.4 MKV . . . . . . . . . .
4.3 General Output Settings . . .
4.3.1 File Access . . . . . .
4.3.2 File Splitting . . . . .
4.4 Output Settings - AVI . . . . .
.
.
.
.
.
.
.
.
.
.
.
.
.
.
.
.
.
.
.
.
.
.
.
.
.
.
.
.
.
.
.
.
.
.
.
.
.
.
.
.
1
.
.
.
.
.
.
.
.
.
.
.
.
.
.
.
.
.
.
.
.
.
.
.
.
.
.
.
.
.
.
.
.
.
.
.
.
.
.
.
.
.
.
.
.
.
.
.
.
.
.
.
.
.
.
.
.
.
.
.
.
.
.
.
.
.
.
.
.
.
.
.
.
.
.
.
.
.
.
.
.
.
.
.
.
.
.
.
.
.
.
.
.
.
.
.
.
.
.
.
.
.
.
.
.
.
.
.
.
.
.
.
.
.
.
.
.
.
.
.
.
.
.
.
.
.
.
.
.
.
.
.
.
.
.
.
.
.
.
.
.
.
.
.
.
.
.
.
.
.
.
.
.
.
.
.
.
.
.
.
.
.
.
.
.
.
.
.
.
.
.
.
.
.
.
.
.
.
.
.
.
.
.
.
.
.
.
.
.
.
.
.
.
.
.
.
.
.
.
.
.
.
.
.
.
.
.
.
.
.
.
.
.
.
.
.
.
.
.
.
.
.
.
.
.
.
.
.
.
.
.
.
.
.
.
.
.
.
.
.
.
.
.
.
.
.
.
.
.
.
.
.
.
.
.
.
.
.
.
.
.
.
.
.
.
.
.
.
.
.
.
.
.
.
.
.
.
.
.
.
.
.
.
.
.
.
.
.
.
.
.
.
.
.
.
.
.
.
.
.
.
.
.
.
.
.
.
.
.
.
.
.
.
.
.
.
.
.
.
.
.
.
.
.
.
.
.
.
.
.
.
.
.
.
.
.
.
.
.
.
.
.
.
.
.
.
.
.
.
.
.
.
.
.
.
.
.
.
.
.
.
.
.
.
.
.
.
.
.
.
.
.
.
.
.
.
.
.
.
.
.
.
.
.
.
.
.
.
.
.
.
.
.
.
.
.
.
.
.
.
.
.
.
.
.
.
.
.
.
.
.
.
.
.
.
6
6
7
7
7
8
8
8
8
9
9
10
11
.
.
.
.
.
.
.
.
.
.
12
12
13
13
14
14
14
14
15
15
16
AVI-Mux GUI - Manual
4.4.1 Miscellaneous settings
4.4.2 Open-DML Settings . .
4.4.3 Audio Interleaving . .
4.5 Output Settings - MKV . . . .
4.5.1 Matroska Version . . .
4.5.2 Lacing . . . . . . . . .
4.5.3 Cluster Settings . . . .
4.5.4 TimecodeScale . . . .
4.5.5 Cues . . . . . . . . . .
4.5.6 Other settings . . . . .
4.6 GUI settings . . . . . . . . . .
5 The Chapter Editor
5.1 Editions and Chapters . . . .
5.1.1 Editions . . . . . . . .
5.1.2 Chapters . . . . . . . .
5.2 Usage Of The Editor . . . . .
5.3 Importing and Exporting Files
.
.
.
.
.
.
.
.
.
.
.
.
.
.
.
.
.
.
.
.
.
.
.
.
.
.
.
.
.
.
.
.
.
.
.
.
.
.
.
.
.
.
.
.
.
.
.
.
.
.
.
.
.
.
.
.
.
.
.
.
.
.
.
.
6 RIFF/EBML Tree
.
.
.
.
.
.
.
.
.
.
.
.
.
.
.
.
.
.
.
.
.
.
.
.
.
.
.
.
.
.
.
.
.
.
.
.
.
.
.
.
.
.
.
.
.
.
.
.
.
.
.
.
.
.
.
.
.
.
.
.
.
.
.
.
.
.
.
.
.
.
.
.
.
.
.
.
.
.
.
.
.
.
.
.
.
.
.
.
.
.
.
.
.
.
.
.
v1.17.8
.
.
.
.
.
.
.
.
.
.
.
.
.
.
.
.
.
.
.
.
.
.
.
.
.
.
.
.
.
.
.
.
.
.
.
.
.
.
.
.
.
.
.
.
.
.
.
.
.
.
.
.
.
.
.
.
.
.
.
.
.
.
.
.
.
.
.
.
.
.
.
.
.
.
.
.
.
.
.
.
.
.
.
.
.
.
.
.
.
.
.
.
.
.
.
.
.
.
.
.
.
.
.
.
.
.
.
.
.
.
.
.
.
.
.
.
.
.
.
.
.
.
.
.
.
.
.
.
.
.
.
.
.
.
.
.
.
.
.
.
.
.
.
.
.
.
.
.
.
.
.
.
.
.
.
.
.
.
.
.
.
.
.
.
.
.
.
.
.
.
.
.
.
.
.
.
.
.
.
.
.
.
.
.
.
.
.
.
.
.
.
.
.
.
.
.
.
.
.
.
.
.
.
.
.
.
.
.
.
.
.
.
.
.
.
.
.
.
.
.
.
.
.
.
.
.
.
.
.
.
.
.
.
.
.
.
.
.
.
.
.
.
.
.
.
.
.
.
.
.
.
16
16
18
18
18
19
19
20
20
21
22
.
.
.
.
.
23
23
23
24
24
25
26
2
AVI-Mux GUI - Manual
1
v1.17.8
Introduction
Figure 1: AVI-Mux GUI’s main window
AVI-Mux GUI is a tool allowing to create AVI and Matroska files from different sources,
offering a couple of special settings and possibilities, such as muxing with lower overhead,
or muxing AAC audio into AVI in a way totally compliant to the AVI file specification.
In Figure 1 you can see its main window, where you can import source files and handle
basic properties of streams, such as selecting streams to be activated by default or defining
the title and language of a stream.
1.1
Features
• File format parsers and muxers are written from scratch: No third party file
format parsers or muxers are used, all have been written from scratch. This way, file
3
AVI-Mux GUI - Manual
v1.17.8
format support doesn’t depend on third party bugs, and possible bugs are easier to
fix.
• Repair common errors in AVI files: Some tools are doing weird things to AVI files.
The most common ones can be repaired, some even without recreating the entire file
• Low overhead mode for AVI files: Support for muxing Open-DML AVI files having
1/2 of the overhead of normal Open-DML files and only 1/3 .. 1/2 of the overhead of
AVI files made for example with VirtualDub. Those files are compatible to Microsoft’s
AVI splitter, MPC’s AVI splitter, and Haali Media Splitter.
• Read support for ffmpeg’s Vorbis-in-AVI implementation: AVI-Mux GUI can read
AVI files with Vorbis audio created by ffmpeg. Although those files are technically
not violating the AVI file specification, the way Vorbis init packets are stored requires
a little bit of extra support for such files.
• Support for Mode 2 Form 2 files: Files stored on CDs in Mode 2 Form 2 - format
are directly supported for reading.
• Supports AAC-in-AVI. AVI-Mux GUI is the first tool to allow muxing AAC audio (including HE-AAC) into the AVI container. This is backward compatible to the AVI file
specification and works with common splitters, like Microsoft’s AVI splitter, Gabest’s
AVI splitter and Haali Media Splitter. An AAC decoder is of course necessary, just like
you need an XVID decoder to play an XVID video.
• Easy file splitting: You can easily split files by time or by size.
• SSA and SRT subtitle support. SSA and SRT subtitles can be muxed into AVI and
MKV, including splitting and joining, including joining of SSA subtitles of which the
style definitions colide and need to be changed accordingly.
• Own cache: An own cache system makes muxing faster, especially when the source
and target drive is the same physical hard disk.
1.2
What AVI-Mux GUI is not
AVI-Mux GUI does not recompress anything. Thus, it will not ”burn” subtitles into a video
in a way that forces spectators to see them by making them a fixed part of the video.
Also, it will not remove subtitles which you have ”burnt” into the video. If you don’t want
to have subtitles which are an unremoveable part of the video stream itself, then don’t
create such files.
4
AVI-Mux GUI - Manual
1.3
v1.17.8
Why the name AVI-Mux GUI?
Usually, GUI is added to the name of a command line tool which is put over that command
line tool to allow more convenient usage.
There was indeed a very, very early version called ’AVI-Mux’, however, I have never released it to the public. Also, AVI still means ’audio/video interleave’, so it was not really
necessary to change the name after having added support for Matroska files.
2
Getting started
This section explains the very first steps after downloading AVI-Mux GUI.
2.1
Requirements
Besides obvious things like enough free hard disk space to process the files you want to
process, you need Windows 2000, XP or compatible. Although I have fixed a few issues that
might have caused the instantanious crash when trying to launch it on Windows 98/ME,
I herewith state explicitely that Windows 9x/ME is not supported. As to Windows NT4, I
have no idea.
If you want to run AVI-Mux GUI on Windows Vista, you have to enable the compatibility
mode. Set it to ”Windows XP SP2”. Future versions of AVI-Mux GUI might automatically
enable the compatibility mode on Windows Vista.
2.2
Installation
AVI-Mux GUI doesn’t come with a bloated installer that is twice as big as the software
itself. Simply download it and decompress the archive to a folder of your choice. Doing
this, you must maintain the folder structure, i.e. you must not use any ’flat mode’ setting in
the decompression tool. Do NOT modify the folder structure. A file language_codes.txt
and languages.amg must be present in the same folder as the executeable file, otherwise
AVI-Mux GUI will refuse to launch.
I’ve received problem reports saying that AVI-Mux GUI didn’t want to start up. After asking
some questions, it turned out that a few users appearently tried to run AVI-Mux GUI from
within the archive file. This does not work either.
The file languages.amg contains a list of language files to be loaded. If you want to install
5
AVI-Mux GUI - Manual
v1.17.8
a new language file, you have to add it to that list and change the number of languages
files to be loaded accordingly. This should be obvious when you open that file in a text
editor. The language system is made in a way allowing users to translate them without
having to touch the source code.
If you unpack v1.17.8 over an existing version v1.17.5, you should delete the file gui.amg.xml.
This file contains information about the last window size and window position of several
windows, including the settings window. Since the size of this window was increased in
v1.17.6, using the old size information leads to a cropped settings window. Version 1.17.8
has a fix in order to autodetect this situation, but if this fix does not work correctly, please
report it and delete the mentioned file.
2.3
Quickstart
If you simply want to start up without continuing to read, you can do so. Simply drag and
drop the source files you want to use into the source file list. Per default, audio and subtitle
files are immediately added as stream source, whereas AVI and Matroska files aren’t. Select
all files you want to be treated as one large file and click ”generate data sources from files”.
If you want to name the streams, click on each stream, press F2, type the stream name,
press TAB, and select the language code of the stream. Then, press start, and selecting the
target file name. The extension of the file name determines the file type you are going to
create, it can be AVI or MKV. If you selected source streams that AVI-Mux GUI cannot put
into an AVI file, the AVI file format will simply not be available. Exampes of such streams
are MP2 VBR and Vorbis.
3
The Main Window
This section describes the windows and settings that are accessible in the main window.
3.1
Source Files and Source Streams
You add files you want to use as source by simply drag&dropping them into the source file
list. You can also right-click onto the source file list and choose add. You can import almost
all file types AVI-Mux GUI can use this way, including XML chapter files or script files.
By default, source files that are already in use as stream source are highlighted. Also,
when selecting a stream, the files exposing that stream are highlighted. Beginning from
v1.17.8, more highlighting has become available: streams that prevent muxing to AVI
6
AVI-Mux GUI - Manual
v1.17.8
are highlighted by using blue color, streams that are selected as default do no longer get
a comment ’(default)’, but are rather displayed in bold letters. All highlighting can be
disabled.
3.1.1
File type identification
AVI-Mux GUI will automatically identify the file type and doesn’t care about the file extension. If you import a .AVI file and AVI-Mux GUI says it is an MKV file, then you most likely
renamed the file from .MKV to .AVI and simply forgot about it.
Identifying WAV files takes rather long, for a simple reason: AVI-Mux GUI wants to avoid
reading WAV files with AC3, MP3 or DTS audio as WAV files, it rather wants to read those
files as binary AC3/MP3/DTS files. This way, broken or weird WAV file headers won’t
cause problems. Thus, a real WAV file can only be identified after having verified the file
is not an AC3/MP3/DTS stream. For this verification AVI-Mux GUI checks if there is a
valid AC3/MP3/DTS frame somewhere within the first 128 kB of a file. AVI-Mux GUI can
identify a WAV file as WAV file only after this verification has failed for all 3 stream types
in that range. This can take a few seconds.
3.1.2
Importing .AAC files
If you import .AAC files with ADTS packing (this is the usual format of .AAC files), there is
no reliable way to determine if the file is LC-AAC or HE-AAC. Usually, files with a sample
rate of not more than 24 kHz are HE-AAC, files with higher sample rates are LC-AAC,
however, this is only a rule over the thumb. Encoders usually require you to select the AAC
profile when encoding, so you know if a file you encoded is HE-AAC or LC-AAC, and can
select the correct profile manually if the wrong one is determined by the rule mentioned
above. Right-click on a stream and select or deselect ’SBR’.
3.1.3
Adding stream sources
Pure audio files and pure subtitle files are added as data source when you add them, file
types that can contain several streams aren’t. You can change this behaviour for pure audio
files, for example if you wish to append two or more audio files. You cannot (yet) change
this for pure subtitle files.
If you want to add the streams in a file as data source, and if you don’t want to append two
or more files, you can simply double-click on the file. If you want to append several files,
you have to select those files by holding the CTRL key while clicking on the files, and then
7
AVI-Mux GUI - Manual
v1.17.8
you have to click generate data source from files. You can remove files which you
have added this way, however, you cannot (yet) simply undo the generate data source
from files - operation. You can remove a file by right-clicking on it and selecting remove.
If the file is not in use, it will simply be removed. If it is used, AVI-Mux GUI will show a
message showing which streams the file added, and which other files have been added at
the same time. Obviously, if you have joined two files, and want to remove one, either the
stream sources that have been created would need to be modified accordingly, which is
not supported, or both of the files have to be removed along with all streams they expose.
3.1.4
File order
You can change the order of files in the source file list box by selecting the file to move and
then using the PgUp and PgDn keys. Note that, once two files have been used to generate
stream sources, the relative order of those two files to each other cannot be changed
anymore. You can move other files around, you can move those two files, but you cannot
change the order of those two files relatively to each other.
3.1.5
Stream order
You can change the order of streams by drag-and-dropping them inside the stream tree or
by using the PgUp and PgDn keys. However, in any case the final output file will contain
the video stream first, then the audio streams in the order you selected, then the subtitles
in the order you selected.
You cannot make AVI-Mux GUI place audio streams before video streams or the like.
3.1.6
Extracing Streams
You can right-click on an audio or subtitle streams. If AVI-Mux GUI supports extraction of
that stream to a separate file, the corresponding menu item will show up.
3.1.7
Default Streams
A default stream is a stream that a player is supposed to play per default. Thus, there
will usually be one default audio stream, and none or one default subtitle stream. AVIMux GUI also allows to use weird default stream settings, like choosing several audio or
subtitle streams as default streams, however, note that a player might ignore such settings
or behave otherwise weirdly.
8
AVI-Mux GUI - Manual
3.1.8
v1.17.8
Delays
When selecting an audio stream, a delay edit field shows up. You can enter a delay (positive or negative) by which the audio stream should be delayed. When muxing to MKV, the
value you type there is simply added to the time codes. The stream itself is not modified.
Consequently, when muxing to MKV, you cannot use a delay below -30.000 time units (see
TimecodeScale setting on page 20).
If you mux to AVI, the beginning of the stream is removed to compensate for a negative
delay. In order to compensate for a positive delay, either silence is added when a silence
file is available, otherwise the first few milliseconds of the stream are duplicated as often
as necessary.
Sometimes, a delay is automatically set for a source stream. This happens when
• an AVI file with an AC3/MP3/DTS stream has garbage data at the beginning of the
stream. The garbage will be removed when muxing, and the delay is set so that it
compensates for removing the garbage
• an AVI file explicitely has a delay for a stream. This kind of delay is not supported by
some players, thus, it is removed and set again the way described above.
• a source audio file contains a string like DELAY -17ms in its file name
A delay in this meaning is an additional time shift or a time shift required to compensate
for modifications AVI-Mux GUI applies to a stream. Thus, if you set for example a delay
for a MKV file, and load it again, no delay will be shown: No modification to the stream is
necessary or done, neither is a modification to any timecode necessary or done, thus there
is no delay.
3.1.9
Stream Names
You can apply stream names for each stream by expanding the node representing the
stream, selecting the stream, right-clicking, selecting the “new stream title” menu item,
expanding the newly created node, selecting the “stream name” item and pressing F2.
This is illustrated in figure 2. If you create MKV files, the stream names are stored in UTF-8
format, meaning that you can type anything you wish, besides klingon, which is not part of
UTF-8. If you create AVI files, however, the stream name is stored in ANSI encoding, so you
should only use standard english characters. Also, whereas MKV files allow several titles
per stream (as illustrated in figure 3), AVI files only allow for one single stream title per
stream. If you want to apply a stream name using AVI output, select “und” (“undefined”)
as language code for the stream title.
9
AVI-Mux GUI - Manual
v1.17.8
Figure 2: Adding a new stream title
3.1.10
Language Codes
After having typed the stream name, press TAB, then you can select a language code for this
stream. If the code you want to use is not in the list, simple type the code instead of selecting one. If you want to use this code more often, you can also edit the language_codes.txt
file and add this code. The complete list of existing language codes can be found in ISO
639.21 .
There are no language codes in AVI files, thus, if you create an AVI file, any language code
you apply is lost.
1
http://www.loc.gov/standards/iso639-2/englangn.html
10
AVI-Mux GUI - Manual
v1.17.8
Figure 3: A stream with three titles
3.2
Settings and Commands in the main window
The following settings are available in AVI-Mux GUI’s main window, some of these can be
accessed via the context menu.
• immediately add audio streams: When enabled, a streams source will immediately
be created from any audio file you add. You have to disable this if you want to
concatenate several audio files
• language: You can change the language of the interface. You can choose languages
installed in the languages.amg file.
• save configuration: Creates a script file that, when loading it, will reload the currently loaded files, and will recreate the currently created stream sources with stream
names, language codes etc. If chapters are configured, an additional chapter XML
file will be created. The script file will automatically load this chapter file.
• File title: For AVI files, this will be the file title, for MKV files, it will be the segment
11
AVI-Mux GUI - Manual
v1.17.8
title. Note that AVI file titles are stored in ANSI encoding, whereas MKV segment
titles are stored in UTF-8 encoding. Consequently MKV segment titles can contain
virtually all characters, except for klingon.
• Resolution: When creating MKV files, you can enter the resolution the video is to
be resized to on replay. You can also enter cropping information. The easiest way
to explain how is probably a bunch of examples: 720x304, 2.35:1 or 640X480 are
possible resolutions, [4,8]-[12,16] will crop 4 pixels from the left, 8 pixels from the
top, 12 pixels from the right and 16 pixels from the bottom, (4,8)-(716,296) will
keep the area between (4,8) and (716,296). If you want to use resizing and cropping,
you have to indicate resolution,cropping. If you want to indicate cropping only,
use ,cropping. Typing nothing will copy the source video stream settings. Resizing
and cropping on replay will, of course, only work if the playback chain (especially
decoder or video renderer) supports that. The edit field turns red if the current input
cannot be processed correctly.
• start: Select output file name, format and start muxing. The listbox of file extensions
will show the file formats that are possible. Sometimes, you’ll notice that only MKV is
available, but not AVI. This happens when one or more source streams simply cannot
be muxed to AVI. Examples are audio streams in matroska source files, MP2 VBR and
OGG/Vorbis streams.
4
Settings
This section describes everything you can change in the settings window.
4.1
General Input Settings
The settings described in this section mainly influence the speed AVI-Mux GUI can operate
at. Normally, the default settings should not be modified. The only reason to change those
settings should be a bug in the corresponding code of AVI-Mux GUI. Picture 4 shows a
remuxing process of one large MKV file with all speed options enabled, with source and
target files on two different SATA hard discs.
generate chapters from filenames: When joining several files and when this setting is
enabled, a chapter entry will be created for each of the files you join, so that you can jump
to each part on playback directly.
avoid unnecessary seek operations: When enabled, AVI-Mux GUI’s own cache system is
used.
12
AVI-Mux GUI - Manual
v1.17.8
unbuffered read : When enabled, the windows file cache will not be used. This can only
be activated when avoid unnecessary seek operations is enabled
read ahead asynchronously: When enabled, accessing one piece of a file (one piece
is, depending on the file type, between 256 and 1024 kB in AVI-Mux GUI) will trigger
prefetching the next piece. This can speed up muxing significantly. If AVI-Mux GUI behaves
weirdly, and disabling this setting helps, the asychronous read ahead has a bug (again).
Figure 4: Remuxing with unbuffered, asynchronous read-ahead
4.2
4.2.1
Format Specific Input Settings
Mode 2 - Form 2 files
activate CRC check as default : Files on Mode 2 Form 2 - CDs usually have a CRC32
checksum for each 2324 byes of data. When enabled, an error there results in a input read
error. This avoids that corrupted data is processed.
13
AVI-Mux GUI - Manual
4.2.2
v1.17.8
MP3
CBR check : MPEG audio files (this also includes MP2, the settings dialog is actually a
little bit misleading here) can be checked (or not) for being CBR. Files not checked for
CBR are considered VBR files. The difference between CBR and VBR matters when muxing an MPEG audio file to AVI because different headers are created for CBR and VBR
streams. However, considering that CBR is actually nothing more than a very special case
of VBR, any CBR stream works fine when being considered VBR, as long as the playback
device/software works with a VBR audio stream.
4.2.3
AVI
maximum chunk size: Chunks larger than the size indicated here are considered broken
and are ignored. This can be useful when trying to save parts of a corrupted file
try to retrieve correct chunk size: When encountering a chunk which is, according to
the index, larger than the maximum allowed chunk size, and when this is enabled, AVIMux GUI will check the chunk size according to the chunk header and use that size if it is
reasonable.
force MP3 streams to VBR : When loading AVI files with MP3 CBR audio, it will be considered VBR.
change dwFourCC ”DX50" to "divx" : Someone introduced a fourcc value if ’DX50’ with
divX 5. When enabled, the fourcc will be changed to ’divx’ during muxing.
4.2.4
MKV
import chapters: When enabled, chapters in MKV files you add as data source are imported, otherwise, they are ignored.
4.3
General Output Settings
The setting described here concern generic file handling and not special aspects of AVI or
Matroska files.
14
AVI-Mux GUI - Manual
4.3.1
v1.17.8
File Access
unbuffered writing: When enabled, the windows file cache will not be used when writing
files. This avoids that it gets filled with data you most likely don’t want or need in it, namely
the file you are going to mux.
asynchronous mode: When enabled, output files are opened in ”overlapped” mode,
meaning that Windows may or may not block a thread that performs a read or write
operation until it’s finished (instead of always blocking it when this setting is disabled).
This can speed up muxing.
use separate thread : When enabled, a separate thread will be created to perform input
and output operations on output files. Note that this setting automatically disables asynchronous mode, because it doesn’t make sense to combine both of them. Those are two
different approaches to achieve exactly the same thing, however, some hard disc drivers
seem to ignore the asynchronous mode setting, so using seperate threads is preferred. An
additional buffer of 32 MB is used to buffer incoming write requests.
create log file: When enabled, the protocol you see while muxing a file will be written to
a text file.
Default file name: You can choose if a default file name should be selected when choosing
the output file name. If you select "segment title", the segment title you typed in the main
window will be proposed as default file name. Invalid characters, i.e. characters that
cannot be used in a filename, are automatically replaced. If you select "first source file",
the name of the first file used to create the first video source in use will be proposed, or
the first file used to create the first audio source if you did not choose any video source.
The file name extension will be dropped.
4.3.2
File Splitting
by size: This is the most obvious setting. When the output file exceeds the chosen file
size, a new file will be started as soon as the next keyframe is encountered. This obviously
means the size you indicate here can be slightly exceeded, for example with a keyframe
interval of 10 seconds and a data rate of 2 megabits per second, the size will be exceeded
by 1.2 MB on average.
manually set split points: There you can indicate a list of timestamps (or chapter marks)
where the file is to be split. Chapter marks can contain the * wildcard, for example 2.3.*
just means every subchapter of edition 2, chapter 3. Those timestamps can be given in
various formats, for example 1h20m52s5 or 1:20:52.5 or even 78m172s5 (=78 minutes
and 172.5 seconds).
15
AVI-Mux GUI - Manual
v1.17.8
Numbering: This string defines how file names are created. It can contain a few different
placeholders:
• $Name is replaced with the file name you indicated in the Save As - dialogue.
• $Nbr{k} is replaced with n using k digits when creating the n − th file during a
muxing process. {k} can be omitted.
• $Chn{<lng>} is replaced by the title of the chapter used as split position in the language <lng>. Example: $Chn{fre} will use the french title of the chapter. {<lng>}
can be omitted.
Example: $Name (3x$Nbr{2}) - $Chn{eng}
4.4
Output Settings - AVI
4.4.1
Miscellaneous settings
make rec lists: rec lists are structures which are supposed to force an AVI splitter/player to
read larger blocks of data at once instead of single frames in order to avoid seeking. When
playing a file with several audio streams using Microsoft’s AVI splitter, the splitter will read
data for each track exactly when it needs it, and does not automatically do caching in order
to avoid excessive seeking. This makes playback impossible from media with high access
time, such as DVD-R. By enabling rec lists this problem is avoided, however, hardware
MPEG4 players usually do not support files created this way, although these rec lists are
part of the original AVI file specification from 1992.
add JUNK before MainAVIHeader: This setting, when enabled, puts 8 bytes of data
before the headers. Typically, the headers of an AVI file start at a fixed position. This
is not a requirement, however, a lot of players/splitters assume it was a requirement,
including Microsoft’s AVI splitter. By enabling this setting, you can check whether or not
a player makes this (wrong) assumption. Obviously, disabling it leads to files with better
compatibility.
4.4.2
Open-DML Settings
Open-DML is an extension to the original AVI file specification which removes the 2 GB
limit. These extensions have been introduced on February 28, 1996. However, some players, especially hardware MPEG4 files supporting the AVI file format, still do not support
those extensions. That means, do NOT activate Open-DML if you plan to play such files on
hardware MPEG4 players. Besides lifting the file size limit, typical Open-DML files have
16
AVI-Mux GUI - Manual
v1.17.8
33% less overhead than old style AVI files (”AVI 1.0”). This is achieved by using a more
compact index design.
use Open-DML output : When disabled, an AVI 1.0 file is created. In this case, the output
files cannot be larger than 2 GB.
standard indices per streams: Open-DML files use a hierachic index with two levels.
This setting defines how the lower level of those two levels is created. Theoretically, this
setting should not matter, however, when creating too large pieces, Microsoft’s AVI splitter
does not recognise such files if there are several audio streams. This bug is reproduceable
with four or more audio streams, and seems to randomly occur with two and three audio
streams. The default setting of 15,000 frames per index piece seems to work fine. Setting
1 piece per RIFF list will trigger this bug when at least four audio streams are included.
create legacy index: Open-DML files allow the first RIFF list to contain an AVI 1.0 index,
called legacy index, to make the first part of the file fully compliant with AVI 1.0. This
is necessary when using Windows XP because there is a bug in shmedia.dll showing the
following effect: When you click on an Open-DML file of which the first RIFF list has no
legacy index, the entire RIFF list will be read looking for this index. During this time (20
seconds for 1 GB if your hard disk can sustain 50 MB/s and the parser is fast enough),
the file is locked and cannot be renamed or deleted. Thus, you either have to enable this
setting or have to unregister shmedia.dll. In order to avoid this additional index to create
much overhead, the first RIFF list can be set to a very small size, such as 1 MB instead of
1 GB.
Low overhead mode: While the index of an AVI 1.0 file points to chunk headers of
chunks containing video/audio data, the lower level index of the Open-DML hierarchic
index points to video/audio data and not to chunk headers. The file format specification
does not explicitely require that a chunk header be stored before a video or audio frame.
Thus, the following interpretation is possible: One RIFF data chunk contains several frames
of the same stream, and there is one index entry per frame, pointing to different locations
inside the same chunk.
The AVI header allows to set a flag called AVIF_MUSTUSEINDEX. When this flag is set, the
index must be used to retrieve the position and size of video/audio chunks, thus this flag
avoids that a parser stumbles over those RIFF structure chunk containing several frames
at once. With a little bit of good will, AVIF_MUSTUSEINDEX being set means that the index actually defines what a ’chunk’ is, especially since index entries have members like
"dwChunkSize". If then an AVI parser respects this flag, it can read such files. Since this
method reduces the overhead by almost 50% compared to normal Open-DML files, they
are called ”low overhead files”. Microsoft’s AVI splitter can read such files, as well as MPC’s
AVI splitter and Haali Media Splitter.
17
AVI-Mux GUI - Manual
4.4.3
v1.17.8
Audio Interleaving
Audio interleave defines how video and audio data is organized within the file. With a
correctly working player/splitter, audio interleave doesn’t matter, however, many players,
especially hardware MPEG4 players, are rather picky here and require proper settings.
Audio interleave: If you select a certain number of frames, AVI-Mux GUI will simply store
this certain number of frames in a sequence, and then stores the corresponding audio data.
This can result in jerky playback if the data rate is very high at some point in the stream
because in this moment it would require more prebuffering. If you select a certain size,
AVI-Mux GUI will write a number of video frames, followed by the corresponding audio
data, so that the entire block of video and audio data has the indicated size. This can
only be an estimation, because the real size of the audio data is not known before actually
reading it.
Preload : Defines by how much time the audio data runs ahead of the video data in the
file. This does NOT add a delay, it only influences the physical position of data in the file.
AC3/MP3/DTS - Frame Grouping: AC3, MP3 and DTS streams consist, just like video
streams (and some other audio streams) of individual frames. AVI-Mux GUI allows to
change the number of individial frames to be stored in each chunk. Since overhead is
caused per chunk, higher numbers decrease overhead. Note that a value of 1 for AC3 leads
to streams that cannot be replayed on some hardware MPEG4 players, and that values
higher than 5 also break some decoders. What is more, some players/decoders do not like
to get half AC3 frames: One AC3 frame has a duration of 32 milliseconds. If you select a
preload and/or interleave that is not a multiple of 32 in NanDub or VirtualDubMod, the
resulting file will contain chunks containing first and second halves of AC3 frames. Such
files play jerkily with some players/some decoders. AVI-Mux GUI avoids this problem, it
never rips AC3 or DTS frames into two halves. For MP3 CBR, you can allow to rip frames
in two halves, however, this breaks some hardware MPEG4 players with MediaTek chipset.
4.5
4.5.1
Output Settings - MKV
Matroska Version
There is Matroska v1 and Matroska v2. The latter implements a new block type with less
overhead. A ’block’ is the structure in which video, audio and subtitle data is stored. You
should use Matroska v2 unless you plan to use this file on a player that doesn’t support v2.
Deselecting both of them allows for enabling discouraged settings. Files created that way
will be referred to as freestyle files.
18
AVI-Mux GUI - Manual
4.5.2
v1.17.8
Lacing
Lacing is a technique allowing to save overhead by placing several frames into one block,
maintaining the possibility to separate the frames later again. However, timestamps are
lost for all frames in a lace besides the first one. This is irrelevant for streams with constant
frame duration, like MP3, AC3, DTS and AAC, but could be problematic for streams with
variable frame duration, like Vorbis. Thus, the default setting creates small laces for Vorbis
(compromise between saving overhead and losing timestamps) and bigger laces for other
audio formats.
AVI-Mux GUI allows to configure different lace intervals for different audio formats, and
it allows to choose XIPH, EBML/fixed and auto lacing. XIPH lacing is the original lacing
technique which is efficient as long as frames are smaller than 255 bytes. EBML lacing is
efficient when at least some frames are larger than 255 bytes, but not all frames are of
equal size, which is the case for pretty much all VBR audio frames. Fixed lacing is possible
when all frames in one lace are of the same size, it simply stores the size of one frame and
the number of frames. Auto lacing encodes a block in XIPH lacing as well as in EBML/fixed
lacing and then chooses the smaller one.
Video lacing is theoretically working for some video formats, like XVID in VFW compatible
mode, but is highly discouraged and can only be enabled if you disable Matroska v1 as
well as Matroska v2, allowing to stretch the Matroska file specification to a questionable
extent. You must choose auto lacing when enabling video lacing.
4.5.3
Cluster Settings
A cluster is a structure in a Matroska file storing video, audio and subtitle data usually
spanning over a couple of seconds or not more than a few megabytes, whatever is less.
maximum cluster size: You can set the maximum size of one Cluster between 4 kBytes
and 32 MBytes. Note that an entire cluster is stored in memory and is only written to
the target file when it is complete, so using excessively large clusters increases memory
consumption. When Clusters are indexed in the SeekHead, a certain amount of memory
is needed during muxing for each Cluster, so that excessively small clusters also increase
memory usage. The default setting is 512 kBytes.
maximum cluster length : You can choose the maximum time over which a cluster should
span, forward-relative to its first block. If you select 10 ku (10,000 units), a block in the
cluster could still have a timecode as early as -15,000 units (not earlier than -32,767 units
because this is a general limitation of a Cluster, AVI-Mux GUI creates a new cluster when
depassing -30,000), but a new Cluster is created when adding a block later than 10,000
time units after the first block of the cluster. One time unit is defined via TimecodeScale.
19
AVI-Mux GUI - Manual
v1.17.8
The maximum settings is 30ku for Matroska v1/v2 and 60ku for freestyle files. Although a
setting of 60ku does not really break the specification, it is discouraged to use this. When
setting it to a value higher than 30ku, you can choose (or not) to limit the first cluster
of the file to 30ku. Earlier versions of MediaPlayer Classic required this to work correctly
with such files.
Writing Position/Prevsize: Clusters have a mechanism allowing for easier resynchronisation in case data is broken: By writing the position of the Cluster itself into the cluster, as
well as the size of the previous cluster, there is additional information available useful for
resychronisation. Those values are useless for correct data.
Index Clusters in SeekHead : When enabled, each Cluster will be indexed in the SeekHead. This requires about 18 bytes per Cluster. It could also be useful for recovering
broken files, but is useless for correct files.
4.5.4
TimecodeScale
Matroska timecodes are always given in nanoseconds. TimecodeScale is a value all scaled
timecodes are multiplied with (some time codes in Matroska files are never scaled and
always use one nanosecond as unit). For example, a value of 1,000,000 means that scaled
timecodes effectively are given in milliseconds. You can indicate different timecode scales
for files with a video stream (MKV) and files without a video stream. Since one Cluster can
span over not more than 30,000 units, smaller timecode scale values result in smaller and
more Clusters. For example, with a timecode scale of 10,000, those 30ku units constitute
an interval of only 300 milliseconds, whereas with a TimecodeScale of 500,000, these
30ku constitute an interval of 15 seconds.
4.5.5
Cues
Cues in Matroska files contain the file index. This index does not contain information
essential for replay, it just makes seeking easier and faster. Usually, the index points to
keyframes for reasons of simplicity: When seeking in a file, decoding must restart at a
keyframe anyway, thus it is reasonable to put only keyframes in the index. One such index
entry is called a CuePoint.
Audio, Video, Subtitles: You can select for which stream types you want cue points to
be created. In the case of audio streams, you can also select whether CuePoints are to be
created always, or only when no video streams is muxed along with the audio stream.
Minimum Cue Interval : The minimum interval between 2 CuePoints in milliseconds.
There is no point in including 2 frames of the same stream in the index if they are very
20
AVI-Mux GUI - Manual
v1.17.8
close, since this won’t really accelerate seeking.
kB per stream and hour: When the index is supposed to precede Clusters, the required
space must be reserved before actually writing any Cluster. Here, you can indicate how
much space is to be reserved for one hour of one stream.
Target Size Ratio: During muxing, a set of CuePoints is created according to the minimum
cue point interval. Obviously, it can happen that the space reserved for Cues is not enough
to hold all those cue points. In this case, the cue points to be dropped are chosen randomly.
available_space
The probability to keep one cue point could simply be set to total_space_of _cue_points . Then,
the resulting set of cue points would be about as large as the available free space, however,
the chances for it to be larger would be 50%, the chances for 7 consecutive attempts to
fail would still be 1%, which could be annoying the for the user. Thus, the probability is
available_space∗target_size_ratio
instead set to 1000∗total_size_of _cue_points , reducing the probability for a failure.
Auto Cue Size chooses whether or not to use the mechanism described above to make
sure the index can be put before the video/audio data. If this is disabled, the user can
select a total amount of space to be reserved for all headers, and the cues are simply put
at the end of the file when not enough space is left before the first Cluster.
4.5.6
Other settings
write 2 copies of Tracks: When enabled, a copy of the tracks definitions is written to the
end of the file, so that there are 2 copies of them and so that it is highly unlikely to lose
both copies at once.
always write DisplayWidth/Height: When enabled, aspect ratio values are written even
when they are in fact superfluous. This was necessary for some older versions of The Core
Media Player and is helpful when trying to chose the aspect ratio after muxing, for example
using Matroska Shell Extentions.
Index non-Clusters in first Seekhead : When enabled, elements like chapter definitions,
headers and similar are forced to be written before any video/audio data, which is reasonable but not mandatory for Matroska files.
Hard-linking when splitting: Hard-linking is a mechanism allowing a player or splitter
to know which files belong to this split operation. A splitter or player having full support
for that mechanism could tell you to insert the next disc after finishing to play one part,
knowing the next and previous file for each file of a set.
Allow CodecID ”A_AAC" : This is purely cosmetic. Disabling this setting results in files
more backward compatible.
Stripe stream headers when possible: Some compression formats include a frame header,
21
AVI-Mux GUI - Manual
v1.17.8
i.e. a sequence of bytes found at the beginning of each frame. For example, MPEG4 ASP
frames always begin with 00 00 01 B6. Storing those bytes for each frame is obviously
redundant. By enabling this setting, a mechanism is used to delete these redundant frame
headers. This gains 4 bytes per frame for MPEG4 ASP, 1 byte per frame for MP3, 2 bytes
per frame for AC3 and 4 bytes per frame for DTS. Considering that a DTS frame typically has a duration of only 10.666 milliseconds, this means you can save 1 byte per 2.66
milliseconds, which is equal to 366 bytes per second for one DTS audio stream.
Width of Floats: There are 3 types of floating point numbers used on Intel x86 compatible
CPUs: 32 bit, 64 bit and 80 bit. Since 80 bit floats were removed from the Matroska
specification, this option is only available when freestyle (neither Matroska v1 nor v2 is
enabled) is chosen. 32 bit floating point numbers have a precision of about 1, 2 ∗ 10−7 . The
segment duration being stored as float, this means for example that, when a segment has a
duration of 10 hours, using a 32 bit floating point number would introduce an inaccuracy
of 4 milliseconds. If you want a higher accuracy, use 64 bit floats.
4.6
GUI settings
The behaviour and layout of the GUI can be modified a bit, as explained below.
highlight files in use: When enabled, files in the source file list that are already used are
displayed in gray color.
highlight stream source files: When enabled, all files which are source files of the currently selected stream, are displayed in red color.
enable overwrite confirmation: When disabled, no overwrite warning will appear when
muxing a file. This setting does not affect saving other file types.
display message when finished muxing: When enabled, a message box indicates when a
muxing process is finished. When disabled, you still know that a process is finished because
the muxing process view disappears. This setting does not enable or disable messages
that are shown or not shown at other occasions, for example when extracting a stream is
finished.
highlight default streams: When enabled, streams that are used as default streams are
displayed in bold letters, otherwise the normal font is used.
highlight streams incompatible to AVI : When enabled, streams that AVI-Mux GUI cannot
use as input for AVI output, are displayed in blue font, otherwise the default font is used.
use cleartype fonts: You can choose if you want to use cleartype fonts, no cleartype fonts
or the operating system default setting concerning cleartype fonts.
22
AVI-Mux GUI - Manual
5
v1.17.8
The Chapter Editor
Matroska files can contain chapter definitions which are actually much more than merely
chapters. Especially, a sequence of chapters can even be a list of pieces of different files to
be played one after the other. Also, several titles can be stored for each chapter or edition,
Figure 5: AVI-Mux GUI’s chapter editor
usually one title for each language.
5.1
5.1.1
Editions and Chapters
Editions
An edition is a list of chapters. Such a list of chapters can have two different meanings: It
can be a bunch of entry points into a movie, as you know it from DVDs. Such an edition
23
AVI-Mux GUI - Manual
v1.17.8
is not ordered. On the contrary, an edition which is interpreted as a playlist, is called
ordered. An ordered edition can point into the file itself, as well as into another file. Such
a playlist allows to emulate multiple angles, or for example a multi-part-episode where the
user can choose (or not) to see intro and outtro after each part.
The edition being marked as default edition is selected by the splitter or player when
loading the file
Editions that are hidden are not accessible via the user interface, but might be available
using other means of navigation.
5.1.2
Chapters
The ChapterSegmentUID of a chapter defines which Segment the start and end time of
that chapter refer to. The file containing that segment must be in the same folder as the
file of which a chapter refers to that segment. When using Haali Media Splitter, a file being
referred to this way must have only one segment.
ChapterSegmentUID can only be used with chapters inside an ordered edition. While the
end time of a chapter inside an unordered edition (meaning that the chapter only defines
an entry point into a segment) does obviously not matter, the end time is mandatory
for a chapter inside an ordered edition. You can copy the SegmentUID of a file to the
ChapterSegmentUID edit field by simply drag-and-dropping it onto that edit field.
A hidden chapter is not accessible via the user interface, but can of course be part of an
ordered edition.
5.2
Usage Of The Editor
Adding a new edition or chapter: If you want to add a new chapter on the same level
as the chapter currently selected, use the Ins key. If you want to add a subchapter to a
chapter or a chapter to an edition, use the subchapter button.
Deleting a chapter: You can delete a chapter using the Del button. Deleting a chapter
or edition will automatically delete all its subchapters, and the current version of AVI-Mux
GUI has no undo function in the chapter editor!
Change start/end time: Use F2 to edit a chapter entry, and simply type a new start and
end time, separated by a ’-’. A time can be indicated in various ways, like 1h13m17s or
1:17:17 or even 73m17.
Adding a new title: Select ’<new>’, choose a language code (should be unique for one
24
AVI-Mux GUI - Manual
v1.17.8
chapter) and type the new title. If the language code you want to use is not in the list, either type it manually, or add it to the list of language codes in the file language_codes.txt
if you plan to use it more often.
5.3
Importing and Exporting Files
You can import chapter definitions from Matroska files and you can add a segment of
another Matroska file as chapter by drag-and-dropping it into the chapter editor, and you
can load DVD Maestro chapter files.
You can save the contents of the chapter editor in two different file formats:
• XML: Three files are created, one that can be used with AVI-Mux GUI containing
everything, and two files that can be used with MKVMerge. Those two files can of
course also be used with AVI-Mux GUI, but this would be a bit less convenient.
• MKC: A Matroska file containing chapters only. Such a file can for example be used
as playlist file.
25
AVI-Mux GUI - Manual
6
v1.17.8
RIFF/EBML Tree
Figure 6: The EBML Tree
Those features allow you to look at the lower level file structure of AVI, WAV and Matroska
files, either to get a better understanding of those files types, or to help finding out why
a certain file doesn’t work or isn’t played back correctly. The structures are created asynchronously, meaning that the window opens immediately, and that you can close them
(and abort building the structure) whenever you wish.
However, note that a completely built tree structure of a large AVI or Matroska file can
require hundreds of megabytes of memory. Also note that opening the RIFF Tree view
immediately starts building the entire tree. This requires to perform a lot of memory allocations and, more importantly, when closing it, a large number of memory deallocations.
Thus, closing those trees can takes several seconds.
Elements you select in the EBML or RIFF tree will be highlighted in the hex viewer directly
below the tree. In the EBML tree, the element ID itself will be displayed in red, the size
integer will be displayed in blue, the element binary data in green. In the RIFF tree, the
26
AVI-Mux GUI - Manual
v1.17.8
Figure 7: The RIFF Tree
first ID of a structure, that means either the chunk ID or the ’LIST’ marker, will be displayed
in red, the following four byte size value will be displayed in blue, in the case of lists the
list ID following the size value will be red, and the rest of the element in green.
Data outside the currently selected element will be displayed in black for both RIFF and
EBML tree structures..
27