1
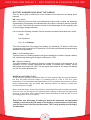
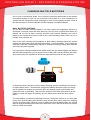
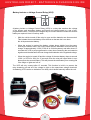
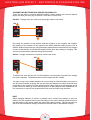
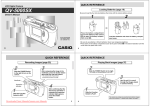
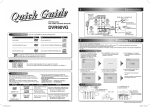
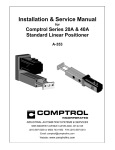
THE COMPLETE GUIDE TO
BATTERIES AND CHARGING
YOUR GUIDE TO BATTERIES, CHARGING, DC TO DC CHARGING, CHARGING FROM SOLAR, SIZING CHARGERS AND MORE
AUSTRALIANDIRECT.COM.AU
07 3123 4715
AUSTRALIAN DIRECT - BATTERIES & CHARGING GUIDE
Table of Contents
BATTERIES……………………………………………………………...
Page 1Page 1
Common Battery Types………………………………….........
Page 2Page 2
Battery Numbers – What does it all mean…………………..
Page 4Page 4
When is a Battery Flat ………………………………………...
Page 4Page 4
BATTERY CHARGING………………………………………………… Page 5
Page 5
Bulk, Absorption & Float………………………………………
5
Page Page
5
Battery Chargers……………………………………………….
Page
6
Page 6
Maintenance Chargers………………………………………...
Page 7Page 7
Buying The Right Size Charger….……………………………
Page 7Page 7
CHARGING MULTIPLE BATTERIES………………………………...
Page 9 Page 9
Dual Battery Systems………………………………………….
Page 9Page 9
Battery Isolator or Voltage Control Relay (VCR)…………...
Page 11
Page 11
Modern Charging Systems…………………………………...
Page 12
Page 12
DC to DC Chargers…………………………………………….
Page 12
Page 12
3 Battery Systems………………………………………………
Page 13
Page 13
Connecting Batteries in Series or Parallel…………………..
Page 14
Page 14
CHARGING FROM SOLAR …………………………………………
Page 15
Page 15
Page
ELECTRICAL LOADS ………………………………………………..
Page 16
16
Loads……………………………………………………………. Page 17
Fridges……………………………………………………….…. Page 18
Measuring Amperage…………………………………………. Page 19
BE VERY CAREFUL AROUND ELECTRICAL SYSTEMS AND ALWAYS HAVE A
SUITABLY QUALIFIED PERSON LOOK AT ANY FAULTS THAT MAY OCCUR. BE
ESPECIALLY CAREFUL AND ALWAYS SEEK PROFESSIONAL HELP WHEN
INSTALLING INVERTERS INTO MOBILE INSTALLATIONS AS CRITICAL CIRCUITS
WILL NEED TO BE CONSIDERED FOR THE PROTECTION OF ALL CONCERNED.
ALWAYS REMEMBER SAFETY FIRST.
AUSTRALIAN DIRECT - BATTERIES & CHARGING GUIDE
BATTERIES
A QUICK LOOK AT HOW A BATTERY WORKS
So that we can better understand battery charging let’s have a quick look at how a
battery is made and what happens inside a battery.
HYDROGEN
H 2 S0 4
H2 0
H2 0
LEAD OXIDE
OXYGEN
H 2 S0 4
LEAD
LEAD OXIDE
DISCHARGED
LEAD
CHARGED
In very simple terms a vehicle battery is made up of a series of cells (usually 6 x 2V
cells) and in each cell there are two sets of plates suspended in electrolyte. In each
cell, one set of plates is made of lead and the other set is made from lead oxide. These
plates are separated and suspended in an electrolyte (typically water or H2O) containing sulphuric acid.
When a battery is fully charged the sulphuric acid is at its strongest and the electrolyte has
a very high specific gravity. Once an electrical load is placed on the battery a chemical
reaction occurs whereby the acid is broken down from the electrolyte and some of its
elements move into the lead plates oxidising the plates. Heavily discharged batteries can
actually sulphate the negative plates making them difficult to receive charge when we try
to reverse the process.
As a result of this internal chemical process electrons are released to flow between
the two plates. A fully discharged battery has very little acid left in the electrolyte and
therefore has a very low specific gravity.
Thankfully a vehicle’s battery can be recharged and this process can be reversed. It
is also worth noting that during recharging, hydrogen and oxygen gases are released,
which is why we need to top up flooded batteries from time to time. Oh…and it’s why you
should never have a naked flame near a battery!
The thickness of the plates within the battery determines a lot about a battery’s intended
use. Thin plates are quite porous and release a lot of energy very quickly, which is ideal
for cranking batteries. Deep cycle batteries on the other hand have much thicker and
denser plates so they provide a much slower and longer discharge. This is also a reason
why some deep cycle batteries do not like to be used as cranking batteries.
1
AUSTRALIAN DIRECT - BATTERIES & CHARGING GUIDE
COMMON BATTERY TYPES
90% of batteries are made up of LEAD and ACID. There are newer batteries out there
that are made of different metals (such as nickel–cadmium and lithium) but the vast
majority of batteries that you can buy in a store will be lead based batteries. It’s also
worth noting that batteries are often very loosely grouped into two main types, “cranking”
and “deep cycle”. Here is a quick rundown on some of the more common types of battery
on the market today.
Flooded
These are easy to identify as they have caps on the top that can be removed so that
you can top up the water (always use distilled demineralised water). The acid in these
batteries is suspended in water, thus the term flooded. By far the most common battery
on the market and most commonly used as cranking batteries in cars and trucks.
Traditional Style Flooded Battery
Pro’s - Very robust batteries that can take a real flogging and a reasonable
amount of heat. They are also inexpensive when compared to other types.
Con’s - They don’t hold a very deep charge. They often need refilling with
water and they can only be mounted in the upright position. They also
vent dangerous gases which does not make them ideal for interior installations.
Typical Voltages:
Healthy resting voltage would be
Absorption voltage
Float voltage
Flat
12.6V – 12.8V
14.4V
13.6V
11.8V – 12V
Maintenance Free
Very similar to the flooded battery, however the lids have been replaced with a fixed
cover that still allows air and gases to escape from the battery. Typically these will have
a coloured sight glass that indicates the condition of the battery and are again commonly
used as cranking batteries. Due to their more advanced construction they often have a
few upgrades such as better supports for the plates. More commonly a maintenace free
battery will contain calcium in the lead plates and for this reason they are often referred
to as a calcium battery.
Pro’s
- Calcium batteries consume less water
- Able to accept a higher charging voltage
Con’s
- If they run out of water you cannot top them back up.
- More prone to sulphation of the plates
Typical Voltages:
Healthy resting voltage would be
Absorption voltage
Float voltage
Flat
12.6V – 12.8V
14.4V
13.6V
11.8V – 12V (check manufacturers spec)
2
AUSTRALIAN DIRECT - BATTERIES & CHARGING GUIDE
AGM or Absorbed Glass Mat
In these batteries the acid is suspended in a glass mat contained between the lead
plates. These types of batteries are commonly referred to as a “Deep Cycle” battery
meaning that they can give out a longer discharge (= more cold refreshments). They
require no maintenance and are valve regulated sealed batteries. This means that they
can be mounted upside down and no electrolyte will escape. You would typically find
these types of batteries in motorbikes and they are great as a second battery for running
fridges and other equipment. SOME brands do not like to be used as cranking battery’s
so always check before you part with your hard earned money.
Pro’s - They have a much longer discharge rate than flooded batteries, can
be mounted in any position and can be mounted inside as they are sealed.
These batteries are ideal for running fridges from.
Con’s - Much more expensive than flooded or maintenance free. They do not
like heat.You need a modern multi stage charger to get the most out of these
batteries.
Typical Voltages:
Healthy resting voltage would be
Absorption voltage
Float voltage
Dead flat
12.8V – 13V
14.7V
13.8V
11.8V – 12V (check manufacturers specs)
Note: Valve regulated means that they recombine the hydrogen and oxygen gases
internally. This is why they are sometimes referred to as a recombination battery.
GEL
Very similar to the AGM but the acid is suspended in a GEL. They are also sealed and
valve regulated. It is worth noting that GEL batteries are more efficient than AGM due to
the way that the GEL assists in the transfer of acid. GEL batteries can be very expensive
so make sure the charging system matches the battery well.
Pros - They have a much longer discharge rate than flooded batteries, can be
mounted in any position and can be mounted inside as they are sealed.
Con’s - They may require a dedicated charger or a charger that has a GEL
setting. Note that they have a slightly lower float voltage than AGM batteries.
GEL batteries are also the most expensive.
Typical Voltages:
Healthy resting voltage would be
Absorption voltage
Float voltage
Flat
12.8V – 13V
14.1V
13.3V
11.8V – 12V
3
(check manufacturers spec)
AUSTRALIAN DIRECT - BATTERIES & CHARGING GUIDE
BATTERY NUMBERS AND WHAT THEY MEAN?
This is a quick guide to what some of the numbers mean when we are talking about
batteries.
AH = Amp Hours
More commonly found on deep cycle batteries this figure tells us about the discharge
characteristics of the battery and should always be read in conjunction with the numbers
C20 or C100. The C20 is the number of hours of rated discharge (C100 is typically used
on much bigger storage batteries).
Let’s look at the following example of these numbers and what information they reveal:
110AH
C20
This equates to:
110 ÷ 20 = 5.5 Amps
This tells us that from fully charged our battery can discharge 5.5 Amps for 20 Hours
continuously until it reaches 10.5V (Note that 10.5V is the internationally accepted testing
standard for a flat battery).
CCA = Cold Cranking Amps
Typically shown on cranking batteries this figure identifies the number of amps a battery
can continuously discharge at 0 degrees fahrenheit (-180C).
RC – Reserve Capacity
This rating relates to the battery’s capacity to power the system if the alternator is not
operating. The RC number represents the number of minutes that a battery can be
discharged at 25 Amps until 10.5V, So the higher this number is, the longer the battery
can run should the alternator fail.
WHEN IS A BATTERY FLAT?
A 12V battery is generally considered flat at 12 volts. Now this will vary by manufacturer
but 90% will state that their battery is considered flat at 11.8V or 12V at a given
temperature. For international testing standards 10.5V is used as a benchmark, however
many manufacturers may shy away from warranty claims if a battery is below their
recommended low voltage.
Now I know that some of you will read this in utter disbelief but this is actually technically
very true. You can be forgiven for assuming that a battery is flat when the lights won’t
come on or the engine won’t start but that is when the battery is dead and this is not at
all a happy place to be for a battery.
Every time you discharge a battery to below the minimum recommended
voltage you shorten the life span of the battery considerably and the lower
you go the shorter the life span becomes. This is why battery monitoring is
so important.
4
AUSTRALIAN DIRECT - BATTERIES & CHARGING GUIDE
BATTERY CHARGING
Understanding the relationship between your battery and your charger will not only
extend your battery life but also the amount of time you can stay away from mains power.
The overwhelming majority of vehicle charging systems deliver a very rudimentary
charge which will not bring the battery to a FULL state of charge. To achieve a full charge
we have to apply three basic stages of charge which achieve very specific voltage points.
These stages are known as:
BULK
ABSORPTION
FLOAT
Understanding these three stages of charge will significantly increase your battery brain
and your understanding of how batteries work. Let’s take a closer look at each.
BULK
The bulk stage of charge is when the charger pushes the maximum amount of amperage
it can into a battery to increase its voltage. This is typically the first stage of charging
although some modern chargers test the battery’s state before moving into this mode
and they may even skip this mode if it is not required.
ABSORPTION
At the absorption stage the voltage is brought up to 14.4V (ideal for a flooded battery)
and is held here while the amperage is slowly reduced. This has the effect of soaking the
cells in the battery with a much more saturated charge and is a critical stage to bring a
battery up to FULLY charged. Flooded batteries like an absorption voltage of 14.4V and
AGMs generally around 14.7V. Older linear chargers do not have the ability to punch the
voltage that high and generally fall short at around 14.1V which does not meet this critical
voltage level to achieve a full charge.
FLOAT
The float stage is when the battery is considered full. In float, the amperage is significantly
reduced (generally to 1Amp or lower) and the battery voltage is held at approx 13.6V.
This is to counteract any self-discharge and to maintain the battery’s full state of charge
so that it is ready to go when you are.
Note: Many maintenance chargers have just 1 Amp charging capacity. This means that
they lack the power to charge a battery from flat but are ideal as a float charger, keeping
your battery fully charged so that it is ready to go when you are.
5
AUSTRALIAN DIRECT - BATTERIES & CHARGING GUIDE
BATTERY CHARGERS
In the old days we had the square box lying around the shed that was referred to as a
linear charger (due to the very linear way it charged a battery) and in fact many of us still
have them. These chargers never had the smarts to fully charge a battery and it was not
good to leave them connected for long periods of time. They pretty much just stay in bulk
boiling the battery dry. They do reduce the amperage as the battery increases in charge
but not reduce the all important voltage.
The other problem with linear chargers is that they rarely bring the voltage up to a high
enough level (14.4V for flooded batteries) for the charge to reach critical absorption. The
other down side to these chargers is that they never reduce the voltage once the battery
is coming up to charge. Instead they hold the voltage high at around 14.1V, which causes
gassing of the cells. That’s why it was always recommended to remove the caps whilst
charging. Functionally, these chargers are far from ideal and they are particularly bad at
charging deep cycle batteries. Far better to use a modern switch mode charger!
As demonstrated by the diagram, a “Switch Mode” charger will alter the charger’s output
to achieve critical voltages for bulk, absorption and float. A charger would normally state
that it is a “three stage charger” if it could achieve these 3 stages and in fact some
modern chargers can have up to 8 or 9 stages of charge where they constantly monitor
the state of the battery and adjust the charge curve to suit. These multi-stage chargers
will charge batteries much quicker and give a much deeper and fuller charge.
BULK
14.4V
14.4V
14.1V
14.1V
13.6V
13.6V
VOLTS
VOLTS
10.6V
10.6V
LINEAR
ABSORPTION
FLOAT
SWITCH MODE
You can see in the diagram that a linear charger simply increases the voltage to about
14.1V and then holds it there until you disconnect it. The switch mode on the other hand
ramps the voltage up to the critical absorption voltage of 14.4V, but as it gets there, it
slowly reduces the amperage. Once the battery is charged the switch mode charger then
reduces the voltage and the amperage to “Float“ levels which will maintain the battery
at full.
Some of the more sophisticated chargers will have additional charging steps that will:
•
Assess the condition and state of charge of the battery prior to charging.
•
Apply a pulse of voltage and amperage to the battery before charging begins. This
6
AUSTRALIAN DIRECT - BATTERIES & CHARGING GUIDE
effectively flexes the plates of the cells creating pathways through the sulphated
plate so as to receive the charge.
•
Stop charging altogether after the absorption stage to see how quickly the battery
voltage drops after a charge (this tests the condition of the battery).
•
Supply mode - the charger outputs a constant voltage.
•
Equalisation charge – pushes the voltage very high to ensure that each cell
receives a balanced charge.
•
Maintenance charge.
MAINTENANCE CHARGERS
Over time a battery will slowly discharge even with nothing connected to it. Therefore it
is the job of the maintenance charger to overcome this self discharge and maintain the
battery at full. Commonly these chargers are only 1 Amp or below so it makes sense that
they would take an extremely long time to charge a flat car battery. Where they come
into their own is charging batteries in things like motorbikes, jet skis, ride on mowers and
caravan or campers in storage - all items that do not typically get used on a regular basis.
HOW MUCH AMPERAGE DOES A CHARGER OUTPUT
That is a very good question and the correct answer would be that a charger puts in only
what is required or that it is capable of delivering. So a fully discharged battery will take
as much amperage as the charger is rated for. So a 5 Amp charger will push out the full
5 Amps in the bulk stage of charge. However, as the battery comes up to charge it will
receive less amperage from the charger.
BUYING THE RIGHT SIZE & TYPE OF CHARGER
When it comes to the correct size of charger use the old 10% rule of thumb. So if my
battery is 100AH I would use a 10 Amp charger as a minimum. To prevent overcharging
you should keep the charger size to within 80% of the total capacity (so no higher than
an 80 Amp on a 100AH battery).
If you ever need assistance with selecting the right charger for the job then
don’t be afraid to ask the team here at Australian Direct and we will guide
you through the process.
Now I did say it was a rule of thumb and you may want to also consider the following
points as they will help you determine the size and type of charger required:
•
The number of batteries being charged. Some chargers can charge multiple
batteries and can have up to three outputs. NOTE: Very few of these chargers,
charge each battery independently, they simply split the charge between all
connected batteries.
•
Size of any loads coming off the battery while charging – so if you have a fridge
and lights running in a caravan you need to overcome this load (in amperage)
7
AUSTRALIAN DIRECT - BATTERIES & CHARGING GUIDE
as well as amperage for recharging the battery. As an example, I have a 15 Amp
load coming off a ½ charged 90AH battery and I connect my 10 Amp charger. Its
pretty safe to say that the battery will not last long because the charger will not be
able to overcome the load and the charger will stay in bulk or absorption voltages
which will gas the battery.
•
The exact absorption and float voltage requirements of your battery – you need
to consider these carefully when purchasing a charger so as to maximise the
charge. Keep in mind that many chargers have dip switch selectors or mode button
settings to change the charge curve to reflect different types of battery. Always
check the user manual or with the manufacturer or with us here at Australian
Direct if in doubt.
•
Do I need a charger with a temperature sensor for the battery? If you are installing
your charger into a portable abode (caravan, RV, and camper etc.) and you intend
to be using power while charging either from mains or generator, then it is highly
recommended that you get a charger with a temp sensor. This will reduce the
amperage going to your battery if the battery gets hot from continuous charge.
•
IP RATING – which is an international standard meaning Ingress Protection. This
is very important when considering where your charger is installed. IP64 is NOT
waterproof. Only IP68 is waterproof. Some of the popular marine chargers are
only rated IP64 which basically means splash proof. Geckos are also a very big
problem for caravan and motorhome owners as the warmth created by charging
attracts these little beggars. So ensure any vents are well covered or meshed.
•
In the case of DC to DC Chargers, does the charger have a solar input and if so
do I need a solar regulator or is the regulator provided internally?
•
Does the charger need to be programmed to suit your battery? It is important to
note that many of the bigger chargers used in boats, caravans and motorhomes
need to be programmed to suit the batteries prior to install.
•
Does the charger have a supply mode? - This mode is particularly handy when
swapping batteries in modern vehicles as the supply mode will output a constant
voltage. Some vehicles MUST have constant power or it is back to the manufacturer
we go. The early model Honda Jazz springs to mind as the transmission needed
to be reprogrammed after a battery change (it would lose its programmed memory
in the transmission module). So the supply mode enables you to connect the
battery to the leads and then swap the battery out….albeit very carefully!
WE ARE HERE TO HELP!
TELEPHONE SUPPORT ANYTIME
07 3123 4715
8
AUSTRALIAN DIRECT - BATTERIES & CHARGING GUIDE
CHARGING MULTIPLE BATTERIES
As our love for electronics grows, so too does the electrical requirement in the modern
recreational system. In fact it is not uncommon now to have 3 or even 4 batteries in a
system and this can present some challenges in itself. In this chapter we take a look at
the various ways to connect batteries and the charging of multiple batteries.
DUAL BATTERY SYSTEMS
So you want to install a second battery? You have read a few magazines, talked to a
few mates, looked at some web sites and now, you are more confused than when you
started. Ok, so let’s go back to basics and then work forward. Basically you have a
battery in the vehicle and now you need to join a second battery either in the car or in a
camper, boat, caravan etc.
One of the most common misconceptions in dual battery charging is that the system
charges the start battery first and then the auxiliary or second battery. This is rarely the
case and in fact the overwhelming majority of systems will simply charge both batteries
once they are joined together.
It is important to note that batteries are selfish and if two are joined together the battery
with the least charge will try to rob power from the other until such time as they are equal.
So at some point it is important to isolate the start battery so that we can get home.
STARTER MOTOR
ALTERNATOR
In the picture above we have a basic vehicle charging system consisting of an alternator and a starter motor. The alternator charges the battery while the engine is running
and is regulated to charge at a set value (this can depend greatly on the make and
model but more on that later). Then we have a starter motor that uses power from the
battery to crank the engine for starting. So one drains power while the other replenishes.
The start battery is extremely important because if this goes flat then it is a long walk
home. So a second battery will extend the time we can have power away from charging
devices or mains power. When it comes to adding the second battery there are several
ways of doing this and each will have pro’s and con’s. Here I will look at the more popular
ways in a little more detail.
9
AUSTRALIAN DIRECT - BATTERIES & CHARGING GUIDE
The Very Basic
The simplest of systems is to add a cable from the start battery to the second battery
connecting the two positives together. Ground both negatives to the chassis. In this way
both batteries are connected together which will now increase the overall capacity of the
system.
Pro’s
Great for emergency starting or high load activities like winching. Increases the
overall amperage capacity of the batteries i.e. 2 x 70AH is now 140AH.
Con’s
Any charge taken from one will ultimately affect the other. So if you leave your
fridge running you will flatten both batteries, which is not ideal.
If one of the batteries is flat when you connect it, the charge will slowly balance
itself to the second battery so that they both become half charged.
Switched
By installing a switch between the two batteries we can isolate the second battery. This
style of system would most commonly be used in boats which often have either a dual or
multi point switch to control the different banks. When the switch is closed the alternator
will charge both batteries at the regulated voltage.
Pro’s
Very simple and cost effective. Ideal for very large banks of batteries or multiple banks of
batteries as you can route the charge where you need it the most.
Con’s
Due to the very manual nature of this system if you forget to disconnect the second
battery then any draw will also lower the charge in your primary battery. So you can run
both flat!
10
AUSTRALIAN DIRECT - BATTERIES & CHARGING GUIDE
Battery Isolator or Voltage Control Relay (VCR)
A battery isolator or Voltage Control Relay (VCR) is a relay that monitors the voltage
of the primary and secondary battery and opens and closes based on a set of preprogrammed values. These pre-set voltages help to connect and then isolate the second
battery as required. Here’s how they work:
•
With the vehicle turned off the relay is open and the batteries are disconnected.
This isolates the second battery from the first so that we don’t run down
the all-important start battery.
•
When the engine is cranked the battery voltage drops slightly from the power
used by the starter motor, the engine starts and the alternator recovers the lost
charge. At approximately 13.2V (or 26.4V in 24 Volt systems) and after about 15
seconds the VCR is pre-programmed to close thus connecting the two batteries
together and the alternator will now charge both batteries at the regulated voltage.
•
When the engine is turned off and the voltage of the start battery drops to around
12.8V (or 25.6V for 24V) for 15 seconds, then the relay will open which in turn
disconnects the second battery. This will prevent the start battery from running flat
if the fridge or lights are left on.
The VCR will only connect after 15 seconds. This function is built in to prevent the
relay chattering on and off if the voltage is right on the open/close voltage threshold.
A chattering VCR can be an indication of a faulty circuit board internally within the unit.
11
AUSTRALIAN DIRECT - BATTERIES & CHARGING GUIDE
MODERN CHARGING SYSTEMS
In all modern common rail diesels and some modern petrol engines, the vehicle
manufacturers are utilising some very advanced charging technologies to help reduce
engine loads and therefore emissions. The important thing to understand is that the
vehicle’s management system monitors the battery voltage and the load coming off the
start battery. The management system then changes the alternator’s charge output to
suit the situation. For example, if you are cruising along a highway with very little electrical
load and the battery is charged, the management system will reduce the alternator’s
output to quite low levels so as to reduce load on the engine and save fuel and emissions.
Some models can get as low as 12.3V.
So a problem occurs if we put a typical VCR relay in the vehicle to charge our second
battery. You see the management system on the vehicle has no way of measuring the
second battery. As far as it is concerned the second battery doesn’t exist. There will be
many occasions during the drive where the system will reduce the voltage to well below
the pre-set voltages in a VCR (remembering that many disconnect at 12.8V). So you
are cruising down the road with the fridge running off the second battery but because
there is no electrical load coming off the start battery, the alternator’s charge output is
reduced, the reduced charge voltage drops out the VCR relay and your second battery
stops charging.
We also have the addition of regenerative charging systems that utilise the electrical
energy generated on deceleration, stores this in the battery, and then re-uses this stored
energy on acceleration. The system does this by increasing the charging voltage on
deceleration (as high as 16V) and then reducing the voltage on acceleration (down as
low as 12.2V). As a result the alternator is pushed to maximum output on deceleration
and minimum output on acceleration. This unloads the alternator, which reduces load on
the engine, thus reducing emissions. Voltage can literally swing from 12.2V (or lower)
right up to 16V which can cause major havoc with accessories like solar regulators and
VCR relays. So as you can see, the modern vehicle is a complex beast and we need a
solution that reaches far beyond the capabilities of a simple VCR relay.
There are many tricks being employed to solve modern charging problems such as
resistors being placed on the start battery to trick the vehicle into thinking it has a
load. Some systems have very low input voltages (such as 12.4V) or an adjustable
input voltage. Each needs to be carefully considered when designing your system. For
example, if you have a DC to DC charger that cuts in at 12.4 Volts then the charger may
be working when the vehicle is not running, therefore lowering the charge in your start
battery.
To better work with these complex systems battery charger manufacturers have turned to
DC to DC chargers and while they are not perfect, they do go a long way to overcoming
the problems associated with modern charging systems.
DC TO DC CHARGERS
A DC to DC charger uses voltage from one battery to charge another and typically they
do not connect to 240V. Note that unlike a 240V charger, DC to DC chargers do not
create amperage, they simply pass it through. DC to DC chargers solve some of the
following charging dilemmas:
12
AUSTRALIAN DIRECT - BATTERIES & CHARGING GUIDE
Charging Different Battery Types
As we learned earlier there are many different battery styles (flooded, AGM, GEL etc)
and each type has its own quirks when it comes to charging. Flooded batteries, which are
the most common vehicle batteries typically charge at around 13.8V-14.4V in a vehicle.
However, if we put an AGM in as the second battery they like to charge at a much higher
voltage, so straight away, we have a problem. A quality DC to DC charger will step up
the voltage being sent to the second battery so that it receives the appropriate charge
voltage and it will apply a bulk, absorption and float charge. Something a Voltage Control
Relay (VCR) can never do!
Alternators Do Not Fully Charge Vehicle Batteries
Most of you will be shocked to know that your fully charged car battery is only about 75 80% charged. As we learnt earlier, a battery needs to go through several stages of charge
to achieve full saturation. A vehicle’s charging system is just not capable of providing the
right levels of charge (although some are getting close). Therefore an isolator or VCR
will also fall short. Most modern DC to DC chargers will provide the additional bulk,
absorption and float charging stages so that you get the full potential from your second
battery. After all, what would be the point of buying an expensive second battery if you
are only going to get access to 70 – 80% of its capacity?
Long Cable Runs
One big advantage DC to DC chargers have over a traditional VCR is that they step up
the voltage to better suit deep cycle batteries. This step up in voltage can also assist to
recover voltage drop in longer cable runs. This becomes a problem when the second
battery is in the boot or mounted in a caravan or camper trailer.
THREE BATTERY SYSTEMS
Why Connect The Third To The Start Battery?
If the second or auxiliary battery is low it may take some time to bring the voltage back
up to a point where the third battery will cut in (assuming you are using a VCR or DC to
DC charger for the third battery).
If you are pulling loads off the second battery while charging this could drop out the VCR
or DC to DC charging the third battery.
This type of scenario is extremely common when you have an established 4WD with
a dual battery system and then you purchase a camper or caravan which also has a
battery that needs to be charged. It is worth noting here that you can run from the second
battery but it’s preferable to run from the start battery.
To keep up to date with the very latest in products and
new releases vist and like us on Facebook at
www.facebook.com/australiandirect
13
AUSTRALIAN DIRECT - BATTERIES & CHARGING GUIDE
CONNECTING BATTERIES IN SERIES OR PARALLEL
There are two ways to connect batteries together. Which method you use will depend
largely on what you are trying to achieve. Let’s have a closer look:
Parallel – Voltage stays the same and amperage capacity Increases
12V
12V
100AH
12V
100AH
By joining the positive to the positive and the negative to the negative we increase
the capacity of the system. So the output of the above batteries now becomes 12V at
200AH. Always ensure that you use good heavy cables that are well secured and always
connect to the positive of one and the negative of the other when taking or charging. This
ensures you spread the load and charge accross both.
Series – Voltage increases but capacity remains the same
24V
12V
100AH
12V
100AH
To achieve 24 Volts we join two 12 Volt batteries in series which increases the voltage
but not the capacity. The batteries above would represent 24V 100AH.
You may or may not be aware that there is no such thing as a 24 Volt battery (not one you
can buy from a retailer anyway). We can join as many batteries in series as we like and
in fact this is very common in solar systems where large capacity 2 Volt batteries are all
joined in series to make up a 24 or 48 Volt system. In many large marine installations it is
not uncommon to see 48 Volt systems which are used to power large inverters.
HINT.
When charging batteries in series or parallel never connect the charger to just one
battery. Put the negative lead on the first battery in the series and the positive lead on
the last battery in the series (apply the same when taking power). This will provide you
with a far more balanced charge. Sometimes referred to as an equalisation charge.
14
AUSTRALIAN DIRECT - BATTERIES & CHARGING GUIDE
CHARGING FROM SOLAR
The efficient use of solar panels can extend your battery’s charge and therefore the
run time of fridges and other devices. You can also significantly reduce the amount of
time that generators need to run. In most recreational applications solar panels can be
extremely benificial when used in conjunction with other charging sources such as DC to
DC. Like all things a little bit of knowledge can go a very long way!
Solar panels convert energy from the sun known as photons into usable electrical energy.
This created energy is in DC (Direct Current) and normally comes out of a 12V panel
around 17-18V range. So the first thing that needs to happen is that the voltage has to
be regulated and reduced down to more acceptable levels for a battery. There are two
common types of solar panel regulators. They are Pulse Width Modulated (PWM) or
Maximum Power Point Tracking (MPPT).
NOTE: Some panels come with a solar controller or regulator built in and others don’t.
So you need to check this when purchasing panels.
PWM – Pulse Width Modulated
PWM is the cheapest way to convert the energy from a solar panel into usable DC
voltage, However it is not as efficient as MPPT. PWM regulators simply switch the voltage
from the panel ON and OFF to regulate the charge. So in many respects they are a pulse
charger.
MPPT – Maximum Power Point Tracking
These have far more sophisticated circuitry that actually tracks the voltage coming from
the panel and then matches this to the battery’s state of charge. A good MPPT solar
charger can be up to 30% more efficient than a PWM. They are also significantly dearer
than PWM.
Most of the PWM and MPPT chargers on the market do a bulk, absorption and float
charge but if you buy a PWM you should check that they have this functionality built into
them.
Solar Numbers
So I have just purchased my 120W 12V Kickass folding solar panel and I want to know
how much power it will put out. Well, to get the amperage we divide the Watts by the
Volts. Therefore 120W ÷ 12V = 10A but wait, that 10 Amps is only available when the sun
is directly over the panel and in clear skies.
The other thing we need to know is that you never get the full rated output of the panel.
Heat, dirt, and cloud can all contribute to loss. Even on a perfect day with full sun and
clean panels you generally lose about 20% to 25% of the panels capacity as a result of
heat loss and other factors.
15
AUSTRALIAN DIRECT - BATTERIES & CHARGING GUIDE
Most people don’t factor the angle or availability of the sun when designing their system
and this is especially common in caravans and RV’s where the panels are bolted flat to
the roof. You see these installs are only getting full power from the panels for a few hours
or two each day. For the rest of the day they get charge, but at a greatly reduced rate. So
this is why solar is great in combination with other charging solutions such as DC to DC.
Here at Australian Direct we have a comprehensive range of solar products
All sourced from leading companies globally
visit our web site at
www.australiandirect.com.au
16
AUSTRALIAN DIRECT - BATTERIES & CHARGING GUIDE
ELECTRICAL LOADS
Every electrical device you connect to a battery will draw power creating a load, and
this load is measured in amperes (or watts when measured over time). The amount of
amperage being drawn from your battery will dictate the speed that your battery loses
charge, so understanding load or amperage draw is extremely important. Especially if
you are trekking into remote places that will demand you manage your resources well.
The Water Theory
An easy way to understand electricity and loads is to think of it like water. The battery
would be represented by a bucket of water (small bucket 12 Volts, big bucket 24 Volts
- as the bigger bucket has a higher potentional of flow). The thickness of a hose will
determine the amount of water we can flow from the bucket (just like electrical cable)
and each accessory is like a tap on the end of a hose. We turn it on and water flows
depending on the size of the hose (and tap) and we consume our water.
In our water scenario Amperage would be the amount of water flowing down the hose.
So the more we let flow, the faster the bucket will empty. Wattage by the way would be
the amount of water we used over time.
If I have a 100 Litre Battery (100AH) and I use 1 Litre per hour (1 Amp) then I will have
100 hours of water usage....See it’e easy!!
NOTE: THIS IS A SCENARIO ONLY. PLEASE DO NOT TREAT THIS LITTERALY
AND START PUTTING CABLES INTO BUCKETS OF WATER AS THIS CAN BE VERY
DANGEROUS AND MAY CAUSE PERSONAL INJURY!!
Peak Usage, Total Usage and Constant Draw
When designing a power system you need to understand the amperage draw from all
the items connected to the battery AND the maximum or peak load (what happens when
I turn everything on at once). We also need to know how long the various loads will run
for and at what times. Lets look at a few examples of common items and then take a look
at how they will interact with our power system.
Fridges
Your average small fridge will draw anywhere from 2A – 10A depending on the make and
size. The tricky part with fridges is the number of times they will cycle (turn on and off) in
a 24 hour period. This can vary greatly, especially if a few mates drop by the camp site
and are in and out of the fridge getting refreshments! The other factor is how cold you run
the fridge. So when you are designing a system go a little heavy on the draw so that you
have enough left in the battery system, just in case you want to turn the fridge to freeze
or in case you get some thirsty visitors.
To help take the guesswork out of it, just say that the fridge (in fridge mode) will be on
40% of the time in a 24 hour period which will give you 9.5 hours of run time (rough
figures). This 40% should translate pretty well to what actually happens on a trip.
17
AUSTRALIAN DIRECT - BATTERIES & CHARGING GUIDE
Now the other tricky part of a fridge is the draw required to start up will be much higher
than it will be to keep it running. Your typical box style fridge will draw about 9-10A to start
up and then consume about 2 - 5 Amps while running. So to factor for this, build in an few
extra amps. You may also want to consider the location of your trip as hotter climates will
dictate longer run times, so don’t forget to factor this into your planning.
Example - my 12V fridge runs at 3 Amps so I will make the average 6 Amps. With a
40% on/off cycle that will be 9.6 hours of run time in 24 hours at 6 Amps = 57.6 AH (Amp
Hours).
As you can see it doesn’t take long to work out that we need a fair amount of battery
capacity to run a fridge all day and all night. Then when we start adding lights and other
accessories into the equation you can be surprised just how much power you are using.
So knowing the numbers (especially amperage draw) can be very valuable information.
Here at Australian Direct we have a great range of fridges at amazing prices. All fully
backed by our great service and support. Visit our website at:
WWW.AUSTRALIANDIRECT.COM.AU
3 Way Fridges
A 3 way fridge will run between 9A and 26 Amps depending on the make and model, so
they are not very practical for running off batteries. Unless you want to tow a box trailer
full of batteries that is! If you are determined to do this then you may want to look at some
serious batteries such as Lifelines but you will need a very specific charger for these.
18
AUSTRALIAN DIRECT - BATTERIES & CHARGING GUIDE
Inverters
Probably one of the most battery hungry devices you can run from a battery is an inverter.
In short you basically have a step up transformer that converts the power from 12V, 24V
or 48V to 240V. By far the most common mistake made with inverters is under sizing for
the load.
TIP.
If you buy a 700W microwave that is rarely the upper limit of what they will actually draw.
When the microwave starts it will pull closer to 1500 -1800 Watts. So always go on the
heavier side for inverters.
When calculating the loads of inverters use a multiplier of 1.2 in the following formula
Wattage x 1.2
Voltage
So our 700W would look like
700W x 1.2
12
= 70 Amps
As you can see a small inverter can pull some serious loads off a battery. This makes
cable sizing, fusing or circuit protection all the more critical and a suitably sized fuse or
circuit breaker should be installed in the positive battery cable going to the inverter. The
closer to the battery the better!
When it comes time to design your system, sit down and make a list of all the things that
will draw power and the amount of amperage they draw. If it is not written on the packaging
(or the product) there are some great websites out there that list the typical values. By
analysing these figures you will be able to determine the total load, any constant loads
and any peak demand periods that you may need to factor. These load figures will also
give you a much better understanding of how big your battery needs to be and the type
and size of charging system you need to use.
MEASURING AMPERAGE
If you are regularly using batteries to power your recreational pursuits then it is highly
recommended that you do one or all of the following:
•
Buy yourself a tonged multimeter, or clampmeter, as they are often referred to,
capable of reading amperage. They simply clip over the wires and tell you the amount
of amperage passing through them. You can buy these from most electrical retailers.
•
Buy and install a volt and amp meter. There are lots of these on the market and they
are very simple to install. I often use inductive pick up style amp meters as they are
very safe and easy to install. You simply disconnect the positive battery lead and pass
the wire through the hole in the pick-up. Note that the pick-up will usually have an
arrow on the side that tells you the direction that it is reading. So if you want it to read
what is coming out of the battery point the arrow away from the battery. Alternatively
point the arrow toward the battery and you can see what is coming in. Easy!
Some Volt/Amp meters use what is called a “shunt” to measure the current draw. A shunt
is simply a device that is placed in-line (normally in the negative battery lead) and it
measures the flow of electrons through the circuit. You connect the negative battery lead
to one side and then ANY earths that you want to measure on the other. So the shunt
becomes part of the earth circuit. Make sure your shunt has the amperage capability to
19
AUSTRALIAN DIRECT - BATTERIES & CHARGING GUIDE
handle the current you are putting through it. Note that most shunts are around the 500
Amp rating...but it pays to check.
Over time you will quickly learn the importance of reading voltage and amperage. Here
is a quick example of how we can use our voltage and amperage information.
12.6V
12.0V
8.0A
8.0A
The meter on the left tells us that our battery is still pretty full and that we have 8 Amps
of load coming off it. If I was to see this, I would guess a fridge is running and some
accessories like camera and phone chargers. The meter on the right however, tells me
that the battery is getting quite low and that it is time to either turn things off or find a
charging solution such as a generator or mains power. Most manufacturers will state that
their battery is considered flat at 11.8V or 12V, but more on this later.
There are some fantastic meters on the market that will even tell you how much time
you have left at your rate of consumption. In fact some of these can even measure up to
two batteries. Again I always try to reference voltage and amperage as these are the two
figures that give a more complete picture.
Want to learn More
This information was an extract from
RECREATIONAL POWER GUIDE
BATTERIES & CHARGING (Second Edition)
Now Available From Australian Direct at
www.australiandirect.com.au/recpower
20