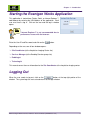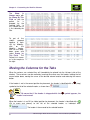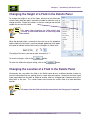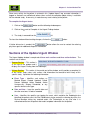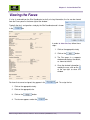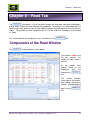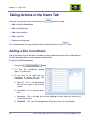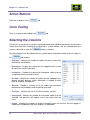
1
BRIT Roentgen Works Flow Site Coordinator June 2009 Release 1.0 UM-BRW-001.0/S Notices, Copyrights, and Revision Records Notices and Copyrights Notice This document is subject to change without notice and does not represent a commitment by BRIT Systems, Inc. The information set forth in this document and all rights in and inventions disclosed herein and the patents that might be granted thereon disclosing or employing the materials, methods, techniques, or apparatus described herein are the exclusive property of BRIT Systems, Inc. Copyright Copyright 2009, BRIT Systems, Inc. All rights reserved. Printed in the United States of America Trademarks BRIT (Beyond Roentgen Imaging Technology), BRIT Systems, Inc., BRIT Viewer, and the Pincher-Man logo/icon are trademarks of BRIT Systems, Inc. Microsoft and MS-Windows are registered trademarks of Microsoft Corporation. All other product names or trademarks mentioned herein are the property of their respective owners BRIT Roentgen Works Flow User Manual – Site Coordinator (UM-BRW-001.0-S) ii Notices, Copyrights, and Revision Records Revision Records Revision Record for User Manual for BRIT Lite Revision Number Date Section/Pages Affected Reason for Change Author Release Number 1 June 2009 All Initial T. Harris 1.0 Copyright 2009 BRIT Systems, Inc. Printed in U.S.A. All rights reserved Technical Publications Department BRIT Systems, Inc. 1909 Hi Line Drive Dallas, Tx 75207 BRIT Roentgen Works Flow User Manual – Site Coordinator (UM-BRW-001.0-S) iii Notices, Copyrights, and Revision Records BRIT Roentgen Works Flow User Manual – Site Coordinator (UM-BRW-001.0-S) iv Table of Contents Table of Contents CHAPTER 1 – INTRODUCTION ........................................................................................................................ 1 W ORKFLOW ...................................................................................................................................................... 2 QUICK START .................................................................................................................................................... 4 STARTING THE ROENTGEN WORKS APPLICATION ................................................................................................ 5 LOGGING OUT ................................................................................................................................................... 5 COMPONENTS OF THE ROENTGEN W ORKS W INDOW ........................................................................................... 6 User Logged In............................................................................................................................................ 7 Tabs............................................................................................................................................................. 7 Patient List................................................................................................................................................... 8 Customizing the Setup and Detail............................................................................................................... 8 Action and User Buttons.............................................................................................................................. 9 Color Coding ............................................................................................................................................. 13 Details........................................................................................................................................................ 14 Faxes......................................................................................................................................................... 15 EDITING THE USER PROFILE............................................................................................................................. 15 INFORMATION IN THE “ABOUT” W INDOW ............................................................................................................ 16 CHAPTER 2 – CUSTOMIZING THE WORKLIST COLUMNS......................................................................... 19 OPENING AND CLOSING THE SETUP .................................................................................................................. 19 SETTING UP THE COLUMNS .............................................................................................................................. 20 Selecting the Columns for the Tabs .......................................................................................................... 20 Resizing the Columns for the Tabs ........................................................................................................... 20 Manually Changing the Width of the Columns....................................................................................................... 20 Changing the Width of the Columns in the Setup panel ........................................................................................ 21 Sorting and Grouping the Columns........................................................................................................... 21 Moving the Columns for the Tabs ............................................................................................................. 22 Available Columns..................................................................................................................................... 23 Saving the Columns .................................................................................................................................. 28 CHAPTER 3 – CUSTOMIZING THE DETAILS PANEL................................................................................... 29 OPENING AND CLOSING THE SETUP .................................................................................................................. 29 SETTING UP THE DETAILS PANEL ...................................................................................................................... 30 Available Detail Selections ........................................................................................................................ 30 Changing the Width, Height, or Placement ............................................................................................... 36 Changing the Width of a Field in the Details Panel ............................................................................................... 36 Changing the Height of a Field in the Details Panel .............................................................................................. 37 Changing the Location of a Field in the Details Panel ........................................................................................... 37 Saving the Changes to the Details ............................................................................................................ 39 CHAPTER 4 – ACTIONS NEEDED TAB ......................................................................................................... 41 COMPONENTS OF THE ACTION NEEDED W INDOW .............................................................................................. 41 Action Buttons ........................................................................................................................................... 42 Color Coding ............................................................................................................................................. 43 Selecting the Columns .............................................................................................................................. 43 Detail Information Panel ............................................................................................................................ 44 TAKING ACTIONS IN THE “ACTION NEEDED” ITEMS ............................................................................................. 45 Releasing the Patient On-Hold.................................................................................................................. 45 Updating the Urgent Status ....................................................................................................................... 46 BRIT Roentgen Works Flow User Manual – Site Coordinator (UM-BRW-001.0-S) v Table of Contents Adding Notes or Completing the Urgent Finding ................................................................................................... 46 Sections of the Update Urgent Window................................................................................................................. 47 Buttons on the Update Urgent Window ................................................................................................................. 48 Notifications Using BRIT Phone ............................................................................................................................ 49 Calling the Referring Physician ................................................................................................................. 49 Editing the Order Information .................................................................................................................... 51 Viewing the Study History ......................................................................................................................... 52 VIEWING THE FAXES ........................................................................................................................................ 53 CHAPTER 5 – INCOMPLETE ORDERS TAB ................................................................................................ 55 COMPONENTS OF THE INCOMPLETE ORDERS W INDOW ...................................................................................... 55 Action Buttons ........................................................................................................................................... 56 Color Coding ............................................................................................................................................. 56 Selecting the Columns .............................................................................................................................. 57 Order Information ...................................................................................................................................... 58 TAKING ACTION IN THE “INCOMPLETE ORDERS” W INDOW................................................................................... 59 Dismissing the Study................................................................................................................................. 59 Marking the Study as a Comparison Study............................................................................................... 60 Viewing the Study History ......................................................................................................................... 60 Marking the Order as “Complete”.............................................................................................................. 61 Adding a Physician.................................................................................................................................... 62 Adding a New Location ............................................................................................................................. 64 VIEWING THE FAXES ........................................................................................................................................ 65 CHAPTER 6 – WORK QUEUED TAB............................................................................................................. 67 COMPONENTS OF THE W ORK QUEUED W INDOW ............................................................................................... 67 Action Buttons ........................................................................................................................................... 68 Color Coding ............................................................................................................................................. 68 Selecting the Columns .............................................................................................................................. 69 Detail Information ...................................................................................................................................... 70 TAKING ACTION IN THE “W ORK QUEUED” W INDOW ............................................................................................ 71 Putting the Study “On-Hold” ...................................................................................................................... 71 Editing the Order Information .................................................................................................................... 72 Viewing the Study History ......................................................................................................................... 73 VIEWING THE FAXES ........................................................................................................................................ 74 CHAPTER 7 – DELIVERED TAB..................................................................................................................... 75 COMPONENTS OF THE DELIVERED W INDOW ...................................................................................................... 75 Action Buttons ........................................................................................................................................... 76 Color Coding ............................................................................................................................................. 77 Selecting Columns .................................................................................................................................... 77 Detail Information ...................................................................................................................................... 78 TAKING ACTIONS IN THE “DELIVERED” TAB ........................................................................................................ 79 Putting the Study “On-Hold” ...................................................................................................................... 79 Calling the Referring Physician ................................................................................................................. 80 Notifications Using BRIT Phone ............................................................................................................................ 81 Editing the Order Information .................................................................................................................... 82 Viewing the Urgent History........................................................................................................................ 83 Viewing the Study History ......................................................................................................................... 83 VIEWING THE FAXES ........................................................................................................................................ 84 CHAPTER 8 – READ TAB ............................................................................................................................... 85 COMPONENTS OF THE READ W INDOW .............................................................................................................. 85 Action Buttons ........................................................................................................................................... 86 Color Coding ............................................................................................................................................. 86 BRIT Roentgen Works Flow User Manual – Site Coordinator (UM-BRW-001.0-S) vi Notices, Copyrights, and Revision Records Selecting the Columns .............................................................................................................................. 87 Detail Information ...................................................................................................................................... 88 TAKING ACTIONS IN THE “READ” TAB ................................................................................................................ 89 Calling the Referring Physician ................................................................................................................. 89 Notifications Using BRIT Phone ............................................................................................................................ 90 Viewing the Urgent History........................................................................................................................ 91 Viewing the Study History ......................................................................................................................... 91 VIEWING THE FAXES ........................................................................................................................................ 92 CHAPTER 9 – MESSAGES TAB ..................................................................................................................... 93 COMPONENTS OF THE MESSAGES W INDOW ...................................................................................................... 93 Action Buttons ........................................................................................................................................... 94 Color Coding ............................................................................................................................................. 94 Selecting the Columns .............................................................................................................................. 94 Detail Information ...................................................................................................................................... 95 TAKING ACTIONS IN THE MESSAGES TAB .......................................................................................................... 96 Sending a Message................................................................................................................................... 96 Replying to a Message.............................................................................................................................. 97 Acknowledging a Message........................................................................................................................ 98 Deleting a Message................................................................................................................................... 98 CHAPTER 10 – MODALITIES TAB ................................................................................................................. 99 COMPONENTS OF THE MODALITIES W INDOW ..................................................................................................... 99 Action Buttons ......................................................................................................................................... 100 Color Coding ........................................................................................................................................... 100 Selecting Columns .................................................................................................................................. 100 Detail Information .................................................................................................................................... 101 TAKING ACTIONS IN THE MODALITIES TAB ....................................................................................................... 101 Adding a New Modality............................................................................................................................ 102 Editing an Existing Modality .................................................................................................................... 103 Deleting an Existing Modality .................................................................................................................. 104 CHAPTER 11 – USERS TAB ......................................................................................................................... 105 COMPONENTS OF THE USERS W INDOW .......................................................................................................... 105 Action Buttons ......................................................................................................................................... 106 Color Coding ........................................................................................................................................... 106 Selecting the Columns ............................................................................................................................ 106 Detail Information .................................................................................................................................... 107 TAKING ACTIONS IN THE USERS TAB............................................................................................................... 108 Adding a Site Coordinator ....................................................................................................................... 108 Adding a Physician.................................................................................................................................. 109 Adding a New Location ........................................................................................................................... 111 Editing an Existing User .......................................................................................................................... 111 Deleting an Existing User ........................................................................................................................ 113 CHAPTER 12 – SEARCH TAB ...................................................................................................................... 115 COMPONENTS OF THE SEARCH W INDOW ........................................................................................................ 115 Action Buttons ......................................................................................................................................... 116 Color Coding ........................................................................................................................................... 117 Selecting the Columns ............................................................................................................................ 117 Detail Information .................................................................................................................................... 118 TAKING ACTIONS IN THE SEARCH TAB............................................................................................................. 119 Searching for a Patient............................................................................................................................ 120 Downloading the Selected Study ............................................................................................................ 121 BRIT Roentgen Works Flow User Manual – Site Coordinator (UM-BRW-001.0-S) vii Table of Contents Viewing the Study History ....................................................................................................................... 121 VIEWING THE FAXES ...................................................................................................................................... 122 CHAPTER 13 – STATISTICS TAB ................................................................................................................ 125 COMPONENTS OF THE STATISTICS W INDOW.................................................................................................... 125 Action Buttons ......................................................................................................................................... 126 Color Coding ........................................................................................................................................... 126 Selecting the Columns ............................................................................................................................ 126 Detail Information .................................................................................................................................... 127 TAKING ACTIONS IN THE STATISTICS TAB ........................................................................................................ 128 CHAPTER 14 – VIEWING THE FAXES ......................................................................................................... 129 SENDING PAPER-BASED INFORMATION ........................................................................................................... 129 ASSIGNED FAXES .......................................................................................................................................... 129 TO ASSIGN UNASSIGNED FAXES..................................................................................................................... 129 VIEWING THE FAXES ...................................................................................................................................... 130 BRIT Roentgen Works Flow User Manual – Site Coordinator (UM-BRW-001.0-S) viii Chapter 1 – Introduction Chapter 1 – Introduction The BRIT Roentgen Works Flow application is a service for Radiologist to provide remote reading services for multiple healthcare facilities. It is designed to allow independent reading groups to compete with the largest groups for reading contracts and provides superior tools for the specific needs of the unique environment. Roentgen Works Flow includes an additional layer of functionality to efficiently support, report, and track the preliminary and final diagnosis in the reading environment. It also allows the Radiologist to quickly identify critical studies or those with urgent finding and communicate efficiently with the referring physician using the latest Web technologies and webbased calling tools for communications. Roentgen Works Flow provides a variety of improvements over the current methods of working with a typical client site. These improvements include: Efficient support for multiple remote customers Powerful application to accommodate duplicate studies and patient ID Application that can handle multiple HL-7 links for returns of reports Reduce, or even eliminate client order entry Easy access to comparisons studies Efficient load balancing and distribution based on rules Eliminate staff handing distribution of studies or order information Provide easy to find and use contact information for referring physicians Provide electronic methods of tracking for on-hold and urgent findings Eliminates staff for transcription and report distribution Provides statistics for management and billing purposes System that handles security issues for multiple sites Roentgen Works Flow also provides the Radiologist with some workflow tools to efficiently take the following actions: Easily open the study when integrated with BRIT Vision by double-clicking on the study in the Delivered list Put studies “on-hold” Mark studies as “urgent” Locate the contact number and use Skype or BRIT Phone to place the call Communicate with the Site Coordinator when “incomplete” studies are received and additional information is needed. Easily customize the information they specifically need on each of the windows. “View the Study History” provides an audit trail of details and timing of each event regarding the study BRIT Roentgen Works Flow User Manual – Site Coordinator (UM-BRW-001.0-S) 1 Chapter 1 – Introduction Workflow This identifies the workflow between the Roentgen Works Flow system and the Radiologist for the Site Coordinator’s information. There are occasions when the Site Coordinator gets involved with the Radiologist’s workflow for items such as helping resolve issues with studies placed “On-Hold”, ensuring the referring physician is contacted for studies tagged as “Urgent”, or replying to messages from the various users. This section is intended to provide the Site Coordinator with an overview of the Radiologist’s workflow. The workflow of the Roentgen Works Flow product is as follows: 2 BRIT Roentgen Works Flow User Manual – Site Coordinator (UM-BRW-001.0-S) Chapter 1 – Introduction For the workflow: 1. The modality sends the images to the BRIT Server. 2. The BRIT system compresses the images, regenerates the Order from the DICOM Meta data, and sends it via DICOM store over the Internet or VPN to the Reading Group. 3. If the Order is incomplete, the study is placed in the tab for the Site Coordinator. 4. The Site Coordinator verifies that they want the Radiologists to read the study, and completes the Order, and it is again sent over the Internet or the VPN to the Reading Group and is placed in the tab. 5. The Order information is sent via HL-7 to the Dictation server, if the integration is done between the Roentgen Works server and the Dictation server. 6. The Radiologist logs into the system and selects to begin accepting studies. 7. The system automatically load balances the studies and assigns the study to the Radiologist based on rules and Radiologist licensing permissions, or the Service Manager may assign the study if necessary. tab. 8. The study appears in the 9. The Radiologist can double-click on the study to open the images on the workstation if the API integration is available between Roentgen Works and the viewing workstation. (If BRIT Vision is available, the API is inherent in the application.) The Radiologist looks at the images in the study and either dictates the report, puts the study on hold because additional information is required, or flags the study as urgent and contacts the referring physician. a. Tag a study with “Urgent” findings in order to quickly contact the referring physician i. ii. iii. iv. The study is moved to the tab to await completion. BRIT Phone calls the referring physician to alert them to the “urgent” information. The study “Update Urgent” finding is acknowledged by the referring physician. The Site Coordinator marks updates the urgent finding to “complete”, and the study is returned to the tab if the Radiologist has not marked the study as “Read”, or it can be returned to the tab if study is marked as “Read”. b. Put the study “On-Hold” due to missing information regarding the study or the patient. i. The study is moved to the tab to await completion. ii. The Site Coordinator fills in the required fields and completes the study. iii. The study is released from hold. iv. The study is returned to the tab for the Radiologist to complete the report. 10. The Study is marked as “Read”. 11. The report is dictated by the Radiologist. 12. The Radiologist signs the report, and the report is stored on the server. 13. The study is moved to the tab. 14. The referring physicians can request an addendum from the Radiologist. a. The addendum is added by the radiologist and the report is updated. b. The report addendum is signed. 15. The system adds any urgent findings to the report, if applicable. 16. The report is distributed via e-mail, fax, or HL-7 services. BRIT Roentgen Works Flow User Manual – Site Coordinator (UM-BRW-001.0-S) 3 Chapter 1 – Introduction Quick Start This section provides a roadmap or quick start path for starting the application and following the different steps that the Site Coordinator would go through from logging in assigning studies that were not automatically assigned, or were returned, or responding to Actions Needed, or Messages.. Log in, handle actions that are needed, handle unassigned studies, and check on and reply to messages, handle users or modalities, view statistics. These first steps allows the user login, check on the Actions needed, and assist in obtaining missing data for studies “On-Hold”. Select the icon and log in Select to handle issues If the study is “On-Hold” get the missing data to enter The next three steps determine what is needed for “incomplete” studies and assist in resolving the issue. Complete the missing data Select the to enter missing data If the study is “Incomplete” find out what is missing The last three steps include replying to or sending messages, handling addition, editing, or deleting users or modalities as necessary, and viewing statistics. Reply to or Send any messages 4 Add, edit, or delete any Users or Modalities as necessary View Statistics for overall system performance BRIT Roentgen Works Flow User Manual – Site Coordinator (UM-BRW-001.0-S) Chapter 1 – Introduction Starting the Roentgen Works Application This application is started from Firefox, Safari, or Internet Explorer 7, web browser by entering the URL/Address of the application. Each user must have a log in. Click on the icon and the log in window opens. Note: Note: Internet Explorer 7 is not recommended due to performance issues with the browser. Enter the User ID and Password, and click on the button. Depending on the user, one of four windows opens: Site Coordinator (at the Hospital or Imaging Center site) Services Manager (at the Reading Services group site) Radiologist Technologist This manual covers the user information for the Site Coordinator at the hospital or imaging center. Logging Out When the user needs to log out, click on the button at the top right portion of the window. The system logs the user out and returns to the login window. BRIT Roentgen Works Flow User Manual – Site Coordinator (UM-BRW-001.0-S) 5 Chapter 1 – Introduction Components of the Roentgen Works Window When the user has logged in, and the application opens, the following window opens: User Logged In User Buttons Tabs Patient List Setup Detail Action Buttons Fax Section Study Details There are several components to this window, which include: User Logged In – Identifies the current user logged into the system. User Buttons – Contains the buttons for the User to logout, change their profile, or to get systems information. Tabs – Identifies the various worklists available. These include: Action Needed Incomplete Orders Work Queued Delivered Read Messages Modalities Users Search Statistics Patient List – Displays the list of patients for each site, and includes routine and critical studies. The Patient List contains the information from the fields selected from the Setup Detail section. Setup – Allows the user to customize the fields in the patient list as well as the Details panel at the bottom of the window. 6 BRIT Roentgen Works Flow User Manual – Site Coordinator (UM-BRW-001.0-S) Chapter 1 – Introduction Action Buttons – Contains a selection of toolbar buttons which allow the user to perform specific additional functions on the study. These are different for each individual tab. Details – Provides the details for the selected study, and can be customized according to the individual user. Some of the details that can be included are: Reason for Hold Reason for Study History Radiologist Tech Comment Fax Section – Allows the user to assign and view faxes that have been sent with the Order information. Note: Note: On each of the tabs there are a variety of buttons and are covered in the section specific to the tab. The components of each of the tabs are similar and are covered specifically for each tab. User Logged In This identifies the user that is currently logged into the system, and displays in the upper right side of the window, as: Tabs Each section for the tabs is covered in the following chapters. These tabs all have very similar screen setups, but have different purposes. They include: Action Needed Incomplete Orders Work Queued Delivered Read Messages Modalities Users Search Statistics Each of these tabs is explained in their own individual chapter. The number in red next to each tab indicates the number of studies contained in the tab. BRIT Roentgen Works Flow User Manual – Site Coordinator (UM-BRW-001.0-S) 7 Chapter 1 – Introduction Patient List The Patient List section provides a list of studies with varying detail, depending on which tab is selected and how the user has customized the Setup. For example in the Delivered tab, the following information is provided for the patients: Action Site Patient Name Patient ID Acc# Description Customizing the Setup and Detail The Setup panel allows the user to customize the columns that are shown in each tab’s patient list and the Details below according to their own personal preferences. If the Setup panel is not shown when the user logs in, there is a button at the far right side of the patient study section that allows the user to open the Setup panel. Once this button is selected, the Setup panel opens to the right of the Patient List, as shown above: Once the Setup panel is open, the changes to a , which allows the user to close the Setup panel and maximize the Patient List. 8 BRIT Roentgen Works Flow User Manual – Site Coordinator (UM-BRW-001.0-S) Chapter 1 – Introduction Action and User Buttons There are a series of Toolbar action buttons under Patient List that allow additional functions to be performed on the selected study. This provides a complete list of those buttons, their purpose, and the tab where the buttons are found. The buttons include: – This is a User button that is found at the top right area in the User Status section and displays the version number, and release date of the Roentgen Works Flow application. – This Action button is found in the tab. It allows the Site Coordinator to send a notification that the message has been received and read. – This Action button is found in the tab, tab, tabs, and it is used to and display a list of contact information for the referring physician identified on the study. Optionally, the Site Coordinator can use Skype to contact the referring physician by automatically dialing through the workstation. Skype is a software package that enables the user to make telephone calls anywhere in the world automatically by connecting through the computer to landline or mobile phones. When this button is selected a pop-up window opens to allow the Site Coordinator to select the referring physician who needs to be contacted regarding this patient. Double-click on the contact’s phone number in the list and Skype automatically places the call. – This button is found in the section, and allows the Site Coordinator to mark the order as Complete to be returned to the Radiologist. the – This button is found in the Setup section and allows the Site Coordinator to set selected setting to be the default settings in all the tabs except the tab. BRIT Roentgen Works Flow User Manual – Site Coordinator (UM-BRW-001.0-S) 9 Chapter 1 – Introduction – This Action button is found in the Coordinator to remove the selected message from the screen. – This Action button is button is found in the Coordinator uses this to remove an existing modality permanently. – This Action button is found in the tab. It allows the Service Manager or Site Coordinator to permanently remove a user from accessing the system. – This Action button is found in the Site Coordinator to delete the order. – This Action button is found in the tab. Once the Site Coordinator has found the study for the patient, this button allows them to download the selected study to the viewer. tab. It allows the Site tab. The Site tab. It allows the Note: Note: This is not the normal way to receive studies and is typically used only when the user has very slow download speed from their ISP. – This Action button is found in the this to modify information for an existing modality. – This Action button is tab. The Site Coordinator uses found in the tab, tab, and the tab. It allows the Site Coordinator to modify the patient’s order because of missing information the Radiologist needs to complete the study’s report. The Order information can be changed until it is marked as “Read”. – This is a User button that is found at the top right area in the User Status and it brings up the User’s Profile to allow the user to make changes to their personal information including: 10 User Name Password DICOM AE Title DICOM Host DICOM Port Mobile Phone Number – This Action button is found in the make changes to the user’s profile. Office Phone Number Home Phone Number Pager Number Fax Number E-mail Address Site Information tab. It allows the Site Coordinator to BRIT Roentgen Works Flow User Manual – Site Coordinator (UM-BRW-001.0-S) Chapter 1 – Introduction – This Action button is found on the tab. It allows the user to search for a patient by all dates from the initial date the system was installed. – This User button is on the first screen that opens, which is the Login screen, and allows the user to enter into the application, based on their permissions. – This is a User button that is found at the top right area in the User Status area, and is used to allow the Site Coordinator to log out of the system. – This Action button is found on the tab. It allows the Site Coordinator to select a study and mark it as a comparison study to send to the Radiologist to view and evaluate against the current study. – This Action button is found in the tab and the tab. It allows the Site Coordinator to define a new location at the hospital facility which the Reading Services Group may use for contact information. Typically this is the ER. – This Action button is found in the Site Coordinator to define new modalities. tab. This button allows the – This Action button is found in the tab and the tab. It allows the Site Coordinator to define new referring physician at one of the imaging centers or hospital facilities. – This Action button is found in the tab. It allows the Site Coordinator to define new Site Coordinator for a hospital or imaging facility. – This Action button is found in the tabs. tab and It allows the Site Coordinator to place the study in the tab because of additional information that is needed for the Radiologist to complete the report. It can be seen by the Site Coordinator as well. – This Action button is found in the Coordinator to remove the study from the tab. It allows the Site queue, and place it back in the area to be read and completed. BRIT Roentgen Works Flow User Manual – Site Coordinator (UM-BRW-001.0-S) 11 Chapter 1 – Introduction – This Action button is found in the Coordinator to respond to the currently selected message. – This button is found in the Setup panel. It allows the Site Coordinator to save the changes that were made to any of their contact information, such as Mobile Phone number, Pager number, viewer type, or password. – This Action button is found in the tab. It allows the Site Coordinator to send a message regarding the currently selected message. – This Action button is found tab, the in tab. It allows the Site the tab, the tab, the tab, the tab, and the tab. It allows the user to see the detailed history of the study, such as when it was created, completed, to whom it was assigned, when it was sent, when it was delivered, when it was read, each time the status was reset, and each status setting. – This Action button is found in the Faxes section and allows the user to remove the fax from assignment to the specific study. – This Action button is found in the update the status on the Urgent study. - This Action button is found in the tab, and the tab. It allows the Site Coordinator to view the comments and statuses of a study that has been identified as urgent. – This button is found in Faxes section, and allows the Site Coordinator to pull up the fax that is associated with the study in order to view it. – This button is found in the the search for the patient for the past one day. – This button is found in the tab. It allows the Site Coordinator to perform the search for the patient for the past one month. – This button is found in the the search for the patient for the past one week. 12 tab and allows the user to tab. It allows the Site Coordinator to perform tab. It allows the Site Coordinator to perform BRIT Roentgen Works Flow User Manual – Site Coordinator (UM-BRW-001.0-S) Chapter 1 – Introduction – This button is found in the the search for the patient for the past one year. tab. It allows the Site Coordinator to perform – This button is found in the the search for the patient for the past two weeks. tab. It allows the Site Coordinator to perform – This button is found in the the search for the patient for the past three days. tab. It allows the Site Coordinator to perform – This button is found in the tab. It allows the Site Coordinator to perform the search for the patient for the past three months. Color Coding The studies are color coded as follows: – Indicates that there is a critical study the Radiologist need to read immediately or an urgent finding or in which the referring physician needs to be notified immediately. “Urgent” findings are identified in pink in the Studies are identified in pink in the tab; whereas “Critical” tab. – Indicates that the study is designated as a Routine study. – Indicates that the study has been placed “On-Hold” due to insufficient or incomplete information, that the Radiologist has flagged, and needs to be addressed before the diagnosis can be done. – Indicates that this is the currently selected study. If there is an interface to a Radiologist viewing workstation, such as BRIT Vision, double-clicking on one of these selected patients, automatically downloads the study to the workstation BRIT Roentgen Works Flow User Manual – Site Coordinator (UM-BRW-001.0-S) 13 Chapter 1 – Introduction Details The Details panel can also be customized from the selections on the Setup panel to the right of the patient list, according to user preferences. The information is shown in this panel when the user clicks on a specific patient’s study in the Patient List above, and the additional detailed information regarding the study is shown. This Details panel can be customized. Below is a sample of a customized Details panel which provides the following information: Final Read Yes or No – Determines if this should be the final read for the study or not. Reason for Study – Identifies why the Referring Physician ordered the study for the patient. History – Shows a brief patient history. Tech comments – Identifies any issues that the Tech determines the Radiologist needs to know about the patient, or the study, or the condition of the patient that is pertinent to a diagnosis. Location – Identifies the patient location where the physician contact is available, such as the ER, and may be used as a point of contact. A location has a phone number associated with it. Physician – Identifies the Referring Physician. Contact #2 – Identifies the backup contact to be used if the physician can’t be reached. Misc Contact # – Provides an additional contact phone number for providing results. DICOM Doc – Refers to the referring physician’s name that is reported in the DICOM header in the study, and can be different from the name in the Order. For more information on customizing the Details panel, see the section Setting up the Details Panel. 14 BRIT Roentgen Works Flow User Manual – Site Coordinator (UM-BRW-001.0-S) Chapter 1 – Introduction Faxes This section allows the user to view faxes that have been sent with the Order information, and is found in the lower right side of the window. This contains a list of the assigned and unassigned faxes that were sent to the server. In order to look at the fax to see the information, click on the appropriate study, and click on the button. The Fax opens in a separate window and displays the details, as shown to the left: Click on the at the top right to close the window. For more information in working with the faxes, see the section Chapter 14 – Viewing the Faxes. Editing the User Profile The user can change their individual information by clicking on the right part of the window. button at the top The User’s Profile window opens to allow the user to make changes to their personal information including: User ID – Displays the User identification that they use when they log in. User Name – Shows the user’s name, this also appears on the upper left of the window to indicate the user logged in, and it is also shown on the Statistics tab. Password – This field does not show the user’s Password. DICOM AE Title – This shows the Application Entity title (DICOM name of the user’s computer). This allows the system to know the specific workstation on which the user is working. BRIT Roentgen Works Flow User Manual – Site Coordinator (UM-BRW-001.0-S) 15 Chapter 1 – Introduction DICOM Host – This field shows the IP address of the workstation receiving the study. DICOM Port – This field shows the port number for the workstation receiving the study. Mobile Phone Number – This field shows the cell phone number for the user. Office Phone Number – This field shows the office telephone number for the user. Home Phone Number – This field shows the home telephone number for the user. Pager Number – This field shows the pager telephone number for the user. Fax Number – This field shows the fax number for the user. E-mail Address – This field shows the e-mail address for the user. Priority Alert #1 – Identifies the preferred primary method to contact the user. Priority Alert #2 – Identifies the preferred secondary method to contact the user. Note: Note: Note that a shortcut to finding the information in a drop-down menu is to begin typing the name in the field, and as characters are matched the name appears. Click on the correct name when it appears. Site Information – This field identifies the sites for which the user is authorized to access studies. If other sites are available that the user is not authorized, the site is not displayed in the window. Once the information is changed, click on the button. To not accept the changes, and close the pop-up window, click on the button. Information in the “About” Window The “About” window provides the following information about the Roentgen Works Flow product: Version Number Build Date Copyright date 16 BRIT Roentgen Works Flow User Manual – Site Coordinator (UM-BRW-001.0-S) Chapter 1 – Introduction The “About window provides the following information about the Roentgen Works server: Version Number Build Date Copyright date Click on the button to close the window. BRIT Roentgen Works Flow User Manual – Site Coordinator (UM-BRW-001.0-S) 17 Chapter 1 – Introduction 18 BRIT Roentgen Works Flow User Manual – Site Coordinator (UM-BRW-001.0-S) Chapter 2 – Customizing the Worklist Columns Chapter 2 – Customizing the Worklist Columns The Setup panel allows the user to customize the columns in the patient list in each of the tabs, and according to their personal preferences. Be aware each tab can have different columns details displayed and are selected on an individual basis. Opening and Closing the Setup The Setup panel is not normally shown when the user logs in. To open the Setup panel, there is a button at the far right side of the patient section: Once this button is selected, the Setup panel opens to the right of the Patient List, as shown here: Once the Setup is open, the changes to a , which allows the user to close the Setup panel and maximize the Patient List, as shown to the left. BRIT Roentgen Works Flow User Manual – Site Coordinator (UM-BRW-001.0-S) 19 Chapter 2 – Customizing the Worklist Columns Setting up the Columns and tab. The There are two tabs at the bottom of the Setup panel tab allows the user to customize the columns that are in each of the working tabs. The tab allows the user to customize the Details at the bottom of the patient list, and is further defined in Chapter 3 – Customizing the Details Panel. This section shows selecting and moving of the columns and the available columns. Selecting the Columns for the Tabs There are a variety of columns available that the user can select to appear in the various tabs. The majority of the fields are available for every tab, but some are specific to individual tabs. Clicking on the checkbox next to the specific column allows the column to be displayed in the working tab. In order to get the column to display on the selected working tab, the tab must be selected, and the Setup panel opened. Click on the checkbox under the Active column next the desired column, and a appears in the checkbox. As long as the appears, the column displays on the specified tab. To remove the column, click on the checkbox, and the disappears. The Width shown displays the size of the field. Resizing the Columns for the Tabs The width of the column can be changed in two manners, either by manually resizing the field or by changing the value of the field in the Setup panel. Manually Changing the Width of the Columns The user can manually change the width of the columns by hovering the cursor over the right edge of the column heading until the cursor changes to appear as shown here: Once the double line and arrow symbol appears, hold the left mouse button down and drag it to the desired width, and release the left mouse button. The column is resized. 20 BRIT Roentgen Works Flow User Manual – Site Coordinator (UM-BRW-001.0-S) Chapter 2 – Customizing the Worklist Columns Changing the Width of the Columns in the Setup panel To change the width of the column, left-click on the field to be resized, and a blue box opens around the number to allow the user to change the field. Delete the numbers in the box, and type the desired number for the size of the column. When the desired width is entered, hit the enter key on the keyboard, and the field turns blue with a small red triangle appearing at the upper left corner to indicate that the field size has changed, as shown here: To save the changes, click on the button. To return the field to the original setting, click on the button. Sorting and Grouping the Columns The column can be sorted in ascending or descending order, as well as displayed in like groups. To sort the patient list by the specified columns in ascending order, click on the drop-down arrow, next to the desired column, and select Sort Ascending. To sort the patient list by the specified columns in descending order, click on the drop-down arrow next to the desired column, and select Sort Descending. The Group By This Field arranges the patient list to be grouped together by the field selected. For example to get all the studies grouped together by Modality, click on the Modality header, click on the drop-down arrow, and select Group by This Field. The Patient list is shown as in the following samples: BRIT Roentgen Works Flow User Manual – Site Coordinator (UM-BRW-001.0-S) 21 Chapter 2 – Customizing the Worklist Columns The Show in Groups works with the Group By This Field so that the patient list is grouped by the selected field. In this sample the list is first sorted by the Site. To get all the studies grouped together in each site by Modality, click on the Modality header, click on the dropdown arrow, and select Group by This Field. The Patient list is shown as in the sample to the right: : Moving the Columns for the Tabs When the columns are selected they will immediately be placed into the left-most side of the window. These columns can be moved by hovering the mouse over the header, holding the left mouse button down, moving the cursor to the desired column location and releasing the mouse button. If the header is not in the correct position for placement, the header is identified with a symbol to the left of the selected header, as shown here: (stop) . Note: Note: Be aware that if the header is dropped while the header is not moved. symbol appears, the When the header is in an OK (or viable) position for placement, the header is identified with a (Ok to move and release) to the left of the selected header, as indicated here: . The header is then moved to the selected location. 22 BRIT Roentgen Works Flow User Manual – Site Coordinator (UM-BRW-001.0-S) Chapter 2 – Customizing the Worklist Columns Available Columns Not all columns are available for every working tab, and they can only be selected when the Setup is open for that tab. Select the desired column by clicking on the corresponding checkbox in the Active column, and the appears when it is successfully selected. The complete list of columns that are available include: # Images – Displays the total number of images that are in the selected study. The number of images column is available in the Action Needed, Incomplete Orders, Work Queued, Delivered, Read, or Search tabs. ACC# – Displays the Accession number assigned to the study. The Accession number column is available in the Action Needed, Incomplete Orders, Work Queued, Delivered, Read, or Search tabs. AE – Displays the Application Entity Title for the modality on which the study was performed (if it is available). The AE Title column is available in the Action Needed, Incomplete Orders, Work Queued, Delivered, Read, or Search tabs. Note: Note: Be aware that when connecting with some specific sites, this could be the AE Title of the PACS system because the PACS could not pass along the AE Title information for the modality itself. Action – Displays the additional action that the Radiologist needs for the Study. This could identify the study as On Hold or Urgent. The Action column is only available in the Action Needed tab. Active – Identifies if the modality is currently integrated or not, or if the user is currently logged into the system. For example, Radiologist would show “Yes” in this column if they are logged in and accepting studies. This Active column is found in the Modalities and Users tab. Arrival Time – Displays the date and time that the study arrived at the Roentgen Works server for diagnosis. The Arrival Time column is available in the Action Needed, Delivered, and Read tabs. Body Part – Displays the specific body part, or region of interest, on which the study was performed. The Body Part column is available in the Action Needed, Incomplete Orders, Work Queued, Delivered, Read, or Search tabs. BRIT Roentgen Works Flow User Manual – Site Coordinator (UM-BRW-001.0-S) 23 Chapter 2 – Customizing the Worklist Columns CPT – Displays the Procedure Code for the selected study. The CPT column is available in the Action Needed, Incomplete Orders, Work Queued, Delivered, Read, or Search tabs. Note: Note: Be aware that CPT Codes are not available for worklists from the DICOM header, unless manually entered. It is available with HL-7 interfaces. Category – Identifies the message class, generated from a specific user, or a system generated message. The Category column is only available in the Message tab. Code – This is the subject of the message that was entered by the user. This Code column is found in the Messages tab. Contact #2 – Displays the second person to contact if the Referring Physician can not be reached. The Contact #2 column is available in the Action Needed, Incomplete Orders, Work Queued, Delivered, Read, or Search tabs. Date of Birth – Displays the patient’s birth date. The Date of Birth column is available in the Action Needed, Incomplete Orders, Work Queued, Delivered, Read, or Search tabs. Delivered – Indicates the number of studies that were successfully delivered to the recipients, and is only available in the Statistics tab. Description – Displays the Study Description as stored in the DICOM header from the Modality, or the CPT code. The Description column is available in the Action Needed, Incomplete Orders, Work Queued, Delivered, Read, or Search tabs. Description – Displays the name of the User logged into the system for which the statistics were built. This Description column is only available in the Statistics tab. Note: Note: Be sure to note that there are two Description columns that have different meanings depending on the tab. DICOM AE – Displays the DICOM Application Entity title of the modality or the user. This DICOM AE Title column is available in the Modalities and Users tab. 24 BRIT Roentgen Works Flow User Manual – Site Coordinator (UM-BRW-001.0-S) Chapter 2 – Customizing the Worklist Columns DICOM Doc – Displays the name of the referring physician as it is reported in the DICOM header of the study. The DICOM Doc column is available in the Action Needed, Incomplete Orders, Work Queued, Delivered, Read, or Search tabs. DICOM Host – Displays the DICOM Host of the modality or to the workstation associated with the user. This DICOM Host column is available in the Modalities and Users tab. DICOM Port – Displays the DICOM Port of the modality or the workstation associated with the user. This DICOM Port column is available in the Modalities and Users tab. ETA – Displays the Estimated Time of Arrival for the study to be delivered. The ETA is available only in the Work Queued tab. Elapsed Time – Displays the amount of time in days, hours, minutes, and seconds that has elapsed since the study was delivered. The Elapsed Time column is available in the Action Needed, Incomplete Orders, Work Queued, Delivered, Read, or Search tabs. Email Address – Displays the e-mail address that is entered in the profile for the selected user. This e-mail address is available in the Users tab. Fax # - Displays the fax number that is entered in the profile for the selected user. This fax number column is available in the Users tab. Faxes – Identifies that a fax has been sent for the specific study from the Site Coordinator. The Faxes column is available in the Action Needed, Incomplete Orders, Work Queued, Delivered, Read, or Search tabs. Final Read – Determines if the Radiologist is to do a final diagnosis on the study, and is identified as a Yes or a No in the Final Read column next to the Study. The Final Read column is available in the Action Needed, Incomplete Orders, Work Queued, Delivered, Read, or Search tabs. From – Identifies the sender of the message, and is only found in the Message tab. History – Provides the brief patient history that was sent with the study. The History column is available in the Action Needed, Incomplete Orders, Work Queued, Delivered, Read, or Search tabs. Home # – Provides the home telephone number that was entered in the profile for the selected user. This home number column is available in the Users tab. BRIT Roentgen Works Flow User Manual – Site Coordinator (UM-BRW-001.0-S) 25 Chapter 2 – Customizing the Worklist Columns Incomplete – Provides the number of incomplete studies. This Incomplete column is only available in the Statistics tab. Location – Identifies the patient location, such as the ER, that may be used as a point of contact. A location has a phone number associated with it. This column is available in the Action Needed, Incomplete Orders, Work Queue, Delivered, Read, and Search tabs. Message Date – Identifies the date the message was created and is only available in the Message tab. Message Text – Contains the complete text of the message created by the sender, and is only available in the Message tab. Misc Contact # - Displays an additional telephone or pager number for an additional contact for the referring physician. The Misc Contact # column is available in the Action Needed, Incomplete Orders, Work Queued, Delivered, Read, or Search tabs. Mobile # - Displays the cell phone number that was entered in the profile for the selected user. This mobile number column is available in the Users tab. Modality – Identifies the type of modality on which the study was performed. The Modality column is available in the Action Needed, Incomplete Orders, Work Queued, Delivered, Read, or Search tabs. Office # - Displays the office telephone number that was entered in the profile for the selected user. This office number column is available in the Users tab. On-Hold – Identifies the number of studies that the Radiologist has placed “on-hold” because further information is needed to allow them to complete the diagnosis. The On-Hold column is only available in the Statistics tab. Pager # - Displays the pager number that was entered in the profile for the selected user. This Pager number column is available in the Users tab. Patient ID – Displays the Patient’s identification number from the sending site. The Patient ID column is available in the Action Needed, Incomplete Orders, Work Queued, Delivered, Read, or Search tabs. Patient Name – Displays the Patient Name for the study. The Patient Name column is available in the Action Needed, Incomplete Orders, Work Queued, Delivered, Read, or Search tabs. 26 BRIT Roentgen Works Flow User Manual – Site Coordinator (UM-BRW-001.0-S) Chapter 2 – Customizing the Worklist Columns Physician – Displays the name of the patient’s referring physician. The Physician is available in the Action Needed, Incomplete Orders, Work Queued, Delivered, Read, or Search tabs. Physician # - Displays the primary telephone contact number for the patient’s referring physician. The Physician # column is available in the Action Needed, Incomplete Orders, Work Queued, Delivered, Read, or Search tabs. Priority – Determines if the study is routine or critical so that the Radiologist knows the importance of the study. The Priority column is available in the Action Needed, Incomplete Orders, Work Queued, Delivered, Read, or Search tabs. Queued – Provides a summary of all the studies that are awaiting delivery to the Radiologist. The Queued column is only available in the Statistics tab. Radiologist – Displays the name of the Radiologist handling the study. The Radiologist column is available in the Action Needed, Incomplete Orders, Work Queued, Delivered, Read, or Search tabs. Reason for Hold – Identifies the explanation from the Radiologist for the study being placed on hold. The Reason for Hold column is available in the Action Needed, Incomplete Orders, Work Queued, Delivered, Read, or Search tabs. Reason for Study – Indicates the reason that the referring physician ordered the study for the patient. The Reason for Study column is available in the Action Needed, Incomplete Orders, Work Queued, Delivered, Read, or Search tabs. Sex – Identifies the Gender of the patient. The Gender column is available in the Action Needed, Incomplete Orders, Work Queued, Delivered, Read, or Search tabs. Site – Identifies the facility where the patient study was captured. Depending on the Licensing agreement with the Site, this is helpful to allow the Radiologist to prioritize reading the studies. The Site column is available in the Action Needed, Incomplete Orders, Work Queued, Delivered, Read, Modalities, Users, or Search tabs. Stat Type – Identifies if the statistics shown are for a Radiologist or are for the site. The Stat Type is only available in the Statistics tab. State – Identifies the status of the message, such as New, Acknowledged, or Deleted, or the status of a job, such as Queued, Running, Waiting, Stopping, Stopped, Done, Failed, or Deleted. This column is found in the Messages tab. BRIT Roentgen Works Flow User Manual – Site Coordinator (UM-BRW-001.0-S) 27 Chapter 2 – Customizing the Worklist Columns Status – Identifies the status of the study according to the server’s status, such as In Progress, Delivered, Dictated, Reported, Assigned (same as Delivered). This is found in the Action Needed, Work Queued, Delivered, Read, Search tabs. Study Status – Identifies the status of the study for the workflow, such as On Hold, Incomplete, Urgent, Delivered, Unread, or Read. The Study Status is available in the Action Needed, Incomplete Orders, Work Queued, Delivered, Read, or Search tabs. Tech Comment – Provides the text from the Technologist that was entered when the study was captured. This alerts the Radiologist to additional information that the Technologist contributed to the patient’s exam. The Tech Comment column is available in the Action Needed, Incomplete Orders, Work Queued, Delivered, Read, or Search tabs. Time of Study – Provides the date and time that the exam was captured at the imaging facility. The Time of Study column is available in the Action Needed, Incomplete Orders, Work Queued, Delivered, Read, or Search tabs. To – Provides the name of the recipient of the message, and is only found in the Message tab. UID – Provides the Study Instance Identifier, which is the unique identifier for the study. The UID column is available in the Action Needed, Incomplete Orders, Work Queued, Delivered, Read, or Search tabs. Unassigned – Identifies the number of unassigned studies that are available, and generally only applies to the sites rather than the users. The Unassigned column is only available for the Statistics tab. Urgent – Identifies the number of studies assigned to each site and user that are tagged as Urgent by the Radiologist after their diagnosis is completed. Urgent is only available in the Statistics tab. User ID – Displays the user identification information that is assigned to the modality or the user ID for the selected user. This User ID is available in the Modalities or the Users tab. User Name – Identifies the user name that is assigned to the modality or the name of the selected user. This User ID column is available in the Modalities or the Users tab. User Type – Identifies the type of user, such as a modality or the user. For the users, the type could be Site Coordinator, Radiologist, Physician, Service Manager, or Location, such as the Emergency Room. This User ID column is available in the Modalities or the Users tab. Saving the Columns Once all of the desired columns have been selected, click on the changes. Click on the 28 button to retain the button to return the settings to the original settings. BRIT Roentgen Works Flow User Manual – Site Coordinator (UM-BRW-001.0-S) Chapter 3 – Customizing the Details Panel Chapter 3 – Customizing the Details Panel The Setup panel allows the user to customize the Details Panel at the bottom of the window under the patient list in each of the tabs, according to their personal preferences. Be aware each tab can have different details display at the bottom and are selected on an individual basis. The individual items checked in the Setup are the only fields shown at the bottom for each tab. Opening and Closing the Setup The Setup panel is not normally shown when the user logs in. To open the Setup panel, there is a button at the far right side of the patient section, as highlighted below: Once this button is selected, the Setup panel opens to the right of the Patient List, as shown to the right: Once the Setup panel is open, the changes to a , which allows the user to close the Setup panel section and maximize the Patient List. BRIT Roentgen Works Flow User Manual – Site Coordinator (UM-BRW-001.0-S) 29 Chapter 3 – Customizing the Details Panel Setting up the Details Panel The second tab at the bottom of the Setup panel is the tab, which allows the user to customize the specific study information that is shown for the Details panel at the bottom. Remember that each tab can have different details display at the bottom and are selected on an individual basis. Available Detail Selections Not all Detail selections are available for every working tab, and they can only be selected for the specific working tab when the Setup is open for that tab. The desired Detail field is selected by clicking on the checkbox, and the appears next to the column when it is successfully selected. A complete list of the selections for the Detail section that is available includes: # Images – Displays the total number of images that are in the selected study. The number of images selection is available in the Action Needed, Work Queued, Delivered, Read, or Search tabs. ACC# – Displays the Accession number assigned to the study. The Accession number selection is available in the Action Needed, Work Queued, Delivered, Read, or Search tabs. AE – Displays the Application Entity Title for the modality on which the study was performed (if it is available). T he AE Title selection is available in the Action Needed, Work Queued, Delivered, Read, or Search tabs. Be aware that when connecting with some specific sites, this could be the AE Title of the PACS system because the PACS could not pass along the AE Title information for the modality itself. Note: ote: Action – Displays the additional action that the Radiologist needs for the Study. This could identify the study as On Hold or Urgent. The Action selection is only available in the Action Needed tab. Active – Identifies if the modality is currently integrated or not, or if the user is currently logged into the system. For example, Radiologist would show “Yes” in the Details panel if they are logged in and accepting studies. This Active column is found in the Modalities and Users tabs. 30 BRIT Roentgen Works Flow User Manual – Site Coordinator (UM-BRW-001.0-S) Chapter 3 – Customizing the Details Panel Arrival Time – Displays the date and time that the study arrived at the Roentgen Works server for diagnosis. The Arrival Time selection is available in the Action Needed, Delivered, and Read tabs. Body Part – Displays the specific body part, or region of interest, on which the study was performed. The Body Part selection is available in the Action Needed, Work Queued, Delivered, Read, or Search tabs. CPT – Displays the Procedure Code for the selected study. The CPT selection is available in the Action Needed, Work Queued, Delivered, Read, or Search tabs. Note: Note: Be aware that CPT Codes are not available for worklists from the DICOM header, unless manually entered. It is available with HL-7 interfaces. Category – Identifies the message class, generated from a specific user, or a system generated message. The Category selection is only available in the Message tab. Code – This is the subject of the message that was entered by the user. This Code selection is found in the Messages tab. Contact #2 – Displays the backup person to contact if the Referring Physician can’t be reached. The Contact #2 selection is available in the Action Needed, Work Queued, Delivered, Read, or Search tabs. Date of Birth – Displays the patient’s birth date. The Date of Birth selection is available in the Action Needed, Work Queued, Delivered, Read, or Search tabs. Delivered – Indicates the number of studies that were successfully delivered to the recipients, and is only available in the Statistics tab. Description – Displays the Study Description as stored in the DICOM header from the Modality, or the CPT code. The Description selection is available in the Action Needed, Work Queued, Delivered, Read, or Search tabs, and is one of the default settings. Description – Displays the name of the User logged into the system for which the statistics. Note: Note: Be sure to note that there are two Description selections that have different meanings depending on the tab. BRIT Roentgen Works Flow User Manual – Site Coordinator (UM-BRW-001.0-S) 31 Chapter 3 – Customizing the Details Panel DICOM AE – Displays the DICOM Application Entity title of the modality or the user. This DICOM AE Title selection is available in the Modalities and Users tab. DICOM Doc – Displays the name of the referring physician as it is reported in the DICOM header of the study. The DICOM Doc selection is available in the Action Needed, Work Queued, Delivered, Read, or Search tabs. DICOM Host – Displays the DICOM Host of the modality or to the workstation associated with this user. This DICOM Host selection is available in the Modalities and Users tab. DICOM Port – Displays the DICOM Port of the modality or to the workstation associated with this user. This DICOM Port selection is available in the Modalities and Users tab. ETA – Displays the Estimated Time of Arrival for the study to be delivered. The ETA is available only in the Work Queued tab. Elapsed Time – Displays the amount of time in days, hours, minutes, and seconds that has elapsed since the study was delivered. The Elapsed Time selection is available in the Action Needed, Work Queued, Delivered, Read, or Search tabs. Email Address – Displays the e-mail address that is entered in the profile for the selected user. This e-mail address selection is available in the Users tab. Fax # - Displays the fax number that is entered in the profile for the selected user. This fax number selection is available in the Users tab. Faxes – Identifies that a fax has been sent for the specific study from the Site Coordinator. The Faxes selection is available in the Action Needed, Work Queued, Delivered, Read, or Search tabs. Final Read – Determines if the Radiologist is to do a final diagnosis on the study, and is identified as a Yes or a No in the Final Read column next to the Study. The Final Read selection is available in the Action Needed, Work Queued, Delivered, Read, or Search tabs, and is one of the default settings. From – Identifies the sender of the message, and is only found in the Messages tab. History – Provides the brief patient history that was sent with the study. The History selection is available in the Action Needed, Work Queued, Delivered, Read, or Search tabs, and is one of the default settings. 32 BRIT Roentgen Works Flow User Manual – Site Coordinator (UM-BRW-001.0-S) Chapter 3 – Customizing the Details Panel Home # – Provides the home telephone number that was entered in the profile for the selected user. This home number selection is available in the Users tab. Incomplete – Provides the number of incomplete studies. This Incomplete selection is only available in the Statistics tab. Location – Identifies the patient location, such as the ER that is used as a point of contact. A location has a phone number associated with it. This selection is available in the Action Needed, Work Queue, Delivered, Read, and Search tabs. Message Date – Identifies the date the message was created and is only available in the Message tab. Message Text – Contains the complete text of the message created by the sender, and is only available in the Message tab. Misc Contact # – Displays an additional telephone or pager number for an additional contact for the referring physician. The Misc Contact # selection is available in the Action Needed, Work Queued, Delivered, Read, or Search tabs, and is one of the default settings. Mobile # – Displays the cell phone number that was entered in the profile for the selected user. This mobile number selection is available in the Users tab. Modality – Identifies the type of modality on which the study was performed. The Modality selection is available in the Action Needed, Work Queued, Delivered, Read, or Search tabs. Office # - Displays the office telephone number that was entered in the profile for the selected user. This office number selection is available in the Users tab. On-Hold – Identifies the number of studies that the Radiologist has placed “on-hold” because further information is needed to allow them to complete the diagnosis. The On-Hold selection is only available in the Statistics tab. Pager # - Displays the pager number that was entered in the profile for the selected user. This Pager number selection is available in the Users tab. Patient ID – Displays the Patient’s identification number from the sending site. The Patient ID selection is available in the Action Needed, Work Queued, Delivered, Read, or Search tabs. Patient Name – Displays the Patient Name for the study. The Patient Name selection is available in the Action Needed, Work Queued, Delivered, Read, or Search tabs. BRIT Roentgen Works Flow User Manual – Site Coordinator (UM-BRW-001.0-S) 33 Chapter 3 – Customizing the Details Panel Physician – Displays the name of the patient’s referring physician. The Physician selection is available in the Action Needed, Work Queued, Delivered, Read, or Search tabs, and is one of the default settings. Physician # - Displays the primary telephone contact number for the patient’s referring physician. The Physician # selection is available in the Action Needed, Work Queued, Delivered, Read, or Search tabs. Priority – Determines if the study is routine or critical so that the Radiologist knows the importance of the study. The Priority selection is available in the Action Needed, Work Queued, Delivered, Read, or Search tabs. Queued – Provides a summary of all the studies that are awaiting delivery to the Radiologist. The Queued selection is only available in the Statistics tab. Radiologist – Displays the name of the Radiologist handling the study. The Radiologist selection is available in the Action Needed, Work Queued, Delivered, Read, or Search tabs. Reason for Hold – Identifies the explanation from the Radiologist for the study being placed on hold. The Reason for Hold selection is available in the Action Needed, Work Queued, Delivered, Read, or Search tabs, and is one of the default settings. Reason for Study – Indicates the reason that the referring physician ordered the study for the patient. The Reason for Study selection is available in the Action Needed, Work Queued, Delivered, Read, or Search tabs, and is one of the default settings. Sex – Identifies the Gender of the patient. The Gender selection is available in the Action Needed, Incomplete Orders Work Queued, Delivered, Read, or Search tabs. Site – Identifies the facility where the patient study was captured. Depending on the Licensing agreement with the Site, this is helpful to allow the Radiologist to prioritize reading the studies. The Site selection is available in the Action Needed, Work Queued, Delivered, Read, Modalities, Users, or Search tabs. Stat Type – Identifies if the statistics shown are for a Radiologist or are for the site. The Stat Type is only available in the Statistics tab. State – Identifies the status of the message, such as New, Acknowledged, or Deleted, or the status of a job, such as Queued, Running, Waiting, Stopping, Stopped, Done, Failed, or Deleted. This selection is found in the Messages tab. 34 BRIT Roentgen Works Flow User Manual – Site Coordinator (UM-BRW-001.0-S) Chapter 3 – Customizing the Details Panel Status – Identifies the status of the study according to the server’s status, such as In Progress, Delivered, Dictated, Reported, Assigned (same as Delivered). This selection is found in the Action Needed, Work Queued, Delivered, Read, Search tabs. Study Status – Identifies the status of the study, such as On Hold, Urgent, Delivered, Unread, or Read. The Study Status is available in the Action Needed, Work Queued, Delivered, Read, or Search tabs. Tech Comment – Provides the text from the Technologist that was entered when the study was captured. This alerts the Radiologist to additional information that the Technologist contributed to the patient’s exam. The Tech Comment selection is available in the Action Needed, Work Queued, Delivered, Read, or Search tabs. Time of Study – Provides the date and time that the exam was captured at the imaging facility. The Time of Study selection is available in the Action Needed, Work Queued, Delivered, Read, or Search tabs. To – Provides the name of the recipient of the message, and is only found in the Message tab. UID – Provides the Study Instance Identifier for the study, which is the unique identifier for the study. The UID selection is available in the Action Needed, Work Queued, Delivered, Read, or Search tabs. Unassigned – Identifies the number of unassigned studies that are available, and generally only applies to the sites rather than the users. The Unassigned selection is only available for the Statistics tab. Urgent – Identifies the number of studies assigned to each site and user that are tagged as Urgent by the Radiologist after their diagnosis is completed. Urgent is only available in the Statistics tab. User ID – Displays the user identification information that is assigned to the modality or the user ID for the selected user. This User ID selection is available in the Modalities or the Users tab. User Name – Identifies the user name that is assigned to the modality or the name of the selected user. This User Name selection is available in the Modalities or the Users tab. User Type – Identifies the type of user, such as a modality or the user. For the users, the type could be Site Coordinator, Radiologist, Physician, Service Manager, or Location, such as the Emergency Room. This User Type selection is available in the Modalities or the Users tab. BRIT Roentgen Works Flow User Manual – Site Coordinator (UM-BRW-001.0-S) 35 Chapter 3 – Customizing the Details Panel Changing the Width, Height, or Placement The width or height of each of these fields in the Details panel can be changed in the Setup Panel, and the placement (or location) can be changed by moving the field. To change the height or width of the fields in the Details panel, click on the tab at the bottom of the Setup panel. This shows the selected fields, and notice that the width (W) and Height (H) sizes are shown to the right of the Active checkbox, and is filled in for each of the fields that are active. Changing the Width of a Field in the Details Panel To change the width on any of the fields, left-click on the field to be resized, and a blue box opens around the number to allow the user to change the field. Delete the numbers in the box, and type the desired number for the size of the field. Note: Note: Be aware that changing the field width may overlap a field to the right and one of them may need to be moved. When the desired width is entered, hit the enter key on the keyboard, and the field turns blue with a small red triangle appearing at the upper left corner to indicate that the field size has changed, as shown here: To save the changes, click on the button. To return the field to the original setting, click on the 36 button. BRIT Roentgen Works Flow User Manual – Site Coordinator (UM-BRW-001.0-S) Chapter 3 – Customizing the Details Panel Changing the Height of a Field in the Details Panel To change the height on any of the fields, left-click on the field to be resized, and a blue box opens around the number to allow the user to change the field. Delete the numbers in the box, and type the desired number for the size of the field. Note: Note: Be aware that changing the field height may overlap a field below and one of them may need to be moved. When the desired height is entered, hit the enter key on the keyboard, and the field turns blue with a small red triangle appearing at the upper left corner to indicate that the field size has changed, as shown here: The height of the row is one row for each increment of “1”. To save the changes, click on the button. To return the field to the original setting, click on the button. Changing the Location of a Field in the Details Panel Occasionally the user prefers the fields in the Details panel to be in a different location in order to have the information they are seeking to be in a more convenient place. Sometimes the fields need to be moved because the width or height of another field has changed and is blocking one of the other fields in the area. This section shows how to move the various fields to a more desirable location. Note: Note: Be aware that the field can only be moved when the Setup panel is opened. BRIT Roentgen Works Flow User Manual – Site Coordinator (UM-BRW-001.0-S) 37 Chapter 3 – Customizing the Details Panel For example, the original Details panel in the tab, looks like this: The user wants to move the Physician field so that it is directly under the Final Read field. To move this Physician field, hold the left mouse button down on the field to be moved, drag it to the desired location, and release the left mouse button. Note: Note: Be aware that the field will be placed where the point of the cursor is located on the window. During the process of dragging the field to the desired location it appears as a floating field, as shown below: At the upper left of the field being moved is a indicating that the field has been selected to move. Position the pointer of the cursor at the desired location to move the field, and release the left mouse button. The field will be snapped to a location as shown below: 38 BRIT Roentgen Works Flow User Manual – Site Coordinator (UM-BRW-001.0-S) Chapter 3 – Customizing the Details Panel Note: Note: Be aware that moving these fields may overlap another field and several moves may be needed to reposition the fields. Once the field is moved, it remains at that location until it is moved elsewhere. Saving the Changes to the Details Once all of the desired changes for the Detail selections, width, or height have been completed, click on the button to retain the changes. Click on the button to return the settings to the original selections. BRIT Roentgen Works Flow User Manual – Site Coordinator (UM-BRW-001.0-S) 39 Chapter 3 – Customizing the Details Panel 40 BRIT Roentgen Works Flow User Manual – Site Coordinator (UM-BRW-001.0-S) Chapter 4 – Action Needed Tab Chapter 4 – Actions Needed Tab There are a variety of tasks in this window that the users work with to take further action on the various studies that appear on this window. This indicates that the referring physician needs to be contacted immediately regarding the patient in case of an urgent finding, or that some type of action needs to be taken for the Radiologist to complete the diagnosis for the patient. For example, the Radiologist may have put a study “on-hold” because the Reason for the Study was not available, and this information is needed before the Radiologist could actually complete the diagnosis for the report. Generally, the Site Coordinator provides the information and returns it. In this tab, the actions needed could be due to “on-hold” studies, studies with “urgent findings”, or “discordance” between the Radiologist and the ER physician. The Site Coordinator or Technologist can also put studies “on-hold”. tab. This section identifies the components, uses, and features of the Components of the Action Needed Window The following shows the window: The number in red next to the tab indicates the number of studies listed in that tab. This is particularly important for this tab because it indicates the number of studies that need to handled immediately. Generally on this page, similar types of actions are grouped together, such as studies that are placed in an “on-hold” state awaiting further detail from the Site Coordinator or the Technologist for completion of the report. This also contains studies that are in an “urgent” state due to the Radiologist observations and findings. The groups can be customized according to personal preference. BRIT Roentgen Works Flow User Manual – Site Coordinator (UM-BRW-001.0-S) 41 Chapter 4 – Action Needed Tab Both of these states are color coded to help alert the users to the urgent need or “on-hold” state, and these are discussed below. Some of the user preferences can be customized, such as the columns, which can be rearranged at will, Detail information, Faxes for the specific study can be viewed, and there are several buttons available to allow the user to easily perform specific functions. This section provides information on the buttons, color coding, changing the columns, and changing the details for the tab. Action Buttons There are five Action buttons available in the tab that allow the user to take specific actions for the patients in this list to resolve the issue regarding the patient and complete the study. These buttons are shown below: – When this Action button is selected, the study is removed from the queue, and returned to the area to be read and completed by the Radiologist. – This Action button allows the user to update the status on the Urgent study. The Update Urgent pop-up window opens to allow the user to enter additional information to update the patient status. – This button displays a list of contact information for the referring physician identified on the study. Optionally, the Site Coordinator can use Skype to contact the referring physician by automatically dialing through the workstation. Skype is an optional software package that enables the user to make telephone calls anywhere in the world automatically by connecting through the computer to landline or mobile phones. When this button is selected a pop-up window opens to allow the Site Coordinator to select the referring physician who needs to be contacted regarding this patient. Double-click on the contact number to select the desired contact method, and place the call. – This Action button allows the Site Coordinator to modify the patient’s order because of missing information the Radiologist needs to complete the study’s report. 42 BRIT Roentgen Works Flow User Manual – Site Coordinator (UM-BRW-001.0-S) Chapter 4 – Action Needed Tab – This Action button allows the user to see the detailed history of the study, such as when it was created, completed, to whom it was assigned, when it was sent, when it was delivered, when it was read, each time the status was reset, and what the status was reset to by the last user. Color Coding The studies are color coded as follows: – Indicates that there is a critical study the Radiologist need to read immediately or an urgent finding in which the referring physician needs to be notified immediately. “Urgent” findings are identified in pink in the tab. – Indicates that the study has been placed “On-Hold” due to insufficient or incomplete information, that the Radiologist has flagged, and needs to be addressed before the diagnosis can be done, the study marked as “Read”, and the Report completed. – Indicates that this is the currently selected study. If there is an interface to a Radiologist viewing workstation, such as BRIT Vision, double-clicking on one of these selected patients, automatically downloads the study to the workstation Selecting the Columns The columns in the patient list can be customized according to individual preferences. There are several that have been chosen as system defaults, are set when the system is delivered, and are shown when the button is selected. There are a variety of additional columns available in the Setup panel, and these can be selected and added, or removed at any time. The system default information shown for these studies in the tab includes: ACC# – Displays the Accession number assigned to the study. Action – Displays the additional action that the Radiologist needs for the Study. Description – Displays the Study Description as stored in the DICOM header from the Modality, or the CPT code. Patient ID – Displays the Patient’s identification number from the sending site. Patient Name – Displays the Patient’s name as sent from the sending site. BRIT Roentgen Works Flow User Manual – Site Coordinator (UM-BRW-001.0-S) 43 Chapter 4 – Action Needed Tab To change the columns selections, open the Setup panel by clicking on the to the right, and clicking on the checkbox next to the desired heading. If the checkbox currently has a , then the column displays on the Patient List. If the checkbox is blank, the column is no longer displayed on the Patient List. The columns can then be moved, or resized according to personal preference. For a complete list of all the available columns, see the section entitled Available Columns. Detail Information Panel The Detail information at the bottom provides additional specific information about the selected study. This Detail panel can be customized according to individual preferences, but there are several that have been selected to be identified as system defaults, and are selected when the system is delivered, or when the button is selected. The system default information shown for these studies in the window include: Reason for Hold – Identifies the explanation from the Radiologist for the study being placed on hold. Reason for Study – Indicates the reason that the referring physician ordered the study for the patient. To change the Detail selections, open the Setup panel by clicking on the to the right, and clicking on the checkbox next to the desired detail. If the checkbox has a , then the details displays on the Patient List. If the checkbox currently does not have a , the detail is not displayed on the Patient List. For a complete list of the selections available for the Details section, see the list in the Available Detail Selections section. 44 BRIT Roentgen Works Flow User Manual – Site Coordinator (UM-BRW-001.0-S) Chapter 4 – Action Needed Tab Taking Actions in the “Action Needed” Items tab There are several actions that can be taken with the studies listed in the which include: Releasing the patient from the “On-Hold” status Updating the “Urgent Finding” status of the patient Calling the referring physician contact Editing the Study’s Order Viewing the history of the study This section provides the steps to perform each of these tasks in the tab. Releasing the Patient On-Hold Generally, a patient has been placed “On-Hold” because further information is required before the Radiologist can complete the diagnosis. Initially, the patient was placed “On-Hold” by the Radiologist from the list of patients in the “On-Hold” by the Site Coordinator. tab, or the patient could also be placed The patient was placed in the when the button was selected. It remains in here to await the resolution of the issue, and will not be removed until the study is released when the information is received. The Site Coordinator, or the Technologist, submitting the study for the patient, is notified that further information is required before the diagnosis can be completed. Generally the Service Manager is also notified of the request for additional details regarding the patient study. The Site Coordinator, Technologist, or Services Manager gathers the information, has the data delivered, and notifies the Radiologist. Note: Note: Don’t forget that the reason the study was put “On-Hold” can be seen in the Details section at the bottom, provided “Reason for Hold” is selected in the Details. BRIT Roentgen Works Flow User Manual – Site Coordinator (UM-BRW-001.0-S) 45 Chapter 4 – Action Needed Tab To release the patient from hold once the issue is resolved: 1. Click on the patient with the updated information. 2. Click on the button. This action removes the study from the list, and returns it to the list for the Radiologist to read the study and complete the report. Updating the Urgent Status One of the most important actions that is performed for the patient identified with an Urgent Finding is done by updating the information for the Urgent Status. This allows additional information about the patient to be updated as the patient’s condition changes. Every activity for the patient is retained in an “Update Urgent” log, so that accurate date and times are logged as contacts are notified and actions taken and the running update history is available for the specific study. Adding Notes or Completing the Urgent Finding The Site Coordinator can add notes to the Urgent Finding or they can mark it as complete. This section identifies how to update the Urgent finding: To update the Urgent status: 1. Click on the button and the following window opens: Note: Note: Notice that the latest “Urgent Finding” is shown in red at the top of the window. 2. Enter in the Notes in the “Add Note” sections. 3. Click on the button to enter the update and save it for the patient’s record. 46 BRIT Roentgen Works Flow User Manual – Site Coordinator (UM-BRW-001.0-S) Chapter 4 – Action Needed Tab Since every activity for the patient is retained in this “Update Urgent” log, accurate information is logged as contacts are notified and actions taken so that the complete update history is available for the selected study. A new entry is made for every event relating to the patient. To complete the Urgent status: 1. Click on the 2. Click on the button and the following window opens: next to Complete in the Urgent Finding window. 3. The study is removed from the list. To close the window without making changes, click on the button. button allows the user to contact the referring If further discussion is needed, the physician again for additional diagnosis information. Sections of the Update Urgent Window The Urgent Update window is comprised of three main sections and three action buttons. The sections are as follows: Reason Section – This section is at the top of the window and it displays the Urgent Finding from the Radiologist. History Section – This section is the central part of the window, and it provides a complete list of the various steps, notes, calls, actions, and information that created a brief history of this specific study. It provides the following information: Event Type – Identifies such actions as Marked Urgent, Viewed, Updated, Called, Reason Updated, Action Needed, Action Unnecessary, Surgery Scheduled, or any specific relevant event type. Date and time – Logs the specific date and time the event was issued or recorded. User – Identifies the specific user logging the event, which could be the Radiologist who identified the patient event, the Site Coordinator trying to contact the referring physician, the Service Manager taking any required action, the Technologist, or any user who is in authorized contact on the patient and needs to update information for the patient. BRIT Roentgen Works Flow User Manual – Site Coordinator (UM-BRW-001.0-S) 47 Chapter 4 – Action Needed Tab Finding – Provides the information alerting the staff to the problem with the patient, such as pneumothorax, hemorrhage, myocardial infarction or other critical or life threatening event in which immediate action needs to be taken. Note – Provides additional notes from the various participants in the history that are relevant, including contacting the physician, phone numbers called, and tracking and communications information that form an audit trail. Add Note – Type any additional notes in the Add Note field. Complete the Action – When the action for the Urgent finding is complete, click on the next to Complete and a is placed in the box. The patient is removed from the window and is moved back to the window for the Radiologist to complete the dictation and mark the study as “Read”. Click on the button to enter the update Buttons on the Update Urgent Window The Action buttons on the Update Urgent window are as follows: - Submits the updates that have been added for the patient, and adds it to the timeline. If the Update Urgent is marked with a next to Complete, it transfers the study from the Action Needed window to the Delivered tab for the Radiologist to complete the dictation and mark the study as “Read”. If the study was already marked as “Read”, it moves the study to the Read tab. - Ends the update urgent action, makes no changes, and closes the Update Urgent window. 48 – Opens the Call contacts window to allow the user to select a contact method for the referring physician. The contact information for each Physician must be entered into the Roentgen Works system. BRIT Roentgen Works Flow User Manual – Site Coordinator (UM-BRW-001.0-S) Chapter 4 – Action Needed Tab Notifications Using BRIT Phone BRIT Phone is initiated automatically each time the Urgent Finding action is taken, or if additional updates are made. This application alerts the referring physician that the Radiologist has found an issue that needs immediate action for the patient. The following actions are taken by BRIT Phone when Urgent Finding is used: Calls the Referring Physician Makes an announcement requesting verification of name The user presses “1” to verify they are the intended recipient, or can hang up. If the correct recipient is identified, the announcement is made regarding the patient name, ID, and the urgent finding indicated by the Radiologist. The user can elect to: 1. Press “1” to simply Acknowledge the call 2. Press “2” to call the Radiologist who identified the urgent finding. 3. Press “3” to call the patient Location, and alert them to the urgent finding. The user can then hang up. Note: Note: BRIT Phone only makes calls to the Referring Physician when the Urgent status is updated, it does not place calls when the Site Coordinator adds Notes or completes the Urgent finding. Calling the Referring Physician Once an Urgent Finding has been identified by the Radiologist, the referring physician must be contacted as quickly as possible to ensure expedited care for the patient. One of the optional features of this system is an automated integration with BRIT Phone or to the Skype application. Skype is an optional software package that enables the user to make telephone calls anywhere in the world automatically by connecting through the computer to landline or mobile phones. It allows the user to effortlessly contact the referring physician by simply clicking on the button, double-clicking on the desired contact’s phone number, and dialing through the workstation via the Skype application. The contact information may be automatically entered from the HL-7 message; however, this is not always available. Other methods for getting the contact information entered include: BRIT Roentgen Works Flow User Manual – Site Coordinator (UM-BRW-001.0-S) 49 Chapter 4 – Action Needed Tab Importing the file with the Referring Physician information Users with proper authority can manually enter the Referring Physician information Referring Physicians can maintain and update their own contact information. The Referring Physician contact information must be entered into the Roentgen Works database in order for Skype to have a list of telephone, pager, or alternate numbers to use to contact the referring physician. Generally, the Site Coordinator at the facility is responsible for establishing the referring physician’s contact information, but the users update their own profile. Note: Note: To call the referring physician: 1. Make sure the correct patient study is selected. 2. Click on the button. 3. When this button is selected a pop-up window opens to allow the Radiologist to click on the desired contact method for the referring physician. 4. Click on the desired contact number to select the number to call. 5. If Skype is being used, the system automatically dials the number, and the call is connected. When the button is selected, the Call Contacts window closes. If the referring physician answers, the call is connected between the two parties. If the referring physician does not answer, Skype can continue autodialing until the contact is made. 50 BRIT Roentgen Works Flow User Manual – Site Coordinator (UM-BRW-001.0-S) Chapter 4 – Action Needed Tab Editing the Order Information The Order information for the Study can be edited by the Site Coordinator when changes, or updates, are needed. Editing can be done until the study has been marked as “Read”. Note: Note: Be aware that the Order can only be edited until the study is marked as “Read”. To edit the Order information, follow these steps: 1. Select the patient with the Order information that needs to be changed. 2. The Edit Order Info pop-up window opens, as shown here: 3. Click on each field to be changed and enter the correct information. Note: Note: Note that a shortcut to finding the information in a drop-down menu is to begin typing the name in the field, and as characters are matched the name appears. Click on the correct name when it appears. 4. Click on the the window closes. button to retain the changes made. The changes are saved and If the incorrect patient was selected, or the changes do not need to be made, click on the to close the window without retaining the changes. BRIT Roentgen Works Flow User Manual – Site Coordinator (UM-BRW-001.0-S) 51 Chapter 4 – Action Needed Tab Viewing the Study History The Study History for the selected study allows the user to see the detailed history of the study, such as when it was created, completed, to whom it was assigned, when it was sent, when it was delivered, when it was read, each time the status was reset, and each status setting. To view the study history: 1. Make sure the correct patient study is selected. 2. Click on the button. 3. The Study history pop-up window opens and displays all events that have been posted regarding the study. This could include such events as: When the study was created When the study was completed by the Site Coordinator When the study was assigned When the study was sent When the study was delivered When the study was read When the study was marked urgent When they study was put “on-hold” 4. When the desired information is received, click on the window. 52 button to close the BRIT Roentgen Works Flow User Manual – Site Coordinator (UM-BRW-001.0-S) Chapter 4 – Action Needed Tab Viewing the Faxes If a fax is received from the Site Coordinator to clarify missing information, the fax can be viewed from the Faxes panel in the lower right of the window. Typically the fax is assigned to a study by the Site Coordinator and is shown in the tab. In order to view the fax, follow these steps: 1. Click on the appropriate study 2. Click on the button. 3. The Fax opens in a separate window and displays the details, as shown to the left: 4. Once the desired information is read by the user, click on the at the top right to close the window. For faxes that are not assigned, they appear in the tab. To assign the fax: 1. Click on the appropriate study. 2. Click on the appropriate fax. 3. Click on the button. 4. The fax now appears under the tab. BRIT Roentgen Works Flow User Manual – Site Coordinator (UM-BRW-001.0-S) 53 Chapter 4 – Action Needed Tab 54 BRIT Roentgen Works Flow User Manual – Site Coordinator (UM-BRW-001.0-S) Chapter 5 – Incomplete Orders Tab Chapter 5 – Incomplete Orders Tab The tab contains the studies that have not been completed due to missing information. The Site Coordinator can then complete the missing information and transmit the study, dismiss the order, or mark it for a comparison to another study. Components Window The of the Incomplete Orders tab window is shown below: The number in red next to the tab indicates the number of studies listed in that tab. When the orders are not complete for the studies due to missing information, or the study needs to be marked as a comparison study; these can all be handled in the tab. Depending on the site’s workflow, the Site Coordinator always needs to complete the studies, or in others they will only provide information that is missing when it is requested. This section provides information about the studies that are found in the BRIT Roentgen Works Flow User Manual – Site Coordinator (UM-BRW-001.0-S) tab. 55 Chapter 5 – Incomplete Orders Tab Action Buttons There are six Action buttons in the tab: – This button allows the Site Coordinator to mark the Order as Complete. The study is then sent to the “Work Queued” tab unless a Radiologist is accepting studies, then it is sent to the “Delivered” tab for the Radiologist to view – This Action button allows the Site Coordinator to delete the order. – This Action allows the Site Coordinator to select a study and mark it as a comparison study to send to the Radiologist to view and evaluate against the current study. – This Action button allows the Site Coordinator to define a new location at the hospital facility for which the Reading Services Group will contact regarding urgent or critical studies. Typically this is the ER. Existing locations can be modified in the – This Action button allows the Site Coordinator to define new referring physician at one of the imaging centers or hospital facilities. Existing physicians can be modified in the tab. tab. – This button allows the Site Coordinator to see the detailed history of the study, such as when it was created, completed, to whom it was assigned, when it was sent, when it was delivered, when it was read, each time the status was reset, and what the status was reset to by the last user. Color Coding The studies shown in the tab are color coded as follows: – Indicates that the study is a Routine study, and is not identified as critical. – Indicates that this is the currently selected study. 56 BRIT Roentgen Works Flow User Manual – Site Coordinator (UM-BRW-001.0-S) Chapter 5 – Incomplete Orders Tab Selecting the Columns The columns for the tab list can be customized according to individual preferences, but there are several that have been selected to be identified as system defaults, and are selected when the system is delivered, or when the button is selected. There are a variety of additional columns available in the Setup panel, and these can be selected and added, or removed at any time. The system default information shown for these studies in the tab includes: # Images – Displays the total number of images in the study. ACC# – Displays the Accession number assigned to the study. Body Part – Displays the specific body part, or region of interest, on which the study was performed. Date of Birth – Displays the patient’s birth date. Description – Displays the Study Description as entered either from the modality or from the order. Modality – Identifies the type of modality on which the study was performed. Patient ID – Displays the Patient’s identification number from the sending site. Patient Name – Displays the Patient’s name. Priority – Determines if the study is routine or critical so that the Radiologist knows the importance of the study. Sex – Identifies the Gender of the patient. Site – Identifies the facility where the patient study was captured. Time of Study – Provides the date and time that the exam was captured at the imaging facility. To change the columns, open the Setup panel by clicking on the to the right, and clicking on the checkbox next to the desired heading. If the checkbox currently has a , then the column displays on the Patient List. If the checkbox is blank, the column is not displayed on the Patient List. BRIT Roentgen Works Flow User Manual – Site Coordinator (UM-BRW-001.0-S) 57 Chapter 5 – Incomplete Orders Tab The columns can then be moved, or resized according to personal preference. For a complete list of all the available columns, see the section entitled Available Columns. Order Information The Order Info panel at the bottom of the to enter the information that is missing in the Order. tab allows the Site Coordinator Once the missing information is entered, they can complete the Order from here and the study moves on to the next step in the workflow. This Order Info panel can not be customized in the Setup panel according to individual preference. There default fields includes: Priority – Indicates if the study is routine or critical indicating the importance of the study. Reason for Study– Indicates the reason that the referring physician ordered the study. History – Provides the brief patient history that was sent with the study. Tech Comment – Provides the text from the Technologist that was entered when the study was captured. This alerts the Site Coordinator to additional information that the Technologist contributed to the patient’s exam. CPT – Displays the Procedure Code for the selected study. Location – Identifies the patient location where the physician contact is available, such as the ER, and may be used as a point of contact. Physician – Displays the name of the patient’s referring physician. Contact #2 – Identifies the backup contact to be used if the physician can’t be reached. Misc Contact # – Displays an additional telephone or pager number for an additional contact for the referring physician. Note: Note: 58 Note that even though the information on the order is incomplete, the study may have already been sent to the workstation; however, it won’t be placed in the Delivered queue until it is complete. BRIT Roentgen Works Flow User Manual – Site Coordinator (UM-BRW-001.0-S) Chapter 5 – Incomplete Orders Tab Taking Action in the “Incomplete Orders” Window There are six actions that can be taken with the patients listed in the Dismissing the study Marking the Study as a Comparison Study Viewing the Study History Marking the Order as “Complete” Adding a New Location Adding a New Physician list Dismissing the Study This Action button allows the Site Coordinator to delete the order. This may need to be deleted because the site does not want the Radiologist to read the study. To dismiss the study, follow these steps: 1. Select the patient’s study. 2. Click on the button. 3. The study is removed from the list. Note: Note: Be aware that the study is not actually deleted, it is flagged for dismissal, but is not removed from the system. Also currently, there is no confirmation to verify that the correct study is selected. BRIT Roentgen Works Flow User Manual – Site Coordinator (UM-BRW-001.0-S) 59 Chapter 5 – Incomplete Orders Tab Marking the Study as a Comparison Study This Action allows the Site Coordinator to select a study and mark it as a comparison study. This allows the study to be sent to the Radiologist for viewing and evaluation against the current study to see improvement or deterioration in the patient’s condition. To mark the study as a comparison study, follow these steps: 1. Select the patient’s study. 2. Click on the button. 3. The study is flagged as a comparison study for the Radiologist. 4. The study is then moved to the appropriate queue. Viewing the Study History The Study History for the selected study allows the user to see the detailed history of the study, such as when it was created, completed, to whom it was assigned, when it was sent, when it was delivered, when it was read, each time the status was reset, and each status setting. To view the study history: 1. Make sure the correct patient study is selected. 2. Click on the button. 3. The Study history pop-up window opens and displays all events that have been posted regarding the study. This could include such events as: When the study was created When the study was completed by the Site Coordinator When the study was assigned When the study was sent When the study was delivered When the study was read When the study was marked urgent When they study was put “on-hold” 4. When the desired information is received, click on the window. 60 button to close the BRIT Roentgen Works Flow User Manual – Site Coordinator (UM-BRW-001.0-S) Chapter 5 – Incomplete Orders Tab Marking the Order as “Complete” Before the Site Coordinator can mark the order as “Complete”, the missing information needs to be entered. This entry is done in the Order Info panel below the study list section. In this example the Physician and secondary contact information are missing. . To mark the Order as “Complete”: 1. Enter the missing information by typing in the information or selecting from the drop-down menu. 2. Once the information is entered or selected, click on the button. 3. The Order is then sent to the Work Queue to await delivery to a Radiologist. It may quickly go to the Delivered queue if a Radiologist is logged in and accepting studies. Note: Note: Note that a shortcut to finding the information in a drop-down menu is to begin typing the name in the field, and as characters are matched the name appears. Click on the correct name when it appears. BRIT Roentgen Works Flow User Manual – Site Coordinator (UM-BRW-001.0-S) 61 Chapter 5 – Incomplete Orders Tab Adding a Physician One of the actions that can be taken here is the ability to add a new Physician, who was not on the current list, but is responsible for patient care. This is helpful in that the Site Coordinator can simply click on the button without having to select the tab and add the user and tab. then have to return to the To add a new Physician, follow these steps: 1. Click on the button. 2. The Physician window opens, as shown here: 3. Fill out each of the fields with the information to define the new Physician. These fields include: a. User ID - This is the identification that the user enters to log into the system. b. User Name – This is the name of the user. c. Mobile # – This is the cell phone number for the new user. d. Office # – This is the office telephone number for the new user. e. Home # – This is the home telephone number for the new user. f. Pager # – This is the pager number for the new user. g. Fax # – This is the fax number for the new user. h. E-mail Address – This is the e-mail address for the new user. i. Priority Alert #1 – This allows the physician to select the primary alert method to be used when they need to be contacted regarding an urgent finding or critical study for one of their patients. Click on the arrow next to the field and select the desired method. The choices are: i. 62 No Alert – When this is selected the physician will not be contacted for urgent findings or critical studies. BRIT Roentgen Works Flow User Manual – Site Coordinator (UM-BRW-001.0-S) Chapter 5 – Incomplete Orders Tab ii. Call Mobile Phone – When this is selected the physician will be contacted via the mobile phone number that is entered. iii. Call Office Phone – When this is selected the physician will be contacted via the office telephone number that is entered. iv. Call Home Phone – When this is selected the physician will be contacted via the Home telephone number that is entered. v. Send Page – When this is selected the physician will be contacted via their pager. Note: Note: Note that a shortcut to finding the information in a drop-down menu is to begin typing the name in the field, and as characters are matched the name appears. Click on the correct name when it appears. j. Priority Alert #2 – This allows the physician to select the secondary alert method to be used when they need to be contacted regarding an urgent finding or critical study for one of their patients. Click on the arrow next to the field and select the desired method. The choices are: 4. On the right side is the Site Access panel which identifies the sites for which the new Physician has viewing authorization. Click on the checkbox for the sites, and a appears in the checkbox. To deselect a site that was selected in error, click on the checkbox again, and the is removed. 5. Once all of the fields are entered, click on the button. If New Physician was selected in error, or if the information entered is not to be saved, click on the button to close the window. BRIT Roentgen Works Flow User Manual – Site Coordinator (UM-BRW-001.0-S) 63 Chapter 5 – Incomplete Orders Tab Adding a New Location One of the actions that can be taken is to add a new Location in the hospital or imaging site, which was not previously entered, such as an emergency room. This is helpful in that the Site Coordinator can simply click on the having to select the button without tab and add the new location then, then have to return to the tab. To add a new Location, follow these steps: 1. Click on the button. 2. The New Location window opens, as shown here: 3. Fill out each of the fields with the information to define the new Location. These fields include: a. Location ID - This is the identification used by the system. b. Location Name – This is the name of the location, such as Emergency Room One, or ER West. c. Primary # – This is the main contact number for the location. d. Secondary # – This is the second contact number for the location. e. Fax # – This is the fax number for the new location. 64 BRIT Roentgen Works Flow User Manual – Site Coordinator (UM-BRW-001.0-S) Chapter 5 – Incomplete Orders Tab Viewing the Faxes If a fax is received from the Site Coordinator to clarify missing information, the fax can be viewed from the Faxes panel in the lower right of the window. Typically the fax is assigned to a study by the Site Coordinator and is shown in the tab. In order to view the fax, follow these steps: 1. Click on the appropriate study 2. Click on the button. 3. The Fax opens in a separate window and displays the details, as shown to the left: 4. Once the user has read the information, at the top right to close click on the the window. For faxes that are not assigned, they appear in the tab. To assign the fax: 1. Click on the appropriate study. 2. Click on the appropriate fax. 3. Click on the button. 4. The fax now appears under the tab. BRIT Roentgen Works Flow User Manual – Site Coordinator (UM-BRW-001.0-S) 65 Chapter 5 – Incomplete Orders Tab 66 BRIT Roentgen Works Flow User Manual – Site Coordinator (UM-BRW-001.0-S) Chapter 6 – Work Queued Tab Chapter 6 – Work Queued Tab The tab contains the studies that have been assigned to the Radiologist, but are not downloaded or “delivered” yet; these are exams that are “queued” to be downloaded to the Radiologist’s DICOM workstation that is defined in their user profile. Once the Radiologist begins accepting studies, they will be downloaded. Components of the Work Queued Window The tab window is shown below: The number in red next to the tab indicates the number of studies listed in that tab. Once the Radiologist logs in and begins accepting studies, the patient studies in the tab are then delivered. Once the images are delivered, the studies are removed from this window and placed in the tab. This chapter identifies the steps that can be performed in the BRIT Roentgen Works Flow User Manual – Site Coordinator (UM-BRW-001.0-S) tab. 67 Chapter 6 – Work Queued Tab Action Buttons There are three buttons in the tab: – This Action button allows the Site Coordinator to place the study in the tab because of additional information that is needed before the Radiologist can complete the report. It can be seen by the Site Coordinator or the Service Manager. – This Action button allows the Site Coordinator to modify the patient’s order because of missing information the Radiologist needs to complete the study’s report. – This button allows the user to see the detailed history of the study, such as when it was created, completed, to whom it was assigned, when it was sent, when it was delivered, when it was read, each time the status was reset, and what the status was reset to by the last user. Color Coding The studies shown in the tab are color coded as follows: – Alerts the Radiologists that the study has come in from the Site tagged as a “Critical” study. The Radiologist needs to select these studies for immediate read and diagnosis. – Indicates that the study is a Routine study. – Indicates that this is the currently selected study. 68 BRIT Roentgen Works Flow User Manual – Site Coordinator (UM-BRW-001.0-S) Chapter 6 – Work Queued Tab Selecting the Columns The columns for the tab list can be customized according to individual preferences, but there are several that have been selected to be identified as system defaults, and are selected when the system is delivered, or when the button is selected. There are a variety of additional columns available in the Setup panel, and these can be selected and added, or removed at any time. The system default information shown for these studies in the tab includes: # Images – Displays the total number of images that are in the selected study. ACC# – Displays the Accession number assigned to the study. Body Part – Displays the specific body part, or region of interest, on which the study was performed. Date of Birth – Displays the patient’s birth date. Description – Displays the Study Description as entered either from the modality or from the order. ETA – Displays the Estimated Time of Arrival for the study to be delivered. available only in the Work Queued, tab. The ETA is Modality – Identifies the type of modality on which the study was performed. Patient ID – Displays the Patient’s identification number from the sending site. Patient Name – Displays the Patient’s name as sent from the sending site. Priority – Determines if the study is routine or critical so that the Radiologist knows the importance of the study. Radiologist – Displays the name of the Radiologist assigned to receive the study. Sex – Identifies the Gender of the patient. Site – Identifies the facility where the patient study was captured. To change the columns, open the Setup panel by clicking on the to the right, and clicking on the checkbox next to the desired heading. If the checkbox has a , then the column displays on the Patient List. If the checkbox currently does not have a , the column is not displayed on the Patient List. The columns can then be moved, or resized according to personal preference. BRIT Roentgen Works Flow User Manual – Site Coordinator (UM-BRW-001.0-S) 69 Chapter 6 – Work Queued Tab For a complete list of all the available columns, see the section entitled Available Columns. Detail Information The Detail information at the bottom provides additional specific information about the selected study. This Detail panel can be customized according to individual preferences, but there are several that have been selected to be identified as system defaults, and are selected when the system is delivered, or when the button is selected. The system default information shown for these studies in the window include: Contact #2 – Identifies the backup contact to be used if the physician can’t be reached. Description – Displays the Study Description as entered either from the modality or from the order. DICOM Doc – Displays the name of the referring physician as it is reported in the DICOM header of the study. Final Read – Determines if the Radiologist is to do a final diagnosis on the study, and is identified as a Yes or a No in the Final Read column next to the Study. History – Provides the brief patient history that was sent with the study. Location – Identifies the patient location where the physician contact is available, such as the ER, and may be used as a point of contact. Misc Contact # - Displays an additional telephone or pager number for an additional contact for the referring physician. Physician – Displays the name of the patient’s referring physician. Reason for Study – Indicates the reason that the referring physician ordered the study for the patient. Tech Comment – Provides the text from the Technologist that were entered when the study was captured. This alerts the Radiologist to additional information that the Technologist contributed to the patient’s exam. To change the Detail selections, open the Setup panel by clicking on the to the right, and clicking on the checkbox next to the desired detail. If the checkbox has a , then the detail displays on the Patient List. If the checkbox currently does not have a , the detail is not displayed on the Patient List. 70 BRIT Roentgen Works Flow User Manual – Site Coordinator (UM-BRW-001.0-S) Chapter 6 – Work Queued Tab For a complete list of the selections available for the Details section, see the list in the Available Detail Selections section. Taking Action in the “Work Queued” Window There are three actions that can be taken with the patients listed in the which is viewing the Study History. Putting the study “On-Hold” Editing the Order information Viewing the history of the study list Putting the Study “On-Hold” There are times when the study requires additional information regarding the patient before a complete diagnosis can be dictated by the Radiologist. Typically, the Radiologist places the study “On-Hold; however, the Site Coordinator can also place a study “On-Hold”. The study remains there until it is removed from hold as the required information is delivered. To place the study “On-Hold: 1. Select the correct study. 2. Click on the button, and the pop-up window opens: . 3. Fill in the “Reason for Hold” in the field. 4. Click on the button. 5. The study is moved to the tab. If the incorrect study was selected, or the study does not have to be placed on hold, click on the to close the window without placing the study “On-Hold”. BRIT Roentgen Works Flow User Manual – Site Coordinator (UM-BRW-001.0-S) 71 Chapter 6 – Work Queued Tab Once the information is completed, the study can be “Completed” and removed from the “On-Hold” state by the Site Coordinator. Editing the Order Information The Order information for the Study can be edited by the Site Coordinator when changes, or updates, are needed. Note: Note: Be aware that the Order can only be edited until the study is marked as “Read”. To edit the Order information, follow these steps: 1. Select the patient with the Order information that needs to be changed. 2. The Edit Order Info popup window opens, as shown here: 3. Click on each field to be changed and enter the correct information. Note: Note: Note that a shortcut to finding the information in a drop-down menu is to begin typing the name in the field, and as characters are matched the name appears. Click on the correct name when it appears. 4. Click on the the window closes. button to retain the changes made. The changes are saved and If the incorrect patient was selected, or the changes do not need to be made, click on the button to close the window without retaining the changes. 72 BRIT Roentgen Works Flow User Manual – Site Coordinator (UM-BRW-001.0-S) Chapter 6 – Work Queued Tab Viewing the Study History The Study History for the selected study allows the user to see the detailed history of the study, such as when it was created, completed, to whom it was assigned, when it was sent, when it was delivered, when it was read, each time the status was reset, and each status setting. To view the study history: 1. Make sure the correct patient study is selected. 2. Click on the button. 3. The Study history pop-up window opens and displays all events that have been posted regarding the study. This could include such events as: When the study was created When the study was completed by the Site Coordinator When the study was assigned When the study was sent When the study was delivered When the study was read When the study was marked urgent When they study was put “on-hold” 4. When the user has the information needed, click on the window. BRIT Roentgen Works Flow User Manual – Site Coordinator (UM-BRW-001.0-S) button to close the 73 Chapter 6 – Work Queued Tab Viewing the Faxes If a fax is received from the Site Coordinator to clarify missing information, the fax can be viewed from the Faxes panel in the lower right of the window. Typically the fax is assigned to a study by the Site Coordinator and is shown in the tab. In order to view the fax, follow these steps: 1. Click on the appropriate study 2. Click on the button. 3. The Fax opens in a separate window and displays the details, as shown to the left: 4. Once the user has read the at the top information, click on the right to close the window. For faxes that are not assigned, they appear in the tab. To assign the fax: 1. Click on the appropriate study. 2. Click on the appropriate fax. 3. Click on the button. 4. The fax now appears under the 74 tab. BRIT Roentgen Works Flow User Manual – Site Coordinator (UM-BRW-001.0-S) Chapter 7 – Delivered Tab Chapter 7 – Delivered Tab The tab provides the Site Coordinator with a list of studies that have been delivered to the various Radiologists. The Site Coordinator can get a list of the studies grouped by Radiologist for easier viewing. These include both the Routine and Critical patient, and are colorcoded to highlight and help identify the Critical patients. This section identifies the components of the taken with this tab. tab, and the actions that can be Components of the Delivered Window The tab window is shown below: The number in red next to the tab indicates the number of studies listed in that tab. This window shows the studies that have been delivered to the various radiologists. This section provides information on the buttons, color coding, changing the columns, and changing the details for the tab. BRIT Roentgen Works Flow User Manual – Site Coordinator (UM-BRW-001.0-S) 75 Chapter 7 – Delivered Tab Action Buttons There are five buttons available in the tab that allows the user to take specific actions for the patients in this list to complete the study and dictate a report on the viewing workstation. These buttons are shown below: – This button allows the Site Coordinator to place the study in the tab because of additional information that is needed for the Radiologist to complete the report. – This button displays a list of contact information for the referring physician identified on the study. Optionally, the Site Coordinator can use Skype contact the referring physician by automatically dialing through the workstation. Skype is a software package that enables the user to make telephone calls anywhere in the world automatically by connecting through the computer to landline or mobile phones. When this button is selected a pop-up window opens to allow the Site Coordinator to select the referring physician who needs to be contacted regarding this patient. Click on the contact number to select the desired contact method. – This Action allows the Site Coordinator to modify the patient’s order because of missing information the Radiologist needs to complete the study’s report. - This Action button allows the Site Coordinator to view the comments and statuses of a study that has been identified as urgent. – This button allows the user to see the detailed history of the study, such as when it was created, completed, to whom it was assigned, when it was sent, when it was delivered, when it was read, each time the status was reset, and what the status was reset to by the last user. 76 BRIT Roentgen Works Flow User Manual – Site Coordinator (UM-BRW-001.0-S) Chapter 7 – Delivered Tab Color Coding The studies are color coded as follows: – Alerts the Radiologists that the study has come in from the Site tagged as a “Critical” study. The Radiologist needs to select these studies for immediate read and diagnosis. – Indicates that the study is a Routine study. – Indicates that this is the currently selected study. If there is an interface to a Radiologist viewing workstation, such as BRIT Vision, double-clicking on one of these selected patients, automatically downloads the study to the workstation without further action by the user to view the study. If there is not interface, the user must take additional action on the viewer to open the study. Selecting Columns The columns in the patient list can be customized according to individual preferences, but there are several that have been selected to be identified as system defaults, and are selected when the system is delivered, or when the button is selected. Any of the columns can be selected, but the system default information shown for these studies in the tab includes: ACC# – Displays the Accession number assigned to the study. Body Part – Displays the specific body part, or region of interest, on which the study was performed. Date of Birth – Displays the patient’s birth date. Description – Displays the Study Description as entered either from the modality or from the order. ETA – Displays the Estimated Time of Arrival for the study to be delivered. Modality – Identifies the type of modality on which the study was performed. Patient ID – Displays the Patient’s identification number from the sending site. Patient Name – Displays the Patient’s name as sent from the sending site. Priority – Determines if the study is routine or critical so that the Radiologist knows the importance of the study. BRIT Roentgen Works Flow User Manual – Site Coordinator (UM-BRW-001.0-S) 77 Chapter 7 – Delivered Tab Radiologist – Displays the name of the Radiologist handling the study. Sex – Identifies the Gender of the patient. Site – Identifies the facility where the patient study was captured. To change the columns selections, open the Setup panel by clicking on the to the right, and clicking on the checkbox next to the desired heading. If the checkbox has a , it displays on the Patient List. If the checkbox currently does not have a , the column is not displayed on the Patient List. The columns can then be moved, or resized according to personal preference. For a complete list of available columns, see the section Available Columns. Detail Information The Detail information at the bottom provides additional specific information about the selected study. This Detail panel can be customized according to individual preferences, but there are several that have been selected to be identified as system defaults, and are selected when the system is delivered, or when the button is selected. The system default information shown for these studies in the window include: Contact #2 – Identifies the backup contact to be used if the physician can’t be reached. DICOM Doc – Displays the name of the referring physician as it is reported in the DICOM header of the study. Final Read – Determines if the Radiologist is to do a final diagnosis on the study, and is identified as a Yes or a No in the Final Read column next to the Study. History – Provides the brief patient history that was sent with the study. Location – Identifies the patient location where the physician contact is available, such as the ER, and may be used as a point of contact.. Misc Contact # - Displays an additional telephone or pager number for an additional contact for the referring physician. Physician – Displays the name of the patient’s referring physician. Reason for Study – Indicates the reason that the referring physician ordered the study for the patient. 78 BRIT Roentgen Works Flow User Manual – Site Coordinator (UM-BRW-001.0-S) Chapter 7 – Delivered Tab Study Status – Identifies the status of the study, such as On Hold, Urgent, Delivered, Unread, or Read. The Study Status Tech Comment – Provides the text from the Technologist that were entered when the study was captured. This alerts the Radiologist to additional information that the Technologist contributed to the patient’s exam. to the right, and To change the Detail selections, open the Setup panel by clicking on the clicking on the checkbox next to the desired detail. If the checkbox has a , then the details display on the Patient List. If the checkbox currently has a , when it is removed, the detail is not displayed on the Patient List. For a complete list of the Detail selections available, see the section Available Detail Selections. Taking Actions in the “Delivered” Tab There are several actions that can be taken to resolve the issues with the patients listed in the list which include: Putting the Study “On-Hold” Viewing the Urgent History Calling the referring physician contact Viewing the Study History Editing the Order information This section provides the steps to perform each of these daily tasks in the tab. Putting the Study “On-Hold” There are times when the study requires additional information regarding the patient before a complete diagnosis can be dictated by the Radiologist. Typically, the Radiologist places the study “On-Hold; however, the Site Coordinator can also place a study “On-Hold”. The study remains there until it is removed from hold as the required information is delivered. To place the study “On-Hold: 1. Select the correct study. 2. Click on the button, and the pop-up window opens: 3. Fill in the “Reason for Hold” in the field. BRIT Roentgen Works Flow User Manual – Site Coordinator (UM-BRW-001.0-S) 79 Chapter 7 – Delivered Tab 4. Click on the button. 5. The study is moved to the tab. If the incorrect study was selected, or the study does not have to be placed on hold, click on the button to close the window without placing the study “On-Hold”. Once the information is completed, the study can be “Completed” and removed from the “On-Hold” state by the Site Coordinator. Calling the Referring Physician Once an Urgent Finding has been identified by the Radiologist, the referring physician must be contacted as quickly as possible to ensure expedited care for the patient. One of the optional features of this system is an automated integration with BRIT Phone or to the Skype application. Skype is an optional software package that enables the user to make telephone calls anywhere in the world automatically by connecting through the computer to landline or mobile phones. It allows the user to effortlessly contact the referring physician by simply clicking on the button, double-clicking on the desired contact’s phone number, and dialing through the workstation via the Skype application. The contact information may be automatically entered from the HL-7 message; however, this is not always available. Other methods for getting the contact information entered include: Importing the file with the Referring Physician information Users with proper authority can manually enter the Referring Physician information Referring Physicians can maintain and update their own contact information. The Referring Physician contact information must be entered into the Roentgen Works database in order for Skype to have a list of telephone, pager, or alternate number to use to contact the referring physician. Generally, the Site Coordinator at the facility is responsible for establishing the referring physician’s contact information, but the users update their own profile. Note: Note: To call the referring physician: 1. Make sure the correct patient study is selected. 2. Click on the button. 3. When this button is selected a pop-up window 80 BRIT Roentgen Works Flow User Manual – Site Coordinator (UM-BRW-001.0-S) Chapter 7 – Delivered Tab opens to allow the Radiologist to click on the desired contact method for the referring physician. 4. Click on the desired contact number to select the number to call. 5. If Skype is being used, double-click on the number and the system automatically dials the number, and the call is connected. When the button is selected, the Call Contacts window closes. If the referring physician answers, the call is connected between the two parties. If the referring physician does not answer, Skype can continue autodialing until the contact is made. Notifications Using BRIT Phone BRIT Phone is initiated automatically each time the Urgent Finding action is taken, or if additional updates are made. This application alerts the referring physician that the Radiologist has found an issue that needs immediate action for the patient. The following actions are taken by BRIT Phone when Urgent Finding is used: Calls the Referring Physician Makes an announcement requesting verification of name The user presses “1” to verify they are the intended recipient, or can hang up. If the correct recipient is identified, the announcement is made regarding the patient name, ID, and the urgent finding indicated by the Radiologist. The user can elect to: 4. Press “1” to simply Acknowledge the call 5. Press “2” to call the Radiologist who identified the urgent finding. 6. Press “3” to call the patient Location, and alert them to the urgent finding. The user can then hang up. Note: Note: BRIT Phone only makes calls to the Referring Physician when the Urgent status is updated, it does not place calls when the Site Coordinator adds Notes or completes the Urgent finding. BRIT Roentgen Works Flow User Manual – Site Coordinator (UM-BRW-001.0-S) 81 Chapter 7 – Delivered Tab Editing the Order Information The Order information for the Study can be edited by the Site Coordinator when changes, or updates, are needed. Note: Note: Be aware that the Order can only be edited until the study is marked as “Read”. To edit the Order information: 1. Select the correct patient. 2. Select the patient with the Order information that needs to be changed. 3. The Edit Order Info pop-up window opens, as shown here: 4. Click on each field to be changed and enter the correct information. Note: Note: Note that a shortcut to finding the information in a drop-down menu is to begin typing the name in the field, and as characters are matched the name appears. Click on the correct name when it appears. 5. Click on the the window closes. button to retain the changes made. The changes are saved and If the incorrect patient was selected, or the changes do not need to be made, click on the to close the window without retaining the changes. 82 BRIT Roentgen Works Flow User Manual – Site Coordinator (UM-BRW-001.0-S) Chapter 7 – Delivered Tab Viewing the Urgent History The Urgent History for the study can be viewed by the Site Coordinator to see the comments and statuses of a study that has been identified as urgent by another user, typically the Radiologist. To view the urgent history: 1. Make sure the correct patient study is selected. 2. Click on the button. 3. The Urgent history pop-up window opens and displays all events that have been posted regarding the study. This could include such events as Viewed, Updated, or Called. 4. Click on the x at the top to close the window. Viewing the Study History The Study History for the selected study allows the user to see the detailed history of the study, such as when it was created, completed, to whom it was assigned, when it was sent, when it was delivered, when it was read, each time the status was reset, and each status setting. To view the study history: 1. Make sure the correct patient study is selected. 2. Click on the button. 3. The Study history pop-up window opens and displays all events that have been posted regarding the study. This could include such events as: When the study was created When the study was completed by the Site Coordinator When the study was assigned When the study was sent When the study was delivered When the study was read When the study was marked urgent When they study was put “on-hold” 4. When the desired information is received, click on the window. BRIT Roentgen Works Flow User Manual – Site Coordinator (UM-BRW-001.0-S) button to close the 83 Chapter 7 – Delivered Tab Viewing the Faxes If a fax is received from the Site Coordinator to clarify missing information, the fax can be viewed from the Faxes panel in the lower right of the window. Typically the fax is assigned to a study by the Site Coordinator and is shown in the tab. In order to view the fax, follow these steps: 1. Click on the appropriate study 2. Click on the button. 3. The Fax opens in a separate window and displays the details, as shown to the left: 4. Once the desired information is read by the user, click on the at the top right to close the window. For faxes that are not assigned, they appear in the tab. To assign the fax: 1. Click on the appropriate study. 2. Click on the appropriate fax. 3. Click on the button. 4. The fax now appears under the 84 tab. BRIT Roentgen Works Flow User Manual – Site Coordinator (UM-BRW-001.0-S) Chapter 8 – Read Tab Chapter 8 – Read Tab tab contains a list of the patient studies that have been read by the Radiologist, The and for which a report has been dictated and completed. The studies in this tab include both the Routine and Critical patients, and are color-coded to highlight and help identify the Critical patient’s studies. This provides the Site Coordinator with a list of the studies all Radiologists have marked as “Read”. This section identifies the components, uses, and features of the tab. Components of the Read Window The Queue window is shown below: The number in red next to the tab indicates the number of studies listed in that tab. As the studies were marked “Read” by the Radiologist they are moved to this tab. This section provides information on the buttons, color coding, changing the columns, and changing the details for the tab. BRIT Roentgen Works Flow User Manual – Site Coordinator (UM-BRW-001.0-S) 85 Chapter 8 – Read Tab Action Buttons There are three Action buttons available in the tab that allows the user to take specific actions for the patients in this list to complete the study and dictate a report on the viewing workstation. These buttons are shown below: – This button displays a list of contact information for the referring physician identified on the study. Optionally, the Site Coordinator can use Skype contact the referring physician by automatically dialing through the workstation. Skype is an optional software package that enables the user to make telephone calls anywhere in the world automatically by connecting through the computer to landline or mobile phones. When this button is selected a pop-up window opens to allow the Site Coordinator to select the referring physician who needs to be contacted regarding this patient. Click on the contact number to select the desired contact method. - This Action button allows the Site Coordinator to view the comments and statuses of a study that has been identified as urgent. – This button allows the user to see the detailed history of the study, such as when it was created, completed, to whom it was assigned, when it was sent, when it was delivered, when it was read, each time the status was reset, and what the status was reset to by the last user. Color Coding The studies are color coded as follows: – Alerts the Radiologists that the study has come in from the Site tagged as a “Critica” study. The Radiologist needs to select these studies for immediate read and diagnosis. – Indicates that the study is a Routine study. – Indicates that this is the currently selected study. If there is an interface to a Radiologist viewing workstation, such as BRIT Vision, double-clicking on one of these selected patients, automatically downloads the study to the workstation without further action by the user to view the study. If there is not interface, the user must take additional action on the viewer to open the study. 86 BRIT Roentgen Works Flow User Manual – Site Coordinator (UM-BRW-001.0-S) Chapter 8 – Read Tab Selecting the Columns The columns in the patient list can be customized according to individual preferences, but there are several that have been selected to be identified as system defaults, and are selected when the system is delivered, or when the button is selected. Any of the columns can be selected, but the system default information shown for these studies in the tab includes: ACC# – Displays the Accession number assigned to the study. Body Part – Displays the specific body part, or region of interest, on which the study was performed. Date of Birth – Displays the patient’s birth date. Description – Displays the Study Description as entered either from the modality or from the order. Final Read – Determines if the Radiologist is to do a final diagnosis on the study, and is identified as a Yes or a No in the Final Read column next to the Study. Modality – Identifies the type of modality on which the study was performed. Patient ID – Displays the Patient’s identification number from the sending site. Patient Name – Displays the Patient’s name as sent from the sending site. Priority – Determines if the study is routine or critical so that the Radiologist knows the importance of the study. Radiologist – Displays the name of the Radiologist handling the study. Sex – Identifies the Gender of the patient. Site – Identifies the facility where the patient study was captured. to the right, and clicking on the To change the columns, open the Setup panel by clicking on the checkbox next to the desired heading. If the checkbox has a , the column displays on the Patient List. If the checkbox currently does not have a , the column is not displayed on the Patient List. The columns can then be moved, or resized according to personal preference. For a complete list of available columns, see the section Available Columns. BRIT Roentgen Works Flow User Manual – Site Coordinator (UM-BRW-001.0-S) 87 Chapter 8 – Read Tab Detail Information The Detail information at the bottom provides additional specific information about the selected study. This Detail panel can be customized according to individual preferences, but there are several that have been selected to be identified as system defaults, and are selected when the system is delivered, or when the button is selected. The system default information shown for these studies in the window include: Contact #2 – Displays the backup contact in case the Referring Physician can not be reached. DICOM Doc – Displays the name of the referring physician as it is reported in the DICOM header of the study. Final Read – Determines if the Radiologist is to do a final diagnosis on the study, and is identified as a Yes or a No in the Final Read column next to the Study. History – Provides the brief patient history that was sent with the study. Location – Identifies the patient location where the physician contact is available, such as the ER, and may be used as a point of contact.. Physician – Displays the name of the patient’s referring physician. Reason for Study – Indicates the reason that the referring physician ordered the study for the patient. Tech Comment – Provides the text from the Technologist that were entered when the study was captured. This alerts the Radiologist to additional information that the Technologist contributed to the patient’s exam. To change the Detail selections, open the Setup panel by clicking on the to the right, and clicking on the checkbox next to the desired detail. If the checkbox has a , it displays on the Patient List. If the checkbox currently does not have a , the detail is not displayed on the Patient List. For a complete list of the Detail selections available, see the section Available Detail Selections. 88 BRIT Roentgen Works Flow User Manual – Site Coordinator (UM-BRW-001.0-S) Chapter 8 – Read Tab Taking Actions in the “Read” Tab list which There are several actions that can be taken with the patients listed in the include: Calling the referring physician contact Viewing the Urgent History Viewing the Study History This section provides the steps to perform each of these daily tasks in the tab. Calling the Referring Physician Once an Urgent Finding has been identified by the Radiologist, the referring physician must be contacted as quickly as possible to ensure expedited care for the patient. One of the optional features of this system is an automated integration with BRIT Phone or to the Skype application. Skype is an optional software package that enables the user to make telephone calls anywhere in the world automatically by connecting through the computer to landline or mobile phones. It allows the user to effortlessly contact the referring physician by simply clicking on the button, double-clicking on the desired contact’s phone number, and dialing through the workstation via the Skype application. The contact information may be automatically entered from the HL-7 message; however, this is not always available. Other methods for getting the contact information entered include: Importing the file with the Referring Physician information Users with proper authority can manually enter the Referring Physician information Referring Physicians can maintain and update their own contact information. The Referring Physician contact information must be entered into the Roentgen Works database in order for Skype to have a list of telephone, pager, or alternate number to use to contact the referring physician. Generally, the Site Coordinator at the facility is responsible for establishing the referring physician’s contact information, but the users update their own profile. To call the referring physician: Note: Note: BRIT Roentgen Works Flow User Manual – Site Coordinator (UM-BRW-001.0-S) 89 Chapter 8 – Read Tab 1. Make sure the correct patient study is selected. 2. Click on the button. 3. When this button is selected a pop-up window opens to allow the Radiologist to click on the desired contact method for the referring physician. 4. Click on the desired contact number to select the number to call. 5. If Skype is being used, double-click on the number for the system to automatically dial the number, and connect the call. When the button is selected, the Call Contacts window closes. If the referring physician answers, the call is connected between the two parties. If the referring physician does not answer, Skype can continue autodialing until the contact is reached. Notifications Using BRIT Phone BRIT Phone is initiated automatically each time the Urgent Finding action is taken, or if additional updates are made. This application alerts the referring physician that the Radiologist has found an issue that needs immediate action for the patient. The following actions are taken by BRIT Phone when Urgent Finding is used: Calls the Referring Physician Makes an announcement requesting verification of name The user presses “1” to verify they are the intended recipient, or can hang up. If the correct recipient is identified, the announcement is made regarding the patient name, ID, and the urgent finding indicated by the Radiologist. The user can elect to: 1. Press “1” to simply Acknowledge the call 2. Press “2” to call the Radiologist who identified the urgent finding. 3. Press “3” to call the patient Location, and alert them to the urgent finding. 90 The user can then hang up. BRIT Roentgen Works Flow User Manual – Site Coordinator (UM-BRW-001.0-S) Chapter 8 – Read Tab Note: Note: BRIT Phone only makes calls to the Referring Physician when the Urgent status is updated, it does not place calls when the Site Coordinator adds Notes or completes the Urgent finding. Viewing the Urgent History The Urgent History for the study can be viewed by the Site Coordinator to see the comments and statuses of a study that has been identified as urgent by another user, typically the Radiologist. To view the urgent history: 1. Make sure the correct patient study is selected. 2. Click on the button. 3. The Urgent history pop-up window opens and displays all events that have been posted regarding the study such as Viewed, Updated, or Called. 4. Click on the x at the top to close the window. Viewing the Study History The Study History for the selected study allows the user to see the detailed history of the study, such as when it was created, completed, to whom it was assigned, when it was sent, when it was delivered, when it was read, each time the status was reset, and each status setting. To view the study history: 1. Make sure the correct patient study is selected. 2. Click on the button. 3. The Study history pop-up window opens and displays all events that have been posted regarding the study. This could include such events as: When the study was created BRIT Roentgen Works Flow User Manual – Site Coordinator (UM-BRW-001.0-S) 91 Chapter 8 – Read Tab When the study was completed by the Site Coordinator When the study was assigned When the study was sent When the study was delivered When the study was read When the study was marked urgent When they study was put “on-hold” 4. When the desired information is read, click on the window. button to close the Viewing the Faxes If a fax is received from the Site Coordinator to clarify missing information, the fax can be viewed from the Faxes panel in the lower right of the window. Typically the fax is assigned to a study by the Site Coordinator and is shown in the tab. In order to view the fax, follow these steps: 1. Click on the appropriate study 2. Click on the button. 3. The Fax opens in a separate window and displays the details, as shown to the left: 4. Once the user has read the information, click on the at the top right to close the window. For faxes that are not assigned, they appear in the tab. To assign the fax: 1. Click on the appropriate study. 2. Click on the appropriate fax. 3. Click on the button. 4. The fax now appears under the 92 tab. BRIT Roentgen Works Flow User Manual – Site Coordinator (UM-BRW-001.0-S) Chapter 9 – Messages Tab Chapter 9 – Messages Tab The tab contains a list of the messages that have been sent to the Site Coordinator. These could be from any of the users, including the Service Manager, the Radiologist, any other physician, and there can also be System generated messages, as well. This section identifies the components, uses, and features of the tab. Components of the Messages Window The tab window is shown below: The number in red next to the tab indicates the number of messages listed in that tab. Messages can be sent from other users of the system, or from the system itself. The information that is included for each message contains: Message Date From Message Text Category Code State Link Count This section provides information on the buttons, color coding, changing the columns, and changing the details for the tab. BRIT Roentgen Works Flow User Manual – Site Coordinator (UM-BRW-001.0-S) 93 Chapter 9 – Messages Tab Action Buttons There are four buttons available in the tab that allows the user to take specific actions for the patients in this list to complete the study and dictate a report on the viewing workstation. These buttons are shown below: – This button allows the Site Coordinator to send a message to another user in the system. – This button allows the Site Coordinator to respond to the currently selected message. – This button allows the Site Coordinator to send a notification that the message has been received and read. – This button allows the Site Coordinator to remove the selected message from the screen. Color Coding There is no specific color coding for the messages. Selecting the Columns The columns in the patient list can be customized according to individual preferences, but there are several that have been selected to be identified as system defaults, and are selected when the system is delivered, or when the button is selected. Any of the columns can be selected, but the system default information shown for these messages in the tab includes: From – Identifies the sender of the message. Message Date – Identifies the date the message was created. Message Text – Contains the complete text of the message created by the sender. To – Provides the name of the recipient of the message. 94 BRIT Roentgen Works Flow User Manual – Site Coordinator (UM-BRW-001.0-S) Chapter 9 – Messages Tab To change the column selections, open the Setup panel by clicking on the to the right, and clicking on the checkbox next to the heading column. If the checkbox has a , then the column displays on the Patient List. If the checkbox currently does not have a , the column is not displayed on the Patient List. The columns can then be moved, or resized according to personal preference. For a complete list of available columns, see the section Available Columns. Detail Information The Detail information at the bottom shows the detailed information about the message. This Detail panel can be customized according to individual preferences, but there are several that have been selected to be identified as system defaults, and are selected when the system is delivered, or when the button is selected. The system default information shown for these messages in the window include: From – Identifies the sender of the message. Message Date – Identifies the date the message was created Message Text – Contains the complete text of the message created by the sender. To – Provides the name of the recipient of the message. To change the Detail selections, open the Setup panel by clicking on the to the right, and clicking on the checkbox next to the desired detail. If the checkbox has a , then the detail displays on the Patient List. If the checkbox does not have a , the detail is not displayed on the Patient List. For a complete list of the Detail selections available, see the section Available Detail Selections. BRIT Roentgen Works Flow User Manual – Site Coordinator (UM-BRW-001.0-S) 95 Chapter 9 – Messages Tab Taking Actions in the Messages Tab There are several actions that can be taken with the messages listed in the which include: Sending a Message Replying to a Message Acknowledging a Message Deleting a Message This section provides the steps to perform each of these daily tasks in the list tab. Sending a Message The Site Coordinator can send a message to anyone in the system by clicking on the button. The New Message window opens, as shown below: To send a message: 1. Click on the next to the message from the drop-down menu. field to select the recipient of the Note: Note: Note that a shortcut to finding the recipient is to begin typing their name in the field, and as characters are matched the name appears. Click on the correct name when it appears. 96 BRIT Roentgen Works Flow User Manual – Site Coordinator (UM-BRW-001.0-S) Chapter 9 – Messages Tab 2. Type the message in the window. 3. Click on the button to save the message and send it. 4. The New Message window closes and the message is sent. To close the window without sending a message, click on the button. For the text in the message, the following can be selected for specific text by the user by selecting the text to which it applies, then selecting the desired text enhancement item: Font – change the font by selecting the drop-down for Bold Text – change the font by selecting the Italicized Text – change the font by selecting the Underlined Text – change the font by selecting the Increase Font Size – change the font by selecting the Decrease Font Size – change the font by selecting the Text Color – change the font by selecting the Highlighting of Text – change the font by selecting the Left, Center, or Right margin justification – change the font by selecting the Hyperlinked Text – change the font by selecting the Numbered List – change the font by selecting the Bulleted List – change the font by selecting the Source Editing – change the font by selecting the Replying to a Message The Site Coordinator can reply to a message that is in their inbox. To reply to a message: 1. Click on the message on which to reply. 2. Click on the button. 3. Type the message in the window. BRIT Roentgen Works Flow User Manual – Site Coordinator (UM-BRW-001.0-S) 97 Chapter 9 – Messages Tab 4. Click on the button to save the message and send it. 5. The Reply Message window closes and the message is sent. To close the window without sending a message, click on the button. Acknowledging a Message The Site Coordinator can acknowledge a message that is in their inbox. To acknowledge a message: 1. Click on the message on which to acknowledge. 2. Click on the button. 3. The acknowledgement is sent. Note: Note: Be aware, there is no visual confirmation that the acknowledgement was successfully sent. Deleting a Message The Site Coordinator can delete a message that is in their inbox. To delete a message: 1. Click on the message that needs to be removed. 2. Click on the button. 3. The selected message is immediately deleted 98 BRIT Roentgen Works Flow User Manual – Site Coordinator (UM-BRW-001.0-S) Chapter 10 – Modalities Tab Chapter 10 – Modalities Tab The tab allows the Site Coordinator to view the modalities that are sending studies to the group, as well as add, modify, and remove modalities. This section identifies the components, uses, and features of the tab. Components of the Modalities Window The window that opens when the tab is selected is shown below: The number in red next to the tab indicates the number of modalities listed in that tab. This window allows the Site Coordinator to add, modify, delete, and view the modalities that are defined and integrated on the system. This section provides information on the buttons, color coding, changing the columns, and changing the details for the tab. BRIT Roentgen Works Flow User Manual – Site Coordinator (UM-BRW-001.0-S) 99 Chapter 10 – Modalities Tab Action Buttons There are three buttons available in the or remove a modality. tab that allows the user to easily add, modify, – This Action button allows the Site Coordinator to define new modalities. – This Action button allows the Site Coordinator to modify information for an existing modality. – This Action button is allows the Site Coordinator to remove an existing modality permanently. Color Coding There is no specific color coding for the modalities. Selecting Columns The columns in the list can be customized according to individual preferences, but there are several that have been selected to be identified as system defaults, and are selected when the system is delivered, or when the button is selected. Any of the columns can be selected, but the system default information shown for these studies in the tab includes: Site – Identifies the facility where the modality is located. User Name – Identifies the user name that is assigned to the modality. User Type – Identifies the type of modality. To change the columns, open the Setup panel by clicking on the to the right, and clicking on the checkbox next to the desired heading. If the checkbox has a , then the column displays in the List. If the checkbox currently does not have a , the column is not displayed in the List. The columns can then be moved, or resized according to personal preference. For a complete list of available columns, see the section Available Columns. 100 BRIT Roentgen Works Flow User Manual – Site Coordinator (UM-BRW-001.0-S) Chapter 10 – Modalities Tab Detail Information The Detail information at the bottom provides additional specific information about the selected modality. This Detail panel can be customized according to individual preferences, but there are several that have been selected to be identified as system defaults, and are selected when the system is delivered, or when the button is selected. The system default information shown for these studies in the window include: Site – Identifies the facility where the modality is located. User Name – Identifies the user name that is assigned to the modality. User Type – Identifies the type of user, such as a modality. To change the Detail selections, open the Setup panel by clicking on the to the right, and clicking on the checkbox next to the desired detail. If the checkbox has a , then the detail displays in the List. If the checkbox does not have a , the details are not displayed in the List. For a complete list of the Detail selections available, see the section Available Detail Selections. Taking Actions in the Modalities Tab There are several actions that can be taken in the Add a new modality Edit an existing modality Delete an existing modality tab which include: This section provides the steps to perform each of these daily tasks in the BRIT Roentgen Works Flow User Manual – Site Coordinator (UM-BRW-001.0-S) tab. 101 Chapter 10 – Modalities Tab Adding a New Modality One of the actions that can be taken is to add a new modality to send studies to the Roentgen Works server. To add a new modality: 1. Click on the button. 2. The New Modality window opens, as shown here: 3. Fill out each of the fields with the information to define the new modality. These fields include: a. System ID - This is the name that identifies the modality to the server. b. User Name – This is a more common name that the users would identify with the modality. c. DICOM AE – This is the DICOM Application Entity title for the modality. d. DICOM Host – This is the IP Address of the modality. e. DICOM Port – This is the DICOM port number on which the modality communicates. 4. Once all of the fields are entered, click on the button. If New Modality was selected in error, or if the information entered is not to be saved, click on the button to close the window. The Roentgen Works server runs in “Strict” mode, meaning it does not accept studies from a modality unless (1) the modality is properly configured in Roentgen Works and (2) the modality has Roentgen Works properly configured. To be properly configured, the IP address, port number, and AE Title must be correct. AE Titles are case sensitive. 102 BRIT Roentgen Works Flow User Manual – Site Coordinator (UM-BRW-001.0-S) Chapter 10 – Modalities Tab Editing an Existing Modality One of the actions that can be taken is to modify an existing modality on which patient studies are currently being taken and sent to the system. To edit an existing modality: 1. Click on the button. 2. The Edit Modality window opens, as shown here: 3. Fill out each of the fields with the information to modify the existing modality. The fields that can be updated include: a. User Name – Click on the field and type in the updated name that the users would identify with the modality. b. DICOM AE – Click on the field and type in the updated DICOM Application Entity title for the modality. c. DICOM Host – Click on the field and type in the updated IP Address of the modality. d. DICOM Port – Click on the field and type in the updated DICOM port number on which the modality communicates. 4. Once all of the fields to be corrected are entered, click on the button. If Edit Modality was selected in error, or if the information entered is not to be saved, click on the button to close the window. BRIT Roentgen Works Flow User Manual – Site Coordinator (UM-BRW-001.0-S) 103 Chapter 10 – Modalities Tab Deleting an Existing Modality One of the actions that can be taken is to remove an existing modality on which patient studies are currently being taken and sent to the system. To delete an existing modality: 1. Click on the button. 2. The Modality is immediately removed from the window. Note: Note: 104 Be aware there is no confirmation window that opens to confirm the correct modality is selected, so be very careful to select the correct modality to delete. BRIT Roentgen Works Flow User Manual – Site Coordinator (UM-BRW-001.0-S) Chapter 11 – Users Tab Chapter 11 – Users Tab The tab allows the Site Coordinator to view the users that are currently defined on the system, add new users, add new locations, edit users, and remove users. This section identifies the components, uses, and features of the tab. Components of the Users Window The window that opens when the tab is selected is shown below: The number in red next to the tab indicates the number of users listed in that tab. This window allows the Site Coordinator to add, modify, delete, and view the user that are defined and authorized to use the system. This section provides information on the buttons, color coding, changing the columns, and changing the details for the BRIT Roentgen Works Flow User Manual – Site Coordinator (UM-BRW-001.0-S) tab. 105 Chapter 11 – Users Tab Action Buttons There are five buttons available in the tab that allows the Site Coordinator to easily add, modify, or remove users, as well as add a new location. – This Action button allows the Site Coordinator to define new Site Coordinator for a hospital or imaging facility. – This Action button allows the Site Coordinator to define a new referring physician at one of the imaging centers or hospital facilities. – This Action button allows the Site Coordinator to define a new patient location at the facility to be notified of patient findings. – This Action button allows the Site Coordinator to make changes to the user’s profile. – This Action button allows the Site Coordinator to permanently remove a user from accessing the system. Color Coding There is no specific color coding for the users or the location. Selecting the Columns The columns in the user list can be customized according to individual preferences, but there are several that have been selected to be identified as system defaults, and are selected when the system is delivered, or when the button is selected. Any of the columns can be selected, but the system default information shown for these studies in the tab includes: Site – Identifies the facility where the patient study was captured. User Name – Identifies the name of the selected user. User Type – Identifies the type of user, such as Site Coordinator, Radiologist, Physician, Service Manager, or Location, such as the Emergency Room. 106 BRIT Roentgen Works Flow User Manual – Site Coordinator (UM-BRW-001.0-S) Chapter 11 – Users Tab To change the columns, open the Setup panel by clicking on the to the right, and clicking on the checkbox next to the desired heading. If the checkbox has a , then the column displays in the List. If the checkbox currently does not have a , the column is not displayed in the List. The columns can then be moved, or resized according to personal preference. For a complete list of available columns, see the section Available Columns. Detail Information The Detail information at the bottom provides additional specific information about the selected study. This Detail panel can be customized according to individual preferences, but there are several that have been selected to be identified as system defaults, and are selected when the system is delivered, or when the button is selected. The system default information shown for these studies in the window include: Site – Identifies the facility where the patient study was captured. User Name – Identifies the user name that is assigned to the selected user. User Type – Identifies the type of user. The type could be Site Coordinator, Physician, or Location, such as the Emergency Room. To change the Detail selections, open the Setup panel by clicking on the to the right, and clicking on the checkbox next to the desired detail. If the checkbox has a , then the detail displays in the List. If the checkbox currently does not have a , the detail is not displayed in the List. For a complete list of the Detail selections available, see the section Available Detail Selections. BRIT Roentgen Works Flow User Manual – Site Coordinator (UM-BRW-001.0-S) 107 Chapter 11 – Users Tab Taking Actions in the Users Tab There are several actions that can be taken in the Add a new Site Coordinator Add a new Physician Add a new Location Edit a new User Delete an existing user tab which include: This section provides the steps to perform each of these daily tasks in the tab. Adding a Site Coordinator One of the actions that can be taken is to add a new Site Coordinator on who will be responsible for the Site Coordinator duties at the hospital or imaging facility. To add a new Site Coordinator: 1. Click on the button. 2. The New Site Coordinator opens, as shown here: window 3. Fill out each of the fields with the information to define the new Site Coordinator. These fields include: a. User ID - This is the identification that the user enters to log into the system. b. User Name – This is the name of the user. c. Password – This is the code that the new Radiologist enters when they log into the system the first time. d. DICOM AE – This is the DICOM Application Entity title for the user’s workstation. 108 BRIT Roentgen Works Flow User Manual – Site Coordinator (UM-BRW-001.0-S) Chapter 11 – Users Tab e. DICOM Host – This is the DICOM host name to which the user’s workstation is communicating. f. DICOM Port – This is the DICOM port number on which the user’s workstation communicates. g. Mobile # – This is the cell phone number for the new user. h. Office # – This is the office telephone number for the new user. i. Home # – This is the home telephone number for the new user. j. Pager # – This is the pager number for the new user. k. Fax # – This is the fax number for the new user. l. E-mail Address – This is the e-mail address for the new user. 4. On the right side is the Site Access panel which identifies the sites for which the new Site Coordinator is responsible. Click on the checkbox for the sites that the Site Coordinator is responsible for, and a appears in the checkbox. To deselect a site that was selected in error, click on the checkbox again, and the is removed. 5. Once all of the fields are entered, click on the button. If New Site Coordinator was selected in error, or if the information entered is not to be saved, click on the button to close the window. Adding a Physician One of the actions that can be taken is to add a new Physician who is responsible for patient care at the facility. To add a new Physician: 1. Click on the button. 2. The Physician window opens, as shown here: 3. Fill out each of the fields with the information to define the new Physician. These fields include: a. User ID - This is the identification that the user enters to log into the system. BRIT Roentgen Works Flow User Manual – Site Coordinator (UM-BRW-001.0-S) 109 Chapter 11 – Users Tab b. User Name – This is the name of the user. c. Mobile # – This is the cell phone number for the new user. d. Office # – This is the office telephone number for the new user. e. Home # – This is the home telephone number for the new user. f. Pager # – This is the pager number for the new user. g. Fax # – This is the fax number for the new user. h. E-mail Address – This is the e-mail address for the new user. i. Priority Alert #1 – This allows the physician to select the primary alert method to be used when they need to be contacted regarding an urgent finding or critical study for one of their patients. Click on the arrow next to the field and select the desired method. The choices are: i. No Alert – When this is selected the physician will not be contacted for urgent findings or critical studies. ii. Call Mobile Phone – When this is selected the physician will be contacted via the mobile phone number that is entered. iii. Call Office Phone – When this is selected the physician will be contacted via the office phone number that is entered. iv. Call Home Phone – When this is selected the physician will be contacted via the Home telephone number that is entered. v. Send Page – When this is selected the physician will be contacted via their pager. Note: Note: Note that a shortcut to finding the information in a drop-down menu is to begin typing the name in the field, and as characters are matched the name appears. Click on the correct name when it appears. j. Priority Alert #2 – This allows the physician to select the secondary alert method to be used when they need to be contacted regarding an urgent finding or critical study for one of their patients. Click on the arrow next to the field and select the desired method. 4. Once all of the fields are entered, click on the 110 button. BRIT Roentgen Works Flow User Manual – Site Coordinator (UM-BRW-001.0-S) Chapter 11 – Users Tab If New Physician was selected in error, or if the information entered is not to be saved, click on the button to close the window. Adding a New Location One of the actions that can be taken is to add a new location in the hospital or imaging site, such as an emergency room, where multiple people could actually be looking for the results from the Radiologist. This means that any physician or nurse in that location can be notified of an urgent finding or critical study for a patient in that location. To add a new Location: button. 1. Click on the 2. The New Location window opens, as shown here: 3. Fill out each of the fields with the information to define the new Location. These fields include: a. Location ID - This is the identification that the user at the specific location enters to log into the system. b. Location Name – This is the name of the location, such as Emergency Room One, or ER West. c. Primary # – This is the main contact number for the location. d. Secondary # – This is the second contact number for the location. e. Fax # – This is the fax number for the new location. Editing an Existing User One of the actions that can be taken is to modify an existing user to change their phone numbers or other user-specific information. To edit an existing user, follow these steps: 1. Click on the user to modify. 2. Click on the button. BRIT Roentgen Works Flow User Manual – Site Coordinator (UM-BRW-001.0-S) 111 Chapter 11 – Users Tab 3. The Edit User window opens, as shown here: Be aware that the window displayed is relevant to the user selected to modify. If a Physician is selected, then this window opens as an Edit Physician window. Note: Note: 4. Modify each of the fields with the information that need to be edited for the user. The fields that can be changed include: a. User Name – This is the name of the user. b. Password – A new password for the user can be entered here. c. DICOM AE – This field is used to change the DICOM Application Entity title for the user’s workstation. d. DICOM Host – This field is used to change the DICOM host name to which the user’s workstation is communicating. e. DICOM Port – This field is used to change the DICOM port number on which the user’s workstation communicates f. Mobile # – This field is used to change the cell phone number for the existing user. g. Office # – This field is used to change the office telephone number for the existing user. h. Home # – This field is used to change the home telephone number for the existing user. i. Pager # – This field is used to change the pager number for the existing user. j. Fax # – This field is used to change the fax number for the existing user. k. E-mail Address – This is the e-mail address for the existing user. 5. If the Site Access needs to be changed, click on the appropriate checkbox to allow access to the site, which places a in the checkbox. If the user needs to be removed from the site, there should already be a in the checkbox, click on the checkbox to remove the . 6. Once all of the fields to be corrected are entered, click on the button. If Edit User was selected in error, if the wrong user was selected, or if the information entered is not to be saved, click on the 112 button to close the window. BRIT Roentgen Works Flow User Manual – Site Coordinator (UM-BRW-001.0-S) Chapter 11 – Users Tab Deleting an Existing User One of the actions that can be taken is to remove an existing user at the hospital or imaging center for which the Site Coordinator is responsible. To delete an existing user: 1. Click on the button. 2. The user is immediately removed from the window. Note: Note: Be aware there is no confirmation window that opens to confirm the correct user is selected, so be very careful to select the correct user to delete. BRIT Roentgen Works Flow User Manual – Site Coordinator (UM-BRW-001.0-S) 113 Chapter 11 – Users Tab 114 BRIT Roentgen Works Flow User Manual – Site Coordinator (UM-BRW-001.0-S) Chapter 12 – Search Tab Chapter 12 – Search Tab tab allows the users to search the entire Roentgen Works database for any patient The for whom they have access rights. The search criteria includes patient name, patient ID, body part, modality, accession number, and study status. This section identifies the components, uses, and features of the tab. Components of the Search Window The window that opens when the tab is selected is shown below: The number in red next to the tab indicates the number of patients listed in that tab that satisfied the search criteria. This is generally used when the Site Coordinator is looking for a specific patient’s study. This section provides information on the buttons, color coding, changing the columns, and changing the details for the tab. BRIT Roentgen Works Flow User Manual – Site Coordinator (UM-BRW-001.0-S) 115 Chapter 12 – Search Tab Action Buttons There are ten buttons available in the tab that allows the user to easily search for a patient by a date without having to select a date by a calendar. – This button allows the Site Coordinator to download the selected study to the viewer. – This button allows the user to see the detailed history of the study, such as when it was created, completed, to whom it was assigned, when it was sent, when it was delivered, when it was read, each time the status was reset, and each status setting. - This button allows the user to search for a patient by all dates from the initial date the system was installed. – This button allows the Site Coordinator to perform the search for the patient for the past one day. – This button allows the Site Coordinator to perform the search for the patient for the past one month. – This button allows the Site Coordinator to perform the search for the patient for the past one week. – This button allows the Site Coordinator to perform the search for the patient for the past one year. – This button allows the Site Coordinator to perform the search for the patient for the past two weeks. – This button allows the Site Coordinator to perform the search for the patient for the past three days. – This button allows the Site Coordinator to perform the search for the patient for the past three months. 116 BRIT Roentgen Works Flow User Manual – Site Coordinator (UM-BRW-001.0-S) Chapter 12 – Search Tab Color Coding Once the studies are listed, they are color coded as follows: – Indicates that there is an urgent or critical finding in the study in which the referring physician needs to be notified immediately. – Indicates that the study has state of Routine. – Indicates that this is the currently selected study. If there is an interface to a Radiologist viewing workstation, such as BRIT Vision, double-clicking on one of these selected patients, automatically downloads the study to the workstation Selecting the Columns The columns in the patient list can be customized according to individual preferences, but there are several that have been selected to be identified as system defaults, and are selected when the system is delivered, or when the button is selected. Any of the columns can be selected, but the system default information shown for these studies in the tab includes: ACC# – Displays the Accession number assigned to the study. Body Part – Displays the specific body part, or region of interest, on which the study was performed. Date of Birth – Displays the patient’s birth date. Description – Displays the Study Description as entered either from the modality or from the order. Final Read – Determines if the Radiologist is to do a final diagnosis on the study, and is identified as a Yes or a No in the Final Read column next to the Study. Modality – Identifies the type of modality on which the study was performed. Patient ID – Displays the Patient’s identification number from the sending site. Patient Name – Displays the Patient’s name as sent from the sending site. Priority – Determines if the study is routine or critical so that the Radiologist knows the importance of the study. Radiologist – Displays the name of the Radiologist handling the study. BRIT Roentgen Works Flow User Manual – Site Coordinator (UM-BRW-001.0-S) 117 Chapter 12 – Search Tab Sex – Identifies the Gender of the patient. Site – Identifies the facility where the patient study was captured. Study Status – Identifies the status of the study for the workflow, such as On Hold, Incomplete, Urgent, Delivered, Unread, or Read. Time of Study – Provides the date and time that the exam was captured at the imaging facility. To change the columns selections, open the Setup panel by clicking on the to the right, and clicking on the checkbox next to the desired heading. If the checkbox has a , then the column displays on the Patient List. If the checkbox currently does not have a , the column is not displayed on the Patient List. The columns can then be moved, or resized according to personal preference. For a complete list of available columns, see the section Available Columns. Detail Information The Detail information at the bottom provides additional specific information about the selected study. This Detail panel can be customized according to individual preferences, but there are several that have been selected to be identified as system defaults, and are selected when the system is delivered, or when the button is selected. The system default information shown for these studies in the window include: Contact #2 – Identifies the backup contact to be used if the physician can’t be reached. DICOM Doc – Displays the name of the referring physician as it is reported in the DICOM header of the study. Final Read – Determines if the Radiologist is to do a final diagnosis on the study, and is identified as a Yes or a No in the Final Read column next to the Study. History – Provides the brief patient history that was sent with the study. Location – Identifies the patient location where the physician contact is available, such as the ER, and may be used as a point of contact. Misc Contact # - Displays an additional telephone or pager number for an additional contact for the referring physician. Physician – Displays the name of the patient’s referring physician. 118 BRIT Roentgen Works Flow User Manual – Site Coordinator (UM-BRW-001.0-S) Chapter 12 – Search Tab Reason for Hold – Identifies the explanation from the Radiologist for the study being placed on hold. Reason for Study – Indicates the reason that the referring physician ordered the study for the patient. Tech Comment – Provides the text from the Technologist that was entered when the study was captured. This alerts the Radiologist to additional information that the Technologist contributed to the patient’s exam. to the right, and To change the Detail selections, open the Setup panel by clicking on the clicking on the checkbox next to the desired detail. If the checkbox has a , then the detail displays on the Patient List. If the checkbox currently does not have a , the detail is not displayed on the Patient List. For a complete list of the Detail selections available, see the section Available Detail Selections. Taking Actions in the Search Tab There are several actions that can be taken with the patients listed in the include: Searching for a patient Downloading the study Viewing the Study history This section provides the steps to perform each of these daily tasks in the BRIT Roentgen Works Flow User Manual – Site Coordinator (UM-BRW-001.0-S) list which tab. 119 Chapter 12 – Search Tab Searching for a Patient The Site Coordinator may need to search for a study for a patient that was previously saved, and this can be done with the Search menu just beneath the tab. There are several categories that can be entered to search on, which include: Site Patient ID Patient Name UID Body Part Accession # Modality Study Status There are also several timeframes available in which to search for the patient’s study. These are in the form of buttons beneath the search criteria panel, and include the following: – Starts the search going back to the previous day. – Starts the search going back the previous three days. – Starts the search going back one week. – Starts the search going back two weeks. – Starts the search going back 30 days. – Starts the search going back 90 days. – Starts the search going back 365 days. (On a leap year, it will be off by one day.) – Starts the search going back to the time that the PACS System was implemented and studies were stored. To start the search: 1. Enter the Search criteria in the Search panel. 2. Click on the desired time frame in which to search; one day, three days, one week, two weeks, one month, three months, one year, or forever. 3. The results are displayed in the search window below the time frame buttons. 4. Click on the desired study. 120 BRIT Roentgen Works Flow User Manual – Site Coordinator (UM-BRW-001.0-S) Chapter 12 – Search Tab 5. To bring the study to the local workstation for viewing, click on the and the selected study is sent to the viewer. button, Note: Note: Be aware that if the user selects a specific timeframe for the search, such as two weeks, and the actual study was performed two weeks and one day previous, the desired study may not be found. It is always helpful if no results were found, to try the next time frame, such as one month. The system searches the number of days specifically by the date and counts back. Downloading the Selected Study Once the Site Coordinator has found the study for the patient, this them to copy the selected study to the viewer. button allows To download the selected study: 1. Enter the Search criteria in the Search panel. 2. Click on the desired time frame in which to search; one day, three days, one week, two weeks, one month, three months, one year, or forever. 3. The results are displayed in the search window below the time frame buttons. 4. Click on the desired study. 5. To bring the study to the local workstation for viewing, click on the and the selected study is sent to the viewer. button, Viewing the Study History The Study History for the selected study allows the user to see the detailed history of the study, such as when it was created, completed, to whom it was assigned, when it was sent, when it was delivered, when it was read, each time the status was reset, and each status setting. To view the study history: 1. Make sure the correct patient study is selected. 2. Click on the button. BRIT Roentgen Works Flow User Manual – Site Coordinator (UM-BRW-001.0-S) 121 Chapter 12 – Search Tab 3. The Study history pop-up window opens and displays all events that have been posted regarding the study. This could include such events as: When the study was created When the study was completed by the Site Coordinator When the study was assigned When the study was sent When the study was delivered When the study was read When the study was marked urgent When they study was put “on-hold” 4. When the desired information is read, click on the window. button to close the Viewing the Faxes If a fax is received from the Site Coordinator to clarify missing information, the fax can be viewed from the Faxes panel in the lower right of the window. Typically the fax is assigned to a study by the Site Coordinator and is shown in the tab. In order to view the fax, follow these steps: 1. Click on the appropriate study 2. Click on the button. 3. The Fax opens in a separate window and displays the details, as shown to the left: 4. Once the user has information, click on the right to close the window. 122 read the at the top BRIT Roentgen Works Flow User Manual – Site Coordinator (UM-BRW-001.0-S) Chapter 12 – Search Tab For faxes that are not assigned, they appear in the tab. To assign the fax: 1. Click on the appropriate study. 2. Click on the appropriate fax. 3. Click on the button. 4. The fax now appears under the tab. BRIT Roentgen Works Flow User Manual – Site Coordinator (UM-BRW-001.0-S) 123 Chapter 12 – Search Tab BRIT Roentgen Works Flow User Manual – Site Coordinator (UM-BRW-001.0-S) 124 Chapter 13 – Statistics Tab Chapter 13 – Statistics Tab The statistics tab allows the users to get a snapshot of the current workflow for the various sites. Only the studies that have not yet been marked as “Read” are displayed on the list. The Site Coordinator sees studies for all the sites they are responsible for accessing. This section identifies the components, uses, and features of the tab. Components of the Statistics Window The window that opens when the tab is selected is shown below: This window provides the statistics for all the users that are currently logged into the system, as they stand at the time the tab was selected. Each Site Coordinator sees the studies that are assigned to the Radiologists authorized to read for their specific site. This section provides information on the buttons, color coding, changing the columns, and changing the details for the tab. BRIT Roentgen Works Flow User Manual – Site Coordinator (UM-BRW-001.0-S) 125 Chapter 13 – Statistics Tab Action Buttons tab. There are no buttons in the Color Coding There is no special color coding in the tab. Selecting the Columns The columns in the patient list can be customized according to individual preferences, but there are several that have been selected to be identified as system defaults, and are selected when the system is delivered, or when the button is selected. Any of the columns can be selected, but the system default information shown for these studies in the tab includes: Delivered – Indicates the number of studies that were successfully delivered to the recipients. Description – Displays the name of the User logged into the system for which the statistics were built. Incomplete – Provides the summary of incomplete studies that are assigned to the user and not finished. On-Hold – Identifies the number of studies that the Radiologist has placed “on-hold” because further information is needed to allow them to complete the diagnosis. Queued – Provides a summary of all the studies that have been delivered to the Radiologist, and are waiting to be read. Stat Type – Identifies the user or site for the studies’ statistics. Unassigned – Identifies the number of unassigned studies that are available, and generally only applies to the sites rather than the users. Urgent – Identifies the number of studies assigned to each site and user that are tagged as Urgent by the Radiologist after their diagnosis is completed. 126 BRIT Roentgen Works Flow User Manual – Site Coordinator (UM-BRW-001.0-S) Chapter 13 – Statistics Tab To change the columns selections, open the Setup panel by clicking on the to the right, and clicking on the checkbox next to the desired heading. If the checkbox has a , then the column displays on the Patient List. If the checkbox currently does not have a , the column is not displayed on the Patient List. The columns can then be moved, or resized according to personal preference. For a complete list of available columns, see the section Available Columns. Detail Information The Detail information at the bottom provides additional specific information about the selected study. This Detail panel can be customized according to individual preferences, but there are several that have been selected to be identified as system defaults, and are selected when the system is delivered, or when the button is selected. The system default information shown for these studies in the Stat Type – Identifies the user or site for the studies’ statistics. Description – Displays the name of the User logged into the system for which the statistics were built. window include: To change the Detail selections, open the Setup panel by clicking on the to the right, and clicking on the checkbox next to the desired detail. If the checkbox has a , then the detail displays on the Patient List. If the checkbox currently does not have a , the detail is not displayed on the Patient List. For a complete list of the Detail selections available, see the section Available Detail Selections. BRIT Roentgen Works Flow User Manual – Site Coordinator (UM-BRW-001.0-S) 127 Chapter 13 – Statistics Tab Taking Actions in the Statistics Tab The only action available in the Statistics tab is to view the statistics which are shown in the various columns: The statistics that can be shown, since they are customizable in the Setup panel, include the following: Stat type – This column displays the type of user or site. Description – This column displays the name of the User logged into the system for which the statistics were built. Incomplete – This column displays the number of studies for each user and site that have a status of incomplete. Unassigned – This column displays the number of studies for each user and site that have not yet been assigned to a specific Radiologist. Queued – This column displays the number of studies for each user and site that are still in the Work Queue waiting to be delivered to a Radiologist. Delivered – This column displays the number of studies for each user and site that have been delivered to a specific Radiologist and are waiting to be read. On-Hold – This column displays the number of studies for each user and site that have been placed on hold by the Radiologist awaiting clarification or additional information about the patient. Urgent – This column displays the number of studies for each user and site that have been tagged as “Urgent” by the Radiologist indicate that the referring physician needs to be contacted immediately in regards to a problem found on the patient’s study, and is critical for patient care. 128 BRIT Roentgen Works Flow User Manual – Site Coordinator (UM-BRW-001.0-S) Chapter 14– Viewing the Faxes Chapter 14 – Viewing the Faxes Many times the Order information is not passed along with the Study, and must be faxed from the site by the Site Coordinator or the Technologist. Once the fax is sent, generally it is assigned to the appropriate study by the Site Coordinator or Technologist, and it appears in the lower right side of the window in the Faxes section. Once the fax is available, it is stored on a server and available for viewing by the user. This section describes the Assigned Faxes, the Unassigned Faxes, and Viewing the faxes. Sending Paper-based Information If the Order information is not passed along, and the information is unavailable, a hard copy of the order can be faxed to the Radiologist. This can be accomplished by: 1. Sending the paper via fax to the fax server. 2. Viewing the list of unassigned faxes. 3. Assigning the appropriate ones to the study. There is a time stamp on the fax and it should help to match the fax to the appropriate study. Assigned Faxes To get the list of the faxes that have been assigned, click on the tab, and the list appears in the Faxes section. These are faxes that are assigned to specific studies in the list. To Assign Unassigned Faxes To get the list of the faxes that have been not been assigned, click on the tab, and the list appears in the Faxes section. To assign the fax, the user must have permission to perform this function, and the button is available. BRIT Roentgen Works Flow User Manual – Site Coordinator (UM-BRW-001.0-S) 129 Chapter 14 – Viewing the Faxes To assign the fax: 1. Click on the specific Order information. 2. Click on the tab. 3. A list of studies is presented, click on the study, and click on the 4. The selected fax is assigned to the study and moved to the button. tab. Viewing the Faxes If a fax is received from the Site Coordinator to clarify missing information, the fax can be viewed from the Faxes panel in the lower right of the window. Typically the fax is assigned to a study by the Site Coordinator and is shown in the tab. In order to view the fax, follow these steps: 1. Click on the appropriate study 2. Click on the button. 3. The Fax opens in a separate window and displays the details, as shown to the left: 4. Once the desired information is read, at the top right to close click on the the window. 130 BRIT Roentgen Works Flow User Manual – Site Coordinator (UM-BRW-001.0-S) Chapter 15 – Viewing the Faxes For faxes that are not assigned, they appear in the tab. To assign the fax: 1. Click on the appropriate study. 2. Click on the appropriate fax. 3. Click on the button. 4. The fax now appears under the tab. BRIT Roentgen Works Flow User Manual – Site Coordinator (UM-BRW-001.0-S) 131 Chapter 14 – Viewing the Faxes 132 BRIT Roentgen Works Flow User Manual – Site Coordinator (UM-BRW-001.0-S)