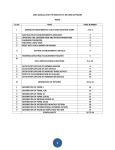
1
]
Clinical Manager - Hospice
User Manual
Last Modified:
MAY, 2012
– CONFIDENTIAL –
INTRODUCTION......................................................................................................................................... 10
1 SIGNING ON TO HCHB .......................................................................................................................... 11
1.1 Passwords and System Security ....................................................................................................... 11
1.2 Automatic Log Off .............................................................................................................................. 12
1.3 Individual User Settings ..................................................................................................................... 13
1.3.1 Layout ......................................................................................................................................... 13
1.3.2 Refresh Times............................................................................................................................. 15
1.3.3 Action View Colors ...................................................................................................................... 16
1.3.5 Defaults ....................................................................................................................................... 17
2 ACTION SCREEN ................................................................................................................................... 18
2.1 Client Related Tasks ......................................................................................................................... 19
2.2 Review Coordination Notes ............................................................................................................... 19
2.2.1 Coordination Notes: End Multiple Coordination Notes ............................................................... 20
2.3 Review Billing Notes .......................................................................................................................... 22
2.4 Administrative Tasks ......................................................................................................................... 22
2.5 Changing the Views to Better Manage Tasks. *Use the Logout Icon to Save changes .................. 23
2.5.1 Moving The Columns .................................................................................................................. 23
2.5.2 Filtering ....................................................................................................................................... 23
2.5.3 Group by Columns ...................................................................................................................... 24
2.5.4 Significance of Colors ................................................................................................................. 24
3 WORKFLOW SUMMARY SCREEN ....................................................................................................... 25
3.1 Expanding/Collapsing the View ......................................................................................................... 26
3.2 Filter by Event, Stage, and Client ...................................................................................................... 26
3.3 Event/Stages History Report ............................................................................................................. 27
3.4 Evaluation Visit Status ....................................................................................................................... 28
3.4.1 Reassign LP from Pending Status .............................................................................................. 28
3.4.2 Reassigning Late or Accepted Admission Visits ........................................................................ 29
3.4.3 Incomplete Status ....................................................................................................................... 30
4 CLINICAL INPUT SCREEN..................................................................................................................... 31
4.1 Getting Familiar with the Screen ....................................................................................................... 31
4.2 Viewing Documents in the Medical Record ....................................................................................... 34
4.2.1 Editing Documents ...................................................................................................................... 35
4.2.2 Printing the Medical Record........................................................................................................ 36
4.2.3 Understanding the Calendar Codes ........................................................................................... 37
4.2.4 Adding Medications, Supplies, Visits, LOC and Changing Vital Sign Parameters ..................... 38
4.2.5 Understanding the Pathway Problem Statements)..................................................................... 38
4.2.6 Coordination Notes ..................................................................................................................... 41
4.2.6.1 Maintain Coordination Notes Menu ................................................................................. 43
Signature forms tracking ...................................................................................................................... 44
4.2.7 Viewing Visit Notes in HCHB ...................................................................................................... 45
4.2.8 Document Management ............................................................................................................. 47
4.2.9 Wound Images ............................................................................................................................ 53
4.2.8.1 To Compare Wound Images ............................................................................................... 55
5 ORDER CONSOLE ................................................................................................................................. 57
5.1 Filtering Orders .................................................................................................................................. 58
5.2 Viewing Orders .................................................................................................................................. 60
5.4 Viewing and Documenting F2F Encounter ........................................................................................ 61
5.4.1 Clinical Input ............................................................................................................................... 61
5.4.2 Order Console and Tracking....................................................................................................... 62
5.4.3 IDG Screen ................................................................................................................................. 63
6 REFERRAL ENTRY ................................................................................................................................ 65
6.1 General Tab ....................................................................................................................................... 66
6.2 Referral Source ................................................................................................................................. 67
6.3 Demographics ................................................................................................................................... 68
6.3.1 Client Tab.................................................................................................................................... 68
6.3.2 Service Locations Tab ................................................................................................................ 68
6.3.3 Client Contact Tab ...................................................................................................................... 69
6.4 Payor Sources ................................................................................................................................... 70
6.5 Physicians Tab .................................................................................................................................. 71
6.6 Clinical Tab ........................................................................................................................................ 73
6.7 Diagnoses Tab .................................................................................................................................. 74
6.8 Scheduling Tab.................................................................................................................................. 77
6.8.1 Extended Referral ....................................................................................................................... 79
6.9 Pending Referral................................................................................................................................ 80
6.10 Continuation of care (CCD) Importing ............................................................................................. 80
7 REVIEW/APPROVE REFERRAL ............................................................................................................ 85
8 VERIFY PAYOR ELIGIBILITY ................................................................................................................ 85
8.1 Medicare Patients .............................................................................................................................. 85
8.2 Transfer and Admission Patients - F2F Process .............................................................................. 87
8.3 Authorization for Non-Medicare Patients........................................................................................... 88
8.3.1 Obtain Payor Source Verification................................................................................................ 88
8.2.1.1 Payor Info ......................................................................................................................... 89
8.2.1.2 Benefit Info Tab ............................................................................................................... 90
8.3.2 Obtain Initial Authorization .......................................................................................................... 92
8.4 Review/Approve Referral after Payor Verification ............................................................................. 96
9 ELECTION OF BENEFITS ...................................................................................................................... 97
9.1 New Client ......................................................................................................................................... 97
9.2 Transfer to HCHB Software ............................................................................................................... 98
9.3 Transfer (From Another Agency to This Agency) .............................................................................. 99
10 COMPLETING THE CTI ORDER ........................................................................................................ 100
11 ASSIGN LICENSED PROFESSIONAL (LP)....................................................................................... 104
12 ROOM AND BOARD WORKFLOW .................................................................................................... 105
13 REVIEW HOSPICE SOC EVALUATION DOCUMENTATION ........................................................... 105
13.1 View Unlisted Items Report ........................................................................................................... 107
13.2 Visit Note ....................................................................................................................................... 107
13.3 Medication Profile .......................................................................................................................... 108
13.4 Edit/View Election of Benefits ........................................................................................................ 108
13.5 Edit/View Calendar ........................................................................................................................ 110
13.6 Edit/View Vital Sign Parameters.................................................................................................... 111
13.7 Edit/View Hospice Plan of Care .................................................................................................... 112
13.8 View Coordination Notes ............................................................................................................... 112
13.9 Edit/View Aide Care Plan .............................................................................................................. 113
13.10 View Initial Hospice Order ........................................................................................................... 114
13.11 Edit/View Related Facilities ......................................................................................................... 115
13.12 Edit/View Advanced Directives .................................................................................................... 118
13.13 View Authorization Information Report ........................................................................................ 119
13.14 View Hospice POC Order ............................................................................................................ 119
13.15 Assign IDG Members .................................................................................................................. 121
st
13.16 Assign 1 IDG Meeting ................................................................................................................ 122
13.17 Select Level of Care Type ........................................................................................................... 123
13.18 Edit/View Contacts ...................................................................................................................... 123
13.19 Review Mar schedule .................................................................................................................. 124
14 FACILITY ACCESS TO PATIENT RECORDS ................................................................................... 124
14.1 Set Up Steps ................................................................................................................................. 124
14.2 Workflow ........................................................................................................................................ 125
14.3 Auto Fax ........................................................................................................................................ 125
14.4 Provider Link .................................................................................................................................. 128
15 INITIAL REVIEW OF HOSPICE POC ................................................................................................. 130
16 OBTAIN ADDITIONAL AUTHORIZATION FOR HOSPICE SERVICES ............................................ 131
7 NON-ADMITTING PATIENTS FROM THE OFFICE ............................................................................. 133
17.1 Undo Non-Admit: Functionality Added to ‘Undo Non-Admitted’ Clients ........................................ 134
18 ADDING AND PROCESSING ORDERS IN THE OFFICE ................................................................. 136
18.1 Adding New Orders ....................................................................................................................... 136
18.2 Voiding Orders ............................................................................................................................... 141
18.3 Editing Orders ................................................................................................................................ 142
18.4 Approving Orders .......................................................................................................................... 142
18.5 UNDO VOIDED/DECLINED ORDERS ......................................................................................... 143
19 APPROVING/EDITING ORDER FOR ADD-ON DISCIPLINE ............................................................ 144
19.1 Calendars on Add-On Orders ........................................................................................................ 144
19.2 Processing Orders ......................................................................................................................... 145
20 CHANGE IN LEVEL OF CARE ........................................................................................................... 146
21 INTERDISCIPLINARY GROUP ........................................................................................................... 150
21.1 Assigning IDG Members................................................................................................................ 150
21.1.1 IDG Teams.............................................................................................................................. 152
21.2 Assigning IDG Workflow Days ...................................................................................................... 153
21.3 Recommended: Adding IDG Notes in PointCare .......................................................................... 154
21.4 Starting the IDG Meeting ............................................................................................................... 155
21.4.1 View/Edit the Hospice Plan of Care ........................................................................................ 158
21.4.2 Signing Orders from IDG ........................................................................................................ 160
21.5 Recert Patients
in IDG ................................................................................................................ 161
21.5.1 Plan F2F Encounter Stage ..................................................................................................... 163
21.5.1.1 Plan F2F Encounter.................................................................................................... 163
21.5.1.1.1 Add Encounter Documentation .................................................................164
21.5.1.1.2 Edit Encounter Documentation .................................................................166
21.5.1.1.3 Inactivate Encounter Documentation .......................................................168
21.5.1.2 Stage Completed ............................................................................................169
21.5.1.3 Delay Planning of F2F Encounter ...................................................................170
21.5.1.4 Cancel Button .............................................................................................................. 170
21.5.2 Medical Director’s CTI ORder ................................................................................................. 170
22 RECERT ORDER PROCESS IN ADDITION TO THE F2F PROCESS .............................................. 172
22.1 Clinical manager – WHo gets the Recert Order ............................................................................ 173
22.2 clinical manager – Recert order form ............................................................................................ 173
23 CONTINUOUS CARE PROCESS ....................................................................................................... 176
23.1 Steps in Continuous Care Process in HCHB ................................................................................ 176
23.2 Continuous Care Reports .............................................................................................................. 176
Modifying/Approving Continuous Care Hours ***Note : Do NOT go into the edit function then click
SAVE as the hours will revert to Zero. Always Cancel if no change is made. ...................................... 180
Modifying/Approving Continuous Care Hours ....................................................................................... 182
24 DISCHARGES ..................................................................................................................................... 183
24.1 Writing a Discharge Order and Related Workflow ........................................................................ 183
24.2 How to Enter a Discharge/Death Note from the Office ................................................................. 187
25 QI FORMS AND EVENTS ................................................................................................................... 192
25.1 Adding a Form ............................................................................................................................... 192
25.2 Reviewing a QI Form ..................................................................................................................... 194
26 PRINT MEDICATION PROFILE .......................................................................................................... 195
27 REPORT MANAGER........................................................................................................................... 196
28 SCHEDULING ..................................................................................................................................... 198
28.1 Assign LP for Hospice Evaluation Visit ......................................................................................... 198
28.1.1 Transitioning of patients to HCHB at Go Live ......................................................................... 201
28.1.2 Assigning workers for Initiation Visits ..................................................................................... 202
29 MEDICAL RECORDS IN HCHB – CAN ALSO BE DONE IN R2 ORDERS CONSOLE ................... 205
29.1 Order Tracking View ...................................................................................................................... 205
29.2 Verify Receipt of Signed Documents and Medical Release Code ................................................ 208
29.2.1 Review/Print Signature forms ................................................................................................. 210
29.3 Process Order to Physician ........................................................................................................... 211
29.4 Reprocessing Unsigned ORders ................................................................................................... 217
29.5 Reports .......................................................................................................................................... 220
29.5.1 Order Tracking - (HCHB or R2 ) Reports Manager ................................................................ 220
29.5.3 Orders to Be Sent - (HCHB or R2 ) Reports Manager ........................................................... 222
30 BEREAVEMENT PROCESS ............................................................................................................... 223
30.1 Bereavement Plan of Care ............................................................................................................ 226
30.1.1 Scheduling Bereavement Visits in Resource Manager .......................................................... 228
30.2 Bereavement Mailing Process ....................................................................................................... 230
30.3 Bereavement Activity Report .................................................................................................... 233
30.4 Community Bereavement ............................................................................................................. 234
30.4.1 Documenting Contact Details ............................................................................................ 237
30.5 Group Documentation .................................................................................................................. 238
30.5.1 Adding Group Details .............................................................................................................. 238
30.6 community Bereavement Report .................................................................................................. 240
Bereavement Group Report ............................................................................................................... 242
31 VOLUNTEER COORDINATOR ........................................................................................................... 245
31.1 How to Enter Volunteers................................................................................................................ 245
31.2 Volunteer Time Capture ................................................................................................................ 248
31.3 Editing Volunteer Time .................................................................................................................. 250
31.4 Viewing Volunteer Time................................................................................................................. 250
31.5 Viewing Volunteer Time History .................................................................................................... 251
31.6 Volunteer Reports.......................................................................................................................... 253
32 HOSPICE INPATIENT ENCOUNTERS ............................................................................................... 255
33 NON-VISIT TIME – IN R2 ................................................................................................................... 257
34 ADMINISTRATIVE ON-CALL RESPONSIBILITIES ........................................................................... 263
35 Schedule THE F2F Encounter Stage ................................................................................ 267
35.2.1.3.1 View F2F Encounter............................................................................................ 267
35.2.1.3.2 Schedule F2F Encounter.................................................................................... 267
35.2.1.3.3 Scheduling to a Nurse Practitioner ................................................................... 267
35.2.1.3.4 Scheduling to a Medical Director ...................................................................... 269
35.2.1.4 Print F2F Form for Manual Completion ................................................................... 270
35.2.1.4.1 Printing F2F Form for a Nurse Practitioner ..................................................... 270
35.2.1.4.2 Printing F2F Form for a Medical Director / Team Physician ......................... 274
35.2.2 Transfer and Admission Patients ............................................................................................ 276
35.3 Clinical Manager – Viewing and Documenting Completed F2F Encounter .................................. 277
35.3.1 Viewing and Documenting F2F Encounter ............................................................................. 277
35.3.1.1 Clinical Input ................................................................................................................ 278
35.3.1.2 Order Console and Tracking ..................................................................................... 278
35.3.1.3 IDG Screen .................................................................................................................. 279
35.5 Report Manager............................................................................................................................. 280
35.5.1 Hospice Incomplete Face to Face Encounter Report ............................................................. 280
35.6 Financial Manager ......................................................................................................................... 281
35.6.1 Level of Care Workflow Review .............................................................................................. 281
35.6.2 Billing Audit ............................................................................................................................. 283
35.6.4 Hospice Ineligible Claims Report ............................................................................................ 284
Page 10 of 284
INTRODUCTION
Welcome!
Homecare Homebase integrates people, processes and information in real time –
empowering agencies to deliver consistently superior outcomes and drive business
success. HCHB controls the point of care component on the PDA [PointCare] as well as
the back office workflow processes from a clinical, operational, scheduling, billing,
quality and management perspective.
This manual describes the tasks that will be required for office users in daily use of the
system. Other manuals can be referenced as a supplement to this information: Reports
Manager Manual, Financial Manual, Clinical Manager Home Care, Database Setup
Manual, PointCare User’s Manual, Provider Link Manual, and the Referral Source Link
Manual.
Page 11 of 284
1 SIGNING ON TO HCHB
Go to www.hchb.com on the Internet
Click on Member Login in the upper right hand corner of the screen
Enter User Name and Password
Click Log In
The Application Portal appears
You will notice that there is an application called “H” and another called “R2”. All
functionality is being integrated into R2, but currently they are fully interfaced
requiring no duplicate entry. There is also a training folder that contains both
applications used only for training purposes.
1.1 PASSW ORDS AND SYSTEM SECURITY
At the time you are given access to the HCHB System, your agency
administrator will assign an initial user ID and Password, which together identify
you and your rights to use the system.
Confidentiality of your password is very important, as the combination of your
user ID and password constitute your “electronic signature”, which may be
stamped into any information that you add, change or inactivate within the
system. It is important that only you know your password, and your agency has
elected to take additional steps to ensure your privacy and security.
Your password will be forced to expire every ninety (90) days, at which time you
will be requested to select a new password, which only you will know. When it is
time to change your password, the system will display a message much like the
one which follows:
Page 12 of 284
There are a few additional considerations on passwords which you may select:
Your password is case sensitive, so if you assign all or part of it in capital letters,
you must remember what you capitalized.
You will not be able to select any of the last four passwords you have already
used.
If you enter your password incorrectly three times, you will be locked out of the
system for ten minutes, and then you may attempt to enter your password again.
If you are certain that you have forgotten your password, contact Customer
Support and request that your password be reset, then enter the new password
to gain access to the system. Once you have done this, you will be required to
change your password again.
If you want to change your password at any time, simply click the “key” icon in
the Portal to request a security change, then follow the prompts to complete your
password reset – as follows:
1.2 AUTOMATIC LOG OFF
After thirty minutes of inactivity (no key strokes or movement of the mouse), the
system will automatically log you off. This is to prevent another user walking up
to your computer after you have stepped away, and using your ID to enter
information of any kind into the system. If you log back into the “portal” within ten
minutes of being automatically logged off, you will be taken to the exact screen
you were working on when you stepped away from your computer (in other
Page 13 of 284
words, within forty minutes total). If you log on again after forty minutes have
passed, any work you were doing will be lost.
Please remember this feature, and if you think you will be away from your
computer for even a few minutes, it is a good idea to complete and save any
transactions you may have underway before you leave. It’s a better idea yet to
actually log off from the system, so there is no chance of another user utilizing
your ID and password while you are away.
1.3 INDIVIDUAL USER SETTINGS
In HCHB, Go to File/User Settings.
The User Settings area allows
individual users to save screen
layout preferences, customize
colors, and establish refresh times.
1.3.1 LAYOUT
In HCHB –
In R2, click on the Orb in the upper
left, then Login Profile Settings.
Page 14 of 284
In R2 –
Allows you to save various screens so that when you exit and log back in, your
screens are how you want them according to your personal preferences.
Make sure “Save All Settings on Exit” box is checked for the appropriate views.
If you check this box in the “All Views” section, every screen will save according
to your preferences.
Page 15 of 284
1.3.2 REFRESH TIMES
In HCHB –
In R2 –
Allows you to decide how often each screen refreshes with new data so that you
see the latest information. (A refresh can always be done manually as well).
10 minutes is the fastest you can set an automatic refresh.
Default settings are shown above but may be changed by the user.
Page 16 of 284
1.3.3 ACTION VIEW COLORS
In HCHB –
In R2 –
This allows each user to define background and text colors used when they look
at the Action screen. * Note that many agencies will not allow anything but the
default to be used. Default background colors are white, yellow, orange, and red.
Page 17 of 284
1.3.5 DEFAULTS
In HCHB -
In R2 –
Based on the settings chosen here, will retain the default filters every time user
logs into HCHB.
Page 18 of 284
2 ACTION SCREEN
This screen found only in HCHB (H) shows actions that need to be taken as
defined in your agency’s workflow (e.g. Assign Hospice LP, Review Hospice
SOC Evaluation Documentation, etc.). This is your electronic to do list and is the
default screen that appears when the HCHB application is launched. The action
screen can also be accessed by clicking the Actions icon from the toolbar.
Action Screen Icon
The Action Screen contains four tabs. All items in these tabs should be
processed timely.
•
•
•
•
Client-Related Tasks
Review Coordination Notes
Review Billing Notes
Administrative Tasks
Page 19 of 284
2.1 CLIENT RELATED TASKS
Client Related Tasks are workflow tasks that involve specific patients. Some
examples of these are: Review/Edit/Approve Hospice POC, Process Hospice
POC to Physician, Process Missed Visit.
Double-click on the task line to open up the action; let the task walk you through
what to do!
Right click on the task to access more information about the patient.
In the Search box type in client’s name (or part of client’s name) and click Search
to find a specific patient.
2.2 REVIEW COORDINATION NOTES
Page 20 of 284
This tab contains information regarding specific communication notes that have
been entered into HCHB or PointCare. Each note type has been assigned to go
to a certain Responsible Position for review.
The patient’s name, date/type of note, who entered it, and a preview of the
contents can be seen.
Double-click to open up and process the note. Follow up comments can be
added, but are optional.
Right-click menu options from Review Coordination Notes provide access to
same client information as found in the Clinical Input (keyboard icon) screen.
2.2.1 COORDINATION NOTES: END MULTIPLE COORDINATION
NOTES
Users have the option to end all coordination notes with a single click. This can
save the user time when processing workflow from their Review Coordinate
Notes tab. This should NOT be done without the user being absolutely sure that
all coordination notes have been reviewed.
Page 21 of 284
Steps to access the End Coordination Notes menu selection:
Step 1
-
From the Actions screen, click the Review Coordination Notes tab
Step 2
-
Use the ctrl + select or shift + select MS Windows functionality to select
multiple coordination notes. Once selected, right-click and select the End
Coordination Notes menu option
Step 3
-
Click Yes to end the coordination notes
Page 22 of 284
2.3 REVIEW BILLING NOTES
•
Billing Notes are reviewed by the billing department
•
Please see separate Financial Manual
2.4 ADMINISTRATIVE TASKS
Administrative Tasks are “to do” items that your agency has established. These
tasks are time related (i.e., something performed daily, weekly, monthly) and are
not related to a specific patient. Some examples are shown below.
If a specific report is “tied to” the task, simply double-click to open up the task
and click “View Report” button. Enter desired parameters to run the report.
Once the report is viewed/printed and task is complete, click on the OK button to
mark the Administrative Task completed.
Page 23 of 284
2.5 CHANGING THE VIEW S TO BETTER MANAGE TASKS. *USE THE
LOGOUT ICON TO SAVE CHANGES
2.5.1 MOVING THE COLUMNS
Tap and hold the column to be moved
Drag the column to the desired position and release the mouse
Example of the column being moved over
2.5.2 FILTERING
Click the down arrow of the column to be filtered
Select desired option from the list and the screen will filter accordingly [i.e., filter
by one client name or a particular task to be performed]
Example of Filtering Options
Page 24 of 284
2.5.3 GROUP BY COLUMNS
Click and hold the group by column
Drag the column to the gray box entitled Drag a column header here to group
by that column and let go of the mouse
This will group the action screen items by that column
Example of Grouping Process (by Task)
2.5.4 SIGNIFICANCE OF COLORS
Blue ~ Selected line
White ~ Current task to be processed
Yellow ~ 75% of the time allotted to complete this task has passed
Orange ~100% of the time allotted to complete the task has passed (supervisor’s
action screen may be notified)
Red ~150% of the time allotted to complete this task has passed (critical point)
Page 25 of 284
2.5.5 Delaying a Stage
Depending on your level of security, you may have the ability to delay a stage on
your action screen. Delaying a stage allows the line item to disappear, but will
reappear on your action screen at the selected new time.
To delay a stage, right click on the line item and select Delay Stage. Indicate
how many days to delay. Note: The item will be delayed in 24-hour increments
from the time delayed. For example, if an item is delayed at 3:00pm on Tuesday
– and one day is selected – the item will reappear at 3:00pm on Wednesday.
To undo a delayed stage, right-click anywhere on the Action Screen and select
View/Undo Delayed Stages. A list of all event/stages that have been delayed
will appear. Select appropriate items and click Undo Delay.
3 WORKFLOW SUMMARY SCREEN
Workflow Summary shows all active stages [regardless of who is responsible for
handling it] for a client and can be displayed by clicking on the toolbar’s second
icon (squiggly arrow).
Only clients with an active event/stage appear on this screen; not all patients will
be shown.
Workflow Summary Icon
Page 26 of 284
3.1 EXPANDING/COLLAPSING THE VIEW
Click the plus sign (+) next to the client’s name to expand and display all stages
for that client
Click the minus sign (-) button to collapse the lines to display only the name,
medical record number, and SOE Date
3.2 FILTER BY EVENT, STAGE, AND CLIENT
The Workflow Summary screen can be filtered to see clients at a particular Event
or Stage. As an example, you want to see all clients at “Assign LP for Hospice
Evaluation Visit” stage or all clients who have a “Process Client Occurrence”
Event. Click on the down arrow next to the Event, Stage, or Client to view only
clients at the particular stage/event. You can also filter the view just to see where
an individual client is in the workflow.
Page 27 of 284
3.3 EVENT/STAGES HISTORY REPORT
This report indicates when items appeared and were clicked off the action screen
as being accomplished; gives a good picture of when processing of events
occurred and who did it. This report can be sorted by Event or Date. Sorting by
date allows users to track the order of the stages as they appeared on the Action
screen.
Click the plus sign (+) next to the client to expand the stages of care
Right click the mouse on the last level for the selected client to display available
options
Left click on the Event/Stages History Report to display the report. User can
see the information by Event or Date.
Event/Stages History Report
Page 28 of 284
3.4 EVALUATION VISIT STATUS
Sometimes it is necessary to change the status of a pending evaluation visit from
the Workflow Summary Screen. It is always preferable for the visit status to be
changed on the PDA and synched back to the office; however it is not always
feasible to do so. Functionality has been incorporated into the application to allow
the visit status to be changed from within the HCHB application. The type of
change is dependent upon the current stage of the visit. Client evaluation visits
(Admissions/Transition Recerts) must be reassigned from the Workflow
Summary Screen. Subsequent visits are always scheduled from the Scheduling
Console.
Examples
3.4.1 REASSIGN LP FROM PENDING STATUS
Click the plus sign (+) next to the desired client to expand stage information
Right click on the last level for the client to display the options that are available
at this point.
Select the Reassign LP option
Page 29 of 284
User can then change the Service Code, Licensed Professional and/or Visit
Date.
Click OK to save and exit
3.4.2 REASSIGNING LATE OR ACCEPTED ADMISSION VISITS
A message box will appear explaining that the client is already assigned to
another worker
Depending on the decision, click OK or Cancel
Page 30 of 284
A second box will appear to change the service code, LP or Visit Date.
3.4.3 INCOMPLETE STATUS
If the client admission visit is in incomplete status, a pop up box will let you know
that the visit has already been started. Office staff must not move or reassign
these visits! The field PDA user must complete and synchronize the visit back.
Page 31 of 284
4 CLINICAL INPUT SCREEN
The Clinical Input screen contains the electronic medical record where users can
view, add, edit, and/or void a variety of clinical documents, including but not
limited to: allergies, calendar, client information, coordination notes, medications,
orders, QI reports, supplies, visit notes, vital sign parameters, and wound sheets.
These records can be accessed by clicking the third icon on the toolbar (the
keyboard icon).
Clinical Input Icon
4.1 GETTING FAMILIAR W ITH THE SCREEN
Clients are listed by Last Name, First Name
Columns can be shuffled around, expanded or decreased in width
Each individual column can be sorted ascending to descending and vice versa by
clicking anywhere on the green column heading
Client Status, Episode Status, and SOE from can be filtered using the
dropdown arrow.
The default view is to ACTIVE patients only (those that are Pending and
Current). Change Client Status to ALL to see all patients including those
Discharged and Non-Admitted.
To quickly find a specific patient in the list, click on the dropdown arrow next to
Client filter and start typing the Last Name.
The paperclip icon indicates that there are scanned attachments in the system
for that patient.
Page 32 of 284
Extended search is available:
Page 33 of 284
The following “wildcard” characters can be used within this search dialog box:
The asterisk (*) represents zero or more characters
The underscore (_) represents one character
The wildcard characters can be used within the following entry boxes:
Client, City, State, Zip code, MR Number and Primary Physician
Examples using wildcard characters:
*CHA – will find any name with “CHA” in it anywhere, i.e. “Sheen, Charlie” or
“Chavez Cesar” or “Charo” *, CHA – will find anyone with a first name that begins
with “CHA”, i.e. “Brown, Charlie” or “Bronson, Charles”
SW*EGG – will find any last name that starts with “SW” and has “EGG” in the
rest somewhere, i.e. “Schwarzenegger”
SM_TH – will find both variations of the name “Smith”, i.e. “Smith, Will”, “Smyth,
Patti”
The SSN entry box will not accept wildcard characters, but will allow you to enter
a portion of the Social Security Number to search on, i.e. for SSN 123-45-6789;
you can enter “123” and then click the “Search” button to find a specific patient.
All other entry boxes requiring specific dates will not accept wildcard characters
and need to have the date entered manually or selected from the drop-down.
Page 34 of 284
4.2 VIEW ING DOCUMENTS IN THE MEDICAL RECORD
Page 35 of 284
From the Clinical Input screen, right
click on client’s name to display the
access menu. Various client-specific
reports can be reviewed.
Select Medical Records Info and
the following box will appear in order
to access items in the electronic
record.
Note that a hospice medical record
will not include a few sections seen
here *Management and Evaluation,
Therapy and Client Tracking Sheet”
4.2.1 EDITING DOCUMENTS
The software follows strict guidelines for editing of information but certain fields
may be edited, with the proper security rights. Whenever a document is edited,
the date, time and name of the individual completing the edit process is captured
and maintained for reference/audit purposes.
Page 36 of 284
4.2.2 PRINTING THE MEDICAL RECORD
If a hard copy of the documents needs to be printed, the quickest way to print is
go to Clinical Input, right click on the patient, go to Medical Records Info, Print
Medical Record Info. The following pop-up box will appear for selection of what to
print.
Click Save as PDF, View/Print, or Print Only and the date range box will appear. Click
OK to continue.
Page 37 of 284
A new “Consolidated Medical Record” checkbox has been added to the “Print
Medical Record” form to allow users an option to print a more
Consolidated/Abbreviated version of the Medical Record report which excludes
redundancy, i.e. medications listed on multiple reports, etc.
4.2.3 UNDERSTANDING THE CALENDAR CODES
R – Requested visit (came in from the handheld device or back office order, but
has not been scheduled to a worker)
S - Scheduled visit (worker has been added and the schedule finalized)
V - Verified visit (completed visit is in and accounted for)
The calendar also displays the service code of the requested, scheduled, or
completed visit. For example, RN00H is a Hospice Nursing Admission.
Page 38 of 284
4.2.4 ADDING MEDICATIONS, SUPPLIES, VISITS, LOC AND
CHANGING VITAL SIGN PARAMETERS
To make additions or changes to these items, a new order must be entered first.
Rationale: If a supply is being added or the calendar is being changed in any
way, an order must be written to make a change. The process of adding new
orders is discussed later in this manual. All orders do not have to be sent to the
Dr. but to get them added t to the system requires the functionality of writing an
order.
4.2.5 UNDERSTANDING THE PATHWAY PROBLEM STATEMENTS)
The clinical pathway is developed on SOC and ADD-ON visits. The designation
of the client’s needs via selection of the Problem Statements is crucial to the Plan
of Care development and the ongoing visit plan. Members of the interdisciplinary
group [nurse/social worker/chaplain] selects problems that are applicable to the
client/family after completing a thorough assessment of the client’s medical,
environmental, psychological and spiritual statuses. Selection of the problems
Page 39 of 284
should always be limited to what the discipline will be doing/providing for the
patient based on current findings. Because these problem statements can be
added/removed from visit to visit “anticipated problems” should not be added until
they occur. A problem should not be selected if no intervention or goal will be
provided for the particular problem in the next 1-2 visits. This focuses the
problems and shortens the documentation needed.
Pathway Significance These visit types require the user to establish or reestablish the plan of care. With the SOC, establishment of the plan of care
results in the development of a Plan of Care order. With the Add On visits, the
establishment of the plan of care results in the development of an additional plan
of care for services of MSW/CH/Music, etc.– via separate order.
First let us discuss the process in PointCare: the user selects the appropriate
diagnoses to justify the services they will provide. Then in the Pathway the
discipline specific problem statements can be selected related to the diagnoses
and the findings in the Physical Assessment. The pathway is comprised of a list
of problem statements. The user simply says YES or NO to the statements to
accurately describe the needs of the client/family, meaning what current issues
must be addressed. Saying YES to the problem statements does two things:
Generates applicable medical POC orders with corresponding long-term goals;
and develops matching interventions and corresponding short-term goals that will
be presented to the users on subsequent visits. These Interventions and goals
are per discipline and generate the comprehensive Care Plan.
So, in the SOC visit, selecting the appropriate problem(s) creates the order/goal
templates that ultimately result in the POC order as well as compiles the list of
interventions and short-term goals that will be presented as the care plan to
users on subsequent visits.
In the Add-On visit selecting the problem statement(s) creates the order/goal
templates that ultimately result in an add-on order as well as compiles the list of
interventions and short-term goals that will be presented to users on subsequent
visits as that discipline’s care plan. .
The combination of all disciplines choices in the pathway will become the
comprehensive plan of care. If the pathways are not developed, the POC will not
contain the orders for the services that need to be provided and there will be no
interventions and goals on subsequent visits
•
•
Problems may be added or removed during subsequent visits by the primary
disciplines to update the Careplan based on patient/family needs.
The Careplan is reviewed/changed in IDG
Page 40 of 284
Completing Interventions and Goals on Subsequent Visits
Visit notes indicate that many interventions and goals that are presented to the
user on subsequent visits may be completed, but is dependent on the complexity
of the patient problems, the comprehension of the patient and caregiver and level
of coping of the patient and caregiver on any given day. It is important that users
understand that we never expect that all the interventions would be completed on
every visit.
Take your time…look at the client…determine what is important for the visit and
what should wait until the next visit. The great thing about this application is that
it allows you to really practice nursing/psychosocial/spiritual care without having
to be concerned that something will get missed. The application will keep track of
the interventions that are provided on the visit as well as the ones that need to be
re-addressed because the client did not fully achieve the goal.
The client/family’s ability to learn and meet goals is greatly dependent upon their
education, mental status and the complexity of their care needs as well as a
variety of other uncontrollable issues.
What you really need to take from this…
SOC/Add On visits…the pathway must be completed or there will be no
interventions and goals on the subsequent visits.
SOC visits…the pathway must be completed or the POC will not contain the
orders for the services to be provided.
All interventions provided on the visit will not necessarily have all associated
goals met on that visit.
Page 41 of 284
Example of the Nursing Problem Statement Report per patient
4.2.6 COORDINATION NOTES
Coordination Notes allow the office user to communicate information to the field user
and vice versa; these Notes show coordination of care between all Pointcare users as
well. To access these notes from inside HCHB:
o
Right click on the client’s name to display the popup menu
o
Select Medical Records Info/Coordination Notes
Users with appropriate security rights can edit/inactivate notes; inactivated notes will not
be synchronized to Pointcare.
Page 42 of 284
Page 43 of 284
Coordination Notes can also be added/viewed from the Referral. Coordination Notes
button appears at the bottom on all screens of the referral.
.
4.2.6.1 MAINTAIN COORDINATION NOTES MENU
An authorized user can set filtering criteria in order to see all of the coordination
notes that have been entered. The user can view text of notes if desired and can
inactivate ones that are not appropriate, for whatever reason. The system warns
before inactivating notes and offers the ability to re-activate if necessary.
Go to the Clients Menu and Maintain Coordination Notes. Enter desired
filtering criteria and click “Show Results” to view. Highlight note type and select
View or Inactivate Coordination Note.
Page 44 of 284
SIGNATURE FORMS TRACKING
The Signature Forms Tracking grid is where electronic signature forms can be
viewed/printed, and also where dates can be tracked for non-electronic forms.
Right click on the client’s name to
Right click on the client’s name to display the popup menu
Select Medical Records Info/Signature Forms Tracking.
Highlight the desired form to preview/print.
Page 45 of 284
Click “Add” to track the signed date of a paper (non-electronic) form.
4.2.7 VIEWING VISIT NOTES IN HCHB
Right click on the client’s name to display the popup menu
Select Medical Records Info/Visit Notes
Highlight desired visit note and click View Visit Note or Print Visit Note
depending on how you want to view the information
Page 46 of 284
Click the Close button to exit
Shows the various visit notes for this patient. Note that if a Paper note was completed
and scanned that after the visit type it will read “Visit Done on Paper”.
Viewing Visit Notes in R2
Page 47 of 284
4.2.8 DOCUMENT MANAGEMENT
The “Attachment Console” provides users with a way to upload multiple
attachment types, i.e. wound images, Client, Episode and Visit Documents, from
a single location, eliminating the need of going into multiple locations to attach
images or documentation.
This tool will allow the user to associate multiple attachments to a single
attachment type, and then individually associate each attachment to a client, and
even to a specific visit when necessary as shown in the example below.
The following example demonstrates the functionality:
- From the HCHB Orb in R2, select the “Attachment Console”
Page 48 of 284
- Click the “C” drive to choose the File(s) to attach
Page 49 of 284
Then do a Ctrl + Click” to highlight attachments individually, or do a “Ctrl” + Click”
to highlight a group of attachments, and then click “Open” to populate the
Attachments grid
Page 50 of 284
Once the documents are attached you get a green “+” sign, to indicate that
the documents have been added.
Page 51 of 284
Don’t forget to complete the right side of the grid under “Settings” this allows you
to select a type/location/recipient and a visit date range that the documents need
to be attached to
Page 52 of 284
If you added an incorrect document you can use the “Remove” or “View
Attachment” buttons to delete or review the attachments before making any client
associations.
Page 53 of 284
Once all attachments have been associated to a client and or visit, users will then be
able to click “Save” to complete the process, or “Save & Stay” to remain in the Document
Management form
4.2.9 WOUND IMAGES
After transferring picture from camera to your computer
Right click on the client’s name to display the popup box
Select Medical Records /Wounds
Right click to display the popup menu.
NOTE: At least one wound must be present in order to attach wound images.
Select Wound Images
Click on Load from File
Page 54 of 284
Locate file on your C: drive.
Click Open to load.
Wound image displays.
Date wound image was taken can be changed from drop down box.
Comments can be added.
Click on Save.
Page 55 of 284
Click Close to exit.
4.2.8.1 TO COMPARE WOUND IMAGES
When multiple wound images are on file for a particular wound, you can compare
wound images to determine healing progression.
Click on Compare Wound Images
Page 56 of 284
Note - each wound image lists a picture ID and date taken. Determine the order
of the comparison by selecting the image id from the drop down box. If multiple
wound images are available for comparison, only two can be compared at a time.
Side by side comparison of selected wounds displays.
Use the +, - , full or all buttons to zoom in or out as desired.
Use vertical and horizontal scroll bars to see a different part of the image.
Click Close.
If necessary, additional comments can be added by editing the wound image
Page 57 of 284
On the Clinical Input Screen a Paper Clip can be seen after the patient name
indication that there are attacnments to that record for viewing.
5 ORDER CONSOLE
The Order Console in R2 allows you to view, sort and track all orders in the
system.
Page 58 of 284
5.1 FILTERING ORDERS
Orders can be filtered (i.e. Not Sent or Sent But Not Signed) using the filters on
the left side of the Order Console. Set the different filters to the desired
parameters, and then click the “Load Order Console” button at the bottom to
populate the appropriate orders in the grid on the right side of the console.
Page 59 of 284
User can also click on desired columns within the order grid on the right side to
sort ascending to descending and vice versa (i.e., Date Expected by Physician,
etc.)
Page 60 of 284
5.2 VIEW ING ORDERS
Right click on an order to display available functions for that order, which include:
Edit Order, Void Order, Process Order, View Order, View Order History, Print
Order, or View/Print Order (for a print preview).
Functions for a selected order can also be accessed from the buttons on the
bottom of the Order Console.
Page 61 of 284
5.4 VIEW ING AND DOCUMENTING F2F ENCOUNTER
The F2F Encounter can be viewed and documented from several different areas
of the application. Users can view the Face to Face encounter grid from the
Clinical Input Screen, Action Screen within specific tasks, Workflow Summary
Screen and the IDG screen. To view the Face to Face encounter grid, the
patient has to have an active F2F encounter record and the menu is available via
right-click.
The user can also document that the encounter took place from PointCare,
Clinical input screen and IDG screen. This documentation of the encounter is the
supporting facts that a Face to Face encounter took place.
5.4.1 CLINICAL INPUT
From the clinical input screen locate the patient from the list and right-click on
their name. This should bring up the medical record menu, select medical
records info and then the Face to Face Encounter menu option. This will present
the user with the Face to Face grid for this patient.
Page 62 of 284
CLINICAL INPUT SCREEN IN R2
5.4.2 ORDER CONSOLE AND TRACKING
From the order console or tracking screens locate an order in the right benefit
period for this patient and right-click on that order (the Medical Director’s CTI
order is a good one to select). This will bring up the menu options, and the user
can select Face to Face Encounter, presenting the user with the Face to Face
grid.
There is also a F2F Completion Date column on this screen. This will populate
with a date when the F2F Encounter has been completed for that benefit period.
Page 63 of 284
5.4.3 IDG SCREEN
From the IDG screen locate the patient from the list and right-click on their name.
This should bring up the medical record menu, select medical records info and
then the Face to Face menu option. This will present the user with the Face to
Face grid for this patient.
Page 64 of 284
User can also document their F2F visit findings on this page and mark the
encounter completed. Once on the Face to Face Grid the user will have several
menu options to select.
Page 65 of 284
6 REFERRAL ENTRY
•
All referrals into Homecare Homebase will originate by clicking the New
Referral icon (blue telephone) from the toolbar.
•
The default selection is New Referral.
All fields in maroon text are required before the referral can be finalized. The
various referral form screens also contain optional items.
•
•
•
•
If you have access to multiple branches/teams, select the Assigned
Branch/Team.
Patient’s Location may be selected if your agency uses Locations. A
patient can be assigned to only one Location.
Social Security Number is not required, but encouraged to enter if you can
get it.
Click Next at the bottom of the screen or tap on the desired tab at the top
to continue entry of info.
Page 66 of 284
6.1 GENERAL TAB
•
For SOC the Election of Benefits tab will not be addressed here, but in
Workflow.
•
NOTE: In Transition Recerts - the Election of Benefits tab must be
addressed in this screen.
Page 67 of 284
6.2 REFERRAL SOURCE
•
•
•
•
•
•
Referral Date – Defaults to the current date
Care Type – Defaults to Hospice but other care types can be added to
facilitate reporting needs at any time. .
Referral Source – Select Physician, Facility or Other from the dropdown
box. After the type of referral source is selected, you will be prompted for
specific information identifying the referral source.
Homecare Coordinator – An optional field that can be used to assign
credit for an admission to an individual. (Not to be confused with
Admission Coordinators/Business Development Dept) if the agency has
one)
AC Credited with Referral – Admission Coordinators/Marketer
Click Next at the bottom of the screen or select the next tab for
information entry
**NOTE: If the Physician is unknown at the time of the referral choose
PHYSICIAN, TBD from the physician table. This is coded to generate
workflow to replace with a known physician and cannot be removed from
workflow until that happens. The CTI cannot be approved until the actual
physician is entered.
Page 68 of 284
6.3 DEMOGRAPHICS
There are three tabs within the Demographics section – Client, Service
Locations, and Client Contact.
6.3.1 CLIENT TAB
6.3.2 SERVICE LOCATIONS TAB
•
•
Service Locations are used to identify address information for the patient
(i.e., primary residence, family member’s house, facility, respite, etc.) At
least one Service Location is required. (There is a 1000 character limit
in the Travel Direction field)
Page 69 of 284
***NOTE: For a Transition Recert an Effective Date tab must be completed
***NOTE: If the patient resides in a facility there will be an added field to enter a
room number.
6.3.3 CLIENT CONTACT TAB
This section contains contact information for the patient – family members,
emergency contact, Power of Attorney, etc.
•
Click the “Add Contact” button to begin entry of information. Multiple
contacts may be entered.
•
Indicate the potential Bereavement status by selecting Yes or No. This
setting can be edited as needed at a later date.
***NOTE: For contacts marked as Potential Bereavement the complete
address must be completed as the address for the bereavement letters
pull from this information!
Page 70 of 284
6.4 PAYOR SOURCES
Click Add Payor Source button to begin entry – or right-click on the screen and
select “Add Payor Source.”
•
•
•
•
•
Select Primary, Secondary radio button (circle) and pick Payor Type from
list
Based on the Payor Type selected, the screens are prompted for
information specific to the type selected
Example of a Medicare referral and the required fields.
Episode Length (Days) show information specific to the payor source
HICN is the patient’s Medicare number or SS # for Commercial patients.
Page 71 of 284
•
Multiple payors can be entered into the referral i.e. Hospice Medicare and
Medicaid
6.5 PHYSICIANS TAB
•
•
•
•
If the referral came from a physician, the referring physician is
automatically entered as primary physician (may be edited if the referring
physician is not the primary physician – example a hospitalist makes the
referral).
Click Add to enter a new physician.
The Medical Director should be in 2nd position unless he/she is filling both
roles.
Select the physician by clicking the <…> button to search the physician
database.
**NOTE: If the Physician is unknown at the time of the referral choose TBD,
Physician from the physician table. This is coded to generate workflow to
replace with a known physician and cannot be removed from workflow until
that happens. The CTI cannot be approved until the actual physician(s) are
entered.
Page 72 of 284
•
•
•
When adding the Medical Director, be sure to check the Hospice Medical
Director box. This will pull the Medical Director’s name to the CTI Order.
If the Attending and Medical Director are the same then check this box by
editing the Attending physician line.
The system is setup so that the physician on row one is the
Attending/Primary Physician. To change the Attending/Primary Physician,
highlight the desired physician and use the “Move Up” and “Move Down”
buttons on the bottom of the screen.
This can also be changed by editing a physician on the list and checking
the “Attending/Primary Physician” checkbox.
A confirmation message will be displayed prior to completing the change:
***NOTE: The correct order of physicians is important for reporting and the
correct order workflow generation. The attending is first, the Medical Director
second and other physicians under these.
Page 73 of 284
6.6 CLINICAL TAB
•
•
•
•
•
•
•
•
•
There are no required fields on this screen
Verbal Start of Care date defaults with the referral date.
Coordination Notes are used to communicate any information to the
admitting nurse/therapist [and thereafter]. Multiple notes can be
entered at referral if necessary. Use note type “clinical commentintake”
Vital Sign Parameters – “Typically” only the MAX parameter for Pain
is filled in. All others are blank. This is addressed by the RN in the
SOC visit and synch back to populate this grid.
Allergies and Medications may be entered, but must be validated by
the RN during the admission visit. Medications can no longer be added
once the Assign LP workflow has been completed.
Assigning Case Managers here will facilitate the retrieval of patient
information by the assigned case mangers on their handheld device.
IDG members who are identified as case managers will maintain
access to client records for 20 days after the date of discharge. These
are typically the IDG Team for the patient. These can be added at a
later date if unknown at this time.
By clicking on the Inpatient Events/Other Facilities tab you can then
add recent Inpatient stays and Related Facilities. Multiple Inpatient
Facilities or related facilities can be added.
If your agency uses DME and/or Pharmacies vendors you may indicate
the vendors serving this patient. Funeral Home may also be entered
here if known.
The Medications (depending on system setting selected by the
agency) and Coordination note tabs are at bottom of this screen.
Page 74 of 284
Many of the fields on the above screen will be “back filled” when the admission visit is
synched back to the server.
6.7 DIAGNOSES TAB
•
•
•
•
At a minimum, complete the required fields for what is the terminal
diagnosis ICD Code, Onset/Exacerbation, and Onset/Exacerbation Date.
Click Add to add the primary diagnosis.
The Frequently Used radio button should be used to narrow the search.
This is a short list of the most commonly used hospice diagnoses used by
your agency. If the desired diagnosis is not found it may be necessary to
select “All”. This is the entire CMS IDC-9 database.
You may search for diagnosis code by ICD Code or Description. Type in
the ICD-9 code number or description name and click the Find button.
(Note that inputting only 3-4 letters of a key word you think is in the
description is preferable when searching by Description. Highlight the
correct diagnosis and click the Select button.
Page 75 of 284
•
Other diagnoses may be entered if they are known at this time
Page 76 of 284
Page 77 of 284
6.8 SCHEDULING TAB
•
Select Yes for Perform Hospice Initiation Visits prior to SOC to
document a pre-admission visit.
•
If the Initiation Visits feature is utilized, the user would then click the
Initiation Visits button to display the Initiation Visits types. From the
Initiation Visits form, the user will be able to add/edit/void up to 5 initiation
visits. NOTE: The visits are not scheduled to workers here but in a later
task in workflow.
The Initiation Visit Grid will present as shown below:
Users will have discipline selections depending on agency preference.
Page 78 of 284
ADD ON Visits
•
•
•
Select Yes or NO in the Add-On Evaluation Prior to Approval of the
Plan of Care associated with the Completed SOC Visit box.
“Yes” will allow scheduling of MSW and/or CH in addition to the admitting
RN on the date of admission. .If MSW and/or CH visits are not needed on
the date of admission select “No”. They can be added into the calendar
by the nurse during the admission visit for later in the week.
If an MSW and/or CH are included on the Referral, then all visits must
be completed and synched before the POC can be approved.
Select the “projected” Evaluation date. This can be changed if the patient is not
admitted on this date.
Page 79 of 284
6.8.1 EXTENDED REFERRAL
•
If the MSW or CH are included in the referral, the date of these visits can
still be managed and edited after the LP stage has been completed.
o A common scenario of how this can be used is if the original plan
was for the nurse to do the admission and an MSW for an Add-On
evaluation, but resource availability necessitates these disciplines
to be swapped.
The following conditions will determine whether the Admitting/Add-On
Discipline fields are Enabled or Disabled.
Both Admitting/Add-On Discipline Fields remain ‘Enabled’ If:
- The Admitting/Add-On Visit(s) are in a Pending state
The Admitting Discipline Field is ‘Disabled’ If:
- The Admitting Visit has been completed
The Add-On Discipline Fields are ‘Disabled’ If:
- Hospice Initial Review of Hospice POC stage is completed
Page 80 of 284
6.9 PENDING REFERRAL
If all of the required information is not obtained at the time the referral data is
entered, it will be set to a pending (“incomplete”) status when saved. Workflow is
generated called Process Pending Referral so it does not get missed.
•
•
To add information, double-click on the task to bring up the referral
information screen again
Add or correct the necessary information and click the Save button
6.10 CONTINUATION OF CARE (CCD) IMPORTING
HCHB can now support an import and export of a CCD file, which would be
used to share patient information between 2 healthcare entities. The other
entity would have to contractually be set up to send and receive data for
this to work.
Process:
When the office receives a valid form of Continuation of Care Document (CCD)
from another healthcare source, this can be imported into Homecare Homebase
from the referral stage in assisting the data entry of that patient. This process
can be initiated from the first screen of entering a referral. Here, the user would
choose the appropriate service line and select “Continuity of Care Document
(CCD)”
Page 81 of 284
The user will immediately be prompted to locate the CCD file from his/her local
computer. If the file format is invalid, an alert will generate stating “Please
select a valid CCD file format for import.”
Otherwise, if the file format is valid, the user will receive a message stating
“Please select an ‘Assigned Branch’ and an ‘Assigned Team’ for this
client.”
Prior to data population, the Assigned Team and Assigned Branch must be
selected. Once this is completed, the Client Look-up table generates to assist
the user in ensuring whether or not the CCD client has been a previous client in
the agency’s database.
Once the Client Look-up table is closed, the referral will populate CCD fields with
current and relevant data. Users will be prompted to add additional
information necessary to create a valid referral. Each Designated CCD field
is “view only” and will be visible only upon initial referral entry.
Page 82 of 284
The CCD fields will be display information on the following New Referral tabs:
General/Demographics CCD Field:
Service Location CCD Field:
Contacts CCD Field:
Page 83 of 284
Payor Source CCD Field:
Physician CCD Field:
Client Information (Medications) CCD Field:
Page 84 of 284
Allergies CCD Field:
Diagnoses CCD Field:
Page 85 of 284
Note: The user can utilize the CCD Import Data from each section as a reference
to populate the required items within the New Referral. Note that some
information is populated automatically including the client’s name, date of birth,
gender, service location, and contact information Other data will be entered into
HCHB tables manually to ensure the appropriate physicians, payor sources,
medications, allergies and diagnoses are listed for the client.
7 REVIEW/APPROVE REFERRAL
If the agency desires, a system setting can be used to require that the Hospice
Referral be approved by a Supervisor prior to billing verification. If this setting is
“ON”, then a task to “Review/Approve Hospice Referral” will appear on workflow.
The supervisor can review then mark Stage Complete to send the referral for
billing review.
If this system setting is “OFF” this task will not appear in workflow
8 VERIFY PAYOR ELIGIBILITY
8.1 MEDICARE PATIENTS
If the agency has not contracted for the “Auto Eligibility” functionality, the
workflow will go to the Verify Medicare Eligibility stage
Appropriate corrections should be made to the client’s name, date of birth, etc.
based on the Common Working File information.
Once eligibility has been verified, click the Medicare Eligibility Verified button
User may add a Coordination Note if further explanation of payor status is
needed or to indicate a delay in verification
Page 86 of 284
•
If “Auto-Eligibility” is being used, then all Medicare patients' eligibility
will be checked electronically by HCHB using a 3rd party application. The
task to “Verify Medicare Eligibility” is completed by the system and will no
longer appear on workflow to be completed. It is advised to also check
the CWF for any revocations.
•
As soon as the Pending referral is completed (saved), the system will
automatically send a request to the 3rd party vendor to verify the Medicare
benefits. .
•
“Review Eligibility Alert” will appear if there is any issue with the eligibility
check.
Page 87 of 284
If the workflow task is “Review Eligibility Response”: The right hand side
indicates any eligibility problems. Do not schedule evaluation visit. Contact the
Manager for further guidance.
If you must click “Medicare eligibility verified” (used only when auto eligibility is
not available) in order to be able to process the referral and schedule visits,
please enter the Medicare Eligibility Coordination Note. Complete this
coordination note for each patient. This will alert the billing office to follow up
and take action to verify the payor later.
8.2 TRANSFER AND ADMISSION PATIENTS - F2F PROCESS
If a patient is coming onto service with your agency as a transfer or new
admission and is in or entering a 60 day episode and has Medicare as a payor
the user will see a F2F Encounter button available in workflow stage ‘Verify
Hospice Benefit Period’. This button, if selected, will present the user with the
F2F Encounter grid. The user can update the Face to Face Encounter record
and document all the information related to the Face to Face encounter.
Page 88 of 284
NOTE: Any payor can now be set up to require F2F documentation.
The F2F Encounter button will work as described above in section F2F
Encounter Grid. Once the user clicks on the stage completed button, the stage
Plan F2F Encounter will appear on the action screen to be processed.
Transfer/Admission patients will be held up until action is taken on the F2F
encounter. *This means that you will not be able to assign the admission visit
until you either schedule the F2F encounter, print F2F form for manual
completion or delay the F2F stage(s).
8.3 AUTHORIZATION FOR NON-MEDICARE PATIENTS
8.3.1 OBTAIN PAYOR SOURCE VERIFICATION
•
Payor Source Verification – Where information regarding co-pays,
deductibles, drug card info, etc. can be entered. When you have entered
your information, click the save button.
Page 89 of 284
8.2.1.1 PAYOR INFO
Page 90 of 284
8.2.1.2 BENEFIT INFO TAB
Mark Stage Complete when all information has been completed.
Answer appropriately to the following question:
Page 91 of 284
If unable to obtain all needed information, selected “Stage complete Prior to
Obtaining All required Info”, you will be asked to complete a system generated
note; example notification to staff responsible for verifying benefit.
Page 92 of 284
8.3.2 OBTAIN INITIAL AUTHORIZATION
The referral will go to the Obtain Initial Authorization stage for entry of required
information according to the payor source.
It is not necessary to process this stage if patient does not need to be admitted
outside of normal business hours.
Click Add/Edit Authorizations
Page 93 of 284
Click Add Authorization
•
•
•
Select Evaluation – Standard – Intermittent from the Program drop down
box.
Pending Authorization?
Click Select Job Codes
NEVER: Assign authorization to a payor of Medicaid Room and Board!
•
•
•
•
•
•
Move desired discipline (job code) from Available column (L) to Assigned
column (R) by highlighting desired job code and clicking >.
Click Save
Date to follow up on Pending Authorization should be Monday.
Click Save.
Number of authorized visits will appear in Authorization Details.
Click Close.
Page 94 of 284
May click on Add Coordination Note
Page 95 of 284
Add Note then Close
Click Pending Auth Request Submitted
Page 96 of 284
For Medicare Replacement Policies, the task that appears will be “Verify
Medicare Eligibility”
•
•
•
•
•
If the patient does not need to be seen prior to the next business day do
not process workflow.
* If the patient needs to be seen prior to the next business day.
Click Review/Edit Funding Source Information to open referral screen.
Add Coordination note type: Commercial Insurance Eligibility.
Document “entered for after hours/weekend admits. Please follow up”.
This will generate a coordination note to the appropriate insurance
verification personnel so they can follow up and obtain appropriate
authorizations if needed.
Click Medicare Eligibility Verified.
8.4 REVIEW /APPROVE REFERRAL AFTER PAYOR VERIFICATION
•
•
Click Edit/Review referral to open referral screen.
Click Save.
Page 97 of 284
9 ELECTION OF BENEFITS
The Hospice patient’s Election of Hospice Benefits must be entered into the system.
9.1 NEW CLIENT
– PATIENT’S FIRST ELECTION OF HOSPICE BENEFITS
•
•
•
•
•
Benefit Period = 1
For new clients, the SOC Date, EOB Date and SOE Date are all the same
Once the SOC Date has been entered, it sets the others and are not editable by
the user
The EOE Date (really known as the End of Benefit Period Date) is calculated
based on this EOB Date and the primary payor source). Note: The EOE Date is
not shown on this screen, but can be seen in Clinical Input
Revocations or discharges have to be entered.
Page 98 of 284
9.2 TRANSFER TO HCHB SOFTW ARE
- (FOR PATIENT ALREADY BEING SERVICED BY THIS AGENCY IN ANOTHER
SOFTWARE APPLICATION) – USE THE ‘TRANSFER TO HCHB’ RADIO BUTTON
•
•
•
•
•
EOB Type (Transfer) and the EOB Date is not editable by user in this situation
SOC Date = this is the date that the client began service with this agency.
SOE Date = User will enter based on which client benefit period will cross over
the Go Live date for transition patients.
EOE Date (not shown on this screen) – Again, this is really the “End of Benefit
Date” and will calculate appropriately based on the EOB and SOE dates
Number of Revocations - if the patient ever revoked his/her hospice benefit or
been discharged from hospice enter the number of times here
.
Page 99 of 284
9.3 TRANSFER (FROM ANOTHER AGENCY TO THIS AGENCY)
– PATIENT IS CHANGING HOSPICE AGENCIES BUT SHOULD BE ENTERED AS A
“NEW” REFERRAL
•
•
•
•
•
•
EOB Type – User should select Transfer
SOC Date = this is the date that the client began service with this agency (not
their original SOC date with any other Hospice agency)!
EOB Date – This field is editable by the user. The patient’s originally elected
EOB Date with the transferring agency should be entered here (very
important!).
SOE Date – Is not editable by user in this situation
Number of Revocations/Discharges – if patient has ever revoked his/her hospice
benefit or been discharged from hospice enter number and dates in the
appropriate fields.
EOE Date – Again, not shown on this screen but can be seen in Clinical Input.
This is the End of Benefit Period Date.
Referrals that include revocations must be documented with the number of
revocations, the EOB date for that admission and Revocation/discharge date.
Validations exist to prevent overlapping of benefit periods and correct calculation
Page 100 of 284
of the current benefit period dates. The EOB date must be prior to the revocation
date.
If a patient has ever revoked/been discharged from his/her benefit and this
information is not added benefit periods will not calculate correctly putting the
agency at risk for lost revenue.
Also it could affect whether or not a F2F Encounter needs to occur to be paid for
the care.
10 COMPLETING THE CTI ORDER
The Hospice CTI Order can be generated at 3 different time points before the Referral is
approved by the clinical manager 1) when the referral is initially entered 2) at the
workflow stage of Obtain Hospice CTI Order or 3) at the workflow stage of
Review/Approve Hospice Referral. The template for this order type is set up in System
Settings by each customer. If it contains asterisks they must be replaced with specific
information before the order can be Saved. The initial CTI must be signed by the
Medical Director and the Attending Physician, if they are not the same person.
Recertification CTIs can be signed by the Medical Director only.
See example of a CTI Order in template below. Note asterisks must be replaced with
text prior to completing the order.
Before replacing asterisks with text
After replacing asterisks with text
Page 101 of 284
VERBAL CERTIFICATION COORDINATION NOTE
The following two Hospice Verbal Certification Coordination Notes have been
created to provide agencies with a way to document the verbal communication
regarding the certification of the client between the agency and the appropriate
Attending Physician and/or Medical Director:
1) Hospice Verbal Certification Primary Physician
2) Hospice Verbal Certification Medical Director
*This feature exists to assist agencies with obtaining the verbal certification in a
documented format to use in producing the written CTI orders at a later date in the case
that a patient does not come on service for up to 14 days after the referral is taken and
before the SOC date. The CTI order cannot be regenerated so this is a way to
document a verbal certification but not use the CTI order until the patient signs the
Election of Benefit and starts care.
The following Note Template information will be included, but may be edited to meet
the agency’s needs:
Hospice Verbal Certification Primary Physician
Physician Giving Verbal Certification:
“The Physician listed above certifies that the patient’s prognosis is six months or less if
the disease runs its normal course.”
Hospice Verbal Certification Medical Director
Medical Director Giving Verbal Certification:
“The Medical Director/Hospice Team Physician listed above certifies that the patient’s
prognosis is six months or less if the disease runs its normal course.”
A new Review Coordination Notes button has been added to the Edit Client Order
form to in order to give agencies access to any available Hospice Verbal Certification
coordination notes, as well as to be able to add a new one.
Page 102 of 284
The new Review Coordination Notes button can be accessed from within one of the
following three workflow stages:
1)
2)
-
Obtain Hospice CTI Order for Primary Physician
Double-click the stage and then click the Obtain Hospice CTI Order button
Obtain Hospice CTI Order for Medical Director
Double-click the stage and then click the Obtain Hospice CTI Order button
3) Review/Edit Approve Hospice CTI Order
- Double-click the stage and then click the Edit Order button
Note: if the Physician is not the same as the Medical Director, then both the Obtain
Hospice CTI Order for Medical Physician and Obtain Hospice CTI Order for
Medical Director stages will be generated, otherwise if the Physician is also the
Medical Director, then only the Obtain Hospice CTI Order for Medical Director stage
will be generated.
‘COORDINATION NOTES’ FORM
Once the new Review Coordination Notes button has been clicked, users will notice
that a new Copy Note Details and Date/Time to CTI Order button has been added to
the Coordination Notes form. The new button will allow agencies to automatically copy
the Hospice Verbal Certification Notes Details directly to the Hospice CTI Order.
Users will receive the following message once the note details have been copied:
“Coordination note copied successfully”.
Page 103 of 284
The note details will then be visible on the Hospice CTI Order. The date of the order
can be entered as appropriate.
CTI Order for F2F: Requirements for Medical Director’s Electronic Signature
In order to maintain compliance with the Face-to-Face regulation, the following
requirements must be met before a Medical Director can electronically sign the
Certification of Terminal Illness (Hospice CTI Order):
Requirements for signing a CTI Order ‘requiring’ a F2F Encounter:
1) Completed/Approved CTI order for a Hospice Medical Director
2) Completed F2F Encounter (Encounter Completion Date populated)
3) Medical Director enters the narrative for the certification order (Hospice CTI)
Requirements for signing a CTI Order ‘not requiring’ a F2F Encounter:
1) Completed/Approved CTI order for Medical Director
2) Medical Director enters the narrative for the certification order (Hospice CTI)
HCHB will prevent Medical Directors from electronically signing CTI orders (disable Sign
Order button) without all the required components listed. Medical Directors can
electronically sign orders via the IDG screen in Clinical Manager.
Note: the Sign Order button is also available on the Review/Approve Unsigned Order
screen.
Page 104 of 284
11 ASSIGN LICENSED PROFESSIONAL (LP)
After payor eligibility is verified, client will go to the Assign the Evaluation Visit stage
IF there is no F2F encounter required or if needed it has not been scheduled.
Double click the client and the Assign LP box will appear [LP=Licensed Professional]
•
•
•
•
•
•
Select correct Service Code (RN00H is the Hospice Admission Service Code)
Click <…> to select Licensed Professional to perform the visit
Verify the Visit Date box for accuracy.
If MSW and/or CH evaluations need to be scheduled on the same date as the
RN Admission assign the Add-On visit/evaluation(s) The service code is
populated per your previous selection, although you can change it. The service
codes for MSW and/or CH initial evaluations is MS01H and CH01H
If the payor requires authorization, select authorization from drop down box.
Click OK (the admission visit is scheduled and ready to be synchronized to the
Pocket PC)
Also if Add on visits (MSW/CH) have been requested fields to schedule these will also
be available. Refer to Section 28 for more details.
If an Initiation Visit has been requested there will be an additional workflow task on the
Action Screen to Assign the Initiation Visit. Scheduled to the appropriate discipline and
Page 105 of 284
date. These can be changed if necessary.
Additional initiation visits are scheduled from the Workflow Summary screen.
12 ROOM AND BOARD WORKFLOW
Hospice workflow for “Verify Room and Board” is triggered by the service location,
not the payor information, so it is very possible to get R&B workflow even if Medicaid
hasn’t been added as a primary/secondary payor. (The intent being that if you do verify
that they should have R&B, you could then add the payor info at that point.)
This is HCHB functionality added because of multiple client requests and cannot be
changed.
13 REVIEW HOSPICE SOC EVALUATION DOCUMENTATION
When the SOC visit is completed and synched by the admitting nurse, the task Review
Hospice SOC Evaluation Documentation will appear on the action screen.
In order to schedule subsequent visits for the patient, this evaluation documentation and
then the Initial review of POC workflow must be completed.
Double click Review Hospice SOC Evaluation Documentation task to view the
information contained in the Admission packet. Most of these items must be reviewed
prior to completing the stage. It is recommended that the POC be printed and used to
make any notes as you review (go to Hospice POC order to print).
Page 106 of 284
A blue line will appear around a button once it has been clicked – this will assist in
tracking items that have been reviewed.
Page 107 of 284
13.1 VIEW UNLISTED ITEMS REPORT
May or may not contain data and is not required to view]; if there are Unlisted Items
(allergies, medications, supplies), they must be dealt with prior to approving the POC
13.2 VISIT NOTE
Allows the supervisor to get a good idea of the client’s status, includes general visit
information as well as physical assessment, interventions and goals provided.
The below screen shot shows only a partial visit note.
Page 108 of 284
13.3 MEDICATION PROFILE
Displays all of the medications and whether or not they have been reviewed for
contraindications, side effects. Review for provider or patient responsibility. Review for
PRN assignment. Edits cannot be made until the next stage of workflow,
A new High Risk flag denotes medications that look alike, are packaged similarly, have
overlapping dose ranges and sound alike according to the Institute for Safe Medication
Practices. High risk meds include anticoagulants, antipsychotics, diuretics and
antiepileptic. At this time determining high risk meds and how to address them is left to
the agency protocols. At a later date FDB will alert the user to high risk meds and a
response will be required.
13.4 EDIT/VIEW ELECTION OF BENEFITS
Enter EOB information. Indicate New or Transfer patient (i.e. transfer from another
hospice) Edit Start of Care Date as needed. If patient has ever revoked hospice it is
important to enter the number of revocations.
Page 109 of 284
Page 110 of 284
You will receive an error when Saving if the visit date and SOC dates are not the same.
To resolve this go to the SOC date calendar icon and change the date.
Click ok and then proceed to the Start of care Drop Date drop down to adjust the date
that the visit was completed on.
13.5 EDIT/VIEW CALENDAR
View visits as plotted on calendar by admitting nurse. Edits can be made to the calendar
at this stage. Select Add/Remove or Change Visit Service Code as needed.
Page 111 of 284
Add Visit(s) – Highlight the date(s) on the calendar then Click the “…” button to search
for the appropriate service code/type of visit. Click Save when complete. Each time a
change is made to the calendar, the frequency string will automatically recalculate.
Change Visit Service Code – Highlight the date, click “…” button to search for new
service code. Click Save to finalize.
Remove Visit(s) – Highlight date(s), search for the service code that is being deleted,
click Save and visits will be removed from the calendar.
**Note: if using PRN visits for scheduling see Using PRN visits
13.6 EDIT/VIEW VITAL SIGN PARAMETERS
Review and edit as needed. Typically for hospice the MAX of 4 for pain is selected. The
clinician and supervisor are notified if the pain is over 4 in this case.
Page 112 of 284
Note: It is extremely important to not use a “zero” as a placeholder with the
intention that it equal "null" in Vital Sign Parameters. If the desire is to not receive Vital
Sign Workflow Alerts, then all vital sign parameters must be a changed from a “zero” to
a “null.” The value of a "zero" is viewed as a valid response for some vital signs.
13.7 EDIT/VIEW HOSPICE PLAN OF CARE
Used to compile POC orders/goals, long term goals, as well as interventions and short
term goals for subsequent visits. The NDP’s (Nursing Diagnoses Problem Statements)
establish each discipline’s orders and global goals as well as set up the care plan for all
future visits. NDP’s are established by the admitting RN in the field; however, office
users can also edit NDP’s in Reviewing SOC Evaluation Documentation workflow. To
add NDPs right click on the SN Pathway (click in the green field) add the NDP then
right click on the NDP added and choose the appropriate Interventions and goals for
that NDP. Or right click on any existing NDP to remove any NDP/Intervention or goal.
IMPORTANT: Add POC orders and goals in the Orders/Goals tab of the POC in a later
task by choosing those appropriate for the NDP(s) that were added….or deselect them
if NDP’s were removed.
13.8 VIEW COORDINATION NOTES
Page 113 of 284
To gain additional information
There should be a note from Intake outlining the reason for the referral and an IDG
Summary – Admission Only from the admitting nurse
13.9 EDIT/VIEW AIDE CARE PLAN
This is required if non-skilled services have been scheduled. The Aide care Plan may
be developed in the field or in the office. If the care plan originates in the field, the office
user may make edits. To edit, click “Create New Version of Care Plan” button and then
the Add/Edit/Delete Care Plan buttons as appropriate. Frequency and Details of each
service may also be entered, frequency is required, while details are optional. To
activate the new care plan Click Save once completed.
Page 114 of 284
13.10 VIEW INITIAL HOSPICE ORDER
The initial order does not have to be used. The CTI s a separate order.
Review the CTI Order for Hospice – it may or may not have a F2F encounter on it.
Page 115 of 284
13.11 EDIT/VIEW RELATED FACILITIES
Review and edit as needed. This screen provides a place to track Inpatient Events
unaffiliated with your agency as well as Facilities associated to the patient i.e.,
pharmacy, DME, funeral home, etc.
Page 116 of 284
A second tab is available in the Edit/View Related Facilities workflow. Some of the
information that can be viewed and edited in this tab is patient Allergies, Acuity and
Disaster Status, Weight and Height. Assign the RN Case Manager, MSW and
Chaplain Case Managers. Any discipline selected here must have the case manager
in worker set up.
Page 117 of 284
Page 118 of 284
13.12 EDIT/VIEW ADVANCED DIRECTIVES
Review and edit as needed. Remove any duplicate that may have occurred if both
Intake and the admitting nurse entered the same one.
Page 119 of 284
13.13 VIEW AUTHORIZATION INFORMATION REPORT
If required by payor no authorizations should be attached to the Medicaid Room and
Board payor source.
13.14 VIEW HOSPICE POC ORDER
This is for Review only. To aid in making notes for edits needed later in the Edit function
(such as medications/orders/goals), print this before starting down the steps in this
ladder.
Page 120 of 284
Page 121 of 284
13.15 ASSIGN IDG MEMBERS
Assign IDG members who will be responsible for patient’s care, these individuals will be
required to enter IDG summaries for IDG meeting. Medical Director; Registered
Nurse; Medical Social Worker and Chaplain must all be assigned. Others may be
assigned per agency policy such as IDG Facilitator (Many agencies use this as a
scribe role to document changes made during the meeting.) This should be made a
required role to ensure it is always assigned. Workers cannot be duplicated, i.e. the RN
cannot also be the scribe.
Page 122 of 284
Move selected IDG members from the left side of the screen to the right by highlighting
and clicking > or by double clicking their name.
13.16 ASSIGN 1 S T IDG MEETING
Setting this date will create the first IDG meeting for this client and additional IDG
meetings every 14 days.
Best practice recommendation is to review the IDG Summary – Admission Only
coordination note (found in the Medical Record) completed by the SOC nurse when the
admission is immediately before a scheduled meeting. This is a way to introduce the
patient to the team. Then set the date of the 1st electronic meeting for the next meeting
time.
Page 123 of 284
13.17 SELECT LEVEL OF CARE TYPE
Required, indicate the appropriate level of care, click Set Initial Level of Care for
Episode button. This sends the information to billing.
13.18 EDIT/VIEW CONTACTS
Allows supervisor to view and/or edit contact information including potential
Bereavement status.
Page 124 of 284
13.19 REVIEW MAR SCHEDULE
The Medication Administration Record (MAR) is a medication scheduling and
administration record used mostly in inpatient Hospice settings. This update will allow
the clinician to document the medication schedule, administrations and any deviations
as an integrated part of the electronic medical record.
Once all steps in the ladder have a blue border click “Stage Complete”
14 FACILITY ACCESS TO PATIENT RECORDS
14.1 SET UP STEPS
Check the System setting on the Hospice Workflow or Home Health Workflow tab.
Page 125 of 284
Check the Facility Access boxes for each appropriate facility in the Facilities Table
**This may necessitate a change to the agency’s consent form.
The workflow stage/task usually goes to the Medical Records (MRS) person in the
agency
14.2 W ORKFLOW
When the SOC visit comes in the following workflow will be generated:
**How the patient approval is obtained is up to the agency. Receipt of the Patient signed
form in Medical Records (like the consent form) is required to mark the task as
Approved or Denied.
Clicking on the task will ask if Authorization was approved or denied by the patient
14.3 AUTO FAX
If the agency has auto fax turned on and the facilities are set up with fax numbers, then
the visit notes will automatically fax when the visits are synched in.
Page 126 of 284
There is workflow for the MRS to Auto fax updates of Hospice POC updates from IDG,
Discharges and all Orders.
Besides visit notes, there is also the capability for any client upon completion of a
Hospice SOC or Hospice Transition visit to have the Client Medication Report
automatically faxed to the agency selected Pharmacy Facility.
Notes:
• The Pharmacy Facility selected in the system setting setup overrides the
selected facility associated with a client’s episode (Referral Clinical tab Inpatient Events/Other Facilities tab Other Facilities grid)
Steps to access the Client Medication Report:
-
From the Clinical Input screen, right-click and go to Medical Records Info Medications
Page 127 of 284
Click the Print Meds button
Page 128 of 284
Faxes can be set to send later in the day through a system setting.
Fax responses alert the user to successful or failed transmissions
There is a fax status report that can be run to see if there have been any unsuccessful
or delayed faxes.
14.4 PROVIDER LINK
If the Agency has Provider Link application initiated and the facility is given rights, the
facility can log in and see the patient’s orders, POC Update and visits notes from the
portal and nothing has to be sent to them. (See Tables Set-up above)
If the agency is not using either of these features the Orders and POC update task will
still come to workflow. They can be printed and faxed. The agency will need to come up
with their own process for getting copies of the visit notes to the facilities.
For a declined Hospice POCor Hospice Recert, aninformational message will be
displayed when opening the workflow to inform users that the order has been by
declined by Provider Link, and that only the physician can be edited on the order. It will
Page 129 of 284
instruct the user that they will need to contact Customer Service if they need to edit
anything other than the physician.
For any other declined orders, a new information message will be displayed when
opening the workflow to inform users that the order has been declined by Provider Link,
and that only the physician can be edited on the order. It will instruct the user that for all
other edits they will need to void the existing order and create a new order.
The Edit/Approve Order button is divided into the following two separate buttons:
1) Edit Physician on Approved Order
2) Reprocess to Physician
The Edit Physician on Approved Order button will bring up a form to change the
physician (or physician office) on the order. The Reprocess to Physician button will
process the order to the new physician, or if the physician was not edited, it will process
it back to the original physician.
Page 130 of 284
15 INITIAL REVIEW OF HOSPICE POC
Completing the Initial Review of Hospice POC allows for clarification time if needed, to
complete the final review/merging of add-on disciplines (if added to the Referral only) to
the POC. During this workflow stage the Hospice POC may be viewed and/or edited
To Edit the POC view it to activate the Edit button, click Edit Hospice POC
Edits may be made to each tab i.e., General Info, Order Text, and Medications etc.
Order Calendar/PRN Visits: Alert received now when Approving Orders Via
Workflow
A popup Alert will occur when approving Orders via Workflow to notify users when
the Order Calendar contains PRN Visits, but the Calendar/Edited Frequency has not
Page 131 of 284
been updated to the specified number of PRN Visits during the Certification Period;
nor has a specific reason or a delineated description of signs and symptoms
necessitating the visit been included in the Calendar/Edited Frequency.
This alert is to serve as a reminder to the user to make the necessary changes to the
Calendar/Edited Frequency.
When the initial review is completed, the scheduler will receive a task to schedule the
first 7 days of visits. An additional task to “Review/Edit/Approve Hospice POC” will
appear for the PCM/Clin Sup to make final changes to the POC.
16 OBTAIN ADDITIONAL AUTHORIZATION FOR HOSPICE SERVICES
Non-Medicare (non-episodic) patients may require additional authorizations to be
entered in order to schedule the remaining visits.
•
Double click on Obtain Additional Authorization for Hospice Services
Workflow to add additional authorizations for subsequent visits.
•
•
Click Edit/View Calendar.
Click Add/Edit Authorizations.
This will display the number of ordered visits (ordered), number of visits already covered
by authorizations (authorized), and number of visits that need authorizations
(insufficient).
Never attach authorization to a Medicaid Room and Board payor source!
Select Evaluation – Standard – Intermittent (for add on disciplines) from the Program
drop down box.
•
•
•
Select Routine Visits (for subsequent visits) from the Program drop down box.
Pending Authorization?
Click Select Job Codes
Page 132 of 284
•
•
•
•
•
•
•
Move desired discipline (job code) from Available column (L) to Assigned column (R)
by highlighting desired job code and clicking >.
Click Save
Date to follow up on Pending Authorization should be the next business day.
Click Save.
Number of authorized visits will appear in Authorization Details.
Click Close.
Add Coordination note type: Commercial Insurance Eligibility. Document
“entered for weekend/after hours admits”. Please follow up. This will generate a
coordination note to the appropriate insurance verification personnel so they can
follow up to obtain appropriate authorizations if needed.
• Click Pending Authorization Request Submitted.
\
Page 133 of 284
7 NON-ADMITTING PATIENTS FROM THE OFFICE
When non-admitting a patient in the office make sure that patient is not on an agent
Pocket PC. If the patient is on a Pocket PC then have the agent enter the non-admit
from that unit and synch it back to the office.
Refer to the PointCare Manual as needed for instructions related to completing this
process on the Pocket PC
If the patient is not on an agent Pocket PC enter the non-admit from the office.
Step 1
Ensure the patient is at the Assign LP stage on the action screen. If they are at any
other stage i.e. missed or declined visit, process that stage until the patient is at Assign
LP.
Step 2
Go to the Workflow screen by clicking on the work flow icon
Click on the refresh button to refresh the Workflow screen
Step 3
From the workflow screen click expand (+) beside the patient that is being non-admitted.
Open all levels of workflow for the patient. At the last level right-click and select the
non-admit option from the pop-up box.
Page 134 of 284
Step 4
In the Non-Admit a Patient pop-up box indicate the reason for non-admitting. Click on
the down arrow and select the correct reason, then click on the Non-Admit button.
To give a detailed explanation of why the patient is being non-admitted, enter a
coordination note from the Clinical input screen.
**Note: If you filter by active patients you will not see non-admits on the clinical input
screen. Filter by inactive or all.
To enter a Coordination Note from the Clinical screen follow the instructions below:
Right click on the patient and select Medical Records Info.
Click Coordination Notes
Click Add Note
Click the down arrow next to Note Type and select CLINICAL
Click in the Note box to enter text; Click the Save button
17.1 UNDO NON-ADMIT: FUNCTIONALITY ADDED TO ‘UNDO NON-ADMITTED’
CLIENTS
Page 135 of 284
When trying to Undo a Non-Admit patient in order to undo clients who may have been
mistakenly Non-Admitted, or if the client/relative chooses to go ahead with the
admission. This allows users to access the patient and not have to re-enter the client’s
information. Once a patient that has been Non-Admit has been reset, the patient’s
episode is then changed to pending.
Step 1
From the Clinical input screen, right- click on the client where the episode is Non- Admit
, and then go to Episode management, and then to Undo Non- Admit.
Step 2
A prompt will occur to ensure the process to undo the non-admit, click OK to complete
the process.
Page 136 of 284
Step 3
A message will appear to notify that the process has been completed, and the clients
Episode Status will be reset to Pending.
18 ADDING AND PROCESSING ORDERS IN THE OFFICE
From the Clinical Input Screen (Keyboard Icon, Right-click on the Patient Name>
Medical Record> Orders.
18.1 ADDING NEW ORDERS
•
•
•
•
•
•
•
•
•
From the Orders screen, click Add Order button. NOTE: if the 6-7 little boxes do
not appear when you choose the Order Type, the POC has not been approved
yet. This has to be done first so the orders do not co-mingle.
Order Date defaults to current date. Change it if necessary
Select the Order Type. Note: Certain order types trigger WORKFLOW Events –
be sure of your selection!
The client’s Primary Physician will automatically populate, but may be changed
by tapping the … button to search the database. Indicate Secondary Physician if
applicable, but note that a signature will be required
Indicate if the order will go to the physician for signature [defaults to Yes]
Required feature for JCAHO/CHAPs compliance – “Order read to physician?”
Indicate Y or N.
Indicate if ABN delivered to patient [defaults to NA] Required for early discharge
by the agency
Enter text in the Order Description section
If the order affects the Calendar, Medications, Level of Care, Supplies, Diagnosis
or Vital Sign Parameters, place a checkmark in the appropriate box(es) for that
new tab to appear next to the Orders Tab.
Page 137 of 284
•
•
•
*Note that in “Approval of Orders” workflow there will be an alert if no reason has
been added to an order.
Click on each “file folder” heading (Calendar, Medications, etc.) to add/delete the
information [called a transaction]. This is very important! Do not just enter text in
the Order Description area if it affects the calendar, LOC, meds, etc. If a
“transaction” is not added, the client’s profile will not get updated.
Check in Wound Care Box “Y” if this order is for wound care.
Click Save after all information has been entered
Shows basic order information
Shows how a transaction appears when the Medications tab is selected.
Page 138 of 284
Page 139 of 284
Shows how a transaction appears when the Calendar tab is selected
An alert has been added when approving Orders via Workflow to notify users when
the Order Calendar contains PRN Visits but the Calendar/Edited Frequency has not
been updated to the specified number of PRN Visits during the Certification Period;
nor has a specific reason or a delineated description of signs and symptoms
necessitating the visit been included in the Calendar/Edited Frequency. This will
override auto approved orders and send them to workflow.
Page 140 of 284
This alert is to serve as a reminder to the user to make the necessary changes to the
Calendar/Edited Frequency
If a Content Reason checkbox has not been checked for an order, the following
validation message will appear:
Page 141 of 284
The validation message will ensure clinicians enter some content information about the
order.
If the user selects YES the order will proceed forward, selecting NO will return the user
to the order entry screen.
An alert window will come up if a box was checked but nothing is selected in the reason
tab.
18.2 VOIDING ORDERS
Orders may be voided; however if workflow exists for the order and the order is voided,
then the subsequent stages for that order are automatically ended. For example, if an
order for a new medication gets voided, that medication will not go into the client’s
profile.
•
•
Click Void Order button to void
A Void Order warning box is displayed
Page 142 of 284
• Click OK to void this order or click Cancel
• When an order is voided, it turns light yellow in the order tracking section. These
orders do not go to Medical Records for processing to the physician nor do they
appear on any order tracking reports.
18.3 EDITING ORDERS
Only authorized users may edit orders. Also, after an order has been approved, only
certain items may be edited. If the approved order attempts to be edited, a warning
message will appear that says “Adding medications, supplies, visits or vital sign
parameters will not change the client’s medical record because this order has already
been approved. Please create a new order for these changes.”
18.4 APPROVING ORDERS
The designated supervisory role will approve all orders – whether written on the Pocket
PC or in the office by other staff unless the author has been given “Auto Approval”.
Note: Using the Auto Approve option per worker is not advised until each user has
proven to be able to use this writing of an order proficiently.
Orders will appear on the Action Screen as Review/Approve New Order and the order
may be:
•
•
•
Approved As Is
Edited by the Supervisor
Declined
Page 143 of 284
Once approved, the RN’s online signature will appear at the bottom of the order and the
order is ready to process to the physician.
18.5 UNDO VOIDED/DECLINED ORDERS
The ability to un-void/un-decline orders that either were voided/declined by mistake, or
had a change in their decision. Appropriate workflow will appear on the Actions screen
once the order has been un-voided or un-declined.
Step 1
From the Clinical Manager or R2 , click the Order Console icon from the toolbar
Step 2
Click the Voided/Declined radio-button, and other desired criteria, and then click the
Load Order Console button
Step 3
Right-click on the Voided/Declined order and then click the Undo Void or Undo
Decline menu option
Page 144 of 284
19 APPROVING/EDITING ORDER FOR ADD-ON DISCIPLINE
Various components of the add-on order may be edited if editing is needed or if
contracted therapists when doing an eval are not using smart phones.
Evaluations done on paper will not generate a schedule to a plan of care in the
electronic record.
Order and Goal text can be inserted and edited for add-on orders. A lookup table is
available to select the order and goal text related to the various treatment codes [click
the Get Order/Goal Text from Treatment Code button to retrieve].
19.1 CALENDARS ON ADD-ON ORDERS
For Add-On visits, it’s very important that the field user schedule their discipline-specific
visits for the episode. If visits need to be added/deleted from the requested calendar,
use the Add or Delete Transaction button.
The Calendar Frequency is what actually appears on the Verbal Order/POC form that
goes to the physician. The Calculated Frequency is automatically captured based on
what’s scheduled.
Page 145 of 284
Automatically captures based on transactions
Can be edited
19.2 PROCESSING ORDERS
Orders are processed to the physician from the Action Screen when the task Process
Order to Physician appears. The order type may be Physician Verbal Order,
Discharge Order, etc. Regardless of the type of order, all are processed out for
signature the same way. Note: If your agency has Provider Link (physicians have
to sign up) the physician signs orders electronically and this process will be
bypassed. Once orders are approved, they will automatically go to the
physician’s website for signature.
**Note: Clients who utilize “Auto Fax” will not receive Process Order workflow.
Very Important: For orders that the Medical Director signed electronically in IDG, type in
IDG as “How Sent” box. When then Medical Director signs the order, this date will auto
populate the signed date field.
Click Print New Order to preview and print.
Displays the
physician’s
preference for
receiving orders
Page 146 of 284
After the order has been printed, click Process Order to Physician so that the
following box appears. Enter the appropriate dates and method, then click Save to exit.
The order will disappear from the Action Screen and now resides in the client’ electronic
medical record.
20 CHANGE IN LEVEL OF CARE
Level of Care (LOC) can be entered in two (2) ways. At the SOC it defaults to Routine,
but in the Review Hospice Evaluation Documentation there is a step in the “ladder”
when LOC is established initially. See example below:
Page 147 of 284
If the Level of Care changes during the benefit period it can only be done by writing a
Physician’s Verbal Order. See Examples on the next page:
When the order is approved through workflow the LOC changes in billing is based on
the effective date entered here.
Page 148 of 284
Respite Care has an effective date and an end date. Both need to be completed. It will
not let the user choose more than 5 days.
Page 149 of 284
Workflow will be generated when the LOC is changed to review POC changes and
change the service location. Service location change are entered in the referral with and
effective date and time.
Page 150 of 284
21 INTERDISCIPLINARY GROUP
IDG groups/teams must include: Medical Director, Pastor/Counselor, RN and Social
Worker. We recommend assigning the Scribe role to someone that can add changes
that occur during the meeting. Other team members can be added in addition to these.
but will not be required to add an IDG electronic note as the others will.
21.1 ASSIGNING IDG MEMBERS
IDG Members can be assigned in three ways.
1) In the Review Hospice SOC Evaluation Documentation.
Page 151 of 284
2) Or in Clinical Input (right click on the patient) assign IDG Members.
3) Or when clicking on the IDG Meetings Icon (Day Planner) from the top of the
HCHB/or 2 IDG Console. Reassigning one of the required four members or adding
members to the team can be completed by right clicking on patient’s name then click on
“Assign IDG Members to Client”.
**NOTE: WORKER QUALIFICATIONS MUST INCLUDE IDG ROLE FOR MEMBER
TO BE ASSIGNED TO AN IDG TEAM.
Page 152 of 284
The team members can document notes directly into the IDG screen if they have a login
after the meeting populates the screen.
21.1.1 IDG TEAMS
Your agency may or may not have Teams assigned. If your agency chooses to use
Teams, simply click on the team and tap on the arrow to move the team from the left
side of the screen to the right side. If you do not use Teams, select your members from
the left and tap on them to move them to the right. You may include volunteer and/or
bereavement roles, however it is optional. Click the save button when done.
.
Page 153 of 284
21.2 ASSIGNING IDG W ORKFLOW DAYS
When Reviewing the Hospice SOC Evaluation task one of the steps in the ladder is to
assign the first date for the IDG team Meeting. This will start the 14 day recurring
meeting dates that will appear in the IDG Screen.
A PRN meeting can be added by right clicking on the patient on the IDG screen and
choosing a date.
“Editing the meeting date will reset the date. Right click on the patient and choosing
EDIT.
Note: If a patient is admitted right before an IDG scheduled meeting the procedure
recommendation you might want to follow is that an IDG Admission Summary Note can
be completed by the Admitting nurse summarizing findings, plan. This can be reviewed
by the team from the Medical Record at the meeting. (This coordination note can have a
different name if desired and include a template)
The IDG Admission Summary Note can be found in Medical Records>Coordination
Notes. The meeting facilitator or the scribe (need rights to Edit notes of others!) would
complete this note naming the team members and introducing the patient case/POC.
This will meet the requirements for initial review of plan and team coordination.
Page 154 of 284
If you choose to do this then schedule the first electronic IDG meeting for the following
electronic meeting rotation.
21.3 RECOMMENDED: ADDING IDG NOTES IN POINTCARE
IDG notes may be added to the IDG meeting from PointCare on the Client screen (see
PointCare Users Manual). IDG Notes may also be entered before the meeting in
HCHB/R2 IDG screen. IDG Members entering IDG notes in HCHB must have a HCHB
log in to do this.
1. In PointCare after the user syncs, the IDG Meeting Details and Status are updated in the
IDG screen Notes can be opened and started (considered “In Progress”) then signed and
synched as the meeting date is imminent. Notes should not be “In Progress” when the
meeting is held.
2. If only Details were entered into PointCare, but the note was not signed yet, then the details
will appear but the status of that team member’s meeting will still show as Open.
* All other features and functionality exist in the IDG Screen with regards to what the IDG
team member can do by right clicking on the patient (edit details, sign or remove signature,
etc.)
**Note: A template for the IDG note can be created for each of the required disciplines
in the Client Icon>IDG Lookup Table.
Page 155 of 284
21.4 STARTING THE IDG MEETING
The ‘IDG Console’ Screen is in R2 : (From the R2 application, click the Clinical Manager tab,
and then the IDG Console icon from the toolbar) or in HCHB > the DayPlanner icon.
From the parameter fields elect the From date as the date of the last meeting and the
TO date as the date of the meeting. (See screen shot on next page). When a client dies
the death date populates the IDG screen for that date not the next meeting date. The
meeting can be completed and the next scheduled meeting on the screen be Voided.
(death and discharge meetings occur on that actual date. This is why you what to start
with the FROM date being the date of the last meeting so they are not missed)
Choose the Meeting reason that you want to review first by clicking on the IDG Meeting
Dates and the Meeting Reason dropdown. The use of a projector is encouraged so
patient information can be seen by all of the team. A meeting facilitator should be
selected to run the computer and projector and a scribe to document in the IDG
Summary note any changes that occur during the meeting.
Meetings start in the “Open” status. Once anyone signs a note it moves to “In Progress
Status”. The Medical Director (needs a portal ID and a laptop) can only sign his/her IDG
Note when the other required team members have signed theirs. As notes are reviewed
and the Medical Director is ready to sign a message will ask if he/she wants to sign any
unsigned order, add a physician narrative and the F2F if appropriate.
Page 156 of 284
The patients will be listed for each meeting date that you select in the left column. Once
selected click on “Load IDG Meetings in the lower left corner.
Options for other functionality are loaded from the tabs across the bottom of the screen
such as
View Details of the notes, Add an IDG Member, Add a PRN Meeting, Edit a meeting,
See the POC Update Report, view the Medical Record, etc. Doing a right click on the
patient or team member will open the view.
Adding a PRN meeting adds an extra meeting
Editing a meeting date resets the 14 day cycle from the editied date forward
An example of all the required team meeting notes being signed is on the next page:
Right clicking on the patient name allows you to see the team memebrs and right click
on the team member allows you to view the note (all data has been removed for HIPAA
purposes).
***Note: if a note needed to be added in R2 rather than in Point Care it would be done
in this way also - except the choice would be “Edit Details” rather than “View Details”.
Page 157 of 284
*If any case manager cannot attend the meeting and has not added the IDG note a
substitute of the same discipline can right click on the patient name in the IDG screen
and select “Assign IDG Meeting Details To Me” . Notes can be added and signed in this
manner. Likewise, a covering Medical Director can do the same.
Once everyone has completed their note the Medical Director can complete his/her note
including the signing of any outstanding orders. When all notes are completed the
meeting for that patient is changed from In- Progress to Completed.
The Comprehensive POC and Update Report can be seen by right clicking on the
patient name then clicking on the POC Update Report. Or highlighting the name and
clicking on the POC Update Report tab on the bottom of the R2 screen. This report
includes any changes such as LOC, orders, notes, v/s, medications, POC changes and
the IDG notes from each team member since the last meeting. This report is projected
and the meeting conducted using this document.
When a meeting is converted to Completed (meaning all notes and orders have been
signed) workflow will prompt the Medical Records staff to send report this to the
attending physician (unless the flag is set to NO in the physician tab of the referral). It
Page 158 of 284
will also prompt workflow to send a copy to a Facility if the patient service location is in a
Facility.
21.4.1 VIEW/EDIT THE HOSPICE PLAN OF CARE
In the IDG Meeting you will be able to Review the IDG Comprehensive Assessment and
POC Update, edit the POC, view the Medical Record and add Coordination Notes or
Orders by right clicking on the patient’s name.
Page 159 of 284
To edit or Print the Team(POC Report open the Edit/View Plan of Care option
To print the report click on Hospice POC Report at the bottom of the view.
Page 160 of 284
Report Example:
21.4.2 SIGNING ORDERS FROM IDG
When the Medical Director tries to sign his/her IDG note a message will pop up that if
they have unsigned orders. F2F encounter may have to be added depending on the
benefit period the patient is in. See F2F information below. If the CTI is not signed the
F2F documentation can be copy/pasted on it if desired.
The F2F documentation can merely be viewed from this screen by clicking on the F2F
button
Page 161 of 284
All unsigned orders will also be available for signing. Once all are signed the Medical
Director can sign the IDG note and the meeting moves to the Completed status.
ANY REQUIRED MEMBER’ S NOTE NOT SIGNED WILL PREVENT THE MEDICAL
DIRECTOR FROM DOING THIS. To manage this run the IDG Meetings Due report the
day before and morning of the meeting and monitor for unsigned notes.
Recommendation is to set up an Administrative Task to do this.
21.5 RECERT PATIENTS IN IDG
If the existing patient is in their 2nd or higher benefit period, has Medicare as a payor
and their next benefit will start in 2011, (all payors are being added in June) there will be
a F2F Encounter button available in the patient’s current referral. This button, if
selected, will present the user with the F2F Encounter grid. The user can enter the
Face to Face Encounter record but the benefit period, SOE and EOE date will not
reflect the next benefit period until the pending episode is created for the patient by the
nightly job using the system setting “Hospice Recertification Process”.
Page 162 of 284
If waiting on the nightly job, instead of using the F2F Encounter button, the system will
automatically alert you via workflow when all required recertification components are
due. This is accomplished by the system setting discussed earlier in this document,
“Hospice Recertification Process…” This system setting will trigger all components
needed for the Hospice Recertification process ‘X’ (value of the setting) days before the
End of the Benefit period. If the setting value is set to 30 days, then 26 days prior to the
end of the benefit period, you will be alerted in workflow.
The stage Plan F2F Encounter will be on the action screen for planning when this
encounter visit should take place and who is going to complete the visit.
If the user double clicks on this stage, they will see the following options:
•
•
•
•
Plan F2F Encounter
Delay Planning of F2F Encounter
Stage Completed
Cancel
Page 163 of 284
21.5.1 PLAN F2F ENCOUNTER STAGE
This stage will allow the user to document that a Face to Face has already been
completed, that one needs to be scheduled or delay the planning stage until another
day.
21.5.1.1 PLAN F2F ENCOUNTER
If the user clicks on the Plan F2F Encounter button, they will be presented with a Face
to Face Encounter grid. This grid will show you the basic information about the Face to
Face Encounter that is due for the next benefit period. The read only grid will show:
•
Encounter Date – date the Face to Face visit was done.
•
Benefit Period - number of the benefit period the Face to Face Encounter is
associated with. This number should be for the pending benefit period.
•
SOE Date – Start of Benefit period date for the pending benefit period.
•
EOE Date – End of Benefit period date for the pending benefit period.
•
Active – if this field is checked the record is active. If left unchecked, the record is
inactive.
•
Date of Planned F2F – the date of the planned Face to Face visit.
•
Service Code – which discipline, nurse practitioner or physician, is going to be doing
the F2F visit.
•
F2F Scheduled To – the name of the nurse practitioner or physician performing the
Face to Face visit.
•
Method of Encounter – what method of documentation the licensed professional
used to justify that the Face to Face visit took place.
•
Attachments – if the Face to Face encounter has scanned documents attached, this
field will be checked.
•
Last Update By – name of the person who last updated this record
•
Date Last Updated – date the record was updated.
Page 164 of 284
•
Document Number – Face to Face document number is used to easily track the
encounter
.
21.5.1.1.1 ADD ENCOUNTER DOCUMENTATION
If a nurse practitioner or physician documents a patient’s Face to Face Documentation
in IDG, they will need to:
•
•
Select the Add F2F Documentation button, from the Face to Face Encounter grid,
to document their findings.
The F2F doumentation form will display:
o Client Information section is read only
Client Name
Medical Record
Benefit Period
Branch the patient is assigned
Page 165 of 284
Team the patient is assigned
o Encounter Date will need to be populated with the date the Face to Face
Encounter took place. The field is required before the documentation can be
saved.
o Face-to-Face Documention is a free text field for the licensed professional to
document their Face to Face findings. The field is required before the
documentation can be saved
o F2F Performed By will default to the person logged into the system. This will
also be the name printed on the signature line of the F2F Encounter report and
on the Face-to-Face section of the Medical Director’s CTI order.
o Copy F2F Documentation to Narrative Section on CTI order is only available
to the physician listed on the Medical Director’s CTI order. This button will allow
the physician to copy their Face to Face doumentation to the narrative section of
their CTI order.
If the physician clicks on the copy button they will receive a message letting
them know that the copy feature was successful.
Page 166 of 284
o Save – Saves and closes the window. This will return the user back to the grid
screen. This also represents the date the licensed professional completed the
documentation. The date will appear on the signature line next to the signature
name and title of the licensed professional.
o Don’t Save - Closes the window without saving data
21.5.1.1.2 EDIT ENCOUNTER DOCUMENTATION
The Edit Encounter Documentation button is only available to the person who entered
the documentation. The user will reveive the same F2F documentation screen as
previously described and make their neseccary changes. When the user clicks on the
save button, it will change the date of documentation completion form and Face to Face
section on the Medical Director’s CTI order.
To edit this Face to Face Encounter record the user will have to highlight the
appropriate row on the grid and click on the Edit button at the bottom. This will present
the user with a Face to Face entry screen containing:
•
Agency Take Date - This is the date entered by the agency to identify when this F2F
record was initiated by your agency. This is a basic drop down calendar box for date
selection or the user can type in the correct date. This field will default to today’s
date.
•
Service Code of Visit to be performed – This field designates if a nurse practitioner
or Medial Director/team physician is performing the Face to Face visit. The user will
need to tap on the down arrow for a list, consisting of NPHF2F – Nurse Practitioner
or PHYHF2F – Physician. The option selected will determine the service code sent
to PointCare (if visit is being done in PointCare) and the worker list populated later
during the workflow process. If necessary the user can change this selection at a
later time.
•
Medical Director responsible for signing the CTI Order – This is a read only field that
will let the user know the name of the Medical Director/team physician listed on the
CTI order.
Page 167 of 284
•
Date of Face to Face Encounter – This date field is to document if a Face to Face
encounter has already taken place.
− If the date of the encounter is known, simply enter the date in this field which
completes the Face to Face encounter for this benefit period. You can enter the
date by clicking on the down arrow and selecting the date from the calendar or
keying in the date in this field.
− If the encounter was completed but you do not have the date, click on the
‘Unknown’ box and workflow will generate to have you follow-up on this
encounter. Click on the ‘Unknown’ box again to uncheck this field.
•
Date of Planned Face to Face Encounter - This date field is when your staff member
plans on performing this Face to Face visit. This date is not a hard date but will help
guide you on the planning of completing this Face to Face encounter. This date field
can be located as previously described for the other fields.
•
Method of Documenting Encounter – This will list the method the person performing
the Face to Face visit will use to document their findings. If the user clicks on the
down arrow, will be shown:
− PointCare – if the visit is going to be documented in PointCare
− Paper – if the visit will be manually documented on paper
− Hospice IDG – if the visit will be documented through the Hospice IDG screen in
clinical Manager
•
Add/View Attachments – if you have support documentation about this encounter,
you can scan the document and attach it to the patient’s record.
Page 168 of 284
•
Save & Stay – Saves the data, but does not close the window
•
Save – Saves and closes the window. This will return the user back to the grid
screen.
•
Don’t Save - Closes the window without saving modified data
If you should need to inactivate the Face to Face Encounter record, you will highlight
the record and click on the Inactivate button. The option would be useful on patients
that originally met the Face to Face encounter requirements. In that case, a Face to
Face encounter may not be needed.
If the user clicks on the Close button it will return the user back to the workflow stage
Plan F2F Encounter and you will also notice that the Stage Completed and Delay
Planning of the F2F Encounter are now available.
21.5.1.1.3 INACTIVATE ENCOUNTER DOCUMENTATION
If a user needs to inactivate the previously entered F2F document they need to select
the Inactivate F2F Documentation button. If users select this button they will receive
a warning message before the request is complete. The user will have two options on
the warning message to select, depending on how the user answers the warning
message the Face to Face documentation may or may not become inactive.
o If the user clicks on Yes, it will inactivate the Face to Face documentation and
the agency will have to document this information again.
o If the user clicks on No, they will be returned to the Process F2F box.
Page 169 of 284
The inactivation button is not available if no documentation exists or if the related CTI
order for the Medical Director has been signed.
21.5.1.2 STAGE COMPLETED
If the user clicks on the Stage Completed button, several different options will be
available. The selection of this button depends on the state of the Face to Face
encounter record.
•
If the Face to Face Encounter has been completed, then the Encounter Date would
not be blank on the grid meaning that the field Date of Face to Face Encounter was
populated with a date. If the user clicks on the stage completed button the stage
would disappear and you are finished.
•
If the ‘Unknown’ option was selected next to the Date of Face to Face Encounter
field, upon clicking the stage completed button, the workflow stage Follow Up on
F2F Encounter will appear on the action screen. To see more about this stage,
click on the link Follow Up on F2F Encounter
•
If the Face to Face Encounter is going to be completed by a member of your
agency, the Date of Planned Face to Face Encounter was populated with a date. If
the user clicks on the stage completed button the stage Schedule F2F Encounter
will appear on the action screen. To see more about this stage click on the link
Schedule F2F Encounter.
•
If the Face to Face Encounter record is in incomplete status, neither the Date of
Face to Face Encounter nor Date of Planned Face to Face Encounter is populated.
If the user clicks on the stage completed button, they will receive a warning that one
of these date fields must be completed before this stage can be closed. The user
would click on the OK button and be returned to the Plan F2F Encounter stage.
They can either complete one of those dates or cancel the stage.
Page 170 of 284
21.5.1.3 DELAY PLANNING OF F2F ENCOUNTER
If the user clicks on the Delay Planning of the F2F Encounter button, they will be
presented with a warning about delaying this stage
•
If the user clicks on the Yes option, they will be given the delay entry screen, in order
to enter how many days they would like to delay this stage. This same stage will
appear on the action screen ‘X” days later.
•
If the user clicks on the No option, they will be returned back to the Plan F2F
Encounter stage.
21.5.1.4 CANCEL BUTTON
If the user clicks on the Cancel button this stage will remain on the action screen until
completion.
21.5.2 MEDICAL DIRECTOR’S CTI ORDER
From the IDG screen Medical Directors can sign outstanding orders. There is a new
F2F Encounter button on the Review/Approve Unsigned orders that the Medical
Page 171 of 284
Director can review before signing their CTI orders. There is also an Edit Narrative
button available on the same screen.
•
BE SURE THE RECERT CTI IS SIGNED PRIOR TO THE SOE DATE FOR THE
RECERT!
Medical Director will not abe able to sign their CTI orders if the F2F Encounter for that
same benefit period has not been completed. There will also be a separate section on
the Medical Director’s CTI order to indicate that a Face to Face Encounter took place
and who completed that encounter.
From the Review/Approve Unsigned Orders screen:
•
•
•
Medical Director(s) have the F2F Encounter available on their CTI orders. This
button will show the F2F Encounter grid as previously discussed
They also have the Edit Physician Narrative button which will allow medical
directors or team physician to edit narratives for the CTI order instead of adding
another one.
If they select this button they will see the previously entered Narrative and they could
make the necessary modifications.
Once the Narrative has been added the order can be signed.
See more information on F2F in section 34.
Page 172 of 284
22 RECERT ORDER PROCESS IN ADDITION TO THE F2F PROCESS
The Review/Edit/Approve Hospice Recert Order event will come to workflow usually
14 days before the end of the current Benefit period. (based on your agency’s System
Setting)
At the same time, the IDG meeting for Recert Order Due is generated. (See process
for date modification below).
The recommended process for recertification includes:
1) Recertification visit (RN02H) is scheduled to occur 3 to 4 weeks prior to the end
of the patient’s current benefit period. The assessment attached to this service
code includes all of the elements needed to determine whether or not the patient
meets criteria for ongoing hospice care. These criteria will be discussed at the
recertification IDG meeting. It is recommended that this service code be plotted
on the patient’s calendar at the time of the SOC visit in order to insure that it
won’t be forgotten.
2) The Review/Edit/Approve Hospice Recertification Order Task initiates based on
system settings determined by the agency (as above).
3) The IDG meeting prior to the end of the patient’s benefit period will automatically
create based on the days defined in system settings. The date of this meeting
may have to be modified to have it fall on the correct meeting day for the agency.
Page 173 of 284
4) Prior to the meeting all disciplines should have completed and signed their IDG
meeting notes which should include their anticipated frequencies for the
upcoming benefit period.
5) During the meeting, the patient’s appropriateness for hospice is discussed and
the Recertification Order – including discipline frequencies and any medication
changes – can be signed by the Medical Director at that time.
Note: For more in depth information on the IDG meeting process, please refer to
the IDG section of this manual.
22.1 CLINICAL MANAGER – W HO GETS THE RECERT ORDER
There are system settings related to the Send To fields on the Hospice Recert order.
These system settings will determine the default of the Send to Physician and Send to
Medical Director fields on the Hospice Recert order. The order may go to both
physicians, or just the Medical Director for signature. .
22.2 CLINICAL MANAGER – RECERT ORDER FORM
Note: The Hospice Recert order is not the Recert CTI needed for the upcoming benefit
period, but instead is a way for agencies to plot visit frequencies, update medications,
etc. for the next benefit period
When the entry screen for the Hospice Recert order is accessed, the following screen
will appear:
Page 174 of 284
Upon the supervisor’s approval of the Hospice Recert Order the appropriate workflow
task will generate to Process the Order to the Physician(s). If both Send To fields are
unchecked, the user will not receive the Process Order task on the action screen. If the
user tries to access the Process Order box from the order console (R2), the following
screens will appear.
Page 175 of 284
In order to process the Hospice Recert order to the Primary Physician and/or Medical
Director for signature, the order must be edited and one or both send to fields checked.
Once the fields are checked, the order can be processed to the appropriate physicians.
Note: For auto-fax and/or Provider Link, the process has not changed. The process
order stage will not generate for those physicians designated to receive their orders via
either of these methods.
The Hospice Recert order report will show Do Not Send on the signature line of the
Primary Physician and/or Medical Director if the Send to fields are not checked. Here’s
an example of the signature line with both send to fields unchecked:
Page 176 of 284
23 CONTINUOUS CARE PROCESS
23.1 STEPS IN CONTINUOUS CARE PROCESS IN HCHB
If a patient goes onto Continuous Care, there are a few steps that must be taken.
1. First an order must be written to change the level of care to continuous care. Please
reference the section on how to write an order for directions on how to do this.
2. The system requires an RN70H to be completed on each day the patient is on
continuous care. You can add these visits to the calendar daily through the order
being written to change the LOC.
3. For any of the other SN or Aide visits completed during continuous care, you may
utilize either a continuous care 70 code (i.e. SN70H/HS70H) or a regular 11 code
(i.e. SN11H/HS11H/HMK11H ).
4. When the RN70H is completed and synched back in, it will generate a workflow task
of Review Hospice Continuous LOC Visit.
5. If a patient is put on Continuous Care at Admission the RN70H visit would have to
be completed on that date. Agency policy can dictate if that visit has to be made
onsite or information taken from the admission visit only. If this is the case it would
need to be made non-billable. Or the first covering nurse going out could do the
RN70H rather than the SN70H.
NOTE: This workflow must be completed daily in order to bill for continuous
care.
23.2 CONTINUOUS CARE REPORTS
There are 2 reports used to manage the claims aspect of Continuous Care billing
Both are worked by clinical ops.
The recommendation is that the review and follow up is added as an Administrative Task every 2 weeks
by the supervisor.
The reports are:
Page 177 of 284
-
Hospice Continuous Care Validation Report
Hospice Ineligible Claims Report
To access this report, select HCHB or R2 >Report Manager > Hospice Continuous Care Validation
Page 178 of 284
Under Branches, select your branch.
For End Date, enter your billing period through date.
Leave Not Approved selected to see only days needing review.
Click View/Print to print the report.
The “Exclude from Billing” column means that data in that ROW meets criteria (not
necessarily does the DAY meet criteria though)
Defining the Column Headings for the Hospice Continuous Care Report
1 – SN Hours equal SN Service codes submitted for the 24 hour timeframe (12 am to 11:59 pm)
Page 179 of 284
2 - Non SN Hours equal the aide/homemaker service codes submitted for the 24 hours
3 – Approved Total Hours is the sum of #1 and #2 hours
4 – Adjusted Total Hours is after any time editing has been done for #1 and/or #2 hours
5 – SN Approved Hours is whether or not at least 50% of the total adjusted hours were SN hours
6 – Date SN hours Approved shows if the visits were “verified” in the system under the Confirmed
7 – Do any of the visit times overlap
8 – Are the total hours greater than 24 hrs
Columns 9-11 are reading the rows horizontally:
9 – Have each of the service codes been confirmed
10 – A list of the service codes of which one daily must be the RN70H
11 – Is the visit listed in this Row only excluded from billing, i.e. right service code/time and verified - this does not
mean that the day
is excluded from billing or not...just whether this row qualifies or not.
Review the report for accuracy. If necessary, modify the details according to your
documentation and agency policy.
*Note issues above: 2/4/2012 does not have enough hours and no RN70H
2/6/2012 has enough hours and the RN70H (check for unverified
visits)
2/7/2012 has enough hours/and an RN70H, but exceeds 24 hrs.
Issue
Resolution
SN / Non-SN
Hours
-
Verify that at least 50% of the hours constituting care
were provided by a skilled nurse. If not, bill as routine (see
Modifying CC hours process below)
Page 180 of 284
-
SN Hours not approved - this is unverified paper visits.
Correct by manually verifying paper visits and/or checking
to see if any visits are still on devices (ASR)
Total Hours
Verify that 8 total hours of care were provided within a 24 hr
day with at least 50% of the hours as skilled care. If not, bill
as routine. (see modifying/approving CC hours below)
Overlapping
Visits
Verify the clinical necessity of overlapping visits. If
overlapping visits were not medically justified, adjust the
hours of care provided in the visit note(s) by right clicking on
the visit note and then again on Edit time
Continuous HC
Hours > 24
Verify that no more than 24 hours of care are being billed. If
more than 24 are recorded adjust the hours of one or more
visits accordingly. (see 24 hr override and approval below)
MODIFYING/APPROVING CONTINUOUS CARE HOURS ***NOTE : DO NOT GO
INTO THE EDIT FUNCTION THEN CLICK SAVE AS THE HOURS W ILL REVERT
TO ZERO. ALW AYS CANCEL IF NO CHANGE IS MADE.
1. On Clinical Manager workspace, click
.
2. Right-click the patient and click Medical Records > Levels of Care.
3. Select the date and click Edit.
4.
5. Modify the level of care based on your documentation and agency policy:
Page 181 of 284
• Click Bill as Routine Homecare to accept billing at standard routine rates.
• Click Override Total Billable Hours and specify the number of billable hours.
• Under Approved By, enter your name or initials
6. Click Save.
To access the Ineligible Claims Report in HCHB/R2 > go to the Reports Manager Icon> Hospice
Ineligible Claims Report
Select the Branch,
Select All Payors
Select the Billing End Date (usually the end of the prior month unless your agency is billing more often).
Page 182 of 284
Review the items that has an asterisk below and address the issues for each patient
included on the report: (as correction are made items will drop off the report)
Issue
Resolution
Plan of Care
Signed
Notify medical records that the plan of care needs to be
signed. Once the order has been signed, verify receipt in
Order Tracking.
Hospice Election
Filed
Create and submit the notice of election (Billing task)
**Level of Care
Order Approved
A PVO changing the LOC needs to be generated/approved
and signed. Once orders have been signed, verify receipt in
Order Tracking.
**Continuous
Care Hours
Review the Hospice Continuous Care Validation Report (see
example below) and modify continuous care hours in the visit
notes if appropriate OR change the level of care to Routine.
**Continuous
Care
Documentation
Notify the clinician that documentation supporting continuous
care needs to be completed. Must have minimally an
RN70H visit each CC day.
**Unverified
Visits
Notify the scheduler to follow up regarding visits outstanding
(not synched back) that may affect per diem billing for the
billing date range. ** Check that paper notes have been
manually verified!
MODIFYING/APPROVING CONTINUOUS CARE HOURS
6. On Clinical Manager workspace, click
.
7. Right-click the patient and click Medical Records > Levels of Care.
8. Select the date and click Edit.
Page 183 of 284
9. Modify the level of care based on your documentation and agency policy:
• Click Bill as Routine Homecare to accept billing at standard routine rates.
• Click Override Total Billable Hours and specify the number of billable hours.
• Under Approved By, enter your name or initials
10. Click Save.
24 DISCHARGES
24.1 W RITING A DISCHARGE ORDER AND RELATED W ORKFLOW
Page 184 of 284
All types of live discharges from hospice require an order. Discharge orders may be
entered in PointCare or in HCHB. To access orders in HCHB, Right-click on the client's
name in the Clinical Input screen. Access the Medical record and click orders.
**Note: death discharges do not require an order but do require entry of discharge
reason, condition, disposition and date.
When you click on SAVE indicate whether the discharge visit will be completed in the
field (in PointCare) or in the Office.
If Office is selected the workflow below is generated
If Field is selected the workflow below is generated
Page 185 of 284
The scheduler will change a nursing visit to an 18H or 66H service code and reschedule
the date as needed.
Address additional workflow related to discharge
Discharge Status; Reason; Condition and date are entered in the Review Hospice
Discharge Visit workflow
Page 186 of 284
**Note: this workflow step is completed for ALL types of discharges
After entering Discharge Status; Reason; Condition and Date click Save. Address the
following question.
Additional workflow may be created based on the type of discharge.
Additional workflow may include “Initiate Hospice Transfer” or “Revocation”
Documentation”.
No action is taken in HCHB to accomplish these tasks. They are reminders to ensure
that Transfer or Revocation documentation has been signed per Medicare regulation
and agency policy.
Page 187 of 284
**Note: When the claim is billed the transfer or revocation date is included and this goes
into the Common Working File (CWF).
24.2 HOW TO ENTER A DISCHARGE/DEATH NOTE FROM THE OFFICE
If a note for a discharge or death needs to be entered from the office (if an actual visit
isn’t made), the following steps need to be followed. First, go to the Clinical Input
screen (the keyboard).
Right click on the patient’s name. Go to Medical Records Info and then Visit Notes.
Page 188 of 284
Tap on Add Discharge Visit Note.
Page 189 of 284
Choose the appropriate service code in the top box using the dropdown. It should tell
you next to the service code what its purpose is. An 88 service code is used for a death
note and a 66 service code is used for a normal discharge note.
In the bottom box, find your name in the dropdown.
Page 190 of 284
Press OK once you have the service code and your name entered.
A grid will show up with all the categories that must be completed in the note. Click on
each category in the grid and press Open Form.
The system will walk you through all the questions in that category. Press OK to move
onto the next question.
Work your way down the list of categories, using Open Form or double click to get to
the list of questions that must be answered.
Page 191 of 284
Once you complete all the categories, the Done button will fill and you can press it to
save the note.
Either Review Hospice Discharge Visit or Review Hospice Death at Home Visit will
generate as a task in the workflow (dependent on the note type entered). After this task
is cleared, it will change the patient’s Episode Status to Discharged.
Undo a Discharge
In the Clinical Input screen, right click on the client’s name, select Episode
Management.
From the Episode Management menu select Undo Discharge.
Page 192 of 284
Update a Discharge Date
From the Episode Management menu select Update Discharge Dates.
25 QI FORMS AND EVENTS
Homecare Homebase contains four QI forms: Medication Error Log, Occurrence Log,
Infection Log and Complaint Log. Information for these forms may be entered by the
field user in PointCare or in office.
25.1 ADDING A FORM
Page 193 of 284
To enter a QI form in HCHB:
Go to Clinical Input and locate the patient. Right-click on the patient and select Medical
Records Info/QI Reports.
You’ll see a tab for each of the forms/logs
Click on the appropriate form, and then click the “Add” button at the bottom.
Click on the SAVE button to send the form to the designated person in the office for
follow up.
Page 194 of 284
25.2 REVIEW ING A QI FORM
After a QI form has been entered in the office or in PointCare, workflow triggers the
appropriate person to review and process the information. Double-click the task on the
action screen, the task pulls up the form for review and processing.
Page 195 of 284
Here is an example of the Complaint Report
26 PRINT MEDICATION PROFILE
This is optional workflow that will allow printing “new or updated” Medication Profile
information for clients at different points within a client’s workflow cycle.
The stages will initiate if any order is approved that contains new Medication(s) or
Medication changes. The stages will be linked to all of the following Events where
changes could be made to the medication profile:
Page 196 of 284
Hospice SOC
Hospice Add-On
Hospice Physician Verbal Order
Hospice Recert
27 REPORT MANAGER
The Report Manager can be viewed from HCHB or R2
HCHB View
R2 View
Once the Report Manager is launched the left pane displays report folders that the
Login Profile has rights to. The right pane displays reports of the selected report folder
from the left pane. All menu items within the Report Module have security like menu
items within HCHB.
The folders are designed to segregate reports to make them easier to find. These are
created by your agency in order to set up security for the reports based on folders.
There is one system folder that cannot be changed which is called ALL REPORTS. This
folder is automatically assigned to any reports that are added to all agencies. Any folder
that is added by a user is automatically assigned the System Administrator Role.
(See the Reports Manual for in-depth information per report)
Page 197 of 284
Previewing a report can be done either by double clicking on a report or right clicking
and selecting Run Report. Users can then enter parameters to be included as they
choose and select Run Report. As you click on a report title information about that
report will pop up to the right of the window.
Page 198 of 284
The new version of the criteria screen has the same filter features as before, but has
some added enhancements (as highlighted in red above) which allow you to save the
selections you want, so you don’t have to repeat the individual selections in the future.
28 SCHEDULING
28.1 ASSIGN LP FOR HOSPICE EVALUATION VISIT
The first task to come to a scheduler when a client referral has been approved is to
Assign LP for Hospice Evaluation Visit stage .
• Double click the client and the Assign LP box will appear [LP=Licensed
Professional]
Page 199 of 284
• Select correct Service Code to perform the visit
• Select correct Licensed Professional to perform the visit by clicking on “the three
dot” box
•
When searching for the worker, you can view the worker’s schedule before
assigning the visit. Once the worker is selected in the grid, tap the button to view
their schedule.
Page 200 of 284
•
The worker’s schedule for the selected day is shown, with productivity points for
each visit and whether or not the visit has been verified. The total number of
scheduled visits and the total productivity points for those visits is also seen. Prior
and next day schedules can be accessed
•
Tap Finish Viewing Schedule to exit the screen
• Verify the Visit Date box for accuracy. Note the Scheduling Acuity.
Page 201 of 284
• You will also assign the Add-On visit/evaluation if an MSW or CH has been
requested to visit on the SOC day. The service code is pre –populated. Select the
Licensed Professional to perform the visit. Verify the Visit Date is correct for the
Add-On Evaluation, if applicable.
• If the payor requires authorization, select authorization from drop down box.
• Click OK (the admission visit is scheduled and ready to be synchronized to the
PocketPC)
28.1.1 TRANSITIONING OF PATIENTS TO HCHB AT GO LIVE
Page 202 of 284
Transition Recerts are entered from the referral screen only during the time period
chosen by your agency to move patients from the legacy system into HCHB at Go
Live only. The visit code for the nursing transitional visit is ALWAYS an RN04H.
These transition recerts get the patient into HCHB for the first time.
The Assign LP task is handled no differently other than the RN00H and will be prepopulated. Add-ons to schedule from the referral process use the service codes of
40H and will include any other discipline seeing the patient currently except the aide.
These visits are referred to as “couch visits” because an actual visit is not made. The
purpose is to generate a calendar and care plan that matches the current one in the
legacy system. Therefore the physical assessment - Intervention and Goals are not
needed. Forms can be removed from the physical assessment or minimal forms
added to keep the visit brief. The calendar visits plotted should start with the date of
Go Live. Medications can be entered into the referral or into Point Care. Orders
should not be sent for signature, but marked as received on the same date as
sent…or the same date as the received date in the legacy system.
28.1.2 ASSIGNING WORKERS FOR INITIATION VISITS
If your agency does initiation visits (these are visits where the social worker or another
discipline will go take the legal’s for explanation and/or signing before the actual SOC
visit), and initiation visit(s) have been requested on the referral you will see an additional
workflow task under the headings of: Event: Hospice Verification/Authorization, Stage:
Assign LP for Hospice Initiation Visit.
Page 203 of 284
Click on the Initiation Visits button to display the Initiation Visits form, and from there
you will have the ability to assign several Initiation Visits.
If a SOC/ Transitional Recert Visit needs to be rescheduled, but the field agent is
unable to send the visit back to the office from the device for whatever reason, you
can still reschedule the visit from the office.
•
Go to the Workflow Summary Screen
Page 204 of 284
•
Find the patient and click on the plus sign
•
•
Right Click on the ‘Event – SOC/Recert’ and select “Reassign Admit LP”
If you click on the plus sign next to the ‘Event – SOC/Recert’ with the ‘Stage – LP
Assigned’ you can see the Visit Type, Status, Visit Date and Assigned LP
•
•
This also applies to any Add-On disciplines ordered from the Referral
Initiation Visits can also be assigned and/or added from the Workflow Summary
screen.
The new grid will present and users will be able to add up to Five Initiation Visits on the Grid
View of the form. The Add button will be disabled once the maximum has been reached.
Page 205 of 284
•
You will be able to view these visits on any calendar type
(Summary/Client/Worker) in the Scheduling Console. They will be on the
calendar as scheduled visits with a lock icon. The lock icon is indicative that the
visit was assigned from the referral and must be reassigned/rescheduled through
Clinical Manager.
***SEE SCHEDULING CONSOLE MANUAL FOR ALL OTHER SCHEDULING TASKS
29 MEDICAL RECORDS IN HCHB – CAN ALSO BE DONE IN R2 ORDERS
CONSOLE
29.1 ORDER TRACKING VIEW
The Order Tracking View allows you to view, sort and track all orders in HCHB and R2.
Page 206 of 284
In HCHB: Click the “Rx” button.
Filtering Orders
•
•
Orders can be filtered (i.e. Not Sent/ Sent But Not Signed etc.)
Column to sort ascending to descending and vice versa (i.e., Date Expected, by
Physician, etc.)
In R2: Click on the Order Console
Page 207 of 284
Filtering Orders
•
To filter orders view the order statuses on the left and check the appropriate
filters.
•
Once finshed tap on the Load Order Console to apply new filters.
Page 208 of 284
Viewing Orders
• Left click on desired order to display the order
• Right click to: View Client Order, Edit Order, Process Order, Void Order, View
Order History, or Print Order. Note: If an item is grayed out (as Process Order is
shown below), the order cannot be processed yet because the previous stage
has not been completed (i.e., order approved).
29.2 VERIFY RECEIPT OF SIGNED DOCUMENTS AND MEDICAL RELEASE CODE
Page 209 of 284
Upon approval of the POC this event is triggered on the action screen to ensure that the
office has received all documents signed by the patient and to capture the information
relative to release medical data to other organizations. Note: this stage will appear only
at the Start of Care and transition recerts. The task opens up the referral form so that
the answer to these two questions may be indicated and/or verified on the Clinical Input
tab.
Page 210 of 284
If Electronic Signature Forms are set up to be used, this task will have an additional
button called Signature Form Tracking.
Once this button is clicked, the Signature Form Tracking grid will appear, from which
signature forms can be viewed and/or printed.
29.2.1 REVIEW/PRINT SIGNATURE FORMS
If Electronic Signature Forms are enabled for your database, and the workflow was
been set up, the task called Review/Print Signature Forms will appear when an
Electronic Form has been completed in a subsequent visit. From the task, the
Signature Form Tracking button is available, from which the Signature Form Tracking
grid can be accessed. From that grid, signature forms can be viewed and/printed.
Page 211 of 284
29.3 PROCESS ORDER TO PHYSICIAN
Orders are processed to the physician from the Action Screen when the task Process
Order to Physician appears. The order type may be the POC, Physician Verbal Order,
Discharge Order, etc. Regardless of the type of order, all are processed out for
signature the same way.
Click Print New Order to preview and print.
Page 212 of 284
After the order has been printed, click Process Order to Physician so that the following
box appears. Enter the appropriate dates and method then click Save to exit. The
order will disappear from the Action Screen and now resides in the client’s medical
record.
Once the order has been signed by the physician, go to Clinical Input, right click on the
client, go to Orders, highlight desired order, click Process button and this same screen
will appear. Enter Date Order Signed by Physician and click Save.
Page 213 of 284
Page 214 of 284
The date an order is signed can also be entered from the Order Tracking screen, simply
right click on the order you wish to mark as signed, and choose “Process Order” (the
easiest way to look up an order that has come back in is by the order number in the
lower left hand corner of the order). From here, enter the date signed.
For order that require both the primary physician and the medical director’s signautres, there will
be two separate areas to mark the order signed.
Page 215 of 284
Type Hospice IDG in the field for the Medical Director that reads “How Order Sent”
The date an order is signed can also be entered from the Order Console screen in R2.
Click on the order you wish to mark as signed, and choose the “Process” button at the
bottom. From here, enter the date signed.
Page 216 of 284
For orders that require both the primary physician and medical director’s signatures,
there will be two separate areas to mark the order signed.
Page 217 of 284
Type Hospice IDG in the field for the Medical Director that reads “ How Order Sent”
29.4 REPROCESSING UNSIGNED ORDERS
Medical Records will receive an administrative task to “Process Unsigned Orders” at an
interval set by each agency, usually once weekly. When the task is double clicked, it will
open into a box that is linked to the Orders Tracking report.
When “View Report” is clicked it opens into the parameters for the Orders Tracking
report.
Set the “Order Status” parameter to “sent but not signed” to capture all of the
outstanding orders. For “Date Sent from”, enter the date your agency went live (Go Live
date), in “Date Sent to” enter the date for two weeks prior. This will pull in all orders that
have been outstanding for two or more weeks.
Page 218 of 284
After the report is printed, go through and reprocess outstanding orders one by one. Go
to the orders tracking screen, locate the order you want to reprocess, right click on it,
and select print order.
Once the order is printed, right click on the order again, and choose “Process Order”.
Here you will see listed the physician’s preferred communications method. Resend the
order to the physician, change the “Date Order Sent” to today, and next to the “How
Order Sent” put a dash and number of attempt(s) to resend. If it is your second time to
send the order, enter “2nd attempt” and the date next to the method in the “How Order
Page 219 of 284
Sent” box. This will help track the number of attempts that have been made to get the
order signed. A coordination note called Order Tracking can be added to the client
record when there are multiple attempts to get orders signed.
Page 220 of 284
29.5 REPORTS
29.5.1 ORDER TRACKING - (HCHB OR R2 ) REPORTS MANAGER
The Order Tracking Report is used to facilitate the tracking of orders that are due on a
specific date. The report shows the client name, order date and type,
primary/secondary physician name, the date the order was sent, expected, and/or
signed. It also includes a description of the order.
This report may be filtered by order status (not sent, sent but not signed, signed), order
type (POC, Add-On, Discharge, Follow-Up, Physician Verbal Order, Level of Care),
Client’s first and/or last name, Physician’s first and/or last name, due date matching a
specific date, and/or branch code.
Note: This report is grouped by client. It can be used to resend orders. HCHB
recommends that this report be run weekly by your designee.
Page 221 of 284
Report Types
•
Full Report will show the order description while Summary will not.
Page 222 of 284
29.5.3 ORDERS TO BE SENT - (HCHB OR R2 ) REPORTS MANAGER
This report displays all orders that have been “approved” and are ready to be sent to the
physician for signature.
Page 223 of 284
30 BEREAVEMENT PROCESS
Bereavement functions are accessed through HCHB:
In order to be listed as a Bereavement Contact, “Yes” must be marked in the Contact
section of the referral (added at the time of referral) or later in the Contacts section in
PointCare.
If the hospice patient is still living a Bereavement Contact Risk Assessment is entered in
PointCare which after synching establishes the Risk Care Plan and moves the Contact
to the Bereavement screen.
Multiple contacts can be marked as Bereavement contacts for a patient.
Page 224 of 284
Bereavement contacts should be risk assessed in PointCare at SOC and in any visit
thereafter by staff who encounter a contact who is considered a potentially bereaved
person.
Prior to the IDG meeting, the Bereavement Coordinator will review the Bereavement
Screen for new contacts.
**Note: Bereavement risk assessments may also be completed at any time prior to or
after a patient’s death. To complete a Bereavement risk assessment and to provide
bereavement services for contacts that have not been risk assessed prior to the
patient’s death, the following steps should be completed.
Right click on the bereavement patient to risk asses.
To risk assess a patient tap on the risk assessment question then click the appropriate
answer, Yes or No, in the left corner. This will generate a score and a risk level which
will generate a Bereavement Care Plan.
Page 225 of 284
When a Hospice Client dies all contacts identified as Bereavement Contacts will flow to
the bereavement screen even if never risk assessed. The date of death initiates the
Bereavement Period start date and end dates. If bereavement is ended early and then
the bereaved want s to resume support the end date can be re-instated using the
dropdown calendar. The change will be visible the next day and the contact will be
displayed as active again.
Note: If the user needs to view this change immediately, after the date change has been
made, go to the Letter tab and click on the Update Letter Queue button then refresh
the Activities tab. This action will make the change visible at that time.
Page 226 of 284
Team members can go to the Bereavement Screen to assess as needed by right
clicking on the contact name and choose Risk Assess. The Care Plan will be created
based on the risk score. Based on the setting for each rips level the contact is converted
to a Client in the scheduling console. Workflow will be generated to allow bereavement
visits/calls be added and scheduled. (See Scheduling Bereavement Visits)
It is highly recommended that all contacts be identified and risk assessed when doing
home visits or at the time of death is possible.
30.1 BEREAVEMENT PLAN OF CARE
A Bereavement Plan of Care is automatically created, based on the risk assessment
score when the Bereavement Risk Assessment is completed.
To view or edit the Bereavement Plan of Care select the Bereavement Contact for
whom you want to view Bereavement Activity Details. Right Click to Edit Careplan or
View Careplan.
Page 227 of 284
NOTE: There are 2 options for documenting bereavement contact:
Coordination notes can be set up to capture information from a phone call for the following: Note
these are only suggestions ADULT BEREAVEMENT STANDARD FOLLOW UP
CHILD BEREAVEMENT STANDARD FOLLOW UP
BEREAVEMENT CONDOLENCE CALL
ADULT BEREAVEMENT ASSESSMENT CONTACT
CHILD BEREAVEMENT ASSESSMENT CONTACT
ADULT BEREAVEMENT FIRST CONTACT ATTEMPT
ADULT BEREAVEMENT SECOND CONTACT ATTEMPT
These can be completed in HCHB and the Coordination Note report can be run by a
specific coordination note per contact per date range if needed.
ALTERNATIVELY YOU CAN SCHEDULE CALLS/VISITS USING THE 72H or 72HP BEREAVEMENT
SERVICE CODES THAT ARE COMPLETED IN POINT CARE
Page 228 of 284
30.1.1 SCHEDULING BEREAVEMENT VISITS IN RESOURCE MANAGER
To add requests/schedule bereavement visits for bereavement clients, in R2, select
Resource Manager, then the Scheduling Console. Use your extended search to see
only those visits with the payor type of “Bereavement”. Go to the client calendar type.
Select the bereavement contact from the list of available calendars.
For Directions on how to add bereavement requests, please see the “Add/Edit/Delete
Requests” section of this manual. The job codes for bereavement visits are: BE, MSW,
and CH. The 72H is a bereavement visit, the 72HA is a bereavement assessment and
the 72HP is a bereavement phone visit.
To schedule the newly created visit, on the same screen right click on the visit to be
scheduled. (You may select more than one visit for scheduling.)
a. When one request visit is selected, the right pane will be enabled and the left grid
disabled. If you select more than one visit to be scheduled at a time, you will
need to select the visit or visits you want to schedule before the right pane will be
enabled. You may only schedule like job codes at the same time.
b. The Client, Service Code Type, Service Code, and Visit Date will be disabled.
Page 229 of 284
c. The Episode/Payor Source will default to the primary payor for the episode. If
additional payors exist for the episode, another can be selected.
d. The Authorization/Program field will default to the first program for the selected
payor and job code tied to the ordered service code. If more than one program
exists, an alternate program may be selected.
e. A validation indicator will exist beside the Worker field as this field is required in
order to schedule the request/recurring visit (See the “Select Worker for
Scheduling” section below for new functionality specific to this form).
f. If there are designated times for the visit, those times may be entered prior to
saving.
g. Once all of the required fields are satisfied, the user may “Save” or “Don’t Save”.
Saving will store the selected information and the request will then display in
green on the calendar since it is now a “Scheduled” visit. “Don’t Save” will
disable the right pane and not store any of the previously selected values.
**Note - In the Bereavement screen you can right click on the contact name and then
click on Calendar. You can see any bereavement visits/phone visits that have been
scheduled/completed.
Page 230 of 284
**Note that unless the bereaved contact has been risk assessed and the resulting care
plan is set to set this contact up as a “client” in scheduling they will not be available for
scheduling visits or phone visits.
30.2 BEREAVEMENT MAILING PROCESS
In the Activity Tab of the Bereavement Screen (HCHB or R2 icon right click on a
Contact that has been assessed to see the Care Plan (that was generated by
completing a Bereavement Risk Assessment)
1. Go to the Letters Tab to see automatically generated letters that are scheduled to go
out based on the Care Plan for each contact. In the “Status Field” choose the correct
type of letter to be sent.
2. To edit the NEW letters right click on each contact’s name and choose EDIT
3. Complete the edit of each letter and change the status in the dropdown to
EDITED/REVIEWED. Save the letter when finished
Example letter
Page 231 of 284
4. Once all the letters have been edited the person designated to get the Administrative
task to do the weekly mailing will select the “Edit/Reviewed” status then Right click on
the first letter in the group, hold down the SHIFT key and click on the last letter. This will
select all the letters that need to be printed.
Right click anywhere in the highlighted area and then choose Print Bereavement Letter.
11. The letters can be then be printed. Currently letters can only be printed from HCHB.
Coming to R2 soon
Page 232 of 284
6. Once the letters are printed click on the Bereavement Mailing Labels Report tab
Label information:
Standard 1 x 2 5/8” address labels… Avery Laser 5150
When running the Bereavement Mailing Labels Report you can select specific
bereavement contact.
If using a partial page of labels select the appropriate skip pattern to eliminate waste
Page 233 of 284
7. Go back to the Letters Screen and change the status of the patient to Sent. This will
mark all the letters Sent and close that mailing. The contact will move to the Closed
status.
Return to the letters screen, double click and change the status of each letter to SENT.
This will move them to the Sent screen and update the Bereavement Activity Report.
30.3 BEREAVEMENT ACTIVITY REPORT
9. Click on the Bereavement Activity Report to see activity that has been created for
each Contact.
If a letter is added out of date sequence, click on the Update Form letter Queue so that
the letter task will not come up at the regularly scheduled time.
Example of the Activity Report:
Page 234 of 284
30.4 COMMUNITY BEREAVEMENT
Community Bereavement functionality can be found in the R2 Bereavement icon.
Hospices are required to provide bereavement service to people within their community
even if the contact did not have any association with a Hospice client. This functionality
allows customers to identify a contact as a Community Bereavement or Self-Referred
Bereavement Contact, as well as track group activities and attendance within the
bereavement console.
In order to add any bereavement contact, click on the ‘Add Contact’ button at the bottom of the
grid.
This action will launch the ‘Add Bereavement Contact’ screen. In order to add new
bereavement contacts the following fields are required.
Page 235 of 284
•
Bereavement Type
o
Hospice – Must have a hospice client attached
o
Community – Usually referred from community partners
o
Self Referral - Walk in contacts from the community
•
Name
•
Assigned Branch
•
Bereavement Start Date
•
Saving will add this contact to the activities grid
Bereavement contacts can be accessed through the activities tab.
Page 236 of 284
The activity grid will display all of the current bereavement contacts. There are a few changes
to the activity grid that are highlighted below.
•
New Bereavement Type Column and Search by option
In order to access contacts either utilize the right click function or double click on the selected
contact.
Page 237 of 284
30.4.1 Documenting Contact Details
From the Bereavement Activity Details Screen, Community and Self Referral Bereavement
Contacts have the ability to:
•
Add a Risk-Assessment
o
•
The corresponding care plan will generate
A notes tab is available for documenting details and assessments of community and self
referral bereavement contacts
o
Individual Notes can be added, printed or batch printed
Please note that letter functionality and scheduling of visits is not available for community
bereavement contacts.
Page 238 of 284
30.5 GROUP DOCUMENTATION
Group Details can now be documented by clicking the Group tab under Bereavement Tracking.
Group information will be held in the Bereavement Groups
•
In order to access the details of each group users can double click on the selected
group.
•
In order to add new groups either right click or click on the ‘add’ button at the bottom of
the grid.
•
Users can edit group details by either right click or clicking on the ‘edit’ button at the
bottom of the grid.
30.5.1 ADDING GROUP DETAILS
Group Details are designed to document date, time, leader, attendees and notes for each
individual meeting.
•
The Group Name is required and must be unique to each group
•
Group Type is required
Page 239 of 284
o
Bereavement Group Types are managed in Table Administration.
•
Assigned Branch is required
•
Leader Name is an optional field
o
Payroll does not pull from this field
•
Group leaders must enter their time through non visit activity
The ‘Details’ field is a free text field available to add any notes related to the group
meeting
Group Attendees are added by clicking on the ‘Add’ button and will launch a new screen utilized
to choose attendees.
•
Attendees stored in this grid must be existing bereavement contacts in the bereavement
activity module.
•
Place a checkmark beside each contact that attended the group and apply the selection
to load the contacts into the group.
Page 240 of 284
30.6 COMMUNITY BEREAVEMENT REPORT
The Community Bereavement Report is a new report that has been created for reporting details
of community and self-referral bereavement contacts.
• Accessed through the report library.
• Reports:
o Notes that have been added in the contact record
o Groups that contact has attended
• Filter by:
o Group Types
o Branches
o Contacts
o Bereavement Case Managers
o Risk Levels
o Date
Page 241 of 284
Page 242 of 284
30.6.1 BEREAVEMENT GROUP REPORT
The bereavement group report is a new report for reporting on bereavement group details.
•
Accessed through:
o
Report Library
o
Group Console
•
Report is filtered by branch level
•
Reports:
o
Group Name
Page 243 of 284
o
Date and Time
o
Group Leader
o
Option to Include Attendees Names
o
Option to Include Group Details
•
Offers total number of groups for the date range selected
•
Offers total number of group attendees for date range selected
Page 244 of 284
Page 245 of 284
31 VOLUNTEER COORDINATOR
31.1 HOW TO ENTER VOLUNTEERS
To enter Volunteers into R2/Resource Manager:
1. Select Manage Workers from the Resource Manager Menu
2. Select Add/Edit Workers.
3. Click the Add button
4. Enter the information on the Demographics tab – MUST enter information in the
red/required fields. All other fields are optional.
Page 246 of 284
*helpful hint: inserting VOL in the Signature Title field creates an easy way to
filter the worker screen to view only volunteers.
5. Click on the Organization Assignments tab. Add Service Line, Branch and Team.
Page 247 of 284
6. Qualifications are not required.
7. Click on Permissions, all fields should default to N. If default is Y click drop down
and select N.
8. Click on the Payroll Information tab. Enter the Hire Date, Worker Category –
Volunteer, Worker Type – Volunteer, Primary Job Description-Volunteer Services
and Mileage Payment Method. Leave all other fields as they default. See
screenshot below.
Page 248 of 284
9. On the Renewable Requirements Tab, right click to Add item(s) to be tracked.
10. Click HR log to Add items per agency policy.
.
31.2 VOLUNTEER TIME CAPTURE
Click on the Volunteer Time Console Icon
Search filters are displayed on the left side of the screen
Page 249 of 284
Click add at the bottom of the screen to add volunteer time
Page 250 of 284
*helpful hint: as items are entered the screen will change to facilitate entry. For example
when Volunteer Client related Service is selected in the Service Provided field the Client
Name field is activated.
*helpful hint: use the Save and Stay button when recording multiple entries.
31.3 EDITING VOLUNTEER TIME
Add, Edit, Inactivate and View Volunteer time or View History by selecting the
appropriate button on the bottom of the screen.
To Edit Volunteer Time simply click the EDIT button and add information to the required
fields and click Save. Use the down arrows to select the appropriate information.
31.4 VIEW ING VOLUNTEER TIME
Page 251 of 284
To View Volunteer Time simply click the VIEW button.
You cannot edit the information in this screen. It is for viewing purposes only.
31.5 VIEW ING VOLUNTEER TIME HISTORY
View Volunteer Time History for a Volunteer by clicking on the View History button. A
history of edits to the time being viewed will be displayed.
Page 252 of 284
Page 253 of 284
31.6 VOLUNTEER REPORTS
Volunteer reports may be accessed from HCHB
Or R2
The percentage of volunteer time in relation to patient care time may be viewed at
any time, and for those agencies that have a need for viewing Volunteer Rates and
Volunteer Dollar Totals per Month. Access the Hospice Volunteer Requirement
Report from R2>Resource Manager>Report Manager
Page 254 of 284
This report uses the rate based on the most recent effective date that applies. Since
few agencies use Volunteer Rates, the Volunteer Rate and Volunteer Total columns
are hidden if there is no Volunteer Rates found. When Show Volunteer Types has
been set to “Yes” the report will display rows w/Volunteer Service Types.
Volunteer Activity Report includes all volunteer activity. Filters may be set as needed
to include individuals as well as all Volunteers. Access the report by following this path:
HCHB>Reports>Hospice Reports>Volunteer Activity Report
The Worker Birthday Report may be used to identify volunteer birth dates. Access the
Worker Birthday Report from R2>Resource Manager>Report Manager>Worker Birthday
Report. Filter the report by Worker Type-Volunteer
Page 255 of 284
The Worker Renewable Requirements Report may be used to track expiring
requirements. Access the Worker Renewable Requirements Report from R2>Resource
Manager>Worker Renewable Requirements Report. An Administrative task may be set
up as a reminder.
Hospice Abbreviated Face Sheet Report provides pertinent client information for the
volunteers, but does not include confidential client information.
32 HOSPICE INPATIENT ENCOUNTERS
If you are a hospice agency that has an inpatient unit, there is functionality within the
system to capture each encounter (encounter is each time direct care is provided
throughout a shift). To enter or modify these encounters, access the visit notes in the
clinical input screen.
1- Clinical Input Screen
2- Find the patient needing an encounter documented
3- Right click and select Medical Records Info
4- Visit Notes
Find the needed visit note and right click. An option to View/Edit Hospice Inpatient
Encounters is now available. Select this option to enter or update existing encounters.
Page 256 of 284
Note: Hospice Inpatient Encounters can also be documented on paper verified visit
notes.
From the Hospice Inpatient Encounters screen the ability to Add, Edit or Delete
encounters that are associated with this visit note are available. To add an encounter,
click on the add button at the bottom of the screen and a pop-up box will appear to enter
the appropriate information
1- Date – defaults to date of visit note. The user can select a different date, but will
only be allowed to select the date of the visit or one day in the future. (i.e., for
visits cross over midnight).
2- Discipline –defaults to the discipline that completed the visit note. This field is
read only and used for reporting purposes.
3- Start Time – defaults to the time the clinician started the visit note and does not
allow encounters with overlapping start times within the same visit note.
4- Duration in minutes – numeric field that users can enter how long the patient
encounter lasted. The default will be 1 but allows the clinicians to change it.
5- Billable – default to “Y” (which is yes) but allows the clinician to change it.
6- Details – free text box to allow clinician to enter supporting information about the
encounter.
Page 257 of 284
Any of the inpatient encounters within the visit note can also be edited or deleted by
highlighting that encounter and clicking on the appropriate action button at the bottom of
the screen.
When printing the visit note report, the Hospice Inpatient Encounters will be included in
that visit note report. The Hospice Inpatient Encounters are visible when viewing the
visit note. They are located on a separate tab within the note.
*Functionality is available in Pointcare to add encounters from inside the visit in
the Pink Quad (Windows Mobile) or the Visit Actions (Android).
33 NON-VISIT TIME – IN R2
Page 258 of 284
The module displays all of the search and filter options on the left side of the window.
The filters allow multiple-selection of items within the list.
Users may use the “Select All” option to select all entries in the list.
To commit the selection, users will click “Done” in the upper right corner of the list.
This multiple-select feature extends to the worker filter as well. When clicking the
“Worker” option to search for activities by a specific worker, users will be presented with
a screen to search for specific workers and select as many workers as needed.
Page 259 of 284
This is done by typing a name in the “Search for” box and selecting workers using the
checkbox beside each appropriate worker’s name.
To clear the search, users will click the red “x” displayed on the right side of the “Search
for” box.
Any workers that have been selected are displayed on the right side of the screen.
Users can clear all of their current worker selections by clicking the “Clear All” button.
Users can clear specific selections by high-lighting the selection and clicking the “Clear
Item(s)” button.
Once the desired list of workers has been selected, users can click the “Apply
Selections” button to return to the Non-Visit Activity Tracking screen.
The “Cancel” button allows users to cancel any worker selection activity and return to
the Non-Visit Activity Tracking screen.
Once all of the desired filters and search options on the left side of the Non-Visit Activity
Tracking screen have been selected, click the “Load Non-Visit Activity Items” button to
Page 260 of 284
refresh the grid on the right side of the screen and display results based on the selected
criteria.
The grid will be initially populated with “less than or equal to” the first 100 Non-Visit
Activity entries that meet the selected criteria. If there are greater than 100 entries in the
grid, users will need to use the “Grid Paging” buttons to view the results.
The Grid Paging buttons are located in the lower right-hand area of the grid,
and are defined as follows:
-Displays all entries “less than or equal to” the first 100.
-Displays the “previous” 100 entries in the list.
-Displays the “next” 100 entries in the list.
-Displays the “last” 100 entries in the list
Users can also perform several actions for items in the grid, by selecting an entry and
right-clicking in the grid:
Page 261 of 284
Add – add a new entry for a worker
Edit – edit an existing entry (only open entries can be edited by users with appropriate
access)
Tip: Users can create Non-Visit Activity entries more quickly, using the “Save & Stay”
button, which saves the current entry and refreshes the screen for a new entry for the
same worker.
Inactivate (Activate) – users can activate or inactivate an existing entry
Page 262 of 284
View – view details of an existing entry without editing the entry
Accept (Unaccept) – accept an entry that has not previously been accepted or
declined
Decline – decline an entry that has not previously been accepted or declined
View History – view the action history of a selected entry
Page 263 of 284
Non-Visit Activity Report – launches the non-visit activity report.
•
Required Fields – Red Asterisks
34 ADMINISTRATIVE ON-CALL RESPONSIBILITIES
Administrative On-Call (AOC) functions may include:
•
•
Entering a new referral in order to schedule an admission visit
Processing client data by reviewing/approving or holding the evaluation packet
for further clinical review if visits are needed prior to the next business day
morning.
Page 264 of 284
•
•
Entering and processing physician orders for extra visits (for current patients)
Processing visits during the AOC period [reassigning or rescheduling visits].
Points to consider when designating staff to the AOC position:
•
•
•
•
A Registered Nurse is required to make changes/approve a patient’s Plan of
Treatment
An LPN/LVN can write orders, but requires approval by an RN
If a non-clinical person takes AOC, they will have to “approve” evaluations, hold
SOC orders, etc. While they are not really approving them, they must enter a
coordination note to indicate what was “approved” so that the appropriate office
nurse can follow up and actually review/approve the documentation the next
business day.
Once your designated staff has been identified, a separate login profile will be
created for these workers. This second profile allows the user to see all action
screen items in order to process appropriately.
Staff will need Internet access through a home computer or laptop; below are options:
Pros
Cons
Home Computer
•
Decrease cost for those who already
have internet connectivity and a
personal computer
•
•
•
May have to worry about security of patient
data by unauthorized users
Support may not be as easy because each
person will have a different setup
Staff may feel tied to home because they
must have connection to the application
Laptop with Cell Phone or Air Card Connectivity
•
•
Spontaneous Internet connection;
morale boost so that staff won’t be tied
to home
Easier connectivity support – setup
established by agency
•
•
•
Cost: laptop (one-time cost)
Cost: Air Cards cost and data minutes may
be expensive unless you get a deal
Connectivity may not be good depending
on the area’s signal strength
The diagram on the next page shows what scenarios might occur after hours that cause
the designated AOC to take action. The diagram does not show all events, but focuses
Page 265 of 284
on what needs to happen in HCHB so that visits may be performed on the Pocket PC at
all times. The AOC workflow in HCHB contains just the tasks that may be required
during the AOC timeframe.
Page 266 of 284
The following is only a recommendation for how to handle the Administrative On-Call
process and delineates how Homecare Homebase agencies handle this function.
Clarification of each position and their functionality:
Administrative On-Call Nurse (AOC Nurse) – A designated RN whose primary
responsibility is to receive phone calls from the answering service and triage all the
incoming calls. This may mean coordinating care with field staff, contacting a physician,
or contacting the patient. This person does not do after hour and weekend visits as this
affects his/her ability to triage the incoming phone calls. The AOC Nurse manages the
action screen during period, including but not limited to rescheduling visits, processing
incoming evaluation visits, orders, etc. to allow scheduling of the visits. The role of the
AOC Nurse is modified to ensure certain aspects of the workflow can be bypassed to
allow administrative functions to be completed by the office staff while allowing the
delivery of care to continue outside of normal office hours. This person is not
responsible for truly reviewing and approving the POC. The “Hold for Additional Clinical
Review” function is always used. The AOC Nurse also provides clinical support to field
staff related to the delivery of hospice service after hours and on weekends.
This person must be knowledgeable of HCHB, scheduling functions, as well as
PointCare. They should be required to attend the office training sessions as well as the
Pocket PC training sessions.
When the size of the agency or complexity of the business mix creates high call
volumes, the On-Call RN can be supported via non-clinical assistance with scheduling
(see below).
On Call Scheduler – A designated non-clinical position that provides scheduling
support. This position is only responsible for the hands–on scheduling of visits as
directed or approved by the AOC Nurse. This position requires Web Access/Internet.
This person must be knowledgeable of HCHB, scheduling functions and PointCare.
They should be required to attend the Office training sessions as well as the Pocket PC
training sessions.
Field Nurse – A nurse who performs visits after hours and on weekends. Visits
performed during the “ON-CALL TIMEFRAME” are not performed by the AOC Nurse.
Instead, the agency has designated staff to perform visits during this period. These staff
members attend the PocketPC training sessions. It is recommended to include this
employee in all training sessions including HCHB if they will be functioning in the role of
On Call RN.
Page 267 of 284
35 SCHEDULE THE F2F ENCOUNTER STAGE
This stage will allow the user to schedule the Face to Face encounter to a nurse
practitioner or physician, print the Face to Face document for manual completion and
signature or delay this scheduling stage until another day.
35.2.1.3.1 VIEW F2F ENCOUNTER
If the user clicks on the View F2F Encounter button, they will be presented with a Face
to Face Encounter grid. This grid will show you the basic information about the Face to
Face Encounter that is due for the next benefit period. The user will be able to
complete the same tasks and fields as previously described in the Plan F2F Encounter
section. To see all the available options in this screen, click on the link F2F Encounter
Grid.
35.2.1.3.2 SCHEDULE F2F ENCOUNTER
If the user clicks on the Schedule F2F Encounter button they will be able to schedule
this Face to Face Encounter to a nurse practitioner or Medical Director/Team Physician.
The screen that pops up for scheduling will look like one of the following screen shots
depending on who should complete the encounter. This was determined when the user
updated the Face to Face encounter record with a service code.
35.2.1.3.3 SCHEDULING TO A NURSE PRACTITIONER
Page 268 of 284
•
•
•
Service Code - This code will default to the hardcoded service code set up for the
Nurse Practitioners. This service code is assigned to a new PointCare format that
only requires the completion of the physical assessment category. This service
code and PointCare information can be found in the section titled PointCare
Manager. To see more about this click on the link… PointCare Manager
Licensed Professional – When the service code is for the nurse practitioner this field
will only display workers who are listed as a nurse practitioner in the worker setup
table. This is why it is important to have all your workers set up correctly.
− The user will need to click on the ellipsis symbol (three dot box) to search for the
correct worker.
− Select the worker from the list and their name will populate the licensed
professional box.
Visit Date –This field needs to be completed with the date the listed worker will be
conducting the Face to Face encounter visit. This is a basic drop down calendar box
for date selection or the user can type in the correct date. This field will default to
the date you entered in the F2F Encounter Record.
If the visit needs to be scheduled to a Medical Director instead of the Nurse Practitioner
this can be changed by updating the F2F Encounter Record.
•
To access this record, cancel off this pop-up scheduling box and select View F2F
Encounter. Select the encounter record and click on the edit button.
Page 269 of 284
•
Change the service code to PHYHF2F – Physician and save the record
•
Click on the Schedule F2F Encounter button again to see your change. Follow the
instructions below for scheduling to a Medical Director or team physician.
35.2.1.3.4 SCHEDULING TO A MEDICAL DIRECTOR
•
Service Code - This code will default to the hardcoded service code setup for the
Physicians. This service code is assigned to a new PointCare format that only
requires the completion of the physical assessment category. This service code and
PointCare information can be found in the section titled PointCare Manager. To see
more about this click on the link… PointCare Manager
•
Licensed Professional – This field will default to the physician listed as the medical
director on your CTI order. This field is pulling from the physician flagged within the
referral as the medical director.
− We do allow the user to change this physician, but they will see warning about
making this change...
− If the user chooses to change the physician’s name, they will need to click on the
ellipsis symbol (three dot boxes) to search for the correct physician.
− Select the correct physician from the list and their name will populate the
licensed professional box.
o Only Medical Directors set up correctly in the physician table and worker
set up will appear on the selection list. This is why it is important to set up
the physician as described previously.
Page 270 of 284
•
Visit Date –This field needs to be completed with the date the listed physician will be
performing the Face to Face encounter visit. This is a basic drop down calendar box
for date selection or the user can type in the correct date.
•
The user should click on the OK button and if the name in the licensed professional
box is different from the medical director listed on the CTI order (Hospice CTI order
for the same benefit period as the F2F encounter), the user will see the following
message:
If the user clicks on Yes, this will scheduled the visit to the physician and
they can complete the F2F visit using PointCare and will complete this
stage.
If the user clicks on the No option they will be returned back to the Schedule
F2F Encounter stage.
If the visit needs to be scheduled to a Nurse Practitioner instead of the Medical Director
or team physician this can be changed by updating the F2F Encounter Record and
following the same instructions as previously described.
35.2.1.4 PRINT F2F FORM FOR MANUAL COMPLETION
If the user clicks on the Print F2F Encounter button, they will be able to print or fax this
Face to Face encounter form to a nurse practitioner or Medical Director/team physician.
The screen the user receives will look like one of the screen shots below depending on
who is going to complete the encounter. This was determined when the user updated
the Face to Face encounter record with a service code.
35.2.1.4.1 PRINTING F2F FORM FOR A NURSE PRACTITIONER
If the F2F encounter is scheduled to the nurse practitioner, the user will see this screen
when they select this print option.
Page 271 of 284
•
Licensed Professional – When the service code is for the nurse practitioner, this field
will only display workers listed as a nurse practitioner in the worker set up table.
This is why it is important to have all your workers set up correctly.
− The user will need to click on the ellipsis symbol (three dot box) to search for the
correct worker.
− Select the worker from the list and their name will populate the licensed
professional box.
•
View/Print Form for Manual Completion – This will show the user what the F2F form
will look like and allow them to select the fax or print option within the preview
screen. This report will show:
− Name, address, phone and fax number of the licensed professional who is going
to perform the F2F encounter
−
Name and address of the patient
− Patient’s medical record number
− Benefit Period dates for the Face to Face is for
− Pulls the Agency Taken Date from the F2F Encounter Record
− Date of Face to Face Encounter will be blank until it is complete
Face to Face Encounter Documentation will be blank until it is complete
− The appropriate attestation statement at the bottom of the report
−
Signature and Date field will be blank until it is completed
− F2F document number will be at the bottom left corner
Page 272 of 284
Page 273 of 284
•
Process F2F Form – This will show the user a box that looks a lot like the process
order box we currently have today. The top section will have the basic information:
− Process F2F For Client will be the patient’s name
− Licensed Professional’s name who is assigned to complete this encounter
− The licensed professional’s preferred communication method
•
In the next section Processing Face to Face Encounter Form the user will need to
complete the date they sent out this form and the method used to send the form.
− Date F2F Encounter Sent - This is a basic drop down calendar box for date
selection or the user can type in the correct date.
− How F2F Encounter Sent – will be a drop down box for the user to select the
method for processing the form:
Page 274 of 284
•
The last section ‘Face to Face Encounter Completion’ does not need to be
completed at this time. This section will be completed after the F2F encounter is
complete.
− Date of Completed F2F Encounter – the date the licensed professional
performed the Face to Face visits. This is a basic drop down calendar box for
date selection or the user can type in the correct date.
− Date F2F Form Signed by Licensed Professional – this is the date the
licensed professional signed their documentation the Face to Face as complete.
This is a basic drop down calendar box for date selection or the user can type in
the correct date.
− Licensed Professional who completed the F2F Encounter – this is a drop
down box for the user to select which licensed professional completed the
documentation.
•
Save – Saves and closes this stage
•
Don’t Save - Closes the window and returns the user to the Schedule F2F Encounter
stage
35.2.1.4.2 PRINTING F2F FORM FOR A MEDICAL DIRECTOR / TEAM PHYSICIAN
If the F2F encounter is scheduled to the Medical Director, the user will see this screen
when they select this print option:
The licensed professional box will default to the Medical Director listed on the CTI order
for that benefit period. We do allow the user to change this physician, but they will see
a warning about making this change.
Page 275 of 284
•
•
If the user chooses to change the physician’s name, they will need to click on the
ellipsis symbol (three dot boxes) to search for the correct physician.
Select the correct physician from the list and their name will populate the licensed
professional box.
− Only Medical Directors set up correctly will appear on the selection list. That is
why it is important to set-up the physician as described above.
.
The View/Print Form for Manual Completion and Process F2F Form will work as
described previously. Below is a copy of the F2F Encounter form for the physician.
Page 276 of 284
35.2.2 TRANSFER AND ADMISSION PATIENTS
If a patient is coming onto service with your agency as a transfer or new admission and
is in their 3rd or greater benefit period, has Medicare as a payor and their benefit will
start in 2011, the user will see a F2F Encounter button available in workflow stage
Verify Hospice Benefit Period. This button, if selected, will present the user with the
Page 277 of 284
F2F Encounter grid. The user can update the Face to Face Encounter record and
document all the information related to the Face to Face encounter.
The F2F Encounter button will work as described above in section F2F Encounter Grid.
To see more information about the button click on the link F2F Encounter Grid.
Once the user clicks on the stage completed button, the stage Plan F2F Encounter will
appear on the action screen. The only difference between the Transfer/Admission
patient F2F Encounter workflow and the workflow for Real Recert patients is that
on Transfer/Admission patients, the next stage under the event ‘Hospice
Verification/Authorization’ will be held up until action is taken on the F2F
encounter. This means that you will not be able to assign the admission visit
until you either 1)schedule the F2F encounter, 2)print F2F form for manual
completion or 3)delay the F2F stage(s). To see more information about this process
and the corresponding workflow stages click on the link Plan F2F Encounter.
35.3 CLINICAL MANAGER – VIEW ING AND DOCUMENTING COMPLETED F2F
ENCOUNTER
Once a F2F Encounter record exists for a patient, the agency will need to track this
record to see that it is completed and document the findings about the encounter after it
has taken place.
35.3.1 VIEWING AND DOCUMENTING F2F ENCOUNTER
Page 278 of 284
The F2F Encounter can be viewed and documented from several different areas of the
application. Users can view the Face to Face encounter grid from the clinical input
screen, order tracking, order console and the IDG screen. To view the Face to Face
encounter grid, the patient has to have an active F2F encounter record and the menu is
available via right-click.
The user can also document that the encounter took place from PointCare, clinical input
screen and IDG screen. This documentation of the encounter is the supporting facts
that the Face to Face encounter took place.
35.3.1.1 CLINICAL INPUT
From the clinical input screen locate the patient from the list and right-click on their
name. This should bring up the medical record menu, select medical records info and
then the Face to Face Encounter menu option. This will present the user with the Face
to Face grid for this patient.
35.3.1.2 ORDER CONSOLE AND TRACKING
From the order console or tracking screens locate an order in the right benefit period for
this patient and right-click on that order (the Medical Director’s CTI order is a good one
to select). This will bring up the menu options, and the user can select Face to Face
Encounter, presenting the user with the Face to Face grid.
There is also a F2F Completion Date column on this screen. This will populate with a
date when the F2F Encounter has been completed for that benefit period.
Page 279 of 284
35.3.1.3 IDG SCREEN
From the IDG screen locate the patient from the list and right-click on their name. This
should bring up the medical record menu, select medical records info and then the Face
to Face menu option. This will present the user with the Face to Face grid for this
patient.
User can also document their F2F visit findings on this page and mark the encounter
completed. Once on the Face to Face Grid the user will have several menu options to
select.
Page 280 of 284
35.5 REPORT MANAGER
35.5.1 HOSPICE INCOMPLETE FACE TO FACE ENCOUNTER REPORT
This report provides the ability to view which clients needed a F2F encounter, plan for
pending F2F encounters and be able to see revenue that may be at risk (or that they
lost) due to incomplete F2F visits. This report will pull all Medicare patients who need a
Face-to-Face Encounter completed.
The report criteria screen will allow you to run this report by the following:
•
•
•
•
•
•
•
•
•
Current EOE date
Date of Planned F2F to and from
Companies
Agencies
Branches
Teams
Clients (default to all)
Group By: Branch will be the default
Sort By: F2F Date Due By will be the default
Page 281 of 284
35.6 FINANCIAL MANAGER
Financial Manager has been updated to meet the new Face to Face Requirements.
Added are Billing Audits, the Hospice Ineligible Report and Claim Management screen.
35.6.1 LEVEL OF CARE WORKFLOW REVIEW
You will receive workflow to review the LOC days until the Face to Face Encounter is
complete. This will help to adjust the billable level of care days so that an invoice will
only contain ‘true’ billable days. If the Face to Face Encounter is not complete and the
first day of the new benefit period starts, the user will the F2F LOC Review task on the
action screen. This will allow user to view the F2F Encounter and the adjust level of
care days if needed.
Page 282 of 284
When the user clicks on the Review/Edit LOC Days button, they will see and adjust any
days that are not billable:
•
•
The user can right click on one day or select multiple days (hold shift or Ctrl key to
select more than one day and then right click).
This will display a box with three options. We will discuss the last two options.
o Change Status to HOLD – every level of care day has a status of HOLD
until it is ready for billing or billed.
o Change Status to NOT BILLABLE – this status will exclude this day from
the invoice because it is not a billable day. All visits (in the same benefit
as the F2F) completed prior to the completion of Face to Face
requirement should be marked as NOT BILLABLE.
Page 283 of 284
This right click functionality is not available to future and already billed level of care
days. This stage will continue to appear on the action screen every day until the Face
to Face requirement has been met.
35.6.2 BILLING AUDIT
The following two Billing Audits were added for Hospice:
1. Hospice Face to Face Visit
a. This audit is initiated when the client is on their 3rd or greater benefit
period and the episode begins after 1/1/2011.
i. If the Face to Face Encounter Date is blank then billing audit will
place the claim on hold.
ii. If the Face to Face Encounter Date is populated but the date is 30
days prior to the Start of Episode, the billing audit will place the
claim on hold.
2. Billable LOC Days Prior to Hospice Face to Face
a. This audit is initiated when the Face to Face Encounter date occurred
after the start of episode and the Level of Care days are marked billable.
Page 284 of 284
i. The user can then review the LOC day and Encounter date and
make the appropriate changes prior to billing occurring.
1. Example: If SOE is 1/1/11 and encounter occurred on 1/3/11
and the LOC days prior to 1/3 are showing as billable, the
audit will be displayed.
35.6.4 HOSPICE INELIGIBLE CLAIMS REPORT
F2F column has been added to Ineligible Claims Report and if the Face to Face
Encounter has not occurred or occurred 30 days prior to the Start of the Episode; the
column will display an “N”. The Hospice Ineligible and Eligible Reports are not affected if
days are marked billable after Face to Face Encounter; this edit is handled by the Billing
Audits on the Claim Management screen.