1
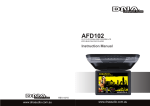
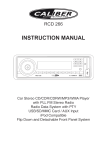
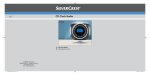
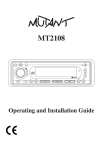
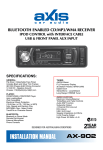
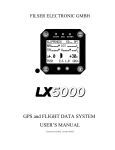
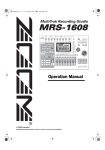
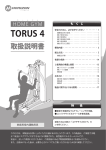
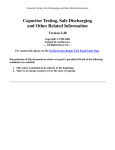
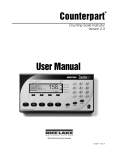
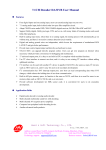
USER MANUAL
AM/FM MP3/CD Player with
3.5mm AUX Audio Input
ACD3
www.dnaaudio.com.au
LOCATIONS OF CONTROLS
1
9
6
LOC
5
2
3
15
11
12 22 13
MU
TE
®
ACD3
CD/MP3/WMA/CD-R/CD-RW PLAYER
16
LOC
4x40WATTS
26
MU
TE
®
ACD3
CD/MP3/WMA/CD-R/CD-RW PLAYE
BD
A
/P
BD
U
A
/P
U
20 10
ST
EQ
EQ
7
1 TOP
8
19
1 TOP
3
3
21
23
4 (1-6)
LOC
24
1
9
25
6
5
14
2
3
15
11
12
MU
TE
®
ACD3
MU
TE
LOC
CD/MP3/WMA/CD-R/CD-RW PLAYER
4x40WATTS
1. POWER ON/OFF ( )
2. FUNCTION SELECT BUTTON: BASS/TREBLE/BALANCE/FADER
/ AUDIO
DSP/
1
2 3
9 8
LOUDNESS/CD MULTI/SCROLL/BEEP/STEREO/LOCAL
SEL / AUDIO DSP/LOUDNESS/CD
3. VOL UP/VOL DOWN FOR BASS/TREBLE/BALANCE/FADER
POWER
MODE
MENU
VOL
MULTI/SCROLL/BEEP/STEREO/LOCAL
11
TUNE/SEEK
4. PRESET STATIONS (1,2,3,4,5,6)
20
5. MUTE BUTTON (MU)
20
10 7
8
19
21
23 24
BAND
VOL
DISP
10
6. LOCAL/DISTANT
��������������������������
BUTTON (LOC)
4 (1-6)
7. EQUALIZER CONTROL (EQ) RPT
19
1
9 TOP
6 INT
5
2 3AS/PS
15
11
12 22 13
16
3
1
2
8. DISPLAY BUTTON (DISP)
RDM
10-DN
10-UP
9. MODE BUTTON (MODE)
1
2
4
5
6
10.BAND BUTTON (BD)
11.AUTOMATIC OR MANUAL TUNING
11
(FREQ18
UP
OR
)/
17 FREQ DOWN
20
CD TRACK/SEARCH BUTTON
10
ACD3
12.AUTO SEEK SEARCH TUNING (AS/PS)
19
1
2
13.‘SCAN’ AUTOMATIC TUNING CONTROL (SCAN)
4
5
14.STEREO/MONO SELECTOR (ST)
23
21
4
24
25 12 22
15.ACTIVE MATRIX DISPLAY
20 10 7
8
19
21
23 24
25
14
(1-6)
16.PANEL RELEASE BUTTON (
)
18
17
AC
17.CD SLOT
4 (1-6)
18.CD EJECT BUTTON (
)
23
2
19.TOP BUTTON
1
2 3 4 9 8 24
(1-6)
20.PAUSE BUTTON
21.INTRO BUTTON (Preview all Tracks)
11
22.REPEAT BUTTON
23.RANDOM BUTTON
20
RESET
10
24, 25. 10 TRACK SEARCH
DOWN/UP
19
3
26��������
.�������
AUX IN
1
2
27.RESET BUTTON
®
ACD3
CD/MP3/WMA/CD-R/CD-RW PLAYE
BD
A
/P
U
ST
BD
A
/P
EQ
U
1 TOP
3
EQ
LOC
1 TOP
3
MU
TE
®
ACD3
POWER
4x40WATTS
CD/MP3/WMA/CD-R/CD-RW PLAYER
SEL
MENU
BD
BAND
A
/P
U
ST
EQ
1 TOP
3
POWER
SEL
MENU
VOL
TOP
INT
RDM
10-DN
MODE
TUNE/SEEK
BAND
RESET
TOP
INT
RDM
10-DN
4
27
18
17
5
VOL
DISP
RPT
AS/PS
10-UP
6
27
ACD3
EN-
4
(1-6)
23
24
21
25 12 22
INSTALLATION
PRECAUTIONS
• Choose the mounting location carefully so that the unit will not interfere with the normal driving functions
of the driver.
• Avoid installing the unit where it would be subject to high temperatures, such as from direct sunlight
or hot air from the heater, or where it would be subject to dust, dirt or excessive vibration.
• Use only the supplied mounting hardware for a safe and secure installation.
• Be sure to remove the front panel before installing the unit.
NOTE: Inclination angle for car radio installation must not exceed 30˚ otherwise the front panel will not
open.
screw
1 release
and bracket
3
2
3 TAP
18mm
4
5mm
2
Bend these
claws, if necessary
NOTE: Keep the release key in a safe place as you may need it in the future to remove the unit from the car.
TO SUPPORT THE UNIT
Dashboard
4
4
1. UNIT
2. RELEASE CASE
3. DASH BOARD
4. HEX NUT
5. LOCK WASHER
6. PLAIN WASHER
7. CAR BODY
8. REAR SUPPORT STRAP
9. TAPPING SCREW
10. M5 X 15 HEX BOLT
6
5
8
10
7
5
1
9
4
6
Detaching and attaching the front panel
The front panel of this unit can be detached in order to prevent the unit from being stolen.
FOLDING DOWN AND DETACHING/ATTACHING THE FRONT PANEL
Before detaching the front panel, be sure to press the
button (1) to OFF first.
Then press the
button (16), let the Front Panel arrive in horizontal position and detach the panel by
pulling it towards you as illustrated.
< 10°
2
1
EN-
Notes:
• Do not press the front panel hard against the unit when attaching it. It can be easily attached by
pressing it lightly against the unit.
• When you carry the front panel with you, put it in the supplied front panel case.
• Do not press hard or give excessive pressure to the display window of the front panel when attaching
it to the unit.
CLEANING THE CONNECTOR
The unit may not function properly if the connectors between
the unit and the front panel are contaminated with dirt. In
order to prevent this from happening, detach the front panel
by pressing the
button and clean the connector from
time to time.
Clean the connector with a cotton swab together with contact
cleaner as illustrated. Be sure to clean them carefully pin by pin
and make sure not to damage the connecting points.
Rear of
front panel
Main unit
Cotton Swab
Electrical Wire Connections
RCA Line Out: Red (right) White (left)
CONNECTOR A
4. MEMORY +12V
5. AUTO ANTENNA OUTPUT
6. DIMMER CONTROL
7. +12V (TO IGNITION KEY)
8. GROUND
Note: (connector A no. 7) must be connected by
car ignition key in order to avoid that car battery
being drained when the car will be not used for
long period.
CONNECTOR B
1. REAR RIGHT SPEAKER (+)
2. REAR RIGHT SPEAKER (-)
3. FRONT RIGHT SPEAKER (+)
4. FRONT RIGHT SPEAKER (-)
5. FRONT LEFT SPEAKER (+)
6. FRONT LEFT SPEAKER (-)
7. REAR LEFT SPEAKER (+)
8. REAR LEFT SPEAKER (-)
ISO CONNECTOR
ANTENNA
CONNECTOR
B
LINE OUT
A
L (WHITE) R (RED)
FUSE 10A
ISO A/B PLUG
POWER
ANTENNA
MEMORY
BACK UP
FRONT
LEFT
SPEAKER
REAR
LEFT
SPEAKER
BLUE
YELLOW
+ WHITE
– WHITE/BLACK
+ GREEN
– GREEN/BLACK
BLACK
GROUND (–)
RED
IGNITION SWITCH (B+)
GREY +
GREY/BLACK –
VIOLET +
VIOLET/BLACK –
FRONT
RIGHT
SPEAKER
REAR
RIGHT
SPEAKER
Maintenance
FUSE REPLACEMENT
If the fuse blows, check the power connection and replace the fuse. If the fuse blows again after the
replacement, there may be an internal malfunction. In this case, consult your nearest repair center.
Warning
Use the specified amperage fuse for each lead. Use of a higher amperage fuse may cause serious damage.
EN-
OPERATION
Basic operation
POWER ON/OFF ( )
By pressing
, the unit is switched on and off. This unit is turned on by pressing any key.
Volume
Turning VOL knob (right/left) to increase or decrease the volume.
Attention!
Always set the volume to a level that will allow you, at any time, to clearly hear acoustical signals from
emergency service vehicles!
Bass/Treble/Balance/Fader
Turning VOL knob (right/left) to adjust VOL/BAS/TRE/BAL/FAD. To select other functions, press the VOL
knob shortly until the desired functions are shown on the display. Figure 1 shows how to control functions
that are selected using the VOL knob.
1
2
3
2
4
2
5
2
6
2
Fig. 1 Selection of sound control functions
1. VOL 2. SEL 3. BASS 4. TRE 5. BAL 6. FAD
Increase or decrease the volume by turning VOL knob (right/left). These buttons can be used to adjust
the BASS, TREBLE, BALANCE and FADER.
MUTE (MU)
Press MU button to mute the sound at once. Press again to return to previous volume level.
EQUALIZER CONTROL (EQ)
Press EQ to select between Off/Pop/Rock/Classic/Flat equalizer modes.
DISPLAY (Set the Clock) (DISP)
Selects radio frequency or clock display.
To set the clock:
1. With clock display selected, hold down DISP button until clock display starts flashing.
VOL
VOL to change hours.
2. Rotate VOL to VOL
change minutes,
3. Press DISP button to start clock.
Display (DISP)
Press DISP button to switch between display informations such as radio frequencies, clock, track and
other informations depending on the playing MODE.
Setting the operating mode (MODE)
Press the MODE button to switch between radio reception (frequency indicator), CD/MP3 operation (CD)
and audio input (AUX).
RESET - Reset the radio
• To reset the car radio to its factory default settings press the RESET button
with a pointed object, for example a ball point pen.
• Reset the car radio: - at initial operation,
- after the cable connection,
• If not all function buttons are working.
• When an error message appears in the display.
EN-
RESET
RESET
Settings for the multi controller
Via the VOL knob you can, in addition, administer settings for the switch on Audio DSP / Loudness / CD
Multi / Scroll / Beep / Stereo / Local.
• Hold down the VOL knob for approx. 2 seconds and then press it several times to access the following
settings:
AUDIO DSP CONTROLS (2)
Press the VOL knob (for more than 2 seconds) to activate Selecting mode for DSP:
2 sec.
SEL
DSP
POP --- ROCK --- CLASSIC --- FLAT --- DSP OFF
VOL
2
2 sec.
sec.
DSP
--- ROCK
--- FLAT --- DSP OFF
SEL
LOUDNESS
CONTROLS
(2)--- CLASSIC
DSP
LOUD
SEL
SEL POP
LOUD ON/OFF
Press the �������������������������������������������������������������������������������������������
VOL knob�����������������������������������������������������������������������������������
again (for more than 2 seconds) to activate Selecting mode for Loudness Controls:
2 sec.
2 sec.
SEL
2SEL
sec.
SEL
VOL
DSP
DSP
DSP
VOL
SEL
SEL
VOL
VOL
LOUD
LOUD ON/OFF
VOL
MULT
MULT ON/OFF
SEL
LOUD
POP --- ROCK --- CLASSIC --- FLAT --- DSP OFF
LOUD
ON/OFF mode is selected by
2 sec.
2 sec.
DSP
SEL
2SEL
sec. DSP
MULTI
CD
SEL
SEL
SEL
SEL
LOUD
LOUD
VOL
VOL
MULT
MULT
orVOLVOL . The bass and treble response will be boosted.
ON/OFF VOL
SCROLL
SEL MULT
SCROLL 1/2
VOL
SECTION MODE (2)
LOUD
SEL
LOUD ON/OFF
Press the ���������������������������������������������������������������������������������
VOL knob�������������������������������������������������������������������������
again (for
more than 2 seconds) to activate Selecting mode for MULTI CD
2 sec.
sec.
2
Controls:
SCROLL
MULT
SEL
DSP
SEL
LOUD
SEL POP
BEEP1/2
SEL SCROLL
BEEP ON/OFF
DSP
--- ROCK SEL
--- CLASSIC
--- FLAT
--- DSP
OFF
SEL
DSP
VOL
SEL
2 sec.
SEL
DSP
2
2 sec.
sec.
2SEL
sec. DSP
DSP
SEL
CD
DSP
2SEL
sec.MULTI
DSP
SEL
LOUD
SEL
MULT
SEL
LOUD
VOL
SEL
MULT
VOL
MULT ON/OFF
VOL
SEL
SCROLL
BEEP
SEL
VOL
BEEP ON/OFF
LOUD
SEL
LOUD ON/OFF VOL
STEREOmulti-section
SCROLL
STEREOCD.
ON/OFF
MULT by
SEL VOL
ON/OFF
mode is
orVOLVOL SEL
. CD BEEP
MULTI SEL
ON: Read
CD
SELselected
LOUD
SEL
MULT
SEL SCROLL
SCROLL 1/2
SELonly.
LOUD
SEL first
Read
section
DSP
MULTI
OFF:
2SEL
sec.
2SEL
sec.
VOL
VOL
VOL
VOL
VOL
POP --- ROCK --- CLASSIC --- FLAT --- DSP OFF
BEEP
SCROLL
2SEL
sec. DSPMODE
SEL STEREO
STEREO ON/OFF
SEL MULT
MULT
ON/OFF SEL
SEL
LOUD
SEL
SCROLL
2
sec.
BEEP
STEREO
SEL LOCAL
SEL
SEL BEEP
SCROLL
MULT
SEL
DSP
SEL
LOUD
SEL
BEEP
SCROLL to activate
MULT
SEL
SEL
ON/OFF
SELmore
DSPVOLSEL
LOUD
Press
knob�����������������������������������������������������������������������
again (for
than SEL
2 seconds)
Selecting
mode
for SCROLL:
2SEL
sec. the �������������������������������������������������������������������������������
VOL
VOL
VOL
VOL
VOL
LOUD
SEL
LOUD ON/OFF
2
sec.
2SEL
sec. DSP
VOL
2SEL
sec. DSP
VOL
POP --ROCK --- CLASSIC
--- FLAT --- SEL
DSP OFF
SCROLL
MULT
SCROLL 1/2
SEL
DSP
SEL
LOUD
SEL
BEEP
SEL
MULT
SEL SCROLL
SEL
LOUD
SEL
2SEL
sec. DSP
2SEL
sec.
BEEP
SCROLL
SEL
MULT
SEL
SEL
DSP
LOUD
SEL
SCROLL
1:
Unit
displays
song
details
but
no
text
scrolling.
VOL
MULT
MULT
ON/OFF
SEL
2
sec.
DSP
SEL
LOUD
SEL
2 sec.
SEL
SEL
STEREO
STEREO
SEL
VOL
DX/LOCAL
VOL
LOCAL
DX/LOCAL
STEREO ON/OFF
DSP
LOUD
SCROLL
details
andSEL
scrolls
the text
information
to the
left.
SEL
SEL
LOUD
ON/OFF
BEEP
SCROLL
MULT
SEL
BEEP
ON/OFF
SEL
DSP2: Unit
SEL
LOUD song
SELdisplays
VOL
sec.
2
2 sec.
sec.
VOL (2)
POP --ROCK --- CLASSIC
--- FLAT --- DSP
BEEP
MODE
MULT
SEL OFFSCROLL
SEL
DSP
SEL
LOUD
SEL
2SEL
sec. DSP
SEL
DSP
SEL
LOUD
SEL
MULT
2
sec.
2SEL
sec.
SEL
2SEL
sec.
DSP
SEL
LOUD
SEL
MULT
VOL
SEL
SCROLL
SEL
SCROLL
SCROLL 1/2
VOL
SEL
BEEP
SEL
STEREO
SEL
SEL
BEEP
SEL
STEREO
VOL
LOCAL
Press
knob���������������������������������������������������������������������
againSEL
(for more
2 seconds)
2SEL
sec. the �����������������������������������������������������������������������������
MULT than MULT
ON/OFF to activate Selecting mode for BEEP:
DSP VOL
LOUD
SEL
DSP
DSP
DSP
SEL
2 sec.
sec. ON:
2
BEEP
2SEL
sec.
SEL
2SEL
sec.
DSP
DSP
SEL
LOUD
SEL LOUD
VOL
LOUD MULT
ON/OFF
SEL
SEL
LOUD
SEL
MULT
VOL
SEL
SEL
SCROLL
SEL
SCROLL
VOL
BEEP
VOL
BEEP ON/OFF
SELSEL
LOUD
LOUD
SEL
SEL
VOL
MULT
MULT
SEL
SEL
SCROLL
SCROLL
SEL
SEL
BEEP
SEL
SEL
STEREO
VOL
SEL
LOCAL
STEREO ON/OFF
VOL
BEEP
MULT
SEL
SEL SCROLL
BEEP ON/OFF
SEL
LOUD
(2)
Press
the ������������������������������������������������������������������������������������
VOL
moreSELthan
2 seconds)
to activate
Selecting mode for Stereo/Mono:
SCROLL
MULT
SCROLL
1/2
SEL (for
DSP
SEL
LOUD again
SEL knob����������������������������������������������������������������������������
22 sec.
sec.
BEEP
SEL LOCAL
SEL
SEL STEREO
DX/LOCAL
MULT
SEL SCROLL
SEL
DSP
SEL
LOUD
SEL
sec.
BEEP
SEL
SEL STEREO
STEREO ON/OFF
MULT
SEL SCROLL
SEL
DSP
LOUD
SEL
2SEL
SEL
DSP
SEL
VOL
SEL
DSP
SEL
DX/LOCAL
VOL
LOUD
SEL
MULT
SEL
SCROLL
SEL
BEEP
VOL
BEEP ON/OFF
VOL
VOL
When FM signals are weak or disrupted, select MONO mode to improve listening.
2 sec.
2 sec.
DX/LOCAL
SCROLL 1/2
BEEPLOUD
soundSEL
be heard
fromMULT
speaker
when the buttons
are pressed.
MULT
ON/OFF
BEEP
STEREO
DSP
SEL
DSP
SEL
SEL
STEREO/MONO
2 sec.
VOL
STEREO ON/OFF
LOUD
SEL
MULT
SEL
SCROLL
SEL
BEEP
SEL
STEREO
VOL
SEL
LOCAL
VOL
BEEP
SEL
SEL STEREO
STEREO ON/OFF
MULT
SEL SCROLL
SEL
DSP
SEL
LOUD
SEL
LOCAL/DX
(2)
Press the VOL knob again (for more than 2 seconds) to activate Selecting mode for Local/DX:
sec.
2SEL
BEEP
SEL LOCAL
SEL
SEL STEREO
DX/LOCAL
MULT
SEL SCROLL
SEL
DSP
LOUD
SEL
VOL
DX/LOCAL
Select “Local” position in areas with strong signals to let radio stop at only strong stations during manual
tuning (LOC appears). Select Distant Position (DX) in areas with weak signals to listen to all stations.
EN-
Radio functions
Selecting the band range (BD/PAU)
Press the BD/PAU button to switch between (FM1, FM2, FM3, AM1, AM2)
Automatic or manual tuning (freq. up
or freq. down
)
• When pressed for less than 1 second, these keys operate as Manual Tuning mode.
• When pressed longer than 1 second, they operate as SEEK tuning mode.
• If the keys are not pressed for 3 seconds, they will return to SEEK mode.
Programming stations
• Press the BD/PAU button to set a band range. In each range you can save six stations.
• Search for the station that you want to save.
• After the search has found a station press one of the station buttons 1-6 for approx. three seconds.
The brief switching off of the sound indicates that the station is saved. The device switches back to radio
playback after a few seconds.
Accessing the station
• Select with BD/PAU the band range.
• By pressing one of the (station 1-6) buttons you access the saved station again.
AUTOMATICALLY STORE STATIONS (AS/PS)
Select six strong stations and store them in current band.
• Select a band (if needed)
• Hold AS/PS button for more than three seconds. The new stations replace stations already stored in
that band.
Preset Scan
Scan stations stored in current band
• Select a band (if needed)
• Hold AS/PS for more than one second but less than three seconds. Radio pauses for five seconds
at each station. Press AS/PS again to stop scanning when desired station is reached.
‘SCAN’ AUTOMATIC TUNING CONTROL (SCAN)
This key operates RADIO SCAN. The operation is similar to normal search but holds 5 seconds on every
station detected in RADIO SCAN mode.
Select Stereo/mono (ST)
This function will only affect the FM reception. Press ST button if the FM reception becomes noisy/hissy.
If the station being received is in stereo, it will now be played in mono. Press this button again to return
the receiver to normal reception.
Select local/distant (LOC)
Press LOC button for listening to strong stations. “LOC ON” indicator will appear on the display. Press
this button again (Distant mode) for normal operation.
EN-
Playing audio CDs
ASP “Anti shock protection”
The device is equipped with an anti shock function. This function serves to compensate for vibrations, for
example on uneven streets, and to provide an uninterupted playback even with device movement. When
the device is switched on the memory automatically fills with data:
• with audio CDs for 10 seconds;
• with MP3-CDs for 120 seconds.
Further information for CD operation
Dampness and high humidity can cause the CD player to malfunction. In this case switch on the vehicle
heating to dissipate the dampness before using the device. Do not subject the CD player to any extreemly
high or low temperatures.
Inserting and removing CDs
• Press
button and the front panel will open. Carefully slide the CD or CD-R or CD-RW through the
CD slot into the CD compartment. The CD starts playing automatically.
• To remove the CD open the face plate again. Press the
button. The CD will be ejected. The car
radio switches to radio mode.
Attention!
Do not drive with an ejected CD. Immediately remove the CD from the CD slot.
If an ejected CD is not removed within approx. 5 seconds the device will draw it back in, however playback
of the CD will not start.
Title skip
By means of the button
or
will be shown in the display.
Fast forward/backward
Hold down the buttons
or
you can select the next and/or the previous title. The title number
longer to start fast forward or backward.
Playing the song (TOP)
Press TOP to play first track.
Stopping a CD
You can stop the playback with the PAU button. To continue playback press the PAU button once more.
Repeating a title
• Press the RPT button. ‘RPT’ indication is displayed and the selected track will be continually repeated
until the Track Repeat mode is cancelled by pressing ‘RPT’ button again.
Title sampling
• Press the INT button. In the display INT will be shown. Appox. 10 seconds from all titles will playback
one after the other. A repeat pressing launches the normal playback.
Random playback of all titles
• Press the RDM button. In the display RDM is shown. A random controlled playback is started. A repeat
pressing launches the normal playback.
EN-
Playing MP3-CDs
The basic functions correspond to those of the audio CDs (see previous chapter). However with MP3CDs you can select the titles and the interpreters directly. These functions and the other MP3 specific
functions are definitivly dependent on the MP3-CD. Please bear this in mind when creating these CDs
(see the next section).
All conventional codings can be played back. TITLE > INTERPRET > ALBUM NAME > RELEASE YEAR
> COMMENTARY.
Note: Creation of MP3-CDs; ID3TAGs
MP3-CDs like data CDs can contain individual titles or directories. Please bear in mind with the creation of
an MP3-CD that you do not save titles on the same level as directories but rather only in the directory.
A mixture of titles and directories on the same level can result in problems when playing back. With the
creation of the MP3 file you can also save the so called “ID3 tag” (for input we recommend an ID3 tag
editor). This is a block of information that is contained in the MP3 file. This can be, for example, information
about the interpreters, titles, album name, release year and a short commentary. The car radio can read
this block of information and show it in the display.
Searching Track:
• Press and hold “AS/PS” to activate Search Track mode.
• Press “VOL” knob. The first digit will flash.
• Rotate “VOL” knob to right or left to select first digit desired.
• Press “VOL” knob. The first digit is fixed and second digit will flash.
• Rotate “VOL” knob to right or left to select second and third digits respectively.
• The selected song will start automatically.
Searching Character:
• Press and hold “AS/PS”. Press “AS/PS” again to activate Character Search mode.
• Press “VOL” knob. “A” is displayed.
• Rotate “VOL” knob to right or left to select the desired letter.
• Press “VOL” knob longer than 2 sec.
• Songs with the same character you selected are displayed.
• Rotate “VOL” knob to right or left to select the desired song.
• Press “VOL” knob and the selected song will start.
Searching File Name:
• Press and hold “AS/PS”. Press “AS/PS” again to activate Directory Search mode.
• Press “VOL” knob. The first directory is displayed.
• Rotate “VOL” knob to right or left to select the desired directory.
• Press “VOL” knob again. The directory is fixed and the first file name is displayed.
• Rotary “VOL” knob to right or left to select the file you want.
• Press “VOL” knob and the selected song will start.
Playback of the 10 TRACK UP/DOWN SELECT
• Press the station button 6 to playback the 10 Track up and/or the station button 5 to playback the
10 Track down.
Note: WMA files
The device can also play WMA files. The operation functions exactly the same as for MP3 files.
Front AUX IN
Convenient easy to use front “AUX IN” input jack, allows easy connection of Portable Media and digital
MP3 Players.
Replacing the fuse
The car radio is equipped with a 10 A fuse on the rear panel, which blows if a voltage peak or a short
circuit should occur.
• In this case replace the fuse with one of equal value and of the same type as listed in the technical
data with the same trip characteristics.
• Before switching the car radio on again remedy the cause of the fuse burnout.
EN-
Troubleshooting
The device will not switch on
The ignition is not switched on
• Switch the ignition on by turning the key. One of the fuses is defective.
• Replace the fuse.
The CD will not load or eject
A CD is already inserted into the car radio.
• Remove the CD.
The CD has been inserted the wrong way up.
• Insert the CD with the inscripted side up.
The CD is dirty or defective.
• Clean the CD or insert a different CD.
The temperature in the vehicle is too high.
• Wait until the surrounding temperature has normalized.
Condensation on the laser lens
• Switch the car radio off for a few hours and then try it again.
No sound
The volume is set to minimum.
• Increase the volume.
The cables are not connected correctly.
• Check the cable connections.
Function buttons are not functioning
There is a malfunction with the device.
• Press the RESET button.
The face plate is not correctly installed.
• Check to see that the face plate is installed correctly.
The CD jumps
The mounting angle exceeds 30°.
• Correct the mounting angle.
The CD is very dirty or defective.
• Clean the CD or insert a different CD.
Failure with burnt CDs
Check the burnt CD in another playback device.
The radio and/or the automatic station memory is not functioning
The antenna cable is not connected correctly.
• Check the antenna cable for correct connection.
The station signals are too weak.
• Set the station manually.
Station memory is not functioning
The connection 6 in the ISO block A (Permanent positive) is not connected correctly.
• Check the cable connections.
For this consult the chapter “Connections”.
Cleaning
Clean the housing exclusively with a soft damp cloth and a mild detergent. Ensure that moisture cannot
permeate into the device during cleaning!
Warning!
Moisture penetrating into the device creates the risk of electric shock! Besides which, the sdevice could
become irreparably damaged!
EN-10
TECHNICAL SPECIFICATIONS
CD/MP3/WMA PLAYER SECTION
Signal to Noise Ratio
Channel Separation
Frequency Response
> 60 dB
> 50 dB (1kHz)
20Hz - 20 kHz
TUNER (FM)
Frequency Range
Intermediate Frequency
Sensitivity
Stereo Separation
Signal to Noise Ratio
Channel Step
87.5-108 MHz
150 KHz
2.8 µV
37 dB
> 50 dB
100 kHz
TUNER (AM)
Frequency Range
Intermediate Frequency
Usable Sensitivity
522-1710 KHz
25 KHz
32 dB
LINE-OUT
Output
Impedance
1.5V (max.)
10k Ohm
GENERAL
Power Supply
Speaker Impedance
Output Power
12V DC (10.8-15.6V allowable)
4 or 8 ohm
40W x 4CH
Note: Specifications and the design are subject to possible modification without notice due to improvement.
EN-11