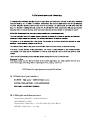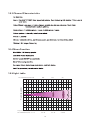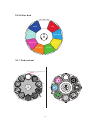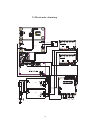
1
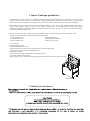
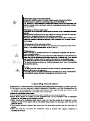
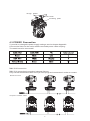
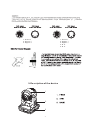
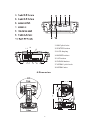
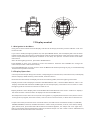
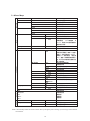
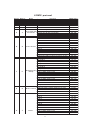
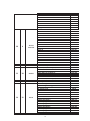
USER MANUAL
52×30mm(掏 空 )
4R-10
型号
Moving head
Professional stage lighting equipment
Table of content
1.Open-Package guidelines............................................................1
1.1Package................................................................................1
2.Safety instructions......................................................................1
3.Operating determination.............................................................3
4.Rigging the fixture.......................................................................4
4.1 Mounting.................................................................................4
4.2Installing the Clamps................................................................5
4.3 POWER Connection.................................................................6
5. Description of the device..............................................................7
6. Dimension....................................................................................8
7. Display control.............................................................................9
7.1 Navigation in the Menu............................................................9
7.2 Display OPeration....................................................................9
7.3 Menu Maps .............................................................................10
8.DMX protocol.............................................................................11
9.Maintenance and cleaning.........................................................13
10.Electric equipment specification...............................................13
10.1 Electrical paramters............................................................13
10.2 Weight and dimensions ............................................................13
10.3 Channel Characteristics.......................................................14
10.4 Menu Function.....................................................................14
10.5 light table...........................................................................14
10.6 Color disk............................................................................15
10.7 Gobo wheel .........................................................................15
11.Electronic drawing...................................................................16
1.Open-Package guidelines
Congratulations on choosing our products! Please carefully read this instruction manual in its entirety and
keep it well for using reference. This manual contained about the installation and the relative using inform
ation of this products.Please according to this manual's relative speaking when using this equipment.
This equipment was made of new style,high intensity plastic. It fully shows the modem times light charac
teristic with beauty struture. And it was made according to CE standard. Fully up the internation
standard of DMX512 agreement. Master or slave in phase ntrol.Can be use in large entertainment theater,
performing and palying hall erc.
When receive the product, please be careful to take and put, check if the product has damage or not
because of transportation, and check the following parts:
1.Signal cable-1PC
3.User Manval-1PC
5.Power cable-1PC
2.Safty cable-1PC
4.Omega holder-2PCS
5.Service card-1PC
1.1Package
Unpacking the fixture
1.Open the flight case couer
2.With one person on each side, lift the fixture out of the flight case.
3.Unlock pan and tilt before operating fixture
Packing the fixture
1.Disconnect the fixture from power and allow it to cool.
2.lock head and arms as figure.
3.Place the fix ture in the bottom of the flight case, and cover the case without forcing.
Aviation box
2.Safety instructions
1
212W
2.5
12
12
40
2
80
3
4
5
omega
holder
Secure chain
mounting plate
4.3 POWER Connection
If you wish to change the power supply settings,see the chapter Appendix
Connect the fixture to the mains with the enclosed power cable and plug.
The earth has to be connected!
DMX-512 Connection
DMX-512 connection/connection between fixtures
Only use stereo shieded cable and 3-pin XLR-plugs and connectors in order to connect.
Standard Version
European standard edition
1.6
1.6
6.3
6.3
6
1.6
6.3
1.6
1.6
1.6
Caution
At the last fixture,the DMX-cable has to be terminated with a terminatou. solder a
120 resistor between signal(-) and Signal (+) into a 3-pin XLR-plug and plug it in the
DMX-output of the last fixture.
5
2
1
2
3
1
4
3
1
5
2
4
3
1: Ground
2: Signal(- )
3: Signal(+ )
1: Ground
2: Signal(- )
3: Signal(+ )
4: N. A.
5: N. A.
DMX Terminator Diagram
5.Description of the device
1
2
3
7
1
2
3
11.MIC pilot hole
13
14
12.ENTER button
15
13.LCD display
14.MODE button
15.UP button
16.DOWN button
16 18
17.WDMX pilot hole
18.WDMX wire
6.Dimension
228 mm
195 mm
476 mm
12
111 mm
18 mm
17 11
310 mm
8
7.Display control
7.1 Navigation in the Menu
Using touch control switch and LCD display, and this can be simply and easily set the address code and
functions code.
If you view or modify the lighting feature set, then press MODE button, the LCD display will enter the menu
interface. Both there is sub menu corresponding to the functional operation of the main menu. Each of the
menus is representative of the specific features of the lamp. The specific contents shows as the table
menu below.
Set or browse lighting function, press UP or DOWN button.
Press ENTER to save your changes or enter the submenu. Press the UP or DOWN can change the
numerical (increase or decrease in value).
Press the MODE button to return to menu. Such as 60 seconds without pressing any key, it will automatically
exit the menu operation interface.
7.2 Display Operation
Connect power and open lamp power switch, Lamps began to reset self-test, at the same time, LCD display
shows company LOGO website, product model, software version.
Reset self-test is finished, the display will show the following table, that is the lighting of the state.
Display window is set to display the status of the DMX address "001", said the DMX address code. If the
display no flashes that indicate the DMX signal is connected properly. This status can be used to check
the lighting and the console connection is normal or not.
Display window is set to display each channel DMX value state. Bottom of the screen location to displays
the channel name. Central location to displays the channel's DMX value.
The lamps can be set to host voice run/ host running built-in program/ Stand-alone voice/ Stand -alone
running built-in program, when set to host, it can not connect to the console, or there will be interference.
Lamps in the reset process if there is a channel failure, the LCD screen will rotate the PAN, TILT, COLOR,
RGOBO,RGOBO2, FOCUS, PRISM "information. That is to say horizontal, vertical, color wheel,rotating
gobo,wheel,focus, prism have fault. When failure information appears, the lamps will once again self test to reset a time and Verifies failures channels, and then Lamps into the normal control state.however,
the failure of the channel will not be controlled.
9
Function
7.3 Menu Maps
Addr
001~xxx
修改 DMX 地址
Value
Free Ch …….
Alone
显示各个通道值
Master
主机自动程序
OFF
关
Alone
单机自动程序
Master
主机自动程序
Auto
Music
单机自动程序
OFF
Time
关
Current
xxxx
本次开机时间显示开关
Total
xxxx
机器总运行时间显示开关
Clear
ON/OFF
清除机器当前运行时间
Info
如果把通道
1,2,3 的数值设
为
10.3.10,在选择 ON 则同时清除机
器总的运行时间
Temp
Head T
Product
Vxx
Status
Addr DMX
xxx
光源部位温度显示开关
软件版本
ON/OFF
控台修改地址开关。
当设为开时把通道 1 调到 10、通道 2
调到 10(当所设地址大于 255 时,
则调到 11 ,地址为通道 3 的值 加
255)、通道 3 调到所要修改的地址
值,则 20 秒后灯具的地址被改为通
道 3 设的数值。
No DMX
Clos
保持无信号前的状态
Pan R
Hold
Auto
Musi
ON/OFF
垂直扫描反相
DMX Mod
ON/OFF
Mod1/Mod2
Feed
ON/OFF
扫描测位盘是否起作用
Wdmx
Alone/Master
/Off/Reset
无线单机/无线主机/无效/复位
Mic
70, 0~99
声控灵敏度调节
CloseT
Rev
05, 02-59
ON/OFF
显示屏背光关闭时间
无 DMX 时的状态选择
Personal
回到复位状态
Tilt R
Reset
Display
运行声控程序
水平扫描反相
通道模式 1/通道模式 2
显示反相
Default
All
Pan/Tilt
重载出厂时所有参数
Col
颜色复位
Gobo
图案复位
灯具全部复位
扫描单独复位
其他复位
Else
Adjust
运行自动程序
Test
Pan…….xxx
xxx
通道测试
Regulate
Sn
xxx
调节通道偏移量密码 088
Pan
xxx
调节通道偏移量
Note: if the actual product menu item shows "N/A" (in English) said "nothing" (in Chinese) product without
the function.
10
8.DMX protocol
M ode1 M ode2
1
2
3
4
5
6
1
2
3
Nam e
Function
DM X Value
Pan 8BIT
PAN 8BIT
0-255
Pan 16BIT
PAN 16BIT
0-255
Tilt 8BIT
TILT 8BIT
0-255
Tilt 16BIT
TILT 16BIT
0-255
m ax to min speed
Speed pan/tilt blackout by movem ent
movem ent
blackout by all wheel changing
no function
Open / white
Color 1
Color 2
Color 3
Color 4
Color 5
Color 6
Color 7
Color 8
Forwards rainbow effect from fast to slow
No rotation
Backwards rainbow effect from slow to fast
0-225
226-235
236-245
246-255
0-14
15-29
30-44
45-59
60-74
75-94
90-104
105-119
120-127
128-187
188-193
194-255
4
Color wheel1
7
5
Open
Rot. gobo 1
Rot. gobo 2
Rot. gobo 3
Rot. gobo 4
Rot. gobo 5
Rot. gobo 6
Rotating gobo Rot. gobo 7
change
Gobo 1 shake slow to fast
Gobo 2 shake slow to fast
Gobo 3 shake slow to fast
Gobo 4 shake slow to fast
Gobo 5 shake slow to fast
Gobo 6 shake slow to fast
Gobo 7 shake slow to fast
Rot. gobo wheel cont. rotation slow to fast
0-9
10-19
20-29
30-39
40-49
50-59
60-69
70-79
80-99
100-119
120-139
140-159
160-179
180-199
200-219
220-255
8
6
Gobo rotation
No rotation
Forwards gobo rotation from fast to slow
No rotation
Backwards gobo rotation from slow to fast
0-8
9-127
128-135
136-255
Open
Gobo
Gobo
Gobo
Gobo
Gobo
Gobo
Gobo
Gobo
Gobo
Gobo
Gobo
0-9
10-19
20-29
30-39
40-49
50-59
60-69
70-79
80-89
90-99
100-109
110-119
9
7
Gobos
1
2
3
4
5
6
7
8
9
1 shake slow to fast
2 shake slow to fast
11
Gobo 3 shake slow to fast
Gobo 4 shake slow to fast
Gobo 5 shake slow to fast
Gobo 6 shake slow to fast
Gobo 7 shake slow to fast
Gobo 8 shake slow to fast
Gobo 9 shake slow to fast
Rot. gobo wheel cont. rotation slow to fast
120-129
130-139
140-149
150-159
160-169
170-179
180-189
190-255
closed
Forwards rotation from fast to slow
No rotation
Backwards rotation from slow to fast
Macro 1
Macro 2
Macro 3
Macro 4
Macro 5
Macro 6
Macro 7
Macro 8
Macro 9
Macro 10
Macro 11
Macro 12
Macro 13
Macro 14
Macro 15
0-3
4-63
64-67
68-127
128-135
136-143
144-151
152-159
160-167
168-175
176-183
184-191
192-199
200-207
208-215
216-223
224-231
232-239
240-255
10
8
3Prism
insertion
11
9
Focus
Continuous adjustment from near to far
No function (shutter open)
Strobe effect slow to fast
No function (shutter open)
Pulse-effect in sequences
No function (shutter open)
Random strobe effect slow to fast
No function (shutter open)
12
10
Strobe
13
11
Dimmer
14
12
Reset
Intensity 0 to 100%
colour change normal
colour change to any position
No function
All motor reset
Scan motor reset
Colors motor reset
Gobo motor reset
No function
Other motor reset
Internal program 1
Internal program 2
Internal program 3
Internal program 4
Internal program 5
Internal program 6
Internal program 7
Internal program 8
12
0-255
0
1-95
96-127
128-159
160-191
192-223
224-255
0-255
0-20
20-39
40-79
80-84
85-87
88-90
91-93
94-96
97-99
100-119
120-139
140-159
160-179
180-199
200-219
220-239
240-255
10.Electric equipment specification
10.1 Electrical paramters
10.2 Weight and dimensions
Dimensions:(W X H X D):310 X310X476mm
NET WEIGHT:13.5KG
Dimensions(Paper skin):395(长)X393(宽)X535(高)mm
WEIGHT ( Paper skin ):16.5Kg
13
10.3 Channel Characteristics
10.4 Menu Function
10.5 light table
394
886
221
Projection distance(m)
13°
Flare diameter(m)
13°Illuminance (Lux) 3542
5
13°Illuminance (Lux) Φ1.13
10
15
Φ2.24
Φ3.36
14
20
Φ4.48
10.6 Color disk
8blue
1red
7cyan
2Light blue
3yellow
6rose red
5orange
4green
10.7 Gobo wheel
10
cylindrical bore,φ22 White circle
1
9
7
1
2
8
6
2
7
3
3
4
5
6
5
4
15
11.Electronic drawing
通
信
线
+
调焦电机
-
图案电机
光
源
4
外购驱动板
3
调焦磁敏
图案磁敏
棱镜旋转电机
1黑色
2蓝色
3棕色
图案旋转电机
棱镜电机
固定图案电机
6
色片
5
母座
棱镜磁敏 固定图案 色片磁敏
显示
水平
磁敏
垂直
磁敏
水平光
藕板
垂直光
敏板
HC211N/U01V1002
开关
电源1
电源1
机
头
风
机
16
底
箱
风
机
水
平
电
机
垂
直
电
机
Note: The above information is for reference only, the final interpretation is belong to
manufacturer.
MADE IN CHINA